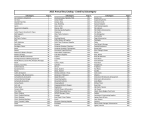
1
Map3D User's
Manual
Map3D Version 64
User's Manual
by Map3D International Ltd
Map3D User's Manual
Map3D International Ltd 1990-2015
All rights reserved. No parts of this work may be reproduced in any form or by any means - graphic, electronic, or
mechanical, including photocopying, recording, taping, or information storage and retrieval systems - without the written
permission of the publisher.
Products that are referred to in this document may be either trademarks and/or registered trademarks of the respective
owners. The publisher and the author make no claim to these trademarks.
While every precaution has been taken in the preparation of this document, the publisher and the author assume no
responsibility for errors or omissions, or for damages resulting from the use of information contained in this document or
from the use of programs and source code that may accompany it. In no event shall the publisher and the author be liable
for any loss of profit or any other commercial damage caused or alleged to have been caused directly or indirectly by this
document.
Printed: May 2015.
Publisher
Map3D Intenrational Ltd
Email: [email protected]
Web: map3d.com
Tel: 1 647 729 7572
I
Map3D User's Manual
Table of Contents
Foreword
0
2
Part I Map3D Overview
1 Introduction
................................................................................................................................... 2
2 About
...................................................................................................................................
Map3D
2
3 Map3D
...................................................................................................................................
Overview
9
4 Applications
................................................................................................................................... 10
5 Model
...................................................................................................................................
Building Overview
11
6 Boundary
...................................................................................................................................
Element Formulation
11
7 Rock
...................................................................................................................................
Mass Response Predictions Using Numerical Modelling
14
8 Implementation
...................................................................................................................................
of Modelling into the Mine Design Process
21
25
Part II Model Building and Editing
1 Model
...................................................................................................................................
Building and Editing
25
2 Building
...................................................................................................................................
Surface Models
25
3 Building
...................................................................................................................................
Models out of Blocks
27
4 Constructing
...................................................................................................................................
Alternate Material Zones
28
5 Material
...................................................................................................................................
Codes - Mining Step Sequence
31
6 Defining
...................................................................................................................................
Ground Surface
33
7 Defining
...................................................................................................................................
Open Pits
33
8 Defining
...................................................................................................................................
Fault Planes and Tabular Mining Zones
34
9 Defining
...................................................................................................................................
Inactive Blocks for Visualization Purposes
36
10 Common
...................................................................................................................................
Problems When Model Building
36
11 Discretizaiton
...................................................................................................................................
and Lumping
42
52
Part III Model Building Tutorials
1 Freehand
...................................................................................................................................
Sketching - Room and Pillar Mining
52
2 Bulk
...................................................................................................................................
Mining Example
72
3 Tabular
...................................................................................................................................
Mining Example
90
4 DDLoop
...................................................................................................................................
Pillar Example
113
5 FFLoop
...................................................................................................................................
Drift Example
119
6 FFLoop
...................................................................................................................................
Stope Example
124
Part IV Menu Commands
130
1 File
...................................................................................................................................
Menu
130
New.........................................................................................................................................................
Model (CAD)
130
Quick
.........................................................................................................................................................
Open (View Only)
130
Open
.........................................................................................................................................................
Model (CAD)
130
Map3D International Ltd 1990-2015
Contents
II
Save
.........................................................................................................................................................
Model (CAD)
131
Save
.........................................................................................................................................................
Model As (CAD)
131
Import
.........................................................................................................................................................
model from DXF or PNT
132
Export
.........................................................................................................................................................
model as DXF or PNT
133
Restore
.........................................................................................................................................................
last CAD State
133
New.........................................................................................................................................................
Construction Lines
133
Quick
.........................................................................................................................................................
Open Construciton Lines (View only)
133
Open
.........................................................................................................................................................
Construction Lines
134
Save
.........................................................................................................................................................
Construction Lines
134
Save
.........................................................................................................................................................
Construction Lines As
135
Open
.........................................................................................................................................................
Analysis Results
135
Subtract
.........................................................................................................................................................
Restart Files
135
Restart
.........................................................................................................................................................
an Analysis
136
Update
.........................................................................................................................................................
Restart Files
136
Mining
.........................................................................................................................................................
Step #
136
Output
......................................................................................................................................................... 137
Copy
..................................................................................................................................................
Screen to Clipboard
137
Copy
..................................................................................................................................................
Screen (B&W flipped)
137
PNG,
..................................................................................................................................................
GIF, JPEG or BMP Screen Image
137
PNG,
..................................................................................................................................................
GIF, JPEG or BMP (B&W flipped)
138
DXF..................................................................................................................................................
Screen Image
138
PNT
..................................................................................................................................................
Screen Image
138
WRL
..................................................................................................................................................
Screen Image
138
OBJ
..................................................................................................................................................
Screen Image
138
Selected
..................................................................................................................................................
Grid Components
138
Selected
..................................................................................................................................................
Surface Components
142
Image
..................................................................................................................................................
Recorder
145
Image
.........................................................................................................................................................
Viewer
146
Save
.........................................................................................................................................................
View
146
Restore
.........................................................................................................................................................
View
146
Recent
.........................................................................................................................................................
Files
146
Exit......................................................................................................................................................... 146
2 View
...................................................................................................................................
Menu
147
Hide......................................................................................................................................................... 147
Off .................................................................................................................................................. 147
Surfaces
.................................................................................................................................................. 147
Blocks
.................................................................................................................................................. 147
Colour
..................................................................................................................................................
Numbers
147
Colours
..................................................................................................................................................
(1-10)
147
Materials
.................................................................................................................................................. 147
Names
.................................................................................................................................................. 147
Mining
..................................................................................................................................................
Steps
147
Window
.................................................................................................................................................. 147
Crossing
.................................................................................................................................................. 147
Undo
..................................................................................................................................................
last Hide
147
Redo
..................................................................................................................................................
last Hide
147
Unhide
..................................................................................................................................................
All
147
Inactive
.................................................................................................................................................. 147
Solids
.................................................................................................................................................. 147
Excavations
.................................................................................................................................................. 147
Unused
.................................................................................................................................................. 147
Translucent
.................................................................................................................................................. 147
Errors
.................................................................................................................................................. 147
Hide.........................................................................................................................................................
Block Colours
149
Map3D International Ltd 1990-2015
III
Map3D User's Manual
Hide
..................................................................................................................................................
All
149
Unhide
..................................................................................................................................................
All
149
Colour
..................................................................................................................................................
1
149
Colour
..................................................................................................................................................
2
149
Colour
..................................................................................................................................................
3
149
Colour
..................................................................................................................................................
4
149
Colour
..................................................................................................................................................
5
149
Colour
..................................................................................................................................................
6
149
Colour
..................................................................................................................................................
7
149
Colour
..................................................................................................................................................
8
149
Colour
..................................................................................................................................................
9
149
Colour
..................................................................................................................................................
10
149
Hide.........................................................................................................................................................
Cline Colours
150
Hide
..................................................................................................................................................
All
150
Unhide
..................................................................................................................................................
All
150
Colour
..................................................................................................................................................
1
150
Colour
..................................................................................................................................................
2
150
Colour
..................................................................................................................................................
3
150
Colour
..................................................................................................................................................
4
150
Colour
..................................................................................................................................................
5
150
Colour
..................................................................................................................................................
8
150
Colour
..................................................................................................................................................
9
150
Colour
..................................................................................................................................................
10
150
Hide.........................................................................................................................................................
Grid Colours
150
Hide
..................................................................................................................................................
All
150
Unhide
..................................................................................................................................................
All
150
Colour
..................................................................................................................................................
1
150
Colour
..................................................................................................................................................
2
150
Colour
..................................................................................................................................................
3
150
Colour
..................................................................................................................................................
4
150
Colour
..................................................................................................................................................
5
150
Colour
..................................................................................................................................................
6
150
Colour
..................................................................................................................................................
7
150
Colour
..................................................................................................................................................
8
150
Colour
..................................................................................................................................................
9
150
Colour
..................................................................................................................................................
10
150
Render
......................................................................................................................................................... 150
Block
..................................................................................................................................................
Outlines
150
Grid..................................................................................................................................................
Lines
150
Block
..................................................................................................................................................
Colours
150
Material
..................................................................................................................................................
Numbers
150
Mining
..................................................................................................................................................
Step Numbers
150
Dark
..................................................................................................................................................
Shading
150
Bright
..................................................................................................................................................
Shading
150
Small
..................................................................................................................................................
Block Numbers
150
Large
..................................................................................................................................................
Block Numbers
150
Small
..................................................................................................................................................
Block Names
150
Large
..................................................................................................................................................
Block Names
150
Small
..................................................................................................................................................
Coordinate Numbers
150
Large
..................................................................................................................................................
Coordinate Numbers
150
Backfacing
..................................................................................................................................................
Surfaces
150
Discretize
.................................................................................................................................................. 150
Perspective
.................................................................................................................................................. 150
Cline
..................................................................................................................................................
dot radius
150
Map3D International Ltd 1990-2015
Contents
IV
Point
..................................................................................................................................................
Size
150
Line..................................................................................................................................................
Width
150
Find.........................................................................................................................................................
Coordinate
151
Initialize
......................................................................................................................................................... 152
Zoom
.........................................................................................................................................................
Extents
152
Zoom
......................................................................................................................................................... 152
Pan......................................................................................................................................................... 152
Length
......................................................................................................................................................... 152
Centre
.........................................................................................................................................................
of Rotation
152
Translation
.........................................................................................................................................................
Increment
152
Rotation
.........................................................................................................................................................
Increment
153
Zoom
.........................................................................................................................................................
Factor
153
View
.........................................................................................................................................................
XY plane
153
View
.........................................................................................................................................................
YZ plane
153
View
.........................................................................................................................................................
ZX plane
153
View
.........................................................................................................................................................
Grid plane
153
View
.........................................................................................................................................................
Digitizer plane
153
View
.........................................................................................................................................................
640x480
154
Continuous
.........................................................................................................................................................
Rotation
154
3 Plot
...................................................................................................................................
Menu
154
Stress
......................................................................................................................................................... 154
Major
..................................................................................................................................................
Principal Stress
154
Intermediate
..................................................................................................................................................
Principal Stress
154
Minor
..................................................................................................................................................
Principal Stress
154
Maximum
..................................................................................................................................................
Shear Stress
155
In-Plane
..................................................................................................................................................
Shear Stress
155
In-Plane
..................................................................................................................................................
Normal Stress
155
In-Plane
..................................................................................................................................................
Maximum Stress
157
In-Plane
..................................................................................................................................................
Minimum Stress
157
Ubiquitous-Plane
..................................................................................................................................................
Shear Stress
157
Ubiquitous-Plane
..................................................................................................................................................
Normal Stress
157
Ubiquitous-Plane
..................................................................................................................................................
Maximum Stress
159
Ubiquitous-Plane
..................................................................................................................................................
Minimum Stress
159
Octahedral
..................................................................................................................................................
Shear Stress
160
Mean
..................................................................................................................................................
Stress
160
Sxx..................................................................................................................................................
Cartesian Stress
160
Syy..................................................................................................................................................
Cartesian Stress
160
Szz..................................................................................................................................................
Cartesian Stress
160
Txy..................................................................................................................................................
Cartesian Stress
160
Txz..................................................................................................................................................
Cartesian Stress
160
Tyz..................................................................................................................................................
Cartesian Stress
160
Value
.................................................................................................................................................. 161
Effective
...........................................................................................................................................
stress
161
Total...........................................................................................................................................
stress
161
Induced
...........................................................................................................................................
Stress
161
Absolute
...........................................................................................................................................
Stress
161
Strain
......................................................................................................................................................... 161
Major
..................................................................................................................................................
Principal Strain
161
Intermediate
..................................................................................................................................................
Principal Strain
161
Minor
..................................................................................................................................................
Principal Strain
161
Maximum
..................................................................................................................................................
Shear Strain
162
In-Plane
..................................................................................................................................................
Shear Strain
163
In-Plane
..................................................................................................................................................
Normal Strain
163
In-Plane
..................................................................................................................................................
Maximum Strain
164
Map3D International Ltd 1990-2015
V
Map3D User's Manual
In-Plane
..................................................................................................................................................
Minimum Strain
164
Ubiquitous-Plane
..................................................................................................................................................
Shear Strain
165
Ubiquitous-Plane
..................................................................................................................................................
Normal Strain
165
Ubiquitous-Plane
..................................................................................................................................................
Maximum Strain
166
Ubiquitous-Plane
..................................................................................................................................................
Minimum Strain
166
Octahedral
..................................................................................................................................................
Shear Strain
167
Volumetric
..................................................................................................................................................
Strain
167
Exx..................................................................................................................................................
Strain Component
168
Eyy..................................................................................................................................................
Strain Component
168
Ezz..................................................................................................................................................
Strain Component
168
Exy..................................................................................................................................................
Strain Component
168
Eyz..................................................................................................................................................
Strain Component
168
Exz..................................................................................................................................................
Strain Component
168
Value
.................................................................................................................................................. 169
Elastic
...........................................................................................................................................
strain
169
Plastic
...........................................................................................................................................
Strain
169
Total...........................................................................................................................................
Strain
169
Induced
...........................................................................................................................................
Strain
169
Absolute
...........................................................................................................................................
Strain
169
Displacement
......................................................................................................................................................... 169
Total
..................................................................................................................................................
displacement
169
X displacement
.................................................................................................................................................. 169
Y displacement
.................................................................................................................................................. 169
Z displacement
.................................................................................................................................................. 169
In-plane
..................................................................................................................................................
normal displacement
169
In-plane
..................................................................................................................................................
maximum displacement
169
Ubiquitous-plane
..................................................................................................................................................
normal displacement
169
Ubiquitous-plane
..................................................................................................................................................
maximum displacement
169
User.........................................................................................................................................................
defined plot
171
Thermal/Flux
......................................................................................................................................................... 174
Plot..................................................................................................................................................
> Thermal/Flux
174
Total
..................................................................................................................................................
flux
174
X flux
.................................................................................................................................................. 174
Y flux
.................................................................................................................................................. 174
Z flux
.................................................................................................................................................. 174
In-plane
..................................................................................................................................................
normal flux
174
In-plane
..................................................................................................................................................
maximum flux
174
Ubiquitous-plane
..................................................................................................................................................
normal flux
174
Ubiquitous-plane
..................................................................................................................................................
maximum flux
174
Strength
.........................................................................................................................................................
Factors
175
Rockmass
..................................................................................................................................................
Strength Parameters
175
S1 ..................................................................................................................................................
Excess Stress
179
Tmax
..................................................................................................................................................
Excess Stress
180
Toct..................................................................................................................................................
Excess Stress
180
NS1..................................................................................................................................................
Normal Probability
182
SF-A
..................................................................................................................................................
Strength/Stress
182
SF-B
..................................................................................................................................................
Strength/Stress
184
SF-C
..................................................................................................................................................
Strength/Stress
186
SF/A
..................................................................................................................................................
Stress/Strength
188
SF/B
..................................................................................................................................................
Stress/Strength
190
SF/C
..................................................................................................................................................
Stress/Strength
191
In-plane
..................................................................................................................................................
parameters
193
In-plane
..................................................................................................................................................
Excess Shear Stress
195
In-plane
..................................................................................................................................................
Excess Stress
195
Map3D International Ltd 1990-2015
Contents
VI
NTip
..................................................................................................................................................
Normal Probability
195
SF-ip
..................................................................................................................................................
Strength/Stress
195
SF/ip
..................................................................................................................................................
Stress/Strength
195
Ubiquitous
..................................................................................................................................................
parameters
196
Ubiquitous
..................................................................................................................................................
Excess Shear Stress
199
Ubiquitous
..................................................................................................................................................
Excess Stress
199
NTub
..................................................................................................................................................
Normal Probability
199
SF-ub
..................................................................................................................................................
Strength/Stress
199
SF/ub
..................................................................................................................................................
Stress/Strength
199
Surface
.........................................................................................................................................................
Components
201
Surface
..................................................................................................................................................
Contours Off
201
Serr..................................................................................................................................................
Stress error
201
Ferr..................................................................................................................................................
Failure error
201
Shear
..................................................................................................................................................
stress
202
Normal
..................................................................................................................................................
stress
202
Shear
..................................................................................................................................................
strain
203
Accumulated
..................................................................................................................................................
strain
203
Normal
..................................................................................................................................................
strain
203
Shear
..................................................................................................................................................
Displacement (Ride)
204
Normal
..................................................................................................................................................
Displacement (Closure)
204
ERR
.................................................................................................................................................. 205
SF-D
..................................................................................................................................................
Strength/Stress
208
Excess
..................................................................................................................................................
Shear Stress
209
Incremental
..................................................................................................................................................
Shear Strain
210
Stress/Strain
..................................................................................................................................................
rate
211
Cohesion
.................................................................................................................................................. 211
Phi.................................................................................................................................................. 211
Temperature/Head
.................................................................................................................................................. 211
Normal
..................................................................................................................................................
Flux
212
Value
.................................................................................................................................................. 212
Elastic
...........................................................................................................................................
strain
212
Plastic
...........................................................................................................................................
Strain
212
Total...........................................................................................................................................
Strain
212
Absolute
...........................................................................................................................................
Strain
212
Induced
...........................................................................................................................................
Strain
212
Induced
...........................................................................................................................................
Stress
212
Absolute
...........................................................................................................................................
Stress
212
Miscellaneous
......................................................................................................................................................... 213
Delem
..................................................................................................................................................
Distance to nearest element on surfaces
213
Dgrid
..................................................................................................................................................
Distance to nearest grid on surfaces
213
Delem/Lelem
..................................................................................................................................................
DON ratio on surfaces
214
Dgrid/Lelem
..................................................................................................................................................
DOL ratio on surfaces
214
Dratio
..................................................................................................................................................
on surfaces
214
Dgrid
..................................................................................................................................................
Distance to nearest element on grids
214
Dgrid/Lgrid
..................................................................................................................................................
DOL ratio on grids
215
Matl#
..................................................................................................................................................
- Material Number on Grids
215
Contour
.........................................................................................................................................................
Range
215
Grid.........................................................................................................................................................
Selection
216
Plot.........................................................................................................................................................
Options
216
Properties
......................................................................................................................................................... 219
Control
..................................................................................................................................................
Parameters
219
Mining
..................................................................................................................................................
Step Titles
223
Material
..................................................................................................................................................
Properties
224
Map3Di
..................................................................................................................................................
Setup
224
Map3D International Ltd 1990-2015
VII
Map3D User's Manual
Model
..................................................................................................................................................
Information
227
Average
.........................................................................................................................................................
Box
227
Polygon
.........................................................................................................................................................
Box
227
Excel
.........................................................................................................................................................
Plot (Grids)
228
Excel
.........................................................................................................................................................
Plot (Surfaces)
231
4 Analysis
................................................................................................................................... 235
Analysis
......................................................................................................................................................... 235
Analysis
.........................................................................................................................................................
Options
236
5 CAD
................................................................................................................................... 237
Build
......................................................................................................................................................... 237
Block
.................................................................................................................................................. 237
FF ..................................................................................................................................................
Loop
241
DD ..................................................................................................................................................
Loop
246
Grid..................................................................................................................................................
Plane
252
Grid..................................................................................................................................................
Line
253
Construction
..................................................................................................................................................
Lines
255
Build
.................................................................................................................................................. 256
Enter
..................................................................................................................................................
Point
257
Extrude/Offset
..................................................................................................................................................
Remaining
257
Undo
..................................................................................................................................................
Point
259
Redo
..................................................................................................................................................
Point
259
Undo
..................................................................................................................................................
Build
260
Redo
..................................................................................................................................................
Build
260
Snap
......................................................................................................................................................... 261
None
.................................................................................................................................................. 261
Nearest
..................................................................................................................................................
Edge
261
Nearest
..................................................................................................................................................
Corner
261
Nearest
..................................................................................................................................................
Surface
262
Midpoint
..................................................................................................................................................
of Line
262
Tangent
..................................................................................................................................................
Snap
262
Intersection
..................................................................................................................................................
Snap
263
Trace
..................................................................................................................................................
Virtual Line Snap
264
Trace
..................................................................................................................................................
Cline Snap
264
Trace
..................................................................................................................................................
Cloop Snap
265
Rectangular
..................................................................................................................................................
Grid Snap
265
Circular
..................................................................................................................................................
Grid Snap
265
X-Grid
..................................................................................................................................................
Snap
266
Y-Grid
..................................................................................................................................................
Snap
266
Z-Grid
..................................................................................................................................................
Snap
267
Cursor/Grid
..................................................................................................................................................
Setup
268
XY ..................................................................................................................................................
Cursor
268
YZ ..................................................................................................................................................
Cursor
268
XZ Cursor
.................................................................................................................................................. 268
User
..................................................................................................................................................
defined cooordinate system
268
Properties
......................................................................................................................................................... 269
Control
..................................................................................................................................................
Parameters
269
Mining
..................................................................................................................................................
Step Titles
273
Material
..................................................................................................................................................
Properties
274
Map3Di
..................................................................................................................................................
Setup
274
Model
..................................................................................................................................................
Information
277
Edit......................................................................................................................................................... 277
Entity
..................................................................................................................................................
Properties
277
Erase
..................................................................................................................................................
Entities
280
Move
..................................................................................................................................................
Entities
281
Map3D International Ltd 1990-2015
Contents
VIII
Copy
..................................................................................................................................................
Entities
283
Scale
..................................................................................................................................................
Entities
284
Rotate
..................................................................................................................................................
Azimuth
286
Rotate
..................................................................................................................................................
Dip
287
Dump
..................................................................................................................................................
to File
289
Group
..................................................................................................................................................
Entities
290
Stretch
..................................................................................................................................................
Verticies
291
Move
..................................................................................................................................................
Verticies to point
293
Move
..................................................................................................................................................
Verticies to X
294
Move
..................................................................................................................................................
Verticies to Y
295
Move
..................................................................................................................................................
Verticies to Z
297
Move
..................................................................................................................................................
Verticies to Plane
298
Subdivide
..................................................................................................................................................
Edges
299
Smooth
..................................................................................................................................................
Construction Lines
300
Remove
..................................................................................................................................................
Construction Line Vertex
302
Grid.........................................................................................................................................................
Selection
303
Digitizer
.........................................................................................................................................................
Setup
304
Recheck
.........................................................................................................................................................
Blocks for Errors
305
Pack
.........................................................................................................................................................
and Renumber Blocks
305
Unpack
.........................................................................................................................................................
Blocks
305
Unpack
.........................................................................................................................................................
Surfaces
305
UnGroup
.........................................................................................................................................................
DDs
306
Pack
.........................................................................................................................................................
and Renumber Clines
306
Unpack
.........................................................................................................................................................
Clines
307
6 Tools
................................................................................................................................... 307
Mouse
.........................................................................................................................................................
Options
307
Mouse
..................................................................................................................................................
Buttons
307
Double
..................................................................................................................................................
Click Time
307
Drag
..................................................................................................................................................
Wait Time
307
Toolbars
......................................................................................................................................................... 308
Rotation
..................................................................................................................................................
Toolbar
308
Translation
..................................................................................................................................................
Toolbar
308
Contour
..................................................................................................................................................
Toolbar
309
Configure
..................................................................................................................................................
Contour Toolbar
309
Solve
..................................................................................................................................................
Toolbar
310
Configure
..................................................................................................................................................
Solve Toolbar
310
View
..................................................................................................................................................
Toolbar
311
Configure
..................................................................................................................................................
View Toolbar
312
CAD
..................................................................................................................................................
Toolbar
312
Configure
..................................................................................................................................................
CAD Toolbar
312
Block
..................................................................................................................................................
Colours
313
Contour
..................................................................................................................................................
Colours
314
Set..................................................................................................................................................
Default Block Colours
314
Set..................................................................................................................................................
Contour Colours 1
315
Set..................................................................................................................................................
Contour Colours 2
315
Set..................................................................................................................................................
Contour Colours 3
315
Set..................................................................................................................................................
Contour Colours 4
315
Configure
..................................................................................................................................................
Button Font
315
Reset
..................................................................................................................................................
Default Font
315
Small
..................................................................................................................................................
Size Buttons
315
Medium
..................................................................................................................................................
Size Buttons
315
Large
..................................................................................................................................................
Size Buttons
315
XL Size
..................................................................................................................................................
Buttons
315
XXL..................................................................................................................................................
Size Buttons
315
Map3D International Ltd 1990-2015
IX
Map3D User's Manual
Assign
.........................................................................................................................................................
Hotkeys
315
OpenGL
......................................................................................................................................................... 316
OpenGL
..................................................................................................................................................
<On/Off>
316
OpenGL
..................................................................................................................................................
Parameters
316
OpenGL
..................................................................................................................................................
Antialiasing
316
OpenGL
..................................................................................................................................................
Redraw
316
OpenGL
..................................................................................................................................................
Pick
316
OpenGL
..................................................................................................................................................
Crosshairs
317
OpenGL
..................................................................................................................................................
Interactive Edit
317
Disk.........................................................................................................................................................
Performance Test
317
Smooth
.........................................................................................................................................................
Scroll
317
Cursor
.........................................................................................................................................................
Pick Box Size
318
Small
..................................................................................................................................................
Pick Box
318
Medium
..................................................................................................................................................
Pick Box
318
Large
..................................................................................................................................................
Pick Box
318
7 Shift-key
...................................................................................................................................
Selection
318
8 Crosshairs
................................................................................................................................... 318
9 Visualization
................................................................................................................................... 318
Visualization
......................................................................................................................................................... 318
Visualization
.........................................................................................................................................................
Database
321
Contour
.........................................................................................................................................................
Plane Options
322
Plot......................................................................................................................................................... 325
10 Help
................................................................................................................................... 325
Contents
.........................................................................................................................................................
and Index
325
What's
.........................................................................................................................................................
This?
325
Web:
.........................................................................................................................................................
www.map3d.com
325
Email:
.........................................................................................................................................................
[email protected]
326
Email:
.........................................................................................................................................................
Key check to [email protected]
326
Download:
.........................................................................................................................................................
Map3D update (setup.exe)
326
Download:
.........................................................................................................................................................
Map3D update (Map3D.zip)
326
Download:
.........................................................................................................................................................
HTML User's Manual
327
Download:
.........................................................................................................................................................
PDF User's Manual
327
Download
.........................................................................................................................................................
Ebook User's Manual
327
About
.........................................................................................................................................................
Map3D
328
Part V Appendix
330
1 Analysis
................................................................................................................................... 330
Analysis
.........................................................................................................................................................
> Options > MSCALC Output File Name
330
Analysis
.........................................................................................................................................................
> Abort
330
Analysis
.........................................................................................................................................................
> Auto Plot
330
Analysis
.........................................................................................................................................................
> Auto Range
330
Analysis
.........................................................................................................................................................
> BEM Analysis
331
Analysis
.........................................................................................................................................................
> Discretization
331
Analysis
.........................................................................................................................................................
> Go to CAD
332
Analysis
.........................................................................................................................................................
> Graphics
332
Analysis
.........................................................................................................................................................
> Intersections
332
Analysis
.........................................................................................................................................................
> Load Model
333
Analysis
.........................................................................................................................................................
> Minimize
333
Analysis
.........................................................................................................................................................
> Options > Accelerator
333
Analysis
.........................................................................................................................................................
> Options > Async I/O
334
Analysis
.........................................................................................................................................................
> Options > Auto Repair
334
Analysis
.........................................................................................................................................................
> Options > Batch
334
Map3D International Ltd 1990-2015
Contents
X
Analysis
.........................................................................................................................................................
> Options > CGM
335
Analysis
.........................................................................................................................................................
> Options > Closure
335
Analysis
.........................................................................................................................................................
> Options > Collinearity
335
Analysis
.........................................................................................................................................................
> Options > Collinearity Search Radius
336
Analysis
.........................................................................................................................................................
> Options > Collapse
336
Analysis
.........................................................................................................................................................
> Options > Creep
337
Analysis
.........................................................................................................................................................
> Options > #C/T
338
Analysis
.........................................................................................................................................................
> Options > Drive #
338
Analysis
.........................................................................................................................................................
> Options > Move Points
340
Analysis
.........................................................................................................................................................
> Options > MSCALC
340
Analysis
.........................................................................................................................................................
> Options > Initialization
342
Analysis
.........................................................................................................................................................
> Options > Initialization file name
343
Analysis
.........................................................................................................................................................
> Options > LERD/LSS
343
Analysis
.........................................................................................................................................................
> Options > LERD/LSS file name
346
Analysis
.........................................................................................................................................................
> Options > Linear
347
Analysis
.........................................................................................................................................................
> Options > Lumping
347
Analysis
.........................................................................................................................................................
> Options > Lumping Accuracy
348
Analysis
.........................................................................................................................................................
> Options > Planar
348
Analysis
.........................................................................................................................................................
> Options > P-ram
348
Analysis
.........................................................................................................................................................
> Options > Precondition
349
Analysis
.........................................................................................................................................................
> Options > Renumber
349
Analysis
.........................................................................................................................................................
> Options > Reset
350
Analysis
.........................................................................................................................................................
> Options > V-ram
350
Analysis
.........................................................................................................................................................
> Options > Verbose
350
Analysis
.........................................................................................................................................................
> Options > Zero Strain Placement
350
Analysis
.........................................................................................................................................................
> Suspend
351
Analysis
.........................................................................................................................................................
> Conclude
351
Analysis
.........................................................................................................................................................
> Disable
352
Analysis
.........................................................................................................................................................
Dialog
353
2 CAD
................................................................................................................................... 354
CAD.........................................................................................................................................................
> Properties > Map3Di Setup > View
354
CAD.........................................................................................................................................................
> Build > Block Mesh Spacing
355
CAD.........................................................................................................................................................
> Snap
355
CAD.........................................................................................................................................................
> Edit
356
CAD.........................................................................................................................................................
> Edit > Entity Properties > DDPlane Thickness
357
CAD.........................................................................................................................................................
> Edit > Entities
357
CAD.........................................................................................................................................................
> Edit > Entities
359
CAD.........................................................................................................................................................
> Edit > Build A List of Entities for Editing
360
CAD.........................................................................................................................................................
> Edit > Build A List of Verticies for Editing
361
CAD.........................................................................................................................................................
> Digitizer > Activate
362
CAD.........................................................................................................................................................
> Properties > Material Properties > Stress State
363
CAD.........................................................................................................................................................
> Properties > Material Properties > Stress State > Cartesian
364
CAD.........................................................................................................................................................
> Properties > Material Properties > Stress State > Datum
365
CAD.........................................................................................................................................................
> Build
366
3 File
................................................................................................................................... 366
File .........................................................................................................................................................
> Open > Merge Materials
366
File .........................................................................................................................................................
> Output > Animated GIF Recorder > Append Images
367
File .........................................................................................................................................................
> PNT Output File Format
367
File .........................................................................................................................................................
> PNT Construction Line File Format
367
File .........................................................................................................................................................
> PNT Model File Format
368
File .........................................................................................................................................................
> Restart File Formats
369
File .........................................................................................................................................................
> Construction Line File Formats
369
File .........................................................................................................................................................
> DXF Construction Line File Format
369
File .........................................................................................................................................................
> DXF Model File Format
370
Map3D International Ltd 1990-2015
XI
Map3D User's Manual
File .........................................................................................................................................................
> INP Model File Format
373
File .........................................................................................................................................................
> Open > Recent Directories
381
File .........................................................................................................................................................
> Open > Merge Geometries
381
File .........................................................................................................................................................
> Model File Formats
381
4 Materials
................................................................................................................................... 382
Materials
.........................................................................................................................................................
> Mohr-Coulomb in 3D FF Blocks
382
Materials
.........................................................................................................................................................
> Hoek-Brown in 3D FF Blocks
386
Materials
.........................................................................................................................................................
> Drucker-Prager in 3D FF Blocks
388
Materials
.........................................................................................................................................................
> Fault-Gouge in DD Planes
390
Materials
.........................................................................................................................................................
> Hyperbolic-Backfill in DD Planes
394
Materials
.........................................................................................................................................................
> Quadratic-Backfill in DD Planes
399
Materials
.........................................................................................................................................................
> Equilibrated-Gouge in DD Planes
403
Materials
.........................................................................................................................................................
> Yielding-Pillar in DD Planes
409
Materials
.........................................................................................................................................................
> User Defined Parameters
413
Materials
.........................................................................................................................................................
> Dump to File
413
Materials
.........................................................................................................................................................
> Expansion Coefficient and Conductivity
414
5 Map3D
...................................................................................................................................
Analysis Stages
414
6 Map3D
...................................................................................................................................
Versions
416
7 Map3D
...................................................................................................................................
Fault-Slip
418
8 Map3D
...................................................................................................................................
Modeller
419
9 Map3D
...................................................................................................................................
Results Viewer
421
10 Map3Di
...................................................................................................................................
Integrated Seismicity
423
11 Map3D
...................................................................................................................................
Thermal-Fluid Flow
425
12 Map3D
...................................................................................................................................
Non-Linear
426
13 Map3D
...................................................................................................................................
Visco-Plastic
427
14 Model
...................................................................................................................................
Building Tutorials
428
15 Plot
...................................................................................................................................
> Stress
428
16 Plot
...................................................................................................................................
> Failure Modes
429
17 Plot
...................................................................................................................................
> Strain
430
18 Plot
...................................................................................................................................
> Surface Components
431
19 Stress
...................................................................................................................................
Orientation Icon
432
20 Translating
...................................................................................................................................
the Model
432
21 View
...................................................................................................................................
> Render > Discretize
433
22 Visualization
...................................................................................................................................
> Make Point
433
23 Global
...................................................................................................................................
Transform Z+ up
434
24 Global
...................................................................................................................................
Transform Z- up_2
435
Index
437
Map3D International Ltd 1990-2015
Map3D
User's Manual
Part
I
2
Map3D User's Manual
1
Map3D Overview
1.1
Introduction
Map3D is a fully integrated three-dimensional layout (CAD), visualization (GIS) and stability analysis
package (BEM stress analysis). Various program modules (Map3D Versions) can be used to
construct models, analyze and display stresses, strains, displacements, strength factors and
probability of failure contours. Map3D is suitable for building and modelling rock and soil
engineering design problems involving both irregular 3D massive excavations, tunnels, faults and
tabular shapes.
Models can include underground excavations, rock slopes, open pits, tunnels, fractures and surface
infrastructure loads. The stress analysis models can simulate yielding (non-linear) zones of different
moduli (e.g. stiff dykes or soft ore zones) and loads due to steady state thermal/fluid flow.
Excavations can be intersected by multiple discrete faults (non-planar and gouge filled) that slip and
open. Map3D can simulate ground support elements such as arches, steel sets, props, thick liners,
chalks, backfill etc.
The program is designed for fast, easy building and visualization of 3D models:
Self-contained 3D CAD system for model construction
Integrated GIS for storing, analyzing and displaying geographical reference information
Advanced boundary element (BEM) stress analysis
Map3D is suitable for mining, geotechnical and civil engineering applications.
What sets Map3D apart from other analysis programs is its ability to accommodate a very wide
range of problems in 3D. Large, complex, fully 3D problems can be built with ease using the built-in
CAD functionality. Combined use of both FF and DD elements allows for simulations of 3D
excavations with intersecting fractures or shear planes.
Powerful pre-processing capabilities automatically fix most model construction problems.
Overlapping and intersecting surfaces are accommodated by the program without user intervention.
Model discretization can be optimized by setting a few control parameters to automatically
concentrate elements at locations of interest. These capabilities greatly ease the burden of model
building letting you get on with engineering rather than spending your time debugging models.
Map3D Overview
1.2
About Map3D
Map3D is developed and supported by Dr. Terry Wiles ([email protected]) of Map3D
International Ltd. Development of Map3D began in the late 1970's and has gone through many
major revisions since then. It has been commercially available since 1990. The program is
constantly under development and supported by dedicated professionals who have been in the rock
mechanics/numerical modelling business for over 40 years.
The program is used by hundreds of mining, civil and geotechnical companies, consultants,
research centres and universities around the world (including Armenia, Australia, Austria, Belgium,
Botswana, Brazil, Bulgaria, Canada, Chile, China, Columbia, Democratic Republic of Congo,
Egypt, England, Finland, Guatemala, Indonesia, Ireland, Italy, Japan, Kazakhstan, Korea, Mali,
Mexico, Namibia, Nedlands, Nicaragua, Papua New Guinea, Peru, Philippines, Saudi Arabia, South
Africa, Sweden, Switzerland, Tanzania, Turkey, UK, USA, Zambia and Zimbabwe). Map3D is often
specified as a prerequisite for employment on job advertisements. The demo_version is used
worldwide for teaching students the fundamentals of numerical modelling and 3D CAD.
Map3D International Ltd 1990-2015
Map3D Overview
3
It has been used in many projects including underground and open pit mine design, mine stability
assessment, nuclear waste repository design, fracture propagation simulations, fault slip problems,
in situ stress back-analysis, rock quarry design, open-pit wall stability, hydraulic-fracture
propagation, earth slope failures, etc.. Current research and development is focusing on
quantitative design procedures, 3D plastic modelling, ground support simulation, the capability to
assess the potential for rock bursting, simulation of discing and integration of modelling with seismic
monitoring.
Boundary Element Method - Map3D is formulated using the very efficient Indirect Boundary
Element Method and incorporates simultaneous use of fictitious force (FF), displacement
discontinuity (DD) and special proprietary boundary elements incorporated for the thermal and nonlinear analysis versions (Map3D Versions).
Research and development over the past 35 years has allowed many of the supposed limitations of
the boundary element method to be overcome. The program can accommodate multi-step mining
sequences, multiple material zones with different material properties and stress states, and
discontinuous rock response with a limited number of discrete features. Both 3D zones and DD
zones are permitted to behave non-linearly. Multiple intersecting fault planes can slip and open
according to user specified shear strength. Coupled steady state thermal/fluid stress analysis can
be simulated. Real time creep and relaxation problems can be accommodated using explicit time
stepping.
Program Accuracy - Solution accuracy is controlled by an automated discretization procedure.
Elements can be automatically concentrated in areas of interest according to user controlled
parameters. This relieves the user of the tedious process of manually discretizing their model, while
improving accuracy and minimizing problem size.
Problem Size - Map3D can accommodate over 1,200,000 degrees of freedom on a PC with a few
GBs of disk space. Although small problems can be solved in minutes, the largest problems can
require overnight or a few days. This tremendous efficiency is achieved by use of matrix lumping.
This permits users to specify existing mine-wide mining geometry in detail, and add new mining as
required. This greatly reduces the effort required to set up and run analyses and permits the whole
mine to be considered when necessary.
Multi-Processing/Multi-Disk - Map3D fully supports parallel processing features such that
computation times scales linearly with the number of processors (6 core processors solve problems
6 times faster than single core). In addition, the program has built in overlapped disk functionality
allowing read and write rates to scale linearly with the number of disks (4 disk read/write rates are 4
times faster than single disk).
Pre-processing - A complete CAD package is incorporated into Map3D featuring numerous
facilities for exchanging data with other CAD packages. Many features including the automated
trace and extrude functions allow complex models to be built with ease. Extensive error checking
and automatic correction routines allow almost any model geometry to be used. Boolean
intersection routines correct overlapping and mismatched block connections without user
intervention. There is full support of importing and exporting geometry files in either DXF or PNT
(ASCII) format.
Post-processing - A complete display package is included featuring hundreds of plotting and data
export functions. User defined plots and visually selected dumps of data ease the effort required for
interpretation and reporting. Dumps can be done directly Excel and graphed automatically.
Why Use Map3D
Map3D has been developed specifically for mining applications from the ground up. The program is
designed to allow you to get high accuracy answers quickly, to get on with the engineering instead
Map3D International Ltd 1990-2015
4
Map3D User's Manual
of the modelling. Large complex problems can be built easily either with Map3D’s own CAD
interface or outside the program then imported in a variety of different formats. No other program
can handle the analyses that Map3D can in the time (run pre & post processing time), cost (may
times cheaper) and ease (Map3D can be used on site for routine analyses). Some of the
advantages of Map3D are as follows:
Convenient upgrade path from elastic, fault slip, thermal/fluid-flow, non-linear and visco-plastic
analysis (Map3D Versions) using the same interface
Extensive training program for both program functionality and detailed engineering results
interpretation (see Map3D Training)
Powerful integrated CAD interface - no third party software required
Easy construction of simple or complex 3D shapes.
Very large problem sizes easily solved on a desktop computer (1,200,000 degrees of freedom)
Automated facility to generate Excel plots from contoured data
Probability of failure plots
Automated block intersection capability relieves the user of manual construction effort
Allows for backfill placement
Multi-step mining sequences
High accuracy elements (requires half as many elements to achieve the same degree of
accuracy as most programs)
Do to advanced lumping procedures, run times are very quick compared to other programs
Up to 100 different material zones
Visco-plastic fault slip simulations
Tabular mining with yielding pillars
Automated discretization ensures easily controlled and consistent degree of accuracy
Powerful integrated results viewer
Easy manipulation of results for interpretation of rock mass failure, slip on fault planes, results on
oriented bore holes and ubiquitous slip on bedding planes or joint sets.
Integrated interactive visualization database allows for display and contouring of seismic data
Contour plotting of user defined functions
Program support is included
Continuous development and enhancements for over 22 years
Incorporation of both Fictitious Force and Displacement Discontinuity elements (as well as
special elements for thermal/fluid flow, and 3D plasticity).
Higher order elements for bending problems
Planar grids, line grids and point grids for viewing results
Isotropic and anisotropic failure criteria
RFC (Rockwall Condition Factor) plots
Integrated accelerated, pre-conditioned and conjugate-gradient solvers work together for fast,
reliable accurate solutions
Import/export facility for input data to other CAD programs
Import/export facility for analysis results to other programs
No expensive buy in fees - Map3D is leased on an annual basis
Some Users - Some current and past users of Map3D include: University of Toronto (Canada),
CRVD INCO Ontario (Creighton Mine, Stobie Mine, Frood Mine, South Mine, Garson Mine, Levack
Mine, Mines Research, Mines Technology - Methods & Design), INCO Manitoba (Canada),
Noranda (Canada), CNG Softeck Co. (Korea), Anglo Gold (South Africa), Golder Associates
(Canada and Australia), Placer Dome Western Area Joint Venture (South Africa), Mount Isa Mines
(Australia), Brunswick Mining and Smelting (Canada), Goldcorp (Canada), Mincad Systems
(Australia), Kanowna Belle Gold Mines (Australia), U. of British Columbia (Canada), U. of Western
Australia, U. of New South Wales (Australia), Laval U. (Canada), McGill U. (Canada), Rock
Mechanics Technology (England), Endeavor Mine (Australia), Australian Mining Consultants, Aur
Map3D International Ltd 1990-2015
Map3D Overview
5
Resources (Canada), CSIR Division of Mining Technology (South Africa), Snowden Mining
Industry Consultants (South Africa and Australia), Tara Mines (Ireland), Georock Inc. (Canada),
Romec n.v. (Belgium), Agnico Eagle - Division Laronde (Canada), Queensland University
(Australia), Geomechanics Research Centre Laurentian U. (Canada), Agnew Gold (Australia),
Western Mining Corp. (Australia), Tao Lekoa Mine (South Africa), AngloGold Ashanti (South Africa
and Australia), Kalgoorlie Consolidated Gold Mines (Australia), INWE Rock Engineering, Lourence
Geotechnical (Australia), Western Deep Levels (South Mine, West Mine, Regional Office),
Zinkgruvan Mining AB (Sweden), Zinkgruvan Mining AB (Sweden), Elandsrand Gold Mine (South
Africa), TWP Consulting (South Africa), Tshepong Mine (South Africa), CAMBIOR Inc. (Canada),
Natural Resources Canada, Avmin Target Mine (South Africa), SRK Consulting (South Africa and
Australia), U. of Waterloo (Canada), St Ives Gold (Australia), Mine Geant Dormant (Canada),
Normandy Jundee Operation (Australia), KULeuven - Unit Mining (Belgium), Leinster Nickel
Operation (Australia), Doyon Mine (Canada), ISS International (South Africa), ISS Pacific
(Australia), Musselwhite Mine (Canada), Finsch Diamond Mine (South Africa), Queen's University
(Canada)., Plutonic Gold Mine (Australia), Campbell Mine (Canada), JCI Travistock Colliery (South
Africa), Strata Control Technology (Australia), Cayeli Bakir Isletmeleri A. S. (Turkey), Asker Thabazimbi ISCOR (South Africa), Douglas Partners (Australia), U. of Queensland (Australia),
Bambanani Mine (South Africa), Palabora Mining Company Ltd. (South Africa), Newcrest Mining
Ltd. (Australia), Delft U. of Technology (The Nedlands), ANGLOVAAL (South Africa), Impala
Platinum (south Africa), Battle Mountain Canada, Black Mountain (South Africa), Tsumeb - Otjihase
Mine (Namibia), Kloof, Division of Kloof G.M. Co. Ltd. (South Africa), Rustenburg Platinum Mines
Ltd. (South Africa), Savuka Mine (South Africa), BCL Botswana (Botswana), Terra Sancta
(Austtalia), Mines Aurizon - Casa Berardi (Canada), Rockland Ltd. (Canada), Darlot Gold Mine
(Australia), Forrestania Gold NL (Australia), WA Department of Minerals and Energy (Australia),
Great Central Mines - Wiluna Gold (Australia), Central Mines Engineering Group - Inco Ltd
(Canada), Kundana Gold (Australia), Henty Gold Mine - Goldfields Ltd. (Australia), Elura Mine
(Australia), Western Australia School of Mines, Cannington - BHP World Minerals (Australia),
WMC Olympic Dam Operations (Australia), BFP Consultants Pty Ltd (Australia), Julius Kruttschnitt
Mineral Research Centre (Australia), Mountan U. of Leoben (Austria), CNR-C.S. Problemi Minerari
(Italy), Japan Nuclear Development Institute (Japan), Lassonde Mineral Engineering (Canada),
Coffey Geosciences Pty Ltd (Australia), Pajingo Joint Venture (Australia), TauTona Mine (South
Africa), Bronzewing - McClure Gold Operations (Australia), Normandy Golden Grove Operation
(Australia), McArther River Mining Pty Ltd (Australia), Boulby Mine - Cleveland Potash Limited
(United Kingdom), AngloGold Ashanti Mineracao: Cuiaba (Brazil), Harmony Gold Mining Company
Limited (Australia), Mirarco Mining Inovation (Canada), Northam Platinum Limited Zondereinde
Division (South Africa), Open House Management Solutions (South Africa), Great Noligwa Mine
(South Africa), Konkola Copper Mines (Zambia), Osborne Mines (Australia), Politecnico di Torino
(Italy), Atomic Energy Canada, Ekati Diamond Mine (Canada), Musslewhite Mine (Canada), Cadia
Holdings Ltd. (Australia), INGWE Rock Engineering (South Africa), Mountan University of
Technology (Austria), Australian Centre for Geomechanics, Granites Gold Mine (Australia),
Northparkes Mines (Australia), Basis Soft Inc. (Korea), Japan Nuclear Development Institute (JNC),
Science & Technology Central South University (Changsha, Hunan China), Groundwork Consulting
(Australia), LionOre Australia, MPI Mines (Australia), Lisheen Mine (Ireland), Northeastern
University (Shengyang, Liaoning, P.R.China), Beck Arndt Engineering (Australia), La Mine Niobec
(Canada), Second Avenue Subway (New York USA), Anglo Platinum (South Africa), Ressources
MSV Inc. (Canada), Selwyn Operations (Australia), Newmont Australia Technical Services
(Australia), Kigam - Geotechnical Engineering Division (Korea), Dempers and Seymour P/L
(Australia), Cobar Management Pty Ltd (Australia), Big Bell Mining Operations (Australia),
Auriongold Kalgoorlie Operations (Australia), Peak Gold Mines (Australia), Driefontein Consolidated
(Pty) Ltd (South Africa), Newmont - Pajingo Joint Venture (Australia), AurionGold - Paddington
Gold Pty Limited (Australia), Mincor Operations (Australia), Falconbridge Ltd. (Canada), Sons of
Gwalia - Southern Cross Operations (Australia), E-Mining Technology S.A. (Chile), Beaconsfield
Gold (Australia), Zinefex Rosebery Mine (Australia), Instituto Innovacion en Mineria y Metalurgia
(Chile), IRSM of Chinese Academy of Sciences (China), Brently, Lucas & Associates (South
Africa), Kirkland Lake Gold Inc.(Canada), Chelopech Mining AD (Bulgaria), Northwind Enterprises
Map3D International Ltd 1990-2015
6
Map3D User's Manual
(Australia), Cameco Corporation (Canada), Barrick Goldstrike Mines (USA), Barrick Gold -Lawlers
Gold Mine (Australia), RMIT - Faculty of Engineering (Australia), Perilya Broken Hill Ltd (Australia),
Placer (PNG) - Porgera Joint Venture (Papua New Guinea), Codelco Chile - Division Andina
(Chile), Codelco Chile - Division El Teniente (Chile), Codelco Chile - Division Norte (Chile), IM2 S.
A. - Filial Codelco (Chile), Codelco Chile - Division Salvador, Geo-Engineering Technology
Limitada (Chile), Xstrata Copper (Australia), Xstrata Nickel (Australia), Mining Geotechnical
Solutions (Australia), Freeport McMoRan Copper & Gold (USA), Kopanang Gold Mine (South
Africa), Seoul National University (Korea), Lawlers Gold Mine (Australia), Bendigo Mining Limited
(Australia), Codelco, Gerencia Corporativa (Chile), Stawell Gold Mines (Australia), Samancor Western Chrome Mines (South Africa), Mponeng Mine (South Africa), KMCL - Bulyanhulu Site
(Tanzania), Ballarat Goldfields (Australia), Goldfields Mine Management (Australia), Dynatec
Corporation (Canada), P.T. Freeport Indonesia, EKJV Management (Australia), BHPB Nickel West
- Leinster Nickel Operation (Australia), Birla - Mt. Gordon (Australia), Ridgeway Project - Cadia
Holdings (Australia), U. of South Australia, Sunrise Dam Gold Mine (Australia), Oxiana Golden
Grove (Australia), Moab Khotsong Mine (South Africa), MIDD & MIDDindi Consulting (South
Africa), Redco Ltda (Chile), Mining One Pty Ltd (Australia), Birla Nifty - Nifty Copper (Australia),
Cracow Gold Mine (Australia), Beta-Hunt Mine (Australia), Universidad de Chile - Facultad de
Ciencias Fisicas y Mathematicas, Geotechnical Consulting Pty Ltd (Australia), NVI Mining Ltd.
Myra Falls (Australia), East Bolder Mine - Stillwater Mining (USA), Cambior - La Mine GeantDormant (Canada), University of Quebec Chicoutimia (Canada), New Gold Afton Project
(Australia), A Karzulovic & Associates (Chile), Strata Engineering (Australia), Peter O'Bryan &
Associates (Australia), Barrick Granny Smith (Australia), Xstrata Nickel - Raglan Mine (Canada),
Genivar (Canada), President Steyn Gold Mine (South Africa), GFL Mining Services Limited (South
Africa), Mopani Copper Mine (Zambia), Tau Lekoa Mine (South Africa), Stanford University
Department of Geophysics (USA), Simon Fraser University - Department of Earth Sciences
(Canada), Resolution Copper Company (Canada), North American Tungsten Corporation
(Canada), Gold Fields Technical Services (South Africa), Maggie Hays - Lake Johnston Operations
(Australia), Nickel West Cliffs Project - BHP Billiton (Australia), Ditton Geotechnical Services
(Australia), GeoMech Services (Australia), Outokumpu Torino Works (Finland), Wardell Armstrong
International Ltd (UK), Cosmos Nickel Project - Jubilee Mines NL (Australia), Long Nickel Project Lighting Nickel Pty (Australia), RESPEC (USA), Xstrata Nickel - Craig Mine (Canada), Northern
3500 Orebody - Xstrata Copper (Australia), Xstrata Zinc - Mount Isa Mines (Australia), Goldfields Beatrix 4 Shaft (South Africa), Omya Central Europe (Austria), Pyhasalmi Mine Oy (Finland),
Outokumpu Torino Works (Finland), Mining One Pty Ltd (Australia), P.T. Newmont Tenggara
(Indonesia), Peak Gold Mines (Australia), Argyle Diamond Mine (Australia), Bullant Gold Mine
(Australia), Geosinergia Ingenieria y Medio Ambiente Ltd (Chile), Lonmin Platinum (South Africa),
DERK Ingenieria y Geologia Ltda (Chile), Montana Exploradora de Guatemala S.A.(Guatemala), St.
Barbara Limited (Australia).
Map3D is developed and supported by:
Dr. Terry D. Wiles
Map3D International Ltd.
Email: [email protected]
Website: www.map3d.com
Tel: (+1) 647 729 7572
Map3D is licensed, not sold. Use of Map3D is through a leasing arrangement, controlled by a time-
Map3D International Ltd 1990-2015
Map3D Overview
7
based protection key. The program is normally leased on an annual basis however multiple year
leases can be negotiated in advance.
Sales and support are provided by the author and through a network of agents worldwide including:
Ken McNabb
Mincad Systems Pty Limited
Box 2114, Richmond South, Victoria
3121 Australia
Email: [email protected]
Website: www.mincad.com.au
Tel: (+61) 3-9427-1085
Fax: (+61) 3-9428-1197
John Hadjigeorgiou
Georock Inc.
17 Highborne Road, Toronto, Ontario
Canada M5P 2J1
Email: [email protected]
Tel: (+1) 647 351 0841
Administration and Orders
Danie Truter
Tina Samuel
Technical Support
Gerrit Kotze
Open House Management Solutions
PO Box 200, 77 Dr James Moroka Avenue
Potchefstroom 2531 South Africa
Tel: (+27) 18 293 1400
Mobile: (+27) 18 293 1940
Email: [email protected]
Email: [email protected]
Email: [email protected]
Website: www.ohms.co.za
Map3D International Ltd 1990-2015
8
Map3D User's Manual
Claudio Martinez
Tecnologia Y Geociencias Limitada
Valenzuela Castillo 1341, Of.205
Providencia-Santiago-Chile
Tel: (+56) 2 2 275 61 08
Mobiile: (+56) 9 0153889
Email: [email protected]
Website: http://www.tecnologiaygeociencias.cl
Mahdi Bayuargo
2M Engineering
Jl. KPR Pemda 2 SP V No. 45
Timika Papua Indonesia 99910
Tel: (+62) 81389-202349
Email: [email protected]
Website: http://www.mmeconsultant.com
Vadim Louchnikov
LVI Geotechnical
19 Columbus Loop
Success, WA 6164 Australia
Tel: (+61) 438 862 436
Email: [email protected]
Website: http://www.lvigeotechnical.com
Srinath Srinivasaiah
Akasha Enterprise
11/1 Mosque Road, Aramane Nagar, Bangalore
560 003 India
(+91) 961 124 1345
Map3D International Ltd 1990-2015
Map3D Overview
9
(+91) 821 419 4125
Email: [email protected]
Website: www.akasha.co.in
1.3
Map3D Overview
Map3D has the ability to simulate everything from simple tabular shapes to detailed 3D excavation
shapes and large scale mine wide problems. The difficulty users will encounter in model
construction and interpretation depend on the amount of complexity required for the simulation at
hand. While simple tabular models or single tunnels are fast and easy to construct in Map3D,
complex three-dimensional problems are inherently difficult to work with and interpret.
Map3D has a completely self-contained CAD facility. One of the keys to the ease of use is model
construction using either conventional surface elements or the built-in solid modelling technology.
This permits users to build models using a series of three-dimensional building blocks. These
blocks, which can be any desired shape or size, are used to construct excavations and accesses,
as well as to define large or irregular shaped non-homogeneous zones (ore zones, dykes and
yielding zones). All of the material outside the model boundary is assumed to be a solid host
material.
The program automatically builds intersections between excavations, faults and multiple material
zones. By coupling this capability with the built-in Boolean operations, complex multi-step mining
sequences can be constructed with ease.
Special features have been implemented to allow fast construction of tabular mining shapes. The
user need only specify the perimeter of each mining step and Map3D automatically builds the
required elements. The perimeter does not necessarily have to be planar. In fact any bounding
polyhedron of three-dimensional points are acceptable. Complex, multi-reef, non-tabular (rolling or
offset) mining is readily simulated. Intersecting faults or three-dimensional dykes can be simulated.
The tabular mining can be extruded into 3D blocks then back into tabular mining if desired. This
allows construction of detailed development to be completed very quickly. Also different parts of the
model can be simulated using the tabular approximation while details can be obtained in areas of
interest by using true 3D shapes.
Wireframe mine plan outlines and excavation geometries can be digitized from within Map3D or
imported from several sources including AutoCAD-DXF and a universal ASCII PNT format. The
user can interactively build a model comprising 3D blocks and planes using the built-in CAD
capabilities of Map3D. Based on the geometric outlines or free-hand drawing, the user picks
corners of blocks and planes to complete construction of the model. All of this is done graphically
using the comprehensive set of tools available in the CAD interface.
A model comprises one or more connected or unconnected blocks and/or planes that can be mined
and filled in a specified sequence. Surfaces of blocks and planes are subsequently discretized into
a number of boundary elements by the program. Extensive error checking assists the user in
identifying whether the geometry is topographically valid or not.
The same input data can be used for elastic, thermal/fluid flow or non-linear analysis
Map3D Versions
Analysis results can be contoured on element surfaces or on a series of used defined field point
grid planes. These later planes can be positioned at any desired location and allow contouring of
stresses, strains, displacements, strength factors or any desired combination of these components.
Line contours and/or colour filled contours can be generated with options for labels, trajectories,
transparency, grid lines and more.
Results can be exported in many formats including raster screen dumps, vector screen dumps or
selected grid or surface locations with user configurable format.
Map3D International Ltd 1990-2015
10
Map3D User's Manual
Applications
1.4
Applications
Map3D is suitable for modelling rock engineering design problems involving both large tabular ore
bodies and irregular massive excavations.
The program is designed to be very versatile in its application. It has the ability to simulate
everything from simple tabular shapes to detailed 3D excavation shapes and large scale mine wide
problems. Models can include tunnels, large irregular shaped excavations, ore zones, massive and
tabular excavations, open pits, faults, fractures and more. It is possible for excavations to the
intersected by multiple faults or discontinuities that are allowed to slip or open. Problem size and
complexity are only limited by the amount of detail the user wants to incorporate.
Map3D can simulate ground support elements such as arches, steel sets, props, thick liners,
chalks, strong backfill etc. When simulating stiff support systems such as arches, steel sets, props,
thick liners, chalks, strong backfill etc., it is necessary to model the ground movement up to the
point of support placement, then insert the support elements either in a stress/strain free state, or
with a prescribed pre-stressing. This feature is particularly useful for simulation of structural support
elements and can accommodate placement, modification of properties and subsequent removal if
desired. This option has been enabled for use with 3D FF blocks and/or DD planes.
To enable this feature you must first excavate the desired support element (either a 3D FF block or
DD plane) to the desired pre-stressed state (use a zero material code for zero stresses or a
negative material number for a prescribed stress state), then in a subsequent mining step insert the
support material (use a positive material number to do this). With the Analysis > Options > Zero
Strain Support Placement option checked, Map3D conducts the necessary calculations to place
support elements in a stress/strain free state or with a prescribed pre-stressing at the current
mining step. The action of excavation to a zero or prescribed stress state followed by insertion of an
alternate material signals Map3D to conduct the required calculations.
Map3D can be applied to the analysis of underground layout and mining sequence problems, as
well as the assessment of pillar designs, stope span stability and fault stability. Depending on the
version being used, non-linear material behaviour can be used when modelling pillars, seams and
abutments.
There is a facility to superimpose external field loading effects into the Map3D model Map3Di.
There is also a facility to visualize point data Seismic. Points can be displayed as light source
shaded spheres with diameter and/or colour varying as magnitude. Each point can be tagged with a
series of numeric values (e.g. colour, magnitude, orientation etc.) and a text message. Upon
clicking on a point, the location, magnitude and text message are displayed on the status bar. This
feature can be used to display a database of useful geologic information such as grade, rock mass
quality etc.
The field loading can come from thermal heating, fluid pressure, non-linear behaviour and
deformations indicated by seismicity. These effects can be used to characterize geologic features,
accommodate changing lithology and incorporate seismic loading effects into the Map3D model.
Model Building Overview
Map3D International Ltd 1990-2015
Map3D Overview
1.5
11
Model Building Overview
Map3D is based on the Boundary Element formulation. With this method, one starts with an infinite
homogeneous elastic medium (rock mass). The process of model building consists of making
excavations and superimposing non-homogeneous zones (dykes, ore zones or yielding zones) and
any faults or joints upon which slip may occur. Since one starts with an infinite medium, far field
boundaries are automatically accommodated.
This is unlike domain formulations such as the Finite Element or Finite Difference methods, where
one starts with empty space. For these latter methods, model building consists of assembling the
entire rock mass and all its components. Elements must be assembled out to some far field
boundary many diameters away from the excavations.
These fundamental differences make the boundary element method much more suitable and
economic (in terms of analysis time) for rock mass problems.
There are several types of boundary elements available in Map3D:
Fictitious force (FF) elements are used to specify the location of excavation surfaces and
boundaries between regions with differing material properties.
Displacement discontinuity (DD) elements are used to specify the location of joints, faults,
fractures, pit walls and ground surface. These elements can intersect excavations at any location,
since Map3D builds edge intersections internally.
Inactive elements are used to construct excavation surfaces that can be displayed, but are not used
in the stress analysis.
Special proprietary boundary elements are incorporated for the thermal and non-linear analysis
versions.
Boundary Element Formulation
The objective of model building is to create a series of surface patches that when taken together,
form a seamless, non-overlapping, continuous skin which describes the location of excavations,
boundaries of regions with different moduli, faults etc. These surfaces must be further subdivided
into smaller boundary elements where the actual influence functions are evaluated and solved. This
approach is called surface modelling.
The user is free to construct surface models and supply this basic input data to Map3D. While this
approach is ideal for describing ore outlines or as-built models, it has been found to be tedious and
error prone when constructing mine layouts. In order to simplify model building, the program has a
powerful pre-processor built into it that can accept and manipulate higher order three-dimensional
entities. This approach is called solid modelling.
Solid modelling permits users to build models using a series of three-dimensional building blocks.
These blocks, which can be any desired shape or size, are used to construct excavations and
accesses, as well as to define non-homogeneous zones (ore zones, dykes and yielding zones).
The program automatically builds intersections between excavations, faults and multiple material
zones. By coupling this capability with the built-in Boolean operations, complex multi-step mining
sequences can be constructed with ease. Map3D creates the required surface description and
automatically discretizes these surfaces into elements for the boundary element stress analysis.
Rock mass Response Predictions Using Numerical Modelling
1.6
Boundary Element Formulation
Numerical modelling is an attempt to mathematically simulate the way the rock mass responds to
mining. This is done by accommodating the effects of:
Loading conditions - Prior to mining the rock mass is loaded by overburden and tectonic
Map3D International Ltd 1990-2015
12
Map3D User's Manual
forces.
Structural support elements - There may also be loads do to mechanical ground support,
backfill, heating, etc.
Geometry - When you make excavations, these pre-existing loads are redistributed around the
excavations, concentrating in abutments and pillars. Stiff dykes and soft ore zones will also
influence the response.
Elasticity - At locations where the stresses do not exceed the strength, the rock deforms in a
more or less elastic manner. This simply means that the deformations are relatively small in
magnitude and are mostly recoverable.
Non-linearity - At locations where the stresses are concentrated to the point where they exceed
the strength, the rock will yield to these loads and deform. This means that the deformations can
be relatively large in magnitude and are mostly non-recoverable. This can include the effects of
fault slip, cracking and generalized 3D non-linear yielding.
How does numerical modelling work?
Numerical modelling achieves this simulation by using certain physical constraints on how the rock
mass can respond:
Equilibrium – Applied forces must always balance one another at all locations in the model. If you
cut out a small cube of material and examine the stresses acting on this cube these stresses must
be in equilibrium.
xx /
x+
xy /
y+
xz /
z+X=0
xy /
x+
yy/
y+
yz /
z+Y=0
xz /
x +
yz /
y+
zz /
z+Z=0
Note that terms X, Y and Z, represent body forces that can be used to apply any sort of external
field loading. Such field loading can be the result of heating, fluid pressures material non-linearity
etc. In addition, these can be determined from many forms of in situ monitoring including for
example fluid pressures (e.g. well drawdown, dams, hydrofracturing), heating (e.g. natural heating,
nuclear waste storage), deformations (e.g. monitored with extensometers), and seismic activity (e.g.
definition of fault slip or material non-linearity from seismic data). It is these terms that will be used
for the integration of numerical modelling with seismic monitoring in Map3Di.
Continuity – In the rock mass continuum, the mass of material must be maintained. You cannot
have material disappearing or being created.
²
xx
²
/ y² + ²
yy / z² + ²
/ x² = 2 ²
/ x/ y
²
zz /
x² + ²
²
xx /
y/ z = / x ( -
yz /
x+
zx /
y+
²
yy/
z/ x = / y ( -
zx /
y +
xy/
z+
²
zz
/ x/ y = / z ( -
xy
yy
xy
zz/ y² = 2 ²
yz/ y/ z
xx/
z² = 2 ²
zx/
z/ x
/ z+
yz
/ x+
xy /
yz /
zx
z)
x)
/ y)
Elasticity - At locations where the stresses do not exceed the strength, the rock deforms in a linear
elastic manner: stresses varying in direct proportion to the elastic strains.
xx
yy
= °xx + [ (1- )
= °yy + [ (1- )
zz
= °zz + [ (1- )
xy
= °xy +
xy
+
(
+
(
xx
yy
zz
+
yy
zz
(
+
+
xx
zz
xx
+
) ] E/[(1+ )(1-2 )]
) ] E/[(1+ )(1-2 )]
yy
) ] E/[(1+ )(1-2 )]
E/(1+ )
Map3D International Ltd 1990-2015
Map3D Overview
yz
= °yz +
yz E/(1+
)
zx
= °zx +
zx E/(1+
)
13
Note that this is where the pre-mining or far-field stresses ( °) are incorporated into the physics.
Non-linearity - At locations where the stresses are concentrated to the point where they exceed the
strength, the rock will yield to these loads and deform. Deformations are all allowed to proceed until
the stresses relax down to the strength. This may be accompanied by some dilation. This can
include the effects of fault slip, cracking and generalized 3D non-linear yielding.
Note that the equations of equilibrium and continuity are expressed as differential equations. What
we need to do to solve these is to integrate them over the rock mass volume such that the
appropriate boundary conditions are satisfied. There are many ways of accomplishing this.
Boundary Element Methods integrate the equations analytically, and then use a numerical
approximation to satisfy the boundary conditions. Finite Element Methods and Finite Difference
Methods use a numerical integration scheme to integrate the differential equations.
No matter which method is used, in the end they all use some sort of numerical approximation and
you end up with a large set of equations that describes how various parts of the rock mass interact
upon one another. In BEM the resulting equations appear as
surface
=
far_field
+MP
where M is the set of simultaneous equations and P represents the loads or deformations that need
to be applied to cause the stresses at the excavation surfaces to be zero. This constitutes a
mathematical description of how the rock mass responds. All numerical models use some variation
on this approach.
These equations need to be solved simultaneously such the boundary conditions are satisfied. By
solving these equations throughout the rock mass, along with the loading conditions and geometry,
you conduct a "stress analysis".
Map3D is based on a very efficient Indirect Boundary Element Method (Banerjee and Butterfield,
1981), and incorporates simultaneous use of both fictitious force and displacement discontinuity
elements. Special proprietary boundary elements are incorporated for the thermal and non-linear
analysis versions.
This Boundary Element formulation offers many advantages over other stress analysis techniques.
Direct Boundary Element formulations require approximately twice the computational effort to
assemble and solve the boundary element matrix, compared to the indirect method used in Map3D.
Matrix lumping techniques are used to reduce the matrix size, and as a result, very large problems
(more than 333333 elements - 1000000 degrees of freedom) can be accommodated on PC
platforms. Without lumping, a 64000 element problem would take 147 GB of disk space. With
lumping, this can be reduced to less than 1 GB. This permits users to specify existing mining
geometry in detail, and add new mining as required. This greatly reduces the effort required to set
up and run analyses and permits the whole mine to be considered when necessary.
With the Boundary Element formulation, one starts with an infinite homogeneous elastic medium
(rock mass). The process of model building consists of making excavations and superimposing nonhomogeneous zones (dykes, ore zones or yielding zones) and any faults or joints upon which slip
may occur. Since one starts with an infinite medium, far field boundaries are automatically
accommodated.
This is unlike domain formulations such as the Finite Element or Finite Difference methods, where
one starts with empty space. For these latter methods, model building consists of assembling the
entire rock mass and all its components. Elements must be assembled out to some far field
boundary many diameters away from the excavations.
While Finite Element and Finite Difference formulations are very well developed for non-linear
Map3D International Ltd 1990-2015
14
Map3D User's Manual
problems such as plasticity, transient heat and fluid flow, and dynamic simulations, there are also
very difficult to use and require very long run times. The difficulty in use comes from the large
amount of information required to discretize the host rock mass. While this can be minimized by
use of mesh generators and powerful front-end graphics, the cost and effort to learn the interface
outweighs the simplicity with which the Map3D Boundary Element analyses can be conducted.
These fundamental differences make the boundary element method much more suitable and
economic (in terms of analysis time) for rock mass problems.
Many of the supposed limitations of the boundary element method have been overcome in Map3D.
The program can accommodate multi-step mining sequences and multiple material zones with
different material properties and stress states. These zones are permitted to behave non-linearly.
Multiple intersecting fault planes can slip and open according to user specified shear strength.
Steady state thermal/fluid stress analysis can be simulated.
The built-in solid modelling technology makes model construction very straightforward by building
complex intersections internally. The discretization routines built into Map3D relieve the user of the
burden of attempting to optimize the use of elements by automatically concentrating them only
where results are requested. The internal lumping procedures reduce both matrix size and
computational effort to a nearly linear dependence on problem size.
1.7
Rock Mass Response Predictions Using Numerical Modelling
The simple goal of numerical modelling is to predict (with accuracy and reliability) how the rock
mass will respond to mining. We specify the loading conditions, specify the geometry (this can
include dykes, faults, bedding etc.), require equilibrium and continuity, assume that elasticity and/or
non-linearity applies, then solve these equations for the stresses, strains, displacement etc.
throughout the rock mass.
By examining the results from the stress analysis we can identify locations that are for example
over-stressed or yielding. We can determine what locations need support and what type of support
is appropriate, etc.
Knowing what problems to expect, and the time and location of these problems is the ultimate goal.
This allows you to compare alternative mine layouts and sequences, and to develop strategies to
deal with problems when they occur. It avoids unexpected production interruptions. It allows you to
lay down hard design numbers for support requirements, specific pillar widths, acceptable stope
heights, etc. In short it provides a tool that helps you to design your mine. While numerical
modelling is reasonably straightforward, interpreting the results is much more of a challenge.
Numerical modelling for rock mass predictions is not an exact science. There will always be rock
mass features that are not anticipated or understood.
The following quotation from Starfield and Cundall (1988) suggests several reasons why this is so.
Rock mechanics models fall into the class of "data-limited problems": one seldom knows enough
about the features and behaviour of the rock mass to model it unambiguously. It follows that one
cannot use models in rock mechanics in a conventional way (for example in electrical or
aerospace engineering), and that there is a need to adopt a distinctive and appropriate
methodology for rock mechanics modelling.
Map3D International Ltd 1990-2015
Map3D Overview
15
Problems are often ill posed, leading to difficulties in interpreting the results and the nagging
question of whether or not the correct problem has been modelled. The design of the model should
be driven by the questions that the model is supposed to answer rather than the details of the
system that is being modelled. This helps to simplify and control the model.
A model is a simplification of reality rather than an imitation of reality. It is an intellectual tool that
has to be designed or chosen for a specific task. The fundamental problem is the question of
resolution. One is nervous of over-simplifying the problem.
It is futile ever to expect to have sufficient data to model rock masses in the conventional (for
example in electrical or aerospace engineering) way. As one includes more and more detail one
loses intellectual control of the model and so it becomes less instead of more effective.
What is the conventional approach for applying numerical modelling to mine design?
In most other engineering disciplines (electrical or aerospace engineering), numerical modelling is
normally based on predicting response based on laboratory measured properties of materials. This
generally works well if the materials, geometry and loading conditions are well known.
By contrast, the conventional method for applying numerical modelling to mine design is based on
"Terzaghi's Observational Approach to Design".
Initially (i.e. pre-mining) you can conduct parametric studies. You can compare alternate designs
and identify important factors affecting stability. You may find that certain orientations are more
favourable than others, or perhaps that certain sequences are better choices than others. You can
make some broad estimate of the cost-benefit of increased production versus increased
maintenance and support requirements.
Knowing what type of problems to expect and locations that are particularly susceptible is certainly
useful information as this allows you to develop strategies to deal with problems if and when they
occur. But if you want to use modelling to lay down hard design numbers for support requirements,
specific pillar widths, acceptable stope heights, and actual costs, you need to have confidence in
the accuracy of your predictions.
For example, there would be no point in specifying that a pillar be made 1.2m wide based on a
model prediction if you had no idea how reliable this prediction was. You would never allow
personnel to walk under a brow based on modelling results that indicated the brow was safe unless
you also were confident that the predictions were reliable.
It is fundamentally necessary to have knowledge of the reliability of a prediction to access risk and
base cost benefit decisions on.
It is worth spending a moment to reflect on this statement. I can think of no examples where
predictions of unknown reliability are of any value. You may admit that the reliability of your
prediction is low and that your predictions could be ±100% error, alternatively you may have
evidence to demonstrate that the reliability of your prediction is very high and that your prediction
has less than ±10% error. Anyone in a decision making position needs to know this so they can
weigh this into there cost benefit considerations.
Map3D International Ltd 1990-2015
16
Map3D User's Manual
Consider these two questions:
If you had demonstrable proof that model predictions were 99% reliable (±1% error) why wouldn't
you use them?
If you had demonstrable proof that model predictions were 1% reliable (±99% error) why would you
use them?
The crux of the matter here is really reliability! We must know how reliable our predictions are or we
have nothing (Wiles 2006 and Wiles 2007).
Then how does one obtain reliable designs? The solution to this problem is the same tried and
proven approach to design that all engineers use. The procedure used to establish the reliability is
called "Terzaghi's Observational Approach to Design" (Terzaghi and Peck, 1967):
Decide on some sort of initial mine layout - parametric studies.
Begin mining.
Monitor the rock mass response – normally visual.
Redesign based on the observed behaviour - model calibration.
This process constitutes model calibration. Whether we use modelling or not, this is basically the
approach we all use to design our mines.
Design on the basis of the most unfavourable assumptions is inevitably uneconomical, but no
other procedure provides the designer in advance of construction with the assurance that the
soil-supported structure will not develop unanticipated defects. However, if the project permits
modifications of the design during construction, important savings can be made by designing on
the basis of the most probable rather than the most unfavourable possibilities. The gaps in the
available information are filled by designing during construction, and the design is modified in
accordance with the findings. This basis of design may be called the observational procedure.
Map3D International Ltd 1990-2015
Map3D Overview
17
In order to use the observational procedure in earthwork engineering, two requirements must be
satisfied. First of all, the presence and general characteristics of the weak zones must be
disclosed by the results of the subsoil exploration in advance of construction. Secondly, special
provisions must be made to secure quantitative information concerning the undesirable
characteristics of these zones during construction before it is too late to modify the design in
accordance with the findings. These requirements could not be satisfied until the mechanics of
interaction between soil and water were clearly understood and adequate means for observation
were developed. Depending on the nature of the project, the data required for practising the
observational procedure are obtained by measuring pore pressures and piezometric levels; loads
and stresses; horizontal, vertical and angular displacements; and quantity of seepage.
Although this text is dated, the ideas are sound. Applying these ideas to determining rock mass
response predictions using numerical modelling leads to the following recommendations:
1) Be sure before you start that you are quite clear about why you are building a model and what
questions you are trying to answer. Hypothesize possible modelling results and decisions that will be
taken as a result. If you cannot make these decisions before you model, you likely will not be able
to make them after you model. Some examples of how this might be approached are as follows:
Pillar width will be selected based on maximum of 50% yielding across the cross-section of the
Map3D International Ltd 1990-2015
18
Map3D User's Manual
pillar.
Backfilling must be completed before 10% dilution is predicted.
Ground reconditioning will be required when non-linear deformations exceed 1% strain.
Long term ground instability will occur when elastic over-stressing exceeds 1.6 times the
strength.
2) Use the model at the earliest possible stage in a project to generate both data and understanding.
Models can often be used to help you understand what is going on.
3) Look for the controlling mechanics of the problem. Try to identify important mechanisms, modes
of deformation and likely modes of failure. Use the model to conduct "numerical experiments" to
clarify conflicting ideas about what is going on in the field. Some examples of controlling mechanics
are as follows:
Compressive yielding of the hangingwall pillar formed between stopes and hangingwall fault is
the cause of the dilution.
Lack of confinement of the hangingwall is the cause of the dilution.
Excessive span is the cause of the dilution.
4) Use the simplest possible model that will allow the important mechanisms to occur (2D, 3D,
elastic, plastic, faults, water, heat, dynamics etc.). Implement this model and verify that it either ties
in with your expectations, or if not, identify the weakness (in the model, or in your expectations) and
adjust.
Although two-dimensional analysis may be applicable early in the mining at very low extraction
ratios, and late in the mining at very high extraction ratios, three-dimensional analysis is usually
necessary.
Slip on a weak fault may dominate the stress redistribution, thus requiring the use of fault slip
simulations.
Pillar yielding may be responsible for significant stress redistribution, thus requiring the use of
non-linear analysis.
5) Once you have learned all you can from simple models, you may want to run more complex and
detailed models to refine accuracy and explore those neglected aspects of the geology and rock
mass response in the simple models.
6) Develop simple trends from the results to be used for design purposes. Assess sensitivity of
Map3D International Ltd 1990-2015
Map3D Overview
19
these trends to various parameters assumed in the model. Statistics may be useful here in defining
the reliability of the predictions. Some useful trends, which could be presented, are:
Dilution volume versus span.
% of pillar intact versus pillar width.
Ground stability versus predicted stress state.
7) Monitor the rock mass response as the excavation progresses. Verify that the observed response
agrees sufficiently well with the predicted results. Re-model is necessary as new information and
understanding of the mechanics progress.
How well does this approach work?
The value of this approach is that as mining progresses, you learn how reliable (or unreliable) your
model is. Note that traditionally observations of the rock mass response are made visually and often
supplemented with sparsely located instruments. By making observations of rock mass response,
over time you literally get to see when the model works and when it does not. You learn what
features need to be included in the model (e.g. fault planes, lithology, loading conditions etc.). You
not only learn how to use the model to predict rock mass response, but also gain confidence in the
predictions and recognise situations where the model predictions are suspect.
In short you learn how reliable (or unreliable) your predictions are.
Once you have established the reliability, you are in a position to fine tune your design. A well
calibrated model allows you a glimpse into the future: to predict how the rock mass will respond.
When properly applied, this procedure is extremely valuable. You can trim pillars and modify the
design with confidence, leaving ore only where you need to. You avoid unexpected interruptions in
production. You can mine with confidence.
To reinforce this concept let's consider a real example. Consider multiple violent pillar failures that
occurred over several years of mining. For each failure, a numerical model was run to determine
the stress state at the time and location of the failure. If we plot all of these stress predictions on a
Map3D International Ltd 1990-2015
20
Map3D User's Manual
set of s1 versus s3 axes we obtain the following:
This figure illustrates that there is a strong correlation between the stress state at the time of each
failure and a linear strength criterion. The coefficient of correlation of this data is 0.90. Let's state
this in a different way. If you calculate the difference between the stress state for each pillar and
the best fit line, then take the mean of these errors, you find that the mean error in prediction of s1
is approximately 17 MPa. This gives a coefficient of variation of only ±9%.
It is evident that for this particular example that this approach can work very well: the stress state
predicted from numerical modelling is a very reliable predictor for the time and location of pillar
failures. Certainly, you would not expect pillars with stress states well below the best-fit line (more
than 17 MPa) to fail. Also you would expect pillars well above (more than 17 MPa) the best-fit line to
have failed at some previous mining step.
It is worth asking if this really is an application of Terzaghi's Observational Approach to design? Yes
is fact it is. The mine operators tried many different modifications to the layout over the years of this
study. The changes they tried were guided by the type of response they observed underground.
Initially they found that although they could not avoid pillar failures, they could exert considerable
control over when in the mining sequence this happened. In the end they found that by applying
ground conditioning they could trigger the pillar failures at times that suited them best.
Implementation of Modelling Into the Mine Design Process
What are the shortcomings of this approach?
There are a few significant shortcomings to this approach. First of all, it takes many passes through
the mine/monitor/redesign loop to learn how reliable the model predictions are. This takes time,
manpower and continued dedication (a lot of trips underground). Monitoring the rock mass
response is no trivial task. It may take several years before you establish the reliability with any
confidence. Only you can decide if the effort can be justified, i.e. it is worth following through on
this.
There are other less obvious limitations. There may be geologic features that cannot be adequately
characterized for modelling. For example, often the details of the location, shape, extent and
condition of various faults are not well enough known to be included in a numerical model with any
accuracy. Exclusion of such features can invalidate the model results. Through proper application
of Terzaghi's Observational Approach to Design you can establish that there is no reliability in the
model predictions, and be left with an unpredictable situation (at least unpredictable as far as your
existing model is concerned). "Geology in: geology out"
Finally, if local conditions such as pre-mining stresses, lithology or jointing vary rapidly from place
to place it may be impractical to monitor with sufficient resolution to identify the effects of such
changing features. There are modelling examples where these changing conditions have been taken
into account. The resulting stress analyses produced predictions with remarkable agreement to the
observed deformations. In these cases at lease, this demonstrates that the variability in results is
due to changing local conditions, not due to model error.
Map3D International Ltd 1990-2015
Map3D Overview
21
This type of variation is normally not taken into account and shows up as large scatter in your
predictions thus reducing you reliability.
While Terzaghi's Observational Approach is sound, it may only serve to demonstrate the lack of
reliability you really have.
Clearly we would like to find a way around these problems:
We would like to shorten the calibration loop.
We would also like to be able to characterise geologic features well enough for incorporation
into numerical modelling.
Finally we would like to reduce scatter and develop a model with high reliability.
How are we going to improve on these shortcomings? One promising avenue of research is
integration of numerical modelling with seismic monitoring Map3Di.
1.8
Implementation of Modelling into the Mine Design Process
The only way numerical modelling will be fully implemented into the mine design process is if
evidence of correlation between modelling results and rock mass response is demonstrated through
case studies. To be of real value, the results from the numerical model must be directly related to
rock mass response. This is best approached from three distinct points of view:
parameters that are relevant to mine operators;
physical aspects of rock mass behaviour; and,
results from numerical modelling.
Rock response related characteristics, which have an important influence on mine design decisions
must be identified and specified from an operating point of view. It is necessary to specify what
parameters are of critical importance in decision making, and how these parameters actually come
into play in the mine design process. Although it will be fairly easy to list these parameters, it will be
much more difficult to define exactly how to use this information. Some examples could be:
level of ground stability,
stand-up time,
risk of ore loss,
level of ground support required.
The rock mass response must be characterized in terms of parameters, which can be directly
measured underground, for example:
level of joint alteration,
displacement,
strain,
closure,
stress change,
but also in terms of parameters which are more subjective such as:
ground support integrity,
level of stability or amount of ground deterioration.
The rock mass at each mine site of interest must be characterized by use of scan line surveys and
point load strength tests. Additional information in the form of displacements and strain
measurements (extensometers and closure points) as well as stress change monitoring (CSIRO
cells or IRAD gauges) should also be used where appropriate.
This work is very important because it provides a repeatable, objective measure of current ground
conditions. By continuing to monitor the rock mass conditions in this way, a record of when and
Map3D International Ltd 1990-2015
22
Map3D User's Manual
where conditions change is made. This not only permits one to compare different sites to one
another, but also to develop a direct method to relate in situ ground conditions to measurable,
physical parameters.
The specific numerical modelling results, which can be used to relate directly to the rock mass
response, are strain, displacement, stress, safety factor and size of failed zone. In order for these
predictions to be reliable, it is necessary that extensive calibration and back-fitting of input
parameters (far field stress, mechanical rock properties, and rock strength properties) be
conducted. This work can only proceed when the physical aspects of rock mass behaviour
(discussed above), are characterized adequately.
The three items: response characteristics specified by the operators, the observed rock mass
response, and results obtained from numerical modelling, must all be correlated to provide reliable
predictive capability. Concrete relationships between predictions, measurements, and the
parameters that are relevant to the mine operators must be developed. One must be able to reliably
correlate for example, the amount of joint alteration with the level of ground stability.
Demonstrations will be necessary so that operators can get a feel for how reliable (or unreliable) the
predictions are, and how seriously they should take these predictions. Several different methods
should be pursued simultaneously so that over time, the most important and reliable indicators can
be identified and verified. Note that the reliability will change with time as rock mass response
characteristics are collected.
It is very important that the far field stress state be established with some confidence. The
orientation can often be determined by observation of ground response (i.e. fault slip direction,
micro-seismic event locations, ground stability dependence on orientation, dominant closure
direction, spalling etc.). An active effort to compile this form of evidence should be undertaken.
Direct measurements by over-coring or some other technique are often necessary (Wiles and
Kaiser, 1994).
The most important deformation properties to be concerned with are the stiffness of the rock mass,
and its inelastic response during yielding. These parameters are the key to making accurate
displacement and strain predictions. A best guess estimate for stiffness can be made by use of
rock mass rating (Hoek and Brown, 1988). However, it must be recognised that this is only an
estimate, and it is necessary to further fine-tune the model.
It is important to distinguish between the actual elastic portion of the ground response, and the total
response, which is a combination of the elastic deformation and non-linear yielding effects such as
joint alteration. At a large distance from openings, one expects ground deformations to be primarily
elastic, where-as near the excavation surfaces, or in yielding pillars, one expects a large part of the
deformation to be inelastic, and highly dilational in nature.
Although the rock mass strength can be estimated by use of a rock mass rating (Hoek and Brown,
1988), laboratory compressive tests and point load test results are also very useful in this
characterisation. Just as for stiffness however, it is necessary to fine-tune the strength parameters
to the actual in situ response. This can only be achieved by use of parametric studies where one
attempts model calibrations by trial and error for numerous different cases. With time, sufficient
examples will be compiled to define a strength envelope, which is truly representative of the rock
mass under study.
It should be mentioned here that both the far field stress and mechanical properties will influence
model results, therefore, before any parametric studies are conducted, the best possible
information must first be obtained for the former parameters. As better far field stress information
and mechanical property information becomes available, strength parameters will have to be reevaluated for accuracy, and adjusted to suit the new information.
This discussion is by no means complete, however it is presented here to give users a start on
developing their own scheme for using modelling. In summary:
Efforts should be made to clearly define the objectives of the modelling along the lines of
Map3D International Ltd 1990-2015
Map3D Overview
23
providing operations with reliable ground control and ground stability predictions. All efforts
should ultimately be directed towards achieving this objective. A plan should be put in place on
how these objectives are to be achieved with the resources available.
A ground stability reporting system should be established to systematically observe, document
and report on ground control related problems. This should include a discussion on how the
observed ground control problem could (or could not) be identified with instrumentation,
numerical modelling etc., and controlled by use of modified sequence, layout or ground
support. The underlying mechanism or cause should also be identified where possible.
Implications with regards to important parameters defined by operations should be addressed,
e.g. level of ground stability, stand-up time, risk of ore loss, level of ground support required
etc. This reporting system can be used as a forum for communication and education on the
use of instrumentation, numerical modelling and rock mechanics principles as applied to mine
stability.
When modelling, one should always test for very specific problems and conditions. Through a
process of back-analysis, one can identify what stress states or stress paths lead to know
problems underground. Some ideas on how to do this are presented in Figure 3. After many
back-analyses have been completed, one will have a good feel for the confidence that can be
placed in the predictions. This confidence level may be very good or very poor, but it must be
established. Once these have been identified, one can then attempt to make predictions with
know reliability.
Some form of routine monitoring should be implemented (e.g. visual, scan-line, closure, ground
movement monitors, extensometers and stope outlines). Scan-lines can be repeated at the
same location as ground conditions deteriorate as a quantitative log of ground response. These
items can be directly related to mining problems and numerical modelling results.
Map3D International Ltd 1990-2015
Map3D
User's Manual
Part
II
Model Building and Editing
2
Model Building and Editing
2.1
Model Building and Editing
25
Building Surface Models
Building Models Out of Blocks
Constructing Alternate Material Zones
Material Codes - Mining Step Sequence
Defining Ground Surface
Defining Open Pits
Defining Fault Planes and Tabular Mining Zones
Defining Inactive Blocks for Visualization Purposes
Common Problems when Model Building
2.2
Building Surface Models
3
2
4
1
Models can be built out of individual surface patches.
CAD > Build > Block
CAD > Build > DD Loop
These are defined by 3 or 4 sided polygons that need not be planar. The corners can be entered in
either clockwise or counter clockwise orientation. Any of the corners can be repeated to define 3
sided shapes and wedges.
Map3D International Ltd 1990-2015
26
Map3D User's Manual
Surface patches can also be used to construct excavation surfaces and complex ore outlines if
desired. The
CAD > Build > FF Loop
routine can assist you in constructing complex as-built layouts with ease. The routine works by
tracing around multiple level plans or sections, then automatically linking them together.
This is often the best approach, particularly when attempting to construct as-built models of
structures where the exact shape is well known. This approach is useful for very detailed analysis of
many civil type structures where stress concentrations and assessment of local instabilities are of
primary concern.
These shapes can be constructed using the CAD functions built into Map3D or can be imported
from other CAD packages in either
AutoCAD-DXF format. This is a popular drawing exchange file with the extension ".DXF".
Point file format is a universal ASCII data file with the extension ".PNT".
Even for simple shapes, this construction procedure can quickly get out of hand. Since it is
necessary to create a series of surface patches that when taken together, form a seamless, nonoverlapping, continuous skin, one cannot leave gaps or holes.
When models are built in this way, Map3D checks that closed surfaces are formed
Analysis > Options > Closure
Also, all surfaces will be renumbered in a consistent manner to ensure that they create positive
volumes
Analysis > Options > Renumber
This renumbering may fail is surfaces are unclosed, i.e. there are holes in the excavation due to
missing portions.
Map3D International Ltd 1990-2015
Model Building and Editing
27
This is
acceptable
Unlike other analysis programs (isoparametric boundary element methods and the finite element or
finite difference methods), it is not necessary that these plates share common corner points. Users
are free to define elements with subdivisions mid-way along their edges, provided no gaps exist.
Although models can be built using this surface modelling technique, an easier and more reliable
technique is to use solid modelling
Building Models Out of Blocks
2.3
Building Models out of Blocks
7
6
8
5
3
2
4
1
For many
problems the
details of the exact shape of excavation surfaces is not important since one
is looking for a more global assessment of stability, such as pillar, abutment or hanging wall
conditions. Since it is very tedious to describe the location and connections for every surface, in
Map3D models can also be assembled out of three-dimensional building blocks.
CAD > Build > Block
CAD > Build > DD Loop
CAD > Build > FF Loop
These blocks are used for construction of three-dimensional excavations, alternate material zones
and back-filled zones. They are defined by a top and bottom, each with 4 corners. The corners can
be entered in either the clockwise or counter clockwise orientation, provided the top and bottom
sides line up with one another (i.e. corner 5 must be opposite corner 1, 2 opposite 6, etc.). The
sides do not have to be neither parallel nor planar and any of the corners can be repeated to define
3 sided shapes and wedges.
These blocks can be stacked together to create complex excavation shapes or ore zone
boundaries. They are linked together either by sharing common corners or by virtue of the fact that
they intersect. Sides, which are common to more than one block or penetrate other blocks are
automatically cut off and deleted. The volume contained within the block structure defines an
excavation, ore zone, yield zone, backfilled zones, etc.
Map3D International Ltd 1990-2015
28
Map3D User's Manual
4
3
2
1
To illustrate this point, consider
a simple drawpoint configuration, which has been assembled out of
4 blocks. Block 1 represents the extraction drift, block 2 represents the crosscut, block 3 represents
the drawpoint, and block 4 represents the stope. The pre-processor in Map3D identifies the
connections between these blocks, cuts them off and deletes the surfaces, which are common to
adjacent blocks.
2.4
Constructing Alternate Material Zones
Models, which use multiple materials, are built using similar principles as normal excavation type
models. Instead of defining the interior of a block as excavated (i.e. material code zero), one simply
specifies the number of the material that exists inside the block.
By default, the host material is material number 1. Any region, which has a different set of
properties (initial stress, elastic response or strength), must be defined just as an excavation would
be defined using Fictitious Force type boundary elements. Instead of assigning these blocks a zero
(to indicate zero surface stresses) or negative material code number (to indicate some specified
stress state), they are simply assigned a positive material code number to indicate the properties to
be associated with each particular group of blocks.
Recall that complex excavation shapes are built by combining several blocks with the same block
number together to form the desired shape. In exactly the same manner, separate regions each
with a different set of material properties, are formed by building the desired shape out of many
blocks, which have the same block number.
An important consideration here is that as few as possible block numbers should be used since all
surfaces between groups of blocks with differing block numbers will be maintained in the database.
There are two methods of defining regions which are to be assigned material number 2 or higher (i.
e. a different material number than the host material).
Map3D International Ltd 1990-2015
Model Building and Editing
Stope
Pillar
29
Stope
In the first method, regions with a different material numbers are constructed out of blocks, which
appear exactly as excavations do.
This technique is useful for defining details of, for example, soft modulus zones around the
periphery of excavations. This is also the best method of defining isolated features such as stiff
dykes or blast damaged pillars.
This block
defines the
extent of the
ore zone
Host
mateiral
outside the
ore zone
Excavation
inside the
ore zone
The second method of defining regions is a more global approach where an entire excavation
system (or part of it) is enveloped in a set of blocks, which define for example the ore zone. It is
permissible to enclose one envelope with another (i.e. like an onion skin), and to overlap envelopes.
Drifts, for example, are permitted to protrude through the ore zone into the host rock mass. Map3D
constructs the required intersections.
These two methods can be used simultaneously. It is permissible to use blocks that define a global
region using the second method. These blocks can either completely or only partially envelop other
excavations defined using the first method.
Map3D International Ltd 1990-2015
30
Map3D User's Manual
Fault
Ore Zone
The only consideration, which must be strictly observed when defining multiple material zones, is
the convention that higher material numbers take priority over lower material numbers. This
Dyke
convention has been adopted to overcome the ambiguity when considering the intersection of two
different features such as a fault with a dyke. When a fault and a dyke intersect, it is not clear
whether the fault should be assumed to persist through the dyke or visa versa. Another example is
the case where a dyke intersects an ore zone. Should the dyke be assumed to be persistent and
cut through the ore, or should the ore be assumed to be persistent and cut off the dyke.
In either of these cases, it is the feature, which is assigned the higher material number, which is
persistent. If the fault was assigned material number 4, the dyke assigned material number 3, and
the ore assigned material number 2, the fault would persist throughout. Because it has the highest
material number, the fault would be continuous though the ore and through the dyke, but not through
excavations of course. Since the ore has the lowest material number, it would not cut through the
dyke, but rather the dyke would cut through the ore.
You can use the following hide functions to assist in resolving which material cuts through other
materials:
View > Hide > Solids
View > Hide > Unused
Logic has been built in to support the intersection of up to five features simultaneously (i.e. the
intersection of blocks with five different block numbers). An unlimited number of blocks may
intersect, but a maximum of five can only intersect at the same location. This will permit
specification for example of multi-layer ore zones, with excavations on either side of the contact,
and a fault running along the contact. Map3D automatically detects blocks which are partially or
totally enclosed within other blocks, and blocks which are adjacent to other blocks thus permitting a
practically unlimited number of regions with different material types to be considered in any
analysis.
When viewing the excavation geometry in graphics mode, the user can move the mouse cursor
over a block of interest. Upon pressing a mouse button, the block number and the block name will
be displayed. Also, the material code assigned to that block and the material code of the region
adjacent or enveloping that block surface will be displayed. For example, for block surfaces
adjacent to the host material, the "adjacent material code" will be one (recall material one represents
the host rock mass). If the block surface is adjacent to an excavation, which has been assigned
material code 2, and then the "adjacent material code" will be 2.
During the analysis, results are generated on field point grids. Map3D automatically detects whether
grid points are located inside excavations or within regions with different material properties. When
contour results are displayed, the user can move the mouse cursor over the field point of interest.
Map3D International Ltd 1990-2015
Model Building and Editing
31
Upon pressing a mouse button, the material code assigned to the region where that particular field
point is located will be displayed along with the coordinates, displacements and stress state
information. Note that strength factor calculations will be made using the material properties
specified for that region. This feature permits assessment of strength, which may be different from
one region to another.
2.5
Material Codes - Mining Step Sequence
The mining step sequence is specified simply by designating appropriate material codes at the
desired mining step. The material code represents the number of the material that exists inside the
block. By default, the host material is material number 1. Any region which has a different set of
properties (initial stress, elastic response or strength) from the host, should simply be assigned a
positive material code number to indicate the properties to be associated with each particular group
of blocks.
Material code 0 specifies that the element will have zero surface stresses. This is the default and is
normally used for excavation surfaces, ground surface and open pit walls.
Material code -M (e.g. -2) specifies that the element will have surface stresses equal to the stress
state associated with material number M. This is useful for modelling pressurized openings or
stresses that vary with depth (e.g. backfill).
Material code +M (e.g. 2) specifies that the enclosed region will behave with the properties
associated with material number M. This code is used to specify regions that have properties
different from the host material (e.g. ore, dyke, backfill, etc.).
Material codes are assigned during model building using
CAD > Build > Block
CAD > Build > DD Loop
CAD > Build > FF Loop
Material codes can be assigned at any time using
CAD > Edit > Entity Properties
You will be prompted as follows
In this example, the selected block is not used at step 1. Assigned the properties for material
Map3D International Ltd 1990-2015
32
Map3D User's Manual
number 2 at mining step 2. At mining step 3 the block is excavated. Finally at mining step 4, the
block is backfilled with material number 4.
This procedure can be used with fictitious force type elements to define three-dimensional zones
with different stresses and material properties (e.g. stiff dykes, soft ore zones or yielding zones). It
can also be used with Displacement Discontinuity type elements to define planar zones with
different stresses and material properties (e.g. gouge filled faults, tabular mining yielding pillars).
The material codes can be specified a different value at each mining step. If no material code is
assigned (i.e. the material code is left blank), the block will remain inactive.
It is important to remember the convention that higher material numbers (material codes) take
priority over lower material numbers. This convention has been adopted to overcome the ambiguity
when considering the intersection of several different features such as a fault with a dyke, or
backfill placed in part of a stope. To ensure you will not have problems it is advisable to use the
highest material numbers for backfill.
When simulating stiff support systems such as arches, steel sets, props, thick liners, chalks, strong
backfill etc., it is necessary to model the ground movement up to the point of support placement,
then insert the support elements either in a stress/strain free state, or with a prescribed prestressing. To accomplish this you must first excavate the desired support element (either a 3D FF
block or DD plane) to the desired pre-stressed state (use a zero material code for zero stresses or
a negative material number for a prescribed stress state), then in a subsequent mining step insert
the support material (use a positive material number to do this). With the Analysis > Options > Zero
Strain Support Placement option checked, Map3D conducts the necessary calculations to place
support elements in a stress/strain free state or with a prescribed pre-stressing at the current
mining step. The action of excavation to a zero or prescribed stress state followed by insertion of an
alternate material signals Map3D to conduct the required calculations.
This procedure is particularly useful for simulation of structural support elements and can
accommodate placement, modification of properties and subsequent removal if desired. This option
has been enabled for use with 3D FF blocks and/or DD planes.
Without this option, all materials are placed at the pre-mining deformation state. This can cause
erroneous large stresses particularly in stiff support elements.
The mining sequence achieved can be viewed while in Map3D graphics mode simple by flipping
between mining steps using
File > Mining Step
Map3D International Ltd 1990-2015
Model Building and Editing
2.6
33
Defining Ground Surface
Ground surface viewed
from beneath
Ground surface is best defined using a large FF zone with its lower surface as the ground surface.
Mining
just
By assigning a material code of zero to these elements, Map3D will ensure zero
normal
and shear
stresses along these surfaces thus simulating a free surface.
below ground
surface
It is only necessary to define ground surface when your mining excavations are fairly shallow, (i.e.
the depth of mining is less than approximately twice the lateral extent of the mining). For these
cases, the free surface should extend at least twice the lateral extent of the mining in all directions.
The user should not extend field point grids near or through the free surface unless absolutely
necessary, since this will result in the discretization of the free surface into a large number of
boundary elements.
2.7
Defining Open Pits
Although open pits can be built using Displacement Discontinuity elements, this is not
recommended. Open pits are best handled when constructed as excavations (using block definitions
with Fictitious Force elements) adjacent to ground surface. This is because the intersection logic
built into Map3D can detect the interior of excavation blocks and cut off any intersecting features
(such as faults, ore zones or drifts). Also, displacement discontinuity elements, which lie along the
edge of an excavation (for example ground surface), will also be detected and treated properly.
This same logic does not exist for zones defined by displacement discontinuity elements. The user
could easily construct a model with multiple overlapping displacement discontinuity elements, which
will not converge.
Map3D International Ltd 1990-2015
34
2.8
Map3D User's Manual
Defining Fault Planes and Tabular Mining Zones
3
2
4
1
Models can be built out of individual surface patches. These are defined by 3 or 4 sided polygons
that need not be planar. The corners can be entered in either clockwise or counter clockwise
orientation. Any of the corners can be repeated to define 3 sided shapes and wedges.
CAD > Build > DD Loop
These shapes can be constructed using the CAD functions built into Map3D or can be imported
from other CAD packages in either:
AutoCAD-DXF format. This is a popular drawing exchange file with the extension ".DXF".
Point file format is a universal ASCII data file with the extension ".PNT".
This is
acceptable
Unlike other analysis programs (isoparametric boundary element methods and the finite element or
finite difference methods), it is not necessary that these plates share common corner points. Users
are free to define elements with subdivisions mid-way along their edges, provided no gaps exist.
Fault planes and tabular mining are built using the same principles as normal excavation type
models. These features are simply specified along with other excavations and multiple material
zones, and can be used simultaneously with all other Map3D features.
Map3D International Ltd 1990-2015
Model Building and Editing
35
Fault planes and tabular mining zones are defined using displacement discontinuity elements. These
can only be specified in terms of plate definitions. The four corners of the plate define the
extremities of the displacement discontinuity. Displacement discontinuities can intersect excavations
at any location, since Map3D builds edge intersections internally.
As in the section above, the only consideration, which must be strictly observed when defining fault
planes, is the convention that higher material numbers take priority over lower material numbers.
When considering the intersection of two different features such as a fault with a dyke, it is the
feature that has been assigned the higher material number that will persist through the other.
A concern, which must be addressed when using non-linear modelling (whether fault slip or
generalised yielding in Map3D Non-Linear), is that the far field stress should not exceed the
strength. If the far field stresses exceed the rock mass strength, then the rock mass itself will be
unstable. Although this may be admissible in some creep problems, it is generally not acceptable,
and steady state (i.e. non-creeping) solutions are not possible.
1
2
n
s
This limitation
is more severe when simulating faults. Any fault may be at or very near static
equilibrium (i.e. stresses equal to the strength) with the far field stress state. For weak faults under
high stress ratios the principal stresses must be oriented almost perpendicular or parallel to the fault
plane, otherwise the fault will be unstable, and slip even without any mining. This condition is
Map3D International Ltd 1990-2015
36
Map3D User's Manual
generally not acceptable since steady state (i.e. non-creeping) solutions are not possible.
For the case where 1 is oriented at the angle
stress acting on the fault are given by
s
n
=(
=
from the fault plane, the shear stress and normal
- 2 ) sin( ) cos( )
sin² ( ) + 2 cos² ( )
1
1
substituting these into the shear strength relation
| s| = Cohesion +
n
tan( )
it can be found that the stress state must satisfy
|(
1
-
2
) sin( ) cos( )| = Cohesion + [
1
sin² ( ) +
2
cos² ( ) ] tan( )
For example, with
= 32 MPa
= 16 MPa
Cohesion = 0
= 10°
1
2
then
must be less than 11° or between 69° and 90°.
With
= 60 MPa
= 16 MPa
Cohesion = 0
= 30°
1
2
then
2.9
must be less than 15° or between 45° and 90°.
Defining Inactive Blocks for Visualization Purposes
Often when building a model it is desirable to include details of the development headings for
visualization purposes. This assists model interpretation since users can more easily identify
familiar locations in the mine. While such detailed geometries can be included in the Map3D stress
analysis, their presence increases the analysis time owing to the larger number of boundary
elements required. Since small drifts normally only influence nearby excavations, the majority of
these can be left out of the analysis without significantly influencing the results.
It is however, desirable to superimpose detailed drift locations on the analysis results to aid in
visualization. Blocks can be included into the Map3D database but not included in the analysis,
simply by assigning an inactive block type. These blocks will be excluded from the intersection,
discretization and analysis portions of the code, and hence do not increase the computational
effort.
2.10
Common Problems When Model Building
In this section a few common construction errors are described along with suggestions as to how to
avoid and correct these problems.
Connecting a Cross Cut onto a Straight Drift
Map3D International Ltd 1990-2015
Model Building and Editing
37
In this example, the crosscut is easily constructed by snapping its corners to the edge of the
access drift. The "nearest edge" snap mode
CAD > Snap > Nearest Edge
should be used to select the indicated points. The built-in Boolean intersection capabilities of
Map3D will automatically create the intersection between the two blocks during stage 2 of the
analysis. This construction will work fine.
While for simple geometries this works fine, in many situations this connection is not so
straightforward.
Let's consider a more complex geometry where the segments of the footwall access drift do not line
up with the desired locations of the crosscuts.
Connecting a Cross Cut onto a Complex Drift
In this example, the crosscut does not join onto the footwall access drift correctly. A thin pillar is
formed at the end of the crosscut. Map3D will detect this pillar and attempt to analyze it, probably
without success. Just as this feature would be in reality physically unstable, it is also unstable
numerically. Map3D can actually conduct a successful analysis of this feature, but only if the
adjacent faces of the pillar are discretized with boundary elements of size similar to the pillar
thickness. However, this is not a desirable approach since it would require a large number of
elements and this pillar does not actually exist.
Map3D International Ltd 1990-2015
38
Map3D User's Manual
In order to avoid this problem, an additional joiner block could be built as shown in the adjacent
exploded view. The "nearest corner" snap mode should be used so that this new block will join onto
the drift and cross cut properly. This joiner block effectively mines out the undesired pillar thus
properly connecting the cross cut to the footwall access drift.
Note that the joiner block has only three points around the top and bottom. This can be readily
constructed by selecting one of the corners twice at the same location (e.g. points 3 & 4 and 7 &
8).
This problem can be avoided entirely if we construct the segments of the footwall access drift such
they line up with the desired locations of the cross cuts. This is easily accomplished by subdividing
the footwall access drift as shown. Often some for thought will help in easing the difficulty of
construction.
Connecting Miss-Matched Stoping Blocks
Map3D International Ltd 1990-2015
Model Building and Editing
39
Often the situation arises where multiple stoping blocks must be joined along their common edges.
In this example, if the bottom of the upper block and the top of the lower block were at the same
elevation, the built-in Boolean intersection capabilities of Map3D would automatically create the
intersection between the two blocks during stage 2 of the analysis. This construction will work fine.
The problem occurs during construction when one attempts to snap the corners of one block to join
along the side of the other. In this example, the upper block has been snapped onto the top edge of
the lower block leaving a gap.
In order to eliminate this gap, one could snap the corners of the lower block onto the bottom edge of
the upper block using the stretch function. But this will create an overlap, and hence does not fix the
problem.
Map3D International Ltd 1990-2015
40
Map3D User's Manual
The alternative is to create a joiner block as described above. However, a simpler alternative is to
create a construction lines that spans the problem area and snap corners from the upper and lower
block to these lines. This procedure would have to be completed for both the back and front faces of
the stoping blocks.
This method has the draw back that it does alter the shape of the stoping blocks, possibly in
undesirable ways.
Map3D International Ltd 1990-2015
Model Building and Editing
41
The best alternative is probably to subdivide one or both of the stoping blocks. This is the most
effective technique for eliminating gaps and joining miss-fitting blocks.
Connecting Offset Stoping Blocks
Often the situation arises where the shape of one stoping block does not match the adjacent stoping
block.
This situation can be easily accommodated by the built-in Boolean intersection capabilities of
Map3D. The program will automatically create the intersection between the two blocks during stage
2 of the analysis.
These routines work best if all points on the bottom side of the upper block and all points on the
topside of the lower block are at the same elevation. This can be achieved using
CAD > Edit > Move Vertices to Z
The routines will even work if the bottom side of the upper block and the topside of the lower block
are non-planar and at different elevations as long as they do in fact intersect one another. In this
latter case however, the resulting intersection may contain many complex elements. While these
shapes will work fine, they could slow the analysis down owing to their large number and the fact
that often they must be discretized heavily.
Connecting A Drift to a Stoping Block
Often the situation arises where one wants to intersect a drift with stoping block.
As above, this situation can be easily accommodated by the built-in Boolean intersection
capabilities of Map3D. The program will automatically create the intersection between the drift and
the stoping block during stage 2 of the analysis.
Map3D International Ltd 1990-2015
42
Map3D User's Manual
These routines work best if the intersecting faces are planar and parallel. The routines will even
work if the intersecting faces are non-planar and non-parallel as long as they do in fact intersect
one another. In this latter case however, the resulting intersection may contain many complex
elements. While these shapes will work fine, they could slow the analysis down considerably owing
to their large number and the fact that often they must be discretized heavily.
2.11
Discretizaiton and Lumping
Map3D uses several different, but complimentary strategies to permit analysis of very large problem
sizes. Discretization is controlled such that boundary elements are only used in locations where
they are needed. Several forms of lumping are then used to reduce analysis time and disk space
requirements. Together, these features enable Map3D to accommodate very large problem sizes
(more than 333333 elements) on PC platforms.
Without lumping, a 64000 element problem would take 147 GB of disk space. With lumping, this can
be reduced to less than 1 GB. The time required for analysis reduces by approximately the same
proportion. This permits users to specify existing mining geometry in detail, and add new mining as
required. This greatly reduces the effort required to set up and run analyses and permits the whole
mine to be considered when necessary.
All discretization and lumping parameters are expressed in terms of a distance over length ratio. In
all cases the distance is measured between two points of interest (e.g. from one element to another,
or from an element to the nearest grid point). In this ratio, the length is the size of the element, or
grid spacing at one of the points of interest.
Suggested values for the discretization and lumping parameters are as follows:
AL should be set equal to twice the smallest pillar or stope width. Use the same units used to
specify the coordinates (e.g. metres or feet).
AG should be set equal to the smallest dimension of interest. Use the same units used to
specify the coordinates (e.g. metres or feet).
DON=0.5, DOL=DOC=1, DOE=DOG=2 for 10-20% error
DON=0.5, DOL=DOC=2, DOE=DOG=4 for 5-10% error
DON=1.0, DOL=DOC=4, DOE=DOG=8 for < 5% error
The details of the use of these parameters for control of discretization and lumping are described
below.
DON and AL - Matrix Conditioning
During the discretization process all model surfaces (surfaces of FF blocks and DD planes) are
subdivided into boundary elements with side length
Lelem = Delem/DON
where Delem is determined by Map3D as the smallest distance between adjacent model surfaces.
Since at some locations the distance Delem may be zero, the minimum element side length AL must
be specified.
AL should be set equal to twice the smallest pillar or stope width. The same units used to specify the
coordinates should be used (e.g. metres or feet).
A value for DON of 0.5 is generally adequate for all problems except those with very narrow
excavations or pillars. In this latter case a value for DON of 1.0 is recommended.
Although higher values of DON results in generation of more boundary elements and hence longer
run times, this is necessary to obtain a well-conditioned solvable problem for very narrow
excavations or pillars.
Map3D International Ltd 1990-2015
Model Building and Editing
43
DON controls the way block surfaces are discretized into boundary elements. This parameter along
with AL, is used to ensure that a well-conditioned, solvable coefficient matrix will be generated by
the Boundary Element Analysis.
Matrix conditioning can be directly related to the magnitude of DON. A well-conditioned, easily
solved matrix can be guaranteed by using larger values (near one) of DON.
DON = 0.5
DON = 1.0
These parameters control how fine the discretization will be for surfaces, which pass near one
another. For example comparing examples using DON of 0.5 and 1.0, it can be observed that larger
values of DON produce smaller boundary elements where the stope is locations.
Delem
From an analysis point of view, there are three basic types of problems. The easiest to solve are
problems, which use bulky, three-dimensional shapes such, that surfaces are spaced well apart.
For this type of problem, a well-conditioned coefficient matrix will always be generated, and the
effect of DON and AL are not important.
Delem
Lelem
Lelem
The next most difficult type of problem to solve is one where narrow stopes are defined. For this
case, the distance Delem (which is the smallest distance from one element to another) is just the
Map3D International Ltd 1990-2015
44
Map3D User's Manual
stope width. Since the element side length Lelem can be calculated from the DON ratio as
Lelem = Delem/DON
such that Lelem is not less that AL, small values of DON will generate small elements only near
locations where stopes are narrow. As one moves away from these areas, the element size will very
quickly increase. The use of fictitious force elements to create this type of tabular shaped
excavation can result in a poorly conditioned matrix unless a value of DON of approximately one
half is used. This must of course be accompanied by a sufficiently small value of AL to permit small
elements to be generated.
AL should normally be set equal to the width of the narrowest pillar, stope, or the smallest
hangingwall to footwall distance. This will permit the discretization routine to use as small size
elements as are necessary to ensure proper matrix conditioning.
Delem
Lelem
Lelem
The most difficult type of problem to solve is one where narrow pillars are defined or where narrowly
spaced joints are used. As above, Delem is the stope or pillar width. The element side length can
also be calculated from the DON ratio, however, for this type of problem, where excavations are
very near one another, creating narrow pillars, a poorly conditioned unsolvable matrix will be
created unless a value of DON of approximately one is used. This must of course be accompanied
by a sufficiently small value of AL to permit small elements to be generated.
The recommended value of DON is 0.5 for narrow stopes problems and 1 for narrow pillar
problems.
AL should normally be set equal to the width of the narrowest pillar or the smallest hangingwall to
footwall distance. This will permit the discretization routine to use as small size elements as are
necessary to ensure proper matrix conditioning.
In summary, AL should be set equal to the width of the narrowest pillar or the smallest hangingwall to
footwall distance. Larger values may be necessary if too many elements are generated. DON
should be set to 0.5 for normal problems, and 1.0 for problems where narrow pillars are defined.
During discretization, Map3D will attempt to satisfy the specified DON ratio for all elements. When
discretizing, the maximum number of boundary elements that any block or plate edge can be
divided into is 256. If this number of subdivisions is reached, and the specified DON ratio has still
not been achieved, Map3D will issue a warning message instructing the user to subdivide the block
or plate into smaller pieces.
Once discretization is complete, the distance Delem can be plotted using
Plot > Miscellaneous > Delem Distance to nearest element on surfaces
The ratio of Delem/Lelem can be plotted using
Plot > Miscellaneous > Delem/Lelem DON ratio on surfaces
Locations where DON is small (less than 0.5) could result in a non-convergent solution process.
Note that if desired, this behaviour can be overridden on an element by element basis my
specifying the maximum width for each element
CAD > Edit > Entity Properties > Maximum Width
Map3D International Ltd 1990-2015
Model Building and Editing
45
DOL and AG - Solution Accuracy
During the discretization process Blocks and DD planes are subdivided into boundary elements with
side length Lgrid. The element size is determined from the minimum distance Dgrid to the nearest
field point grid plane according the relation
Lgrid = Dgrid/DOL
Since at some locations the distance Dgrid may be zero, a minimum element side length AG must
also be specified.
This same relationship is also used to subdivide grid planes into points where field stresses, strains
and displacements are calculated. A minimum grid spacing of half AG will be used.
The AG parameter should be set equal to smallest dimension of interest. To obtain reasonable
accurate results, AG should be set to approximately one quarter the stope or pillar width. For
example if the user wants to see the stress distribution across a 2m wide pillar, a value of 0.5 for AG
would give a sufficient number of field points for accurate contouring.
The same units used to specify the coordinate locations should be used (e.g. metres or feet).
A value for DOL of 1.0 is recommended for all problems except those where increased accuracy is
required. With a value of 1.0 an error of 10-20% can be expected. A value of 2.0 should provide 510% error. A value of 4.0 should provide less than 2% error.
Although higher values for DOL result in more elements being generated, this is necessary to obtain
increased accuracy.
DOL controls the way in which grids and block surfaces are subdivided. This parameter along with
AG, is used to control the amount of detailed accuracy one requires in the results.
AG should be selected to reflect the size of interest. For example, if details of the stress distribution
are only required to within one metre of the surface excavations, then AG should be set equal to
one metre.
Map3D International Ltd 1990-2015
46
Map3D User's Manual
Lgrid
Lgrid
Dgrid
The field point spacing and element side length Lgrid, are determined from the specified DOL ratio.
Dgrid is determined as the minimum distance from a given element to the nearest grid. Since Lgrid
can be calculated from the DOL ratio as
Lgrid = Dgrid/DOL
such that Lgrid is not less that AG, small values of DOL will generate small elements and grid
spacing only near locations where grids pass near to stopes. As one moves away from these areas,
the element size will very quickly increase.
DOL = 1
Map3D International Ltd 1990-2015
Model Building and Editing
47
DOL = 2
DOL = 1
DOL = 2
Small values of DOL (one or less) will generate small field point spacings and small elements only
near locations where the grid intersects or passes very close to the block. As one moves further
away from these areas, the field point spacing and element side length will very quickly increase.
Larger values of DOL (two or more) will increase the distance over which the field point spacing and
element side length are kept small.
Map3D International Ltd 1990-2015
48
Map3D User's Manual
ERROR
20%
15%
10%
5%
Result accuracy can be directly related to the magnitude of DOL. Errors are limited to
approximately 10-20% for DOL near one, and 5-10% for DOL near two. These values are only
approximate, and it is therefore
recommended
that in problems
whereDOL
high accuracy is required,
1
2
3
values of DOL near four be used. In problems where low accuracy is necessary, DOL near one is
adequate. It is not recommended to set DOL less that one.
Note that large values of DOL and small values for AG result in increased number of elements and
increased run times, but greater accuracy.
In summary, AG should be set to the resolution of interest (a fraction of the stope width). DOL
should be set to 1 for coarse analysis results, 2 for detailed analysis results, and 4 when very high
accuracy is required.
During discretization, Map3D will attempt to satisfy the specified DOL ratio for all elements and
grids. When discretizing, the maximum number of boundary elements that any block or plate edge
can be divided into is 256. The maximum number of field points that any grid edge can be divided
into is also 256. If this number of subdivisions is reached, and the specified DOL ratio has still not
been achieved, Map3D will issue a warning message instructing the user to subdivide the block,
plate or grid into smaller pieces.
Once discretization is complete, the distance Dgrid can be plotted on model surfaces using
Plot > Miscellaneous > Dgird Distance to nearest grid on surfaces
or on grids using
Plot > Miscellaneous > Dgrid Distance to nearest element on grids
The ratio of Dgrid/Lgrid can be plotted on model surfaces using
Plot > Miscellaneous > Dgrid/Lgrid DOL ratio on surfaces
or on grids using
Plot > Miscellaneous > Dgrid/Lgrid DOL ratio on grids
Note that if desired, this behaviour can be overridden on a grid by grid basis by specifying the
maximum width for each grid
CAD > Edit > Entity Properties > Maximum Width
DOR - Element Aspect Ratio
Map3D International Ltd 1990-2015
Model Building and Editing
49
DOR controls the maximum element aspect ratio. If the ratio of the side length of an element is
determined to exceed DOR, that element is subdivided. The recommended value of DOR is 5. If
erratic results are detected, DOR should be decreased to 2. Note that smaller values of DOR results
in more elements and longer run times, but greater accuracy.
During discretization, Map3D will attempt to satisfy the specified DOR ratio for all elements. When
discretizing, the maximum number of boundary elements that any block or plate edge can be
divided into is 256. If this number of subdivisions is reached, and the specified DOR ratio has still
not been achieved, Map3D will issue a warning message instructing the user to subdivide the block
or plate into smaller pieces.
DOC - Matrix Lumping
During matrix assembly, the distance Delem between groups of Blocks and DD planes is examined
to see if these can be lumped together for calculation and storage purposes. The amount of lumping
depends on how many elements can fit into a zone with side length Lelem, determined from the
relation
Lelem = Delem/DOC
A value for DOC of 1.0 is recommended for all problems except those where increased accuracy is
required. With a value of 1.0 an error of 10-20% can be expected. A value of 2.0 should provide 510% error. A value of 4.0 should provide less than 5% error.
Although higher values of DOC result in larger problem sizes, this is necessary to obtain increased
accuracy.
Lelem
Delem
DOC controls the way in which elements are lumped during matrix assembly. Elements with
combined side length Lelem, are lumped if the distance Delem, to the affected element exceeds the
required DOC ratio. If the stope to stope distances are large, many elements can be lumped.
Small values of DOC (one or less) will provide maximum lumping, however, stresses near excavation
surfaces will deteriorate in accuracy, and matrix conditioning will be reduced. Larger values of DOC
(two or more) will provide less lumping, but accuracy and good matrix conditioning will be
maintained.
DOC should be set to 1 for coarse analysis results, 2 for detailed analysis results, and 4 when very
high accuracy is required. Note that large values of DOC results in increased matrix size and longer
run times, but greater accuracy.
DOE - Element Lumping
During the calculation of field points (i.e. grid assembly), the distance Dgrid between these points
and groups of Blocks and DD planes is examined to see if these groups can be lumped together for
calculation purposes. The amount of lumping depends on how many elements can fit into a zone
with side length Lgrid, determined from the relation
Lgrid = Dgrid/DOE
A value for DOE of 2.0 is recommended for all problems except those where increased accuracy is
Map3D International Ltd 1990-2015
50
Map3D User's Manual
required. With a value of 2.0 an error of 10-20% can be expected. A value of 4.0 should provide 510% error. A value of 8.0 should provide less than 5% error.
Although higher values of DOE result in larger analysis times, this is necessary to obtain increased
accuracy.
DOE controls the way in which elements are lumped during field point calculations. Elements with
combined side length Lgrid, are lumped if the distance Dgrid, to the field point exceeds the required
DOE ratio. Small values of DOE (two or less) will provide maximum lumping, however, stresses
distributions near excavation surfaces will deteriorate in accuracy and become erratic. Larger
values of DOE (four or more) will provide less lumping, but accuracy and smooth stress
distributions will be ensured.
DOE should be set to 2 for coarse analysis results, 4 for detailed analysis results, and 8 when very
high accuracy is required. Note that large values of DOE results in increased matrix size and longer
run times, but greater accuracy.
DOG - Grid Lumping
During the calculation of field points (i.e. grid assembly), the distance Dgrid between these points
and groups of Blocks and DD planes is examined to see if these field points can be lumped together
for calculation purposes. The amount of lumping depends on how many field points can fit into a
zone with side length Lgrid, determined from the relation
Lgrid = Dgrid/DOG
A value for DOG of 2.0 is recommended for all problems except those where increased accuracy is
required. With a value of 2.0 an error of 10-20% can be expected. A value of 4.0 should provide 510% error. A value of 8.0 should provide less than 5% error.
Although higher values of DOG result in larger analysis times, this is necessary to obtain increased
accuracy.
DOG controls the way in which field points are lumped during field point calculations. Field points
with combined spacing length Lgrid, are lumped if the distance DOG, to the affecting element
exceeds the required DOG ratio. Small values of DOG (two or less) will provide maximum lumping,
however, stresses distributions near excavation surfaces will deteriorate in accuracy and become
erratic. Larger values of DOG (four or more) will provide less lumping, but accuracy and smooth
stress distributions will be ensured.
DOG should be set to 2 for coarse analysis results, 4 for detailed analysis results, and 8 when very
high accuracy is required. Note that large values of DOG results in increased matrix size and
longer run times, but greater accuracy.
Map3D International Ltd 1990-2015
Map3D
User's Manual
Part
III
52
Map3D User's Manual
3
Model Building Tutorials
3.1
Freehand Sketching - Room and Pillar Mining
Coal Pillar
6m
2m
Coal Pillar
2m
Coal Pillar
2m
8m
Z - Elevation
Y - Nort h
To demonstrate the freehand sketching technique, let's start by building a simple room and pillar
coal mining geometry. The roadways measure 2m wide by 2m high, and the coal pillars measure
6m towards the East and 4m towards the West.
We want to start with aX clean
- Eastslate, so we will select
File > New Model
Before beginning please note that the user can hover over any button to obtain a tooltip identifying
that buttons function. Also the use can right click on any item to obtain detailed help on that
function.
Building the Intersection
Map3D International Ltd 1990-2015
Model Building Tutorials
7
53
6
8
5
3
4
2
1
First let's construct an intersection. This will be constructed using blocks with 8 corners. To
construct the first block, use CAD > Build > FFLoop. This function can be selected from the CAD
toolbar as follows (activate the CAD toolbar if it is not visible using Tools > CAD Toolbar):
Select
CAD > Build from the CAD toolbar
You will be presented with the sub-menu of build functions
Now select
CAD > Build > FFLoop
Since we are going to be freehand drawing we must set up the snap grid. This is done using CAD >
Snap > Rectangular Grid Snap. This function can be selected from the Build Entity toolbar
To activate the snap grid select
CAD > Snap > Rectangular Grid Snap
(this only needs to be done if the grid snap button is not already highlighted
).
The coordinates of the current cursor location are indicated on the status bar. You will notice that
the x and y values change as you move the cursor about, but not the z value. To set the current z
value, click on
CAD > Snap > Cursor/Grid Setup, you will be prompted as follows:
Set the origin and snap spacing as follows:
X-Origin > 0
Y-Origin > 0
Z-Origin > 0
Map3D International Ltd 1990-2015
54
Map3D User's Manual
Snap spacing > 1
If the cursor cross-hairs are not moving the x-y plane, select the
button.
This sets the snap mode to grid. In this mode, no pick-box will be displayed at the intersection of the
cross-hairs and the movement of the cursor will be restricted to the specified grid spacing. As you
move the cursor around the display the cursor will jump from location to location by the grid spacing
amount (1 metre in this case).
You will see that the FFLoop building routine is prompting you to enter the first corner of the block
on the status bar
Input: Select
Point 1
Move the cursor about until you locate the first point
x,y,z > 0 0 0
Select this point by clicking the left mouse button once.
You will now be prompted for the next block corner
Input: Select
Point 2
As you move the cursor about you will see that not only is the current cursor location indicated at
the lower left hand corner of the display, but also the offset of the current point from the last one
selected (i.e. the offset vector from point 1 to point 2). Select point 2 at
x,y,z > 2 0 0
Repeat this selection process for point 3
x,y,z > 2 2 0
and point 4
x,y,z > 0 2 0
If you select the wrong location for a point, simply undo that selection using the undo button
CAD > Build > Undo Point then try again.
Finally, reselect the first point
x,y,z > 0 0 0
When first point has been reselected, the base of the block has been completely formed. You will
be prompted with the message
Loop complete: Start next
loop.
To complete building the block you can either change the elevation and select the remaining 4
points (i.e. points 5, 6, 7 and 8), or generate them from the first 4 corners by adding an offset to
them. To use this latter procedure, select the offset function from the build entity toolbar
CAD > Build > Extrude/Offset Remaining
You will be prompted for this offset vector as follows
Map3D International Ltd 1990-2015
Model Building Tutorials
55
Enter the offset as:
X-offset > 0
Y-offset > 0
Z-offset > 2
Points 5, 6, 7 and 8 will be generated respectively from points 1, 2, 3 and 4 by adding the offset
values to their coordinates.
7
8
6
5
Offset
vector
3
2
4
1
Upon
completion of block
construction you will automatically be prompted to enter the block
properties (
CAD > Build > FFLoop)
Enter the following:
Block Name: Intersection
Element Type: Fictitious Force
Block Colour: 1
Map3D International Ltd 1990-2015
56
Map3D User's Manual
This intersection block should be excavated at mining step 1. This is indicated by specifying
Mining Step 1: 0
We are now finished and can Build this block by pressing the
button.
Roadway
Coal Pillar
Intersection
z
y
Repositioning The View
x
Roadway
During block building or at any other time, the user is free to reposition (translate, rotate or zoom)
the geometry to make visualization easier. This is readily accomplished by several means (refer to
Rotating the Model and Translating the Model).
Building the Roadway 1
Additional blocks can now be constructed by selecting the FFLoop building function again
CAD > Build > FFLoop
Let's build the next block adjacent to the first one. Select point 1 at
x,y,z > 2 0 0
We would like to select point 2 at
x,y,z > 8 0 0
Roadway
Coal Pillar
Intersection
z
y
Roadway
x
Map3D International Ltd 1990-2015
Model Building Tutorials
57
but this location is beyond the limits of the display. To overcome this problem, simply zoom out (
Translating the Model).
Point 2 can now be readily selected.
Select point 3 at
x,y,z > 8 2 0
Select point 4 at
x,y,z > 2 2 0
Finally, reselect the first point
x,y,z > 2 0 0
When first point has been reselected, the base of the block has been completely formed. You will
be prompted as before with the message
Loop complete: Start next
loop.
Now offset the remaining points for this block using the offset function
CAD > Build > Extrude/Offset Remaining
You will be prompted for this offset vector as follows
Enter the offset as:
X-offset > 0
Y-offset > 0
Z-offset > 2
Upon completion of block construction you will automatically be prompted to enter the entity
properties (
CAD > Build > FFLoop)
Map3D International Ltd 1990-2015
58
Map3D User's Manual
Enter the following:
Block Name: Roadway
Element Type: Fictitious Force
Block Colour: 1
This roadway block should be excavated at mining step 1. This is indicated by specifying
Mining Step 1: 0
We are now finished and can build this block by pressing the
button.
Building the Roadway 2
Let's construct a third block
Roadway
Coal Pillar
Intersection
z
y
Roadway
by selecting point 1 at
x,y,z > 2 2 0
x
Select point 2 at
Map3D International Ltd 1990-2015
Model Building Tutorials
x,y,z > 2 6 0
Select point 3 at
x,y,z > 0 6 0
Select point 4 at
x,y,z > 0 2 0
Reselect the first point to complete construction of the base
x,y,z > 2 0 0
then offset the remaining points as before
CAD > Build > Extrude/Offset Remaining
This will complete construction of the roadway.
Building the Coal Pillar
Roadway
Coal Pillar
Intersection
z
y
Roadway
You should now have completed construction of an intersection and two roadways. Now let's
construct a coal pillar.
x
CAD > Build > FFLoop
by selecting point 1 at
x,y,z > 2 2 0
Select point 2 at
x,y,z > 8 2 0
Select point 3 at
x,y,z > 8 6 0
Select point 4 at
x,y,z > 2 6 0
Reselect the first point to complete construction of the base
x,y,z > 2 2 0
Map3D International Ltd 1990-2015
59
60
Map3D User's Manual
then offset the remaining points as before
CAD > Build > Extrude/Offset Remaining
This will complete construction of the coal pillar.
Upon completion of block construction you will automatically be prompted to enter the block
properties (
CAD > Build > FFLoop). We must specify that this block will be a coal pillar rather
than an excavation (the default). You will be prompted as follows:
Enter the following:
Block Name: Coal Pillar
Element Type: Fictitious Force
Block Colour: 3
We must specify that this block has the material properties for coal. This is done by defining
material number 2 for coal at mining step 1. This is indicated by specifying
Mining Step 1: 2
This same pillar could be excavated at step 2 by specifying a material code of
Mining Step 2: 0
We are now finished and can Build this block.
Saving the Geometry
At this point we have constructed one small corner of the desired mining geometry. Before
proceeding further it would be a good idea to save the model as built so far. To do this we select
File > Save Model As
Let's save with the name "COAL.INP"
Expanding the Geometry
The model as constructed represents only a small part of the final model. It is easy to repeat this
pattern by copying this pattern multiple times. To do this we must select the copy function
CAD > Edit > Copy Entities
This function can also be selected from the CAD toolbar as follows:
Map3D International Ltd 1990-2015
Model Building Tutorials
Select
61
CAD > Edit from the CAD toolbar
You will be presented with the sub-menu of edit functions
To activate the copy function select
CAD > Edit > Copy Entities
At this point you will be prompted to build a list of entities to copy
Hold down the Shift-key and drag out a selection window (alternatively you may select the crossing
window function
).
Second corner
of window
All entities within the selection window (i.e. the intersection, roadways and coal pillar) should be
highlighted.
First corner
of window
You can now copy the selected entities by picking the copy button
You will be prompted to enter the copy-offset vector as follows:
Map3D International Ltd 1990-2015
62
Map3D User's Manual
There are numerous ways to select the copy-offset vector. You can type in the desired offset as (8
0 0).
This is also readily accomplished graphically by picking two points to define the vector. First set the
snap mode to
CAD > Snap > Rectangular Grid Snap
(this only needs to be done if the grid snap button is not already highlighted
).
Copy from
here
Offset Vector
to the first end of the offset vector
You will be prompted (at the top of the screen)Copy
to pick
here
INPUT: Select first offset
point
Select this point at
x,y,z > 0 0 0
You will then be prompted to pick the other end of the offset vector
INPUT: Select second
offset point
Select this point at
x,y,z > 8 0 0
The offset (8 0 0) will now be displayed in the dialog box.
Map3D International Ltd 1990-2015
Model Building Tutorials
63
Now press OK, and the selected entities will be copied by adding the offset vector to all coordinates.
To repeat this copy operation, either rebuild the selection set, or select
to restore the previous
selection set, then copy the selected entities by picking the copy function again
CAD > Edit > Copy Entities
If desired, this copy procedure can be repeated as many times as desired to duplicate the mining
pattern in the x and y directions.
At this point the geometry can be considered complete. We must now define the location of grid
planes where results will be calculated and specify the material properties.
Building Grid Planes
3
2
1
We4 must now decide where
we want results to be calculated. In this example we are interested in
the stress in the coal pillars. We will therefore define a cross-sectional grid plane that passes
through the centre of one of the pillars. This will be constructed using a plane with 4 corners. To
Map3D International Ltd 1990-2015
64
Map3D User's Manual
construct this plane, select the grid building menu function
CAD > Build > Grid Plane
This function can also be selected from the CAD toolbar as follows:
Select
CAD > Build from the CAD toolbar
You will be presented with the sub-menu of build functions
Now select
CAD > Build > Grid Plane
Since we are going to be freehand drawing we must set up the snap grid. This is done using CAD >
Snap > Rectangular Grid Snap. This function can be selected from the Build Entity toolbar
To activate the snap grid select
CAD > Snap > Rectangular Grid Snap
(this only needs to be done if the grid snap button is not already highlighted
).
The coordinates of the current cursor location are indicated on the status bar. To set the current z
value, click on
CAD > Snap > Cursor/Grid Setup, you will be prompted as follows:
Set the origin and snap spacing as follows:
X-Origin > 0
Y-Origin > 0
Z-Origin > -2
Snap spacing > 1
If the cursor cross-hairs are not moving the x-y plane, select the
button.
You will see that the grid plane building routine is prompting you to enter the first corner of the plane
INPUT: Select
point 1
Map3D International Ltd 1990-2015
Model Building Tutorials
65
Move the cursor about until you locate the desired point
x,y,z > 9 4 -2
Select this point by clicking the left mouse button once.
You will now be prompted for the next block corner
INPUT: Select
point 2
Select point 2 at
x,y,z > 17 4 -2
If you select the wrong location for a point, simply undo that selection
CAD > Build > Undo Point
then try again.
When point 2 has been selected, one edge of the plane has been completely formed. To complete
building the plane you can either change the elevation and select the remaining 2 points (i.e. points
3 and 4), or generate them from the first 2 corners by adding an offset to them. To use this latter
procedure, select the offset function from the build entity toolbar
CAD > Build > Offset Remaining
4
3
Offset
vector
1
2
You will be prompted for this offset vector as follows
Enter the offset as:
X-offset > 0
Y-offset > 0
Z-offset > 6
Points 3 and 4 will be generated respectively from points 2 and 1 by adding the offset values to their
coordinates.
Map3D International Ltd 1990-2015
66
Map3D User's Manual
4
3
1
2
This will complete construction of the grid plane (
CAD > Build > Grid Plane)
Enter a descriptive name for the grid plane and leave the Fixed Grid Spacing check box unchecked.
Specifying Material Properties for the Sandstone Host
We must now specify properties for the host material. These are entered using the material
properties function
CAD > Properties > Material Properties.
Selecting this item opens a sub-menu of items associated with editing the material properties. Note
that material number 1 is by definition the host material. Other material numbers are used to define
alternate material zones such as the coal, fault gouge, backfill etc. The user is first prompted to
enter the material number that is to be edited. First let's define properties for the host material
Map3D International Ltd 1990-2015
Model Building Tutorials
67
Enter the following:
Material Name: Sandstone Host
Material # : 1
Young's Modulus: 11000 MPa
Poisson's Ratio: 0.16
The Viscous Moduli can be set to zero since they are only used to simulate creep response in nonlinear analysis.
We want to use the Mohr-Coulomb criterion here. To do this set
Material Type: Mohr-Coulomb
UCS: 60 MPa
The cohesion parameter is not used in this case and hence can be set to zero.
Friction Angle: 30°
The dilation angle is not used in this case and hence can be set to zero.
The pre-mining stress state can now be specified
CAD > Properties > Material Properties > Stress State
Map3D International Ltd 1990-2015
68
Map3D User's Manual
The appropriate far field stress state for this model is
constant: 5 MPa
constant: 5 MPa
c constant: 10 MPa
a
b
We will set the variation of stress with depth to zero
variation: 0 MPa/m
variation: 0 MPa/m
c variation: 0 MPa/m
a
b
Also the stress orientations (trend and plunge) should be set to zero, thus defining a and b as
horizontal and c as vertical.
The Datum can also be set to zero since this is only used to define the variation with depth.
Specifying Material Properties for the Coal Seam
We must now specify properties for the coal seam. These are entered using the material properties
function
CAD > Properties > Material Properties
Selecting this item opens a sub-menu of items associated with editing the material properties. Recall
that when building the coal pillar, we specified that material number 2 was to be used for that block.
Let's set Material # to 2.
Enter the following:
Material Name: Coal Seam
Young's Modulus: 3500 MPa
Poisson's Ratio: 0.25
The Viscous Moduli can be set to zero since they are only used to simulate creep response in nonlinear analysis.
We want to use the Mohr-Coulomb criterion here. To do this set
Material Type: Mohr-Coulomb
Map3D International Ltd 1990-2015
Model Building Tutorials
69
UCS: 7.2 MPa
The cohesion parameter is not used in this case and hence can be set to zero.
Friction Angle: 27°
The dilation angle is not used in this case and hence can be set to zero.
The pre-mining stress state can now be specified
CAD > Properties > Material Properties > Stress State
We want the initial stress in the coal to be the same as in the sandstone host, so lets Copy from
material 1.
Specifying Control Parameters
We must now specify parameters to control model discretization and solution. These are entered
using the control parameters function
CAD > Properties > Control Parameters
Selecting this item opens a dialog box of items associated with the control parameters
Map3D International Ltd 1990-2015
70
Map3D User's Manual
Enter the following:
Job Title: Coal Pillar Model
All parameters can be left at there default values except the stress tolerance, element length and
grid spacing.
Stress Tolerance: 0.01 MPa
should be set to approximately 0.1% of the far field stress state. This ensures that during solution,
the surface stresses will be calculated with 0.01 MPa numerical accuracy.
Element Length: 4
should be set equal to twice the thickness of the coal seam This parameter is used to control the
minimum boundary element size that will be used at locations where narrow seams or pillars are
located. This ensures that a well-conditioned, readily solvable problem will be formulated.
Grid Spacing: 0.5
should be set to approximately one quarter of the seam thickness. This parameter is used to control
the minimum boundary element size and the minimum spacing on the grid plane that will be used at
locations where it passes close to or intersects the model. Accurate results can be obtained as
close as half this spacing from the model surfaces. This parameter also ensures that a sufficient
number of stress points will be calculated within in the pillar to generate smooth contours.
The user is free to select a larger value for the grid spacing. This will result in smaller problem size
and hence shorter run times. However, with larger boundary elements results will be less accurate,
especially near the model surfaces, also with wider grid spacing, smooth contours cannot be
generated.
Suggested values for the discretization and lumping parameters are as follows:
DON=0.5, DOL=DOC=1, DOE=DOG=2 for 10-20% error
DON=0.5, DOL=DOC=2, DOE=DOG=4 for 5-10% error
DON=1.0, DOL=DOC=4, DOE=DOG=8 for < 5% error
Coarse analysis results are recommended for all problems except those where increased accuracy
is required. At this setting numerical errors of 10-20% in stress predictions can be expected. The
settings for detailed analysis results provide 5-10% numerical error. The settings for high accuracy
results provide less than 5% numerical error. The user is free to specify higher accuracy settings
for these parameters, however this will result in larger problem size and hence longer run times.
Running a Map3D Analysis
At this point we have completed construction of the model and are ready to begin an analysis. If
you are using Map3D Fault-Slip you will obtain an elastic solution to this problem. If you are using
Map3D Non-Linear, a complete non-linear analysis will be conducted.
Analysis is executed from the main menu.
Map3D International Ltd 1990-2015
Model Building Tutorials
71
You can run through the complete analysis by selecting
BEM Analysis
Here we will do this in stages. So first select
Discretization
If you have modified the model in any way since the last time you saved, you will be prompted to
save these modifications.
When the Intersections and Discretization analyses are complete select
Analysis > Graphics
When in graphical mode, you should select the discretized view option
View > Render > Discretize
This will enable you to see how the block surfaces have been discretized into boundary elements.
You must have set outlines on in order to see the individual elements
View > Render > Block Outlines
To see how the grid has been discretized (activate the Contour toolbar if it is not visible using Tools
> CAD Toolbar), you must select
Plot > Grid Selection > Grid #1
from the contour toolbar
The discretization analysis can be repeated as many times as desired with different values
specified for grid spacing, discretization and lumping parameters until the desired density of
boundary elements and grids points is achieved.
Once you are satisfied, you can proceed to the BEM Analysis (matrix assembly and solution), by
selecting
Analysis
from the main menu, then selecting
BEM Analysis
Map3D International Ltd 1990-2015
72
Map3D User's Manual
When the analysis is complete, select
Analysis > Graphics
When in graphical mode, you can contour any desired parameter. For example to display the major
principal stress contours, select
Plot > Stress > S1 Major Principal Stress
This will generate a contour plot on the grid plane.
Interpretation of the results will not be discussed here.
3.2
Bulk Mining Example
To demonstrate model building using digitized mine plans, let's build a simple VRM bulk mining
geometry.
Construction lines are used to define detailed locations of underground features such as
excavations, contacts structure etc. A Map3D model is normally built on top of this construction line
data.
The mine plans have been previously digitized using Map3D
CAD > Digitizer Setup
or some other CAD program. These plans can be saved in either:
Point file format is a universal ASCII data file with the extension ".PNT". This format is useful for
exchanging raw construction line data with other CAD software.
AutoCAD-DXF format is a popular drawing exchange file with the extension ".DXF". This format is
useful for exchanging construction line data with other CAD software.
We want to start with a clean slate, so we will select
File > New (Model)
Before beginning please note that the user can hover over any button to obtain a tooltip identifying
that buttons function. Also the use can right click on any item to obtain detailed help on that
function.
Importing digitized mine plans
First we must open a file containing the digitized mine plans. This is done using
File > Open (Construction Lines)
In this case the construction lines have been saved in DXF format, so change the "Files of Type" to
*.dxf
The file "BULK.dxf" is included with the Map3D installation and should be available to import.
Map3D International Ltd 1990-2015
Model Building Tutorials
73
Z - Elevation
Y - North
The access drifts measure approximately 5m wide by 5m high, and the distance between levels is
25m.
Repositioning The View
X - East
During block building or at any other time, the user is free to reposition (translate, rotate or zoom)
the geometry to make visualization easier. This is readily accomplished by several means (refer to
Rotating the Model and Translating the Model). The easiest way is to rotate is simply hold down the
left mouse button will dragging the cursor across the screen. Translation is achieved by holding
down the right mouse button. The model can be zooming in or out by holding down both mouse
buttons.
Position the view so that the construction lines are readily visible.
Building Footwall Access Drifts and Cross Cuts
There are numerous methods that can be used to construct these entities. In this tutorial a few
different techniques will be demonstrated.
Building Blocks One at a Time
The simplest (although the most time consuming) approach is to construct a series of 8 cornered
blocks one at a time.
7
6
8
5
Offset
vector
3
2
4
Map3D International Ltd 1990-2015
1
74
Map3D User's Manual
To construct the first block, use CAD > Build > FFLoop. This function can be selected from the
CAD toolbar as follows (activate the CAD toolbar if it is not visible using Tools > CAD Toolbar):
Select
CAD > Build from the CAD toolbar
You will be presented with the sub-menu of build functions
Now select
CAD > Build > FFLoop
Since we want to snap to construction lines we must set the snap mode. This is done using CAD >
Snap > Nearest Edge. This function can be selected from the Build Entity toolbar
To activate the nearest edge snap select
CAD > Snap > Nearest Edge
(this only needs to be done if the nearest edge snap button is not already highlighted
).
In this mode, a pick-box will be displayed at the intersection of the cross-hairs.
The nearest
Although the coordinates of the current cursor location are indicated on the status bar, if the
pickpoint on this
box is located over the corner of a construction line, that corner will be selected, otherwise,edge
the will be
nearest point on the edge of the construction line under the pick-box will be selected. In eitherselected
case
all 3 coordinate values (x, y and z) are uniquely specified.
You will see that the FFLoop building routine is prompting you to enter the first corner of the block
on the status bar
Input: Select
Map3D International Ltd 1990-2015
Model Building Tutorials
75
Point 1
1
4
2
3
Move the cursor about until you locate point #1. Select this point by clicking the left mouse button
once.
You will now be prompted for the next block corner
Input: Select
Point 2
As you move the cursor about you will see that not only is the current cursor location indicated at
the lower left hand corner of the display, but also the offset of the current point from the last one
selected (i.e. the offset vector from point 1 to point 2). Select point #2. Repeat this selection
process for point #3 and #4.
If you select the wrong location for a point, simply undo that selection using the undo button
CAD > Build > Undo Point then try again.
Finally, reselect the first point (i.e. point #1).
When first point has been reselected, the base of the block has been completely formed. You will
be prompted with the message
Loop complete: Start next
loop.
To complete building the block we will generate the remaining 4 points from the first 4 corners by
adding an offset to them. To use this latter procedure, select the offset function from the Build
Entity toolbar
CAD > Build > Extrude/Offset Remaining
You will be prompted for this offset vector as follows
Map3D International Ltd 1990-2015
76
Map3D User's Manual
Enter the offset as:
X-offset > 0
Y-offset > 0
Z-offset > 5
Points 5, 6, 7 and 8 will be generated respectively from points 1, 2, 3 and 4 by adding the offset
values to their coordinates.
7
8
6
5
Offset
vector
3
2
4
1
Upon
completion of block
construction you will automatically be prompted to enter the block
properties (
CAD > Build > FFLoop)
Enter the following:
Block Name: Intersection
Element Type: Fictitious Force
Block Colour: 1
Map3D International Ltd 1990-2015
Model Building Tutorials
77
This intersection block should be excavated at mining step 1. This is indicated by specifying
Mining Step 1: 0
We are now finished and can Build this block by pressing the
button.
1
2
3
4
5
6
By repeating the above FFLoop construction procedure the entire level can be constructed as a
series of blocks.
Building Complex Blocks
Let's now construct more complex shaped blocks.
1
14
2
3
4
13
5
10
9
6
12
11
This can be done using the same FFLoop construction technique described above, except we will
8
select all 14 points as the floor plan. Once the point #14 has been selected you must reselect point
#1 to complete the base of the block. You will be prompted with the7message
Loop complete: Start next
loop.
To complete building the block select the offset function from the build entity toolbar as before.
CAD > Build > Extrude/Offset Remaining
Map3D International Ltd 1990-2015
78
Map3D User's Manual
This construction procedure will create one large continuous block covering the entire floor plan. If
desired the user could build one block using the point sequence 1-2-3-4-5-6-9-10-13-14-1 to build
the hangingwall drive, then 13-10-11-12 and 9-6-7-8 to build the cross-cuts as separate blocks. This
later procedure would be desirable if the cross-cuts were to be mined at a different mining step than
the hangingwall drive.
Now build the access drifts on the lower level using the same procedure.
Building VRM Panels
The VRM panels can now be built. These will be constructed using FFLoop blocks with 8 corners.
8
7
5
6
4
3
1
2
To begin building select
CAD > Build > FFLoop
Since we want to snap to corners of previously constructed blocks we must set the snap mode to
CAD > Snap > Nearest Corner. This function can be selected from the Build Entity toolbar
To activate the nearest corner snap select
CAD > Snap > Nearest Corner
(this only needs to be done if the nearest edge snap button is not already highlighted
).
This corner will
be selected
In corner snap mode, a pick-box will be displayed at the intersection of the cross-hairs. The nearest
corner on the entity or construction line under the pick-box will be selected (snapped to), thus all 3
coordinate values (x, y and z) are uniquely specified.
We could actually use edge snap mode here
CAD > Snap > Nearest Edge
since the corners of the blocks would be selected anyway (as long as the corner is located within
the pick box). However, using corner snap allows us to be sloppier with our selection since only
corners will be selected.
Select the first 4 points as shown below. Remember to reselect point #1 to complete construction of
the floor plan loop.
Map3D International Ltd 1990-2015
Model Building Tutorials
79
Select point 7 here
Select point 8 here
Select point 6 here
Select point 5 here
Select point 3 here
Select point 4 here
Select point 1 here
To select points 5 to 8 we will need to rotate the model so we are looking up from below. This is
easily done by holding the left mouse button down while dragging the mouse cursor upwards on the
screen.
2 herebelow. Remember to reselect point #5 to complete construction of the
Select pointsSelect
5 to 8point
as shown
upper plan loop.
Map3D International Ltd 1990-2015
80
Map3D User's Manual
Select point 6 here
Select point 5 here
Select point 7 here
Select point 8 here
Select point 1 here
Select point 2 here
As before you will be prompted with the message
Loop complete: Start next
loop.
To complete building the block select the build button
from the Build Entity toolbar
Upon completion of block construction you will automatically be prompted to enter the block
properties (
CAD > Build > FFLoop)
Map3D International Ltd 1990-2015
Model Building Tutorials
81
Enter the following:
Block Name: VRM Panel
Element Type: Fictitious Force
Block Colour: 4
We will leave this block unmined at step 1 and excavated at step 2. This is indicated by leaving
Mining Step 1: (leave this field blank)
Mining Step 2: 0
We are now finished and can Build this block. The adjacent panel can be constructed using the
same procedure giving the final geometry.
Map3D International Ltd 1990-2015
82
Map3D User's Manual
Saving the Geometry
At this point we have constructed the footwall access drifts and two VRM panels. Before proceeding
further it would be a good idea to save the model as built so far. To do this we select
File > Save Model As
Let's save with the name "VRM.INP"
Building Grid Planes
We must now decide where we want results to be calculated. In this example we are interested in
the stress in the pillar formed between the two VRM panels. We will therefore define a level grid
plane that passes mid-height through the pillar.
We will be using the snap grid function. This can be set up now or after we start the build grid plane
function. To set this up now, pick the
button from the CAD toolbar
Since we are going to be freehand drawing we must set up the snap grid. This is done using CAD >
Snap > Rectangular Grid Snap. This function can be selected from the Snap toolbar
To activate the snap grid select
CAD > Snap > Rectangular Grid Snap
Map3D International Ltd 1990-2015
Model Building Tutorials
(this only needs to be done if the grid snap button is not already highlighted
83
).
The coordinates of the current cursor location are indicated on the status bar. You will notice that
the x and y values change as you move the cursor about, but not the z value. To set the current z
value, click on click on
CAD > Snap > Cursor/Grid Setup, you will be prompted as follows:
Let's pick this location graphically using the Pick function.
Since we want the snap base mid height on the VRM panels, change the snap mode to the midpoint
of line
CAD > Snap > Midpoint of Line
Before proceeding, you must ensure that the correct snap mode has been set either by verifying
that the CAD > Snap > Midpoint of Line menu item is checked, or the midpoint snap button is
highlighted
Select the Cursor/Snap Base Origin on the vertical edge of the VRM panel.
Map3D International Ltd 1990-2015
84
Map3D User's Manual
Select the
origin here
4
The point mid-height on this edge will be selected. The z value should read
Z Origin: 1012.5
We should also set
Snap Spacing: 10
for easier point selection.
If the cursor cross-hairs are not moving the x-y plane, select the
button.
Before beginning construction of the grid plane, we should first reorient the geometry to a plan view.
This can be done using
View > View XY Plane
Now let's build the grid plane.
3
2
4
1
This will be constructed using a plane with 4 corners. To construct this plane, select the grid
building menu function
CAD > Build > Grid Plane
Map3D International Ltd 1990-2015
Model Building Tutorials
85
This function can also be selected from the CAD toolbar as follows:
Select
CAD > Build from the CAD toolbar
You will be presented with the sub-menu of build functions
Now select
CAD > Build > Grid Plane
Since we are going to be freehand drawing we must make sure that CAD > Snap > Rectangular
Grid Snap. This function can be selected from the Build Entity toolbar
To activate the snap grid select
CAD > Snap > Rectangular Grid Snap
(this only needs to be done if the grid snap button is not already highlighted
).
You will see that the grid plane building routine is prompting you to enter the first corner of the plane
Input: Select
Point 1
Select the four corners of the plane.
3
Y - North
Upon selecting the 4th point, you will automatically be prompted to specify the grid plane properties
(
CAD > Build > Grid Plane).
X - East
Map3D International Ltd 1990-2015
4
86
Map3D User's Manual
Enter a descriptive Name for the grid plane, make sure the Grid Type is Active and leave the Fixed
Grid Spacing box unchecked.
Specifying Material Properties for the Host Rock mass
We must now specify properties for the host material. These are entered using the material
properties function
CAD > Properties > Material Properties
Selecting this item opens a sub-menu of items associated with editing the material properties. Note
that material number 1 is by definition the host material. Other material numbers are used to define
alternate material zones such as ore, fault gouge, backfill etc. The user is first prompted to enter the
material number that is to be edited. First let's define properties for the host material
Enter the following:
Material Name: Sandstone Host
Material # : 1
Young's Modulus: 60000 MPa
Poisson's Ratio: 0.25
The Viscous Moduli can be set to zero since they are only used to simulate creep response in nonlinear analysis.
We want to use the Mohr-Coulomb criterion here. To do this set
Material Type: Mohr-Coulomb
UCS: 60 MPa
The cohesion parameter is not used in this case and hence can be set to zero.
Friction Angle: 30°
Map3D International Ltd 1990-2015
Model Building Tutorials
87
The dilation angle is not used in this case and hence can be set to zero.
The pre-mining stress state can now be specified
CAD > Properties > Material Properties > Stress State
The appropriate far field stress state for this model is
constant: 30 MPa
constant: 20 MPa
c constant: 20 MPa
a
b
We will set the variation of stress with depth to zero
variation: -0.027 MPa/m
variation: -0.013 MPa/m
c variation: -0.013 MPa/m
a
b
Also the stress orientations (trend and plunge) should be set to zero, thus defining
horizontal and c as vertical.
a
and
b
as
The Datum can be set to 1000 metres to define the variation with depth as
+
(z - Datum)
Defined in this way, the stress
of 0.027 MPa/m of depth.
a
equals 30 MPa at depth z equals 1000m, and increases at a rate
Specifying Control Parameters
We must now specify parameters to control model discretization and solution. These are entered
using the control parameters function
CAD > Properties > Control Parameters
Selecting this item opens a dialog box of items associated with the control parameters
Map3D International Ltd 1990-2015
88
Map3D User's Manual
Enter the following:
Job Title: VRM Mining
All parameters can be left at there default values except the stress tolerance, element length and
grid spacing.
Stress Tolerance: 0.03 MPa
should be set to approximately 0.1% of the far field stress state. This ensures that during solution,
the surface stresses will be calculated with 0.03 MPa numerical accuracy.
Element Length: 10
should be set equal to twice the drift height or twice the pillar width. This parameter is used to
control the minimum boundary element size that will be used at locations where narrow seams or
pillars are located. This ensures that a well-conditioned, readily solvable problem will be formulated.
Grid Spacing: 2
should be set to approximately one half the pillar width. This parameter is used to control the
minimum boundary element size and the minimum spacing on the grid plane that will be used at
locations where it passes close to or intersects the model. Accurate results can be obtained as
close as half this spacing from the model surfaces. This parameter also ensures that a sufficient
number of stress points will be calculated within in the pillar to generate smooth contours.
The user is free to select a larger value for the grid spacing. This will result in smaller problem size
and hence shorter run times. However, with larger boundary elements results will be less accurate,
especially near the model surfaces, also with wider grid spacing, smooth contours cannot be
generated.
Suggested values for the discretization and lumping parameters are as follows:
DON=0.5, DOL=DOC=1, DOE=DOG=2 for 10-20% error
DON=0.5, DOL=DOC=2, DOE=DOG=4 for 5-10% error
DON=1.0, DOL=DOC=4, DOE=DOG=8 for < 5% error
Coarse analysis results are recommended for all problems except those where increased accuracy
is required. At this setting numerical errors of 10-20% in stress predictions can be expected. The
settings for detailed analysis results provide 5-10% numerical error. The settings for high accuracy
results provide less than 5% numerical error. The user is free to specify higher accuracy settings
for these parameters, however this will result in larger problem size and hence longer run times.
Map3D International Ltd 1990-2015
Model Building Tutorials
89
Running a Map3D Analysis
At this point we have completed construction of the model and are ready to begin an analysis. If
you are using Map3D Fault-Slip you will obtain an elastic solution to this problem. If you are using
Map3D Non-Linear, a complete non-linear analysis will be conducted.
Analysis is executed from the main menu.
You can run through the complete analysis by selecting
BEM Analysis
Here we will do this in stages. So first select
Discretization
If you have modified the model in any way since the last time you saved, you will be prompted to
save these modifications.
When the Intersections and Discretization analyses are complete select
Analysis > Graphics
When in graphical mode, you should select the discretized view option
View > Render > Discretize
This will enable you to see how the block surfaces have been discretized into boundary elements.
You must have set outlines on in order to see the individual elements
View > Render > Block Outlines
To see how the grid has been discretized (activate the Contour toolbar if it is not visible using Tools
> CAD Toolbar), you must select
Plot > Grid Selection > Grid #1
from the contour toolbar
The discretization analysis can be repeated as many times as desired with different values
Map3D International Ltd 1990-2015
90
Map3D User's Manual
specified for grid spacing, discretization and lumping parameters until the desired density of
boundary elements and grids points is achieved.
Once you are satisfied, you can proceed to the BEM Analysis (matrix assembly and solution), by
selecting
Analysis
from the main menu, then selecting
BEM Analysis
When the analysis is complete, select
Analysis > Graphics
When in graphical mode, you can contour any desired parameter. For example to display the major
principal stress contours, select
Plot > Stress > S1 Major Principal Stress
This will generate a contour plot on the grid plane.
Interpretation of the results will not be discussed here.
3.3
Tabular Mining Example
This example demonstrates model building for a multi-step tabular mining example.
Construction lines are used to define detailed locations of underground features such as
excavations, contacts structure etc. A Map3D model is normally built on top of this construction line
data.
The mine plans have been previously digitized using Map3D
CAD > Digitizer Setup
or some other CAD program. These plans can be saved in either:
Point file format is a universal ASCII data file with the extension ".PNT". This format is useful for
exchanging raw construction line data with other CAD software.
AutoCAD-DXF format is a popular drawing exchange file with the extension ".DXF". This format is
useful for exchanging construction line data with other CAD software.
We want to start with a clean slate, so we will select
File > New Model
Before beginning please note that the user can hover over any button to obtain a tooltip identifying
that buttons function. Also the use can right click on any item to obtain detailed help on that
function.
Importing digitized mine plans
First we must open a file containing the digitized mine plans. This is done using
File > Open Construction Lines
In this case the construction lines have been saved in PNT format. The file "TAB.pnt" is included
with the Map3D installation and should be available to import.
Map3D International Ltd 1990-2015
Model Building Tutorials
91
Main A
Step #3
Step #2
Step #1
Step #3
Step #2
Tabular Mining
D
Gully
Z - Elevation
Y – North
Repositioning The View
During block building or at any other time, the user is free to reposition (translate, rotate or zoom)
the geometry to make visualization easier. This is readily accomplished by several means (refer to
Rotating the Model and Translating the Model). The easiest way is to rotate is simply hold down the
X - East
left mouse button will dragging
the cursor across the screen. Translation is achieved by holding
down the right mouse button. The model can be zooming in or out by holding down both mouse
buttons.
Position the view so that the construction lines are readily visible.
Building Mining Step #1
Let's now construct the tabular mining step #1. This will be constructed using displacement
discontinuity elements, which are defined by the perimeter of the mining zone.
To construct the first block, use CAD > Build > DDLoop. This function can be selected from the
CAD toolbar as follows (activate the CAD toolbar if it is not visible using Tools > CAD Toolbar):
Select
CAD > Build from the CAD toolbar
You will be presented with the sub-menu of build functions
Map3D International Ltd 1990-2015
92
Map3D User's Manual
Now select
CAD > Build > DDLoop
Since we want to snap to construction lines we must set the snap mode. This is done using CAD >
Snap > Nearest Edge. This function can be selected from the Build Entity toolbar
To activate the nearest edge snap select
CAD > Snap > Nearest Edge
(this only needs to be done if the nearest edge snap button is not already highlighted
).
In this mode, a pick-box will be displayed at the intersection of the cross-hairs. Although the
coordinates of the current cursor location are indicated on the status bar, if the pick-box is located
over the corner of a construction line, that corner will be selected, otherwise, the nearest point on
the edge of the construction line under the pick-box will be selected. In either case all 3 coordinate
values (x, y and z) are uniquely specified.
You will see that the DDLoop building routine is prompting you to enter the first corner of the block
on the status bar
Input: Select
Point 1
Main Access
Point #1
Step #3
Point #2
Step #2
Point #8
Step #1
Step #3
Point #7
Step #2
Point # 4
Gully
Point #6
Z - Elevation
Y - North
Point #5
Select the points 1 through 8 as shown.
X - East
Map3D International Ltd 1990-2015
Model Building Tutorials
93
Note that we could actually use corner snap mode here
CAD > Snap > Nearest Corner
for all points except number 2 and 4.
If you select the wrong location for a point, simply undo that selection
CAD > Build > Undo Point
then try again.
Points 2 and 4 are optional and have only been selected to generate a neater looking model.
When point #8 has been selected, the floor plan is complete. To complete building the DDLoop,
select point #1 again or pick the
button.
You will automatically be prompted to enter the block properties (
CAD > Build > DDLoop)
Enter the following:
Block Name: Mining Step #1
Element Type: Displacement Discontinuity
Block Colour: 2
DDPlane Thickness: 1
DDPlane Thickness should be set to the mining thickness.
This tabular mining should be excavated at mining step 1. This is indicated by specifying
Mining Step 1: 0
We are now finished and can Build this block by pressing the
button.
Building Mining Step #2
Let's now construct the tabular mining step #2. This will also be constructed using displacement
discontinuity elements, which are defined by the perimeter of the mining zone. To start building
select
CAD > Build > DDLoop
Map3D International Ltd 1990-2015
94
Map3D User's Manual
Point #1
Point #2
Step #3
Main Access
Step #2
Step #1
Point #4
Point #3
Step #3
Step #2
Gully
Z - Elevation
Y - West
X - East
Select the 4 points as shown.
When point 4 has been selected, the floor plan is complete. To complete building the DDLoop,
select point #1 again or pick the
button.
You will automatically be prompted to enter the block properties (
CAD > Build > DDLoop)
Enter the following:
Block Name: Mining Step #2
Element Type: Displacement Discontinuity
Block Colour: 3
DDPlane Thickness: 1
DDPlane Thickness should be set to the mining thickness.
This tabular mining should be assigned the properties of ore (material #2) at mining step 1, then
excavated at mining step 2. This is indicated by specifying
Map3D International Ltd 1990-2015
Model Building Tutorials
95
Mining Step 1: 2
Mining Step 2: 0
We are now finished and can Build this block by pressing the
button.
Now build the other part of step 2 using this same procedure.
Main Access
Step #3
Step #2
Step #1
Point #1
Step #3
Point #2
Step #2
Point #4
Point #3
Gully
Z - Elevation
Y - West
X - East
Building Mining Step #3
This mining can be built the same way as the step 2 mining, except
this tabular mining should be assigned the properties of ore (material #2) at both mining step 1 and
2, then excavated at mining step 3.
Getting Results
Even though we have defined the mining geometry, we must still specify where we want to obtain
stress predictions. By default, we will get these at all unmined DD planes. If we also want stresses
off-reef, or out ahead of the mining zone, we must place either DD planes or grid planes at those
locations. Grid planes provide a much more economical (in terms of analysis time) alternative.
Map3D International Ltd 1990-2015
96
Map3D User's Manual
In this case we choose to only obtain results on DD planes. We will want to force the discretization
on these planes to a suitable element size using the Fixed Element Width parameter. To do this,
use CAD > Edit > Properties > Entity Properties. This function can be selected from the CAD
toolbar as follows (activate the CAD toolbar if it is not visible using Tools > CAD Toolbar):
Select
CAD > Edit from the CAD toolbar
You will be presented with the sub-menu of edit functions
Now select
CAD > Edit > Entity Properties
This will open the edit entities toolbar
When you initiate this routine you will first be prompted to build a list of entities that you wish to edit.
Hold the shift key down and pick all of the DD planes that represent the mining steps.
When you have selected all of the mining, you can pick
CAD > Edit > Entity Properties
again, or double click on any entity to open the Entity Properties dialogue box.
If any of the fields in the dialogue box read "Variable" it is because some of the blocks you have
selected have different properties for that field. If you wish to leave these properties as they are (i.e.
different for each block), leave the field as "Variable". If you wish to change the value of that field
for all selected blocks, enter the desired value.
In this case the only field we want to change is the
Map3D International Ltd 1990-2015
Model Building Tutorials
97
Fixed Element Width: 20
Set this value to 20, then select OK.
This will force Map3D to subdivide the mining zone into uniform elements with width 20 metres
during the discretization process. This parameter can be set smaller later if a finer discretization is
desired.
Saving the Geometry
For this example it will be assumed that the geometry as defined thus far is satisfactory. Since both
the final geometry and mining sequence are now complete, we should save the model. To do this we
select
File > Save Model As
Let's save with the name "TAB.INP"
Building The Dyke
As an added complication, let's now build the dyke. o construct the dyke, use CAD > Build >
FFLoop. This function can be selected from the CAD toolbar as follows (activate the CAD toolbar if
it is not visible using Tools > CAD Toolbar):
Select
CAD > Build from the CAD toolbar
You will be presented with the sub-menu of build functions
Now select
CAD > Build > FFLoop
Since we want to snap to the corners of the construction lines we must set the snap mode. This is
done using CAD > Snap > Nearest Corner. This function can be selected from the Build Entity
toolbar
To activate the nearest edge snap select
CAD > Snap > Nearest Corner
(this only needs to be done if the Nearest Corner Snap button is not already highlighted
).
We could actually use edge snap mode here
CAD > Snap > Nearest Edge
since the corners of the construction lines would be selected anyway (as long as the corner is
located within the pick box). However, using corner snap allows us to be sloppier with our selection
since only corners will be selected.
Pick all four points as shown in the figure.
Map3D International Ltd 1990-2015
98
Map3D User's Manual
Main Access
Step #3
Point #2
Step #2
Step #1
Point #1
Step #3
Step #2
Dyke
Tabular Mining
Point #3
Gully
Point #4
Z - Elevation
Y - West
X - East
If you select the wrong location for a point, simply undo that selection using the undo button
CAD > Build > Undo Point then try again.
Finally, reselect the first point (i.e. point #1).
When first point has been reselected, the base of the block has been completely formed. You will
be prompted with the message
Loop complete: Start next
loop.
To complete building the block we will generate the remaining 4 points from the first 4 corners by
adding an offset to them. To use this latter procedure, select the offset function from the Build
Entity toolbar
CAD > Build > Extrude/Offset Remaining
You will be prompted for this offset vector as follows
Enter the offset as:
X-offset > 0
Y-offset > 50
Z-offset > 200
Points 5, 6, 7 and 8 will be generated respectively from points 1, 2, 3 and 4 by adding the offset
values to their coordinates.
Map3D International Ltd 1990-2015
Model Building Tutorials
7
8
99
6
5
Offset
vector
3
2
4
1
Upon
completion of block
construction you will automatically be prompted to enter the block
properties (
CAD > Build > FFLoop)
Enter the following:
Block Name: Dyke
Element Type: Fictitious Force
Block Colour: 9
The Fixed Element Width should be unchecked to disable this feature
This dyke should be assigned material #3 at mining step 1. This is indicated by specifying
Mining Step 1: 3
We are now finished and can Build this block by pressing the
button.
We need to extend the dyke below the mining as well. To do this we can copy this block below the
mining. To do this, select
CAD > Edit from the CAD toolbar
This will open the edit toolbar
To copy entities, select
Map3D International Ltd 1990-2015
100
Map3D User's Manual
CAD > Edit > Copy Entities
This will open the copy entities toolbar
When you initiate this routine you will first be prompted to build a list of entities that you wish to edit.
Click on the dyke. This will open the copy offset vector dialogue box
Let's pick this location graphically using the Pick function.
Main Access
Step #3
Point #1
Step #2
Step #1
Step #3
Step #2
Dyke
Tabular Mining
Gully
Point #2
Z - Elevation
Y - West
X - East
This will define the offset vector
X - offset: 0
Y - offset: -50
Z - offset: -200
Now pick OK. This will copy the dyke below the mining.
Map3D International Ltd 1990-2015
Model Building Tutorials
101
Main Access
Step #3
Step #2
Step #1
Step #3
Step #2
Dyke
Tabular Mining
Gully
Z - Elevation
Y - West
X - East
This completes the model construction.
Specifying Material Properties for the Host Rock mass
We must now specify properties for the host material. These are entered using the material
properties function
CAD > Properties > Material Properties
Selecting this item opens a sub-menu of items associated with editing the material properties. Note
that material number 1 is by definition the host material. Other material numbers are used to define
alternate material zones such as ore, fault gouge, backfill etc. The user is first prompted to enter the
material number that is to be edited. First let's define properties for the host material
Enter the following:
Material Name: Granite Host
Material #: 1
Young's Modulus: 60000 MPa
Map3D International Ltd 1990-2015
102
Map3D User's Manual
Poisson's Ratio: 0.25
The Viscous Moduli can be set to zero since they are only used to simulate creep response in nonlinear analysis.
We want to use the Mohr-Coulomb criterion here. To do this set
Material Type: Mohr-Coulomb
UCS: 60 MPa
The cohesion parameter is not used in this case and hence can be set to zero.
Friction angle: 30°
The dilation angle is not used in this case and hence can be set to zero.
Pick Stress State to open the stress state dialog box
The appropriate far field stress state for this model is
constant: 30 MPa
constant: 20 MPa
c constant: 20 MPa
a
b
We will set the variation of stress with depth to zero
variation: -0.027 MPa/m
variation: -0.013 MPa/m
c variation: -0.013 MPa/m
a
b
Also the stress orientations (trend and plunge) should be set to zero, thus defining
horizontal and c as vertical.
a
and
b
as
The Datum can be set to 1000 metres to define the variation with depth as
+
(z - Datum)
Defined in this way, the stress
of 0.027 MPa/m of depth.
a
equals 30 MPa at depth z equals 1000m, and increases at a rate
Specifying Material Properties for the Ore
We must now specify properties for the ore. These are entered using the material properties
function
CAD > Properties > Material Properties
Map3D International Ltd 1990-2015
Model Building Tutorials
103
Selecting this item opens a sub-menu of items associated with editing the material properties. Note
that material number 1 is by definition the host material. Other material numbers are used to define
alternate material zones such as ore, fault gouge, backfill etc. The user is first prompted to enter the
material number that is to be edited. First let's define properties for the host material
Let's set Material # to 2.
All parameters can be set as desired. The user should take special care in this case since this
material is inserted into DD planes. These features can behave non-linearly yielding in compression
and shearing (refer to the section on Mohr-Coulomb in DD Planes).
Pick Stress State to open the stress state dialog box
We want the initial stress in the ore to be the same as in the host, so lets Copy from material 1.
Specifying Material Properties for the Dyke
We must now specify properties for the dyke. These are entered using the material properties
function
CAD > Properties > Material Properties
Selecting this item opens a sub-menu of items associated with editing the material properties. Note
Map3D International Ltd 1990-2015
104
Map3D User's Manual
that material number 1 is by definition the host material. Other material numbers are used to define
alternate material zones such as ore, fault gouge, backfill etc. The user is first prompted to enter the
material number that is to be edited. First let's define properties for the host material
Let's set Material # to 3.
All parameters can be set as desired. If Map3D Non-Linear is being used, the user should take
special care in this case since this feature can behave non-linearly yielding in compression and
shearing (refer to the section on Mohr-Coulomb in 3D FF Blocks).
Be sure to Pick Stress State to open the stress state dialog box, as set the stress state in the dyke
to be the same as in the host (Copy from material 1).
Specifying Control Parameters
We must now specify parameters to control model discretization and solution. These are entered
using the control parameters function
CAD > Properties > Control Parameters
Selecting this item opens a dialog box of items associated with the control parameters
Enter the following:
Job Title: Tabular Mining
All parameters can be left at their default values except the stress tolerance, element length and grid
spacing.
Stress Tolerance: 0.03 MPa
should be set to approximately 0.1% of the far field stress state. This ensures that during solution,
the surface stresses will be calculated with 0.03 MPa numerical accuracy.
Element Length: 20
should be set equal to twice the thickness of the Dyke (the dyke is 10 metres thick) since this is the
narrowest feature used in this model. This parameter is used to control the minimum boundary
element size that will be used at locations where narrow seams or pillars are located. This ensures
that a well-conditioned, readily solvable problem will be formulated.
The Grid Spacing is not used since we have not defined any field point grids.
Map3D International Ltd 1990-2015
Model Building Tutorials
105
Suggested values for the discretization and lumping parameters are as follows:
DON=0.5, DOL=DOC=1, DOE=DOG=2 for 10-20% error
DON=0.5, DOL=DOC=2, DOE=DOG=4 for 5-10% error
DON=1.0, DOL=DOC=4, DOE=DOG=8 for < 5% error
Coarse analysis results are recommended for all problems except those where increased accuracy
is required. At this setting numerical errors of 10-20% in stress predictions can be expected. The
settings for detailed analysis results provide 5-10% numerical error. The settings for high accuracy
results provide less than 5% numerical error. The user is free to specify higher accuracy settings
for these parameters, however this will result in larger problem size and hence longer run times.
Running a Map3D Analysis
At this point we have completed construction of the model and are ready to begin an analysis. If
you are using Map3D Fault-Slip you will obtain an elastic solution to this problem. If you are using
Map3D Non-Linear, a complete non-linear analysis will be conducted.
Analysis is executed from the main menu.
You can run through the complete analysis by selecting
BEM Analysis
here we will do this in stages. So first select
Discretization
If you have modified the model in any way since the last time you saved, you will be prompted to
save these modifications.
When the Intersections and Discretization analyses are complete select
Analysis > Graphics
When in graphical mode, you should select the discretized view option
View > Render > Discretize
This will enable you to see how the block surfaces have been discretized into boundary elements.
You must have set outlines on in order to see the individual elements
View > Render > Block Outlines
To see how the grid has been discretized, you must select the
Plot > Grid Selection > Grid #1
Map3D International Ltd 1990-2015
106
Map3D User's Manual
If everything is satisfactory, you can now proceed to the BEM Analysis (matrix assembly and
solution), by selecting
Analysis
from the main menu, then selecting
BEM Analysis
When the analysis is complete, select
Analysis > Graphics
When in graphical mode, you can contour any desired parameter. For example to display the
normal displacement (closure) on the tabular mining, select
Plot > Surface Components > Dn Normal Displacement (Closure)
This will generate a contour plot on the DD planes.
Building The Main Access
This will be built by drawing a floor plan with DDLoop then extruding this into a 3D block.
To do this we must return to the CAD stage of the Map3D analysis by selecting
Analysis > Go to CAD
from the analysis dialogue box. Then select
Analysis > Graphics
To begin, select the DDLoop building menu function
CAD > Build > DD Loop
Set the snap mode to nearest edge (or nearest corner)
CAD > Snap > Nearest Edge
this only needs to be done if the edge snap button is not already highlighted
).
You will see that the DDLoop building routine is prompting you to enter the first corner of the block
on the status bar
Input: Select
Point 1
Pick the first two points as shown in the figure.
Map3D International Ltd 1990-2015
Model Building Tutorials
107
Point #3
Point #2
Main Access
Step #3
Point #4
Step #2
Step #1
Step #3
Point #1
Step #2
Tabular Mining
Gully
Z - Elevation
Y - West
X - East
Points 3 and 4 will be generated by offsetting them from the line defined by points 1 and 2. To do
this select
CAD > Build > Offset Remaining
from either the build toolbar.
You will be prompted to enter the offset vector.
Enter the offset as
X - offset: 0
Y - offset: 2
Z - offset: 0
This will generate points 3 and 4 and complete building the DDLoop.
You will automatically be prompted to enter the block properties
Map3D International Ltd 1990-2015
108
Map3D User's Manual
Enter the following:
Block Name: Main Access
Element Type: Fictitious Force
When you do this you will be prompted to enter the offset vector that will be used to extrude the
block.
7
6
8
5
Offset
vector
3
2
4
1
Enter the offset as:
X - offset: 0
Y - offset: 0
Z - offset: -2
Block Colour: 1
Fixed Element Width: (leave this unchecked)
Map3D International Ltd 1990-2015
Model Building Tutorials
109
This access should be excavated at mining step 1. This is indicated by specifying
Mining Step 1: 0
We are now finished and can Build this block.
Building The Gully
Now build the gully using the same procedure as described above.
Pick the first two points as shown in the figure.
Main Access
Step #3
Point #2
Step #2
Step #1
Step #3
Point #3
Step #2
Tabular Mining
Gully
Point #1
Z - Elevation
Point #4
Y - West
X - East
Points 3 and 4 will be generated by offsetting them from the line defined by points 1 and 2. To do
this select
CAD > Build > Offset Remaining
from either the build toolbar.
You will be prompted to enter the offset vector.
Enter the offset as:
X - offset: 1
Y - offset: 0
Z - offset: 0
Map3D International Ltd 1990-2015
110
Map3D User's Manual
This will generate points 3 and 4 and complete building the DDLoop.
You will automatically be prompted to enter the block properties
Enter the following:
Block Name: Gully
Element Type: Fictitious Force
When you do this you will be prompted to enter the offset vector that will be used to extrude the
block.
7
6
8
5
Offset
vector
3
2
4
1
Enter the offset as:
X - offset: 0
Y - offset: 0
Z - offset: -1
Map3D International Ltd 1990-2015
Model Building Tutorials
111
Block Colour: 1
Fixed Element Width: (leave this unchecked)
This access should be excavated at mining step 1. This is indicated by specifying
Mining Step 1: 0
We are now finished and can Build this block.
Discussion
Before proceeding with the analysis we must modify the Element Length (AL) control parameter to
accommodate these new additions to our model properly
CAD > Properties > Control Parameters
AL should be set equal to twice the thickness of the gully (the gully is 1 metres thick) since this is
the narrowest feature used in this model.
If we now discretize the model
Analysis > Discretization
a careful look illustrates that a large number of boundary elements are used in discretizing the
areas adjacent to the gully and main access. These features are clearly going to be expensive in
terms of analysis time. If these features are not important contributing factors considerable saving
in analysis effort can be achieved by removing them from the analysis. This can be achieved by
making these features inactive.
To do this select
Analysis > Go to CAD
from the analysis dialogue box. Then select
Analysis > Graphics
Now select
from the CAD toolbar
This will open the edit toolbar
To edit entities, select
CAD > Edit > Entity Properties
This will open the edit entities toolbar
When you initiate this routine you will first be prompted to build a list of entities that you wish to edit.
Hold down the Shift key then pick the Gully and Main Access. Do not pick the tabular mining or
dyke.
Map3D International Ltd 1990-2015
112
Map3D User's Manual
When you have selected these features, you can pick
CAD > Edit > Entity Properties
again, or double click on the Gully or Main Access to open the Entity Properties dialogue box.
If any of the fields in the dialogue box read "Variable" it is because some of the blocks you have
selected have different properties for that field. If you wish to leave these properties as they are (i.e.
different for each block), leave the field as "Variable". If you wish to change the value of that field
for all selected blocks, enter the desired value.
In this case the only field we want to change is the Element Type parameter. Set this to Inactive
Fictitious Force
Element Type: Inactive Fictitious Force
then select OK.
You can now start the BEM analysis again by selecting
BEM Analysis
.
Map3D International Ltd 1990-2015
Model Building Tutorials
3.4
DDLoop Pillar Example
Step 1: Import digitized mine plans.
The plans for this example are in a file called "t.pnt".
These are imported using the File > Open Construction Lines command.
Step 2: Next we start the DDLoop routine and set the CLine snap mode.
DDLoop can be started by selecting
then
(CAD > Build > DDLoop).
CLine snap mode can be set by selecting
(CAD > Snap > Trace CLine).
Map3D International Ltd 1990-2015
113
114
Map3D User's Manual
Step 3: Build the outer loop.
The outer loop is built by selecting the end points of the desired construction line segments.
Here we pick point 1-2-3-4-5-6-1
Point 1 is picked at the end of this sequence to close the loop, thus completing construction of
the outer loop.
Map3D International Ltd 1990-2015
Model Building Tutorials
Step 4: Set the snap mode to CLoop then build the inner loops.
CLoop snap mode can be set by selecting
(CAD > Snap > Trace CLoop).
The inner loops are defined by picking the entry and exit points for each loop.
The 1st loop is defined by points 1 and 2.
The 2nd loop is defined by points 3 and 4.
The 3rd loop is defined by point 5.
The 4th loop is defined by points 6 and 7.
The 5th loop is defined by points 8 and 9.
The 6th loop is defined by points 10 and 11.
The 7th loop is defined by point 12.
The 8th loop is defined by point 13.
The 9th loop is defined by points 14 and 15.
The 10th loop is defined by point 16.
Map3D International Ltd 1990-2015
115
116
Map3D User's Manual
Step 5: Signal completion of construction.
Now that all of the loops have been defined, we pick
(CAD > Build > DDLoop) again to
signal completion of construction.
This can also be signalled by picking the last point (i.e. point 16) a second time.
Map3D International Ltd 1990-2015
Model Building Tutorials
Step 6: Build the DDLoops.
Although we could build the DDLoops using the
function, here we will use the
function.
This later function builds better shaped elements.
You will be prompted for the desired mesh spacing.
Set this to 50 metres.
Map3D International Ltd 1990-2015
117
118
Map3D User's Manual
Step 7: Construction Complete.
This completes construction of the tabular mining complete with pillars.
You will likely want to edit the entity properties of the pillars to assign appropriate properties and
mining sequence.
Map3D International Ltd 1990-2015
Model Building Tutorials
3.5
FFLoop Drift Example
Step 1: Import digitized mine plans.
The plans for this example are in a file called "bulk.dxf".
These are imported using the File > Open Construction Lines command.
Map3D International Ltd 1990-2015
119
120
Map3D User's Manual
Step 2: Next we start the FFLoop routine and set the CLoop snap mode.
FFLoop can be started by selecting
then
CLoop snap mode can be set by selecting
(CAD > Build > FFLoop).
(CAD > Snap > Trace CLoop).
Map3D International Ltd 1990-2015
Model Building Tutorials
Step 3: Build the FFLoop.
The FFLoop is built by selecting one of the points on the desired construction line.
Map3D International Ltd 1990-2015
121
122
Map3D User's Manual
Step 4: Extrude the floor plan into a 3D drift.
At this point we have constructed the floor plan of the drift.
This can now be extruded into a 3D shape by picking
(CAD > Build > Offset/Extrude).
Set the offset vector to (0 0 5).
Step 5: Build the drift.
The FFLoop can now be built using the
function.
Specify 10 as the Mesh Spacing, then press OK.
Map3D International Ltd 1990-2015
Model Building Tutorials
Step 6: Construction Complete.
This completes construction of the drift.
Map3D International Ltd 1990-2015
123
124
3.6
Map3D User's Manual
FFLoop Stope Example
Step 1: Import digitized mine plans.
The plans for this example are in a file called "bulk.dxf".
These are imported using the File > Open Construction Lines command.
Step 2: Next we start the FFLoop routine and set the CLoop snap mode.
FFLoop can be started by selecting
then
CLoop snap mode can be set by selecting
(CAD > Build > FFLoop).
(CAD > Snap > Trace CLoop).
Map3D International Ltd 1990-2015
Model Building Tutorials
125
Step 3: Build the FFLoop.
The FFLoop is built by selecting one points on each construction line.
Note that points are automatically be generated at 10m intervals along long sides
It is best to pick points that are at sharp corners or bends as the line between the loops will
guide the construction process.
Map3D International Ltd 1990-2015
126
Map3D User's Manual
Step 4: Signal completion of construction.
Now that all of the loops have been defined, we pick
(CAD > Build > FFLoop) again to
signal completion of construction.
This can also be signalled by picking the last point (i.e. point 3) a second time.
Map3D International Ltd 1990-2015
Model Building Tutorials
Step 5: Build the stope.
The FFLoop can now be built using the
function.
Specify 10 for the Mesh Spacing then pick OK.
Map3D International Ltd 1990-2015
127
128
Map3D User's Manual
Step 6: Construction Complete.
This completes construction of the stope.
Map3D International Ltd 1990-2015
Map3D
User's Manual
Part
IV
130
Map3D User's Manual
4
Menu Commands
4.1
File Menu
4.1.1
New Model (CAD)
Clears all current model data.
All FF blocks, DD planes, field point grids and materials are erased.
4.1.2
Quick Open (View Only)
Quickly loads a model from a file, but skips all preprocessing.
Note that you cannot use any of the CAD functions until you have loaded the file with Open Model
(CAD),
or selected "Go To CAD" on the main program menu.
Merging multiple files into one model
You may select multiple files simultaneously by holding the standard windows "shift" or "ctrl" keys
for multiple selections.
These files will be merging into one model/database.
This allows you to keep separate parts of model data in different files then easily merge them
together into one model/database.
Another way of merging multiple files is to select the "Merge Geometries" option prior to selecting
the additional file you want to add to the existing model/database.
This is useful if you already have a model open and want to add additional model data to this.
4.1.3
Open Model (CAD)
Loads a model from a file.
Once loaded the user can execute any desired Map3D Analysis Stage.
To add or edit mining blocks and set up the Map3D analysis use
Analysis > Go to CAD.
While loading the model Map3D checks for basic consistency of the modelling parameters (e.g. if a
material is used, its properties must be specified in the material list).
You will be prompted to search for a model file name, location and file format. Models can be
loaded from several file types:
Map3D-INP format is an editable ASCII data file with the extension ".INP". This is the
recommended Map3D model format. All Map3D functionality is supported with this format.
AutoCAD-DXF format is a popular drawing exchange file with the extension ".DXF". This format
is useful for exchanging model data with other CAD software.
Point file format is a universal ASCII data file with the extension ".PNT". This format is useful for
exchanging raw model data with other CAD software.
The model geometric and material data being loaded can either overwrite or be merged with existing
model data. The overwrite/merge options:
File > Open > Merge Geometries
File > Open > Merge Materials
Map3D International Ltd 1990-2015
Menu Commands
131
appears at the bottom of the open file dialogue box.
Merging multiple files into one model
You may select multiple files simultaneously by holding the standard windows "shift" or "ctrl" keys
for multiple selections.
These files will be merging into one model/database.
This allows you to keep separate parts of model data in different files then easily merge them
together into one model/database.
Another way of merging multiple files is to select the "Merge Geometries" option prior to selecting
the additional file you want to add to the existing model/database.
This is useful if you already have a model open and want to add additional model data to this.
Notes:
For quick access at a later session, each time you open a file its name is saved under
File > Recent Files
and the working directory is saved under
File > Open > Recent Directories.
To load analysis results use
File > Open Analysis Results.
To restart an analysis that was aborted or interrupted by a power failure or operating system crash
use
File > Restart an Analysis.
4.1.4
Save Model (CAD)
Saves the current model to a file with its current file name, location, and file format.
To save with a different file name, location or file format use
File > Save Model As
4.1.5
Save Model As (CAD)
Saves the current model with a different file name, location, and file format.
Models can be saved in several file types:
Map3D-INP format is an editable ASCII data file with the extension ".INP". This is the
recommended Map3D model format. All Map3D functionality is supported with this format.
AutoCAD-DXF format is a popular drawing exchange file with the extension ".DXF". This format
is useful for exchanging model data with other CAD software.
Point file format is a universal ASCII data file with the extension ".PNT". This format is useful for
exchanging raw model data with other CAD software.
To save with the same file name, location or file format use
File > Save Model.
Map3D International Ltd 1990-2015
132
4.1.6
Map3D User's Manual
Import model from DXF or PNT
Loads a model from a DXF (AutoCAD-DXF) or PNT (Point file format) file.
Once loaded the user can execute any desired Map3D Analysis Stage.
To add or edit mining blocks and set up the Map3D analysis use
Analysis > Go to CAD.
While loading the model Map3D checks for basic consistency of the modelling parameters (e.g. if a
material is used, its properties must be specified in the material list).
You will be prompted to search for a model file name, location and file format. Models can be
loaded from several file types:
AutoCAD-DXF format is a popular drawing exchange file with the extension ".DXF". This format
is useful for exchanging model data with other CAD software.
Point file format is a universal ASCII data file with the extension ".PNT". This format is useful for
exchanging raw model data with other CAD software.
The model geometric and material data being loaded can either overwrite or be merged with existing
model data. The overwrite/merge options:
Note that geometric information is imported as Fictitious Force - FF type elements (used for threedimensional features such as excavations, alternate material zones, back-filled stopes etc.). If you
want to use these as Displacement Discontinuity - DD type elements (used for tabular mining
excavations, fractures and fault planes) you will need to edit these using CAD > Edit > Entity
Properties and change the element type.
File > Open > Merge Geometries
File > Open > Merge Materials
appears at the bottom of the open file dialogue box.
Merging multiple files into one model
You may select multiple files simultaneously by holding the standard windows "shift" or "ctrl" keys
for multiple selections.
These files will be merging into one model/database.
This allows you to keep separate parts of model data in different files then easily merge them
together into one model/database.
Another way of merging multiple files is to select the "Merge Geometries" option prior to selecting
the additional file you want to add to the existing model/database.
This is useful if you already have a model open and want to add additional model data to this.
Notes:
For quick access at a later session, each time you open a file its name is saved under
File > Recent Files
and the working directory is saved under
File > Open > Recent Directories.
To load analysis results use
File > Open Analysis Results.
Map3D International Ltd 1990-2015
Menu Commands
133
To restart an analysis that was aborted or interrupted by a power failure or operating system crash
use
File > Restart an Analysis.
4.1.7
Export model as DXF or PNT
Saves the current model with a different file name, location, and file format.
Models can be saved in several file types:
AutoCAD-DXF format is a popular drawing exchange file with the extension ".DXF". This format
is useful for exchanging model data with other CAD software.
Point file format is a universal ASCII data file with the extension ".PNT". This format is useful for
exchanging raw model data with other CAD software.
Note that all surfaces in the model will be saved as 3DFACEs.
4.1.8
Restore last CAD State
Restores the last automatically saved CAD State.
During model editing, every time you modify the geometry, the current CAD state is saved to a
scratch file that is maintained between Map3D sessions.
This allows to return to exactly where you left off in a new Map3D session, or in the event of
program crash.
4.1.9
New Construction Lines
Clears all current construction line data.
4.1.10 Quick Open Construciton Lines (View only)
Quickly loads construction line data from a file, but skips all preprocessing.
Note that you cannot use any of the CAD functions until you have loaded the file with Open
Construction Lines,
Construction lines are used to define detailed locations of underground features such as
excavations, contacts structure etc. A Map3D model is normally built on top of this construction line
data.
You will be prompted to search for a construction line file name, location and file format.
Construction lines can be loaded from several file types:
Point file format is a universal ASCII data file with the extension ".PNT". This format is useful for
exchanging raw construction line data with other CAD software.
AutoCAD-DXF format is a popular drawing exchange file with the extension ".DXF". This format
is useful for exchanging construction line data with other CAD software.
The construction line data being loaded can either overwrite or be merged with existing data. The
overwrite/merge option
File > Open > Merge Geometires
appears at the bottom of the open file dialogue box.
Merging multiple files into one database
Map3D International Ltd 1990-2015
134
Map3D User's Manual
You may select multiple files simultaneously by holding the standard windows "shift" or "ctrl" keys
for multiple selections.
These files will be merging into one database.
This allows you to keep separate parts of construction line data in different files then easily merge
them together into one database.
Another way of merging multiple files is to select the "Merge Geometries" option prior to selecting
the additional file you want to add to the existing database.
This is useful if you already have construction line data open and want to add additional
4.1.11 Open Construction Lines
Loads construction lines from a file.
Construction lines are used to define detailed locations of underground features such as
excavations, contacts structure etc. A Map3D model is normally built on top of this construction line
data.
You will be prompted to search for a construction line file name, location and file format.
Construction lines can be loaded from several file types:
Point file format is a universal ASCII data file with the extension ".PNT". This format is useful for
exchanging raw construction line data with other CAD software.
AutoCAD-DXF format is a popular drawing exchange file with the extension ".DXF". This format
is useful for exchanging construction line data with other CAD software.
The construction line data being loaded can either overwrite or be merged with existing data. The
overwrite/merge option
File > Open > Merge Geometires
appears at the bottom of the open file dialogue box.
Merging multiple files into one database
You may select multiple files simultaneously by holding the standard windows "shift" or "ctrl" keys
for multiple selections.
These files will be merging into one database.
This allows you to keep separate parts of construction line data in different files then easily merge
them together into one database.
Another way of merging multiple files is to select the "Merge Geometries" option prior to selecting
the additional file you want to add to the existing database.
This is useful if you already have construction line data open and want to add additional
construction line data to this.
4.1.12 Save Construction Lines
Saves the current construction line data to a file with its current file name, location, and file format.
To save with a different file name, location or file format use File > Save As.
Map3D International Ltd 1990-2015
Menu Commands
135
4.1.13 Save Construction Lines As
Saves the current construction lines with a different file name, location, and file format.
Construction lines can be saved in several file types:
Point file format is a universal ASCII data file with the extension ".PNT". This format is useful for
exchanging raw construction line data with other CAD software.
AutoCAD-DXF format is a popular drawing exchange file with the extension ".DXF". This format
is useful for exchanging construction line data with other CAD software.
To save with the same file name, location or file format use File > Save.
4.1.14 Open Analysis Results
Loads analysis results from a restart file.
You will be prompted to search for a restart file name, location and file format.
Once loaded, the user can view and process the analysis results. Contour plots of any desired
combination of stress, strain and displacement components can be generated. Results can be
displayed either as total values, or the difference in value between mining steps.
To change from one mining step to another use
File > Mining Step.
Notes:
For quick access at a later session, each time you open a file its name is saved under
File > Recent Files
and the working directory is saved under
File > Open > Recent Directories.
To reload the model file for and editing mining blocks and setting up the Map3D analysis, use
Analysis > Go to CAD.
To load a different model file use
File > Open (Model).
To restart an analysis that was aborted or interrupted by a power failure or operating system crash
use
File > Restart an Analysis.
4.1.15 Subtract Restart Files
Subtracts results in the selected restart file from the results that are currently loaded.
You will be prompted to search for a restart file name, location and file format.
Notes:
Only results on grid planes are subtracted.
This feature can be used to subtract one mining step from another.
If results from different models are subtracted these models must have identical grid planes.
Map3D International Ltd 1990-2015
136
Map3D User's Manual
When subtracting, all Cartesian components (stress, strain and displacement) are subtracted, then
principal components of these changes are recalculated for display.
The model geometry for the currently loaded model is retained for display.
4.1.16 Restart an Analysis
Restarts an analysis that was aborted or interrupted by a power failure or operating system crash.
This function will scan all mining steps associated with the selected restart file to determine at which
mining step the analysis was interrupted. It will then verify that all required scratch files required to
restart the analysis are available. Finally it will display this information and offer the option of
restarting the analysis from where it left off if this is possible.
In order to restart the following scratch files must be intact:
file.00n where n is the mining step number where the analysis left off.
file.1 and file.2 these files are used to restart the solver.
file.dms this file is only used with the zero strain option (Analysis > Options > Zero Strain
Support Placement).
file.hms this file is only used by Map3Di and are used to accumulate the field loading as the
analysis progresses.
Notes:
Refer to Analysis > Options > Initialize to start a new analysis from where a previous model
completed.
4.1.17 Update Restart Files
Saves modified material strength properties to results files.
After elastic analyses are complete you are free to modify the strength properties since the
calculated stresses do not depend on these. This options allows you to save these modified setting
to the results file.
4.1.18 Mining Step #
Selects a different mining step for viewing.
If the Map3D BEM Analysis for the selected mining step has been completed, the restart file for this
mining step will be loaded. If the restart file does not exist (because the analysis has not been
completed) only the geometry for that mining step will be displayed.
Changing between mining steps using this feature is quicker than loading a restart file using
File > Open Analysis Results
since element and grid sorting do not have to be repeated for the same model.
For quick access to different mining steps use
File > Mining Step.
from the view toolbar
Tools > View Toolbar.
Individual mining step buttons can be placed on the view toolbar if desired using
Map3D International Ltd 1990-2015
Menu Commands
137
Tools > View Toolbar Configure.
You can quickly advance or retard on mining step by holding the Alt key and pressing respectively
the + key or – key.
4.1.19 Output
4.1.19.1 Copy Screen to Clipboard
Dumps a bitmap of the screen to the windows clipboard. This image can be pasted into other
applications.
Since normally the screen background is black and element outlines are white, the user may want
to select
File > Output > Copy Screen (B&W flipped)
to exchange these two colours.
4.1.19.2 Copy Screen (B&W flipped)
Dumps a bitmap of the screen to a PNG (Portable Network Graphics - *.PNG) , GIF (Compuserve
Graphics Interchange Format) or BMP (Windows device independent bitmap *.BMP) file with the
screen background and element outline colours exchanged. This file can be loaded into other
software for report presentation and printing.
For more details refer to
File > Output > PNG, GIF or BMP image
4.1.19.3 PNG, GIF, JPEG or BMP Screen Image
Dumps a bitmap of the screen to a PNG (Portable Network Graphics - *.PNG), GIF (CompuServe
Graphics Interchange Format) or BMP (Windows device independent bitmap *.BMP) file. This file
can be loaded into other software for report presentation and printing.
Since normally the screen background is black and element outlines are white, the user may want
to select
File > Output > PNG, GIF, JPEG or BMP (B&W flipped)
to exchange these two colours.
These files can be displayed using File > Image Viewer
BMP format is a well supported (most web browsers, word processors and paint programs) graphic
file format. The main advantage of BMP format is support for all colours displayed. Unfortunately
since there is no compression, these files can be very large (1MB or more each).
PNG format is a well supported (most web browsers, word processors and paint programs) graphic
file format. The main advantages of PNG format are excellent lossless compression (normally 1% of
the size of a BMP file) and support for all colours displayed. Refer to File > Output > Image
Recorder for animation details.
GIF format is the more widely supported graphic file format. The main advantages of GIF format are
excellent lossless compression (normally 1% of the size of a BMP file) and animation capability.
Unfortunately GIF only provides support for 256 display colours. Depending on what is displayed,
Map3D can use up to 512 colours and hence GIF may not reproduce screen images in all colours
GIF format has been implemented using the specification Version 89a ©1987,1988,1989,1990
Copyright CompuServe Incorporated, Columbus, Ohio.
Map3D International Ltd 1990-2015
138
Map3D User's Manual
This software uses the FreeImage open source image library. See http://freeimage.sourceforge.net
for details. FreeImage is used under the (GNU GPL or FIPL), version (license version).
4.1.19.4 PNG, GIF, JPEG or BMP (B&W flipped)
Dumps a bitmap of the screen to a PNG (Portable Network Graphics - *.PNG) , GIF (Compuserve
Graphics Interchange Format) or BMP (Windows device independent bitmap *.BMP) file with the
screen background and element outline colours exchanged. This file can be loaded into other
software for report presentation and printing.
For more details refer to
File > Output > PNG, JPEG, GIF or BMP image
4.1.19.5 DXF Screen Image
Dumps a screen image to a file (*.DXF) in AutoCAD drawing exchange format. This is a vector
format that can be imported into many software packages for further rendering.
4.1.19.6 PNT Screen Image
Dumps a screen image to a file (*.PNT) in a universal ASCII data file with the extension ".PNT".
The PNT format is useful for exchanging raw model data with other CAD software. This is a vector
format that can be imported into many software packages for further rendering.
4.1.19.7 WRL Screen Image
Dumps a screen image to a file (*.WRL) in VRML format. VRML is useful for exchanging model
data with other CAD and virtual reality modelling software. This is a vector format that can be
imported into many software packages for further rendering.
4.1.19.8 OBJ Screen Image
Dumps a screen image to a file (*.OBJ) in Wavefront format. This is useful for exchanging model
data with other CAD and virtual reality modelling software. This is a vector format that can be
imported into many software packages for further rendering.
4.1.19.9 Selected Grid Components
Dumps selected grid components to a text file (*.txt) in a user controlled format.
By default all points on all grids are dumped. If you want to dump only a selected set of points use
the window function defined below.
Map3D International Ltd 1990-2015
Menu Commands
139
Upon selecting the desired data then OK, you will be prompted for a file name to save the data.
You can select CSV (comma separated/delimited data), TSV (tab separated/delimited data) or TXT
(space sepat\rated/delimited data).
You can also specify to automatically open the file in Excel or Notepad.
Note that you should not use CSV files with commas as decimal points.
Stresses:
s1 ts1 ps1 major principal stress
1
its trend and plunge.
s2 ts2 ps2 intermediate principal stress
2
its trend and plunge.
s3 ts3 ps3 minor principal stress 3 its trend and plunge.
sxx syy szz sxy syz sxz Cartesian stress components.
tmax maximum shear stress max = ½ ( 1 - 3 )
toct octahedral shear stress
oct
= ¹/3 [(
1
-
2
)² + (
2
-
3
)² +(
3
smean mean stress mean = ¹/3 ( 1 + 2 + 3 )
ti tti pti maximum shear stress in the grid plane, its trend and plunge.
Map3D International Ltd 1990-2015
-
1
)²]½
140
Map3D User's Manual
si tsi psi normal stress in the grid plane, its trend and plunge.
s1i ts1i ps1i maximum stress tangential to the grid plane, its trend and plunge.
s3i ts3i ps3i minimum stress tangential to the grid plane, its trend and plunge.
tu ttu ptu maximum shear stress in the ubiquitous-plane, its trend and plunge.
su tsu psu stress normal to the ubiquitous plane, its trend and plunge.
s1u ts1u ps1u maximum stress tangential to the ubiquitous plane, its trend and plunge.
s3u ts3u ps3u minimum stress tangential to the ubiquitous plane, its trend and plunge.
The orientation of the ubiquitous-plane is specified in
Plot > Strength Factors > Ubiquitous Parameters
Effective/Total effective stress or total stress components. These options are only used in Map3D
Thermal-Fluid Flow, as this code allows for calculation of steady state pore pressure distributions.
Strains:
e1 te1 pe1 major principal strain 1 its trend and plunge.
e2 te2 pe2 intermediate principal strain 2 its trend and plunge.
e3 te3 pe3 minor principal strain 3 its trend and plunge.
exx eyy ezz exy eyz exz Cartesian strain components.
emax maximum shear strain max = ½ ( 1 - 3 )
eoct octahedral shear strain
oct =
¹/3 [(
1
-
2
)² + (
2
-
3
)² +(
3
-
1
)²]½
evol volumetric strain vol = ( 1 + 2 + 3 )
esi tesi pesi maximum shear strain in the grid plane, its trend and plunge.
eni teni peni normal strain in the grid plane, its trend and plunge.
e1i te1i pe1i maximum strain tangential to the grid plane, its trend and plunge.
e3i te3i pe3i minimum strain tangential to the grid plane, its trend and plunge.
esu tesu pesu maximum shear strain in the ubiquitous-plane, its trend and plunge.
enu tenu penu strain normal to the ubiquitous plane, its trend and plunge.
e1u te1u pe1u maximum strain tangential to the ubiquitous plane, its trend and plunge.
e3u te3u pe3u minimum strain tangential to the ubiquitous plane, its trend and plunge.
Elastic/Plastic/Total elastic, plastic or total strain components. These options are only used in
Map3D Non-Linear, as this code allows for calculation of non-linear strains.
Displacements:
ut tut put total displacement, its trend and plunge.
ux uy uz Cartesian displacement components.
uni tuni puni displacement normal to the grid plane, its trend and plunge.
umi tumi pumi maximum displacement tangential to the grid plane, its trend and plunge.
unu tunu punu displacement normal to the ubiquitous plane, its trend and plunge.
umu tumu pumu maximum displacement tangential to the ubiquitous plane, its trend and plunge.
Flow:
t temperature/head.
qt tqt pqt total flow, its trend and plunge.
qx qy qz Cartesian flow components.
qni tqni pqni displacement normal to the grid plane, its trend and plunge.
qmi tqmi pqmi maximum displacement tangential to the grid plane, its trend and plunge.
qnu tqnu pqnu displacement normal to the ubiquitous plane, its trend and plunge.
qmu tqmu pqmu maximum displacement tangential to the ubiquitous plane, its trend and plunge.
Miscellaneous:
user User defined value.
grid# the number of the grid where the point is located.
matl# the number of the material within which the point is located. The host material is material
Map3D International Ltd 1990-2015
Menu Commands
141
number 1. In problems where multiple materials are used, results may be calculated in an
alternate material zone.
step# the mining step number.
name the name of the grid.
area the area of the grid patch adjacent to the point picked.
dgrid distance to the nearest surface from each grid point.
dol distance to the nearest grid Dgrid divided by the grid spacing Lgrid.
f1 f2... user defined material parameters. These can be defined using Plot > Properties >
Material Properties > User defined Parameters.
Data Format:
Points data will be written out as a series of points with one point per line:
x1 y1 z1 values1
x2 y2 z2 values2
x3 y3 z3 values3
x4 y4 z4 values4
...
where xi yi zi represent the coordinates of each point,
valuesi represents the values of the list of user selected components at each point. The user
defined values will be listed as a comment line (i.e. a line beginning with an asterisk "*") at the
beginning of the file.
Polylines data will be written out as a series of polylines in PNT file format
x1 y1 z1 3 values1
x2 y2 z2 2 values2
x3 y3 z3 2 values3
x4 y4 z4 2 values4
...
where xi yi zi represent the coordinates of each point,
3 indicates that this point is the beginning of a new line,
2 indicates that this point is a continuation of the same line,
valuesi represents the values of the list of user selected components at each corner of the
polyline. The user defined values will be listed as a comment line (i.e. a line beginning with an
asterisk "*") at the beginning of the file.
Fully Populated data will be written out such that all data will be on a regular sized grid.
Use Commas data will be written out with commas in place of decimal points.
Other:
<< to shrink the dialogue box to small size
>> to expand the dialogue box to large size
Cartesian configures for output of cartesian stress components.
Principal configures for output of principal stress components.
Window activates a graphical pick window.
You will be prompted to select the two corners of the window by picking each with a single
mouse click.
Only grid points enclosed within the window will be included in the dump.
If you do not use this function all points on all grids are dumped.
To view the location of the actual contour points enable display of trajectories (Plot > Options
> Trajectories). The contour points are located where the trajectories are drawn.
Polyline activates a graphical pick polygon. You will be prompted to select a series of corners to
define a polygon by picking each with a single mouse click:
You must hold the Shift-key down while selecting these points.
If you define a closed polygonal shape - those contour points enclosed in the polygon will be
Map3D International Ltd 1990-2015
142
Map3D User's Manual
included.
If you define an open polygonal shape - a series of points along the length of the polyline will
be included.
To view the location of the actual contour points enable display of trajectories (Plot > Options
> Trajectories). The contour points are located where the trajectories are drawn.
Simple rectangular widow shapes can be defined by holding the Shift-key and dragging
open a window (same as with the Window button).
4.1.19.10 Selected Surface Components
Dumps selected surface components to a text file (*.txt) in a user controlled format.
By default all points on all surfaces are dumped. If you want to dump only a selected set of points
use the window function defined below.
Upon selecting the desired data then OK, you will be prompted for a file name to save the data.
You can select CSV (comma separated/delimited data), TSV (tab separated/delimited data) or TXT
(space sepat\rated/delimited data).
You can also specify to automatically open the file in Excel or Notepad.
Note that you should not use CSV files with commas as decimal points.
Stresses:
Map3D International Ltd 1990-2015
Menu Commands
143
sn tsn psn stress normal to the surface, its trend and plunge.
ts tts pts maximum shear stress in the plane of the surface, its trend and plunge.
ts1 ts2 shear stress components in the plane of the surface. ts1 is parallel to the first side (i.e.
the side defined by x1 y1 z1 – x2 y2 z2). ts2 is perpendicular to ts1 in the direction of the second
side (i.e. the side defined by x2 y2 z2 – x3 y3 z3).
ser surface stress error. Iterative solvers function by determining the error in the current solution
of each simultaneous equation, then reducing these errors by a process of successive
approximations. This parameter indicates the error for each of the equations.
fer failure criterion error. This parameter is only used for non-linear creep analyses (including
fault slip and 3D material non-linearity). This parameter should always be near zero unless some
viscosity has been specified and the problem goes non-linear. In this latter case, viscous creep
can allow stress states above the failure criterion, thus indicating a lack of static equilibrium. This
parameter indicates the viscous stress for each of the equations.
Effective/Total – effective stress or total stress components. These options are only used in
Map3D Thermal-Fluid Flow, as this code allows for calculation of steady state pore pressure
distributions.
Strains:
en ten pen strain in the direction normal to the surface, its trend and plunge. This parameter is
only used for DD planes and is calculated as the normal displacement (closure) divided by the
thickness.
es tes pes maximum shear strain in the plane of the surface, its trend and plunge. This
parameter is only used for DD planes and is calculated as the shear displacement (ride) divided
by the thickness.
es1 es2 shear strain components in the plane of the surface. es1 is parallel to the first side (i.e.
the side defined by x1 y1 z1 – x2 y2 z2). es2 is perpendicular to es1 in the direction of the second
side (i.e. the side defined by x2 y2 z2 – x3 y3 z3).
Displacements:
dn tdn pdn normal displacement (closure) in the direction normal to the surface, its trend and
plunge. This parameter is only used for DD planes. Note that the elastic, plastic or total value can
be specified.
ds tds pds maximum shear displacement (ride) in the plane of the surface, its trend and plunge.
This parameter is only used for DD planes. Note that the elastic, plastic or total value can be
specified.
ds1 ds2 shear displacement (ride) components in the plane of the surface. ds1 is parallel to the
first side (i.e. the side defined by x1 y1 z1 – x2 y2 z2). ds2 is perpendicular to ds1 in the direction
of the second side (i.e. the side defined by x2 y2 z2 – x3 y3 z3).
Elastic/Plastic/Total elastic, plastic or total strain/displacement components. These options are
only used for DD planes.
Miscellaneous:
area the area of the surface.
matl# the number of the material assigned to the surface.
step# the mining step number.
blk# the block number.
name the name of the block surface.
dof# the degree of freedom number.
Data Format
Points data will be written out as a series of points with one point per line.
x1 y1 z1 values1
x2 y2 z2 values2
Map3D International Ltd 1990-2015
144
Map3D User's Manual
x3 y3 z3 values3
x4 y4 z4 values4
...
where xi yi zi represent the coordinates of each point,
valuesi represents the values of the list of user selected components at each point. The user
defined values will be listed as a comment line (i.e. a line beginning with an asterisk "*") at the
beginning of the file.
Polylines data will be written out as a series of polylines in PNT file format
x1 y1 z1 3 values1
x2 y2 z2 2 values2
x3 y3 z3 2 values3
x4 y4 z4 2 values4
...
where xi yi zi represent the coordinates of each point,
3 indicates that this point is the beginning of a new line,
2 indicates that this point is a continuation of the same line,
valuesi represents the values of the list of user selected components at each corner of the
polyline. The user defined values will be listed as a comment line (i.e. a line beginning with an
asterisk "*") at the beginning of the file.
If linear BEM analysis (Analysis > Options > Linear) was not selected, valuesi are only available at
the element centres and hence will only be supplied for the first point. If linear BEM analysis was
selected, values are available at each corner and hence will only be supplied for all points.
Other
<< to shrink the dialogue box to small size
>> to expand the dialogue box to large size
Window activates a graphical pick window.
You will be prompted to select the two corners of the window by picking each with a single
mouse click.
Only grid points enclosed within the window will be included in the dump.
If you do not use this function all points on all grids are dumped.
To view the location of the actual contour points enable display of trajectories (Plot > Options
> Trajectories). The contour points are located where the trajectories are drawn.
Polyline activates a graphical pick polygon. You will be prompted to select a series of corners to
define a polygon by picking each with a single mouse click:
You must hold the Shift-key down while selecting these points.
If you define a closed polygonal shape - those contour points enclosed in the polygon will be
included.
If you define an open polygonal shape - a series of points along the length of the polyline will
be included.
To view the location of the actual contour points enable display of trajectories (Plot > Options
> Trajectories). The contour points are located where the trajectories are drawn.
Simple rectangular widow shapes can be defined by holding the Shift-key and dragging
open a window (same as with the Window button).
Use Commas data will be written out with commas in place of decimal points.
Map3D International Ltd 1990-2015
Menu Commands
145
4.1.19.11 Image Recorder
Records multiple sequential images to individual PNG, GIF or BMP files.
Many presentation programs allow you to construct simple animations by displaying a sequence of
images. The Map3D image recorder allows you to record multiple screen dumps to a individual
PNG, GIF or BMP files.
Once you select File > Output > Image Recorder, you will be prompted to specify a file name to
save the animation. Image file names will be generated by appending the image count onto the file
name you specify (e.g. name0001.png, name0002.png, name0003.png ...).
The recorder dialogue box provides information on the current animation and allows you to control
recording and specify animation options.
The current number of images in the animation is displayed along with the status of the recorder.
Various status states include:
Ready/Paused – animation file is open and ready to record. Press Grab or Auto to add an image.
Capturing Image – image is being added to the animation.
Ready/Auto Capture - displayed images will be automatically added to the animation as you update
the screen.
Recorder Off – animation file is closed and not ready to record.
Grab – adds the current displayed image to the animation.
Auto – automatically adds displayed images to the animation as you update the screen. This
includes all rotation, translation and plotting operations you perform.
Pause – disables automatic mode.
End – stops the recorder and closes the animation file.
Options – allows specification of options. Currently the only option is
Background/foreground flipped – the background and foreground (normally black and white) will be
reversed.
Notes:
Additional images can be appended to an existing sequence of images be checking File > Output >
Image Recorder > Append Images when selecting the file name for the animation sequence.
Rotation and translation operations can be repeated automatically by typing n# before selecting the
operation. For example to produce an animated display of a stress plot, specify the following
Plot > Options > Persist
Plot > Stress > Sigma:1
View > Rotation Increment > 10
Select the Auto button
Type in 35#
Select rotate right (either from the rotation toolbar or the PageDown key).
A series of files numbered name001 to name036 will be created. These can be imported into
presentation software for animation and display.
Map3D International Ltd 1990-2015
146
Map3D User's Manual
Stress contours that change as mining progresses can be displayed by grabbing a series of plots
as the mining step is advanced.
4.1.20 Image Viewer
Displays PNG (Portable Network Graphics - *.PNG), GIF (Graphics Interchange Format) or BMP
(Windows device independent bitmap *.BMP) files in a window.
When the viewer is started the current screen image is displayed.
The viewer can be used to display individual images, animated GIFs and sequences of images.
Screen images can be saved to files using
File > Output > PNG, GIF or BMP Image
File > Output > PNG, GIF or BMP (B&W flipped)
File > Output > Image Recorder
4.1.21 Save View
Save the current view position to a file (*.VEW). The current orientation and position is saved along
with the current contour ranges.
This view can be restored later using
File > Restore View.
4.1.22 Restore View
Restores a previously saved view position from a file (*.VEW). The orientation and position are
restored along with the contour ranges.
The current view can be saved using
File > Save View.
4.1.23 Recent Files
Each time you open a model file its name is saved for quick access at a later session. To reopen
one of these files just pick it from the list.
Related Topics:
File > Open > Recent Directories
4.1.24 Exit
Closes the program after prompting you to save any unsaved files.
Map3D International Ltd 1990-2015
Menu Commands
4.2
View Menu
4.2.1
Hide
4.2.1.1
Off
147
These tools are used to make it easy to hide various portions of the geometry.
Selecting the
button on the View toolbar activates the Hide toolbar
Note that if the
button is not on the View toolbar it can be added by using the
selecting Hide > Hide More.
button then
View > Hide > Off Turns off the hide function.
View > Hide > Surfaces Hides surfaces by picking one at a time.
View > Hide > Blocks Hides all surfaces that make up the selected block.
View > Hide > Numbers Hide all surfaces with the selected block colour number.
View > Hide > Colour Hide all surfaces with the selected colour.
View > Hide > Materials Hides all surfaces with the selected material number. The same
block may have different materials in it depending on the currently active mining step.
When using this later function, make sure to select the appropriate mining step
File > Mining Step
View > Hide > Names Hide all surfaces with the selected block name.
View > Hide > Steps Hide all surfaces that are mined in the selected step.
View > Hide > Window Hides all surfaces within the selected window. Entities will only be
selected if the entire entity is contained within the window.
View > Hide > Crossing Hides all surfaces within the crossing window. Entities will be
selected if even a part of the entity is within the window.
View > Hide > Undo last Hide Undo the last hide operation (maximum of 10 are currently
saved).
View > Hide > Redo last Hide Redo the previous hide operation (maximum of 10 are
currently saved).
View > Hide > Unhide All Unhide all currently hidden surfaces.
View > Hide > Inactive When activated, inactive elements are displayed. Inactive surfaces
are used to display features that are to be included for visualization purposes only and not to be
used for the actual stress analysis
CAD > Edit > Entity Properties
View > Hide > Solids When activated, solids are hidden. Solids are 3D blocks or DD planes
that are not excavated.
As the mining sequence progresses
File > Mining Step
Map3D International Ltd 1990-2015
148
Map3D User's Manual
different blocks will be excavated. To display only excavations, turn this option on.
View > Hide > Excavations When activated, excavations are hidden.
View > Hide > Unused When activated, unused elements are hidden. Unused elements are
3D block surfaces or DD planes that are not used in the analysis. Such elements exist where a
fault cuts through an excavation, or where a material with a lower material number resides within a
zone with a higher material number (e.g. a dyke cutting through an ore zone).
As the mining sequence progresses
File > Mining Step
this may change. To hide unused surfaces, turn this option on. Refer to
Analysis > Options > Closure
Constructing Alternate Material Zones
for additional discussion.
View > Hide > Translucent When activated, hidden surfaces as displayed translucent.
View > Hide > Show Errors Hide/display errors (when activated, show only element
errors). Note that this option can be used with the View > Hide > Translucent option.
View > Hide > Hide Errors Hide/display errors (when activated, do not show element
errors).
At the CAD stage the various colours indicate the following problems:
Purple - gaps have been found and filled, thus fixing this problem. This message does not
indicate an error and is given as user information.
Green - duplicate blocks have been found and deleted, thus fixing this problem. This message
does not indicate an error and is given as user information.
Blue - narrow gaps have been detected. These gaps do not indicate an error and are not
necessarily a problem, however if problems arise during the intersection analysis or BEM
analysis, these locations are the most likely causes. This message does not indicate an error
and is given as user warning.
White - edges that link the wrong way have been detected. Closed blocks must have all edges
linking in a consistent manner so that the inside and outside of a block can be consistently
determined. White edges do not satisfy this requirement. This message does indicate an error
which should be fixed before proceeding with the analysis.
Orange - edges that do not link to other edges have been detected. Closed blocks must have all
edges linking to one other edge to form a closed block. Orange edges do not satisfy this
requirement. This message does indicate an error which should be fixed before proceeding
with the analysis.
Yellow - edges that link to more than one other edge have been detected. Closed blocks must
have all edges linking to only one other edge to form a closed block. Yellow edges do not satisfy
this requirement. This message does indicate an error which should be fixed before proceeding
with the analysis.
Red - highlights Visco-Plastic zones with invalid hex shapes. In Map3D Visco-Plastic, plastic
zones are only permitted to have hexahedron shapes (4 corners at the top and 4 corners at the
bottom) or some degeneration of this shape such as tetrahedron.
At the INTERSECTION stage the various colours indicate the following problems:
Purple - a surface has been disabled due to an unresolvable contact. When the contacts been
various block surfaces was analysed, the way that this surface interfaced with another surface
could not be resolved so the surface was disabled and hence will not be used in the BEM stress
Map3D International Ltd 1990-2015
Menu Commands
149
analysis. The most likely cause of this problem is a very odd shape such as an extremely
narrow triangle. Although this is an error, such errors can normally be ignored since extremely
narrow shapes contribute little to the analysis results.
Green - a surface has been disabled due to an unresolvable closure. When the closure of a
block was analysed, the way that this surface interfaced with the block could not be resolved so
the surface was disabled and hence will not be used in the BEM stress analysis. The most likely
cause of this problem is a very odd shape such as an extremely narrow triangle. Although this
is an error, such errors can normally be ignored since extremely narrow shapes contribute little
to the analysis results.
Blue - narrow gaps have been detected. These gaps do not indicate an error and are not
necessarily a problem, however if problems arise during the intersection analysis or BEM
analysis, these locations are the most likely causes. This message does not indicate an error
and is given as user warning.
White - unclosed surfaces have been detected. When the closure of a block was analysed it
was found that the interior and exterior of the block could not be consistently determined. This
message does indicate an error which should be fixed before proceeding with the analysis.
Orange - edges that do not link to other edges have been detected. Closed blocks must have all
edges linking to one other edge to form a closed block. Orange edges do not satisfy this
requirement. This message does indicate an error which should be fixed before proceeding
with the analysis.
Yellow - a surface has been disabled due to an unresolvable shape. The most likely cause of
this problem is a very odd shape such as an extremely narrow triangle. Although this is an
error, such errors can normally be ignored since extremely narrow shapes contribute little to the
analysis results.
4.2.2
Hide Block Colours
4.2.2.1
Hide All
This allows you to hides all blocks with the selected colour number.
Selecting the
button on the View toolbar activates the Hide Block Colours toolbar.
View > Hide Block Colours > Hide All Hide all block surfaces.
View > Hide Block Colours > Unhide All Unhide all currently hidden surfaces.
The first row hide and un-hides all blocks with the associated colour.
The buttons labelled s1, s2, s3… are used to hide mining steps.
The remaining buttons are labelled with the associated block colour number and are used to hide
these. The block name associated with each colour number is displayed in the tooltip and on the
menu list.
Map3D International Ltd 1990-2015
150
Map3D User's Manual
4.2.3
Hide Cline Colours
4.2.3.1
Hide All
This allows you to hide all construction lines with the selected colour.
Selecting the
button on the View toolbar activates the Hide Cline Colours toolbar.
View > Hide Cline Colours > Hide All Hide all construction lines.
View > Hide Cline Colours > Unhide All Unhide all currently hidden construction lines.
The first row hide and un-hides all clines with the associated colour.
The remaining buttons are labelled with the associated cline colour number and are used to hide
these.
4.2.4
Hide Grid Colours
4.2.4.1
Hide All
This allow you to hides all grids with the selected colour.
Selecting the
button activates the Hide Grid Colours toolbar.
View > Hide Grid Colours > Hide All Hide all grids.
View > Hide Grid Colours > Unhide All Unhide all currently hidden grids.
The first row hide and un-hides all grids with the associated colour.
The buttons labelled with the associated grid colour number and are used to hide these. The grid
name associated with each colour number is displayed in the tooltip and on the menu list.
The remaining buttons are used to hide individual grids just in Grid Selection.
4.2.5
Render
4.2.5.1
Block Outlines
Sets up rendering options for the model.
View > Render > Block Outlines - blocks are drawn with outlines showing the edges of the blocks.
View > Render > Grid Lines - blocks are drawn with lines at regular grid intervals. You are
prompted for the grid interval when you activate this feature.
Map3D International Ltd 1990-2015
Menu Commands
151
View > Render > Block Colours - blocks are drawn with colour shading. Turn this feature off for a
wireframe view.
View > Render > Material Numbers - blocks are coloured corresponding to the material property
inserted in the block. The same block may have different materials in it depending on the currently
active mining step.
When using this function, make sure to select the appropriate mining step
File > Mining Step
View > Render > Mining Step Numbers - blocks are coloured corresponding to the mining step at
which they are excavated.
View > Render > Dark Shading - blocks are drawn with a dark light-source shading model. You are
prompted for an edge radius when you activate this feature. The edge radius is used to shade
edges and corners to give them a rounded appearance. The edge radius should be specified as a
fraction of the block thickness. Shading can considerably slow down the refresh rate.
View > Render > Bright Shading - blocks are drawn with a bright light-source shading model. You
are prompted for an edge radius when you activate this feature. The edge radius is used to shade
edges and corners to give them a rounded appearance. The edge radius should be specified as a
fraction of the block thickness. Shading can considerably slow down the refresh rate.
View > Render > Block Numbers - blocks are drawn with numbers on their surfaces. These
numbers correspond to the currently selected render mode: Block Colours, Material Numbers, or
Mining Step Numbers.
View > Render > Block Names - blocks are drawn with the block names on their surfaces.
View > Render > Coordinate Numbers - blocks are drawn with the block names on their surfaces.
View > Render > Backfacing Surfaces - when activated, back-facing surfaces of 3D FF blocks are
drawn. Generally the user does not need or want to see these surfaces.
View > Render > Discretize - Toggles the display of discretized and non-discretized views of the
model.
View > Render > Perspective - Toggles the display of perspective or orthogonal viewing. In
orthogonal mode, all dimensions are drawn to true scale. In perspective view, entities further from
the observer are drawn smaller in size.
View > Render > Clines Dot Radius - specifies the radius of dots that will be drawn at all corner
points along construction lines. This significantly slows the drawing operation and should only be
used if needed. A zero value indicates that no dots will be drawn.
View > Render > Point Size - specifies the radius of dots that will be drawn at all corner points
during selection.
View > Render > Line Width - specifies the width of the block outlines and contour lines.
4.2.6
Find Coordinate
Repositions the model so that the display is centred at the specified coordinate. This repositioning is
done without rotation or magnification.
Map3D International Ltd 1990-2015
152
4.2.7
Map3D User's Manual
Initialize
Initializes all viewing parameters. All contour ranges are also reset.
4.2.8
Zoom Extents
Zoom so that all entities are visible. This repositioning is done without rotation.
4.2.9
Zoom
Activates the view toolbar.
The default configuration for this toolbar is as follows
This toolbar provides quick access to various viewing functions.
View > Centre of Rotation Sets the centre of rotation. This point remains stationary while
you rotate and zoom the display.
View > Zoom activates a graphical zoom window. You will be prompted to select the two
corners of the window by picking each with a single mouse click.
View > Pan activates a graphical pan. You will be prompted to select the two ends of the pan
vector by picking each with a single mouse click.
View > Length activates a graphical length measuring tool. You will prompted to select the
two ends of the length vector by picking each with a single mouse click. These points must be
selected on the model or on a contour. The length, dip and dip direction of the selected vector is
reported. If you hold down the shift key while selecting points, you can define a line composed of
multiple segments and obtain the total length. If you define a closed polygonal shape (by holding
down the shift key while selecting points) on a contour plot, the average contour value within the
polygon will be reported (see Plot > Polygon Box). Simple rectangular widow shapes can be
defined by holding the shift key and dragging open a window.
View > Hide activates the hide toolbar.
View > Hide Block Colours activates the hide block colour toolbar.
View > Hide CLine Colours activates the hide construction line colour toolbar.
File > Mining Step activates the mining step selection toolbar.
Tools > View Toolbar Configure adds or removes buttons from the view toolbar.
Notes:
Buttons can be moved around on the toolbar simply by holding down the left mouse button and
dragging the button to the desired location.
4.2.13 Translation Increment
Sets the translation increment.
This can also be set simply by typing in the desired translation increment then selecting any
translate button or key.
Notes:
Map3D International Ltd 1990-2015
Menu Commands
153
If the translation toolbar is not visible it can be activated with
Tools > Translation Toolbar.
4.2.14 Rotation Increment
Sets the rotation angle.
This can also be set simply by typing in the desired rotation angle then selecting any rotate button
or key.
Notes:
If the rotation toolbar is not visible it can be activated with
Tools > Rotation Toolbar.
4.2.15 Zoom Factor
Sets the zoom magnification factor.
Each time you zoom in the model will be magnified by this factor. Each time you zoom out the
model will be shrunk by this factor.
This can also be set simply by typing in the zoom factor then selecting any zoom button or key.
Notes:
You should set the desired centre of rotation
View > Centre of Rotation
before zooming in
Zoom In
If the translation toolbar is not visible it can be activated with
Tools > Translation Toolbar.
4.2.16 View XY plane
Reorients the view of the model to a special view position:
View > View XY Plane - view with the x-axis to the right and y-axis up.
View > View YZ Plane - view with the y-axis to the right and z-axis up.
View > View ZX Plane - view with the x-axis to the right and z-axis up.
View > View Grid Plane - currently selected grid plane fills the screen
CAD > Grid Selection
Plot > Grid Selection
View > View Digitizer Plane current digitizing area fills the screen
CAD > Digitizer Setup.
Notes:
The current view position can be saved
Map3D International Ltd 1990-2015
154
Map3D User's Manual
File > Save View
or restored
File > Restore View
between sessions.
4.2.21 View 640x480
Resizes the window to 640x480 pixels to enable standard screen dump size.
4.2.22 Continuous Rotation
Set the model to continuously rotate.
4.3
Plot Menu
4.3.1
Stress
4.3.1.1
Major Principal Stress
Contours the principal stresses
.
In elastic analysis, the major principal stress is normally used with the minor principal stress and the
Mohr-Coulomb or Hoek-Brown strength criterion
Plot > Strength Factors > Strength Parameters
to estimate the amount of damage in the rockmass due to over-stressing. Since none of the
parameters have any orientation sensitivity, this criterion is representative for homogeneous rock
mass stability.
By contrast, in non-linear analysis the stresses can never exceed the strength unless some creep is
used. In this latter case, viscous creep can allow stress states above the failure criterion, thus
indicating a lack of static equilibrium. Hence for non-linear analysis one normally directly considers
the amount of non-linear strain or the strain rate predicted by the model
Mohr-Coulomb in 3D FF blocks.
Over-stressing can be presented in several forms including:
Plot > Strength Factor > SF-A Strength/Stress
Plot > Strength Factor > SF-B Strength/Stress
Plot > Strength Factors > SF-C Strength/Stress
Plot > Strength Factors > dS1 Excess Stress
Plot > Strength Factors > dTmax Excess Stress
The contour range is set using
Plot > Range
Any of these components can be added to the contouring toolbar if desired
Tools > Configure Contouring Toolbar > Stress
The user may find it handy to add the
More Stress Components
Map3D International Ltd 1990-2015
Menu Commands
155
button to the contouring toolbar for quick access to all stress components.
The intermediate principal stress is normally used in the calculation of the octahedral shear stress
Plot > Stress > Toct Octahedral shear Stress
or the mean stress
Plot > Stress > Smean Mean Stress.
4.3.1.4
Maximum Shear Stress
Contours the maximum shear stress
=½(
max
1
-
3
)
In elastic analysis, the maximum shear stress is normally used with the minor principal stress and
the Mohr-Coulomb or Hoek-Brown strength criterion
Plot > Strength Factors > Strength Parameters
to estimate the amount of damage due to over-stressing. Since none of the parameters have any
orientation sensitivity, this criterion is representative for homogeneous rock mass stability.
By contrast, in non-linear analysis the stresses can never exceed the strength unless some creep is
used. In this latter case, viscous creep can allow stress states above the failure criterion, thus
indicating a lack of static equilibrium. Hence for non-linear analysis one normally directly considers
the amount of non-linear strain or the strain rate predicted by the model
Mohr-Coulomb in 3D FF blocks.
Over-stressing can be presented in several forms including:
Plot > Strength Factor > SF-A Strength/Stress
Plot > Strength Factor > SF-B Strength/Stress
Plot > Strength Factors > SF-C Strength/Stress
Plot > Strength Factors > dS1 Excess Stress
Plot > Strength Factors > dTmax Excess Stress
The contour range is set using
Plot > Range
Any of these components can be added to the contouring toolbar if desired
Tools > Configure Contouring Toolbar > Stress
The user may find it handy to add the
More Stress Components
button to the contouring toolbar for quick access to all stress components.
4.3.1.5
In-Plane Shear Stress
Contours the maximum shear stress acting on the grid plane, and the stress component normal to
the grid plane or parallel to a line grid.
Plot > Grid Selection
To calculate the in-plane stresses, the stress state at each point on the grid plane is reoriented to
Map3D International Ltd 1990-2015
156
Map3D User's Manual
determine the maximum shear stress parallel to the grid plane and the stress normal to the plane.
Note that ip is oriented normal to the grid plane and parallel to the direction of a line grid.
Line Grid
ip
Grid plane
ip
ip
Dip
direction
ip
Dip
direction
Dip of
Plunge of
grid plane
dip direction
is measured positive
clockwise
from the y-axis.
Plunge
of normal
normal
to grid
plane
dip of the plane is measured positive
down
from the horizontal (i.e.
the dip direction).
plunge of the normal is measured positive down (i.e. negative up) from the horizontal.
In elastic analysis, the maximum in-plane shear stress is normally used with the in-plane normal
stress and the Mohr-Coulomb strength criterion
Plot > Strength Factors > In-plane Parameters
to estimate the amount of slip due to over-stressing, on a fault, joint set or bedding plane oriented in
the same way as the grid plane. Since these parameters are orientation dependant, this criterion is
representative for anisotropic rock mass stability.
By contrast, in non-linear analysis the stresses can never exceed the strength unless some creep is
used. In this latter case, viscous creep can allow stress states above the failure criterion, thus
indicating a lack of static equilibrium. Hence for non-linear analysis one normally directly considers
the amount of non-linear strain or the strain rate predicted by the model
Mohr-Coulomb in DD planes
Fault-Gouge in DD planes
Backfill-Hyperbolic in DD planes.
Over-stressing can be presented in several forms including:
Plot > Strength Factors > SF-ip Strength/Stress
Plot > Strength Factors > dTip Excess Shear Stress
The contour range is set using
Plot > Range
Any of these components can be added to the contouring toolbar if desired
Tools > Configure Contouring Toolbar > Stress
The user may find it handy to add the
More Stress Components
button to the contouring toolbar for quick access to all stress components.
Related topics:
Plot > Stress > S1i In-plane Maximum
Plot > Stress > S3i In-plane Minimum
Plot > Stress > Tub Ubiquitous-plane Shear
Map3D International Ltd 1990-2015
Menu Commands
157
Plot > Stress > Sub Ubiquitous-plane Normal
4.3.1.7
In-Plane Maximum Stress
Contours the maximum and minimum stresses tangential to the currently selected grid plane or
perpendicular to a line grid.
Plot > Grid Selection
To calculate the maximum and minimum in-plane stresses, the stresses tangential to the grid plane
are determined, then resolved to give the maximum and minimum values. Note that ip is oriented
normal to the grid plane and parallel to the direction of a line grid. Also note that ip, 1i and 3i are
perpendicular to one another.
Line Grid
ip
Grid plane
ip
1i
Dip
direction
1i
3i
Dip
direction
Dip of
Plunge of
grid plane
dip direction
is measured positive
clockwise
from the y-axis.
Plunge
of normal
normal
to grid
plane
dip of the plane is measured positive
down
from the horizontal (i.e.
the dip direction).
plunge of the normal is measured positive down (i.e. negative up) from the horizontal.
3i
The contour range is set using
Plot > Range
This component can be added to the contour toolbar if desired
Tools > Configure Contouring Toolbar > Stress
The user may find it handy to add the
More Stress Components
button to the contouring toolbar for quick access to all stress components.
Related topics:
Plot > Stress > Tip
Plot > Stress > Sip
Plot > Stress > S1u
Plot > Stress > S3u
4.3.1.9
In-plane Shear
In-plane Normal
Ubiquitous-plane Maximum.
Ubiquitous-plane Minimum.
Ubiquitous-Plane Shear Stress
Contours the maximum shear stress acting on ubiquitous plane #1, and the stress component
normal to this plane.
To calculate the ubiquitous stresses, the stress state at each point on the grid plane is reoriented to
determine the maximum shear stress parallel to the ubiquitous plane and the stress normal to the
ubiquitous plane. Note that ub is oriented normal to the ubiquitous plane and is not parallel to the
Map3D International Ltd 1990-2015
158
Map3D User's Manual
direction of a line grid.
Line Grid
ub
Ubiquitous plane
ub
ub
Dip
direction
ub
Dip
direction
Dip of
ubiquitous plane
Plunge of normal to
ubiquitous plane
Plunge of
normal
dip direction is measured positive clockwise from the y-axis.
dip of the plane is measured positive down from the horizontal (i.e. the dip direction).
plunge of the normal is measured positive down (i.e. negative up) from the horizontal.
The orientation of the ubiquitous shear plane is set using
Plot > Strength Factors > Ubiquitous Parameters
In elastic analysis the maximum ubiquitous-plane shear stress is normally used with the ubiquitousplane normal stress and the Mohr-Coulomb strength criterion
Plot > Strength Factors > Ubiquitous Parameters
to estimate the amount of slip due to over-stressing, on a fault, joint set or bedding plane at the
specified orientation. Since these parameters are orientation dependant, this criterion is
representative for anisotropic rock mass stability.
By contrast, in non-linear analysis the stresses can never exceed the strength unless some creep is
used. In this latter case, viscous creep can allow stress states above the failure criterion, thus
indicating a lack of static equilibrium. Hence for non-linear analysis one normally directly considers
the amount of non-linear strain or the strain rate predicted by the model
Mohr-Coulomb in DD planes
Fault-Gouge in DD planes
Backfill-Hyperbolic in DD planes.
Over-stressing can be presented in several forms including:
Plot > Strength Factors > SF-ub Strength/Stress.
Plot > Strength Factors > dTub Excess Shear Stress.
The contour range is set using
Plot > Range
This component can be added to the contour toolbar if desired
Tools > Configure Contouring Toolbar > Stress
The user may find it handy to add the
More Stress Components
button to the contouring toolbar for quick access to all stress components.
Map3D International Ltd 1990-2015
Menu Commands
159
Related topics:
Plot > Stress > S1u
Plot > Stress > S3u
Plot > Stress > Tip
Plot > Stress > Sip
Ubiquitous-plane Maximum
Ubiquitous-plane Minimum
In-plane Shear
In-plane Normal
The orientation of the ubiquitous-plane is specified in
Plot > Strength Factors > Ubiquitous Parameters
4.3.1.11 Ubiquitous-Plane Maximum Stress
Contours the maximum and minimum stresses tangential to the ubiquitous plane #1.
To calculate the maximum and minimum ubiquitous-plane stresses, the stresses tangential to the
plane are determined, then resolved to give the maximum and minimum values. Note that ub is
oriented normal to the ubiquitous plane and is not parallel to the direction of a line grid. Also note
that ub, 1u and 3u are perpendicular to one another.
Line Grid
ub
Ubiquitous plane
ub
1u
Dip
direction
1u
3u
Dip of
ubiquitous plane
Dip
direction
3u
Plunge of normal to
ubiquitous plane
Plunge of
normal
dip direction is measured positive clockwise from the y-axis.
dip of the plane is measured positive down from the horizontal (i.e. the dip direction).
plunge of the normal is measured positive down (i.e. negative up) from the horizontal.
The orientation of the ubiquitous shear plane is set using
Plot > Strength Factors > Ubiquitous Parameters
The contour range is set using
Plot > Range
This component can be added to the contour toolbar if desired
Tools > Configure Contouring Toolbar > Stress
The user may find it handy to add the
More Stress Components
button to the contouring toolbar for quick access to all stress components.
Related topics:
Plot > Stress > Tub In-plane Shear
Plot > Stress > Sub In-plane Normal
Map3D International Ltd 1990-2015
160
Map3D User's Manual
Plot > Stress > S1i In-plane Maximum.
Plot > Stress > S3i In-plane Minimum.
4.3.1.13 Octahedral Shear Stress
Contours the octahedral shear stress
oct
= ¹/3 [ (
1
-
2)²
+(
2
-
3)²
+(
3
-
1)²
]½
and mean stress
mean
= ¹/3 (
1
+
2
+
3)
In elastic analysis the octahedral shear stress is normally used with the mean stress and the
Drucker-Prager strength criterion
Plot > Strength Factors > Strength Parameters
to estimate the amount of damage due to over-stressing. Since none of the parameters have any
orientation sensitivity, this criterion is representative for homogeneous rock mass stability.
By contrast, in non-linear analysis the stresses can never exceed the strength unless some creep is
used. In this latter case, viscous creep can allow stress states above the failure criterion, thus
indicating a lack of static equilibrium. Hence for non-linear analysis one normally directly considers
the amount of non-linear strain or the strain rate predicted by the model
Mohr-Coulomb in 3D FF blocks.
Over-stressing can be presented in several forms including:
Plot > Strength Factors > SF-C Strength/Stress
Plot > Strength Factors > dToct Excess Stress
Plot > Strength Factors > dS1 Excess Stress
Plot > Strength Factors > dTmax Excess Stress
The contour range is set using
Plot > Range
Any of these components can be added to the contouring toolbar if desired
Tools > Configure Contouring Toolbar > Stress
The user may find it handy to add the
More Stress Components
button to the contouring toolbar for quick access to all stress components.
4.3.1.15 Sxx Cartesian Stress
Contours the Cartesian stress components.
Plot > Stress >
Plot > Stress >
axis.
Plot > Stress >
Plot > Stress >
xx
Cartesian Stress Component normal stress in the direction of the x-axis.
yy
Cartesian Stress Component normal stress in the direction of the y-
zz
Cartesian Stress Component normal stress in the direction of the z-axis.
xy
Cartesian Stress Component shear stress in the x-y plane.
Map3D International Ltd 1990-2015
Menu Commands
Plot > Stress >
yz
Cartesian Stress Component shear stress in the y-z plane.
Plot > Stress >
zx
Cartesian Stress Component shear stress in the x-z plane.
161
The contour range is set using
Plot > Range
Any of these components can be added to the contouring toolbar if desired
Tools > Configure Contouring Toolbar > Stress
The user may find it handy to add the
More Stress Components
button to the contouring toolbar for quick access to all stress components.
4.3.1.21 Value
4.3.1.21.1 Effective stress
Selects the effective or total stress component.
Effective stress is the skeletal stress (i.e. without the pore pressure component).
Total stress is the skeletal stress plus the pore pressure (or thermal component).
This option is only used with Map3D Thermal-Fluid Flow the Thermal stress/Fluid flow analysis
version of Map3D.
Refer to Expansion Coefficient and Conductivity for details.
4.3.1.21.3 Induced Stress
Plot the induced or absolute stress component.
Induced stress is the stress without the pre-mining stress contribution. This represents the stress
change since the pre-mining condition.
Absolute stress is the stress including the pre-mining stress contribution.
Also see:
Plot > Strain > Value > Induced Strain
Plot > Strain > Value > Absolute Strain
4.3.2
Strain
4.3.2.1
Major Principal Strain
Contours the major, intermediate and minor principal strains.
In elastic analysis the major principal stress is normally used with the minor principal stress and the
Mohr-Coulomb or Hoek-Brown strength criterion to estimate the amount of damage due to overstressing. By contrast, in non-linear analysis the stresses can never exceed the strength unless
some creep is used. In this latter case, viscous creep can allow stress states above the failure
criterion, thus indicating a lack of static equilibrium. Hence for non-linear analysis one normally
directly considers the amount of non-linear strain or the strain rate predicted by the model
Map3D International Ltd 1990-2015
162
Map3D User's Manual
Mohr-Coulomb in 3D FF blocks
Note that there are three components of strain that can be contoured:
Plot > Strain > Value > Elastic
Plot > Strain > Value > Plastic
Plot > Strain > Value > Total
There are also two different ways of presenting the strain:
Plot > Strain > Value > Induced Strain
Plot > Strain > Value > Absolute Strain
The contour range is set using
Plot > Range
Any of these components can be added to the contouring toolbar if desired.
Tools > Configure Contouring Toolbar > Strain
The user may find it handy to add the
More Strain Components
button to the contouring toolbar for quick access to all strain components.
4.3.2.4
Maximum Shear Strain
Contours the maximum shear strain ½(
1
-
3
)
In elastic analysis the major principal stress is normally used with the minor principal stress and the
Mohr-Coulomb or Hoek-Brown strength criterion to estimate the amount of damage due to overstressing. By contrast, in non-linear analysis the stresses can never exceed the strength unless
some creep is used. In this latter case, viscous creep can allow stress states above the failure
criterion, thus indicating a lack of static equilibrium. Hence for non-linear analysis one normally
directly considers the amount of non-linear strain or the strain rate predicted by the model
Mohr-Coulomb in 3D FF blocks
Note that there are three components of strain that can be contoured:
Plot > Strain > Value > Elastic
Plot > Strain > Value > Plastic
Plot > Strain > Value > Total
There are also two different ways of presenting the strain:
Plot > Strain > Value > Induced Strain
Plot > Strain > Value > Absolute Strain
The contour range is set using
Plot > Range
Any of these components can be added to the contouring toolbar if desired
Tools > Configure Contouring Toolbar > Strain
The user may find it handy to add the
More Strain Components
Map3D International Ltd 1990-2015
Menu Commands
163
button to the contouring toolbar for quick access to all strain components.
4.3.2.5
In-Plane Shear Strain
Contours the maximum shear strain acting on the grid plane, and the strain component normal to
the grid plane or parallel to a line grid.
Plot > Grid Selection
To calculate the in-plane strains, the strain state at each point on the grid plane is reoriented to
determine the maximum shear strain parallel to the grid plane and the strain normal to the plane.
Note that ip is oriented normal to the grid plane and parallel to the direction of a line grid.
Line Grid
ni
Grid plane
ni
si
Dip
direction
si
Dip
direction
Dip of
Plunge of
grid plane
Plunge of normal
dip direction is measured positive clockwise from the y-axis.
normal
to grid plane
dip of the plane is measured positive down from the horizontal (i.e. the dip direction).
plunge of the normal is measured positive down (i.e. negative up) from the horizontal.
In elastic analysis the maximum in-plane shear stress is normally used with the in-plane normal
stress and the Mohr-Coulomb strength criterion
Mohr-Coulomb in 3D FF blocks
to estimate the amount of damage due to over-stressing. By contrast, in non-linear analysis the
stresses can never exceed the strength unless some creep is used. In this latter case, viscous
creep can allow stress states above the failure criterion, thus indicating a lack of static equilibrium.
Hence for non-linear analysis one normally directly considers the amount of non-linear strain or the
strain rate predicted by the model
Mohr-Coulomb in DD planes
to estimate the amount of slip due to over-stressing, on a fault, joint set or bedding plane oriented in
the same way as the grid plane. Since these parameters are orientation dependant, this criterion is
representative for anisotropic rock mass stability.
Note that there are three components of strain that can be contoured:
Plot > Strain > Value > Elastic
Plot > Strain > Value > Plastic
Plot > Strain > Value > Total
There are also two different ways of presenting the strain:
Plot > Strain > Value > Induced Strain
Plot > Strain > Value > Absolute Strain
The contour range is set using
Map3D International Ltd 1990-2015
164
Map3D User's Manual
Plot > Range
Any of these components can be added to the contouring toolbar if desired
Tools > Configure Contouring Toolbar > Strain
The user may find it handy to add the
More Strain Components
button to the contouring toolbar for quick access to all strain components.
Related topics:
Plot > Strain > e1i
Plot > Strain > e3i
Plot > Strain > esu
Plot > Strain > enu
4.3.2.7
In-plane Maximum
In-plane Minimum
Ubiquitous-plane Shear
Ubiquitous-plane Normal
In-Plane Maximum Strain
Contours the maximum and minimum strains tangential to the currently selected grid plane or
perpendicular to a line grid.
Plot > Grid Selection
To calculate the maximum and minimum in-plane strains, the strains tangential to the grid plane are
determined, then resolved to give the maximum and minimum values. Note that ni is oriented normal
to the grid plane and parallel to the direction of a line grid. Also note that ni , 1i and 3i are
perpendicular to one another.
Line Grid
ni
Grid plane
ni
1i
Dip
direction
1i
3i
Dip
direction
Dip of
Plunge of
grid plane
Plunge of normal
dip direction is measured positive
clockwise from the y-axis.
normal
to grid plane
dip of the plane is measured positive down from the horizontal (i.e. the dip direction).
plunge of the normal is measured positive down (i.e. negative up) from the horizontal.
3i
Note that there are three components of strain that can be contoured:
Plot > Strain > Value > Elastic
Plot > Strain > Value > Plastic
Plot > Strain > Value > Total
There are also two different ways of presenting the strain:
Plot > Strain > Value > Induced Strain
Plot > Strain > Value > Absolute Strain
Map3D International Ltd 1990-2015
Menu Commands
165
The contour range is set using
Plot > Range
This component can be added to the contour toolbar if desired
Tools > Configure Contouring Toolbar > Strain
The user may find it handy to add the
More Strain Components
button to the contouring toolbar for quick access to all strain components.
Related topics:
Plot > Strain > esi
Plot > Strain > eni
Plot > Strain > e1u
Plot > Strain > e3u
4.3.2.9
In-plane Shear
In-plane Normal
Ubiquitous-plane Maximum.
Ubiquitous-plane Minimum.
Ubiquitous-Plane Shear Strain
Contours the maximum shear strain acting on ubiquitous plane #1, and the strain component normal
to this plane.
To calculate the ubiquitous strains, the strain state at each point on the grid plane is reoriented to
determine the maximum shear strain parallel to the ubiquitous plane and the strain normal to the
ubiquitous plane. Note that nu is oriented normal to the ubiquitous plane and is not parallel to the
direction of a line grid.
Line Grid
nu
Ubiquitous plane
nu
su
Dip
direction
su
Dip
direction
Dip of
ubiquitous plane
Plunge of normal to
ubiquitous plane
Plunge of
normal
dip direction is measured positive clockwise from the y-axis.
dip of the plane is measured positive down from the horizontal (i.e. the dip direction).
plunge of the normal is measured positive down (i.e. negative up) from the horizontal.
The orientation of the ubiquitous shear plane is set using
Plot > Strength Factors > Ubiquitous Parameters
Note that there are three components of strain that can be contoured:
Plot > Strain > Value > Elastic
Plot > Strain > Value > Plastic
Plot > Strain > Value > Total
Map3D International Ltd 1990-2015
166
Map3D User's Manual
There are also two different ways of presenting the strain:
Plot > Strain > Value > Induced Strain
Plot > Strain > Value > Absolute Strain
The contour range is set using
Plot > Range
This component can be added to the contour toolbar if desired
Tools > Configure Contouring Toolbar > Strain
The user may find it handy to add the
More Strain Components
button to the contouring toolbar for quick access to all strain components.
Related topics:
Plot > Strain > e1u
Plot > Strain > e3u
Plot > Strain > esi
Plot > Strain > eni
Ubiquitous-plane Maximum.
Ubiquitous-plane Minimum.
In-plane Shear
In-plane Normal
4.3.2.11 Ubiquitous-Plane Maximum Strain
Contours the maximum and minimum strains tangential to the ubiquitous plane #1.
To calculate the ubiquitous strains, the strain state at each point on the grid plane is reoriented to
determine the maximum and minimum strain parallel to the ubiquitous plane. Note that nu is not
oriented normal to the ubiquitous plane and is not parallel to the direction of a line grid.
nu
Line Grid
Ubiquitous plane
nu
1u
Dip
direction
1u
3u
Dip of
ubiquitous plane
Dip
direction
3u
Plunge of normal to
ubiquitous plane
Plunge of
normal
dip direction is measured positive clockwise from the y-axis.
dip of the plane is measured positive down from the horizontal (i.e. the dip direction).
plunge of the normal is measured positive down (i.e. negative up) from the horizontal.
The orientation of the ubiquitous shear plane is set using
Plot > Strength Factors > Ubiquitous Parameters
Map3D International Ltd 1990-2015
Menu Commands
167
Note that there are three components of strain that can be contoured:
Plot > Strain > Value > Elastic
Plot > Strain > Value > Plastic
Plot > Strain > Value > Total
There are also two different ways of presenting the strain:
Plot > Strain > Value > Induced Strain
Plot > Strain > Value > Absolute Strain
The contour range is set using
Plot > Range
This component can be added to the contour toolbar if desired
Tools > Configure Contouring Toolbar > Strain
The user may find it handy to add the
More Strain Components
button to the contouring toolbar for quick access to all strain components.
Related topics:
Plot > Strain > esi
Plot > Strain > eni
Plot > Strain > e1u
Plot > Strain > e3u
Ubiquitous-plane Shear
Ubiquitous-plane Normal
In-plane Maximum.
In-plane Minimum.
4.3.2.13 Octahedral Shear Strain
Contours the octahedral shear strain
oct
= ¹/3 [ (
1
-
2)²
+(
2
-
3)²
+(
3
-
1)²
]½
and the volumetric strain
v
vol
=(
1
+
2
+
3)
In elastic analysis the major principal stress is normally used with the minor principal stress and the
Mohr-Coulomb or Hoek-Brown strength criterion to estimate the amount of damage due to overstressing.
By contrast, in non-linear analysis the stresses can never exceed the strength unless some creep is
used. In this latter case, viscous creep can allow stress states above the failure criterion, thus
indicating a lack of static equilibrium. Hence for non-linear analysis one normally directly considers
the amount of non-linear strain or the strain rate predicted by the model
Mohr-Coulomb in 3D FF blocks
Note that there are three components of strain that can be contoured:
Plot > Strain > Value > Elastic
Plot > Strain > Value > Plastic
Plot > Strain > Value > Total
There are also two different ways of presenting the strain:
Map3D International Ltd 1990-2015
168
Map3D User's Manual
Plot > Strain > Value > Induced Strain
Plot > Strain > Value > Absolute Strain
The contour range is set using
Plot > Range
This component can be added to the contour toolbar if desired
Tools > Configure Contouring Toolbar > Strain
The user may find it handy to add the
More Strain Components
button to the contouring toolbar for quick access to all strain components.
4.3.2.15 Exx Strain Component
Contours the Cartesian stress components.
Plot > Strain >
xx
Cartesian Strain Component normal strain in the direction of the x-axis
Plot > Strain >
yy
Cartesian Strain Component normal strain in the direction of the y-axis
Plot > Strain >
zz
Cartesian Strain Component normal strain in the direction of the z-axis
xy
Cartesian Strain Component normal strain in the direction of the x-y
yz
Cartesian Strain Component normal strain in the direction of the y-z
xz
Cartesian Strain Component normal strain in the direction of the x-z
Plot > Strain >
plane
Plot > Strain >
plane
Plot > Strain >
plane
Note that there are three components of strain that can be contoured:
Plot > Strain > Value > Elastic
Plot > Strain > Value > Plastic
Plot > Strain > Value > Total
There are also two different ways of presenting the strain:
Plot > Strain > Value > Induced Strain
Plot > Strain > Value > Absolute Strain
The contour range is set using
Plot > Range
This component can be added to the contour toolbar if desired
Tools > Configure Contouring Toolbar > Strain
The user may find it handy to add the
More Strain Components
button to the contouring toolbar for quick access to all strain components.
Map3D International Ltd 1990-2015
Menu Commands
169
4.3.2.21 Value
4.3.2.21.1 Elastic strain
Selects the elastic, plastic or total strain component.
For details, refer to
Mohr-Coulomb in 3D FF blocks.
4.3.2.21.4 Induced Strain
Plot the induced or absolute strain component.
Induced strain is the strain without the pre-mining strain contribution. This represents the strain
change since the pre-mining condition.
Absolute strain is the strain including the pre-mining strain contribution.
Also see:
Plot > Stress > Value > Induced Strain
Plot > Stress > Value > Absolute Strain
4.3.3
Displacement
4.3.3.1
Total displacement
Activate the displacement toolbar – after Map3D BEM analysis.
This toolbar is meant to provide quick access to displacement components.
Plot > Displacement >
displacement
Plot > Displacement >
total
=(
x²
+
y²
+
z²
)½ Total Displacement contours the total
x
X-Displacement contours the x-displacement component
Plot > Displacement >
y
Y-Displacement contours the y-displacement component
Plot > Displacement >
z
Z-Displacement contours the z-displacement component
To calculate the in-plane displacements, the displacement state at each point on the grid plane is
reoriented to determine the maximum displacement parallel to the grid plane and the displacement
normal to the plane. Note that ni is oriented normal to the grid plane and parallel to the direction of
a line grid.
Plot > Displacement >
the grid plane.
Plot > Displacement >
tangential to the grid plane.
Map3D International Ltd 1990-2015
ni
mi
In-plane normal contours the displacement component normal to
In-plane maximum contours the maximum displacement
170
Map3D User's Manual
Line Grid
ni
Grid plane
ni
mi
Dip
direction
mi
Dip
direction
Dip of
grid plane
Plunge of
normal
Plunge of normal
to grid plane
To calculate the ubiquitous-plane #1 displacements, the displacement state at each point on the grid
plane is reoriented to determine the maximum displacement parallel to the ubiquitous plane #1 and
the displacement normal to the plane. Note that mi is not oriented normal to the grid plane.
Plot > Displacement > nu Ubiquitous-plane normal contours the displacement component
normal to the ubiquitous plane.
Plot > Displacement > mu Ubiquitous-plane maximum contours the maximum displacement
tangential to the ubiquitous plane.
Line Grid
nu
Ubiquitous plane
nu
mu
Dip
direction
mu
Dip
direction
Dip of
ubiquitous plane
Plunge of normal to
ubiquitous plane
Plunge of
normal
dip direction is measured positive clockwise from the y-axis.
dip of the plane is measured positive down from the horizontal (i.e. the dip direction).
plunge of the normal is measured positive down (i.e. negative up) from the horizontal.
Notes:
The displacement toolbar can only be activated after the model building - CAD Stage
Map3D Analysis Stages.
The orientation of the ubiquitous shear plane is set using
Plot > Strength Factors > Ubiquitous Parameters
The contour range is set using
Plot > Range
This component can be added to the contour toolbar if desired
Map3D International Ltd 1990-2015
Menu Commands
171
Tools > Configure Contouring Toolbar > Displacement
The user may find it handy to add the
More Displacement Components
button to the contouring toolbar for quick access to all displacement components.
4.3.4
User defined plot
Contours a user defined stress component.
Stresses:
S1 S2 S3 principal stress components
1
2
3
Sxx Syy Szz Sxy Syz Sxz Cartesian stress components
Tmax maximum shear stress ½(
Toct octahedral shear stress
Smean mean stress
mean
1
-
oct = ¹/3 [(
= ¹/3 (
1
xx
yy
zz xy yz zx
3)²
+(
3
ip
ip
3)
+
2
1
+
-
2)²
+(
2
-
-
1)²]
½
3)
Ti Si maximum shear and normal stress in the grid plane
S1i S3i maximum and minimum stress tangential to the grid plane
Tu Su maximum shear and normal stress in the ubiquitous-plane
ubiquitous shear plane is set using
1i
3i
ub.
ub
The orientation of the
Plot > Strength Factors > Ubiquitous Parameters
S1u S3u maximum and minimum stress tangential to the ubiquitous plane
1u
3u
Effective/Total effective stress or total stress components. These options are only used in
Map3D Thermal-Fluid Flow, as this code allows for calculation of steady state pore pressure
distributions.
Induced/Absolute induced stress or absolute stress components (i.e. the stress without the
pre-mining stress contribution).
Strains:
e1 e2 e3 major principal strain
1
2
3
exx eyy ezz exy eyz exz Cartesian strain components
Map3D International Ltd 1990-2015
xx
yy
zz xy
yz
zx
172
Map3D User's Manual
emax maximum shear strain ½(
1
eoct octahedral shear strain
oct
= ¹/3 [(
evol volumetric strain
1
vol
=(
+
-
2
3)
+
3
1
-
2)²
+(
2
-
3)²
+(
3
si
ni
-
1)²]
½
)
esi eni maximum shear and normal strain in the grid plane
e1i e3i maximum and minimum strain tangential to the grid plane
esu enu maximum shear and normal strain in the ubiquitous-plane
1i
3i
su
nu
e1u e3u maximum and minimum strain tangential to the ubiquitous plane
1u
3u
Elastic/Plastic/Total elastic, plastic or total strain components. These options are only used in
Map3D Non-Linear, as this code allows for calculation of non-linear strains.
Induced/Absolute induced strain or absolute strain components (i.e. the stress without the premining stress contribution).
Displacements:
ut total displacement, its trend and plunge
t
ux uy uz Cartesian displacement components
uni displacement normal to the grid plane
x
y
z
ni
umi maximum displacement tangential to the grid plane
unu displacement normal to the ubiquitous plane
mi
nu
umu maximum displacement tangential to the ubiquitous plane
mu
Thermal/Fluid Flow:
t temperature/head
qt total flow, its trend and plunge.
qx qy qz Cartesian flow components.
qni displacement normal to the grid plane.
qmi maximum displacement tangential to the grid plane.
qnu displacement normal to the ubiquitous plane.
qmu maximum displacement tangential to the ubiquitous plane.
Functions:
sin() cos() tan() sine, cosine and tangent trigonometric functions.
asin() acos() atan() Inverse trigonometric functions.
sqrt() square root function.
log() natural logarithmic function.
abs() absolute value.
exp() exponential function (antilogarithm).
n() an() normal and inverse normal probability distribution. The argument used with the normal
distribution is ( 1/s) which represents the excess major principal stress divided by the
standard deviation (see
).
t(,) at(,) t and inverse t probability distribution. The argument used with the t distribution is (
1/(sg),n-2) where
1 represents the excess major principal stress, s represents the standard
deviation, n represents the number of data points, and g represents the factor [1 + 1/n + (
m )²/s3 ²/(n-1)]
deviation of
½
3
where
m
represents the mean value of
3,
3
-
and s3 represents the standard
.
Map3D International Ltd 1990-2015
Menu Commands
173
Strength:
ds1 excess major principal stress
1
dtmax excess maximum shear stress
max
dtoct excess octahedral shear stress
oct
dtip excess in-plane shear stress
ip
dtub excess ubiquitous-plane shear stress
ub
UCS phi q Mohr-Coulomb strength parameters defined using
Rockmass Strength Parameters.
Plot > Strength Factors >
Location:
x y z coordinate of grid point.
Miscellaneous:
Dgrid distance to the nearest surface from each grid point.
Dol distance to the nearest grid Dgrid divided by the grid spacing Lgrid.
f1 f2... user defined material parameters. These can be defined using Plot > Properties >
Material Properties > User defined Parameters.
Operators:
+ - * / ^ addition, subtraction, multiplication, division and exponentiation operators. Note that
exponentials are computed first, followed by multiplication and division and finally addition and
subtraction.
() [] {} styles of brackets. Pairs of brackets must match.
> maximum value. For example if the plot equation is specified as s1 > 10, the larger of s1 or
10 will be plotted.
< minimum value. For example if the plot equation is specified as s1 < 10, the smaller of s1 or
10 will be plotted.
" " comment.
Other:
phi atan(Ti/Si) plots the friction angle necessary to resist slip on a fault, joint set or bedding
plane oriented in the same way as the grid plane.
Mohr-Coulomb 60 + S3*tan(45+30/2)^2 plots the strength for a Mohr-Coulomb criterion with
a UCS of 60 and friction angle of 30°. The equation UCS + S3*q or alternatively UCS +S3*tan
(45+phi/2)^2 could also be used here if the strength parameters have been previously defined
using
Plot > Strength Factors > Rockmass Strength Parameters.
T-distribution T[ds1/f1/sqrt(1+1/f2+(s3-f3)^2/(f2-1)/f4^2),f2-2]*100 plots the probability of
failure using the t-distribution. Here f1 represents the standard deviation s, f2 represents the
number of data points n, f3 represents the mean value of 3, and f4 represents the standard
deviation of 3. f1, f2, f3 and f4 can be defined using Plot > Properties > Material Properties >
User defined Parameters or the actual numeric values can be used.
Range – sets the contour range.
Plot – regenerates the contour plot.
The pull-down window allows you to store up to 20 different equations. These are stored between
Map3D sessions in the map3d.ini file.
Map3D International Ltd 1990-2015
174
Map3D User's Manual
4.3.5
Thermal/Flux
4.3.5.1
Plot > Thermal/Flux
Activate the Thermal/Flux toolbar – after Map3D Thermal-Fluid Flow BEM analysis.
Parameters for Thermal/Flux Analysis are described in Expansion Coefficient and Conductivity.
This toolbar is meant to provide quick access to thermal/flux components.
Plot > Flux > t/h Temperature/Head
Plot > Flux > qtotal = ( qx² + qy² + qz² )½ Total Flux contours the total displacement
Plot > Flux > qx X-Flux contours the x-flux component
Plot > Flux > qy Y-Flux contours the y-flux component
Plot > Flux > qz Z-Flux contours the z-flux component
To calculate the in-plane flux, the flux state at each point on the grid plane is reoriented to determine
the maximum flux parallel to the grid plane and the flux normal to the plane. Note that qni is oriented
normal to the grid plane and parallel to the direction of a line grid.
Plot > Flux > qni In-plane normal contours the flux component normal to the grid plane.
Plot > Flux > qmi In-plane maximum contours the maximum flux tangential to the grid plane.
Line Grid
qni
Grid plane
qni
qmi
Dip
direction
qmi
Dip
direction
Dip of
grid plane
Plunge of normal
to grid plane
Plunge of
normal
To calculate the ubiquitous-plane #1 flux, the flux state at each point on the grid plane is reoriented
to determine the maximum flux parallel to the ubiquitous plane #1 and the flux normal to the plane.
Note that mi is not oriented normal to the grid plane.
Plot > Flux > qnu Ubiquitous-plane normal contours the flux component normal to the
ubiquitous plane.
Plot > Flux > qmu Ubiquitous-plane maximum contours the maximum flux tangential to the
ubiquitous plane.
Map3D International Ltd 1990-2015
Menu Commands
175
Line Grid
qnu
Ubiquitous plane
qnu
qmu
Dip
direction
qmu
Dip
direction
Dip of
ubiquitous plane
Plunge of normal to
ubiquitous plane
Plunge of
normal
dip direction is measured positive clockwise from the y-axis.
dip of the plane is measured positive down from the horizontal (i.e. the dip direction).
plunge of the normal is measured positive down (i.e. negative up) from the horizontal.
Notes:
The flux toolbar can only be activated after the model building - CAD Stage
Map3D Analysis Stages.
The orientation of the ubiquitous shear plane is set using
Plot > Strength Factors > Ubiquitous Parameters
The contour range is set using
Plot > Range
This component can be added to the contour toolbar if desired
Tools > Configure Contouring Toolbar > Displacement
The user may find it handy to add the
More Flow Components
button to the contouring toolbar for quick access to all flow components.
4.3.6
Strength Factors
4.3.6.1
Rockmass Strength Parameters
Sets up the strength parameters for generating strength factor contour plots in terms of principal
stress components.
In elastic analysis the major and minor principal stresses can be used with the Mohr-Coulomb,
Hoek-Brown or Drucker-Prager strength criteria to estimate the amount of damage due to overstressing. Since none of the parameters have any orientation sensitivity, this criterion is
representative for homogeneous rock mass stability.
By contrast, in non-linear analysis the stresses can never exceed the strength unless some creep is
used. In this latter case, viscous creep can allow stress states above the failure criterion, thus
indicating a lack of static equilibrium. Hence for non-linear analysis one normally directly considers
the amount of non-linear strain or the strain rate predicted by the model
Map3D International Ltd 1990-2015
176
Map3D User's Manual
Mohr-Coulomb in 3D FF blocks.
Mohr-Coulomb
Material # specifies the material number. Material #1 represents the host material. Other material
numbers are used to define alternate material zones such as ore, fault gouge, backfill etc.
Standard Deviation specifies the uncertainty you have in the failure criterion measured in the
direction.
1
Material Type specifies the material type: Mohr-Coulomb, Hoek-Brown, Drucker-Prager or None.
Tension Cutoff, UCS, Friction Angle the Mohr-Coulomb criterion defines strength in terms of
principal stresses as follows:
Mohr-Coulomb
= UCS + q
3
q = tan²(45+ /2)
1
UCS
Tension cutoff and UCS are specified in units of stress (MPa or psi). Friction angle is specified in
degrees. Tension
Cuttoff
Plot – regenerates the contour plot.
Hoek-Brown
Map3D International Ltd 1990-2015
Menu Commands
177
Material # specifies the material number. Material #1 represents the host material. Other material
numbers are used to define alternate material zones such as ore, fault gouge, backfill etc.
Material Type specifies the material type: Mohr-Coulomb, Hoek-Brown, Drucker-Prager or None.
Standard Deviation specifies the uncertainty you have in the failure criterion measured in the
direction (specified in units of stress, MPa or psi).
1
Tension Cutoff, Sigma:C, m and s the Hoek-Brown criterion defines strength in terms of principal
stresses as follows:
Hoek-Brown
=
c
+ m
c
+s
c²
s
Tension cutoff and Sigma:C are specified in units of stress (MPa or psi).
Tension
Plot – regenerates
Cuttoff the contour plot.
Drucker-Prager
Material # specifies the material number. Material #1 represents the host material. Other material
numbers are used to define alternate material zones such as ore, fault gouge, backfill etc.
Map3D International Ltd 1990-2015
178
Map3D User's Manual
Material Type specifies the material type: Mohr-Coulomb, Hoek-Brown, Drucker-Prager or None.
Standard Deviation specifies the uncertainty you have in the failure criterion measured in the
direction.
oct
Tension Cutoff, UCS, Friction Angle the Drucker-Prager criterion defines strength in terms of
principal stresses as follows:
Drucker-Prager
oct
= [UCS + (q-1)
m]
2 /(2+q)
(q-1) 2 /(2+q)
1
UCS 2 /(2+q)
q = tan²(45+ /2)
where
oct
Tension
1 - 2)² + (
Cuttoff
= ¹/3 [(
mean
= ¹/3 (
1
+
2
+
2
-
3)²
+(
3
-
1)²]
½ m
3)
Tension cutoff and UCS are specified in units of stress (MPa or psi). Friction angle is specified in
degrees.
Note that the strength parameters have been chosen so that the criterion simplifies to the MohrCoulomb criterion when 2 equals 3.
Plot – regenerates the contour plot.
Related topics:
Plot > Strength Factor > Probability N-distribution
Plot > Strength Factor > SF-A - Strength/Stress
Plot > Strength Factor > SF-B - Strength/Stress
Plot > Strength Factors > SF-C - Strength/Stress
Plot > Strength Factors > dS1 - Excess Stress
Plot > Strength Factors > dTmax - Excess Stress
Plot > Strength Factors > dToct - Excess Stress
Plot > Strength Factors > In-plane Parameters
Plot > Strength Factors > Ubiquitous Parameters
Map3D International Ltd 1990-2015
Menu Commands
4.3.6.2
179
S1 Excess Stress
Contours the strength using method "A".
In elastic analysis the major and minor principal stresses can be used with the Mohr-Coulomb or
Hoek-Brown strength criteria
Plot > Strength Factors > Strength Parameters
to estimate the amount of damage due to over-stressing. Since none of the parameters have any
orientation sensitivity, this criterion is representative for homogeneous rock mass stability.
By contrast, in non-linear analysis the stresses can never exceed the strength unless some creep is
used. In this latter case, viscous creep can allow stress states above the failure criterion, thus
indicating a lack of static equilibrium. Hence for non-linear analysis one normally directly considers
the amount of non-linear strain or the strain rate predicted by the model
Mohr-Coulomb in 3D FF blocks.
Method "A" assumes that the stress path to failure takes place by increasing 1 without loss of
confinement. This is representative of a pillar failure where 1 is considered to be the driving force.
Mohr-Coulomb
q = tan²(45+ /2)
1
UCS
UCS + q
3
Plot > Strength Factors > SF-A Strength/Stress can be determined as ( UCS + q
Tension
Plot
> Strength Factors > SF/A Strength/Stress can be determined as
Cutoff
Plot > Strength Factors >
3
1
excess stress can be determined as
1
1
=
the same as in method "B".
Map3D International Ltd 1990-2015
1
)/
/ ( UCS + q
1
1
3
- ( UCS + q
)
Plot > Strength Factors > N(
3
/std) Probability using the Normal distribution.
)
180
Map3D User's Manual
Hoek-Brown
c
s
+ m
+s
c
c²
Plot > Strength Factors > SF-A Strength/Stress can be determined as [
Tension
c²) ] / Cutoff
1
Plot > Strength Factors > SF/A Strength/Stress can be determined as
+s
c²)
c 3
+s
3
+ (m
1
/[
3
=
1
-[
c 3
+ (m
+s
c 3
]
Plot > Strength Factors >
1
excess stress can be determined as
1
3
+ (m
c²) ]
Plot > Strength Factors > N(
1 /std)
Probability using the Normal distribution.
the same as in method "B".
Drucker-Prager is only defined using method "C".
Strength parameters are setup using
Plot > Strength Factors > Strength Parameters
Related topics:
Plot > Strength Factor > SF-B - Strength/Stress
Plot > Strength Factors > SF-C - Strength/Stress
Plot > Strength Factors > dTmax - Excess Stress
Plot > Strength Factors > dToct - Excess Stress
Plot > Strength Factors > In-plane Parameters
Plot > Strength Factors > Ubiquitous Parameters
4.3.6.3
Tmax Excess Stress
Contours the strength using method "C".
In elastic analysis the major and minor principal stresses can be used with the Mohr-Coulomb or
Hoek-Brown strength criteria
Plot > Strength Factors > Strength Parameters
to estimate the amount of damage due to over-stressing. Since none of the parameters have any
orientation sensitivity, this criterion is representative for homogeneous rock mass stability.
By contrast, in non-linear analysis the stresses can never exceed the strength unless some creep is
used. In this latter case, viscous creep can allow stress states above the failure criterion, thus
Map3D International Ltd 1990-2015
Menu Commands
181
indicating a lack of static equilibrium. Hence for non-linear analysis one normally directly considers
the amount of non-linear strain or the strain rate predicted by the model
Mohr-Coulomb in 3D FF blocks.
Method "C" assumes that the stress path to failure takes place by increasing 1 while loosing
confinement. This is representative of an abutment failure where 1 - 3 is considered to be the
driving force.
Mohr-Coulomb
q = tan²(45+ /2)
1
max
= ½
- )
[ UCS + ½ ( 1+ 3)(q–1)]/(q+1)
UCS
=
Plot > Strength Factors > SF-C Strength/Stress can be determined as [ UCS + ½(
Tension
q-1) ]/[ ½(
1 - 3)(q+1) ]
Cutoff
Plot > Strength Factors > SF/C Strength/Stress can be determined as [ ½(
UCS + ½(
1+ 3)
= ½(
=[
1
3)(q+1)
(
]/[
(q-1) ]
Plot > Strength Factors >
max
1-
1+ 3)
1-
3)
excess stress can be determined as
max
- [ UCS + ½(
- ( UCS + q
3)
1+ 3)
(q-1) ]/(q+1)
]/(q+1)
Hoek-Brown
1
max
=½ ( 1- 3)
½ 1/ 16 m² c ² + ½( 1+
c
3)
m
c
+s
c²
- 1/ 8 m
c
s
1= 3
Plot > Strength Factors > SF-C Strength/Stress can be determined as { [ 1/16 m² c² + ½(
Tension
1
+
3)
mCutoff
c + s c²] - ¼ m c}/(
1
-
3)
3
Plot > Strength Factors > SF/C Strength/Stress can be determined as (
Map3D International Ltd 1990-2015
1
-
3)/{
[ 1/16 m²
182
Map3D User's Manual
c²
+ ½(
1
+
3)
m
c
+s
c²]
- ¼m
Plot > Strength Factors >
max
= ½(
1
-
3
c}
max
excess stress can be determined as
) - ½{ [ 1/16 m² c² + ½(
1
+
3
)m
c
+s
²] - ¼ m
c
c
}
Drucker-Prager
oct
(q-1) 2 /(2+q)
1
oct
q = tan²(45+ /2)
UCS 2 /(2+q)
[UCS + (q-1)
m]
2/(2+q)
SF-C
Strength/Stress can be determined as [ UCS + (q–1)
Tension
m
SF-C
Stress/Strength can be determined as
Cutoff
Dtoct Excess can be determined as
oct
oct
mean
/[ UCS + (q–1)
- [ UCS + (q–1)
mean
]
]
2) /[
mean
]
oct
(q+2) ]
2) /(q+2)
2) /(q+2)
where
q = tan²(45+ /2)
oct = ¹/3 [( 1 mean
= ¹/3 (
1
+
2
)² + (
2
+
3
2
-
3
)² +(
3
-
1
)²]
)
Note that the strength parameters have been chosen so that the criterion simplifies to the MohrCoulomb criterion when 2 equals 3.
Strength parameters are setup using
Plot > Strength Factors > Strength Parameters
Related topics:
Plot > Strength Factor > SF-A - Stress/Strength
Plot > Strength Factors > SF-B - Stress/Strength
Plot > Strength Factors > dS1 - Excess Stress
Plot > Strength Factors > In-plane Parameters
Plot > Strength Factors > Ubiquitous Parameters
4.3.6.5
NS1 Normal Probability
Contours the strength using method "A".
In elastic analysis the major and minor principal stresses can be used with the Mohr-Coulomb or
Hoek-Brown strength criteria
Plot > Strength Factors > Strength Parameters
Map3D International Ltd 1990-2015
Menu Commands
183
to estimate the amount of damage due to over-stressing. Since none of the parameters have any
orientation sensitivity, this criterion is representative for homogeneous rock mass stability.
By contrast, in non-linear analysis the stresses can never exceed the strength unless some creep is
used. In this latter case, viscous creep can allow stress states above the failure criterion, thus
indicating a lack of static equilibrium. Hence for non-linear analysis one normally directly considers
the amount of non-linear strain or the strain rate predicted by the model
Mohr-Coulomb in 3D FF blocks.
Method "A" assumes that the stress path to failure takes place by increasing 1 without loss of
confinement. This is representative of a pillar failure where 1 is considered to be the driving force.
Mohr-Coulomb
q = tan²(45+ /2)
1
UCS
UCS + q
3
Plot > Strength Factors > SF-A Strength/Stress can be determined as ( UCS + q
Tension
Plot
> Strength Factors > SF/A Strength/Stress can be determined as
Cutoff
Plot > Strength Factors >
3
excess stress can be determined as
1
1
1
3
)/
/ ( UCS + q
=
1
1
3
)
- ( UCS + q
)
Plot > Strength Factors > N(
1 /std)
Probability using the Normal distribution.
the same as in method "B".
Hoek-Brown
c
s
+ m
c
+s
c²
Plot > Strength Factors > SF-A Strength/Stress can be determined as [
Tension
Cutoff
Map3D International Ltd 1990-2015
3
+ (m
c 3
+s
184
Map3D User's Manual
c²)
]/
1
Plot > Strength Factors > SF/A Strength/Stress can be determined as
+s
/[
3
=
1
-[
+ (m
c 3
²) ]
c
Plot > Strength Factors >
c 3
1
+s
c²)
1
excess stress can be determined as
1
3
+ (m
]
Plot > Strength Factors > N(
1
/std) Probability using the Normal distribution.
the same as in method "B".
Drucker-Prager is only defined using method "C".
Strength parameters are setup using
Plot > Strength Factors > Strength Parameters
Related topics:
Plot > Strength Factor > SF-B - Strength/Stress
Plot > Strength Factors > SF-C - Strength/Stress
Plot > Strength Factors > dTmax - Excess Stress
Plot > Strength Factors > dToct - Excess Stress
Plot > Strength Factors > In-plane Parameters
Plot > Strength Factors > Ubiquitous Parameters
4.3.6.7
SF-B Strength/Stress
Contours the strength using method "B".
In elastic analysis the major and minor principal stresses can be used with the Mohr-Coulomb or
Hoek-Brown strength criteria
Plot > Strength Factors > Strength Parameters
to estimate the amount of damage due to over-stressing. Since none of the parameters have any
orientation sensitivity, this criterion is representative for homogeneous rock mass stability.
By contrast, in non-linear analysis the stresses can never exceed the strength unless some creep is
used. In this latter case, viscous creep can allow stress states above the failure criterion, thus
indicating a lack of static equilibrium. Hence for non-linear analysis one normally directly considers
the amount of non-linear strain or the strain rate predicted by the model
Mohr-Coulomb in 3D FF blocks.
Method "B" assumes that the stress path to failure takes place by increasing 1 without loss of
confinement. This is representative of a pillar failure where 1 - 3 is considered to be the driving
force.
Map3D International Ltd 1990-2015
Menu Commands
185
Mohr-Coulomb
q = tan²(45+ /2)
1
UCS + q
3-
UCS
=
Plot > Strength Factors > SF-B Strength/Stress can be determined as ( UCS + q
Tension
( 1 - 3) Cutoff
Plot > Strength Factors > SF/B Strength/Stress can be determined as (
3
-
3)/(
-
3 )/
UCS + q
3)
Plot > Strength Factors >
3
1-
3
excess stress can be determined as
1
1
=
1
- ( UCS + q
)
Plot > Strength Factors > N(
1 /std)
Probability using the Normal distribution.
the same as in method "A".
Hoek-Brown
m
c
c
+s
c²
s
=
Plot > Strength Factors > SF-B Strength/Stress can be determined as (m
Tension
- 3) Cutoff
1
Plot > Strength Factors > SF/B Strength/Stress can be determined as (
s
1
c 3
-
3
+s
)/ (m
c²)/(
c 3
c²)
Plot > Strength Factors >
c 3
+s
c²)
1
excess stress can be determined as
1
=
1
-[
]
Plot > Strength Factors > N(
the same as in method "A".
Map3D International Ltd 1990-2015
1 /std)
Probability using the Normal distribution.
3
+ (m
+
186
Map3D User's Manual
Drucker-Prager is only defined using method "C".
Strength parameters are setup using
Plot > Strength Factors > Strength Parameters
Related topics:
Plot > Strength Factor > SF-A - Strength/Stress
Plot > Strength Factors > SF-C - Strength/Stress
Plot > Strength Factors > dTmax - Excess Stress
Plot > Strength Factors > dToct - Excess Stress
Plot > Strength Factors > In-plane Parameters
Plot > Strength Factors > Ubiquitous Parameters
4.3.6.8
SF-C Strength/Stress
Contours the strength using method "C".
In elastic analysis the major and minor principal stresses can be used with the Mohr-Coulomb or
Hoek-Brown strength criteria
Plot > Strength Factors > Strength Parameters
to estimate the amount of damage due to over-stressing. Since none of the parameters have any
orientation sensitivity, this criterion is representative for homogeneous rock mass stability.
By contrast, in non-linear analysis the stresses can never exceed the strength unless some creep is
used. In this latter case, viscous creep can allow stress states above the failure criterion, thus
indicating a lack of static equilibrium. Hence for non-linear analysis one normally directly considers
the amount of non-linear strain or the strain rate predicted by the model
Mohr-Coulomb in 3D FF blocks.
Method "C" assumes that the stress path to failure takes place by increasing 1 while loosing
confinement. This is representative of an abutment failure where 1 - 3 is considered to be the
driving force.
Mohr-Coulomb
q = tan²(45+ /2)
1
max
= ½
- )
[ UCS + ½ ( 1+ 3)(q–1)]/(q+1)
UCS
=
Plot > Strength Factors > SF-C Strength/Stress can be determined as [ UCS + ½(
Tension
q-1) ]/[ ½(
- 3)(q+1) ]
1
Cutoff
Plot > Strength Factors > SF/C Strength/Stress can be determined as [ ½(
1-
1+ 3)
3)(q+1)
(
]/[
Map3D International Ltd 1990-2015
Menu Commands
UCS + ½(
1+ 3)
(q-1) ]
Plot > Strength Factors >
max
= ½(
=[
1
187
1
-
3
excess stress can be determined as
max
) - [ UCS + ½(
- ( UCS + q
3)
1
+
3
) (q-1) ]/(q+1)
]/(q+1)
Hoek-Brown
1
max
=½ ( 1- 3)
½ 1/ 16 m² c ² + ½( 1+
c
3)
m
c
+s
c²
- 1/ 8 m
c
s
1= 3
Plot > Strength Factors > SF-C Strength/Stress can be determined as { [ 1/16 m² c² + ½(
Tension
1
+
3)
mCutoff
c + s c²] - ¼ m c}/(
1
-
3
3)
Plot > Strength Factors > SF/C Strength/Stress can be determined as (
c²
+ ½(
1
+
3)
m
c
+s
c²]
- ¼m
Plot > Strength Factors >
max
= ½(
1
-
3)
[ 1/16 m²
-
3)/{
oct
(q+2) ]
1
c}
max
excess stress can be determined as
- ½{ [ 1/16 m² c² + ½(
1
+
3)
m
c
+s
c²]
- ¼m
c}
Drucker-Prager
oct
(q-1) 2 /(2+q)
1
oct
q = tan²(45+ /2)
UCS 2 /(2+q)
[UCS + (q-1)
m]
2/(2+q)
SF-C
Strength/Stress can be determined as [ UCS + (q–1)
Tension
m
SF-C
Stress/Strength can be determined as
Cutoff
Dtoct Excess can be determined as
where
Map3D International Ltd 1990-2015
oct
oct
mean
/[ UCS + (q–1)
- [ UCS + (q–1)
mean
]
]
2) /[
mean
]
2) /(q+2)
2) /(q+2)
188
Map3D User's Manual
q = tan²(45+ /2)
oct = ¹/3 [( 1 mean
= ¹/3 (
1
+
2
)² + (
2
+
3
2
-
3
)² +(
3
-
1
)²]
)
Note that the strength parameters have been chosen so that the criterion simplifies to the MohrCoulomb criterion when 2 equals 3.
Strength parameters are setup using
Plot > Strength Factors > Strength Parameters
Related topics:
Plot > Strength Factor > SF-A - Stress/Strength
Plot > Strength Factors > SF-B - Stress/Strength
Plot > Strength Factors > dS1 - Excess Stress
Plot > Strength Factors > In-plane Parameters
Plot > Strength Factors > Ubiquitous Parameters
4.3.6.9
SF/A Stress/Strength
Contours the strength using method "A".
In elastic analysis the major and minor principal stresses can be used with the Mohr-Coulomb or
Hoek-Brown strength criteria
Plot > Strength Factors > Strength Parameters
to estimate the amount of damage due to over-stressing. Since none of the parameters have any
orientation sensitivity, this criterion is representative for homogeneous rock mass stability.
By contrast, in non-linear analysis the stresses can never exceed the strength unless some creep is
used. In this latter case, viscous creep can allow stress states above the failure criterion, thus
indicating a lack of static equilibrium. Hence for non-linear analysis one normally directly considers
the amount of non-linear strain or the strain rate predicted by the model
Mohr-Coulomb in 3D FF blocks.
Method "A" assumes that the stress path to failure takes place by increasing 1 without loss of
confinement. This is representative of a pillar failure where 1 is considered to be the driving force.
Mohr-Coulomb
q = tan²(45+ /2)
1
UCS
UCS + q
3
Tension
Cutoff
Map3D International Ltd 1990-2015
Menu Commands
189
Plot > Strength Factors > SF-A Strength/Stress can be determined as ( UCS + q
Plot > Strength Factors > SF/A Strength/Stress can be determined as
Plot > Strength Factors >
3
excess stress can be determined as
1
1
1
3
)/
/ ( UCS + q
=
1
1
3
)
- ( UCS + q
)
Plot > Strength Factors > N(
1 /std)
Probability using the Normal distribution.
the same as in method "B".
Hoek-Brown
c
+ m
s
c
+s
c²
Plot > Strength Factors > SF-A Strength/Stress can be determined as [
Tension
²)
]
/
c
1
Cutoff
Plot > Strength Factors > SF/A Strength/Stress can be determined as
+s
+ (m
1
/[
3
=
1
-[
c 3
+ (m
+s
c 3
c²) ]
Plot > Strength Factors >
c 3
3
+s
c²)
1
excess stress can be determined as
1
]
Plot > Strength Factors > N(
1 /std)
Probability using the Normal distribution.
the same as in method "B".
Drucker-Prager is only defined using method "C".
Strength parameters are setup using
Plot > Strength Factors > Strength Parameters
Related topics:
Plot > Strength Factor > SF-B - Strength/Stress
Plot > Strength Factors > SF-C - Strength/Stress
Plot > Strength Factors > dTmax - Excess Stress
Plot > Strength Factors > dToct - Excess Stress
Plot > Strength Factors > In-plane Parameters
Plot > Strength Factors > Ubiquitous Parameters
Map3D International Ltd 1990-2015
3
+ (m
190
Map3D User's Manual
4.3.6.10 SF/B Stress/Strength
Contours the strength using method "B".
In elastic analysis the major and minor principal stresses can be used with the Mohr-Coulomb or
Hoek-Brown strength criteria
Plot > Strength Factors > Strength Parameters
to estimate the amount of damage due to over-stressing. Since none of the parameters have any
orientation sensitivity, this criterion is representative for homogeneous rock mass stability.
By contrast, in non-linear analysis the stresses can never exceed the strength unless some creep is
used. In this latter case, viscous creep can allow stress states above the failure criterion, thus
indicating a lack of static equilibrium. Hence for non-linear analysis one normally directly considers
the amount of non-linear strain or the strain rate predicted by the model
Mohr-Coulomb in 3D FF blocks.
Method "B" assumes that the stress path to failure takes place by increasing 1 without loss of
confinement. This is representative of a pillar failure where 1 - 3 is considered to be the driving
force.
Mohr-Coulomb
q = tan²(45+ /2)
1
UCS + q
3-
UCS
=
Plot > Strength Factors > SF-B Strength/Stress can be determined as ( UCS + q
Tension
( 1 - 3) Cutoff
Plot > Strength Factors > SF/B Strength/Stress can be determined as (
3
-
3)/(
-
3 )/
UCS + q
3)
Plot > Strength Factors >
3
1-
3
1
excess stress can be determined as
1
=
1
- ( UCS + q
)
Plot > Strength Factors > N(
1 /std)
Probability using the Normal distribution.
the same as in method "A".
Map3D International Ltd 1990-2015
Menu Commands
191
Hoek-Brown
m
c
c
+s
c²
s
=
Plot > Strength Factors > SF-B Strength/Stress can be determined as (m
Tension
1 - 3) Cutoff
Plot > Strength Factors > SF/B Strength/Stress can be determined as (
s
1
-
c 3
+s
c²)/(
3)/
(m
c 3
+
c²)
Plot > Strength Factors >
c 3
+s
1
excess stress can be determined as
1
=
1
-[
3
+ (m
c²) ]
Plot > Strength Factors > N(
1 /std)
Probability using the Normal distribution.
the same as in method "A".
Drucker-Prager is only defined using method "C".
Strength parameters are setup using
Plot > Strength Factors > Strength Parameters
Related topics:
Plot > Strength Factor > SF-A - Strength/Stress
Plot > Strength Factors > SF-C - Strength/Stress
Plot > Strength Factors > dTmax - Excess Stress
Plot > Strength Factors > dToct - Excess Stress
Plot > Strength Factors > In-plane Parameters
Plot > Strength Factors > Ubiquitous Parameters
4.3.6.11 SF/C Stress/Strength
Contours the strength using method "C".
In elastic analysis the major and minor principal stresses can be used with the Mohr-Coulomb or
Hoek-Brown strength criteria
Plot > Strength Factors > Strength Parameters
to estimate the amount of damage due to over-stressing. Since none of the parameters have any
orientation sensitivity, this criterion is representative for homogeneous rock mass stability.
By contrast, in non-linear analysis the stresses can never exceed the strength unless some creep is
used. In this latter case, viscous creep can allow stress states above the failure criterion, thus
indicating a lack of static equilibrium. Hence for non-linear analysis one normally directly considers
Map3D International Ltd 1990-2015
192
Map3D User's Manual
the amount of non-linear strain or the strain rate predicted by the model
Mohr-Coulomb in 3D FF blocks.
Method "C" assumes that the stress path to failure takes place by increasing 1 while loosing
confinement. This is representative of an abutment failure where 1 - 3 is considered to be the
driving force.
Mohr-Coulomb
q = tan²(45+ /2)
1
max
= ½
- )
[ UCS + ½ ( 1+ 3)(q–1)]/(q+1)
UCS
=
Plot > Strength Factors > SF-C Strength/Stress can be determined as [ UCS + ½(
Tension
q-1) ]/[ ½(
1 - 3)(q+1) ]
Cutoff
Plot > Strength Factors > SF/C Strength/Stress can be determined as [ ½(
UCS + ½(
1+ 3)
= ½(
=[
1
3)(q+1)
(
]/[
(q-1) ]
Plot > Strength Factors >
max
1-
1+ 3)
1-
3)
excess stress can be determined as
max
- [ UCS + ½(
- ( UCS + q
1+ 3)
(q-1) ]/(q+1)
3) ]/(q+1)
Hoek-Brown
1
max
=½ ( 1- 3)
½ 1/ 16 m² c ² + ½( 1+
c
3)
m
c
+s
c²
- 1/ 8 m
c
s
1= 3
Plot > Strength Factors > SF-C Strength/Stress can be determined as { [ 1/16 m² c² + ½(
Tension
1
+
3
) mCutoff
+ s c²] - ¼ m c}/(
c
1
-
3
)
3
Plot > Strength Factors > SF/C Strength/Stress can be determined as (
c²
+ ½(
1
+
3)
m
c
+s
c²]
- ¼m
1
-
3
)/{ [ 1/16 m²
c}
Map3D International Ltd 1990-2015
Menu Commands
Plot > Strength Factors >
max
= ½(
1
-
3
max
193
excess stress can be determined as
) - ½{ [ 1/16 m² c² + ½(
1
+
3
)m
c
+s
²] - ¼ m
c
c
}
Drucker-Prager
oct
(q-1) 2 /(2+q)
1
oct
q = tan²(45+ /2)
UCS 2 /(2+q)
[UCS + (q-1)
m]
2/(2+q)
SF-C
Strength/Stress can be determined as [ UCS + (q–1)
Tension
m
SF-C
Stress/Strength can be determined as
Cutoff
Dtoct Excess can be determined as
oct
oct
mean
/[ UCS + (q–1)
- [ UCS + (q–1)
mean
]
]
2) /[
mean
]
oct
(q+2) ]
2) /(q+2)
2) /(q+2)
where
q = tan²(45+ /2)
oct = ¹/3 [( 1 mean
= ¹/3 (
1
+
2
)² + (
2
+
3
2
-
3
)² +(
3
-
1
)²]
)
Note that the strength parameters have been chosen so that the criterion simplifies to the MohrCoulomb criterion when 2 equals 3.
Strength parameters are setup using
Plot > Strength Factors > Strength Parameters
Related topics:
Plot > Strength Factor > SF-A - Stress/Strength
Plot > Strength Factors > SF-B - Stress/Strength
Plot > Strength Factors > dS1 - Excess Stress
Plot > Strength Factors > In-plane Parameters
Plot > Strength Factors > Ubiquitous Parameters
4.3.6.12 In-plane parameters
Sets up the strength parameters for generating strength factor contour plots in terms of in-plane
stress components.
To calculate the in-plane shear and normal stresses, the stress state at each point on the grid plane
is reoriented to determine the maximum shear stress parallel to the grid plane and the stress normal
to the grid plane.
Map3D International Ltd 1990-2015
194
Map3D User's Manual
Line Grid
ip
Grid plane
ip
ip
Dip
direction
ip
Dip
direction
Dip of
Plunge of
grid plane
Plunge
of normal
In elastic analysis the maximum in-plane
shear
and normal stresses can be used with the Mohrnormal
planeof slip due to over-stressing,
Coulomb strength criterion to estimate to
thegrid
amount
on a fault, joint set
or bedding plane oriented in the same way as the grid plane. Since these parameters are
orientation dependant, this criterion is representative for anisotropic rock mass stability.
By contrast, in non-linear analysis the stresses can never exceed the strength unless some creep is
used. In this latter case, viscous creep can allow stress states above the failure criterion, thus
indicating a lack of static equilibrium. Hence for non-linear analysis one normally directly considers
the amount of non-linear strain or the strain rate predicted by the model
Mohr-Coulomb in DD planes
Fault-Gouge in DD planes
Backfill-Hyperbolic in DD planes
The Mohr-Coulomb criterion defines the shear strength in terms of shear stress and normal stress
as follows:
Mohr-Coulomb
ip
tan( )
1
ip
Coh
Coh + tan( )
ip
Tension cutoff, UCS and Cohesion are specified in units of stress (MPa or psi).
Tension
Cutoff
ip
Map3D International Ltd 1990-2015
Menu Commands
195
Friction angle is specified in degrees.
Standard Deviation specifies the uncertainty you have in the failure criterion measured in the
direction (specified in units of stress, MPa or psi).
ip
Plot – regenerates the contour plot.
Related topics:
Plot > Strength Factor > Probability N-distribution
Plot > Strength Factor > SF-ip - Stress/Strength
Plot > Strength Factors > SF-ub - Stress/Strength
Plot > Strength Factors > dTip - Excess Stress
Plot > Strength Factors > dTub - Excess Stress
Plot > Strength Factors > Rockmass Strength Parameters
Plot > Strength Factors > Ubiquitous Parameters
4.3.6.13 In-plane Excess Shear Stress
Contours the strength for in-plane shear.
To calculate the in-plane shear and normal stresses, the stress state at each point on the grid plane
is reoriented to determine the maximum shear stress parallel to the grid plane and the stress normal
to the grid plane.
Line Grid
ip
Grid plane
ip
ip
Dip
direction
ip
Dip
direction
Dip of
In elasticgrid
analysis
shear
and normal stresses Plunge
can be of
used with the Mohrplanethe maximum in-plane
Plunge
of normal
Coulomb strength criterion
normal
to grid plane
Plot > Strength Factors > In-plane Parameters
to estimate the amount of slip due to over-stressing, on a fault, joint set or bedding plane oriented in
the same way as the grid plane. Since these parameters are orientation dependant, this criterion is
representative for anisotropic rock mass stability.
By contrast, in non-linear analysis the stresses can never exceed the strength unless some creep is
used. In this latter case, viscous creep can allow stress states above the failure criterion, thus
indicating a lack of static equilibrium. Hence for non-linear analysis one normally directly considers
the amount of non-linear strain or the strain rate predicted by the model
Mohr-Coulomb in DD planes
Fault-Gouge in DD planes
Backfill-Hyperbolic in DD planes
Here we assume that the stress path to failure takes place by increasing tip without loosing
confinement.
Map3D International Ltd 1990-2015
196
Map3D User's Manual
Mohr-Coulomb
ip
tan( )
1
ip
Coh
Coh + tan( )
ip
SF-ip
Strength/Stress can be determined as [ Cohesion +
Tension
ip
SF-ip
Stress/Strength can be determined as
Cutoff
dTip Excess can be determined as
ip
dSip Excess can be determined as
ip
=
ip
ip
NTip Probability can be determined as N
/ [ Cohesion +
- [ Cohesion +
=[3
ip
tan( ) ] /
ip
1i
-
3i
ip
ip
ip
tan( ) ]
tan( ) ]
] - UCS
/std)
Strength parameters are set up using
Plot > Strength Factors > In-plane Parameters
Related topics:
Plot > Stress > Tip - In-plane Shear
Plot > Stress > Sip - In-plane Normal
Plot > Stress > S1i - In-plane Maximum
Plot > Stress > S3i - In-plane Minimum
Plot > Strength Factors > SF-ub Strength/Stress
Plot > Strength Factors > dTub Excess
Plot > Strength Factors > dSub Excess
Plot > Strength Factors > NSub Probability
4.3.6.18 Ubiquitous parameters
Sets up the strength parameters for generating strength factor contour plots in terms of ubiquitousplane stress components.
To calculate the ubiquitous shear and normal stresses, the stress state at each point on the grid
plane is reoriented to determine the maximum shear stress parallel to the ubiquitous shear plane
and the stress normal to the ubiquitous shear plane.
Map3D International Ltd 1990-2015
Menu Commands
197
Line Grid
ub
Ubiquitous plane
ub
ub
Dip
direction
ub
Dip
direction
Dip of
ubiquitous plane
Plunge of normal to
ubiquitous plane
Plunge of
normal
In elastic analysis the maximum ubiquitous-plane shear and normal stresses can be used with the
Mohr-Coulomb strength criterion to estimate the amount of slip due to over-stressing, on a fault, joint
set or bedding plane at the specified orientation. Since these parameters are orientation dependant,
this criterion is representative for anisotropic rock mass stability.
By contrast, in non-linear analysis the stresses can never exceed the strength unless some creep is
used. In this latter case, viscous creep can allow stress states above the failure criterion, thus
indicating a lack of static equilibrium. Hence for non-linear analysis one normally directly considers
the amount of non-linear strain or the strain rate predicted by the model
Mohr-Coulomb in DD planes
Fault-Gouge in DD planes
Backfill-Hyperbolic in DD planes
Cohesion and Friction Angle the Mohr-Coulomb criterion defines strength in terms of principal
stresses as follows:
Map3D International Ltd 1990-2015
198
Map3D User's Manual
Mohr-Coulomb
ub
tan( )
1
ub
Coh
Coh + tan( )
Tension
Cutoff
ub
ub
Tension cutoff, UCS and Cohesion are specified in units of stress (MPa or psi). Friction angle is
specified in degrees.
Standard Deviation specifies the uncertainty you have in the failure criterion measured in the
direction (specified in units of stress, MPa or psi).
Dip of plane – specifies the dip of the ubiquitous plane (in degrees). The dip of the normal is
automatically adjusted to reflect changes in this value.
ip
Dip Direction – specifies the dip direction of the ubiquitous plane (in degrees).
Dip of Normal – specifies the dip of the normal to the ubiquitous plane (in degrees). The dip of
plane is automatically adjusted to reflect changes in this value.
Grid Normal – sets the ubiquitous plane parallel to the currently selected grid plane. In this case all
in-plane results will be identical to the ubiquitous plane results.
Plot – regenerates the contour plot.
UB#2 & UB#3 – activates strength parameters for ubiquitous plane #2 and/or #3. When checked,
the minimum for all active ubiquitous planes is presented for all strength parameters (
Plot >
Strength Factor > Probability N-distribution,
Plot > Strength Factors > SF-ub - Stress/
Strength and
Plot > Strength Factors > dTub - Excess Stress). To determine which ubiquitous
plane has the minimum strength you can plot
Plot > Strength Factors > UB# with minimum
strength) or left click on and strength parameter plot.
Related topics:
Plot > Strength Factor > Probability N-distribution
Plot > Strength Factors > SF-ub - Stress/Strength
Plot > Strength Factor > SF-ip - Stress/Strength
Plot > Strength Factors > dTub - Excess Stress
Plot > Strength Factors > dTip - Excess Stress
Plot > Strength Factors > UB# with minimum strength
Plot > Strength Factors > Rockmass Strength Parameters
Plot > Strength Factors > In-plane Parameters
Map3D International Ltd 1990-2015
Menu Commands
199
4.3.6.19 Ubiquitous Excess Shear Stress
Contours the strength for ubiquitous-plane shear.
To calculate the ubiquitous shear and normal stresses, the stress state at each point on the grid
plane is reoriented to determine the maximum shear stress parallel to the ubiquitous shear plane
and the stress normal to the ubiquitous shear plane.
Line Grid
ub
Ubiquitous plane
ub
ub
Dip
direction
ub
Dip
direction
Dip of
ubiquitous plane
Plunge of normal to
ubiquitous plane
Plunge of
normal
The orientation of the ubiquitous shear plane is set using
Plot > Strength Factors > Ubiquitous Parameters
In elastic analysis the maximum ubiquitous-plane shear and normal stress can be used with the
Mohr-Coulomb strength criterion to estimate the amount of slip due to over-stressing, on a fault, joint
set or bedding plane at the specified orientation. Since these parameters are orientation dependant,
this criterion is representative for anisotropic rock mass stability.
By contrast, in non-linear analysis the stresses can never exceed the strength unless some creep is
used. In this latter case, viscous creep can allow stress states above the failure criterion, thus
indicating a lack of static equilibrium. Hence for non-linear analysis one normally directly considers
the amount of non-linear strain or the strain rate predicted by the model
Mohr-Coulomb in DD planes
Fault-Gouge in DD planes
Backfill-Hyperbolic in DD planes
Here we assume that the stress path to failure takes place by increasing tub without loosing
confinement.
Map3D International Ltd 1990-2015
200
Map3D User's Manual
Mohr-Coulomb
ub
tan( )
1
ub
Coh
Coh + tan( )
ub
Tension
Cutoff
ub
SF-ub Strength/Stress can be determined as [ Cohesion +
ub
SF-ub Stress/Strength can be determined as
ub
dTub Excess can be determined as
- [ Cohesion +
ub
dSub Excess can be determined as
ub
=
ub
=[3
NTub Probability can be determined as N
ub
tan( ) ] /
/ [ Cohesion +
1u
-
3u
ub
ub
ub
tan( ) ]
tan( ) ]
] - UCS
/std)
Strength parameters are set up using
Plot > Strength Factors > Ubiquitous Parameters
Related topics:
Plot > Stress > Tub - Ubiquitous-plane Shear
Plot > Stress > Sub - Ubiquitous-plane Normal
Plot > Stress > S1u - Ubiquitous-plane Maximum
Plot > Stress > S3u - Ubiquitous-plane Minimum
Plot > Strength Factors > SF-ub Strength/Stress
Plot > Strength Factors > dTip Excess
Plot > Strength Factors > dSip Excess
Plot > Strength Factors > NTip Probability
UB#2 & UB#3 – activates strength parameters for ubiquitous plane #2 and/or #3. When checked,
the minimum for all active ubiquitous planes is presented for all strength parameters (
Plot >
Strength Factor > Probability N-distribution,
Plot > Strength Factors > SF-ub - Stress/
Strength and
Plot > Strength Factors > dTub - Excess Stress). To determine which ubiquitous
plane has the minimum strength you can plot
Plot > Strength Factors > UB# with minimum
strength) or left click on and strength parameter plot.
Map3D International Ltd 1990-2015
Menu Commands
4.3.7
Surface Components
4.3.7.1
Surface Contours Off
201
Turns the contours off.
4.3.7.2
Serr Stress error
Contours the surface stress error.
During matrix solution Map3D is attempting to progressively solve the simultaneous equations saved
in the coefficient matrix along with any other equations describing the alternate material zones, fault
slip, creep etc. The iterative solver functions by determining the error in the current solution of each
simultaneous equation (the surface stress error), then reducing these errors by a process of
successive approximations.
A converged solution is assumed to have been obtained when the maximum surface stress error
and the maximum failure criterion error are reduced below the user specified stress tolerance STOL
Analysis > CParams
Related Topics:
Plot > Surface Components > Ferr - Failure Error
Analysis Dialog
4.3.7.3
Ferr Failure error
Contours the surface failure criterion error.
During matrix solution Map3D is attempting to progressively solve the simultaneous equations saved
in the coefficient matrix along with any other equations describing the alternate material zones, fault
slip, creep etc. The iterative solver functions by determining the error in the current solution of each
simultaneous equation (the surface stress error), then reducing these errors by a process of
successive approximations.
A converged solution is assumed to have been obtained when the maximum surface stress error
and the maximum failure criterion error are reduced below the user specified stress tolerance STOL
Analysis > CParams
The failure criterion error is only used for non-linear creep analyses (including fault slip and 3D
material non-linearity). This parameter should always be near zero unless some viscosity has been
specified and the problem goes non-linear. In this latter case, viscous creep can allow stress states
above the failure criterion, thus indicating a lack of static equilibrium.
Related Topics:
Plot > Surface Components > Serr - Stress Error
Analysis > Options > Creep
Analysis Dialog
Map3D International Ltd 1990-2015
202
4.3.7.4
Map3D User's Manual
Shear stress
Contours the maximum shear stress in the plane of the surface.
In elastic analysis the maximum in-plane shear stress is normally used with the in-plane normal
stress and the Mohr-Coulomb strength criterion to estimate the amount of slip due to over-stressing,
on a fault, joint set or bedding plane.
By contrast, in non-linear analysis the maximum in-plane shear stress can never exceed the
strength unless some creep is used. In this latter case, viscous creep can allow stress states above
the failure criterion, thus indicating a lack of static equilibrium. Hence for non-linear analysis one
normally directly considers the amount of slip predicted by the model
Mohr-Coulomb in DD planes
Fault-Gouge in DD planes
Backfill-Hyperbolic in DD planes
The contour range is set using
Plot > Range
This component can be added to the contour toolbar if desired
Tools > Configure Contouring Toolbar
Related Topics:
Plot > Surface Components > Sn Normal Stress
Plot > Surface Components > dTs - Excess Shear Stress
Plot > Surface Components > dEs - Incremental Shear Strain
Plot > Surface Components > Es - Shear Strain
Plot > Surface Components > ds - Shear Displacement (Ride)
4.3.7.5
Normal stress
Contours the stress normal to the surface.
In elastic analysis the maximum in-plane shear stress is normally used with the in-plane normal
stress and the Mohr-Coulomb strength criterion to estimate the amount of slip due to over-stressing,
on a fault, joint set or bedding plane.
By contrast, in non-linear analysis the maximum in-plane shear stress can never exceed the
strength unless some creep is used. In this latter case, viscous creep can allow stress states above
the failure criterion, thus indicating a lack of static equilibrium. Hence for non-linear analysis one
normally directly considers the amount of slip predicted by the model
Mohr-Coulomb in DD planes
Fault-Gouge in DD planes
Backfill-Hyperbolic in DD planes
The contour range is set using
Plot > Range
This component can be added to the contour toolbar if desired
Tools > Configure Contouring Toolbar
Related Topics:
Map3D International Ltd 1990-2015
Menu Commands
203
Plot > Surface Components > Ts Shear Stress
Plot > Surface Components > dTs - Excess Shear Stress
Plot > Surface Components > dEs - Incremental Shear Strain
Plot > Surface Components > Es - Shear Strain
Plot > Surface Components > ds - Shear Displacement (Ride)
4.3.7.6
Shear strain
Contours the shear strain occurring in the in-filling material of DD elements.
The shear strain is determined by dividing the shear displacement (ride) by the DDplane thickness.
CAD > Edit > Entity Properties > DDplane Thickess
Note that there are three components of strain that can be contoured:
Plot > Surface Components > Value > Elastic
Plot > Surface Components > Value > Plastic
Plot > Surface Components > Value > Total
There are also two different ways of presenting the strain:
Plot > Strain > Value > Induced Strain
Plot > Strain > Value > Absolute Strain
Note that
is the current level of shear strain acting on the DD surfaces.
Since the displacement can change direction and even reverse during slip, the total accumulated
shear strain
can give different values.
The contour range is set using
Plot > Range
This component can be added to the contour toolbar if desired
Tools > Configure Contouring Toolbar
Related Topics:
Plot > Surface Components > dEs - Incremental Shear Strain
Plot > Surface Components > ds - Shear Displacement (Ride)
4.3.7.8
Normal strain
Contours the normal strain occurring in the in-filling material of DD elements.
The normal strain is determined by dividing the normal displacement (closure) by the DDplane
thickness
CAD > Edit > Entity Properties > DDplane Thickess
Note that there are three components of strain that can be contoured:
Plot > Surface Components > Value > Elastic
Map3D International Ltd 1990-2015
204
Map3D User's Manual
Plot > Surface Components > Value > Plastic
Plot > Surface Components > Value > Total
The contour range is set using
Plot > Range
This component can be added to the contour toolbar if desired
Tools > Configure Contouring Toolbar
Related Topics:
Plot > Surface Components > dn - Normal Displacement (Closure)
4.3.7.9
Shear Displacement (Ride)
Contours the ride or shear displacement occurring on DD elements.
Note that there are three components of shear displacement that can be contoured:
Plot > Surface Components > Value > Elastic
Plot > Surface Components > Value > Plastic
Plot > Surface Components > Value > Total
There are also two different ways of presenting the displacement:
Plot > Strain > Value > Induced Strain
Plot > Strain > Value > Absolute Strain
The contour range is set using
Plot > Range
This component can be added to the contour toolbar if desired
Tools > Configure Contouring Toolbar
Related Topics:
Plot > Surface Components > dEs - Incremental Shear Strain
Plot > Surface Components > Es - Shear Strain
4.3.7.10 Normal Displacement (Closure)
Contours the closure or normal displacement occurring on DD elements.
Note that there are three components of closure that can be contoured:
Plot > Surface Components > Value > Elastic
Plot > Surface Components > Value > Plastic
Plot > Surface Components > Value > Total
The contour range is set using
Plot > Range
This component can be added to the contour toolbar if desired
Map3D International Ltd 1990-2015
Menu Commands
205
Tools > Configure Contouring Toolbar
Related Topics:
Plot > Surface Components > ds - Shear Displacement (Ride)
4.3.7.11 ERR
Calculate energy release rate.
This routine enables the user to calculate energy release rate (ERR) ahead of an excavation face.
An alternative method is available where ERR can be calculated at any desired location Analysis >
Options > LERD/LSS
Crack-tip Formulation
Consider a planar crack in an infinite homogeneous elastic medium. It is well known that near the
crack tip, the aperture exhibits a r response near the face
=p
r
[1]
and the stress
exhibits a 1/ r response
=p / r
[2]
where r represents the distance from the crack tip.
The total energy released can be determined for a small increment of face advance by
superimposing the normal displacement (closure) with the stress over the region . This requires
that we offset the coordinate system for by the distance giving
=p
r
[3]
The total energy released can then be calculated from (the integral is taken from 0 to )
W=½
dr
=½p p
=¼
r / r dr
[4]
p p
The energy release rate can now be determined by differentiating by
ERR = ¼
p p
to arrive at
[5]
This expression has only made the assumption that exhibits a r response near the face and that
exhibits a 1/ r response near the face. No assumptions regarding the geometry have been
made. There is no requirement for p to be related to p in any way. Note that these assumptions
are only true in an infinite homogeneous elastic medium. Near bi-material interfaces or other
excavation surfaces these assumptions break down.
Analytical Solution for a Planar Crack
Consider a planar crack with width 2c and length eight times the width.
Map3D International Ltd 1990-2015
206
Map3D User's Manual
y
z
x
For such a shape, the aperture (normal displacement or closure) can be determined analytically as
(at the mid-section)
= 4(1- ²)/E p (c²-x²)
2c
[6]
where E and represent respectively Young's modulus and Poisson's ratio, and p represents the
homogeneous pre-mining stress state. The stress ahead of the crack tip can also be determined
analytically as
= px / (x²-c²)
[7]
The work done in deforming the crack surfaces is equivalent to the total energy released and can
be determined as follows (the integral is taken from -c to +c)
W = ½ p dx
= 2 (1- ²) p²/E
=
(c²-x²) dx
[8]
(1- ²) p²c²/E
As the length of the crack increases, the energy release per unit length of crack extension can be
determined by differentiation as
dW/dc = 2 (1- ²) p²c/E
[9]
For extension of one end of the crack only, we obtain the energy release rate as half this value
ERR =
(1- ²) p²c/E
[10]
Comparison with Planar Crack Solution
If we now compare the planar crack geometry with the crack-tip formulation, it can be observed that
for planar crack (comparing equations [1] and [2] with [6] and [7])
p = 4(1- ²)/E p (2c)
[11]
Map3D International Ltd 1990-2015
Menu Commands
p = p (c/2)
207
[12]
Observation of these equations reveals that these two parameters can be related in the case of a
planar crack geometry by
p = 8(1- ²)/E p
[13]
Substituting these into equation [5] for ERR provides
ERR =
(1- ²) p²c/E
[14]
the same result as determined for the planar crack (equation [10]).
Various substitutions for p and p can be made to determine
ERR = 2 (1- ²)
p ²/E
[15]
ERR = 1/32 p ² E/(1- ²)
[16]
and
This later equation is the same expression derived by Ryder and Jager (their equation [11], p. 236,
Rock Mechanics for Tabular Hard Rock Mines, 2002). They state that this equation is used to
calculate ERR in MINSIM. Some form of -edge correction (Ryder and Napier, Numerical Methods
in Geomechanics, Nagoya, 1985) is also apparently implemented but the details on exactly how this
done are unclear.
ERR Calculation in Map3D
Both of p and p can be determined from numerical modelling.
y
z
m
m
a
x
b
For example, given the normal displacement (closure) m determined at distance a behind the
advancing face, p can be determined using equation [1] as
2c
Map3D International Ltd 1990-2015
208
Map3D User's Manual
p =
m
/ a
[17]
Similarly, given the stress
using equation [2] as
p =
m
at distance b ahead of the advancing face, p can be determined
m
b
[18]
Note that there is no reason for a to be equal to b and hence there is no requirement for uniform
boundary element sizes.
Once either or both of p and p are determined, ERR is readily calculated from equation [5], [15]
or [16].
Detailed studies of stress and displacement distributions near the crack tip reveal that for constant
DD elements, both the aperture and stress are consistently over-estimated. Fortunately, the degree
of over-estimation is closely related to the element size and it can be found that if a is multiplied by 3
/2 and b is multiplied by 2/3, much more accurate results can be obtained. With these substitutions,
and using equation [17] and [18], ERR can be determined from
ERR = 1/6
m
m
2/3
b) /
= 1 /6
m
m
b/a)
3/2
a)
[19]
This equation is used to calculate ERR in Map3D.
An Example
With E of 60000 MPa, of 0.25, p of 100 MPa and c of 100 m we calculate theoretical values for p
of 707.11, p of 0.088388 and 49.1 MN/m for ERR
This can be modelled using Map3D using uniform elements of width w, to provide the following
results:
w (m)
b = a (m)
50
25
12.5
10
6.25
5
3.125
25
12.5
6.25
5
3.125
2.5
1.5625
(MPa)
197.567
262.669
358.943
398.56
498.323
554.58
697.764
m
(m)
0.5209
0.3754
0.2679
0.2402
0.1903
0.1705
0.1349
m
ERR (MN/m)
error
53.9
51.6
50.3
50.1
49.6
49.5
49.3
+9.8%
+5.2%
+2.5%
+2.1%
+1.0%
+0.9%
+0.4%
Note that the stress m and normal displacement (closure) m are determined at the element
centres. Since uniform element widths were used, a equals b equals ½w
4.3.7.12 SF-D Strength/Stress
Contours the strength/stress ratio on DD elements.
In elastic analysis the maximum in-plane shear stress is normally used with the in-plane normal
stress and the Mohr-Coulomb strength criterion to estimate the amount of slip due to over-stressing,
on a fault, joint set or bedding plane.
By contrast, in non-linear analysis the maximum in-plane shear stress can never exceed the
strength unless some creep is used. In this latter case, viscous creep can allow stress states above
Map3D International Ltd 1990-2015
Menu Commands
209
the failure criterion, thus indicating a lack of static equilibrium. Hence for non-linear analysis one
normally directly considers the amount of slip predicted by the model
Mohr-Coulomb in DD planes
Fault-Gouge in DD planes
Backfill-Hyperbolic in DD planes
Mohr-Coulomb
s
tan( )
1
s
Coh
Coh + tan( )
n
Strength/Stress
can be determined as [ Cohesion +
Tension
n
dTs Cutoff
Excess Shear Stress can be determined as
s
n
=
tan( ) ] /
s
s
- [ Cohesion +
n
tan( ) ]
The contour range is set using
Plot > Range
This component can be added to the contour toolbar if desired
Tools > Configure Contouring Toolbar
Related Topics:
Plot > Surface Components > dTs - Excess Shear Stress
4.3.7.13 Excess Shear Stress
Contours the excess stress
s
on DD elements.
This feature is used only in non-linear analyses (3D FF blocks in Map3D Non-Linear and DD planes
in Map3D Fault-Slip). For details refer to
CAD > Properties > Material Properties
At each creep step the stress state on all yielding elements (elements where the stress exceeds the
strength) is calculated as the strength plus the creep resistance. This limits the size of plastic creep
increment plastic on each yielding element
s
= Strength + C
plastic
/ t
C=G t
where the creep resistance is determined as the creep coefficient C, times the plastic strain rate.
Note that the user must select both the creep coefficient C, and the time step size t, then specify
the quotient of these as the viscous modulus G. The contribution to the stress s , made by the creep
increment is the excess stress given by
Map3D International Ltd 1990-2015
210
Map3D User's Manual
s
=C
plastic
/ t
The accumulated plastic strain
plastic, for all creep steps.
plastic,
is determined as the sum of the plastic creep increments
Related Topics:
Plot > Surface Components > dEs - Incremental Shear Strain
Plot > Surface Components > Ts - Shear Stress
Plot > Surface Components > Es - Shear Strain
Analysis > Options > Creep
4.3.7.14 Incremental Shear Strain
Contours the plastic creep increment
plastic
on DD elements.
This feature is used only in non-linear analyses (3D FF blocks in Map3D Non-Linear and DD planes
in Map3D Fault-Slip). For details refer to
CAD > Properties > Material Properties
At each creep step the stress state on all yielding elements (elements where the stress exceeds the
strength) is calculated as the strength plus the creep resistance. This limits the size of plastic creep
increment plastic on each yielding element
s
= Strength + C
plastic
/ t
C=G t
where the creep resistance is determined as the creep coefficient C, times the plastic strain rate.
Note that the user must select both the creep coefficient C, and the time step size t, then specify
the quotient of these as the viscous modulus G. The contribution to the stress s, made by the creep
increment is the excess stress given by
s
=C
plastic
/ t
The accumulated plastic strain
plastic, for all creep steps.
plastic,
is determined as the sum of the plastic creep increments
Note that since the user must select the time step size t, in order to define the viscous modulus G,
the shear strain rate is easily determined from the incremental shear strain plastic, simply by
dividing by the time step size.
Related Topics:
Plot > Surface Components > dTs - Excess Shear Stress
Plot > Surface Components > Ts - Shear Stress
Plot > Surface Components > Es - Shear Strain
Analysis > Options > Creep
Map3D International Ltd 1990-2015
Menu Commands
211
4.3.7.15 Stress/Strain rate
Contours the excess stress divided by the plastic creep increment
s
/
plastic
on DD elements.
This feature is used only in non-linear analyses (3D FF blocks in Map3D Non-Linear and DD planes
in Map3D Fault-Slip). For details refer to
CAD > Properties > Material Properties
At each creep step the stress state on all yielding elements (elements where the stress exceeds the
strength) is calculated as the strength plus the creep resistance. This limits the size of plastic creep
increment plastic on each yielding element
s
= Strength + C
plastic
/ t
C=G t
where the creep resistance is determined as the creep coefficient C, times the plastic strain rate.
Note that the user must select both the creep coefficient C, and the time step size t, then specify
the quotient of these as the viscous modulus G. The contribution to the stress s , made by the creep
increment is the excess stress given by
s
=C
plastic
/ t
The accumulated plastic strain
plastic, for all creep steps.
plastic,
is determined as the sum of the plastic creep increments
Related Topics:
Plot > Surface Components > dTs - Excess Shear Stress
Plot > Surface Components > dEs - Incremental Shear Strain
Plot > Surface Components > Ts - Shear Stress
Plot > Surface Components > Es - Shear Strain
Analysis > Options > Creep
4.3.7.16 Cohesion
Contours the Cohesion and Friction angle of the gouge material.
This is of particular interest when you use the Equilibrated-Gouge material type since the cohesion
and friction angle can vary from place to place..
4.3.7.18 Temperature/Head
Contours the temperature or head.
Map3D Thermal-Fluid Flow can be used to simultaneously solve steady state heat/fluid flow coupled
to the stress analysis. The program is set up so that the user need only specify the temperature/
head boundary conditions, then the coupled thermal/fluid flow stress problem is solved
simultaneously. This feature is useful for the simulation of heating or cooling effects and drained or
undrained response of soils.
For more details refer to
Expansion Coefficient and Conductivity
The contour range is set using
Map3D International Ltd 1990-2015
212
Map3D User's Manual
Plot > Range
This component can be added to the contour toolbar if desired
Tools > Configure Contouring Toolbar
4.3.7.19 Normal Flux
Contours the flow rate normal to the surface.
Map3D Thermal-Fluid Flow can be used to simultaneously solve steady state heat/fluid flow coupled
to the stress analysis. The program is set up so that the user need only specify the temperature/
head boundary conditions, then the coupled thermal/fluid flow stress problem is solved
simultaneously. This feature is useful for the simulation of heating or cooling effects and drained or
undrained response of soils.
For more details refer to
Expansion Coefficient and Conductivity
The contour range is set using
Plot > Range
This component can be added to the contour toolbar if desired
Tools > Configure Contouring Toolbar
4.3.7.20 Value
4.3.7.20.1 Elastic strain
Selects the elastic, plastic or total strain component.
For details, refer to
Mohr-Coulomb in 3D FF blocks.
4.3.7.20.4 Absolute Strain
Plot the induced or absolute strain component.
Induced strain is the strain without the pre-mining strain contribution. This represents the strain
change since the pre-mining condition.
Absolute strain is the strain including the pre-mining strain contribution.
Also see:
Plot > Stress > Value > Induced Strain
Plot > Stress > Value > Absolute Strain
4.3.7.20.6 Induced Stress
Plot the induced or absolute stress component.
Induced stress is the stress without the pre-mining stress contribution. This represents the stress
change since the pre-mining condition.
Map3D International Ltd 1990-2015
Menu Commands
213
Absolute stress is the stress including the pre-mining stress contribution.
Also see:
Plot > Strain > Value > Induced Strain
Plot > Strain > Value > Absolute Strain
4.3.8
Miscellaneous
4.3.8.1
Delem Distance to nearest element on surfaces
Contours the distance to the nearest element from each surface.
Delem is determined by Map3D as the smallest distance between adjacent model surfaces.
During the discretization process all model surfaces (surfaces of FF blocks and DD planes) are
subdivided into boundary elements with side length
Delem /DON
During matrix assembly, all elements that fit within the dimension
Delem/DOC
will be lumped together.
For more details refer to
CAD > Properties > Control Parameters.
Related topics:
Plot > Miscellaneous > Delem/Lelem - DON ratio on surfaces
4.3.8.2
Dgrid Distance to nearest grid on surfaces
Contours the distance to the nearest grid from each surface.
Dgrid is determined by Map3D as the smallest distance between model surfaces and grid planes.
During the discretization process all model surfaces (surfaces of FF blocks and DD planes) are
subdivided into boundary elements with side length
Dgrid/DOL
During grid assembly, all elements that fit within the dimension
Dgrid/DOE
will be lumped together.
During grid assembly, all grid points that fit within the dimension
Dgrid/DOG
will be lumped together.
For more details refer to
CAD > Properties > Control Parameters
Map3D International Ltd 1990-2015
214
Map3D User's Manual
Related topics:
Plot > Miscellaneous > Delem/Lelem - DON ratio on surfaces
4.3.8.3
Delem/Lelem DON ratio on surfaces
Contours the distance to the nearest element Delem divided by the element width Lelem.
Delem is determined by Map3D as the smallest distance between adjacent model surfaces.
Small values of DON can be related to convergence problems.
For more details refer to
CAD > Properties > Control Parameters.
4.3.8.4
Dgrid/Lelem DOL ratio on surfaces
Contours the distance to the nearest grid Dgrid divided by the element width Lelem.
Dgrid is determined by Map3D as the smallest distance between model surfaces and grid planes.
Small values of DOL can be related to low accuracy predictions (DOL=1 for 10-20% error, DOL=2
for 5-10% error, DOL=4 for < 5% error).
For more details refer to
CAD > Properties > Control Parameters.
4.3.8.5
Dratio on surfaces
Contours the coefficient ratio on surfaces.
This ratio identifies locations where surfaces are very close to one-another, indicating possible
construction errors.
4.3.8.6
Dgrid Distance to nearest element on grids
Contours the distance to the nearest surface from each grid point.
Dgrid is determined by Map3D as the smallest distance between grid planes and model surfaces.
During the discretization process all grid planes are subdivided into elements with side length
Dgrid/DOL
During grid assembly, all elements that fit within the dimension
Dgrid/DOE
will be lumped together.
During grid assembly, all grid points that fit within the dimension
Dgrid/DOG
will be lumped together.
For more details refer to
CAD > Properties > Control Parameters
Map3D International Ltd 1990-2015
Menu Commands
215
Related topics:
Plot > Miscellaneous > Dgrid/Lgrid DOL ratio on grids
4.3.8.7
Dgrid/Lgrid DOL ratio on grids
Contours the distance to the nearest grid Dgrid divided by the grid spacing Lgrid.
Dgrid is determined by Map3D as the smallest distance between model surfaces and grid planes.
Small values of DOL can be related to low accuracy predictions (DOL=1 for 10-20% error, DOL=2
for 5-10% error, DOL=4 for < 5% error).
For more details refer to
CAD > Properties > Control Parameters
4.3.8.8
Matl# - Material Number on Grids
Plots material number as coloured contour.
4.3.9
Contour Range
Specifies the contour range (minimum, maximum, interval ...) of the currently plotted contour.
This routine can be initiated either by picking the
Label
Minimum
button or simple right clicking on any contour.
Interval
Maximum
Minimum - specifies the lower value of the contour range.
Maximum - specifies the upper value of the contour range.
Interval - specifies the contour interval. The interval can be set larger than 1/10th of the maximum
minus the minimum, but not smaller.
Label - specifies the contour label.
Extremes – Indicates the lower and upper extremes detected for this parameter. Selecting this
button set the contour range to these values.
Defaults - Indicates the default lower and upper contour range for this parameter. Selecting this
button set the contour range to these values.
Map3D International Ltd 1990-2015
216
Map3D User's Manual
Reset All - Sets the ranges of all plot parameters to the default values.
Plot – regenerates the contour plot.
The minimum contour range does not necessarily have to be set less than the maximum. For
example when contouring strength factors it may be desirable to set the minimum to 2 and the
maximum to 1 so that strength factors near one are contoured in the colour red.
4.3.10 Grid Selection
Selects a field point grid for viewing.
Analysis results (stresses, strains and displacements) can be contoured on element surfaces and
on field point grids.
With OpenGL enabled (Tools > OpenGL), all grids can be displayed simultaneously. Without
OpenGL enabled, only two grids can be displayed simultaneously.
Hide All - Hides all grids.
Unhide All - Unhide all grids.
The user can construct multiple field point grid planes using
CAD > Build > Grid Plane
CAD > Build > Grid Line
Individual grid selection buttons can be placed on the view toolbar if desired using
Tools > View Toolbar Configure
4.3.11 Plot Options
Sets up contour plot options.
This routine can be initiated either by picking the
button or simple right clicking on any contour.
Map3D International Ltd 1990-2015
Menu Commands
217
Trajectory-Label Options:
3D Fixed Length – display fixed length 3D orientation indicators.
The indicator is constructed as a 3D vector with an arrow head placed on the end that points
away from you (i.e. into the display). This permits you to determine whether the vector is dipping
away from you or towards you. Vectors that appear as dots point directly into or away from the
display.
If you orient the view such that you are looking along the edge of a grid, you will see the vectors
protruding in and out of the contour plane.
The length of the vectors is set with the TLength: parameter.
The density of the vectors is set with the TSpacing: parameter.
3D Scaled Length – display scaled length 3D orientation indicators.
The indicator is constructed as described above.
The length of the vectors are scaled to the stress magnitude such that if the magnitude equals the
minimum of the contour range, the vector is drawn with zero length. If the magnitude equals the
maximum of the contour range, the vector is drawn with the length specified by the TLength:
parameter.
2D Fixed Length – display fixed length 2D orientation indicators.
The indicator is constructed as a 2D projection of the true 3D vector, in the plane of the grid.
The length of the vectors is set with the TLength: parameter.
The density of the vectors is set with the TSpacing: parameter.
2D Scaled Length – display scaled length 2D orientation indicators.
The indicator is constructed as described above.
The indicator is constructed as a 2D projection of the true 3D vector, in the plane of the grid.
The length of the vectors are scaled to the stress magnitude such that if the magnitude equals the
minimum of the contour range, the vector is drawn with zero length. If the magnitude equals the
maximum of the contour range, the vector is drawn with the length specified by the TLength:
parameter.
Map3D International Ltd 1990-2015
218
Map3D User's Manual
Small Numbers – display small numbers on the contours. The number corresponds to the magnitude
of the contour at each point.
Large Numbers – display large numbers on the contours. The number corresponds to the
magnitude of the contour at each point.
TLength – set the length that the orientation indicators will be drawn. If you set this parameter too
small, the trajectory vectors will be too small to see. If you set this parameter too large, the
trajectory vectors will overlap and create a confusing display.
TSpacing – set the spacing between adjacent orientation indicators or numbers. If set this
parameter to zero, trajectories will be drawn at all grid points. For finely discretized grids, the
trajectory vectors may be too concentrated and difficult to distinguish. Larger values for this
parameter will result in fewer trajectory symbols being drawn.
Contour Options:
Contour Lines – draws lines between the contour colours. These lines help highlight the boundary
between different contour intervals and are particularly useful for black and white presentation.
Opaque – draws the contours as opaque colours. If both this option and the translucent option are
unchecked, only contour lines (i.e. no coloured contour) will be drawn.
Translucent - draws the contours as translucent colours. If both this option and the opaque option
are unchecked, only contour lines (i.e. no coloured contour) will be drawn.
Display Options:
Blank – when checked, contours are blanked out where the grid plane passes through excavation
blocks. This is useful to identify the extent of excavations when portions of the model have been
hidden. It is also useful for generation of 2D sections since the location of the excavations are
clearly visible.
Blank Colour: - sets colour used for Blanking.
Grid Lines – contours are drawn with lines at regular grid intervals. The desired interval is set using
the Spacing: parameter.
Outlines – outlines are drawn around the grid edges. When using multiple grids you may not want to
see these outlines.
Discretization – the grid discretization is superimposed on the contours.
Min Contour – when unchecked, contours below the minimum contour range are not drawn. This is
useful for displaying contours where only the upper part of the contour range is important.
For example when displaying non-linear strain components or excess stresses, it is often useful to
only have non-zero portions of the contours visible.
If the desired parameter has a negative value simply swap the maximum and minimum contour
range or plot the absolute value of the parameter.
Max Contour – when unchecked, contours above the maximum contour range are not drawn.
Tension Cutoff Symbol – when checked a special tension symbol will be plotted anywhere the stress
state is below the specified tension cutoff. This option is only used for strength factor plots.
Smooth Contours – if you have not checked the linear analysis option, results are only calculated at
the centre of each boundary element and contour plots of surface values will appear very
checkered. This option smoothes these contours to assist in interpretation.
If you have checked the linear analysis option results are calculated at element corners. Since no
smoothing is required this option is ignored.
Map3D International Ltd 1990-2015
Menu Commands
219
This option has no effect on grid plots.
Hex contours – in the Visco-Plastic version of Map3D this will enable display of values calculated at
internal node points.
Horizontal Banner - orients the contour interval banner horizontally.
Vertical Banner - orients the contour interval banner vertically.
Topo-Contours – display contours as a topographical surface.
The height normal to the plane is scaled to the stress magnitude such that if the magnitude equals
the minimum of the contour range, the height is drawn with zero length. If the magnitude equals
the maximum of the contour range, the vector is drawn with the length specified by the CRadius:
parameter.
For line grids, the radius of the tube is scaled.
GSpacing: - sets the grid interval.
CRadius - sets the radius for contouring of line grids.
Miscellaneous:
Apply – regenerates the contour plot.
4.3.12 Properties
4.3.12.1 Control Parameters
Specification of analysis control parameters.
Job Title - specifies a descriptive project title.
Maximum # of Time Steps (NLD) - specifies the maximum number of steps that will be used during
analysis. This parameter is only relevant if you are conducting a non-linear creep analysis
Analysis > Options > Creep
where this limits the actual number of time steps.
Map3D International Ltd 1990-2015
220
Map3D User's Manual
If this parameter is exceeded, the program stops and the user is prompted for instructions on how
to proceed. This parameter can be modified during solution.
Unless the user has some special reason for limiting the number of time steps this parameter
should be set to an arbitrarily large number.
Maximum # of Iterations (NIT) - specifies the maximum number of iterations that will used during
matrix solution.
If this parameter is exceeded, the program stops and the user is prompted for instructions on how
to proceed. This parameter can be modified during solution.
Unless the user has some special reason for limiting the number of time steps this parameter
should be set to an arbitrarily large number.
Stress Tolerance (STOL) - specifies the required accuracy of the matrix solution.
During matrix solution the accuracy is successively improved with each iteration. When the
maximum stress error falls below this value the matrix can be considered to be solved.
The suggested value for the parameter is 0.1% of the far field stress state at the depth of interest.
STOL should be specified in the same units as the far field stress state (e.g. MPa or psi).
Relaxation Parameter (RPAR) - specifies the maximum relaxation value that will be used during
matrix solution.
During matrix solution the program continuously modifies the relaxation parameter in an attempt to
obtain convergence with as few as possible iterations. This parameter limits the maximum value
that will be used.
The value of 1.2 is recommended for well-conditioned problems. For poorly conditioned problems
a value of 0.8 should be used.
Element Length (AL) - specifies the minimum element length.
During the discretization process all model surfaces (surfaces of FF blocks and DD planes) are
subdivided into boundary elements with side length
Lelem = Delem/DON
where Delem is determined by Map3D as the smallest distance between adjacent model surfaces.
Since at some locations the distance Delem may be zero, the minimum element side length AL
must be specified.
AL should be set equal to twice the smallest pillar or stope width. The same units used to specify
the coordinates should be used (e.g. metres or feet).
Once discretization is complete, the distance Delem can be plotted using
Plot > Miscellaneous > Delem distance to nearest element on surfaces.
Note that if desired, this behaviour can be overridden on an element by element basis by
specifying the maximum width for each element
CAD > Edit > Entity Properties > Maximum Width
This allows users to force fine uniform discretization on surfaces in areas where there are no grid
planes.
Grid Spacing (AG) - specifies the minimum grid spacing.
During the discretization process all field point grids and model surfaces are subdivided into
elements with side length
Map3D International Ltd 1990-2015
Menu Commands
221
Lgrid = Dgrid/DOL
where Dgrid is determined by Map3D as the smallest distance between model surfaces and grid
planes. Since at some locations the distance Dgrid may be zero, the minimum grid spacing AG
must be specified. This same process is used to discretize model surfaces (surfaces of FF blocks
and DD planes) that are near field point grids.
AG should be set equal to the smallest dimension of interest. For example if the user needs to see
the stress distribution across a 2m wide pillar, a value for AG of 0.5 would give sufficient number
of field points for accurate contouring. The same units used to specify the coordinates should be
used (e.g. metres or feet).
Once discretization is complete, the distance Dgrid can be plotted on model surfaces using
Plot > Surface Components > Dgird distance to nearest grid
or on grids using
Plot > Miscellaneous > Delem distance to nearest element on grids.
Note that if desired, this behaviour can be overridden on a grid by grid basis by specifying the
maximum spacing for each grid
CAD > Edit > Entity Properties > Maximum Width
This allows users to force fine uniform discretization on grids.
Grid Discretize (DOL) - specifies the desired distance to element length ratio used to determine
the grid spacing from
Lgrid = Dgrid/DOL
where Dgrid is determined by Map3D as the smallest distance between model surfaces and grid
planes.
A value for DOL of 1.0 is generally adequate and can be expected to provide solutions with 1020% error. If higher accuracy is required a value for DOL of 2.0 should give 5-10% error. Use a
value of 4.0 for less than 5% error. Although higher values of DOL results in generation of more
boundary elements and hence longer run times, this is necessary to obtain increased accuracy.
Once discretization is complete, the ratio of Dgrid/Lelem can be plotted on model surfaces using
Plot > Miscellaneous > Dgrid/Lelem DOL ratio on surfaces
or the ratio of Dgrid/Lgrid on grids using
Plot > Miscellaneous > Dgrid/Lgrid DOL ratio on grids.
Element Discretize (DON) - specifies the desired distance to element length ratio used to
determine the element side length
Lelem = Delem/DON
where Delem represents the distance to the nearest model surface.
A value for DON of 0.5 is generally adequate for all problems except those with very narrow
excavations or pillars. In this latter case a value for DON of 1.0 is recommended. Although higher
values of DON results in generation of more boundary elements and hence longer run times, this
is necessary to obtain a well conditioned solvable problem for very narrow excavations or pillars.
Once discretization is complete, the ratio of Delem/Lelem can be plotted using
Plot > Miscellaneous > Delem/Lelem DON ratio on surfaces.
Map3D International Ltd 1990-2015
222
Map3D User's Manual
Matrix Lumping (DOC) - specifies the desired distance to element length ratio. During matrix
assembly, all elements that fit within the dimension
Delem/DOC
will be lumped together. Delem represents the distance to the nearest model surface.
Just as for DOL, a value for DOC of 1.0 is generally adequate and can be expected to provide
solutions with 10-20% error. If higher accuracy is required a value for DOC of 2.0 should give 510% error. Use a value of 4.0 for less than 5% error. Although higher values of DOC result in
larger coefficient matricies and hence longer run times, this is necessary to obtain increased
accuracy.
Once discretization is complete, the distance Delem can be plotted using
Plot > Miscellaneous > Delem distance to nearest element on surfaces.
Element Lumping (DOE) - specifies the desired distance to element length ratio. During grid
assembly, all elements that fit within the dimension
Dgrid/DOE
will be lumped together. Dgrid represents the distance to the nearest field point grid surface.
A value for DOE of 2.0 is generally adequate and can be expected to provide solutions with 1020% error. If higher accuracy is required a value for DOE of 4.0 should give 5-10% error. Use a
value of 8.0 for less than 5% error. Although higher values of DOE result in longer run times, this
is necessary to obtain increased accuracy.
Once discretization is complete, the distance Dgrid can be plotted on grids using
Plot > Miscellaneous > Delem distance to nearest element on grids.
Grid Lumping (DOG) - specifies the desired distance to element length ratio. During grid
assembly, all grid points that fit within the dimension
Dgrid/DOG
will be lumped together. Dgrid represents the distance to the nearest field point grid surface.
A value for DOG of 2.0 is generally adequate and can be expected to provide solutions with 1020% error. If higher accuracy is required a value for DOG of 4.0 should give 5-10% error. Use a
value of 8.0 for less than 5% error. Although higher values of DOG result in longer run times, this
is necessary to obtain increased accuracy.
Once discretization is complete, the distance Dgrid can be plotted on grids using
Plot > Miscellaneous > Delem distance to nearest element on grids.
Aspect Ratio (DOR) - specifies the desired element aspect ratio. A value for DOR of 5.0 is
recommended for all problems except where the user wants narrow elements subdivided into more
uniform shapes.
Comments - allows you to specify comments to be saved with the run.
Summary:
STOL should be set equal to 0.1% of the far field stress state at the depth of interest. Use the
same units as the far field stress state (e.g. MPa or psi).
AL should be set equal to twice the smallest pillar or stope width. Use the same units used to
Map3D International Ltd 1990-2015
Menu Commands
223
specify the coordinates (e.g. metres or feet).
AG should be set equal to the smallest dimension of interest. Use the same units used to specify
the coordinates (e.g. metres or feet).
DON=0.5, DOL=DOC=1, DOE=DOG=2 for 10-20% error.
DON=0.5, DOL=DOC=2, DOE=DOG=4 for 5-10% error.
DON=1, DOL=DOC=4, DOE=DOG=8 for < 5% error.
Elements are discretized to a side length that is the smaller of Delem/DON and Dgrid/DOL, such
that it cannot be less than AL and cannot be larger than the maximum width.
Grid are discretized to a spacing is determined from Dgrid/DOL such that is cannot be less than
AG and cannot be larger than the maximum spacing.
During matrix assembly, all elements that fit within the dimension Delem/DOC will be lumped
together.
During grid assembly, all elements that fit within the dimension Dgrid/DOE will be lumped together.
During grid assembly, all grid points that fit within the dimension Dgrid/DOG will be lumped
together.
Notes:
For a more detailed discussion on discretization and lumping refer to
Discretization and Lumping.
4.3.12.2 Mining Step Titles
Specification of a specifies a descriptive title for each mining step.
Map3D International Ltd 1990-2015
224
Map3D User's Manual
4.3.12.3 Material Properties
Specification of material properties.
Several different dialogue boxes will appear depending on the material type selected: MohrCoulomb, Hoek-Brown, Drucker-Prager, Backfill Hyperbolic and None.
Mohr-Coulomb in 3D FF blocks can be used as a flow rule for non-linear material behaviour in
Map3D Non-Linear and Map3D Visco-Plastic. Can also be used as failure criterion in 3D FF blocks
or in the host material in Map3D Fault-Slip.
Hoek-Brown in 3D FF blocks can be used as failure criterion in 3D FF blocks or in the host material
in Map3D Fault-Slip.
Drucker-Prager in 3D FF blocks can be used as failure criterion in 3D FF blocks or in the host
material in Map3D Fault-Slip.
Fault-Gouge in DD planes can be used as a flow rule in DD planes in Map3D Fault-Slip, Map3D
Non-Linear or Map3D Visco-Plastic.
Hyperbolic-Backfill in DD planes can be used as a flow rule in DD planes in Map3D Fault-Slip,
Map3D Non-Linear or Map3D Visco-Plastic.
Quadratic-Backfill in DD planes can be used as a flow rule in DD planes in Map3D Fault-Slip,
Map3D Non-Linear or Map3D Visco-Plastic.
Equilbrated-Gouge in DD planes can be used as a flow rule in DD planes in Map3D Fault-Slip,
Map3D Non-Linear or Map3D Visco-Plastic.
Yielding-Pillar in DD planes can be used as a flow rule in DD planes in Map3D Fault-Slip, Map3D
Non-Linear or Map3D Visco-Plastic.
In elastic analyses the failure criterion is used only for strength factor calculations and contour
plotting and does not affect the analysis results.
In non-linear analyses (3D FF blocks in Map3D Non-Linear, 3D FF blocks in Map3D Visco-Plastic,
and DD planes in Map3D Fault-Slip) the failure criterion is used as a flow rule to control yielding
and non-linear deformations.
4.3.12.4 Map3Di Setup
Sets up the Map3Di analysis.
Map3Di allows one to superimpose external field loading effects into the Map3D model. For details
on this feature refer to Map3Di.
When you check a Map3Di loading file for use you will be prompted to search for a file name,
location. If the search is successful, the file will be checked.
The Map3Di loading file is specified in polyline file format. Refer to Contour Plane Options for
details on generating a Map3Di loading file.
Comment lines must start with an asterisk "*" in column 1.
2D planes are stored as a series of triangle or quadrilateral polylines as follows:
x1 y1
x2 y2
x3 y3
x4 y4
...
z1
z2
z3
z4
3 values1
2 values2
2 values3
2 values4
3D blocks are stored as a series of tetrahedral or hexahedral polylines as follows:
Map3D International Ltd 1990-2015
Menu Commands
x1 y1
x2 y2
x3 y3
x4 y4
x5 y5
x6 y6
x7 y7
x8 y8
...
z1
z2
z3
z4
z5
z6
z7
z8
225
3 values1
2 values2
2 values3
2 values4
1 values5
1 values6
1 values7
1 values8
where xi yi zi represent the coordinates of each point.
3 indicates that this point is the beginning of a new polyline.
2 indicates that this point forms part of the base of the block.
1 indicates that this point forms part of the top of the block. This item is only used for definition of
3D block shapes.
Additional polylines are specified by repeating the sequence (i.e. starting a new polyline with the
number 3).
Any of the points can be repeated or skipped to specify triangular shaped sides or tetrahedrons.
valuesi specifies the magnitude of the field loading at the centre, or at each corner. If only values1
is specified (i.e. values2 … are left blank) that value is applied uniformly across the entity.
If valuesi are specified for all corners, the field loading is applied according to a higher order
polynomial distribution.
For 2D surface triangles a linear distribution is used
a+bx+cy
For 2D quadrilaterals, the following distribution is used
a+bx+cy+dxy
For 3D block shapes, as many terms as possible of the distribution are used
a+ bx + c y + dz+ ex y + f y z+ gzx + hx y z
The actual field loading effects can be specified in several ways.
2D Planes
2D planes define a Displacement Discontinuity with specified normal displacement (closure)
and shear displacement (ride) s, such that valuesi can be specified either as
n
s
or
n
s1
n
,
s2
If only n s are specified, the shear displacement (ride) is applied parallel to the maximum inplane shear stress for the 2D plane.
If all of
n
s1
s2 are
specified, the shear displacement (ride) component
s1
is applied parallel to
the first side (i.e. the side defined by x1 y1 z1 – x2 y2 z2). s2 is applied perpendicular to
direction of the second side (i.e. the side defined by x2 y2 z2 - x3 y3 z3).
s1
in the
Shear displacement (ride) and normal displacement (closure) are specified in displacement units
(i.e. the same units as the geometry is specified in (metres).
The shear displacement (ride) and normal displacement (closure) may be determined from in situ
or laboratory measurements of shear, closure and/or crack opening, or from another numerical
modelling program such as a reservoir or hydraulic fracture simulator. These can also be
Map3D International Ltd 1990-2015
226
Map3D User's Manual
estimated from seismic monitoring data.
3D Blocks
3D blocks define a zone with specified strain , either as
1
2
3
or
xx
yy
zz
xy
yz
zx
If only 1 2 3 are specified, these principal strains are applied parallel to the principal stresses.
The strains are used to determine the initial stress ° using
1
° = [ (1- )
2°
= [ (1- )
3° = [ (1- )
1
+
(
2
+
3
) ] E / [ (1+ ) (1-2 ) ]
2
+
(
3
+
1
) ] E / [ (1+ ) (1-2 ) ]
3
+
(
1
+
2
) ] E / [ (1+ ) (1-2 ) ]
If all of xx yy zz xy yz zx are specified, these strains are applied as Cartesian components. The
strains are used to determine the initial stress ° using
xx°
= [ (1- )
yy°
= [ (1- )
zz°
= [ (1- )
+
(
+
(
+
(
xx
yy
zz
xy°
=
xy
E / (1+ )
yz°
=
yz
E / (1+ )
zx°
=
zx
E / (1+ )
yy
zz
+
+
xx
+
zz
xx
) ] E / [ (1+ ) (1-2 ) ]
) ] E / [ (1+ ) (1-2 ) ]
yy
) ] E / [ (1+ ) (1-2 ) ]
Strains are specified in dimensionless strain units (i.e. 0.001 would specify 1000 micro strain).
E and represent respectively Young's modulus and Poisson's ratio. Map3D automatically
determines which material the corner of the 3D block is located within and uses the corresponding
material properties.
The strains may be determined from in situ or laboratory measurements of temperature or fluid
pressure, or from another numerical modelling program such as a thermal analysis code. These
can also be estimated from seismic monitoring data.
The strains that should be applied can be determined from the temperature through an expansion
coefficient A, where the temperature change or fluid pressure change (from the background value)
induces the initial stresses
1°
=
2°
=
3°
=A
T
For fluid flow problems the expansion coefficient A, should be set to unity (positive one) for
saturated media. For thermal problems the expansion coefficient should be specified as a negative
quantity given by
A=
where
E /(1-2 )
represents the coefficient of thermal expansion (i.e. the linear expansivity).
Notes
This function must be set up before conducting the Map3D BEM analysis
Analysis > BEM Analysis.
CAD > Properties > Map3Di Setup > View enables viewing of the Map3Di data.
Map3D International Ltd 1990-2015
Menu Commands
227
4.3.12.5 Model Information
Displays the current tally for the following model parameters:
number of surfaces used to define the geometry,
number of coordinates used to define the surfaces,
number of mining steps.
The following parameters are only displayed after the discretization analysis (Analysis >
Discretization) is complete:
number of boundary elements,
number of boundary nodes (only used for higher order elements (Analysis > Options > Linear),
number of field points on user defined grids.
4.3.13 Average Box
Calculates the weighted average value for all selected contour points.
You will be prompted to select the two corners of the window by picking each with a single mouse
click. Only those contour points enclosed in the window will be included. To view the location of the
actual contour points enable display of trajectories (Plot > Options > Trajectories). The contour
points are located where the trajectories are drawn.
The averaging is done by multiplying each selected value by the area of its associated surface or
grid patch, then summing these. This result is presented as the "Weighted Sum". The "Average" is
determined by dividing the weighted sum by the total area.
All values are accumulated as vector components. Principal stresses are determined from the
weighted mean of the Cartesian components. Displacement, flow and surface shear components
are determined from the weighted mean of the vector components.
Note that for stresses, the "Weighted Sum" is actually the total force acting on the surface.
If you multiply by the shear modulus, the "Weighted Sum" of the plastic shear displacement (ride) is
actually the Seismic Moment.
Complex polygonal shapes can be defined using Plot > Polygon Box.
4.3.14 Polygon Box
Calculates the weighted average value for all selected contour points. This function can also be
activated using
View > Length.
You will be prompted to select a series of corners to define a closed polygon by picking each with a
single mouse click:
You must hold down the Shift-key so that multiple line segments can be selected.
A closed polygonal shape is defined by closing the polyline by selecting the starting point.
If you define a closed polygonal shape - those contour points enclosed in the polygon will be
included in the averaging.
The average routine will not function if you define an open polyline shape (by not selecting the
starting point).
To view the location of the actual contour points enable display of trajectories (Plot > Options
> Trajectories). The contour points are located where the trajectories are drawn.
The averaging is done by multiplying each selected value by the area of its associated surface or
grid patch, then summing these. This result is presented as the "Weighted Sum". The "Average" is
determined by dividing the weighted sum by the total area.
Map3D International Ltd 1990-2015
228
Map3D User's Manual
All values are accumulated as vector components. Principal stresses are determined from the
weighted mean of the Cartesian components. Displacement, flow and surface shear components
are determined from the weighted mean of the vector components.
Note that for stresses, the "Weighted Sum" is actually the total force acting on the surface.
If you multiply by the shear modulus, the "Weighted Sum" of the plastic shear displacement (ride) is
actually the Seismic Moment.
4.3.15 Excel Plot (Grids)
Plots specified grid components in Excel.
You must contour grid results in order to be able to select these for Excel plotting (e.g.
Stress > s1 Major Principal Stress).
Plot >
The first parameter will be used as the x plot axis (i..e abscissa).
Additional parameters will define the y plot axes (i.e. series or ordinates). Multiple y plot axes
parameters can be specified.
Two types of Excel plots can be created:
selected contour points.
a series of points along the length of a polyline.
Excel plotting through Map3D is facilitated by the add-in routine Map3D.xla
This routine is automatically loaded when Map3D starts Excel.
You must allow this macro to run in order for the Map3D plotting routines to work.
Fully populated Specifies that all missing contour points will be generated via interpolation.
This option applies only to plotting of selected contour points (Points, Window and closed
Polyline).
This option does not apply to plotting on an open polyline.
Map3D International Ltd 1990-2015
Menu Commands
229
Map3D calculates results on a sparsely populated grid in order to save on analysis time.
To view the location of the actual contour points enable display of trajectories (Plot > Options
> Trajectories).
With this option unchecked, only the actual contour points will be included in the plot.
With this option checked, all missing contour points will be included in the plot.
Line interpolation width Specifies the desired spacing at which contour points will be generated via
interpolation.
This option applies only to plotting on an open polyline.
This option does not apply to plotting of selected contour points.
If the Line interpolation width is set to zero, only the ends of the open polyline will be plotted.
Otherwise points will be generated along the polyline via interpolation at the specified Line
interpolation width.
Step # only Specifies that the results for step # only will be dumped (# is the currently displayed
loaded mining step).
Steps 1-5 Specifies that the results for all steps will be dumped.
Note that this can take a considerable amount of time for large datasets so you must be
patient and wait for Map3D to cycle through all of the steps.
Use Commas Specifies that the results dumped to Excel will have commas in place of decimal
points for the number format.
Restart Excel If Map3D looses communication with Excel, you must Restart Excel to re-establish
communications.
Points activates graphical picking of individual points.
The nearest point to the pick point will be plotted.
To view the location of the actual contour points enable display of trajectories (Plot > Options
> Trajectories). The contour points are located where the trajectories are drawn.
Window activates a rectangular pick window.
You will be prompted to select the two corners of the window by picking each with a single
mouse click.
Only grid points enclosed within the window will be included in the plot.
To view the location of the actual contour points enable display of trajectories (Plot > Options
> Trajectories). The contour points are located where the trajectories are drawn.
Polyline (closed) activates a graphical pick polygon.
You must hold down the Shift-key so that multiple line segments can be selected.
A closed polygonal shape is defined by closing the polyline by selecting the starting point.
If you define a closed polygonal shape - those contour points enclosed in the polygon will be
plotted.
If you define an open polyline shape - a series of points along the length of the polyline will be
plotted.
To view the location of the actual contour points enable display of trajectories (Plot > Options
> Trajectories). The contour points are located where the trajectories are drawn.
Polyline (open) activates a graphical pick polygon.
You can select two points to define a single line segment.
If you hold down the Shift-key multiple line segments can be selected.
You can specify the desired spacing at which contour points will be generated via
Map3D International Ltd 1990-2015
230
Map3D User's Manual
interpolation with using the Line interpolation width parameter.
The user may find it useful to superimpose a regular grid on top of the contours (Plot >
Options > Grid Lines) to assist in selecting the polyline location.
If the Line interpolation width is set to zero, only the ends of the open polyline will be plotted.
If you define an open polyline shape - a series of points along the length of the polyline will be
plotted.
If you define a closed polygonal shape - those contour points enclosed in the polygon will be
plotted.
Excel Chart Control:
New chart - creates a new Excel chart.
Extend existing chart - adds data to the existing Excel chart. All plot parameters must be the
same as those used previously.
Change series - changes or adds new series to an existing Excel chart. Only the first plot
parameter must be the same. Additional plot parameters can be specified as desired.
Stresses:
s1 ts1 ps1 major principal stress
1
its trend and plunge.
s2 ts2 ps2 intermediate principal stress
2
its trend and plunge.
s3 ts3 ps3 minor principal stress 3 its trend and plunge.
sxx syy szz sxy syz sxz Cartesian stress components.
tmax maximum shear stress max = ½ ( 1 - 3 )
toct octahedral shear stress
oct
= ¹/3 [(
1
-
2
)² + (
2
-
3
)² +(
3
-
1
)²]½
smean mean stress mean = ¹/3 ( 1 + 2 + 3 )
ti tti pti maximum shear stress in the grid plane, its trend and plunge.
si tsi psi normal stress in the grid plane, its trend and plunge.
s1i ts1i ps1i maximum stress tangential to the grid plane, its trend and plunge.
s3i ts3i ps3i minimum stress tangential to the grid plane, its trend and plunge.
tu ttu ptu maximum shear stress in the ubiquitous-plane, its trend and plunge.
su tsu psu stress normal to the ubiquitous plane, its trend and plunge.
s1u ts1u ps1u maximum stress tangential to the ubiquitous plane, its trend and plunge.
s3u ts3u ps3u minimum stress tangential to the ubiquitous plane, its trend and plunge.
The orientation of the ubiquitous-plane is specified in
Plot > Strength Factors > Ubiquitous Parameters
Effective/Total effective stress or total stress components. These options are only used in Map3D
Thermal-Fluid Flow, as this code allows for calculation of steady state pore pressure distributions.
Induced/Absolute induced stress or absolute stress components (i.e. the stress without the premining stress contribution).
Strains:
e1 te1 pe1 major principal strain 1 its trend and plunge.
e2 te2 pe2 intermediate principal strain 2 its trend and plunge.
e3 te3 pe3 minor principal strain 3 its trend and plunge.
exx eyy ezz exy eyz exz Cartesian strain components.
emax maximum shear strain max = ½ ( 1 - 3 )
eoct octahedral shear strain
oct
= ¹/3 [(
1
-
2
)² + (
2
-
3
)² +(
3
-
1
)²]½
evol volumetric strain vol = ( 1 + 2 + 3 )
esi tesi pesi maximum shear strain in the grid plane, its trend and plunge.
eni teni peni normal strain in the grid plane, its trend and plunge.
Map3D International Ltd 1990-2015
Menu Commands
231
e1i te1i pe1i maximum strain tangential to the grid plane, its trend and plunge.
e3i te3i pe3i minimum strain tangential to the grid plane, its trend and plunge.
esu tesu pesu maximum shear strain in the ubiquitous-plane, its trend and plunge.
enu tenu penu strain normal to the ubiquitous plane, its trend and plunge.
e1u te1u pe1u maximum strain tangential to the ubiquitous plane, its trend and plunge.
e3u te3u pe3u minimum strain tangential to the ubiquitous plane, its trend and plunge.
Elastic/Plastic/Total elastic, plastic or total strain components. These options are only used in
Map3D Non-Linear, as this code allows for calculation of non-linear strains.
Induced/Absolute induced strain or absolute strain components (i.e. the stress without the premining stress contribution).
Displacements:
ut tut put total displacement, its trend and plunge.
ux uy uz Cartesian displacement components.
uni tuni puni displacement normal to the grid plane, its trend and plunge.
umi tumi pumi maximum displacement tangential to the grid plane, its trend and plunge.
unu tunu punu displacement normal to the ubiquitous plane, its trend and plunge.
umu tumu pumu maximum displacement tangential to the ubiquitous plane, its trend and plunge.
Flow:
t temperature/head.
qt tqt pqt total flow, its trend and plunge.
qx qy qz Cartesian flow components.
qni tqni pqni displacement normal to the grid plane, its trend and plunge.
qmi tqmi pqmi maximum displacement tangential to the grid plane, its trend and plunge.
qnu tqnu pqnu displacement normal to the ubiquitous plane, its trend and plunge.
qmu tqmu pqmu maximum displacement tangential to the ubiquitous plane, its trend and plunge.
Miscellaneous:
L Length along a line. Use the Polyline command to select the desired line.
X coordinate value.
Y coordinate value.
Z coordinate value.
user User defined value.
grid# the number of the grid where the point is located.
col# the colour number assigned to the grid where the point is located.
matl# the number of the material within which the point is located. The host material is material
number 1. In problems where multiple materials are used, results may be calculated in an
alternate material zone.
step# the mining step number.
name the name assigned to the grid where the point is located.
dof# a unique number specifying the storage location of the point in the Map3D database.
dgrid distance to the nearest surface from each grid point.
dol distance to the nearest grid Dgrid divided by the grid spacing Lgrid.
f1 f2... user defined material parameters. These can be defined using Plot > Properties >
Material Properties > User defined Parameters.
4.3.16 Excel Plot (Surfaces)
Plots specified surface components in Excel.
You must contour surface results in order to be able to select these for Excel plotting (e.g.
> Surface Components > Ts Shear Stress).
The first parameter will be used as the x plot axis (i..e abscissa).
Map3D International Ltd 1990-2015
Plot
232
Map3D User's Manual
Additional parameters will define the y plot axes (i.e. series or ordinates). Multiple y plot axes
parameters can be specified.
Two types of Excel plots can be created:
selected contour points.
a series of points along the length of a polyline.
Excel plotting through Map3D is facilitated by the add-in routine Map3D.xla
This routine is automatically loaded when Map3D starts Excel.
You must allow this macro to run in order for the Map3D plotting routines to work.
Fully populated Specifies that all missing contour points will be generated via interpolation.
This option applies only to plotting of selected contour points (Points, Window and closed
Polyline).
This option does not apply to plotting on an open polyline.
Map3D calculates results on a sparsely populated grid in order to save on analysis time.
To view the location of the actual contour points enable display of trajectories (Plot > Options
> Trajectories).
With this option unchecked, only the actual contour points will be included in the plot.
With this option checked, all missing contour points will be included in the plot.
Line interpolation width Specifies the desired spacing at which contour points will be generated via
interpolation.
This option applies only to plotting on an open polyline.
This option does not apply to plotting of selected contour points.
If the Line interpolation width is set to zero, only the ends of the open polyline will be plotted.
Otherwise points will be generated along the polyline via interpolation at the specified Line
interpolation width.
Step # only Specifies that the results for step # only will be dumped (# is the currently displayed
loaded mining step).
Steps 1-5 Specifies that the results for all steps will be dumped.
Note that this can take a considerable amount of time for large datasets so you must be
patient and wait for Map3D to cycle through all of the steps.
Map3D International Ltd 1990-2015
Menu Commands
233
Use Commas Specifies that the results dumped to Excel will have commas in place of decimal
points for the number format.
Restart Excel If Map3D looses communication with Excel, you must Restart Excel to re-establish
communications.
Points activates graphical picking of individual points.
The nearest point to the pick point will be plotted.
To view the location of the actual contour points enable display of trajectories (Plot > Options
> Trajectories). The contour points are located where the trajectories are drawn.
Window activates a rectangular pick window.
You will be prompted to select the two corners of the window by picking each with a single
mouse click.
Only grid points enclosed within the window will be included in the plot.
To view the location of the actual contour points enable display of trajectories (Plot > Options
> Trajectories). The contour points are located where the trajectories are drawn.
Polyline (closed) activates a graphical pick polygon.
You must hold down the Shift-key so that multiple line segments can be selected.
A closed polygonal shape is defined by closing the polyline by selecting the starting point.
If you define a closed polygonal shape - those contour points enclosed in the polygon will be
plotted.
If you define an open polyline shape - a series of points along the length of the polyline will be
plotted.
To view the location of the actual contour points enable display of trajectories (Plot > Options
> Trajectories). The contour points are located where the trajectories are drawn.
Polyline (open) activates a graphical pick polygon.
You can select two points to define a single line segment.
If you hold down the Shift-key multiple line segments can be selected.
You can specify the desired spacing at which contour points will be generated via
interpolation with using the Line interpolation width parameter.
The user may find it useful to superimpose a regular grid on top of the contours (View >
Render > Grid Lines) to assist in selecting the polyline location.
If the Line interpolation width is set to zero, only the ends of the open polyline will be plotted.
If you define an open polyline shape - a series of points along the length of the polyline will be
plotted.
If you define a closed polygonal shape - those contour points enclosed in the polygon will be
plotted.
Excel Chart Control:
New chart - creates a new Excel chart.
Extend existing chart - adds data to the existing Excel chart. All plot parameters must be the
same as those used previously.
Change series - changes or adds new series to an existing Excel chart. Only the first plot
parameter must be the same. Additional plot parameters can be specified as desired.
Stresses:
sn tsn psn stress normal to the surface, its trend and plunge.
ts tts pts maximum shear stress in the plane of the surface, its trend and plunge.
Map3D International Ltd 1990-2015
234
Map3D User's Manual
ts1 ts2 shear stress components in the plane of the surface. ts1 is parallel to the first side (i.e.
the side defined by x1 y1 z1 – x2 y2 z2). ts2 is perpendicular to ts1 in the direction of the second
side (i.e. the side defined by x2 y2 z2 – x3 y3 z3).
ser surface stress error. Iterative solvers function by determining the error in the current solution
of each simultaneous equation, then reducing these errors by a process of successive
approximations. This parameter indicates the error for each of the equations.
fer failure criterion error. This parameter is only used for non-linear creep analyses (including
fault slip and 3D material non-linearity). This parameter should always be near zero unless some
viscosity has been specified and the problem goes non-linear. In this latter case, viscous creep
can allow stress states above the failure criterion, thus indicating a lack of static equilibrium. This
parameter indicates the viscous stress for each of the equations.
Effective/Total – effective stress or total stress components. These options are only used in
Map3D Thermal-Fluid Flow, as this code allows for calculation of steady state pore pressure
distributions.
Induced/Absolute induced stress or absolute stress components (i.e. the stress without the premining stress contribution).
Strains:
en ten pen strain in the direction normal to the surface, its trend and plunge. This parameter is
only used for DD planes and is calculated as the normal displacement (closure) divided by the
thickness.
es tes pes maximum shear strain in the plane of the surface, its trend and plunge. This
parameter is only used for DD planes and is calculated as the shear displacement (ride) divided
by the thickness.
es1 es2 shear strain components in the plane of the surface. es1 is parallel to the first side (i.e.
the side defined by x1 y1 z1 – x2 y2 z2). es2 is perpendicular to es1 in the direction of the second
side (i.e. the side defined by x2 y2 z2 – x3 y3 z3).
Elastic/Plastic/Total elastic, plastic or total strain components. These options are used for DD
planes in Map3D Fault-Slip, and also used in Map3D Non-Linear, as this code allows for
calculation of non-linear strains.
Induced/Absolute induced strain or absolute strain components (i.e. the stress without the premining stress contribution).
Displacements:
dn tdn pdn normal displacement (closure) in the direction normal to the surface, its trend and
plunge. This parameter is only used for DD planes. Note that the elastic, plastic or total value can
be specified.
ds tds pds maximum shear displacement (ride) in the plane of the surface, its trend and plunge.
This parameter is only used for DD planes. Note that the elastic, plastic or total value can be
specified.
ds1 ds2 shear displacement (ride) components in the plane of the surface. ds1 is parallel to the
first side (i.e. the side defined by x1 y1 z1 – x2 y2 z2). ds2 is perpendicular to ds1 in the direction
of the second side (i.e. the side defined by x2 y2 z2 – x3 y3 z3).
Miscellaneous:
L Length along a line. Use the Polyline command to select the desired line.
X coordinate value.
Y coordinate value.
Z coordinate value.
area the area of the surface.
matl# the number of the material assigned to the surface.
step# the mining step number.
blk# the block number.
name the block name.
Map3D International Ltd 1990-2015
Menu Commands
235
dof# the degree of freedom number.
ERR energy release rate plot.
4.4
Analysis
4.4.1
Analysis
Opens the Map3D Analysis dialogue box that controls all stress analysis functions.
Analysis > Open Loads a model from a file.
Analysis > Restart Restarts an analysis that was aborted or interrupted by a power failure or
operating system crash.
Analysis > Model (CAD) Loads a model from a file.
Analysis > Intersections Conducts contact and intersection analysis.
Analysis > Discretization Block and grid discretization.
Analysis > BEM Analysis Map3D BEM analysis.
Analysis > Auto Plot Automatically plot selected surface components as the Map3D BEM analysis
proceeds.
Analysis > Auto Range Automatically modify the contour range as the Map3D BEM analysis
proceeds.
Analysis > Options Sets up options that control various program operations.
Analysis > Cparams Modifies analysis control parameters during analysis.
Analysis > Materials Modifies material properties during analysis.
Analysis > Minimize Minimizes the graphics display during analysis.
Analysis > Edit log Edits the log file. The log file is a recording of all messages written to the
message window.
Analysis > Go to CAD Go to the model building and editing stage.
Analysis > Close Close the dialogue box.
Map3D International Ltd 1990-2015
236
Map3D User's Manual
Analysis > Spawn Results Starts another instance of Map3D and loads the results for the first
mining step. This is useful for viewing results of currently completed steps while subsequent steps
are being analysed.
Analysis > Suspend Suspends/Pauses the currently running analysis.
Analysis > Resume Resumes the currently suspended analysis.
4.4.2
Analysis Options
Sets up options that control various program operations.
File Load Options:
Analysis > Options > Renumber Renumber surfaces so the volume is positive (during file load).
Analysis > Options > Auto Repair Attempts to repair you model by filling gaps, deleting duplicates
etc.(during file load).
Intersection Options:
Analysis > Options > Collapse Merge adjacent surfaces (during intersection analysis).
Analysis > Options > Planarity Subdivide non-planar quadrilaterals into triangles (during
intersection analysis).
Analysis > Options > Closure Conducts closure and overlap checking, and resolves Boolean
intersections (during intersection analysis).
Discretization Options:
Analysis > Options > MSCALC Calculate results at user defined points (during Map3D BEM
analysis).
Analysis > Options > LERD ERR Calculate energy release rate and loading system stiffness
(during Map3D BEM analysis).
Analysis > Options > Lumping Accuracy
Map3D International Ltd 1990-2015
Menu Commands
237
Analysis > Options > Lumping Pre-calculate coefficient matrix size (during discretization
analysis).
Map3D BEM Analysis Options:
Analysis > Options > V-ram Store part of the coefficient matrix in virtual RAM (during Map3D BEM
analysis).
Analysis > Options > P-ram Store part of the coefficient matrix in physical RAM (during Map3D
BEM analysis).
Analysis > Options > Drive # Specify scratch drives for coefficient matrix (during Map3D BEM
analysis).
Analysis > Options > Drive 2 Specify secondary scratch drive for coefficient matrix (during
Map3D BEM analysis).
Analysis > Options > Drive 3 Specify third scratch drive for coefficient matrix (during Map3D
BEM analysis).
Analysis > Options > Drive 4 Specify fourth scratch drive for coefficient matrix (during Map3D
BEM analysis).
Analysis > Options > Creep Conduct elasto-visco-plastic creep analysis.
Analysis > Options > Move Points Move field points that are very close to boundary surfaces
(during Map3D BEM analysis).
Analysis > Options > Verbose Write all solution vectors and field point results to the log file (during
Map3D BEM analysis).
Analysis > Options > CGM Use the conjugate gradient solver (during Map3D BEM analysis).
Analysis > Options > Precondition Precondition the matrix (during Map3D BEM analysis).
Analysis > Options > Accelerate Use the matrix accelerator (during Map3D BEM analysis).
Analysis > Options > Linear Use higher order boundary elements (during Map3D BEM analysis).
Analysis > Options > #C/T = 6/12 indicates the number of cores/threads currently active.
Analysis > Options > Async I/O Use Windows asynchronous I/O routines (during Map3D BEM
analysis).
Analysis > Options > Zero Strain Placement
Analysis > Options > Initialization Initialize the model so that the analysis continues from where a
previous analysis completed.
Miscellaneous Options:
Analysis > Options > Batch Set up analysis batch queue.
Analysis > Options > Reset
4.5
CAD
4.5.1
Build
4.5.1.1
Block
Builds a fully three-dimensional FF (Fictitious Force) type block. These are used for 3D
excavations, alternate material zones (ore zones or dykes) and backfilled zones. The block surfaces
will be further subdivided into boundary elements at a later stage in the program. In Map3D NonLinear these zones can yield and behave non-linearly.
Map3D International Ltd 1990-2015
238
Map3D User's Manual
Multiple blocks can be combined to create complex 3D shapes. The FFLoop routine (
CAD >
Build > FF Loop) can be used to extrude a series of 3D FF blocks from a floor plane or section, and
can be used to interpolate between multiple floor planes or sections.
7
6
8
5
3
2
4
1
When the routine is initiated the user is prompted to select the first 4 corners that define one side
(e.g. the bottom) of a 6-sided block. Once these are entered, the user is prompted for 4 additional
corners (corners 5, 6, 7 and 8) that define the opposite side of the block (e.g. the top).
Corners can be ordered in the either the clockwise or counter clockwise sense provided the top and
bottom are entered in the same order with the top side corners 5, 6, 7 and 8 laying directly above
the bottom side corners 1, 2, 3 and 4.
7
8
5&6
3
2
4
1
Any of the corners can be repeated to define 3 sided shapes and wedges.
7
6
8
5
3
4
Offset
Vector
2
1
Once the base is defined (corners 1, 2, 3 and 4), the remaining corners (5, 6, 7 and 8) can be
generated by offsetting or extruding
CAD > Build > Offset Remaining
The coordinates of the corners can be typed in from the keyboard
CAD > Build > Enter Point
selected by freehand drawing, picked from other entities (other blocks or construction lines) or
digitized
CAD > Digitizer Setup > Activate
A large variety of drawing tools are available to assist in visually selecting points from the model
CAD > Snap
Corners can be unselected using
CAD > Build > Undo Point
Corners can be reselected using
CAD > Build > Redo Point
The block is considered to be complete when either the 8th corner is entered or the user selects
Map3D International Ltd 1990-2015
Menu Commands
239
.
Upon completion of block construction the user is prompted to enter the block properties. This
allows you to specify the various parameters including the block colour and mining sequence.
Block Volume - displays the volume of the block.
Block Name - specifies a descriptive name for the block.
Element Type - specifies the type of boundary element that will be used for the block.
Fictitious Force - FF elements should be used for three-dimensional features such as
excavations, alternate material zones, back-filled stopes etc.
Displacement Discontinuity - DD elements should be used for tabular mining excavations,
fractures and fault planes.
Inactive elements can be used to display features that are to be included for visualization
purposes only and not to be used for the actual stress analysis.
Block Colour - specifies the colour number that will be used to display the block.
Specifies the colour number that will be assigned to each button. A total of 10 colours are
available for display. These are numbered respectively
1 through 10,
11 through 20,
21 through 30, etc.,
such that the same colour is displayed for numbers
1, 11, 21...,
2, 22, 32...,
3, 23, 33..., etc.
Fixed Element Width - specifies the user defined element width.
This parameter can be used to force uniform discretization on selected entities. Extreme caution
should be used in specifying this value since a small value can easily lead to enormous problem
size.
In general this option should not be used (unchecked) and discretization should be left to the AL
and AG parameters. These latter parameters will concentrate elements only where analysis results
are requested thus optimizing the use of elements and minimizing problem size. For further
discussion refer to
Map3D International Ltd 1990-2015
240
Map3D User's Manual
CAD > Properties Control Parameters
This parameter can also be used to avoid making surfaces with sides larger than this during the
intersection analysis. Any surfaces whose side length exceeds this dimension will not be
collapsed
Analysis > Options > Collapse
During the discretization process, any surface whose side length exceeds this dimension will be
subdivided to prevent surfaces having sides larger than this.
For an example of the use of this parameter refer to Tabular Mining Example
Matl_Code LERD/MStep - specifies the material code that will be substituted into the block for the
LERD/LSS calculation.
The first box is for the material code.
The second box is to specify the mining step number when the calculation is to be done. If this
box is left blank then the LERD calculation will be done for all steps.
Analysis > Options > LERD/LSS.
Mining Step n - specifies the material code that will be used for this block in mining step n. In the
above example, the block is non-existent at step 1, has material #2 (Ore) inserted in it at step 2, it
is excavated at step 3 (material code 0 means to excavate), and finally at step 4 material #5
(backfill) is inserted. When you use a positive material number, the material is placed into the
block at the specified initial stress state, and is then allowed to deform according to the elastic/
plastic properties you have set for that material number. When you use a negative material
number, the material is placed into the block at the specified initial stress state, but the stress state
is held at these vales regardless of the deformations, thereby providing a stress boundary
condition.
More Steps - allows specification of additional mining steps.
Clear All Steps - clears all mining steps (1-100).
Undo - unselects the last point entered and returns to the block construction routine
CAD > Build > Undo Point
Copy From… - allows you to select another block to copy the entity properties from.
Mesh - builds the block with surfaces subdivided into smaller parts at the specified block grid
spacing.
Build - completes block construction and enters the block into the model database.
Once you have completed this operation you have one last chance to undo this and remove this
block from the model database by selecting
CAD > Build > Undo Build
Cancel aborts block construction.
Note that it is possible to create zero volume blocks for example by specifying a zero length offset
vector. This allows users to construct individual FF surfaces if desired. While this is permissible it is
not recommended as this can lead to unclosed volumes.
FF blocks can be collapsed into DD planes at any time simply by changing the element type
CAD > Edit > Entity Properties
In this case the base of the block (the side defined by corners 1, 2, 3 and 4) will become the DD
plane and the remainder of the block sides will be discarded.
Map3D International Ltd 1990-2015
Menu Commands
241
Notes:
Different colour numbers should be used to represent logical groupings of blocks (e.g. for different
levels, sections or logical mining units such as development, stoping etc.). These colours are user
definable
Tools > Custom Colours
Any blocks with the same colour number will be automatically combined into single complex shapes
by Map3D.
Since it is easy to toggle on and off the display of specific block colour numbers
View > Hide Block Colours
This provides an efficient method to work with complex model data.
For discussion on model building aspects refer to:
Model Building and Editing
For tutorials on model building refer to:
Model Building Tutorials
Pressing the space-bar automatically activates the last build function that was used.
4.5.1.2
FF Loop
Builds fully three-dimensional FF (Fictitious Force) type blocks. These are used for 3D excavations,
alternate material zones (ore zones or dykes) and backfilled zones. The block surfaces will be
further subdivided into boundary elements at a later stage in the program. In Map3D Non-Linear
these zones can yield and behave non-linearly.
A few examples demonstrating this routine can be found under Model Building Tutorials. Refer
specifically to
FFLoop Drift Example
FFLoop Stope Example
Bulk Mining Example
FFLoops
When the routine is initiated the user is prompted to select the corners that define the perimeter of
a series of floor plans or sections. The direction you traverse each loop is not relevant. As many
loops as desired can be defined simultaneously. The number of points does not have to be the
same on each loop. The starting and end points on each loop (e.g. points 1 and 11 on the first loop,
and points 12 and 22 on the second) must be at the same location to define a series of closed
loops.
6
17
5
4
7
15
16
8
3
18
9
14
19
10
20
21
1,11
12,22
2
Trace
Map3D International Ltd 1990-2015
13
242
Map3D User's Manual
These points can be selected one at a time, or all points along a construction line segment can be
selected using the
CAD > Snap > Trace CLoop snap function.
Close
The FFLoop routine is considered to be complete when one of the following two conditions is met:
the user selects the final loop point (i.e. point #22) a third time
CAD > Build > FFLoop
The loops will then be subdivided into a series of 3 or 4 sided FF elements. These surfaces will be
further subdivided into boundary elements at a later stage in the program. The routine that does this
subdivision searches for corners that are near one another, so the user should take care to define
the loop such that the connections are straightforward. In the above example it is recommended that
points 4 and 5 be selected or generated.
Guide Lines
Guide lines
6
17
5
4
7
15
16
8
3
18
9
14
19
10
20
21
1,11
2
12,22
For more complex shapes, guide lines
13 (shown in yellow) can be defined, that force the sides to be
subdivided along these lines. These are simply defined as construction lines. For an example refer
to http://www.map3d.com/ffloop.htm. Guide lines must not intersect or cross one another.
Extrusion using Offset
Once the first closed loop has been entered, the remaining points can be generated by offsetting
the remaining points using
CAD > Build > Offset Remaining
Map3D International Ltd 1990-2015
Menu Commands
243
6
5
4
7
3
8
10
9
1,11
2
Miscellaneous
The coordinates of the corners can be typed in from the keyboard
CAD > Build > Enter Point
selected by freehand drawing, picked from other entities (other blocks or construction lines) or
digitized
CAD > Digitizer Setup > Activate
A large variety of drawing tools are available to assist in visually selecting points from the model
CAD > Snap
Corners can be unselected using
CAD > Build > Undo Point
Corners can be reselected using
CAD > Build > Redo Point
Upon completion of block construction the user is prompted to enter the block properties. This
allows you to specify the various parameters including the block colour and mining sequence.
Block Volume - displays the volume of the block.
Block Name - specifies a descriptive name for the block.
Element Type - specifies the type of boundary element that will be used for the block.
Map3D International Ltd 1990-2015
244
Map3D User's Manual
Fictitious Force - FF elements should be used for three-dimensional features such as
excavations, alternate material zones, back-filled stopes etc.
Displacement Discontinuity - DD elements should be used for tabular mining excavations,
fractures and fault planes.
Inactive elements can be used to display features that are to be included for visualization
purposes only and not to be used for the actual stress analysis.
Block Colour - specifies the colour number that will be used to display the block.
Specifies the colour number that will be assigned to each button. A total of 10 colours are
available for display. These are numbered respectively
1 through 10,
11 through 20,
21 through 30, etc.,
such that the same colour is displayed for numbers
1, 11, 21...,
2, 22, 32...,
3, 23, 33..., etc.
Fixed Element Width - specifies the user defined element width.
This parameter can be used to force uniform discretization on selected entities. Extreme caution
should be used in specifying this value since a small value can easily lead to enormous problem
size.
In general this option should not be used (unchecked) and discretization should be left to the AL
and AG parameters. These latter parameters will concentrate elements only where analysis results
are requested thus optimizing the use of elements and minimizing problem size. For further
discussion refer to
CAD > Properties Control Parameters
This parameter can also be used to avoid making surfaces with sides larger than this during the
intersection analysis. Any surfaces whose side length exceeds this dimension will not be
collapsed
Analysis > Options > Collapse
During the discretization process, any surface whose side length exceeds this dimension will be
subdivided to prevent surfaces having sides larger than this.
For an example of the use of this parameter refer to Tabular Mining Example
Matl_Code LERD/MStep - specifies the material code that will be substituted into the block for the
LERD/LSS calculation.
The first box is for the material code.
The second box is to specify the mining step number when the calculation is to be done. If this
box is left blank then the LERD calculation will be done for all steps.
Analysis > Options > LERD/LSS.
Mining Step n - specifies the material code that will be used for this block in mining step n. In the
above example, the block is non-existent at step 1, has material #2 (Ore) inserted in it at step 2, it
is excavated at step 3 (material code 0 means to excavate), and finally at step 4 material #5
(backfill) is inserted. When you use a positive material number, the material is placed into the
block at the specified initial stress state, and is then allowed to deform according to the elastic/
plastic properties you have set for that material number. When you use a negative material
number, the material is placed into the block at the specified initial stress state, but the stress state
is held at these vales regardless of the deformations, thereby providing a stress boundary
Map3D International Ltd 1990-2015
Menu Commands
245
condition.
Generate Separate Loop Blocks - if you are building multi-loop blocks, you can specify whether or
not interfaces will be created between each block so that each block can be treated as a separate
mining unit.
If you do not specify this option then a single large block will be created.
Offset - allows you to offset a planar loop to extrude the block into a 3D shape.
This operation can also be done using Extrude/Offset Remaining.
More Steps - allows specification of additional mining steps.
Clear All Steps - clears all mining steps (1-100).
Undo - unselects the last point entered and returns to the block construction routine
CAD > Build > Undo Point
Copy From… - allows you to select another block to copy the entity properties from.
Mesh - builds the block with surfaces subdivided into smaller parts at the specified block grid
spacing.
Build - completes block construction and enters the block into the model database.
Once you have completed this operation you have one last chance to undo this and remove this
block from the model database by selecting
CAD > Build > Undo Build
Cancel aborts block construction.
Note that it is possible to create zero volume blocks for example by specifying a zero length offset
vector. This allows users to construct individual FF surfaces if desired. While this is permissible it is
not recommended as this can lead to unclosed volumes.
FF blocks can be collapsed into DD planes at any time simply by changing the element type
CAD > Edit > Entity Properties
In this case the base of the block (the side defined by corners 1, 2, 3 and 4) will become the DD
plane and the remainder of the block sides will be discarded.
Notes:
Different colour numbers should be used to represent logical groupings of blocks (e.g. for different
levels, sections or logical mining units such as development, stoping etc.). These colours are user
definable
Tools > Custom Colours
Any blocks with the same colour number will be automatically combined into single complex shapes
Map3D International Ltd 1990-2015
246
Map3D User's Manual
by Map3D.
Since it is easy to toggle on and off the display of specific block colour numbers
View > Hide Block Colours
This provides an efficient method to work with complex model data.
For discussion on model building aspects refer to:
Model Building and Editing
For tutorials on model building refer to:
Model Building Tutorials
Pressing the space-bar automatically activates the last build function that was used.
4.5.1.3
DD Loop
Builds DD (Displacement Discontinuity) type block. These are used for tabular mining, thin seams
or fault planes. In all versions of Map3D these zones can yield and behave non-linearly. Multiple
DD's can be combined to create complex offset and rolling shapes.
A few examples demonstrating this routine can be found under Model Building Tutorials. Refer
specifically to
DDLoop Pillar Example
Tabular Mining Example
DDLoop
When the routine is initiated the user is prompted to select a series of loops that define the
perimeter of the desired zones. The direction you traverse each loop is not relevant. The starting
and end point of each loop (e.g. points 1 and 11, or 12 and 22) must be at the same location to
define closed loops.
6
4
17
5
15
7
3
16
18
8
14
19
9
20
10
21
1,11
12,22
2
Trace
13
These points can be selected one at a time, or all points along a construction line segment can be
selected using the
CAD > Snap > Trace CLoop snap function.
Close
The DDLoop routine is considered to be complete when one of the following two conditions is met:
the user selects the final loop point (i.e. point #12,22) a third time
CAD > Build > DDLoop
Map3D International Ltd 1990-2015
Menu Commands
247
6
4
5
7
3
8
9
10
1
2 then be subdivided into a series of 3 or 4 sided DD elements. These surfaces will be
The loops will
further subdivided into boundary elements at a later stage in the program. The routine that does this
subdivision searches for corners that are near one another, so the user should take care to define
the loop such that the connections are straightforward. In the above example it is recommended that
points 4 and 5 be selected or generated.
The Mesh build function (see below) can be used to build the block with surfaces subdivided into
smaller parts at the specified block grid spacing. This routine generates interior points as required
to maintain well shaped elements.
Guide Lines
Multiple interior zones can be traced simultaneously by defining guide lines (shown in yellow).
6
4
5
7
3
8
9
10
Guide
1
lines are simply defined as construction lines. For an example refer to http://www.map3d.com/t.
These
2
htm. Guide lines must traverse the perimeter loop from edge to edge. Multiple guide lines can be
defined that intersect one another thus defining multiple zones.
6
4
5
7
3
8
9
10
Guide
lines
2
Interior Zones
1
Multiple interior zones (e.g. pillars) can be defined by tracing around their periphery as shown
below. The direction you traverse the interior zone is not relevant. As many interior zones as
desired can be defined in this way.
Map3D International Ltd 1990-2015
248
Map3D User's Manual
12
5,11
4
6,10
3
13
7
9
8
1
2 these interior zones may be conveniently constructed by tracing around the outer
Alternatively
perimeter (
CAD > Snap > Trace CLoop) and using guide lines to define the desired interior
shapes.
8
6
7
9
5
10
4
11
12
3
1
2
Extrusion using Offset
Once at least two points have been entered, the remaining points can be generated by offsetting the
remaining points using
CAD > Build > Offset Remaining
Offset
Vector
6
5
4
Block
Grid the element type
Note also that DD elements can 3be extruded into FF zones simply by changing
2
from DD to FF.
Spacing
1
Miscellaneous
The coordinates of the corners can be typed in from the keyboard
CAD > Build > Enter Point
selected by freehand drawing, picked from other entities (other blocks or construction lines) or
digitized
Map3D International Ltd 1990-2015
Menu Commands
249
CAD > Digitizer Setup > Activate
A large variety of drawing tools are available to assist in visually selecting points from the model
CAD > Snap
Corners can be unselected using
CAD > Build > Undo Point
Corners can be reselected using
CAD > Build > Redo Point
Upon completion of block construction the user is prompted to enter the block properties. This
allows you to specify the various parameters including the block colour and mining sequence.
DDPlane Area - displays the combined area of all of the DDPlanes included in the DDLoop.
Block Name - specifies a descriptive name for the block.
Element Type - specifies the type of boundary element that will be used for the block.
Displacement Discontinuity - DD type elements should be used for tabular mining excavations,
fractures and fault planes.
Fictitious Force - FF type elements should be used.For three-dimensional features such as
excavations, alternate material zones, back-filled stopes etc.
Inactive elements can be used to display features that are to be included for visualization
purposes only and not to be used for the actual stress analysis.
Block Colour - specifies the colour number that will be used to display the block.
Specifies the colour number that will be assigned to each button. A total of 10 colours are
available for display. These are numbered respectively
1 through 10,
11 through 20,
21 through 30, etc.,
such that the same colour is displayed for numbers
1, 11, 21...,
Map3D International Ltd 1990-2015
250
Map3D User's Manual
2, 22, 32...,
3, 23, 33..., etc.
Fixed Element Width - specifies the user defined element width.
This parameter can be used to force uniform discretization on selected entities. Extreme caution
should be used in specifying this value since a small value can easily lead to enormous problem
size.
In general this option should not be used (unchecked) and discretization should be left to the AL
and AG parameters. These latter parameters will concentrate elements only where analysis results
are requested thus optimizing the use of elements and minimizing problem size. For further
discussion refer to
CAD > Properties Control Parameters
This parameter can also be used to avoid making surfaces with sides larger than this during the
intersection analysis. Any surfaces whose side length exceeds this dimension will not be
collapsed
Analysis > Options > Collapse
During the discretization process, any surface whose side length exceeds this dimension will be
subdivided to prevent surfaces having sides larger than this.
For an example of the use of this parameter refer to Tabular Mining Example
Matl_Code LERD/MStep - specifies the material code that will be substituted into the block for the
LERD/LSS calculation.
The first box is for the material code.
The second box is to specify the mining step number when the calculation is to be done. If this
box is left blank then the LERD calculation will be done for all steps.
Analysis > Options > LERD/LSS.
Analysis > Options > LERD/LSS
DDPlane Thickness - specifies the thickness of the material inserted into the DD element (i.e. fault
gouge, seam width, mining width or pillar height).
Normal displacement (closure) of the feature when in-filled will be limited to this thickness. Also,
the normal displacement (closure) and shear displacement (ride) are divided by the thickness to
determine the strain occurring in the in-filling material
Fault-Gouge in DD planes
Backfill-Hyperbolic in DD planes
Equilibrated-Gouge in DD planes
Mohr-Coulomb in DD planes
This parameter should be specified in the same units used to specify the coordinate positions (e.
g. metres or feet).
Mining Step n - specifies the material code that will be used for this block in mining step n. In the
above example, the block is non-existent at step 1, has material #2 (Ore) inserted in it at step 2, it
is excavated at step 3 (material code 0 means to excavate), and finally at step 4 material #5
(backfill) is inserted. When you use a positive material number, the material is placed into the
block at the specified initial stress state, and is then allowed to deform according to the elastic/
plastic properties you have set for that material number. When you use a negative material
number, the material is placed into the block at the specified initial stress state, but the stress state
is held at these vales regardless of the deformations, thereby providing a stress boundary
condition.
Map3D International Ltd 1990-2015
Menu Commands
251
Extrude DD into FF blocks - allows you to extrude a DD plane into an FF block. You will be
prompted for the extrusion vector
More Steps - allows specification of additional mining steps.
Clear All Steps - clears all mining steps (1-100).
Undo - unselects the last point entered and returns to the block construction routine
CAD > Build > Undo Point
Copy From… - allows you to select another block to copy the entity properties from.
Mesh - builds the block with surfaces subdivided into smaller parts at the specified block grid
spacing. This routine generates interior points as required to maintain good shaped elements.
Build - completes block construction and enters the block into the model database.
Once you have completed this operation you have one last chance to undo this and remove this
block from the model database by selecting
CAD > Build > Undo Build
Cancel aborts block construction.
Note that it is possible to create zero volume blocks for example by specifying a zero length offset
vector. This allows users to construct individual FF surfaces if desired. While this is permissible it is
not recommended as this can lead to unclosed volumes.
DD blocks can be extruded into 3D FF blocks at any time simply by changing the element type
CAD > Edit > Entity Properties
5
6
Offset
Vector
4
7
3
8
2
1
In this case corners 1 through 8 define the base of the block. The top and sides are automatically
generated during the extrusion process.
Note that it is possible to create zero volume blocks for example by specifying a zero length offset
vector. This allows users to construct individual FF surfaces if desired. While this is permissible it is
not recommended as this can lead to unclosed volumes.
Notes:
Different colour numbers should be used to represent logical groupings of blocks (e.g. for different
levels, sections or logical mining units such as development, stoping etc.). These colours are user
definable
Tools > Custom Colours
Any blocks with the same colour number will be automatically combined into single complex shapes
by Map3D.
Since it is easy to toggle on and off the display of specific block colour numbers
View > Hide Block Colours
This provides an efficient method to work with complex model data.
Map3D International Ltd 1990-2015
252
Map3D User's Manual
For discussion on model building aspects refer to:
Model Building and Editing
For tutorials on model building refer to:
Model Building Tutorials
Pressing the space-bar automatically activates the lat build function that was used.
4.5.1.4
Grid Plane
Builds a grid plane. Analysis results (stresses, strains and displacements) are calculated on these
grid planes. Each grid plane will be further subdivided at a later stage in the program (line grids can
be created using
CAD > Build > Grid Line).
3
2
4
1
When the routine is initiated the user is prompted to select 4 corners that define the perimeter of
the grid plane. The grid plane is considered to be complete when either the 4th corner is selected or
the user selects
CAD > Build > Build
3
2
1
4
Offset
Vector
Once at least two points have been entered, the remaining points can be generated by offsetting
CAD > Build > Offset Remaining
The coordinates of the corners can be typed in from the keyboard
CAD > Build > Enter Point
selected by freehand drawing, picked from other entities (other blocks or construction lines) or
digitized
CAD > Digitizer Setup > Activate
A large variety of drawing tools are available to assist in visually selecting points from the model
CAD > Snap
Corners can be unselected using
CAD > Build > Undo Point
Corners can be reselected using
CAD > Build > Redo Point
Upon completion of grid plane construction the user is prompted to enter the properties. This allows
you to specify a name for the grid plane.
Map3D International Ltd 1990-2015
Menu Commands
253
Name - specifies a descriptive name for the grid.
Grid Type - specifies whether you want the grid to be active (used in the stress analysis) or inactive
(not used in the stress analysis).
Fixed Grid Spacing - specifies the user grid spacing.
This parameter can be used to force uniform discretization on selected grids. Extreme caution
should be used in specifying this value since a small value can easily lead to enormous problem
size.
In general this option should not be used (unchecked) and discretization should be left to the AG
parameter. This latter parameter will concentrate elements only where analysis results are
requested thus optimizing the use of elements and minimizing problem size.
CAD > Properties Control Parameters
Undo - unselects the last point entered and returns to the grid construction routine
CAD > Build > Undo Point
Build - completes grid construction and enters the block into the model database.
Once you have completed this operation you have one last chance to undo this and remove this
grid from the model database by selecting
CAD > Build > Undo Build
Cancel - aborts grid construction.
For examples on the use of field point grid planes refer to:
Model Building Tutorials
Pressing the space-bar automatically activates the last build function that was used.
4.5.1.5
Grid Line
Builds a grid line. Analysis results (stresses, strains and displacements) are calculated on these
grid lines. Each grid line will be further subdivided at a later stage in the program (grid planes can
be created using
CAD > Build > Grid Plane).
2
1
When the routine is initiated the user is prompted to select 2 corners that define the ends of the grid
line. The grid line is considered to be complete when either the 2nd corner is selected or the user
selects
CAD > Build > Build
Map3D International Ltd 1990-2015
254
Map3D User's Manual
2
1
Offset
Vector
After the first point has been entered, the remaining point can be generated by offsetting
CAD > Build > Offset Remaining
The coordinates of the corners can be typed in from the keyboard
CAD > Build > Enter Point
selected by freehand drawing, picked from other entities (other blocks or construction lines) or
digitized
CAD > Digitizer Setup > Activate
A large variety of drawing tools are available to assist in visually selecting points from the model
CAD > Snap
Corners can be unselected using
CAD > Build > Undo Point
Corners can be reselected using
CAD > Build > Redo Point
Upon completion of grid plane construction the user is prompted to enter the properties. This allows
you to specify a name for the grid line.
Name - specifies a descriptive name for the grid.
Grid Type - specifies whether you want the grid to be active (used in the stress analysis) or inactive
(not used in the stress analysis).
Fixed Grid Spacing - specifies the user grid spacing.
This parameter can be used to force uniform discretization on selected grids. Extreme caution
should be used in specifying this value since a small value can easily lead to enormous problem
size.
In general this option should not be used (unchecked) and discretization should be left to the AG
parameter. This latter parameter will concentrate elements only where analysis results are
requested thus optimizing the use of elements and minimizing problem size.
CAD > Properties Control Parameters
Undo - unselects the last point entered and returns to the grid construction routine
CAD > Build > Undo Point
Build - completes grid construction and enters the block into the model database.
Map3D International Ltd 1990-2015
Menu Commands
255
Once you have completed this operation you have one last chance to undo this and remove this
grid from the model database by selecting
CAD > Build > Undo Build
Cancel - aborts grid construction.
For examples on the use of field point grid planes refer to:
Model Building Tutorials
Pressing the space-bar automatically activates the last build function that was used.
4.5.1.6
Construction Lines
Builds construction lines. These are meant to represent the mining outlines and are used as aids for
building your model. Construction lines are generally digitized from drawings or imported from other
CAD packages.
5
6
4
7
3
8
2
1
When the routine is initiated the user is prompted to select a series of corners that define the
perimeter of the desired zone. The construction line is considered to be complete when either the
1st corner is repeated or the user selects
CAD > Build > Build
6
5
7
8
9
10
4
3
2
1
Offset
Vector
Once at least two points have been entered, the remaining points can be generated by offsetting
CAD > Build > Offset Remaining
The coordinates of the corners can be typed in from the keyboard
CAD > Build > Enter Point
selected by freehand drawing, picked from other entities (other blocks or construction lines) or
digitized
CAD > Digitizer Setup > Activate
A large variety of drawing tools are available to assist in visually selecting points from the model
CAD > Snap
Corners can be unselected using
CAD > Build > Undo Point
Corners can be reselected using
Map3D International Ltd 1990-2015
256
Map3D User's Manual
CAD > Build > Redo Point
Upon completion of block construction the user is prompted to enter the properties. This allows you
to specify the colour of the construction line.
Colour - specifies the colour number that will be used to display the construction line.
A total of 10 colours are available for display. These are numbered respectively
1 through 10,
11 through 20,
21 through 30, etc.,
such that the same colour is displayed for numbers
1, 11, 21...,
2, 22, 32...,
3, 23, 33..., etc.
Undo - unselects the last point entered and returns to the construction line grid building routine.
CAD > Build > Undo Point
Build - completes grid construction and enters the block into the model database.
Once you have completed this operation you have one last chance to undo this and remove this
grid from the model database by selecting
CAD > Build > Undo Build
Cancel - aborts line construction.
Notes
Different colour numbers should be used to represent logical groupings of construction lines (e.g.
for different levels, sections or logical mining units such as development, stoping etc.). These
colours are user definable
Tools > Custom Colours
Since it is easy to toggle on and off the display of specific construction line colour numbers
View > Hide Block Colours
This provides an efficient method to work with complex construction line data.
For examples on the use of construction lines in model building refer to:
Model Building Tutorials
Pressing the space-bar automatically activates the last build function that was used.
4.5.1.7
Build
Completes construction of the following entities by filling in default values for all remaining points:
CAD > Build > Block
CAD > Build > FF Loop
Map3D International Ltd 1990-2015
Menu Commands
257
CAD > Build > DD Loop
CAD > Build > Grid Plane
CAD > Build > Grid Line
CAD > Build > Construction Lines
Upon completion of block construction the user is prompted to enter the block properties
CAD > Edit > Entity Properties
This allows you to specify the various parameters including the block colour and mining sequence.
Pressing the space-bar automatically activates the last build function that was used.
4.5.1.8
Enter Point
The coordinates of the corners can be typed in from the keyboard during construction of the
following entities:
CAD > Build > Block
CAD > Build > FF Loop
CAD > Build > DD Loop
CAD > Build > Grid Plane
CAD > Build > Grid Line
CAD > Build > Construction Lines
X, Y and Z – coordinate specify the coordinates of the point.
Pick - activates the cursor cross-hairs allowing interactive selection of the point from the model.
To assist in visually selecting points from the model, all snap functions are available.
CAD > Snap
Once selected, the coordinates of the point are displayed in the dialogue box.
4.5.1.9
Extrude/Offset Remaining
Extrudes a partially constructed entity to assist in generating the remaining points during
construction of the following entities:
CAD > Build > Block
CAD > Build > FF Loop
Map3D International Ltd 1990-2015
258
Map3D User's Manual
CAD > Build > DD Loop
CAD > Build > Grid Plane
CAD > Build > Grid Line
CAD > Build > Construction Lines
X, Y and Z – offset specify the components of the offset vector. All selected entities will be moved
by this amount.
Pick - activates the cursor cross-hairs allowing interactive selection of the offset vector from the
model. This requires that you select two points to define this vector.
Length, Plunge and Direction - specify the components of the offset vector. All selected entities will
be moved by this amount.
Norm - activates the cursor allowing interactive selection of a surface to make the offset vector
normal to. This requires that you select two points to define this vector. Once selected, the
components of the offset vector are displayed in the dialogue box.
To assist in visually selecting points from the model, all snap functions are available.
CAD > Snap
Once selected, the components of the offset vector are displayed in the dialogue box.
z
Offset Vector
y
x
For example if you have constructed the base of a 3D block (points 1, 2, 3 and 4) and you wish to
generate the remaining points (5, 6, 7 and 8) at one metre elevation above the base, you would
simply enter the offset vector as (0,0,1).
7
6
8
5
3
4
Offset
Vector
(0,0,1)
2
1
Map3D International Ltd 1990-2015
Menu Commands
259
Note that it is possible to create zero volume blocks for example by specifying a zero length offset
vector. This allows users to construct individual FF surfaces if desired. While this is permissible it is
not recommended as this can lead to unclosed volumes.
4.5.1.10 Undo Point
During block construction, points are selected in sequence. This allows points to be unselected
during construction of the following entities:
CAD > Build > Block
CAD > Build > FF Loop
CAD > Build > DD Loop
CAD > Build > Grid Plane
CAD > Build > Grid Line
CAD > Build > Construction Lines
Any unselected points can be reselected using
CAD > Build > Redo Point
Once you have completed block construction, you can undo this and remove this block from the
model database by selecting (10 levels of undo/redo are supported)
CAD > Build > Undo Build
You can then redo the block construction. This allows you to repeat any trial meshing operation.
CAD > Build > Undo Redo
4.5.1.11 Redo Point
During block construction, points are selected in sequence. This allows any points that have been
unselected to be reselected during construction of the following entities:
CAD > Build > Block
CAD > Build > FF Loop
CAD > Build > DD Loop
CAD > Build > Grid Plane
CAD > Build > Grid Line
CAD > Build > Construction Lines
Points can be unselected using
CAD > Build > Undo Point
Once you have completed block construction, you can undo this and remove this block from the
model database by selecting (10 levels of undo/redo are supported)
CAD > Build > Undo Build
Map3D International Ltd 1990-2015
260
Map3D User's Manual
You can then redo the block construction. This allows you to repeat any trial meshing operation.
CAD > Build > Undo Redo
4.5.1.12 Undo Build
During block construction, points are selected in sequence. This allows points to be unselected
during construction of the following entities:
CAD > Build > Block
CAD > Build > FF Loop
CAD > Build > DD Loop
CAD > Build > Grid Plane
CAD > Build > Grid Line
CAD > Build > Construction Lines
Any unselected points can be reselected using
CAD > Build > Redo Point
Once you have completed block construction, you can undo this and remove this block from the
model database by selecting (10 levels of undo/redo are supported)
CAD > Build > Undo Build
You can then redo the block construction. This allows you to repeat any trial meshing operation.
CAD > Build > Undo Redo
4.5.1.13 Redo Build
During block construction, points are selected in sequence. This allows any points that have been
unselected to be reselected during construction of the following entities:
CAD > Build > Block
CAD > Build > FF Loop
CAD > Build > DD Loop
CAD > Build > Grid Plane
CAD > Build > Grid Line
CAD > Build > Construction Lines
Points can be unselected using
CAD > Build > Undo Point
Once you have completed block construction, you can undo this and remove this block from the
model database by selecting (10 levels of undo/redo are supported)
CAD > Build > Undo Build
Map3D International Ltd 1990-2015
Menu Commands
261
You can then redo the block construction. This allows you to repeat any trial meshing operation.
CAD > Build > Undo Redo
4.5.2
Snap
4.5.2.1
None
Disable snapping. No pick-box is displayed at the intersection of the cursor cross-hairs.
Points will be selected at the location indicated by the cross-hairs. This mode is useful for freehand
sketching or digitizing. When digitizing, all three coordinate values are scaled off of the drawing.
However when freehand sketching, only two of the coordinates can be located and the third must be
supplied from the snap base
CAD > Snap > Cursor/Grid Base
This is the recommended setting while digitizing.
4.5.2.2
Nearest Edge
Snap to the nearest edge.
The nearest
point on this
edge will be
selected
If the pick-box is located over the corner of an entity, that corner will be selected.
Otherwise the nearest point on the nearest edge will be selected.
The pick-box must be located over an entity or construction line.
4.5.2.3
Nearest Corner
Snap to the nearest corner.
This corner
will be
selected
The corner nearest the pick-box will be selected.
The pick-box must be located over an entity or construction line.
Map3D International Ltd 1990-2015
262
4.5.2.4
Map3D User's Manual
Nearest Surface
Snap onto the surface.
If the pick-box is located over the corner of an entity, that corner will be selected.
If the pick-box is located over an edge, the nearest point on that edge will be selected.
Otherwise the nearest point on the surface will be selected.
The pick-box must be located over an entity or construction line.
4.5.2.5
Midpoint of Line
Snap to the midpoint of the selected edge.
The midpoint
on this edge
will be
selected
If the pick-box is located over the corner of an entity, that corner will be selected.
Otherwise the midpoint on the nearest edge will be selected.
The pick-box must be located over an entity or construction line.
4.5.2.6
Tangent Snap
Force cursor tangent to the selected edge.
Cursor
movement will
be constrained
to this tangent
The edge nearest the pickbox will be selected. The pick-box must be located over an entity or
construction line.
Once selected, all cursor movement will be constrained to the tangent defined by the selected edge.
Points can now be selected anywhere along this tangent.
Once a point is selected, tangent snap is automatically cancelled. Tangent snap can be cancelled at
any time by pressing the escape key (Esc) or right click the mouse.
To select points at even spacing along the tangent line, tangent snap can be used in conjunction
with any of:
CAD > Snap > Grid Snap Snap to a rectangular grid.
CAD > Snap > X-Gird Snap Snap to the selected edge at an even X grid spacing.
CAD > Snap > Y-Grid Snap Snap to the selected edge at an even Y grid spacing.
Map3D International Ltd 1990-2015
Menu Commands
263
CAD > Snap > Z-Grid Snap Snap to the selected edge at an even Z grid spacing.
4.5.2.7
Intersection Snap
Snap to the intersection of the selected edge and a tangent.
Tangent line
The intersection of this edge and
the tangent line will be selected
Since this function operates in full 3D, the tangent may pass above or below the selected edge and
not actually intersect. In this case the closest point to the tangent line on the selected edge will be
picked.
This convention must be emphasized. The intersection point will not be selected on the tangent line:
it will be selected on the intersection line.
Using this feature is a two step process. When you click on the Intersect Snap button
be prompted as follows:
you will
1. First select a tangent line.
2. Then select the edge you want to intersect the tangent with. The point will be selected on this
line.
The edge nearest the pickbox will be selected.
The pick-box must be located over an entity or construction line.
This function can be used to locate points at the intersection of the tangent and the projection of the
selected edge.
Located point
Tangent line
The point will be selected at the
intersection of the projection of
this edge and the tangent line
Once a point is selected, intersection snap is automatically cancelled. Intersection snap can be
cancelled at any time by pressing the escape key (Esc) or right click the mouse.
For an example on the use of intersection snap in model building refer to
Tabular Mining
Map3D International Ltd 1990-2015
264
4.5.2.8
Map3D User's Manual
Trace Virtual Line Snap
Generate points along a virtual line segment. This snap mode is generally used in conjunction with
CAD > Snap >Trace Cline as a quick method for building DDLoops (
CAD > Build >
DDLoop) and FFLoops (
CAD > Build > FFLoop).
To use this snap mode you simply define the virtual line segment by picking the start and end
points, and the function will automatically generate points along this line. For example if you select
points 4 and 10, the points along the dashed line will be automatically generated.
6
4
5
7
3
8
9
10
1
Notes:
2
The location of all points along construction lines can be viewed by setting the View > Render >
Cline dot radius parameter.
4.5.2.9
Trace Cline Snap
Snap to selected corners along a construction line segment. This snap mode can be used as a
quick method for building DDLoops (
CAD > Build > DDLoop) and FFLoops (
CAD > Build
> FFLoop).
To use this snap mode you simply pick the start and end points along the desired construction line
segment and all point between these will be automatically selected. For example if you select points
4 and 9, points 5, 6, 7 and 8 will automatically be selected. Note that if you select the same point
twice, the entire loop will be selected.
6
4
5
7
3
8
9
10
1
Notes:
2
The location of all points along construction lines can be viewed by setting the View > Render >
Cline dot radius parameter.
Before using this trace snap mode, construction lines should be cleaned up using the CAD > Pack
and Renumber Clines function.
The
CAD > Edit > Smooth Construction Lines function can also be used to aid in cleaning up
construction lines.
Map3D International Ltd 1990-2015
Menu Commands
265
4.5.2.10 Trace Cloop Snap
Snap to all corners along a construction line segment. This snap mode can be used as a quick
method for building DDLoops (
CAD > Build > DDLoop) and FFLoops (
CAD > Build >
FFLoop).
To use this snap mode you simply pick a single points on the desired construction line segment and
all points on this line will be automatically selected. For example if you select point 4, points 5, 6, 7,
8, 1, 2 and 3 will automatically be selected.
6
4
5
7
3
8
9
10
1
2
The location of all points along construction lines can be viewed by setting the View > Render >
Cline dot radius parameter.
Notes:
Before using this trace snap mode, construction lines should be cleaned up using the CAD > Pack
and Renumber Clines function.
The
CAD > Edit > Smooth Construction Lines function can also be used to aid in cleaning up
construction lines.
4.5.2.11 Rectangular Grid Snap
Snap to a rectangular grid. No pick-box is displayed at the intersection of the cursor cross-hairs.
All cursor movement will be constrained to the grid points.
The grid can be oriented in either the X-Y, Y-Z or X-Z planes at any desired spacing and location.
To set up these parameters use
CAD > Snap > Cursor/Grid Setup setup the cursor/grid spacing and orientation.
For an example on the use of grid snap mode in model building refer to
Freehand Sketching - Room and Pillar.
4.5.2.12 Circular Grid Snap
Snap to a cylindrical grid. No pick-box is displayed at the intersection of the cursor cross-hairs.
All cursor movement will be constrained to the grid points.
The grid can be oriented in either the X-Y, Y-Z or X-Z planes at any desired spacing and location.
To set up these parameters use
CAD > Snap > Cursor/Grid Setup setup the cursor/grid spacing and orientation.
Map3D International Ltd 1990-2015
266
Map3D User's Manual
4.5.2.13 X-Grid Snap
Snap to an x-grid spacing.
z
y
The nearest xgrid point on
this edge will
be selected
x pick-box is located over the corner of an entity, that corner will be selected.
If the
Otherwise the nearest point at the x-grid spacing on the nearest edge will be selected.
The pick-box must be located over an entity or construction line.
Since the x coordinate values are constrained to the prescribed X-grid spacing, the y and z
coordinate values are calculated from the equation of the selected line.
The grid spacing and location are defined either by picking the X-Grid Snap button
time or use
a second
CAD > Snap > Cursor/Grid Setup setup the cursor/grid spacing and orientation.
X-grid snap can be used in conjunction with any of:
CAD > Snap > None Disable snapping.
CAD > Snap > Edge Snap to the nearest edge.
CAD > Snap > Tangent Snap Force cursor tangent to the selected edge.
4.5.2.14 Y-Grid Snap
Snap to a y-grid spacing.
z
x
y
The nearest ygrid point on
this edge will
be selected
If the pick-box is located over the corner of an entity, that corner will be selected.
Otherwise the nearest point at the y-grid spacing on the nearest edge will be selected.
The pick-box must be located over an entity or construction line.
Since the y coordinate values are constrained to the prescribed y-grid spacing, the x and z
coordinate values are calculated from the equation of the selected line.
The grid spacing and location are defined either by picking the Y-Grid Snap button
time or use
a second
Map3D International Ltd 1990-2015
Menu Commands
267
CAD > Snap > Cursor/Grid Setup setup the cursor/grid spacing and orientation.
Y-grid snap can be used in conjunction with any of:
CAD > Snap > None Disable snapping.
CAD > Snap > Edge Snap to the nearest edge.
CAD > Snap > Tangent Snap Force cursor tangent to the selected edge.
4.5.2.15 Z-Grid Snap
Snap to a z-grid spacing.
The nearest zgrid point on
this edge will
be selected
z
y
If the
x pick-box is located over the corner of an entity, that corner will be selected.
Otherwise the nearest point at the y-grid spacing on the nearest edge will be selected.
The pick-box must be located over an entity or construction line.
Since the z coordinate values are constrained to the prescribed Z-grid spacing, the x and y
coordinate values are calculated from the equation of the selected line.
The grid spacing and location are defined either by picking the Z-Grid Snap button
time or use
a second
CAD > Snap > Cursor/Grid Setup setup the cursor/grid spacing and orientation.
Z-grid snap can be used in conjunction with any of:
CAD > Snap > None Disable snapping.
CAD > Snap > Edge Snap to the nearest edge.
CAD > Snap > Tangent Snap Force cursor tangent to the selected edge.
Map3D International Ltd 1990-2015
268
Map3D User's Manual
4.5.2.16 Cursor/Grid Setup
Setup the cursor/grid location, spacing and orientation.
X, Y and Z Origin - specifies the coordinates of the centre of the grid.
Pick - activates the cursor cross-hairs allowing interactive selection of the cursor/grid base from the
model.
Spacing - specifies the distance between grid points.
Angle - specifies the angle (in degrees) between the radii of the cylindrical grid.
# Intervals - specifies the number of grid points that will be displayed.
CAD > Snap > XY Cursor - constrains the cursor cross-hairs and snap grid to the X-Y plane.
CAD > Snap > YZ Cursor - constrains the cursor cross-hairs and snap grid to the Y-Z plane.
CAD > Snap > XZ Cursor - constrains the cursor cross-hairs and snap grid to the X-Z plane.
CAD > Snap > User defined Cursor - constrains the cursor cross-hairs
and snap grid to the user defined plane.
The user defined coordinate system is only active with rectangular and circular grid snapping (
CAD > Snap > Grid Snap and
CAD > Snap > Cylinder Snap).
The user defined plane is specified by its dip ( ), dip direction ( ) and rake ( ) such that:
The local x-axis (x') is defined along the strike of the plane.
The local y-axis (y') is defined as down dip.
The local z-axis is perpendicular to the plane.
Rake allows for rotation around the local z-axis.
Map3D International Ltd 1990-2015
Menu Commands
269
z
z’
y
x'
For an example on the use of grid snap mode in model building refer to
FreehandxSketching - Room and Pillar.
4.5.3
Properties
4.5.3.1
Control Parameters
y'
Specification of analysis control parameters.
Job Title - specifies a descriptive project title.
Maximum # of Time Steps (NLD) - specifies the maximum number of steps that will be used during
analysis. This parameter is only relevant if you are conducting a non-linear creep analysis
Analysis > Options > Creep
where this limits the actual number of time steps.
Map3D International Ltd 1990-2015
270
Map3D User's Manual
If this parameter is exceeded, the program stops and the user is prompted for instructions on how
to proceed. This parameter can be modified during solution.
Unless the user has some special reason for limiting the number of time steps this parameter
should be set to an arbitrarily large number.
Maximum # of Iterations (NIT) - specifies the maximum number of iterations that will used during
matrix solution.
If this parameter is exceeded, the program stops and the user is prompted for instructions on how
to proceed. This parameter can be modified during solution.
Unless the user has some special reason for limiting the number of time steps this parameter
should be set to an arbitrarily large number.
Stress Tolerance (STOL) - specifies the required accuracy of the matrix solution.
During matrix solution the accuracy is successively improved with each iteration. When the
maximum stress error falls below this value the matrix can be considered to be solved.
The suggested value for the parameter is 0.1% of the far field stress state at the depth of interest.
STOL should be specified in the same units as the far field stress state (e.g. MPa or psi).
Relaxation Parameter (RPAR) - specifies the maximum relaxation value that will be used during
matrix solution.
During matrix solution the program continuously modifies the relaxation parameter in an attempt to
obtain convergence with as few as possible iterations. This parameter limits the maximum value
that will be used.
The value of 1.2 is recommended for well-conditioned problems. For poorly conditioned problems
a value of 0.8 should be used.
Element Length (AL) - specifies the minimum element length.
During the discretization process all model surfaces (surfaces of FF blocks and DD planes) are
subdivided into boundary elements with side length
Lelem = Delem/DON
where Delem is determined by Map3D as the smallest distance between adjacent model surfaces.
Since at some locations the distance Delem may be zero, the minimum element side length AL
must be specified.
AL should be set equal to twice the smallest pillar or stope width. The same units used to specify
the coordinates should be used (e.g. metres or feet).
Once discretization is complete, the distance Delem can be plotted using
Plot > Miscellaneous > Delem distance to nearest element on surfaces.
Note that if desired, this behaviour can be overridden on an element by element basis by
specifying the maximum width for each element
CAD > Edit > Entity Properties > Maximum Width
This allows users to force fine uniform discretization on surfaces in areas where there are no grid
planes.
Grid Spacing (AG) - specifies the minimum grid spacing.
During the discretization process all field point grids and model surfaces are subdivided into
elements with side length
Map3D International Ltd 1990-2015
Menu Commands
271
Lgrid = Dgrid/DOL
where Dgrid is determined by Map3D as the smallest distance between model surfaces and grid
planes. Since at some locations the distance Dgrid may be zero, the minimum grid spacing AG
must be specified. This same process is used to discretize model surfaces (surfaces of FF blocks
and DD planes) that are near field point grids.
AG should be set equal to the smallest dimension of interest. For example if the user needs to see
the stress distribution across a 2m wide pillar, a value for AG of 0.5 would give sufficient number
of field points for accurate contouring. The same units used to specify the coordinates should be
used (e.g. metres or feet).
Once discretization is complete, the distance Dgrid can be plotted on model surfaces using
Plot > Surface Components > Dgird distance to nearest grid
or on grids using
Plot > Miscellaneous > Delem distance to nearest element on grids.
Note that if desired, this behaviour can be overridden on a grid by grid basis by specifying the
maximum spacing for each grid
CAD > Edit > Entity Properties > Maximum Width
This allows users to force fine uniform discretization on grids.
Grid Discretize (DOL) - specifies the desired distance to element length ratio used to determine
the grid spacing from
Lgrid = Dgrid/DOL
where Dgrid is determined by Map3D as the smallest distance between model surfaces and grid
planes.
A value for DOL of 1.0 is generally adequate and can be expected to provide solutions with 1020% error. If higher accuracy is required a value for DOL of 2.0 should give 5-10% error. Use a
value of 4.0 for less than 5% error. Although higher values of DOL results in generation of more
boundary elements and hence longer run times, this is necessary to obtain increased accuracy.
Once discretization is complete, the ratio of Dgrid/Lelem can be plotted on model surfaces using
Plot > Miscellaneous > Dgrid/Lelem DOL ratio on surfaces
or the ratio of Dgrid/Lgrid on grids using
Plot > Miscellaneous > Dgrid/Lgrid DOL ratio on grids.
Element Discretize (DON) - specifies the desired distance to element length ratio used to
determine the element side length
Lelem = Delem/DON
where Delem represents the distance to the nearest model surface.
A value for DON of 0.5 is generally adequate for all problems except those with very narrow
excavations or pillars. In this latter case a value for DON of 1.0 is recommended. Although higher
values of DON results in generation of more boundary elements and hence longer run times, this
is necessary to obtain a well conditioned solvable problem for very narrow excavations or pillars.
Once discretization is complete, the ratio of Delem/Lelem can be plotted using
Plot > Miscellaneous > Delem/Lelem DON ratio on surfaces.
Map3D International Ltd 1990-2015
272
Map3D User's Manual
Matrix Lumping (DOC) - specifies the desired distance to element length ratio. During matrix
assembly, all elements that fit within the dimension
Delem/DOC
will be lumped together. Delem represents the distance to the nearest model surface.
Just as for DOL, a value for DOC of 1.0 is generally adequate and can be expected to provide
solutions with 10-20% error. If higher accuracy is required a value for DOC of 2.0 should give 510% error. Use a value of 4.0 for less than 5% error. Although higher values of DOC result in
larger coefficient matricies and hence longer run times, this is necessary to obtain increased
accuracy.
Once discretization is complete, the distance Delem can be plotted using
Plot > Miscellaneous > Delem distance to nearest element on surfaces.
Element Lumping (DOE) - specifies the desired distance to element length ratio. During grid
assembly, all elements that fit within the dimension
Dgrid/DOE
will be lumped together. Dgrid represents the distance to the nearest field point grid surface.
A value for DOE of 2.0 is generally adequate and can be expected to provide solutions with 1020% error. If higher accuracy is required a value for DOE of 4.0 should give 5-10% error. Use a
value of 8.0 for less than 5% error. Although higher values of DOE result in longer run times, this
is necessary to obtain increased accuracy.
Once discretization is complete, the distance Dgrid can be plotted on grids using
Plot > Miscellaneous > Delem distance to nearest element on grids.
Grid Lumping (DOG) - specifies the desired distance to element length ratio. During grid
assembly, all grid points that fit within the dimension
Dgrid/DOG
will be lumped together. Dgrid represents the distance to the nearest field point grid surface.
A value for DOG of 2.0 is generally adequate and can be expected to provide solutions with 1020% error. If higher accuracy is required a value for DOG of 4.0 should give 5-10% error. Use a
value of 8.0 for less than 5% error. Although higher values of DOG result in longer run times, this
is necessary to obtain increased accuracy.
Once discretization is complete, the distance Dgrid can be plotted on grids using
Plot > Miscellaneous > Delem distance to nearest element on grids.
Aspect Ratio (DOR) - specifies the desired element aspect ratio. A value for DOR of 5.0 is
recommended for all problems except where the user wants narrow elements subdivided into more
uniform shapes.
Comments - allows you to specify comments to be saved with the run.
Summary:
STOL should be set equal to 0.1% of the far field stress state at the depth of interest. Use the
same units as the far field stress state (e.g. MPa or psi).
AL should be set equal to twice the smallest pillar or stope width. Use the same units used to
specify the coordinates (e.g. metres or feet).
Map3D International Ltd 1990-2015
Menu Commands
273
AG should be set equal to the smallest dimension of interest. Use the same units used to specify
the coordinates (e.g. metres or feet).
DON=0.5, DOL=DOC=1, DOE=DOG=2 for 10-20% error.
DON=0.5, DOL=DOC=2, DOE=DOG=4 for 5-10% error.
DON=1, DOL=DOC=4, DOE=DOG=8 for < 5% error.
Elements are discretized to a side length that is the smaller of Delem/DON and Dgrid/DOL, such
that it cannot be less than AL and cannot be larger than the maximum width.
Grid are discretized to a spacing is determined from Dgrid/DOL such that is cannot be less than
AG and cannot be larger than the maximum spacing.
During matrix assembly, all elements that fit within the dimension Delem/DOC will be lumped
together.
During grid assembly, all elements that fit within the dimension Dgrid/DOE will be lumped together.
During grid assembly, all grid points that fit within the dimension Dgrid/DOG will be lumped
together.
Notes:
For a more detailed discussion on discretization and lumping refer to
Discretization and Lumping.
4.5.3.2
Mining Step Titles
Specification of a specifies a descriptive title for each mining step.
Map3D International Ltd 1990-2015
274
4.5.3.3
Map3D User's Manual
Material Properties
Specification of material properties.
Several different dialogue boxes will appear depending on the material type selected: MohrCoulomb, Hoek-Brown, Drucker-Prager, Backfill Hyperbolic and None.
Mohr-Coulomb in 3D FF blocks can be used as a flow rule for non-linear material behaviour in
Map3D Non-Linear and Map3D Visco-Plastic. Can also be used as failure criterion in 3D FF blocks
or in the host material in Map3D Fault-Slip.
Hoek-Brown in 3D FF blocks can be used as failure criterion in 3D FF blocks or in the host material
in Map3D Fault-Slip.
Drucker-Prager in 3D FF blocks can be used as failure criterion in 3D FF blocks or in the host
material in Map3D Fault-Slip.
Fault-Gouge in DD planes can be used as a flow rule in DD planes in Map3D Fault-Slip, Map3D
Non-Linear or Map3D Visco-Plastic.
Hyperbolic-Backfill in DD planes can be used as a flow rule in DD planes in Map3D Fault-Slip,
Map3D Non-Linear or Map3D Visco-Plastic.
Quadratic-Backfill in DD planes can be used as a flow rule in DD planes in Map3D Fault-Slip,
Map3D Non-Linear or Map3D Visco-Plastic.
Equilbrated-Gouge in DD planes can be used as a flow rule in DD planes in Map3D Fault-Slip,
Map3D Non-Linear or Map3D Visco-Plastic.
Yielding-Pillar in DD planes can be used as a flow rule in DD planes in Map3D Fault-Slip, Map3D
Non-Linear or Map3D Visco-Plastic.
In elastic analyses the failure criterion is used only for strength factor calculations and contour
plotting and does not affect the analysis results.
In non-linear analyses (3D FF blocks in Map3D Non-Linear, 3D FF blocks in Map3D Visco-Plastic,
and DD planes in Map3D Fault-Slip) the failure criterion is used as a flow rule to control yielding
and non-linear deformations.
4.5.3.4
Map3Di Setup
Sets up the Map3Di analysis.
Map3Di allows one to superimpose external field loading effects into the Map3D model. For details
on this feature refer to Map3Di.
When you check a Map3Di loading file for use you will be prompted to search for a file name,
location. If the search is successful, the file will be checked.
The Map3Di loading file is specified in polyline file format. Refer to Contour Plane Options for
details on generating a Map3Di loading file.
Comment lines must start with an asterisk "*" in column 1.
2D planes are stored as a series of triangle or quadrilateral polylines as follows:
x1 y1
x2 y2
x3 y3
x4 y4
...
z1
z2
z3
z4
3 values1
2 values2
2 values3
2 values4
3D blocks are stored as a series of tetrahedral or hexahedral polylines as follows:
Map3D International Ltd 1990-2015
Menu Commands
x1 y1
x2 y2
x3 y3
x4 y4
x5 y5
x6 y6
x7 y7
x8 y8
...
z1
z2
z3
z4
z5
z6
z7
z8
275
3 values1
2 values2
2 values3
2 values4
1 values5
1 values6
1 values7
1 values8
where xi yi zi represent the coordinates of each point.
3 indicates that this point is the beginning of a new polyline.
2 indicates that this point forms part of the base of the block.
1 indicates that this point forms part of the top of the block. This item is only used for definition of
3D block shapes.
Additional polylines are specified by repeating the sequence (i.e. starting a new polyline with the
number 3).
Any of the points can be repeated or skipped to specify triangular shaped sides or tetrahedrons.
valuesi specifies the magnitude of the field loading at the centre, or at each corner. If only values1
is specified (i.e. values2 … are left blank) that value is applied uniformly across the entity.
If valuesi are specified for all corners, the field loading is applied according to a higher order
polynomial distribution.
For 2D surface triangles a linear distribution is used
a+bx+cy
For 2D quadrilaterals, the following distribution is used
a+bx+cy+dxy
For 3D block shapes, as many terms as possible of the distribution are used
a+ bx + c y + dz+ ex y + f y z+ gzx + hx y z
The actual field loading effects can be specified in several ways.
2D Planes
2D planes define a Displacement Discontinuity with specified normal displacement (closure)
and shear displacement (ride) s, such that valuesi can be specified either as
n
s
or
n
s1
n
,
s2
If only n s are specified, the shear displacement (ride) is applied parallel to the maximum inplane shear stress for the 2D plane.
If all of
n
s1
s2 are
specified, the shear displacement (ride) component
s1
is applied parallel to
the first side (i.e. the side defined by x1 y1 z1 – x2 y2 z2). s2 is applied perpendicular to
direction of the second side (i.e. the side defined by x2 y2 z2 - x3 y3 z3).
s1
in the
Shear displacement (ride) and normal displacement (closure) are specified in displacement units
(i.e. the same units as the geometry is specified in (metres).
The shear displacement (ride) and normal displacement (closure) may be determined from in situ
or laboratory measurements of shear, closure and/or crack opening, or from another numerical
modelling program such as a reservoir or hydraulic fracture simulator. These can also be
Map3D International Ltd 1990-2015
276
Map3D User's Manual
estimated from seismic monitoring data.
3D Blocks
3D blocks define a zone with specified strain , either as
1
2
3
or
xx
yy
zz
xy
yz
zx
If only 1 2 3 are specified, these principal strains are applied parallel to the principal stresses.
The strains are used to determine the initial stress ° using
1
° = [ (1- )
2°
= [ (1- )
3° = [ (1- )
1
+
(
2
+
3
) ] E / [ (1+ ) (1-2 ) ]
2
+
(
3
+
1
) ] E / [ (1+ ) (1-2 ) ]
3
+
(
1
+
2
) ] E / [ (1+ ) (1-2 ) ]
If all of xx yy zz xy yz zx are specified, these strains are applied as Cartesian components. The
strains are used to determine the initial stress ° using
xx°
= [ (1- )
yy°
= [ (1- )
zz°
= [ (1- )
+
(
+
(
+
(
xx
yy
zz
xy°
=
xy
E / (1+ )
yz°
=
yz
E / (1+ )
zx°
=
zx
E / (1+ )
yy
zz
+
+
xx
+
zz
xx
) ] E / [ (1+ ) (1-2 ) ]
) ] E / [ (1+ ) (1-2 ) ]
yy
) ] E / [ (1+ ) (1-2 ) ]
Strains are specified in dimensionless strain units (i.e. 0.001 would specify 1000 micro strain).
E and represent respectively Young's modulus and Poisson's ratio. Map3D automatically
determines which material the corner of the 3D block is located within and uses the corresponding
material properties.
The strains may be determined from in situ or laboratory measurements of temperature or fluid
pressure, or from another numerical modelling program such as a thermal analysis code. These
can also be estimated from seismic monitoring data.
The strains that should be applied can be determined from the temperature through an expansion
coefficient A, where the temperature change or fluid pressure change (from the background value)
induces the initial stresses
1°
=
2°
=
3°
=A
T
For fluid flow problems the expansion coefficient A, should be set to unity (positive one) for
saturated media. For thermal problems the expansion coefficient should be specified as a negative
quantity given by
A=
where
E /(1-2 )
represents the coefficient of thermal expansion (i.e. the linear expansivity).
Notes
This function must be set up before conducting the Map3D BEM analysis
Analysis > BEM Analysis.
CAD > Properties > Map3Di Setup > View enables viewing of the Map3Di data.
Map3D International Ltd 1990-2015
Menu Commands
4.5.3.5
277
Model Information
Displays the current tally for the following model parameters:
number of surfaces used to define the geometry,
number of coordinates used to define the surfaces,
number of mining steps.
The following parameters are only displayed after the discretization analysis (Analysis >
Discretization) is complete:
number of boundary elements,
number of boundary nodes (only used for higher order elements (Analysis > Options > Linear),
number of field points on user defined grids.
4.5.4
Edit
4.5.4.1
Entity Properties
Edit block type, colour, mining sequence etc.
This routine can be initiated either by picking the
button or simple right-clicking on any entity.
When you initiate this routine you will first be prompted to build a list of entities that you wish to edit
If Tools > Shift-key Selection is checked, you must hold down the Shift-key to make multiple
selections.
By default, selected entities are added to the list, however if the Ctrl-key is held down, selected
entities will be removed from the list.
While holding down the Shift-key or Ctrl-key, you can drag open a crossing window.
Use of this toolbar is detailed in Build A List of Entities for Editing
Pressing the space-bar automatically activates the last edit function that was used.
Holding the Alt-key when you right-click automatically repeats the last edit function that was
used.
Once you have selected the desired entities, you can either pick any of the edit buttons:
CAD > Edit > Entity Properties Edit block type, colour, mining sequence,
CAD > Edit > Erase Entities Erase selected entities,
CAD > Edit > Move Entities Move selected entities,
CAD > Edit > Copy Entities Copy selected entities,
CAD > Edit > Scale Entities Scale selected entities,
CAD > Edit > Rotate Azimuth Rotate the azimuth of selected entities,
CAD > Edit > Rotate Dip Rotate the dip of selected entities,
CAD > Edit > Dump to File Dump selected entities to a file,
CAD > Edit > Group Group selected entities into a single block,
double click on any vertex to execute the highlighted function,
right click for a list of options.
If any of the fields in the dialogue box read "Variable" it is because some of the blocks you have
selected have different properties for that field. If you wish to leave these properties as they are (i.e.
different for each block), leave the field as "Variable". If you wish to change the value of that field
for all selected blocks, enter the desired value.
Map3D International Ltd 1990-2015
278
Map3D User's Manual
Block Volume - If you have selected all FF blocks, the total combined volume of the blocks will be
displayed. If you have selected all FF blocks, the total combined volume of the blocks will be
displayed.
DDPlane Area - If you have selected all DD blocks, displays the combined area of all of the
DDPlanes included in the DDLoop.
Block Name - specifies a descriptive name for the block.
Element Type - specifies the type of boundary element that will be used for the block.
Displacement Discontinuity - DD type elements should be used for tabular mining excavations,
fractures and fault planes.
Fictitious Force - FF type elements should be used for three-dimensional features such as
excavations, alternate material zones, back-filled stopes etc.
Inactive elements can be used to display features that are to be included for visualization
purposes only and not to be used for the actual stress analysis.
Note that DD type elements can be changed into GPlanes.
Block Colour - specifies the colour number that will be used to display the block.
Specifies the colour number that will be assigned to each button. A total of 10 colours are
available for display. These are numbered respectively
1 through 10,
11 through 20,
21 through 30, etc.,
such that the same colour is displayed for numbers
1, 11, 21...,
2, 22, 32...,
3, 23, 33..., etc.
Fixed Element Width - specifies the user defined element width.
This parameter can be used to force uniform discretization on selected entities. Extreme
caution should be used in specifying this value since a small value can easily lead to enormous
problem size.
In general this option should not be used (unchecked) and discretization should be left to the
AL and AG parameters. These latter parameters will concentrate elements only where analysis
results are requested thus optimizing the use of elements and minimizing problem size. For
further discussion refer to
Map3D International Ltd 1990-2015
Menu Commands
279
CAD > Properties Control Parameters
This parameter can also be used to avoid making surfaces with sides larger than this during the
intersection analysis. Any surfaces whose side length exceeds this dimension will not be
collapsed
Analysis > Options > Collapse
During the discretization process, any surface whose side length exceeds this dimension will be
subdivided to prevent surfaces having sides larger than this.
For an example of the use of this parameter refer to Tabular Mining Example
Matl_Code LERD/MStep - specifies the material code that will be substituted into the block for the
LERD/LSS calculation.
The first box is for the material code.
The second box is to specify the mining step number when the calculation is to be done. If this
box is left blank then the LERD calculation will be done for all steps.
Analysis > Options > LERD/LSS.
DDPlane Thickness - specifies the thickness of the material inserted into the DD element (i.e. fault
gouge, seam width, mining width or pillar height).
Normal displacement (closure) of the feature when in-filled will be limited to this thickness. Also,
the normal displacement (closure) and shear displacement (ride) are divided by the thickness
to determine the strain occurring in the in-filling material
Mohr-Coulomb in DD planes
Fault-Gouge in DD planes
Backfill-Hyperbolic in DD planes
This parameter should be specified in the same units used to specify the coordinate positions
(e.g. metres or feet).
Mining Step n - specifies the material code that will be used for this block in mining step n.
In the above example, the block is non-existent at step 1, has material #2 (Ore) inserted in it at
step 2, it is excavated at step 3 (material code 0 means to excavate), and finally at step 4
material #5 (backfill) is inserted.
When you use a positive material number, the material is placed into the block at the specified
initial stress state, and is then allowed to deform according to the elastic/plastic properties you
have set for that material number.
When you use a negative material number, the material is placed into the block at the specified
initial stress state, but the stress state is held at these vales regardless of the deformations,
thereby providing a stress boundary condition.
Extrude DD into FF blocks - allows you to extrude a DD plane into an FF block. You will be
prompted for the extrusion vector
More Steps - allows specification of additional mining steps.
Clear All Steps - clears all mining steps (1-100).
Copy From… - allows you to select another block to copy the entity properties from.
OK - completes editing of blocks and modifies any properties that have been changed.
Cancel - aborts block editing.
Once you have completed any edit operation you have one chance to undo the modifications by
selecting
Undo
Map3D International Ltd 1990-2015
280
Map3D User's Manual
You can also restore the same selection set and modify the same set of entities again be selecting
Redo
DD blocks can be extruded into 3D FF blocks simply by changing the element type from
Displacement Discontinuity to Fictitious Force.
7
6
8
5
3
4
Offset
Vector
2
1
In this case corners 1 through 4 define the base of the block. The top and sides are automatically
generated during the extrusion process. FF blocks can be collapsed into DD planes by changing
the element type from Fictitious Force to Displacement Discontinuity. In this case the base of the
block (the side defined by corners 1, 2, 3 and 4) will become the DD plane and the remainder of
the block sides will be discarded.
Note that it is possible to create zero volume blocks for example by specifying a zero length offset
vector. This allows users to construct individual FF surfaces if desired. While this is permissible it is
not recommended as this can lead to unclosed volumes.
Notes
Different colour numbers should be used to represent logical groupings of blocks (e.g. for different
levels, sections or logical mining units such as development, stoping etc.). These colours are user
definable
Tools > Custom Colours
Any blocks with the same colour number will be automatically combined into single complex shapes
by Map3D.
Since it is easy to toggle on and off the display of specific block colour numbers
View > Hide Block Colours
This provides an efficient method to work with complex model data.
You can adjust the double click time using
Tools > Double Click Time
For discussion on model building aspects refer to:
Model Building and Editing
For tutorials on model building refer to:
Model Building Tutorials
4.5.4.2
Erase Entities
Erase selected entities.
This routine can be initiated either by picking the
button or simple right-clicking on any entity.
When you initiate this routine you will first be prompted to build a list of entities that you wish to edit
Map3D International Ltd 1990-2015
Menu Commands
281
If Tools > Shift-key Selection is checked, you must hold down the Shift-key to make multiple
selections.
By default, selected entities are added to the list, however if the Ctrl-key is held down, selected
entities will be removed from the list.
While holding down the Shift-key or Ctrl-key, you can drag open a crossing window.
Use of this toolbar is detailed in Build A List of Entities for Editing
Pressing the space-bar automatically activates the last edit function that was used.
Holding the Alt-key when you right-click automatically repeats the last edit function that was used.
Once you have selected the desired entities, you can either pick any of the edit buttons:
CAD > Edit > Entity Properties Edit block type, colour, mining sequence,
CAD > Edit > Erase Entities Erase selected entities,
CAD > Edit > Move Entities Move selected entities,
CAD > Edit > Copy Entities Copy selected entities,
CAD > Edit > Scale Entities Scale selected entities,
CAD > Edit > Rotate Azimuth Rotate the azimuth of selected entities,
CAD > Edit > Rotate Dip Rotate the dip of selected entities,
CAD > Edit > Dump to File Dump selected entities to a file,
CAD > Edit > Group Group selected entities into a single block,
double click on any vertex to execute the highlighted function,
right click for a list of options.
Once you have completed any edit operation you have one chance to undo the modifications by
selecting
Undo
You can also restore the same selection set and modify the same set of entities again be selecting
Redo
You can adjust the double click time using
Tools > Double Click Time
4.5.4.3
Move Entities
Move selected entities.
This routine can be initiated either by picking the
button or simple right-clicking on any entity.
When you initiate this routine you will first be prompted to build a list of entities that you wish to edit
If Tools > Shift-key Selection is checked, you must hold down the Shift-key to make multiple
selections.
By default, selected entities are added to the list, however if the Ctrl-key is held down, selected
entities will be removed from the list.
While holding down the Shift-key or Ctrl-key, you can drag open a crossing window.
Use of this toolbar is detailed in Build A List of Entities for Editing
Pressing the space-bar automatically activates the last edit function that was used.
Holding the Alt-key when you right-click automatically repeats the last edit function that was used.
Map3D International Ltd 1990-2015
282
Map3D User's Manual
Once you have selected the desired entities, you can either pick any of the edit buttons:
CAD > Edit > Entity Properties Edit block type, colour, mining sequence,
CAD > Edit > Erase Entities Erase selected entities,
CAD > Edit > Move Entities Move selected entities,
CAD > Edit > Copy Entities Copy selected entities,
CAD > Edit > Scale Entities Scale selected entities,
CAD > Edit > Rotate Azimuth Rotate the azimuth of selected entities,
CAD > Edit > Rotate Dip Rotate the dip of selected entities,
CAD > Edit > Dump to File Dump selected entities to a file,
CAD > Edit > Group Group selected entities into a single block,
double click on any vertex to execute the highlighted function,
right click for a list of options.
X, Y and Z – offset specify the components of the offset vector. All selected entities will be moved
by this amount.
Pick - activates the cursor cross-hairs allowing interactive selection of the offset vector from the
model. This requires that you select two points to define this vector.
Length, Plunge and Direction - specify the components of the offset vector. All selected entities will
be moved by this amount.
Norm - activates the cursor allowing interactive selection of a surface to make the offset vector
normal to.
This requires that you select two points to define this vector.
Once selected, the components of the offset vector are displayed in the dialogue box.
To assist in visually selecting points from the model, all snap functions are available.
CAD > Snap
Once selected, the components of the offset vector are displayed in the dialogue box.
Edit - completes editing and invoked editing of the entity properties for the selected blocks.
OK - completes editing of the offset vector and moves the selected blocks.
Cancel - aborts moving of entities.
Once you have completed any edit operation you have one chance to undo the modifications by
selecting
Undo
You can also restore the same selection set and modify the same set of entities again be selecting
Map3D International Ltd 1990-2015
Menu Commands
283
Redo
You can adjust the double click time using
Tools > Double Click Time
4.5.4.4
Copy Entities
Copy selected entities.
This routine can be initiated either by picking the
button or simple right-clicking on any entity.
When you initiate this routine you will first be prompted to build a list of entities that you wish to edit
If Tools > Shift-key Selection is checked, you must hold down the Shift-key to make multiple
selections.
By default, selected entities are added to the list, however if the Ctrl-key is held down, selected
entities will be removed from the list.
While holding down the Shift-key or Ctrl-key, you can drag open a crossing window.
Use of this toolbar is detailed in Build A List of Entities for Editing
Pressing the space-bar automatically activates the last edit function that was used.
Holding the Alt-key when you right-click automatically repeats the last edit function that was used.
Once you have selected the desired entities, you can either pick any of the edit buttons:
CAD > Edit > Entity Properties Edit block type, colour, mining sequence,
CAD > Edit > Erase Entities Erase selected entities,
CAD > Edit > Move Entities Move selected entities,
CAD > Edit > Copy Entities Copy selected entities,
CAD > Edit > Scale Entities Scale selected entities,
CAD > Edit > Rotate Azimuth Rotate the azimuth of selected entities,
CAD > Edit > Rotate Dip Rotate the dip of selected entities,
CAD > Edit > Dump to File Dump selected entities to a file,
CAD > Edit > Group Group selected entities into a single block,
double click on any vertex to execute the highlighted function,
right click for a list of options.
X, Y and Z – offset specify the components of the offset vector. All selected entities will be copied to
the location specified by this offset.
Map3D International Ltd 1990-2015
284
Map3D User's Manual
Pick - activates the cursor cross-hairs allowing interactive selection of the offset vector from the
model. This requires that you select two points to define this vector.
Length, Plunge and Direction - specify the components of the offset vector. All selected entities will
be copied to the location specified by this offset.
Norm - activates the cursor allowing interactive selection of a surface to make the offset vector
normal to.
This requires that you select two points to define this vector.
Once selected, the components of the offset vector are displayed in the dialogue box.
To assist in visually selecting points from the model, all snap functions are available.
CAD > Snap
Once selected, the components of the offset vector are displayed in the dialogue box.
Edit - completes editing and invoked editing of the entity properties for the selected blocks.
OK - completes editing of the offset vector and moves the selected blocks.
Cancel - aborts moving of entities.
Once you have completed any edit operation you have one chance to undo the modifications by
selecting
Undo
You can also restore the same selection set and modify the same set of entities again be selecting
Redo
You can adjust the double click time using
Tools > Double Click Time
4.5.4.5
Scale Entities
Scale the selected entities.
This routine can be initiated either by picking the
button or simple right-clicking on any entity.
When you initiate this routine you will first be prompted to build a list of entities that you wish to edit
If Tools > Shift-key Selection is checked, you must hold down the Shift-key to make multiple
selections.
By default, selected entities are added to the list, however if the Ctrl-key is held down, selected
entities will be removed from the list.
While holding down the Shift-key or Ctrl-key, you can drag open a crossing window.
Use of this toolbar is detailed in Build A List of Entities for Editing
Pressing the space-bar automatically activates the last edit function that was used.
Holding the Alt-key when you right-click automatically repeats the last edit function that was used.
Once you have selected the desired entities, you can either pick any of the edit buttons:
CAD > Edit > Entity Properties Edit block type, colour, mining sequence,
CAD > Edit > Erase Entities Erase selected entities,
CAD > Edit > Move Entities Move selected entities,
Map3D International Ltd 1990-2015
Menu Commands
285
CAD > Edit > Copy Entities Copy selected entities,
CAD > Edit > Scale Entities Scale selected entities,
CAD > Edit > Rotate Azimuth Rotate the azimuth of selected entities,
CAD > Edit > Rotate Dip Rotate the dip of selected entities,
CAD > Edit > Dump to File Dump selected entities to a file,
CAD > Edit > Group Group selected entities into a single block,
double click on any vertex to execute the highlighted function,
right click for a list of options.
X, Y and Z – coordinates specify the coordinates of the centre for scaling. During scaling, this point
will stay stationary. All other points will be moved to achieve the desired scaling.
Pick - activates the cursor cross-hairs allowing interactive selection of the centre or rotation from
the model.
To assist in visually selecting points from the model, all snap functions are available.
CAD > Snap
Once selected, the components of the centre for scaling are displayed in the dialogue box.
Centroid - calculates the centre of all selected entities.
OK - completes editing of the coordinates and prompts you for the scale factors.
X, Y and Z - scale specifies the amount by which the entities are to be scaled. Below, the block is
scaled 1.5 times in the y direction.
z
y
Centre
x
Centre
Scale
Edit - completes editing and invoked editing of the entity properties for the selected blocks.
OK - completes editing of the scale factors and scales the selected entities.
Cancel - aborts the scaling of entities.
Once you have completed any edit operation you have one chance to undo the modifications by
Map3D International Ltd 1990-2015
286
Map3D User's Manual
selecting
Undo
You can also restore the same selection set and modify the same set of entities again be selecting
Redo
You can adjust the double click time using
Tools > Double Click Time
4.5.4.6
Rotate Azimuth
Rotate the azimuth of selected entities.
This routine can be initiated either by picking the
button or simple right-clicking on any entity.
When you initiate this routine you will first be prompted to build a list of entities that you wish to edit
If Tools > Shift-key Selection is checked, you must hold down the Shift-key to make multiple
selections.
By default, selected entities are added to the list, however if the Ctrl-key is held down, selected
entities will be removed from the list.
While holding down the Shift-key or Ctrl-key, you can drag open a crossing window.
Use of this toolbar is detailed in Build A List of Entities for Editing
Pressing the space-bar automatically activates the last edit function that was used.
Holding the Alt-key when you right-click automatically repeats the last edit function that was used.
Once you have selected the desired entities, you can either pick any of the edit buttons:
CAD > Edit > Entity Properties Edit block type, colour, mining sequence,
CAD > Edit > Erase Entities Erase selected entities,
CAD > Edit > Move Entities Move selected entities,
CAD > Edit > Copy Entities Copy selected entities,
CAD > Edit > Scale Entities Scale selected entities,
CAD > Edit > Rotate Azimuth Rotate the azimuth of selected entities,
CAD > Edit > Rotate Dip Rotate the dip of selected entities,
CAD > Edit > Dump to File Dump selected entities to a file,
CAD > Edit > Group Group selected entities into a single block,
double click on any vertex to execute the highlighted function,
right click for a list of options.
X, Y and Z – coordinates specify the coordinates of the centre of rotation.
Map3D International Ltd 1990-2015
Menu Commands
287
Pick - activates the cursor cross-hairs allowing interactive selection of the centre or rotation from
the model.
To assist in visually selecting points from the model, all snap functions are available.
CAD > Snap
Once selected, the components of the centre for scaling are displayed in the dialogue box.
Centroid - calculates the centre of all selected entities.
OK - completes editing of the coordinates and prompts you for the scale factors.
Azimuth - specifies the angle (in degrees) through which you want the selected entities to be
rotated.
The rotation takes place in the X-Y plane, thus all vertical lines remain vertical.
z
y
Centre
x
Azimuth
Centre
Rotate
Edit - completes editing and invoked editing of the entity properties for the selected blocks.
OK - completes editing of the azimuth and rotates the selected entities.
Cancel - aborts the rotating of entities.
Once you have completed any edit operation you have one chance to undo the modifications by
selecting
Undo
You can also restore the same selection set and modify the same set of entities again be selecting
Redo
You can adjust the double click time using
Tools > Double Click Time
4.5.4.7
Rotate Dip
Rotate the dip of selected entities.
This routine can be initiated either by picking the
button or simple right-clicking on any entity.
When you initiate this routine you will first be prompted to build a list of entities that you wish to edit
Map3D International Ltd 1990-2015
288
Map3D User's Manual
If Tools > Shift-key Selection is checked, you must hold down the Shift-key to make multiple
selections.
By default, selected entities are added to the list, however if the Ctrl-key is held down, selected
entities will be removed from the list.
While holding down the Shift-key or Ctrl-key, you can drag open a crossing window.
Use of this toolbar is detailed in Build A List of Entities for Editing
Pressing the space-bar automatically activates the last edit function that was used.
Holding the Alt-key when you right-click automatically repeats the last edit function that was used.
Once you have selected the desired entities, you can either pick any of the edit buttons:
CAD > Edit > Entity Properties Edit block type, colour, mining sequence,
CAD > Edit > Erase Entities Erase selected entities,
CAD > Edit > Move Entities Move selected entities,
CAD > Edit > Copy Entities Copy selected entities,
CAD > Edit > Scale Entities Scale selected entities,
CAD > Edit > Rotate Azimuth Rotate the azimuth of selected entities,
CAD > Edit > Rotate Dip Rotate the dip of selected entities,
CAD > Edit > Dump to File Dump selected entities to a file,
CAD > Edit > Group Group selected entities into a single block,
double click on any vertex to execute the highlighted function,
right click for a list of options.
X, Y and Z – coordinates specify the coordinates of the centre of rotation.
Pick - activates the cursor cross-hairs allowing interactive selection of the centre or rotation from
the model.
To assist in visually selecting points from the model, all snap functions are available.
CAD > Snap
Once selected, the components of the centre for scaling are displayed in the dialogue box.
Centroid - calculates the centre of all selected entities.
OK - completes editing of the coordinates and prompts you for the scale factors.
Map3D International Ltd 1990-2015
Menu Commands
289
Dip - specifies the angle (in degrees) through which you want the selected entities to be rotated.
Dip Direction - specifies the azimuth (in degrees) at which the dip is to take place. The dip direction
is 90° from the strike of the dip plane.
z
y
x
Dip Direction
Dip
Centre
Centre
Rotate
Edit - completes editing and invoked editing of the entity properties for the selected blocks.
OK - completes editing of the dip and dip direction and rotates the selected entities.
Cancel - aborts the rotating of entities.
Once you have completed any edit operation you have one chance to undo the modifications by
selecting
Undo
You can also restore the same selection set and modify the same set of entities again be selecting
Redo
You can adjust the double click time using
Tools > Double Click Time
4.5.4.8
Dump to File
Dumps selected entities to a file.
This routine can be initiated either by picking the
button or simple right-clicking on any entity.
When you initiate this routine you will first be prompted to build a list of entities that you wish to
dump
If Tools > Shift-key Selection is checked, you must hold down the Shift-key to make multiple
selections.
By default, selected entities are added to the list, however if the Ctrl-key is held down, selected
entities will be removed from the list.
While holding down the Shift-key or Ctrl-key, you can drag open a crossing window.
Use of this toolbar is detailed in Build A List of Entities for Editing
Map3D International Ltd 1990-2015
290
Map3D User's Manual
Pressing the space-bar automatically activates the last edit function that was used.
Holding the Alt-key when you right-click automatically repeats the last edit function that was used.
Once you have selected the desired entities, you can either pick any of the edit buttons:
CAD > Edit > Entity Properties Edit block type, colour, mining sequence,
CAD > Edit > Erase Entities Erase selected entities,
CAD > Edit > Move Entities Move selected entities,
CAD > Edit > Copy Entities Copy selected entities,
CAD > Edit > Scale Entities Scale selected entities,
CAD > Edit > Rotate Azimuth Rotate the azimuth of selected entities,
CAD > Edit > Rotate Dip Rotate the dip of selected entities,
CAD > Edit > Dump to File Dump selected entities to a file,
CAD > Edit > Group Group selected entities into a single block,
double click on any vertex to execute the highlighted function,
right click for a list of options.
You can adjust the double click time using
Tools > Double Click Time
4.5.4.9
Group Entities
Group the selected entities into a single block. This is an advanced option that should only be used
by experienced users.
At times you may need to erase or build individual surfaces, then group them together to form a
single block. This function groups entities together to form seamless closed block from individual
surfaces. Note that when using this operation the user must ensure that the grouped surfaces form
a seamless, closed surface envelope with no internal surfaces. The presence of internal surfaces
may cause errors.
The group function was implemented to allow advanced users to erase a few surface elements and
rebuild them. It is also useful for joining surfaces together that are brought in from CAD packages.
Note that the user is required to ensure that there are no internal surfaces and the surfaces you
group together do form a seamless, closed surface envelope.
This routine can be initiated either by picking the
button or simple right-clicking on any entity.
When you initiate this routine you will first be prompted to build a list of entities that you wish to
group
If Tools > Shift-key Selection is checked, you must hold down the Shift-key to make multiple
selections.
By default, selected entities are added to the list, however if the Ctrl-key is held down, selected
entities will be removed from the list.
While holding down the Shift-key or Ctrl-key, you can drag open a crossing window.
Use of this toolbar is detailed in Build A List of Entities for Editing
Pressing the space-bar automatically activates the last edit function that was used.
Holding the Alt-key when you right-click automatically repeats the last edit function that was used.
Once you have selected the desired entities, you can either pick any of the edit buttons:
Map3D International Ltd 1990-2015
Menu Commands
291
CAD > Edit > Entity Properties Edit block type, colour, mining sequence,
CAD > Edit > Erase Entities Erase selected entities,
CAD > Edit > Move Entities Move selected entities,
CAD > Edit > Copy Entities Copy selected entities,
CAD > Edit > Scale Entities Scale selected entities,
CAD > Edit > Rotate Azimuth Rotate the azimuth of selected entities,
CAD > Edit > Rotate Dip Rotate the dip of selected entities,
CAD > Edit > Dump to File Dump selected entities to a file,
CAD > Edit > Group Group selected entities into a single block,
double click on any vertex to execute the highlighted function,
right click for a list of options.
If any of the fields in the dialogue box read "Variable" it is because some of the surfaces you have
selected have different properties for that field. In order to group the selected entities into a single
block, all surfaces must have the same settings for all fields. Use
CAD > Edit > Entity
Properties to do this.
Once you have completed any edit operation you have one chance to undo the modifications by
selecting
Undo
You can also restore the same selection set and modify the same set of entities again be selecting
Redo
You can adjust the double click time using
Tools > Double Click Time
4.5.4.10 Stretch Verticies
Adds an offset to selected vertices.
This routine can be initiated either by picking the
button or simple right-clicking on any vertex.
When you initiate this routine you will first be prompted to build a list of vertices that you wish to
Map3D International Ltd 1990-2015
292
Map3D User's Manual
stretch
If Tools > Shift-key Selection is checked, you must hold down the Shift-key to make multiple
selections.
By default, selected entities are added to the list, however if the Ctrl-key is held down, selected
entities will be removed from the list.
While holding down the Shift-key or Ctrl-key, you can drag open a crossing window.
Use of this toolbar is detailed in Build A List of Vertices for Editing
Pressing the space-bar automatically activates the last edit function that was used.
Holding the Alt-key when you right-click automatically repeats the last edit function that was used.
Once you have selected the desired entities, you can either pick any of the edit buttons:
CAD > Edit > Stretch Vertices
CAD > Edit > Move Vertices to Point
CAD > Edit > Move Vertices to X
CAD > Edit > Move Vertices to Y
CAD > Edit > Move Vertices to Z
CAD > Edit > Move Vertices to Plane
CAD > Edit > Subdivide Construction Lines
CAD > Edit > Smooth Construction Lines
CAD > Edit > Remove Construction Vertex
double click on any vertex to execute the highlighted function,
right click for a list of options.
X, Y and Z – offset specify the components of the stretch vector.
All selected vertices will be moved to the location specified by this offset.
This requires that you select two points to define this vector.
Once selected, the components of the offset vector are displayed in the dialogue box.
Pick activates the cursor cross-hairs allowing interactive selection of the offset vector from the
model. This requires that you select two points to define this vector.
Length, Plunge and Direction - specify the components of the offset vector. All selected vertices will
be moved by this amount.
Norm - activates the cursor allowing interactive selection of a surface to make the offset vector
normal to.
Map3D International Ltd 1990-2015
Menu Commands
293
To assist in visually selecting points from the model, all snap functions are available.
CAD > Snap
Once selected, the components of the offset vector are displayed in the dialogue box.
OK - completes editing of the offset vector and stretches the selected vertices.
Cancel - aborts stretching of vertices.
Once you have completed any edit operation you have one chance to undo the modifications by
selecting
Undo
You can also restore the same selection set and modify the same set of entities again be selecting
Redo
You can adjust the double click time using
Tools > Double Click Time
4.5.4.11 Move Verticies to point
Moves selected vertices to a point.
This routine can be initiated either by picking the
button or simple right-clicking on any vertex.
When you initiate this routine you will first be prompted to build a list of vertices that you wish to
move.
If Tools > Shift-key Selection is checked, you must hold down the Shift-key to make multiple
selections.
By default, selected entities are added to the list, however if the Ctrl-key is held down, selected
entities will be removed from the list.
While holding down the Shift-key or Ctrl-key, you can drag open a crossing window.
Use of this toolbar is detailed in Build A List of Vertices for Editing
Pressing the space-bar automatically activates the last edit function that was used.
Holding the Alt-key when you right-click automatically repeats the last edit function that was used.
Once you have selected the desired entities, you can either pick any of the edit buttons:
CAD > Edit > Stretch Vertices
CAD > Edit > Move Vertices to Point
CAD > Edit > Move Vertices to X
CAD > Edit > Move Vertices to Y
CAD > Edit > Move Vertices to Z
CAD > Edit > Move Vertices to Plane
CAD > Edit > Subdivide Construction Lines
CAD > Edit > Smooth Construction Lines
CAD > Edit > Remove Construction Vertex
double click on any vertex to execute the highlighted function,
right click for a list of options.
Map3D International Ltd 1990-2015
294
Map3D User's Manual
X, Y and Z – coordinate specify the coordinates of the point. All selected vertices will be moved to
this point.
Pick - activates the cursor cross-hairs allowing interactive selection of the point from the model.
To assist in visually selecting points from the model, all snap functions are available.
CAD > Snap
Once selected, the components of the offset vector are displayed in the dialogue box.
OK - completes editing of the offset vector and stretches the selected vertices.
Cancel - aborts stretching of vertices.
Once you have completed any edit operation you have one chance to undo the modifications by
selecting
Undo
You can also restore the same selection set and modify the same set of entities again be selecting
Redo
You can adjust the double click time using
Tools > Double Click Time
4.5.4.12 Move Verticies to X
Moves the X-coordinate of selected vertices.
This routine can be initiated either by picking the
button or simple right-clicking on any vertex.
When you initiate this routine you will first be prompted to build a list of vertices that you wish to
move.
If Tools > Shift-key Selection is checked, you must hold down the Shift-key to make multiple
selections.
By default, selected entities are added to the list, however if the Ctrl-key is held down, selected
entities will be removed from the list.
While holding down the Shift-key or Ctrl-key, you can drag open a crossing window.
Use of this toolbar is detailed in Build A List of Vertices for Editing
Pressing the space-bar automatically activates the last edit function that was used.
Holding the Alt-key when you right-click automatically repeats the last edit function that was used.
Once you have selected the desired entities, you can either pick any of the edit buttons:
CAD > Edit > Stretch Vertices
Map3D International Ltd 1990-2015
Menu Commands
295
CAD > Edit > Move Vertices to Point
CAD > Edit > Move Vertices to X
CAD > Edit > Move Vertices to Y
CAD > Edit > Move Vertices to Z
CAD > Edit > Move Vertices to Plane
CAD > Edit > Subdivide Construction Lines
CAD > Edit > Smooth Construction Lines
CAD > Edit > Remove Construction Vertex
double click on any vertex to execute the highlighted function,
right click for a list of options.
X – coordinate specify the X-coordinate of the point. The X-coordinate of all selected vertices (i.e.
vertices in the list) will be moved to this value.
Search width all coordinates with the search width distance of the specified x-coordinate value will
be moved even if they are not in the list.
Pick activates the cursor cross-hairs allowing interactive selection of the point from the model. To
assist in visually selecting points from the model, all snap functions are available
To assist in visually selecting points from the model, all snap functions are available.
CAD > Snap
Once selected, the components of the offset vector are displayed in the dialogue box.
OK - completes editing of the offset vector and stretches the selected vertices.
Cancel - aborts stretching of vertices.
Once you have completed any edit operation you have one chance to undo the modifications by
selecting
Undo
You can also restore the same selection set and modify the same set of entities again be selecting
Redo
You can adjust the double click time using
Tools > Double Click Time
4.5.4.13 Move Verticies to Y
Moves the Y-coordinate of selected vertices.
This routine can be initiated either by picking the
button or simple right-clicking on any vertex.
When you initiate this routine you will first be prompted to build a list of vertices that you wish to
move.
Map3D International Ltd 1990-2015
296
Map3D User's Manual
If Tools > Shift-key Selection is checked, you must hold down the Shift-key to make multiple
selections.
By default, selected entities are added to the list, however if the Ctrl-key is held down, selected
entities will be removed from the list.
While holding down the Shift-key or Ctrl-key, you can drag open a crossing window.
Use of this toolbar is detailed in Build A List of Vertices for Editing
Pressing the space-bar automatically activates the last edit function that was used.
Holding the Alt-key when you right-click automatically repeats the last edit function that was used.
Once you have selected the desired entities, you can either pick any of the edit buttons:
CAD > Edit > Stretch Vertices
CAD > Edit > Move Vertices to Point
CAD > Edit > Move Vertices to X
CAD > Edit > Move Vertices to Y
CAD > Edit > Move Vertices to Z
CAD > Edit > Move Vertices to Plane
CAD > Edit > Subdivide Construction Lines
CAD > Edit > Smooth Construction Lines
CAD > Edit > Remove Construction Vertex
double click on any vertex to execute the highlighted function,
right click for a list of options.
Y – coordinate specify the Y-coordinate of the point. The Y-coordinate of all selected vertices (i.e.
vertices in the list) will be moved to this value.
Search width all coordinates with the search width distance of the specified y-coordinate value will
be moved even if they are not in the list.
Pick activates the cursor cross-hairs allowing interactive selection of the point from the model. To
assist in visually selecting points from the model, all snap functions are available
To assist in visually selecting points from the model, all snap functions are available.
CAD > Snap
Once selected, the components of the offset vector are displayed in the dialogue box.
OK - completes editing of the offset vector and stretches the selected vertices.
Cancel - aborts stretching of vertices.
Once you have completed any edit operation you have one chance to undo the modifications by
selecting
Undo
Map3D International Ltd 1990-2015
Menu Commands
297
You can also restore the same selection set and modify the same set of entities again be selecting
Redo
You can adjust the double click time using
Tools > Double Click Time
4.5.4.14 Move Verticies to Z
Moves the Z-coordinate of selected vertices.
This routine can be initiated either by picking the
button or simple right-clicking on any vertex.
When you initiate this routine you will first be prompted to build a list of vertices that you wish to
move.
If Tools > Shift-key Selection is checked, you must hold down the Shift-key to make multiple
selections.
By default, selected entities are added to the list, however if the Ctrl-key is held down, selected
entities will be removed from the list.
While holding down the Shift-key or Ctrl-key, you can drag open a crossing window.
Use of this toolbar is detailed in Build A List of Vertices for Editing
Pressing the space-bar automatically activates the last edit function that was used.
Holding the Alt-key when you right-click automatically repeats the last edit function that was used.
Once you have selected the desired entities, you can either pick any of the edit buttons:
CAD > Edit > Stretch Vertices
CAD > Edit > Move Vertices to Point
CAD > Edit > Move Vertices to X
CAD > Edit > Move Vertices to Y
CAD > Edit > Move Vertices to Z
CAD > Edit > Move Vertices to Plane
CAD > Edit > Subdivide Construction Lines
CAD > Edit > Smooth Construction Lines
CAD > Edit > Remove Construction Vertex
double click on any vertex to execute the highlighted function,
right click for a list of options.
Z – coordinate specify the Z-coordinate of the point. The Z-coordinate of all selected vertices (i.e.
vertices in the list) will be moved to this value.
Search width all coordinates with the search width distance of the specified z-coordinate value will
be moved even if they are not in the list.
Map3D International Ltd 1990-2015
298
Map3D User's Manual
Pick activates the cursor cross-hairs allowing interactive selection of the point from the model. To
assist in visually selecting points from the model, all snap functions are available
To assist in visually selecting points from the model, all snap functions are available.
CAD > Snap
Once selected, the components of the offset vector are displayed in the dialogue box.
OK - completes editing of the offset vector and stretches the selected vertices.
Cancel - aborts stretching of vertices.
Once you have completed any edit operation you have one chance to undo the modifications by
selecting
Undo
You can also restore the same selection set and modify the same set of entities again be selecting
Redo
You can adjust the double click time using
Tools > Double Click Time
4.5.4.15 Move Verticies to Plane
Moves the selected vertices to a plane. Vertices are moved in the direction normal to the plane.
This routine can be initiated either by picking the
button or simple right-clicking on any vertex.
When you initiate this routine you will first be prompted to build a list of vertices that you wish to
move.
If Tools > Shift-key Selection is checked, you must hold down the Shift-key to make multiple
selections.
By default, selected entities are added to the list, however if the Ctrl-key is held down, selected
entities will be removed from the list.
While holding down the Shift-key or Ctrl-key, you can drag open a crossing window.
Use of this toolbar is detailed in Build A List of Vertices for Editing
Pressing the space-bar automatically activates the last edit function that was used.
Holding the Alt-key when you right-click automatically repeats the last edit function that was used.
Once you have selected the desired entities, you can either pick any of the edit buttons:
CAD > Edit > Stretch Vertices
CAD > Edit > Move Vertices to Point
CAD > Edit > Move Vertices to X
CAD > Edit > Move Vertices to Y
CAD > Edit > Move Vertices to Z
CAD > Edit > Move Vertices to Plane
CAD > Edit > Subdivide Construction Lines
CAD > Edit > Smooth Construction Lines
CAD > Edit > Remove Construction Vertex
Map3D International Ltd 1990-2015
Menu Commands
299
double click on any vertex to execute the highlighted function,
right click for a list of options.
X Y Z – coordinate specify the coordinates of any point on the plane.
Pick activates the cursor cross-hairs allowing interactive selection of the x y z coordinates of the
point on the plane from the model. To assist in visually selecting points from the model, all snap
functions are available
Dip of Plane specify the dip of the plane (positive down in degrees).
Dip Direction specify the azimuth of the dip vector (degrees).
Norm - activates the cursor allowing interactive selection of a surface. The dip and dip direction of
the plane will be set parallel to the selected surface.
Search width all coordinates with the search width distance of the specified plane will be moved
even if they are not in the list.
To assist in visually selecting points from the model, all snap functions are available.
CAD > Snap
Once selected, the components of the offset vector are displayed in the dialogue box.
OK - completes editing of the offset vector and stretches the selected vertices.
Cancel - aborts stretching of vertices.
Once you have completed any edit operation you have one chance to undo the modifications by
selecting
Undo
You can also restore the same selection set and modify the same set of entities again be selecting
Redo
You can adjust the double click time using
Tools > Double Click Time
4.5.4.16 Subdivide Edges
Inserts vertices on block edges or construction line edges (also see
Construction Vertex).
CAD > Edit > Remove
This routine can be initiated either by picking the
button or simple right-clicking on any edge.
When you initiate this routine you will first be prompted to build a list of locations where you wish to
insert vertices.
Map3D International Ltd 1990-2015
300
Map3D User's Manual
If Tools > Shift-key Selection is checked, you must hold down the Shift-key to make multiple
selections.
By default, selected entities are added to the list, however if the Ctrl-key is held down, selected
entities will be removed from the list.
While holding down the Shift-key or Ctrl-key, you can drag open a crossing window.
Use of this toolbar is detailed in Build A List of Vertices for Editing
Pressing the space-bar automatically activates the last edit function that was used.
Holding the Alt-key when you right-click automatically repeats the last edit function that was used.
Once you have selected the desired entities, you can either pick any of the edit buttons:
CAD > Edit > Stretch Vertices
CAD > Edit > Move Vertices to Point
CAD > Edit > Move Vertices to X
CAD > Edit > Move Vertices to Y
CAD > Edit > Move Vertices to Z
CAD > Edit > Move Vertices to Plane
CAD > Edit > Subdivide Construction Lines
CAD > Edit > Smooth Construction Lines
CAD > Edit > Remove Construction Vertex
double click on any vertex to execute the highlighted function,
right click for a list of options.
Once you have completed any edit operation you have one chance to undo the modifications by
selecting
Undo
You can also restore the same selection set and modify the same set of entities again be selecting
Redo
You can adjust the double click time using
Tools > Double Click Time
Notes:
The location of all points along construction lines can be viewed by setting the View > Render >
Cline dot radius parameter.
Before using this trace smoothing function, construction lines should be cleaned up using the
CAD > Pack and Renumber Clines function.
You can adjust the double click time using Tools > Double Click Time.
4.5.4.17 Smooth Construction Lines
Smooths construction lines by eliminating corner points (also see
Construction Vertex).
This routine can be initiated either by picking the
CAD > Edit > Remove
button or simple right-clicking on any vertex.
Map3D International Ltd 1990-2015
Menu Commands
301
When you initiate this routine you will first be prompted to build a list of vertices that you wish to
smooth.
If Tools > Shift-key Selection is checked, you must hold down the Shift-key to make multiple
selections.
By default, selected entities are added to the list, however if the Ctrl-key is held down, selected
entities will be removed from the list.
While holding down the Shift-key or Ctrl-key, you can drag open a crossing window.
Use of this toolbar is detailed in Build A List of Vertices for Editing
Pressing the space-bar automatically activates the last edit function that was used.
Holding the Alt-key when you right-click automatically repeats the last edit function that was used.
Once you have selected the desired entities, you can either pick any of the edit buttons:
CAD > Edit > Stretch Vertices
CAD > Edit > Move Vertices to Point
CAD > Edit > Move Vertices to X
CAD > Edit > Move Vertices to Y
CAD > Edit > Move Vertices to Z
CAD > Edit > Move Vertices to Plane
CAD > Edit > Subdivide Construction Lines
CAD > Edit > Smooth Construction Lines
CAD > Edit > Remove Construction Vertex
double click on any vertex to execute the highlighted function,
right click for a list of options.
The Spacing value limits the minimum space between points. For example if the Spacing was
specified as 2m and the trace length between points 4 and 5 in the following figure was 1.5m, point
4 would be removed and replaced by a straight line between points 3 and 5.
1.5m
6
5
4
7
3
8
9
10
1
A zero value for this parameter indicates that it will not be used.
2
Map3D International Ltd 1990-2015
302
Map3D User's Manual
The Angle value limits the minimum angle between successive line segments. For example if the
Angle was specified as 10 and the direction of line segment 3-4 was 7 different than the direction
of line segment 4-5 in the following figure, point 4 would be removed and replaced by a straight line
between points 3 and 5.
7
6
4
5
3
7
8
9
10
1
A zero value
2 for this parameter indicates that it will not be used.
OK - completes editing of the offset vector and stretches the selected vertices.
Cancel - aborts stretching of vertices.
Once you have completed any edit operation you have one chance to undo the modifications by
selecting
Undo
You can also restore the same selection set and modify the same set of entities again be selecting
Redo
You can adjust the double click time using
Tools > Double Click Time
Notes:
The location of all points along construction lines can be viewed by setting the View > Render >
Cline dot radius parameter.
Before using this trace smoothing function, construction lines should be cleaned up using the
CAD > Pack and Renumber Clines function.
You can adjust the double click time using Tools > Double Click Time.
4.5.4.18 Remove Construction Line Vertex
Smooths construction lines by eliminating individual corner points (also see
Smooth Construction Lines).
CAD > Edit >
This routine can be initiated either by picking the
button or simple right-clicking on any vertex.
When you initiate this routine you will first be prompted to build a list of vertices that you wish to
remove.
If Tools > Shift-key Selection is checked, you must hold down the Shift-key to make multiple
selections.
By default, selected entities are added to the list, however if the Ctrl-key is held down, selected
Map3D International Ltd 1990-2015
Menu Commands
303
entities will be removed from the list.
While holding down the Shift-key or Ctrl-key, you can drag open a crossing window.
Use of this toolbar is detailed in Build A List of Vertices for Editing
Pressing the space-bar automatically activates the last edit function that was used.
Holding the Alt-key when you right-click automatically repeats the last edit function that was used.
Once you have selected the desired entities, you can either pick any of the edit buttons:
CAD > Edit > Stretch Vertices
CAD > Edit > Move Vertices to Point
CAD > Edit > Move Vertices to X
CAD > Edit > Move Vertices to Y
CAD > Edit > Move Vertices to Z
CAD > Edit > Move Vertices to Plane
CAD > Edit > Subdivide Construction Lines
CAD > Edit > Smooth Construction Lines
CAD > Edit > Remove Construction Vertex
double click on any vertex to execute the highlighted function,
right click for a list of options.
Once you have completed any edit operation you have one chance to undo the modifications by
selecting
Undo
You can also restore the same selection set and modify the same set of entities again be selecting
Redo
You can adjust the double click time using
Tools > Double Click Time
Notes:
The location of all points along construction lines can be viewed by setting the View > Render >
Cline dot radius parameter.
Before using this trace smoothing function, construction lines should be cleaned up using the
CAD > Pack and Renumber Clines function.
You can adjust the double click time using Tools > Double Click Time.
4.5.5
Grid Selection
Selects a field point grid for viewing.
Analysis results (stresses, strains and displacements) can be contoured on element surfaces and
on field point grids.
With OpenGL enabled (Tools > OpenGL), all grids can be displayed simultaneously. Without
OpenGL enabled, only two grids can be displayed simultaneously.
Hide All - Hides all grids.
Map3D International Ltd 1990-2015
304
Map3D User's Manual
Unhide All - Unhide all grids.
The user can construct multiple field point grid planes using
CAD > Build > Grid Plane
CAD > Build > Grid Line
Individual grid selection buttons can be placed on the view toolbar if desired using
Tools > View Toolbar Configure
4.5.6
Digitizer Setup
Setup the digitizer.
The digitizing plane is uniquely scaled, located and oriented by specifying 3 points on the drawing
to be digitized.
The procedure for doing this is to:
1.
2.
3.
4.
select 3 points on the drawing,
enter the coordinates of each point,
then pick the points with the digitizer puck.
Pick activates the digitizer puck to allow selection of each point.
CAD > Digitizer > Activate toggles activation of the digitizer for selecting points from a
drawing. This button can be placed on the CAD toolbar using Tools > CAD Toolbar > Configure.
View - repositions the view so you can see the digitizer plane superimposed with the model.
Digitizer support is available for any digitizer that can be setup to control cursor movements in
absolute mode (i.e. providing a one to one correspondence of digitizer movement with cursor
position). Most new digitizers ship with their own software drivers that provide this support. An
alternative is to use the following software that supports most digitizers:
Virtual Tablet Interface
Digitizer Technology Company
16541 Redmond Way, Suite 195C
Redmond, Washington USA 98052
Tel: 206 868 3246
Fax: 206 885 7704
Map3D International Ltd 1990-2015
Menu Commands
4.5.7
305
Recheck Blocks for Errors
Re-analyses the model to detect gaps, duplicates, construction errors etc.
This is the same procedure that is executed during file load.
4.5.8
Pack and Renumber Blocks
Packs and renumbers all model entities.
Coordinate points that are very close to one another are merged together. Corners of blocks that
share the same location will use the same coordinate point number and hence will move together in
any coordinate editing operation (Cad > Edit). This feature is useful for eliminating small gaps and
overlaps between adjacent surfaces and blocks.
When you initiate this function you will be prompted to specify a pack search radius
Radius this value is used to merge points that are close to one another. A zero value for this
parameter indicates that it will not be used, and instead Map3D will merge points if they are within a
search radius of 1000th of the edge length from the line. Extreme caution should be used when
specifying a non-zero value for this parameter since large values can cause more problems then it
will fix by merging too many points together.
Any unused coordinate numbers are removed from the list of coordinates.
Blocks can be unpacked using the CAD > Unpack Blocks function.
4.5.9
Unpack Blocks
Unpacks all model entities.
All block corners will be given there own coordinate point numbers and hence will move separately
in any coordinate editing operation (Cad > Edit).
Blocks can be packed using the CAD > Pack and Renumber Blocks function.
Also see CAD > Unpack Surfaces function.
4.5.10 Unpack Surfaces
Unpacks all model entities.
All surface corners will be given there own coordinate point numbers and hence will move
separately in any coordinate editing operation (Cad > Edit).
Blocks can be packed using the CAD > Pack and Renumber Blocks function.
Also see CAD > Unpack Blocks function.
Map3D International Ltd 1990-2015
306
Map3D User's Manual
4.5.11 UnGroup DDs
Un-Groups all DDs.
Each DD will be given its own block number and hence can be edited separately using any entity
editing operation (Cad > Edit).
DD's can be re-Grouped using the CAD > Edit > Group Entities function.
4.5.12 Pack and Renumber Clines
Packs and renumbers all construction lines.
Coordinate points that are very close to one another are merged together. Corners of construction
lines that share the same location will use the same coordinate point number and hence will move
together in any coordinate editing operation (Cad > Edit). This feature is useful for eliminating small
gaps and overlaps between adjacent construction lines.
All possible construction line segments of the same colour will be linked together to form contiguous
lines between intersection points.
6
4
5
7
3
8
9
10
1
In this example,
3
line
segments will be formed consisting of the following groupings of points
2
Line segment 1: 10, 1, 2, 3, 4.
Line segment 2: 4, 5, 6, 7, 8, 9, 10.
Line segment 3: 4, 10.
When you initiate this function you will be prompted to specify a pack search radius
Radius this value is used to merge points that are close to one another. A zero value for this
parameter indicates that it will not be used, and instead Map3D will merge points if they are within a
search radius of 1000th of the edge length from the line. Extreme caution should be used when
specifying a non-zero value for this parameter since large values can cause more problems then it
will fix by merging too many points together.
Any unused coordinate numbers are removed from the list of coordinates.
This function should be used before using the CAD > Edit > Smooth Construction lines function.
This function should be used before using the CAD > Snap > Trace Cline Snap function.
Construction lines can be unpacked using the CAD > Unpack Clines function.
Map3D International Ltd 1990-2015
Menu Commands
307
4.5.13 Unpack Clines
Unpacks all construction lines.
All corners will be given there own coordinate point numbers and hence will move separately in any
coordinate editing operation (Cad > Edit).
Construction lines can be packed using the CAD > Pack and Renumber Clines function.
4.6
Tools
4.6.1
Mouse Options
4.6.1.1
Mouse Buttons
Allows you to specify custom mouse rotation, translation and zoom functionality.
Note that a maximum of two buttons can be specified for each function.
These buttons will be saved from session to session.
Z+ up rotation - specifies that the Z+ axis is constrained to point vertically such that when the the Z+
axis points upwards, dragging the mouse to the left rotates the model to the left.
Z- up rotation - reverses the above assumption. In this case specifies that the Z+ axis is constrained
to point vertically such that when the the Z+ axis points upwards, dragging the mouse to the left
rotates the model to the right.
Reverse Mouse Wheel - reverses the action of the mouse wheel such that forward rotation zooms
the model in instead of out.
4.6.1.2
Double Click Time
Specifies the amount time (in milliseconds) between double mouse clicks.
Double clicks are used to activate edit functions
CAD > Edit
4.6.1.3
Drag Wait Time
Specifies the amount time (in milliseconds) you must hold down a mouse button before the drag
mouse pointer
appears.
The drag mouse pointer is used to rotate and translate and zoom the model.
Map3D International Ltd 1990-2015
308
Map3D User's Manual
4.6.2
Toolbars
4.6.2.1
Rotation Toolbar
Activate the rotation toolbar.
The model can be rotated by using these buttons or by dragging the orientation icon around to the
desired position.
Rotate Counter clockwise (Insert key)
Rotate Up (Home key or shift+up arrow)
Rotate Clockwise (Page Up key)
Rotate Left (Delete key or shift+left arrow)
Rotate Down (End key or shift+down arrow)
Rotate Right (Page Down key or shift+right arrow)
View > Centre of Rotation
View > Rotation Increment
Notes:
If the rotation toolbar is not visible it can be activated with
Tools > Rotation Toolbar
Before rotating the model you should set the desired centre of rotation
View > Centre of Rotation
4.6.2.2
Translation Toolbar
Activate the translation toolbar.
The model can be translated by using these buttons or by dragging the model to the desired
position.
Zoom In (Enter or "+" key)
Translate Up (up arrow)
Zoom Out (Ctrl+Enter or "-" key)
Translate Left (left arrow)
Translate Down (down arrow)
Translate Right (right arrow)
View > Zoom Factor
View > Translation Increment
Notes:
If the translation toolbar is not visible it can be activated with
Tools > Translation Toolbar
Before zooming in
Map3D International Ltd 1990-2015
Menu Commands
309
Zoom In
you should set the desired centre of rotation
View > Centre of Rotation
4.6.2.3
Contour Toolbar
Activate the contouring toolbar – after Map3D BEM analysis.
The default configuration for this toolbar is as follows:
This toolbar is meant to provide quick access to commonly used stress parameters.
Plot > Stress > S1 Major Principal Stress
Plot > Stress > S3 Minor Principal Stress
Plot > Stress > Tmax Maximum Shear Stress
Plot > Stress activates the stress toolbar. This toolbar contains all stress components.
Plot > Surface Components activates the surface toolbar. This toolbar contains all surface
components.
Plot > Strength Factors activates the strength factor toolbar. This toolbar contains all strength
parameter components.
Plot > Stress > User User defined stress plot.
Plot > Range specifies the contour range (minimum, maximum, interval ...) of the currently
plotted contour.
Plot > Grid Selection Activate the grid selection toolbar.
Plot > Surface Components > Options specifies contour plot options (trajectories, contour
lines ...).
Tools > Contouring Toolbar Configure add or remove buttons from the contouring toolbar.
Notes:
Buttons can be moved around on the toolbar simply by holding down the left mouse button and
dragging the button to the desired location.
The contouring toolbar can only be activated after the model building - CAD Stage
Map3D Analysis Stages.
4.6.2.4
Configure Contour Toolbar
Adds or remove buttons from the contouring toolbar.
Simply check or uncheck the desired item to add or remove the desired item from the toolbar.
Notes:
The contouring toolbar can only be activated
Tools > Contouring toolbar
after the model building - CAD Stage
Map3D Analysis Stages.
Buttons can be moved around on the toolbar simply by holding down the left mouse button and
Map3D International Ltd 1990-2015
310
Map3D User's Manual
dragging the button to the desired location.
The toolbar configuration is saved between analyses in the map3d.ini file.
4.6.2.5
Solve Toolbar
Activate the solve toolbar – during Map3D BEM analysis.
The default configuration for this toolbar is as follows:
This toolbar is meant to provide quick access to parameters that are important during the solution
stage of the Map3D BEM analysis
Analysis > BEM Analysis
Plot > Surface Components > Serr Stress Error
Plot > Surface Components > Ferr Failure Error
Plot > Surface Components > Shear Stress
Plot > Surface Components > Normal Stress
Plot > Surface Components > Shear Displacement (Ride)
Plot > Surface Components activates the surface toolbar containing all surface components.
Plot > Range specifies the contour range (minimum, maximum, interval ...) of the currently
plotted contour.
Plot > Surface Components > Options specifies contour plot options (trajectories, contour
lines ...).
Tools > Solve Toolbar Configure add or remove buttons from the solve toolbar.
Notes:
During analysis, the solve toolbar is displayed when you suspend the analysis
Analysis > Suspend.
If this option is not checked the solve toolbar will not be activated when you suspend the Map3D
BEM analysis.
Buttons can be moved around on the toolbar simply by holding down the left mouse button and
dragging the button to the desired location.
The solve toolbar can only be activated after the model building - CAD Stage
Map3D Analysis Stages.
Related Topics:
Analysis > Auto Plot.
Analysis > Auto Range.
4.6.2.6
Configure Solve Toolbar
Adds or remove buttons from the solve toolbar.
Simply check or uncheck the desired item to add or remove the desired item from the toolbar.
Notes:
Map3D International Ltd 1990-2015
Menu Commands
311
The solve toolbar can only be activated
Tools > Solve toolbar
after the model building - CAD Stage
Map3D Analysis Stages
During analysis, the solve toolbar is displayed when you suspend the analysis
Analysis > Suspend
Buttons can be moved around on the toolbar simply by holding down the left mouse button and
dragging the button to the desired location.
The toolbar configuration is saved between analyses in the map3d.ini file.
4.6.2.7
View Toolbar
Activates the view toolbar.
The default configuration for this toolbar is as follows
This toolbar provides quick access to various viewing functions.
View > Centre of Rotation Sets the centre of rotation. This point remains stationary while
you rotate and zoom the display.
View > Zoom activates a graphical zoom window. You will be prompted to select the two
corners of the window by picking each with a single mouse click.
View > Pan activates a graphical pan. You will be prompted to select the two ends of the pan
vector by picking each with a single mouse click.
View > Length activates a graphical length measuring tool. You will prompted to select the
two ends of the length vector by picking each with a single mouse click. These points must be
selected on the model or on a contour. The length, dip and dip direction of the selected vector is
reported. If you hold down the shift key while selecting points, you can define a line composed of
multiple segments and obtain the total length. If you define a closed polygonal shape (by holding
down the shift key while selecting points) on a contour plot, the average contour value within the
polygon will be reported (see Plot > Polygon Box). Simple rectangular widow shapes can be
defined by holding the shift key and dragging open a window.
View > Hide activates the hide toolbar.
View > Hide Block Colours activates the hide block colour toolbar.
View > Hide CLine Colours activates the hide construction line colour toolbar.
File > Mining Step activates the mining step selection toolbar.
Tools > View Toolbar Configure adds or removes buttons from the view toolbar.
Notes:
Buttons can be moved around on the toolbar simply by holding down the left mouse button and
dragging the button to the desired location.
Map3D International Ltd 1990-2015
312
4.6.2.8
Map3D User's Manual
Configure View Toolbar
Adds or remove buttons from the view toolbar.
Simply check or uncheck the desired item to add or remove the desired item from the toolbar.
Notes:
Buttons can be moved around on the toolbar simply by holding down the left mouse button and
dragging the button to the desired location.
The toolbar configuration is saved between analyses in the map3d.ini file.
4.6.2.9
CAD Toolbar
Activate the CAD toolbar.
The default configuration for this toolbar is as follows:
This toolbar is meant to provide quick access to CAD functions that are used in the model building
and editing stage of the Map3D BEM analysis
Analysis > Go to CAD
CAD > Build Activate the build toolbar for building new model entities.
CAD > Snap Activate the snap toolbar for setting the snap mode.
CAD > Edit Activate the edit toolbar for modifying model entities.
CAD > Grid Selection Activate the grid selection toolbar for displaying grids.
Tools > CAD Toolbar > Configure Add or remove buttons.
Notes:
The CAD toolbar is only displayed during the model building and editing stage of the analysis
Analysis > Go to CAD
If this option is not checked the CAD toolbar will not be activated during the model building and
editing stage.
Buttons can be moved around on the toolbar simply by holding down the left mouse button and
dragging the button to the desired location.
Related Topics:
Map3D Analysis Stages
4.6.2.10 Configure CAD Toolbar
Adds or remove buttons from the CAD toolbar.
Simply check or uncheck the desired item to add or remove the desired item from the toolbar.
Notes:
The Cad toolbar can only be activated
Tools > CAD toolbar
during the model building - CAD Stage
Map3D Analysis Stages
Map3D International Ltd 1990-2015
Menu Commands
313
Buttons can be moved around on the toolbar simply by holding down the left mouse button and
dragging the button to the desired location.
The toolbar configuration is saved between analyses in the map3d.ini file.
4.6.2.11 Block Colours
Assigns custom colours for rendering blocks.
Map3D uses 16 base colours for rendering.
The user can assign any desired colour to the base colours and Map3D automatically generates
shades of these for rendering.
The colours are used as follows:
Colour
Colour
Colour
Colour
Colour
Colour
Colour
Colour
Colour
Colour
Colour
Colour
Colour
0 - screen background colour.
1-4 – rubber band and marker colours.
5 – foreground colour, used for text, block outlines, trajectory symbols and grid lines.
6 – block colour number 1, 11, 21, 31, ...
7 - block colour number 2, 12, 22, 32, ...
8 - block colour number 3, 13, 23, 33, ...
9 - block colour number 4, 14, 24, 34, ...
10 - block colour number 5, 15, 25, 35, ...
11 - block colour number 6, 16, 26, 36, ...
12 - block colour number 7, 17, 27, 37, ...
13 - block colour number 8, 18, 28, 38, ...
14 - block colour number 9, 19, 29, 39, ...
15 - block colour number 10, 20, 30, 40, ...
Reassigning a colour is a three step process:
1. Pick the colour you want to redefine from one of the "Custom Colors:".
2. Set the new colour you desire by picking from the "Basic Colors:", picking from the "Color
Matrix", or by setting the "Hue: Sat: Lum: Red: Green: Blue:".
3. Push the "Add to Custom Colors" button.
All colours can be reset to the original Map3D default values by selecting
Tools > Set Default Block Colours
Map3D International Ltd 1990-2015
314
Map3D User's Manual
The custom colours are saved between analyses in the map3d.ini file.
4.6.2.12 Contour Colours
Assigns custom colours for rendering contours.
Map3D uses 16 base colours for contouring.
The colours are used as follows:
Colour
Colour
Colour
Colour
Colour
Colour
0 - screen background colour.
1 – below range contour colour.
2 through 11 – contour colours.
12 above range contour colour.
13 – Tension cutoff colour.
15 – foreground colour, used for text, block outlines, trajectory symbols and grid lines.
Reassigning a colour is a three step process:
1. Pick the colour you want to redefine from one of the "Custom Colors:".
2. Set the new colour you desire by picking from the "Basic Colors:", picking from the "Color
Matrix", or by setting the "Hue: Sat: Lum: Red: Green: Blue:".
3. Push the "Add to Custom Colors" button.
The custom colours are saved between analyses in the map3d.ini file.
Contour colours can be set to Map3D default values by selecting
Tools > Set Contour Colours
4.6.2.13 Set Default Block Colours
Resets all colours to the original Map3D default values.
Custom colours can be set using
Tools > Custom Colours
Map3D International Ltd 1990-2015
Menu Commands
4.6.2.14 Set Contour Colours 1
Resets all colours to the original Map3D default values.
Custom colours can be set using
Tools > Contour Colours
4.6.2.18 Configure Button Font
Assigns a custom button font, size, colour etc.
Map3D uses the "Windows System Font" to draw all buttons.
The user can redefine this font and its display characteristics.
The font can be reset to the original Map3D default value by selecting
Tools > Reset Default Font
The custom font is saved between analyses in the map3d.ini file.
4.6.2.19 Reset Default Font
Resets the button font back to the original Map3D default value.
A custom font can be set using
Tools > Configure Button Font
4.6.2.20 Small Size Buttons
Allows you to set the toolbar button size.
4.6.3
Assign Hotkeys
Allows you select use defined hotkeys.
For example to assign the F5 key to activate the Build > Cline function you would assign the
function key as follows:
Note that function key assignments are saved from session to session the Map3D.cfg file.
Map3D International Ltd 1990-2015
315
316
Map3D User's Manual
4.6.4
OpenGL
4.6.4.1
OpenGL <On/Off>
Enables OpenGL support.
OpenGL is an industry standard high-quality 3D graphics rendering interface. The main advantages
in using OpenGL are hardware acceleration of the graphics display and support for z-buffering. Of
course you must have a graphics adapter that supports OpenGL and have the OpenGL display
driver installed to get hardware acceleration.
See Tools > OpenGL Parameters to view OpenGL setup.
See Tools > OpenGL Antialiasing to smooth lines.
4.6.4.2
OpenGL Parameters
Reports on OpenGL setup:
Support OpenGL – indicates whether an OpenGL driver is installed and enabled.
Driver or Hardware Support - indicates whether an OpenGL is supported by your graphics
adapter.
Double Buffered – indicates that there is sufficient memory to support double buffering.
Color Buffer Bits – indicates the number of bits used for the colour buffer.
Depth Buffer Bits – indicates the number of bits used for the z-buffer.
4.6.4.3
OpenGL Antialiasing
Enables smoothing of points, lines and edges of polygons.
This OpenGL feature provides improved appearance but slows rendering.
View > Render > Line Width can be used to enable drawing of wider lines. This would also help
smooth line drawing with as much impact on performance.
4.6.4.4
OpenGL Redraw
Enables OpenGL redrawing of the screen when the window needs to be refreshed.
The Map3D display window must be refreshed every time a dialogue box is moved or removed. This
refresh can either be done by saving the display window to a back buffer (this option is not
checked), or by simply redrawing the screen (this option is checked).
This option should normally be checked, but can be disabled for problem graphics adaptors.
4.6.4.5
OpenGL Pick
Enables OpenGL to locate graphics entities on the screen.
When you left click on an entity Map3D must determine which entity you have selected. This can be
determined either by OpenGL or internally by Map3D.
This option should normally be checked, but can be disabled for problem graphics adaptors.
Map3D International Ltd 1990-2015
Menu Commands
4.6.4.6
317
OpenGL Crosshairs
Toggles between OpenGL and Windows API drawing of cursor crosshairs.
This option should normally be checked, but can be disabled for problem graphics adaptors.
To completely disable drawing of the cursor crosshairs select Tools > Crosshairs.
4.6.4.7
OpenGL Interactive Edit
Enables interactive OpenGL drawing of modified shapes during editing operations.
This option should normally be checked, but can be disabled for problem graphics adaptors.
4.6.5
Disk Performance Test
Tests the performance of the hard disk system.
This test simulates the behaviour of Map3D during the solution stage of the BEM analysis.
Buffer Size - Size of the buffer used for reads and write to disk. Map3D uses a 256K buffer for its
file read and writes.
Write Through - Instructs the system to write through any intermediate cache and go directly to
disk. Map3D uses "Write Through" for its file writes.
No Buffering - Instructs the system to write to the file with no intermediate buffering or caching.
Map3D uses "No Buffering" for its file writes.
Asynchronous I/O - Instructs the system to enable more than one read and/or write operation to be
performed simultaneously. This option is only supported under Window NT/2000. Map3D can be
instructed to use this feature with
Analysis > Options > Async I/O
Size MB - File size used for the test. It is recommended that this test be done with a large file size
(considerably larger than the amount of RAM).
Drive - Disk drive used for the test.
The important results are:
Write rate - the number of MBytes written to the disk per second. You should expect more than 510 MB/second.
Read rate - the number of MBytes read from the disk per second. You should expect more than 510 MB/second.
Multiply/sec - the number of floating point multiplies done per second. You should expect more than
50 MFLOPS.
4.6.6
Smooth Scroll
Activates smooth scrolling in the information area of the analysis dialogue box
Analysis Dialog
Since smooth scrolling limits the rate at which information can be written to the information area, it
can considerably slow down the Map3D analysis. It is recommended that smooth scrolling not be
used.
Map3D International Ltd 1990-2015
318
Map3D User's Manual
4.6.7
Cursor Pick Box Size
4.6.7.1
Small Pick Box
Defines the desired size of the pick box that is displayed at the cursor cross-hairs.
4.7
Shift-key Selection
When checked, the user must hold the shift-key in order to make multiple selections when building
a list of entities to edit using any of the CAD > Edit commands. If the shift-key is not held down, the
edit command will be automatically executed after the first selection.
When not checked, the edit command will not be automatically executed. Once the list of entities is
complete, the user must either:
pick any of the edit buttons,
execute the highlighted function,
double click on any vertex to execute the highlighted function,
or right click for a list of options.
4.8
Crosshairs
Toggles drawing of cursor crosshairs.
Crosshairs can be drawn using either OpenGL or Windows API drawing commands (refer to Tools
> OpenGL Crosshairs).
4.9
Visualization
4.9.1
Visualization
This option enables visualization of point data. Points can be displayed as light source shaded
spheres with diameter and/or colour varying as magnitude, and contoured on a plane to display
density etc.
Each point can be tagged with a series of:
numeric values (e.g. colour, magnitude, orientation etc.)
text messages
file names (e.g. graphics files, documents, spreadsheets etc.)
Upon left clicking on a point, the location, magnitude and text message are displayed on the status
bar.
Right clicking on a point activates the Visual Database. This feature can be used to display a
database of useful geologic information such as grade, rockmass quality etc.
Each point can be tagged with a series of:
numeric values (e.g. colour, magnitude, orientation etc.)
text messages
file names (e.g. graphics files, documents, spreadsheets etc.)
Map3D International Ltd 1990-2015
Menu Commands
319
Event File:
The event file is simply a text file (*.txt).
This format is useful for exchanging raw model data with other CAD software.
Comment lines must start with an asterisk "*" in column 1.
Seismic data are stored as a series of points as follows:
x1 y1 z1 f1 f2 f3 … "text message" "file name"...
x2 y2 z2 f1 f2 f3 … "text message" "file name"...
x3 y3 z3 f1 f2 f3 … "text message" "file name"...
...
where xi yi zi represent the coordinates of each point,
f1 f2 f3… indicates an optional series of numeric values (e.g. colour, magnitude, orientation
etc.),
text message indicates an optional series of text strings that must be enclosed in double
quotes.
file name indicates an optional series of file names that must be enclosed in double quotes.
The text message and file name are displayed in the status bar across the bottom of the
screen by picking an event with the left mouse button.
They can also be edited by picking an event with the right mouse button.
Picking with the right mouse button also allows for display of the file if the file name has
been associated with an application (refer to Windows documentation on how to
"Associate a file with a program").
Merging multiple files into one database
You may select multiple files simultaneously by holding the standard windows "shift" or "ctrl" keys
for multiple selections.
These files will be merging into one database.
This allows you to keep separate parts of your visualization data in different files then easily merge
them together into one database.
Plot Equation:
Map3D International Ltd 1990-2015
320
Map3D User's Manual
Defines the parameter that will be plotted, e.g. (f1-f2)/3
The pull-down window allows you to store up to 20 different equations. These are stored between
Map3D sessions in the map3d.ini file.
Plot Variables:
f1 f2 f3… data fields in the event file.
Functions:
sin() cos() tan() sine, cosine and tangent trigonometric functions
asin() acos() atan() Inverse trigonometric functions
sqrt() square root function
log() natural logarithmic function
abs() absolute value
exp() exponential function (antilogarithm)
n() t(,) normal and t-distribution
an() at(,) inverse normal and t-distribution
Location:
x y z coordinate of grid point.
Operators:
+ - * / ^ addition, subtraction, multiplication, division and exponentiation operators. Note that
exponentials are computed first, followed by multiplication and division and finally addition and
subtraction.
() [] {} styles of brackets. Pairs of brackets must match.
> maximum value. For example if the plot equation is specified as f1 > 10, the larger of f1 or 10
will be plotted.
< minimum value. For example if the plot equation is specified as f1 < 10, the smaller of f1 or
10 will be plotted.
Point Plotting Options:
Filled – points are filled with the specified colour, contoured colour and/or shaded.
Contoured Colours –fill colour is adjusted according to the magnitude determined from the Plot
Equation.
Dark – fill colour is shaded to appear as light source shaded spheres using a dark rich colour
scheme.
Light – fill colour is shaded to appear as light source shaded spheres using a bright shinny
colour scheme.
Outlined – points are outlined with the specified colour or contoured colour.
Contoured Outline – points are drawn with contour colours adjusted according to the
magnitude determined from the Plot Equation.
Contour Plane – enables or disables display of a contour plane (refer to Plane).
Fixed Radius – points will be plotted as spheres with a the specified Radius: parameter.
Scaled Radius – points will be plotted as spheres with radius scaled to the magnitude
(determined from the Plot Equation) such that if the magnitude is less than the minimum of
the contour range, the sphere is drawn with zero radius. If the magnitude equals the
maximum of the contour range, the vector is drawn with the radius specified by the Radius:
parameter.
Other:
Map3D International Ltd 1990-2015
Menu Commands
321
Persist – when checked, the points will be re-plotted each time the model is reoriented,
translated or zoomed. Since this may be time consuming for large models this option may not
always be desired.
Translucent - draws the points as translucent spheres.
Zero Contour - when unchecked, contours below the minimum contour range are not drawn.
This is useful for displaying contours where only the upper part of the contour range is
important.
Make Point - adds of a new point.
Plane – enables setup of the contour plane.
Range – specify the minimum, maximum and interval for radius scaling and contouring.
Plot regenerates the plot. This button can be placed on either the View Toolbar (Tools >
View Toolbar Configure) or the Contour Toolbar (Tools > Contour Toolbar Configure).
4.9.2
Visualization Database
This feature can be used to display a database of useful geologic information such as grade,
rockmass quality etc.
Each point can be tagged with a series of:
numeric values (e.g. colour, magnitude, orientation etc.)
keywords
text messages
file names (e.g. graphics files, documents, spreadsheets etc.)
To activate this feature you right-click on a visualization data point (see Visualization).
If there are no visualization points one can be created using Make Point - adds of a new point.
Upon right-clicking you will be presented with a popup menu with the following options:
The "Display" items in the upper section of this menu are data that are attached to the data point
(respectively, a text string, bitmap, spreadsheet and document). Selecting of these will display that
item.
The items in the lower section of this menu are functions that access the database:
Keyword Filter (Show) – used to specify a series of show keyword filters. Only point data that
has one of these keywords associated with it will be visible, all others will be hidden. This allows
users to filter display of desired database entries.
Keyword Filter (Hide) – used to specify a series of hide keyword filters. Point data that has one
of these keywords associated with it will be hidden, all others will be visible. This allows users to
filter display of unwanted database entries.
Map3D International Ltd 1990-2015
322
Map3D User's Manual
Add Text (Keyword) Parameter - used to add a text string to a data point. This text is used for
keyword filtering. This text will be added to the display list.
Add File Parameter - used to add a file parameter to a data point. The file name is used for
keyword filtering. This file will be added to the display list. Any file name can be specified here
(.e.g. graphics files, spreadsheet files, document files etc.) If the file type is associated with an
application, that application will be automatically started in order to display the specified file.
Remove Parameter - used to remove a parameter from the data point.
Edit Parameter - used to edit or modify a parameter.
4.9.3
Contour Plane Options
Enables setup of the plane used for contouring of visualization point data (see Visualization).
X-centre – the x-coordinate value of the centre of the contour plane.
Y-centre – the y-coordinate value of the centre of the contour plane.
Z-centre – the z-coordinate value of the centre of the contour plane.
Dip of plane – the dip of the contour plane.
Dip direction – the dip direction of the contour plane.
Dip of normal – the dip of the normal to the contour plane (this value is 90° from the dip of the
plane).
Pick Normal - activates the cursor allowing interactive selection of a surface. The centre, dip
and dip direction of the contour plane will be set parallel to the selected surface.
Copy from Grid# – copies the location and orientation parameters from a model grid plane.
Linear regression – finds a best fit plane through the seismic data by minimizing the normal
distance from all points to the plane.
Make Grid – creates a model grid plane from the contour plane.
Make Map3Di file – generates a data file from the contoured data to be used for seismic loading
in a Map3Di analysis (more on this below).
Map3D International Ltd 1990-2015
Menu Commands
323
Contour Plane Options:
Num in voxel – the count of the number of points within each voxel is contoured.
Sum in voxel – the sum of the plot equation values for all points located in the voxel is
contoured.
Sum/Num in voxel – the quotient of the two values is contoured.
Grid Spacing
Voxel Height
Grid spacing – the grid spacing used to contour the seismic data. Since the voxel is centred at
each grid corner, this parameter controls the density of the voxels. Note that if the grid
Voxel
spacing is smaller
thanWidth
the voxel width, adjacent voxels will overlap.
Voxel width – the voxel width is measured parallel to the edges of the grid plane.
Voxel height – the voxel height is measured perpendicular to the grid plane. This allows the user
to limit the distance from the grid plane within which data will be included in the contouring.
Outlines – draws the actual voxel outlines.
Persist – when checked, the points will be re-plotted each time the model is reoriented,
translated or zoomed. Since this may be time consuming for large models this option may not
always be desired.
Translucent - draws the points as translucent spheres.
Zero Contour - when unchecked, contours below the minimum contour range are not drawn.
This is useful for displaying contours where only the upper part of the contour range is
important.
Range – specifies the minimum, maximum and interval for radius scaling and contouring.
Plot
regenerates the plot. This button can be placed on either the View Toolbar (Tools >
View Toolbar Configure) or the Contour Toolbar (Tools > Contour Toolbar Configure).
Linear Regression:
The linear regression is conducted by finding the plane that has the minimum rms value (the root
mean square, or mean distance of all points to the fitted plane).
Standard theory on correlation coefficient is not suitable as a measure of goodness of fit in this
case. This is because we are not interested in the "measure of the degree of association between
variables" but rather we want a measure of how well the fitted plane represents out data. Note that
if all data lies in a single horizontal plane, we have a perfect plane fit. By definition however there
is zero correlation (and hence the correlation coefficient equals zero) because the z value does
not depend on the x or y values. This is not what we want.
Here a parameter similar to a coefficient of variation (a measure of the variability divided by the
magnitude) is defined. Cv is simply defined as the rms value (the mean distance of all points to the
Map3D International Ltd 1990-2015
324
Map3D User's Manual
fitted plane) divided by the mean distance of all points to the centroid. This measures how well the
plane represents the data. This ratio is usually expressed as a percentage. Defined like this,
random data gives a Cv=100% (100% variability). A perfect fit gives a Cv=0 (0% variability). Note
that it is possible for Cv to exceed 100%. You can think of this parameter as the ratio of the
variability around the plane divided by the physical width of the data set.
This is very similar to the formal definition of coefficient of variation which is standard deviation
divided by the mean. Most geologic materials have properties with Cv on the order of 20 to 30%. C
v could be turned into an equivalent correlation coefficient using
r = (1- Cv²)½
but this is not really the correct parameter to use and there are problems in definition for cases
where Cv exceeds 1.
Both the rms and Cv are displayed for the current plane whenever data is plotted.
Make Map3Di file:
In order to make a Map3Di loading file one must determine the shear displacement distribution
(ride) indicated by the seismicity. This requires several assumptions (refer to A. McGarr, "Some
Applications of Seismic Source Mechanism Studies to Assessing Underground Hazard", Proc. 1st
International Symposium on Rockbursts and Seismicity in Mines, SAIMM, Johannesburg, 1984,
pp. 199-208, and Hoffman, G, R. Sewjee and G. van Aswegan, "First steps in the integration of
numerical modelling and seismic monitoring", 5th International Symposium on Rockburst and
Seismicity in Mines, SAIMM, Johannesburg, 2000, pp. 397-404.) which are outlined here:
1) Assuming a slip model. Here we can consider either an elliptic crack model (Brune) or an
asperity model with soft edges due to creep (Walsh, J.J. and J. Waterson, "Distribution of
cumulative displacements and seismic slip on a single normal fault surface", J. Struct. Geol., V.
9, 1987, pp. 1039-1046). Generally a circular (penny) shape will be used unless the user has
some way to define an alternate shape.
2) The average value of slip can be determined from the seismic moment Mo = AD where is
the modulus of rigidity, A is the source area (determined from the source radius), and D is the
average slip across the fault. This can also be determined from the determined from the "Seismic
Strain Drop".
3) The slip surface radius can be estimated from the Brune radius as a = 2.34 /(2 fo), where
is the shear wave velocity and fo is the corner frequency. For an asperity model, the radius
determined from the radius of the "Apparent Volume" is probably more appropriate.
4) The orientation of slip can be determined from the seismic moment tensor if available, or from
the stress state from modelling.
From these 4 items you can determine the slip profile indicated by the seismic event.
For an elliptic profile, the shear displacement (ride) distribution is given by
1.50 D(1-r²/a²)½
For an asperity profile, the shear displacement (ride) distribution is given by
2.89 D(1-r/a)(1+2r/a-3r²/a²)½
A seismic loading file can be generated for Map3Di as follows:
1) Construct a seismic data file with as a series of points:
x1 y1 z1 f1 f2 …
x2 y2 z2 f1 f2 …
x3 y3 z3 f1 f2 …
Map3D International Ltd 1990-2015
Menu Commands
325
...
where xi yi zi represent the coordinates of each point,
f1 indicates the average slip D, and f2 indicates the source radius a.
2) Using the Visualization routine, for an elliptic profile specify the plot equation as
1.50*f1*sqrt(1-rip^2/f2^2)
For an asperity profile use
2.89*f1*(1-rip/f2)*sqrt(1+2*rip/f2-3*rip^2/f2^2)
3) Choose your desired plane, grid spacing, set the desired voxel height and width. The voxel
height can be used to clip out of plane events. It is important to choose the voxel width equal to
the largest desired event radius in order to distribute the shear displacement (ride) over all
affected voxels.
4) Set Plotting Options to "Sum in Voxel" and Plot.
5) Make Map3Di file.
6) View Map3Di file using CAD > Properties > Map3Di Setup and view the f2 parameter.
Refer to CAD > Properties > Map3Di for details concerning the data format.
4.9.4
Plot
Plots seismic data. Points can be displayed as light source shaded spheres with diameter and/or
colour varying as magnitude (see Visualization).
This button can be placed on the view toolbar or the contouring toolbar using
Tools > Configure View Toolbar
Tools > Configure Contouring Toolbar
4.10
Help
4.10.1 Contents and Index
Opens the help contents and index.
4.10.2 What's This?
Activates context sensitive help.
Once activated, a question mark cursor appears. You can then use this to pick any menu item or
toolbar button to obtain help.
This has the same effect as simply right clicking on an item.
4.10.3 Web: www.map3d.com
Opens www.map3d.com in the default web browser.
Map3D International Ltd 1990-2015
326
Map3D User's Manual
4.10.4 Email: [email protected]
Emails [email protected] using the default emailer.
4.10.5 Email: Key check to [email protected]
Emails "Key Check" results to [email protected] using the default emailer.
These results are required for debugging installation problems and determining lease expiry dates
etc.
4.10.6 Download: Map3D update (setup.exe)
Download: Map3D update (setup.exe 18MB)
Downloads the latest Map3D update from the Map3D website www.map3d.com/update.htm
The complete update includes all Map3D executables, automated installation routines, the Map3D
User's Manual in HTML format, and Sentinel SuperPro key drivers as well as a few sample files.
As the complete update (setup.exe) is quite large (8MB), an alternative is to download the updated
executables only (Map3D.zip).
Download: Map3D update (Map3D.zip 8MB) This does not include the installation routines, the
Map3D User's Manual in HTML format, nor the Sentinel SuperPro key drivers. Note that the HTML
Map3D User's Manual (Map3D.chm) is required for context sensitive help to function from within
Map3D.
The user's manual can be downloaded in several formats:
Download HTML User's Manual (Map3D.chm 4MB) The HTML User's Manual can be download from
Tools > Download HTML User's Manual. This manual is in native Windows HTML help format.
Download PDF User's Manual (Map3D_Help.pdf 7MB) The PDF User's Manual can be download from
Tools > Download PDF User's Manual. This manual is in PDF format as is a good choice for
printing.
Download Ebook User's Manual (Map3D_Help.exe 5MB) The Electronic book User's Manual can be
download from Tools > Download Ebook User's Manual. This manual is in a standalone electronic
book format.
4.10.7 Download: Map3D update (Map3D.zip)
Download: Map3D update (Map3D.zip 8MB)
Downloads the latest Map3D update from the Map3D website www.map3d.com/update.htm
This does not include the installation routines, the Map3D User's Manual in HTML format, nor the
Sentinel SuperPro key drivers. Note that the HTML Map3D User's Manual (Map3D.chm) is required
for context sensitive help to function from within Map3D.
Download: Map3D update (setup.exe 18MB) The complete update includes all Map3D executables,
automated installation routines, the Map3D User's Manual in HTML format, and Sentinel SuperPro
key drivers as well as a few sample files.
Map3D International Ltd 1990-2015
Menu Commands
327
The user's manual can be downloaded in several formats:
Download HTML User's Manual (Map3D.chm 4MB) The HTML User's Manual can be download from
Tools > Download HTML User's Manual. This manual is in native Windows HTML help format.
Download PDF User's Manual (Map3D_Help.pdf 7MB) The PDF User's Manual can be download from
Tools > Download PDF User's Manual. This manual is in PDF format as is a good choice for
printing.
Download Ebook User's Manual (Map3D_Help.exe 5MB) The Electronic book User's Manual can be
download from Tools > Download Ebook User's Manual. This manual is in a standalone electronic
book format.
4.10.8 Download: HTML User's Manual
Download HTML User's Manual (Map3D.chm 4MB) The HTML User's Manual can be download from
Tools > Download HTML User's Manual. This manual is in native Windows HTML help format.
Download PDF User's Manual (Map3D_Help.pdf 7MB) The PDF User's Manual can be download from
Tools > Download PDF User's Manual. This manual is in PDF format as is a good choice for
printing.
Download Ebook User's Manual (Map3D_Help.exe 5MB) The Electronic book User's Manual can be
download from Tools > Download Ebook User's Manual. This manual is in a standalone electronic
book format.
4.10.9 Download: PDF User's Manual
Download HTML User's Manual (Map3D.chm 4MB) The HTML User's Manual can be download from
Tools > Download HTML User's Manual. This manual is in native Windows HTML help format.
Download PDF User's Manual (Map3D_Help.pdf 7MB) The PDF User's Manual can be download from
Tools > Download PDF User's Manual. This manual is in PDF format as is a good choice for
printing.
Download Ebook User's Manual (Map3D_Help.exe 5MB) The Electronic book User's Manual can be
download from Tools > Download Ebook User's Manual. This manual is in a standalone electronic
book format.
4.10.10 Download Ebook User's Manual
Download HTML User's Manual (Map3D.chm 4MB) The HTML User's Manual can be download from
Tools > Download HTML User's Manual. This manual is in native Windows HTML help format.
Download PDF User's Manual (Map3D_Help.pdf 7MB) The PDF User's Manual can be download from
Tools > Download PDF User's Manual. This manual is in PDF format as is a good choice for
printing.
Download Ebook User's Manual (Map3D_Help.exe 5MB) The Electronic book User's Manual can be
download from Tools > Download Ebook User's Manual. This manual is in a standalone electronic
book format.
Map3D International Ltd 1990-2015
328
Map3D User's Manual
4.10.11 About Map3D
Version and license information.
Map3D International Ltd 1990-2015
Map3D
User's Manual
Part
V
330
Map3D User's Manual
5
Appendix
5.1
Analysis
5.1.1
Analysis > Options > MSCALC Output File Name
Displays the file name containing user defined points
Analysis > Options > MSCALC.
5.1.2
Analysis > Abort
Aborts execution of the analysis.
Related Topics:
Analysis > Suspend
5.1.3
Analysis > Auto Plot
Activates the auto plot feature.
When checked Map3D automatically plots the selected surface components as the Map3D BEM
analysis proceeds. Any desired surface component can be plotted. By default the surface stress
error is plotted
Plot > Surface Components > Serr Stress Error.
To change the surface component that is plotted:
1. During analysis select Analysis > Suspend
2. Select the desired component from the solve toolbar Tools > Solve Toolbar
3. To continue the analysis, select Analysis > Resume
Notes
You must check Tools > Solve Toolbar for the solve toolbar to be displayed when you suspend the
analysis.
To have Map3D automatically modify the contour range as the Map3D BEM analysis proceeds,
check Analysis > Auto Range
5.1.4
Analysis > Auto Range
Activates the auto range feature.
When checked Map3D automatically modifies the contour range as the Map3D BEM analysis
proceeds.
To automatically plot surface components, you must activate
Analysis > Auto Plot
Map3D International Ltd 1990-2015
Appendix
5.1.5
331
Analysis > BEM Analysis
Starts the Map3D BEM analysis.
Options:
Analysis > Options > VRAM
Analysis > Options > PRAM
Analysis > Options > Drive 1
Analysis > Options > Drive 2
Analysis > Options > Drive 3
Analysis > Options > Drive 4
Analysis > Options > Creep
Analysis > Options > Move Points
Analysis > Options > Verbose
Analysis > Options > CGM
Analysis > Options > Accelerator
Analysis > Options > Async I/O
Analysis > Options > Linear
Analysis > Options > Zero Strain Support Placement
Analysis > Options > Initialization
Related Topics:
Analysis Dialog
Analysis > Suspend
Analysis > ABORT
5.1.6
Analysis > Discretization
Discretization the model.
All excavation surfaces are automatically discretized by concentrating elements where results are
requested
View > Render > Discretize
Analysis results are calculated on DD surfaces and on a series of user defined grid planes
CAD > Build > Grid Plane
or at user defined points
Analysis > Options > MSCALC
The grid planes are automatically discretized into a series of field points at which displacements,
strains and stresses are calculated.
The discretization analysis can be repeated as many times as desired with different control
parameters.
The user has complete control over the way in which the model is discretized by specifying various
Map3D International Ltd 1990-2015
332
Map3D User's Manual
control parameters (Element Length AL, Grid Spacing AG, Element Discretization DON, Grid
Discretization DOL)
Analysis > CParams
and by specifying the maximum element width for 3D FF blocks and DD planes
CAD > Edit > Entities > Maximum Element Width
as well as for field point grids
CAD > Edit > Entities > Maximum Element Width
Refer to Discretization and Lumping for a thorough discussion on how to set up these control
parameters.
Options:
Analysis > Options > MSCALC
Analysis > Options > LERD/LSS
Analysis > Options > Lumping
Related Topics:
Analysis Dialog
Analysis > Suspend
Analysis > ABORT
Analysis > Restart
5.1.7
Analysis > Go to CAD
Re-loads the model if necessary, closes the Analysis dialogue box and returns to the graphics
display.
Related Topics:
Analysis > Graphics
5.1.8
Analysis > Graphics
Closes the Analysis dialogue box and returns to the graphics display at the current analysis stage.
Related Topics:
Analysis > Go to CAD
5.1.9
Analysis > Intersections
Conducts contact and intersection analysis.
One of the keys to ease of use in Map3D is model construction using solid modelling technology.
This permits users to build models using a series of three-dimensional building blocks and DD
planes. These entities, which can be any desired shape, size and orientation, are used to construct
excavations and accesses as well as to define non-homogeneous zones (e.g. ore zones, dykes and
yielding zones). The program automatically builds intersections between excavations, faults and
multiple material zones. By coupling this capability with the built-in Boolean operations, complex
Map3D International Ltd 1990-2015
Appendix
333
multi-step mining sequences can be constructed with ease.
Options:
Analysis > Options > Collapse
Analysis > Options > Planarity
Analysis > Options > Closure
Related Topics:
Analysis Dialog
Analysis > Suspend
Analysis > ABORT
5.1.10 Analysis > Load Model
Loads a model from a file (INP or DXF format). Once loaded the user can use
Analysis > Go to CAD
to add or edit mining blocks and set up the Map3D analysis.
While loading the model Map3D checks for basic consistency of the modelling parameters (e.g. if a
material is used, its properties must be specified in the material list).
Options:
Analysis > Options > Reunmber
Analysis > Options > Collinearity
Related Topics:
Analysis Dialog
Analysis > Suspend
Analysis > ABORT
5.1.11 Analysis > Minimize
Minimizes the graphics display during analysis.
The analysis dialogue box can be minimized by selecting the minimize button from the windows
system menu at the top right of the dialogue box.
5.1.12 Analysis > Options > Accelerator
Use the matrix accelerator – during Map3D BEM analysis.
This solver will accelerate convergence even for poorly conditioned problems and can reduce the
total number of iterations by half or more. This option can be used in conjunction with the CGM
option (Analysis > Options > CGM) to provide a reduction in the total number of iterations by a
quarter or more.
Notes:
This function must be checked before conducting the Map3D BEM analysis
Map3D International Ltd 1990-2015
334
Map3D User's Manual
Analysis > BEM Analysis
It is recommended that this option be used.
5.1.13 Analysis > Options > Async I/O
Use Windows asynchronous I/O routines – during Map3D BEM analysis.
Windows allows disk I/O to be conducted asynchronously from the BEM analysis. This is supposed
to allow disk I/O to occur in parallel with other calculations thus reducing matrix solution time.
Notes:
This function must be checked before conducting the Map3D BEM analysis
Analysis > BEM Analysis
5.1.14 Analysis > Options > Auto Repair
Attempts to repair you model by filling gaps, deleting duplicates etc.- during file load.
Model pre-processing to detect common model building errors including:
detection and automatic filling of simple gaps such as missing surfaces - highlighted in black.
detection and automatic deletion of duplicate blocks - highlighted in green.
detection of narrow gaps between adjacent blocks - highlighted in blue. The warning is generated
when ever the gap is less than 1/1000 of the element width.
detection of edges that link the wrong way to other edges - highlighted in white.
detection of edges that do not link to any other edges - highlighted in red.
detection of edges that link to too many other edges - highlighted in yellow.
The above model problems will not necessarily stop Map3D from running properly, but close
scrutiny of these locations will help user's debug problems and find unintended construction errors.
5.1.15 Analysis > Options > Batch
Set up analysis batch queue.
If the user has multiple models that need to be run, these can be specified in this batch queue. By
selecting
Analysis > Options > Batch > Execute Batch Queue
all checked models will be run without any request for interactive response from the user.
When you check a batch file for execution you will be prompted to search for a model file name,
location, and file format. If the search is successful, the model will be checked.
The second column in the Batch File Setup dialogue box allows you to set analysis options if
desired. These setting override any options set in the Analysis > Options dialogue box.
Notes:
Batch model files names are saved and restored each time Map3D is executed.
Model files that are not checked will not be executed in batch mode.
The batch queue can be interrupted at any time simply by aborting the current analysis
Map3D International Ltd 1990-2015
Appendix
335
Analysis > Abort
5.1.16 Analysis > Options > CGM
Use the conjugate gradient solver – during Map3D BEM analysis.
This solver will accelerate convergence even for poorly conditioned problems and can reduce the
total number of iterations by half or more. This option can be used in conjunction with the matrix
accelerator (Analysis > Options > Accelerator) to provide a reduction in the total number of
iterations by a quarter or more.
Notes:
This function must be checked before conducting the Map3D BEM analysis
Analysis > BEM Analysis
It is recommended that this option be used.
5.1.17 Analysis > Options > Closure
Conducts closure and overlap checking, and resolves Boolean intersections – during intersection
analysis.
Complex excavation shapes are checked to ensure that their bounding surfaces form a continuous
envelope with no gaps or missing surfaces. Locations where a gap is detected are identified by
coordinate numbers in that vicinity.
Interference between intersecting features such a fault and an ore zone are automatically resolved
by Map3D. Surfaces are subdivided to create edges where these features meet. A solid modelling
Boolean operation is then performed to determine which feature persists through the other. Since it
is not clear whether the fault should persist through the ore, or the ore should persist through the
fault, a convention has been adopted in Map3D such that the feature with the higher material
number takes priority over a feature with a lower material number. For example if the ore were
assigned material number 2 and the fault were assigned material number 3, the fault would be
assumed to be continuous through the ore. Note that excavations are assumed to cut through all
other features.
For additional discussion, refer to
Constructing Alternate Material Zones.
Notes
This function must be checked before conducting the intersection analysis
Analysis > Intersections.
It is recommended that you check this option.
5.1.18 Analysis > Options > Collinearity
Merge coordinate points that are close to one another – during file load.
Coordinate points that are very close to one another are merged together. Coordinate points that
are very near an edge of a surface are moved onto that edge. By default Map3D will move these
points if they are within a search radius of 1000th of the edge length from the surface.
If desired, the user can define a search radius by entering a value in the data box. Other CAD
Map3D International Ltd 1990-2015
336
Map3D User's Manual
packages may not link corners of surfaces together. This feature is useful for eliminating small gaps
and overlaps between adjacent surfaces and blocks. Extreme caution should be used when
specifying a non-zero value for this parameter since large values can cause more problems then it
will fix by merging too many points together.
Notes
This function must be checked before loading the model file
Analysis > Load Model.
It is recommended that you check this option. However caution must be exercised if a non-zero
search radius is specified since too large a value can cause undesired merging of coordinate
points thus destroying model integrity.
5.1.19 Analysis > Options > Collinearity Search Radius
Specifies the search radius that is used in collinearity checking during file load (see Analysis >
Options > Collinearity).
Coordinate points that are very close to one another are merged together. Coordinate points that
are very near an edge of a surface are moved onto that edge. By default Map3D will move these
points if they are within a search radius of 1000th of the edge length from the surface.
If desired, the user can use this option to define a search radius by entering a value in the data
box. Other CAD packages may not link corners of surfaces together. This feature is useful for
eliminating small gaps and overlaps between adjacent surfaces and blocks.
Notes
This function must be checked before loading the model file
Analysis > Load Model.
Caution must be exercised if a non-zero search radius is specified since too large a value can
cause undesired merging of coordinate points thus destroying model integrity.
5.1.20 Analysis > Options > Collapse
Merge adjacent surfaces – during intersection analysis.
Surfaces that share common edges and can be collapsed into a single quadrilateral, will be,
provided they are parallel to one another.
Notes
This function must be checked before conducting the intersection analysis
Analysis > Intersections.
This can result in a large reduction in problem size significantly reducing analysis time.
It is recommended that you check this option unless you specifically do not want adjacent surfaces
to be merged.
Map3D International Ltd 1990-2015
Appendix
337
5.1.21 Analysis > Options > Creep
Conduct elasto-visco-plastic creep analysis.
Strength
Elastic
Viscous
This feature elastiic
is used only inplastic
non-linear analyses (3D FF blocks in Map3D Non-Linear and DD planes
in Map3D Fault-Slip). The creep model can be used simply as a technique for damping the nonlinear deformations or if this creep option is activated, for real time dependant creep simulation.
At each creep step the stress state on all yielding elements (elements where the stress exceeds the
strength) is calculated as the strength plus the creep resistance. This limits the size of plastic creep
increment plastic on each yielding element
= Strength + C
C=G t
plastic
/ t
where the creep resistance is determined as the creep coefficient C, times the plastic strain rate
plastic / t. Note that the user must select both the creep coefficient C, and the time step size t, then
specify the quotient of these as the viscous modulus G. The contribution to the stress , made by
the creep increment is the excess stress given by
=C
plastic
/ t
The maximum excess stress for all yielding elements is indicated by
Components > Ferr
Plot > Surface
If this creep option is activated, Map3D will execute only one creep increment for each mining step.
Thus the elapsed time can be determined as the product of the current time step number is (
Analysis Dialog) with the user defined time step size t.
Total Elapsed Time = is t
The user may wish to repeat several mining steps without adding any new mining simply to allow the
model to creep for a controlled number of steps.
If this creep option is not activated, Map3D will execute as many creep increments as is required to
reduce fer below the stress tolerance STOL, before moving onto the next mining step.
In either case, the accumulated plastic strain
increments plastic, for all creep steps.
, is determined as the sum of the plastic creep
plastic
Related Topics:
Plot > Surface Components > DTs
Excess Shear Stress
Plot > Surface Components > DEs Incremental Shear Strain
Plot > Surface Components > Ts Shear Stress
Plot > Surface Components > Es
Shear Strain
This function must be checked before conducting the Map3D BEM analysis
Analysis > BEM Analysis
Map3D International Ltd 1990-2015
338
Map3D User's Manual
5.1.22 Analysis > Options > #C/T
Displays the number of cores/threads active.
Map3D fully supports parallel processing and parallel disk I/O with the multi-processor/multi-drive
option.
If you are licensed to use the multi-processor/multi-drive option, Map3D will conduct all analysis
procedures in parallel distributed among all available processors.
CPU: Recent CPU's are now available as dual, quad and hex cores.
Map3D V58 now supports parallel processing which allows faster computational rates.
This results in more than 6x reduction in matrix assembly and grid assembly times.
Multi-CPU computers would go even faster.
The following parallel processing benchmark clearly shows that you can expect dual cores CPU's to
perform more than twice as fast,
quad cores to perform more than 4 times as fast and hex-cores to perform more than 6 times faster.
In hyper-threading enabled CPUs, 2 computational threads are superimposed on the same core.
This is the reason why Map3D-MP actually achieves performance better than the theoretical
maximum.
In order to achieve these performance gains it is necessary to improve both the processing power
and/or disk I/O rate Analysis > Options > Drive #.
5.1.23 Analysis > Options > Drive #
Specify scratch drives for coefficient matrix – during Map3D BEM analysis.
If you have multiple disk drives installed, this option can be used to direct Map3D where to store the
coefficient matrix. When the first drive fills up, Map3D will write the remainder of the matrix to next
scratch drive.
When the solution matrix is too big to fit into RAM (refer to Analysis > Options > VRAM and
Analysis > Options > PRAM) , Matrix solution becomes an I/O intensive operation that depends only
on the I/O rate of your computer. In this case, a large part of the analysis time can be spent in the
Map3D International Ltd 1990-2015
Appendix
339
solution stage due to slow disk performance.
To overcome this problem it is imperative that the user install multiple, high speed disks.
Map3D fully supports parallel processing and parallel disk I/O with the multi-processor/multi-drive
option.
If you are licensed to use the multi-processor/multi-drive option, Map3D set up these drives into a
RAID array such that I/O is done in an overlapped manner to all of the drives, in parallel with the
computations.
Set up in this way you can increases the I/O performance in proportion to the number of drives in
the array.
In the following benchmark, the same model is run with 1, 2 and 4 disks.
1
disk
2
4
8GB
disks disk PRAM
s
Measured Disk
Throughput (MB/
sec)
55
112
Matrix Solution
(hours)
0.54 0.28 0.1
6
2
63
Solution Speed
Increase
1x
206 3000
equival
ent
1.9x 3.3x 16x
Total Analysis Time 0.64 0.37 0.2
(4 cores)
0
6
57
Total Speed
Increase
1x
0.033
0.107
1.7x 2.5x 6x
The disks used in this benchmark are older 50-60 MB/sec drives (Seagate Barracuda 7200.7).
More recent mechanical drives perform at 100 MB/sec (Seagate Momentus 7200.4).
SATA2 SSDs can provide over 250 MB/sec per drive.
SATA3 SSDs can provide over 500 MB/sec per drive.
Multiple SSDs can be expected to perform as fast as PRAM.
Note that some motherboards have limitations on the total combined throughput and may require
add-in controller adapters.
To determine if you are licensed to use the multi-processor/multi-drive option check on Analysis >
Options > #C/T.
If you are licensed to use the multi-processor/multi-drive option, faster disk rates can be achieved if
you set SE_MANAGE_VOLUME_NAME privilege.
This capability is available in the following versions of Windows:
Windows NT 4.0, Windows 2000 Professional and Server (maximum of 4 GB).
Windows 2000 Advanced Server (maximum of 8 GB).
Windows 2000 Datacenter Server (maximum of 32 GB).
Windows XP Professional and Windows Server 2003 (maximum of 4 GB).
Windows Server 2003 Enterprise Edition (maximum of 32 GB).
Windows Server 2003 Datacenter Edition (maximum of 64 GB).
To set "SE_MANAGE_VOLUME_NAME" privilege, follow these steps:
Control Panel > Administrative Tools > Local Security Policies
Then set
Map3D International Ltd 1990-2015
340
Map3D User's Manual
Local Policies > User Rights Assignment > Perform Volume Maintenance Tasks > Add User or
Group > Everyone
You must reboot for this setting to take effect.
Notes:
This function must be checked before conducting the Map3D BEM analysis
Analysis > BEM Analysis
You should specify the fastest drive in your system. You can test your drive performance using
Tools > Disk Performance Test
5.1.24 Analysis > Options > Move Points
Move field points that are very close to boundary surfaces – during Map3D BEM analysis.
Field points (results on grid planes or at user defined points) that are located within a fraction of an
element width from an element corner or edge will have very poor accuracy often indicating
unrealistically large stress concentrations. By moving such points to the nearest boundary node,
more realistic stress predictions can be obtained. This option only moves points that are within ¼ of
AG (AG is the minimum allowable grid spacing, see Analysis > CParams > AG) from the surface.
This feature also causes field points that are just inside excavations (within ½ of AG) to be moved
onto the excavation surface, and thus provides smooth contouring of results right up to the
excavation surface.
Notes:
This function must be checked before conducting the Map3D BEM analysis
Analysis > BEM Analysis.
It is recommended that you check this option unless you specifically do not want field points moved.
5.1.25 Analysis > Options > MSCALC
Calculate results at user defined points – during Map3D BEM analysis.
Analysis results can be calculated at user defined coordinate locations.
When you select MSCALC, you will be prompted for a data file name and the desired output format
as follows.
Data file format:
The data file contains is simply a text file (*.txt) with a list of the coordinate locations where the
results are to be calculated.
The format of this file requires one set of coordinates per line
x1 y1
x2 y2
x3 y3
x4 y4
...
z1
z2
z3
z4
where xi yi zi represent the coordinates of each point.
Map3D International Ltd 1990-2015
Appendix
341
Output file format:
Results are written back to the same data file with x y z coordinates followed by user specified
parameters
Stresses:
s1 ts1 ps1 major principal stress 1 its trend and plunge.
s2 ts2 ps2 intermediate principal stress 2 its trend and plunge.
s3 ts3 ps3 minor principal stress 3 its trend and plunge.
user User defined value.
sxx syy szz sxy syz sxz Cartesian stress components.
tmax maximum shear stress max=½ ( 1 - 3 )
toct octahedral shear stress oct=¹/3 [( 1 - 2 )² + ( 2 - 3 )² +( 3 - 1 )²]1/2
smean mean stress mean=¹/3 ( 1 + 2 + 3 )
ti tti pti maximum shear stress in the grid plane, its trend and plunge.
si tsi psi normal stress in the grid plane, its trend and plunge.
s1i ts1i ps1i maximum stress tangential to the grid plane, its trend and plunge.
s3i ts3i ps3i minimum stress tangential to the grid plane, its trend and plunge.
tu ttu ptu maximum shear stress in the ubiquitous-plane, its trend and plunge.
su tsu psu stress normal to the ubiquitous plane, its trend and plunge.
s1u ts1u ps1u maximum stress tangential to the ubiquitous plane, its trend and plunge.
s3u ts3u ps3u minimum stress tangential to the ubiquitous plane, its trend and plunge.
The orientation of the ubiquitous-plane is specified in
Plot > Strength Factors > Ubiquitous Parameters
Effective/Total effective stress or total stress components. These options are only used in Map3D
Thermal-Fluid Flow, as this code allows for calculation of steady state pore pressure distributions.
Strains:
e1 te1 pe1 major principal strain 1 its trend and plunge.
e2 te2 pe2 intermediate principal strain 2 its trend and plunge.
e3 te3 pe3 minor principal strain 3 its trend and plunge.
exx eyy ezz exy eyz exz Cartesian strain components.
emax maximum shear strain max=½ ( 1 - 3 )
eoct octahedral shear strain oct=¹/3 [( 1 - 2 )² + ( 2 - 3 )² +( 3 - 1 )²]1/2
evol volumetric strain vol =( 1 + 2 + 3 )
esi tesi pesi maximum shear strain in the grid plane, its trend and plunge.
Map3D International Ltd 1990-2015
342
Map3D User's Manual
eni teni peni normal strain in the grid plane, its trend and plunge.
e1i te1i pe1i maximum strain tangential to the grid plane, its trend and plunge.
e3i te3i pe3i minimum strain tangential to the grid plane, its trend and plunge.
esu tesu pesu maximum shear strain in the ubiquitous-plane, its trend and plunge.
enu tenu penu strain normal to the ubiquitous plane, its trend and plunge.
e1u te1u pe1u maximum strain tangential to the ubiquitous plane, its trend and plunge.
e3u te3u pe3u minimum strain tangential to the ubiquitous plane, its trend and plunge.
Elastic/Plastic/Total elastic, plastic or total strain components. These options are only used in
Map3D Non-Linear, as this code allows for calculation of non-linear strains.
Displacements:
ut tut put total displacement, its trend and plunge.
ux uy uz Cartesian displacement components.
uni tuni puni displacement normal to the grid plane, its trend and plunge.
umi tumi pumi maximum displacement tangential to the grid plane, its trend and plunge.
unu tunu punu displacement normal to the ubiquitous plane, its trend and plunge.
umu tumu pumu maximum displacement tangential to the ubiquitous plane, its trend and plunge.
Flow:
t temperature/head.
qt tqt pqt total flow, its trend and plunge.
qx qy qz Cartesian flow components.
qni tqni pqni displacement normal to the grid plane, its trend and plunge.
qmi tqmi pqmi maximum displacement tangential to the grid plane, its trend and plunge.
qnu tqnu pqnu displacement normal to the ubiquitous plane, its trend and plunge.
qmu tqmu pqmu maximum displacement tangential to the ubiquitous plane, its trend and plunge.
Miscellaneous:
matl# the number of the material within which the point is located. The host material is material
number 1. In problems where multiple materials are used, results may be calculated in an
alternate material zone.
step# the mining step number.
Other:
Cartesian configures for output of cartesian stress components.
Principal configures for output of principal stress components.
Notes:
This function must be checked before conducting the discretization analysis
Analysis > Discretization.
Any desired number of points can be specified.
The model is discretized according to the locations of the specified points.
5.1.26 Analysis > Options > Initialization
Initialize the model so that the analysis continues from where a previous analysis completed.
This option enables you to start a new analysis from where a previous model completed. All nonlinear, zero strain and seismic loading (seismic loading only in Map3Di) components are passed on
to the new model from the previous analysis.
Map3D International Ltd 1990-2015
Appendix
343
In order for this function to work properly the new model must have all of the model data (geometry)
that the initialization model has plus any new data, mining steps or grids. There is no requirement to
use the same discretization or grid planes.
In order to initialize the following files must be intact:
file.00n where n represents the mining step number where the previous analysis finished.
file.dms this file is only used with the zero strain option (Analysis > Options > Zero Strain Support
Placement).
file.hms this file is only used by Map3Di and are used to accumulate the field loading as the
analysis progresses.
Notes:
This function must be checked before conducting the Map3D BEM analysis
Analysis > BEM Analysis
This option requires additional calculations and hence increases analysis time.
Refer to Analysis > Options > Restart to restart an analysis that was aborted or interrupted by a
power failure or operating system crash.
5.1.27 Analysis > Options > Initialization file name
Displays the name of the initialization file file.00n where n represents the mining step number where
the previous analysis finished.
Analysis > Options > Initialize
5.1.28 Analysis > Options > LERD/LSS
Calculate energy release rate and loading system stiffness – during Map3D BEM analysis.
This routine enables the user to calculate energy release rate (ERR) at any desired location and
provides a wide range of flexibility for controlling how the calculation is conducted. An alternative
method is available where ERR is calculated ahead of an excavation face only
Plot > Surface
Components > ERR
When you select LERD/LSS, you will be prompted for a data file name where the results from the
LERD/LSS calculations are to be written. The default extension for this file is ".ERR".
Results will be written to this file in the following format:
If the test block is constructed as a 3D block (using FF elements)
Block# Volume Area Wk Wf LSS x y z
where
i
1
t1 p1
2
t2 p2
3
t3 p3
ti pi represent a principal stress component, its trend and plunge.
If the test block is constructed as a planar feature (using DD elements)
Block# Volume Area W k W f LSS x y z
s
ts ps
n
tn pn
where s ts ps represent the maximum in-plane shear stress, its trend and plunge, and
represent the normal stress, its trend and plunge.
n
tn pn
In both cases, x y z are the coordinates of the centre of the test block where the stresses are
calculated.
In addition, the total energy release associated with new excavations made during for the current
mining step will also be calculated. Note that no test blocks need to be specified for this calculation
Map3D International Ltd 1990-2015
344
Map3D User's Manual
to take place. Results will be reported as follows:
Stp# Volume Area W k W f
A useful indicator of the nature of the response expected during yielding are the loading system
stiffness (LSS) and local energy release density (LERD). At different locations in a model one can
expect these indicators to change owing to geometric effects. At locations where the LSS is stiffer
that the post peak response of the yielding rock, one can expect controlled failure that progresses
in sequence with the advancing mining. However, at locations where the LSS is softer that the post
peak response of the yielding rock, one can expect uncontrolled failures. The amount of excess
energy available can be expected to correlate with the magnitude of the event.
In order to determine the LSS or LERD in a numerical model it is necessary to flex the model and
observe the loading system response. This is done by specification of the Material Code for the
LERD/LSS calculation using
CAD > Edit > Entity Properties > Matl Code LERD/LSS
This special Material Code is used to temporarily alter the material properties or boundary
conditions in the test area to cause the model to deform in some way.
Since the LSS is expected to change from one location to another, it is necessary do this at all
locations of interest. By carefully monitoring the loading system response during this deformation,
the LSS and the various amounts of energy transferred can be calculated.
Consider the simple example of a fault plane passing through a mining zone, and ask the question
"How would this fault respond if it were to yield?". One could simply substitute a lower friction angle
and observe how the rock mass deformed. Let's call "Stage I" the model with the fault at its normal
friction angle, and "Stage II" the same model but with the fault at some reduced friction angle. At
some location on the fault plane we can expect the following type of response.
Load
LSS
Wk
Wf
Deformation
The LSS is simply the slope of the load deformation response curve. The maximum amount of
energy that can be released as kinetic energy is the area of the upper triangle labelled as W k (one
should expect this to correlate with observed event magnitude). The minimum amount of energy
that can be dissipated in the frictional deformation of the fault is the area of the lower rectangle
labelled as W f (one should expect this to correlate with the amount of damage observed at the
event source). This calculation must be conducted at all locations on the fault plane in order to get
the total energy transferred as a result of the reduction in friction angle. Note that depending on
how the material properties are set up there could be normal deformations (dilation occurring with
the shear response) that this must be included in the energy calculations.
The same calculations can be done for a pillar between two drifts. For this case let's call "Stage I"
the model with the pillar intact. In order to flex the model we could substitute a different material
into the pillar and call this "Stage II". All of the above calculations and interpretations for W k and W f
can then be taken again. Note that as above, there will be contributions from both normal and
shear components included in the energy calculations.
Since Map3D calculates the stresses acting on boundary elements, the total energy transfer can
be calculated as the integral of the stresses through their deformations over all elements. In the
case of the pillar example above, if we actually excavate the pillar to obtain stage II, then divide (W k
Map3D International Ltd 1990-2015
Appendix
345
+ W f ) by the volume of the pillar, we obtain the local energy release density (LERD). This has
been found to correlate very well with violent failure episodes. (Note that for the case of tabular
mining, if you divide (W k + W f ) by the area (in the plane of mining), you obtain the classical
energy release rate, ERR).
To reinforce this concept let's consider a real example. Consider multiple pillar bursts that
occurred over several years of mining. For each failure, a numerical model was run to determine
the stress state at the time and location of the failure. If we plot all of these stress predictions on a
set of 1 versus 3 axes we obtain the following:
300
250
200
1 150
100
50
0
0
5
10
15
20
25
30
This figure illustrates that there is a strong correlation between the stress state at the time of each
3
burst and a linear strength criterion. The coefficient of correlation of this data is 0.90. Stated in a
different way, the mean error in prediction of 1 is approximately 17 MPa. This gives a coefficient
of variation of only 9%.
0.5
0.45
0.4
0.35
0.3
LERD
(MJ/ m ³)
0.25
0.2
0.15
0.1
0.05
0
0
5
10
15
20
25
30
The LERD at the time of the burst as each
location also shows a strong correlation between the
3
stress state at the time of each burst and a linear criterion. The coefficient of correlation of this
data is 0.88. Stated in a different way, the mean error in prediction of LERD is approximately
0.045 MPa/mª. This gives a coefficient of variation of only 14%.
While the Wk and Wf components are readily calculated in this way, the definition of LSS is not
so straightforward. However a representative LSS can be determined as follows:
Identify a representative area for which the LSS is to be determined. This is done by building a
test block that should encompass the anticipated yield zone.
You construct the test block as you would any other feature, but identify this block as a "test block"
by specifying the desired Material Code for the LERD/LSS calculation using
CAD > Edit > Entity Properties > Matl Code LERD/LSS
The Material Code for the Mining Steps should be set according to how you want this zone to be
Map3D International Ltd 1990-2015
346
Map3D User's Manual
treated during the mining sequence. These blocks can be used as alternate material zones and
excavated if desired.
Assuming that this test block is filled with a fictitious material whose post-peak stiffness exactly
matches the loading system response, and that the behaviour of the test block can be described
by
1
= LSS
1
2
= LSS
2
3
= LSS
3
The energy density can be calculated as
½(
1
1
+
2
2
+
3
3
)
The mean energy density can be estimated as
( W k + W f ) / Volume
Hence the loading system stiffness can determined from
LSS = ½ (
1
²+
2
²+
3
² ) Volume / ( W k + W f )
If we do this calculation for the data presented above we obtain the following plot.
90000
80000
70000
60000
LS S
(MP a )
50000
40000
30000
20000
10000
0
0
5
10
15
20
25
30
The LSS at the time of the burst as each
location shows a strong stress independent value. The
3
mean error in prediction of LSS is approximately 4730 MPa. This gives a coefficient of variation of
only 7%.
This LSS calculation is only representative provided the stresses are uniformly distributed
throughout the test block. In cases where this is not true, poor correlation with LSS is found.
Notes
This function must be checked before conducting the discretization analysis
Analysis > Discretization
5.1.29 Analysis > Options > LERD/LSS file name
Displays the file name where results from the LERD/LSS calculations are to be written
Analysis > Options > LERD/LSS
Map3D International Ltd 1990-2015
Appendix
347
5.1.30 Analysis > Options > Linear
Use higher order boundary elements – during Map3D BEM analysis.
The Boundary Element Method utilizes a numerical approximation of how the intensity of the surface
components of stress or displacement discontinuity are distributed over the boundaries. The
simplest assumption is to assume that these surface components are distributed uniformly over
each boundary element. Experience with Map3D has shown that accurate results are obtained with
this approximation for all but a limited class of problems where there are significant bending effects
involved. Even for this later type of problem, accurate results are still obtained at all locations except
near the boundary surfaces.
To obtain accurate results near the boundaries of problems where there are significant bending
effects involved it is necessary to implement higher order boundary elements. Bending effects
normally become important for problems with large spans that are irregularly shaped. This is
particularly important near kinks in the boundary that can arise due to intersections between various
features.
When this option is checked, the intensity of the surface components of stress or displacement
discontinuity are distributed over the boundary elements using a higher order polynomial
distribution. For triangles a linear distribution is used
a+bx+cy
For quadrilaterals, the following distribution is used
a+bx+cy+dxy
Notes:
This function must be checked before conducting the Map3D BEM analysis
Analysis > BEM Analysis
This option will increase problem size and hence analysis time, since higher order elements require
more interpolation nodes on the bounding surfaces.
If the user is uncertain about the sensitivity of their model to this approximation, it is suggested that
some subset of the actual model is run with and without linear elements for comparison.
5.1.31 Analysis > Options > Lumping
Pre-calculate coefficient matrix size – during discretization analysis.
To accurately determine the amount of scratch disk space required to store the coefficient matrix
during a Map3D BEM analysis, it is necessary to conduct a lumping procedure. This option
executes the lumping procedure during the discretization analysis (i.e. prior to the Map3D BEM
analysis).
The boundary element method generates a fully populated coefficient matrix of size 4•n² bytes,
where n is the number of degrees of freedom. Even for small problems, disk space requirements
and analysis time can become quite large (e.g. 20,000 degrees of freedom requires 2 GBytes of
disk space without lumping). Large problems quickly become impractical to solve (e.g. 200,000
degrees of freedom requires 160 GBytes of disk space without lumping). To overcome this problem
a procedure called matrix lumping is conducted in Map3D. This typically achieves a reduction of
coefficient matrix size by a factor of 10 times for small problems and more than 100 times for larger
problems.
Notes
This function must be checked before conducting the discretization analysis
Map3D International Ltd 1990-2015
348
Map3D User's Manual
Analysis > Discretization.
The matrix lumping procedure is conducted during the Map3D BEM analysis whether this option is
selected or not.
This is a time consuming procedure that should only be conducted if you need to accurately
determine disk space requirements prior to Map3D BEM analysis.
5.1.32 Analysis > Options > Lumping Accuracy
When this option is checked, lumping will only be allowed between adjacent elements that share the
same local coordinate system (i.e. parallel normals and parallel sides). This ensures relatively good
accuracy of lumped zones.
When this option is not checked, lumping will be allowed between all adjacent elements regardless
of the orientation. This procedure will result in increased lumping and hence smaller coefficient
matrix size, but at the expense of reduced accuracy of the results.
The boundary element method generates a fully populated coefficient matrix of size 4•n² bytes,
where n is the number of degrees of freedom. Even for small problems, disk space requirements
and analysis time can become quite large (e.g. 20,000 degrees of freedom requires 2 GBytes of
disk space without lumping). Large problems quickly become impractical to solve (e.g. 200,000
degrees of freedom requires 160 GBytes of disk space without lumping). To overcome this problem
a procedure called matrix lumping is conducted in Map3D. This typically achieves a reduction of
coefficient matrix size by a factor of 10 times for small problems and more than 100 times for larger
problems.
Notes
This function must be checked before conducting the discretization analysis
Analysis > Discretization
Refer to Analysis > Options > Lumping for information on lumping.
5.1.33 Analysis > Options > Planar
Subdivide non-planar quadrilaterals into triangles – during intersection analysis.
Moderately non-planar surfaces do not pose a problem for Map3D. However, extreme warping of
surfaces can interfere with the intersection analysis.
Notes
This function must be checked before conducting the intersection analysis
Analysis > Intersections.
This can result in an increase in problem size thus increasing analysis time.
It is recommended that do not check this option unless you specifically want to eliminate non-planar
features.
5.1.34 Analysis > Options > P-ram
Store part of the coefficient matrix in physical RAM – during Map3D BEM analysis.
If your computer has a large amount of RAM installed, this option may significantly speed execution
since data can be retrieved from RAM much more quickly than from disk. Although Windows 32 bit
Map3D International Ltd 1990-2015
Appendix
349
only allows each process to address 2GB, for users with large amounts of RAM in their computer,
physical RAM can be accesses using AWE (Address Windowing Extensions). AWE allows access
to all available RAM in your computer. Most systems can support 4GB of RAM. Some can support
more than 64GB. Various versions of Windows provide different levels of AWE support varying
from 1GB up to 512GB. AWE support is available in the following versions of Windows:
Windows NT 4.0, Windows 2000 Professional and Server (maximum of 4 GB).
Windows 2000 Advanced Server (maximum of 8 GB).
Windows 2000 Datacenter Server (maximum of 32 GB).
Windows XP Professional and Windows Server 2003 (maximum of 4 GB).
Windows Server 2003 Enterprise Edition (maximum of 32 GB).
Windows Server 2003 Datacenter Edition (maximum of 64 GB).
Windows 7 & 8.
AWE requires "SE_LOCK_MEMORY" privilege. To enable AWE, follow these steps:
Control Panel > Administrative Tools > Local Security Policies
Then set
Local Policies > User Rights Assignment > Lock Pages in Memory > Add User or Group >
Everyone
You must reboot for this setting to take effect.
Notes:
This function must be checked before conducting the Map3D BEM analysis
Analysis > BEM Analysis.
You should only allocate the amount of RAM you want Map3D to use making sure to leave adequate
space for any other applications you intend to run.
You should never set this parameter larger than the available RAM since this will result in excessive
paging of your operating system which will significantly slow down the analysis.
5.1.35 Analysis > Options > Precondition
Precondition the matrix – during Map3D BEM analysis.
This option instructs Map3D to search through the matrix for unreasonably large off diagonal
coefficients. These normally result from construction errors and are disabled when this option is
check.
Notes:
This function must be checked before conducting the Map3D BEM analysis
Analysis > BEM Analysis
It is recommended that this option be used.
5.1.36 Analysis > Options > Renumber
Renumber surfaces so the volume is positive – during file load.
Map3D surfaces are defined with a top and bottom to enable distinction between the inside and
outside of excavations, alternate material zones, etc. Other CAD packages may specify surfaces in
a manner inconsistent with the Map3D convention. This option renumbers all surfaces with the
Map3D convention such that they form zones with a positive volume.
Map3D International Ltd 1990-2015
350
Map3D User's Manual
Notes
This function must be checked before loading the model file
Analysis > Load Model.
It is strongly recommended that you check this option.
5.1.37 Analysis > Options > Reset
Set all analysis options to their default (recommended) settings.
5.1.38 Analysis > Options > V-ram
Store part of the coefficient matrix in virtual RAM – during Map3D BEM analysis.
If your computer has a large amount of RAM installed, this option may significantly speed execution
since data can be retrieved from RAM much more quickly than from disk. Unfortunately Windows
32 bit only allows each process to address 2GB. After you remove overheads this leaves only about
1GB for auxiliary storage, even if you have plenty of RAM. For users with large amounts of RAM in
their computer, an alternative is to use physical RAM (Analysis > Options > P-ram) instead of virtual
RAM.
Notes:
This function must be checked before conducting the Map3D BEM analysis
Analysis > BEM Analysis.
You should only allocate the amount of RAM you want Map3D to use making sure to leave adequate
space for any other applications you intend to run.
You should never set this parameter larger than the available RAM since this will result in excessive
paging of your operating system which will significantly slow down the analysis.
5.1.39 Analysis > Options > Verbose
Write all solution vectors and field point results to the log file – during Map3D BEM analysis.
Notes:
This function must be checked before conducting the Map3D BEM analysis
Analysis > BEM Analysis
It is recommended that you do not check this option unless you specifically want to see this
information in the log file.
5.1.40 Analysis > Options > Zero Strain Placement
Use zero strain support placement – during Map3D BEM analysis.
This option enables simulation of ground support elements. When simulating stiff support systems
such as arches, steel sets, props, thick liners, chalks, strong backfill etc., it is necessary to model
the ground movement up to the point of support placement, then insert the support elements either
in a stress/strain free state, or with a prescribed pre-stressing. This feature is particularly useful for
simulation of structural support elements and can accommodate placement, modification of
Map3D International Ltd 1990-2015
Appendix
351
properties and subsequent removal if desired. This option has been enabled for use with 3D FF
blocks and/or DD planes.
To enable this feature you must first excavate the desired support element (either a 3D FF block or
DD plane) to the desired pre-stressed state (use a zero material code for zero stresses or a
negative material number for a prescribed stress state), then in a subsequent mining step insert the
support material (use a positive material number to do this). With the Analysis > Options > Zero
Strain Support Placement option checked, Map3D conducts the necessary calculations to place
support elements in a stress/strain free state or with a prescribed pre-stressing at the current
mining step. The action of excavation to a zero or prescribed stress state followed by insertion of an
alternate material signals Map3D to conduct the required calculations.
Without this option, all materials are placed at the pre-mining deformation state. This can cause
erroneous large stresses particularly in stiff support elements.
Notes:
This function must be checked before conducting the Map3D BEM analysis
Analysis > BEM Analysis
This option requires additional calculations and hence increases analysis time.
5.1.41 Analysis > Suspend
Suspends execution of the analysis.
Select Analysis > Resume to continue execution.
5.1.42 Analysis > Conclude
Concludes the current analysis.
During matrix solution Map3D is attempting to progressively solve the simultaneous equations saved
in the coefficient matrix along with any other equations describing the alternate material zones,
fault-slip, creep etc. A converged solution is assumed to have been obtained when the maximum
surface stress error and the maximum failure criterion error are reduced below the user specified
stress tolerance STOL
Analysis > CParams > STOL
If the user is satisfied the current level of accuracy is acceptable, the analysis can be concluded by
checking this option.
Extreme caution should be exercised when using this function as the results will contain numerical
errors which could be significant.
Notes:
The distribution of surface stress error can be displayed by selecting
Plot > Surface Components > Serr Stress Error
from the solve toolbar.
The distribution of failure criterion error can be displayed by selecting
Plot > Surface Components > Ferr Failure Error
from the solve toolbar.
During analysis, the solve toolbar will be displayed when you suspend the analysis
Map3D International Ltd 1990-2015
352
Map3D User's Manual
Analysis > Suspend
only if the
Tools > Solve Toolbar
has been checked.
5.1.43 Analysis > Disable
Disables boundary elements that have a surface stress error (Serr) greater than ten times the root
mean square value (Rms) for all elements.
During matrix solution Map3D is attempting to progressively solve the simultaneous equations saved
in the coefficient matrix along with any other equations describing the alternate material zones,
fault-slip, creep etc. A converged solution is assumed to have been obtained when the maximum
surface stress error and the maximum failure criterion error are reduced below the user specified
stress tolerance STOL
Analysis > CParams > STOL
In some problems, certain elements will not converge to a solution due to excessively poor
numerical conditioning. If the user is satisfied the current level of accuracy, a solution can for
forced by checking this option.
This function instructs Map3D to disable any elements with values of Serr > 10 Rms. A few
iterations after executing this function, additional elements may appear with the same problem
requiring this function to executed again. After a few times all elements will be disabled and the
solution can proceed to convergence.
Extreme caution should be exercised when using this function as the results will contain numerical
errors which could be significant.
Notes:
The distribution of surface stress error can be displayed by selecting
Plot > Surface Components > Serr Stress Error
from the solve toolbar.
The distribution of failure criterion error can be displayed by selecting
Plot > Surface Components > Ferr Failure Error
from the solve toolbar.
During analysis, the solve toolbar will be displayed when you suspend the analysis
Analysis > Suspend
only if the
Tools > Solve Toolbar
has been checked.
Map3D International Ltd 1990-2015
Appendix
353
5.1.44 Analysis Dialog
Displays a scrollable dialogue of analysis activity including:
INFO: messages describing current operations.
WARNING: messages describing possible inconsistencies that may cause problems.
ERROR: messages describing errors that will cause program execution to terminate.
During matrix solution Map3D is attempting to progressively solve the simultaneous equations saved
in the coefficient matrix along with any other equations describing the alternate material zones,
fault-slip, creep etc. A converged solution is assumed to have been obtained when the maximum
surface stress error
Plot > Surface Components > Serr Stress Error
and the maximum failure criterion error
Plot > Surface Components > Ferr Failure Error
are reduced below the user specified stress tolerance STOL
Analysis > CParams > STOL
As the solution progresses, summary information regarding the solution is displayed:
is=1 it=3 ser=-1.29E+01 fer= 0.00E+00 rms=5.85E+00 ratio=0.414 converging
is - current time step number.
This counter is only used for non-linear creep analyses (including fault-slip and 3D material
non-linearity).
Map3D uses an implicit solution method to solve the visco-plastic part of creep problems.
Each time Map3D reaches an equilibrium creep solution, the creep strain increments are
added to the total plastic strains and then a new time step is begun (i.e. the is counter is
incremented).
it - current iteration count.
Map3D uses an iterative solution method to solve the simultaneous equations saved in the
coefficient matrix.
This counter refers to the cumulative number of iterations executed.
ser - maximum surface stress error.
Iterative solvers function by determining the error in the current solution of each simultaneous
equation, then reducing these errors by a process of successive approximations.
This parameter indicates the maximum error for all of the equations.
fer - maximum failure criterion error.
This parameter is only used for non-linear creep analyses (including fault-slip and 3D material
non-linearity).
This parameter should always be near zero unless some viscosity has been specified and the
problem goes non-linear.
In this latter case, viscous creep can allow stress states above the failure criterion, thus
indicating a lack of static equilibrium.
This parameter indicates the maximum viscous stress for all of the equations.
rms - root mean square of all surface stress errors.
ratio - ratio of the current value of rms divided by the value of rms at the previous iteration.
This provides an indications of how quickly the solution is progressing.
converging - indicator that the problem is converging.
This indicator may also read diverging if the ratio is greater than one.
Map3D International Ltd 1990-2015
354
Map3D User's Manual
Notes:
Since smooth scrolling limits the rate at which information can be written to the information area, it
can considerably slow down the Map3D analysis. It is recommended that smooth scrolling not be
used
Tools > Smooth Scroll
5.2
CAD
5.2.1
CAD > Properties > Map3Di Setup > View
This option enables visualization of Map3Di data.
Map3Di File:
The Map3Di data file is simply an ASCII data file with the default extension ".PNT".
Refer to CAD > Properties > Map3Di for details concerning data format.
Refer to Visualization > Plane > Make Map3Di File for details concerning data format.
Plot Equation:
Defines the parameter that will be plotted.
The pull-down window allows you to store up to 20 different equations. These are stored between
Map3D sessions in the map3d.ini file.
Plot Variables:
f1 f2 f3… - data fields in the event file.
Functions:
sin() cos() tan() - sine, cosine and tangent trigonometric functions.
asin() acos() atan() - Inverse trigonometric functions.
sqrt() - square root function.
log() - natural logarithmic function.
abs() - absolute value.
exp() - exponential function (antilogarithm).
Location:
x y z - coordinate of grid point.
Operators:
Map3D International Ltd 1990-2015
Appendix
355
+ - * / ^ addition, subtraction, multiplication, division and exponentiation operators. Note that
exponentials are computed first, followed by multiplication and division and finally addition and
subtraction.
() [] {} styles of brackets. Pairs of brackets must match.
> maximum value. For example if the plot equation is specified as f1 > 10, the larger of f1 or 10
will be plotted.
< minimum value. For example if the plot equation is specified as f1 < 10, the smaller of f1 or 10
will be plotted.
Point Plotting Options:
Outlined – Map3Di data patches are outlined.
Other:
Persist – when checked, the points will be re-plotted each time the model is reoriented, translated
or zoomed. Since this may be time consuming for large models this option may not always be
desired.
Translucent - draws the points as translucent spheres.
Zero Contour - when unchecked, contours below the minimum contour range are not drawn. This
is useful for displaying contours where only the upper part of the contour range is important.
Range – specifies the minimium, maximum and interval for radius scaling and contouring.
Plot - regenerates the plot. This button can be placed on either the View Toolbar (Tools >
View Toolbar Configure) or the Contour Toolbar (Tools > Contour Toolbar Configure).
5.2.2
CAD > Build > Block Mesh Spacing
Specifies the desired block mesh spacing.
When building Blocks
CAD > Build > Block
CAD > Build > FF Loop
CAD > Build > DD Loop
surfaces will be subdivided into smaller parts at the specified mesh spacing.
5.2.3
Spacing
CAD > Snap
Activates the snap toolbar.
Snap functions assist in visually selecting points from the model during block building and other
editing functions.
Map3D International Ltd 1990-2015
356
Map3D User's Manual
This toolbar is meant to provide quick access to the snap functions that are used in the model
building and editing stage of the Map3D BEM analysis Analysis > Go to CAD
CAD > Snap > None Disable snapping.
CAD > Snap > Edge Snap to the nearest edge.
CAD > Snap > Corner Snap to the nearest corner.
CAD > Snap > Midpoint Snap to the midpoint of the selected edge.
CAD > Snap > Tangent Snap Force cursor tangent to the selected edge.
CAD > Snap > Intersection Snap Snap to the intersection of the selected edge and a
tangent.
CAD > Snap > Trace Cline Snap Snap to selected corners along a construction line
segment.
CAD > Snap > Trace Cloop Snap Snap to all corners along a construction line segment.
CAD > Snap > Grid Snap Snap to a rectangular grid.
CAD > Snap > Cylinder Snap Snap to a circular grid.
CAD > Snap > X-Gird Snap Snap to the selected edge at an even X grid spacing.
CAD > Snap > Y-Grid Snap Snap to the selected edge at an even Y grid spacing.
CAD > Snap > Z-Grid Snap Snap to the selected edge at an even Z grid spacing.
CAD > Snap > Cursor/Grid Setup Setup the cursor/grid spacing and orientation.
5.2.4
CAD > Edit
Activates the edit toolbar.
This toolbar is meant to provide quick access to the edit functions that are used in the model
building and editing stage of the Map3D BEM analysis Analysis > Go to CAD
Edit functions are grouped into two sections depending on whether you want to modify blocks or
coordinates.
Modify bocks:
CAD > Edit > Entity Properties Edit block type, colour, mining sequence etc.
CAD > Edit > Erase Entities Erase selected entities.
CAD > Edit > Move Entities Move selected entities.
CAD > Edit > Copy Entities Copy selected entities.
CAD > Edit > Scale Entities Scale selected entities.
CAD > Edit > Rotate Azimuth Rotate the azimuth of selected entities.
CAD > Edit > Rotate Dip Rotate the dip of selected entities.
CAD > Edit > Dump to File Dump selected entities to a file.
CAD > Edit > Group Group selected entities into a single block.
Modify coordinates:
CAD > Edit > Stretch Vertices Stretch selected vertices.
CAD > Edit > Move Vertices to Point Move selected vertices to a point.
CAD > Edit > Move Vertices to X Move the x-coordinate of selected vertices.
CAD > Edit > Move Vertices to Y Move the y-coordinate of selected vertices.
Map3D International Ltd 1990-2015
Appendix
357
CAD > Edit > Move Vertices to Z Move the z-coordinate of selected vertices.
CAD > Edit > Move Vertices to Plane Move selected vertices to a plane.
CAD > Edit > Smooth Construction Lines Smooth construction lines.
CAD > Edit > Remove Construction Vertex Remove a construction vertex.
CAD > Edit > Subdivide Construction Lines Subdivide a construction line.
Undo - Redo
Once you have completed any edit operation you have one chance to undo the modifications by
selecting
Undo
You can also restore the same selection set and modify the same set of entities again be selecting
Redo
Pressing the space-bar automatically activates the last edit function that was used.
5.2.5
CAD > Edit > Entity Properties > DDPlane Thickness
Specifies the thickness of the material inserted into the DD element (i.e. fault gouge, seam width,
mining width or pillar height).
Normal displacement (closure) of the feature when in-filled will be limited to this thickness. Also, the
normal displacement (closure) and shear displacement (ride) are divided by the thickness to
determine the strain occurring in the in-filling material.
This parameter should be specified in the same units used to specify the coordinate positions (e.g.
metres or feet). This parameter is not used for 3D FF blocks.
Related topics:
CAD > Edit > Entity Properties
5.2.6
CAD > Edit > Entities
Edit grid name and maximum spacing.
When you initiate this routine you will first be prompted to build a list of entities that you wish to edit
If Tools > Shift-key Selection is checked, you must hold down the shift key to make multiple
selections.
Use of this toolbar is detailed in Build A List of Entities for Editing
Pressing the space-bar automatically activates the last edit function that was used.
Once you have selected the desired entities, you can either pick any of the edit buttons:
CAD > Edit > Entity Properties Edit block type, colour, mining sequence,
CAD > Edit > Erase Entities Erase selected entities,
CAD > Edit > Move Entities Move selected entities,
CAD > Edit > Copy Entities Copy selected entities,
CAD > Edit > Scale Entities Scale selected entities,
Map3D International Ltd 1990-2015
358
Map3D User's Manual
CAD > Edit > Rotate Azimuth Rotate the azimuth of selected entities,
CAD > Edit > Rotate Dip Rotate the dip of selected entities,
CAD > Edit > Dump to File Dump selected entities to a file,
CAD > Edit > Group Group selected entities into a single block,
double click on any vertex to execute the highlighted function,
right click for a list of options.
If any of the fields in the dialogue box read "Variable" it is because some of the blocks you have
selected have different properties for that field. If you wish to leave these properties as they are (i.e.
different for each block), leave the field as "Variable". If you wish to change the value of that field
for all selected blocks, enter the desired value.
Name - specifies a descriptive name for the grid.
Grid Type - specifies whether you want the grid to be active (used in the stress analysis) or inactive
(not used in the stress analysis).
Maximum Spacing - specifies the maximum spacing permitted.
This parameter can be used to force fine uniform discretization on selected grids. Extreme
caution should be used in specifying this value since a small value can easily lead to enormous
problem size.
In general this parameter should be left blank (i.e. not used), and discretization should be left to
the AG parameter. This latter parameter will concentrate elements only where analysis results
are requested thus optimizing the use of elements and minimizing problem size.
CAD > Properties Control Parameters.
If this field is left blank this parameter is not used.
OK - completes editing of blocks and modifies any properties that have been changed.
Cancel - aborts editing of entities.
Once you have completed any edit operation you have one chance to undo the modifications by
selecting
Undo
You can also restore the same selection set and modify the same set of entities again be selecting
Redo
You can adjust the double click time using
Tools > Double Click Time
Map3D International Ltd 1990-2015
Appendix
5.2.7
359
CAD > Edit > Entities
Edit construction line colour.
When you initiate this routine you will first be prompted to build a list of entities that you wish to edit
If Tools > Shift-key Selection is checked, you must hold down the shift key to make multiple
selections.
Use of this toolbar is detailed in Build A List of Entities for Editing
Pressing the space-bar automatically activates the last edit function that was used.
Once you have selected the desired entities, you can either pick any of the edit buttons:
CAD > Edit > Entity Properties Edit block type, colour, mining sequence,
CAD > Edit > Erase Entities Erase selected entities,
CAD > Edit > Move Entities Move selected entities,
CAD > Edit > Copy Entities Copy selected entities,
CAD > Edit > Scale Entities Scale selected entities,
CAD > Edit > Rotate Azimuth Rotate the azimuth of selected entities,
CAD > Edit > Rotate Dip Rotate the dip of selected entities,
CAD > Edit > Dump to File Dump selected entities to a file,
CAD > Edit > Group Group selected entities into a single block,
double click on any vertex to execute the highlighted function,
right click for a list of options.
If any of the fields in the dialogue box read "Variable" it is because some of the blocks you have
selected have different properties for that field. If you wish to leave these properties as they are (i.e.
different for each block), leave the field as "Variable". If you wish to change the value of that field
for all selected blocks, enter the desired value.
Colour - specifies the colour number that will be used to display the construction line.
A total of 10 colours are available for display. These are numbered respectively
1 through 10,
11 through 20,
21 through 30, etc.,
such that the same colour is displayed for numbers
1, 11, 21...,
2, 22, 32...,
3, 23, 33..., etc.
OK - completes editing of construction lines and modifies any properties that have been changed.
Cancel - aborts editing of entities.
Once you have completed any edit operation you have one chance to undo the modifications by
selecting
Undo
You can also restore the same selection set and modify the same set of entities again be selecting
Map3D International Ltd 1990-2015
360
Map3D User's Manual
Redo
You can adjust the double click time using
Tools > Double Click Time
For examples on the use of construction lines in model building refer to:
Model Building Tutorials
5.2.8
CAD > Edit > Build A List of Entities for Editing
This routine can be initiated either by picking any edit function (e.g.
button) or simple rightclicking on any entity.
When you initiate any entity editing routine you will first be prompted to build a list of entities that
you wish to edit
If Tools > Shift-key Selection is checked, you must hold down the shift key to make multiple
selections.
By default, selected entities are added to the list, however if the Ctrl-key is held down, selected
entities will be removed from the list.
While holding down the Shift-key or Ctrl-key, you can drag open a crossing window.
Pressing the space-bar automatically activates the last edit function that was used.
Holding the Alt-key when you right-click automatically repeats the last edit function that was
used.
This toolbar controls the various functions used in list building.
Aborts editing.
Select entities by picking one surface at a time.
Select entities by picking whole groups making up a block.
Include all entities with the selected number.
Include all entities with the selected colour.
Include all entities with the selected material number.
The same block may have different materials in it depending on the currently active mining
step.
When using this function, make sure to select the appropriate mining step
File > Mining
Step
Include all entities excavated with the selected mining step number.
Include all entities within the selected window.
Entities will only be selected if the entire entity is contained within the window.
If
(surface select mode) is active, only surfaces will be included.
If
(entity select mode) is active, all surfaces making up the block will be included.
Include all entities within the crossing window.
Entities will be selected if even a part of the entity is within the window.
This function can also be activated by holding down the Shift-key or Ctrl-key and dragging
open a crossing window.
If
(surface select mode) is active, only surfaces will be included.
If
(entity select mode) is active, all surfaces making up the block will be included.
Map3D International Ltd 1990-2015
Appendix
361
Selected entities will be added to the list.
Selected entities will be removed from the list.
Undo last selection.
Redo the last section.
Once you have selected the desired entities, you can either pick any of the edit buttons:
CAD > Edit > Entity Properties Edit block type, colour, mining sequence etc.
CAD > Edit > Erase Entities Erase selected entities.
CAD > Edit > Move Entities Move selected entities.
CAD > Edit > Copy Entities Copy selected entities.
CAD > Edit > Scale Entities Scale selected entities.
CAD > Edit > Rotate Azimuth Rotate the azimuth of selected entities.
CAD > Edit > Rotate Dip Rotate the dip of selected entities.
CAD > Edit > Dump to File Dump selected entities to a file.
CAD > Edit > Group Group selected entities into a single block.
double click on any vertex to execute the highlighted function,
right click for a list of options.
Once you have completed any edit operation you have one chance to undo the modifications by
selecting
Undo
You can also restore the same selection set and modify the same set of entities again be selecting
Redo
You can adjust the double click time using
Tools > Double Click Time
5.2.9
CAD > Edit > Build A List of Verticies for Editing
This routine can be initiated either by picking any edit function (e.g.
button) or simple rightclicking on any vertex.
When you initiate any entity editing routine you will first be prompted to build a list of vertices that
you wish to edit.
If Tools > Shift-key Selection is checked, you must hold down the Shift-key to make multiple
selections.
By default, selected entities are added to the list, however if the Ctrl-key is held down, selected
entities will be removed from the list.
While holding down the Shift-key or Ctrl-key, you can drag open a selection window.
Pressing the space-bar automatically activates the last edit function that was used.
Holding the Alt-key when you right-click automatically repeats the last edit function that was used.
This toolbar controls the various functions used in list building.
Aborts editing.
Select vertices by picking one at a time.
Select vertices by picking groups.
Map3D International Ltd 1990-2015
362
Map3D User's Manual
Include all entities within the selected window.
Entities will only be selected if the entire entity is contained within the window.
This function can also be activated by holding down the Shift-key or Ctrl-key and dragging
open a crossing window.
Selected entities will be added to the list.
Selected entities will be removed from the list.
Undo last selection.
Redo the last section.
Once you have selected the desired entities, you can either pick any of the edit buttons:
CAD > Edit > Stretch Vertices
CAD > Edit > Move Vertices to Point
CAD > Edit > Move Vertices to X
CAD > Edit > Move Vertices to Y
CAD > Edit > Move Vertices to Z
CAD > Edit > Move Vertices to Plane
CAD > Edit > Smooth Construction Lines
CAD > Edit > Remove Construction Vertex
CAD > Edit > Subdivide Construction Lines
double click on any vertex to execute the highlighted function,
right click for a list of options.
Once you have completed any edit operation you have one chance to undo the modifications by
selecting
Undo
You can also restore the same selection set and modify the same set of entities again be selecting
Redo
You can adjust the double click time using
Tools > Double Click Time
5.2.10 CAD > Digitizer > Activate
Activates the digitizer for selecting points from a drawing
to set up the digitizer, refer to
CAD > Digitizer Setup
Map3D International Ltd 1990-2015
Appendix
363
5.2.11 CAD > Properties > Material Properties > Stress State
Datum - The pre-mining stress state is specified as a linear variation with depth in either principal or
Cartesian components.
Copy from... - allows you to copy the stress state from another material.
Only the stress state is copied.
Other material properties are left unchanged.
Cartesian - The pre-mining stress state is specified as a linear variation with depth in either
principal or Cartesian components.
Z - Ele vation
Ve rt
TH max
TVe rt
Y - North
PH max
H min
The three principal stress components
are referred to as the Hmax, Hmin and Vert components.
Hmax
X - East
Hmax is the maximum (nearly) horizontal stress.
Hmin is the minimum (nearly) horizontal stress.
Vert is the (nearly) vertical stress.
These stress components are perpendicular to one another.
The horizontal and vertical components do not need to be exactly horizontal or vertical.
The trend and plunge of Hmax can be adjusted using THmax and PHmax.
The trend of Vert can be adjusted using TVert.
The variation of each of these components is described as a linear variation with depth as (for
example for the Hmax component)
Hmax
+
Hmax
(z - Datum)
To determine appropriate values for each of these components the user must first select a depth
(z = Datum)
Map3D International Ltd 1990-2015
364
Map3D User's Manual
where the stresses have known values. These later values are the
Hmax
Hmin
Vert
constant values.
The variation of each component with depth can then be specified as
Hmax
Hmin
Vert
variation values. If you have set up your coordinate system with z positive up, then the variations
should be specified as negative quantities so that the stresses increase with depth.
For example if you know that the Hmax component has a value of
30 MPa at z = 1000m
and varies as (z is positive up)
0.027 MPa/m
you would specify
Datum = 1000
a = 30
a = -0.027
Finally, the trend and plunge of the Hmax component and the trend of the Vert component uniquely
define the stress state orientation.
The parameters
t/h constant
t/h variation
refer to the ambient temperature/head distribution and are specified in the same manner as the
stresses.
5.2.12 CAD > Properties > Material Properties > Stress State > Cartesian
The pre-mining stress state is specified as a linear variation with depth in either Cartesian or
principal components.
The variation of each of the Cartesian components is described as a linear variation with depth as
Map3D International Ltd 1990-2015
Appendix
(for example for the
+
xx
xx
xx
365
component)
(z - Datum)
To determine appropriate values for each of these components the user must first select a depth
(z = Datum)
where the stresses have known values. These later values are the
xx
yy
zz
xy
yz
xz
constant values.
The variation of each component with depth can then be specified as
xx
yy
zz
xy
yz
xz
variation values. If you have set up your coordinate system with z positive up, then the variations
should be specified as negative quantities so that the stresses increase with depth.
For example if you know that the
xx
component has a value of
30 MPa at z = -1000m
and varies as (z is positive up)
0.027 MPa/m
you would specify
Datum = -1000
xx = 30
xx = -0.027
5.2.13 CAD > Properties > Material Properties > Stress State > Datum
The variation of each of the stress components is described as a linear variation in either principal
or Cartesian components.
If desired this can be specified as a variation in the x, y and z directions by defining a sloping
datum.
This is meant to be used at locations where the topography has a dominant slope.
To define a sloping datum, you are required to specify a point on the plane that represents the
datum (X-datum, Y-datum and Z-datum),
as well as the slope of the plane. The slope is specified as a gradient in the X (dx-datum) and Y (
dy-datum) directions.
Map3D International Ltd 1990-2015
366
Map3D User's Manual
For user convenience, the slope of the place can be specified using either the "Dip" and "Dip
direction" of the plane, or the "Dip direction" and "Dip of the Normal" to the plane. The gradients are
automatically determined from these later values as follows:
dx-datum = -sin( sin( )
dy-datum = -cos( sin( )
hence
tan( =dx/dy
tan( )=sqrt(dx^2+dy^2)
Defined in this way, the stresses vary both with depth and horizontal position.
5.2.14 CAD > Build
Activate the Build toolbar.
This toolbar is meant to provide quick access to the entity building functions that are used in the
model building and editing stage of the Map3D BEM analysis Analysis > Go to CAD.
CAD > Build > FF Loop Build a multi-cornered 3D, FF type block used for excavations and
alternate material zones.
CAD > Build > DD Loop Build a multi-cornered DD type block used for tabular mining, thin
seams or fault planes.
CAD > Build > Grid Plane Build a grid plane where analysis results are calculated.
CAD > Build > Grid Line Build a grid line where analysis results are calculated.
CAD > Build > Construction Lines Build construction lines to define detailed locations of
underground features such as excavations, contacts structure etc.
CAD > Build > Enter Point Enter coordinate values for a point.
CAD > Build > Offset Remaining Offset remaining points.
CAD > Build > Undo Point Undo last point selection.
CAD > Build > Redo Point Redo last point selection.
Pressing the space-bar automatically activates the build edit function that was used.
5.3
File
5.3.1
File > Open > Merge Materials
If this option is checked, as the new model file is loaded, the material data in the new file is merged
with the current material data.
If this option is not checked, as the new model file is loaded, the material data in the new file will
replace the current material data.
This allows you to keep your material models in separate data files then incorporate them into
models as required.
Related Topics:
Map3D International Ltd 1990-2015
Appendix
367
File > Open > Merge Geometries.
5.3.2
File > Output > Animated GIF Recorder > Append Images
When checked, new images will be appended to an existing animation.
5.3.3
File > PNT Output File Format
PNT format is a universal ASCII data file with the extension ".PNT".
This format is useful for exchanging raw model data with other CAD software.
Comment lines start with an asterisk "*" in column 1.
Surfaces are stored as a series of polylines as follows:
x1 y1
x2 y2
x3 y3
x4 y4
...
z1
z2
z3
z4
3 value1
2 value2
2 value3
2 value4
xI yI zI represent the coordinates of each point.
3 indicates that this point is the beginning of a new line.
2 indicates that this point is a continuation of the same line.
valuei for geometric entities this represents the colour number for the surface
For contours this represents the value of the contoured parameter at each corner of the surface.
5.3.4
File > PNT Construction Line File Format
PNT format is a universal ASCII data file with the extension ".PNT".
This format is useful for exchanging raw model data with other CAD software.
Comment lines must start with an asterisk "*" in column 1.
Construction lines are stored as a series of polylines as follows:
x1
x2
x3
x4
...
y1
y1
y3
y4
z1
z1
z3
z4
3 colour
2
2
2
xi yi zi represent the coordinates of each point.
3 indicates that this point is the beginning of a new line.
2 indicates that this point is a continuation of the same line.
colour specifies the colour number that will be used to display the construction line.
A total of 10 colours are available for display.
These are numbered respectively 1 through 10, 11 through 20, 21 through 30, etc., such that the
same colour is displayed for number 1, 11, 21, 31..., 2, 22, 32..., etc.
Any number of points can be specified for each polyline.
Additional polylines are specified by repeating the sequence (i.e. starting a new line with the
Map3D International Ltd 1990-2015
368
Map3D User's Manual
number 3).
Notes
Different colour numbers should be used to represent logical groupings of construction lines (e.g.
for different levels, sections or logical mining units such as development, stoping etc.). These
colours are user definable using
Tools > Custom Colours.
Since it is easy to toggle on and off the display of specific construction line colour numbers, this
provides an efficient method to work with complex construction line data
View > Hide Cline Colours.
5.3.5
File > PNT Model File Format
PNT format is a universal ASCII data file with the extension ".PNT".
This format is useful for exchanging raw model data with other CAD software.
Comment lines must start with an asterisk "*" in column 1.
Map3D FF blocks and DD planes are stored as a series of polylines as follows:
x1
x2
x3
x4
x5
x6
x7
x8
...
y1
y1
y3
y4
y5
y6
y7
y8
z1
z1
z3
z4
z5
z6
z7
z8
3 colour mtype
2
2
2
1
1
1
1
where xi yi zi represent the coordinates of each point,
3 indicates that this point is the beginning of a new polyline,
2 indicates that this point forms part of the base of the block,
1 indicates that this point forms part of the top of the block. This item is only used for definition of
3D block shapes.
colour specifies the colour number that will be used to display the block.
A total of 10 colours are available for display.
These are numbered respectively 1 through 10, 11 through 20, 21 through 30, etc., such that the
same colour is displayed for number 1, 11, 21, 31..., 2, 22, 32..., etc.
mtype specifies the type of boundary element that will be used for the block.
For three-dimensional features such as excavations, alternate material zones, back-filled stopes
etc., Fictitious Force type 1 elements should be used
CAD > Build > Block and
CAD > Build > Block for details.
Displacement Discontinuity type 2 elements should be used for tabular mining excavations,
fractures and fault planes
CAD > Build > DDLoop for details.
Inactive elements (98 for inactive 3D blocks and 99 for inactive DD planes) can be used to display
features that are to be included for visualization purposes only and not to be used for the actual
stress analysis.
Map3D International Ltd 1990-2015
Appendix
369
Additional polylines are specified by repeating the sequence (i.e. starting a new line with the
number 3).
Notes
Different colour numbers should be used to represent logical groupings of blocks (e.g. for different
levels, sections or logical mining units such as development, stoping etc.). These colours are user
definable using
Tools > Custom Colours
Map3D will automatically combine any blocks with the same colour number into single complex
shapes.
Since it is easy to toggle on and off the display of specific block colour numbers, this provides an
efficient method to work with complex model data
View > Hide Block Colours
5.3.6
File > Restart File Formats
Analysis results are saved in files with the extensions ".001", ".002", ".003", ..., where the number
refers to the mining step number.
5.3.7
File > Construction Line File Formats
Construction lines can be saved in several file types:
Point file format is a universal ASCII data file with the extension ".PNT". This format is useful for
exchanging raw construction line data with other CAD software.
AutoCAD-DXF format is a popular drawing exchange file with the extension ".DXF". This format is
useful for exchanging construction line data with other CAD software.
Construction lines from different files can be merged. The merge option
File > Open > Merge
appears at the bottom of the open file dialogue box.
Related Topics:
File > Open (Construction Lines).
File > Save As.
5.3.8
File > DXF Construction Line File Format
DXF format is an AutoCAD drawing exchange file with the extension ".DXF".
This format is useful for exchanging model data with other CAD software.
Construction lines are saved as a series of AutoCAD DXF POLYLINE entities.
Construction lines can be imported as a series of AutoCAD DXF POLYLINE, LINE, 3DLINE or
3DFACE entities.
Map3D International Ltd 1990-2015
370
5.3.9
Map3D User's Manual
File > DXF Model File Format
DXF format is an AutoCAD drawing exchange file with the extension ".DXF".
This format is useful for exchanging model data with other CAD software.
Three-Dimensional Block Type AutoCAD Entities
The most reliable method of generating Map3D compatible data is to use three-dimensional
AutoCAD entities. This type of entity generates blocks, which are structured identically to Map3D
3D FF blocks and thus can be passed directly through to Map3D. Closure of all surfaces is
guaranteed when using this command since each three-dimensional entity defines a closed block.
There are many ways of generating such objects from within AutoCAD as described below.
3DMESH
N=4
N=3
7
8
6
5
5
6
4
3
2
2
The4 recommended1method of defining three-dimensional
AutoCAD
entities is to use the 3DMESH
3
1
command, with AutoCAD THICKNESS and WIDTH set equal to zero. These 3DMESH's can be
specified with any desired values of M and N. If N is set equal to 3 or 4, these entities will come
into Map3D as blocks. This approach is the most general, but also the most complex to specify
since the layout of both the floor and back of the drift must be defined along its length.
PLINE, POLYLINE or ELLIPSE with WIDTH and THICKNESS
Thickness
PLINE with
Width and
Thickness
Width
The simplest technique for generating a drift or stope with a regular rectangular cross-section, and
uniform height, is to use the AutoCAD PLINE command. One simply defines an AutoCAD UCS
(user coordinate system) for the drift, then defines the floor elevation centre line of the drift using
the AutoCAD PLINE command. The width of the drift is then specified using the AutoCAD PEDIT
command. Either a constant width or changing width at each vertex can be specified. The
AutoCAD COLOUR (Map3D block number) and AutoCAD THICKNESS (drift height) of the drift are
specified using the AutoCAD CHANGE PROPERTIES command. The AutoCAD POLYLINE and
ELLIPSE commands can also be used to create drifts with specified AutoCAD WIDTH and
THICKNESS.
PLINE, POLYLINE or SOLID with THICKNESS Only
Map3D International Ltd 1990-2015
Appendix
371
Thickness
PLINE with
Thickness only
Another simple method of defining a drifts or stopes with a rectangular cross-section is to use
either of the AutoCAD PLINE, POLYLINE or SOLID commands with a specified AutoCAD
THICKNESS (drift height), and AutoCAD WIDTH set equal to zero (see Figure 32). Although this
approach is more general than PLINE, it is also more complex to specify since the floor plan of the
drift must be defined along its length. If either the AutoCAD PLINE or POLYLINE commands are
used, one must form a closed loop with either 3 or 4 line segments.
Other Three-dimensional AutoCAD Entities
AutoCAD supplies routines to generate several three-dimensional objects including spheres,
toruses, boxes, cones etc. These can all be used if desired. The user is responsible to close the
open ends of shapes such as hemispheres and cones.
Two-Dimensional Plate Type AutoCAD Entities
Map3D compatible data can also be specified in terms of two-dimensional AutoCAD entities. This
technique is not as reliable as the methods described above because closure of all surfaces is no
longer guaranteed. The user must define excavations with a series of surface plates (all assigned
the same AutoCAD colour number), which must join along their edges and completely envelope the
excavation with a continuous surface skin. These surfaces are structured identically to Map3D
surface plates. Closure of all surfaces is not guaranteed when using this method since the user
may leave out a surface patch, thus forming a hole in the excavation surface. The user must take
care to place all plates such that all surfaces close perfectly.
LINE, PLINE, 3DPOLY, POLYLINE and ELLIPSE - THICKNESS Only
Thickness
PLINE with
Thickness
only
These entities can be used to define two-dimensional plates. One simply defines an AutoCAD UCS
(user coordinate system) for the plate, then defines the edge of the plate using any of the
AutoCAD LINE, PLINE, 3DPOLY, POLYLINE or ELLIPSE commands. The AutoCAD COLOUR
(Map3D block number) and AutoCAD THICKNESS (plate width) are specified using the AutoCAD
CHANGE PROPERTIES command. The AutoCAD WIDTH must be set equal to zero.
LINE, PLINE, 3DPOLY, POLYLINE and ELLIPSE with WIDTH Only
Map3D International Ltd 1990-2015
372
Map3D User's Manual
PLINE with
Width only
Width
Using these entities, one defines the centre line of the plate using any of the AutoCAD LINE,
PLINE, 3DPOLY, POLYLINE or ELLIPSE commands. The width is then specified using the
AutoCAD PEDIT command. Either a constant width or changing width at each vertex may be
specified. The AutoCAD THICKNESS must be set equal to zero.
3DFACE
Two-dimensional surfaces can also be generated using the AutoCAD 3DFACE command. This
method is more general, but since all corners of the AutoCAD 3DFACE must be specified, it is
also more complex.
3DMESH
Complex two-dimensional surfaces can be generated using types of 3DMESHs with N larger than
4 (e.g. Rulesurf, Tabsurf, Revsurf etc.). For these shapes, the DXF conversion routine creates a
series of 3DFACEs to describe the excavation surface. These surfaces are structured identically
to Map3D surface plates. Surface closure is fairly easy to ensure for these cases owing to the
regular nature of the construction.
Unsupported AutoCAD Entities
There are a number of unsupported AutoCAD entities, meaning that Map3D was not designed to
reconstruct these as they appear from within AutoCAD. These entities include the CIRCLE, ARC
and DOUGHNUT entities. These entities may be supported in future Map3D updates. Note that
most shapes can be generated by alternate means using the AutoCAD ELLIPSE command, or
3DMESH command.
Map3D International Ltd 1990-2015
Appendix
373
5.3.10 File > INP Model File Format
INP format is an editable ASCII data file with the extension ".INP".
This is the recommended Map3D model format. All Map3D functionality is supported with this
format.
The file is organized into 7 sections:
1.
2.
3.
4.
5.
6.
7.
Job Title
Control Parameters
Block Specification
Coordinate Specification
Material Property Specification
Grid Specification
Mining Step Specification
Comment lines must start with an asterisk "*" in column 1.
Blank lines are skipped.
Maximum line length is 256 characters.
Commas or spaces can be used to separate data fields.
1. Job Title
This section permits the user to specify a descriptive project title:
1 line of data must be specified.
Quotation marks are not necessary.
Only the first 70 characters will be used.
2. Control Parameters
This section permits the user to specify job control parameters.
NLD,NIT,NPS RPAR,STOL AL,AG DOL,DON DOC,DOE,DOG,DOR
1 line of data must be specified.
All parameters must appear on one line.
Only the first 7 parameters (NLD,NIT,NPS RPAR,STOL AL,AG) must be specified. The
remaining parameters will be assigned default values, which may or may not be appropriate for
your application.
For a detailed description of parameters refer to CAD > Properties > Control Parameters
NPS This item specifies the number of planes of symmetry to be used in the analysis. Normally
no planes of symmetry are used. If symmetry is used, the far field stresses (Stress State) must be
aligned with the axis of symmetry.
NPS=0 no symmetry
NPS=1 x <=> -x, the geometry is reflected in the y-z plane
NPS=2 x <=> -x and y <=> -y, the geometry is reflected in the y-z and x-z planes
NPS=3 x <=> -x, y <=> -y and z <=> -z, the geometry is reflected in the y-z, x-z, and x-y
planes
RPAR During the matrix solution process, the relaxation parameter is continuously modified by
the program in an attempt to obtain convergence with as few as possible iterations. This
parameter limits the maximum value that will be used. The suggested value of 1.2 is recommended
for well-conditioned problems. For very poorly conditioned problems a value of 0.8 should be
used.
3. Block Specification
Map3D International Ltd 1990-2015
374
Map3D User's Manual
This section permits the user to define the model geometry. 3D FF Blocks and DD planes are
constructed here.
N 'Block_Name' I1,I2,I3,I4 I5,I6,I7,I8 Type Thickness,Width
1 line of data per block must be specified.
All parameters must appear on one line.
Only the first 5 parameters (N I1,I2,I3,I4) must be specified.
Use N=0 to end the list of blocks.
For a detailed description of parameters refer to
CAD > Build > Block
CAD > Build > FF Loop
CAD > Build > DD Loop
N specifies the block colour number. It is used to identify this block when setting material
codes, and also to set the colour of the block for graphics display. Different colour numbers
should be used to represent logical groupings of blocks (e.g. for different levels, sections or
logical mining units such as development, stoping etc.). As many blocks as possible should
use the same block identification number.
A total of 10 colours are available for display. These are numbered respectively
1 through 10,
11 through 20,
21 through 30, etc.,
such that the same colour is displayed for numbers
1, 11, 21...,
2, 22, 32...,
3, 23, 33..., etc.
'Block_Name' specifies a descriptive name for the Block (e.g. 4540 stope). The program will
use this name when supplying information concerning the block volume, errors and warnings.
The block name is optional, but if used it must appear in single quotation marks. Only the first
20 characters of any block name will be used.
I1,I2,I3,I4 I5,I6,I7,I8 represent the numbers of coordinate points that form the block corners,
These are described in detail below.
Type specifies which type of boundary element to use. Inactive elements (98 or inactive FF and
99 for inactive DD) can be used to display features that are to be included for visualization
purposes only and not to be used for the actual stress analysis.
For three-dimensional features such as excavations, alternate material zones, back-filled stopes
etc., Type=1 (Fictitious Force) type elements should be used.
I7
I8
I6
I6
I7 & I8
I5
I5
I3
I4
I2
I1
I2
I3 & I4
I1
The first 4 corners (I1,I2,I3,I4) represent coordinate numbers that define one side (e.g. the bottom)
of a 6 sided block. The next 4 corners (I5,I6,I7,I8) define the opposite side of the block (e.g.
the top). The corners can be entered in either clockwise or counter clockwise orientation. Any
of the corners can be repeated to define 3 sided shapes and wedges. Blocks can be linked
together to form larger more complex excavation shapes by using common coordinate numbers
Map3D International Ltd 1990-2015
Appendix
375
to specify adjacent blocks.
I3
I2
I4
I1
I2
I3 & I4
I1
If desired, surfaces can be constructed using 3 or 4 sided surfaces by using only the first 4
corners (I1,I2,I3,I4). The next 4 corners (I5,I6,I7,I8) should be specified as zeros. The corners
can be entered in either clockwise or counter clockwise orientation. Any of the corners can be
repeated to define 3 sided shapes and wedges.
These surfaces can be linked together to form larger more complex excavation shapes by using
common coordinate numbers to specify adjacent plates. The user must take care to ensure that
complete closing surfaces are constructed leaving no holes or missing plates.
Type=2 (Displacement Discontinuity) type elements should be used for tabular mining excavations,
fractures and fault planes.
I3
I2
I4
I1
I2
I3 & I4
I1
Surfaces are constructed using 3 or 4 sided surfaces by using only the first 4 corners (I1,I2,I3,I4).
The next 4 corners (I5,I6,I7,I8) should be specified as zeros. The corners can be entered in
either clockwise or counter clockwise orientation. Any of the corners can be repeated to define
3 sided shapes and wedges.
These surfaces can be linked together to form larger more complex shapes by using common
coordinate numbers to specify adjacent surfaces.
Thickness This parameter is only used for type 2 (displacement discontinuity) elements, where it
is used to specify the apparent thickness of the in-filling material (i.e. fault gouge, seam width,
mining width or pillar height). Normal displacement (closure) of this feature when in-filled will be
limited to this thickness. Also, the normal displacement (closure) and shear displacement (ride)
are divided by the Thickness to determine the strain occurring in the in-filling material. This
parameter should be specified in the same units that are used to specify the coordinate
positions (i.e. metres or feet).
Width specifies the maximum width permitted.
This parameter can be used to force uniform discretization on selected entities. Extreme caution
should be used in specifying this value since a small value can easily lead to enormous
problem size.
In general this parameter should be left blank (i.e. not used), and discretization should be left to
the AL and AG parameters. These latter parameters will concentrate elements only where
analysis results are requested thus optimizing the use of elements and minimizing problem
size.
For an example of the use of this parameter refer to Tabular Mining Example.
A Simple Example
Map3D International Ltd 1990-2015
376
Map3D User's Manual
7
6
5
4
3
2
1
To illustrate the use of model
building using three-dimensional building blocks consider the
construction of a simple drawpoint configuration. This model has been assembled out of 7 blocks.
Blocks 1, 2 and 3 form the extraction drift, block 4 forms the crosscut, blocks 5 and 6 represent
the drawpoint, and block 7 represents the stope. Map3D recognizes and deletes the surfaces,
which are common to adjacent blocks.
Many blocks can share the same block number (colour) thus permitting a group of blocks to be
used to construct complex excavation shapes. An important consideration here is that, as few as
possible block numbers should be used since all surfaces between blocks, which have different
block numbers, will be maintained in the database.
19
18
20
17
22
24
21
5
25
26
4
32
29
6
12
7
3
2
10
11
8
1
16
9
The coordinate numbers for the same drawpoint configuration are required if one wants to
construct the model using the Map3D input file specification. The blocks would be numbered as
follows:
* Block Specification
* N 'Block Name' I1,I2,I3,I4 I5,I6,I7,I8 Type,Thic,Width
1 'Block 1' 1 2 7 8 9 10 15 16 1 0 0
1 'Block 2' 2 3 6 7 10 11 14 15 1 0 0
1 'Block 3' 3 4 5 6 11 12 13 14 1 0 0
1 'Block 4' 7 6 26 25 15 14 30 29 1 0 0
2 'Block 5' 25 26 27 28 29 30 31 32 1 0 0
2 'Block 6' 21 22 23 24 25 26 27 28 1 0 0
2 'Block 7' 17 18 19 20 21 22 23 24 1 0 0
0
4. Coordinate Specification
This section permits the user to specify coordinate locations that are used to define the corners of
Blocks, DD planes and Grid planes.
M X,Y,Z
1 line of data per coordinate point must be specified.
Map3D International Ltd 1990-2015
Appendix
377
All parameters must appear on one line.
All 4 parameters (M X,Y,Z) must be specified.
Use N=0 to end the list of coordinates.
M This parameter is the coordinate number. Coordinates may be entered in any desired order.
X,Y,Z These parameters represent the coordinate location. It is recommended that X is used for
East, Y is used for North, and Z is used for elevation (positive up). The values should be
specified in units of length (metres or feet).
5. Material Property Specification
This section permits the user to specify the properties for each material used in the model. The
properties for each material are defined in groups of three lines specifying respectively the stress
state, constitutive parameters and strength parameters.
M sa, sb, sc Dsa, Dsb, Dsc Ta,Pa,Tc Datum t/h,Dt/h
Mt Ep,Er vp,vr Gn,Gs A,C 'Material Name'
Mf Top,Tor UCSp,UCSr Cohesionp,Cohesionr fp,fr fi
For a detailed description of parameters refer to CAD > Properties > Material Properties
3 lines of data per material must be specified, use N=0 to end the list.
Material Property Specification - Line 1 - Stress State
This line of data sets up the starting stress state for material number N. Material number 1 is
reserved for the host rock mass.
M sa, sb, sc Dsa, Dsb, Dsc Ta,Pa,Tc Datum t/h,Dt/h
1 line of numeric data per material must be specified.
All parameters must appear on one line.
Only the first 4 parameters (M sa, sb, sc) must be specified.
For a detailed description of parameters refer to Stress State
Material Property Specification - Line 2 - Constitutive Properties
Constitutive properties are specified in five different ways,
Mt=1 Ep,Er vp,vr Gn,Gs 0,0 A,C 'Material Name'
where Ep,Er vp,vr represent respectively the peak and residual values for Young's modulus,
Poisson's ratio
E = 9 BS/(3B+S)
v = (3B-2S)/(6B+2S)
Gn,Gs represent respectively the normal and shear viscous moduli,
A,C represent respectively the expansion coefficient and conductivity (only used in Map3D
Thermal-Fluid Flow).
For more details refer to
Mohr-Coulomb in 3D FF Blocks
Mohr-Coulomb in DD Planes
Mt=2 Bp,Br Sp,Sr Gn,Gs 0,0 A,C 'Material Name'
where Bp,Br Sp,Sr represent respectively the peak and residual values for the bulk and
shear moduli,
B = E (1-2v)/3
S = E / [ 2(1+v) ]
Map3D International Ltd 1990-2015
378
Map3D User's Manual
Gn,Gs represent respectively the normal and shear viscous moduli,
A,C represent respectively the expansion coefficient and conductivity (only used in Map3D
Thermal-Fluid Flow).
Mt=3 Knp,Knr Ksp,Ksr Gn,Gs 0,0 A,C 'Material Name'
where Knp,Knr Ksp,Ksr represent respectively the peak and residual values for the normal
and shear stiffness,
Kn = N/Thickness
Ks = S/Thickness
Gn,Gs represent respectively the normal and shear viscous moduli,
A,C represent respectively the expansion coefficient and conductivity (only used in Map3D
Thermal-Fluid Flow).
This material type can only be used in DD planes.
Mt=4 Np,Nr Sp,Sr Gn,Gs B,Et A,C 'Material Name'
where Np,Nr Sp,Sr represent respectively the peak and residual values for the normal and
shear moduli,
Gn,Gs represent respectively the normal and shear viscous moduli,
A,C represent respectively the expansion coefficient and conductivity (only used in Map3D
Thermal-Fluid Flow).
This material type can only be used in DD planes.
For more details refer to Fault-Gouge in DD planes
Mt=5 Np,Nr Sp,Sr Gn,Gs B,Et A,C 'Material Name'
where Np,Nr Sp,Sr represent respectively the peak and residual values for the normal and
shear moduli,
Gn,Gs represent respectively the normal and shear viscous moduli,
B,Et represent respectively the compression limit and transition strain,
A,C represent respectively the expansion coefficient and conductivity (only used in Map3D
Thermal-Fluid Flow).
This material type can only be used in DD planes.
For more details refer to Backfill-Hyperbolic in DD planes
For the host rock mass and non-homogeneous zones enclosed by FF elements, the value for Mt
must be 1 or 2. For in-filling material placed in DD elements, any value of Mt may be used.
For elastic analysis, only the peak value is used. In non-linear analysis (fault-slip or material
yielding in Map3D Non-Linear), the residual value is only used after the material yields.
Peak Strength
Residual Strength
Peak
Elastic
Stiffness
Residual
Elastic
Stiffness
Material Property Specification - Line 3 - Strength Parameters
Map3D International Ltd 1990-2015
Appendix
379
1 line of numeric data per material must be specified.
All parameters must appear on one line.
All parameters must be specified if Mf is non-zero.
Strength parameters may be specified in four different ways:
Mf=0
No failure criterion used.
Mf=1 Top,Tor UCSp,UCSr Cohesionp,Cohesionr wp,wr wi
These parameters are defined in detail in
Mohr-Coulomb in 3D FF Blocks
Mohr-Coulomb in DD Planes
Mf=2 Top,Tor sc p, sc r mp,mr sp,sr
These parameters are defined in detail in
Hoek-Brown in 3D FF Blocks
Mf=3 Top,Tor UCSp,UCSr Cohesionp,Cohesionr wp,wr
These parameters are defined in detail in
Drucker-Prager in 3D FF Blocks
6. Grid Specification
This section permits the user to define the location of grid planes where analysis results will be
calculated.
N 'Gird_Name' I1,I2,I3,I4 I5,I6,I7,I8 0,0,0,0
N 'Grid_Name' I1,I2,I3,I4 I5,I6,I7,I8 Type Thickness,Width
1 line of data per block must be specified.
All parameters must appear on one line.
Use N=0 to end the list of grids.
N This parameter is the grid number. Grids should by numbered consecutively from 1, but may
be entered in any desired order.
I3
I2
I4
I1
'Grid_Name' This parameter permits the user to specify a descriptive name for the Grid (e.g.
HW grid through 4540 stope). The program will use this name when supplying information
concerning the grid. The grid name is optional, but if used it must appear in single quotation
marks. Only the first 20 characters of any grid name will be used.
I1,I2,I3,I4 These parameters represent the numbers of coordinate points that form the grid
corners.
Grids are constructed using 4 sided planes. The corners can be entered in either clockwise or
counter clockwise orientation.
I5,I6,I7,I8 These parameters are not used and should be specified as zeros.
Thickness This parameter is not used and should be specified as zero.
Spacing specifies the maximum spacing permitted.
This parameter can be used to force uniform discretization on the grid. Extreme caution should
Map3D International Ltd 1990-2015
380
Map3D User's Manual
be used in specifying this value since a small value can easily lead to enormous problem
size.
In general this parameter should be set to zero (i.e. not used), and discretization should be left to
the AL and AG parameters. These latter parameters will concentrate elements only where
analysis results are requested thus optimizing the use of elements and minimizing problem
size.
7. Mining Step Specification
This item permits the user to specify the material code to be assigned to the selected entities at
each mining step.
'Mining_Step_Title'
N, Mc
1 line of numeric data per block specification must be specified.
All parameters must appear on one line.
2 parameters (N,Mc) must be specified.
The mining sequence is defined by repeatedly specifying a list of material codes. Each list is
ended by using N=0. At each mining step, only the material codes that change need to be
specified. Blocks will remain inactive until a material code is assigned.
Blocks which are never assigned a material code will be assigned a block type of 98 or 99 (i.e.
inactive), these blocks will be included in the database for visualization purposed only, they will
not be used in the analysis, nor will intersections be created for these surfaces.
'Mining_Step_Title' This parameter permits the user to specify a descriptive name for each
mining step. The program will use this name when supplying information concerning the mining
step. This is optional, but if used it must appear in single quotation marks.
N This parameter is the block identification number used to identify which blocks are assigned
the specified material code. These may be entered in any desired order. 0 specifies the end of
each mining step list.
Mc This parameter sets the material code for the block.
Mc=0 surface stresses equal to zero. This is normally used to indicate stress free excavation
surfaces.
Mc=-M A negative material number inserts (applies) the initial stress state for the material as
a boundary condition. This allows you to specify any desired surface loading conditions. This
is actually equivalent to inserting a material that has a zero stiffness, and thus can neither
accumulate nor dissipate stress. This is normally used to indicate excavations with some
internal stress state due to ground support, backfill or active pressurization.
For most analyses, the host is so stiff compared to the backfill that the amount of accumulate or
dissipation of stress is insignificant. The exception would be non-linear material deformation or
large closure areas.
Mc=+M A positive material number M specifies insertion of material number M at the initial
stress state specified for that material. The material is placed with the starting stress state equal
to the initial stress state for the material, then is allowed to accumulate or dissipate stress with
deformation. The amount of stress change will depend on the stiffness of the inserted
materialThis option is used assign alternate material properties to zones defined by type 1
blocks, or to place gouge or backfill material into type 2 elements (displacement discontinuities)
to simulate faults or backfilled tabular mining zones.
A simple example illustrating this feature is given in the following table:
* Mining Step Specification
* Mining Step #1
* N,Mc
Map3D International Ltd 1990-2015
Appendix
381
'Block #1 is assigned properties of Ore Material #2'
1 2
0
'Block #1 is excavated'
1 0
0
'Block #1 is backfilled with Material #3'
1 3
0
5.3.11 File > Open > Recent Directories
Each time you open a model file or restart file its working directory is saved for quick access at a
later session. To reopen one of these directories just pick it from the list.
Related Topics:
File > Open > Recent Files
5.3.12 File > Open > Merge Geometries
If this option is checked, as the new model file or construction line file is loaded, the geometric data
is merged with the current geometric data.
If this option is not checked, as the new model file or construction line file is loaded, the geometric
data will replace/overwrite the current geometric data.
This allows you to construct your model or construction line database in small pieces and merge
them as required.
Related Topics:
File > Open > Merge Materials.
5.3.13 File > Model File Formats
Models can be loaded from several file types:
Map3D-INP format is an editable ASCII data file with the extension ".INP". This is the
recommended Map3D model format. All Map3D functionality is supported with this format.
AutoCAD-DXF format is a popular drawing exchange file with the extension ".DXF". This format is
useful for exchanging model data with other CAD software.
Point file format is a universal ASCII data file with the extension ".PNT". This format is useful for
exchanging raw model data with other CAD software.
Models from different files can be merged. The merge option
File > Open > Merge
appears at the bottom of the open file dialogue box.
Related Topics:
File > Open
Map3D International Ltd 1990-2015
382
Map3D User's Manual
File > Save As
5.4
Materials
5.4.1
Materials > Mohr-Coulomb in 3D FF Blocks
Mohr-Coulomb material can be used to describe non-linear response in 3D FF blocks in Map3D
Non-Linear. It can also be used as a failure criterion for elastic analyses in Map3D Fault-Slip.
Material Name - specifies a descriptive name for the material.
Material # - specifies the material number.
Material #1 is reserved for the host material.
Other material numbers are used to define alternate material zones such as ore, fault gouge,
backfill etc.
Material Type - specifies the material type (Mohr-Coulomb, Hoek-Brown, Drucker-Prager, FaultGouge, Hyperbolic-Backfill, Quadratic-Backfill, Equilibrated-Gouge, Yielding-Pillar or none).
Mohr-Coulomb - defines the failure envelope as a straight line.
For 3D FF blocks the Mohr-Coulomb criterion defines strength in terms of principal stresses as
follows:
Map3D International Ltd 1990-2015
Appendix
383
Mohr-Coulomb in 3D FF blocks
= UCS + q
3
q = tan²(45+ /2)
1
UCS
Tension
cutoff and UCS - are specified in units of stress (MPa or psi).
Tension
Friction
angle
Cuttoff and dilation angle are specified in degrees.
Cohesion is related to UCS and friction angle by the relationship UCS=2 Coh tan(45+ /2). If
Cohesion is specified then UCS is determined from this relation.
Peak values of these parameters are used up until failure. After yielding, the residual values are
used to provide a strain softening response.
Residual values are ignored in elastic analyses.
Young's Modulus and Poisson's Ratio - specify Young's Modulus in units of stress (MPa or psi).
Peak values of these parameters are used up until failure.
After yielding, the residual values are used. Residual values are ignored in elastic analyses.
Standard Deviation - specify standard deviation in units of stress (MPa or psi).
This parameter describes the uncertainty you have in the strength parameters.
This parameter is only used for plotting the probability of shear failure Plot > Strength Factors >
Rockmass Probability N-distribution.
Viscous Modulus (Gn and Gs) - These parameters are used only in non-linear analyses (3D FF
blocks in Map3D Non-Linear and DD planes in Map3D Fault-Slip). For 3D FF blocks only Gs is
used.
The viscous modulus describes the creep response. where the creep resistance is determined
as the creep coefficient C, times the plastic strain rate. Note that the user must select both the
creep coefficient C, and the time step size t, then specify the quotient of these as the viscous
modulus G.
Specify the viscous modulus in units of stress (MPa or psi).
Expansion Coefficient and Conductivity are only used in Map3D Thermal-Fluid Flow.
Map3D Thermal-Fluid Flow can be used to simultaneously solve steady state heat/fluid flow
coupled to the stress analysis.
Elastic only - when checked this material will respond elastically only, i.e. strength parameters will
not be used.
This can be used to define zones with different elastic properties and/or initial stress states.
This could include for example stiff dykes, soft ore zones, backfill or support elements.
Elasto-Plastic - when checked this material will respond elasto-visco-plastically, i.e. the strength
parameters will be used as a flow rule.
This can be used to define zones with both different elastic properties and strength parameters.
Note that in Map3D Fault-Slip, only DD elements (i.e. fault gouge) are permitted to respond
non-linearly.
Map3D International Ltd 1990-2015
384
Map3D User's Manual
In Map3D Non-Linear the 3D rock mass can also yield plastically.
Inactive - when checked this material will not be used in the stress analysis and hence will not affect
the predicted stresses, strains or displacements.
This can be used to define zones with different strength parameters to be used when
generating contours of strength factors.
User Defined - allows specification of user defined parameters to be used in contouring.
Different parameters are defined for each material number.
These parameters are used with
Plot > Stress > User
This can be used to define zones with different strength parameters to be used when
generating contours of strength factors.
Dump to File - allows you to dump all material property data to a file for viewing in Notepad or Excel.
Copy from material - allows you to copy the material properties from one material number to
another. All properties including the stress state are copied.
Stress State - specifies the initial (far field) stress state for the material.
Most materials are inserted into blocks with the same (far field) stress state.
Materials such as props or backfill are placed at near zero initial stresses.
In elastic analysis the principal stresses are normally used with the Mohr-Coulomb or Hoek-Brown
strength criterion to estimate the amount of damage due to over-stressing. One can expect that
more excess stress in an elastic analysis would in general correlate with increased amounts of
plastic strain in a non-linear analysis. Since none of the parameters have any orientation sensitivity,
this criterion is representative for homogeneous rock mass stability.
Mohr-Coulomb in 3D FF blocks
= UCS + q
Excess
Stress
1
f
Plastic
Strain
UCS
Over-stressing
can be presented in several ways including:
Tension
Cutoff
Plot > Strength Factors > dS1 - Excess Stress
Plot > Strength Factors > dTmax - Excess Stress
Plot > Strength Factor > SF-A - Strength/Stress
Plot > Strength Factor > SF-B - Strength/Stress
Plot > Strength Factors > SF-C - Strength/Stress
By contrast, in non-linear analysis the stresses can never exceed the strength unless some creep is
used (in this latter case, viscous creep can allow stress states above the failure criterion, thus
indicating a lack of static equilibrium). Hence for non-linear analysis one normally directly
considers the plastic strain or the plastic strain rate predicted by the model as an indicator of
damage.
In 3D FF blocks, the elastic strains are determined from the stresses by
Map3D International Ltd 1990-2015
Appendix
385
= xxf + [ (1- ) xxelastic + ( yyelastic + zzelastic ) ] E / [ (1+ ) (1-2 ) ]
= yyf + [ (1- ) yyelastic + ( zzelastic + xxelastic ) ] E / [ (1+ ) (1-2 ) ]
= zzf + [ (1- ) zzelastic + ( xxelastic + yyelastic ) ] E / [ (1+ ) (1-2 ) ]
= xyf + xyelastic E / (1+ )
= yzf + yzelastic E / (1+ )
= xzf + xzelastic E / (1+ )
xx
yy
zz
xy
yz
xz
where E and represent respectively Young's modulus and Poisson's ratio, and
the initial (pre-mining) stress state
f
and
f
represent
In Map3D Non-Linear, if the stress goes above the strength, the plastic strain can be determined by
limiting the stress
1
-
1
°-C
1plastic
/ t = UCS + q (
3
-
3
°-C
3plastic
/ t)
where
° = [ (1- )
2 ° = [ (1- )
3 ° = [ (1- )
1
+
2plastic +
3plastic +
(
(
(
1plastic
The accumulated plastic strain
plastic, for all creep steps.
+
3plastic +
1plastic +
2plastic
) ] E / [ (1+ ) (1-2 ) ]
1plastic ) ] E / [ (1+ ) (1-2 ) ]
2plastic ) ] E / [ (1+ ) (1-2 ) ]
3plastic
, is determined as the sum of the plastic creep increments
plastic
If the stress goes below the tension cutoff, the plastic strain can be determined by limiting the
stress
3
-
3
°-C
3plastic
/ t = To
The plastic volumetric strain can also have a dilation component
volume
=(
1plastic
+
+
2plastic
3plastic
) = tan(dilation angle)
1plastic
The total strain is equal to the sum of the elastic and plastic parts.
The creep response is simulated using a linear (Bingham) creep model.
Strength
Elastic
Viscous
At each creep
step the stress
state on all yielding elements (elements where the stress exceeds the
elastic
plastic
strength) is calculated as the strength plus the creep resistance
= Strength + C
C=G t
plastic
/ t
where the creep resistance is determined as the creep coefficient C, times the plastic strain rate.
Note that the user must select both the creep coefficient C, and the time step size t, then specify
the quotient of these as the viscous modulus G. The creep resistance can be used simply as a
technique for damping the non-linear deformations or for real time dependent creep simulation
Analysis > Options > Creep
The strains can be presented in several ways including:
Plot > Strain > Value > Elastic
Plot > Strain > Value > Plastic
Map3D International Ltd 1990-2015
386
Map3D User's Manual
Plot > Strain > Value > Total
Plot > Strain > E1 - Major principal strain
Plot > Strain > E2 - Intermediate principal strain
Plot > Strain > E3 - Minor principal strain
Plot > Strain > Emax - Maximum shear strain
Plot > Strain > Evolume - Volumetric shear strain
Related Topics:
Hoek-Brown in 3D FF blocks
Drucker-Prager in 3D FF blocks
5.4.2
Materials > Hoek-Brown in 3D FF Blocks
Hoek-Brown material can only be used as a failure criterion for elastic analyses in Map3D FaultSlip.
Material Name - specifies a descriptive name for the material.
Material # - specifies the material number.
Material #1 is reserved for the host material.
Other material numbers are used to define alternate material zones such as ore, fault gouge,
backfill etc.
Material Type - specifies the material type (Mohr-Coulomb, Hoek-Brown, Drucker-Prager, FaultGouge, Hyperbolic-Backfill, Quadratic-Backfill, Equilibrated-Gouge, Yielding-Pillar or none).
Hoek-Brown - defines the failure envelope as a curved line.
For 3D FF blocks the Hoek-Brown criterion defines strength in terms of principal stresses as
follows:
Map3D International Ltd 1990-2015
Appendix
387
Hoek-Brown in 3D FF blocks
1
=
3
+(m
c
3
+s
½
c² )
1
s½
c
Tension cutoff and c are specified in units of stress (MPa or psi).
Tension
Only
the peak values are used.
3
Cutoff
Young's Modulus and Poisson's Ratio - specify Young's Modulus in units of stress (MPa or psi).
Only the peak values are used.
Standard Deviation - specify standard deviation in units of stress (MPa or psi).
This parameter describes the uncertainty you have in the strength parameters.
This parameter is only used for plotting the probability of shear failure Plot > Strength Factors >
Rockmass Probability N-distribution.
Viscous Modulus (Gn and Gs) - These parameters are not used for the Hoek-Brown material.
Expansion Coefficient and Conductivity are only used in Map3D Thermal-Fluid Flow. Map3D
Thermal-Fluid Flow can be used to simultaneously solve steady state heat/fluid flow coupled to the
stress analysis.
Elastic only - when checked this material will respond elastically only, i.e. strength parameters will
not be used.
This can be used to define zones with different elastic properties and/or initial stress states.
This could include for example stiff dykes, soft ore zones, backfill or support elements.
Elasto-Plastic - when checked this material will respond elasto-visco-plastically, i.e. the strength
parameters will be used as a flow rule.
This can be used to define zones with both different elastic properties and strength parameters.
Note that in Map3D Fault-Slip, only DD elements (i.e. fault gouge) are permitted to respond
non-linearly.
In Map3D Non-Linear the 3D rock mass can also yield plastically.
Yielding of Hoek-Brown materials is not supported at this time.
Inactive - when checked this material will not be used in the stress analysis and hence will not affect
the predicted stresses, strains or displacements.
This can be used to define zones with different strength parameters to be used when
generating contours of strength factors.
User Defined - allows specification of user defined parameters to be used in contouring.
Different parameters are defined for each material number.
These parameters are used with
Plot > Stress > User
This can be used to define zones with different strength parameters to be used when generating
contours of strength factors.
Dump to File - allows you to dump all material property data to a file for viewing in Notepad or Excel.
Copy from material - allows you to copy the material properties from one material number to
another. All properties including the stress state are copied.
Map3D International Ltd 1990-2015
388
Map3D User's Manual
Stress State - specifies the initial (far field) stress state for the material.
Most materials are inserted into blocks with the same (far field) stress state.
Materials such as props or backfill are placed at near zero initial stresses.
Related Topics:
Mohr_Coulomb in 3D FF blocks
Drucker-Prager in 3D FF blocks
5.4.3
Materials > Drucker-Prager in 3D FF Blocks
Hoek-Brown material can only be used as a failure criterion for elastic analyses in Map3D FaultSlip.
Material Name - specifies a descriptive name for the material.
Material # - specifies the material number.
Material #1 is reserved for the host material.
Other material numbers are used to define alternate material zones such as ore, fault gouge,
backfill etc.
Material Type - specifies the material type (Mohr-Coulomb, Hoek-Brown, Drucker-Prager, FaultGouge, Hyperbolic-Backfill, Quadratic-Backfill, Equilibrated-Gouge, Yielding-Pillar or none).
Drucker-Prager - defines the failure envelope as a straight line.
For 3D FF blocks the Drucker-Prager criterion defines strength in terms of principal stresses
as follows:
Map3D International Ltd 1990-2015
Appendix
389
Drucker-Prager in 3D FF blocks
oct
= [ UCS + (q-1) m ] 2½/(2+q)
oct
(q-1) 2½/(2+q)
1
UCS 2½/(2+q)
where
Tension
= ¹/3 Cutoff
[( 1 - 2 )² + (
m = ¹/3 (
1 +
2 +
3 )
q = tan²(45+½ )
oct
2
-
m
3
)² +(
3
-
1
)²]½
Note that the strength parameters have been chosen so that the criterion simplifies to the MohrCoulomb criterion when 2 equals 3.
Tension cutoff and UCS - are specified in units of stress (MPa or psi).
Friction angle and dilation angle are specified in degrees.
Cohesion is not used for 3D FF blocks.
Only the peak values are used.
Young's Modulus and Poisson's Ratio - specify Young's Modulus in units of stress (MPa or psi).
Only the peak values are used.
Standard Deviation - specify standard deviation in units of stress (MPa or psi).
This parameter describes the uncertainty you have in the strength parameters.
This parameter is only used for plotting the probability of shear failure Plot > Strength Factors >
Rockmass Probability N-distribution.
Viscous Modulus (Gn and Gs) - These parameters are not used for the Drucker-Prager material.
Expansion Coefficient and Conductivity are only used in Map3D Thermal-Fluid Flow. Map3D
Thermal-Fluid Flow can be used to simultaneously solve steady state heat/fluid flow coupled to the
stress analysis.
Elastic only - when checked this material will respond elastically only, i.e. strength parameters will
not be used.
This can be used to define zones with different elastic properties and/or initial stress states.
This could include for example stiff dykes, soft ore zones, backfill or support elements.
Elasto-Plastic - when checked this material will respond elasto-visco-plastically, i.e. the strength
parameters will be used as a flow rule.
This can be used to define zones with both different elastic properties and strength parameters.
Note that in Map3D Fault-Slip, only DD elements (i.e. fault gouge) are permitted to respond
non-linearly.
In Map3D Non-Linear the 3D rock mass can also yield plastically.
Yielding of Drucker-Prager materials is not supported at this time.
Inactive - when checked this material will not be used in the stress analysis and hence will not affect
the predicted stresses, strains or displacements.
This can be used to define zones with different strength parameters to be used when
generating contours of strength factors.
Map3D International Ltd 1990-2015
390
Map3D User's Manual
User Defined - allows specification of user defined parameters to be used in contouring.
Different parameters are defined for each material number.
These parameters are used with
Plot > Stress > User
This can be used to define zones with different strength parameters to be used when generating
contours of strength factors.
Dump to File - allows you to dump all material property data to a file for viewing in Notepad or Excel.
Copy from material - allows you to copy the material properties from one material number to
another.
All properties including the stress state are copied.
Stress State - specifies the initial (far field) stress state for the material.
Most materials are inserted into blocks with the same (far field) stress state.
Materials such as props or backfill are placed at near zero initial stresses.
Related Topics:
Mohr_Coulomb in 3D FF blocks
Hoek-Brown in 3D FF blocks
5.4.4
Materials > Fault-Gouge in DD Planes
Fault-Gouge material can be used to describe non-linear response in DD planes in both Map3D
Fault-Slip and Map3D Non-Linear.
Material Name - specifies a descriptive name for the material.
Material # - specifies the material number.
Material #1 is reserved for the host material.
Other material numbers are used to define alternate material zones such as ore, fault gouge,
backfill etc.
Material Type - specifies the material type (Mohr-Coulomb, Hoek-Brown, Drucker-Prager, FaultGouge, Hyperbolic-Backfill, Quadratic-Backfill, Equilibrated-Gouge, Yielding-Pillar or none).
Map3D International Ltd 1990-2015
Appendix
391
Fault-Gouge - defines the failure envelope as a straight line in the same as Mohr-Coulomb in
DD planes but without UCS.
Strength is defined in terms of in-plane shear and normal stresses as follows:
Fault-Gouge in DD planes
s
= Cohesion + tan( )
s
Cohesion
Tension
Cutoff and Cohesion are specified inn units of stress (MPa or psi).
Tension
Cutoff
Friction angle and dilation angle are specified in degrees.
Cohesion and friction angle define the shear response.
The tension cutoff defines the response in the direction normal to the shear plane.
Peak values of these parameters are used up until failure.
After yielding, the residual values are used to provide a strain softening response.
Residual values are ignored in elastic analyses.
Normal and Shear Modulus - specify moduli in units of stress (MPa or psi).
In DD planes the shear and normal stresses acting on the surfaces of the element are related to
the elastic portion of the shear displacement (ride) and normal displacement (closure) through
the shear and normal moduli.
Peak values of these parameters are used up until failure.
After yielding, the residual values are used.
Standard Deviation - specify standard deviation in units of stress (MPa or psi).
This parameter describes the uncertainty you have in the strength parameters.
This parameter is only used for plotting the probability of shear failure Plot > Strength Factors >
In-Plane Probability N-distribution.
Viscous Modulus (Gn and Gs) - These parameters are used only in non-linear analyses (3D FF
blocks in Map3D Non-Linear and DD planes in Map3D Fault-Slip).
The viscous modulus describes the creep response. where the creep resistance is determined
as the creep coefficient C, times the plastic strain rate.
Note that the user must select both the creep coefficient C, and the time step size t, then
specify the quotient of these as the viscous modulus G.
Specify the viscous modulus in units of stress (MPa or psi).
Expansion Coefficient and Conductivity are only used in Map3D Thermal-Fluid Flow.
Map3D Thermal-Fluid Flow can be used to simultaneously solve steady state heat/fluid flow
coupled to the stress analysis.
Elastic only - when checked this material will respond elastically only, i.e. strength parameters will
not be used.
This can be used to define zones with different elastic properties and/or initial stress states.
This could include for example stiff dykes, soft ore zones, backfill or support elements.
Elasto-Plastic - when checked this material will respond elasto-visco-plastically, i.e. the strength
parameters will be used as a flow rule.
This can be used to define zones with both different elastic properties and strength parameters.
Map3D International Ltd 1990-2015
392
Map3D User's Manual
Note that in Map3D Fault-Slip, only DD elements (i.e. fault gouge) are permitted to respond
non-linearly.
In Map3D Non-Linear the 3D rock mass can also yield plastically.
Inactive - when checked this material will not be used in the stress analysis and hence will not affect
the predicted stresses, strains or displacements.
This can be used to define zones with different strength parameters to be used when
generating contours of strength factors.
User Defined - allows specification of user defined parameters to be used in contouring.
Different parameters are defined for each material number.
These parameters are used with
Plot > Stress > User
This can be used to define zones with different strength parameters to be used when generating
contours of strength factors.
Dump to File - allows you to dump all material property data to a file for viewing in Notepad or Excel.
Copy from material allows you to copy the material properties from one material number to another.
All properties including the stress state are copied.
Stress State - specifies the initial (far field) stress state for the material.
Most materials are inserted into blocks with the same (far field) stress state.
Materials such as props or backfill are placed at near zero initial stresses.
In elastic analysis the shear and normal stresses in the plane of weakness (on a fault, joint set or
bedding plane) are normally used with the Mohr-Coulomb strength criterion to estimate the amount
of damage due to over-stressing. One can expect that more excess stress in an elastic analysis
would in general correlate with increased amounts of plastic strain (slip) in a non-linear analysis.
Since these parameters are orientation dependant, this criterion is representative for anisotropic
rock mass stability.
Fault-Gouge in DD planes
s
= Cohesion + tan( )
s
s
Excess
Stress
s
f
Plastic
Strain
Cohesion
Over-stressing
can be presented in several ways including:
Tension
Cutoff
n
s
Plot > Strength Factors > dTip In-Plane excess shear stress
Plot > Strength Factors > dTub Ubiquitous-plane excess shear stress
Plot > Strength Factors > SF-ip Strength/Stress
Plot > Strength Factors > SF-ub Strength/Stress
By contrast, in non-linear analysis the stresses can never exceed the strength unless some creep is
used (in this latter case, viscous creep can allow stress states above the failure criterion, thus
indicating a lack of static equilibrium). Hence for non-linear analysis one normally directly
considers the plastic strain or the plastic strain rate predicted by the model as an indicator of
damage.
Map3D International Ltd 1990-2015
Appendix
393
In DD planes, the elastic strains are determined from the stresses by
s
n
= f + Shear Modulus selastic
= f + Normal Modulus nelastic
where Shear Modulus and Normal Modulus represent respectively the elastic moduli of the gouge
material in the shear and normal directions, and f and f represent the initial stress state in the
shear and normal directions, and
=
nelastic =
/ Thickness
nelastic / Thickness
selastic
selastic
where selastic and nelastic represent respectively the elastic component of the shear displacement
(ride) and normal displacement (closure) and Thickness represents the DD plane thickness (i.e.
fault gouge, seam width, mining width or pillar height). The DD plane thickness is set using
CAD > Build > DDLoop
and can be modified using
CAD > Edit > Entity Properties
In DD elements, if the shear stress goes above the strength, the plastic strain can be determined by
limiting the stress
s
- s° - C
splastic
/ t = Cohesion + tan( ) (
n
-
n
°-C
nplastic
/ t)
where
° = Shear Modulus splastic
° = Normal Modulus nplastic
s
n
The accumulated plastic strain
plastic, for all creep steps.
, is determined as the sum of the plastic creep increments
plastic
If the normal stress goes below the tension cutoff, the plastic strain can be determined by limiting
the stress
n
-
n
°-C
nplastic
/ t = To
In the case of shear failure, the plastic normal strain can also have a dilation component
nplastic
= tan(dilation angle)
splastic
The total strain is equal to the sum of the elastic and plastic parts.
The creep response is simulated using a linear (Bingham) creep model.
Strength
Elastic
Viscous
elastic
pastic
At each creep
step the stress
state on all yielding elements (elements where the stress exceeds the
strength) is calculated as the strength plus the creep resistance
Strength + C
C=G t
nplastic
/ t
where the creep resistance is determined as the creep coefficient C, times the plastic strain rate.
Note that the user must select both the creep coefficient C, and the time step size t, then specify
Map3D International Ltd 1990-2015
394
Map3D User's Manual
the quotient of these as the viscous modulus G. The creep resistance can be used simply as a
technique for damping the non-linear deformations or for real time dependent creep simulation
Analysis > Options > Creep
The strains, shear displacement (ride) and normal displacement (closure) can be presented in
several ways including:
Plot > Surface > Value > Elastic
Plot > Surface > Value > Plastic
Plot > Surface > Value > Total
Plot > Strain > E1 - Major principal strain
Plot > Surface > Es Shear Strain
Plot > Surface > En Normal Strain
Plot > Surface > ds Shear Displacement (Ride)
Plot > Surface > dn Normal Displacement (Closure)
Also of interest is the plastic creep increment
the viscous element
s
=C
splastic
, the contribution to the shear resistance from
plastic
/ t
Plot > Surface > dEs Incremental Shear Strain
Plot > Surface > dTs Excess Shear Stress
Related Topics:
Mohr-Coulomb in DD planes
Backfill-Hyperbolic in DD planes
5.4.5
Materials > Hyperbolic-Backfill in DD Planes
Hyperbolic-Backfill material can be used to describe non-linear response in DD planes in both
Map3D Fault-Slip, Map3D Non-Linear and Map3D Visco-Plastic.
Map3D International Ltd 1990-2015
Appendix
395
Material Name - specifies a descriptive name for the material.
Material # - specifies the material number.
Material #1 is reserved for the host material.
Other material numbers are used to define alternate material zones such as ore, fault gouge,
backfill etc.
Material Type - specifies the material type (Mohr-Coulomb, Hoek-Brown, Drucker-Prager, FaultGouge, Hyperbolic-Backfill, Quadratic-Backfill, Equilibrated-Gouge, Yielding-Pillar or none).
Hyperbolic-Backfill - defines the failure envelope as a straight line in the same as MohrCoulomb in DD planes but without UCS.
Strength is defined in terms of in-plane shear and normal stresses as follows:
Hyperbolic-Backfill in DD planes
s
= Cohesion + tan( )
s
Cohesion
Tension
Cutoff and Cohesion are specified inn units of stress (MPa or psi).
Tension
Cutoff
Friction
angle and dilation angle are specified in degrees.
Cohesion and friction angle define the shear response.
The tension cutoff defines the response in the direction normal to the shear plane.
Peak values of these parameters are used up until failure.
After yielding, the residual values are used to provide a strain softening response.
Residual values are ignored in elastic analyses.
B, et - for DD planes the Hyperbolic-Backfill criterion defines the hyperbolic normal response as
follows:
Map3D International Ltd 1990-2015
396
Map3D User's Manual
Hyperbolic-Backfill in DD planes
n
=
f
+ N ( n - t )/(B -
)
n
n
f
n
t
B
The normal
stress varies according
to
the hyperbolic relation.
As the strain approaches the value B the normal stress rapidly become infinite thus limited the
amount of normal displacement (closure) that can take place.
Normal and Shear Modulus - specify moduli in units of stress (MPa or psi).
The normal response is defined above. N represents the value of the normal stress (for
at n=½( t+B).
f=0)
The shear stresses acting on the surfaces of the elements are related to the elastic portion of
the shear displacement (ride) through the shear modulus as in the Fault-Gouge model.
Standard Deviation - specify standard deviation in units of stress (MPa or psi).
This parameter describes the uncertainty you have in the strength parameters.
This parameter is only used for plotting the probability of shear failure Plot > Strength Factors >
In-Plane Probability N-distribution.
Viscous Modulus (Gn and Gs) - These parameters are used only in non-linear analyses (3D FF
blocks in Map3D Non-Linear and DD planes in Map3D Fault-Slip).
The viscous modulus describes the creep response. where the creep resistance is determined
as the creep coefficient C, times the plastic strain rate. Note that the user must select both the
creep coefficient C, and the time step size t, then specify the quotient of these as the viscous
modulus G.
Gn is not used in the hyperbolic model.
Specify the viscous modulus in units of stress (MPa or psi).
Expansion Coefficient and Conductivity are only used in Map3D Thermal-Fluid Flow.
Map3D Thermal-Fluid Flow can be used to simultaneously solve steady state heat/fluid flow
coupled to the stress analysis.
Elastic only - when checked this material will respond elastically only, i.e. strength parameters will
not be used.
This can be used to define zones with different elastic properties and/or initial stress states.
This could include for example stiff dykes, soft ore zones, backfill or support elements.
Elasto-Plastic - when checked this material will respond elasto-visco-plastically, i.e. the strength
parameters will be used as a flow rule.
This can be used to define zones with both different elastic properties and strength parameters.
Note that in Map3D Fault-Slip, only DD elements (i.e. fault gouge) are permitted to respond
non-linearly.
In Map3D Non-Linear and Map3D Visco-Plastic the 3D rock mass can also yield plastically.
Inactive - when checked this material will not be used in the stress analysis and hence will not affect
the predicted stresses, strains or displacements.
This can be used to define zones with different strength parameters to be used when
Map3D International Ltd 1990-2015
Appendix
397
generating contours of strength factors.
User Defined - allows specification of user defined parameters to be used in contouring.
Different parameters are defined for each material number.
These parameters are used with
Plot > Stress > User
This can be used to define zones with different strength parameters to be used when generating
contours of strength factors.
Dump to File - allows you to dump all material property data to a file for viewing in Notepad or Excel.
Copy from material - allows you to copy the material properties from one material number to
another. All properties including the stress state are copied.
Stress State - specifies the initial (far field) stress state for the material.
Most materials are inserted into blocks with the same (far field) stress state.
Materials such as props or backfill are placed at near zero initial stresses.
Over-stressing can be presented in several ways including:
Plot > Strength Factors > dTip In-Plane excess shear stress
Plot > Strength Factors > dTub Ubiquitous-plane excess shear stress
Plot > Strength Factors > SF-ip Strength/Stress
Plot > Strength Factors > SF-ub Strength/Stress
By contrast, in non-linear analysis the stresses can never exceed the strength unless some creep is
used (in this latter case, viscous creep can allow stress states above the failure criterion, thus
indicating a lack of static equilibrium). Hence for non-linear analysis one normally directly
considers the plastic strain or the plastic strain rate predicted by the model as an indicator of
damage.
In DD planes, the elastic strains are determined from the stresses by
s
=
n
=
f
+ Shear Modulus
f
elastic
s
+ Normal Modulus (
n
elastic-
t )/(
B-
n
elastic)
where Shear Modulus and Normal Modulus represent respectively the elastic moduli of the gouge
material in the shear and normal directions, and f and f represent the initial stress state in the
shear and normal directions, and
elastic
s
elastic
n
=
=
elastic
/ Thickness
elastic
/ Thickness
s
n
where selastic and nelastic represent respectively the elastic component of the shear displacement
(ride) and normal displacement (closure) and Thickness represents the DD plane thickness (i.e.
fault gouge, seam width, mining width or pillar height). The DD plane thickness is set using
CAD > Build > DDLoop
and can be modified using
CAD > Edit > Entity Properties
In DD elements, if the shear stress goes above the strength, the plastic strain can be determined by
limiting the stress
s
-
s
°-C
plastic
s
where
Map3D International Ltd 1990-2015
/ t = Cohesion + tan( ) (
n
-
n
°-C
plastic
n
/ t)
398
Map3D User's Manual
s
plastic
° = Shear Modulus
n
s
° = Normal Modulus
plastic
n
plastic
The accumulated plastic strain
plastic, for all creep steps.
, is determined as the sum of the plastic creep increments
If the normal stress goes below the tension cutoff, the plastic strain can be determined by limiting
the stress
n
-
n°
-C
plastic
n
/ t = To
In the case of shear failure, the plastic normal strain can also have a dilation component
plastic
n
= tan(dilation angle)
plastic
s
The total strain is equal to the sum of the elastic and plastic parts.
The creep response is simulated using a linear (Bingham) creep model.
Strength
Elastic
Viscous
elastic
pastic
At each creep
step the stress
state on all yielding elements (elements where the stress exceeds the
strength) is calculated as the strength plus the creep resistance
Strength + C
plastic
n
/ t
C=G t
where the creep resistance is determined as the creep coefficient C, times the plastic strain rate.
Note that the user must select both the creep coefficient C, and the time step size t, then specify
the quotient of these as the viscous modulus G. The creep resistance can be used simply as a
technique for damping the non-linear deformations or for real time dependent creep simulation
Analysis > Options > Creep
The strains, shear displacement (ride) and normal displacement (closure) can be presented in
several ways including:
Plot > Surface > Value > Elastic
Plot > Surface > Value > Plastic
Plot > Surface > Value > Total
Plot > Strain > E1 - Major principal strain
Plot > Surface > Es Shear Strain
Plot > Surface > En Normal Strain
Plot > Surface > ds Shear Displacement (Ride)
Plot > Surface > dn Normal Displacement (Closure)
Also of interest is the plastic creep increment
the viscous element
, the contribution to the shear resistance from
plastic
Map3D International Ltd 1990-2015
Appendix
s
=C
plastic
s
399
/ t
Plot > Surface > dEs Incremental Shear Strain
Plot > Surface > dTs Excess Shear Stress
Related Topics:
Mohr-Coulomb in DD planes
Fault-Gouge in DD planes
5.4.6
Materials > Quadratic-Backfill in DD Planes
Quadratic-Backfill material can be used to describe non-linear response in DD planes in both
Map3D Fault-Slip, Map3D Non-Linear and Map3D Visco-Plastic.
Material Name - specifies a descriptive name for the material.
Material # - specifies the material number.
Material #1 is reserved for the host material.
Other material numbers are used to define alternate material zones such as ore, fault gouge,
backfill etc.
Material Type - specifies the material type (Mohr-Coulomb, Hoek-Brown, Drucker-Prager, FaultGouge, Hyperbolic-Backfill, Quadratic-Backfill, Equilibrated-Gouge, Yielding-Pillar or none).
Quadratic-Backfill - defines the failure envelope as a straight line in the same as Mohr-Coulomb
in DD planes but without UCS.
Strength is defined in terms of in-plane shear and normal stresses as follows:
Map3D International Ltd 1990-2015
400
Map3D User's Manual
Quadratic-Backfill in DD planes
s
= Cohesion + tan( )
s
Cohesion
Tension
Cutoff and Cohesion are specified inn units of stress (MPa or psi).
Tension
Cutoff
Friction angle and dilation angle are specified in degrees.
Cohesion and friction angle define the shear response.
The tension cutoff defines the response in the direction normal to the shear plane.
Peak values of these parameters are used up until failure.
After yielding, the residual values are used to provide a strain softening response.
Residual values are ignored in elastic analyses.
B, et - for DD planes the Backfill-Hyperbolic criterion defines the hyperbolic normal response as
follows:
Quadratic-Backfill in DD planes
n
=
f
+ N ( n - t ) 2/(B -
n
)
n
f
n
t
B
The normal
stress varies according
to
the hyperbolic relation.
As the strain approaches the value B the normal stress rapidly become infinite thus limited the
amount of normal displacement (closure) that can take place.
Normal and Shear Modulus - specify moduli in units of stress (MPa or psi).
The normal response is defined above. N represents the value of the normal stress (for
at n=( t-½)+v(B- t+¼).
f=0)
The shear stresses acting on the surfaces of the elements are related to the elastic portion of
the shear displacement (ride) through the shear modulus as in the Fault-Gouge model.
Standard Deviation - specify standard deviation in units of stress (MPa or psi).
This parameter describes the uncertainty you have in the strength parameters.
This parameter is only used for plotting the probability of shear failure Plot > Strength Factors >
In-Plane Probability N-distribution.
Viscous Modulus (Gn and Gs) - These parameters are used only in non-linear analyses (3D FF
blocks in Map3D Non-Linear and DD planes in Map3D Fault-Slip).
The viscous modulus describes the creep response. where the creep resistance is determined
as the creep coefficient C, times the plastic strain rate. Note that the user must select both the
Map3D International Ltd 1990-2015
Appendix
401
creep coefficient C, and the time step size t, then specify the quotient of these as the viscous
modulus G.
Gn is not used in the hyperbolic model.
Specify the viscous modulus in units of stress (MPa or psi).
Expansion Coefficient and Conductivity are only used in Map3D Thermal-Fluid Flow.
Map3D Thermal-Fluid Flow can be used to simultaneously solve steady state heat/fluid flow
coupled to the stress analysis.
Elastic only - when checked this material will respond elastically only, i.e. strength parameters will
not be used.
This can be used to define zones with different elastic properties and/or initial stress states.
This could include for example stiff dykes, soft ore zones, backfill or support elements.
Elasto-Plastic - when checked this material will respond elasto-visco-plastically, i.e. the strength
parameters will be used as a flow rule.
This can be used to define zones with both different elastic properties and strength parameters.
Note that in Map3D Fault-Slip, only DD elements (i.e. fault gouge) are permitted to respond
non-linearly.
In Map3D Non-Linear the 3D rock mass can also yield plastically.
Inactive - when checked this material will not be used in the stress analysis and hence will not affect
the predicted stresses, strains or displacements.
This can be used to define zones with different strength parameters to be used when
generating contours of strength factors.
User Defined - allows specification of user defined parameters to be used in contouring.
Different parameters are defined for each material number.
These parameters are used with
Plot > Stress > User
This can be used to define zones with different strength parameters to be used when generating
contours of strength factors.
Dump to File - allows you to dump all material property data to a file for viewing in Notepad or Excel.
Copy from material - allows you to copy the material properties from one material number to
another. All properties including the stress state are copied.
Stress State - specifies the initial (far field) stress state for the material.
Most materials are inserted into blocks with the same (far field) stress state.
Materials such as props or backfill are placed at near zero initial stresses.
Over-stressing can be presented in several ways including:
Plot > Strength Factors > dTip In-Plane excess shear stress
Plot > Strength Factors > dTub Ubiquitous-plane excess shear stress
Plot > Strength Factors > SF-ip Strength/Stress
Plot > Strength Factors > SF-ub Strength/Stress
By contrast, in non-linear analysis the stresses can never exceed the strength unless some creep is
used (in this latter case, viscous creep can allow stress states above the failure criterion, thus
indicating a lack of static equilibrium). Hence for non-linear analysis one normally directly
considers the plastic strain or the plastic strain rate predicted by the model as an indicator of
damage.
In DD planes, the elastic strains are determined from the stresses by
s
=
f
+ Shear Modulus
Map3D International Ltd 1990-2015
elastic
s
402
Map3D User's Manual
=
n
f
+ Normal Modulus (
n
elastic-
t )2/(
B-
n
elastic)
where Shear Modulus and Normal Modulus represent respectively the elastic moduli of the gouge
material in the shear and normal directions, and f and f represent the initial stress state in the
shear and normal directions, and
elastic
s
elastic
n
=
elastic
/ Thickness
elastic
/ Thickness
s
=
n
where selastic and nelastic represent respectively the elastic component of the shear displacement
(ride) and normal displacement (closure) and Thickness represents the DD plane thickness (i.e.
fault gouge, seam width, mining width or pillar height). The DD plane thickness is set using
CAD > Build > DDLoop
and can be modified using
CAD > Edit > Entity Properties
In DD elements, if the shear stress goes above the strength, the plastic strain can be determined by
limiting the stress
-
s
s°
-C
plastic
s
/ t = Cohesion + tan( ) (
n
-
n°
-C
plastic
n
/ t)
where
plastic
s°
= Shear Modulus
n°
= Normal Modulus
s
plastic
n
plastic,
The accumulated plastic strain
plastic, for all creep steps.
is determined as the sum of the plastic creep increments
If the normal stress goes below the tension cutoff, the plastic strain can be determined by limiting
the stress
n
-
n°
-C
plastic
n
/ t = To
In the case of shear failure, the plastic normal strain can also have a dilation component
plastic
n
= tan(dilation angle)
plastic
s
The total strain is equal to the sum of the elastic and plastic parts.
The creep response is simulated using a linear (Bingham) creep model.
Strength
Elastic
Viscous
elastic
pastic
At each creep
step the stress
state on all yielding elements (elements where the stress exceeds the
strength) is calculated as the strength plus the creep resistance
Strength + C
plastic
n
/ t
C=G t
where the creep resistance is determined as the creep coefficient C, times the plastic strain rate.
Map3D International Ltd 1990-2015
Appendix
403
Note that the user must select both the creep coefficient C, and the time step size t, then specify
the quotient of these as the viscous modulus G. The creep resistance can be used simply as a
technique for damping the non-linear deformations or for real time dependent creep simulation
Analysis > Options > Creep
The strains, shear displacement (ride) and normal displacement (closure) can be presented in
several ways including:
Plot > Surface > Value > Elastic
Plot > Surface > Value > Plastic
Plot > Surface > Value > Total
Plot > Strain > E1 - Major principal strain
Plot > Surface > Es Shear Strain
Plot > Surface > En Normal Strain
Plot > Surface > ds Shear Displacement (Ride)
Plot > Surface > dn Normal Displacement (Closure)
Also of interest is the plastic creep increment
the viscous element
s
=C
plastic
s
, the contribution to the shear resistance from
plastic
/ t
Plot > Surface > dEs Incremental Shear Strain
Plot > Surface > dTs Excess Shear Stress
Related Topics:
Mohr-Coulomb in DD planes
Fault-Gouge in DD planes
5.4.7
Materials > Equilibrated-Gouge in DD Planes
Equilibrated-Gouge material can be used to describe non-linear response in DD planes in both
Map3D Fault-Slip and Map3D Non-Linear.
This material is similar to the Fault-Gouge material type but automatically adjusts the strength
parameters to place the gouge into critical equilibrium at the first mining step.
Map3D International Ltd 1990-2015
404
Map3D User's Manual
At step 1 of the stress analysis, the elastic stresses are calculated at all locations on the DD fault
plane.
From this information, the required strength parameters (Cohesion and friction angle) are
determined by interpolation such that every location is exactly at the point of failure.
This is done by linearly interpolating between the specified minimum and maximum strength values.
If the elastic stress falls below the minimum, the minimum is used. If the elastic stress falls above the
maximum, the maximum is used.
The interpolated strength values are then used for all subsequent mining steps.
This can be considered to the the worst case scenario where any mining induced stress change
has the potential to case slip on the fault.
Equilibrated-Gouge in DD planes
Maximum
Strength
Elastic
Str ess
Inter polated
Strength
s
*
Minimum
Strength
n
Material Name - specifies a descriptive name for the material.
Material # - specifies the material number.
Material #1 is reserved for the host material.
Other material numbers are used to define alternate material zones such as ore, fault gouge,
backfill etc.
Material Type - specifies the material type (Mohr-Coulomb, Hoek-Brown, Drucker-Prager, FaultGouge, Hyperbolic-Backfill, Quadratic-Backfill, Equilibrated-Gouge, Yielding-Pillar or none).
Fault-Gouge - defines the failure envelope as a straight line in the same as Mohr-Coulomb in
Map3D International Ltd 1990-2015
Appendix
405
DD planes but without UCS.
Strength is defined in terms of in-plane shear and normal stresses as follows:
Fault-Gouge in DD planes
s
= Cohesion + tan( )
s
Cohesion
Tension
Cutoff and Cohesion are specified inn units of stress (MPa or psi).
Tension
Cutoff
Friction
angle and dilation angle are specified in degrees.
Cohesion and friction angle define the shear response.
The tension cutoff defines the response in the direction normal to the shear plane.
Maximum values specify the maximum allowable interpolated strength.
Min values specify the minimum allowable interpolated strength.
Normal and Shear Modulus - specify moduli in units of stress (MPa or psi).
In DD planes the shear and normal stresses acting on the surfaces of the element are related to
the elastic portion of the shear displacement (ride) and normal displacement (closure) through
the shear and normal moduli.
Peak values of these parameters are used up until failure.
After yielding, the residual values are used.
Standard Deviation - specify standard deviation in units of stress (MPa or psi).
This parameter describes the uncertainty you have in the strength parameters.
This parameter is only used for plotting the probability of shear failure Plot > Strength Factors >
In-Plane Probability N-distribution.
Viscous Modulus (Gn and Gs) - These parameters are used only in non-linear analyses (3D FF
blocks in Map3D Non-Linear and DD planes in Map3D Fault-Slip).
The viscous modulus describes the creep response. where the creep resistance is determined
as the creep coefficient C, times the plastic strain rate.
Note that the user must select both the creep coefficient C, and the time step size t, then
specify the quotient of these as the viscous modulus G.
Specify the viscous modulus in units of stress (MPa or psi).
Expansion Coefficient and Conductivity are only used in Map3D Thermal-Fluid Flow.
Map3D Thermal-Fluid Flow can be used to simultaneously solve steady state heat/fluid flow
coupled to the stress analysis.
Elastic only - when checked this material will respond elastically only, i.e. strength parameters will
not be used.
This can be used to define zones with different elastic properties and/or initial stress states.
This could include for example stiff dykes, soft ore zones, backfill or support elements.
Elasto-Plastic - when checked this material will respond elasto-visco-plastically, i.e. the strength
parameters will be used as a flow rule.
This can be used to define zones with both different elastic properties and strength parameters.
Note that in Map3D Fault-Slip, only DD elements (i.e. fault gouge) are permitted to respond
non-linearly.
Map3D International Ltd 1990-2015
406
Map3D User's Manual
In Map3D Non-Linear the 3D rock mass can also yield plastically.
Inactive - when checked this material will not be used in the stress analysis and hence will not affect
the predicted stresses, strains or displacements.
This can be used to define zones with different strength parameters to be used when
generating contours of strength factors.
User Defined - allows specification of user defined parameters to be used in contouring.
Different parameters are defined for each material number.
These parameters are used with
Plot > Stress > User
This can be used to define zones with different strength parameters to be used when generating
contours of strength factors.
Dump to File - allows you to dump all material property data to a file for viewing in Notepad or Excel.
Copy from material allows you to copy the material properties from one material number to another.
All properties including the stress state are copied.
Stress State - specifies the initial (far field) stress state for the material.
Most materials are inserted into blocks with the same (far field) stress state.
Materials such as props or backfill are placed at near zero initial stresses.
In elastic analysis the shear and normal stresses in the plane of weakness (on a fault, joint set or
bedding plane) are normally used with the Mohr-Coulomb strength criterion to estimate the amount
of damage due to over-stressing. One can expect that more excess stress in an elastic analysis
would in general correlate with increased amounts of plastic strain (slip) in a non-linear analysis.
Since these parameters are orientation dependant, this criterion is representative for anisotropic
rock mass stability.
Fault-Gouge in DD planes
s
= Cohesion + tan( )
s
s
Excess
Stress
s
f
Plastic
Strain
Cohesion
Over-stressing
can be presented in several ways including:
Tension
n
Cutoff
s
Plot > Strength Factors > dTip In-Plane excess shear stress
Plot > Strength Factors > dTub Ubiquitous-plane excess shear stress
Plot > Strength Factors > SF-ip Strength/Stress
Plot > Strength Factors > SF-ub Strength/Stress
By contrast, in non-linear analysis the stresses can never exceed the strength unless some creep is
used (in this latter case, viscous creep can allow stress states above the failure criterion, thus
indicating a lack of static equilibrium). Hence for non-linear analysis one normally directly
considers the plastic strain or the plastic strain rate predicted by the model as an indicator of
damage.
In DD planes, the elastic strains are determined from the stresses by
s
=
f
+ Shear Modulus
selastic
Map3D International Ltd 1990-2015
Appendix
n
=
f
+ Normal Modulus
407
nelastic
where Shear Modulus and Normal Modulus represent respectively the elastic moduli of the gouge
material in the shear and normal directions, and f and f represent the initial stress state in the
shear and normal directions, and
selastic
nelastic
=
=
selastic
nelastic
/ Thickness
/ Thickness
where selastic and nelastic represent respectively the elastic component of the shear displacement
(ride) and normal displacement (closure) and Thickness represents the DD plane thickness (i.e.
fault gouge, seam width, mining width or pillar height). The DD plane thickness is set using
CAD > Build > DDLoop
and can be modified using
CAD > Edit > Entity Properties
In DD elements, if the shear stress goes above the strength, the plastic strain can be determined by
limiting the stress
s
- s° - C
splastic
/ t = Cohesion + tan( ) (
n
-
n
°-C
nplastic
/ t)
where
° = Shear Modulus splastic
n ° = Normal Modulus nplastic
s
The accumulated plastic strain
plastic, for all creep steps.
, is determined as the sum of the plastic creep increments
plastic
If the normal stress goes below the tension cutoff, the plastic strain can be determined by limiting
the stress
n
-
n
°-C
nplastic
/ t = To
In the case of shear failure, the plastic normal strain can also have a dilation component
nplastic
= tan(dilation angle)
splastic
The total strain is equal to the sum of the elastic and plastic parts.
The creep response is simulated using a linear (Bingham) creep model.
Strength
Elastic
Viscous
elastic
pastic
At each creep
step the stress
state on all yielding elements (elements where the stress exceeds the
strength) is calculated as the strength plus the creep resistance
Strength + C
C=G t
nplastic
/ t
where the creep resistance is determined as the creep coefficient C, times the plastic strain rate.
Note that the user must select both the creep coefficient C, and the time step size t, then specify
the quotient of these as the viscous modulus G. The creep resistance can be used simply as a
technique for damping the non-linear deformations or for real time dependent creep simulation
Map3D International Ltd 1990-2015
408
Map3D User's Manual
Analysis > Options > Creep
The strains, shear displacement (ride) and normal displacement (closure) can be presented in
several ways including:
Plot > Surface > Value > Elastic
Plot > Surface > Value > Plastic
Plot > Surface > Value > Total
Plot > Strain > E1 - Major principal strain
Plot > Surface > Es Shear Strain
Plot > Surface > En Normal Strain
Plot > Surface > ds Shear Displacement (Ride)
Plot > Surface > dn Normal Displacement (Closure)
Also of interest is the plastic creep increment
the viscous element
s
=C
splastic
, the contribution to the shear resistance from
plastic
/ t
Plot > Surface > dEs Incremental Shear Strain
Plot > Surface > dTs Excess Shear Stress
Related Topics:
Mohr-Coulomb in DD planes
Backfill-Hyperbolic in DD planes
Map3D International Ltd 1990-2015
Appendix
5.4.8
409
Materials > Yielding-Pillar in DD Planes
Yielding-Pillar material can be used to describe non-linear response in DD planes in both Map3D
Fault-Slip and Map3D Non-Linear.
Material Name - specifies a descriptive name for the material.
Material # - specifies the material number.
Material #1 is reserved for the host material.
Other material numbers are used to define alternate material zones such as ore, fault gouge,
backfill etc.
Material Type - specifies the material type (Mohr-Coulomb, Hoek-Brown, Drucker-Prager, FaultGouge, Hyperbolic-Backfill, Quadratic-Backfill, Equilibrated-Gouge, Yielding-Pillar or none).
Mohr-Coulomb - defines the failure envelope as a straight line.
For DD planes the Mohr-Coulomb criterion defines strength in terms of in-plane shear and
normal stresses as follows:
Mohr-Coulomb in DD planes
s
= Cohesion + tan( )
s
Cohesion
n
Tension
Cutoff, Cohesion and UCS
are specified
in units of stress (MPa or psi).
Tension
UCS
Cutoff
Friction angle and dilation angle are specified in degrees.
Cohesion and friction angle define the shear response.
The tension cutoff and UCS define the response in the direction normal to the shear plane.
Map3D International Ltd 1990-2015
410
Map3D User's Manual
Here UCS permits simulation of yielding pillars.
Peak values of these parameters are used up until failure.
After yielding, the residual values are used to provide a strain softening response. Residual
values are ignored in elastic analyses.
Young's Modulus and Poisson's Ratio specify Young's Modulus in units of stress (MPa or psi).
In DD planes the shear and normal stresses acting on the surfaces of the element are related
to the elastic portion of the shear displacement (ride) and normal displacement (closure)
through the shear and normal moduli
Shear Modulus = E / [ 2 (1+ ) ]
Normal Modulus = E / [ 3 (1-2 ) ]
Peak values of these parameters are used up until failure.
After yielding, the residual values are used.
Residual values are ignored in elastic analyses.
Standard Deviation - specify standard deviation in units of stress (MPa or psi).
This parameter describes the uncertainty you have in the strength parameters.
This parameter is only used for plotting the probability of shear failure Plot > Strength Factors >
In-Plane Probability N-distribution.
Viscous Modulus (Gn and Gs) - These parameters are used only in non-linear analyses (3D FF
blocks in Map3D Non-Linear and DD planes in Map3D Fault-Slip).
The viscous modulus describes the creep response. where the creep resistance is determined
as the creep coefficient C, times the plastic strain rate. Note that the user must select both the
creep coefficient C, and the time step size t, then specify the quotient of these as the viscous
modulus G.
Specify the viscous modulus in units of stress (MPa or psi).
Expansion Coefficient and Conductivity are only used in Map3D Thermal-Fluid Flow.
Map3D Thermal-Fluid Flow can be used to simultaneously solve steady state heat/fluid flow
coupled to the stress analysis.
Elastic only - when checked this material will respond elastically only, i.e. strength parameters will
not be used.
This can be used to define zones with different elastic properties and/or initial stress states.
This could include for example stiff dykes, soft ore zones, backfill or support elements.
Elasto-Plastic - when checked this material will respond elasto-visco-plastically, i.e. the strength
parameters will be used as a flow rule.
This can be used to define zones with both different elastic properties and strength parameters.
Note that in Map3D Fault-Slip, only DD elements (i.e. fault gouge) are permitted to respond
non-linearly.
In Map3D Non-Linear the 3D rock mass can also yield plastically.
Inactive - when checked this material will not be used in the stress analysis and hence will not affect
the predicted stresses, strains or displacements.
This can be used to define zones with different strength parameters to be used when
generating contours of strength factors.
User Defined - allows specification of user defined parameters to be used in contouring.
Different parameters are defined for each material number.
These parameters are used with
Plot > Stress > User
This can be used to define zones with different strength parameters to be used when generating
contours of strength factors.
Dump to File - allows you to dump all material property data to a file for viewing in Notepad or Excel.
Map3D International Ltd 1990-2015
Appendix
411
Copy from material allows you to copy the material properties from one material number to another.
All properties including the stress state are copied.
Stress State - specifies the initial (far field) stress state for the material.
Most materials are inserted into blocks with the same (far field) stress state.
Materials such as props or backfill are placed at near zero initial stresses.
In elastic analysis the shear and normal stresses in the plane of weakness (on a fault, joint set or
bedding plane) are normally used with the Mohr-Coulomb strength criterion to estimate the amount
of damage due to over-stressing. One can expect that more excess stress in an elastic analysis
would in general correlate with increased amounts of plastic strain (slip) in a non-linear analysis.
Since these parameters are orientation dependant, this criterion is representative for anisotropic
rock mass stability.
Mohr-Coulomb in DD planes
s
= Cohesion + tan( )
s
s
Excess
Stress
s
f
Plastic
Strain
Cohesion
Over-stressing
can be presented in several ways including:
Tension
n
Cutoff
s
Plot > Strength Factors > dTip In-Plane excess shear stress
Plot > Strength Factors > dTub Ubiquitous-plane excess shear stress
Plot > Strength Factors > SF-ip Strength/Stress
Plot > Strength Factors > SF-ub Strength/Stress
By contrast, in non-linear analysis the stresses can never exceed the strength unless some creep is
used (in this latter case, viscous creep can allow stress states above the failure criterion, thus
indicating a lack of static equilibrium). Hence for non-linear analysis one normally directly
considers the plastic strain or the plastic strain rate predicted by the model as an indicator of
damage.
In DD planes, the elastic strains are determined from the stresses by
= f + Shear Modulus selastic
n =
f + Normal Modulus nelastic
s
where Shear Modulus and Normal Modulus represent respectively the elastic moduli of the gouge
material in the shear and normal directions, and f and f represent the initial stress state in the
shear and normal directions, and
selastic
nelastic
=
=
selastic
nelastic
/ Thickness
/ Thickness
where selastic and nelastic represent respectively the elastic component of the shear displacement
(ride) and normal displacement (closure) and Thickness represents the DD plane thickness (i.e.
fault gouge, seam width, mining width or pillar height). The DD plane thickness is set using
CAD > Build > DDLoop
Map3D International Ltd 1990-2015
412
Map3D User's Manual
and can be modified using
CAD > Edit > Entity Properties
In DD elements, if the shear stress goes above the strength, the plastic strain can be determined by
limiting the stress
s
- s° - C
splastic
/ t = Cohesion + tan( ) (
n
-
n
°-C
nplastic
/ t)
where
° = Shear Modulus splastic
° = Normal Modulus nplastic
s
n
The accumulated plastic strain
plastic, for all creep steps.
, is determined as the sum of the plastic creep increments
plastic
If the normal stress goes below the tension cutoff, the plastic strain can be determined by limiting
the stress
n
-
n
°-C
nplastic
/ t = To
If the normal stress goes above the UCS, the plastic strain can be determined by limiting the stress
n
-
n
°-C
nplastic
/ t = UCS
In the case of shear failure, the plastic normal strain can also have a dilation component
nplastic
= tan(dilation angle)
splastic
The total strain is equal to the sum of the elastic and plastic parts.
The creep response is simulated using a linear (Bingham) creep model.
Strength
Elastic
Viscous
elastic
pastic
At each creep
step the stress
state on all yielding elements (elements where the stress exceeds the
strength) is calculated as the strength plus the creep resistance
Strength + C
C=G t
nplastic
/ t
where the creep resistance is determined as the creep coefficient C, times the plastic strain rate.
Note that the user must select both the creep coefficient C, and the time step size t, then specify
the quotient of these as the viscous modulus G. The creep resistance can be used simply as a
technique for damping the non-linear deformations or for real time dependent creep simulation
Analysis > Options > Creep
The strains, shear displacement (ride) and normal displacement (closure) can be presented in
several ways including:
Plot > Surface > Value > Elastic
Plot > Surface > Value > Plastic
Plot > Surface > Value > Total
Map3D International Ltd 1990-2015
Appendix
413
Plot > Strain > E1 - Major principal strain
Plot > Surface > Es Shear Strain
Plot > Surface > En Normal Strain
Plot > Surface > ds Shear Displacement (Ride)
Plot > Surface > dn Normal Displacement (Closure)
Also of interest is the plastic creep increment
the viscous element
s
=C
splastic
, the contribution to the shear resistance from
plastic
/ t
Plot > Surface > dEs Incremental Shear Strain
Plot > Surface > dTs Excess Shear Stress
Related Topics:
Fault-Gouge in DD planes
Backfill-Hyperbolic in DD planes
5.4.9
Materials > User Defined Parameters
Allows specification of user defined parameters to be used in contouring.
These parameters are used with
Plot > Stress > User
Different parameters are defined for each material number. Hence analysis results that are
calculated in different alternate material zones will use the user defined parameters appropriate for
each zone.
5.4.10 Materials > Dump to File
Allows you to dump all material property data to a file for viewing in Notepad or Excel.
You will be prompted to select a file name for the dump.
Options include:
Open in Excel
Open in Notepad
Use commas as decimal points
Map3D International Ltd 1990-2015
414
Map3D User's Manual
File formats available include:
csv - comma separated values (useful for direct import into Excel)
tsv - tab separated values (useful for direct import into Excel)
txt - space separated values (useful for direct import into Notepad)
5.4.11 Materials > Expansion Coefficient and Conductivity
Map3D Thermal-Fluid Flow can be used to simultaneously solve steady state heat/fluid flow coupled
to the stress analysis. The program is set up so that the user need only specify the temperature/
head boundary conditions, then the coupled thermal/fluid flow stress problem is solved
simultaneously. This feature is useful for the simulation of heating or cooling effects and drained or
undrained response of soils.
The steady state thermal/fluid flow problem is solved according to Laplace's equation in threedimensions. This is directly coupled to the stress analysis through an expansion coefficient A,
where the temperature change or fluid pressure change (from the background value) induces the
initial stresses
=A T
The stresses can be presented either without or with the initial stresses
.
Plot > Stress > Value > Seff Effective Stress
Plot > Stress > Value > Stotal Total Stress
For fluid flow problems the expansion coefficient should be set to unity (positive one) for saturated
media
A=1
For thermal problems the expansion coefficient should be specified as a negative quantity given by
A = - E /(1-2 )
where E and represent the coefficient of thermal expansion (i.e. the linear expansivity),
Young's modulus and Poisson's ratio.
It is also necessary to specify the conductivity C. This parameter relates the gradient to the flux qx
such that
qx = -C T/ x
The recommended units for C are J/(m s 8C).
The various flow parameters can be plotted using
Plot > Flow
5.5
Map3D Analysis Stages
A Map3D analysis proceeds in five stages:
Stage 1 – Model building and editing
This stage is used to setup the Map3D analysis.
Analysis > Go to CAD
The user can add new mining blocks and edit existing blocks using the CAD functions built into
Map3D International Ltd 1990-2015
Appendix
415
Map3D. This can include tunnels, large irregular shaped excavations, ore zones, massive and
tabular excavations, open pits, faults, fractures and more.
Various parts of the model can be saved in separate component files and merged for final analysis.
Analysis > Load Model
At this stage, material properties are assigned and the desired mining sequence is set up. This can
include ore placement, excavation and backfilling.
Field point grids are positioned at locations where off reef results are desired. For the case of
tabular excavations, often only on reef results are required and hence field points grids are optional.
Stage 2 – Contact and intersection analysis
Analysis > Intersections.
Intersections are built between blocks that cut through one another. Boolean operations are
performed to resolve the mining sequence. Comprehensive model integrity checking is conducted.
Stage 3 – Block and grid discretization
Analysis > Discretization.
The model is discretized into boundary elements to be used in the BEM analysis. The user has
complete control over the way in which the model is discretized. This can be conducted
automatically by the program concentrating results only where results are requested, or specified
manually.
Stage 4 – Map3D BEM analysis
Analysis > BEM Analysis.
Conducts the Boundary Element Analysis. The same input data can be used for elastic, thermal/
fluid flow or non-linear analysis
Map3D Versions
Stage 5 – Post-processing
Analysis > Graphics.
This stage is used to view and process the Map3D analysis results. Contour plots of stress, strain,
displacement and strength factors, or any desired combination of these components can be
generated on boundary surfaces and on user defined field point grids. Results can be displayed
either as total values, or the difference in value between mining steps.
Results from previous analyses can be loaded for viewing
File > Open Analysis Results.
Map3D International Ltd 1990-2015
416
5.6
Map3D User's Manual
Map3D Versions
CAD
Visual Results Elastic Fault
Databas Viewer Analysis Slip
e
Non
Linear
3D
Plastic
Map3D Modeller
Map3D Results Viewer
Map3D Fault-Slip
Map3Di Integrated
Seismicity
Map3D Thermal-Fluid Flow
Map3D Non-Linear
Map3D Visco-Plastic
Map3D Modeller - features 3D CAD and Visual Database capabilities.
Easy to use 3D CAD (OpenGL based graphics) system includes free-hand sketching or
object picking to build and edit 5 basic entity types:
3D blocks (e.g. stopes, ore zones, dykes, tunnels),
2D features (e.g. faults, tabular mining, topography, fractures)
grid planes (e.g. cross-sections)
grid lines (e.g. bore holes, ground support)
construction lines (e.g. survey data, drift centre lines)
Includes a full sweet of editing functions including copy, move, stretch, flatten, scale, rotate
and more. Full dxf and pnt import/export capability to exchange data with other CAD
programs.
The visual database can be used to display a database of any desired information including
seismic or geologic information such as grade, rock mass quality etc. 3D points can be
tagged with a series of:
numeric values (e.g. colour, magnitude, orientation etc.),
keywords (for filtering),
text messages,
file names (e.g. graphics files, documents, spreadsheets etc.).
Display of these items can be filtered in various ways. The location of each point can be
displayed as colour shaded spheres or squares. The size and colour can be scaled
according to various combinations of parameters. Point magnitude density can be contoured
on a plane according to a user defined density function. A best-fit plane can be fitted using
linear-regression.
Map3D Results Viewer - features stand-alone viewing of stress analysis results.
Includes the visual database but not the CAD system.
views stress analysis results generated by any of the Map3D analysis codes
displays contours on cutting planes, along lines and at specific points
user defined contouring functions
direct ink to Excel for plotting x-y graphs
display of 3D trajectories
display of all stress, strain, displacement and strength parameters including principal
components and resultant values on user defined planes and lines.
export in dxf and pnt format for compatibility with other CAD and display systems
Map3D International Ltd 1990-2015
Appendix
417
probability of failure contours
safety factor contour
light source shaded models
topographical contours
Map3D Fault-Slip - adds elastic rock mass and fully plastic fault-slip stress analysis capabilities.
Includes the 3D CAD modeller, the results viewer and the visual database.
The stress analysis utilizes the BEM (boundary element method) and has many features:
the ability to analyze very large problem sizes (one million degrees of freedom)
full 3D complex excavation shapes
multiple elastic zones with different moduli (stiff dykes or soft ore)
zones with different pre-mining stress state
tabular mining with yielding pillars
discrete non-planar fault planes that slip and dilate elasto-visco-plastically (including
creep)
multiple mining steps (40)
automatic intersections allowing for excavations and faults to cross and overlap
A demonstration version of Map3D Fault-Slip is available at no charge. All features are
available except the user is only permitted to run small size problems. This version is
extremely useful for teaching the fundamentals of modelling and 3D CAD.
Map3Di Integrated Seismicity - allows one to superimpose external field loading effects into the
stress analysis.
Includes all capabilities from Map3D Fault-Slip and adds the field loading effects. The field
loading can come from thermal heating, fluid pressure, non-linear behaviour and
deformations indicated by seismicity. These effects can be used to characterize geologic
features, accommodate changing lithology and incorporate seismic loading effects into the
stress analysis.
Map3D Thermal-Fluid Flow - adds thermal stress - fluid flow analysis.
Includes all capabilities from Map3D Fault-Slip and adds simultaneous solution of steady state
thermal stress - fluid flow. The program is set up so that the user need only specify the
temperature/head boundary conditions, then the thermal stress problem is solved
simultaneously. This feature is useful for simulation of heating/cooling effects and drained/
undrained response.
Map3D Non-Linear - adds non-linear rock mass response.
Includes all capabilities from Map3D Fault-Slip and adds the capability for the 3D rock mass
to yield to loads that exceed the rock strength, and deform non-linearly to dissipate the
excess stresses. This feature is useful for simulation of thick seams, over-stressed pillars,
abutments, backfill and creep response. This formulation solves the non-linear problem on the
surface of the boundary elements and interpolates these effects between these boundaries.
This represents a first approximation to inelastic modelling that boasts the advantage of large
problem sizes and very fast execution speeds.
Map3D Visco-Plastic - adds 3D elasto-visco-plastic rock mass response (still under development not available commercially at this time).
Includes all capabilities from Map3D Fault-Slip and adds the capability for the 3D rock mass
to behave elasto-visco-plastically. This model features a full solution of the non-associated
incremental plasticity equations and adds the capability for the 3D rock mass to yield to loads
Map3D International Ltd 1990-2015
418
Map3D User's Manual
that exceed the rock strength, and deform non-linearly to dissipate the excess stresses. This
feature is useful for simulation of thick seams, over-stressed pillars, abutments, backfill and
creep response. This formulation solves the non-linear problem throughout the rock mass.
5.7
Map3D Fault-Slip
Map3D Fault-Slip - elastic rock mass and fully plastic fault-slip stress analysis.
This module is used for conducting stress analysis of 3D models. This software is used for
civil, geological and mining projects.
Includes the 3D CAD modeller (Map3D Modeller), results viewer (Map3D Results Viewer) and
the GIS visual database.
The stress analysis utilizes the BEM (boundary element method) and has many features:
Very large problem sizes. Map3D can conduct stress analysis on models with
thousands of excavations (over one million degrees of freedom). This allows for
detailed representation of the geometry and eliminates the need to simplify large
models (over simplification is a primary source of error in modelling). Mine widemodels can by readily simulated.
Full 3D complex excavation shapes. As-built detailed models and complex 3D shapes
can readily be analyzed. Since the stress analysis is based on the boundary element
method (BEM), only the surfaces of the excavations (and other features) needs to be
specified. There is no need for definition (subdivision into elements) of the pillars
between adjacent excavations. Any arbitrary shapes are readily combined into a single
large model ready for analysis.
Multiple elastic zones with different moduli (stiff dykes or soft ore). Map3D is fully
capable of incorporating alternate material zones. This makes consideration of stiff or
soft rock types easy to consider.
Zones with different pre-mining stress states.
Tabular mining with yielding pillars. This approximation is often appropriate for large
narrow vein mines.
Discrete non-planar fault planes that slip and dilate elasto-visco-plastically (including
creep). These features are implemented using the displacement discontinuity method.
Elasto-visco-plastic flow rules are implemented to accommodate a variety of different
types of behaviour. Fault slip analysis for both mining as well as earthquake simulation
is readily accommodated.
Cracks and fractures can be simulated including energy release rate and stress
intensity calculations. Fracture propagation can be simulated as a series of discrete
steps.
Multiple mining steps are required to consider effects such as backfill placement or
crack propagation. Map3D currently allows for 40 steps. Various materials can be
substituted into excavations or fractures at any stage.
Automatic Boolean intersections allows for excavations, faults and fractures to cross
and overlap. Without this capability, modelling of intersecting features would be
practically impossible for complex models. Map3D handles these situations with ease.
Automated discretization. Models can be manually discretized if desired, or this can
be left to the automated routines built into the program. These routines ensure that
elements are concentrated only where needed providing consistently high accuracy
while optimizing for analysis time.
Map3D International Ltd 1990-2015
Appendix
A demonstration version of Map3D Fault-Slip is available at no charge. All features are
available except the user is only permitted to run small size problems. This version is
extremely useful for teaching the fundamentals of modelling, visualization and 3D CAD.
Map3Di Integrated Seismicity
5.8
Map3D Modeller
Map3D Modeller - 3D CAD and GIS visual database.
This module is used for constructing and visualizing 3D models. This software is used for
civil, geological and mining projects.
Map3D International Ltd 1990-2015
419
420
Map3D User's Manual
Easy to use 3D CAD (OpenGL based) system includes free-hand sketching, digitizing or
object picking to build and edit 5 basic entity types:
3D blocks. These entities are used to construct stopes, ore zones, dykes and tunnels.
Construction is most easily approached by defining a series of cross-sections or level
plans (each can have a different shape and different number of points). Map3D can
readily simplify these if desired and then interpolate between the loops to form complex
3D shapes.
2D features. These entities are used to construct faults, tabular mining, ground
topography and fractures. These features need not be planar. Curved and offset
fractures and faults are fully supported.
Grid planes. Cross-sections can be defined for contouring or simply slicing the model.
Grid lines. These are particularly useful for representing the location of bore holes and
ground support. Instrument locations and orientations are easily identified.
Construction lines. Simple survey data such as drift centre lines are most easily
represented using construction lines. This allows for easy import/export to other CAD
packages (full dxf and pnt capability) as well a quick way of displaying line data.
Light source shaded models. OpenGL light source shading is supported for enhanced
model representation.
Includes a full suite of editing functions including copy, move, stretch, flatten, scale, rotate
and more. This allows for easy graphical manipulation of the above entities.
The GIS visual database can be used store, analyze and display a database of any desired
information including seismic data and geologic information such as grade, rock mass quality
etc.
Map3D International Ltd 1990-2015
Appendix
421
3D points can be tagged with a series of:
numeric values (e.g. colour, magnitude, orientation, time etc.),
keywords (for filtering),
text messages,
file names (e.g. graphics files, documents, spreadsheets, drawings etc.).
Display of these items can be filtered in various ways. The location of each point can be
displayed as colour shaded spheres with size and colour scaled according to various
combinations of parameters. Point magnitude density can be contoured on a plane
according to user defined density functions. Contour planes can be user defined of fitted
using automated linear-regression.
Map3D Results Viewer
5.9
Map3D Results Viewer
Map3D Results Viewer - viewing and analysis of stress analysis results.
Includes the GIS visual database but not the CAD system.
views stress analysis results generated by Map3D stress analysis codes
displays contours on cutting planes, along lines and at specific points
user defined contouring functions
direct export to Excel for plotting x-y graphs
display of 3D trajectories
display of all stress, strain, displacement and strength parameters including principal
components and resultant values on user defined planes and lines
export in dxf and pnt format for compatibility with other CAD and display systems
probability of failure contours
safety factor contours
light source shaded models
topographical contours
Map3D International Ltd 1990-2015
422
Map3D User's Manual
Map3D Fault-Slip
Map3D International Ltd 1990-2015
Appendix
5.10
423
Map3Di Integrated Seismicity
Map3Di Integrated Seismicity - superimpose external field loading effects into the stress analysis.
Includes all capabilities from Map3D Fault-Slip and adds field loading effects. The field
loading effects can be imported from any database of thermal heating, fluid pressure, nonlinear behaviour and deformations indicated by seismicity. These effects can be used to
characterize 2D and 3D geologic features, accommodate changing lithology and incorporate
seismic loading effects into the stress analysis.
Numerical modelling allows one to predict the rock mass response as a result of advancing
mining excavations. While the effect of geologic features such as faults or changing lithology
can be readily incorporated into the model, often the location, orientation and behavioural
properties of such features is uncertain. This can result in modelling results of low reliability
and hence of limited use to mine operators. Map3Di allows one to superimpose external field
loading effects into the Map3D model. The field loading can come from thermal heating, fluid
pressure, non-linear behaviour, etc. In addition, these can be determined from many forms
of in situ monitoring including for example fluid pressures (e.g. well drawdown, dams,
hydrofracturing), heating (e.g. natural heating, nuclear waste storage), and deformations (e.
g. monitored with extensometers).
Another important source of in situ field loading information comes from seismic activity. By
definition, the presence of seismicity indicates that the rock mass is yielding to load and
hence deforming in some way. The seismicity could indicate shearing on a fault plane or 3D
material non-linearity possibly resulting due to a weak lithological feature. Map3Di allows you
to superimpose the deformations indicated by the seismicity onto your Map3D mine model.
For example, if your seismicity is telling you that you are getting shearing at some location,
then this can be enforced in the model, thereby redistributing the stresses to accommodate
this effect.
The concept behind Map3Di is to superimpose some known field loading along with regular
modelling features (pre-mining stress, model geometry, dykes, faults, etc.) to provide a
composite prediction of the stresses, strain and displacements throughout the rock mass.
The integration of numerical modelling with seismic monitoring through the Map3Di boundary
element method allows one to superimpose the deformations indicated by the seismicity into
your numerical model. This effectively characterizes geologic features and accommodates
the effect these have on rock mass response.
The field loading information boils down to specification of: ride and dilation on a segment of
a slip plane, and/or deformation of a 3D zone. But where does such information come from:
Suppose you measure the temperature distribution throughout your mine and you want
to apply this field loading to a Map3Di model. This would be applied by subdividing the
whole rock mass up into small 3D zones then specifying the temperature in each zone.
You would then need to calculate the "free thermal expansion" for each zone. You then
simply tell Map3Di to use this field loading. Map3Di conducts the necessary
calculations to determine the stress contribution of the integrated field loading.
Suppose you inject some heavy grout into a fracture, then after this sets, drill some
holes to determine the amount of dilation you caused in the fracture, and you want to
apply this field loading to a Map3Di model. This would be applied by subdividing the
fracture into small planar zones then specifying the dilation in each zone. You then
simply tell Map3Di to use this field loading. Map3Di conducts the necessary
calculations to determine the stress contribution of the integrated field loading.
Suppose from your seismicity you determine that portions of your rock mass are
Map3D International Ltd 1990-2015
424
Map3D User's Manual
deforming and other parts are not. This would be applied by subdividing the whole rock
mass up into small 3D zones then calculating the deformation in each zone. You then
simply tell Map3Di to use this field loading. Map3Di conducts the necessary
calculations to determine the stress contribution of the integrated field loading.
Note that the Map3Di model can contain all of the regular features including excavations, stiff
dykes, faults etc. The effects of the field loading and all of these other features will be
superimposed to provide a final composite prediction of the stresses, strains and
displacements throughout the rock mass.
How does Map3Di assist us in overcoming the shortcomings in applying Terzaghi’s
Observational Approach to Design? There are many possible benefits from adopting this
approach:
First let’s recognize that we intend to apply known field loading conditions measured
from field data (seismicity, temperature, fluid pressures or deformations). This in itself
can be considered to be a calibration or fine-tuning exercise, as opposed to making a
prediction. We are literally adding information to our model.
The wealth of information that comes from seismic monitoring is enormous. Seismic
monitoring provides the volume and spatial distribution of information on the rock mass
response that can be obtained in no other way at reasonable cost. Map3Di provides a
mechanism to directly use this information for model calibration. Owing to the real-time
nature of seismicity, it becomes practical to traverse the mine/monitor/redesign loop
for every increment of mining. Thus instead of spending years making visual
observations to develop a history of rock mass response, there is potential to calibrate
your model much more quickly.
Perhaps the most important part of this is that it provides the possibility of adapting to
changing rock mass conditions in real-time. This allows one to recognize and adapt to
rapidly changing local conditions such as lithology or jointing. You can update your
model calibration as conditions change. This has the potential to significantly improve
the reliability of predictions.
Finally, by incorporating for example some fault slip indicated by seismicity, you have
in fact characterized the effect of that fault slip and incorporated its effect into your
model. For example, if your seismicity is telling you that you are getting shearing at
some location, then this can be enforced in the model, thereby redistributing the
stresses to accommodate this exact effect.
Map3D International Ltd 1990-2015
Appendix
425
Map3D Thermal-Fluid Flow
5.11
Map3D Thermal-Fluid Flow
Map3D Thermal-Fluid Flow - thermal stress - fluid flow analysis.
Includes all capabilities from Map3D Fault-Slip and adds simultaneous solution of steady state
thermal stress - fluid flow. The program is set up so that the user need only specify the
temperature/head boundary conditions, then the thermal stress problem is solved
simultaneously. This feature is useful for simulation of heating/cooling effects and drained/
undrained response.
Map3D International Ltd 1990-2015
426
Map3D User's Manual
Map3D Non-Linear
5.12
Map3D Non-Linear
Map3D Non-Linear - non-linear rock mass response.
Includes all capabilities from Map3D Fault-Slip and adds the capability for the 3D rock mass
to yield to loads that exceed the rock strength, and deform non-linearly to dissipate the
excess stresses. This feature is useful for simulation of thick seams, over-stressed pillars,
abutments, backfill and creep response. This formulation solves the non-linear problem on the
surface of the boundary elements and interpolates these effects between these boundaries.
This represents a first approximation to inelastic modelling that boasts the advantage of large
problem sizes and very fast execution speeds.
Map3D International Ltd 1990-2015
Appendix
427
Map3D Visco-Plastic
5.13
Map3D Visco-Plastic
Map3D Visco-Plastic - 3D elasto-visco-plastic rock mass response (still under development - not
available commercially at this time).
Includes all capabilities from Map3D Fault-Slip and adds the capability for the 3D rock mass
to behave elasto-visco-plastically. This model features a full solution of the non-associated
incremental plasticity equations and adds the capability for the 3D rock mass to yield to loads
that exceed the rock strength, and deform non-linearly to dissipate the excess stresses. This
simulation capability provides the large displacements required to simulate ground support
and backfill interaction studies. This feature is useful for simulation of thick seams, overstressed pillars, abutments, backfill and creep response. This formulation solves the nonlinear problem throughout specified zones in the rock mass.
Map3D International Ltd 1990-2015
428
Map3D User's Manual
Map3D Overview
5.14
Model Building Tutorials
Freehand Sketching - Room and Pillar Mining
Bulk Mining Example
Tabular Mining Example
DDLoop Pillar Example
FFLoop Drift Example
FFLoop Stope Example
5.15
Plot > Stress
Activate the stress toolbar – after Map3D BEM analysis.
This toolbar is meant to provide quick access to stress components.
Plot > Stress > S1 Major Principal Stress 1
Plot > Stress > S2 Intermediate Principal Stress
Plot > Stress > S3 Minor Principal Stress 3
Plot > Stress > Tmax Maximum Shear Stress ½(
2
1
-
3
)
Plot > Stress > Tip
Plot > Stress > Sip
Plot > Stress > S1i
Plot > Stress > S3i
In-Plane Shear Stress ip
In-Plane Normal Stress ip
In-Plane Maximum Stress
In-Plane Minimum Stress
Plot > Stress > Tub
Plot > Stress > Sub
Plot > Stress > S1u
Plot > Stress > S3u
Ubiquitous-Plane Shear Stress ub
Ubiquitous-Plane Normal Stress ub
Ubiquitous-Plane Maximum Stress 1u
Ubiquitous-Plane Minimum Stress 3u
i1
i3
Map3D International Ltd 1990-2015
Appendix
Plot > Stress > Toct Octahedral Shear Stress oct = 1/3 [( 1 - 2)² + (
Plot > Stress > Smean Mean Stress mean = 1/3 ( 1 + 2 + 3)
Plot > Stress > Sxx
Plot > Stress > Syy
Plot > Stress > Szz
Plot > Stress > Txy
Plot > Stress > Tyz
Plot > Stress > Txz
Cartesian Stress Component
Cartesian Stress Component
Cartesian Stress Component
Cartesian Stress Component
Cartesian Stress Component
Cartesian Stress Component
2
-
3
)² +(
3
429
-
1
)²]½
xx
yy
zz
xy
yz
xz
Plot > Stress > Value > Seff Effective Stress eff
Plot > Stress > Value > Stotal Total Stress total
Notes:
The stress toolbar can only be activated after the model building - CAD Stage
Map3D Analysis Stages
Any of these components can be added to the contour toolbar if desired
Tools > Configure Contouring Toolbar
5.16
Plot > Failure Modes
Activate the strength factors toolbar – after Map3D BEM analysis.
This toolbar is meant to provide quick access to the failure mode plots.
Rock mass Strength
Plot > Strength Factors > Strength Parameters parameters. modifies the 3D Mohr-Coulomb,
Hoek-Brown and Drucker-Prager strength
Plot > Strength Factors > SF-A contours the strength/stress ratio using method A
Plot > Strength Factors > SF-B contours the strength/stress ratio using method B
Plot > Strength Factors > SF-C contours the strength/stress ratio using method C
Plot > Strength Factors > SF/A contours the stress/strength ratio using method A
Plot > Strength Factors > SF/B contours the stress/strength ratio using method B
Plot > Strength Factors > SF/C contours the stress/strength ratio using method C
Plot > Strength Factors > dS1 contours the excess major principal stress 1
Plot > Strength Factors > dTmax contours the excess maximum shear stress
- 3)
Plot > Strength Factors > dToct contours the excess octahedral shear stress
- 2)² + ( 2 - 3)² +( 3 - 1)²]½
max =
oct
=
½(
/ [(
1 3
1
1
In-Plane Strength
Plot > Strength Factors > In-plane parameters modifies the Mohr-Coulomb in-plane strength
parameters
Plot > Strength Factors > SF-ip contours the strength/stress ratio using in-plane stresses
Map3D International Ltd 1990-2015
430
Map3D User's Manual
Plot > Strength Factors > SF/ip contours the stress/strength ratio using in-plane stresses
Plot > Strength Factors > dTip contours the excess in-plane shear stress
ip
Ubiquitous-Plane Strength
Plot > Strength Factors > Ubiquitous Parameters modifies the Mohr-Coulomb ubiquitous plane strength parameters
Plot > Strength Factors > SF-ub contours the strength/stress ratio using ubiquitous-plane
stresses
Plot > Strength Factors > SF/ub contours the stress/strength ratio using ubiquitous-plane
stresses
Plot > Strength Factors > dTub contours the excess ubiquitous-plane shear stress
ub
Notes:
The strength factors toolbar can only be activated after the model building - CAD Stage
Map3D Analysis Stages
Any of these components can be added to the contour toolbar if desired
Tools > Configure Contouring Toolbar
5.17
Plot > Strain
Activate the strain toolbar – after Map3D BEM analysis.
This toolbar is meant to provide quick access to strain components.
Plot > Strain > E1 Major Principal Strain 1
Plot > Strain > E2 Intermediate Principal Strain 2
Plot > Strain > E3 Minor Principal Strain 3
Plot > Strain > Emax Maximum Shear Strain max = ½(
3
-
Plot > Strain > Esi
Plot > Strain > Eni
Plot > Strain > E1i
Plot > Strain > E3i
In-plane Maximum Shear Strain
In-plane Normal Strain ni
In-plane Maximum Strain 1i
In-plane Maximum Strain 3i
Plot > Strain > Esu
Plot > Strain > Enu
Plot > Strain > E1u
Plot > Strain > E3u
Ubiquitous-plane Maximum Shear Strain
Ubiquitous-plane Normal Strain nu
Ubiquitous-plane Maximum Strain 1u
Ubiquitous-plane Maximum Strain 3u
Plot > Strain > Eoct Octahedral Shear Strain
Plot > Strain > Evol Volumetric Strain vol = (
oct
1
+
Plot > Strain > Exx Cartesian Strain Component
Plot > Strain > Eyy Cartesian Strain Component
Plot > Strain > Ezz Cartesian Strain Component
3
)
si
= 1/3 [( 1 2 + 3)
su
2
)² + (
2
-
3
)² +(
3
-
1
)²]½
xx
yy
zz
Map3D International Ltd 1990-2015
Appendix
Plot > Strain > Exy Cartesian Strain Component
Plot > Strain > Eyz Cartesian Strain Component
Plot > Strain > Exz Cartesian Strain Component
xy
yz
xz
Plot > Strain > Value > Elastic elastic
Plot > Strain > Value > Plastic plastic
Plot > Strain > Value > Total total
Notes:
The strain toolbar can only be activated after the model building - CAD Stage
Map3D Analysis Stages.
Any of these components can be added to the contour toolbar if desired
Tools > Configure Contouring Toolbar
5.18
Plot > Surface Components
Activate the surface components toolbar – after Map3D BEM analysis.
This toolbar is meant to provide quick access to the surface component plots.
Plot > Surface Components > Serr Stress Error
Plot > Surface Components > Ferr Failure Error
Plot > Surface Components > Ts Shear Stress
Plot > Surface Components > Sn Normal Stress
Plot > Surface Components > Es Shear Strain
Plot > Surface Components > En Normal Strain
Plot > Surface Components > Ds Shear Displacement (Ride)
Plot > Surface Components > Dn Normal Displacement (Closure)
Plot > Surface Components > Strength/Stress
Plot > Surface Components > dTs Excess Shear Stress
Plot > Surface Components > dEs Incremental Shear Strain
Plot > Surface Components > dTs / dEs Stress/Strain rate
Plot > Surface Components > Temperature/Head
Plot > Surface Components > qn Normal Flux
Plot > Surface Components > Value > Elastic
Plot > Surface Components > Value > Plastic
Plot > Surface Components > Value > Total
Notes:
The surface components toolbar can only be activated after the model building - CAD Stage
Map3D Analysis Stages
Any of these components can be added to the contour toolbar if desired
Tools > Configure Contouring Toolbar
Map3D International Ltd 1990-2015
431
432
5.19
Map3D User's Manual
Stress Orientation Icon
The orientation of the far field principal stress state is indicated by the stress orientation icon
located at the upper right corner of the display.
In the view above, the 1 axis points mostly into the screen and a bit to the right, the 2 axis points
mostly to the right and a bit out of the screen, and the 3 axis points straight up. Note that the
backside of the icon is shaded in blue.
In the view above, the 1 axis points mostly to the right and a bit into the screen, the 2 axis points
mostly out of the screen and a bit to the right, and the 3 axis points straight up. Note that the inside
of the icon is shaded in red.
Note that the length of the axes are scaled according to the magnitude of the principal stress
components.
5.20
Translating the Model
Translating the Model - The model can be translated by holding down the right mouse button and
wait for the drag mouse pointer
to appear, then drag out a pan vector. Dragging towards the top
or bottom translates the model up or down. Dragging towards the left or right translates the model
left or right.
Zooming the Model - The model can be zoomed by rotating the mouse wheel, or holding down both
the left and right mouse buttons and wait for the drag mouse pointer
to appear, then dragging
out a zoom factor. Dragging towards the top zooms the model out. Dragging towards the bottom
magnifies the model.
The model can also be translated and zoomed using the translation toolbar or keyboard keys
Tools > Translation Toolbar
Related Topics:
Rotating the model
Selecting special view positions
You can adjust the drag wait time using
Tools > Drag Wait Time
Map3D International Ltd 1990-2015
Appendix
5.21
433
View > Render > Discretize
Toggles the display of discretized and non-discretized views of the model.
The non-discretized view simply shows the model surfaces.
When checked, the discretized view shows how all model surfaces have been subdivided into
boundary elements. The element discretization can only be viewed after the discretization analysis
Analysis > Discretization.
5.22
Visualization > Make Point
Creates a new visualization point. Refer to Visualization for a description of the visualization
routines available in Map3D.
Visualization points can be displayed as light source shaded spheres with diameter and/or colour
varying as magnitude, and contoured on a plane to display density etc.
Each point can be tagged with a series of:
numeric values (e.g. colour, magnitude, orientation etc.)
text messages
file names (e.g. graphics files, documents, spreadsheets etc.)
Upon left clicking on a point, the location, magnitude and text message are displayed on the status
bar.
Right clicking on a point activates the Visual Database. This feature can be used to display a
database of useful geologic information such as grade, rock mass quality etc.
Upon activating the feature, the user will be prompted to supply the coordinates of the new
visualization point.
Note that if a visualization file is already active, this new point will be added to the file.
If there is no active visualization file the user will be prompted open one and this new point will be
added to the file.
X, Y and Z coordinate - specifies the coordinates of the visualization point.
Pick - activates the cursor cross-hairs allowing interactive selection of the coordinates from the
model.
To assist in visually selecting points from the model, all snap functions are available.
CAD > Snap
Once selected, the coordinates of the visualization point are displayed in the dialogue box.
Centroid - activates the cursor so the user can select an entity from the model. The coordinates will
Map3D International Ltd 1990-2015
434
Map3D User's Manual
be calculated at the centre of the selected entity.
OK - completes editing of the coordinates and creates and displays the visualization point.
Once the visualization point is created, the user can now right click on the point to add text
messages and/or file names.
The text message and file name are displayed in the status bar across the bottom of the
screen by picking an event with the left mouse button.
They can also be edited by picking an event with the right mouse button.
Picking with the right mouse button also allows for display of the file if the file name has been
associated with an application (refer to Windows documentation on how to "Associate a file
with a program").
5.23
Global Transform Z+ up
The orientation of the model is indicated by an orientation icon located at the bottom left corner of
the display. This icon indicates the direction of the axes (X for East, Y for North and Z up).
In the view above, the Y-axis points mostly into the screen and a bit to the right, the X-axis points
mostly to the right and a bit out of the screen, and the Z-axis points straight up. Note that the
backside of the icon is shaded in blue.
In the view above, the Y-axis points mostly to the right and a bit into the screen, the X-axis points
mostly out of the screen and a bit to the right, and the Z-axis points straight up. Note that the inside
of the icon is shaded in red.
There are three selectable rotation models:
1. Rotations can be applied to the current geometry. This mode allows for a non-horizontal
horizons
2. Rotations can be applied such that the horizon always remains horizontal assuming the Z+
axis is up (Tools > Global Transform Z+ up).
This causes the mouse rotation to occur in the opposite way to Tools > Global Transform Zup.
3. Rotations can be applied such that the horizon always remains horizontal assuming the Z- axis
is up (Tools > Global Transform Z- up).
This causes the mouse rotation to occur in the opposite way to Tools > Global Transform Z+
up.
The model can be rotated by holding down the left mouse button and wait for the drag mouse
pointer
to appear, then drag the orientation icon around to the desired position. Dragging
towards the top or bottom rotates the model up or down. Near the bottom of the screen, dragging
towards the left or right rotates the model left or right. Near the top of the screen, dragging towards
the left or right rotates the model counter clockwise or clockwise.
The model can be rotated by using the rotation toolbar or keyboard keys
Tools > Rotation Toolbar.
Notes:
Before rotating the model, you should set the desired centre of rotation
Map3D International Ltd 1990-2015
Appendix
435
View > Centre
You can adjust the drag wait time using
Tools > Drag Wait Time
Rotation and translation operations can be repeated automatically by typing n# before selecting the
operation. For example to produce an animated display of a stress plot, specify
Plot > Options > Persist
Plot > Stress > Sigma:1
View > Rotation Increment > 10
type in 35# from the keyboard
select rotate right (either from the rotation toolbar or the PageDown key)
Press the Esc key to cancel the animation.
Entering 0# will repeat the operation indefinitely. Press the escape key to stop.
Related Topics:
Translating the model
Selecting special view positions
5.24
Global Transform Z- up_2
The orientation of the model is indicated by an orientation icon located at the bottom left corner of
the display. This icon indicates the direction of the axes (X for East, Y for North and Z up).
In the view above, the Y-axis points mostly into the screen and a bit to the right, the X-axis points
mostly to the right and a bit out of the screen, and the Z-axis points straight up. Note that the
backside of the icon is shaded in blue.
In the view above, the Y-axis points mostly to the right and a bit into the screen, the X-axis points
mostly out of the screen and a bit to the right, and the Z-axis points straight up. Note that the inside
of the icon is shaded in red.
There are three selectable rotation models:
1. Rotations can be applied to the current geometry. This mode allows for a non-horizontal
horizons
2. Rotations can be applied such that the horizon always remains horizontal assuming the Z+
axis is up (Tools > Global Transform Z+ up).
This causes the mouse rotation to occur in the opposite way to Tools > Global Transform Zup.
3. Rotations can be applied such that the horizon always remains horizontal assuming the Z- axis
is up (Tools > Global Transform Z- up).
This causes the mouse rotation to occur in the opposite way to Tools > Global Transform Z+
up.
The model can be rotated by holding down the left mouse button and wait for the drag mouse
Map3D International Ltd 1990-2015
436
Map3D User's Manual
pointer
to appear, then drag the orientation icon around to the desired position. Dragging
towards the top or bottom rotates the model up or down. Near the bottom of the screen, dragging
towards the left or right rotates the model left or right. Near the top of the screen, dragging towards
the left or right rotates the model counter clockwise or clockwise.
The model can be rotated by using the rotation toolbar or keyboard keys
Tools > Rotation Toolbar.
Notes:
Before rotating the model, you should set the desired centre of rotation
View > Centre
You can adjust the drag wait time using
Tools > Drag Wait Time
Rotation and translation operations can be repeated automatically by typing n# before selecting the
operation. For example to produce an animated display of a stress plot, specify
Plot > Options > Persist
Plot > Stress > Sigma:1
View > Rotation Increment > 10
type in 35# from the keyboard
select rotate right (either from the rotation toolbar or the PageDown key)
Press the Esc key to cancel the animation.
Entering 0# will repeat the operation indefinitely. Press the escape key to stop.
Related Topics:
Translating the model
Selecting special view positions
Map3D International Ltd 1990-2015
Index
Index
-0001 002 ... files
369, 433
-33D excavation shapes
25, 27, 28
-AAborting a Map3D analysis 330
About Map3D 2
Absolute strain 169, 212
Absolute stress 161, 212
Accuracy
42, 219, 269, 331, 347
AG - grid spacing 42, 213, 214, 215, 219, 269, 331
AL - element size 42, 213, 214, 219, 269, 331
Alternate material zones 28
Analysis dialogue box 136, 219, 235, 269, 330,
331, 332, 333, 351, 352
Analysis Options dialogue box 236, 333, 334, 335,
336, 337, 338, 340, 342, 343, 347, 348, 349, 350
Analysis results 135, 136, 146, 369, 381, 433
Analysis time 42, 219, 269, 331
Animation 145, 367
Applications of Map3D 10
As-built models 25
Automated discretization 42, 213, 214, 215, 219,
269, 331
Average value of contour points 227
-BBackfilling 28, 31, 342, 350
Batching analyses 334
BEM analysis 227, 277, 310, 330, 331, 333, 334,
335, 337, 338, 340, 342, 343, 347, 348, 349, 350,
351, 352, 414, 428, 429, 430, 431
Bitmap dump of the screen 137, 138, 145, 146,
367
Block models 27, 28
BMP 137, 138, 145, 367
Map3D International Ltd 1990-2015
437
Boolean intersections 335
Boundary Element Method 11, 342, 347, 350, 416
Build toolbar 237, 241, 246, 252, 253, 255, 256,
257, 259, 260, 312, 355, 366
Building 3D FF blocks 237, 241, 246, 256, 257,
259, 260, 277, 280, 281, 283, 284, 286, 287, 289,
290, 291, 293, 294, 295, 297, 298, 300, 302
Building construction lines 255, 256, 257, 259, 260,
359
Building DD planes 237, 241, 246, 256, 257, 259,
260, 277, 280, 281, 283, 284, 286, 287, 289, 290,
291, 293, 294, 295, 297, 298, 300, 302
Building field point grid lines 252, 253
Building field point grid planes 252, 253, 256, 257,
259, 260, 355, 357
Building field point lines planes 256, 257, 259, 260
Bulk mining - Model building tutorial 72
-CCAD 304, 305, 306, 307
CAD > Build 237, 241, 246, 252, 253, 255, 256,
257, 259, 260
CAD > Build menu 355, 366
CAD > Edit 277, 280, 281, 283, 284, 286, 287,
289, 290, 291, 293, 294, 295, 297, 298, 300, 302
CAD > Edit menu 356, 357, 359
CAD > Properties 219, 227, 269, 277
CAD > Properties menu 224, 274
CAD > Propertiesu 223, 273
CAD > Snap 261, 262, 263, 264, 265, 266, 267,
268
CAD > Snap menu 355
CAD menu 216, 303
CAD toolbar 312, 355, 366
Cartesian strain 168
Cartesian stress 160
Clearing construction line data 133
Clearing model data 130
Closure and overlap checking 335
Coefficient matrix 338, 347, 348, 350
Common problems when model Building 36
Conclude the current analysis 351, 352
Conducting a BEM stress analysis 331
Conducting a Map3D analysis 235
Configuring toolbars 152, 309, 310, 311, 312
Construction line data 133, 134, 135, 367, 369
438
Map3D User's Manual
Contact and intersection analysis 332
Contour plot options 216
Contour range 215
Contouring toolbar 309, 428, 429, 430, 431
Copying model data 283
Creep elasto-viscoplastic
337
Custom button font 315
Custom colours 313, 314, 315
DXF model file format
370, 381
-E-
Edit toolbar 277, 280, 281, 283, 284, 286, 287,
289, 290, 291, 293, 294, 295, 297, 298, 300, 302,
312, 356, 357, 359, 360, 361
Editing model data 277, 307, 356, 357, 359, 360,
361
Effective stress 161
Elastic strain 169, 212
Elasto-viscoplastic creep 337
DD plane thickness 357
Element lumping 42, 213, 214, 219, 269, 331
DD planes 25, 33, 34
Element size 42, 213, 214, 219, 269, 331
depth buffer 316, 317
Energy release rate calculation 343
Digitizer support 304, 362
Erasing model data 280
Discretization analysis 331, 347, 348, 414
ESS 155, 157, 159
Discretization and Lumping 42, 213, 214, 215, 219,
Excess stress 175, 179, 180, 182, 184, 186, 188,
269, 331
190, 191, 193, 195, 196, 199, 382, 386, 388, 390,
Discretized view
394, 409, 429
display of 433
Expansion coefficient and conductivity 414
Discretizing a model 331
Extruding planes into blocks 257
Disk performance test 317
Disk space requirements 42, 219, 269, 331, 347,
348
Displacement components 169
Failure criterion 175, 179, 180, 182, 184, 186, 188,
Displacement discontinutity elements 25, 33, 34
190, 191, 193, 195, 196, 199, 382, 386, 388, 390,
394, 409, 429
Displacement toolbar 169
Far field stress state specification 363, 364
Display a saved screen image 145, 146, 367
Fault planes 34
Divergent solutions 42, 213, 214, 219, 269, 331
DOC - matrix lumping 42, 213, 214, 219, 269, 331 Fault-Gouge in DD Planes 193, 195, 196, 199, 390
Fictitious force elements 25, 27
DOE - element lumping 42, 219, 269, 331
File > Output menu 137, 138, 142
DOG - grid lumping 42, 219, 269, 331
File menu 130, 131, 132, 133, 134, 135, 136, 145,
DOL - solution accuracy
42, 213, 214, 215, 219,
146, 366, 367, 381
269, 331
DON - matrix conditioning 42, 213, 214, 219, 269, Find a specified coordinate point in the model 151
331
Flow components 174
DOR - element aspect ratio 42, 219, 269, 331
Flow rules 382, 390, 394, 409, 414
Drag rotation of the model 307, 434, 435
Flow toolbar 174
Drag translation of the model 307, 432
Fluid/thermal flow analysis 414
Drag zooming the model 307, 432
Freehand sketching - Model building tutorial 52
Drucker-Prager in 3D FF Blocks 175, 179, 180,
182, 184, 186, 188, 190, 191, 388
Dump analysis results 138, 142
Dump the screen image 137, 138, 367
GIF 137, 138, 145, 367
DXF construction line file format 369
Going to graphics at the current analysis stage 332
DXF dump of the screen 138
Going to the model building and editing stage 332
-D-
-F-
-G-
Map3D International Ltd 1990-2015
Index
Grid lumping 42, 213, 214, 215, 219, 269, 331
Grid selection 216, 303, 312
Grid spacing 42, 213, 214, 215, 219, 269, 331
Ground surface 33
Grouping model data 290
439
Loading a model from a file 130, 132, 333, 366,
381
Loading analysis results from a recently file 146
Loading analysis results from a recently used
directory
381
Loading analysis results from a restart file 135
Loading construction line data from a file 133, 134
Loading model data from a recently used directory
381
Help menu 325
Loading model data from a recently used file 146
hidden surface removal 316, 317
Loading system stiffness calculation 343
Hide block colours toolbar 149, 152, 311
Local energy release rate calculation 343
Hide Cline Colours toolbar 150
Lumping and discretization 42, 213, 214, 215, 219,
Hide construction line colours toolbar 150, 152, 311 269, 331
Hide toolbar 147, 152, 311
Hiding various parts of the model 147
Hoek-Brown in 3D FF Blocks 175, 179, 180, 182,
184, 186, 188, 190, 191, 386
Map3D 2, 9, 10, 11, 414, 416
Hyperbolic-Backfill in DD Planes 193, 195, 196,
Map3D analysis options 236
199, 394
Map3Di 224, 274, 322
Material codes 31
Material property specification 224, 274, 332, 363,
364, 382, 386, 388, 390, 394, 409, 414
In situ stress state specification 363, 364
Matrix conditioning 42, 213, 214, 219, 269, 331
Inactive blocks 36
Matrix lumping 42, 213, 214, 219, 269, 331
Induced strain 169, 212
Matrix solution 333, 335, 349
Induced stress 161, 212
Maximum shear strain 162
Initial stress state specification 363, 364
Maximum shear stress 155
Initialize all viewing parameters 152
Mean stress 160
INP model file format 373, 381
Mean value of contour points 227
In-plane 193, 195, 196, 199
Menu Commands - Analysis dialogue box 136, 219,
In-plane strain 163, 164, 165, 166
269, 330, 331, 332, 333, 351, 352
In-plane stress 155, 157, 159
Menu Commands – Analysis dialogue box 235
Interpretation of results 14, 21, 343
Menu Commands - Analysis Options dialogue box
Intersection analysis 332, 335, 336, 348, 414
333, 334, 335, 336, 337, 338, 340, 342, 343, 347,
348, 349, 350
Introduction 2
Menu Commands – Analysis Options dialogue box
236
Menu Commands - CAD 304, 305, 306, 307
Menu Commands - CAD > Build 237, 241, 246,
JPEG 137, 138, 145
252, 253, 255, 256, 257, 259, 260
JPG 137, 138, 145
Menu Commands - CAD > Build menu 355, 366
Menu Commands - CAD > Edit 277, 280, 281, 283,
284, 286, 287, 289, 290, 291, 293, 294, 295, 297,
298, 300, 302
Leasing Map3D 2
Menu Commands - CAD > Edit menu 356, 357,
359
Limitations and shortcomings 14
-H-
-M-
-I-
-J-
-L-
Map3D International Ltd 1990-2015
440
Map3D User's Manual
Menu Commands - CAD > Properties 219, 223,
224, 227, 269, 273, 274, 277
Menu Commands - CAD > Snap 261, 262, 263,
264, 265, 266, 267, 268
Menu Commands - CAD > Snap menu 355
Menu Commands - CAD menu 216, 303
Menu Commands File 133, 134
Menu Commands - File 130, 131, 132, 133, 134,
135, 136, 145, 146
Menu Commands - File > Output 137, 138, 142
Menu Commands - File menu 366, 381
Menu Commands - Help menu 325
Menu Commands - Plot 215
Menu Commands - Plot > Displacement 169
Menu Commands - Plot > Flow 174
Menu Commands - Plot > Miscellaneous 214, 215
Menu Commands - Plot > Properties 219, 223,
224, 227, 269, 273, 274, 277
Menu Commands - Plot > Strain 161, 162, 163,
164, 165, 166, 167, 168, 169, 171, 212
Menu Commands - Plot > Strength Factors 175,
179, 180, 182, 184, 186, 188, 190, 191, 193, 195,
196, 199
Menu Commands - Plot > Stress 154, 155, 157,
159, 160, 161, 171, 212
Menu Commands - Plot > Surface Components
201, 202, 203, 204, 205, 208, 209, 210, 211, 212,
213, 214
Menu Commands - Plot menu 428, 429, 430, 431
Menu Commands – Plot menu 216, 227
Menu Commands - Seismic
318, 322, 325, 354
Menu Commands - Tools 152, 307, 308, 309, 310,
311, 312, 313, 314, 315, 316, 317
Menu Commands – Tools menuMenu Commands ToolsTools menu 315
Menu Commands - View > Find Coordinate 151
Menu Commands - View > Hide 147
Menu Commands - View > Hide Block Colours 149
Menu Commands - View > Hide Cline Colours 150
Menu Commands - View > Initialize 152
Menu Commands - View > Length 152, 311
Menu Commands - View > Pan 152, 311
Menu Commands - View > Render 150, 433
Menu Commands - View > Zoom 152, 311
Menu Commands - View > Zoom Extents 152
Menu Commands - View menu 152, 153
Menu Commands -File menu 367
Merge adjacent surfaces 336
Merge coordinate points that are close to one another
335
Merging model data 366, 381
Mine design 21
Mining step selection 136
Mining step sequence 31
Model building 11, 25, 27, 28, 31, 33, 34, 36, 52,
72, 90, 224, 237, 241, 246, 252, 253, 255, 274, 277,
280, 281, 283, 284, 286, 287, 289, 290, 291, 293,
294, 295, 297, 298, 300, 302, 304, 332, 335, 336,
348, 349, 355, 357, 359, 366, 381
Model data 130, 131, 132, 133, 146, 224, 274, 333,
335, 349, 366, 368, 370, 373, 381, 414
Model orientation icon 434, 435
Mohr-Coulomb in 3D FF Blocks 175, 179, 180,
182, 184, 186, 188, 190, 191, 382
Mohr-Coulomb in DD Planes 193, 195, 196, 199,
409
Moving field points that are very close to boundary
surfaces 340
Moving model data 281, 293, 294, 295, 297, 298
-NNumerical Modelling
9, 10, 11, 14, 21
-OOctahedral shear strain 167
Octahedral shear stress 160
Open pits 33
OpenGL 316, 317
Ore zones 25, 27, 28
Overview of Map3D 9
Overview of model building 11
-PParametric studies 14
Pick box size 318
Plastic strain 169, 212
Plot > Displacement 169
Plot > Flow 174
Plot > Miscellaneous 214, 215
Plot > Properties 219, 223, 227, 269, 273, 277
Plot > Properties menu 224, 274
Plot > Strain 161, 162, 163, 164, 165, 166, 167,
168, 169, 171, 212
Map3D International Ltd 1990-2015
Index
Plot > Strength Factors 175, 179, 180, 182, 184,
186, 188, 190, 191, 193, 195, 196, 199
Plot > Stress 154, 155, 157, 159, 160, 161, 171,
212
Plot > Surface Components 201, 202, 203, 204,
205, 208, 209, 210, 211, 212, 213, 214
Plot menu 215, 216, 227, 303, 428, 429, 430, 431
Plot options 216
Plotting surface components during analysis 330,
331
PNG 137, 138, 145, 367
PNT construction line file format 367, 369
PNT dump of analysis results 138, 142
PNT dump of the screen 138, 367
PNT model file format 368, 381
PNT screen image file format 138, 367
Poorly conditioned problems 42, 213, 214, 219,
269, 331
Principal strains 161
Principal stresses 154
Probability
175, 179, 180, 182, 186, 188, 191, 193,
195, 196, 199
Problem size 42, 219, 269, 331
-RRAM for matrix storage 348, 350
Range for plotting contours 215
Recently used directories 381
Recently used files 146
Reliability of modelling predictions 14
Rendering the contours 216
Rendering the model 150
Renumbering surfaces so the volume is positive
349
Reset all viewing parameters 152
Restart files 369, 433
Restarting an analysis 136
Restoring a previously saved view position and
contour range 146
Rock mass response predictions 14, 21, 343
Rotating model data 286, 287
Rotating the model 153, 307, 308, 434, 435
Rotation Toobar 308
Running multiple consecutive analyses 334
Map3D International Ltd 1990-2015
441
-SSales and support 2
Saving a model to a file 131
Saving a model to a new file name 131, 133
Saving construction line data to a file 134
Saving construction line data to a new file name
135
Saving model data 289
Saving the current view position and contour ranges
146
Scaling model data 284
Screen dump 137, 138, 145, 146, 367
Seismic 318, 322, 325, 354
Seismic menu 318, 322, 325, 354
Seismic Moment 227
Smooth scrolling in the analysis dialogue box 317
Smoothing construction lines 300, 302
Snap toolbar 261, 262, 263, 264, 265, 266, 267,
268, 312, 355, 362
Solution accuracy
42, 213, 214, 215, 219, 269,
331, 347
Solve toolbar 310
Special view positions 153
Steady state thermal/fluid flow analysis 414
Strain toolbar 161, 162, 163, 164, 165, 166, 167,
168, 169, 171, 212, 430
Strength criterion 175, 179, 180, 182, 184, 186,
188, 190, 191, 193, 195, 196, 199, 382, 386, 388,
390, 394, 409, 429
Strength Factors toolbar 175, 179, 180, 182, 184,
186, 188, 190, 191, 193, 195, 196, 199, 429
Stress Orientation Icon 432
Stress toolbar 154, 155, 157, 159, 160, 161, 171,
212, 428
Stretching model data 291
Subdivide non-planar quadrilaterials into triangles
348
Subtracting analysis results 135
Support and sales 2
Support placement 28, 31, 342, 350
Surface Components toolbar 201, 202, 203, 204,
205, 208, 209, 211, 212, 213, 214, 431
Surface Components toolbarr 210
Surface models 25, 28
Suspending a Map3D analysis 351
442
Map3D User's Manual
Zoom so that all entities are visible 152
Zooming the model 153, 307, 308
-TTabular mining - Model building tutorial 90
Tabular mining zones 34
Terzaghis Observational Approach 14
Testing disk performance 317
Thermal/fluid flow analysis 414
Three-Dimensional excavation shapes 25, 27, 28
Toolbars 308, 310, 312, 428, 429, 430, 431
Tools menu 152, 307, 308, 309, 310, 311, 312,
313, 314, 315, 316, 317
Total strain 169, 212
Total stress 161
Translating and zooming the model 432
Translating the model 152, 307, 308
Translation toolbar 308
Tutorial 52, 72, 90
-UUbiquitous-plane 193, 195, 196, 199
Ubiquitous-plane strain 163, 164, 165, 166
Ubiquitous-plane stress 155, 157, 159
Update results file 136
User defined button font 315
User defined colours 313, 314, 315
User defined contour plots 318, 322, 325, 354
User defined dump of analysis results 138, 142
User defined plots 171
User defined points for stress calculation 340
-VView > Hide Block Colours Menu 149
View > Hide Cline Colours Menu 150
View > Hide Menu 147
View > Render Menu 150, 433
View menu 151, 152, 153, 311
View toolbar 149, 152, 311, 312
Viewing grid planes 216, 303, 312
Viewing mining steps 136
-Zz-buffering
316, 317
Map3D International Ltd 1990-2015