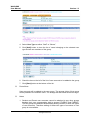
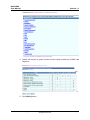
1
USER MANUAL
Security
(Document 27e)
Copyright © 2007. Education Bureau. The Government of the HKSAR.
All Rights Reserved.
WebSAMS
User Manual
Version 1.3
Table of Contents
1
MODULE OVERVIEW .............................................................................................................. 1
1.1
INTRODUCTION ........................................................................................................................ 1
1.1.1
Objective ......................................................................................................................... 1
1.2
FUNCTION CHART ................................................................................................................... 2
1.3
FLOW DIAGRAM ...................................................................................................................... 3
1.4
INTERACTIONS WITH OTHER MODULES ................................................................................... 4
SEC ..................................................................................................................................................... 4
2
OPERATION PROCEDURES ................................................................................................... 6
2.1
ACCESS CONTROL ................................................................................................................... 6
2.1.1
User Group Maintenance................................................................................................ 6
Add User Group .......................................................................................................................... 7
Update User Group ..................................................................................................................... 8
Copy User Group ...................................................................................................................... 10
Delete User Group .................................................................................................................... 11
Access Right Maintenance ........................................................................................................ 12
Add User Accounts to Existing User Group ............................................................................. 14
Remove User Accounts from Existing User Group .................................................................. 16
2.1.2
Special Team Maintenance ........................................................................................... 18
Add User Accounts to Score Capture Team ............................................................................. 18
Delete User Accounts from Score Capture Team ..................................................................... 19
Capture Score Option ................................................................................................................ 20
Add User Accounts to Student Data Access Control Team ...................................................... 21
Delete Users Accounts from Student Data Access Control Team ............................................ 22
Student Data Access Control Option ........................................................................................ 23
2.1.3
User Account Maintenance ........................................................................................... 25
Modify User Account Information ........................................................................................... 25
Delete User Account ................................................................................................................. 28
Reset Password ......................................................................................................................... 29
Create Individual Account ........................................................................................................ 30
Create Student / Parent Account ............................................................................................... 35
2.1.4
Location Access Control Maintenance ......................................................................... 38
2.1.5
Unlock Account ............................................................................................................. 41
2.1.6
Login Status .................................................................................................................. 42
2.1.7
Maintain Internet Access Time Profile ......................................................................... 43
Add Internet Access Time Profile............................................................................................. 43
Copy Internet Access Time Profile ........................................................................................... 45
Edit Internet Access Time Profile ............................................................................................. 46
View Internet Access Time Profile ........................................................................................... 48
Delete Internet Access Time Profile ......................................................................................... 48
Add Account to Profile ............................................................................................................. 50
Delete Account from Internet Access Time Profile .................................................................. 53
2.2
CONFIGURATION ................................................................................................................... 54
2.2.1
System Configuration Maintenance .............................................................................. 54
2.2.2
IP Configuration Maintenance ..................................................................................... 61
2.2.3
System Customization ................................................................................................... 64
2.3
REPORT & LOG...................................................................................................................... 67
2.3.1
Audit Trail ..................................................................................................................... 67
View Audit Trail ....................................................................................................................... 67
Archive Audit Trail ................................................................................................................... 69
Copyright © 2007. Education Bureau. The Government of the HKSAR.
All Rights Reserved.
WebSAMS
User Manual
Version 1.3
Delete Archived Audit Trail ..................................................................................................... 70
2.3.2
Staff Audit Trail............................................................................................................. 72
View Audit Trail ....................................................................................................................... 72
Archive Audit Trail ................................................................................................................... 73
Delete Archived Audit Trail ..................................................................................................... 74
2.3.3
FMP Audit Trail ............................................................................................................ 76
View Audit Trail ....................................................................................................................... 76
Archive Audit Trail ................................................................................................................... 77
Delete Archived Audit Trail ..................................................................................................... 78
2.3.4
Report............................................................................................................................ 80
Select Report Template ............................................................................................................. 80
User Account List by User Group Report (R-SEC001) ............................................................ 81
User Account Profile Report (R-SEC002) ................................................................................ 82
User Group Access Rights Report (R-SEC003) ....................................................................... 83
Successful Login Log Report (R-SEC004) ............................................................................... 85
Unsuccessful Login Log Report (R-SEC005)........................................................................... 86
List of functions that can be accessed outside SAMS LAN Segment Report (R-SEC007) ..... 87
List of functions that can be accessed by User Account outside SAMS LAN Segment Report
(R-SEC008)............................................................................................................................... 88
List of functions that can be accessed by User Group outside SAMS LAN Segment Report (RSEC009) .................................................................................................................................... 90
List of Access Time Profile and user account(s) assigned Report (R-SEC011-E) ................... 92
2.3.5
Purge Log...................................................................................................................... 94
2.3.6
View Backup Log .......................................................................................................... 95
Copyright © 2007. Education Bureau. The Government of the HKSAR.
All Rights Reserved.Prohibited
WebSAMS
User Manual
Version 1.3
1
Module Overview
1.1
Introduction
1.1.1 Objective
Security module consists of three major components – Access Control, System
Configuration and Audit Trail & Log.
Access control comprises User Account, User Group, Function Access Control
and Location Access Control. For function access control, a user account must
be created before a user can access the system. A user account can be
assigned to one or more user groups and access rights are granted to the user
groups. The user accounts inherit the function access rights of the groups to
which the user accounts belong. Moreover, a user account can be of different
user types that restrict what user groups can be granted to that user account. To
simplify the set up of access rights, there are more than twenty built-in user
groups that have default function access rights. The school can also create new
user-defined groups and change the built-in user groups’ function access rights.
Normally, the school users should be accessing WebSAMS from the SAMS LAN
Segment, which is treated as a trusted network by the system. For Location
Access Control, the school can determine whether to allow access to WebSAMS
from ITED LAN Segment or via Internet (i.e. untrusted network) and what
functions can be accessed when a user logins outside SAMS LAN segment (i.e.
ITED LAN Segment & Internet). The school can define the exact function rights
that can be accessed outside SAMS LAN Segment, for instance, allow viewing
but deny editing.
System Configuration comprises WebSAMS system settings and customisation.
The school can set up specific access control options, function access settings,
system file paths, location access control, E-Mail settings and other options. In
addition, the school can customise the look and feel of its WebSAMS.
Audit Trail & Log allows the user to view, archive and delete the audit trail and
other log records generated by the system. View functions for the database
backup log and server backup log are also provided.
The system also provides a comprehensive set of reports to allow the school to
check the access rights of various users and groups, from inside and outside the
trusted network. The school can also view reports on the successful and failed
login attempts of the users.
Copyright © 2007. Education Bureau. The Government of the HKSAR.
All Rights Reserved.
Page 1
WebSAMS
User Manual
1.2
Version 1.3
Function Chart
Security (SEC)
User Group
Special Team
User Account
Location Access Control
Internet Access Time Profile
Unlock Account
Login Status
System Configuration
IP Configuration
System Customization
Audit Trail
Staff Audit Trail
FMP Audit Trail
Report
Purge Log
View Backup Log
Access Control
Configuration
Report & Log
Copyright © 2007. Education Bureau. The Government of the HKSAR.
All Rights Reserved.
Page 2
WebSAMS
User Manual
1.3
Version 1.3
Flow Diagram
Security Module
System Configuration
IP Configuration
Location Access Control
Report &
Log
Audit Trail
Maintenance
Internet Access
Time Profile
User Group
Maintenance
Copyright © 2007. Education Bureau. The Government of the HKSAR.
All Rights Reserved.
User Account
Maintenance
Page 3
WebSAMS
User Manual
1.4
Version 1.3
Interactions with other modules
SCH
- SEC03 Add user account
- SEC04 Modify user account
- SEC22 Internet Access Time Profile
STU
- SEC03 Add Student / Parent user account
- SEC04 Modify Student / Parent user account
SEC
STF
- SEC03 Add Staff user account
- SEC04 Modify Staff user account
- SEC21 Staff Audit Trail
RPT
- SEC09 Report (English & Chinese)
FMP
- SEC20 FMP Audit Trail
All Modules
- SEC08 Audit Trail
Copyright © 2007. Education Bureau. The Government of the HKSAR.
All Rights Reserved.
Page 4
WebSAMS
User Manual
Version 1.3
SEC03 – Add user account, SEC04 – Modify user account, SEC22 – Internet
Access Time Profile
• SCHOOL (SCH)
•
Retrieve school level / session / class information
• STUDENT (STU)
•
Retrieve Student Registration Number
•
Retrieve Guardian Information
•
Retrieve Student / Guardian Phone No., HKID No.
• STAFF (STF)
•
Retrieve Staff Code and Staff Name
•
SEC09 – Report (English & Chinese)
Report Management (RPT)
•
Retrieve related report template
•
SEC08 – Audit Trail, SEC21 – Staff Audit Trail, SEC20 – FMP Audit Trail
ALL Modules
•
Retrieve audit trail records
Copyright © 2007. Education Bureau. The Government of the HKSAR.
All Rights Reserved.
Page 5
WebSAMS
User Manual
Version 1.3
2
Operation Procedures
2.1
Access Control
2.1.1 User Group Maintenance
Users can add, modify, copy and delete a user group and its access rights by
the “User Group Maintenance” function.
The following diagram illustrates the general concept of a User Group:
User Group
Users can be assigned to multiple user groups. The following diagram illustrates
the concept:
Copyright © 2007. Education Bureau. The Government of the HKSAR.
All Rights Reserved.
Page 6
WebSAMS
User Manual
Version 1.3
Add User Group
Function Description
User can add a new user group through the “User Group Maintenance”
function.
Pre-requisites
N/A
User Procedures
1. Click [Security] [Access Control] [User Group] on the left menu.
2. A list of groups is shown, click the [Add] button at the bottom of the page to
add a new user group.
3. Fill in the Group ID, Group Description and Chinese Group Description
for the new group.
4.
Click [Save] button.
Post-effects
The user-defined user group can be attached to any users. The access rights of
the user group will then be passed to the users of the user group. Access rights
granted will be effective the next time the member users login to the system.
Notes
1. User group created by the user is called user-defined user group.
2. All user-defined user groups can be granted access to all modules / functions
except some restricted functions (e.g. all functions under the two modules of
FMP and Staff). This is to exercise strict control on the access of these
restricted functions / modules to the built-in groups only.
Copyright © 2007. Education Bureau. The Government of the HKSAR.
All Rights Reserved.
Page 7
WebSAMS
User Manual
Version 1.3
3. Under Chinese Language the Chinese Group Description field will be
displayed in the group selection drop down for selection. If this field is blank,
the Group Description will be displayed instead.
Update User Group
Function Description
A user can modify an existing user group’s description, access rights and group
members through the “User Group Maintenance” function.
Pre-requisites
User group already exists.
User Procedures
1. Click [Security] [Access Control] [User Group] on the left menu.
2. A list of groups is shown. Click the Group ID link to modify the function
access rights of the group.
3. Select the Group Desc tab to modify the group description.
4. Select the Access Right tab and then click on the module link to modify the
access rights.
5. When modifying the access rights, a pop-up screen with the access rights of
the selected module for the user group is shown. Mark or un-mark the check
boxes to grant or revoke the access rights to or from the user group.
6. Select the Add A/C to Group tab to add / remove members to / from the
user group.
7. Click [Save] button to save any changes.
Copyright © 2007. Education Bureau. The Government of the HKSAR.
All Rights Reserved.
Page 8
WebSAMS
User Manual
Version 1.3
Post-effects
1. Changes to the user Group Description and Chinese Group Description
would be updated.
2. As user group is used to grant access rights to users, any changes in the
access right settings in a user group will affect the access rights of all the
users belonging to the group. New rights will be effective when the affected
users login the system the next time.
Notes
1. The Group ID cannot be updated.
2. The assistant system administrator account ‘asysadmin’ has access right to
perform one and only one function — changing the system administrator’s
(i.e. the ‘sysadmin’ account) password. This right is built in the system and
cannot be modified and cannot be granted to any other user groups.
3. Some functions, for instance Staff Audit Trail and FMP Audit Trail functions
under Security module, are only available to the SCHOOL_HEAD user group.
The system will ensure that access rights of these restricted functions cannot
be granted to all other user groups.
4. For all built-in user groups, only the access rights of the relevant modules /
functions can be maintained. For example, for the STUDENT or PARENT
user groups, only the pre-defined set of functions / modules are listed for
access rights maintenance.
5. For user-defined user groups, access rights of all modules / functions (except
the restricted functions and the Staff & FMP modules) can be maintained.
6. The four built-in user groups for Staff are STAFF, STAFF_MANAGEMENT_1,
STAFF_MANAGEMENT_2
and
STAFF_MANAGEMENT_3.
The
STAFF_MANAGEMENT_1 user group is granted with all access rights to the
modules of Staff and Staff Deployment, while the STAFF_MANAGEMENT_2
and STAFF_MANAGEMENT_3 user groups are granted with no access
rights. The school can customize the access rights of these 3 groups to
control access to staff information. The STAFF group only has view rights to
Staff module functions. Similarly, there are 6 FMP built-in user groups.
7. For ‘Student’ and ‘Parent’ accounts, they are only allowed to be added to the
user groups STUDENT & PARENT respectively.
8. STAFF user group can only be assigned to user account of ‘Staff’ type. It
cannot be assigned to user account of ‘Others’ type.
9. FMP module access rights can only granted to the SCHOOL_HEAD group
and the six built-in FMP groups.
10. Staff module access rights can only granted to the SCHOOL_HEAD group,
the STAFF group and the three built-in STAFF_MANAGEMENT groups.
Copyright © 2007. Education Bureau. The Government of the HKSAR.
All Rights Reserved.
Page 9
WebSAMS
User Manual
Version 1.3
Copy User Group
Function Description
A user can copy a user group through the “User Group Maintenance” function.
Pre-requisites
The source user group to copy from should already exist.
User Procedures
1. Click [Security] [Access Control] [User Group] on the left menu.
2. Select the User Group by checking the box beside the Group ID column.
3. Click [Copy] button.
Only authorised function
will be shown.
4. Fill in the Group ID, Group Description and Chinese Group Description
for the new group. (Group ID cannot be duplicated with any existing group)
5. Click [Save] button to create the new group.
Copyright © 2007. Education Bureau. The Government of the HKSAR.
All Rights Reserved.
Page 10
WebSAMS
User Manual
Version 1.3
Post-effects
1. The user group created will have a set of function access rights same as that
of the original user group, less the restricted modules / functions.
2. Users in the original user group will not be copied to the newly created user
group.
Notes
1.
The access rights of the source group for every module can be viewed by
clicking the triangular icon next to the module name.
2.
The access rights of the source group will be copied to the new group.
However, a user group created by copying from the built-in FMP or STAFF
user groups or the SCHOOL_HEAD group will not contain the modules of
FMP and Staff for access right setting. The reason is to confine the access
to FMP and staff functions to the corresponding built-in user groups for
tighter control on the sensitive FMP and staff data. Similarly, access rights
of functions restricted to the SCHOOL_HEAD group will not be copied.
3.
The user accounts attached to the source group will not be copied. The
user has to add user accounts to the newly created group.
Delete User Group
Function Description
A user can delete a user group through the “User Group Maintenance”
function.
Pre-requisites
The user group to be deleted exists and is not a built-in group.
User Procedures
1. Click [Security] [Access Control] [User Group] on the left menu.
2. Select the User Group by checking the box beside the Group ID column.
3. Click [Delete] button.
4. User accounts belonging to the deleted group will be shown.
Copyright © 2007. Education Bureau. The Government of the HKSAR.
All Rights Reserved.
Page 11
WebSAMS
User Manual
Version 1.3
5. Click [Delete] button to confirm deletion of the group.
Post-effects
The user groups will be removed. All user accounts in the deleted user groups
will be removed from the user groups first.
Notes
All built-in user groups, e.g. STUDENT, cannot be deleted and error message
“Built-in user group cannot be deleted.“ will be shown.
Access Right Maintenance
Function Description
The access rights of functions / modules for a user group can be maintained
through the “User Group Maintenance” function.
Pre-requisites
User group exists.
User Procedures
1. Click [Security] [Access Control] [User Group] on the left menu.
2. Select the User Group by clicking on the Group ID link.
3. Module / Function list will be displayed.
Copyright © 2007. Education Bureau. The Government of the HKSAR.
All Rights Reserved.
Page 12
WebSAMS
User Manual
Version 1.3
4. Select a module by clicking on its link to amend the specified module /
function access rights.
5. Module / function access right maintenance window will be popped-up.
Copyright © 2007. Education Bureau. The Government of the HKSAR.
All Rights Reserved.
Page 13
WebSAMS
User Manual
Version 1.3
6. Maintain the specified module / function access rights by checking on or off
the boxes.
7. Click [Save] button to update the changes.
Post-effects
1. The access rights are updated accordingly and will be effective upon the
affected users’ next login.
2. If a user does not have the access rights to a function, the corresponding
function will not be shown at the left menu or the corresponding tab will not
be shown in the main page.
3. If a user does not have the action access right to an action such as "Delete",
the corresponding action button i.e. "Delete" button will be dimmed. When
the dimmed button is clicked, there will be no response.
Notes
1. In the access right table, Symbol "X" represents that the specific right has
been granted; while symbol "-" represents that the specific right does not
exist. If the specific right has not been granted, no symbol will be displayed in
the cell of the table.
2. If any of the Add / Edit / Delete / Execute right is granted to the group, the
View right will be automatically granted. However, for some functions, the
setting of View Right is not available, e.g. the Plan New School Year function
in School Management.
3. For module specific built-in user groups, only the relevant modules are
available for setting access rights, e.g. only the CDS module is available for
CDS_ADMIN user group.
Add User Accounts to Existing User Group
Function Description
Users can add user accounts to an existing user group through the “User
Group Maintenance” function.
Pre-requisites
Only the user accounts that are not yet members of the target user group can be
added to that user group.
User Procedures
1. Click [Security] [Access Control] [User Group] on the left menu.
2. Select a User Group by clicking on the Group ID link.
3. Click Add Account to Group tab.
Copyright © 2007. Education Bureau. The Government of the HKSAR.
All Rights Reserved.
Page 14
WebSAMS
User Manual
Version 1.3
4. Select User Type as either “Staff” or “Others”.
5. Click [Add] button to view the list of users belonging to the selected user
type and are not members of the group.
6. Check the box on the left of the list of user accounts to be added to the group.
7. Click [Save] button at the bottom of the list.
Post-effects
User accounts will be added to the user group. The access rights of that group
will be passed to the member users. The change will take effect at the next login.
Notes
1. Student and Parent user accounts cannot be attached to any other groups
besides their own corresponding built-in groups STUDENT and PARENT.
The two groups are attached automatically during creation of these two types
of user accounts. Therefore adding of these two types of accounts to user
group is not available.
Copyright © 2007. Education Bureau. The Government of the HKSAR.
All Rights Reserved.
Page 15
WebSAMS
User Manual
Version 1.3
2. The built-in user accounts ‘sysadmin’ & ‘asysadmin’ cannot be added to any
user groups.
Remove User Accounts from Existing User Group
Function Description
User can remove user accounts from the existing user group through the “User
Group Maintenance” function.
Pre-requisites
User accounts that have already been added to a user group can be removed
from the user group.
User Procedures
1. Click [Security] [Access Control] [User Group] on the left menu.
2. Select a User Group by clicking on the Group ID link.
3. Click Add A/C to Group tab.
4. Select the user accounts to be deleted by checking the box beside the User
ID link.
5. Click [Delete] button.
Post-effects
Copyright © 2007. Education Bureau. The Government of the HKSAR.
All Rights Reserved.
Page 16
WebSAMS
User Manual
Version 1.3
User accounts will be removed from the user group. The access rights of that
group are not applicable to the user accounts anymore. The change will take
effect at the user’s next login.
Notes
The built-in user account ‘sysadmin’ belongs to the SYSTEM_ADMIN group but
it cannot be removed from the group.
Copyright © 2007. Education Bureau. The Government of the HKSAR.
All Rights Reserved.
Page 17
WebSAMS
User Manual
Version 1.3
2.1.2 Special Team Maintenance
Assessment score entry is only available to Subject Teacher, Class Teacher or
members of the Score Capture Team. Score Capture Team can enter the scores
of all subjects for all classes. Subject Teacher can enter the scores of the
subject that he / she teaches. Class Teacher can enter the scores of all subjects
for his / her class.
Access to Student Information can only be granted to members of the Student
Data Access Control Team, School Head group, WebSAMS System
Administrator group, Clerk group and Class Teacher. Class Teacher can access
the personal information of students belonging to his / her class. Student Data
Access Control Team, School Head group, WebSAMS System Administrator
group and Clerk group can access the personal information of all students.
The function “Special Team Maintenance” allows adding / removing user
accounts to / from the two special user groups “Score Capture Team”
and ”Student Data Access Control Team”, and allows granting / revoking of
access rights of assessment score entry and student data maintenance to / from
the pre-defined types of users or user groups.
Add User Accounts to Score Capture Team
Function Description
User can add user accounts to the Score Capture Team through the “Special
Team Maintenance” function.
Pre-requisites
1. The user account is not a member of this group.
2. Only user accounts of “Staff” and “Others” type can be added to this group.
User Procedures
1. Click [Security] [Access Control] [Special Team] on the left menu.
Copyright © 2007. Education Bureau. The Government of the HKSAR.
All Rights Reserved.
Page 18
WebSAMS
User Manual
Version 1.3
2. A list of user accounts who are group members is shown; click [Add] button
to add new members to the group.
3. Check the check box(es) to select user account(s) to be added as group
members.
4. Click [Save] button.
Post-effects
User accounts will be added to the special group of Score Capture Team.
Notes
Members of the Score Capture Team are able to enter scores for all subjects of
all classes of the current school year or even past school years if the option of
“by Score Capture Team” has been checked in the Capture Score Option page.
Delete User Accounts from Score Capture Team
Function Description
User can remove user accounts from the Score Capture Team through the
“Special Team Maintenance” function.
Pre-requisites
The user account is a member of this group.
Copyright © 2007. Education Bureau. The Government of the HKSAR.
All Rights Reserved.
Page 19
WebSAMS
User Manual
Version 1.3
User Procedures
1. Click [Security] [Access Control] [Special Team] on the left menu.
2. A list of user accounts is shown. Check the check box(es) to select user
account(s) to be deleted.
3. Click [Delete] button.
Post-effects
User accounts will be removed from the special user group of Score Capture
Team.
Notes
N/A
Capture Score Option
Function Description
User can select entry of scores by Subject teacher, by Class Teacher, or by
Score Capture Team through the “Special Team Maintenance” function.
Pre-requisites
N/A
User Procedures
1. Click [Security] [Access Control] [Special Team] on the left menu.
2. Click Capture Score Option tab.
3. Check the check box(es) to grant the score entry rights to the groups.
Copyright © 2007. Education Bureau. The Government of the HKSAR.
All Rights Reserved.
Page 20
WebSAMS
User Manual
Version 1.3
4. Click [Save] button.
Post-effects
If an option has been checked, members of the selected user groups or user
types can enter assessment scores.
Notes
1. Capture Score Option is used to control which kinds of users (subject
teacher, class teacher, or Score Capture Team) have the rights to enter
assessment scores.
2. Data Access Control
•
•
•
Score Capture Team can enter the scores of all subjects for all classes.
Subject Teacher can enter the scores of the subject that he / she teaches.
Class Teacher can enter the scores of all subjects for his / her class only.
Add User Accounts to Student Data Access Control Team
Function Description
User can add user accounts to the Student Data Access Control Team through
the “Special Team Maintenance” function.
Pre-requisites
1. The user account is not a member of the group.
2. Only user accounts of “Staff” and “Others” type can be added to this group.
User Procedures
1. Click [Security] [Access Control] [Special Team] on the left menu.
2. Click Student Data Access Control Team tab.
Copyright © 2007. Education Bureau. The Government of the HKSAR.
All Rights Reserved.
Page 21
WebSAMS
User Manual
Version 1.3
3. Click [Add] button.
4. Check the check box(es) to select user account(s) to add to the group.
5. Click [Save] button.
Post-effects
User accounts will be added to the special group of Student Data Access Control
Team.
Notes
Members of the Student Data Access Control Team will have full rights to
maintain student data if the option of “by Student Data Access Control Team”
has been checked in the Student Data Access Control Option page.
Delete Users Accounts from Student Data Access Control Team
Function Description
Copyright © 2007. Education Bureau. The Government of the HKSAR.
All Rights Reserved.
Page 22
WebSAMS
User Manual
Version 1.3
User can remove user accounts from the Student Data Access Control Team
through the “Special Team Maintenance” function.
Pre-requisites
The user is a member of this group.
User Procedures
1. Click [Security] [Access Control] [Special Team] on the left menu.
2. Click Student Data Access Control Team tab.
3. A list of user accounts is shown. Check the check box(es) to select the user
account(s) to remove.
4. Click [Delete] button.
Post-effects
User accounts will be removed from the special user group of Student Data
Access Control Team.
Notes
N/A
Student Data Access Control Option
Function Description
User can select which of the pre-defined user groups or user types to have the
rights to maintain student data through the “Special Team Maintenance”
function.
Pre-requisites
N/A
User Procedures
Copyright © 2007. Education Bureau. The Government of the HKSAR.
All Rights Reserved.
Page 23
WebSAMS
User Manual
Version 1.3
1. Click [Security] [Access Control] [Special Team] on the left menu.
2. Click Student Data Access Control Option tab.
3. Check the check box(es) to set which user groups or user types to have the
rights to maintain student data.
4. Click [Save] button.
Post-effects
Only members of those selected user groups or user types have the rights to
maintain student data.
Notes
1. Class Teacher can access the student data of his / her class only.
2. If the Student Data Access Control Team has been checked, members of
this special user group will have the full rights to maintain all student data.
Copyright © 2007. Education Bureau. The Government of the HKSAR.
All Rights Reserved.
Page 24
WebSAMS
User Manual
Version 1.3
2.1.3 User Account Maintenance
A user can add, modify and delete a user account by the following functions:
• Create Individual Account — create a user account for “Staff”, “Student”,
“Parent” or “Others” user type by entering the details manually.
• Create Student / Parent Account — create student / parent accounts by
batch.
• Search a User Account for deletion and modification.
Modify User Account Information
Function Description
A user can modify the information of a user account through the “User Account
Maintenance” function.
Pre-requisites
The user account exists.
User Procedures
1. Click [Security] [Access Control] [User Account] on the left menu.
2. Fill in the search criteria. Click [Search] button.
User ID link
Copyright © 2007. Education Bureau. The Government of the HKSAR.
All Rights Reserved.
Page 25
WebSAMS
User Manual
Version 1.3
Click on the User ID link for the user account information to be modified.
3. Edit the user account information as required. For details of the user account
information, refer to the section “Create Individual Account”.
4. The password of the user account can be changed by entering the new
password twice. The next time the user account login, the new password has
to be used.
5. To attach user groups to the account,
i. Click [Attach Group] button.
ii. Check the box(es) to select the group(s) to be attached in the pop-up
screen.
Copyright © 2007. Education Bureau. The Government of the HKSAR.
All Rights Reserved.
Page 26
WebSAMS
User Manual
Version 1.3
5
6. To detach user groups from the user account,
i. Check the box(es) adjacent to the group(s) to be detached.
ii. Click [Detach Group] button to detach group(s).
7. To attach Internet Access Time Profiles to the account,
i. Click [Attach Profile] button.
ii. Check the box(es) to select the profile(s) to be attached in the pop-up
screen.
8. To detach Internet Access Time Profiles from the user account,
i. Check the box(es) adjacent to the profile(s) to be detached.
ii. Click [Detach Profile] button to detach profile(s).
9. Click [Save] button to save the changes.
Post-effects
Changes will be effective upon the affected user’s next login. Expired accounts
will not be able to login again.
Notes
1. Staff / Others Accounts will be listed if “Staff / Others Accounts” option is
checked in the Search Criteria.
Copyright © 2007. Education Bureau. The Government of the HKSAR.
All Rights Reserved.
Page 27
WebSAMS
User Manual
Version 1.3
2. Student / Parent Accounts will be listed if “Student / Parent Accounts” option
is checked in the Search Criteria.
3. For Student / Parent account, School Year option will be provided. And once
IYP is started, next school year option will be provided in field “School Year”.
4. The two built-in accounts ‘sysadmin’ and ‘asysadmin’ cannot be searched
out; and hence the information of these accounts cannot be modified.
5. User ID cannot be changed.
6. The user account type cannot be changed; except that ‘Others’ type account
can be changed to ‘Staff’ type account.
7. Only STUDENT user group is attached to a student account and the group
cannot be detached from the account as the “Detach Group” button is
disabled. Similarly, only PARENT user group is attached to a parent account
and the group also cannot be detached.
8. The two special teams (Score Capture Team and Student Data Access
Control Team) cannot be attached to the user accounts through this function.
However, they can be detached here.
9. The existing user password will be displayed as '*******' and thus even the
system administrator cannot read the existing user password.
10. If the password is going to expire within 14 days, user will be warned after
login.
11. The function access rights of individual user account are based on the user
group(s) attached.
Delete User Account
Function Description
User can delete a user account through the “User Account Maintenance”
function.
Pre-requisites
The user account exists.
User Procedures
1. Click [Security] [Access Control] [User Account] on the left menu.
2. Enter the search criteria. Click [Search] button to list the corresponding
accounts.
Copyright © 2007. Education Bureau. The Government of the HKSAR.
All Rights Reserved.
Page 28
WebSAMS
User Manual
Version 1.3
3. Check the check box(es) to select the user account(s) to be deleted.
Click [Delete] button.Post-effects
Deletion will take effect immediately and the user account, if currently logging in,
will be logged out from the system at once.
Notes
1. The two built-in accounts ‘sysadmin’ and ‘asysadmin’ cannot be searched
out; and hence cannot be deleted from the system.
2. When a user is deleted, the relevant group memberships are also removed
from the system.
3. For Student / Parent account, School Year option will be provided. And once
IYP is started, next school year option will be provided in field “School Year”.
Reset Password
Function Description
User can reset a user account(s) password through the “User Account
Maintenance” function.
Pre-requisites
The user account exists.
User Procedures
1. Click [Security] [Access Control] [User Account] on the left menu.
Copyright © 2007. Education Bureau. The Government of the HKSAR.
All Rights Reserved.
Page 29
WebSAMS
User Manual
Version 1.3
2. Enter the search criteria. Click [Search] button to list the corresponding
accounts
3. Check the check box(es) to select the user account(s) to be reset password.
4. Click [Reset Password] button.
Post-effects
1.
The selected user account(s) password will be reset. The new passwords
are generated by system.
2.
A report will be generated and it is in PDF format.
3.
The report “Reset Password Report (R-SEC012-E)” generated will be filed to
[Report Management] > [Repository]
Notes
1. There is no limitation on the frequency for password reset.
2. If no user account exists under the specific options, “No record” will be
shown.
3. After password reset, it is not necessary for user to change the password
during the first login.
Create Individual Account
Function Description
User can create a new user account through the “User Account Maintenance”
function.
Pre-requisites
1. The Staff, Student or Guardian information for the corresponding user type
must be present before creation of a user account of any one of these three
types.
2. For Student or Parent account, the student must be an active student
currently or newly admit student in next school year with schooling record;
and the parent must be the guardian of an active student currently or newly
admit student in next school year with schooling record.
3. For Staff account, the staff be an active staff currently (not departed) or
having future employment record.
4. Only one user account can been created for the same student, parent or staff.
However, if a parent has more than one child in the same school, he / she
can have one parent account for each child.
User Procedures
Copyright © 2007. Education Bureau. The Government of the HKSAR.
All Rights Reserved.
Page 30
WebSAMS
User Manual
Version 1.3
1. Click [Security] [Access Control] [User Account] on the left menu.
2. Click Create Individual A/C tab.
3. Fill in the details of the account to be created.
4
4. For Staff / Student / Parent account, click [Go to Search] button to search
for a user code from the existing staff / student / guardian records.
5. Search for a staff / student / parent user and select the user code of the user.
Copyright © 2007. Education Bureau. The Government of the HKSAR.
All Rights Reserved.
Page 31
WebSAMS
User Manual
Version 1.3
6. Click [Add] button. The user code as well as the user’s English and Chinese
names will be entered automatically.
7. The system will go back to Create Individual Account page. To attach a
user group to the user account, click [Attach Group] button.
8. Check the box to select the user group(s) to be attached.
9. Click [Select] button to attach the group(s) and the system will go back to
Create Individual Account page.
10. To detach any attached user group(s), check the box next to the group name
to select the group(s) to be detached.
Copyright © 2007. Education Bureau. The Government of the HKSAR.
All Rights Reserved.
Page 32
WebSAMS
User Manual
Version 1.3
11. Click [Detach Group] button to detach the group(s).
12. Click [Save] button to create the user account.
Post-effects
1. A newly created user account will be able to login WebSAMS, but will have
no rights to use the functions until he / she is attached to at least one User
Group with function access rights.
2. When a student departs the school, the corresponding student and parent
accounts will expire immediately. However, when a student is graduated, the
account will expire after the last day of the school year, i.e. expire on 01
September.
3. When the employment of a staff is terminated, the staff account will expire
immediately.
4. Data Access Control on the student / parent / staff account is facilitated by
the user code of the account.
• A student account can access only his / her own data.
• A parent account can access only his / her child's data.
• A staff account added to the STAFF group can access only his / her own
personal particulars.
Notes
1. Account Details: (Fields in red are mandatory)
• School Level / Session for ‘Staff’ and ‘Others’ accounts
a. School Level / Session is used to handle data access control in some
modules for these two types of accounts. For example, if AM session
is selected for a school with both AM and PM sessions, the user
account can only access the staff data of the AM session.
• User ID / User Code
a. User Code is used for data access control on an account. Student
accounts are linked to valid students, Parent accounts to valid
students & guardians and Staff account to valid staff.
b. The User ID and User Code of a Student account is the Student
Registration Number.
c. The User ID of a Parent account is “G_” + Student Registration
Number of his / her child and the User Code is the Student
Registration Number of his / her child.
d. The User Code of a Staff account is the Staff Code.
• Password
a. The password is case-sensitive.
b. For a newly created account, the user has to change the password
upon the first login.
c. The password is encrypted before being stored in the database. This
protects the system from leakage of passwords even if hackers get
access to the database. If the user account records are extracted
from the database, passwords will be displayed in encrypted form as
follows:
Copyright © 2007. Education Bureau. The Government of the HKSAR.
All Rights Reserved.
Page 33
WebSAMS
User Manual
Version 1.3
•
•
•
•
Password Expiry
a. Password Expiry Date: Password will expire on the date stated in the
field “Password Expiry Date”. The “Password Expiry Date” is entered
automatically by the system, based on the “Password Expiry Period”
set in the System Configuration function. If the password has expired,
the system will not allow the user to login. There will be warnings to
the user starting from 14 days before the expiry of the password.
b. Never Expire: Password will never expire. If the “Password Expiry
Period” set in the System Configuration function is 0, the radio button
of “Never Expire” will be selected automatically.
Login Language
a. The default login language (Chinese / English) used each time the
user logins.
User Account Access Times
a. Upon login, the system will first check the System Access Time in
System Configuration and then the User Account Access Time.
b. Login is allowed only when the user logins within the overlapping
period of the System Access Time and the User Account Access
Time.
c. Login permission of 24 hours a day can be set by clicking the “24
Hours” button.
Account Expiry
a. A user account cannot login on or after the account expiry date.
b. Account can be set to “Never Expire”.
2. User Groups
• STUDENT and PARENT user groups will be attached automatically to
the Student and Parent accounts respectively and cannot be detached.
Copyright © 2007. Education Bureau. The Government of the HKSAR.
All Rights Reserved.
Page 34
WebSAMS
User Manual
Version 1.3
STAFF user group will be automatically attached to Staff user accounts.
However, STAFF group can be detached from a staff account.
• The two special teams cannot be attached to a user account by this
function.
3. Search User Code
• Once IYP is started, next school year option will be provided in field
“School Year”
• For Student / Parent type, when “All” option is selected in field “School
Year”, if student has schooling record in both current or next school year,
only current year record will be displayed.
•
Create Student / Parent Account
Function Description
User can create Student / Parent accounts by batch for the whole school or by
school year, school level, session, class level or individual class through the
“User Account Maintenance” function.
Pre-requisites
The school information has been properly set up with the correct class
information. Students and parents are present.
User Procedures
1. Click [Security] [Access Control] [User Account] on the left menu.
2. Click Create Student / Parent A/C tab.
3. Select Account Type (Student / Parent) to be created.
4. Select School Year, School Level, School Session, Class Level and
Class Code for creating the target accounts.
5. Select Account Password Option.
6. Select Login Language Option.
7. Select Report Option.
Copyright © 2007. Education Bureau. The Government of the HKSAR.
All Rights Reserved.
Page 35
WebSAMS
User Manual
Version 1.3
8. Click [Generate A/C] button.
Post-effects
User accounts are created and can be used to login the system. The STUDENT
and PARENT user group will be attached to the Student and Parent user
accounts respectively.
Notes
1. Once IYP is started, next school year option will be provided in field “School
Year”.
2. Only the guardian of a student can have a Parent user account and each
student only has one guardian.
3. The password will be generated by the system according to the selected
Password Option. There are four Account Password Options:
• User ID:
a. The password for a Student account will be the same as the User ID,
i.e. the Student Registration Number.
b. The password for a Parent account will be the same as the User ID,
i.e. “G_” + Student Registration Number.
c. If a parent has two or more children at the same school, different
accounts will be created for the parent for different student
registration codes.
• Tel No:
a. The password will be the telephone number of the student for a
Student account and the telephone number of the guardian for a
Parent account.
• HKID:
a. The password will be the HKID number of the student for a Student
account and the HKID number of the guardian for a Parent account.
• System Generated
a. The password will be the generated by the system randomly.
Copyright © 2007. Education Bureau. The Government of the HKSAR.
All Rights Reserved.
Page 36
WebSAMS
User Manual
Version 1.3
4. If ‘Tel No’ or ‘HKID’ is selected as the Password option and the
corresponding information is not available, ‘User ID’ will be used as the
password instead.
5. No user account will be generated when there is no student / parent in the
class or all the user accounts of the class have already been created.
6. If a new student has been admitted to a class already with student / parent
accounts, only the student / parent account of this student will be created.
Create Individual Account can also be used to create user account for this
student and his / her parent.
7. The student / parent account will automatically expire when the student
departs or graduates.
8. When “All” option is selected in field “School Year”, if student has schooling
record in both current or next school year, only current year record will be
displayed.
9. A report in PDF or Excel format containing the account information will be
generated and stored in the Report Repository. This report will list the School
Year, School Level, School Session, Class Name, User ID, Class No.,
English Name, Chinese Name and the Password Option of the user
accounts generated.
Copyright © 2007. Education Bureau. The Government of the HKSAR.
All Rights Reserved.
Page 37
WebSAMS
User Manual
Version 1.3
2.1.4 Location Access Control Maintenance
Function Description
This function allows the school to set the accessibility of functions outside the
SAMS LAN Segment, i.e. from ITED LAN Segment or Internet. The following
diagram illustrates this concept:
Function A
User A
Pre-requisites
May Not Be
Accessible
User A
e.g. Home
N/A.
User Procedures
1. Click [Security] [Access Control] [Loc Access Ctrl] on the left menu.
2. Click on the triangular icon to the right of the module name to expand the
location access right table to show the function access rights outside the
SAMS LAN Segment.
3. Click on the module link to edit the corresponding function access rights
outside the SAMS LAN Segment.
Copyright © 2007. Education Bureau. The Government of the HKSAR.
All Rights Reserved.
Page 38
WebSAMS
User Manual
Version 1.3
4. Check the box(es) to grant function access rights outside the SAMS LAN
Segment.
5. Click [Save] button.
Copyright © 2007. Education Bureau. The Government of the HKSAR.
All Rights Reserved.
Page 39
WebSAMS
User Manual
Version 1.3
Post-effects
Changes to location access rights will take effect when users login WebSAMS
the next time.
Notes
1. There are two master settings in the ‘System Configuration’ function to
control access from ITED LAN Segment and from the Internet. If the master
settings are turned off, even though location access rights have been
granted, login is not allowed outside the SAMS LAN Segment.
2. User’s actual access rights outside the SAMS LAN Segments depends on
i. the master settings defined in the System Configuration;
ii. the location access rights; and
iii. his / her own access rights inherited from the user groups to which he
/ she belongs.
3. By default, some functions in WebSAMS are not accessible outside SAMS
LAN segment. They are 'IP Configuration', 'Staff Audit Trail' and 'FMP Audit
Trail'.
4. The location access control settings apply to all user accounts. It is not
designed to set rights on individual user group or user account basis.
5. In the access right table, "X" represents that right has been granted, while "-"
represents that the setting of right is not available. If a cell is blank, right has
not been granted.
Copyright © 2007. Education Bureau. The Government of the HKSAR.
All Rights Reserved.
Page 40
WebSAMS
User Manual
Version 1.3
2.1.5 Unlock Account
Function Description
User can unlock a locked account through the “Unlock Account” function.
Pre-requisites
A user account is locked when a user uses wrong passwords to login WebSAMS
repeatedly and the number of times of fault login exceeds the maximum number
of fault login attemps defined in the System Configuration function.
User Procedures
1. Click [Security] [Access Control] [Acct Unlocking] on the left menu.
2. Check the box to select the account(s) to be unlocked.
3. Click [Unlock] button.
Post-effects
The user account will be unlocked and then the user can login immediately.
Notes
1. When a user uses a wrong password to login WebSAMS repeatedly and if
the number of times of fault login is greater than the maximum number of
fault login attempts allowed, the user account will be locked by the system.
2. A user whose account is locked can contact the system administrator to
unlock the account.
3. A locked account may be unlocked automatically after the elapse of the autounlock period if automatic unlocking of accounts has been set in the System
Configuration function.
4. If the "sysadmin" account has been locked, it can still login to WebSAMS if
the login is carried out in the WebSAMS server directly. After the successful
login, the account will be unlocked at the same time.
Copyright © 2007. Education Bureau. The Government of the HKSAR.
All Rights Reserved.
Page 41
WebSAMS
User Manual
Version 1.3
2.1.6 Login Status
Function Description
User can view the status of all user accounts logging in the system through the
“Login Status” function. Besides, this function can be used to force user
accounts(s) to logout from the system.
Pre-requisites
N/A
User Procedures
1. Click [Security] [Access Control] [Login Status] on the left menu.
2. A snapshot of all the user accounts who have logged in the system are
shown.
3. Check the box(es) to select the user account(s) to be logged out of the
system.
4. Click [Logout] button to force the selected user account(s) to logout.
Post-effects
When a user account is forced to logout, the user’s session will be killed
immediately and the connection will be terminated at once.
Notes
1. The current activities of individual user accounts are not shown.
2. The current process being carried out by the user will not be completed after
being logged-out.
3. The login status is only a snapshot taken when the page is loaded. Click the
“Refresh” button to reload the current login status.
Copyright © 2007. Education Bureau. The Government of the HKSAR.
All Rights Reserved.
Page 42
WebSAMS
User Manual
Version 1.3
2.1.7 Maintain Internet Access Time Profile
•
This use case allows school users setup the internet access time profile(s)
and then assign user account(s) to the profile(s) according to their needs.
•
Built-in User Groups namely SCHOOL_HEAD, SYSTEM_ADMIN, CLERK,
SENIOR_TEACHER and TEACHER should have the access right for
“Internet Access Time Profile”
•
3 built-in profiles “STAFF/OTHERS”, “PARENT”, and “STUDENT”, which
cannot be deleted, with the following setting is provided:
1. Weekday: All
2. Period: --3. Time: 24 Hours
•
By default, user accounts (i.e existing A/C and subsequent newly created
A/C) with user type “Staff” or “Others”, “Parent” and “Student” are assigned
to build-in profiles “STAFF/OTHERS”, “PARENT” and “STUDENT”
respectively. There is no limitation of internet access for all user accounts
initially while school users can add/delete user account(s) in 3 built-in
profiles according to their operational needs afterwards
Add Internet Access Time Profile
Function Description
This use case allows school users to add internet access time profile(s).
Pre-requisites
1.
The user must be logon first
2.
Users belong to a user group with "Internet Access Time Profile - Execute"
right can process this function.
User Procedures
1.
Click [Security] [Access Control] [Internet Access Time Profile]
on the left menu.
2.
A list of Internet Access Time Profiles is shown; click the [Add] button at
the bottom of the page to add a new Internet Access Time Profile.
Copyright © 2007. Education Bureau. The Government of the HKSAR.
All Rights Reserved.
Page 43
WebSAMS
User Manual
Version 1.3
2
3
3.
Fill in the Internet Access Time Profile ID, Internet Access Time Profile
Description and Internet Access Time Chinese Profile Description for
the new profile.
4.
Click [Save] button.
5.
Click [Reset] button to reset all the inputted data
6.
Click [Back] button to go back to [S-SEC04-01].
Post-effects
1.
If user click [Save] button, a message “Record(s) saved successfully” will be displayed at
the top of the screen [S-SEC04-02]
2.
A new Internet Access Time Profile will be created.
Copyright © 2007. Education Bureau. The Government of the HKSAR.
All Rights Reserved.
Page 44
WebSAMS
User Manual
Version 1.3
Notes
NIL.
Copy Internet Access Time Profile
Function Description
This use case allows school users to copy internet access time profile(s).
Pre-requisites
1.
The user must be logon first
2.
Users belong to a user group with "Internet Access Time Profile - Execute"
right can process this function.
User Procedures
1.
Click [Security] [Access Control] [Internet Access Time Profile]
on the left menu.
2.
Select a profile to copy by selecting a checkbox at the left hand side of the
profile name.
3.
Click [Copy] button.
4.
Screen [S-SEC22-03] will be shown and Internet Access Time Profile ID of
the selected Internet Access Time Profile will be filled.
Copyright © 2007. Education Bureau. The Government of the HKSAR.
All Rights Reserved.
Page 45
WebSAMS
User Manual
Version 1.3
5.
Modify the information then click [Save] button to save the record.
6.
Click [Reset] button to reset all the inputted data
7.
Click [Back] button to go back to [S-SEC04-01].
Post-effects
1.
If user click [Save] button, a message “Record(s) saved successfully” will be displayed at
the top of the screen [S-SEC04-03]
2.
A new Internet Access Time Profile will be created.
Notes
NIL.
Edit Internet Access Time Profile
Function Description
This use case allows school users to edit internet access time profile(s).
Pre-requisites
1.
The user must be logon first
Copyright © 2007. Education Bureau. The Government of the HKSAR.
All Rights Reserved.
Page 46
WebSAMS
User Manual
2.
Version 1.3
Users belong to a user group with "Internet Access Time Profile - Execute"
right can process this function.
User Procedures
1.
Click [Security] [Access Control] [Internet Access Time Profile]
on the left menu.
2.
Click the Internet Access Time Profile ID, screen [S-SEC22-04] will be
shown.
3.
All the information including Internet Access Time Profile ID, Profile
Description, Chinese Profile Description and access time information, of the
selected Internet Access Time Profile will be filled in the field(s).
4.
Update the data
5.
Click [Save] button.
6.
Click [Reset] button to reset all the inputted data
7.
Click [Back] button to go back to [S-SEC04-01].
Post-effects
1.
If user click [Save] button, a message “Record(s) updated successfully” will be displayed
at the top of the screen [S-SEC04-04].
2.
The information of the Internet Access Time Profile is updated.
Copyright © 2007. Education Bureau. The Government of the HKSAR.
All Rights Reserved.
Page 47
WebSAMS
User Manual
Version 1.3
Notes
NIL.
View Internet Access Time Profile
Function Description
This use case allows school users to view internet access time profile(s).
Pre-requisites
1.
The user must be logon first
2.
Users belong to a user group with "Internet Access Time Profile - Execute"
right can process this function.
User Procedures
1.
Click [Security] [Access Control] [Internet Access Time Profile]
on the left menu.
2.
Click the built-in Internet Access Time Profile ID to view the profile details.
3.
Click [Back] button to go back to [S-SEC04-01].
Post-effects
NIL
Notes
NIL.
Delete Internet Access Time Profile
Function Description
This use case allows school users to delete internet access time profile(s).
Copyright © 2007. Education Bureau. The Government of the HKSAR.
All Rights Reserved.
Page 48
WebSAMS
User Manual
Version 1.3
Pre-requisites
1.
The user must be logon first
2.
Users belong to a user group with "Internet Access Time Profile - Execute"
right can process this function.
User Procedures
1.
In screen [S-SEC22-01], select a profile(s) to delete by selecting a
checkbox(s) at the left hand side of the profile name.
2.
Click [Delete] button to delete profile(s).
3.
A dialog box “Are you sure to delete record(s)?”
4.
Click [OK] button to confirm the deletion.
Post-effects
NIL
Notes
If there are some User Accounts in the profile,
1.
It will go to screen [S-SEC22-07] and show the message “The following
User Account(s) is/are found in the Internet Access Time Profile (<Profile
ID1, Profile Description1>) you want to delete. If you still want to delete this
Internet Access Time Profile, please click on the "Confirm" button. The
User Account(s) will be first detached from the Internet Access Time Profile
and then the Internet Access Time Profile will be deleted.
2.
After user click [Confirm] button, user account(s) will be detached, Internet
Access Time Profile will be deleted and will go back to screen [S-SEC2201].
Copyright © 2007. Education Bureau. The Government of the HKSAR.
All Rights Reserved.
Page 49
WebSAMS
User Manual
Version 1.3
Clicking [Back] button will go back to screen [S-SEC22-01] and Internet
Access Time Profile will not be deleted.
Add Account to Profile
Function Description
This use case allows school users to assign user account(s) to Internet Access
Time Profile(s).
If the user account is assigned to more than one access time profile, the actual
internet access time of this user account shall be the union of the attached
profiles.
Pre-requisites
1.
The user must be logon first
2.
Internet Access Time Profile ID must exist.
User Procedures
1.
Click [Security] [Access Control] [Internet Access Time Profile]
on the left menu.
2.
User can click [Add Account to Profile] tab in the screen.
3.
User account record(s) of the selected profile are listed in the page.
For Adding user account of user type is “Staff/Others”
a.
User can select User Type "Staff/Others" and click [Add] button
b.
The User Type radio button “Staff/Others” will be selected be default.
Copyright © 2007. Education Bureau. The Government of the HKSAR.
All Rights Reserved.
Page 50
WebSAMS
User Manual
Version 1.3
c.
Select [School Level].
d.
Select [School Session].
For Adding user account of user type is “Student/Parent”
a.
User can select User Type " Student/Parent " and click [Add] button
b.
The User Type radio button “Student/Parent” will be selected be
default.
c.
Select [School Year]
d.
Select [School Level].
e.
Select [School Session].
f.
g.
Select [Class Level]
Select [Class]
Copyright © 2007. Education Bureau. The Government of the HKSAR.
All Rights Reserved.
Page 51
WebSAMS
User Manual
Version 1.3
For Adding user account of user type is “All”
a.
User can select User Type "All" and click [Add] button
b.
The User Type radio button “All” will be selected be default.
c.
Select [School Year]
d.
Select [School Level].
e.
Select [School Session].
f.
Select [Class Level]
g.
Select [Class]
4.
Fill in [User ID].
5.
Fill in [User Code].
6.
Fill in [User Name (English or Chinese)].
7.
Select [User Group].
8.
Select [Account Status].
9.
Click [Search] button to search user account(s) that are not exist in the
profile.
10. Click [Reset] button to reset all inputted data.
11. Select the user account(s) by checking the checkbox(s) besides the User ID.
12. Click [Save] button to save the record(s) to profile.
13.
Click [Close] button to close the popup window.
Post-effects
Copyright © 2007. Education Bureau. The Government of the HKSAR.
All Rights Reserved.
Page 52
WebSAMS
User Manual
Version 1.3
1.
If user clicks [Save] button, “Are you sure to save the record(s)?” will be
alerted
2.
Click [OK] button to save the record(s). The popup window will be closed.
3.
“Record(s) added successfully” will be shown on the top of the screen
[S-SEC22-05].
4.
Selected record(s) will be listed in screen [S-SEC22-05]
Notes
NIL.
Delete Account from Internet Access Time Profile
Function Description
This use case allows school users to delete user account(s) from internet access
time profile(s).
Pre-requisites
1.
The user must be logon first
2.
There is user account(s) attached in the Internet Access Time Profile.
User Procedures
1.
Click [Security] [Access Control] [Internet Access Time Profile]
on the left menu.
2.
Select record(s) by checking the checkbox beside the User ID.
3.
Click [Delete] button to remove the records from profile.
.
Post-effects
1.
If user clicks [Delete] button, “Are you sure to delete the record(s)?” will
be alerted.
2.
Click [OK] button to delete the record(s).
3.
“Record(s) deleted successfully” will be shown on the top of the screen
[S-SEC22-05]
Notes
NIL.
Copyright © 2007. Education Bureau. The Government of the HKSAR.
All Rights Reserved.
Page 53
WebSAMS
User Manual
2.2
Version 1.3
Configuration
2.2.1 System Configuration Maintenance
Function Description
User can maintain the General Settings, System Access Time inside SAMS LAN
Segment, System Access Time outside SAMS LAN Segment (i.e. ITED LAN or
Internet), Release of Access Time Control to 24 hours, E-mail Function Settings
and Size Control of Audit Trail & Log through the “System Configuration
Maintenance” function.
Pre-requisites
N/A
User Procedures
1. Click [Security] [Configuration] [System Config] on the left menu.
2. Fill in the details of the settings.
3. Click [Save] button at the bottom of the page.
Copyright © 2007. Education Bureau. The Government of the HKSAR.
All Rights Reserved.
Page 54
WebSAMS
User Manual
Version 1.3
Copyright © 2007. Education Bureau. The Government of the HKSAR.
All Rights Reserved.
Page 55
WebSAMS
User Manual
Version 1.3
Post-effects
The system will operate with the settings that have been entered. The settings
will be effective only when users login the system in the next time.
Notes
1. Maximum number of fault login attempts allowed
• The number of attempts that a user can try to login with a wrong
password before the user account is locked. After an account has been
locked, it can no longer login the system. However, after the elapse of the
auto-unlock period, the user can login the system again.
• Zero value means that there is no limitation for unsuccessful login
attempts; while the default fault login attempt allowed is three.
2. Auto-unlock period of locked accounts
• Locked user account will be unlocked after the elapse of the auto-unlock
period, counting from the time the account is locked.
• If no auto-unlock is selected, the locked account can only be unlocked
manually in the "Unlock Account" function.
• Zero value means that there is no auto-unlock for locked account, and
the default is fifteen hours.
3. Automatic logout period (inside SAMS LAN segment)
• The system will automatically logout an account after it has been left idle
for a period longer than this setting when the account logins within the
SAMS LAN segment.
• The default value is 15 minutes.
4. Automatic logout period (outside SAM LAN segment)
• The system will automatically logout an account after it has been left idle
for a period longer than this setting when the account logins outside the
SAMS LAN segment.
• The default value is 5 minutes.
5. Password expiry period
Copyright © 2007. Education Bureau. The Government of the HKSAR.
All Rights Reserved.
Page 56
WebSAMS
User Manual
Version 1.3
•
•
•
•
•
For security reason, a normal user account should change its password
periodically. System will force the user to change the password after the
elapse of the period defined.
User accounts can also be set to have password never expired. By
default, the password of the ‘sysadmin’ account never expires.
For user accounts with password expiry, the password expiry date is
shown on the screen displaying the user information. The user will be
reminded to change his / her account password if it is going to expire
within 14 days. The remaining number of days will be displayed after
each successful login. After the password has been changed, the new
password expiry date will be the change password date plus the
password expiry period.
Zero value means the password of user accounts would never expire.
The default value is 100 days.
6. Number of passwords stored in password history
• The system will store a certain number of passwords previously used.
The number of passwords stored can be defined, from 1 to 5.
• When user changes the password, the system will ensure that the new
password entered does not duplicate with the stored passwords.
• The default value is one.
7. Enable Multiple Login
• With this flag turned on, users can login the system by using the same
account in the same or different workstations from several browsers at
the same time.
• It is recommended to disable Multiple Login for security reason. By
default, multiple login is not allowed.
8. Enable Internet Access
• Login from the Internet can be enabled / disabled.
• By default, access from Internet is disabled.
9. Enable ITED Access
• Login from the school ITED LAN Segment can be enabled / disabled.
However, any workstations in the ITED LAN segment still cannot login
the system unless its IP Address has been entered in the IP configuration
table.
• By default, access from ITED LAN Segment is disabled.
10. Data Backup log file path
• The database backup and recovery log can be viewed in WebSAMS.
This is the specific file path / directory where the database backup /
recovery operation log files are stored.
• There is no default file path.
11. Server Backup log file path
• The server backup and recovery log can be viewed in WebSAMS. This is
the specific file path / directory where the server backup / recovery
operation log files are stored.
• The actual file path applicable is different for different backup tools used.
• There is no default file path.
Copyright © 2007. Education Bureau. The Government of the HKSAR.
All Rights Reserved.
Page 57
WebSAMS
User Manual
Version 1.3
12. Archive file path
• The file path where the system archive files (e.g. archived audit trail) will
be stored.
• There is no default file path.
13. System access time inside SAMS LAN segment
• It is the service time of the WebSAMS system for users logging in from
the SAMS LAN Segment. All users (except the system administrator
account ‘sysadmin’) can only login the system within the time period
defined.
• The start and end service time for both Monday - Saturday and Sunday
are in 24-hour time format (HH:MM). A “24 Hours” button is provided for
setting the access time to 24 hours a day.
• The default value is 07:00 – 23:00 for Monday - Saturday and 07:00 –
18:00 for Sunday.
• If the time range is set as 07:00 – 01:00, it means that the service time is
from 7a.m. in the morning to 1a.m. of the next day.
14. System access time outside SAMS LAN segment
• It is the service time of the WebSAMS system for users logging in from
the ITED LAN segment or via the Internet. All users (except the system
administrator account ‘sysadmin’) can only login the system within the
time period defined.
• The start and end service time for both Monday - Saturday and Sunday
are in 24-hour time format (HH:MM). A “24 Hours” button is provided for
setting the access time to 24 hours a day.
• The default value is 07:00 – 23:00 for Monday - Saturday and 07:00 –
23:00 for Sunday.
• If the time range is set to 07:00 – 01:00, it means that the service time is
from 7a.m. in the morning to 1a.m. of the next day.
15. Release of Access Time Control to 24 Hours
• The three account types of Staff, Student, and Parent can be selected to
enjoy round the clock access to the system within a certain period for
operation purpose.
• The release of access time is confined to the period defined by the dates
entered in the "From" and "To" fields.
• No default value is set.
16. Enable E-Mail Function
• The mail sending functions in WebSAMS can be enabled or disabled by
this master setting.
17. School’s E-Mail Address for Return of E-Mail by Recipients
• It is the school’s E-Mail address displayed as sender’s E-Mail address in
outgoing mails for recipients to reply E-Mails to the school. If the school
wants to use another E-Mail account to receive E-Mail replies, this E-Mail
address has to be changed accordingly.
• If e-Certificate for digital signature is not available in the WebSAMS
server, this field is mandatory.
Copyright © 2007. Education Bureau. The Government of the HKSAR.
All Rights Reserved.
Page 58
WebSAMS
User Manual
Version 1.3
•
If e-Certificate has been installed and Location Path & Password have
been entered, E-Mail address of the e-Certificate will be used as the
school’s Return E-Mail Address.
18. SMTP Server of ISP subscribed by School
• All E-Mails are sent out from WebSAMS via the SMTP server provided by
an ISP. To access the SMTP server, the school needs to use the E-Mail
account and the corresponding password provided by the ISP.
• No default value for the SMTP server.
19. E-Mail Account and Password of the E-Mail Account provided by ISP
subscribed
• The E-Mail Account and its password provided by the ISP to the school
for accessing the SMTP server to send out E-Mails from WebSAMS.
• No default value for the E-Mail Account and password.
20. E-Mail Recipient Limit for each mail
• If the number of recipients of an E-Mail is larger than this limit, the E-Mail
will be sent out by batch. Each batch will contain the number of recipients
equal to the Recipient Limit.
• The default value is 50. The school has to check with the ISP to which
the school subscribes what is the appropriate value for this limit.
21. Size Limit for each E-Mail (Mega Byte - MB)
• The maximum size of each outgoing E-Mail.
• The default value is 1 MB.
22. Size Limit for Storing Each User’s Sent Mails (MB)
• The maximum size available for storing each user's sent E-Mails in
Megabytes.
• The default value is 10 MB.
23. Maximum number of Retry for Sending Mail
• This setting controls maximum number of trials for the system to send
any outgoing E-Mail.
• The default value is three.
24. Location Path and Password of (Organizational) e-Cert for Digital Signature
• The school may use an e-Cert to digitally sign all the outgoing E-Mails for
authentication purpose. These two settings allow the school to enter the
e-Cert information. If the school is not going to use e-Cert for signing EMails, there is no need to fill in the information.
• If e-Cert is used, the e-mail address in the e-Cert will be displayed as the
Sender's e-mail address for all mails sent out from WebSAMS
• There is no default value for these two settings.
25. Size Limit of Audit Trail stored in Database (MB)
• The maximum database space used for storing Audit Trail in Megabytes.
• When the assigned database space is full, the school can choose to
archive the audit trail records as Archived Audit Trail files. After the
archive process, the audit trail records which have been archived will be
permanently deleted from the database.
Copyright © 2007. Education Bureau. The Government of the HKSAR.
All Rights Reserved.
Page 59
WebSAMS
User Manual
Version 1.3
•
•
If usage of space exceeds 80% of this limit, warning message will be
shown to users of the SYSTEM_ADMIN group when they login.
Zero value means no limit. The default value is 1 MB.
26. Size Limit of Archived Audit Trail stored in server (MB)
• The maximum hard disk space used for storing Archived Audit Trail files
in Megabytes.
• When the assigned hard disk space is full, the school can choose to
delete the archived files or move the files to other folders manually.
• Zero value means no limit. The default value is 1 MB.
27. Size Limit of DB backup / recovery operation log stored in server (MB)
• The maximum hard disk space used for storing the database backup /
recovery log in Megabytes.
• Zero value means no limit. The default value is 1 MB.
28. Size Limit of Server backup / recovery operation log stored in server (MB)
• The maximum hard disk space used for storing the server backup /
recovery log in Megabytes.
• Zero value means no limit. The default value is 1 MB.
Copyright © 2007. Education Bureau. The Government of the HKSAR.
All Rights Reserved.
Page 60
WebSAMS
User Manual
Version 1.3
2.2.2 IP Configuration Maintenance
In the System Configuration function, the system administrator can separately
enable access to WebSAMS via ITED LAN Segment or via Internet.
When a user logins the WebSAMS from a workstation, the system can detect
whether the login comes from the SAMS LAN Segment. If the IP address of this
workstation is the same as that of the subnet of the WebSAMS server, the login
is treated as from SAMS LAN Segment, i.e. from a trusted network.
In order to allow a workstation in the ITED LAN Segment to login WebSAMS, the
following two conditions should be met:
• Access from the ITED LAN has been enabled; and
• The IP address of this workstation has been entered into the IP Configuration
table
The IP Configuration function allows the definition of the IP address groups to
contain the IP addresses of those workstations inside the ITED LAN Segment
that are allowed to access the system.
For a login from a workstation with an IP address having different subnet as
compared to the IP address of the WebSAMS Server and also having different
subnet as compared to the subnet information of the ITED LAN defined in the
system property file, the login will be treated as from the Internet. Access from
Internet can be enabled / disabled in the System Configuration function.
Special attention should be paid to whether the school's ITED LAN Segment
uses a Dynamic Host Configuration Protocol (DHCP) server, as the IP address
may not be dedicated to a specific workstation. In this case, IP addresses have
to be entered manually into those workstations that are allowed to access
WebSAMS. These IP addresses entered should fall within the IP Exclusion
Range of the DHCP server.
Add IP Group
Function Description
User can create an IP Group that controls which workstations in the ITED LAN
Segment to be able to access WebSAMS through the “IP Configuration
Maintenance”.
Pre-requisites
This function is available only when the user logins WebSAMS from a
workstation inside the SAMS LAN Segment.
Copyright © 2007. Education Bureau. The Government of the HKSAR.
All Rights Reserved.
Page 61
WebSAMS
User Manual
Version 1.3
User Procedures
1. Click [Security] [Configuration] [IP Config] on the left menu.
2. Click [Add] button to add a new IP Group.
3. Enter IP Address Range.
4. Enter Excluding IP Address Range if necessary.
5. Click [Save] button.
Post-effects
The IP Address Group will be effective immediately once created. A user can
then login WebSAMS from an ITED workstation with an IP address included in
the IP Address Range of an IP Group.
Notes
1. The subnet of the IP group entered into the table should be same as those
defined in the system property file which records the subnet information of
the ITED LAN Segment. Otherwise, the system will prompt errors when the
user tries to save the record of the IP group.
Copyright © 2007. Education Bureau. The Government of the HKSAR.
All Rights Reserved.
Page 62
WebSAMS
User Manual
Version 1.3
2. Each IP group should have a unique name. It may contain two IP lists, one is
“IP Address Range” while the other is “Excluding IP Address Range”. Both
ranges should have the same subnet values. The “Excluding IP Address
Range” allows a segment of IP addresses in the IP Range to be excluded
from the group.
3. "IP Address Range" in one IP group should not fall into the "Excluding IP
address Range" in another IP group. For example, the "IP Address Range" in
one group is 10.15.33.100-10.15.33.105 while the "Excluding IP address
Range" in another IP group is 10.15.33.95-10.15.33.120. This will cause
conflict and the system will prompt the user to re-enter a valid IP Address
Range.
Delete IP Group
Function Description
A User can delete an IP Group through the “IP Configuration Maintenance”
function.
Pre-requisites
The IP Group exists.
User Procedures
1. Click [Security] [Configuration] [IP Config] on the left menu.
2. Check the box(es) on the left to select the IP Group(s) to be deleted.
3. Click [Delete] button to delete the selected IP Group(s).
Post-effects
The IP Address Group will be removed immediately and those ITED
workstations with IP addresses falling into the IP Range of the group will not be
able to access the system from ITED LAN Segment any more.
Notes
This function is available only when the user logins WebSAMS from a
workstation inside the SAMS LAN Segment.
Copyright © 2007. Education Bureau. The Government of the HKSAR.
All Rights Reserved.
Page 63
WebSAMS
User Manual
Version 1.3
2.2.3 System Customization
Function Description
User can maintain the Central and Right Images in the Login Page, School Logo
and School Name in the top frame of every page and the Colour Scheme for
newly created accounts through the “System Customization” function.
Pre-requisites
N/A
User Procedures
1. Click [Security] [Configuration] [System Custom] on the left menu.
2
4
2. The system comes with several images for the Central Image and the Right
Image. To upload a new Central Image / Right Image / School Logo, click the
corresponding [Add] button. The Upload Image pop-up window will be
shown.
Copyright © 2007. Education Bureau. The Government of the HKSAR.
All Rights Reserved.
Page 64
WebSAMS
User Manual
Version 1.3
3. Enter the English and Chinese image names, and then click [Browse] button
to select an image file. Click [Upload] button to upload the image to
WebSAMS. After successful uploading, the image name will appear in the
corresponding image’s drop down list box.
4. After the image has been successfully uploaded, it will not be displayed
automatically. User has to select the image file in the drop down list box and
click [Save] button to save the change for the image to take effect.
5. To delete an uploaded Central Image / Right Image / School Logo, select the
image to be deleted from the drop down list box and click [Delete] button.
The image would be permanently removed.
6i
6ii
6. You can customize the school’s English and Chinese names by using either
text format or image format school names.
i. To use text format school name, click the “Text” option and enter the
name in the adjacent input box.
ii. To use image format school name, click “Image” option and then click
[Browse] button to select an image file for uploading. Click [Upload]
button to upload the image. At any time, the system only keeps one
English and one Chinese school name image in the WebSAMS server
and the newly uploaded image will overwrite the existing one.
iii. Click [Save] button to save the school name changes.
Copyright © 2007. Education Bureau. The Government of the HKSAR.
All Rights Reserved.
Page 65
WebSAMS
User Manual
Version 1.3
7. You can also delete the existing school name image by clicking [Delete]
button.
8. To set the colour scheme, click the preferred colour. The colour will be
adopted by the newly created user accounts. Click [Save] button to save the
colour scheme changes.
Post-effects
The changes will take effect when the users login the next time.
Notes
1. When an image file has been successfully uploaded, it will not be displayed
automatically. User has to select the image file and click the “Save” button
for the image to take effect.
2. The school logo will be displayed at the top left of the page.
3. School name image will be displayed at the top left of the page. If school
logo has been uploaded and selected, school name image will appear at the
right of the school logo.
4. Only JPEG and GIF image file formats are supported and the file size should
not be more than 100KB.
Copyright © 2007. Education Bureau. The Government of the HKSAR.
All Rights Reserved.
Page 66
WebSAMS
User Manual
2.3
Version 1.3
Report & Log
2.3.1 Audit Trail
This function allows a user to view or download the audit trail which records the
important transactions made in the system. The user can also choose to archive
the audit trail records into audit trail files when the system is running out of disk
space. After the archive action, the corresponding audit trail records will be
deleted from the database so as to release disk space. In addition, user can also
download or delete the archived audit trail files.
View Audit Trail
Function Description
User can view or download the Audit Trail records through the “Audit Trail”
function.
Pre-requisites
The audit trail records the access to functions and all updates made to sensitive
data in the database. In each audit trail record, information such as user ID,
time-stamp, name of the function accessed, action performed, before image and
after image of data will be logged.
User Procedures
1. Click [Security] [Report & Log] [Audit Trail] on the left menu.
2. Click View tab.
3. Fill in the date range of the audit trails to be viewed or downloaded.
4. Check the box(es) to select the module(s) for which the audit trail is to be
viewed or downloaded.
5. Click [View] button at the bottom of the page.
Copyright © 2007. Education Bureau. The Government of the HKSAR.
All Rights Reserved.
Page 67
WebSAMS
User Manual
Version 1.3
6. Click [View] button in the pop-up window to trigger the Windows download
pop-up window.
Copyright © 2007. Education Bureau. The Government of the HKSAR.
All Rights Reserved.
Page 68
WebSAMS
User Manual
Version 1.3
7. Select the option to [Open] or [Save] the audit trail file.
Post-effects
The audit trail records are presented in a file in MS-Excel CSV format.
Notes
The audit trails of Staff and FMP modules cannot be viewed or downloaded in
this function.
Archive Audit Trail
Function Description
User can archive Audit Trail records through the “Audit Trail” function.
Pre-requisites
Audit Trail records exist.
User Procedures
1. Click [Security] [Report & Log] [Audit Trail] on the left menu.
2. Click Archive tab.
3. Fill in the date range of the audit trails to be archived.
4. Click [Save] button.
Post-effects
1. Audit trail records that have been archived cannot be restored to WebSAMS
system.
2. Audit trail records that have been archived will be deleted from the
WebSAMS database permanently and cannot be enquired from the
WebSAMS online system anymore.
3. Archived audit trail files are in ZIP format. After unzipping, the original file is
in MS-Excel CSV format.
4. A new audit trail record recording the archive action will be created.
Copyright © 2007. Education Bureau. The Government of the HKSAR.
All Rights Reserved.
Page 69
WebSAMS
User Manual
Version 1.3
Notes
1. The archive audit trail function can be used when the disk space allocated for
audit trails is running out. After the archive process, the corresponding audit
trail records will be deleted from the database.
2. The ‘From’ date is provided by the system and it is the earliest date audit trail
records exist. User has to enter the ‘To’ date. Then the audit trails within the
date range will be archived.
3. A link will be provided for downloading the archived audit trail file if the user
logins from the SAMS LAN Segment. Outside SAMS LAN Segment (i.e.
ITED LAN or Internet), the link will not be available.
Delete Archived Audit Trail
Function Description
User can download or delete archived audit trail ZIP files through the “Audit
Trail” function.
Pre-requisites
An archived audit trail file is present.
User Procedures
1. Click [Security] [Report & Log] [Audit Trail] on the left menu.
2. Click Delete Archived Audit Trail tab.
3. Select the archived audit trail file to be downloaded / deleted.
4. Click the file name link to download.
5. Check the check box on the left of the file name and click [Delete] button to
delete the file.
Post-effects
The archived audit trail file stored as a physical file in ZIP format in the archive
file directory will be physically removed from the WebSAMS server.
Notes
Copyright © 2007. Education Bureau. The Government of the HKSAR.
All Rights Reserved.
Page 70
WebSAMS
User Manual
Version 1.3
1. Archived audit trail files are in ZIP format. After unzipping, the original
archived audit trail file is in MS-Excel CSV format.
2. A link will be provided for downloading the archived audit trail files if the user
logins from the SAMS LAN Segment. Outside SAMS LAN Segment (i.e.
ITED LAN or Internet), the link will not be available.
Copyright © 2007. Education Bureau. The Government of the HKSAR.
All Rights Reserved.
Page 71
WebSAMS
User Manual
Version 1.3
2.3.2 Staff Audit Trail
This function allows a user to view or download the Staff audit trail which records
the important transactions related to Staff module. The user can also choose to
archive the audit trail records into audit trail files when the system is running out
of disk space. After the archive action, the corresponding audit trail records will
be deleted from the database so as to release disk space. In addition, user can
also download or delete the archived audit trail files.
View Audit Trail
Function Description
User can view or download the audit trail which records the daily transactions,
user group assignment or access right maintenance of Staff module through the
“Staff Audit Trail” function.
Pre-requisites
The Staff audit trail records the access to functions and all updates made to
sensitive data related to Staff module. In each audit trail record, information such
as user ID, time-stamp, name of the function accessed, action performed, before
image and after image of data will be logged.
User Procedures
1. Click [Security] [Report & Log] [Staff Audit Trail] on the left menu.
2. Click View tab.
3. Select Audit Trail Type to be viewed.
3
4. Fill in the date range of the audit trails to be viewed or downloaded.
5. Click [View] button at the bottom of the page.
6. Click [Open] button to open the file. The audit trail will be shown in MS Excel
format.
Post-effects
The audit trail records are presented in a file in MS-Excel CSV format.
Copyright © 2007. Education Bureau. The Government of the HKSAR.
All Rights Reserved.
Page 72
WebSAMS
User Manual
Version 1.3
Notes
1. The audit trail of the Staff module can only be viewed by the users of the
SCHOOL_HEAD user group.
2. There are 3 types of staff audit trails:
• Staff Daily Transaction Log – records updates to staff information
• User Group Assignment Log – records addition / removal of user
accounts to / from the SCHOOL_HEAD group and the 4 built-in Staff user
groups
• Access Rights Maintenance Log – records updates to access rights of
Staff functions.
Archive Audit Trail
Function Description
User can archive Staff Audit Trail records through the “Staff Audit Trail”
function.
Pre-requisites
Staff Audit Trail records exist.
User Procedures
1. Click [Security] [Report & Log] [Staff Audit Trail] on the left menu.
2. Click Archive tab.
3. Select Audit Trail Type to archive.
4. Fill in the date range of the staff audit trails to be archived.
5. Click [Save] button.
Post-effects
1. Audit trail records that have been archived cannot be restored to WebSAMS
system.
Copyright © 2007. Education Bureau. The Government of the HKSAR.
All Rights Reserved.
Page 73
WebSAMS
User Manual
Version 1.3
2. Audit trail records that have been archived will be deleted from the
WebSAMS database permanently and cannot be enquired from the
WebSAMS online system anymore.
3. Archived audit trail files are in ZIP format. After unzipping, the original file is
in MS-Excel CSV format.
4. A new audit trail record recording the archive action will be created.
Notes
1. The audit trail of the Staff module can only be archived by the users of the
SCHOOL_HEAD user group.
2. The archive audit trail function can be used when the disk space allocated for
audit trails is running out. After the archive process, the corresponding audit
trail records will be deleted from the database.
3. The ‘From’ date is provided by the system and it is the earliest date staff
audit trail records of the selected type exist. User has to enter the ‘To’ date.
Then the audit trails within the date range will be archived.
4. A link will be provided for downloading the archived audit trail files if the user
logins from the SAMS LAN Segment. Outside SAMS LAN Segment (i.e.
ITED LAN or Internet), the link will not be available.
Delete Archived Audit Trail
Function Description
User can download or delete archived Staff Audit Trail ZIP files through the
“Staff Audit Trail” function.
Pre-requisites
An archived staff audit trail file is present.
User Procedures
1. Click [Security] [Report & Log] [Staff Audit Trail] on the left menu.
2. Click Delete Archived Audit Trail tab.
3. Select the archived file to be downloaded / deleted.
4. Click the file name link to download.
Copyright © 2007. Education Bureau. The Government of the HKSAR.
All Rights Reserved.
Page 74
WebSAMS
User Manual
Version 1.3
5. Check the check box on the left of the file name and click [Delete] button to
delete the file.
Post-effects
1. The archived audit trail file stored as a physical file in ZIP format in the
directory will be physically removed from the WebSAMS server.
2. A new audit trail record recording the deletion action of the Archived Audit
Trail file will be created.
Notes
1. The audit trail of the Staff module can only be downloaded or deleted by
users of the SCHOOL_HEAD user group.
2. Archived audit trail files are in ZIP format. After unzipping, the original
archived audit trail file is in MS-Excel CSV format.
3. A link will be provided for downloading the archived audit trail files if the user
logins from the SAMS LAN Segment. Outside SAMS LAN Segment (i.e.
ITED LAN or Internet), the link will not be available.
Copyright © 2007. Education Bureau. The Government of the HKSAR.
All Rights Reserved.
Page 75
WebSAMS
User Manual
Version 1.3
2.3.3 FMP Audit Trail
This function allows a user to view or download the FMP audit trail which records
the important transactions related to FMP module. The user can also choose to
archive the audit trail records into audit trail files when the system is running out
of disk space. After the archive action, the corresponding audit trail records will
be deleted from the database so as to release disk space. In addition, user can
also download or delete the archived audit trail files.
View Audit Trail
Function Description
User can view or download the audit trail which records the daily transactions,
user group assignment or access right maintenance of FMP module through the
“FMP Audit Trail” function.
Pre-requisites
The FMP audit trail records the access to functions and all updates made to
sensitive data related to FMP module. In each audit trail record, information such
as user ID, time-stamp, name of the function accessed, action performed, before
image and after image of data will be logged.
User Procedures
1. Click [Security] [Report & Log] [FMP Audit Trail] on the left menu.
2. Click View tab.
3. Select Audit Trail Type to be viewed.
3
4. Fill in the date range of the audit trails to be viewed or downloaded.
5. Click [View] button at the bottom of the page.
6. Click [Open] button to open the file. The audit trails will be shown in MS
Excel format.
Post-effects
The audit trail records are presented in a file in MS-Excel CSV format.
Copyright © 2007. Education Bureau. The Government of the HKSAR.
All Rights Reserved.
Page 76
WebSAMS
User Manual
Version 1.3
Notes
1. The audit trail of the FMP module can only be viewed by the users of the
SCHOOL_HEAD user group.
2. There are 3 types of audit trails:
• FMP Daily Transaction Log – records updates to FMP information
• User Group Assignment Log – records addition / removal of user
accounts to / from the SCHOOL_HEAD group and the 6 built-in FMP
user groups
• Access Rights Maintenance Log – records updates to access rights of
FMP functions.
3. For Primary AM and Primary PM schools each having its own WebSAMS
server, the FMP information is stored in the Primary AM WebSAMS server
and both schools share the same FMP data.
Archive Audit Trail
Function Description
User can archive FMP Audit Trail records through the “FMP Audit Trail”
function.
Pre-requisites
FMP Audit Trail records exist.
User Procedures
1. Click [Security] [Report & Log] [FMP Audit Trail] on the left menu.
2. Click Archive tab.
3. Select Audit Trail Type to archive.
4. Fill in the date range of the FMP audit trails to be archived.
5. Click [Save] button.
Copyright © 2007. Education Bureau. The Government of the HKSAR.
All Rights Reserved.
Page 77
WebSAMS
User Manual
Version 1.3
Post-effects
1. Audit trail records that have been archived cannot be restored to WebSAMS
system.
2. Audit trail records that have been archived will be deleted from the
WebSAMS database permanently and cannot be enquired from the
WebSAMS online system anymore.
3. Archived audit trail files are in ZIP format. After unzipping, the original file is
in MS-Excel CSV format.
4. A new audit trail record recording the archive action will be created.
Notes
1. The audit trail of the FMP module can only be archived by users of the
SCHOOL_HEAD user group.
2. The archive audit trail function can be used when the disk space allocated for
audit trails is running out. After the archive process, the corresponding audit
trail records will be deleted from the database.
3. The ‘From’ date is provided by the system and it is the earliest date FMP
audit trail records of the selected type exist. User has to enter the ‘To’ date.
Then the audit trails within the date range will be archived.
4. A link will be provided for downloading the archived audit trail files if the user
logins from the SAMS LAN Segment. Outside SAMS LAN Segment (i.e.
ITED LAN or Internet), the link will not be available.
5. For Primary AM and Primary PM schools each having its own WebSAMS
server, the two schools actually share the same FMP data set and the FMP
information is stored in the Primary AM WebSAMS server. The archive
action must be done in the Primary AM WebSAMS and cannot be done in
the Primary PM WebSAMS because it does not contain the FMP data.
Delete Archived Audit Trail
Function Description
User can download or delete archived FMP Audit Trail ZIP files through the
“FMP Audit Trail” function.
Pre-requisites
An archived FMP audit trail file is present.
User Procedures
Copyright © 2007. Education Bureau. The Government of the HKSAR.
All Rights Reserved.
Page 78
WebSAMS
User Manual
Version 1.3
1. Click [Security] [Report & Log] [FMP Audit Trail] on the left menu.
2. Click Delete Archived Audit Trail tab.
3. Select the archived file to be downloaded / deleted.
4. Click the file name link to download.
5. Check the check box on the left of the file name and click [Delete] button to
delete the file.
Post-effects
1. The archived audit trail stored as a physical file in ZIP format in the directory
will be physically removed from the WebSAMS server.
2. A new audit trail record recording the deletion action of the Archived Audit
Trail file will be created.
Notes
1. The audit trail of the FMP module can only be downloaded or deleted by
users of the SCHOOL_HEAD user group.
2. Archived audit trail files are in ZIP format. After unzipping, the original
archived audit trail file is in MS-Excel CSV format.
3. A link will be provided for downloading the archived audit trail files if the user
logins from the SAMS LAN Segment. Outside SAMS LAN Segment (i.e.
ITED LAN or Internet), the link will not be available.
4. For Primary AM and Primary PM schools each having its own WebSAMS
server, the two schools actually share the same FMP data set and the FMP
information is stored in the Primary AM WebSAMS server. The delete
archived audit trail action must be done in the Primary AM WebSAMS and
cannot be done in the Primary PM WebSAMS because it does not contain
the FMP data.
Copyright © 2007. Education Bureau. The Government of the HKSAR.
All Rights Reserved.
Page 79
WebSAMS
User Manual
Version 1.3
2.3.4 Report
Select Report Template
Function Description
User can produce reports through the “Report” function. Before producing a
report, the report template has to be selected. This section describes how to
select report templates for printing while the detailed instructions of producing
individual reports are described in the individual report sections.
Pre-requisites
Adobe Acrobat Reader and Microsoft Office 2000 should be installed in the
workstation to view the reports.
User Procedures
1. Click [Security] [Report & Log] [Report] on the left menu.
2. Select the report category and the report language. All reports of the
selected language under the selected category will be listed.
3. Click on the Report Name (ID) link and a list of built-in and user-defined
report templates is displayed.
3. Report Name (ID) Link
4. Report Template Link
4. Click on the Report Template link to go to the corresponding report
parameter screen.
5. Follow the steps in the individual report’s section to enter the print criteria to
produce the reports.
Post-effects
Copyright © 2007. Education Bureau. The Government of the HKSAR.
All Rights Reserved.
Page 80
WebSAMS
User Manual
Version 1.3
The report parameter screen of the selected report will be shown for the user to
enter the print criteria.
Notes
1. Reports under the Security module are grouped into 3 report categories:
• Access Control Information
• Login Log
• User Group / Account Information
2. A built-in template is provided for each Report Name (ID). It can be
downloaded from the Template function of the Report Management module.
After editing by using the Crystal Reports software, the edited report
template can be uploaded to the WebSAMS server as a user-defined
template.
User Account List by User Group Report (R-SEC001)
Function Description
Under the “User Group / Account Information” report category, this report lists
out the members of any user groups.
Pre-requisites
Adobe Acrobat Reader and Microsoft Office
workstation in order to view the report.
should be installed in the
User Procedures
1. Select "User Account List by User Group Report" from the report selection
page. Click on the template link to go to the report parameter screen.
Copyright © 2007. Education Bureau. The Government of the HKSAR.
All Rights Reserved.
Page 81
WebSAMS
User Manual
Version 1.3
2. Check the check box(es) on the left of the user group(s) to be listed in the
report.
3. Select the format of the report to be one of PDF / Word / RTF / Excel.
4. Click [Preview & Print] button to produce the report.
Post-effects
The report will be displayed in a pop-up window which allows user to preview or
print it out.
Notes
1. The Group ID and Group Description are shown.
2. For group members, the User ID, User Name, User Type and User Code are
shown.
3. Report supports selection of multiple user groups.
User Account Profile Report (R-SEC002)
Function Description
Under the “User Group / Account Information” report category, this report lists
out the details of the individual user accounts.
Pre-requisites
Adobe Acrobat Reader and Microsoft Office
workstation in order to view the report.
should be installed in the
User Procedures
1. Select "User Account Profile Report" from the report selection page. Click on
the template link to go to the report parameter screen.
2. Specify the search criteria of the user accounts to be listed.
3. Click [Search] button to list out the user accounts.
Copyright © 2007. Education Bureau. The Government of the HKSAR.
All Rights Reserved.
Page 82
WebSAMS
User Manual
Version 1.3
4. Check the check box(es) on the left of the user(s) to be listed in the report.
5. Select the format of the report to be one of PDF / Word / RTF / Excel.
6. Click [Preview & Print] button to produce the report.
Post-effects
The report will be displayed in a pop-up window which allows user to preview or
print it out.
Notes
1. The User ID, User Name, User Code, User Type, Login Language, Account
Expiry Information, Password Expiry Information, Last Login Time, User
Account Access Time and the attached user groups of each user account
are shown.
2. Report supports selection of multiple user accounts.
User Group Access Rights Report (R-SEC003)
Function Description
Under the “Access Control Information” report category, this report lists out the
access rights of user groups inside the SAMS LAN segment (i.e. within the
trusted network).
Copyright © 2007. Education Bureau. The Government of the HKSAR.
All Rights Reserved.
Page 83
WebSAMS
User Manual
Version 1.3
Pre-requisites
Adobe Acrobat Reader and Microsoft Office
workstation in order to view the report.
should be installed in the
User Procedures
1. Select "User Group Access Rights Report" from the report selection page.
Click on the template link to go to the report parameter screen.
2. Check the check box(es) on the left of the user group(s) to list in the report.
3. Select the format of the report to be one of PDF / Word / RTF / Excel.
4. Click [Preview & Print] button to generate the report.
Post-effects
The report will be displayed in a pop-up window which allows user to preview or
print it out.
Copyright © 2007. Education Bureau. The Government of the HKSAR.
All Rights Reserved.
Page 84
WebSAMS
User Manual
Version 1.3
Notes
1. The report shows the function accessibility inside SAMS LAN segment
grouped by user group and by module.
2. The setting of the View, Edit, Add, Delete & Execute rights of the selected
user groups for every applicable function are shown. For built-in groups, all
functions under the applicable modules will be listed and those nonapplicable modules will not be shown; corresponding to the User Group online function. For user-defined groups, all modules / functions will be listed
except functions under the Customization module.
3. Access right setting of ‘Y’ means having access right, ‘N’ means no access
right and ‘-‘ means the right not applicable.
4. Report supports selection of multiple built-in or user-defined user groups.
Successful Login Log Report (R-SEC004)
Function Description
Under the “Login Log” report category, this report lists out the details of any
successful login attempts.
Pre-requisites
Adobe Acrobat Reader and Microsoft Office
workstation in order to view the report.
should be installed in the
User Procedures
1. Select "Successful Login Log Report" from the report selection page. Click
on the template link to go to the report parameter screen.
2. Specify the date range within which all the successful login attempts will be
included in the report.
3. Select the format of the report to be one of PDF / Word / RTF / Excel.
4. Click [Preview & Print] button to generate the report.
Copyright © 2007. Education Bureau. The Government of the HKSAR.
All Rights Reserved.
Page 85
WebSAMS
User Manual
Version 1.3
Post-effects
The report will be displayed in a pop-up window which allows user to preview or
print it out.
Notes
All login attempt records are stored in the system. The Login Date & Time, User
ID, User Name, User Type and User Code of the successful login attempts are
shown in the report.
Unsuccessful Login Log Report (R-SEC005)
Function Description
Under the “Login Log” report category, this report lists out the details of any
unsuccessful login attempts.
Pre-requisites
Adobe Acrobat Reader and Microsoft Office
workstation in order to view the report.
should be installed in the
User Procedures
1. Select "Unsuccessful Login Log Report" from the report selection page. Click
on the template link to go to the report parameter screen.
2. Specify the date range within which all the unsuccessful login attempts will
be included in the report.
3. Select the format of the report to be one of PDF / Word / RTF / Excel.
4. Click [Preview & Print] button to generate the report.
Post-effects
The report will be displayed in a pop-up window which allows user to preview or
print it out.
Copyright © 2007. Education Bureau. The Government of the HKSAR.
All Rights Reserved.
Page 86
WebSAMS
User Manual
Version 1.3
Notes
All login attempt records are stored in the system. The attempted Login Date &
Time, User ID, User Name, User Type and the failure reason of the unsuccessful
login attempts are shown.
List of functions that can be accessed outside SAMS LAN Segment Report
(R-SEC007)
Function Description
Under the “Access Control Information” report category, this report lists out the
accessibility of functions outside the SAMS LAN segment (i.e. ITED LAN
Segment or Internet).
Pre-requisites
Adobe Acrobat Reader and Microsoft Office
workstation in order to view the report.
should be installed in the
User Procedures
1. Select "List of functions that can be accessed outside SAMS LAN Segment
Report" from the report selection page. Click on the template link to go to the
report parameter screen.
Copyright © 2007. Education Bureau. The Government of the HKSAR.
All Rights Reserved.
Page 87
WebSAMS
User Manual
Version 1.3
2. Check the check box(es) on the left of the module(s) to list in the report.
3. Select the format of the report to be one of PDF / Word / RTF / Excel.
4. Click [Preview & Print] button to generate the report.
Post-effects
The report will be displayed in a pop-up window which allows user to preview or
print it out.
Notes
1. The report shows the accessibility of functions outside SAMS LAN segment
grouped by module.
2. The master settings of access from the Internet and from ITED LAN
Segment are listed at the beginning of the report. Besides having the
accessibility of functions, these master settings must be turned on before the
functions can actually be accessed from Internet or from ITED LAN Segment.
3. The View, Edit, Add, Delete & Execute rights of the functions under the
selected modules are shown.
4. Access right setting of ‘Y’ means having access right, ‘N’ means no access
rights and ‘-‘ means the right not applicable.
5. Report supports selection of multiple modules.
List of functions that can be accessed by User Account outside SAMS LAN
Segment Report (R-SEC008)
Function Description
Under the “Access Control Information” report category, this report lists out the
accessibility of functions by user account outside the SAMS LAN segment (i.e.
ITED LAN Segment or Internet).
Copyright © 2007. Education Bureau. The Government of the HKSAR.
All Rights Reserved.
Page 88
WebSAMS
User Manual
Version 1.3
Pre-requisites
Adobe Acrobat Reader and Microsoft Office
workstation in order to view the report.
should be installed in the
User Procedures
1. Select "List of functions that can be accessed by User Account outside
SAMS LAN Segment Report" from the report selection page. Click on the
template link to go to the report parameter screen.
2. Specify the search criteria of the user accounts to list.
3. Click [Search] button to list out the user accounts.
4. Check the check box(es) on the left of the user(s) to list in the report.
5. Select the format of the report to be one of PDF / Word / RTF / Excel.
6. Click [Preview & Print] button to generate the report.
Post-effects
The report will be displayed in a pop-up window which allows user to preview or
print it out.
Copyright © 2007. Education Bureau. The Government of the HKSAR.
All Rights Reserved.
Page 89
WebSAMS
User Manual
Version 1.3
Notes
1. The report shows the accessibility of functions by user account outside
SAMS LAN segment.
2. The master settings of access from the Internet and from ITED LAN
Segment are listed at the beginning of the report. Besides having the
accessibility of functions, these master settings must be turned on before the
user can actually access the functions from Internet or from ITED LAN
Segment.
3. The View, Edit, Add, Delete & Execute rights to every function of the
selected user(s) are shown.
4. Access right setting of ‘Y’ means having access right, ‘N’ means no access
right and ‘-‘ means the right not applicable.
5. A user account can access a function only if the account is in a group which
has access right to this function and the accessibility of this function outside
SAMS LAN Segment has been turned on in the Location Access Control
function.
6. Report supports selection of multiple user accounts.
7. Only Staff & Others accounts can be selected and listed in this report. For
Student or Parent accounts, refer to the ‘List of functions that can be
accessed by User Group outside SAMS LAN Segment’ report (R-SEC009)
and select STUDENT or PARENT group.
List of functions that can be accessed by User Group outside SAMS LAN
Segment Report (R-SEC009)
Function Description
Under the “Access Control Information” report category, this report lists out the
accessibility of functions by user group outside the SAMS LAN segment (i.e.
ITED LAN Segment or Internet).
Pre-requisites
Adobe Acrobat Reader and Microsoft Office
workstation in order to view the report.
should be installed in the
User Procedures
1. Select "List of functions that can be accessed by User Group outside SAMS
LAN Segment Report" from the report selection page. Click on the template
link to go to the report parameter screen.
Copyright © 2007. Education Bureau. The Government of the HKSAR.
All Rights Reserved.
Page 90
WebSAMS
User Manual
Version 1.3
Copyright © 2007. Education Bureau. The Government of the HKSAR.
All Rights Reserved.
Page 91
WebSAMS
User Manual
Version 1.3
2. Check the check box(es) on the left of the user group(s) to list in the report.
3. Select the format of the report to be one of PDF / Word / RTF / Excel.
4. Click [Preview & Print] button to generate the report.
Post-effects
The report will be displayed in a pop-up window which allows user to preview or
print it out.
Notes
1. The report shows the accessibility of functions by user group outside SAMS
LAN Segment.
2. The master settings of access from the Internet and from ITED LAN
Segment are listed at the beginning of the report. Besides having the
accessibility of functions, these master settings must be turned on before the
users of a user group can actually access the function from Internet or from
ITED LAN Segment.
3. The View, Edit, Add, Delete & Execute rights to every function of the
selected user groups are shown. For built-in groups, all functions under the
applicable modules will be listed and functions under those non-applicable
modules will not be shown. For user-created groups, all modules / functions
will be listed except functions under the Customization module.
4. Access right setting of ‘Y’ means having access rights outside SAMS LAN
segment, ‘N’ means no access rights and ‘-‘ means the right not applicable.
5. Users of a user group can access a function only if the user group has
access right to this function and the accessibility of this function outside
SAMS LAN Segment has been turned on in the Location Access Control
function.
6. Report supports selection of multiple built-in or user-created user groups.
List of Access Time Profile and user account(s) assigned Report (R-SEC011-E)
Function Description
Under the “Access Control Info” report category, this report lists out the user
account(s) of any Internet Access Time Profile(s).
Pre-requisites
Adobe Acrobat Reader and Microsoft Office
workstation in order to view the report.
should be installed in the
User Procedures
1.
Select "List of Access Time Profile and user account(s) assigned Report"
from the report selection page. Click on the template link to go to the report
parameter screen.
Copyright © 2007. Education Bureau. The Government of the HKSAR.
All Rights Reserved.
Page 92
WebSAMS
User Manual
Version 1.3
2.
Check the check box(es) on the left of the profile(s) to be listed in the report.
3.
Select the format of the report to be one of PDF / Word / RTF / Excel.
4.
Click [Preview & Print] button to produce the report.
Post-effects
The report will be displayed in a pop-up window which allows user to preview or
print it out.
Notes
1.
2.
3.
The Profile ID and Profile Description are shown.
For School Year, the User ID, User Name, User Code, User Type and
Class are shown.
Report supports selection of multiple profiles.
Copyright © 2007. Education Bureau. The Government of the HKSAR.
All Rights Reserved.
Page 93
WebSAMS
User Manual
Version 1.3
2.3.5 Purge Log
Function Description
User can delete the successful and unsuccessful login logs permanently from
the system through the “Purge Log” function.
Pre-requisites
The log records to be deleted are not required to be retrieved anymore.
User Procedures
1. Click [Security] [Report & Log] [Purge Log] on the left menu.
2. Select the type of login log to be deleted.
3. Fill in the date range of the log records to be deleted.
4. Click [Delete] button.
Post-effects
All purged logs are removed from the system permanently. There is no way to
recover purged log records.
Notes
1. WebSAMS logs every login attempt in its database, regardless whether the
attempt is successful or not. For failed login attempts, the failure reasons will
be recorded.
2. To free up space in the database, the system administrator may purge the
log records when necessary.
3. By default, the ‘From’ date is provided by the system and it is the earliest
date successful / unsuccessful login log records exist. The ‘To’ date is also
provided and its default value is one day before the system date. User can
modify both dates, and then the successful / unsuccessful login log records
within the date range will be purged.
Copyright © 2007. Education Bureau. The Government of the HKSAR.
All Rights Reserved.
Page 94
WebSAMS
User Manual
Version 1.3
2.3.6 View Backup Log
Function Description
User can view the database and server backup / recovery operation log files
through the “View Backup Log” function.
Pre-requisites
The Data Backup log file and Server Backup log file paths stated in the System
Configuration function should be entered correctly so that these log files can be
retrieved.
User Procedures
1. Click [Security] [Report & Log] [View Backup Log] on the left menu.
2. Select Log File type.
3. Fill in the date range of the backup log files to be listed.
4. Click [View] button.
Log File Link
5. Click the log file link to download / open the file.
Post-effects
The corresponding log files will be listed below the search criteria in the same
page. The user can view the log files or download them.
Notes
1. The log files contain only the summary of backup / recovery operations
carried out in the WebSAMS server. The summary includes date / time of the
operations and whether the operations are successful or not.
2. The file format of the server backup log file is dependent on the server
backup tools used.
3. Size limitation for database backup / recovery log and server backup /
recovery log is set in System Configuration function. If the size has reached
Copyright © 2007. Education Bureau. The Government of the HKSAR.
All Rights Reserved.
Page 95
WebSAMS
User Manual
Version 1.3
80% of its limitation, an alert message will be displayed after users of the
SYSTEM_ADMIN group login to WebSAMS.
4. No deletion function of the logs is provided. User has to go to the
corresponding directory in the WebSAMS server to remove the obsolete log
files.
Copyright © 2007. Education Bureau. The Government of the HKSAR.
All Rights Reserved.
Page 96