1
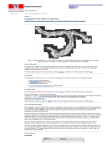
Date: 04/25/2008 Authors: Ping Fu and Jennifer Staab, UNC-Chapel Hill Version 03 User Manual for 3D Neural Alignment Table of Contents User Manual for 3D Neural Alignment........................................................................................... 1 Creating a Working Environment:................................................................................................... 2 Loading ImageJ and all Needed Plugins and Macros:.............................................................3 Importing Results from ImageJ Plugin & Macro into SPM:................................................... 4 Choosing the Plugin verses Macro:......................................................................................... 4 Directions for using the Plugin........................................................................................................ 5 General notes:.......................................................................................................................... 5 Step-by-step directions:........................................................................................................... 5 If you selected to align using TurboReg.................................................................. 7 If you selected to align using Saved Transforms................................................... 12 Troubleshooting:.................................................................................................................... 15 Directions for using the Macro...................................................................................................... 16 General notes and troubleshooting:....................................................................................... 16 Step-by-Step instructions:...................................................................................................... 17 ................................................................................................................................17 I Aligning an entire brain (in color or grayscale)........................................ 17 II Aligning a brain section (cells and grains)......................................................... 33 III & IV. Aligning an entire brain OR brain section using Saved Transformations45 Flow diagram for both Plugin and Macro:.....................................................................................52 1 Date: 04/25/2008 Authors: Ping Fu and Jennifer Staab, UNC-Chapel Hill Version 03 Creating a Working Environment: The user will need to have ImageJ loaded on their computer. Both the macro and plugin were written using ImageJ version 1.39u; thus, earlier versions of ImageJ may not be able to run the macro and plugin properly. The plugin will consist of a single java file named AlignWiz_.java and a number of class files that start with “AlignWiz” (like AlignWiz_.class, AlignWiz_$0Panel.class, etc.), all of which should be placed in an ImageJ folder under ‘plugins’ (like ...ImageJ/plugins/tools). The macro will consist of a single text file “microBrainAlignMacro.txt” that should be placed in the ImageJ ‘macros’ folder (… ImageJ/macros). In addition, the user will also need to load the ImageJ plugins TurboReg and MultiStackRegFix so that both tools can align image sequences correctly. Moreover, the user will also need to load the ImageJ plugin NIfTi so that the final result can be saved in a SPMusable format. Below one can find more information about each of the plugins and how to install all of the required software. The following are ImageJ plugins used in our project: Used to allow alignment of the imported image sequences: TurboReg: http://bigwww.epfl.ch/thevenaz/turboreg/ ***MultiStackReg: http://www.stanford.edu/~bbusse/work/downloads.html Used to export image sequence in a SPM readable format: NIfTi: http://rsb.info.nih.gov/ij/plugins/nifti.html ImageJ general information, downloads and documentation: Main information page: http://rsb.info.nih.gov/ij/ 2 Date: 04/25/2008 Authors: Ping Fu and Jennifer Staab, UNC-Chapel Hill Version 03 Documentation on ImageJ Developer’s Resources: API: http://rsb.info.nih.gov/ij/developer/api/index.html Built-In Macro Functions: http://rsb.info.nih.gov/ij/developer/macro/functions.html Statistical Parametric Mapping Software: SPM software: http://www.fil.ion.ucl.ac.uk/spm/ ***MultiStackReg was not directly used. It was revised and named “MultiStackRegFix” and allows the following “additional” functionality: 1. Error checking to guarantee that the alignment plugin, MultiStackRegFix, ran to completion 2. Error checking to guarantee that if a saved Transformation file is used for alignment, the alignment will only occur if the image sequence to be aligned has the same number of images and the same dimensions as the image sequence that originally generated the saved Transformation file. 3. Modified to allow only three types of alignments when run in batch mode from a plugin or macro. a. Rigid body alignments that save a Transformation file. b. Alignments using a saved Transformation file. c. Alignment using a saved Transformation file. Same as b. except the program does not prompt the user to select where the saved Transformation file can be found. 4. Modified to prevent warning messages from closing the macro if they appear during execution of the MultiStackRegFix plugin. 5. Allows rigid body alignment and alignment from saved transforms for color images (previously one could only align grayscale images in this way). Loading ImageJ and all Needed Plugins and Macros: 1. Download and Load ImageJ. Go to http://rsb.info.nih.gov/ij/download.html and select the appropriate download option. Download ImageJ bundled with Java if you do not already have Java on your computer. 2. Download TurboReg plugin (http://bigwww.epfl.ch/thevenaz/turboreg/ ), extract files and load *.java and *.class files into any applicable plugin folder in ImageJ (ex. … /ImageJ/plugins/tools or …/ImageJ/plugins/stacks). 3. Download NIfTi Input/Output plugin (http://rsb.info.nih.gov/ij/plugins/nifti.html ), save file and load nifti_io.jar file into Input-Output plugin folder in ImageJ (… /ImageJ/plugins/Input-Output). 4. Download MultiStackRegFix plugin (http://www.cs.unc.edu/Courses/comp523- s08/3D_Neural/home.html ), extract files and load *.java and *.class files into any applicable plugin folder in ImageJ (ex. …/ImageJ/plugins/tools or ImageJ/plugins/stacks). 3 Date: 04/25/2008 Authors: Ping Fu and Jennifer Staab, UNC-Chapel Hill Version 03 5. Download AlignWiz plugin (http://www.cs.unc.edu/Courses/comp523- s08/3D_Neural/home.html ), extract files and load *.java and *.class files into any applicable plugin folder in ImageJ (ex. …/ImageJ/plugins/tools or ImageJ/plugins/stacks). 6. Download alignBrainOrBrainSection.txt (http://www.cs.unc.edu/Courses/comp523- s08/3D_Neural/home.html ) and put the file in ImageJ/macros in ImageJ. 7. Importing Results from ImageJ Plugin & Macro into SPM: 1. Load MATLAB and SPM. SPM can be found at http://www.fil.ion.ucl.ac.uk/spm/software/spm5/. You will need to complete the registration form to download it. Unlike all other ‘open’ software for this project MATLAB is a license product that the user will need to purchase in order to use. In addition, other than opening and viewing the *.nii file in SPM, other functionality of SPM has not been tested. 2. Open MATLAB, and change the Current Directory to the “spm5” folder (the main folder where the SPM files are saved). You can do this by clicking the “…” symbol next to “Current Directory” and browsing through your folders. 3. In the Command Window, type in “spm” and hit enter. A startup window should pop up for SPM5. Select “fMRI time series” to start SPM. Two more windows should pop up. 4. On the upper left window, click “Display,” and an “Image to Display” window should pop up. On the left hand side of the “Image to Display” window, browse through your folders and select the folder where your NIfTi (.nii) file is located. Select the appropriate file and click “Done.” 5. Your image stack should now open in SPM. Choosing the Plugin verses Macro: We will have a plugin and a macro with similar functionality. They will both go through the set of screens as specified in the flow diagram on the last page of this document. The only real difference is that the macro runs faster, while the plugin has a more elegant user friendly interface. The macro runs faster in masking, image import and other features that specifically use the built-in macro language features. The Plugin provides a much more elegant user interface and allows for wizard-like features which allow the user to return to the previous selections using the back button and proceeding forward using the next button. This type of 4 Date: 04/25/2008 Authors: Ping Fu and Jennifer Staab, UNC-Chapel Hill Version 03 functionality is not possible using the macro language; thus, we recommend new and naïve user to use the plugin over the macro. The macro should be used by experienced users and running multiple alignments where speed is essential. Step-by-Step directions for both of the Plugin and Macro can be found below. Directions for using the Plugin General notes: Pressing the Enter key is equivalent to clicking the “Next” button. If the “Quit” button is highlighted by tabbing however, the Enter key is equivalent to clicking the “Quit” button. Please do not open additional images in ImageJ while the plugin runs. Please do not click on images during masking and alignment. This is when the wizard reads: “Masking in progress…” or “Alignment in progress…” Please also do not close image windows while the plugin runs, with the exception of 3D projections. All other windows should close automatically when they are no longer needed. Step-by-step directions: 1. What images are you working on? Choose whether you are aligning images of an entire brain in grayscale, an entire brain in color, or a brain section in grayscale. 5 Date: 04/25/2008 Authors: Ping Fu and Jennifer Staab, UNC-Chapel Hill Version 03 2. Please select how to align: Select “Align with TurboReg” if you do not already have a transformation file. If you have a transformation file you wish to use, select “Align with Transformation File.” If you are working on colored images, you will not have a choice and they will be aligned with TurboReg. 3. Import image sequence: Select the first image in your sequence, and then enter the appropriate parameters. For instance, if your sequence consists of the images cells1.tif, cells3.tif, cells5.tif… .cells99.tif, and you wish to keep the original image size, you would enter: Start number: 1 End number: 99 Increment: 2 File name contains: cells Scale: 100 Importing a sequence can be tricky in ImageJ. Please see the troubleshooting section if you encounter any problems. You will get an error message in the following cases: -No file is selected -Start number is not a positive integer -End number is not a positive integer -Increment is not a positive integer -Scale is not a positive integer -Start number is greater than End number -Increment is greater than the difference between Start number and End number 6 Date: 04/25/2008 Authors: Ping Fu and Jennifer Staab, UNC-Chapel Hill Version 03 If the file you selected is in a folder with no image files, you will get an error from ImageJ and will have to go back to the previous panel. If you selected to align using TurboReg 4. Fix Images: 1) If your slices are all roughly oriented the same way, you can go ahead and click “Next.” However, if the orientation between two adjacent slices differ greatly (for instance, if the slices are rotated more than 30 degrees), please rotate or translate them directly using ImageJ. You can go to ImageTranslate or ImageRotate to perform these operations. Make sure the “Fill with background color” box is checked if you are rotating. If you are translating, you will have to fill the background color in with the flood fill tool afterwards. 2) If you chose to rotate or translate any images and are importing a corresponding image sequence later, please remember all changes and apply them to the corresponding image sequence when prompted to. 5. Masking image sequence: 7 Date: 04/25/2008 Authors: Ping Fu and Jennifer Staab, UNC-Chapel Hill Version 03 First, select a sigma value for the Gaussian blur. The default value is set to 4. Enter a higher value for more blur and a lower value for less blur. Please note: clicking “OK” more than once will increasingly blur the image instead of resetting the blur, so we suggest starting out with a small sigma if you wish to repeatedly blur your image by repeatedly clicking “OK.” Once you click “OK,” a threshold window will appear. Please adjust the upper and lower thresholds so that all portions of the image you wish to retain are covered. All other portions will be converted to a uniform background color. To apply the threshold, you can simply click “Next” without clicking anything on the Threshold window. 8 Date: 04/25/2008 Authors: Ping Fu and Jennifer Staab, UNC-Chapel Hill Version 03 6. Pre-alignment processing 1) Erase any image imperfections with ImageJ’s paintbrush tool. Do not rotate or translate images at this point. All rotations and translations should be performed at step 4. If you are aligning colored images, the images will appear as grayscale here. You can still erase any imperfections, and the resulting aligned stack will be in color. 2) Scroll to the most centered image, and click “Next”. The most centered image is an image with an orientation which you wish to remain the same after alignment. For instance, it may be the image with the most even amount of white space on all sides. 3) The image window will now scroll through and mask each slice. After that is complete, a popup window will appear to prompt you to choose where you want to save your transformation file. The default folder and file name generally works, unless you are doing multiple alignments on images in a single folder, in which case you would want to rename the default file name so no files are overwritten. The mask images will be saved under the default folder in a folder named “Mask.” 9 Date: 04/25/2008 Authors: Ping Fu and Jennifer Staab, UNC-Chapel Hill Version 03 4) The screen should now read “Alignment in process…” Do not click the scrollbar in the image window during this process. 7. Post-alignment processing You can look at the results and choose to realign, save and view 3D projections, save only, or start over. 10 Date: 04/25/2008 Authors: Ping Fu and Jennifer Staab, UNC-Chapel Hill Version 03 If you choose to save results, a file window will pop up and prompt you to choose where to save your aligned results. All results will be saved as .nii files, even if you select otherwise in the file window. If you choose to save and view 3D projections, a file window will pop up to prompt you to choose where to save your aligned results, then the 3D projections will be generated . You will not be prompted to save the 3D projections. You can view them and close them or save them manually. 8. Results have been saved: You can choose to import and align corresponding grains images, start over, or exit. Start over takes you back to the starting panel (step 1). 11 Date: 04/25/2008 Authors: Ping Fu and Jennifer Staab, UNC-Chapel Hill Version 03 If you choose to import and align corresponding grains images, you will be taken to Step 3, and you will go through the same process without Steps 5 and 6. If you selected to align using Saved Transforms 6. Pre-Alignment Processing Fix any image imperfections. You should apply any rotations or translations that were applied to the original sequence from which the transformation file was obtained. You do not have to scroll to the most centered image to align. The alignment will start on the slice indicated by the transformation file. 7. Import transformation and mask files Select the transformation file you wish to use, as well as the mask file to be applied. If you are working on images of an entire brain, simply select the mask for the first image 12 Date: 04/25/2008 Authors: Ping Fu and Jennifer Staab, UNC-Chapel Hill Version 03 of your sequence, and the rest should be automatically imported. Please note: the mask images should be saved in a folder named “Mask,” and the images should be numbered starting with the number “1,” and the files should contain the word “mask.” For instance, if your sequence contains grains3.tif, grains4.tif, grains5.tif…grains20.tif, we expect your mask files to be called mask1.tif, mask2.tif, mask3.tif…mask18.tif. The dimensions of the mask files and the transformation file should both match the dimensions of the sequence you imported. Otherwise, you will get an error if the image height, image width, or number of images is inconsistent with the selected mask or transformation file. 8. Post-alignment processing You can look at the results and choose to realign, save and view 3D projections, save only, or start over. If you choose to realign, you will be asked to import a different transformation file and mask file. 13 Date: 04/25/2008 Authors: Ping Fu and Jennifer Staab, UNC-Chapel Hill Version 03 If you choose to save results, a file window will pop up and prompt you to choose where to save your aligned results. All results will be saved as .nii files, even if you select otherwise in the file window. If you choose to save and view 3D projections, the projections will be generated first, and then a file window will pop up to prompt you to choose where to save your aligned results. You will not be prompted to save the 3D projections. You can view them and close them or save them manually. 9. Results have been saved You can choose to start over or exit. Start over takes you back to the starting panel (Step 1). 14 Date: 04/25/2008 Authors: Ping Fu and Jennifer Staab, UNC-Chapel Hill Version 03 Troubleshooting: • • • Complex eigenvalues: If you are aligning colored images and get a window saying “Complex eigenvalues found. Ignoring imaginary parts,” simply click “OK.” Alignment should continue and work as normal. TempImages folder: If you find a folder named “TempImages” in your original images folder, it is okay to delete it. It should be automatically deleted if you abort the plugin by clicking “Quit” or selecting “Exit” on the last panel, but will not be automatically deleted if you abort the plugin by directly closing the wizard window. Importing sequence: If you get the wrong image numbers when importing an image sequence, it might be because the first image in your folder has an image number other than “1.” This is because “Start number: n” in ImageJ means the nth image in your folder of images. For instance, if your folder only contains “3.tif”, “4.tif”…”10.tif”, ImageJ will take “Start number: 3” to mean “5.tif,” which is the 3rd image contained in your folder. You can avoid this problem by renaming your images so that the lowest-numbered image in your folder is always “1,” and that the image numbers in your folder increment by 1. Faulty imports can also be because you did not specify a “File name contains” string and your folder contains images with different names but the same numbers (such as “1.tif” and “grains1.tif”). To avoid this problem, if you are going to have two different sequences in the same folder, make sure all files have a string identifying them before the image number in their file names. For instance, do not have the sequences “1.tif”, “2.tif”,…”10.tif”, and “grains1.tif”, “grains2.tif”,…”grains10.tif”, but instead, have the sequences named “cells1.tif”, “cells2.tif”,…”cells10.tif”, and “grains1.tif”, “grains2.tif”,…”grains10.tif”. This way, you can and should always fill out the “File name contains” field if you have image file names containing the same numbers in your folder. 15 Date: 04/25/2008 Authors: Ping Fu and Jennifer Staab, UNC-Chapel Hill Version 03 Directions for using the Macro General notes and troubleshooting: If running both the Plugin and Macro sequentially close out ImageJ and reopen it prior to running the other tool (Plugin or Macro dependent on the one that was used first). This prevents ImageJ from incorrectly processing the commands that are issued by the second tool to be used. If one chooses only to run a single tool, like just the Plugin, calling the Plugin multiple times in a single ImageJ session will not cause any problems with the Plugin’s functionality. If macro fails to begin after selecting ‘Plugins Macros, and clicking on ‘alignBrainOrBrainSection’ on the bottom of the drop-down menu’ then one needs to re-install the macro to get it to run. This will occasionally happen if one terminates the macro using ‘Quit’ and is presumably a bug in ImageJ. Selecting the ‘Cancel’ Button any time during the running of the Macro causes the Macro to abort and close immediately with no guarantee of saving the progress that one has made, instead just choose ‘Quit’ when the opportunity is next offered. The Macro closes all windows that it opens as it proceeds through its script, do not close any windows or open any new windows (i.e. importing another set of images) unless instructed to do so by the Macro while the Macro is running. Opening new windows OR closing open windows when not instructed to do so by the Macro, will cause the Macro to run incorrectly and possibly abort midway through its process. The Macro tends to open multiple windows one on top of the other, as part of the normal functioning of ImageJ Macro language. The user may find it necessary to select the active window and move it to a different location to get access to windows that it may have hidden as they are processing their image sequences. Please read and follow the directions provided at each step. These directions are provided specifically to help prevent the user from making errors in the process of using the Macro so that they will successfully align their image sequence. If for some reason the plugin used to align the image sequence fails and throws an error then the error will appear and the macro will be aborted immediately. This alignment error would be due to something innately wrong with the imported image sequence that prevented TurboReg from being able to align the images (like "Insufficient accuracy."). If the error indicated something that could not be fixed by the user then the user would not be able to align the image sequence using our macro and would need to look for other means to align their images. 16 Date: 04/25/2008 Authors: Ping Fu and Jennifer Staab, UNC-Chapel Hill Version 03 Step-by-Step instructions: To start/load the macro for use: 1. Open ImageJ, go to Plugins Macros Install, select the alignBrainOrBrainSection.txt file from ImageJ/macros, and click ‘Open.’ 2. The macro should now be installed. Go again to Plugins Macros, and click on ‘alignBrainOrBrainSection’ on the bottom of the drop-down menu to use the macro. I 1. Aligning an entire brain (in color or grayscale) The user selects the type of alignment from a drop down menu: a. Grayscale_Brain (aligning whole brain that is in grayscale) b. Color_Brain (aligning whole brain that is in color) c. Brain_Section (aligning brain section) d. Quit The user chooses to align “Grayscale_Brain” or “Color_Brain” 17 Date: 04/25/2008 Authors: Ping Fu and Jennifer Staab, UNC-Chapel Hill Version 03 2. The user selects the type of alignment from a drop down menu: a. TurboReg (aligns with TurboReg) b. SavedTransforms (aligns with saved Transforms file from previous alignment) c. Quit The user chooses to align “TurboReg” 3. Next the user needs to import the cells image sequence. The user is prompted to select the location of a single file from the image sequence and then the user is prompted to enter the following fields to allow the user to import the cells image sequence. Start Number (a positive integer that indicates the first image in the sequence) End Number (a positive integer that indicates the last image in the sequence) Increment (a positive integer of value 1 or greater that indicates by what increment images are to be imported in) Scale (a positive integer that indicates how much to reduce the resolution of the imported images where 100% indicates no reduction) Contains (a string that is common to all image sequence file names) After the user enters these fields and clicks ‘ok’, the image sequence will be imported into ImageJ and appear in the active image window. 18 Date: 04/25/2008 Authors: Ping Fu and Jennifer Staab, UNC-Chapel Hill 4. Version 03 Next the user needs to create masks for the imported image sequence. The user will need to use Gaussian blur and Thresholding ImageJ functions to do this. 19 Date: 04/25/2008 Authors: Ping Fu and Jennifer Staab, UNC-Chapel Hill Version 03 (Step 1) First the user will be asked to set the Gaussian blur, the program defaults to a value of 4. Note that the higher the value the more blurred the resulting image will appear. Once a value has been selected the user clicks ‘OK’. (Step 2) Next the user is asked to mask out the background using by picking the correct threshold value. First the Threshold window titled “Threshold” may appear underneath the two other windows that are open at the time (the active image sequence window and the “User Picks Threshold to Mask Out Background” window). If this is the case, the user will need to drag all three windows to separate locations on their monitor. Once the user is able to get access to the “Threshold” window they need to slide the bottom most scrollbar (‘upper’ threshold) towards the right until the area that encompasses the entire brain for each image in the image sequence is entirely filled with red. If other areas in the image sequence fill with red in the process that is ok as long as the entire image isn’t all red. If the entire image is all red one need to move the bottom most scroll bar in the threshold window to the left enough so that the entire images aren’t all red. Once the images in the image sequence all have the entire brain area covered with red the user needs to click the “Apply” button in the Threshold window. (Step 3) Then click ‘ok’ button on the “Convert to Mask” window that appears. 20 Date: 04/25/2008 Authors: Ping Fu and Jennifer Staab, UNC-Chapel Hill Version 03 (Step 4) Then close the Threshold window by clicking on the ‘x’ in the upper right hand corner. Then click ‘ok’ button on the “User Pick Threshold to Mask Out Background” window. Now the macro will mask out the background of the images the user imported. 1. Next the user needs to check the masking and fix any imperfections in the masking by using the brush tool in ImageJ. The user will use the brush tool to paint the background color over all image imperfections. To do this the user will first select the color picker tool in the ImageJ tool bar and then click on the background color of their image. Next the user will select the brush to in the ImageJ tool bar and use this tool to paint the background color over any image imperfections (like the gray dots circled in blue in the Result of Mask window below). Image imperfections are areas where the background was not masked out during the masking process. Once the user has completed the task they will need to click ‘ok’ in the “Check Masking & Stack” window to proceed to the next step. 21 Date: 04/25/2008 Authors: Ping Fu and Jennifer Staab, UNC-Chapel Hill Version 03 2. Next the user needs to use the scroll bar in the active image sequence window to select the most centered image in the image sequence as the start image for alignment. This will help the macro to better align the images. Once they have completed this task they should click ‘ok’ button of the ‘Select Alignment Start Image’ window. 22 Date: 04/25/2008 Authors: Ping Fu and Jennifer Staab, UNC-Chapel Hill Version 03 3. Next the user will need to indicate the location in which they want to save the Transfor- mation file that will result from the image sequence alignment. The user first clicks ‘ok’ in the ‘Save Transformation File’ window. Then they will need to select the location and name of the saved transformation file. We suggest that the user saves this file with its default name “TransformationMatrices.txt” in the same folder that they have stored the cells image sequence. 4. Next the user will need to check the resulting alignment of the imported image sequence. The macro will align the image sequence and then create two 3D projections of the aligned image sequence. The windows may appear over top of one another so the user may need to move them to separate places on their monitor. The user will use the scroll bars on the 3D projection windows and the aligned image sequence window to view the alignment. The user will need to determine whether or not the images aligned properly. If the images are properly aligned they should appear that they fit in a seamless stack that 23 Date: 04/25/2008 Authors: Ping Fu and Jennifer Staab, UNC-Chapel Hill Version 03 seems to align the adjacent images well to each other. Once they have made this determination the user will need to click on ‘ok’ in the “Check Alignment” window. 5. Next the “Adjust Stack & Realign” window appears. If the user had a poor alignment then they will need to place a check in the check box next to ‘Realign?’ otherwise they should leave this box unchecked. Once the user has made a selection they will then need to click on ‘ok’ in the “Adjust Stack & Realign” window. The user is only allowed to realign 3 times. 6. Note that if the user selects to realign they will be able to select a different image as the most centered image for when the alignment is performed. Moreover the user is also able to adjust the masked image sequence as an attempt to get a better alignment. The user can adjust the masked image sequence by using the “Translate” and “Rotate” processes in ImageJ (they are found under “Image” in the tool bar). ***Note that if the user does use Translate to re-center an image in the sequence or Rotate to rotate an image in the sequence to the left or right; they need to record all changes they make so that the exact same changes (Translate & Rotate commands) can be made on the same image in the corresponding image sequence (the grains images). In addition the user also needs to make sure they use the flood fill tool to fill in the background color in the images that they ‘Translate’ so that the alignment can process correctly (only use flood fill of the background color for entire brains for brain sections leave the background black). If the user decides to rotate the images they can just click on the check 24 Date: 04/25/2008 Authors: Ping Fu and Jennifer Staab, UNC-Chapel Hill Version 03 box “Fill with background color” to keep the background a consistent color when they rotate the image (only click fill with background color if the images to be aligned are entire brains, don’t fill with background color if aligning brain sections). 25 Date: 04/25/2008 Authors: Ping Fu and Jennifer Staab, UNC-Chapel Hill Version 03 7. Once the user is done adjusting the images using rotation and translation they will want to click ‘ok’. Once they do that the images will be re-masked and the ‘Select Alignment Start Image’ window pops up and the user will repeat steps 6 10 above and follow the applicable directions for those steps. 8. Now that the user has a correct alignment. They need to choose where to store the re- sults of the alignment and what they would like to name the resulting *.nii file. The window “Save Results of Alignment” will popup and the user will click ‘ok’. Next the user needs to select where to save the resulting *.nii file and what to name it. We suggest storing it in the same folder as the one that contained the images that were imported in for alignment. Once the user has made their folder and name selections they need to click ‘Save’ to save the results. 26 Date: 04/25/2008 Authors: Ping Fu and Jennifer Staab, UNC-Chapel Hill Version 03 9. Next a window will popup that asks the user if they would like to view the 3D projec- tions of their resulting alignment. If they select ‘yes’ the user will see their 3D projections of the alignment and another window will popup asking the user if they would like to save the 3D projections. If they choose yes these projections will be save, if they choose no they won’t be saved. If the user doesn’t select that they would like to view the 3D projections, then the user won’t be prompted to save the 3D projections. 27 Date: 04/25/2008 Authors: Ping Fu and Jennifer Staab, UNC-Chapel Hill Version 03 10. Next a window will popup that asks the user would like to ‘Align the corresponding (grains) images’. If the user selects ‘no’ then the macro will start over by preceding back to step 1. If the user selects ‘quit’ then the macro will exit. If the user selects ‘yes’ then the macro will allow the user to align corresponding (grains) images. 11. Next the user needs to import the corresponding (grains) image sequence. The user is prompted to select the location of a single file from the image sequence and then the user is prompted to enter the following fields to allow the user to import the cells image se28 Date: 04/25/2008 Authors: Ping Fu and Jennifer Staab, UNC-Chapel Hill Version 03 quence: Start Number, End Number, Increment, Scale and Contains. Note that all these fields but ‘contains’ will default to the values entered in when the user imported in the cells sequence in step 3. We feel that none of these fields should change with the exception of the ‘contains’ field if the corresponding images truly correspond to the cells images, but we allow the user to change these fields just in case the dimensions of the grains images differ from the cells images thus scale must be set differently so that both images have the same dimensions when imported into the macro. Once this is complete the user clicks ‘ok’ and the corresponding images are imported in and masked. Please note that if the dimensions of the imported images don’t match the dimensions of the cells images an error message will appear and the user will be prompted to re-import (repeat this step) the corresponding images again and they will only be allowed to re-import 3 times before the macro starts over (starts at step 1). Also note that when trying to import with negative numbers, floats or something of that nature the user will get error messages stating the problems with the inputs. 29 Date: 04/25/2008 Authors: Ping Fu and Jennifer Staab, UNC-Chapel Hill Version 03 12. If the user had re-aligned the cells images, then the ‘Adjust Corresponding Images based on Realignment’ window will popup. If this happens then the user needs to apply the same ‘rotation’ and ‘translation’ changes to the same images that they had applied these to when they performed the re-alignment of the cells images. If the user only selected a different ‘center most’ image then the user doesn’t need to adjust the corresponding images using translation and rotation. Once the user is done making adjustments, they just click ‘ok’. If the user did not re-align the cells images they can just proceed to the next step. 13. Next the “Load Transformation File” window appears and the user clicks ok and then se- lects the transformation file from where it is located and clicks ‘open’ so that it can be used to align the corresponding (grains) images. Note if the user followed our suggestions the file should be named ‘TransformationMatrices.txt’ and located in the same folder as the cells images. If for some reason the user selects a file that isn’t the transformation file OR selects the incorrect transformation file (one for more images in the sequence or images of different dimensions) a warning pops up and the user will only be allowed 3 more chances to select the right transformation file. Please note that if the user selects an incorrect file (one that isn’t a transformation file), the ImageJ exception window may popup. This happens because exceptions were thrown when the alignment plugin attempted to read a file that wasn’t a transformation file. Once the user is done using the macro the user will be able to close the exception window. 30 Date: 04/25/2008 Authors: Ping Fu and Jennifer Staab, UNC-Chapel Hill Version 03 14. Now that the corresponding images are aligned. The user will need to choose where to store the results of the alignment and what they would like to name the resulting *.nii file. The window “Save Results of Alignment” will popup and the user will click ‘ok’. Next the user needs to select where to save the resulting *.nii file and what to name it. We suggest storing it in the same folder as the one that contained the images that were imported in for alignment. Once the user has made their folder and name selections they need to click ‘Save’ to save the results. 31 Date: 04/25/2008 Authors: Ping Fu and Jennifer Staab, UNC-Chapel Hill Version 03 15. Next a window will popup that asks the user if they would like to view the 3D projec- tions of their resulting alignment. If they select ‘yes’, the user will see their 3D projections of the alignment and another window will popup asking the user if they would like to save the 3D projections. If the user chooses yes these projections will be save, if they choose no they won’t be saved. If the user doesn’t select that they would like to view the 3D projections, then the user won’t be prompted to save the 3D projections. 32 Date: 04/25/2008 Authors: Ping Fu and Jennifer Staab, UNC-Chapel Hill Version 03 16. Next a window the macro will start over so the user will see the window that appeared in step 1. II Aligning a brain section (cells and grains) 1. The user selects the type of alignment from a drop down menu a. Grayscale_Brain (aligning whole brain that is in grayscale) b. Color_Brain (aligning whole brain that is in color) c. Brain_Section (aligning brain section) d. Quit User chooses to align “Brain_Section” 33 Date: 04/25/2008 Authors: Ping Fu and Jennifer Staab, UNC-Chapel Hill Version 03 2. The user selects the type of alignment from a drop down menu a. TurboReg (aligns with TurboReg) b. SavedTransforms (aligns with saved Transforms file from previous alignment) c. Quit User chooses to align “TurboReg” 3. Next the user needs to import the cells image sequence. The user is prompted to select the location of a single file from the image sequence and then the user is prompted to enter the following fields to allow the user to import the cells image sequence. Start Number (a positive integer that indicates the first image in the sequence) End Number (a positive integer that indicates the last image in the sequence) Increment (a positive integer of value 1 or greater that indicates by what increment images are to be imported in) Scale (a positive integer that indicates how much to reduce the resolution of the imported images where 100% indicates no reduction) Contains (a string that is common to all image sequence file names) After the user enters these fields and clicks ok, the image sequence will be imported into ImageJ and appear in the active image window. 34 Date: 04/25/2008 Authors: Ping Fu and Jennifer Staab, UNC-Chapel Hill 4. Version 03 Select the Alignment Start Image for the alignment. If you don’t want to select the first image as the start image use the scrollbar on the active image window to select the start image as the most centered image. 35 Date: 04/25/2008 Authors: Ping Fu and Jennifer Staab, UNC-Chapel Hill 5. Version 03 Next the user will need to indicate the location in which they want to save the Transformation file that will result from the image sequence alignment. The user first clicks ‘ok’ in the ‘Save Transformation File’ window. Then they will need to select the location and name of the saved transformation file. We suggest that the user saves this file with its default name “TransformationMatrices.txt” in the same folder that they have stored all the imported cells images. 36 Date: 04/25/2008 Authors: Ping Fu and Jennifer Staab, UNC-Chapel Hill 6. Version 03 Next the user will need to check the resulting alignment of the imported image sequence. The macro will align the image sequence. Windows may appear over top of one another so the user may need to move them to separate places on their monitor. The user will use the scroll bars on the aligned image sequence window to view the alignment. The user will need to determine whether or not the images aligned properly. To do so the user will visual inspect the aligned image sequence using the scrollbar in the active image window to making sure the images appear to match up between adjacent images. Once they have made this determination the user will need to click on ‘ok’ in the “Check Alignment” window. 37 Date: 04/25/2008 Authors: Ping Fu and Jennifer Staab, UNC-Chapel Hill Version 03 7. Next the “Adjust Stack & Realign” window appears. If the user had a poor alignment then they will need to place a check in the check box next to ‘Realign?’ otherwise they should leave this box unchecked. Once the user has made a selection they will then need to click on ‘ok’ in the “Adjust Stack & Realign” window. The user is only allowed to realign 3 times. 8. Note that if the user selects to realign they will be able to select a different image as the most centered image for when the alignment is performed. Moreover the user is also able to adjust the masked image sequence as an attempt to get a better alignment. The user can adjust the masked image sequence by using the “Translate” and “Rotate” processes in ImageJ (they are found under “Image” in the tool bar). ***Note that if the user does 38 Date: 04/25/2008 Authors: Ping Fu and Jennifer Staab, UNC-Chapel Hill Version 03 use Translate to re-center an image in the sequence or Rotate to rotate an image in the sequence to the left or right; they need to record all changes they make so that the exact same changes (Translate & Rotate commands) can be made on the same image in the corresponding image sequence (the grains images). In addition the user also needs to make sure they use they do not use the flood fill tool to fill in the background color in the images that they ‘Translate’, instead the user should leave any corrections black so that the alignment can process correctly on a brain section. If the user decides to rotate the images they should not click on the check box “Fill with background color”, instead they should leave the background color black to allow for proper alignment. 9. Once the user is done adjusting the images using rotation and translation they will want to click ‘ok’. Once they do the ‘Select Alignment Start Image’ window pops up and the user will repeat steps 48 above and follow the applicable directions for those steps. 10. Now that the user has a correct alignment. They need to choose where to store the results of the alignment and what they would like to name the resulting *.nii file. The window “Save Results of Alignment” will popup and the user will click ‘ok’. Next the user needs to select where to save the resulting *.nii file and what to name it. We suggest storing it 39 Date: 04/25/2008 Authors: Ping Fu and Jennifer Staab, UNC-Chapel Hill Version 03 in the same folder as the one that contained the images that were imported in for alignment. Once the user has made their folder and name selections they need to click ‘Save’ to save the results. 11. Next a window will popup that asks the user if they would like to view the 3D projections of their resulting alignment. If they select ‘yes’ the user will see their 3D projections of the alignment and another window will popup asking the user if they would like to save the 3D projections. If they choose yes these projections will be saved, if they choose no they won’t be saved. If the user doesn’t select that they would like to view the 3D projections, then the user won’t be prompted to save the 3D projections. Note that the 3D projections for brain sections for the most part do not provide helpful information like they do for whole brain images. 40 Date: 04/25/2008 Authors: Ping Fu and Jennifer Staab, UNC-Chapel Hill Version 03 12. Next a window will popup that asks the user would like to ‘Align the corresponding (grains) images’. If the user selects ‘no’ then the macro will start over by preceding back to step 1. If the user selects ‘quit’ then the macro will exit. If the user selects ‘yes’ then the macro will allow the user to align corresponding (grains) images. 13. Next the user needs to import the corresponding (grains) image sequence. The user is prompted to select the location of a single file from the image sequence and then the user is prompted to enter the following fields to allow the user to import the cells image sequence: Start Number, End Number, Increment, Scale and Contains. Note that all these fields but ‘contains’ will default to the values entered in when the user imported in the cells sequence in step 3. We feel that none of these fields should change with the exception of the ‘contains’ field if the corresponding images truly correspond to the cells images. But we allow the user to change these fields if for some reason the dimension of the corresponding images differ from that of the cells one would want to use a different scale value so that both images had the same dimensions when imported into the macro. Once this is complete the user clicks ‘ok’ and the corresponding images are imported in and masked. Please note that if the dimensions of the imported images don’t match the dimensions of the cells images a error message will appear and the user will be prompted to re-import (repeat this step) the corresponding images again and they will only be allowed to re-import 3 times before the macro starts over (starts at step 1). 41 Date: 04/25/2008 Authors: Ping Fu and Jennifer Staab, UNC-Chapel Hill 14. Version 03 If the user had re-aligned the cells images, then the ‘Adjust Corresponding Images based on Realignment’ window will popup. If this happens then the user needs to apply the same ‘rotation’ and ‘translation’ changes to the same images that they had applied these to when they performed the re-alignment of the cells images. If the user only selected a different ‘center most’ image then the user doesn’t need to adjust the corresponding images using translation and rotation. Once the user is done making adjustments, they just click ‘ok’. If the user did not re-align the cells images they can just proceed to the next step. 42 Date: 04/25/2008 Authors: Ping Fu and Jennifer Staab, UNC-Chapel Hill 15. Version 03 Next the “Load Transformation File” window appears and the user clicks ok and then selects the transformation file from where it is located and clicks ‘open’ so that it can be used to align the corresponding (grains) images. Note if the user followed our suggestions the file should be named ‘TransformationMatrices.txt’ and located in the same folder as the cells images. If for some reason the user selects a file that isn’t the transformation file OR selects the incorrect transformation file (one for more images in the sequence or images of different dimensions) a warning pops up and the user will only be allowed 3 more chances to select the right transformation file. Please not that if the user selects an incorrect file (one that isn’t a transformation file), the ImageJ exception window may popup. If this happens, it is because exceptions were thrown when the alignment plugin attempted to read a file that wasn’t a transformation file. Once the user is done using the macro the user will be able to close the exception window. 43 Date: 04/25/2008 Authors: Ping Fu and Jennifer Staab, UNC-Chapel Hill 16. Version 03 Now that the corresponding images are aligned. The user will need to choose where to store the results of the alignment and what they would like to name the resulting *.nii file. The window “Save Results of Alignment” will popup and the user will click ‘ok’. Next the user needs to select where to save the resulting *.nii file and what to name it. We suggest storing it in the same folder as the one that contained the images that were imported in for alignment. Once the user has made their folder and name selections they need to click ‘Save’ to save the results. 44 Date: 04/25/2008 Authors: Ping Fu and Jennifer Staab, UNC-Chapel Hill Version 03 17. Next a window will popup that asks the user if they would like to view the 3D projections of their resulting alignment. If they select ‘yes’, the user will see their 3D projections of the alignment and another window will popup asking the user if they would like to save the 3D projections. If the user chooses yes these projections will be save, if they choose no they won’t be saved. If the user doesn’t select that they would like to view the 3D projections then the user won’t be prompted to save the 3D projections. Note that the 3D projections for brain sections for the most part do not provide helpful information like they do for entire brain images. 18. Next the macro will start over so the user will see the window that appeared in step 1. III & IV. Aligning an entire brain OR brain section using Saved Transformations 1. The user selects the type of alignment from a drop down menu a. Grayscale_Brain (aligning whole brain that is in grayscale) b. Color_Brain (aligning whole brain that is in color) c. Brain_Section (aligning brain section) 45 Date: 04/25/2008 Authors: Ping Fu and Jennifer Staab, UNC-Chapel Hill Version 03 d. Quit User chooses to align “Brain_Section” or “Grayscale_Brain” 2. The user selects the type of alignment from a drop down menu a. TurboReg (aligns with TurboReg) b. SavedTransforms (aligns with saved Transforms file from previous alignment) c. Quit User chooses to align “SavedTransforms” 3. Next the user needs to import the corresponding (grains) image sequence. The user is prompted to select the location of a single file from the image sequence and then the user is prompted to enter the following fields to allow the user to import the cells image sequence. Start Number (a positive integer that indicates the first image in the sequence) End Number (a positive integer that indicates the last image in the sequence) Increment (a positive integer of value 1 or greater that indicates by what increment images are to be imported in) Scale (a positive integer that indicates how much to reduce the resolution of the imported images where 100% indicates no reduction) Contains (a string that is common to all image sequence file names) After the user enters these fields and clicks ok, the image sequence will be imported into ImageJ and appear in the active image window. Note that the error messages will appear if the user enters in float or negative numbers into the numeric fields of the import. 46 Date: 04/25/2008 Authors: Ping Fu and Jennifer Staab, UNC-Chapel Hill 4. Version 03 Next the user will need indicate where the Mask folder is located. The user needs to click ‘ok’ in the ‘Find Mask Directory’ window. Next the user needs to select any file (not folder) within the folder that contains the ‘Mask’ folder. If the user fails to select the correct folder location then the Macro fails and aborts leaving windows open that need to be closed, so the user will need to close these windows and restart the Macro. If the user selects the correct location of the mask folder then the imported images are masked and the macro continues to process. If the images imported are different dimensions than the 47 Date: 04/25/2008 Authors: Ping Fu and Jennifer Staab, UNC-Chapel Hill Version 03 Masks in the Mask folder, this step fails and a warning window appears. The warning window asks the user if they would like to Start Over (start with step 1), quit (exit macro), or try import masks again. If the user choose to import the masks again they repeat this step(import masks again) up to 3 times before they are forced to start over (start with step 1). 48 Date: 04/25/2008 Authors: Ping Fu and Jennifer Staab, UNC-Chapel Hill Version 03 5. Next the ‘Adjust Corresponding Images based on Realignment’ window will appear. If the user had realigned using Translation and/or Rotation to adjust the cells images (the images that provide the transformation file that the user will select for the alignment) prior to re-alignment, then the user needs to apply these same changes to the imported corresponding (grains) images at this point. Once the user has completed this task, if the user didn’t use translation and rotation with the realignment, or if the user didn’t realign then the user will click ‘ok’ in the window. 6. Next the “Load Transformation File” window will appear. The user needs to click ‘ok’ in this window and then they need to select the location of the transformation file that they would like to use to align the imported corresponding (grains) images. If the user selects a file that is not a transformation file OR if the user selects a transformation file for an alignment with a different number of images or different image dimensions then a warning window appears that alerts the user that they failed to align the images. The user can either select that they would like to try to align again (repeat this step of importing the transformation file), quit (exit the macro), or select ‘no’ and they will start over (step 1). If they choose to try to align again they can only repeat the attempt 3 times before they are forced to start over. 49 Date: 04/25/2008 Authors: Ping Fu and Jennifer Staab, UNC-Chapel Hill 7. Version 03 Now that the corresponding images are aligned. The user will need to choose where to store the results of the alignment and what they would like to name the resulting *.nii file. The window “Save Results of Alignment” will popup and the user will click ‘ok’. Next the user needs to select where to save the resulting *.nii file and what to name it. We suggest storing it in the same folder as the one that contained the images that were imported in for alignment. Please note that the default location will be the location of where the stored transformation file was found, the user will need to select the appropriate location for the results. Once the user has made their folder and name selections they need to click ‘Save’ to save the results. 50 Date: 04/25/2008 Authors: Ping Fu and Jennifer Staab, UNC-Chapel Hill Version 03 8. Next a window will popup that asks the user if they would like to view the 3D projections of their resulting alignment. If they select ‘yes’, the user will see their 3D projections of the alignment and another window will popup asking the user if they would like to save the 3D projections. If the user chooses yes these projections will be save, if they choose no they won’t be saved. If the user doesn’t select that they would like to view the 3D projections then the user won’t be prompted to save the 3D projections. 9. Next the macro will start over so the user will see the window that appeared in step 1. 51 Date: 04/25/2008 Authors: Ping Fu and Jennifer Staab, UNC-Chapel Hill Version 03 Flow diagram for both Plugin and Macro: 52