1
Biomedical Imaging Group
Download Algorithms
English only
BIG > Download Algorithms >MosaicJ
MosaicJ
An ImageJ plugin for the creation of an image mosaic.
Philippe Thévenaz, Biomedical Imaging Group, Swiss Federal Institute of Technology Lausanne
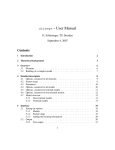
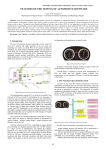
Figure 1. Columnar epithelium, t.s. of blind gut from rabbit. This (3650×2068)- mosaic has been assembled from seventeen
(636×512)- slices. The version on display has been much reduced to save on bandwidth.
General Description
The purpose of this plugin is to facilitate the assembly of a mosaic of overlapping individual images, or tiles. It provides a semiautomated solution where the initial rough positioning of the tiles must be performed by the user, and where the final delicate
adjustments are performed by the plugin.
The MosaicJ plugin requires that a second plugin, named TurboReg, is installed. This ancillary plugin is available here.
I. Download
This distribution is dated July 6, 2011. It includes the complete set of source files, along with the precompiled classes.
UNIX distribution [276,480 bytes]
Macintosh distribution [148,461 bytes]
PC distribution [128,868 bytes]
This page in pdf format (printer- friendly) [656,078 bytes]
II. Related Work
The MosaicJ plugin requires that a second plugin, named TurboReg, is installed. This ancillary plugin is available here.
This set of Java classes is based on the following paper:
P. Thévenaz, M. Unser, "User- Friendly Semiautomated Assembly of Accurate Image Mosaics in Microscopy," Microscopy Research and
Technique, vol. 70, no. 2, pp. 135- 146, February 2007. Other relevant on- line publications are available at
http://bigwww.epfl.ch/publications/.
MosaicJ has been written as a plugin for ImageJ . Please read the ImageJ documentation to learn how to install plugins.
III. Technical Explanations
After completion of the interactive stage, the tiles are examined for mutual overlap. Pairs of overlapping tiles are then aligned thanks
to the registration engine TurboReg. This alignment is organized by decreasing amount of overlap; pairs of tiles are skipped if the two
tiles have been registered already. In the end, an arbitrary tile is selected as anchor and all the other tiles are positioned by
propagating the pairwise transformations.
The interactive stage is translational only. Meanwhile, the automatized refinement stage allows for subpixel translations and optional
rotations. A global mosaic is produced once the geometry of all tiles has been finalized. Locations not covered by any tile are set to the
background intensity or color defined by ImageJ according to the settings found under [Edit→Options→Colors...] . Locations where
several tiles overlap are given a weighted contribution from each tile. An optional blending mechanism reduces the visibility of tile
edges; when disengaged, each tile contributes equally.
The user may have positioned tiles in such a way that more than one simply connected mosaic is present. The user receives a
notification when this happens, and is offered the opportunity to concentrate on the mosaic with the largest number of tiles.
Currently, all ImageJ types are supported on input, but the registration and the interaction always operate on grayscale images. The
color- to - grayscale conversion of MosaicJ tends to maximize contrasts, which makes it different from ImageJ's. This behavior can be
overridden if desired. The output image is RGB- color if at least one of the tiles that participate to the mosaic is in color; else, the
output image is 32- bit grayscale.
IV. User Manual
Generalities
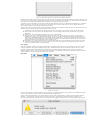
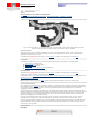
Figure 2. Initial empty window, here reduced for illustration purposes.
Once the plugin is fired, an empty window covering the whole screen should appear. This window contains two sections: the upper, and
the lower one. The upper section is the gridded area where the user can interactively arrange tiles; the lower section contains tiles that
have not yet been arranged. This window cannot be resized, but scroll bars appear when needed.
The mosaic is built in two stages. First, the user interactively loads, discards, arranges, and otherwise manipulates tiles, or thumbnails
thereof. This stage is visual, mouse- and menu- driven, and its goal is to provide a rough version of the final mosaic. Second, the
plugin works on its own to automatically refine this rough version.
The menu bar is holding five menus that are directly related to MosaicJ: File, Edit, Object, Scale, and Help. The operations that are not
available through menus include the direct manipulation of tiles, such as:
Activating a tile. This is performed by clicking a tile that lies in the lower area of the screen. The tile will be placed in the
center of the upper area, where it can be operated upon. It will be selected, and previously selected tiles, if any, will be
deselected.
Moving a tile. This is performed by dragging a tile or a set of selected tiles.
Selecting a tile. This is achieved by clicking a tile that lies in the upper area of the screen. If the click is performed on a
superposition of tiles, only the topmost tile is selected; conversely, the last selected tile automatically becomes topmost. In
case a tile is inaccessible because it would be covered entirely by other tiles, it is possible to temporarily hide the top tiles
until the desired tile becomes accessible. It is also possible to rearrange the tiles so that the topmost tile is sent to the back.
Selecting several tiles. This is achieved by shift- clicking the tiles.
Identifying a tile. A tool tip identifies the name of the file associated with the tile and indicates its slice number in the stack.
This tool tip is displayed when the user hovers the cursor over a tile in the lower section of MosaicJ's window. It does not
obtrude once tiles are moved to the gridded area.
Color Images
When color images are provided, the registration proceeds on a grayscale version that is built as a weighted sum of the red, green,
and blue components—even when the stack is pseudo- color. The weights can be made to correspond to the BT.709 norm, but by
default they depend on the whole stack and are determined by a principal- component analysis in such a way as to provide the
maximum possible contrast. The colors are restored upon completion of the interaction and automatic registration stages, so that the
created mosaic is in full color when at least one input tile is colored.
[File] Menu
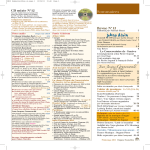
Figure 3. File menu.
The menu [Open Image...] will allow access to one file at a time; it is always available so that more tiles can be added to the mosaic
at will. If the file contains a stack, all slices will be considered as independent tiles.
The menu [Open Image Sequence...] will allow access to every file inside a folder/directory, except to the files that start with the
character '.' (a leading dot). To access the folder, select any file within, but please note that the exploration of folders is not
hierarchical. Types and sizes of images can be mixed freely. An error message is displayed when an unrecognized file type is found.
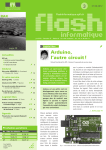
Figure 4. Error message when an unrecognized file is found. By choosing [Cancel] , the user would abort the whole process of building
a mosaic and would return to ImageJ. By choosing [Stop Opening], the images loaded so far, if any, would be retained, but no more
would be loaded. By choosing [Resume Opening], the loading of images would be resumed until the folder content is exhausted or until
the next unrecognized file is found. By choosing [Open All Valid], the next unrecognized files are skipped silently.
The [{Activate/Deactivate} Smart Color Conversion] menu determines how color images are desaturated. Before smart color
conversion is deactivated, like in Figure 3, the intermediate images over which registration is performed are obtained from color
images by attempting to maximize contrasts. Once deactivated, the menu switches to [Activate Smart Color Conversion]. In this
condition, a standardized sum of the RGB color components is computed as Y = 0.212671 * R + 0.71516 * G + 0.072169 * B.
The menu [Create Mosaic] is active when at least one tile has been placed. It is not available when there are hidden tiles. Once [Create
Mosaic] has been activated, the second, non- interactive stage of building the mosaic can proceed. A progress bar provides visual
feedback on the fraction of work remaining to perform. An error message is displayed when the rough mosaic created by the user is
not simply connected.
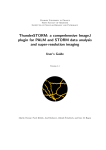
Figure 5. Error message when the mosaic is not simply connected. By choosing [Cancel] , the user would abort the whole process of
building a mosaic and would return to ImageJ. By choosing [Abort Creation], the user would resume MosaicJ's interactive operations.
By choosing [Create Largest], the simply connected mosaic that contains the most tiles would be created, while the other mosaics
would be discarded. In case of a tie in the number of tiles, the simply connected piece that is chosen is arbitrary.
The [{Activate/Deactivate} Blending] menu determines whether the bounds of the tiles do or do not fuse gradually with the inside of
the other tiles in the final mosaic. Before blending is deactivated, like in Figure 3, the transition between tiles is smoothed out. Once
deactivated, the menu switches to [Activate Blending]. In this condition, the tiles are uniformly averaged when creating the final
mosaic.
The [{Activate/Deactivate} Rotation] menu determines whether rotation is optimized for. Before rotation is deactivated, like in Figure
3, the tiles are translated and rotated. Once deactivated, the menu switches to [Activate Rotation]. In this condition, the final mosaic
will consist of tiles that are only translated without being rotated.
The [{Activate/Deactivate} Log File] menu determines if the operations applied to the tiles should be recorded in a file when the final
mosaic is created. Before the log file is activated, like in Figure 3, no file is created. Once logging is activated, the menu switches to
[Deactivate Log File]. In this condition, upon creation of the final mosaic, the user is given the opportunity to save a text file that will
contain the operations performed to create the mosaic. These operations can be reapplied to recreate the same mosaic. Another use
emerges if the log file is edited before it is reapplied; this allows one to process multichannel images, for example, by changing the
source of the tiles.
The log file consists of lines. Each line contains tab- separated items. The syntax is as follows: The first line is a header that contains
Gray or Color, followed by the dimensions of the mosaic (width and height). Each of the next lines pertains to a single tile. The first six
floating- point numbers give the source landmarks; the next six floating- point numbers give the target landmarks. Two additional
floating- point numbers record the pre- computed location of the bottom- right corner of the tile. The next number is the negative of the
index of the slice in the stack from which the tile is originating. The last item is the filename of the stack; please note that such
filenames should not contain tabs.
The menu [Save Pre- Mosaic...] is active when a mosaic is ready to be produced. It can be used to save the current configuration of
tiles before the automatic refinement stage is applied. Beware that no groupings are saved; the overall reduction factor is also not
saved. The resulting text file is a set of line records, each record being tab- delimited. A record contains the grayscale contrast and
offset that is specific to the tile, the weights being used to desaturate an RGB representation of the color image, and the relative
location of the tiles, followed by a slice index, by the frozen/unfrozen state of the tile, and by the name of the file from which the tile
came. Negative slice indices indicate that the tile belongs to the lower section.
The menu [Load Pre- Mosaic...] can be used to restore a configuration of tiles. In the process, any current tile is discarded. The size of
the tiles fits the actual reduction factor. All resulting tiles are ungrouped. The error message of Figure 4 pops up when a tile fails to
load.
The menu [Previous Pre- Mosaic...] can be used to restore the configuration of tiles that was active the last time the operation [Create
Mosaic...] was called. The usual limitations apply (see [Save Pre- Mosaic...] and [Load Pre- Mosaic...]).
The menu [Replay from Log...] can be used to recreate a mosaic from a log file (see [{Activate/Deactivate} Log File...]). It is
accessible only when the upper section of the workspace contains no tiles.
The menu [Reset MosaicJ] can be used to discard any tile currently loaded, and to empty a file- based cache that MosaicJ is
maintaining in the temporary folder of ImageJ. These files are all prefixed by "MosaicJ". The user must confirm the operation before it
takes place.
Figure 6. Request for confirmation before resetting MosaicJ and its cache.
The menu [Abort] is used to abort the whole process of building a mosaic, after which the user is returned to ImageJ. This can also be
achieved by closing MosaicJ's window.
[Edit] Menu
Figure 7. Edit menu.
The menu [Select All] is active when at least one tile has been placed. It is not available when there are hidden tiles. Its purpose is to
select all the tiles and groups of tiles in the upper area of the screen.
The menu [Deselect] is active when at least one tile or group of tiles has been selected. Its purpose is to deselect all selected tiles or
groups of tiles.
The menu [Stow] is active when at least one tile or group of tiles has been selected. Its purpose is to deselect all selected tiles or
groups of tiles and to place them back in the lower area of the screen, so that they are still available but do not participate in the
construction of the final mosaic. Upon being stowed, all groups are dismantled and the tiles are individual again.
The menu [Forget] is active when at least one tile or group of tiles has been selected. Its purpose is to deselect all selected tiles or
groups of tiles and to remove them entirely from the mosaic. They can then be accessed again only through [Open File..] or [Open
Image Sequence...].
The menus [Nudge *] are active when at least one tile or group of tiles has been selected. Their purpose is to offer a keyboard- based
way to displace the tiles by one pixel at a time. The effective amount of displacement depends on the current magnification scale.
[Object] Menu
Figure 8. Object menu.
The menu [Send to Back] is active when at least one tile or group of tiles has been selected, and when the stacking order of all tiles is
such that some selected tiles may obscure unselected ones. Its purpose is to ensure that no unselected tile is obscured by the ones
that are currently selected.
The menu [Group] is active when at least two tiles or groups of tiles have been selected. Its purpose is to group tiles or groups of tiles
together. Once grouped, the selection outline of an unfrozen set of tiles becomes green (orange for frozen tiles), while the selection
outline of a single unfrozen tile is blue (red when the tile is frozen). In effect, a group behaves like a tile that would have an arbitrary
shape. A dialog message is displayed when grouping a combination of frozen and unfrozen tiles.
Figure 9. Dialog to determine the course of action when grouping a mixture of frozen and unfrozen tiles.
The menu [Ungroup] is active when at least one group of tiles has been selected. Its purpose is to break the group bonds, one
hierarchical level at a time. After completion of the [Ungroup] command, the individual group components are independent again and
remain selected.
The menu [Freeze] is active when at least one tile or group of tiles has been selected. Its purpose is to designate tiles over which no
automatic refinement of the rough position will take place. When the mosaic is been built, the frozen tiles will maintain their current
relative position. If one single tile of the whole mosaic is frozen, it will act as anchor and all the other tiles will align to it; if no tile is
frozen (default condition), the anchoring tile that is chosen is arbitrary; if several tiles are frozen, the closest unfrozen tiles will align to
them. The manual building of a mosaic is therefore achieved by freezing all tiles, in which case no automatic refinement takes place.
The menu [Unfreeze] is active when at least one tile or group of tiles has been selected. Its purpose is to designate tiles over which
the automatic refinement of the position will take place. By default, all tiles are unfrozen.
The menu [Hide] is active when at least one tile or group of tiles has been selected. Its purpose is to deselect and to hide the
currently selected objects from the upper part of the screen, so that the remaining objects can be operated upon. The spatial extent of
the mosaic is not affected by the hiding of tiles.
The menu [Show All] is active when there is at least one hidden object. Its purpose is to restore its visibility in the upper part of the
screen. The revealed objects remain unselected.
The menu [Maximize Contrast] is active when at least one tile or group of tiles has been selected. Its purpose is to map to black the
lowest grayvalue observed over the collection of selected tiles, and to white the highest one. The intermediate grayvalues are mapped
linearly between these two extremes. This contrast remapping is applied to the selected tiles. It affects only their display but has no
effect on the final mosaic.
The menu [Set Contrast...] is active when at least one tile or group of tiles has been selected. Its purpose is to map to black the userprovided 'Min' grayvalue, and to white the user- provided 'Max' grayvalue. These bounds are neither necessarily integers nor necessarily
positive, but 'Min' must be less than 'Max'; they are set in the dialog shown in Figure 10. The intermediate grayvalues are mapped
linearly between these two extremes, and out- of- bounds values are saturated. This contrast remapping is applied to the selected tiles.
It affects only their display but has no effect on the final mosaic.
Figure 10. Dialog to establish the range of displayed gray values.
The menu [Reset Contrast] is active when at least one tile or group of tiles has been selected. Its purpose is to enforce the generic
mapping where the value 0.0 corresponds to black and 255.0 to white. The intermediate grayvalues are mapped linearly between
these two extremes, and out- of- bounds values are saturated. This contrast remapping is applied to the selected tiles. It affects only
their display but has no effect on the final mosaic.
[Scale] Menu
Figure 11. Scale menu.
The menu [Minify] is always active. Its purpose is to reduce the size of the tiles by a linear factor two, so that large tiles can be
manipulated with more ease. The current scale is displayed as the last item of the [Scale] menu.
The menu [Magnify] is active unless the tiles are displayed at full scale. Its purpose is to magnify the size of the tiles by a linear factor
two, so that tiles can be manipulated with more precision. The current scale is displayed as the last item of the [Scale] menu.
The [{Activate/Deactivate} Quick&Dirty Scaling] menu determines the quality and speed of the reduction algorithm. Before quick&dirty
scaling is activated, like in Figure 11, the reduced tiles show good fidelity to the full- size tiles. Once quick&dirty scaling is activated,
the menu switches to [Deactivate Quick&Dirty Scaling]. In this condition, the reduction is performed faster, albeit with a lesser quality.
[Help] Menu
Figure 12. Help menu.
The menu [Credits] is always active. Its purpose is to present the text of Figure 13.
Figure 13. Credits.
The menu [Status] is always active. Its purpose is to offer a centralized access to the switches that control the behavior of MosaicJ.
These switches are summarized in Figures 14 to 17.
Figure 14. Import status.
Figure 15. Display status when there are no hidden files.
Figure 16. Display status when there are hidden files.
Figure 17. Export status.
Temporary files
The present plugin (MosaicJ) is used as a front- end to another plugin named TurboReg. Several mechanisms are at work to exchange
data between these plugins. One of them involves temporary files which are written into the temporary directory that ImageJ defines.
The location of this directory can be examined by issuing the macro command 'print(getDirectory("temp"));'. The names of the
written files are
MosaicJPreMosaic
MosaicJ*
where '*' is an integer number, sometimes followed by 'R', 'G', or 'B'. Warning: existing files of the same name in the temporary
directory may be silently overwritten.
V. Conditions of Use
You'll be free to use this software for research purposes, but you must not transmit and distribute it without our consent. In addition,
you undertake to include a citation or acknowledgment whenever you present or publish results that are based on it. EPFL makes no
warranties of any kind on this software and shall in no event be liable for damages of any kind in connection with the use and
exploitation of this technology.