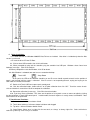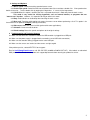
1
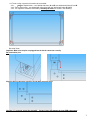
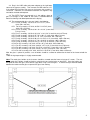
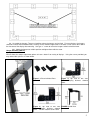
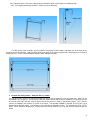
520 Shepherd Drive, Garland, TX 75042, USA Tel 1-800-624-4289 (US toll free) or 1-972-272-7555 Fax 972-272-7501 Email [email protected]
OPTIR Touch User’s Manual (32A Model)
Contents:
1. The Components
2. Standard Sizes
3. Available Packages
4. Frame Assembly
5. Custom Size Configuration – How to make it re-sizable
6. Driver Installation
7. Touch Screen Functions
8. Setting and Options
9. Troubleshooting and Technical Support
Introduction
OPTIR Touch - 32A Model (sensor board width 32 mm)
.
A creative solution for large-size touch interactive screens.
.
Standard sizes are from 26" to 65". Custom sizes are available up to 140". Simple USB interface, compatible with
Windows 7, Vista, XP, 2000, Intel Mac and Linux.
.
Advantages:
.
1. The sensor components can be reused and resized to different sizes and aspect ratios.
2. Maximum clarity - no added overlay except protection glass if needed.
3. Light touch - no pressure is needed, can be activated by finger, gloved hand or stylus.
4. High durability - 100% solid state electronics, no moving parts involved.
5. Do-it-yourself kit can be shipped at minimal cost comparing to shipping a large touch screen.
6. Flexible purchasing options: 1. components only for DIY assembly, or 2. framed segments (unassembled frames), or 3.
finished assembly with protective glass.
Update July 27, 2012
1
1. The Components: All measurements are in mm, 1 mm is approximately 0.04”. All circuit boards are 32 mm wide 9 mm
high.
Transmitter
Length
IRT-31
161.2
IRT-37
192.4
IRT-40
208
IRT-46
239.2
IRT-48
249.6
IRT-49
254.8
IRT-51
265.2
IRT-56
291.2
IRT-64
332.8
Corner
Length
IRC-00
35.4
* A universal external power adapter is included.
Receiver
IRR-31
IRR-37
IRR-40
IRR-46
IRR-48
IRR-49
IRR-51
IRR-56
IRR-64
Controller*
IRM-64
Length
161.2
192.4
208
239.2
249.6
254.8
265.2
291.2
332.8
Length
332.8
2. Standard Sizes: All measurements are in mm, 1 mm is approximately 0.04”. Maximum tolerance = +/- 2mm.
Diagonal Size 16:9 ratio
Typical Display Area
Active Area
PCB Outside Area
Frame Size
26”
576 x 324
582.4 x 332.8
653.2 x 403.6
657.2 x 407.6
30”
665 x 374
665.6 x 369.2
736.4 x 440
740.4 x 444
32”
709 x 399
702 x 400.4
772.8 x 471.2
776.8 x 475.2
37”
820 x 461
821.6 x 462.8
892.4 x 533.6
896.4 x 537.8
40”
886 x 499
889.2 x 504.4
960 x 575.2
964 x 579.2
42”
930 x 524
930.8 x 525.2
1001.6 x 596
1005.6 x 600
46”
1019 x 573
1024.4 x 577.2
1095.2 x 648
1099.2 x 652
47”
1041 x 586
1040 x 587.6
1110.8 x 658.4
1114.8 x 662.4
50”
1107 x 623
1118 x 624
1188.8 x 694.8
1192.8 x 698.8
52”
1152 x 648
1154.4 x 650
1225.2 x 720.8
1229.2 x 724.8
55”
1218 x 685
1222 x 691.6
1292.8 x 762.4
1296 x 765.6
60”
1329 x 748
1331.2 x 748.8
1402 x 819.6
1406 x 823.6
65”
1439 x 810
1430 x 806
1500.8 x 876.8
1504.8 x 880.8
103” (special order)
2269 x 1276
2272.4 x 1284.4
2343.2 x 1355.2
2347.2 x 1359.2
* Custom sizes can be arranged. Maximum size 140”.
* USB interface. Resolution 4096 x 4096. Compatible with Windows, Mac, Linux.
* Components for making 103” model are special type, so a special order is required.
3. Available Packages:
3.1. Components Only: Customers can purchase the components only for their own integration. Upon receiving the
active area dimensions from customer, we will assemble the components to be as close as possible to the dimensions
specified and test the functionality. A configuration drawing will be generated for customer to follow to complete the
assembly. Each circuit board will be labeled with serial number and packed into a box.
3.2. Framed Segments are unassembled frames. Customers can purchase the frame segments which already have the
components assembled inside. When they receive the segments, they will just need to join the 4 segments with corners as
labeled. They can also add a piece of glass or Plexiglas to the back of the frame for protecting the display and optimizing
the functionality. The IR filter is included with frame. See section 4 for assembly instruction.
3.3. Assembled Frame: The IR touch screen is fully assembled as shown in the following picture, except the hangers
will be installed by the customer to the desired position. A piece of tempered glass is mounted at the back of the frame.
4. Frame Assembly:
4.1. The frame assembly includes the following parts:
The screws:
Type “a” Screws for the frame assembly – 3mm x 4mm.
Type “b” Screws for the backing glass holders – 3mm x 6mm.
Type “c” Screws for installing hangers to frame – 3mm x 8mm.
Type “d” Screws for connecting 3 hanger pieces – 4mm x 6mm
Rivets, Velcro Pads, Rubber Pads, Metal Glass Holders, 3-pc Hangers (IRH-3P), USB Cable , Power adapter.
2
4.2. There are four segments that need to be assembled:
Two shaped frames – one labeled with letters A and B, one labeled with letters C and D.
4.2.1.
4.2.2. Two straight frames - one labeled with letters A and C, one labeled with letters B and D
4.2.3. The segments should be connected by matching the letters as shown in the following:
(Backside View)
Important: Make sure the pins are plugged into the female connector correctly.
Do not bend the pins.
Align the pins to connector carefully, do not apply excessive force.
Use type “a” screws to secure the assembly. Longer screws will damage the inner PCB components
3
4.3. Plug in the USB cable and power adapter to the right-lower
corner of the frame assembly. Then connect the USB cable to a PC.
If the yellow LED first blinks then stays on, that means the assembly is
successful. Otherwise, the connections between the segments may
need to be checked and adjusted.
4.4. The OPTIR Touch can now work as is, but adding a piece of
glass or Plexiglas in the middle of the frame is recommended for
better functionality and added protection to the display.
4.5. The recommended glass sizes are listed in the following:
4.5.1. For 26” assembly: 1/8” thick, 23 3/8 x 13 1/2” ( 3 mm
thick, 594 x 343 mm).
4.5.2 For 30” assembly: 1/8” thick, 26 5/8 X 14 15/16" (3mm
thick, 676 x 379 mm).
4.5.3. For 32” assembly: 1/8” thick, 28 1/16 x 16 1/8” (3 mm thick,
712 x 411 mm).
4.5.4. For 37” assembly: 1/8” thick, 32 13/16” x 18 11/16” (3 mm thick, 833 x 475 mm).
4.5.5. For 40” assembly: 1/8” thick, 35 7/16” x 20 1/4” (3 mm thick, 900 x 514 mm).
4.5.6. For 42” assembly: 1/8” thick, 37 x 21 1/16” (3 mm thick, 941 x 536 mm).
4.5.7. For 46” assembly: 1/8” thick, 40 3/4” x 23 3/16” x 1/8” (3 mm thick, 1035 x 589 mm).
4.5.8. For 47” assembly: 1/8” thick, 41 7/16 x 23 9/16” (3 mm thick, 1053 x 598 mm).
4.5.9. For 50” assembly: 3/16” thick, 44 1/2 x 25 1/16” (5 mm thick, 1130 x 637 mm).
4.5.10. For 52” assembly: 3/16” thick, 45 7/8 x 26” (5 mm thick, 1165 x 660 mm).
4.5.11. For 55” assembly: 3/16” thick, 48 9/16” x 27 11/16” ( 5 mm thick, 1233 x 703 mm).
4.5.12. For 60” assembly: 3/16” thick, 52 15/16” x 29 15/16” ( 5 mm thick, 1345 x 760 mm).
4.5.13. For 65” assembly: 3/16” thick, 56 3/4 x 32 3/16” (5 mm thick, 1441 x 818 mm).
4.5.14. For 103” assembly: 3/16” thick, 89 15/16” x 50 15/16” (5 mm thick, 2286 x 1296 mm).
After the glass is placed in position, a set of holders should be screwed or adhered to the back of the frame to hold the
glass.
* Note: Using tempered glass is highly recommended.
Note: The metal glass holders at the 4 corners should be screwed onto the frame using type “b” screws. The rest
of the metal glass holders should be fixed by using black rivets into the holes on the frame. Since the holders are
designed for 5mm thick glass, there will be a gap when using 3 mm thick glass. A 2mm thick tape should be added
between the holder and the glass to prevent the glass from moving.
4
4.6. Assemble the hangers: There are 4 positions where the hangers can be fixed. For most displays, the hangers
should be inserted into the bottom holes, but they can be moved to upper holes if the touch screen seems to be above
the view area of the display after mounting. Use type “c” screws to secure the hangers to the back of the frame.
4.6.1. Adjust the hangers to suitable position and tighten them with the screw.
Hanger Assembly (IRH-3P)
IRH-3P allows for multiple adjustment options to have a better fit on variety of displays. Using the screws provided, you
may connect the 3-pieces as shown below:
(Figure 1) 3-Piece Individual Parts.
(Figure 3) Top view of one side.
Maximum display thickness allowed:
70mm.
(Figure 2) Top view of one side. (FIGURE 4) Side View.
Minimum display thickness allowed:
45mm. “FRONT” attaches to IR Frame.
5
4.6.2. Hang the touch screen on the display and assemble the other set of hangers to suitable position.
4.6.3. The completed mounting structure is shown here in the following:
4.7. After finishing the assembly, you may add the Velcro pads to the hangers and lower part of the back of the
frame to secure the mounting. Add the rubber pads to the back of the frame to prevent the scratching on the surface of
display housing. Please see the following sketches about adding those pads:
5. Custom Size Configuration – How to make it re-sizable
The rule of thumb is all the parts with part number that can be evenly divided by 4 are re-sizable parts, which can be
assembled in any sequence. For those parts with part number that cannot be evenly divided by 4, only one piece can
be used on each side, and they must be placed next to the corner as shown in the following figure. The 3 corners
must be assembled in the positions as shown in the figure. The controller IRM64B is required, and a IRT-64 is also
required at the opposite frame. The following is the assembly configuration of 103”. The components IRT31, IRT37,
IRR31, IRR37 cannot be divided by 4, so only one piece can be used on each side and must be placed next to the
corner.
6
6. Driver Installation:
6.1. A USB controller and Windows 2000/XP/Vista/7 driver are included.
version is purchased.
Mac driver is included only when the Mac
6.2. Insert the driver CD into CD Rom.
6.3. Click to select USB controller, then click install button.
6.4. When prompted for plug into the controller, plug the controller into USB port. Windows shows “found new
hardware” message. Click OK to continue.
6.5 When prompted for restart the Windows, click OK to reboot.
6.6. After Windows is rebooted, two new icons are created on desktop.
Touch USB
Swap Button
At this point, the LED on the controller should be on and IR screen should respond to touch, but the position of
touch is not accurate until the screen is calibrated. If the IR screen is not responding to touch, unplug and re-plug in the
USB cable to re-initiate the controller.
6.7. Double click Touch USB icon to open touch control panel.
6.8. Click the calibration button, choose either 5 or 25 point calibration then click ‘GO!’ Touch the center of each
circle and hold for 2 seconds then lift off to complete the calibration.
6.9. Repeat the calibration if necessary. Click OK to close the window.
6.10. If you have Vista or Windows 7 OS, there are the options of using touch screen as mouse or tablet by clicking
the desired button in Touch USB control panel. In tablet mode, the touch response is usually slower, but Windows 7 dual
touch feature can be performed.
7. Touch Screen Functions:
7.1. Screen touched = left mouse button clicked
7.2. Touch down and drag = left mouse button held down and dragged
7.3. Tap twice = left mouse button double clicked
7.4. Swap Button: Select ‘once’ to right-click for one touch, or ‘always’ to always right-click. Select minimize to
reduce to system tray. Click in tray as a shortcut!
7
8. Settings and Options:
8.1. Mouse speed: Control the tracking speed of mouse cursor.
8.2. Double click speed: Control the time interval between two clicks to activate a double click. Slow speed makes
double click easier. Test the double click by tapping the K logo twice. If successful, the logo rotates.
8.3. Lift Off: When this option is enabled, the click is activated when touch is lifted away from the touch screen.
This mode is very useful for clicking hyperlinks, such as Internet browser, or programs that use
“mouse- over” function. However, it is impossible to drag or draw in this mode.
8.4. Beep: Enable/disable an audio beep when touching the touch screen.
8.5. Move only: Touching and dragging only moves the mouse cursor without performing a click. This option is for
those who have an optional click pen (currently unavailable).
8.6. Hide cursor: Makes the cursor invisible (preferred for some applications).
8.7. Uninstall: Click to uninstall the driver.
8.8. Default setting: Return the speeds and options to the original settings.
9.
Troubleshooting and Technical Support:
9.1. Make sure the driver was installed first before the USB controller is plugged into a USB port.
9.2. Make sure the power supply is plugged into the controller (next to USB cable connection).
9.3. Make sure the controller always plugged into the same USB port.
9.4. Make sure the sensors are leveled, and the corners are right angled.
If the problem persists, contact KEYTEC’S tech support:
Email to [email protected] or call 972-272-7555 (8:30AM to 5:00PM CST M-F). Must obtain an authorized
RMA (return merchant authorization) from tech support department before returning the product for service.
8