1
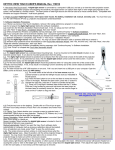
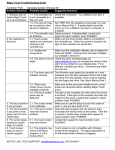
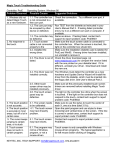
1. Please read the instructions carefully.
Improper installation may cause permanent damages, which may not be covered by the warranty.
2. Check all the parts in the package against the following parts list.
One Digital Light Sensor (Part No. VT-DC1)
One Dual Level Laser Pen (Part No. VT-LP1)
One Tabletop Tripod (Part No. VT-TP1)
One Installation CD (VT-CD1)
One User’s Manual (Part No. VT-UM1)
Two AA Batteries
One Warranty Card
3. Minimum System Requirements:
PIII 850MHz CPU , 128MB RAM, CD ROM, 1 Mb Hard Drive Space, USB port, Windows 98/2000/XP.
4. Software Installation:
Insert the installation CD into your computer’s CD ROM.
Click Install View Touch.
Installation starts.
Click Next.
Click Finish.
Click Yes.
Click Yes. Note: Windows 98 may require to reboot computer after DirectX installation.
Click OK and EXIT.
View Touch” and “View Touch Pen” icons are added on the desktop.
Now, plug the digital light sensor into USB port.
In Windows XP:
Check either option, and then click Next.
Click Continue Anyway.
Click Finish. Continue to 5. Set Up and Calibration.
In Windows 2000:
Click Yes. Continue to 5. Set Up and Calibration.
In Windows 98:
Click Next.
Click Next.
Click Next.
Click Finish. Continue to 5. Set up and Calibration.
5. Setup and Calibration:
The digital light sensor can be mounted on the tabletop tripod (included) or any kind of camera tripod, or clip on a notebook
computer or mounted on the ceiling.
on tripod
on notebook
If you use the tabletop tripod provided, loose the black knob and turn the mounting head to the side way. Mount the digital light
sensor onto it as shown above.
Double click the View Touch icon to open the setup and calibration screen.
Position the digital light sensor by adjusting the distance and angle until the entire displayed image is within the center of picture-inpicture window.
The digital light sensor can be rotated horizontally to view left and right, and tilted vertically to view up and down, but the level needs
to be adjusted from the tripod after loosing the black knob.
Although it is preferable to do the setup and calibration in a dimmer room, it is not strictly required. As long as there is no strong
lighting interference in and around the area of the displayed image, the setup can be done successfully.
If the image keeps flashing, it is usually caused by the unstable light source, such as sunlight going through the window or glass
door, or there is a ceiling fan near the screen. Even with this kind of interference, the setup can be accomplished unless the
intensity of this light source is too strong.
Slight keystone effect does not affect the accuracy of View Touch calibration. The digital light sensor can be set at +/- 15 degree
angle horizontally or vertically from the center point of the displayed image.
To make sure the entire image is viewed by the digital light sensor, it is recommended to use the laser pen to point at 4 extreme
corners of the image and see if the bright spots can be seen within the picture-in-picture window, as shown in the following.
Make sure the sensitivity bar at right is set at minimum. Click Calibration. Wait until you see the following pattern in the window.
If you don’t see all the complete pattern, it is either the digital light sensor cannot see the entire
image or the light is too strong and “washes off” the image. Click Reset and do the necessary
adjustments, then click Calibration again. To do the calibration, use mouse to move and place
the cursor at the center of each cross point, then click the left mouse button. A cross will be
placed over the cross point upon clicking. For front projection or display monitors, start from
the left-upper corner and follow the sequence as shown.
>>>
<<< For rear projection, start with the right-upper corner and follow the sequence as shown.
After all the 9 cross points have been clicked, you will be prompted for whether you accept this
calibration. If you think you did not click each point very accurately, then click no and redo the
calibration. Otherwise, click yes. Note: After the calibration, the image in window turns dark. If
you need to adjust the digital light sensor position, click Reset to brighten the image.
If all the settings remain unchanged, next time when you start the View Touch, you may just click
Load Calibration, and the last calibration data will be loaded.
After calibration, you will need to set the sensitivity level for the laser pointer.
The brighter the room, the higher the sensitivity needs to be set. However, when
the sensitivity is set too high, the performance may become unstable. In general, start testing from the middle
point setting is recommended. The sensitivity bar can be controlled by mouse and keyboard up/down arrow keys
(useful for fine tuning). After the sensitivity level is set, point the laser pointer provided to the image and press on
switch B to see if the mouse cursor follows the laser light spot. If it doesn’t, then the sensitivity needs to be
increased. If it does, move the laser pointer around the image screen
and see if the cursor is following smoothly. If the cursor movement is
jumpy, then the sensitivity needs to be increased. Also check the
accuracy of cursor position versus laser spot. If it is not accurate
enough, redo the calibration.
After the switch B is tested. Turn on switch A only, a smaller and
weaker laser spot is emitted; which is a guiding light and not supposed
to activate the mouse cursor. Move the laser pointer around the image screen and see if the cursor reacts to it. If it does, the
sensitivity needs to be decreased.
Once the switch A and switch B function correctly and the accuracy is satisfactory, the View Touch is ready for operation. Click
Minimize to minimize the setup screen. If you need to bring up the setup screen again, double click the View Touch icon on the
desktop , or right mouse click on the View Touch icon at the bottom task bar and select maximize.
6. How to use View Touch
Set the double click speed to the slowest in the mouse control panel for ease of activating the double click. Press switch A to turn
on the guiding light. Please remember to turn it off after use. Aim the target with guiding light, then press switch B to activate the
mouse movement and click. For dragging, hold down the switch B and move the laser pointer. You may practice
from short distance first, and then gradually increase the distance. For rear projection user, you may point the laser
directly onto the screen. If the surface of the screen tends to adsorb or diffuse the laser light, using a red LED may
solve the problem, but you need to point the LED directly onto the screen.
After a little practice, you will learn to use the View Touch like a wireless remote mouse control.
The utility software, View Touch Pen, is designed as a presentation tool. Double click the View Touch Pen icon to
open it. Click on the mouse button, it extends into 6 more buttons. The two arrow buttons are used for power point
slide show to forward and backward the slides. The swap mouse button is used to swap the left mouse
click to right-mouse click. Click the X to close the program.
>>>
<<< Click on the pen button, it extends into more functional buttons for annotation purpose. There are 4
colors to choose from. You can use it to draw, mark and write on the screen. Click on the save button
to save the entire screen as a snap shot in BMP format. Other buttons perform the undo, redo and
delete functions. Please note when in the pen mode, the mouse click function is disabled. Click the
arrow button at the bottom to return to mouse control functions.
The View Touch can be used in conjunction with other useful utility software such as on-screen keyboard
and writing recognition programs. It can also be used concurrently with KEYTEC’S Magic Touch
screens for writing/drawing enhancement. (more information available at www.magictouch.com)
7. Troubleshooting
7.1. Error message when opening View Touch: No video capture device was detected on your system.
* Check and make sure the digital light sensor is connected to your computer’s USB port (the green light
on the digital light sensor indicates a good connection).
* If your View Touch is already running, do not double click the icon on desktop to reopen it. Use the mouse right click
to maximize the View Touch icon at the bottom of the task bar.
* If you use a USB extension cable, make sure it is specified for the length that you extend it to.
7.2. Can not see all the calibration dots:
* If one of more of the dots at the edge or corner is missing, you may need to adjust the digital light sensor angle or
increase the distance between digital light sensor and the screen in order to view the entire screen.
* If some dots are covered by white color and cannot be seen, it is cause by the lighting problem. Try to dim the lights
and reset.
7.3. The cursor is stuck to the edge of the screen:
* Check if there is any reflective material (such as metal frame) or some lights (such as the indicator LED). Cover them
if any.
7.4. The cursor is stuck in the middle of the screen:
* Check if there is a bright spot caused by the projector. Adjust the angle or change the fabric of the screen to avoid
this kind of problem.
7.5. Can not see the guiding light:
* The guiding light is weak. It takes a little while for your eyes to get used to it. It is more visible in dimmer room and on the screen
color that has good contrast to the red.
7.6. The mouse control function is not sensitive enough:
* Check if the ambient lighting condition is changed.
* Check if the batteries need to be replaced.
* Adjust the sensitivity bar to optimize the performance.
7.7. The View Touch is not sensitive on part of the screen:
* Check if the digital light sensor has been set up at an angle greater than 15 degrees from the center point of the screen.
7.8. The View Touch stop responding after I change the display resolution, or the display resolution is changed by certain program:
* Maximize the View Touch from the bottom task bar, and test it with laser pointer. If mouse follows, minimize the View Touch. If
mouse does not follow, exit the View Touch. Unplug the USB cable and plug it back in. Start the View Touch and click Load
Calibration.
For assistance, please contact KEYTEC: Email: [email protected] Tel: 800-MAGIC-89 or 972-2348617 Fax: 972-2348542.