1
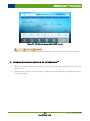
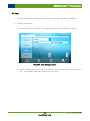
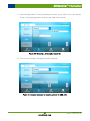
I AllInOneCyclerTM / Thermal Block I Bioneer Corporation 8-11, Munpyeongseo-ro, Daedeok-gu, Daejeon, 34302, Republic of Korea Tel: +82-42-930-8777 Fax: +82-42-930-8688 Email: [email protected] www.bioneer.com www.bioneer.com BQ-042-101-01 Revision : 0(2012-12-07) AllInOneCyclerTM / Thermal Block AllInOneCycler™ www.bioneer.com BQ-042-101-01 Revision : 0(2012-12-07) AllInOneCyclerTM / Thermal Block Contents I. Getting Started ............................................................................................................... 1 II. Symbols on the AllInOneCycler™....................................................................................... 3 III. Safety Warnings and Precautions ....................................................................................... 5 1. User and experimental precautions ......................................................................... 5 2. Precautions regarding the electrical environment ........................................................ 5 3. Precautions regarding the operation environment ........................................................ 6 4. Precautions and warnings regarding instrument installation ........................................... 7 5. Precautions and warnings regarding instrument operation ............................................. 7 6. Precautions and warnings regarding product usage and maintenance .............................. 7 7. Precautions regarding moving and lifting instrument .................................................... 8 8. Warnings regarding biological and chemical hazard safety ............................................ 8 IV. System Components and Specifications ........................................................................... 10 1. System Components ........................................................................................ 10 2. Specifications ................................................................................................. 12 3. System Views ................................................................................................. 13 TM Installing the AllInOneCycler V. ......................................................................................... 14 1. Site Requirements ............................................................................................ 14 2. Required Materials............................................................................................ 14 3. Unpacking the AllInOneCycler TM ........................................................................... 14 TM ........................................................................... 15 4. Setting Up the AllInOneCycler 5. Power ON ...................................................................................................... 16 TM VI. Operating the AllInOneCycler ........................................................................................ 17 1. Loading Samples into the Instrument..................................................................... 17 2. Home menu ................................................................................................... 18 3. Editing Protocols ............................................................................................. 19 4. Running the PCR protocols ................................................................................. 36 5. Removing the tubes or plate from the AllInOneCycler 6. Setting menu .................................................................................................. 39 7. About menu ................................................................................................... 47 8. Network Operating AllInOneCycler ...................................................................... 48 TM .............................................. 38 TM VII. Troubleshooting ............................................................................................................ 55 VIII. User Maintenance ......................................................................................................... 58 1. Cleaning the main body ..................................................................................... 58 2. Cleaning the Hot-top Cover ................................................................................ 59 3. Replacing Fuses .............................................................................................. 59 4. Returning an AllInOneCycler TM for Service ............................................................... 61 IX. Warranty ...................................................................................................................... 62 www.bioneer.com BQ-042-101-01 Revision : 0(2012-12-07) AllInOneCyclerTM / Thermal Block I. Getting Started Thank you for purchasing this Bioneer product. We will try our best to provide satisfactory results to our customers. This manual contains practical guidelines and cautions to be taken regarding the instrument. Please read this manual carefully and thoroughly before using the instrument. Website Please visit us online at http://www.bioneer.com to obtain more information about AllInOneCyclerTM. General information AllInOneCyclerTM is a trademark of Bioneer Corporation. The information contained in this manual is under copyright protection. It is unlawful to reproduce part or all of the contents of this manual without the expressed written consent of Bioneer Corporation. Bioneer Corporation reserves the right to alter, modify and otherwise make changes to the instrument and manuals without prior notice. You must use the supplied accessories and tubes. AllInOneCyclerTM can be used multi system use to PC software. Safety Labels Description on the AllInOneCycler™ English Do not touch the surface. It is extremely hot. Francais Surface chaude Faites attention à la surface chaude. English Do not operate the bath on at low temperature for a long time. This will produce condensation, which may cause malfunction. Francais Ne pas utiliser le bain à basses températures pendant plusieurs heures. Risque de condensation pouvant entrainer des fonctionnements défectueux de l’équipement. English Be aware of the door moving. This may cause injury. Francais Manipulation de la porte Risque de blessures corporelles (pincement/écrasement) lors de l’ouverture/fermeture de la porte. 1 www.bioneer.com BQ-042-101-01 Revision : 0(2012-12-07) AllInOneCyclerTM / Thermal Block About the AllInOneCycler™ AllInOneCyclerTM Thermal Block is a multifunctional, peltier-based thermal block, equipped with a temperature control system. AllInOneCycler TM Thermal Block has various functions including temperature increment, time increment and ramp rate control. This system is compact in size and light weight for easy storage and moving. It has user friendly interface with TFT-LCD touch screen to allow users to program easily and conveniently. AllInOneCycler TM Thermal Block also can be controlled with optional PC software which is supplied separately. AllInOneCycler TM is equipped with communication functions between PC and instrument using TCP/IP protocol, providing full operations from a remote location. Users can create PCR protocols on computer that can be loaded onto instrument at a later time. Intended purpose Amplification of specific DNA that is included in samples. 2 www.bioneer.com BQ-042-101-01 Revision : 0(2012-12-07) AllInOneCyclerTM / Thermal Block II. Symbols on the AllInOneCycler™ Symbols on the AllInOneCycler™ user manual The following table describes the symbols that may be displayed on AllInOneCycler TM user manual. Conformité Européenne Mark In vitro diagnostic medical device Temperature limitation Manufacturer Authorized representative in the European Community Catalog number Safety Symbols on the AllInOneCycler™ TM The following table describes the safety symbols that may be displayed on AllInOneCycler . Each symbol may appear by itself or with text that explains the relevant hazard. Do not touch the surface. It is extremely hot. Do not operate the bath on at low temperature for a long time. This will produce condensation, which may cause malfunction. Be aware of the door moving. This may cause injury. 3 www.bioneer.com BQ-042-101-01 Revision : 0(2012-12-07) AllInOneCyclerTM / Thermal Block Electrical Symbols on the AllInOneCycler™ TM The following table describes the electrical symbols that may be displayed on the AllInOneCycler . Indicates the On position of the main power switch. Indicates the Off position of the main power switch. Indicates a protective grounding terminal in the instruments that must be connected to earth ground. Indicates a terminal that can receive or supply alternating current or voltage. Indicates a terminal that can receive or supply alternating or direct current or voltage. Environmental Symbols on the AllInOneCyclerTM The following symbol (WEEE) applies to the AllInOneCycler TM placed on the European market. Do not dispose of AllInOneCycler™ as unsorted municipal waste. Follow local municipal waste ordinances for proper disposal provisions to reduce the environmental impact of waste electrical and electronic Instrument. European Union customers: Call your local Europe office for Bioneer instruments pick-up and recycling. 4 www.bioneer.com BQ-042-101-01 Revision : 0(2012-12-07) AllInOneCyclerTM / Thermal Block III. Safety Warnings and Precautions The warnings and precautions stated below are for the correct and safe operation of the instrument. Please heed all information for your safety. Bioneer Corporation does not assume responsibility for non-compliance with the safety warnings and precautions stated below. Warning: Hazards or dangerous actions that may result in severe injury. Caution: Hazards or dangerous actions that may result in minor injury or damage. Warning: Hazards or dangerous actions that may result in burn. Danger: Hazards or dangerous actions that may result in electric shock. 1. User and experimental precautions (1) Make sure that the power supply (100-240VAC, 50/60Hz) is correctly connected to the power cord and that the power cord is correctly connected to the instrument. Incorrect connection of the power cord can result in instrument damage or failure to turn on. (2) This instrument is intended for nucleic acid amplification. Please use as such. (3) The instrument may stop if the LCD panel is touched while connected to a PC via LAN cable. If operating the instrument via PC software, please allow for the instrument to finish its programmed movement before operating the LCD panel. (4) Do not turn the PC off or disconnect the LAN cable connecting the PC to the instrument while instrument is running. Data communication error can result in instrument malfunction and can affect the results of your experiment. (5) Please install the instrument on a flat surface. (6) Do not operate the instrument with wet hands as this may result in shock or instrument malfunction. Please touch the power cord with dry hands. (7) If you make a mistake such as using an improper accessory, or force the instrument to stop during a normal operation, the instrument may stop working. (8) Avoid placing objects in the front and rear of the instrument, as fan blockage may cause lowered efficiency of the Cooling Block. (9) Be careful not to have any obstructions or foreign materials introduced into the front, rear and side Cooling Fan mesh. Foreign objects can hinder normal Cooling Fan operation and may lead to overheating of parts or cause a fire. 2. Precautions regarding the electrical environment (1) If the power cord is loose, do not use the instrument. Power cord overheating may result in 5 www.bioneer.com BQ-042-101-01 Revision : 0(2012-12-07) AllInOneCyclerTM / Thermal Block shock or fire. (2) Do not operate multiple instruments out of a single wall outlet. The load may cause overheating and may lead to fire. (3) When plugging or unplugging the power cord from a wall outlet, make sure your hands are completely dry. Wet or moist hands may cause electric shock. (4) A convenient and safe power cord should be available. The power cord provided by our company should be used. (5) Socket outlets should be at least 1.5 m from a sink or wash basin. (6) Power cord cable should not be repaired with insulating tape. Water can still get inside. (7) If you use other power cord, it should be adequate for the electrical capacity for the AllInOneCyclerTM (250V, 16A, 0.75 mm2, VDE). (8) Plugs should match the socket outlets. (9) Unplug the power cord from the AllInOneCycler TM when not in operation for a long period of time to prevent the possibility of fire by overheating. (10) AllInOneCycler TM is equipped with a 3-conductor AC power cord that, when connected to an appropriate AC power outlet, grounds (earths) the instrument. To preserve this protection feature, do not operate the instrument from an AC power outlet that has no ground (earth) connection. (11) Improper fuses or high-voltage supply can damage the instrument wiring system and cause a fire. Before turning on the instrument, verify that the fuses are properly installed and that the instrument voltage matches the power supply in your laboratory. (12) For continued protection against the risk of fire, replace fuses only with fuses (250V,F10AL, 2ea) of the type and rating specified for the instrument. 3. Precautions regarding the operation environment (1) Avoid placing objects from every which direction the instrument. (2) Avoid installing the instrument in a dusty environment. Excessive dust may cause malfunction or damage to the instrument. (3) Avoid installation near heat sources. This can cause fire. (4) Avoid installation near sources of water or damp locations. This can cause electrical shock, fire or instrument malfunction. (5) Do not install near sources of flammable or corrosive gas. If there is a gas leak, do not touch the power plug but open a window to circulate fresh air. Sparks from the power plug can cause fire and explosions. (6) Do not disassemble or modify the instrument in any way. This can result in fire, electrical shock or malfunction, and also voids your warranty. 6 www.bioneer.com BQ-042-101-01 Revision : 0(2012-12-07) AllInOneCyclerTM / Thermal Block 4. Precautions and warnings regarding instrument installation (1) This is a precision instrument. Do not install in a location exposed to direct sunlight. (2) Install the instrument on a flat, solid surface that is flat and does not move. (3) When installing the instrument, make sure at least 15 cm separate the instrument from the nearest wall. TM (4) When connecting the PC, network hub and AllInOneCycler , do so with all involved components powered off. Connecting components while the power is on may cause damage to the instrument. (5) Verify the network cable integrity when connecting between the PC, network hub and AllInOneCyclerTM. Unstable network connections may result in invalid experimental data from data communication errors. 5. Precautions and warnings regarding instrument operation (1) Dust off the power plug and insert the plug so that the connection is firm and does not wiggle. Incomplete electrical contacts may cause fire. (2) Operate the instrument in an ambient temperature range of 15℃~30℃(59~86℉). Excessive exposure to heat may affect the instrument and yield inexact results. (3) Operate the instrument within the recommended humidity range (20~80%, no condensation). Humid conditions may cause corrosion or malfunction. (4) Do not place any objects next to or behind the instrument. The instrument may malfunction. (5) This instrument contains precision machined parts. Do not drop or severely agitate the instrument. This can break the instrument and compromise the safety of the product. (6) When not using the instrument for a long period of time, turn the instrument off and unplug from the wall outlet. Overheating and fire may occur. (7) Set your PC's Power Options for 'Turn off the display', 'Turn off the hard disk', 'Standby mode' and 'Sleep mode' to 'Never'. Because the instrument continuously transmits and receives data from the PC, hard disk power-down may cause malfunctions. (8) Do NOT open the door during instrument’s operation as this may result in the instrument to malfunction, causing bodily harm, including burns to hands or body. (9) Moving parts can crush and cut. Keep hands clear of moving parts while operating the instrument. 6. Precautions and warnings regarding product usage and maintenance 7 www.bioneer.com BQ-042-101-01 Revision : 0(2012-12-07) AllInOneCyclerTM / Thermal Block (1) This product must only be used for nucleic acid amplification. Do not use the instrument for any use other than explicitly stated in the User Guide. (2) You must use the supplied accessories and tubes. (3) Do not modify or delete instrument-related information installed within the instrument. (4) Operate the LCD touch-screen using a non-sharp object. Nails and other sharp objects may damage the product. (5) Do not use powerful detergents or solvents to clean the outside of the instrument as this may cause discoloration. If such chemicals are spilled on the instrument, immediately clean with a soft cloth. (6) Do not keep the instrument in an environment with high humidity. Damage from storage in these conditions is classified as water damage and is not covered by warranty. Also, damage arising from this type of exposure may be irreparable. (7) Disassembly and/or modification of the instrument voids the warranty and the instrument may be refused service. (8) Do not unplug the power cord from the instrument while the instrument is in use. This may cause the instrument to malfunction. (9) If a burning smell is detected or the instrument seems to be excessively hot during operation, immediately stop using the instrument and call your service representative. (10) Do not drop or impact the instrument. This is a direct cause of instrument damage and may void the warranty. 7. Precautions regarding moving and lifting instrument (1) The instrument is to be moved and positioned only by the personnel or vendor specified in the applicable site preparation guide. If you decide to lift or move the instrument after it has been installed, do not attempt to lift or move the instrument without the assistance of others, the use of appropriate moving Instrument, and proper lifting techniques. (2) Improper lifting can cause painful and permanent back injury. Depending on the weight, moving or lifting an instrument may require two or more persons. 8. Warnings regarding biological and chemical hazard safety (1) Biological samples such as tissues, body fluids, and blood of humans and other animals have the potential to transmit infectious diseases. Follow all applicable local, state/provincial, and/or national regulations. Wear appropriate protective eyewear, clothing, and gloves. (2) Before handling any chemicals, refer to the Material Safety Data Sheet (MSDS) provided by the manufacturer, and observe all relevant precautions. 8 www.bioneer.com BQ-042-101-01 Revision : 0(2012-12-07) AllInOneCyclerTM / Thermal Block (3) Always determine what chemicals have been used in the instrument before changing reagents or instrument components. Wear appropriate eyewear, protective clothing, and gloves when working on the instrument. (4) Read and understand the Material Safety Data Sheet (MSDS) provided by the chemical manufacturer before you store, handle, or work with any chemicals or hazardous materials. (5) Minimize contact with chemicals. Wear appropriate personal protective Instrument when handling chemicals (for example, safety glasses, gloves, or protective clothing). 9 www.bioneer.com BQ-042-101-01 Revision : 0(2012-12-07) AllInOneCyclerTM / Thermal Block IV. System Components and Specifications 1. System Components TM Figure 1. System components of the AllInOneCycler 10 www.bioneer.com BQ-042-101-01 Revision : 0(2012-12-07) AllInOneCyclerTM / Thermal Block TM Table 1. System components of the AllInOneCycler Part Name TM AllInOneCycler Cat. No. Qty. PCR system (Basic) AllInOneCyclerTM 96 well PCR system* TM (Optional) AllInOneCycler 384 well PCR system (Optional) AllInOneCyclerTM Slide PCR system TM (Optional) AllInOneCycler Fast 96 well PCR system (Optional) AllInOneCyclerTM Fast 384 well PCR system TM (Optional) AllInOneCycler Fast Slide PCR system A-2041-1N 1 ea A-2041-2N A-2041-3N A-2041-1F A-2041-2F A-2041-3F AllInOneCyclerTM thermal block (Basic) AllInOneCyclerTM 96 well thermal block only* A-2041-1-1 TM A-2041-2-1 (Optional) AllInOneCycler 384 well thermal block only (Optional) AllInOneCyclerTM Slide thermal block only A-2041-3-1 TM A-2041-1-2 (Optional) AllInOneCycler Fast 96 well thermal block only (Optional) AllInOneCyclerTM Fast 384 well thermal block only TM (Optional) AllInOneCycler Fast Slide thermal block only 1 ea A-2041-2-2 A-2041-3-2 User’s Guide 1 ea Power Cord 1 ea (Optional) AllInOneCyclerTM PC control software A-2041-9 * AllInOneCyclerTM 96 well PCR system (A-2041-1N) is basic model and includes AllInOneCyclerTM 96 well thermal block (A2041-1-1). 11 www.bioneer.com BQ-042-101-01 Revision : 0(2012-12-07) AllInOneCyclerTM / Thermal Block 2. Specifications Physical specifications 246 mm(W) x 232 mm(H) x 369 mm(D) Dimension 9.68 in(W) x 9.14 in(H) x 14.53 in(D) Weight 8.4 kg (18.52 lbs) Display 7-inch Touch LCD screen 100-240 V~, Max 8.5 A, 50/60 Hz Power consumption Port 630 VA 2 USB ports for storage (front and lower rear) * 1 USB port for engineering (upper rear) Fuses Two fuses (250 V, F10AL, 5×20m) Operating temperature 15 °C ~ 30 °C (59 ℉ ~ 86 ℉) Operating humidity 20 % ~ 80 %, no condensation Interchangeable block format † PCR volume range 96-well (0.2 ml), 384-well (0.02 ml) and Slide PCR type 5 μl ~ 80 μl Operating specifications Method of heating / cooling Peltier Temperature range 4.0 °C ~ 99.9 °C (39.2 ℉ ~ 211.82 ℉) ‡ Maximum ramp rate Heating : 6.5 °C/sec (11.7 ℉/sec) Cooling : 4.5 °C/sec (8.1 ℉/sec) Temperature accuracy ± 0.3 °C (± 0.54 ℉) Temperature uniformity ≤ 0.3 °C (≤ 0.54℉) Lid temperature 90 °C ~110 °C (194 ℉ ~ 230 ℉) Temperature increment range 0.1 °C ~ 2.0 °C (0.18 ℉ ~ 3.6 ℉) Time increment range 1 sec ~ 59 sec Ramp rate control 0.1 °C/sec (0.18 ℉/sec) * Upper USB port on the back of the instrument is only for engineer, and the user can not use for saving data files. † Basic supplied block is AllInOneCyclerTM 96 well thermal block (Cat. No. A-2041-1-1), and other formats of block are optional. Bioneer provides the interchangeable thermal blocks made of 2 different metals (normal and novel alloy) and classified to 3 sample-well types (96-well, 384-well and slide PCR). ‡ The max ramp rate is using AllInOneCyclerTM 96 well PCR system (Cat. No. A-2041-1N). When using AllInOneCyclerTM Fast 96 well PCR system (Cat. No. A-2041-1F), the max block ramp rates are 9.5 °C/sec for heating and 7.7 °C/sec for cooling. 12 www.bioneer.com BQ-042-101-01 Revision : 0(2012-12-07) AllInOneCyclerTM / Thermal Block 3. System Views TM Figure 2. Front view of the AllInOneCycler TM Figure 3. Back view of the AllInOneCycler 13 www.bioneer.com BQ-042-101-01 Revision : 0(2012-12-07) AllInOneCyclerTM / Thermal Block V. Installing the AllInOneCyclerTM 1. Site Requirements The AllInOneCycler TM Thermal Block is for indoor use. Ensure that the installation site. - Meets the spatial and weight requirements - Meets environmental requirements - Is within 1.5 m (4.92 ft) of a 700VA power receptacle - Is away from water 2. Required Materials Scissors, pocket knife, or box cutter 3. Unpacking the AllInOneCyclerTM Save the packing materials and box in case you need to ship the instrument to Bioneer for service. TM (1) To unpack the AllInOneCycler : TM Figure 4. Package of the AllInOneCycler 1) Cut the straps securing the instrument box. 2) Cut the tape securing the top flaps of the instrument crate, then open the flaps. 14 www.bioneer.com BQ-042-101-01 Revision : 0(2012-12-07) AllInOneCyclerTM / Thermal Block TM 3) Remove the AllInOneCycler 4) Lift and remove the cover from the instrument crate. 5) Remove the packing material from the AllInOneCycler , and then inspect the instrument accessories from the instrument and set them aside. TM for shipping damage. If the AllInOneCycler TM is damaged, note the location and appearance of the damage, and then contact Bioneer Technical Support or your service representative. (2) Move the AllInOneCycler TM to the desired installation site. Follow these guidelines for lifting and moving: Make sure that you have a secure, comfortable grip. Keep your spine in a neutral position. Bend at the knees and lift with your legs. Do not lift and twist your torso at the same time. (3) Open the box containing the AllInOneCycler TM accessories, then verify that it contains: AllInOneCyclerTM Thermal Block User Guide Power Cord, Power 10A/125V North America or Power 10A/220V Europe 4. Setting Up the AllInOneCyclerTM (1) Remove the packing material: TM 1) Open the AllInOneCycler 2) Using a can of compressed air, deliver a blast of air into each well of the bath block to hot-top cover. remove any particles that may have collected during transportation. 3) Close the hot-top cover. TM (2) Connect the power cord to the AllInOneCycler . (3) (Optional) Install any of the recommended protective devices. (4) Connect the power cord to the 700VA power source receptacle. 15 www.bioneer.com BQ-042-101-01 Revision : 0(2012-12-07) AllInOneCyclerTM / Thermal Block 5. Power ON (1) Confirm that the hot-top cover of the AllInOneCycler TM is closed. TM (2) Press the power button on the back left side of the AllInOneCycler . TM Figure 5. Power button of the AllInOneCycler (3) When the initialization of the device is completed, ‘Home’ menu will be displayed on screen. TM Figure 6. Home screen of the AllInOneCycler 16 www.bioneer.com BQ-042-101-01 Revision : 0(2012-12-07) AllInOneCyclerTM / Thermal Block VI. Operating the AllInOneCyclerTM 1. Loading Samples into the Instrument This section describes how to load samples in tubes or plates. See the appropriate section for your instrument. There is no need to use mineral oil or glycerin in the block wells or as a vapor barrier over the PCR reaction mixture in the tubes. The Tubes fit tightly in the wells, and the hot-top cover exerts an even pressure on all tubes, eliminating condensation on the tubes. (1) Loading Samples in AllInOneCyclerTM 96-well Thermal Block Loading tubes 1) Prepare 0.2 ml volume PCR tubes. 2) Pipette the samples into the tubes. 3) Cap the tubes. 4) Place the tubes onto the bath block. 5) Close the hot-top cover. Loading the 96-well plate 1) Prepare 0.2 ml volume 96-well plate. 2) Pipette the samples into wells of the plate. 3) Cover the plates with clear adhesive film. 4) Place the 96-well plates onto the bath block. 5) Close the hot-top cover. (2) Loading Samples in the AllInOneCyclerTM 384-well Thermal Block 1) Prepare 0.02 ml volume 384-well plate. 2) Pipette the samples into wells of the plate. 3) Cover the plates with clear adhesive film. 4) Place the 384-well plate onto the bath block. 5) Close the hot-top cover. (3) Loading Samples in the AllInOneCyclerTM Slide Thermal Block 1) Place the slide block on the block guide adapter. 2) Pipette the samples onto wells of the gel coated glass. 3) Cover the glass with clear silicon. 4) Place the slide block onto the bath block. 17 www.bioneer.com BQ-042-101-01 Revision : 0(2012-12-07) AllInOneCyclerTM / Thermal Block 5) Close the hot-top cover. 2. Home menu The user can create a new protocol, select the saved protocols, change the setup, and confirm the information of the instrument selectively on this ‘Home’ menu. Table 2. Function icons of Home menu Function icon Description Create a new protocol View or edit the saved protocols Set the network, manage protocol files, and calibrate block temperature control The installed software version and the contact information 18 www.bioneer.com BQ-042-101-01 Revision : 0(2012-12-07) AllInOneCyclerTM / Thermal Block 3. Editing Protocols (1) Creating a new protocol 1) Press ‘New Protocol’ icon of ‘Home’ menu. Press ‘New Protocol’ icon, and then ‘Edit Protocol’ screen will appear. In this screen, the user can select a protocol among template protocols for new experiment. The user can make customized protocols for their intended purpose, by changing values such as temperature, time, repeats and the number of steps in the template protocol and then save the changed protocol to the desired name on the directed folder. TM Figure 7. Edit Protocol screen of the AllInOneCycler Table 3. The components of Edit Protocol screen List Description Display the name of the pre-set protocols, and the user can select 1. Protocol name one of those for their purpose. After saving the protocol, display the name of the saved protocol. 2. Lid temperature If this option is checked, hot-top is used. Its temperature fixed at 105 °C 19 www.bioneer.com BQ-042-101-01 Revision : 0(2012-12-07) AllInOneCyclerTM / Thermal Block List 3. Step order Description The numbers to distinguish the order of the steps. The protocol will be sequentially processed. Display the temperature of each step. 4. Temperature By pressing ‘the temperature’ icon, the user can change temperature values. 5. Repeat sections Display the range of repeats. 6. Time and Display the time setting of each step, or the number of repeats. additional information If pressing number, the user can change their values. 7. Side scroll bar Press the scroll arrow buttons, and , to select from long list of protocols. Move to ‘Home’ menu Add a new step in the right of the selected step Delete the selected step 8. Function icons Open the previously saved protocol file Save the edited protocol Start the current protocol 20 www.bioneer.com BQ-042-101-01 Revision : 0(2012-12-07) AllInOneCyclerTM / Thermal Block 2) Select a protocol among template protocols We provide 8 protocol template protocols as described below. The user can select one of these for their intended purpose. Table 4. Template protocol list Protocol name Standard 3 step Fast 3 step Fast 2 step One step RT-PCR Reverse transcription Incubation a) Press ‘Protocol name’, and the list of the template protocols will appear. Figure 8. Selecting a template protocol in Edit Protocol screen b) Select from 8 different template protocols in the list. c) The protocol procedure of the selected template will be displayed on screen. d) Edit the procedure in detail for intended purpose. (see ‘Editing protocols in ‘Edit Protocol’ screen’ at p. 22 ~ 31) 21 www.bioneer.com BQ-042-101-01 Revision : 0(2012-12-07) AllInOneCyclerTM / Thermal Block (2) Editing protocols in ‘Edit Protocol’ screen 1) Modifying the temperature, time and cycles of the existing steps. a) Select the values of the temperature, the time and the repeats on the procedure graph. b) ‘Step Options’ window will appear. There are 4 types of ‘Step Options’ described in Table 5. c) Touch the values that need to be changed. d) Modify the values by using the number pad on the right side. e) Press ‘OK’ button f) ‘Step Options’ window will disappear, and the changed values are applied on the current protocol. Table 5. ‘Step Options’ Protocol step Description Incubate Keeping at a certain temperature for a certain time Goto Setting the range and the number of repeats Keeping at a certain temperature until the user stops the Store protocols ① Incubate step Figure 9. Incubate step option window of existing step 22 www.bioneer.com BQ-042-101-01 Revision : 0(2012-12-07) AllInOneCyclerTM / Thermal Block Temperature range : 4 °C ~ 99.9 °C Time range : 1 seconds ~ 5 hours 59 minutes 59 seconds ※ Set the incubate options additionally. Figure 10. Incubate options of Incubate step option (Lower left) Touch the The additional three setting windows about ‘Extended time per cycle’, ‘Increment button below the temperature and time setting windows. temperature per cycle’ and ‘Ramping Rate’ will be activated. Touch the circles in front of each value to edit, and then change the values using number pad on the right screen. (Only one selected option can be applied in a single step.) 23 www.bioneer.com BQ-042-101-01 Revision : 0(2012-12-07) AllInOneCyclerTM / Thermal Block Table 6. How to set incubate options. Option Description This menu is to set the gradual time increase and decrease of the selected step with each cycle. Extended time per 1. Touch and change the values between 0 and 59. 2. Touch cycle button behind the value to select increase or decrease of time. 3. When this option is applied, the set value will be displayed on the step of the procedure graph with this figure . This menu is to set the gradual temperature increase and decrease of the selected step with each cycle. Increment 1. Touch and change the values between 0 and 2.0. 2. Touch temperature per cycle button behind the value to select increase or decrease of temperature. 3. When this option is applied, the set value will be displayed on the step of the procedure graph with this figure . This menu is to set the constant value of the ramping rate. Ramping Rate 1. Touch and change the values between 0.1 and 6.0. 2. When this option is applied, the set value will be displayed on the step of the procedure graph with this figure . 24 www.bioneer.com BQ-042-101-01 Revision : 0(2012-12-07) AllInOneCyclerTM / Thermal Block ② Goto step Figure 11. Goto step option window of existing step Touch the ‘Goto’ icon or select number of repeats, and ‘Goto Step Options’ window will appear. Change the 'step number' to start the repeat interval. The ‘Step Number’ must be smaller value than the step number in the ‘Goto’ step. ③ Cycles range : 1 ~ 100 Store step Figure 12. Store step option window of existing step 25 www.bioneer.com BQ-042-101-01 Revision : 0(2012-12-07) AllInOneCyclerTM / Thermal Block Store temperature : 4 °C ~ 12 °C Store step is provided in the last part of each protocol for proper storage of samples. 2) Adding new steps. a) Touch the step to add a new step on their right. If a specific step is not selected, a new step will be added in front of the first step. b) Press ‘Add’ icon of the bottom menu. c) ‘Step Options’ window will be appeared. d) Select a protocol step among ‘Incubate’, ‘Goto’ and ‘Store’ in the top side of this window. Figure 13. Step Options window of a new step e) In each protocol step, the method of inserting values is same to ‘change values’ that previously described (See ‘Modifying the temperature, time and cycles of the existing steps’ at p. 22 ~ 26). 26 www.bioneer.com BQ-042-101-01 Revision : 0(2012-12-07) AllInOneCyclerTM / Thermal Block 3) Deleting steps a) Touch the step(s) to remove. Figure 14. Selecting a step that needs to remove b) 4) 5) Press ‘Delete’ icon of the bottom menu. Opening the previously saved protocol a) Press ‘Open’ icon. b) ‘Open protocol’ screen will appear. c) See ‘Opening the existing protocols’ (p. 32 ~ 33) in detail. Saving the edited protocol. a) Press ‘Save’ icon after modifying the protocol in ‘Edit Protocol’ screen. b) ‘Save Protocol’ window will appear. 27 www.bioneer.com BQ-042-101-01 Revision : 0(2012-12-07) AllInOneCyclerTM / Thermal Block Figure 15. ‘Save Protocol’ window c) Select an existing folder in ‘Folder selection’ window. Figure 16. Selecting the existing folder to save the edited protocol d) Or if it is necessary to create a new folder, touch the check box at the left of ‘New Folder’ and assign a name of new folder. When ‘New Folder’ is checked, ‘Folder selection’ window is inactivated. 28 www.bioneer.com BQ-042-101-01 Revision : 0(2012-12-07) AllInOneCyclerTM / Thermal Block Figure 17. Creating a new folder e) Assign a name to the new protocol. Figure 18. Assigning a name of the edited protocol f) If a folder is not selected, the protocol will be saved in the "Default" folder. 29 www.bioneer.com BQ-042-101-01 Revision : 0(2012-12-07) AllInOneCyclerTM / Thermal Block Figure 19. Default folder setting g) When saving protocols in a USB drive, insert USB drive in USB ports in the front or rear (lower) of AllInOneCycler TM (See figure 2 and 3 at p. 13). And then, the user can select USB drive in ‘folder selection’ window. In ‘folder selection’ window, the default name of USB folder is displayed as ‘USB – (Default)’, and the user can find the saved protocols in ‘USB:\AllInOneCycler\Protocols’. Figure 20. Direction of the saved files in the USB drive The user cannot create new folder directly from the USB drive in ‘Save Protocol’ window. If there are folders in ‘USB:\AllInOneCycler\Protocols’, the user can find the folders displayed as ‘USB – folder name’ and select one to save protocols in ‘protocol selection’ window. How to create folders in ‘USB:\AllInOneCycler\Protocols’ is to create in PC or to copy protocol folders in ‘Data’ menu of ‘Setting’ (See ‘Copying data to USB drive’ at p. 43 ~ 45). 30 www.bioneer.com BQ-042-101-01 Revision : 0(2012-12-07) AllInOneCyclerTM / Thermal Block Figure 21. Save the protocol in USB drive h) Press ‘OK’ button to finish. 31 www.bioneer.com BQ-042-101-01 Revision : 0(2012-12-07) AllInOneCyclerTM / Thermal Block (3) Opening the existing protocols 1) ‘Open Protocol’ menu a) Press ‘Open Protocol’ icon at ‘Home’ menu, ‘Open protocol’ screen will appear. TM Figure 22. Open Protocol screen of the AllInOneCycler b) Find the previously saved folders in the ‘Folders’ window on the upper left side of the screen by pressing the up and down arrows. And select the protocols at ‘Protocol Files’ window below ‘Folders’ window. The user can navigate the folders and files with ‘up’ c) and ‘down’ scroll arrow buttons. The corresponding graph of the selected protocol will be displayed on the ‘Preview’ window at the right of the screen. d) At the bottom of the menu, ‘Home’, ‘Edit’, ‘Delete’ and ‘Run’ icons are displayed. 32 www.bioneer.com BQ-042-101-01 Revision : 0(2012-12-07) AllInOneCyclerTM / Thermal Block Table 7. Function icons of Open Protocol screen Function icon Description Return to ‘Home’ menu. Edit the selected protocol. When pressing this icon, ‘Edit protocol’ screen will be displayed. And the user can modify the selected protocol in the same way as in the ‘New Protocol’ menu. Remove the selected protocol. The protocols saved in ‘Reserved Template’ folder cannot be deleted. Display the list of the protocols saved in USB drive. The user can edit and run the protocols saved in USB drive. Start the selected protocol. 33 www.bioneer.com BQ-042-101-01 Revision : 0(2012-12-07) AllInOneCyclerTM / Thermal Block 2) Open protocols saved in USB drive The user can open or run protocols saved in USB drive. a) Insert USB drive to the USB ports in front or rear (lower) of AllInOneCycler TM (See figure 2 and 3 at p. 13). b) A few seconds later, ‘From USB’ icon will be activated. Figure 23. Open the protocols saved in USB drive c) Press ‘From USB’ icon, and the list of saved protocols in USB will be displayed in the left side of the screen. The USB folders displayed as ‘USB – folder name’ will be listed at the top of ‘Folders’ window, and the folders of AllInOneCycler TM will be below the USB folder list. d) The user can select protocols in ‘Protocol Files’ window and confirm the detailed procedure of the selected protocols in the right side of the screen. 34 www.bioneer.com BQ-042-101-01 Revision : 0(2012-12-07) AllInOneCyclerTM / Thermal Block 3) Editing the existing protocol. a) Press ‘Edit’ icon in ‘Open protocol’ menu, and the selected protocol will be displayed in ‘Edit Protocol’ screen. b) The name of current protocol is displayed on the ‘protocol name’ on the center of the top screen. Press the name, and the list including 8 template protocols with the current protocol will be appeared. The user can select one of those for their purposes. c) Edit details of the protocol (See ‘Editing protocols in ‘Edit Protocol’ screen’ at p. 22 ~ 31). Figure 24. Selecting a protocol in ‘Edit Protocol’ screen 35 www.bioneer.com BQ-042-101-01 Revision : 0(2012-12-07) AllInOneCyclerTM / Thermal Block 4. Running the PCR protocols Press ‘Run’ icon on ‘Edit Protocol’ or ‘Open Protocol’ screen, and then the ‘Run’ screen is displayed as shown below. Figure 25. ‘Run’ screen Table 8. The components of ‘Run’ screen List Description 1. Protocol Name The name of the current protocol 2. Lid Temperature Show current lid temperature. 3. Step 4. Repeats The current running step is displayed blinking, and the time of the step will be decreased. The repeat number will be displayed like as ‘current repeat number / full repeat number’ on ‘Goto’ step. Show the estimated end time. (H:M:S) 5. Status messages Show the current block temperature. 36 www.bioneer.com BQ-042-101-01 Revision : 0(2012-12-07) AllInOneCyclerTM / Thermal Block List Description Show the running time. (H:M:S) When error occurs on the peltier, error messages will be displayed instead of time Return to ‘Home’ menu. ‘Pause’ is to stop temporarily. 6. Function icons ‘Resume’ is to continue ‘Run’ again from the ‘Pause’ state. Stop current running protocol. When pressing ‘Home’ icon, ‘Home’ menu will be displayed with the message blinking ‘PCR Running’. By pressing it, the screen will turn into ‘Run’ screen again. Figure 26. Home screen during PCR running While running, the user can make, open and edit protocols at ‘New Protocol’ and ‘Open Protocol’. However, the current running protocol cannot be edited until the run has ended. 37 www.bioneer.com BQ-042-101-01 Revision : 0(2012-12-07) AllInOneCyclerTM / Thermal Block Figure 27. Edit Protocol screen during PCR running If the lid is open, the current protocol will be paused. Use caution because the lid is still hot. 5. Removing the tubes or plate from the AllInOneCyclerTM Grasp the sample tray/retainer assembly or plate firmly with both hands until the tubes (or plate) are free. Sample caps may pop off if the cover is opened when the bath block temperature is above room temperature. 38 www.bioneer.com BQ-042-101-01 Revision : 0(2012-12-07) AllInOneCyclerTM / Thermal Block 6. Setting menu The instrumental settings and their inspection can be checked in the ‘Setting’ menu. In addition, the user can manage the protocol files and folders Press ‘Setting’ icon at ‘Home’ menu, and the ‘Setting’ screen will be displayed. There are four sub-menus on the left side of the ‘Setting’ screen. (1) General In this sub-menu, the user can set the instrument name and update AllInOneCycler TM software. TM Figure 28. Setting screen of the AllInOneCycler 1) Software update a) TM Before updating software of AllInOneCycler , download the recent version from the Bioneer website (www.bioneer.com). Once most current software has been downloaded,create new folder named ‘USB:\AllInOneCycler_Update’ in USB, and then copy the software to the folder. b) Insert USB drive to the USB ports in front or rear (lower) of AllInOneCycler TM (See figure 2 and 3 at p. 13). A few seconds later, the message ‘USB Disconnected’ with red color will change to ‘USB Connected’ with green color on the right top side of the screen, and the ‘S/W Update’ button will be activated. 39 www.bioneer.com BQ-042-101-01 Revision : 0(2012-12-07) AllInOneCyclerTM / Thermal Block Figure 29. Software update c) Press ‘S/W Update’ button, and the software will be installed automaticaly, and then the instrument will restart. 2) Setting the instrument name Touch ‘Instrument Name’ window, and the keypad will appear on the bottom of the screen. Rename the instrument name and press ‘return’ button to apply it. Figure 30. Editing the instrument name 40 www.bioneer.com BQ-042-101-01 Revision : 0(2012-12-07) AllInOneCyclerTM / Thermal Block (2) Network Set the network settings including IP address for the remote control. Figure 31. ‘Network setting’ menu Touch the values that need to change, and the number pad will appear on the center of the screen. Insert the values by using number pad. Figure 32. Editing network setting 41 www.bioneer.com BQ-042-101-01 Revision : 0(2012-12-07) AllInOneCyclerTM / Thermal Block (3) Data The user can confirm and delete the protocol files, and also copy them to USB drive. 1) Protocol confirmation a) Press ‘Data’ button, and the file manager will display on the right part of screen. Figure 33. Data manager screen b) When selecting ‘Protocol’ menu, the folders are listed on the center and the files in the corresponding folder are listed on the left screen. 42 www.bioneer.com BQ-042-101-01 Revision : 0(2012-12-07) AllInOneCyclerTM / Thermal Block c) To confirm protocol, press the name of the files twice. Details of the selected file will be displayed on screen. Figure 34. Protocol graph view screen 2) Copying protocol files to USB drive a) Insert USB drive to the USB ports in front or rear (lower) of AllInOneCycler TM (See figure 2 and 3 on p. 13). b) A few seconds later, the message ‘USB Disconnected’ with red color will change ‘USB Connected’ to green color on the right top side of the screen. Figure 35. ‘Setting’ screen when USB drive connected 43 www.bioneer.com BQ-042-101-01 Revision : 0(2012-12-07) AllInOneCyclerTM / Thermal Block c) After selecting folder or file by pressing their name, press ‘Save’ icon in the bottom menu. If only selecting folder, all files in the folder will be saved. Figure 36. Selecting a folder and protocol file d) The success message ‘Completed’ will be displayed. Figure 37. Success message for copying protocol to USB drive 44 www.bioneer.com BQ-042-101-01 Revision : 0(2012-12-07) AllInOneCyclerTM / Thermal Block e) In USB drive, the new folder named ‘AllInOneCycler’ will be created. The protocol files are saved to ‘Protocols’ folder of ‘AllInOneCycler’. If the user selects a folder and presses the ‘Save’ icon of the bottom menu, the folder will be copied in the ‘Protocols’ folder. Figure 38. Direction of the saved files in the USB drive 3) Deleting protocols For deleting data, select file or folder, and press ‘Delete’ icon in the botton menu. Then, ‘Question’ message that confirms the deletion of files or folders will appear. To finalize deletion, press the ‘OK’ button, the success message will then appear. Figure 39. Confirmation message of deleting files 45 www.bioneer.com BQ-042-101-01 Revision : 0(2012-12-07) AllInOneCyclerTM / Thermal Block (4) Option This menu is about resetting to factory mode (only for the engineer). A mouse can be used for this mode. 1) Connect USB mouse controller to the front or back USB port (lower) on AllInOneCycler TM (See figure 2 and 3 at p. 13). 2) Touch and check the small box next to ‘Show Mouse’. And then, press ‘Save’ icon of the bottom menu. 3) On screen, mouse cursor will appear and the user can operate by clicking. Figure 40. Option menu 46 www.bioneer.com BQ-042-101-01 Revision : 0(2012-12-07) AllInOneCyclerTM / Thermal Block (5) Functions In ‘Setting’ menu, there are four functions that are described in the following table. Table 9. Function icons of ‘Setting’ menu Function icon Description Calibrate the temperature control setting of the instrument. (Only for the engineer) Save the current settings for each sub-menu and save protocol files to USB drive. Delete protocol files or folders. Quit ‘Setting’ menu and return to ‘Home’ menu. (The current setting will not be saved without pressing ‘Save’ icon.) 7. About menu Displays the current software version of the AllInOneCycler TM and the contact information. Figure 41. About screen 47 www.bioneer.com BQ-042-101-01 Revision : 0(2012-12-07) AllInOneCyclerTM / Thermal Block 8. Network Operating AllInOneCyclerTM (1) Composition TM It is possible to operate multiple AllInOneCycler The optional PC is necessary in order to control network operation. The PC requires ‘Server.exe’ program and ‘Manager.exe’ program for controlling. instruments through TCP/IP network. (2) Program operation procedures For successful program operation, it is crucial to follow the procedures described below: a) Run ‘server.exe’ program in PC. b) Tray icon of ‘server.exe’ program will appear at the right taskbar. Figure 42. Tray icon of 'server.exe' program at right taskbar c) The user can view log messages of the server in right click menu of the tray icon. Figure 43. Right click menu of the tray icon of ‘server.exe’ program 48 www.bioneer.com BQ-042-101-01 Revision : 0(2012-12-07) AllInOneCyclerTM / Thermal Block d) Turn on the instrument(s), and ‘Poplar.exe’ AllInOneCyclerTM will operating automatically start. When turning on the instrument, the network between the instrument and PC should be connected. TM Figure 44. Connection status between PC and AllInOneCycler e) Run ‘manager.exe’ in PC, and the connection state will be displayed as shown below. 49 www.bioneer.com BQ-042-101-01 Revision : 0(2012-12-07) AllInOneCyclerTM / Thermal Block Figure 45. Connection status when 'manager.exe' program is running in PC f) When ‘manager.exe’ is running, the currently connected instrument is displayed as shown below. Figure 46. 'manager.exe' window shows the currently connected instrument 50 www.bioneer.com BQ-042-101-01 Revision : 0(2012-12-07) AllInOneCyclerTM / Thermal Block (3) Execution of running 1) Select a protocol a) Click the ‘Batch Run’ icon in the ribbon menu. Figure 47. The ribbon menu of 'manager.exe' program b) The ‘Batch Run’ window will appear, and then the user can select and run the protocol saved in local (PC) or the connected instrument. Figure 48. Selecting a protocol in ‘Batch Run’ window 51 www.bioneer.com BQ-042-101-01 Revision : 0(2012-12-07) AllInOneCyclerTM / Thermal Block c) Select the protocol by using the protocol file tree in the left top side of the screen, from the file explorer. In this figure, the protocol named ‘Demo2’ is selected. d) When a protocol is selected the corresponding protocol graph will be displayed in the right top side of the screen. 2) Select a target Instrument a) Select the instrument to operate from the list in the lower left of the screen. Figure 49. Selecting a target instrument in ‘Batch Run’ window b) Click the check box, and then ‘Run’ button will be activated in the left bottom of the screen. 3) Run a) Click ‘Run’ button, the message box confirming whether to run will appear as shown in the figure below. b) If ‘Yes’ button is clicked, the protocol will be downloaded to the selected instrument and begin. 52 www.bioneer.com BQ-042-101-01 Revision : 0(2012-12-07) AllInOneCyclerTM / Thermal Block Figure 50. Confirmation message of starting the selected protocol in the selected instrument 4) Stop a) When the instrument is running, ‘Stop’ button is activated in the lower right of the screen. In addition, the user can pause or resume the current running PCR by clicking the ‘Pause’ or ‘Resume’ button beside the ‘Stop’ button. Figure 51. ‘manager.exe’ program window while PCR running 53 www.bioneer.com BQ-042-101-01 Revision : 0(2012-12-07) AllInOneCyclerTM / Thermal Block b) If ‘Stop’ button is clicked, the stop signal appears in the screen of the running instrument, and then the instrument will stop. TM Figure 52. Stop screen of the AllInOneCycler c) controlled by PC If ‘OK’ button is clicked, the instrument will stop. And then, the main menu will be displayed on the screen. 54 www.bioneer.com BQ-042-101-01 Revision : 0(2012-12-07) AllInOneCyclerTM / Thermal Block VII. Troubleshooting Error The Power is not on. Solution 1. Make sure the power connector is connected. 2. Check if the instrument is connected to the power cord. 3. Check if the instrument's power switch is turned off. 4. If everything above has been followed but the power is not on, contact Service. The Power is on but the system 1. Check if the power was turned off abnormally. cannot initiate. 2. Remove any residues that may distract operating the system. 3. Turn the power on and check whether the system is initiating. LCD Screen is not on. 4. Request for Service. 1. It may be interior problem of the system, call for the Service. The system does not operate 1. even if RUN button is pressed. Check if the system is initiating normally when the power is on. 2. Check if there are any residues or obstacles in the system that may interfere in door closing. The system is running but does 3. Check if all the accessories are inserted correctly. 4. Check if other buttons in the LCD are working. 5. Request for Service. 1. Check if there are remaining residues or any obstacles not operate correctly. The Hot-top cover does not that may interrupt operating the system. 2. Check if all the accessories are inserted correctly. 3. Request for Service. 1. Hold the hot-top cover open, release the cover, and close. The instrument is not working check if cover is closed automatically by the spring. 2. Request for Service. 1. Check if the pair of magnets attached to the door are even if the hot-top cover is correctly attached. closed. 2. Request for Service. Hot-top cover stuck 1. Request for Service. 55 www.bioneer.com BQ-042-101-01 Revision : 0(2012-12-07) AllInOneCyclerTM / Thermal Block Error Solution It stops while operating. 1. Check if power-supply to the instrument is on. 2. Check if the Power switch has been pressed off. 3. Check if you have pressed ‘Pause” by mistake. 4. Request for Service. The System is running but there 1. Check if wrong protocol has been used. is an error. 2. Check if it is operating after rerunning the same program. 3. Request for Service. 1. Instrument may require calibration. Request for Service. 1. Request for Service. 1. Disconnect the power and unplug the power connector Temperature does not match specified temperature Cooling and heating rate too slow. There is a burning smell in the system. immediately. Hot-top cover not heated 2. Request for Service. 1. Request for Service. Multi instrument use via PC Error The PC software Solution does not 1. operate the instrument. Inspect the network cables connecting the PC and network hub. 2. Inspect the network cables connecting the instruments and network hub. 3. Verify that the network hub power is ON. 4. Verify the PC network settings. 5. Make sure the instrument control software is installed in the correct folder. Instrument is not operating as 6. Request for service. 1. Check to see if the ‘Run’ button was pressed more than expected. twice. 2. Check to see if the software was executed twice. 3. Restart the instrument and software. 4. Request for service. 56 www.bioneer.com BQ-042-101-01 Revision : 0(2012-12-07) AllInOneCyclerTM / Thermal Block No buttons or pictures are 1. Erase and re-install the software. displayed within the software. 57 www.bioneer.com BQ-042-101-01 Revision : 0(2012-12-07) AllInOneCyclerTM / Thermal Block VIII. User Maintenance 1. Cleaning the main body Note TM Power off the AllInOneCycler Allow the instrument to cool until the hot-top cover and bath block reach room Thermal Block, and then remove the power cord. temperature. (1) Cleaning the Touch-screen Clean the touch-screen with any commercially available LCD cleaning product. Be careful not to scratch the screen. (2) Cleaning the Block Wells Do not use other cleaning or decontamination methods other than what is recommended in the manual, doing so risks damage to instrument. Clean the block wells once weekly or as needed. Always wear protective glasses and gloves when servicing the instrument. Also, make sure you disconnect the instrument from AC line power before you begin any service procedure. During instrument operation, the temperature of the hot-top cover can be as high as 110°C, and the temperature of the bath block can be as high as 100°C. Before cleaning instrument, ensure that the hot-top cover and bath block reach room temperature. To clean the block wells 1) Open the hot-top cover. 2) Remove the sample tray from the bath block and set it aside. 3) Use a cotton swab soaked in pure isopropyl alcohol or commercial PCR DNA degradation solution to clean the wells thoroughly. Make certain that the isopropyl alcohol or PCR DNA degradation solution has evaporated completely before reloading a sample tray. 58 www.bioneer.com BQ-042-101-01 Revision : 0(2012-12-07) AllInOneCyclerTM / Thermal Block 2. Cleaning the Hot-top Cover Clean the hot-top cover once a month or as needed. During instrument operation, the temperature of the hot-top cover can be as high as 110°C, and the temperature of the bath block can be as high as 100°C. Before cleaning instrument, ensure that the hot-top cover and bath block reach room temperature. To clean the hot-top cover (1) Open the hot-top cover. (2) Soak a cotton swab with pure isopropyl alcohol or PCR DNA degradation solution and gently wipe the heated platen. CHEMICAL HAZARD Isopropyl alcohol is a flammable liquid and vapor. Exposure may cause eye, skin, and upper respiratory tract irritation. Prolonged or repeated contact may dry skin and cause irritation. Exposure may cause central nervous system effects such as drowsiness, dizziness, and headache. Read the MSDS, and follow the handling instructions. Remove any remaining isopropyl alcohol from the cover. Note: If the platen becomes contaminated with amplified DNA, then raise the hot-top cover to the cleaning position, wipe the platen with a cloth or cotton swab soaked in bleach (about 5 % v/v concentration in tap water), then rinse with water. (3) Clean the heated platen once a month or as needed. (4) If the hot-top cover become contaminated with amplified DNA, raise the hot-top cover to the cleaning position and wipe the cover with a cloth swab soaked in Isopropyl alcohol or PCR DNA degradation solution, then wipe the cover with a damp cloth. 3. Replacing Fuses The instrument has two 250V, F10AL, 5×20mm fuses. Required Materials - Two 250V, F10AL, 5×20mm fuses - Small screw-driver(-) 59 www.bioneer.com BQ-042-101-01 Revision : 0(2012-12-07) AllInOneCyclerTM / Thermal Block Procedure TM (1) Turn off the instrument and disconnect the power cord from the back of the AllInOneCycler . ELECTRICAL SHOCK HAZARD Severe electrical shock, which could cause physical injury or death, can result from working on an instrument when the high voltage power supply is operating. To avoid electrical shock, disconnect the power supply to the instrument, unplug the power cord, and wait at least 1 minute before working on the instrument. (2) Insert a small screw-driver (-) into the slot in the upper portion of the power entry module, and open the fuses door. TM Figure 53. The power entry module in the back side of the AllInOneCycler (3) Pull out the fuse compartment to inspect the two fuses in the fuse compartment. Figure 54. Two fuses in the fuse compartment (4) Pull out the blown fuse(s) from the fuse compartment and replace with new 250V, F10AL, 5× 20mm fuses. 60 www.bioneer.com BQ-042-101-01 Revision : 0(2012-12-07) AllInOneCyclerTM / Thermal Block Figure 55. Pulling out the blown fuse Figure 56. 250V, F10AL, 5x20mm fuse (5) Place the fuse compartment back into the power entry module and close the fuses door. (6) Press the fuses door until it locks in place. (7) Connect the instrument power cord. 4. Returning an AllInOneCyclerTM for Service (1) Decontaminate the instrument. If the bath block becomes contaminated with radioactivity, use a commercially available decontaminant to remove the contamination. If the block cannot be decontaminated, the instrument cannot be returned to Bioneer for service. (2) Complete instrument decontamination. (3) Fax or e-mail([email protected]) the service request form to the customer center. (4) Pack the instrument in the provided packaging, without any accessories or power cords. Include service request form in the box. Note: Repairs for instruments without the service request form are delayed. (5) Affix the provided postage to the box, then ship the instrument to the designated facility. The repair process requires 1 to 3 weeks. 61 www.bioneer.com BQ-042-101-01 Revision : 0(2012-12-07) AllInOneCyclerTM / Thermal Block IX. Warranty This instrument is warranted by Bioneer against manufacturing defects in materials and workmanship for a limited warranty period of one (1) year from the date you received your product. Bioneer will either (1) repair the product at no charge if a hardware defect is found or (2) exchange the product if the same hardware defect arises more than three times during the limited warranty period. Any other accessories other than the instrument itself are considered as consumables and warranted for three months. Spare parts for the instrument will be available for five years from the initial instrument release date. If a defect arises after the limited warranty period, shipping and handling charges may apply to any repairs or exchanges of the product undertaken by Bioneer. 1. Exclusions and limitations This warranty does not apply. (1) Cosmetic damage including but not limited to scratches, dents, and broken plastic on ports (2) Damages caused by accident, abuse, misuse, flood, fire, earthquake or other external causes (3) A product or part that has been modified in any way without explicit written consent of Bioneer (4) Damages cause by any services performed by unauthorized engineers or service providers 2. Obtaining Warranty Service Please review this User Manual and access the online support referred to in the manual accompanying this product before requesting warranty service. 62 www.bioneer.com BQ-042-101-01 Revision : 0(2012-12-07) Service Request Form Product AllInOneCyclerTM / Thermal Block Catalog No. A-2041 Serial No. Date of request Date of purchase * Please list one service issue or concern per line Issue 1 Issue 2 Service Issue Issue 3 Issue 4 Address Company Customer Name Information Contact Phone: Fax: E - mail Please send service request to Fax(042-930-8688) or E-mail([email protected]). You can download this service request document in Bioneer website(www.bioneer.com).