1
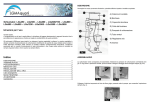
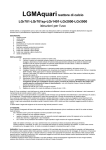
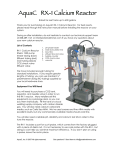
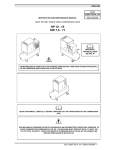
M
ad
in e
Ita
ly
User Manual
LGs450 - LGs600sp - LGs800/II
LGs900/II - LGs950 - LGs1260
LGs2000 - LGs2500 - LGs3000
Skimmer
Parts Diagram
Correct Water level
Correct water level
Model without silencer
Model with silencer
Description
A
Contact Column
H
Outlet pipe
B
Collector cup
1
Suction line inlet (with O-Ring)
C
Collector cup cover
2
Water Pump intake inlet
D
Collector dropdown neck
3
Air intake silencer *
E
Skimmer Pump
4
Waste drain outlet *
F
Venturi joint
5
Clean water drain outlet
G
Air flow regulator
*: Available only on selected models
v.1.1 ENG | 450~3000 | 03-2014
www.lgmaquari.it | [email protected]
2
Dear customer,
congratulations for buying your new skimmer.
We share a passion for aquariums. To put the life of your aquarium into the hands of a sturdy and easy
to use product is crucial. This is why we have always tried to design the ever best products.
LGMAquari 's equipment is a synonymous of quality, reliability and ease of use.
BRead these simple instructions to appreciate LGMAquari experience and use your new skimmer to
the best.
Geppy Apuleo - LGMAquari Product Manager
1. Assembly
1
Grase the inner O-Ring
2
Grease with silicon grease* the inner O-Ring where
3
Install
&
4
Install
**
5
Install
and plug it into
6
Install the water intake pump*** & plug it into
7
Connect if ** if an external waste system is available
on
with silicon grease*
is normally housed
. Do not over tighten the thread
. Please, use a soft rubber pipe
* Silicon Grease is included only for some countries
** Available only on selected models
*** Water intake pump NOT included
!
O-Ring
Do not power the pump if dry. You may damage it.
LGMAquari 's skimmers are equipped with an exhaust system which is adjustable in height .
This type of exhaust allows to customize the skimming, changing the amount of treated water without
changing the water level inside the contact column . This will avoid any wrong bottleneck.
Always keeping the water level in the contact column A at the right level and the drain outlet 5 free
from any obstruction are the essential requirements to keep the skimmer properly working.
To lower any noise from the clean water outlet , it’s better to
use a pipe with a diameter the same as the drain hole’s and long
enough to take the drain outlet to the most appropriate place.
Plug a “T”joint with one hole upward-facing; another vertical pipe
can be plugged into the “T” joint and immersed into 2cm (< 1”)
water so that the drain outlet will become totally noiseless. If you
use a 90° joint instead of a “T”, to maintain proper stability of use,
“T” Joint , 90° joint mounted as silencer
it will not be possible to immerse the vertical pipe in any case.
v.1.1 ENG | 450~3000 | 03-2014
www.lgmaquari.it | [email protected]
3
2. Positioning & Installation
All LGMAquari 's skimmers have been designed to be placed inside or outside a sump tank.
Inside the Sump tank
Outside the Sump tank
Inside the Acquarium tank
3. Water direction
Water flow back and forth the Aquarium
Water flow back and forth the Sump *
* Recommended configuration
!
Never install a system to pump water from the aquarium, through
the skimmer and back to a lower-levelled Sump.
If the return pump from Sump to the Aquarium get stuck, the Sump
tank will overflow and the Aquarium tank will be emptied.
4. Water intake pump startup
!
DANGER!
All power plugs MUST be dry! Never plug if wet!
Turn on the water intake pump connected to 2 and wait until water begins to overflow from the drain
outlet 5 . The drain outlet may be extended depending on your needs and/or deflected with specific
fittings. The drain outlet can be extended horizontally and/or vertically, but never upwards. The end of
the drain outlet must always be at least partially out of the water in case of use of an 90° joint while
may be partially immersed (up to 2cm- 1") in case of use of a “T" joint. The adjustment of the amount
of water treated and the levels must be done with all fittings mounted.
!
The drain outlet must be always free from any obstruction.
v.1.1 ENG | 450~3000 | 03-2014
www.lgmaquari.it | [email protected]
4
5. Water flow setup
Adjust the amount of water flow, using a valve or the flow regulator of the water intake pump
connected to . The flow must be adjusted according to the here below table and your skimmer
model.
Skimmer
Max Flow lt/h (US gal/h)
Skimmer
Max Flow lt/h (US gal/h)
LGs450
350 (90)
LGs1260
1.300 (345)
LGs600 SP
700 (185)
LGs2000
2.000 (530)
LGs800/II
850 (225)
LGs2500
2.500 (660)
LGs900/II
950 (250)
LGs3000
3.000 (790)
LGs950
1.100 (290)
For fine adjust, use a graduated bowl to measure the amount of water flowing from the outlet pipe H .
Manufacturers always report a flow value for their
Correct water level
intake pumps. This is not a valid reference to setup
the skimmer. Once the water flow rate is properly
adjusted, rise or lower the height level of H to
bring the water level inside the column D close to
the base of the Contact Column neck. The water
should not fill the neck (water must fill the conical
part of the Contact Column , without entering the Collector Cup neck B ).
Turn on the pump and adjust the air flow through G in order to obtain a foam, not too dry but very
dense and dark. The air adjustment is empirical, according to the organic load of the tank, the skimmer
model and some other minor factors.
Wrong air flow or level in A too high
Correct air flow
LGMAquari 's skimmers can achieve different performances, by working on several fine calibrations.
You can obtain very different results by acting on the adjustments of the air, amount of water treated
and the level in the contact column.
v.1.1 ENG | 450~3000 | 03-2014
www.lgmaquari.it | [email protected]
5
6. Warning on startup & adjustment
• Keep the drain outlet
free from any obstruction
• The best skimmer performances are obtained if the water intake pump is placed in a compartment
with water at a constant height, or by using a high prevalence pump
• The skimmer needs at least from 3 to 7 days of startup to work properly, effectively and steadily
• A too much quick Collect Cup B fill-up means a wrong skimmer adjustment. The reasons for this may
be one or more of the following typical installation mistakes:
• Too high water level in Contact Column A (see chapter 5)
• Too high air flow from G (the foam will be too wet - see chapter 5)
• A too big and sudden organic load for the current calibration
• Some rubber tubes, even if not connected to the skimmer, may release substances that may inhibit
the skimming process. It is strongly recommended that only tubes specifically designed for aquariums
and for food should be used.
7. Maintenance
!
Before lifting the skimmer, if filled with water, empty the skimmer before lifting it by
by unscrewing the fitting
and put aside to help water pour out. In case of lifting
with water inside, place one hand below the bottom base of the skimmer and the
other along the Contact Column . Never lift up the skimmer from any upper edge.
To ensure your skimmer is working properly, it is essential to perform some simple periodic maintenances. This is essential to maintain the aquarium healthy.
• 7.1 Contact Column cleaning
Periodically wash the inside of A with bleach (chlorine-based products) to remove any traces of algae
which inhibit the skimming. Also residues of calcium deposited on the inside will inhibit skimming. To
remove them, perform a flush with diluted hydrochloric acid or vinegar.
!
Before reinstalling and restarting the skimmer, rinse well all the parts and make sure
you completely removed any trace of cleaning chemical agents.
• 7.2 Air suction block cleaning
Periodically or in case of very low air flow, clean G and the connection rubber tube to F .
Calcium and/or salt deposits may progressively block up these parts.
!
Before reinstalling and restarting the skimmer, rinse well all the parts and make sure
you completely removed any trace of cleaning chemical agents.
v.1.1 ENG | 450~3000 | 03-2014
www.lgmaquari.it | [email protected]
6
• 7.3 Skimming pump cleaning
Important attention should be given to the pump E . Between the ceramic shaft and bushings you
will have calcification deposits, as well as in the compartment of the pump impeller. These deposits
will cause frictions, noises, overheating, a premature consumption and quick decrease of the skimmer
performances. Periodically, and in the case of precipitation of calcium (kalkwasser, etc.), you must
perform a strong washing of all internal components with dilute hydrochloric acid or vinegar.
Detail of the bushings and shaft for reassembly
!
Impeller cleaned and reassembled
Before reinstalling and restarting the skimmer, rinse well all the parts and make sure
you completely removed any trace of cleaning chemical agents.
8. Safety Instructions
• 8.1- Turn off and disconnect all electrical equipment in the Acquarium and/or Sump before carryng
out any maintenance tasks.
• 8.2 - The power cord must not be repaired or replaced. if it is damaged, replace the entrie pump.
• 8.3 - Always check the voltage on the pump label to make sure it corresponds to your local main
power supply.
• 8.4 - The pump can not be left to run dry.
• 8.5 - When the pump is plugged into the mains, make sure the lowest part of the lead is lower than
the socket. This is to prevent accidental spillage of water running along the lead and reaching the
socket.
• 8.6 - We recommend that the pump and all…should be connected to a grounded circuit breaker with
a 30mA fuse.
• 8.7 - The skimmer must not be used or disassembeld without the supervision of an adult. it’s not a
toy.
v.1.1 ENG | 450~3000 | 03-2014
www.lgmaquari.it | [email protected]
7
The information in this document is subject to change without notice. LGMAquari is not legally bound
to update, upgrade or modify any product.
LGMAquari is not responsible for any errors that may appear in this document.
LGMAquari shall never be liable for accidental damages due to improper use of the materials or
wrong application of the procedures described in this document.
This document must not be fully or partially reproduced or copied without LGMAquari’s written
authorization and its contents must neither be divulged to a third party nor be used for any unauthorized purpose. Offenders will be legally prosecuted.
LGMAquari di Manuela Apuleo
Via Domenico Fontana 134 - 80128 Napoli (Na) Italy | VAT# IT05758341217
Phone +39.081.36.57.289 | Sales +39.334.98.61.535 | Tech Support +39.333.15.32.318
www.lgmaquari.it | [email protected]
v.1.1 ENG | 450~3000 | 03-2014
www.lgmaquari.it | [email protected]
8
Warranty conditions
• 1 - The skimmer is warranted against defects in material and manufacturing for 24 months from the
date of purchase.
• 2 - Damages resulting from errors in installation, assembly, operation and lack of maintenance, action
of frost, calcium deposits, or inappropriate repair/modification by unauthorized personnel are not
under any warranty.
• 3 - All consumables are not under warranty (eg. O-rings , rubber tubes , shaft , etc. ) or, more generally, all components subject to consumption periodically replaced for routine maintenance and cleaning.
• 4 - The use of non-genuine consumables and non-genuine spare parts may invalidate the warranty.
• 5 - LGMAquari’s products are LIFETIME GUARANTEED against manufacturing defects.
• 6 - The warranty card must be fully filled by the seller and must be returned with the broken part for
any repair or maintenance, together with the purchase receipt showing the date and place of purchase.
Warranty certificate
Receipt
Model
Purchase date
Reseller
LGMAquari di Manuela Apuleo
Via Domenico Fontana 134 - 80128 Napoli (Na) Italy | VAT# IT05758341217
Phone +39.081.36.57.289 | Sales +39.334.98.61.535 | Tech Support +39.333.15.32.318
www.lgmaquari.it | [email protected]
v.1.1 ENG | 450~3000 | 03-2014
www.lgmaquari.it | [email protected]
Warranty certificate