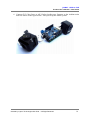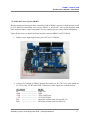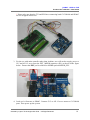
1
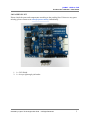
ROBOT . HEAD to TOE
Product User’s Manual – G15 Shield
G15 Shield
User's Manual
V1.0
October 2012
Created by Cytron Technologies Sdn. Bhd. – All Right Reserved
1
ROBOT . HEAD to TOE
Product User’s Manual – G15 Shield
Index
1. Introduction
3
2. Packing List
4
3. Product Specification and Limitation
5
4. Board or Product Layout
6
5. Dimension
8
6. Half Duplex Serial Communication
9
7. Hardware Installation
11
7.1 Arduino Uno
11
Created by Cytron Technologies Sdn. Bhd. – All Right Reserved
2
ROBOT . HEAD to TOE
Product User’s Manual – G15 Shield
7.2 40-Pin PIC Start-Up Kit (SK40C)
15
8. Warranty
17
Created by Cytron Technologies Sdn. Bhd. – All Right Reserved
3
ROBOT . HEAD to TOE
Product User’s Manual – G15 Shield
1.0 INTRODUCTION
G15 Shield is an Arduino shield for controlling Cytron’s G15 Cube Servo and Robotis
Dynamixel AX-12 servo motor. It converts UART duplex communication to half-duplex
single line communication compatible for both G15 Cube Servo and AX-12. It is compatible
with Arduino Uno, Arduino Duemilanove, Arduino Mega, Arduino Leonardo and possibly
other pin compatible main boards. G15 shield has two ports for Cytron’s G15 Cube Servo
and two ports for Robotis’ Dynamixel AX-12 servo. Both G15 and AX-12 servos are serial
servo which can be daisy chained for more servos. G15 Shield has external motor power port
for user to suppply a seperated power for the servos besides using the internal power from the
Arduino board. G15 Shield has stackable side headers which allows for more Arduino shields
to be stacked on top of it.
G15 Shield comes with:
●
●
●
●
●
●
●
Reset button
2 x G15 Cube Servo ports
2 x AX-12 Dynamixel AX12 servo ports
External power port for servo with polarity protection
Stackable I/O header pin
Selectable Digital pins for the Control pin with Mini Jumper
2 LEDs as logic power and servo power indicators.
Created by Cytron Technologies Sdn. Bhd. – All Right Reserved
4
ROBOT . HEAD to TOE
Product User’s Manual – G15 Shield
2.0 PACKING LIST
Please check the parts and components according to the packing lists. If there are any parts
missing, please contact us at [email protected] immediately.
1. 1 x G15 Shield
2. 1 x 6 ways right angle pin header
Created by Cytron Technologies Sdn. Bhd. – All Right Reserved
5
ROBOT . HEAD to TOE
Product User’s Manual – G15 Shield
3.0 PRODUCT SPECIFICATION AND LIMITATIONS
Parameter
Min
Logic Voltage
Servo Motor’s Voltage
Typical
Max
5
7
12
Servo Motor’s Current
Created by Cytron Technologies Sdn. Bhd. – All Right Reserved
Unit
V
15
V
5
A
6
ROBOT . HEAD to TOE
Product User’s Manual – G15 Shield
4.0 BOARD OR PRODUCT LAYOUT
1. External Motor Power (EXT_MPWR)
JP1 is for external power for the servo motor. User may choose to provide power to the servo
through this connector besides using the internal Vin power from Arduino main board.
2. Stackable Digital I/O header
JP2 and JP9 is Digital I/O pin stacked to the Arduino main board.
3. Control pin
JP4 (EN1) is the control pin for AX-12 servo and JP5 (EN2) is control pin for G15 servo.
For AX-12 Control pin (EN1), user can select either D2 or D8 as the control pin for the
half-duplex communication. For G15 Control pin (EN2) user can select either D3 or D9 as
the control pin of the communication. The selection is done by changing the mini jumper
selector. The default control pin for AX-12 is D2, and for G15 is D3.
4. AX-12 Servo port
2 ports for AX-12 servo motor.
5. Stackable Analog Input pin header
Created by Cytron Technologies Sdn. Bhd. – All Right Reserved
7
ROBOT . HEAD to TOE
Product User’s Manual – G15 Shield
JP8 is stacked to the Arduino main board. Other Arduino shield can be stacked on top of this
stackable header.
6. Stackable Power Input pin header
Power Input pin is stacked to the Arduino main board. Power supply for this board is 5V and
Vin. Make sure the Vin voltage to the Arduino main board is within the operating range of
the servo motor.
7. Reset button
Reset button is for convenience of user to reset the Arduino main board.
8. Power LED
Power indicator LED for logic power (5V). The LED will turn on when 5V power is supplied
to this board.
9. Motor Power LED
Power indicator LED for motor power. The LED will turn on when power for motor is supply
either through internal or external power option.
10. External Control
JP7 is for the used of main controller other than Arduino main boards. JP7 includes the signal
of 5V, EN1, EN2, TX, RX and GND. user who choose to control using other controller need
to power the servo from external motor power port (EXT_MPWR).
11. G15 Servo port
2 ports for G15 servo motor.
12. Motor Power Selection
JP3 is Motor power selection. Default setting for motor power is internal power for easy
setup and test. However, user may desolder internal power connection and solder the MPWR
pad to external motor power pad (EXT pad) if user want external power for motor.
Created by Cytron Technologies Sdn. Bhd. – All Right Reserved
8
ROBOT . HEAD to TOE
Product User’s Manual – G15 Shield
5.0 DIMENSION
Created by Cytron Technologies Sdn. Bhd. – All Right Reserved
9
ROBOT . HEAD to TOE
Product User’s Manual – G15 Shield
6.0 HALF DUPLEX SERIAL COMMUNICATION
Both G15 Cube Servo and AX-12 servo are using half duplex serial communication.
The communication is standard UART with 8 bit data, 1 stop bit and no parity. There is
only one data pin for the half duplex communication instead of 2 pins of normal UART
communication. Thus, the main controller as the master will need to have one control pin
to switch between transmit and receive mode as shown by the figure below. So besides
TX and RX pin, main controller will need one digital output pin as the control pin. The
implementation is as shown by the logic circuit below. TX and RX bus is merged into one
single data bus.
On G15 Shield, the control pin is labelled as EN1 for AX-12 and EN2 for G15 Cube Servo.
G15 and AX-12 has separate channel of communication on G15 Shield. Thus, they has their
own control pin respectively. If control pin (EN1 or EN2) is 1, it is in receive mode (Arduino
receives data from G15 or AX-12). Else if control pin is 0, it is in transmit mode (Arduino
transmits data to G15 or AX-12).
The following flowchart shows the communication flow for both G15 Cube Servo and AX12 Servo. For AX-12, EN1 is a digital pin of Arduino selected on EN1_SEL by using the
Created by Cytron Technologies Sdn. Bhd. – All Right Reserved
10
ROBOT . HEAD to TOE
Product User’s Manual – G15 Shield
mini jumper. It can be either D2 or D8. For G15, EN2 is also a digital pin of Arduino’s
digital port which can be either D3 or D9, selectable by EN2_SEL using mini jumper. For the
communication protocol, please refer to G15 Cube Servo’s user manual and Dynamixel AX12’s user manual.
Created by Cytron Technologies Sdn. Bhd. – All Right Reserved
11
ROBOT . HEAD to TOE
Product User’s Manual – G15 Shield
7.0 HARDWARE INSTALLATION
This section will show example installation of G15 Shield with Arduino Uno as a main
controller to control G15 Cube Servo and AX-12 servo. However, other main board such as
Arduino Duemilanove and Arduino Mega can also be used. Besides that, this section will
also show example connection for others controller to G15 Shield.
7.1 Arduino Uno
Arduino is an open-source physical computing platform based on a simple I/O board and
a development environment that implements the Processing/Wiring language. G15 Shield
can be used together with Arduino Uno to control both G15 and AX-12 servo motor. Figure
below shows example hardware connection between Arduino Uno and G15 Shield; it is
simply stacking up the shield onto the main board.
The default communication control pin is set to D3 for G15 and D2 for AX-12. However,
user can select D9 for G15 and D8 for AX-12 as the control pin if the previous pin is used
by other application. The selection of control pin is done by using the mini jumper on board.
Please be cautious to initialize the correct Arduino’s digital pin according to the selected
control pin for the communication.
It is not necessary to use both G15 and AX-12 ports on G15 Shield. User can choose to use
G15 ports only or AX-12 ports only.
1. Stack G15 Shield on Arduino Uno. Ensure that the pins alignment is correct.
Created by Cytron Technologies Sdn. Bhd. – All Right Reserved
12
ROBOT . HEAD to TOE
Product User’s Manual – G15 Shield
2. Supply power to Arduino main board. The PWR LED will light up in green colour.
Created by Cytron Technologies Sdn. Bhd. – All Right Reserved
13
ROBOT . HEAD to TOE
Product User’s Manual – G15 Shield
3. Select power source for servo motor. The MPWR LED will light up in orange colour
if there is power source to servo motor. User has the option either to use internal or
external motor power source. Internal motor power is supply from Vin on Arduino
main board (DC adaptor to the Arduino main board). Ensure that INT pad is soldered
to MPWR pad in the case of internal power is selected as shown in figure below.
4. If user chooses to use external power for motor, connect 12V supply to EXT_MPWR
connector (JP1). Ensure that EXT pad is soldered to MPWR pad on MPWR_SEL as
shown in the figure below.
Created by Cytron Technologies Sdn. Bhd. – All Right Reserved
14
ROBOT . HEAD to TOE
Product User’s Manual – G15 Shield
5. Set control pin for G15 and AX-12 servo motor on EN1_SEL and EN2_SEL. EN1
is control pin for AX-12 and EN2 is control signal for G15 servo motor. User may
choose D8 or D2 as control pin for AX-12 communication and for G15, user may
choose D9 or D3 as the control pin of the communication. Figure below shows the
selection jumper for the control pin.
Created by Cytron Technologies Sdn. Bhd. – All Right Reserved
15
ROBOT . HEAD to TOE
Product User’s Manual – G15 Shield
6. Connect G15 Cube Servo or AX-12 after loading user firmware to the Arduino main
board as shown in the figure below. Then power up the whole system.
Created by Cytron Technologies Sdn. Bhd. – All Right Reserved
16
ROBOT . HEAD to TOE
Product User’s Manual – G15 Shield
7.2 40-Pin PIC Start-Up kit (SK40C)
Besides Arduino main board, other controllers such as SK40C can also be used as main board
to G15 Shield in controlling servo motor. SK40C is 40 pin PIC start-up kit designed with
basic on-board input, output components for easy and fast project startup and development.
Figure below shows example hardware interface between SK40C and G15 Shield.
1. Solder 6 ways right angle header pin to JP7 on G15 Shield.
2. Connect G15 Shield to SK40C through the header on JP7. JP7 has 6 pins which are
5V, EN1, EN2, TX, RX,and GND. Connection of the signals are as shown below.
G15 Shield
5V
------------------------GND ------------------------* RX ------------------------* TX ------------------------EN1 ------------------------EN2 -------------------------
SK40C
VDD (5V)
GND
* RX (UART pin)
* TX (UART pin)
GPIO pin (connect only if using AX-12)
GPIO pin (connect only if using G15)
Created by Cytron Technologies Sdn. Bhd. – All Right Reserved
17
ROBOT . HEAD to TOE
Product User’s Manual – G15 Shield
* Please take note that the TX and RX lines connecting both G15 Shield and SK40C
are not swapped in this case.
3. For the use with main controller other than Arduino, user will need to supply power to
G15 and AX-12 servo from the EXT_MPWR connector (JP1) as shown in the figure
below. Ensure that EXT pad is soldered to MPWR pad on MPWR_SEL.
4. Load user’s firmware to SK40C. Connect G15 or AX-12 servo motor to G15 Shield
ports. Then power up the system.
Created by Cytron Technologies Sdn. Bhd. – All Right Reserved
18
ROBOT . HEAD to TOE
Product User’s Manual – G15 Shield
Created by Cytron Technologies Sdn. Bhd. – All Right Reserved
19
ROBOT . HEAD to TOE
Product User’s Manual – G15 Shield
8.0 WARRANTY
●
●
●
●
Product warranty is valid for 6 months.
Warranty only applies to manufacturing defect.
Damaged caused by misuse is not covered under warranty
Warranty does not cover freight cost for both ways.
Prepared by
Cytron Technologies Sdn. Bhd.
19, Jalan Kebudayaan 1A,
Taman Universiti,
81300 Skudai,
Johor, Malaysia.
Tel:
Fax:
+607-521 3178
+607-521 1861
URL: www.cytron.com.my
Email: [email protected]
[email protected]
Created by Cytron Technologies Sdn. Bhd. – All Right Reserved
20