1
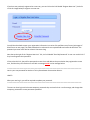
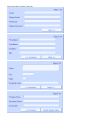
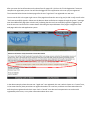
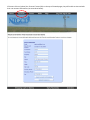
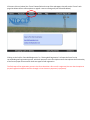
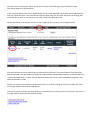
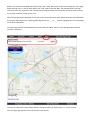
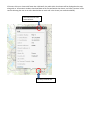
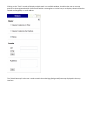
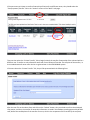
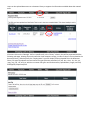
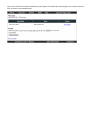
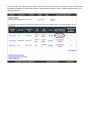
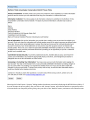
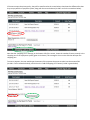
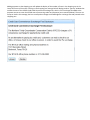
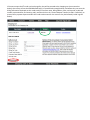
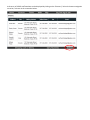
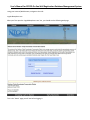
User’s Manual for NTGCD On-line Well Registration Database Management System
Using your Internet/Web browser, navigate to the URL:
ntgcd.dbstephens.com
When you first open the ‘ntgcd.dbstephens.com’ site, you should see the following web page:
This is the “Home” page you will see before logging in.
If you have not previously registered as a new user, you can click on the link labeled “Register New User” (circled in
red in the image below) to register as a new user.
You will then be asked to enter your registration information in a series of 4 small data-entry forms (see images of
blank forms on next page). The fields marked with a red asterisk are required fields and cannot be left blank. The
password you enter must also be at least 6 characters long.
Note that to the right of the “Register New User” link, is a link labeled “Email My Password”. A user can use this link if
they have forgotten their password.
If they select this link, they will be prompted to enter the e-mail address they used when they registered as a new
user, and then they will receive an e-mail with a message similar to the message below:
============================================================================================
Here is your new password for Northern Trinity Groundwater Conservation District:
L2NEF2
When you next log in, you will be required to update your password.
============================================================================================
The user can then log in with the new temporary password they received in their e-mail message, and change their
temporary password to a new permanent password.
Four forms used to register a new user:
After you enter the last information on the above form for page 4 of 4, click on the “Finish Registration” button to
complete the registration process. You will then be logged in to the application as the user you just registered.
The screenshot below shows the home page after the user “ntgcd user” has registered as a new user.
You can see the link in the upper-right corner of the page that allows the user to log out (circled in red), as well as the
“You have successfully signed in. Please use the buttons above and below to navigate through the system.“ message
near the middle of the page (also circled in red), indicating that the user has successfully signed in (logged in), and
that the user can now click on the various button links along the top and bottom of the page to navigate to other
web pages within the web application system.
In the above example, where the new user “ntgcd user” was registered, this user is what is known as a “normal” user,
in the sense that they have permissions to register themselves as a new user, and then see information about the
wells they have registered under their name. Such a “normal” user does not have permission to see the wells
registered by other users, or any other information about other users.
If the user clicks on (selects) the “Account” button/link on the top of the web pages, they will be able to view and edit
their user account information (see screenshot below).
If the user clicks on (selects) the “Forms” button/link on the top of the web pages, they will see the “Forms” web
page that allows them to select options to register a new or existing well (see screenshot below).
Clicking on the links for “New Well Registration” or “Exisitng Well Registration” will open the forms for the
corresponding well registration process, which will present a series of multiple screens that replicate the functionality
of the current paper forms used for these two types of well registration.
The final steps of the registration process is the form submission. After a well is registered, the user has the option to
pay well registration deposits and fees through on-line electronic payments (e-payments).
If the user clicks on (selects) the “Wells” button/link on the top of the web pages, they will be able to view
information about their registered wells.
In the screenshot below, there are no registered wells for this newly registered user as they have not registered any
wells yet. Notice that there is also a link labeled “Switch to Map View” near the lower-left portion of the page, that
allows the user to switch to a map view of their wells, instead of a tabular/grid view.
The example below is the data grid view for the user ‘ntgcd user’ that currently has one registered well.
If the user selects one or more well records, by checking the check boxes in the column labeled “Select Record for
Map or Download”, they can display the records on a map interface, or download the data for the selected wells to a
“comma-separated values” (.csv) file, that can then be used directly in Excel or other spreadsheet programs or text
editors that handle .csv files.
The user can choose to download the selected wells data to a .csv file by clicking on the link in the lower-left corner
of the page, labeled “Download Selected Records”.
The user can choose to display the selected wells on a map interface by clicking on the link in the lower-left corner of
the page, labeled “Display Selected Records on Map”.
Below is a screenshot of the Map View of the current user’s wells. Notice that on the lower-left portion of this page,
below the map view, is a link to switch back to the “Grid” view of their well data. The example below is the map
interface for the user ‘ntgcd user’ that currently has one registered well, and the location of that one well is shown
on the map, marked by a small, green circle.
Note: The registered wells displayed on the map can be restricted to those wells registered between specified dates
by using the date ranges in the “Showing Wells Registered From ___ to ___ controls, highlighted in the red rectangle
on the screenshot below.
The same map interface will be displayed if the user selects the “Map” button on the web application interface
(circled in red below).
The user can select other map interface tools by clicking on either the “Select Layers” or “Tools” controls
near the upper-right portion of the map (circled in blue above).
Clicking on the “Select Layers” control will display multiple controls in a scrollable window, that allow the user
to determine what map layers and features are visible, including registered wells, historic wells, aquifer layers, FEMA
floodplain information, and aerial photography layers, as well as setting the map zoom-level to the extent of Tarrant
County.
If the option to show ‘Historic Wells’ is selected (see screenshot below), then ‘Historic’ wells will be displayed on the
map, using icons that show ‘clustering’ of well locations, with blue icons indicating a cluster of 1-9 wells, green icons
indicating clusters of 10-800 wells, and red icons indicating clusters of more than 800 (801+) wells.
If the user clicks on a cluster with fewer than 1,001 wells, the wells within that cluster will be displayed on the map,
along with an ‘information’ window, that shows data on the first well within that cluster, and ‘next’/’previous’ arrow
controls allowing the user to see more detailed data on each well in the cluster (see screenshot below).
Next well/Previous well
arrow controls.
Currently selected well.
Clicking on the “Tools” control will display multiple tools in a scrollable window, that allow the user to use map
queries to show registered and/or historic wells within a rectangular or circular area, or to display a location based on
latitude and longitude, or street address.
The “Switch Basemap” sub-menu is used to switch the underlying (background) base map displayed in the map
interface.
If the user wants to initiate a transfer of ownership of their well to a different owner, they should select the
“Fees/Payments/Transfer” link in the “Actions” column of the “Wells” web page.
They can then select the “Initiate Transfer” link to begin (initiate) the transfer of ownership of the selected well to a
different user. Transfers are only allowed for wells with a zero balnace of fees due. The recipient of the transfer, i.e.
the intended new well owner must also be a registered user in the NTGCD DBMS system.
If the user selects the “Initiate Transfer” link, they will be presented with the following form:
After the user fills out the above form and clicks on the “Submit” button, they are asked to confirm the submitted
information, and then, the transfer of ownership information is saved in the database, pending approval by NTGCD
staff, before the second phase of the transfer can occur, which is the acceptance of the transfer by the recipient.
Users can also upload documents to a document library to support the information available about their owned
wells.
If the user clicks on the “Manage” link for a specific well, in the “Library” column, they will be presented with the
following web page, allowing them to browse their local computer storage, in order to select a file to upload to the
document library, and also specify the “Display Name” to use for display of that uploaded file in the document
library. File types for uploads are restricted to file types (filename extensions) of .pdf, .doc, .docx, .xls, .xlsx, .txt,
.jpeg, .png, .zip, .tiff, and .csv, which are common file types used for documents, spreadsheets, images, text files,
and zipped (compressed) files.
Once one or more files have been uploaded, they will appear in the Well Library web page for the currently selected
well, as shown in the example below:
From the screen that displays the user’s wells, the user can also choose to use an e-payment system to pay for well
registration and water use fees by selecting the “Fees/Payment/Transfers” link for a specific well (see red circle in
screenshot below).
Selecting this link will open a “pop-up” dialog window (see above screenshot) displaying the NTGCD Privacy Policy. If
the user accepts the privacy policy, they can click on the “Accept” button, and continue with the e-payment process.
If the user does not accept the privacy policy, they can click on the “Decline” button, and return to the above screen.
If the user accepts the privacy policy, they will be transferred to the screen below, that shows the different fees that
they can pay with the e-payment system, along with the current balance (circled in red in the screenshot below).
Note that the “Shopping Cart” message, on the bottom-left of the screen, shows the number of items currently in the
shopping cart of the e-payment system (green circle above). This message is also an active link that will open the
shopping cart.
To enter a payment, the user would type the amount of the payment they want to make into the amount field
(circled in red in screenshot below), and click on the “Add to Shopping Cart” button (circled in green below).
Adding payments to the shopping cart will update the display of the number of items in the shopping cart in the
lower-left corner of the screen. Clicking on the shopping cart message link will display another “pop-up” window that
notifies the user of the NTGCD Credit Card Convenience Surcharge Fee, which is a 3% surcharge fee added to the
payment amount to cover the NTGCD costs of processing credit card payments (see screenshot below). The user can
accept or decline this message, but has to accept the message to acknowledge the surcharge fees and proceed to the
shopping cart.
If the user accepts the 3% credit card surcharge fee, they will be proceed to the shopping cart (see screenshot
below), where they will see the NTGCD Refund Policy (in rounded red rectangle below), and where they can enter the
billing information displayed on their credit card (first and last name, billing address, state, and zip code, credit card
number, expiration date, and security code), and then click on the “Process Request” button (circled in red below), to
process the e-payment request and bill their credit card account for the amount they had entered (circled in green
below).
A directory of NTGCD staff members can be displayed by clicking on the “Directory” link on the bottom navigation
menu bar, as shown in the screenshot below: