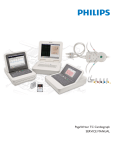
1
Design of a Digital Choral Folder Design of a Digital Choral Folder Inspired by Professor John Delorey, ACDA Director of Choral Activities at WPI A Major Qualifying Project Report Submitted to the Faculty of the WORCESTER POLYTECHNIC INSTITUTE in partial fulfillment of the requirements for the Degree of Bachelor of Science Submitted by: __________________________________ Joseph McCarthy Jr. [email protected] Approved by: ____________________________ Project Adviser: Provost John Orr [email protected] 10 July 2009 Redacted Version 1 Design of a Digital Choral Folder Abstract Advances in electronic displays have led to the creation of electronic readers such as the Amazon Kindle. Electronic paper (e-paper) technology combines the benefits of electronic displays without many of their typical disadvantages. The goal of this project was to bring e-paper to the realm of choral sheet music by designing a digital choral folder. The project involved digital circuit design and embedded microprocessor programming. This report details the design process for developing a Digital Choral Folder with e-paper, as well as recommendations for completing the design. Portions of this report have been redacted to comply with a Non Disclosure Agreement. The author and advisor have copies of the complete report. 2 Design of a Digital Choral Folder Executive Summary The purpose of this project was to design a digital choral folder, as envisioned by Professor John Delorey. Professor Delorey's idea was inspired by a demonstration he saw of E-Ink technology. E-Ink is an e-paper technology developed at the MIT Media Lab, produced by E-Ink Corporation based out of Cambridge, MA. Professor Delorey is the choral director at WPI. His love for music made him think of an application for the new technology as a means of displaying choral sheet music. Copies of choral sheet music are printed by the tens of thousands and distributed all over the world to schools, professional and amateur choirs, and choral conventions. Often, the paper sheet music will be performed only a few times and then discarded or locked in storage for years. This method wastes space and paper, and can become an organizational nightmare for choral directors and singers alike. Professor Delorey saw the need to bring modern digital storage technology to choral music. The problem was finding a medium through which choral music could be viewed in a concert setting, without printing it. Previous attempts to display music digitally include projection systems and custom tablet PCs. However, Professor Delorey realized that the best approach would be to use a screen technology as close as possible to real paper. E-Ink provided the solution to the problem. The first step in this project was to examine previous implementations of digital choral folders, as well as other e-paper technologies such as the Amazon Kindle. The weaknesses and strengths of these products would be examined in the context of a choral performance, in order to arrive at the best possible approach to the problem of delivering a digital choral folder using an e-paper display. The analysis of prior art and Professor Delorey's guidance led to a set of design goals to be met for the project. These goals included using two screens and displaying PDF documents natively, while maintaining a lightweight design. The next step in this project was to obtain the e-paper screens from E-Ink along with the necessary driving circuitry. E-Ink Corporation was chosen because Professor Delorey had previously made contact with them, and because they provide a of development kit suited to this project's needs. It was determined that the AM-200 EPD Prototype Kit was the most appropriate for this project. This kit comes with an e-paper display panel, the Metronome IC which interfaces with the display, a host system comprised of a Gumstix motherboard and an Intel microprocessor capable of driving the Metronome, and some startup software. The AM-200 kit provided nearly everything necessary to develop the digital choral folder. However, the development kit did leave out a few key pieces necessary for implementing a complete design. For one, there was no second e-paper panel, which had to be ordered separately. Also, there was no method for driving both screens using only one Metronome controller. Finally, the included software was primitive and incapable of drawing PDFs natively. Therefore, the bulk portion of the project was to design solutions to these missing pieces. 3 Design of a Digital Choral Folder In order to design a two screen device there must be some sort of switching action, so that one screen can be drawn without interfering with the image on the other screen. With only one Metronome IC available for this project, the switching had to be performed at the panel. The basic idea was to develop a circuit which could be inserted into the development kit at the output of the Metronome display driver, with two outputs connected to two different panels. Only one output would be active at a time, and the inactive output would not communicate fully with its panel. In this way, the active panel could be drawn to and then deactivated while maintaining its image information. Then the second panel would be activated and drawn to with a different image. This design relies on the fact that e-paper has “persistent images”, meaning the display panel will maintain its image even when completely unplugged. The 30 pins connecting the panel to the Metronome were examined and a switching strategy was developed. It became apparent that only some of the signals between the panel and the Metronome needed to be switched. For example the ground reference was not required to be be disconnected from the inactive panel while updating the active panel. At first, the design approach was to switch all of the data and control signals from the Metronome. This was found to be inadequate and a new strategy was developed which switched fewer signals. The final switching approach ended up switching just two of the signals from the Metronome. The software goals for this project included designing a menu navigation system for displaying digital choral sheet music in PDF format. PDF was chosen because it is the most common format for sheet music. The development kit initially only has the capability to display PPM images, a very basic image format. Although it is possible to convert images from PDF to PPM, it was desired to display PDF natively to avoid the slow conversion process. In order to do this the kit would have to run the Linux graphical software called the X Window System, or just “X”. This required the crosscompilation of a more recent Linux kernel, which has a modules called metronomefb and defio. Metronomefb is a kernel module which allows the AM-200 development kit to display an X server on the E-Ink screen, along with any programs which run on X such as a PDF viewer. Defio provides a solution to problems associated with the e-paper's update latency. The final step in developing the software was to design a program to run on the Linux X-server that would display PDFs selected from a menu. The four buttons on the development kit would provide the necessary input. After 6 terms of development the project was not as far advanced as it might have been. The dual screen PCB was designed and redesigned multiple times, and the final design was not implemented and tested due to time restraints. Although some basic software was developed, a fully functional program using the desired Linux kernel modules was not achieved. However, the development process revealed that solutions to these problems are not beyond the realm of possibility, and another project should be able to start where this one left off and complete the design. 4 Design of a Digital Choral Folder Table Of Contents Abstract Executive summary Table of Contents List of Figures and Tables 1 Introduction 2 General Background 2.1 History of Sheet Music 2.2 Prior Art 2.3 Hands-on Background Research 3 Technical Background 3.1 E-paper 3.1.1 E-paper Technologies 3.2 AM-200 Development Kit 3.3 Active Matrix Addressing 3.4 Signal Switching 3.5 Software Development on the E-Ink Kit 3.5.1 Thinspace API 3.5.2 Linux Development 4 Project Specifications 5 Design Options 6 Design 6.1 Two Screens 6.1.1 Datasheet Information 6.1.2 Breakout PCB 6.1.3 Designing a Two Screen Solution 6.1.4 Dual PCB Configuration 6.1.5 Two Screen PCB Design 6.2 Displaying a PDF 6.2.1 Thinspace Development 6.2.2 OpenEmbedded Linux Development 7 Results 8 Future Considerations 9 Conclusion References Acknowledgments Appendix A: E-Ink Corporation Appendix B: Thinspace Software 2 3 5 6 7 8 8 11 12 15 15 15 17 20 20 21 22 24 28 29 31 31 31 40 44 51 54 57 57 59 63 64 65 66 67 68 69 5 Design of a Digital Choral Folder List of Figures and Tables Figure 1: Early Cuneiform Musical Notation Figure 2: Woodcut Musical Print in Black and Red Figure 3: Original Musical Lithograph Stone Figure 4: Modern Printed Music Figure 5: Hammacher Schlemmer Electronic Music Stand Figure 6: The Prototype in Action Figure 7: The Concept of Electrophoretic E-Paper Figure 8: AM-200 E-Ink Development Kit Figure 9: AM-200 Development Kit System Block Diagram Figure 10: Active Matrix TFT Array Figure 11: Buffer Logic Symbol Figure 12: GNOME Desktop Based on the X Window System Figure 13: SmallX Desktop Based on Xfbdev Figure 14: Metronomefb and Defio in Action Figure 15: Host System Connection to the Metronome Figure 16: Metronome Connection to the Display Panel Table 1: Metronome Pins on the Host Interface Figure 17: Data Frame Format Figure 18: Metronome Command Codes Figure 19: Format of the Top Padding Lines Figure 20: Frame, Line, and Pixel Clocks and PDOE Table 2: Metronome Pins on the Gate and Source Driver Interfaces Figure 21: nnnnnnnnnnnnnnnnnnn Source Driver Block Diagram Figure 22: nnnnnnnnnnnnnn Gate Driver Pin Connection Diagram Figure 23: Source Driver Process Figure 24: Unsoldered Breakout PCB Figure 25: Breakout PCB with 30 Pin Connector Attached Figure 26: nnnnnnnn Frequency Measurement Figure 27: nnnnnnnnnnnnnn During an Image Update Figure 28: Host Interface Interception Strategy Figure 29: Gate Driver Mode Selections Figure 30: nnnnnn Rise Time Measurement Figure 31: nnnnnnnSupply Circuit from the Lyre PCB Schematic Table 3: Switching IC Requirements Figure 32: SN74LVC125A Quad Line Driver Logic Diagram Table 4: 74LVC125A Characteristics (-40 to +85 °C) Figure 33: Two Screen Switching Strategy Figure 34: Dual PCB Configuration Figure 35: Dual PCB Testing Setup Figure 36: Two Screen Circuit Diagram in Multisim Figure 37: Two Screen PCB Layout in Ultiboard Figure 38: Two Screen PCB 3D Render Figure 39: Metronome Image Update Modes 8 9 9 10 12 13 16 18 19 20 21 25 25 27 31 32 33 34 34 35 36 37 38 39 40 41 42 43 44 45 46 48 49 49 50 50 51 52 52 55 56 57 58 6 Design of a Digital Choral Folder 1 Introduction E-paper is a relatively new technology with a myriad of applications in the realm of digital displays. It looks like paper, and like paper it requires no back light, is lightweight, and draws no power when displaying a static image. However, the image on an e-paper display can be changed electronically. This amazing material has already been successfully integrated into electronic readers such as the Amazon Kindle, and its popularity may continue to rise as it improves with higher resolutions, faster refresh rates, and the introduction of color images. For now, however, the limits of e-paper restrain its uses to gray-scale displays that do not need to update very often. [7] Professor John Delorey, the choral director at WPI, saw a demo of e-paper by E-Ink Corporation, a Cambridge based company which has developed the technology since 1997. He instantly thought of an application for E-Ink's displays which would not suffer from their limitations – a digital choral folder. His idea sparked this MQP, which documents the design and development of the digital choral folder using e-paper technology. The process began with Professor Delorey's idea and developed into a full project involving embedded microprocessor programming and digital circuit design. Numerous problems plagued the project from beginning to end, and the final results fall short of the initial design goals. Tho results of this project are a completed design for a PCB circuit which will enable two screens to be driven using one Metronome chip, and the software needed to display PDFs natively. This project is incomplete, however, the process of struggling to bring the idea of a digital choral folder to life has been very educational, both in terms of engineering design and project management. 7 Design of a Digital Choral Folder 2 General Background In order to develop this project properly, is important to have an understanding of the background of its constituent parts. As the goal of the project is to create a sheet music reader, this background section will present a brief history of sheet music. Also included is an overview of prior attempts to bring musical scores into the digital realm. Finally, this section will cover the hands-on research that was conducted with Jamie Barriga here at WPI and at the Hartford, RI convention of the American Choral Directors Association (ACDA), which we attended with Professor Delorey. The results of that research greatly helped to shape the design goals of this project. 2.1 A History of Sheet Music Ancient Music. Musical notation has been recorded on engravings and handwritten on parchments since at least 1400 BC, the approximate date of the oldest known song engraving. The piece is a hymn, recorded in the Hurrian language and excavated from the Syrian city of ancient Ugarit. [15] Figure 1: Early Cuneiform Musical Notation Ancient civilizations from around the world including the Greek, Chinese, and Mesopotamian cultures developed their own musical notation systems in addition to the songs passed down as part of oral history, but mass production was impossible and portable music was rare. Despite this, manuscripts of handwritten music became more common as time passed, and by the 12th century western music was regularly recorded on parchment manuscripts. Even as late as the early 19th century, some western music was hand written in beautiful fashion by monks, performers, and scholars. These artful scores are called “illuminated” manuscripts because of the amount of decoration and detail that went into their creation. [13] Early Printing. Even though Gutenburg's printing press revolutionized typography in 1440, musical scores were not commonly printed via the press until late in the 15th century. This is because music notation was not standardized, and the number of different possible symbols and elements was much greater than the amount used in the romance languages. Often, the staff lines and lyrics of a musical piece would be printed with a press, and the musical notation would be added manually afterward. The first fully printed sheet music came out around 1473 in Germany, in a the Constance Gradual. Music printing was enabled in this time by the invention of woodcut printing. Woodcuts are simply wood carvings of the pages to be printed, not unlike modern day stamps. 8 Design of a Digital Choral Folder Soon printed music became the most common means of circulation. By 1500, missals and hymn books were distributed throughout Europe Despite the complexity and number of musical symbols, printing technology continued to advance, to a point where music could be printed and distributed with relative ease. Figure 2: Woodcut Musical Print in Black and Red The perfection of movable type fonts for musical notation was a great step forward for the music printing industry, and by the 17th century musical printing was nearly on par with plain text printing. [13] Lithography. The next advancement in music printing came with the invention of lithography. Like woodcut prints, lithographs were engravings of pages of music which could be used to stamp ink on a blank medium. However, lithographs could be created through chemical processes rather than the laborious and skillful carving necessary for woodcuts. Lithography was invented by Alois Senefelder, a playwright who could not afford to print his work with typical methods. After some experimenting, Senefelder found that he could etch an image on limestone using nitric acid. The resulting raised image was ideal for printing. [13] Figure 3: Original Musical Lithograph Stone In 1796 Senefelder printed the first lithograph of music, a piece by his friend and composer Franz Gleissner. Soon lithography was perfected, and color was added using 9 Design of a Digital Choral Folder chromolithography. Color was added by passing the same page through multiple printings, adding one color at a time. The invention of the camera took music printing a step further. Called photo lithography, the new process involved taking photos of sheet music and transferring the image onto a light-sensitive material. Zinc was used as a cheap and lightweight alternative to to the limestone wheels from older lithographs. By 1860 the process of photo lithography was perfected, and musical scores could be printed by the thousands per week. [13] Modern Printing. Currently, sheet music is produced on modern printers, which use computers, robotic components, and magnetic principals to paint ink on paper in a way that is both accurate and reproducible on a mass scale. Despite the advances in printing technology, the use of paper or parchment for the final product - a sheet of music - has dominated the industry for over 500 years. Paper is used because it is cheap and abundant, but more and more, concerns over the environment have led people to devise new ways in which music can be viewed without wasting a sheet of paper for every page of music. Computer screens offer a possible solution to the problem, because they can display many pages on a single screen. Along with digital storage and a processing core, a single computer screen can display an unlimited number of musical scores. However, current technologies such as CRT, LCD, and plasma screens are bulky, and require a constant and not insignificant power supply to produce an image that is inferior in many ways to a printed page. The glow of a monitor is distracting in a performance setting, and other limitations such as viewing angle and visibility in varied lighting conditions prevent computer screens from fully replacing sheet music today. Figure 4: Modern Printed Music Digital Sheet Music. Today, sheet music is often transferred and read on computers. Although the printed page is still the accepted standard for music, the advantages of digital storage and the speed of computers make a digital music format desirable, at least for temporary purposes. There exist many computer programs for musical notation to create or reproduce musical scores digitally, but there is a major drawback to using these programs simply to store, read, or print electronic sheet music: they are not standardized formats. In fact, for someone who merely desires to read or print their digital music, 10 Design of a Digital Choral Folder those programs are an unnecessary hassle. Digital sheet music is most often found in a format which has become the de facto standard for advanced documents – the Portable Document Format, or PDF. This format was devised by Adobe and can easily display both images and text, which is the exact requirement for digital sheet music. PDFs can be read on nearly any computer system without the need for a large software download. In fact, the required software to view and even edit PDFs is free, and comes standard on most operating systems. Therefore, PDF has become the standard for digital sheet music. 2.2 Prior Art Although there has not been a major move in the music industry toward electronic displays, there have been a few attempts to move away from paper as the medium. None of these solutions are complete, and none have become widely popular. However, their existence hints to the fact that, with the advent of the digital age, music will not be left behind in paper format. Projection Systems. One idea to modernize the display of sheet music is a projection system. This idea comes in two flavors – a personal projection system, and a mass projection system. The personal projection system is best described by US patent 3992088, called the Blankette projector, filed in 1975. This system uses translucent film cassettes and a backlight to project music onto a screen for viewing. A large number of musical scores may be stored on the cassette, and a motor or manual crank can be used to select the page which is displayed. A mass projection system uses a similar concept, but projects the music onto a larger display above or behind the music director, in the fashion of an overhead projector. While these methods address certain problems associated with paper music, they are far from ideal solutions. The Blankette system eliminates paper, but the projector requires a considerable amount of room to recreate the small cassette images on a readable scale. Also, the backlight requires a constant power source and may be distracting in a performance setting. Furthermore, each performer must have a cassette for the desired piece, and each cassette must be made independently. The mass projection system has different limitations. For instance, if a song requires a significant number of different parts, such as bass, tenor, and alto, a single projection might be inadequate. Also, the projector forces the eyes of the performers away from the director. It is also difficult to coordinate a page change among performers who may have different personal preferences as to when they like to turn the page. Digital Music Stands. Another attempt to bring electronic displays to musical performances, which has had more success than projection systems, is the digital music stand. This idea brings LCD monitor technology into the picture. US patent 7041890 for an Electronic sheet music display device exemplifies this idea. There are various products already on the market which fit the description of this patent, including the Electronic Music Stand from Hammacher Schlemmer. This stand includes an LCD monitor and software which displays musical scores electronically, as if on a personal computer. The benefits of this type of product are many, but there are still the limitations of a power-hungry screen, a three hour battery life, and a backlight which is undesirable 11 Design of a Digital Choral Folder in a performance setting. Also, the flickering of an LCD monitor can cause headaches and motion sickness. This flickering is due to the constant updating of the screen which is required to maintain an image on an LCD. While a fast enough refresh rate, usually quoted around 75 Hz, can nearly eliminate flickering, some sensitive people may still notice the annoying effect at high refresh rates. Another drawback to this type of display is its weight, which is too great to hold comfortably with proper posture for the duration of a performance. The stand is not made to be held in hand, and although it works for instrumental performances, choirs would find it uncomfortable to say the least. Another major drawback to this type of stand is the fact that it comes standard with only one screen, while performers are accustomed to performing with two pages visible at a time. Professor Delorey has studied a one page system versus two pages, and he has determined that the performances were of consistently lower quality when the performers read from a single page at a time. Finally, the price of this kind of device is a drawback for most performers. Figure 5: Hammacher Schlemmer Electronic Music Stand It is apparent that the prior art available for electronic musical displays leaves something to be desired from musicians, especially choral performers. Also, there is a decided lack of popular interest in such devices. This is probably due in part to their price and the limitations of screen technology. Based purely on the prior art, the market for electronic music readers is missing a lightweight device that can be held in the crook of the arm like a choral folder, with a low-power display and no backlight. Such a device was inconceivable until recently, with the introduction of a new technology called e-paper. 2.3 Hands-on Background Research While a knowledge of musical printing history and prior art for digital music readers is important for developing a new music reader, it can't replace hands on market research. With this in mind, Jamie Barriga and I organized a trip with Professor Delorey to the 12 Design of a Digital Choral Folder ACDA convention in Hartford CT in mid-February of 2008. Jamie was a Computer Science senior at WPI, working on his own MQP on the subject of human-computer interaction. Together we devised a survey which we could use to study the crowd's reaction to an electronic music stand with various iterations of software. Prototype. The first step in devising the survey was to have a mock-up of an electronic music stand to use for the survey, along with the software to display music on two screens. We obtained from WPI a tablet PC along with a secondary LCD monitor, and I connected them together with a standard monitor cable. The software to use both screens simultaneously was already included on the system, so the only missing components were a realistic input method and the software to draw the correct pages on each screen as the user browsed through a musical score. We also needed a case to house the system, hide its exposed wires, and cover inconsistencies such as the fact that the two screens were of a different size. While I built the case and buttons, Jamie wrote the necessary code for the system to display music properly and carefully devised a survey to go along with the prototype. Figure 6: The Prototype in Action The buttons on the prototype were devised from a wireless mouse. The mouse was taken apart to reveal the contacts for the left and right mouse click buttons. Wires were soldered to those contacts, which led to momentary switches obtained from the WPI ECE parts shop. Blank bottle caps were attached to the buttons to create a large surface area to push. The buttons were secured at the lower right and left corners of the prototype's case. The case itself was made from a wooden ply-board back frame with a rectangular block of wood screwed into the bottom to support the screens. The buttons were positioned on either side of the support block. A black painted cardboard cover was designed with two small round holes for the buttons and two larger rectangular holes for the screens. There were no sides on the prototype so that the tablet PC and secondary monitor power cords could be plugged in. The disassembled wireless mouse used for the buttons was placed between the screens, hidden by the cardboard cover. The entire device was rested on a 13 Design of a Digital Choral Folder metal music stand and secured with duct tape to prevent it from tilting over backwards. This mock-up was primitive but effective. It had the capability to display a two-page view of a musical score and navigate the music with the buttons. Jamie's code only needed to interpret mouse presses to include full button functionality. An unmodified mouse and a keyboard was plugged into the device before it was deployed in order to setup and start Jamie's software. The Hartford ACDA Convention. The prototype had multiple purposes at the Hartford ACDA Convention. It was supposed to provoke a reaction from the attendees, to give a general idea of how a similar device would be received by the choral community. The idea of a digital choral folder has not been extensively tested in the market, and this prototype could provide feedback from potential consumers. The prototype was also used to conduct a much more specific survey pertaining to Jamie Barriga's MQP. Jamie developed a questionnaire to determine the reaction to different software iterations which employed two distinct methods of page turning. The choral community was eager to try the prototype. In order to get a substantial number of survey responses, Jamie offered the incentive of a raffle prize for participants, an “i-pod shuffle” music player. Even without the prize, however, there was a good deal of interest in an electronic choral folder. The advantages of mass-storage devices and electronic displays were apparent to the convention attendees, even those with very limited knowledge of electronics and computers. They seemed enthusiastic to have engineers working on advances in music technology, and hopeful that one day they would see such a product on the market. Attendees also showed enthusiasm in offering constructive criticism of the prototype. This was the most valuable result of the Hartford convention, as it helped to refine the final design goals for the project as well as confirm some assumptions. Specifically, the survey participants expressed a desire for a display that would be easy to read in many lighting conditions. Equally important, they desired a lightweight device that would be comfortable to hold and encourage good posture and stance, which to a choir singer translates to a good vocal sound. Finally, everyone at the convention confirmed Professor Delorey's assertion that two screens were absolutely necessary in a digital folder device. It is not surprising that the scrutinizing survey participants identified the major flaws of the prototype and listed them as the barriers to a marketable design. The LCD screens had slightly different color, brightness, and contrast levels. This led to a display that was more difficult to read than a single large screen, or two matched screens, would have been. The prototype also was extremely cumbersome and was difficult to adjust. This caused users to take an awkward stance, and was less comfortable than a lightweight device would have allowed. However, the flaws themselves were illuminating in dictating the course of the design for this project, especially in identifying the most important design goals. In this way, the Hartford convention and the prototype digital folder device were key aspects of this project's development. 14 Design of a Digital Choral Folder 3 Technical Background A thorough understanding of the technology and science behind this project is required to develop a comprehensive solution to the major design goals. The details and inner workings of e-paper technology are covered in this section, as well as the specifics of the AM-200 development kit from E-Ink Corporation. Also, the development kit software is reviewed, as well as the Linux kernel module Metronomefb. Finally, the concept of electronically passing or blocking a signal is overviewed. 3.1 E-paper The overall concept of electronic paper is relatively simple, although the advanced materials science and electrical technology required to make a high resolution screen is no easy achievement. The concept is not unlike that used in the “Etch-a-sketch” childrens toy. A charged material is sent to either the top or bottom of a transparent container, creating a gray-scale image. However, unlike the simple Etch-a-sketch, epaper utilizes a dense array of pixel components with dark and light states which are controlled individually with an overlaying array of electrodes. One important feature of e-paper is the fact that an image created on an electronic paper display is persistent. A persistent image is maintained even when the device has no power. It does not require constant refreshing like an LCD. In fact, the image will remain for a great length of time, making e-paper ideal for an application where the screen image does not change often. Another important feature of all e-papers is the lack of a backlight. An LCD monitor requires a powerful backlight to shine through the pixels and illuminate them. E-paper, on the other hand, merely reflects and absorbs ambient light, in the same way regular paper does. These two features – persistent images and no backlight – are perhaps epaper's most advantageous when compared to conventional electronic displays. [7] 3.1.1 E-Paper Technologies Various electronic paper technologies have come about since their inception in the 1970s. While some technologies have proven better than others, there is a constant improvement in the science behind the screens, leading to higher resolutions, faster refresh rates, greater visibility, and the use of color in the displays. Gyricon Display. The first e-paper was developed by Nick Sheridan in the 1970s. The technology was developed at Xerox’s Palo Alto research center and dubbed Gyricon due to its use of rotating beads. The microscopic beads, in the realm of 100 micrometers in diameter, were made of polyethylene and consisted of two hemispheres of oppositely charged plastics, colored black (negative charge) and white (positive charge). The beads were suspended in a transparent oil to allow free rotation. Electrodes could be used to apply a field across the beads, causing them to rotate to align with the field. Depending on the polarity of the applied field, the spherical beads would show either their black or white hemispheres. [7] Electrophoretic Display. An electrophoretic display is another, more recent e-paper 15 Design of a Digital Choral Folder technology which uses thousands of capsules filled with charged pigment particles to form an image. The concept is very similar to Gyricon but employs particles suspended in a fluid rather than solid beads with dual-colored hemispheres. Each capsule contains a chemical mixture consisting of highly reflective, electrically charged particles suspended in a light-absorbing dyed ink. Like a Gyricon display, an electric field is applied to the charged particles in order to bring them to the surface of their containing capsules, or hide them at the bottom. However, an electrophoretic display uses the principal of electrophoresis to move the charged particles. Electrophoresis is the phenomonon whereby charged particles migrate through a fluid when exposed to an electric field. The capsules full of charged particles are placed between electrodes, which apply an electric field of variable polarity through the capsules. Depending on the polarity of the applied field, the charged reflective particles will migrate to the surface of the capsule or to the bottom. Ambient light will reflect off the charged particles or be absorbed by the dark ink, whichever is on the surface of the capsule. Thus, the electric field applied to each capsule determines whether it is “white” or “black” from the top perspective. In one implementation, the charged reflective particles are titanium dioxide (TiO2), also called “titanium white” when used as a pigment. This chemical has a high refractive index at about 2.7, making it an ideal choice for implementation in a display. The titanium oxide particles are suspended in a darkly dyed hydrocarbon oil. The oil also contains various chemicals which give the particles an electric charge. An applied field sends the suspended particles to the top or bottom of the capsule to show either a light or dark pixel. [7] Figure 7: The Concept of Electrophoretic E-Paper Electrowetting and Electrofluidic Displays. Another e-paper technology is based on the scientific principal of electrowetting. Electrowetting is the change in a surface's hydrophobia due to an electric field. When no field is applied to a hydrophobic surface, an electrolytic liquid will bead, as a drop of water on an oily surface. An applied electric field causes a change in the properties of the surface-liquid boundary, causing the liquid to spreading out on the solid surface. This principal may be exploited to create an epaper display by constructing a pixel containing a mixture of dyed oil and water, made from a hydrophobic material. With no field applied to the pixel the oil covers the water, creating a colored pixel. However, with the correct voltage, the electrowetting principal begins to change the properties of the water-container boundary, and the water moves the oil away from the surface of the container. This creates a transparent pixel. If the pixel is placed on a reflective surface, the appearance of a white pixel is achieved. Electrowetting has the advantages of an excellent update speed and low voltage requirements, as well as the capability to display colored pixels more easily than the other 16 Design of a Digital Choral Folder e-paper technologies. A further advance in electrowetting e-paper technology is the socalled electrofluidic display. This type of display uses pixels, each with comparatively tiny containers of colored ink. When a voltage is applied, the ink spreads across the surface of the pixel giving it color. Without an applied voltage the ink retreats quickly into its container, effectively creating a white pixel if the background is highly reflective. [16] This section has demonstrated that e-paper display technologies come in many flavors, and that the technology is in many cases still in its infancy. Although there is a constant development and improvement process in the e-paper industry, the purposes of this project required a working technology immediately. Choosing that technology and finding a way to develop this project with it was one of the major guiding decisions of this project. 3.2 AM-200 Development Kit The choice to use E-Ink Corporation's brand of e-paper was made for two major reasons. One is because Professor Delorey first experienced electronic paper at a demonstration of E-Ink technology. He contacted the people at the sales/marketing branch of the company and received information about their development kits before I was even made aware of this project. The second, more important reason is because of the benefits of working with the E-Ink development kit. At the time of this project's inception, E-Ink offered by far the most advanced and user-friendly development kits for e-paper. Their features and capabilities seemed very well suited for the design of the digital choral folder. When this project began, the best kit available from E-Ink was the AM-200 development kit. This is the second iteration of the active matrix (AM) line of development kits from E-Ink. Kit Hardware. The AM-200 development kit comes with everything required to display images on an e-paper screen, along with some extra features which were especially useful for this project. Most importantly, the kit includes an E-Ink screen manufactured by PVI, and the Metronome display board, housing the Metronome 8T125100A controller chip, which drives the screen. The E-Ink screen is an electrophoretic display (EPD) on a glass substrate. Our display is 8 inches diagonally, but the kit is capable of driving 9.7, 8, 6, and 5 inch screens. The kit also includes the necessary microprocessor and motherboard to send images to the screen through the Metronome. The processor is an Intel XScale PXA255 processor on a Gumstix brand motherboard, which like the name implies is no larger than a stick of gum. Also included is the Lyre expansion board with connectors for two USB connections, DC power input, and for the Metronome board. The Lyre PCB also has “on”, “off” and “reset” buttons. The kit also includes another adapter strip PCB which has four buttons and connections for each of the screen sizes. Finally, the kit has a rechargeable lithium-ion battery, a removable MMC/USB card with 512 MB of memory, and all of the necessary cables. [5] 17 Design of a Digital Choral Folder Figure 8: AM-200 E-Ink Development Kit The image above shows the development kit in full. The screen is on the left with the Vizplex and E-Ink logos being displayed. The two silver rectangles on the bottom right are the rechargeable batteries. Above the batteries on the right is the Metronome board, with the Metronome 8T125100A chip labeled with a white sticker. To the left of the Metronome is the adapter strip PCB with four buttons visible. Above the Metronome is the Gumstix motherboard and Lyre expansion board, housing the Intel processor, and the USB and power connections. The black MMC/USB card is plugged into the Gumstix board at the top right. [5] Connections. The Gumstix board is attached to the Lyre expansion board through a 60 pin Molex connector. The other physical connections between system components mostly use FPC connectors. FPC stands for flexible printed circuit, and like the name implies, the connecting cables are actually thin, flexible plastic circuit boards. The Lyre and Metronome boards communicate through a 30 pin FPC connection. The Metronome and the adapter strip also communicate through a 30 pin FPC. The adapter strip has a 20 pin FPC connecting it back to the Lyre for button communication with the processor, and a set of 40, 39, and 30 pin FPC connections to attach the different sized screens. The 8 inch display in our kit uses the 30 pin connection. All of the FPC connectors used in our kit are 0.5mm pitch. That means that there is 0.5mm, or 20 mil (20/1000 inch) between the wires on the connectors. The physical connectors on the various PCBs are ZIF (zero insertion force) latches, in both the “flip tab” and “slide tab” varieties. These connectors are delicate and are not meant to be continually plugged and unplugged. External connections to the kit include a 2.5mm stereo plug for the DC charger input, and two MiniB USB ports for network and serial connections. There is also an unused 10 pin 18 Design of a Digital Choral Folder FPC serial connection. [5] Included Software. The development kit comes pre-programmed with the Thinspace software collection. This is a set of programs, display drivers, and I/O routines which allow for the development of simple programs using the E-Ink display. Sample programs are included as well, such as software to run a slide show demonstration, and a simple photo browser. The buttons on the Lyre board are used to make selections and start/stop the sample programs. Kit Performance. The AM-200 kit is a complete computer system on a small scale, as can be seen in the block diagram in figure 9 below. The XScale processor can be clocked up to 400 MHz, and runs a version of the Linux operating system. The processor and motherboard are from Gumstix Inc. which develops open source software for the platform based on the GNU/Linux operating system. The lithium-ion batteries on the device allow for many screen updates and lots of system up-time per charge, lasting a couple of days with moderate use. The kit has boot and power indicator LEDs. There is also a red battery charge indicator LED, which turns off when the charge is complete. A full charge takes a few hours. As expected, the display hardware has a very slow update frequency. The E-Ink screen can refresh at about 2 Hz, or twice per second, at best. The MMC card converts to a USB which can be used to transfer files from a PC to the device. The kit's memory can also be accessed through the two miniB USB ports or the wireless bluetooth transceiver. Figure 9: AM-200 Development Kit System Block Diagram 19 Design of a Digital Choral Folder 3.3 Active Matrix Addressing The E-Ink panel uses a common method to update the display called active matrix addressing. This is a process developed in the 1960s for better pixel switching on LCD screens. A matrix of thin film transistors (TFTs) is laid on the bottom of the display substrate, and connections to each row and column of the matrix are made as in figure 10. The TFT gate (row) and source (column) pins are connected to gate and source driver circuitry, which performs the update of the display matrix according to input from a processing unit. [2] A typical active matrix update, called a “scan period”, can be broken into three steps which are repeated for each row of pixels. First, the selected row is addressed by applying the select voltage. This voltage is applied across the row to each TFT gate pin on the row. All other rows are set to the deselect voltage level so they are inactive. Once the desired row is selected, the next step is to apply the correct voltage to each source pin at the same time. The source pins are charged to their proper levels depending on the desired pixel state at the particular location in the display matrix. Finally, when the pixels on the selected row have been set, the gate row is deselected, and the process begins again on the next row of the display matrix. [3] Figure 10: Active Matrix TFT Array An active matrix display requires source and gate driver hardware. The E-Ink panels use the nnnnnnnnnnnnnnnnnnnnn source driver and the nnnnnnnnn gate driver circuits, which are physically attached to the glass panels. These circuits take in TTL data and level-shift them to the voltages required to charge the EPD pixels to their on or off states. The E-Ink display uses nnnnn volts for its source driver, and nnnnn volts for its gate driver. [3] 3.4 Signal Switching In order to switch between two panels without physically unplugging them, some signals must be temporarily blocked from passing through to the inactive panel while the other 20 Design of a Digital Choral Folder panel is updated. The concept of an electrical switch is one of the foundations of electrical engineering. The most basic form of a switch is a physical one that actually disconnects/reconnects the wires in a circuit. However, the simplest electrically controlled switch without moving parts is the transistor. The invention of the field-effect transistor in the early 1900s sparked the modern era of electronics, and is a key ingredient in nearly every modern electrical device, from personal computers to audio equipment, even including the E-Ink panel used in this project. Transistors are three terminal devices which can be combined to influence an input signal and achieve all different types of output characteristics. One of their most common applications is as an electrical switch. Both analog and digital switches have been developed extensively using transistors and are available as stand-alone ICs. There are many kinds and variations of electrical switches, two of which are explained in this section. D-Latch. A data latch, or d-latch, also called a “transparent latch” is an electronic component which can be used as a switch. Basically, a d-latch takes a digital signal input and passes it through unchanged while the device is enabled. When the latch is disabled, the previous value on the output of the latch is preserved and a change in input is ignored on the output. A data latch is a good way to switch a digital signal, but it is not meant for analog signals. The major limiting factor of a d-latch is its response time – the time required for a change in input to be reflected on the output. Buffer Amplifier. An operational amplifier, or op-amp, is an analog circuit component which passes an input signal through with some amplification, or gain. A unity gain buffer, or voltage follower, has a gain of 1. Its logic symbol is shown in figure 11. The output of the unity gain buffer will be nearly an exact copy of the input. However, when the buffer is disabled there is no output on the device at all. The important limits on a non-ideal buffer are its response time and its bandwidth response. Figure 11: Buffer Logic Symbol 3.5 Software Development on the E-Ink Kit The E-Ink development kit comes with a working computer system to drive the display. Software may be written for this system to do all sorts of things. The system is based on the Linux kernel, which may be downloaded and modified for any purpose under the GPL. The kit also includes software development tools called Thinspace, which are a simple set of scripts and programs that interact with the kit hardware. This section will cover the basics of the Linux system on the E-Ink kit, the Thinspace development tools, 21 Design of a Digital Choral Folder and the other tools and methods for developing the programs necessary to interface with the project hardware. Communicating with the Development Kit. To access the operating system on the development kit, a communication link is established between a host system and the kit. The AM-200 system has a few methods for communication, including a serial USB DEV interface and USB NET interface which are accessed through the miniB USB ports on the Lyre PCB. The kit also has bluetooth capability if a wireless link is required. [5] The easiest way to communicate with the development kit is over the USB DEV serial interface. In order to do this, the miniB to USB cable that is included in the AM-200 kit must be plugged into the port on the Lyre PCB labeled “USB DEV” on one end, and any USB port on a host computer at the other end. Then the proper software must be installed on the host computer and it must be made to recognize that the kit is plugged in. To do this on a Windows PC, first the physical connection must be made between the two systems. Then, the kit must be turned on by pressing the power button. Windows will automatically recognize a new device. Simply follow the on screen instructions, telling the host computer to find the software automatically if it prompts for directions. Press finish, and Windows will detect another piece of connected hardware. Repeat the installation process and finally the host computer will be able to make a serial link with the development kit. [5] There are many terminal emulators available on the internet as free downloads, and one must be obtained to access the serial link. The AM-200 User's Guide recommends TeraTerm. TeraTerm must be configured to watch the COM port that the operating system has associated with the serial link. The number of the port can be determined in Windows XP by running the device manager program “devmgmt.msc” at the “Run” prompt in the start menu. Check under the Ports expandable tree for a “USB Serial Device (COMX)” where X is the port number. Open TeraTerm and select a new serial connection using the COM port number that was just identified. Then go to “setup” and “serial port” and set the baud rate to 115200, 8 bit data, no parity, 1 stop bit, and no flow control. At this point the TeraTerm window represents a serial connection to the development kit. If a program is running on the kit, enter “Ctrl+X” in TeraTerm to stop it. The password for logging into the kit is “root” and the password is “gumstix” by default. [5] 3.5.1 Thinspace API The software included with the development kit is called Thinspace. This is an “application programming interface” (API) which enables a kit developer to write code to interact with the kit hardware. Thinspace comes with some pre-built software routines to make the job easier for a kit developer. These routines can poll the buttons and update the screen with a PPM image. Thinspace was developed for users of the older E-Ink kits which used the Hecuba IC rather than the Metronome 8T125100A controller. The 22 Design of a Digital Choral Folder differences between the two are such that software developed for one will not work on the other. However, the MMC card that came with the AM-200 kit has a folder called “Thinspace” containing the software described in this section. Therefore this included software will be referred to as the Thinspace API, although the user manual for Thinspace is based on the obsolete Hecuba board which is not used in this project. All of the Thinspace software works by loading the properly formatted data into a framebuffer setup in the system's memory, and communicating with the Metronome over the AMLCD interface and GPIO pins on the processor. The system's AMLCD interface is given the location of the framebuffer and sends the data out as if it were sending image data to an LCD screen. The Metronome then interprets the received data as a command, waveform, image, CRC, and padding as described in the Metronome's datasheet, then produces an internal set of image data which are relayed to the E-Ink screen. Button Polling. The Thinspace software file get_button.c enables the developer to check the button status on the development kit. First, the GPIO (general pin input output) pins on the processor, which are physically connected to the buttons on the kit adapter board through a 20 pin connection, are mapped in memory. When get_button.c is called it continually polls those pins until it detects that one has been pressed. Then get_button.c returns to the code it was called from with the number of the button that was pressed, 1, 2, 3, or 4. The calling program can then process that number and react to the user input on the buttons. Image Display. Metro_display is another file that is included in the Thinspace API. This piece of code takes as inputs the location of a PPM image, and the location of a waveform file. Both files may be located on the development kit storage or loaded from another system connected to the kit. This software loads the image and waveform files are into the framebuffer along with the properly formatted display command. Then they are sent out to the Metronome board and drawn to the screen. Metronome Setup and Configuration. There are certain steps required in order to get an image to display properly. The Metronome must be initialized so that it is ready to receive a display command. This is accomplished through the metro_init.sh code, which calls other specialized software to get the system ready to draw. First the framebuffer, which contains the command, waveform, and image to be displayed, is initialized. Then the processor's registers and GPIO pins which are used by the Metronome are setup. These include the RDY and ERR signals which the Metronome uses to communicate with the host system. The next step sends the reset command to the Metronome 8T125100A display controller, followed by the command to power up the controller. The setup code then waits for the controller to report that it is ready by polling the RDY signal. Once the controller is ready, it is sent configuration and initialization commands to tell the controller information such as the size of the attached screen. At that point, the Metronome is ready to display an image. Standby Mode and Powering Up. In order to save battery life, it is important to only 23 Design of a Digital Choral Folder send power to the Metronome when it is about to draw an image. There is a standby mode for the Metronome that can save power, controlled by the Thinspace software metro_stby.sh. To wake the controller up from standby mode, the software metro_powerup.sh can be used. 3.5.2 Linux Development Linux is a computer operating system developed by Linus Torvalds in the 1960s. It has since become a major force in the computing world, along with other major operating systems such as Microsoft Windows. Linux is protected under the Gnu General Public License (GPL), a software license that enables developers to freely use and modify the software so long as they also offer those modifications freely to the development community. The Gumstix single board computer that comes with the E-Ink development kit is shipped with a version of Linux. Gumstix has developed a stripped down Linux system which can run on their tiny hardware, but even their small version is feature-rich, with the ability to interact with many peripheral devices including the E-Ink panel. Also, because of the GPL, the source code for the operating system is freely available. If a developer wishes to include extra functionality, they can make the appropriate changes to the Linux source code and recompile it. This robust operating system is the backbone of the E-Ink development kit. Operating Systems. Conceptually, an operating system (OS) is the software that communicates a computer user's commands to the computer's hardware. The commands are interpreted as computer programs that a human must write and interact with. The OS acts as a middle-man so that the hardware is never told to perform a task that would damage the system or cause it to react improperly. It also enables the user to forget about the complicated details of memory management, scheduling, and the physical hardware in the system, and focus on the broader problems which the system is capable of solving. In the case of this project, it would be beneficial to have the OS handle all communication with the E-Ink panel and the Metronome, so that more complicated and useful programs may be run on the kit. The Thinspace API does not provide the integration necessary to use the E-Ink screen in the same way as an LCD on a modern computer. With the proper software the e-paper display could be “transparent”. This means that user software would not need to worry about using the E-Ink panel because it is completely handled behind the scenes within the OS. For example, a program could tell the OS to draw a PDF image, and the OS would take care of processing it into a format suitable for the Metronome controller. X Window System. All popular operating systems have a means of showing graphics on an electronic display. From plain text documents to complicated 3d environments in video games, modern operating systems strive to render the information stored in their memory in a useful and pleasing manner. Graphics processing is an important part of an OS because it can greatly enhance the user experience. Microsoft Windows is a prime example of this, with its familiar “start” menu and folder explorer. Linux also has a system for drawing information on the screen, called the X Window System, often just 24 Design of a Digital Choral Folder called “X”. X is a simple system but is capable of drawing complicated user interfaces (UIs), as evidenced by the beautiful desktop environments which it is the backbone for, such as GNOME and KDE. Figure 12: GNOME Desktop Based on the X Window System SmallX. Although complicated UIs are possible with X, the E-Ink development kit system is small and the hardware is too slow to render such displays. A small, simple version of X is therefore the best for this project. One such program based on X is called smallX, formerly tinyX. SmallX is made for embedded applications, and as such does not require much system memory or storage space. However, smallX can run X applications like XPDF, making it an ideal version of X for this project. The X server that smallX runs is called Xfbdev. [4] Figure 13: SmallX Desktop Based on Xfbdev XPDF. Many software programs are available which use the X Window System, including one called XPDF. XPDF is an open source PDF viewer for X. This program can read and display all kinds of PDF images including encrypted PDFs. Because the EInk kit uses Linux as its operating system, the logical means to display PDF musical scores would be XPDF. Certain modifications could be made to the program so that only the musical score is shown, and not the user interface buttons, as required by a digital choral folder program. This is feasible because the XPDF source code is available under the GPL. 25 Design of a Digital Choral Folder There are some requirements to use XPDF to display images on the E-Ink panel. First, the development kit must run a version of the X Window System. Second, the version of Linux on the kit must support two key kernel modules – metronomefb and defio. Metronomefb Kernel Module. Metronomefb stands for Metronome Frame Buffer. It is a Linux kernel module developed and maintained by Jaya Kumar. This module provides the necessary software to render an image from the X server onto an E-Ink display. It achieves this by setting up a framebuffer which is read by the Metronome board and relayed to the screen. A framebuffer is simply a mapping of an image onto memory before it is displayed. It is used to hold image data while the display device is busy. Metronomefb takes the X Window System image and processes for display on the E-Ink screen. The Thinspace program ppm.c processes PPM images in the same way, but not for the X Window System. [9] Defio Kernel Module. Because of the slow update speed of the E-Ink screen, there is a problem with simply running X on the system. Every time there is a change in the metronomefb framebuffer, it must update the screen. Thus, any action should happen quickly could take a very long time. For example, if a user was typing a document, each character typed would require an image update. Even though a typical typist can type 60 words per minute, the screen can only update about twice a second. This would limit a typist to about 24 words per minute, which is very slow. In order to fix this issue, Jaya Kumar developed the defio kernel module. Defio stands for deferred input/output. This module makes a copy in memory of the metronomefb framebuffer and tells the X server to draw to the copy. Then, periodically, the copied framebuffer is mapped to the metronomefb framebuffer, and any changes since the last update are made all at once on the E-Ink panel. Therefore, when the typist writes characters faster than the screen can update, they are not displayed immediately but are stored in memory and displayed the next time the screen has a chance to redraw itself. [9] The actual mechanism of defio is achieved through page faults. By periodically setting the host memory framebuffer to read-only status, any attempted changes to the memory, which represents the screen image, will throw a page fault. Then, a specific exception handler for defio schedules a delayed write to the actual screen framebuffer. Before this scheduled update, any changes to the memory will be accepted by the system, but it will not attempt to write them to the screen until the update actually occurs. Once the screen is updated, the memory framebuffer is set to read-only once more, and the process may repeat. 26 Design of a Digital Choral Folder Figure 14: Metronomefb and Defio in Action Cross-Compiling. In order for an operating system to interface with computer hardware, it must be specifically designed to run on that hardware. The OS must be informed of the location and nature of the physical connections between the system's processor, memory, and other peripheral devices. Therefore, every time a better computer system is devised, which happens very frequently, a new operating system must be developed for it. The process of designing a new operating system may take months or years if started from scratch. However, usually the process is much faster due to the standardization of computer system architecture. [8] In the realm of slower computers, such as the field of embedded microprocessors, there is another problem in developing software for a new system. The hardware is often so slow or inaccessible that the system would take a very long time to compile the software. Sometimes the target hardware is completely incapable of compiling any of its own software. In order to address this problem, cross-compiling is used. This is the process of compiling the new software on a faster computer and then transferring the completed file onto the slower one. First, a cross-compiling toolchain must be built on the larger system. This generates a compiler which can take software written in common languages such as C and compile programs that can be run on the target hardware. In order to use X, metronomefb, defio, and XPDF, the E-Ink system must be updated with a more recent Linux kernel specifically cross-compiled for the system's PXA255 XScale processor. There are multiple ways to cross-compile software for the E-Ink system on a PC. Two of the most popular and easiest are called buildroot and OpenEmbedded. Buildroot is the method recommended by E-Ink in their user's guide. OpenEmbedded is a more robust alternative which has the greater support from the Gumstix development community. Both methods create a cross-compilation toolchain for the kit's processor and allow for software to be compiled that runs on the kit hardware. OpenEmbedded was chosen for this project because there is more internet community support for this software. [8] 27 Design of a Digital Choral Folder 4 Project Specifications With a good understanding of the background material and a some hands-on market research, as well as the pre-made decision to use E-Ink's version of e-paper and the AM200 development kit, the design goals for this project were beginning to shape up. Based on all of the background research, choral singers and directors would be most interested in: A two screen device which is lightweight and easy to hold properly viewable in many lighting conditions, such as a performance setting low power with long battery life A product with an intuitive interface that can be used by the “computer illiterate” displays PDF images natively Therefore, the major design goals of this project are to design a hardware solution which allows the development kit to display different images on two screens simultaneously, and to develop software which can take advantage of the new hardware and also display PDF documents two pages at a time. 28 Design of a Digital Choral Folder 5 Design Options There are multiple ways in which the project goals may be attained. Even with the choice to use the E-Ink development kit, there are different approaches to enabling the use of two screens. Also, the software solution is open-ended. This section briefly explores the different possible design options. Two Screens. The two e-paper displays must be connected to a single host system, which must have the capability to draw to one screen and then the other. The host system must send an additional bit of information along with its image to be drawn – it must inform the new hardware know which screen is being drawn to. The new hardware must then select that screen by routing the image data to it while blocking the image data from being sent to the inactive screen. One method to achieve this is to acquire two Metronome PC boards. This would provide two outputs for the screens but would require some way to select which Metronome device is active and receiving image data from the host processor. The obvious downside to this method is the fact that the device will use two Metronome chips, which are expensive and take up extra space in the design. Another method is to intercept and reroute the image data from after it is processed by a single Metronome device. This method is attractive because it does not require an additional Metronome. A downside of this approach is the fact that the signal characteristics of the image data leaving the Metronome may be too complicated for digital switching. If analog switching is required then the solution becomes much more complicated. Perhaps the most complicated method would be to redesign the Metronome device itself, using the Metronome 8T125100A IC but modifying the surrounding components so that the image is sent to one of two outputs depending on an input to the new device. This particular method is attractive because it would result in the smallest lowest-level design. However, without a very thorough understanding of the Metronome chip, this method will be impossible. The design options for building the two screen device are varied and have different pros and cons. The final decision on how to approach this aspect of the project can only be made after a closer look at the image signals that pass between the processor, the Metronome, and the E-Ink screen. Software. There are many possible software approaches to achieve the goal of drawing PDFs. One is to use the included scripts from the Thinspace API which can draw PPM images, and to load a program which converts PDF to PPM on the fly. Then, the PDF could be converted and drawn using the already included software. A simple bit of scripting and C programming could then be done to get select the two visible page images and send them out one at a time to the screens. 29 Design of a Digital Choral Folder Another approach is to use a Linux Kernel module to specifically render PDF images in the proper format. This is a much more robust approach, and is especially appealing because of the existence of an open-source module which already has this functionality, metronomefb and defio. This software was specifically designed for use with the E-Ink development kit and is probably the best solution. If this solution is chosen, the system will be able to display any application that runs on the X window manager on the E-Ink screen, including the open source program XPDF. XPDF could then be modified to display two images sequentially, and a control signal could be used to switch between the two screens while each was drawn to. 30 Design of a Digital Choral Folder 6 Design This section begins with an outline of the requirements dictating the design process, and then gives a detailed account of the design for the two screen PCB and the metronomefb software, as well as covering the requirements for implementing the design using the EInk development kit. There was a great deal of difficulty encountered in this process, and that is documented as well, along with the steps taken to try and overcome the problems with the design and with the kit hardware and software. This section will also provide the information necessary for someone to repeat the steps taken during this project's development and to continue work on this idea. 6.1 Two Screens Designing a two screen solution is the major hurdle of this project. There are many possible ways to approach this problem, and the best one for this particular MQP can not be chosen without a clear understanding of the actual signals from the development kit. The first step in this process was to obtain the datasheet and schematics for the Metronome controller and board. These documents do not come with the development kit, and must be requested from E-Ink Corporation. E-Ink requires a signed nondisclosure agreement (NDA) before they will send the documents. 6.1.1 Datasheet Information Once the datasheet documentation was received, it had to be examined in detail to glean every useful bit of information. The datasheet has several tables and descriptions which explain the signal characteristics and functions of the 30 pins which are inputs to the Metronome, and of the other 30 pins which are outputs to the e-paper screen. [10] Figure 15: Host System Connection to the Metronome Both of these 30 pin connections represent a possible point of interception for the implementation of a two screen solution. The question that needs to be answered before a determination can be made is which, if either, is the best option for a quick and 31 Design of a Digital Choral Folder effective solution. The descriptions given in the Metronome datasheet are the best place to start to find that answer. Therefore, a summary of all of the communication signals and their function as described in the Metronome 8T125100A datasheet is given in this section. [10] Figure 16: Metronome Connection to the Display Panel Host-to-Metronome Interface. The connection between the Metronome board and the development kit processor is a 30 pin FPC ribbon cable. Each of the pins is used but there are some signals which repeat such as the 0 V ground reference. The table shown below names and describes the signals that come from the processor and go to the Metronome board. Such signals are said to be on the host interface, because they communicate with the development kit processor. Pin # Pin Name Function [unless voltage is given, signal is digital 0-3.3V] n nnnn nnnnnnnnnnnnnnnnnnnnnnnn n nnn_n nnnnnnnnnnnnnnnnnnnnnnnnnnnnnnnnnnnnnnnnnnnnnnnnnnnn nnnnnnnnnnnnnnnnnnnnnnnnnnnnnnnnnnn n nnn nnnnnnnnnnnnnnnnn,nnnnnn n nnn nnnnnnnnnnnnnnnnnn,nnnnnnnnnnnnnn n nnn nnnnnnnnnnnnnnnnnnnnnnnnnnnnnnnnnnnnnnnnnnnnnnnnnnnn nnnnnnnnnnnnnnnnnnnnnnnn n nnn nnnnnnnnnnnnnnnnnnnnnnn,nnn n nnnn_n nnnnnnnnnnnnnnnnnnnnnnnnnnnnnnnnnnnnnnnnnnnnnnnnnnnn nnnnnnnnnnnnnnn n nnn nnnnnnnnnnnnnnnnnnnnnnnnnnnnnnnnnnnnnnnnnnnnnnnnnnnn nnnnnnnnnnnnnnnnnnnnnnnnn 32 Design of a Digital Choral Folder n:nn nn nn:nn nn nn:nn nn nn nn nn nnnnnnnnn nnnn nnnnnnnn nnn nnnnnnn nnn nnnn nnnn nnnn_n nnnnnnnnnnnnnnnnnnnnnnnnn nnnnnnnnnnnnnnnnnnnnnnnn nnnnnnnnnnnnnnnnnnnnnnnn nnnnnnnnnnnnnnnnnnnnnnn,nnn nnnnnnnnnnnnnnnnnnnnnnn nnnnnnnnnnnnnnnnnnnnnnn,nnn nnnnnnnnnnnnnnnnnnnnnnnnnnnnnnnnnnnnnnnnnnnnnnnn nnnnnnnnnnnnnnnnnnnnnnnnnnnnnnnnnnnnnnnnnnnnnnn nnnnnnnnnnnnnnnnnnnnnnnnnnnnnnnnnnnnnnnnnnnnnnnnnnnn nnnnnnnnnnnnnnnnnnnnnnnnnnnnnnnn Table 1: Host-to-Metronome Interface nnnnnnnnnnnnnnnnnnnnnnnnnnnnnnnnnnnnnnnnnnnnnnnnnnnnnnnnnnnnnnnnnnnnnnn nnnnnnnnnnnnnnnnnnnnnnnnnnnnnnnnnnnnnnnnnnnnnnnnnnnnnnnnnnnnnnnnnnnnnnn nnnnnnnnnnnnn,nnnnnnnnnnnnnnnnnnnnnnnnnnnnnnnnnnnnn The Metronome datasheet explains the purpose of each signal in detail. The image data is sent via the processor's active matrix LCD (AMLCD) interface. Normally, the AMLCD data bus contains video image data for an LCD screen. A screen could be plugged in and image data could be drawn to it by sending the pixel data out over the bus. However, in the case of the Metronome display, the AMLCD interface also carries timing signals, as well as command data and padding data. Rather than acting only as the image data bus, the AMLCD bus is the complete connection to the Metronome, which processes the commands and format the pixel data into the proper format necessary to draw to the EInk screen. [10] Host Image Update. A typical image update, as seen from the processor, consists of a set of commands and the actual image being sent over the AMLCD interface to the Metronome. First, the processor reads the RDY pin on the connection. As long at RDY is not asserted, the processor will refuse to send any data. Once RDY is set, the processor can start to send information. As soon as the Metronome begins to process that information, the RDY signal is de-asserted to let the processor know that it is busy and should not attempt to send another command. Every time the processor sends a command to the Metronome, it must be packaged into a pre-determined number of “frames”. There are “F” frames in a single image update. A single frame is made up of a number of “lines”, and each line contains pixel data. There are “frame height” (FH) lines in a frame, and “frame width” (FW) pixels per line. Therefore, a frame is made up of FH*FW pixels. However, not all of the pixel data in a frame actually contains image data. Before the image is sent, data called the top padding lines (TPL) are sent which contain the display command, a waveform look-up table, and CRC error checking information. Then the image data is sent, along with padding pixels at the start and end of each line, called the start padding pixels (SPP) and end padding pixels (EPP). After the image data is sent, there is more CRC checking information, and finally the bottom padding lines (BPL) are used to fill the rest of the frame. Therefore, the image pixel data sent to the Metronome is only (FH-TPL-BPL)*(FW-SPP-EPP) 33 Design of a Digital Choral Folder pixels in size. The constants F, FH, FW, etc. are set when the Metronome controller is initialized and configured, and change depending on the size of the E-Ink panel connected to the system. [10] Figure 17: Data Frame Format The top padding lines consist of a display command, a waveform look-up table, and CRC error checking data. The first line contains a command. This tells the Metronome what to expect and how to react to the data that follows. The command code 0xCC1 configures the Metronome. 0xCC2 tells the Metronome to initialize. 0xCC4 is the command to actually display image data. All other commands are interpreted as NOP (no operation). The first line also contains CRC data. If there is an improper format or an issue on the display board, perhaps identified with the CRC hash, the Metronome will assert its ERR pin to let the processor know about the problem. Finally, the first line ends in padding pixels with no purpose except to fill the space. [10] Figure 18: Metronome Command Codes 34 Design of a Digital Choral Folder If the command is a display command, the next lines contain the waveform look-up table. This is a 16 KB (16384 bytes) file which the Metronome uses to format the image pixel data that is sent in the frame. The Metronome does not use the pixel data to display to the screen. Rather, it uses the 8 bit pixel data as an index for the waveform look-up table. Then it sends the waveform data to the E-Ink screen to display the image. The waveform data is sent along, followed by more CRC data and some padding pixels to complete the last of the top padding lines. Figure 19: Format of the Top Padding Lines After the top padding lines are sent, the actual visible pixel data is sent from the processor to the Metronome. The visible pixels are sent nnnnnnnnnnnnnnnnnnnnnnnnnnnnnnnnnnnnnnnnnnnnnnnnnnnnnnnnnnnnnnnnnnnnnnn nnnnnnnnnnnnnnnnnnnnnnnnnnnnnnnnnnnnnnnnn The image data is followed by more CRC data, and finally the bottom padding lines to complete the transfer of a frame to the Metronome. The data transfer timing is handled by the pixel clock, line clock, frame clock, and pixel data output enable signals sent to the Metronome from the processor. These signals are all synchronous with the pixel clock. The frame clock cycles for every frame sent over the data lines. Within one frame clock cycle, the line clock goes through FH (frame height) cycles. During each of the line clock cycles, the pixel data is sent. The nnnn signal is asserted, and 2 pixels at a time are sent for each cycle of nnnn, the pixel clock. [10] 35 Design of a Digital Choral Folder Figure 20: Frame, Line, and Pixel Clocks and nnnn During an image update, the frame data must be continually sent to the Metronome because the Metronome has no internal memory to store the data. The image update process from host system's standpoint is therefore quite simple. It must feed the Metronome the current image, waveform, command, and CRC data continually until the image update is complete, which is signified by the reassertion of the RDY signal. Metronome-to-Panel Interface. The connection between the Metronome board and the E-Ink panel has a slightly different nature from the connection from the host system to the Metronome, although the goal of displaying an image on the panel remains the same. The difference is that the Metronome must communicate with the active matrix driving circuitry to set the electrophoretic pixels in the display to the proper state, to reflect or absorb light as required by the image. This is achieved through an active matrix of TFTs connected to source driver and gate driver circuitry. nnnn,nnnnnnnnnnnnnnnnnnnnnnnnnnnnnnnnnnnnnnnnnnnnnnnnnnnnnnnnnnnnnnnnnnn nnnnnnnnnnnnnnnnnnnnnnnnnnnnnnnnnnnnnnnnnnnn,nnnnnnnnnnnnnnnnnnnnnnnnnnn nnnnnnnnnnnnnnnnnnnnnnnnnnnnnn The table below gives all of the pin assignments as shown on the Metronome datasheet and schematics. [10] Pin # n n n Pin Name nnnn nnnn nnn Function [unless voltage is given, signal is digital 0-3.3V] nnnnnnnnnnnnnnnnnnnnnnnnnnn,nnnnn nnnnnnnnnnnnnnnnnnnnnnnnnnn,nnnnn nnnnnnnnnnnnnnnnnnnnnnn,nnn 36 Design of a Digital Choral Folder n n nnn nnnnn nnnnnnnnnnnnnnnnn,nnnnnn nnnnnnnnnnnnnnnnnnnnnnnnnnnnnnnnnnnnnnnnnnnnnnnn nnnnnnnnnnnnnnnnnnnnnnnnnnnnnnnnnn[n:n],nnnnnnnnnn nnnnnnnnnnnnnnn n nnnn nnnnnnnnnnnnnnnnnnnnnnnnnnnnnnnnnnnnnnnnnnnnnnnn nnnnnnnnnnnnnnnnnnnnnnnnnnnnn n nnnn nnnnnnnnnnnnnnnnnnnnnnnnnnnnnnnnnnnnnnnnnnnnnnnn nnnnnnnnnnnnnnnnnnnnnnnnnnnnnnnnnnnnnnnnnnnnnnnn n nnn nnnnnnnnnnnnnnnnnnnnnnnnnnnnnnnnnnnnnnnnnnnnnnnn nnnnnnnnnn n nnnn_n[n] nnnnnnnnnnnnnnnnnnnnnnnnnnnnnnnnnnnnnnnnnnnnnn[n: n]nnnnnnnnnnnnnnnnnnnnnnnnnnnnnnnnnnnnnnnn nn:nn nnnn[n:n] nnnn[n:n]nnnnnnnnnnnnnnnnnnnnnnnnnnnnn,nnnnnnnnnnn nnnnnnnnnnnnnnnnnnnnnnnnnnnnnnnnnnnnnnnnnnnnnnnn nnn nn nnn nnnnnnnnnnnnnnnnnnnnnnnnnnnnnnnnnnnnnnnnnnnn nn nnnn_nnnnn nnnnnnnnnnnnnnnnnnnnnnnnnnnnnnnnnnnnnnnnnnnnnnnn' nnnnnnnnnnnnnnnnnnnnnnnn nn nnn nnn nn nnnn nnnnnnnnnnnnnnnnnnnnnnnnn,nnnnn nn nnn nnn nn nnn nnnnnnnnnnnnnnnnnnnnnnnnn,nnnnn nn nnn nnn nn nnnn nnnnnnn/nnnnnnnnnnnnnnnnnnnnnnnnnnn nn nnnn nnnnnnnnnnnnnnnnnnn,nnnnnnnnnnnnnn nn nn nnnnnnnnnnnnnnnnnnnnnnnnnnnnnnnnnnnnnnnnnnnnnnnn nnnnnnnnnnnn nn nnnn nnnnnnnnnnnnnnnnnnnnnnnnnnnnnnnnnnnnnnnnnnnnnnnn nnnnnnnnnnnnnnnnnnnnnnnnnnnnnnnnnnnnnnnnnnnnnn nn nnnnn nnnnnnnnnnnnnnnnnnnnnnnnnnnnnnnnnnnnnnnnnnnnnnn(n nnn)nnnnnnnnnnnnnnnnnnnnnnnnnnnnnnnnnnnnnnnnnnnnn nnnnnn nn nnnnnn nnnnnnnnnnnn,nn/nnnnn Table 2: Metronome-to-Panel Interface nnnnnnnnnnnnnnnnnnnnnnnnnnnnnnnnnnnnnnnnnnnnnnnnnnnnnnnnnnnnnnnnnnnnnnn nnnnnn,nnnnnnnnnnnnnnnnnnnnnnnnnnnnnnnnnnnnnnnnnnnnnnnnnnnnnnnnnnnnnnnnn nnnnnnnnnnnnnnnnnnnnnn The inputs to the display panel may be categorized into four classes of signals. There are the power signals, which provide a constant voltage to be used to power the panel's internal circuitry such as the gate and source drivers. Then there are the data signals, which carry the image data from the Metronome to the panel. Next there are the control signals, used to send each piece of data to the proper pixel in the panel, with the correct timing. Finally, there are a few specialized signals that do not fall into the first three categories. 37 Design of a Digital Choral Folder The power signals are nnnnnnnnnnn,nnnnn,nnnnn,nnnnn,nnnn,nnnnnnnnnnnnnnnnnnnnnnnnnnnnnnnnnnnnnnn nnnnnnnnnnnnnnnnnnnnnnnnnnnnn,nnnnnnnnnnnnnnnnnnnnnnnnnnnnnnnnnnnnnnnnnn nnnnnnnnnnnnnnnnnnnnnnnnnnnnnnnnnn/nnnnnnnnnnnnnnnnnnnnnnnnnnnnnnnnnnnnn nnnnnnnnnnnnnnnnnnnnnnnnnnnnnnnnnnnnnnnnnnn/nnnnnnnnnnnnnnnnnnnnnnnnnnnn nnnnnnnnnnnnnnnnnnnnnnnnnnnnnnnnnnnnnnnnnnnnnnnnnnnnnnnnnnnnnnnnnnnnnnn nnnnnnnnnnnnnnnnnnnnnnnnn [10] nnnnnnnnnnnnnnnnnnnnnnnnnnnnnnnnnnnnnnnnnnnnnnnnnnnnnnnnnnnnnnnnnnnnnnn nnnnnnnnnnnnnnnnnnnnnnnnnnnnnnnnnnnnnnnnnnnnnnnnnnnnnnnnnnnnnnnnnnnnnnn nnnnnnnnnnnnnnnnnnnnnn,nnnnnnnnnnnnnnnnnnnnnnnnnnnnnnnnnnnnnnnnnnnnnnnnn nnnnnnnnnnnnnnnnnnnnnnnnnnnnnnnnnnnnnnnnnnnnnnnnnnnnnnnnnnnnnnnnnnnnnnn nnnnnnnnnnnnnnnnnnnnnnnnnnnnnnnnnnnnnnnnnnnnnnnnnnnnnnnnnnnnnnnnnnnnnnn nnnnnnnnn This is the data that comes from the waveform look-up table that the host system sends to the Metronome. The control signals are nnnnnnnnnnnnn,nnnnn,nnnnn,nnnnn_n[n],nnnnnn,nnnnn,nnnnnnnnnnnnnnnnnnnnnnnnn nnnnnnnn,nnnnnnnnnnnnnnnnnnnnnnnnnnnnnnnnnnnnnnnnnnnnnnnnnnnnnnnnn,nnnnn nnnnnnnnnnnnnnnnnnnnnnnnnnnnnnnnnnnnnnnnnnnnnnnnnnnnnnnnnnnnnnnnnnnnnnn n– nnnnnnnnnnnnnnnnnnnnnnnnnnnnnnnnnnnnnnnnnnnnnnnnnnnnnnnnnnn,nnnnnnnnnnnn nnnnnnnnnnnnnnnnnnnnnnnnnnnnnnnnnnnnn,nnnnnnnnnnnnnnnnnnn The control signals nnnnnnnnnnnnnnnnnn“nn”nnnnnnnnnnnnnnnnnnnnnnnnnnnnnnnnnnnnnnnnnnnnnnnnnn nnnnnnnnnnnnnnnnnnnnnnnnnnnnnnnnnnnnnnnnnnnnnnnnnnnnnnnnnnnnnnnnnnnnnnn nnnnnnnnnnnnnnnnnnnnnnnnnnnnnnnnnnnnnnnnnnnnnnnnnnnnnnnnnnnnnnnnnnnnnnn nnnnnnnnnnnnnnnnnnnnnnnnnnnnnnnnnnnnnnnnnnnnnnnnnnnnnnnn'nnnnnnnnnnnnnnn nnnnnnnnnnnnn,nnnnnnnnnnnnnnnnnnnnnnnnnnnnnnnnnnnnnnnnnnnnnnnnnnnnnnnnnn nnnnnnnnnnnnnnnnnnnnnnnnnnnnnnnnnnnnnnnnnnnnnnnnnnnnnnnnnnnnnnnnnnnnnnn nnnnnnnnnnnnnnnnnnnnnnnnnnnnnnnnnnnnnnnnnnnnnnnnnnnnnnnnnnnnnnnnnnnnnnn nnnnnnnnnnnnnnnnnnnnnnnnnnnnnnnnnnnnnnnnnnnnnnnnnnnnnnnnnnnnnnnnnnnnnnn nnnnnnnnnnnnnnnnnnnnnnnnnnnnnnnnnnnnnnnnn,nnnnnnnnnnnnnnnnnnnnnnnnnnnnnn nnnnnnnnnnnnnnnnnnnnnnnnnn_n[n]nnnnnnnnnnnnnnnnnnnnnnnnnnnnnnnnnnnnnnnnn nnnnnn,nnnnnnnnnnnnnnnnnnnnnnnnnnnnnnnnnnnnnnnnnnnnnnnnnnnnnnnnnnnnnnnnn nnnnnnnnnnnnnnnnnnnnnnnnnnnnnnnnnnnnnnnnnnnnnnnnnnnnnnnn[11 38 Design of a Digital Choral Folder Figure 21: nnnnnnnnnnnnnnnSource Driver Block Diagram nnnnnnnnnnnnnnnnnnnnnnnnnnnnnnnnn“nn”nnnnnnnnnnnnnnnnnnnnnnnnnnnnnnnnnnn nnnnnnnnnnnnnnnnnnnnnnnnnnnnnnnnn,nnnnnnnnnnnnnnnnnnnnnnnnnnnnnnnnnnnnnn nnnnnnnnnnnnnnnnnnnnnnnnnnnnnnnnnnnnnnnnnnnnnnnnnnnnnnnnnnnnnnnnnnnnnnn nnnnnnnnnnnnnnnnnnnnnnnnnnnnnnnnnnnnnnnnnnnnnnnnnnnnnnnnnnnnnnnnnnnnnnn nnnnnnnnnnnnnnnnnnnnnnnnnnnnnnnnnnnnnnnnnnnnnnn,nnnnnnnnnnnnnnnnnnnnnnnn nnnnnnnnnnnnnnnnnnnnnnnnnnnnnnnnnnnnnnnnnnn,nnnnnnnnnnnnnnnnnnnnnnnnnnnn nnnnnnnnnnnnnnnnnnnnnnnnnnnnnnnnnnnnnnnnnnnnnnnnnnnnnnnnnnnnnnnn[nn] 39 Design of a Digital Choral Folder Figure 22: nnnnnnnnnnnn Gate Driver Pin Connection Diagram The remaining signals sent from the Metronome to the panel are somewhat specialized. They arennnnnnnnnnnn,nnnnn_nnnnn,nnnnnnnnnnnnnnnnnnnnnnnnnnnnnnnnnnnnnnnnnnnnn nnnnnnnnnnnnnnnnnnnnnnnnnnnnnnnnnnnnnnnnnnnnnnnnnnnnnnnnnnnnnnnnnnnnnnn nnnnnn_nnnnnnnnnnnnnnnnnnnnnnnnnnnnnnnnnnnnnnnnnnnnnnnnnnnnnnnnnnnnnnnn nnnnnnnnnnnnnnnnnnnnnnnnnnnnnnnnnnnnnnnnnnnnnnnnnnnnnnnnnnnnnnnnnnnnnnn nnnnnnnnnnnnnnnnn,nnnnnnnnnnnnnnnnnnnnnnnnnnnnnnnnnnnnnnnnnnnnnnnnnnnnnn nnnnnnnnnnnnnnnnnnnnnnnnnnnnnnnnnnnnnnnnnnnnnnnnnnnnnnnnnnnnnnnnnnnnnnn nnnnnnnnnnnnnnnnnnnnnnnnnnnnnnnnnnnnnnnnnnnnnnnnnnnnnnnnnnnnnnnnnnnnnnn nnnnnnnnnnnnnnnnnnnnnnnnnnnnnnnnnnnnnnnnnnnnnnnnnnnnnnnnnn/nnnnnnnnnnnnn nnnnnnnnnnnnnnnnnnnnnnnnnnnnnnnn Metronome Image Update. A screen update from the perspective of the panel is similar to the image update from the host to the Metronome. Signal timing is achieved through the source driver and gate driver clocks and the other control signals. Pixel data from the host system is used as an index for the waveform file, also sent by the host. The resulting data from the waveform is loaded onto the source driver data pins on the panel, one pixel at a time. Then, the source driver latch enable (nnnn) signal is asserted, so that the small-signal digital pixel data is stepped up or down nnnnnnnn/nnnnnnnnnnnnnnnnnnnnnnnnnnnnnnnnnnnnnnnnnnnnnnnnnnnnnnnnnn 40 Design of a Digital Choral Folder Figure 23: Source Driver Process When all of the source driver data for the first row on the screen has been latched for output, the gate driver begins its output pulse sequence, triggered by the gate driver start pulse (nnnn) signal. The first gate column that is selected by the gate driver by applying the select voltage nnnn. The pixels in that column are charged to the levels set in the source driver row, and the gate column is deselected by applying nnn. Then the source driver latches the pixel data for the next row onto its output pins, and the gate driver continues its pulse sequence, selecting the next column. Those pixels are charged and set, and the column is once again deselected. In this manner the gate driver sequentially pulses each of the gate columns on the device according to the process of active matrix addressing, while the source driver latches the pixel data for each row onto its output pins. Eventually every bit of pixel data is loaded into the TFT array at the correct location on the screen, and the image update is complete. [11] [14] 6.1.2 Breakout PCB Although the datasheet provides a good deal of information, there are some unanswered questions pertinent to the design. In order to discover more about the signals sent from the Metronome to the screen, the breakout PCB was designed. This small circuit board has a 30 pin connector that can take the FPC cable from the Metronome output and send each pin to an easily accessible test pad. It was designed with National Instruments Multisim and Ultiboard circuit design and simulation tools. A custom connector part had to be built in those programs because a 30 pin 0.5mm pitch SMT connector was not in the default parts database. A thin trace connects each of the 30 pins on this custom part to a test pad which are arranged in an orderly pattern for attaching wires. Figure 24: Unsoldered Breakout PCB 41 Design of a Digital Choral Folder The purpose of the breakout PCB was to test the signals on the metronome to panel interface. The design of the PCB allows for two important testing procedures. First, each pin can be accessed easily for analysis so that signal timing, voltage level, and current can be checked. The datasheet information gives an idea of what to expect on each pin, but direct access to the signals allows specific questions pertaining to the design to be answered. Another important test allowed by the breakout PCB is an actual test of the design concept of intercepting signals. By connecting two of the PCBs together, they can be placed in the development kit system at the location of the proposed two screen device, the Metronome to screen interface. The Metronome will output its signals to a breakout PCB, which will relay the signals to the other connected breakout PCB. Finally the screen can be plugged into that PCB, creating a complete connection between the Metronome and the screen. Switching of the signals can then be attempted by breaking some of the connecting wires. This dual PCB configuration allows for a proof of concept to be obtained before a more complicated design is made. Breakout PCB Parts and Assembly. There were four physical parts required in order to use the breakout PCB to test the design approach. One part was the breakout PCB itself. 10 boards were obtained through two separate PCB suppliers - Beta Layout Ltd. and Futurlec. Futurlec was very inexpensive, but their schedule for manufacturing and delivery was slower than anticipated. In order to speed up the design, more breakout PCBs were ordered from Beta Layout, which operates the website pcb-pool.com. The Beta Layout boards were ordered with expedited delivery and were received within five business days. Although the design only calls for two boards, it turned out that ordering extra boards was a good thing, because some were ruined while trying to solder the finepitch surface mount connector. The 30 pin connectors for the breakout boards were ordered from Digikey.com. Digikey is a reliable supplier of all manner of electrical parts. The connector part is an Omron Electronics XF2L-3035-1A ZIF (zero insertion force) connector with slide locks. It has bottom contacts and is a surface mount component. This is identical in appearance to the one used on the E-Ink development kit, although the manufacturer of the kit connector is unknown. Digikey delivered the connectors within a week of placing the order. Another part required for the breakout board was cable with 30 connections and a 0.5mm pitch. This cable is necessary to connect the breakout PCB to both the Metronome and to the panel at the same time. Two samples of flexible ribbon cable were obtained for free through Wavelink Cable. Glenn Manchester at Wavelink's Sales and Engineering department was very helpful in obtaining the cables and he actually provided free samples for this educational application. The last part required for the design was the wires which were soldered to the test pads. Braided cable was chosen because it makes a good connection to the surface mount test pads. This cable was obtained cheaply through the ECE shop in Atwater Kent at WPI. The breakout PCB was built by soldering a 30 pin connector to the SMT pads on the 42 Design of a Digital Choral Folder board. First, the connector was aligned on the board so that all 30 connector pins made contact with the PCBs SMT pads. Then the connector was held in place while the mounting braces on either side of the connector were soldered to the corresponding pads on the breakout board. Next, under a microscope tiny quantities of solder paste are applied to all 30 pins of the connector. Finally, a hot air soldering gun is carefully used to melt the solder paste and make the connection to the breakout PCB. Figure 25: Breakout PCB with 30 Pin Connector Attached The next step in assembly is to test all 30 of the connections to the board. A lab multimeter was set up to detect short circuits by buzzing. The two leads of the multimeter were applied to each of the 30 test pads on the breakout PCB, so that each pad was tested for a short to its adjacent pads. None of the boards had a short between pins on the connector. Next, the boards were all checked for signal continuity. One lead of the multimeter was applied to a test pad, and the other was applied to the pin on the connector where the test pad was supposed to be connected. If a short was detected the multimeter buzzed, indicating that the test pad was connected properly to the connector pin. Some of the breakout boards had broken connections on some pins, and were set aside for repair in case more boards were needed. Two of the boards which had compete connections were chosen for use in testing the development kit. Next, short lengths of braided wire were cut and the ends were stripped to expose the conductive interior. One end of each wire was soldered to one of the test pads on the breakout PCB. The other end of the wires could be tested with a lab oscilloscope or soldered to the test pad on another breakout board in the dual PCB configuration. Because pinsnn,nnn,nnn,nnn,nnnnnnnnnnnnnnnnnn,nnnnnnnnnnnnnnnnnnnnnnnnnnnnnnnnnnnn, they were not connected to wires. With the access wires attached, the breakout PCB was completed and ready for testing. Basic Signal Testing. Signal testing was begun as soon as the breakout PCB was delivered and constructed. The ECE labs in Atwater Kent provided oscilloscopes for testing the signals. The breakout PCB was connected to the metronome board with the Wavelink sample cable. The oscilloscope probe was attached to the access wire corresponding to the signal that was being tested. Then, the development kit was booted 43 Design of a Digital Choral Folder up and a screen update was attempted. The oscilloscope measured and drew the signals so that their amplitude and frequency could be determined. Figure 26: nnnnnnFrequency Measurement Tests in the lab confirmed the datasheet information. Most signals are nnnnnnnnnnnnnnnnnnnnnnnnnnnnnnnnnnnnnnnnnnnnnnnnnnnnnnn, which is the frequency of the source driver clock. The power signals are n/nnnnnnnnnnn/nnnnnnnnnnnnnnnnnnnnnnnnnnnnnnnnnnnnn, per the datasheet. The behavior of the irregular signals nnnnnn,nnnnn_nnnnn,nnnnnnnnn was also determined through this testing process. nnnnnnnnnnnnnnnnnnnnnnnnnnnnnnnnnnnnnnnnnnnnnnnnnnnnnnnnnnnnnnnnnnnnnnn _nnnnnnnnnnnnnnnnnnnnnnnnnnnnnnnnnnnnnnnnnnnnnnnnn,nnnnnnnnnnnnnnnnnnnnn nnnnnnnnnnnnnnnnnnnnnnnnnnnnnnnnnnnnnnnnnnn 44 Design of a Digital Choral Folder Figure 27:nnnnn_nnnnn During an Image Update As the schematic suggests,nnnnnremains grounded at 0 V at all times before during and after an image update. 6.1.3 Designing a Two Screen Solution With the datasheets and breakout PCBs in available for gathering information, a good start could be made on developing an approach for switching between two screens. The strategy of completely redesigning the Metronome board was eliminated for various reasons. The major reason was because of the complicated nature of the design and time restraints on the project. Also, the development kit already had a Metronome board which worked well for one screen. It seemed easier to use the tools provided by the kit rather than completely redesign the circuitry. The option to intercept signals coming from the host system and output them to two Metronome boards was also dismissed, because it required acquisition of another expensive Metronome board. Once again, it was decided that the project should progress using the standard development kit without doubling up or removing key kit components like the Metronome board. 45 Design of a Digital Choral Folder Figure 28: Host Interface Interception Strategy Therefore, the option to intercept the signals going from the Metronome to the E-Ink panel was chosen. This method is actually very similar to what would be necessary if the Metronome board were to be completely redesigned. However, this method uses a separate PCB which can be tested without worrying about the performance of the Metronome IC. If the design is successful, there will be the option to combine it with the Metronome IC for a smaller overall design. Approach. The general approach of switching the signals on the Metronome-to-screen interface is simple. Both screens are attached to the output of the Metronome. A control signal is used to electrically isolate one of the screens while the other screen receives an image update. Then the control signal changes state and the isolated screen is once again connected to the Metronome, but the first screen becomes isolated. Then another image update is sent by the host controller and the second screen receives an image. The first screen will maintain its image because E-Ink technology has persistent images. The mechanism of isolating one of the panels is signal switching. Some or all of the 30 pins which connect the Metronome to the screen must be fed to a circuit which can redirect input signals to one screen or the other depending on an external control signal. Detailed Signal Switching Solution. Switching all thirty of the pins connecting the Metronome and E-Ink screen is a worst case solution. It is possible that some of those signals do not have an impact on the display, so that they do not need to be switched. However, some of the signals definitely need to be blocked so that only one screen is updated at a time. Therefore the signals that must be switched need to be identified. Based on the datasheet information, a possible approach to signal switching can be formulated. The nnnnnnnnnnnnnnnn source and gate drivers on the E-Ink screen have three types of signals – data, power, and control. The data and control signals are purely TTL, requiring only a tiny input current and a standard 0-3.3 input voltage to operate. These predictable, low power signals are ideal candidates for switching. However, even among the 13 data 46 Design of a Digital Choral Folder and control signals there might be some which do not require switching. At a bare minimum the output enable signals on the gate and source driver chips should be switched. If the chips are not output-enabled, they will not be able to send data to the pixels in the TFT active matrix embedded in the screen. The data pins could possibly remain unswitched. This is based on the datasheet for the nnnnn source driver. nnnnnnnnnnnnnnnnnnnnnnnnnnnnnnnnnnnnnnnnnnnnnnnnnnnnnnnnnnnnnnnnnnnnnnn nnnnnnnnnnnnnnnnnnnnnnnnnnnnnnnnnnnnnnnnnnnnnnnnnnnnnnnnnnnnnnnnnnnnnnn nnnnnnnnnnnnnnnnnnnnnnnnnn However, between the data inputs and the levelconverter is a decoder which is controlled by the nnnnn's output enable signal, nnnn. Thus, data input on the nnnn bus will not find its way to the source driver's output stage if the nnnn signal is disabled through switching. [11] Similar logic applies to the remaining control signals on the source driver. The clock (nnnnn), latch enable (nnnn), and chip enable (nnnn_nn) signals can never result in an output on the nnnnn if the output enable signal is off. There is the possibility that data will be queued for the level shifter on the source driver if only nnnn is switched, but that data will be overwritten by the next image update and should not corrupt the display. The gate driver output enable signal (nnnn) is connected to both the MODE1 and MODE2 pins on the nnnnnn gate driver. These pins are used to select the output mode of the gate driver. [14] Figure 29: Gate Driver Mode Selections When nnnn is at a logic high, both MODE pins are logic high, which puts the gate driver in “normal mode”. In this mode the gate driver circuitry uses the nnnnn signal to form an output pulse sequence, as required by active matrix addressing to update the screen. When nnnn is logic low, MODE1 and MODE2 are also at logic low. In this mode the outputs on the gate driver are set to nnn, which is the deselect voltage level for the gate driver. Thus, when nnnn is low, the nnnnnn chip does not select any of the gate rows in the TFT active matrix in the screen. By attaching nnnn to the MODE pins of the gate driver, it becomes a functional output enable signal for the circuit. [14] The gate driver output enable signal (nnnn) should be switched for the same reason as the source driver's. nnnn allows the gate driver to change the pixels in the E-Ink screen, but 47 Design of a Digital Choral Folder that must be prevented through signal switching. If the nnnn signal is blocked, the other control inputs to the gate driver probably do not need to be switched. nnnnn and nnnn can not produce an output when the driver is in the disabled mode. Of the remaining signals sent to the E-Ink screen, it is unlikely that any of them require switching. The unused pins on the Metronome-to-screen interface obviously do not need to be switched. These pins are not physically connected on the interface and no purpose is served in switching them. The power pins are nnn, nnnn, nnnn, nnnn, nnn, and nnn. They can be connected without switching, because even with power connected to the source and gate drivers, the output enable signals on those chips will prevent unwanted changes to the screen. Likewise, the signals nnn, nnnn_nnnnn and nnnnnn can probably be left unswitched. nnn and nnn are connected, so if nnn does not need switching then neither does nnn. nnnn_nnnnn and nnnnnn should be the same for both panels, and have nothing to do with an actual image update according to the datasheet. Even if leaving the nnnnnn signal unswitched causes unwanted behavior, such behavior will be confined to the border area of the panel. If that happens perhaps the nnnnnn signal will require switching. Switching Mechanism. The actual mechanism of switching the nnnn and nnnn signals must be determined. This requires a thorough analysis of the voltage, current, and frequency characteristics of the signal being switched. Then an IC can be chosen which conforms to the determined requirements and is capable of switching the signals. The datasheet reveals that nnnnnnnnnnnnnnnnnnnnnnnnnnnnnnnnnnnnnnnnnnnnnnnnnnnnnnnnnnnnnnnnnnnnnn/n nnnnnnnnnnnnnnnnnnnnnnnnnnnnnnnnnnnnnnnnnnnnnnnnnnnnnnnnnnnnnnnnnnnnnnn nnnnnnnnnnnnnnnnnnnnnnnnnnnnnnnnnnnnnnnnnnnnnnnnnnnnnnnnnnnnnnnnnnnnnnn nnnnnnnnnnnnnnnnnnnnnnnn(nnnnnnn)nnnnnnnnnnnnnnnnnnnnnnnnnnn“nnnn”nnnnnn nnnnnnnnnnnnnnnnnnnnnn,nnnnnnnnnnnnnnnnnnnnnnnnnnnnnnnnnnnnnnnnnnnnnnnnn nnnnnnnnnnnnnnnnnnnTesting on the breakout PCB revealed an approximate rise and fall time of 2.6 ns for nnnn and nnnn. 48 Design of a Digital Choral Folder Figure 30: nnnn Rise Time Measurement The nnnnn source driver datasheet does not provide input voltage or current ratings. It does mention that the inputs are CMOS. This, along with a 3.3 V supply voltage, implies LVCMOS levels. Therefore, the source driver low input voltage must be below 0.66 V, and the high input voltage must be above 2.31 V (VCC*0.7). The current requirements of the source driver are not reported. However, current requirements for driving CMOS circuits are very low. The nnnnnn gate driver datasheet does provide the required logic input levels for the chip. With a 3.3 V VLS, the input low voltage (VIL) must be no more than 0.66 V (VLS*0.2). The high input voltage (VIH) must be no less than 2.64 V (VLS*0.8). According to the Metronome datasheet all I/O pins have a maximum I/O current of 12 mA. The maximum leakage current for the gate driver inputs is 5 µA. This current will be used to estimate the source driver leakage current rating as well. [11] [14] The current sourcing capacity of VDD is not reported on the Metronome datasheet. However, the schematic for the Lyre PCB shows the circuit which creates the 3.3 V VDD supply. The LTC3406 chip used in this step-down circuit can source up to 600 mA. 49 Design of a Digital Choral Folder Figure 31: VDD Supply Circuit from the Lyre PCB Schematic This source must supply 3.3 V power to the panel. The Metronome datasheet says that typically VDD sources 0.89 mA while the Metronome is idle, and 2.00 mA during an image update. That means that, even during an image update, VDD can source an additional 598 mA. The IC which switches nnnn and nnnn must conform to the various voltage and current requirements that were determined, summarized in the table below. Parameter (Symbol) Min Max Low Input Voltage (VIL) 0V 0.4 V High Input Voltage (VIH) 2.4 V 3.2 V Low Output Voltage (VOL) - 0.66 V High Output Voltage (VOH) 2.64 V - Output Current (IIO) - 12 mA Leakage Current (IL) - 5 µA Voltage Supply (VCC) 3.3 V 3.3 V Current Supply (ICC) 598 mA Table 3: Signal Switching Requirements The most common solution to switching signals with these input and output characteristics is to use a digital buffer circuit, often called a “line driver”. There are many digital buffers available, but a search can quickly eliminate those whose characteristics fall outside the requirements. The 74LVC125A non-inverting tri-state line driver is one example of a buffer IC which fits all of the requirements. A summary of the 74LVC125A characteristics from its datasheet is given in the table below to compare with the requirements gathered in the table above. [1] 50 Design of a Digital Choral Folder Parameter (Symbol) Min Max Low Input Voltage (VIL) 0 0.8 V High Input Voltage (VIH) 2V - Low Output Voltage (VOL) 0 0.4 V High Output Voltage (VOH) 2.8 V VCC V Output Current (IIO) - 24 mA Leakage Current (IL) - 5 µA Voltage Supply (VCC) 2.7 V 3.6 V Current Supply (ICC) 100 mA Table 4: 74LVC125A Characteristics (-40 to +85 °C) The 74LVC125A is a cheap part, readily available, and it can do the job required. All of the voltage, current, and frequency requirements of the design can be met with this chip. There is no obvious reason not to use it as the switching element in the two screen PCB, and unless a reason presents itself this will be the switching element used to go forward with the design. Figure 32: SN74LVC125A Quad Line Driver Logic Diagram In summary, the signal switching approach for this design is to switch only the SDOE and nnnn signals. When these signals are blocked, the screen will not be able to output data to the active matrix of TFTs on the panel and no change should be observed in the persistent image. The most straightforward mechanism for signal switching the output enable signals is to use a line driver IC. The 74LVC125A quad line driver meets all of 51 Design of a Digital Choral Folder the design requirements, and is cheap and available. Thus the design will be to switch nnnn and nnnn with a 74LVC125A line driver in a quad package. Figure 33: Two Screen Switching Strategy Although the switching approach developed in this section seems solid, it is possible that some of the other signals do require switching to achieve the desired behavior, or that the line driver IC is inadequate. Therefore testing is required. The dual PCB configuration of the breakout boards will be used to test the signal switching approach developed in this section. 6.1.4 Dual PCB Configuration The breakout PCB allows for a proof of concept experiment for the signal switching design approach. This approach calls for some of the signals on the Metronome-toscreen interface to be disconnected in order to prevent one screen from updating. In order to test this idea, one breakout PCB is connected to another so that the E-Ink screen can be connected into the setup. Ideally the development kit will not recognize that there are two PCBs in between the Metronome and screen and it will perform normally. Most importantly, the dual PCB configuration can be used to “switch” signals on and off by physically disconnecting the access wires between the two breakout boards. Furthermore, some access wires can be attached to a breadboard circuit and switched 52 Design of a Digital Choral Folder electronically. This allows for a complete prototype of the switching design. Figure 34: Dual PCB Configuration This setup was built by connecting the access wires from one breakout PCB to the wires of another. Care had to be taken to ensure that the pins of the input PCB aligned with the pins on the output. By flipping one of the breakouts around 180 degrees, the input and output connectors are placed in convenient locations for testing. However, this means that the wires connecting the breakout PCBs together must cross in a rather messy fashion, as seen in the image above. The access wires on the PCBs had to be soldered in place with patience so that each pin on the two connectors went to its proper place. The screen was attached to one connector, and the other connector was attached to the Metronome output on the development kit. The kit was turned on and an image update was attempted to be sure that the intercepting PCBs did not corrupt the image. Then the process of disconnecting signals from the dual PCB configuration and testing the resulting image update behavior was begun. Figure 35: Dual PCB Testing Setup 53 Design of a Digital Choral Folder Dual PCB Testing Results. The initial test of the dual PCB configuration did not work at all. Careful examination of the test setup revealed that some of the pins on the 30 pin connectors were not actually bonded to the pads on the breakout boards. The boards were repaired in the lab and the test was redone, with good results. The development kit drew an image just as if the screen was plugged directly into the kit. Further testing of the dual PCB setup involved determining which signals needed to be switched. The switching strategy developed suggested that only the nnnn and nnnn signals needed to be switched in order to completely deactivate the screen. First, the nnnn signal was physically disconnected from the dual PCB configuration so that it did not relay its data to the screen. At first this seemed to work, because the image would stay on the screen even when the kit was instructed to draw a different image. However, repeated attempted screen updates revealed that dark vertical lines would sometimes appear on the screen. Next the nnnn signal was disconnected along with the nnnn signal. This resulted in very satisfactory performance. The screen image would not update when the kit was instructed to update the screen as long as both signals were disconnected, just as expected. Further testing was done on the signals. When nnnn was re-attached and just nnnn was off, the screen would not draw new images, and there was no corruption observed on the screen. Therefore only nnnn (nnnnn) needs to be switched. nnnn (nnnnnnn/nn) should be switched as well so the gate driver doesn't draw power needed by the screen that is actually updating. Testing the Switching Mechanism. Although the basic dual PCB configuration provides a proof of concept for the switching design approach, the signals have so far been switched physically. In the final design the signals must be switched electronically, but so far that has not been tested. In order to test if the two screen design approach will hold up to electrical signal switching, the dual PCB configuration must be expanded to include an electrical switch. Ideally the switching element to be tested should be the 74LVC125A chip that was chosen for the final design. Although a few of those chips were obtained through Digikey, they are all fine pitch TSSOP surface mount chips which are very difficult to work with given the large wires on the breakout PCBs. A different switching element that can fit in a breadboard may be used in place of the 74LVC125A so long as the replacement chip has the same buffering capability and the same I/O specifications. The source voltage and current do not need to conform to the design requirements, because the test IC can be powered with a lab power supply instead of the 3.3 V nnn signal from the Metronome. With this in mind, the SN74LS224N octal line driver chip conforms to the I/O requirements of the switching design but requires a 5 V input to drive a 3.3 V output. A standard through-hole DIP version of this chip was obtained from the WPI 54 Design of a Digital Choral Folder ECE lab. Expanded Dual PCB Setup. The expanded dual PCB configuration was built with the SN74LS244N chip used as the line driver/buffer. The IC was placed in a breadboard, with power and ground connections on pins 20 and 10 were connected to the 5 V lab power supply and ground. Pin 1, the !enable pin for the first set of switching elements, was connected to ground. This enabled the elements and caused them to pass digital signals on the chip inputs to the outputs. nnnn and nnnn were rerouted from the input breakout board to the first two switching elements on pins 2 and 4 on the 244 chip. The corresponding output pins for those elements, pins 18 and 16, were connected to nnnn and nnnn on the output breakout PCB. Finally, the E-Ink screen and Metronome were connected to the output and input of the expanded dual PCB configuration. Expanded Dual PCB Testing. The 244 IC was powered with the lab power supply, and the development kit was turned on. The kit was instructed to perform an image update and it reacted exactly as expected. The nnnn and nnnn signals were passed through the switching IC and the image was drawn to the E-Ink screen. When the !enable inputs of the IC were set to a logic high, the 244 chip did not relay nnnn or nnnn through the dual PCB setup. This caused the screen to retain its previous image even when the kit instructed to draw a new one. This experiment confirmed that the electrical switching design approach developed in this section is a feasible solution to the two screen problem. Remaining Questions. There are some questions remaining about the design. One is if the signals will act in the same way when a second panel is attached. This can be tested with a more complete PCB design which actually provides a solution to the original problem of electrically switching between two screens. Based on knowledge gained from datasheets and the breakout board, this problem should not affect any of the unswitched control or data pins, because they are purely TTL and CMOS. TTL fanout is not huge, but in most cases it can handle one additional chip. CMOS fanout is very great, and there is no question that the CMOS connections will not suffer from driving an additional CMOS device. Another potential problem is power. The power supplies to the source and gate drivers (nnnn, nnn, nnnn and nnnn) might be an issue. However, the driver chips should not attempt to draw power if the chips are not enabled. 6.1.5 Two Screen PCB Design With the proof of concept from the dual PCB configuration and expanded configuration, it was time to design a PCB which could output to two E-Ink screens. This is the final step of the two screen design process. The National Instruments Multisim and Ultiboard software tools were used to design the two screen PCB. Multisim Design. First, three of the connectors that were created for the breakout PCB design were loaded into a new multisim design file. Then the non-switching signals were connected from the input connector to the two output connectors. These signals are pins 55 Design of a Digital Choral Folder nnn,nnnnn,nnn,nnn,nnnnnnnnnnn. Pins nnnnnnnn were not connected, and pinnnn was connected to pin nn as per the Metronome schematic. Next, the 74LVC125A chip was loaded into multisim. The nnn pin was connected to pin 4 and GND was connected to pin 3. The !output enable pins for the first two line driver buffer elements were connected to a single test pin. The !output enable pins for the remaining two buffer elements were connected to another test pin. The nnnn and nnnn signals on the input connector were attached to the four input pins on the line driver IC. nnnn was attached to the input pins for the first and third elements, and nnnn was attached to the inputs for the second and fourth elements. The outputs of the first two elements were connected to the nnnn and nnnn connections of the first output connector. The output pins of the third and fourth elements were connected to nnnn and nnnn of the second output connector. With that done, the circuit diagram for the two screen PCB was complete. Figure 36: Two Screen Circuit Diagram in Multisim The multisim two screen circuit is controlled by two test pins connected to the 74LVC125A !output enable pins. When the first test pin is set to a logic low and the other is set to a logic high, the line driver IC will pass the nnnn and nnnn signals from the input connector to the first output connector, but not to the second output connector. When the test pins switch, the second output connector will get the nnnn and nnnn signals and the first output connector will not. In this way switching between the two connected screens can be done electronically. Ultiboard Design. The multisim circuit was exported to Ultiboard. Footprints for the 30 56 Design of a Digital Choral Folder pin connector were already available from the breakout PCB design. The 74LVC125A TSSOP chips that were obtained from Digikey have a standard footprint which exists in the Ultiboard footprint database. All of the part footprints were loaded into the Ultiboard design. First the components were placed in an orderly fashion on the board in the Ultiboard main display window. Then each connection was routed to its proper location on the board. Both the top and bottom copper layers of the board are required to to this, and holes called vias are used to traverse a signal between those layers. Routing can take a long time, especially when the circuit is too complicated for Ultiboard's autorouter function to work well. The autorouter could not solve this circuit and it had to be done manually. Figure 37: Two Screen PCB Layout in Ultiboard The board is 2 inches tall and 1.68 inches wide. It uses 56 vias and 30 different routing paths, or “nets”. The two screen design was set to use 8 mil (0.2 mm) traces with 8 mil clearance. This is the usual minimum trace width and clearance for a relatively cheap PCB fabrication shop like Beta Layout. Using Beta Layout's price calculator, 4 of these boards could be fabricated and delivered in 8 working days for $50.90. 57 Design of a Digital Choral Folder Figure 38: Two Screen PCB 3D Render There was no opportunity to order, assemble, and test the two screen PCB. However, the switching approach that was developed and tested in this section proves that the concept is feasible. The design has been turned into a computer model in multisim, and was prepared for manufacturing in Ultiboard. There is very little remaining work required to finishing the development of a two screen solution. 6.2 Displaying a PDF There are a few different ways to display an image on the development kit. The Thinspace API is the easiest, and can be used “out of the box” with no additional development required. However, Thinspace only renders .ppm images to the screen. PPM is not a standard format for choral music. Moreover, converting to PPM from other more common formats is a hassle and not a real solution. Therefore, another approach was developed for this project that would allow PDF images to be displayed on the development kit. PDF is the most common format for choral music and the final product should be able to read PDF natively. In other words, a user should be able to load a PDF onto their device and read the document without a lengthy and space-wasting conversion process. The process involves cross-compiling a more recent Linux kernel and a version of X for the kit. 6.2.1 Thinspace Development Some basic software was written using the Thinspace API that came with the development kit. The slide show script that was written by developers at E-Ink showcased the functionality of the kit using only a few basic commands. This software was used as a model for a custom script that could be used to browse and display music on the digital choral folder. After the development kit first boots, it is programmed to run the setup.sh script. This piece of code does some setup of the system framebuffer resolution. Next, setup.sh tells the system to run another piece of code called metro_init.sh. 58 Design of a Digital Choral Folder Metro_init initializes the Metronome board and gets the screen ready to accept image updates. First, it clears the system framebuffer. Then it runs another script, metro_regs.sh, which sets up all of the registers which are used to communicate with the Metronome such as the RDY and ERR signals and power control registers. Metro_init then uses those registers to first send the reset signal to the Metronome, and then to enable the Metronome's power supplies. The initialization script then waits for the Metronome to report that it is ready, looping until the RDY signal is asserted. At this point the Metronome is ready to receive commands. The first commands sent to the controller should be configuration and initialization commands. Metro_init.sh runs some config and init commands that were precompiled as part of the Thinspace API. Finally, the initialization script waits for the RDY signal again, and then reports that the Metronome is ready to display images. After the metro_init.sh code completes, it returns to the setup.sh script. The next thing that setup.sh does is to call the menu.sh script which was made specifically for this project. The menu script runs an infinite loop which does three things. First, it displays a menu image that was made to display a few pieces of music. Next, it checks the buttons on the development kit and waits for a button to be pressed. Finally, it reacts to the button press by either changing the menu selection, or opening the selected musical score. Drawing an Image. The Thinspace software draws an image to the E-Ink screen through the metro_display command. This is precompiled software that takes up to five arguments – a .ppm image to be displayed, a .wbf waveform file, an update mode setting, a temperature, and a border color. The image can be any .ppm image of the proper format and size. Waveform files are located on the MMC card. There are four image update modes – INIT, MU, GU, and GC. INIT is only used when the image on the display is in an unknown state. MU is a monochrome-only update, where gray pixels are not changed. GU is a slower gray-scale update that does not flash the screen. GC is a faster gray-scale update, but flashes the screen while updating. Figure 39: Metronome Image Update Modes 59 Design of a Digital Choral Folder The temperature parameter is used to set the temperature setting during an image update. For the best performance it should be measured by the sensors on the development kit. Finally, the border parameter sets the border color. 0 is a black border and 15 is a white border. Values in between are gray-scale settings. Checking Buttons. In order to check the buttons on the development kit, the get_button software is used. This continuously polls the four buttons on the adapter strip PCB and finally returns once a button press is detected. The code returns an integer corresponding to the labels on the physical buttons. If button 1 or 2 is pressed, the menu script reacts by changing the menu image so that a different musical piece is selected, looping around from the bottom to the top (or top to bottom) if necessary. If button 3 is pressed, the menu script runs another script called CDF_script.sh. This file works in a similar fashion to the menu script – it draws the current page of the musical piece that was selected, then polls for button presses. Buttons 1 and 2 go backward and forward in the musical piece. Button 3 closes the CDF_script, returning to the menu. Power Control. The Metronome can be put in standby mode in order to save battery life. This mode disables the high voltage (n/nnnnnnnnn/nnnnn) supplies to the source and gate drivers on the panel. The command metro_stby.sh cuts power to those supplies. metro_powerup.sh will return power to the supplies so that the panel can update once more. PPM to PDF Conversion. The Thinspace software can only process .PPM files for the Metronome controller. In order to display a .PDF, it must be converted to .PPM first. This can be done with a variety of software, including the Linux script pdftoppm. The resulting PPM image must be 1024x768 pixels, in 1, 2, or 3 bit gray-scale This can be done with most image editing software including the Linux image editing suite Gimp. Problems. The Thinspace API allows for simple applications to be developed quickly, but it does not have the robustness required for this project. Specifically, the Thinspace software can not display PDF files without an initial conversion to .PPM. This issue may be addressed by writing and/or compiling some software for the development kit which uses the metronomefb Linux kernel module instead of the precompiled metro_display code. 6.2.2 OpenEmbedded Linux Development This section describes the steps required to develop more robust code for the E-Ink development kit. In part it contains a summary of the very helpful and informative guide written by Jaya Kumar which covers all of the steps necessary to get an X server running on the E-Ink development kit, using OpenEmbedded. This development is best done on a host system running a version of the Linux operating system. Setting Up a Build Environment. To start development in OpenEmbedded (OE), a 60 Design of a Digital Choral Folder development environment must be set up, and the required software must be obtained from the OE servers. On a Linux machine this can be done by creating a directory in the home folder for OE stuff, perhaps called ~/OEbase with the subfolders ~/OEbase/build and ~/OEbase/build/conf. The build tool OE uses is called bitbake, and it can be obtained using subversion, a Linux tool for obtaining software over a network. To get it, cd into ~/OEbase and use the command: $ svn co svn://svn.berlios.de/bitbake/branches/bitbake-1.8/ bitbake This will download bitbake. Once that is obtained, it is a good idea to update to the latest version, by running the subversion update command, thus: $ cd ~/OEbase/bitbake; svn update After an updated version of bitbake is obtained, the actual OpenEmbedded code must also be downloaded. The Linux repository program Git is used to keep OE up to date. While in the ~/OEbase directory, run the command: $ git clone git://git.openembedded.org/openembedded This will download the OpenEmbedded code. It can be updated to the latest version through Git by using the following command in the ~/OEbase folder: $ git pull Now a complete OE environment has been built on the system and development for a specific embedded system can begin. For this project the system is the Intel XScale PXA255 processor on the Gumstix board. This can be accomplished with a few more command line statements: $ mkdir ~/gumstix $ cd ~/gumstix $ svn co https://gumstix.svn.sourceforge.net/svnroot/gumstix/trunk gumstix-oe This creates another directory for the specific Gumstix system and downloads the source code for the Gumstix build environment. The next step is to modify the build profile by running the command: $ . ~/gumstix/gumstix-oe/extras/profile The profile should be changed to tell the build environment that we are using a Gumstix Basix system (using a PXA255). Finally bitbake is used to compile the cross-compilation toolchain with the command: $ bitbake gumstix-basic-image This may take a very long time to complete depending on the host system hardware, but when it is done there is a working cross-compilation toolchain available for the E-Ink development kit board. Now software written on the host system can be compiled for the PXA255 processor on the development kit, including the Linux kernel and programs like X and XPDF. [8] Building the Linux Kernel. To build the new OS for the development kit, it is first necessary to download the source for the main Linux kernel tree. This can be obtained from the Linux website http://kernel.org. The 2.6 kernel has all of the modules required for this project, but a later version will work as well. The commands to build the 2.6 Linux kernel from source in the OpenEmbedded environment that was just set up are: $ git pull git://git.kernel.org/pub/scm/linux/kernel/git/torvalds/linux-2.6.git $ cd linux-2.6 61 Design of a Digital Choral Folder $ cp arch/arm/configs/am200epdkit_defconfig .config $ make CROSS_COMPILE=arm-linux- ARCH=arm oldconfig $ make CROSS_COMPILE=arm-linux- ARCH=arm menuconfig Then make sure to enable the drivers for the E-Ink panel by selecting them in Device Drivers → graphics support → support for framebuffer devices. Next, build the binaries with the commands: $ make CROSS_COMPILE=arm-linux- ARCH=arm $ arm-linux-objcopy -O binary -R .note -R .comment -S arch/arm/boot/compressed/vmlinux linux.bin $ mkimage -A arm -O linux -T kernel -C none -a 0xa0008000 -e 0xa0008000 -n "uImage" -d linux.bin arch/arm/boot/uImage The resulting uImage file and driver files (ending with the “.ko” extension) all need to be put on the development kit. This can be done by copying them onto the USB/MMC card that comes with the kit. Then, plug the MMC into the kit and open a serial connection over the miniB to USB cable to access the kit in a terminal. Tell the kit to reboot but interrupt the process by pressing a key as it restarts. Then, load the new uImage file into the kit memory's boot sector with the following command: GUM> mmcinit GUM> fatload mmc 1 a2000000 uimage.bin GUM> bootm Log in and type the command “uname -a” to check the version of Linux on the system. If it reports Linux version 2.6, the process worked, and a Linux version capable of running the metronomefb software is running on the development kit. [8] Building an X Server. The next step is getting an X server running on the development kit hardware. This can be achieved by cross-compiling Xfbdev, the X server behind smallX. With a functional OpenEmbedded system, Xfbdev can be compiled with the command: $ bitbake xserver-kdrive This will result in a .ipk package file which can be installed on the development kit system. In order to do this, the file must be copied to the MMC card and installed on the kit system through the install command: $ ipkg install /mnt/mmc/ipk_filename.ipk Where ipk_filename.ipk is the name of the package file that bitbake compiled. For example, Xfbdev version 1.4 r1 would result in a file called “xserver-kdrive-fbdev_1.4r1_armv5te.ipk”. The next step is to install and load all of the driver files that were compiled along with Xfbdev. These files end in the “.ko” extension. Use the insmod command to load the drivers: $ cd /mnt/mmc $ insmod drivers/video/syscopyarea.ko && insmod drivers/video/sysfillrect.ko && insmod drivers/video/sysimgblt.ko && insmod drivers/video/fb_sys_fops.ko $ insmod drivers/video/metronomefb.ko $ insmod drivers/video/am200epd.ko Finally, the Xfbdev X server must be told where the framebuffer is in memory and where the E-Ink device is located. The commands to do that are: $ rm /dev/fb0 $ mknod /dev/fb0 c 29 1 62 Design of a Digital Choral Folder $ /usr/X11R6/bin/Xfbdev -ac & That should tell Xfbdev to draw to the E-Ink screen, and a crosshatch pattern with an “X” in the center will be drawn to the display to indicate that X is running on the kit. [8] Compiling XPDF. The next step in developing a digital choral folder on OpenEmbedded is to get XPDF running on the kit hardware. The XPDF source code is available for free, under the GPL, at http://www.foolabs.com/xpdf/download.html. XPDF must be built using the OE cross-compile toolchain. This can be done with bitbake in the same way that Linux was built on the cross-compilation toolchain. Then the XPDF binary files must be placed on the MMC card and transferred to the development kit and tested. [12] 63 Design of a Digital Choral Folder 7 Results Although the ultimate goal of a complete working digital choral folder was not accomplished, several significant sub goals were completed. The project was broken into hardware and software goals, which were approached separately. For hardware, the switching approach and design for the two screen solution was completed, if not fully verified and implemented. As for software, a working program was developed using Thinspace, and the approach to a more thorough Linux solution was laid down. The results of the two screen design and of the software development are detailed in this section. Two Screen Design Results. The two screen design is complete, although the final PCB has not been fully verified, ordered, assembled, or physically tested. The proof of concept demonstrated by the expanded dual PCB configuration was as far as this project got to achieving the requirement of a two screen device. The switching approach was tested and partially implemented through the design of the two screen PCB. However, the final step of confirming the design by testing the two screen PCB was never implemented. The remaining question for the two screen design is whether the proposed switching approach can handle two screens simultaneously. Software Development Results. Software development resulted in two distinct solutions. The first is the Thinspace development that produced the CDF_script.sh shell script, capable of providing basic menu functionality and drawing pre-loaded pieces of music onto the E-Ink display. This solution was fully implemented on the development kit for one screen. The second software solution involved cross-compiling a new Linux Kernel and running an X server with XPDF to draw musical scores natively. The method for developing the necessary software in an OpenEmbedded environment was thoroughly documented and attempted, but a working Linux kernel with metronomefb was not compiled for the system. The remaining tasks for the software solution are to complete the OpenEmbedded design and to develop the software required to send two images out to the hardware sequentially. 64 Design of a Digital Choral Folder 8 Future Considerations There is a good deal of work remaining for this project. Another student, or group of students, may take this on, working from where this MQP leaves off or stepping back and starting from an earlier point and revising the design. This section provides recommendations for the continuation and completion of this project, and suggestions for additional goals to be met if possible. Two Screen Design. The current design of the two screen PCB needs to be verified. The design so far has not driven two screens off of one Metronome, as is required. This could be checked by attaching a third breakout PCB into the switching test setup, effectively prototyping the entire two screen PCB using the breakout boards and breadboard. Once the design is verified, it must be ordered, assembled, and tested. Also, the switching signal must be incorporated by assigning the desired GPIO pins on the development kit to digital outputs. Then the pins must be accessed from the development kit connector and attached to the output enable control pins on the two screen PCB. Another consideration is the fact that there have been advances in E-Ink hardware since this project began. The new AM-300 development kits have a completely new display driver chip to replace the Metronome. The Epson S1D13521 chip may offer the opportunity for a better solution. Software. The GPIO switching pins must be incorporated into the image update software on the system. This must be done in the metronomefb and/or X server code. A possible approach is to extend the framebuffer so it can hold two images rather than one. Then, after a normal image update is performed the software could be made to toggle the switching pin and draw the other half of the framebuffer to the other screen. Also, XPDF must be modified in a few different ways. The UI buttons must not be drawn, and most of the advanced functionality can be removed to make the program smaller. Also, a method to access two PDF pages at a time must be developed and a change must be made to the page turning code so that the pages turn two at a time, like a book. Finally, a small menu program must be written to check for PDFs on the device and list them so that the user can select the desired document to read. Chassis and Buttons. A mechanical engineer could design a chassis for the development kit components to house the screens and buttons, and to hide the exposed electronics. It should be able to fold in half like a choral folder, and it must give access to the MMC card reader on the kit so that PDFs can be loaded. Also, a button PCB could be developed that has big, attractive push buttons at convenient locations on the chassis. This may be attached to the 10 pin FPC cable on the development kit to communicate with software. The software for setting up the button pins on that IO port must also be developed. 65 Design of a Digital Choral Folder 9 Conclusion The goal of this project was to develop a digital choral folder using E-Ink technology, to bring choral music into the digital age and to solve the problems of paper sheet music storage and organization. Such devices exist but are unpopular because of the limitations of their screen technologies. A device using new electronic paper technology from E-Ink Corporation was conceived which could become a popular item among the choral and broader music reading community. After studying the problem extensively and determining a project plan, a design was attempted using the E-Ink AM-200 development kit. PCB design and embedded systems programming techniques were employed to develop a solution to drawing PDFs to two attached E-Ink screens. The design approach was tested and a proof of concept was achieved. Damage to the hardware, delays, hesitation, and poor project management were at the core of the difficulties in this project. While this MQP did result in some achievements, the original goal of a complete digital choral folder was not attained. Hopefully Professor Delorey will not abandon his idea and another MQP will have success at completing the design of a digital choral folder. 66 Design of a Digital Choral Folder References 1. 74LVC125A Quad Buffer/Line Driver Datasheet. May 7, 2003. Philips Semiconductors. 2. Active Matrix. July 2006. Meko Ltd. Accessed July 10, 2009. [http://www.meko.co.uk/activematrix.shtml] 3. Basic Active Matrix Technology. June 1992. Japanese Technology Evaluation Center. Accessed July 10, 2009. [http://www.wtec.org/loyola/dsply_jp/c5_s2.htm] 4. Chroboczek, Juliusz. The KDrive Tiny X Server. Accessed July 10, 2009. [http://www.pps.jussieu.fr/~jch/software/kdrive.html] 5. E-Ink AM-200 Users Guide. October 2007. E-Ink Corporation. 6. E-Ink Company Overview. 2005. E-Ink Corporation. Accessed July 10, 2009. [http://www.eink.com/company/index.html] 7. Electronic Paper. 2009. Accessed July 10, 2009. [http://en.wikipedia.org/wiki/Electronic_paper] 8. Kumar, Jaya. Fun with E-Ink, X and Gumstix. August 1, 2008. Accessed July 10, 2009. [http://www.linuxjournal.com/article/10110] 9. Kumar, Jaya. Supporting Electronic Paper. November 19, 2007. Accessed July 10, 2009. [http://lwn.net/Articles/259210/] 10. Metronome 8T125100A Product Datasheet. May 7, 2007. E-Ink Corporation. 11. nnnnnnnn nnnnn +/-15V E-Paper Source Driver Partial Datasheet. May 5, 2008. Micronix Inc. 12. OpenEmbedded User Manual. 2009. OpenEmbedded Team. Accessed July 10, 2009. [http://docs.openembedded.org/usermanual/usermanual.html] 13. Printing & Publishing of Music: A Short History & How it is Done. 2007. The Parlor Songs Association, Inc. Accessed July 10, 2009. [http://parlorsongs.com/insearch/printing/printing.php] 14. Sharp nnnnnn TFT-LCD Gate Driver Datasheet. Sharp Corporation. 15. The Oldest Song in the World. 2006. Amaranth Publishing. Accessed July 10, 2009. [http://www.amaranthpublishing.com/hurrian.htm] 16. What is Electrowetting? 2008. Liquavista B.V. Accessed July 10, 2009. [http://www.liquavista.com/technology/whatIsElectrowetting.aspx] 67 Design of a Digital Choral Folder Acknowledgments Provost John Orr – As project adviser, Provost Orr helped shape the design process and address the numerous problems which arose, as well as proofread this MQP paper. He was also responsible for acquiring the funding for the E-Ink development kit and second screen. Professor John Delorey – Project co-adviser and the man to come up with the idea for the Digital Choral Folder. As choral director at WPI, Professor Delorey helped to identify project goals and specifications. He also organized the trip to the Hartford ACDA convention, and was the main liaison to E-Ink Corporation. Professor R. James Duckworth – Professor Duckworth donated his time to look at multiple iterations of the design and identify problems. Jaya Kumar – Linux developer and author of the metronomefb and defio kernel modules, Mr. Kumar also responded to multiple emails pertaining to the project's software development process. Glenn Manchester – Glenn works at the Sales and Engineering department of Wavelink Cable, and provided free samples of Wavelink's flexible FPC ribbon cable for this project. Ben Paletsky and Jennifer Vail – Ben and Jennifer work at E-Ink Corporation's customer service and technical support groups and were very helpful in obtaining the required datasheets and offering their advice for the project. 68 Design of a Digital Choral Folder Appendix A: E-Ink Corporation Founded in 1997 based on research started at the MIT Media Lab, E Ink Corporation is the leading supplier of electronic paper display (EPD) technologies. Products made with E Ink's revolutionary electronic ink possess a paper-like high contrast appearance, ultralow power consumption and a thin, light form. E Ink's technology is ideal for many consumer and industrial applications spanning handheld devices, watches, clocks and public information and promotional signs. Future technology developments will enable many new applications through ultra-thin, lightweight, rugged, flexible, full color displays. E Ink has commercialized many different forms of "Electronic Paper" solutions over the past ten years. Most recently, Sony, Lexar, Motorola and others have all won prestigious awards for their use of E Ink's technology in their devices. Customers value E Ink's technology for its brightness, high contrast, and low power - attributes that are similar to that of paper. E Ink is currently mass manufacturing high-resolution displays for several electronic books, including the Amazon Kindle & Sony Reader, as well as for signage, watches and other portable devices. For more information about E Ink, please visit our web site at www.eink.com. [6] 69 Design of a Digital Choral Folder Appendix B: Thinspace Software menu.sh #!/bin/sh MAX_INDEX=3 display=/mnt/mmc/root/metro_display menu_image=/mnt/mmc/images_1024x768/menu wfm=/mnt/mmc/root/wfms/23P00000_80_TB1001_MTC.wbf CDF=/mnt/mmc/root/CDF_script.sh cd "/mnt/mmc/images_1024x768" index=1 folder=1 pieces='ls -1 -d */ | wc -l' sh /mnt/mmc/root/setup/metro_powerup.sh $display "$menu_image$index.ppm" $wfm sh /mnt/mmc/root/setup/metro_stby.sh while [ 1 -ne 0 ] do echo $index folder=`ls -1 -d */ | sed -n "$index"p` echo $folder buttons=`/mnt/mmc/root/get_button 1` case "$buttons" in 1 ) if [ "$index" -eq "$MAX_INDEX" ] then index=1 else index=$(($index+1)) fi ;; 2 ) if [ "$index" -eq "1" ] then index=$MAX_INDEX else index=$(($index-1)) fi ;; 4 ) sh $CDF $folder ;; esac sh /mnt/mmc/root/setup/metro_powerup.sh $display "$menu_image$index.ppm" $wfm sh /mnt/mmc/root/setup/metro_stby.sh done exit 0 70 Design of a Digital Choral Folder CDF_Script.sh #!/bin/sh display=/mnt/mmc/root/metro_display fld=${1%/} image=/mnt/mmc/images_1024x768/$fld/$fld wfm=/mnt/mmc/root/wfms/23P00000_80_TB1001_MTC.wbf buttons=0 index=1 redraw=1 echo $1 echo "$1" while [ 1 -ne 0 ] do if [ $redraw -eq 1 ] then /mnt/mmc/root/setup/metro_powerup.sh $display "$image$index.ppm" $wfm /mnt/mmc/root/setup/metro_stby.sh redraw=0; fi buttons=`/mnt/mmc/root/get_button 1` case $buttons in 1 ) if [ "$(($index-1))" -eq "0" ] then redraw=0 else index=$(($index-1)) redraw=1 fi ;; 2 ) index=$(($index+1)) redraw=1 ;; 4 ) break esac done exit 0 71 Design of a Digital Choral Folder setup.sh #! /bin/sh # CHECK FRAMEBUFFER RESOLUTION setres=`/usr/sbin/fw_printenv|grep bootargs|sed -e "s/ [^.]*video=pxafb:mode://g" -e "s/-16,active[^.]*//g"` case $setres in "64x272") res="128x112" exit 0 ;; "416x622") res="800x600" ;; "544x791") res="1024x768" ;; "600x842") res="1200x825" ;; "640x940") res="1280x900" ;; *) res="NoValue" exit 0 ;; esac echo echo "Framebuffer is set to $res." res="_$res" display=/mnt/mmc/root/metro_display wfm=/mnt/mmc/root/wfms/wfm_def.wbf buttons=0 /mnt/mmc/root/setup/metro_init.sh echo "... initializing display" /mnt/mmc/root/setup/metro_stby.sh sh /mnt/mmc/root/menu.sh exit 0 # end of file 72