1
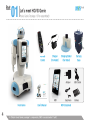
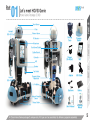
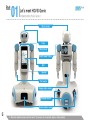
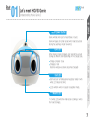
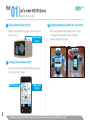
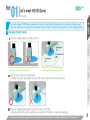
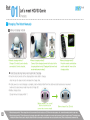
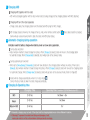
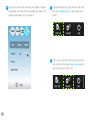
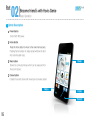
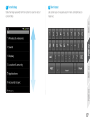
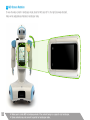
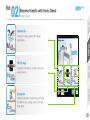
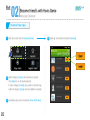
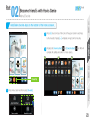
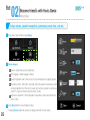
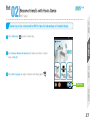
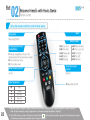
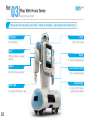
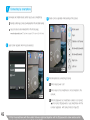
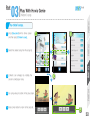
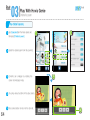
User’s Guide
This user’s guide maybe changed without notice to
reflect product upgrade or other changes to the product.
Contents
Part 01
Part 02
Part 03
Part 04
Meet Hovis Genie
Become Friends With
Hovis Genie
Play With Hovis Genie
I Want To Ask
Hovis Genie
04
Hovis Genie Package
16
Basic Operation
30
Autonomous Action
60
Caution & Warning
06
Understaing Hovis Genie
19
How Window
32
Speech Recognition
64
FAQ
08
Starting Hovis Genie
20
Menu>App Download
33
Camera
65
Service Guide
09
Charging
21
Menu>Favorite
34
Gallery (Data Management)
66
A/S Request
12
Updating
22
Menu>Robot Regstration
35
MP3 Player
67
Product Specification
13
Selftest (Assembly type)
26
Menu>Setup
36
Recorder
27
WiFi Setup
37
Morning Info
28
Remote Control
45
Remote Control
51
Home Security
52
Children’s Story
53
Children’s Song
54
Children’s Poem
Let’s Meet
HOVIS Genie
04 Hovis Genie Package
06 Understanding Hovis Genie
08 Starting Hovis Genie
09 Charging
12 Updating
13 Self Test
Part
01
Let’s meet HOVIS Genie
Hovis Genie Package 1 (Pre-assembled)
Remote
Control
Charger
(For Robot)
Charging Station
(For Robot)
Adaper
MID
Hovis Genie
4
User’s Manual
※ Check Hovis Genie package 1 components. (MID is comprised of 1 unit)
Earphone
MID Componets
Carrying
Case
USB Cable
Battery
Hovis Genie Package 2 (Kit)
PART 01
01
Let’s meet HOVIS Genie
Touch Sensor
Flash
HerkuleX
DRS-0101 (6ea)
Distance Sensor
Carrying
Case
Microphone
Charging
Station
PART 02
IR Receiver
Gyro Sensor(Option)
ZigBee(Option)
Controller
MID
Charger
(For Robot)
MID
Speaker
Tact Switch
Charging Station
Receptacle
HerkuleX
DRS-0104 (2ea)
Adapter
USB Cable
PART 03
Part
Earphone
Battery
User’s Manual
Assembly
Manual
Obstacle Detection
Sensor
HerkuleX
DRS-0102 (3ea)
Charge Station
※ Check Hovis Genie package 2 components. Kit type can be assembled by following separate assembly
PART 04
Li-Po Battery
5
Part
01
Let’s meet HOVIS Genie
Understanding Hovis Genie 1
Touch sensor
Flash
Microphone
Robot power button
MID
Speaker
Tact switch
Charging station receiver
Charging terminal
Obstacle detection sensor
6
※ Obstacle detection sensors will not work if the sensors are covered by taper or other material.
Robot power button
PART 01
Understanding Hovis Genie 2
Genie will pause for certain period when head is touched
during the automous mode movement.
Eye(LED)
When Genie is being charged, color around the eys will
change to different color depending on the charge state.
Charge complete : Blue
Charging : Red
(Red line will grow as Genie becomes charged)
Ear(LED)
Both ears are normally(autonomous/stop mode) lit with
white LED (does not blink).
PART 02
Genie will feel and react to head stroke or touch.
PART 03
01
Let’s meet HOVIS Genie
LEDs will blink when in speech recognition mode.
Mouth(LED)
1~3 white LEDs will blink while Genie is talking or when
the mood changes.
PART 04
Part
7
Part
01
Let’s meet HOVIS Genie
Starting Hovis Genie
1 Turning Robot Power On/Off
3 Detaching/Attaching MID From The Robot
Slide the power switch at the back of the robot to turn
on/off the robot.
Robot power
button
MID can be detached after opening the front cover.
To reattach MID, insert MID into the connection
jack and close the front cover.
2 Turning Screen Power On/Off
Open the front cover and press the MID power button
for 3s to turn On/Off power.
MID Volume
8
MID Power
Button
※ Becareful not to bend the MID connection jack at the bottom when detaching MID from the robot.
01
Let’s meet HOVIS Genie
Charging
For proper usage of HOVIS Genie, please fully charge the robot before first operation after purchase. Insufficient power
may lead malfunction of the robot. We recommend “Manual charge 1” described on page 10 for the first charging method.
1 Charging Station Setup
PART 01
Part
※Against fllat wall on flat surface. In same direction as the
wood grain when placing on wood floor.
※Away (L/R 1M, front 1.8M) from obstacles
and dangerous area where robot can fall.
2 Plug the power cable into the wall socket.
- Arrange the power cable agains the wall so that it will not interfere with Genie’s movement.
X
PART 04
X
PART 03
PART 02
1 Setup the charging station at a location similar to.
3 Attach the charging station against the wall to prevent it from shifting.
(If charging station shifts, clean the adhesive area at btttom of the station or use dobul sided tape.)
※ Station should be allways plugged into the wall socket. Genie will not be able to recharge automatically if station power is off.
9
Part
01
Let’s meet HOVIS Genie
Charging
2 Charging The Robot Manually
1 Manual charging method
※Manual charging method1 :
Charger (For robto) can be directly
connected to Genie’s shoulder.
※Manual charging method2 :
Connect Genie charging terminal at the back to the
charging station termial.( Charging will start even if only
one terminal comes in contact.)
※Manual charging methd3 :
Press the remote control button
and the robot will move to the
charging station.
2 Robot status during manual and automatic charging.
※Once the robot connects to the charging station and starts to charge,
robot will go into sleep mode to decrease the charge time.
※If robot power is on and charging is complete, robot will detach itself from the station and start autonomus movement
(when set to autonomous mode time, refer to Page 26)
※Battery charge status
(Except manual chargng methd 1)
<Battery charging : Eye LED red>
(Red line around the eyes will
grow as battery becomes charged)
10
<Battery charged : Eye LED blue>
※ Manual charging method 1 : When charger (for robot) is connected to Genie’s shoulder, eye LED will not show charge status. Also, robot will automatically switch to stop mode.
※ Manual charging method 3 : Robot will remaing at the charging station after the charge is complete when remote control command is used to charge the robot. This method comes
in handy when robot will not be used for long time. Robot will switch to autonomous movement mode when user touches the screen. (When set to autonomous movement time).
01
3 Charging MID
Part
Let’s meet HOVIS Genie
1
2 Charging MID and the robot separately
- Charge robot using the charging station and the detached MID using the MID charger.
3 MID charge status is shown by the image at the top. Also, when remote control button(
battery status button) is pressed,
PART 01
Charging MID together with the robot
- MID will be charged together with the robot when robot is being charged at the charging stataion with MID attached.
Genie will use voice announcement to state the robot and MID battyer status.
2 During autonomous movement
- When set to [Menu>Setup] > [Automatic], robot will move directly to the chargng station without any notice. When set to
[Manual], robot will ask whether it should charge the battery. When [Charge] is selectd, robot will move to the charging station
for automatic charge. When [Charge later] is selected, robot will go back to the previous mode. (Refer to Page 26)
3 Robot will not charge automatically when it is in stop mode(
).
PART 03
Indicates need for battery charge when battery level runs low during operation.
1 During App exectution
- Robot will ask whether it should charge the battery. When [Charge] is selectd, robot will move to the charging station
for automatic charge. When [Charge later] is selected, robot will go back to the previous mode.
PART 02
4 Automatic charging during operation
Cancel the stop mode to allow the robot charge automatically.
Charging Time
Operating Time ( condition: LCD/WiFi/Media play-ON )
MID
2~3 hrs
1hr 30min ~ 2hr
Robot
2~3 hrs
1hr 30min
Robot + MID
3~4 hrs
1hr
※ Automatic charging may not work if the robot and the charging statation are at two differennt locations.
※ <Warning> To prevent the robot from falling and damaging it self,
make sure robot is on flat surface before starting automatic recharge.
PART 04
5 Charging & Operating time
11
Part
01
Let’s meet HOVIS Genie
Updating
1 Genie will ask for confirmation to update the software when new version becomes available.
2 Press [Confirm] to begin updating. Window will open up showing software update is in progress.
3 Robot and MID has to be rebooted to apply the updated software.
2
12
3
※ Update may not proceed if WiFi connection is unstable or if the battery level is low.
Self test feature enables the user to test the user assembled Genie.
2 Follow the voice and screen instructions to test the robot.
test]. Press [Start] at the bottom when self test instruction
If problem is detected, test can be repeated to verify the
screen opens. Test will be performed in the following
error or malfunction.
sequence; wheel
sensor
upper body.
3 Press [Next test] when current test is complete.
PART 02
1 From the home screen, press [HOVIS App] and then [Self
PART 01
Self test (Kit)
PART 03
01
Let’s meet HOVIS Genie
PART 04
Part
13
01
4 Test results are shown after all the tests are complete. If problem
Part
was detected, click “detail”
to view detailed
decscription
of the
Let’slinkmeet
HOVIS
Genie
problem and information on how to reslove it.
5 To perform individual test , press the menu button and
then press [Individual test] to select desired test to
perform.
6 To find out the robot status during the test, press the
menu button and then press [Current robot status] to
open the result screen shown in #4.
14
0
02
Become friend’s with
HOVIS Genie
16 Basic operation
19 Home screen
20 Menu>App download
21 Menu>Favorite
22 Menu>Robot registration
26 Menu>Setup
27 WiFi setup
28 Remote control
Part
02
Become friend’s with Hovis Genie
Basic Operation
1 Button Description
1 Power button
Turns On/Off MID power.
2 Home button
Press the home button to move to the Hovis home screen.
Pressing the home button for longer period will show the list of
most currently used Apps.
Power
3 Menu button
Shows the connected menus which can be executed from
the current screen.
4 Cancel button
Cancels the current screen and moves back to previous screen.
Menu
Home
Cancel
16
3 Text Input
Become friend’s with HovisUseGenie
same type of keypad used in many smartphones to
PART 02
PART 01
input text.
PART 03
Slide the finger upwards from the bottom to see the rest of
content titles
PART 04
02
2 Scroll drag
Part
17
02
4 MID Screen Rotation
Part
Become friend’s with Hovis Genie
To view the video content in landscape mode, rotate the MID case 90˚to the right (clockwise direction).
Video will be adjusted automatically to landscape mode.
18
※ Make sure to rotate MID to landscape mode if the content being run supports only landscape.
※ Some contents may not convert to portrait or landscape mode.
Home Screen
Multimedia
PART 01
02
Become friend’s with Hovis Genie
PART 02
Consists of camera, gallery, MP3 player,
and recorder.
Consists of morning info, remote control, and
weekly security.
Education
Children’s education content menu consisting
of children’s story, songs, poems, and basic
living habits.
PART 03
HOVIS App
PART 04
Part
19
Part
02
Become friend’s with Hovis Genie
Menu>App Download
Download New Apps.
1 Press menu button and then [App download].
3 Button changes to [Open] when download is complete.
Press [Open] to run the downloaded App.
If button changes to [Install], press confirm to install the App.
Button will change to [Open] once the installation in complete.
4 Downloaded Apps can be checked at [Home-HOVIS App].
20
2 Select app to downloand and press [Download].
02
Become friend’s with Hovis Genie
Menu>Favorite
Add/delete favorite Apps to the bottom of the home screeen.
2 Press [+] found on top of the icons at the upper screen to add App
PART 01
Part
or [Cancel button]
complete the editing and switch to home screen.
Favorite
1 Press menu button and then press [Favorite].
2
3
PART 03
1
on MID will
PART 04
3 Pressing the [Home button]
PART 02
to the Favorite. Pressing [-] will delete an App from the Favorite.
21
Part
1
02
Become friend’s with Hovis Genie
Menu>Robot Registration
Robot Registration : Robot and the user must be registered in order to operate the robot.
1 If the robot has not been registered, robot registration
screen will open when the robot is turned on.
2 Input sequence
1 Input the serial number found at bottom of the robot.
2 Input ID and the password.
6
3 Input cell phone (smart phone) number to use
as ID when ID is lost or forgotten.
4 Input password hint and an answer which will
be used to recover lost or forgotten password.
5 Input cell phone (smart phone) numbers (up to
10)from which remote control of robot is allowed.
22
6 Press [Save] to save input. Login screen will appear once
the input is saved.
1
3
2
4
5
6
02
login is selected.
*****
3 To register new ID, press [Robot registration] to open the
PART 02
[Login] to access home screen.
2 User will be logged in automatically after power on if automatic
PART 03
1 Input registered ID and password and press
PART 01
Part
2 Login : Login screen or automatic login after registration.
Become friend’s with Hovis Genie
password to create another ID. Multiple IDs can be used.
(Refer tp Page 22)
※ User will not be able to login without Wi-Fi connection. Connect to Wi-FI first and then press the login button in
home screen to login (Refer to Page 27).
PART 04
registration screen. Input original serial number, new ID, and
23
02
Part
3 Logout & Logging in with another ID
Become friend’s with Hovis Genie
1 Press menu button and then press [Robot registration].
3 Input new ID and the password and press [Login].
2 Screen shows connected ID. Pressing [Logout] will logout
current user and login screen will open.
1
2
*****
24
02
1 Press menu button and then press [Robot registration].
3 Enter the previously registered password to open the
registration information edit window.
Edit the registration information such as the robot serial
number, ID, password, ID replacement cell phone number,
PART 01
Registration Information Edit : Edit previously entered registration information such as robot
Part
4
Become friend’s
Hovis
serial with
number,
ID, andGenie
password.
and smart phone numbers for remote control.
PART 02
2 Press the [Registration Information Edit] at the bottom to
open the password input window.
*******
*****
*****
***
***
***
***
PART 03
*******
4 Pressing [Change] after editing the desired information will
PART 04
*******
save the edited registration information and open the login
window.
25
Part
02
Become friend’s with Hovis Genie
Menu>Setup
Setup volume, speech recognition, autonomous mode time, and etc.
1 Press menu button and then press [Setup].
2 Setup category
1 Volume : Adjust robot sound to desired level.
2 TTS language : Default language is Korean.
3 Speech recognition mode : When set to ON, robot will respond to recognized speech.
4 Autonomus mode : When set to automatic, robot will operate in autonomous mode
during designated time. When set to maual, robot will only operate in autonomous
mode if it is given command using the remote control.
5 Autonomous mode time : Robot will operate in autonomous mode only during the set
time (0~23hr).
3 Press [Save] button to save changes to setup.
26
Pressing [Cancel] button will cancel any changes and switch to home screen.
WiFi Setup
PART 01
02
Become friend’s with Hovis Genie
Genie has to be connected to WiFi to take full advantage of installed Apps.
) found in Favorite area.
PART 02
1 Press [Shortcut] (
2 Go to [Setup-Wireless & Network] and make sure there is a check
3 Press [Wi-Fi setup] and select a network with strong signal
PART 03
mark on [Wi-Fi].
.
Shortcut
PART 04
Part
27
Part
02
Become friend’s with Hovis Genie
Remote Control
Using the remote control to control Hovis Genie.
Mute
Stop mode
Wheel stop[ON/OFF]
Charging/autonomous
mode/battery
F1 Manual charging(Robot moves to the
charging station/Cancels autonomous mode)
F2 Run autonomous mode
F3 Check battery level
Robot movment control
Left turn
28
1+OK (Love You)
2+OK (Kiss Kiss)
3+OK (Taekwondo)
4+OK (Dance)
5+OK (Exercise)
6+OK (Wave both arms)
7+OK (Turn+Love You)
8+OK (Turn right)
9+OK (Turn left)
0+OK (Attention)
Robot movement
control
Right turn
Robot movement
OK
▲
▼
◀
▶
Robot motion
P3 head flash ON/OFF
Stop
Forward
Backward
Move left
Move right
※ Robot will come to a stop if it does not receive an input within 3s and go back to previous mode if no input is received
within 10s after coming to a stop. (Except when in autonomous mode time, Refer to Page 26)
※ Touch MID screen or press ‘Autonomous mode’ button
) on the remote control to go back to the autonomous mode
if autonomous mode was cancelled due to manual charging.
0
03
Play With
HOVIS Genie
30
Autonomous mode
32
Speech recognition
33
Camera
34
Gallery (Data management)
35
MP3 Player
36
Recorder
37
Morning info
45
Remote control
51
Weekly security
52
Children’s story
53
Children’s song
54
Children’s poem
Part
03
Play With Hovis Genie
Autonomous Mode
Genie can move by itself, stop when it meets an obstacle, and respond to human touch.
Shoulder
90° auto rotation
Neck
L/R 90° auto rotation
Arm
180° auto rotation in outward
direction
Elbow
90° bend in inward direction
Palm hole
For inserting small stick or flag
30
Waist
14 ° bend forward/backward
Hand tactile switch
Can be clicked manually
Foot(wheel)
L/R & F/B 360 ° rotation,
autonomous movement
03
1 When Genie meets an obstacle
Part
Play With Hovis Genie
2 Responses to head touch
1 Genie will react with pleasure if it is stroked on the head.
2 Genie will react with displeasure if it is hit on the head.
PART 01
When Genie meets an obstacle while moving, Genie will turn and move towards another direction.
Genie will start automatic recharge when battery level falls below 20%.
4 Action based on time
PART 02
3 When hungry
2 During lunch , Genie will announce lunchtime and ask if you have had lunch yet.
3 In the evening, Genie will ask about today’s weather and ask how you spent your day.
At 9PM, Genie will say it’s almost time for bed and at 10PM, Genie will ask to get ready for bed and show action simulating face washing
or brushing teeth.
PART 03
1 In the morning, Genie will ask about today’s weather and wish you a nice day.
Acting bored, expressing love, playing cute, asking time, playing alone, stretching, scratching it’s head, exercising, conducting, and
other actions and speech.
6 Action when hand tactile switch is clicked
1 Left hand click - Genie will greet you with ‘hello’ or kiss you to express positive feeling towards you.
PART 04
5 Autonomous action
2 Right hand click - Genie will make a motion similar to looking at a wrist watch and tell you the current time and the day.
3 Both hands click - Place small bouncy ball between Genie’s hands and Genie will lift the ball above it’s head and throw the ball to you.
31
Part
03
Play With Hovis Genie
Speech Recognition
Genie will recognize and respond to various voice commands and statements related to charging,
greeting, movement, special action, emotional statement, and etc.
Ear LEDs will blink when Genie is in speech recognition mode and ready to receive input.
Type
Emotional
Greeting
Move
Special action
Function
Genie, love you
Genie, hello
Genie, left turn
Genie, dance
Genie, charge
Genie, cute
Genie, happy to see you
Genie, right turn
Genie, wash face
Genie, goodnight
Genie, good job
Genie, name
Genie, forward
Genie, brush teeth
Genie, morning info
Genie, backward
Genie, bath
Genie, weekly security
Genie, handsome
Genie, bored
Command
Genie, clap
Genie, shake
Genie, exercise
Genie, lift hands
Genie, pause
Genie, turn
Genie, shake head
32
※ Speech recognition may not work properly when Wi-Fi connection is unstable, there is lots of
background noise, MID microphone is more than 50cm away, or when words are not spoken
03
Play With Hovis Genie
Camera
Camera is used to take photos and videos.
2 Press
to take photo/video.
Photos and videos are automatically saved in the gallery.
PART 01
Part
1 Press [Multimedia] from the home screen and then press
PART 02
[Camera].
PART 04
3 Press image on the right to open the gallery screen.
PART 03
Select desired effect
33
Part
03
Play With Hovis Genie
Gallery(Data Management)
Photos and videos taken by the camera can be
checked in the gallery.
1 Press [Multimedia] from the home screen and then press
[Gallery].
2 Press camera folder and then select the image you want to see.
Data management method
< Saving MID data in PC >
1) Use USB cable to connect MID to the PC.
2) Drag top of the MID screen to the bottom.
3) Press ‘USB connected’.
4) Press‘Use USB storage’.
5) Open portable storage folder (F) from the PC.
6) Find and open ‘dongbu’ folder.
7) Open desired folder.
8) Select files to be transferred and save in PC.
9) Press ‘USB storage not used’ in MID screen.
10) Disconnect USB cable connecting MID to PC.
< Saving PC data in MID >
1) Use USB cable to connect MID to the PC.
2) rag top of the MID screen to the bottom.
3) Press ‘USB connected’.
4) Press‘Use USB storage’.
5) Open portable storage folder (F) from the PC.
6) Find and open ‘dongbu’ folder.
7) Select files to be transferred and save in MID.
8) Press ‘ USB storage not used’ in MID screen.
9) Disconnect USB cable connecting MID to PC.
34
03
Play With Hovis Genie
MP3 Player
PART 01
Part
Down load music files to MID and listen to music.
1 Press [Multimedia] from the home screen and then press
Love Love Love
Hovis song
PART 04
Select desired content.
Genie’s smile
PART 03
2 List of content files (mp3) saved in Hovis Genie will be shown.
PART 02
[MP3 player].
※ Only Mp3 type files can be played by the MP3 player.
35
Part
03
Play With Hovis Genie
Recorder
Use the recorder to record and play back sound.
1 Recording
2 Play Recorded File
1 Press [Multimedia] from the home screen and then
press [Recorder].
1 Select the recording to play back.
2 Press [Play] to play back the recorded file.
2 [Record] Recording will start when the button is pressed,
[Stop] Recording will stop when the button is pressed.
3 Save the recorded fie by selecting a file name.
1
36
2
1
2
3
※ Record files have 3gp file extension.
※ Recording function will not work when robot is in speech recognition mode (Refer to Page 26).
(Please note that English version for this function will be updated soon. You can update HOVIS Genie simply by downloading
update patch from Donbu website then.)
Mr. Dongbu’s morning.
1
2
Genie is waking
Mr.Dongbu up in
the morning using
the alarm schedule,
sound, and motion
set previously.
Genie will move
around until Mr.
Dongbu wakes
up and touches
Genie’s head to
turn off the alarm.
3
4
Genie is informing
Mr.Dongbu about
today’s weather.
Weather report
can be local or
other designated
location.
Genie is using
registered google
account to read
today’s schedule to
Mr.Dongbu.Genie
can also wake up
Mr. Dongbu’s son!
※ If 2nd alarm goes off while Genie is in th midst of morning alarm & info, first alarm will stop and the 2nd alarm will run.
PART 02
Genie can provide customized morning service and information such as morning alarm,
weather and temperature information, google schedule, and etc.
PART 01
Morning Info
PART 03
03
Play With Hovis Genie
PART 04
Part
37
Part
03
Play With Hovis Genie
Morning Info (View)
Monring info runs in the morning at an alarm time.
Morning info can also be viewed at anytime to check the alarm time and other information.
1 Press [HOVIS App] from the home screen and then press [Morning info].
38
03
Alarm
Weather
Schedule
PART 03
PART 02
PART 01
2 Press [View] to check the morning info for individaul user.
Part
This screen can alsoPlay
be used With
to check the
alarm time,
weather, and schedule.
Hovis
Genie
PART 04
Select user Select Info
39
Part
1
03
Play With Hovis Genie
Morning info (setup)
User list check and user delete.
1 Press [Setup] to open the list of users using morning info,
Alarm time User name Alarm ON/
OFF switch
40
2 Press [delete] to delete selected user from the list.
03
3 Press Google account and select an account from the list.
****
PART 02
1 Press [Add] to add new use.
PART 01
Part
user name
2 Add user > Input
Play
With Hovis Genie
Press [Yes] when Google acccount registration message
comes up and then select [Setup]. Account can be
addedfrom [Setup - Accounts & Syncs - Add account].
PART 04
2 Input new user name in the space beside ‘User name’.
PART 03
4 Touch (Warning) to add an existing account.
It is important to put “m.google.com” in “server” section for proper Google registration.
41
03
3 Add user> Setup alarm and Genie motion
Part
Play With Hovis Genie
1 Variety of different types of alarm format can be selected.
2 Setup Genie sound and motion to be run when alarm rings.
1
2
42
3 Sound and motion list.
1 Alarm list
2 Motion list
03
4 Add user > Select location for weather report
Part
Play With Hovis Genie
PART 02
PART 03
report for.
PART 01
2 Press [Weather] to select the location to receive weather
PART 04
1 Press [Next info] to setup weather report and Google schedule.
43
Part
5
03
Play With Hovis Genie
Add user > Google schedule setup
1 If Google accont has been registered, press [Google schedule]
to check the schedule using the calender.
2 If Google account has not been registered, screen for registering
the Google account will appear.
1
2
****
3
44
03
Play With Hovis Genie
Remote Control
Add remote control App to the smartphone to monitor your home in real time, take photos, and
control Genie from anyhwhere.
1
Mrs. Dongbu is out Grocery shopping. She is checking her
home by remote control to make sure her elderly mother is well.
2
Mrs. Dongbu’s mother just woke up and she is looking for her.
PART 03
PART 02
Home monitoring by Mrs. Dongbu
PART 01
Part
PART 04
Mom!,
I’ll be back soon
from shopping
3
Mrs. Donbgu is using Genie to tell her mother she will be back
home soon. Now, you can feel secure konwing you can check
on your home at anytime from anyplace.
4
Mrs. Dongbu’s mother is listening to her daughter through
Genie and feels secure knowing she is not alone.
※ To send message to your home in real time, send txt message to Genie and Genie will read out the message aloud.
45
03
Part
1 Connecting by smartphone
Play With Hovis Genie
1 Donwload and install remote control App to your smartphone.
3 Genie can be operated while looking at the screen.
1 Remote control App can be downloaded from the Android market.
2 App can also be downloaded from the home page.
Robot speed
www.dongburobot.com > Customer support > For service > Archives
Flash
Obstacle or cliff sensor
2 Login screen appears when App is executed.
Bend waist backwards
Bend waist forwards
Right turn
Left turn
4 Potential problems connecting to Genie.
1 When robot power is off
2 When robot or the smartphone is not connected to the
network.
3 When ID/password or smartphone number is not correct.
Find correct ID/password or use smartphone with the
number registered with Genie. (Refer to Page 25)
46
※Only the smartphone with the number that was registered together with the ID/password to allow remote control
03
Part
2 Genie screen when under remote control from smart phone
Play With Hovis Genie
screen will switch to remote control screen.
3 Genie will go back to previous screen when smartphone remote control connection ends.
PART 04
PART 03
PART 02
2 Genie screen will show “under remote control” when it comes under smartphone remote control.
PART 01
1 Genie will stop autonomous operation or App execution when it receives remote control connection from the outside and
47
03
Part
with a smartphone: Reserve mode to run after smartphone
3 Controlling robot
Playmode
With
Hovis Genie
remote control of the robot ends
1 To chrage the robot using smartphone, Reserve [Charge mode] and press run. Reserved mode will run after smartphone
remote control ends.
48
03
Part
4 Controlling robot motion with smartphone: Used for controlling robot motion from away from home.
Play With Hovis Genie
1
2
PART 01
PART 02
Select the desired motion to run.
PART 03
2 Pressing [Motion list] will open the motion list screen.
3 Press [Run] to run the selected motion.
PART 04
1 Press menu button and then press [Motion list].
49
03
Part
5 Using smartphone to make the robot talk : Used for making the robot talk from away from home.
Play With Hovis Genie
1 Press menu button and then press [Robot talk].
3 Press [Run] and Genie will convert the received txt message
to speech. Typed txt message can be saved in the [Speech
list] by pressing [Save].
2 Press [Send TTS] and type what you would like Genie to say.
1
2
4 Pressing the [Speech list] will open a screen with list of saved
txt meessages that were sent by [Send TTS].
To send one of the saved messages again, select the message
and press [Run].
3
50
4
03
Play With Hovis Genie
Home security
While you are away, Genie can take photos of your home at specified intervals.
PART 01
Part
1 Press [HOVIS App-Home security] from the home screen. Home security application will start to run as soon as the screen changes
2 Press [Setup] and then press [Photo interval] to open the screen for setting up photo interval.
2
3 Phots taken during home security mode can be viewed in [Gallery-Home security].
PART 04
PART 03
1
PART 02
to camera view.
4 Maximum of 50MB of photos (300 photos) can be saved. If the number of photos go over the maximum limit, photos will be deleted starting
from the oldest photos to make room for new phtotos.
51
Part
03
Play With Hovis Genie
Children’s story
Play Children’s stories
1 Press [Education] from the home screen
1
2
and then press [Children’s story].
2 Select the desired story from the story list.
3 Contents can enlarged by rotating the
screen to landscape mode.
3
4 Try using various functions in the play screen.
5 Press cancel button to return to the story list.
52
Please be advised that current Children’s songs, stories and poems are sample contents based on Korean language and
Korean culture. More attractive contents for respective countries are to be developed by world-wide developers in future.
4
03
Play With Hovis Genie
Children’s song
PART 01
Part
Play children’s songs.
1 Press [Education]from the home screen
1
2
PART 02
and then press [Children’s song].
screen to landscape mode.
3
PART 04
3 Contents can enlarged by rotating the
PART 03
2 Select the desired song from the song list.
4 Try using various functions in the play screen.
5 Press cancel button to return to the song list.
4
53
Part
03
0
Play With Hovis Genie
Children’s poem
Play children’s poems.
1 ress [Education]from the home screen and
then press [Children’s poem].
2
1
2 Select the desired poem from the poem list.
3 Contents can enlarged by rotating the
screen to landscape mode.
3
4 Try using various functions in the play screen.
5 Press cancel button to return to the story list.
54
4
04
I want to ask
Hovis Genie
60
Caution & Warning
64
FAQ
65
Service Guide
66
A/S Request
67
Product Specification
Part
04
I want to ask Hovis Genie
Caution & Warning 1
Warning
• To prevent product damage, fire, electric shock, and explosion from overload, DO NOT use chargers other than the one
provided with the product or chargers specifically designed to be used the product.
• To prevent fire or damage to the product from over heating, DO NOT connect the charger to the travel voltage converters,
adapters, mulitplugs, and voltage converters.
• To prevent overheating and fire, avoid connecting multiple plugs to sigle electric socket.
• To prevent fire and electric shock, DO NOT touch the charge with wet hands.
• Becareful not to let sharp objects, children, or animals near the power cord.
To prevent injury, fire, and electric shock, avoid bending the power cord or be pressed by a heavy object. Place the power cord in
such a way as to avoid tripping over the cord.
• To prevent electric shock, fire, product damage, and personl injury, check the charger and the power cord for any dam
ages or excessive wear before use. Charger with damages or excessive wear should not be used and relpaced with a new
charger.
• During use, charger should be placed at well ventilated location such as the desk top and not covered with any material
that could prevent ventilation. DO NOT place the charger inside a case or other type of enclousre during use.
• To prevent fire or electric shock, make sure the charger cable is plugged in prpoerly to the wall socket.
56
04
prevent fire and product damage, make sure the power from the wall socket matches the voltage and frequency as
Part • Tospecified
on the charger.
I want to ask Hovis Genie
• To avoid fire or electric shock, DO NOT attach conducting material to the the robot charge terminal or to the charger terminal.
• To avoid degradation of performance, damage to the product, explosion, and fire, DO NOT expose the charging station and
the robot to the temperature greater than 49℃(120℉), radiator or stove, electric heater, direct sunlight. Enclosed space
without ventilation should also be avoided..
• To avoid damage to the product and personal injury, avoid using the robot at a location where there is danger of robot
falling off. Less than firm ground and location with danger of vibation should also be avoided.
PART 02
• Product should only be disassembled or modified by the authorized service person. the product
(Contact the customer service found at back of user’s manual)
Damage to the product caused by non authozied person attempting to repair the product will void free service even during the free
warranty period.
PART 03
• To prevent fire, electric shock, and personal injury, unplug the charger plug from the wall socket and from the robot when
expecting thunderstorm accompanied by lightning. Do not touch the power cord during thunderstorm and leave the
charger detached from the robot.
PART 01
• To prevent electric shock and fire, do not touch the metal prongs of the charger plug when plugging or unplugging the plug
from the wall socket.
• To avoid product damage or personal injury, avoid putting your finger between the robot joints and connections. Care
should also be taken to prevent foreign material from getting caught in the robot joints and connections.
PART 04
• To avoid electric shock or fire, DO NOT touch the robot charging terminal with conducting material.
57
04
injury and product damage, avoid sitting or stepping on the robot. Also, Do not place anything on the robot.
Part • To avoid personal
I want to ask Hovis Genie
• To prevent electric shock or product damage, DO NOT pour water, liquid, or sand on the product. DO NOT wash the product.
• To prevent electric shock or product damage, avoid using the product in humid environment such as bathroom or swimming pool.
• Moving the robot from cold environment to warm or hot environment may cause condensation to form insided and outside
of the product. To avoid damaging the product, turn off the power to the robot and let the humidity evaporate by leaving
the robot in the new environment for at least an hour or more.
• Always use dry soft clothe to clean the robot exterior. Using wet clothe may cause electric shock , personal injury, or damage
to the robot. Using rough clothe may damage the robot exterior.
• To prevent fire or product damage, remove obstacles or electrical wiring from the floor around the robot.
58
Warning & Caution2
Caution
PART 01
04
I want to ask Hovis Genie
• Battery will discharge naturally over period of time even though it is not used. Charge the battery prior to using the
product again.
• To prevent damage or malfuction, do not drop the robot or inflict external shock to the robot.
PART 02
• To prevent external shock to the robot gears, motors, and to other parts, place the robot in the original carrier or other
appropriate box when storing or transporting the robot.
• Robot may not be able to move forward or fall down if the floor is uneven, slippery, at steep angle or when there are too
many obstacles.
PART 03
• Robot may not respond immediately to the touch or remote control command while it is moving. Do not force the robot to
respnd, wait until the robot finishes moving before using touch or remote control command.
• To prevent damage or malfuction, do not place a magnet or magnetic object near the robot and avoid placing the robot at
a loation where it maybe exposed to X-ray.
• To prevent damage, use the robot only indoors. Robot should not be used on rought concrete floor or other rough surface.
• Use the wrapping material that came with the robot or other appropritae wrapping material to wrap the robot head and body when
robot is being stored for long period or being transported.
PART 04
Part
• Do not use oil or other lubricanst on robot joints and other moving parts.
59
Part
04
I want to ask Hovis Genie
FAQ
Check the following before contacting the customer service to report a malfunction.
• Power does not come on.
- Battery maybe completely discharged. Place Hovis Genie on the charging station. (Refer to Pg10)
• Battery is not charging.
- Check the charging station adapter to make sure it’s plugged in.
- Check the charging station and Hovis Genie charge terminals to make sure they are in contact.
- If automatic charging is not working prperly, check to make sure there is no obstacle between the charging station and Hovis
Genie. Remove any obstacles found (Refer to Page 9).
• Hove Genie wheel is not turning.
- Check the wheel for any foreign mateial that maybe prevent the wheel from turning.
- Check the MID screen to see if Genie is in stop mode. Cancel the stop mode if Genie is in stop mode.
• Eye and emoticon LEDs are lit but Genie is not moving/Genie is standing on one spot with arms shaking.
- Check the Hovis Genie battery level to make sure there is enough charge.
- Turn off the power and then turn the power back on. Contact our customer service center if the same problem persists.
• No sound.
- Check [Setup] to see if the volume level is set to minimum.
• Can not download contents.
- Check the network sign.
60
- Move Hovis Genie closer to the AP .
04
I want to ask Hovis Genie
Service guide
Customer rights
Customer has the ‘right’ to recieve free service within 12month period from the date of purchase However, malfunction or dam-
PART 01
Part
age caused by a natural disaster or misuse by the consumer will not be covered under free service even within the 12 month
Liability for charged services
In the event of following circumstances, consumer will be charged for any services provided even within the free service period.
PART 02
period and any services provided will be charged.
1. Not product failure
owners to read the included user’s manual to become familiar with the product.
2. Malfunction or damage due to misuse by the consumer
• Malfunction or damage due to unstable input power or power supply equipment.
PART 03
• Service charge will occur when service is requested and no malfunction or defect is found to be present. We stronly recommend all
• Malfunction or damage due to external shock.
• Missing or damage to the parts.
• Damage to the external case from corrosive material or liquid.
PART 04
• Malfunction or damage due to foreign material being inserted or sucked into the product.
3. Other
• Damage or malfuction caused by natural disaster(lightning, fire, flood, wind, gas, salt water, earthquake, and etc)
• Replacement of battery and other consumables.
61
Part
04
I want to ask Hovis Genie
Product specification
Item
Model name
Szie
Robot
Motor
11pcs
Sensor
Obstacle detection sensor, cliff detection snsor, IR sensor, touch sensor Tactile sensor,
localization sensor.
Omni-directional Drive / HerkuleX 0102 3ea
IR Receiver, ZigBee[option]
External Speaker
External 2 way stereo Speaker(1W 2Ch)
Battery capacity
7.4V / 3,000mAh / Li-Po
Display
3.5”TFT(480X320)
Screen input method
Capacitive Full Touch
Main processor
MID : S5PC110, 1GHz
Camera
Front Rear Camera
Audio
1ch MIC
Internal memory
256MB
External memory
Micro SD 4G
Network
62
255(W) X 236.5(D) X 408.5(H)
3.4kg
Network
Other
HOVIS Genie
Weight
Drive train
MID
Detailed description
Remote control
Wi-Fi
IR type / ZigBee Remocon[Option]
No part of the manual, including the products and software described in it may be reproduced or distributed
without express written permission of Dongbu Robot. Co., Ltd.
Copyright ⓒ 2012 Dongburobot Corp.All rights reserved.
Product inquires, service request : Customer Service (Ext 112)
www.dongburobot.com