1
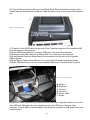
Imaging Wheel Aligner ___________________________________________________________________________ Installation Guide & User Manual Version 10.02 Copyright © 2010 All rights reserved No part of this publication maybe translated, stored in an electronic retrieval system, reproduced, or partially or totally adapted by any means (including microfilm and Photostats) without prior written permission. Information and specifications contained herein may be subject to modification and change without prior notice. READ THIS ENTIRE MANUAL BEFORE ASSEMBLING AND OPERATING THE ALIGNER IMPORTANT ! RECORD THE FOLLOWING INFORMATION LOCATED ON THE SERIAL NUMBER DATA PLATE AT THE BACK OF THE CABINET: Model Number: ________________________________ Serial Number: ________________________________ USB Security Key Number: ______________________ Date of Manufacturing: __________________________ HP, Philips, Dell, Microsoft, Windows Vista, MS and MS-DOS are registered trademarks. Windows and the Windows logo are trademarks of Microsoft Corporation. IBM is a registered trademark of IBM Corporation. 2 SAFETY REGULATIONS WARNING: Failure to observe all instructions and all danger warnings can cause serious injury to the operator and/or other persons. Do not use the aligner until you have read and completely understand all the danger, warning and attention notices in this manual. ProtoStar multi-dimensional digital wheel aligner must only be used by authorized and qualified operators who are capable of understanding all written instructions provided by the manufacturer. They must be suitably trained and conversant with all safety regulations. Operators are expressly forbidden to use the aligner under the influence of alcohol or drugs capable of affecting physical and mental capacity. The following conditions are essential: Read and understand all operating and safety instructions before using the aligner; Have a thorough knowledge of the capacities and characteristics of the aligner; Keep unauthorized persons well clear of the area of operation; Insure the aligner has been installed in compliance with established legislation and standards; Before using the ProtoStar multi-dimensional digital wheel aligner, the operator must be knowledgeable of automobile systems and other safety regulations including all tools and equipment that will operate together with the aligner (such as a lift, rolling jack and repair tools). Improper use may cause serious injury. SAVE THIS INSTRUCTION MANUAL — DO NOT DISCARD!! IMPORTANT!! Risk of electrical shock: Do not operate equipment with a damaged power cord or if the equipment has been dropped or damaged. Consult a qualified service person and confirm it is safe to operate. If an extension cord is necessary, use a cord with an electrical current rating equal to or greater than that of the aligner. Using an improper extension cord is a serious danger to both the operator and the aligner. Personal Injury and non warranty aligner damage can result. Unplug the aligner from electrical outlet when not in use. Never use the cord to pull the plug from the outlet. Grasp plug firmly and pull gently to disconnect. Do not expose the aligner to any form of water. Do not use on wet surfaces. Plug unit into correct power supply. Connecting the aligner to an incorrect power supply will void the aligner warranty and can cause serious injury or death. Do not remove or bypass grounding pin. High voltages are present within the console unit. Contact with high voltages can cause death or serious injury. Service: There are no operator serviceable items inside the console except the keyboard and printer. Service on the aligner must only be performed by qualified personnel. Do not open any part of the console unless it is clearly identified as being acceptable to do so. Turn power switch off and disconnect the aligner from all power sources before servicing. 3 Risk of eye injury: Wear approved safety goggles when operating the aligner or servicing a vehicle. Dirt, fluids, or other debris may drop from a vehicle or lift. These can cause serious eye injury. Take care that nothing will fall on the operator or the aligner. Risk of crushing: Vehicles may roll off alignment lift if not secured. Use wheel chocks whenever vehicle is positioned on the lift Leave automatic transmission in park or manual transmission in gear with the brake applied unless aligner operation steps require vehicle in neutral. Apply parking brake unless aligner operation steps require wheel movement. Follow vehicle and lift manufacturer’s safety recommendations when lifting a vehicle. Vehicles rolling off lifts can cause death or serious injury. When using a rolling jack to raise a vehicle, insure the vehicle is properly secured on the jack. Risk of entanglement or crushing: There are moving parts on vehicle lifts during operation. Keep all persons clear of lifts. Read lift manufacturer’s operation instructions carefully. Follow lift manufacturer’s safety recommendations. Contact with moving parts can cause injury. Risk of burns: Do not touch hot exhaust system, manifolds, engines, radiators, etc. Wear gloves whenever performing a service near hot components. Hot components can cause burns. Risk of injury: Tools may break or slip if improperly used or maintained. Use the correct tool for the task. Frequently inspect, clean, and lubricate (If recommended) all tools Follow recommended tool procedures when performing vehicle services. Tools that break or slip can cause injury. DEFINITIONS OF HAZARD LEVELS Identify hazard levels used in this manual with the following definitions and symbols: DANGER! WARNING! CAUTION! Watch for this symbol: It Means: Immediate hazards which will result in severe personal injury or death. Watch for this symbol: It Means: Hazards or unsafe practices which could result in severe personal injury or death. Watch for this symbol: It Means: Hazards or unsafe practices which may result in minor personal injury or product or property damage. Watch for all Hazard Symbols! They mean: "BE ALERT!" Your safety, and the safety of others, is involved! 4 The Aligner is designed for INDOOR USE ONLY. Exposure to damp or wet locations will cause damage to the aligner’s components or injury to the user and will void warranty. The computer may have the ability to connect to the internet, intranet, a local or wide area network. DO NOT connect the computer to any network or the internet unless instructed to by a manufacture or authorized technician. DO NOT install any 3rd party software or hardware into or onto the aligner as it may cause conflicts with Aligner software or drivers. Failure to comply will void aligner warranty Do not plug the cabinet power cord in until all connections have been verified. Damage or injury can result. Insure all installations on this aligner are legal in your country. 5 Table of Contents PART I: INTRODUCTION ................................................................................................................................. 11 PART II: GETTING STARTED .......................................................................................................................... 12 Transport, Storage and Handling ................................................................................................................... 12 Uncrating Instructions ...................................................................................................................................... 12 Installation Instructions..................................................................................................................................... 13 Requirement for already installed lift/ service bay ....................................................................................... 13 Post Position and Installation (For installation with Post) ....................................................................... 14 Cabinet Assembly ......................................................................................................................................... 15 Testing the installation position ...................................................................................................................... 20 Lift Calibration / Initial Calibration .................................................................................................................. 21 Positioning the Aligner ..................................................................................................................................... 23 Aligner Components: ........................................................................................................................................ 24 Console .............................................................................................................................................................. 24 Chessboard Targets ..................................................................................................................................... 24 Wheel Clamps ............................................................................................................................................... 24 Settings............................................................................................................................................................... 25 Opening and Closing SureAlignTM 3.0 Alignment Software .................................................................... 25 Common shortcut keys ................................................................................................................................ 26 Software Settings .......................................................................................................................................... 27 Shop Owner’s Information ........................................................................................................................... 31 Part III Operating Guide ....................................................................................................................................... 31 Alignment Procedures ...................................................................................................................................... 31 Attach Wheel Clamps and Targets ................................................................................................................ 32 Start Wheel Alignment Software..................................................................................................................... 32 Vehicle Specifications ...................................................................................................................................... 33 Pre-Alignment .................................................................................................................................................... 34 6 Pre-Alignment Inspection............................................................................................................................. 34 Run out Compensation .................................................................................................................................... 34 Measuring Caster.............................................................................................................................................. 37 Rear Axle Reading............................................................................................................................................ 40 Front Axle Reading ........................................................................................................................................... 40 Software Functions ........................................................................................................................................... 41 Live Caster ..................................................................................................................................................... 41 Super Toe ...................................................................................................................................................... 41 Display and Print Measuring Result ............................................................................................................... 44 Customer Data .................................................................................................................................................. 45 New Customer Information .......................................................................................................................... 46 Part IV Aligner Maintenance ............................................................................................................................... 46 Database Manager ........................................................................................................................................... 47 Add New Vehicle Data ................................................................................................................................. 47 Update Vehicle Database ............................................................................................................................ 49 Internet Update.............................................................................................................................................. 49 Customer Information Manager .................................................................................................................. 49 Appendix 1: Basic Shortcuts ............................................................................................................................... 51 Appendix 2: Troubleshooting .............................................................................................................................. 52 Appendix 3: Technical Specifications ................................................................................................................ 53 Appendix 4: ProtoStar Aligner Components and Parts Lists ......................................................................... 54 Appendix 4: Aligner Components and Parts Lists (continued) ..................................................................... 55 Appendix 4: Aligner Components and Parts Lists (continued) ..................................................................... 56 7 Table of Figures Figure 1 Aligner Crate .............................................................................................................................................. 12 Figure 2 Leveled and parallel lift illustration ........................................................................................................... 14 Figure 3 Illustration of geometric center line of the lift .......................................................................................... 14 Figure 4 Illustration of the distance from the center of the camera to the center of the turn table ..................... 14 Figure 5 Illustration of Camera Beam prependicular to the post............................................................................ 15 Figure 6 Illustration of height between camera to the lift ...................................................................................... 15 Figure 7 Swivel and Rigid Caster installation ........................................................................................................... 16 Figure 8 Power Box Wiring ...................................................................................................................................... 16 Figure 9 Wheel clamp bracket ................................................................................................................................. 17 Figure 10 Mouse Holder (Socket Head Cap Screws) ............................................................................................... 17 Figure 11 Monitor Wiring ........................................................................................................................................ 18 Figure 12 Cabinet Backdoor .................................................................................................................................... 18 Figure 13 Printer Location ....................................................................................................................................... 18 Figure 14 Keyboard Wiring ...................................................................................................................................... 19 Figure 15 Computer Wiring ..................................................................................................................................... 19 Figure 16 Installation Requirements ....................................................................................................................... 20 Figure 17 illustration of installation methods ......................................................................................................... 20 Figure 18 Illustration of Vehicle Position on the lift ................................................................................................ 21 Figure 19 Rear Target Calibration ............................................................................................................................ 21 Figure 20 Front target calibration ........................................................................................................................... 22 Figure 21 Console .................................................................................................................................................... 24 Figure 22 Illustration of Target ................................................................................................................................ 24 Figure 23 Wheel Clamp ........................................................................................................................................... 24 Figure 24 System Connection Diagram ................................................................................................................... 25 Figure 25 Alignment Software ................................................................................................................................. 26 8 Figure 26 Exit SureAlignTM Alignment Software .................................................................................................... 26 Figure 27 Aligner Management Screen ................................................................................................................... 27 Figure 28 Aligner Setup ........................................................................................................................................... 27 Figure 29 Standard Axis Setting ............................................................................................................................... 28 Figure 30 Selection of Toe measurement unit ........................................................................................................ 28 Figure 31 Rim measurement ................................................................................................................................... 29 Figure 32 Measurement units ................................................................................................................................. 29 Figure 33 Value Display Precision ............................................................................................................................ 29 Figure 34 Value Display Style ................................................................................................................................... 30 Figure 35 Language Selection .................................................................................................................................. 30 Figure 36 Workshop Information ............................................................................................................................ 31 Figure 37 Vehicle Manufacturer's Selection ............................................................................................................ 32 Figure 38 Vehicle manufacturer and Year Selection ............................................................................................... 33 Figure 39 Vehicle model selection........................................................................................................................... 33 Figure 40 Alignment Preliminaries .......................................................................................................................... 34 Figure 41 Run out Compensation 1 ......................................................................................................................... 35 Figure 42 Run out Compensation 2 ......................................................................................................................... 35 Figure 43 Run out Compensation 3 ......................................................................................................................... 36 Figure 44 Run out Compensation 4 ......................................................................................................................... 36 Figure 45 Run out Compensation 5 ......................................................................................................................... 36 Figure 46 Run out Compensation 6 ......................................................................................................................... 37 Figure 47 Caster Swing Screen at 10 degree ........................................................................................................... 37 Figure 48 Straight Steering Wheel at 10 degree ..................................................................................................... 37 Figure 49 Caster Measurement Screen ................................................................................................................... 38 Figure 50 Instruction to turn steering wheel left .................................................................................................... 38 Figure 51 Instruction to turn steering wheel right .................................................................................................. 38 Figure 52 Instruction to return steering wheel to straight ahead position............................................................. 39 9 Figure 53 Warning Screen ....................................................................................................................................... 39 Figure 54 All Data Screen......................................................................................................................................... 39 Figure 55 Rear Axle Readings .................................................................................................................................. 40 Figure 56 Zoom Function ......................................................................................................................................... 40 Figure 57 Front Reading Screen............................................................................................................................... 41 Figure 58 Live Caster Screen .................................................................................................................................... 41 Figure 59 Super Toe Screen ..................................................................................................................................... 42 Figure 60 Super Toe Screen ..................................................................................................................................... 42 Figure 61 Left Front Toe Reading Screen................................................................................................................. 42 Figure 62 Left Front Toe .......................................................................................................................................... 43 Figure 63 Right Front Toe ........................................................................................................................................ 43 Figure 64 Right Front Toe ........................................................................................................................................ 43 Figure 65 Front Toe ................................................................................................................................................. 44 Figure 66 Result Screen ........................................................................................................................................... 44 Figure 67 Select Customer Screen ........................................................................................................................... 45 Figure 68 Existing Vehicle Plate Number ................................................................................................................. 45 Figure 69 New Vehicle ............................................................................................................................................. 45 Figure 70 New Customer Screen ............................................................................................................................. 46 Figure 71 Aligner Maintenance Screen ................................................................................................................... 46 Figure 72 Data Bank Manager ................................................................................................................................. 47 Figure 73 Add New Vehicle Data Manager.............................................................................................................. 47 Figure 74 Add Vehicle Manufacturer Data .............................................................................................................. 48 Figure 75 Add Vehicle Specification Data ................................................................................................................ 48 Figure 76 Add Vehicle Specification Data ................................................................................................................ 49 10 PART I: INTRODUCTION The purpose of this manual is to provide the owner and operator of the ProtoStar 9000 Multi Dimensional Multi dimensional digital wheel aligner with safe and practical instructions for its use and maintenance. Following all instructions carefully will assist you in your work and give long term and efficient service. The following paragraphs define the levels of danger associated with warning captions in this manual. The 9000 ProtoStar Aligner is intended for use by properly trained, skilled automotive technicians. The safety messages presented in this section and throughout the manual are reminders to the operator to exercise extreme care when performing wheel alignments with this product. There are many variations in procedures, techniques, tools, and parts for servicing vehicles, as well as the skill of the individual doing the work. Because of the vast number of vehicle applications and potential uses of the aligner, the manufacturer cannot possibly anticipate or provide advice or safety messages to cover every situation. It is the automotive technician’s responsibility to be knowledgeable of the vehicle to be aligned. It is essential to use proper servicing methods and perform wheel alignments in an appropriate and acceptable manner that does not endanger operator safety, the safety of others in the work area, the equipment or vehicle being serviced. Read this manual carefully before powering up the equipment. Conserve this manual and all illustrative material supplied with the equipment in a folder near the equipment where it is readily accessible for consolation by the operator. The technical documentation supplied is considered an integral part of the equipment; in the even of sale all relative documentation must remain with the system. This manual is only being considered valid for the equipment of the model and with the serial number indicated on the nameplate applied to it. The nameplate is attached to the back of the cabinet. Without prior knowledge to the manufacture or manufacture authorized dealers, any alterations to this aligner may cause serious injury. The manufacture is not responsible for any injury caused by improper use, abuse, or unauthorized repair. 11 PART II: GETTING STARTED Transport, Storage and Handling Equipment transport conditions The aligner must be shipped in its original packing and stowed in the position indicated on the outside. To avoid damage, never place other items on top of the packaging. Figure 1 Aligner Crate Handling of the aligner must be performed only with an appropriate lifting device such as a forklift or pallet jack. Only personnel who are experienced and qualified on material handling procedures should handle any transportation or moving of the aligner. Inspect for any damage to the crate and notify local distributor (and/or transport company) immediately if any damage is observed. Uncrating Instructions: Carefully remove the crating and packing materials and all skid and pallet fasteners. Be careful when cutting banding material as items may become loose and fall causing personal harm or injury. Always wear gloves when uncrating the machine to prevent scratches, abrasions, or cuts due to the contact with packing materials. Retain all packaging in the event you need to return any parts for warranty or servicing. Carefully unpack and inventory all items. Familiarize yourself with all components before beginning set up and assembly. 12 Check List Your aligner should include the following items 1 1 4 4 1 1 1 1 1 2 2 1 1 1 1 Camera beam Post or wall mount bracket Chessboard Target Wheel clamps Cabinet Computer USB Security Key Monitor Printer Swivel casters Rigid casters Power bar Plastic Top Steering wheel lock Brake depressor Installation Instructions NOTE: Check the voltage, phase and proper amperage requirements for the alignment machine and components. Wiring should only be performed by a certified technician. Overheating, short circuits and fire damage will result from inadequate wiring. Wiring must be installed in accordance with National and Local Electric Codes and Standards covering electrical apparatus and wiring. Be certain that adequate wire sizes are used, and that: Service is of adequate amp rating. The supply line wire is the proper size and has the same electrical characteristics (voltage, cycles and phase) as the alignment machine and components. No other equipment is to be operated from the same line. Requirement for already installed lift/ service bay To obtain accurate result, first check if the lift is leveled and parallel on both sides. If not, have the authorized technician to adjust. 13 Figure 2 Leveled and parallel lift illustration Post Position and Installation (For installation with Post) Use tape measure to find the center line of the lift. Put the Post of the aligner in front of the lift, make sure the distance between the camera and center of turn table is approximately 2200 mm. Install the camera beam on to the post, adjust the post position so the center of the beam is on the same axes as center of the lift. Figure 3 Illustration of geometric center line of the lift Use the tape measure to find if the distance from the camera to the center of turn table is the same for both side. Once the post is moved, make sure the camera beam is leveled and is on the center line of the lift. Figure 4 Illustration of the distance from the center of the camera to the center of the turn table 14 Level the camera beam and make sure the beam is perpendicular to the post. Figure 5 Illustration of Camera Beam prependicular to the post Figure 6 Illustration of height between camera to the lift Raise the lift to the alignment position. Make sure the distance between the camera beams is about 700 mm higher than the alignment position. Cabinet Assembly 1. Open the Cabinet and remove all items packed inside. 2. Use the shipping carton or other protective material for protection. Lay the cabinet down on its side. 3. Install the two Swivel Casters with brake and two Rigid Casters to the bottom of the Cabinet using the 16 Hex Head Bolts, Nuts and Washers. 15 NOTE: Install the Swivel Casters with Brake in the front and the Rigid Casters in the rear. (see next page for illustration) Figure 7 Swivel and Rigid Caster installation 4. Raise cabinet up onto the Casters. 5. Connect Power Strip to Power Box Wiring as shown below Figure 8 Power Box Wiring 16 6. Install four wheel clamp brackets to the sides of the cabinet using the two Clip Nuts, Socket Head Screws, and Washers as shown Figure 9 Wheel clamp bracket 7. Install Mouse Holder on right side of Cabinet using two Nuts and Socket Head Screws. Figure 10 Mouse Holder (Socket Head Cap Screws) Do not move the cabinet until you have tightened down the Monitor. Hold Down Clamps or the monitor may fall off the cabinet while moving. 11. Place the Monitor on top of the Cabinet. Tighten the Monitor hold down clamps. 17 Connect the Power Cable and Monitor Cable to the Monitor. Route the Monitor Cable and Monitor Power Cable through the Hole. Figure 11 Monitor Wiring 12. Remove lower rear panel of cabinet for better access to computer and power cables. Figure 12 Cabinet Backdoor 18. Place the Computer in the drawer 19 Read the Printer Manual for instructions on installation. Load printer paper and printing cartridges into the printer. Plug the USB Printer Cable into Printer. Figure 13 Printer Location 18 20. Place the Mouse Pad and Mouse on the Mouse Shelf. Place the Keyboard on top of the Cabinet and run the Keyboard and Mouse Cable through the hole in the center of the Cabinet top. Figure 14 Keyboard Wiring 21. Plug the Printer USB Cable into the back of the Computer using one of the available USB Ports on the rear of the computer. Plug the USB Mouse Cable into an empty USB Port on the rear of the computer. Plug the Keyboard USB cable into an empty USB Port on the rear of the computer. Plug the Bluetooth Receiver Serial Cable into the serial port on the rear of the Computer. Tighten Screws. Plug the Monitor Cable into the Monitor Port on rear of the Computer and tighten screws. Plug the USB Security Key into one of the available USB ports on the rear of the Computer. Figure 15 Computer Wiring A. Monitor B. Keyboard C. Camera 1 D. Camera 2 E. Printer Cable F. Mouse Please note, some computers may come with more USB ports. Plug the software key into the extra USB port. Otherwise, plug the software key onto the USB port in the front of the computer. If only 4 USB port are available on the computer, purchase a USB splitter from local computer store. 19 22. Plug the Power Cable into the Computer Plug the Computer Power Cable into the Power Strip Plug the Monitor Power Cable into the Power Strip Plug the Printer Power Cable into the Power Strip Plug the Power Supply for the Blue Tooth Receiver Box into the Power Strip Installation of the Post Follow the dimensions below and choose appropriate mounting. Figure 16 Installation Requirements Please note the standard and adjustable post has to be mounted / fixed on the floor or else it may tilt and affect accuracy of the measurement. The wall mount has to be attached to permanent wall not dry wall. Figure 17 illustration of installation methods Testing the installation position Drive a standard sized vehicle (eg Ford Taurus, Volkswagen Passat, Honda Accord etc.) onto the lift; install the wheel clamp and target, from the home screen. Press F11-F2-F1 to Lift 20 Calibration. The software will draw color lines on the target if it recognizes the pattern. Push the vehicle backward and check if the camera can recognize the pattern for the entire distance of the lift. Adjust the angle of the camera beam if necessary until the camera can see the entire route. Figure 18 Illustration of Vehicle Position on the lift Drive the vehicle off the lift. Lift Calibration / Initial Calibration Put the calibration fixture on the rear of the lift, installed both rear targets on to the shaft. Make sure the calibration fixture is leveled. From the alignment software main screen, press F11-F2F2 to lift calibration screen and following the procedure below. Figure 19 Rear Target Calibration 1. Level the rear target by checking the bubble on the target 2. Make sure the number on one side of the calibration fixture is at 0 then click “Set to Target Vertical Angle Position” 3. The number will floating, once it becomes stable, click “Set to Target Vertical Angle Position” 4. Rotate the calibration bar 45 degree, then click “Set to Target Vertical Angle Position” 5. Rotate the calibration bar back to 0 degree, Click “Set to Target Vertical Angle Position” 6. The number will floating, once it becomes stable, click “Set to Target Vertical Angle 21 Position” 7. Rotate the calibration bar 45 degree, then click “Set to Target Vertical Angle Position” 8. Rotate the calibration bar back to 0 degree, Click “Set to Target Vertical Angle Position” 9. The number will floating, once it becomes stable, click “Set to Target Vertical Angle Position” 10. Rotate the calibration bar 45 degree, then click “Set to Target Vertical Angle Position” Once the above procedure is done, the program will enter the 2 nd step. This step will be the same as last step; the purpose of this step is to verify the calibration in the 1 st step. 1. Level the target by checking the bubble on the target 2. Make sure the number on one side of the calibration fixture is at 0 then click “Set to Target Vertical Angle Position” 3. The number will floating, once it becomes stable, click “Set to Target Vertical Angle Position” 4. Rotate the calibration bar 45 degree, then click “Set to Target Vertical Angle Position” 5. Rotate the calibration bar back to 0 degree, Click “Set to Target Vertical Angle Position” 6. The number will floating, once it becomes stable, click “Set to Target Vertical Angle Position” 7. Rotate the calibration bar 45 degree, then click “Set to Target Vertical Angle Position” 8. Rotate the calibration bar back to 0 degree, Click “Set to Target Vertical Angle Position” 9. The number will floating, once it becomes stable, click “Set to Target Vertical Angle Position” 10. Rotate the calibration bar 45 degree, then click “Set to Target Vertical Angle Position” At this time, the rear target calibration is done. Continue to the front target calibration by putting the calibration fixture on the front of the lift. Make sure the calibration bar is leveled using the bubble. Figure 20 Front target calibration 1. Level the front target by checking the bubble on the target 2. Make sure the number on one side of the calibration fixture is at 0 then click “Set to 22 Target Vertical Angle Position” 3. The number will floating, once it becomes stable, click “Set to Target Vertical Angle Position” 4. Rotate the calibration bar 45 degree, then click “Set to Target Vertical Angle Position” 5. Rotate the calibration bar back to 0 degree, Click “Set to Target Vertical Angle Position” 6. The number will floating, once it becomes stable, click “Set to Target Vertical Angle Position” 7. Rotate the calibration bar 45 degree, then click “Set to Target Vertical Angle Position” 8. Rotate the calibration bar back to 0 degree, Click “Set to Target Vertical Angle Position” 9. The number will floating, once it becomes stable, click “Set to Target Vertical Angle Position” 10. Rotate the calibration bar 45 degree, then click “Set to Target Vertical Angle Position” Once this step is done, click ok to save the calibration data then follow the next section to verify the data. 1. Level the front target by checking the bubble on the target 2. Make sure the number on one side of the calibration fixture is at 0 then click “Set to Target Vertical Angle Position” 3. The number will floating, once it becomes stable, click “Set to Target Vertical Angle Position” 4. Rotate the calibration bar 45 degree, then click “Set to Target Vertical Angle Position” 5. Rotate the calibration bar back to 0 degree, Click “Set to Target Vertical Angle Position” 6. The number will floating, once it becomes stable, click “Set to Target Vertical Angle Position” 7. Rotate the calibration bar 45 degree, then click “Set to Target Vertical Angle Position” 8. Rotate the calibration bar back to 0 degree, Click “Set to Target Vertical Angle Position” 9. The number will floating, once it becomes stable, click “Set to Target Vertical Angle Position” 10. Rotate the calibration bar 45 degree, then click “Set to Target Vertical Angle Position” Click “OK” to finish the calibration procedure. To check if the calibration is completed correctly, Test it with vehicle on and do a run out compensation. Positioning the Aligner Place the aligner in a convenient location where the monitor can be seen from every position during the measuring process. Take care to protect the aligner from any potential damage. Caution: Insure there are no permanent magnets, electromagnets or sources of heat or water in the vicinity of the machine as these could cause irreparable damage to the computer and other components. Keep the aligner dry all the time. 23 Aligner Components: Console Most aligner components are kept in the console, including power supply, computer, monitor, keyboard, mouse, printer as well as targets and wheel clamps. Figure 21 Console Chessboard Targets Figure 22 Illustration of Target Wheel Clamps Figure 23 Wheel Clamp 24 The ProtoStar 9000 multi dimensional digital wheel aligner uses 2 industrial camera connected with computer to dynamically monitor the real time geometric change at four targets. Figure 24 System Connection Diagram Settings Opening and Closing SureAlignTM 3.0 Alignment Software ProtoStar 9000 multi dimensional wheel aligner is equipped with SureAlign TM 3.0 wheel alignment software. Switch on power supply and push the power button to start the computer. The computer should start the alignment software automatically. In case the alignment software does not start, click on the Minster icon to start the alignment software. To enable automatic software start-up, copy the alignment software shortcut from the desktop to C:\Documents and Settings\All Users\Start Menu\Programs\Startup under Windows XP Or C:\Users\*User Name*\AppData\Roaming\Microsoft\Windows\Start Menu\Programs\Startup under Windows Vista or Windows 7 If you do not see a shortcut for the alignment software, please make sure your alignment software is properly installed; contact your local service center if necessary. 25 Figure 25 Alignment Software Following a 9000 ProtoStar welcome animation, the monitor will display SureAlignTM 3.0 alignment software main menu screen as shown in figure above. For easy operation, the SureAlignTM 3.0 alignment software uses function keys. Users can access a required function by pressing the appropriate function key. As the 9000 ProtoStar aligner uses an IBM standard keyboard, there are 12 function keys from F1 to F12 located on the top of keyboard. There are also specific function keys located on the right side of keyboard, such as “Page Up”, “Page Down”, “Enter” “Home” and arrow direction keys. Instructions for these function keys will be mentioned in following sections and you will find their use very convenient. Common shortcut keys Home - from any screen in the software, once home key is pressed, it will return to main menu F6 – Caster sweep menu F7 – Front Axle F8 – Rear AxleF9 – Result Screen F6 – F2 or F7-F5 Direct Caster F10 – Help ESC – double press escape turns off the computer Press HOME key under any screen to go back to SureAlignTM software main menu screen Press ESC function key located at the top left corner of keyboard will display the following window: Figure 26 Exit SureAlignTM Alignment Software 26 Following the instructions, press ESC again to close SureAlignTM Alignment software. Press any other key to close the dialog window and go back main screen. After exiting SureAlignTM Alignment S software, the computer will turn off automatically within 10 seconds. Please do NOT switch off power supply directly to shut down the computer. Switching off power directly may affect proper operation of the Microsoft Windows system. Press ESC under SureAlignTM Alignment Software main menu screen to close software. Press F10 under any window to get Help of software Software Settings Figure 27 Aligner Management Screen SureAlignTM Aligner Alignment Settings Press F11 under main menu screen to enter T SureAlignTM Aligner Manager Screen. In this window, you can choose from aligner setting, aligner maintenance, manage aligner, customer database and upgrade database as well as personalize the aligner on the printout. The following section provides detailed instructions regarding these settings. Aligner Setup Figure 28 Aligner Setup 27 Press F11 to enter Aligner Setup Caution: Only qualified technicians are allowed to access and perform settings. Inaccurate settings will deliver inaccurate results. Make sure the “F9 Demo Mode” icon is grayed out. If it is highlighted, the aligner will NOT take any measurement and is running in demonstration mode. Insure the following instructions are carefully read and understood before operation: Standard Axis Press F1 to display the following window Figure 29 Standard Axis Setting Press “Up” or “Down” arrow key to select. The selected item will be marked with black dot on the left side. Press “Page Down” to confirm selection and goes back to Setup screen. Press “Page Up” to cancel selection and go back to Setup screen. Settings remain unchanged. Toe Measurement Units Press F2 to display the following window Three units may be selected for Toe measurement i.e. degree, mm and inch. If you select the degree setting, the screen displays measurements in degrees. If you select mm or inch as measurement units, the software requires you to input the diameter of tire before the aligner begins the measuring process. Figure 30 Selection of Toe measurement unit 28 Rim Diameter Measurement Units Press F3 to display the following window Select “mm” or “inch” as the measurement unit for rim diameter Figure 31 Rim measurement Measurement Units Press F4 to display the window below. You can select 1/60 minute fraction or 1/100 decimal fraction mode for angle value display. Figure 32 Measurement units Value Display Precision Press F5 to display the following window Figure 33 Value Display Precision 29 The three values of display precision are 0.1, 0.05 and 0.01 respectively. Select the value of required accuracy by inserting a dot in the circle on the left side of the heading you choose. The recommended setting is High (0.01) If 0.01 is selected, the number will be shown in increments of 0.01: for example 0.01, 0.02, 0.03 etc. if 0.05 is selected, the number will be shown in increments of 0.05 : for example 0.05, 0.10, 0.15 etc if 0.1 is selected, the number will be shown in increments of 0.1: for example, 0.1, 0.2, 0.3 etc. Value Display Style PressF6 to display the following window The default setting from the factory is for an actual measurement value. The operator can select a different measurement display value if required. Figure 34 Value Display Style Relative value is how much off from the manufacturer data, it displays the difference between the actual values to the manufacturer data. By formula, Relative Value= Manufacturer data – Actual Value. Please note that the result screen will always displayed in actual reading value. Language Selection You can select different languages in the alignment software, Press "PageDn" key or use mouse to click “Confirm” icon to save your selection. (Language availability may differ by location) Figure 35 Language Selection 30 Shop Owner’s Information Press “Page Up” or “Home-F11” to go back to aligner manager screen. Press F4 to display Workshop information setup screen. Completing the information on this screen personalizes your aligner. The information will then be displayed on the aligner's main menu screen and will print out on the information sheets detailing alignment results. Fill in your information in the column highlighted in yellow. Use the Up or Down arrow keys to select the column you want to edit. For Multilanguage input method please refers to Microsoft Windows user menu. Figure 36 Workshop Information Part III Operating Guide Alignment Procedures Diagnosing vehicle problems is very important before starting and during the alignment process. The following steps are important minimum guidelines: Question the vehicle owner to discover all vehicle problems (check for collision damage or change of parts). Perform a test drive — try to find and confirm the customer's problem. Check tires for wear patterns. Check frame and steering system. Carefully drive vehicle onto the lift. Install wheel clamps and sensors. Perform Run Out Compensation. If measuring error is out of range, first check the wheel clamp. Complete Caster Swing Measure Camber and Toe. Follow instructions on screen. Angle adjustments must be done in sequence: Rear Camber Rear Toe Front Caster Front Camber Front Toe If Caster is adjusted, re-measure to insure accuracy If necessary, re-center steering wheel and readjust front Toe 31 Print alignment results. Perform test-drive to confirm you have solved all customer problems. Attach Wheel Clamps and Targets Pay attention to sensor position. Incorrect position may lead to alignment problems. Start Wheel Alignment Software Search for correct vehicle manufacturer’s data. Figure 37 Vehicle Manufacturer's Selection Press Page Down or select Start on the Home Screen to access Vehicle Manufacturers Screen.This screen shows the vehicle manufacturers in the alignment database. Move selection bar up or down with arrow direction keys to select manufacturer and press “Page Down” or double click Manufacturer icon to select. For easy searching, the software sorts each manufacturer by “country”, “name” and “frequency” respectively. You can use the function keys listed below to complete your own personalized search. When not under alignment software main screen, press HOME to enter main menu screen. This operation means the start of new search and all previous data measured will be deleted. F1: sort manufacturer by country. F2: sort manufacturer by name. F3: sort manufacturer by frequency. >> Page Down: enter selection. << Page Up: exit selection and return to last page. Home: exit selection and go back to main menu screen. If you cannot get the vehicle manufacturer's data you need, please contact the Wheel Aligner manufacture and ask how to update your database. If you have access to standard data not contained in the database, you can add it by using the alignment database manager. For details, refer to Management (Part IV) of this menu. 32 Vehicle Year Selection After confirming vehicle manufacturer press >> Page Down or double click the to select vehicle year. Figure 38 Vehicle manufacturer and Year Selection Figure 39 Vehicle model selection Once the year is selected, the software will show vehicle models made in selected year. Double click the model or use up down arrow to select. Move selection bar up or down with arrow direction keys to select. You can also use the following function keys to search: F1 - models sorted by year. F2 - models sorted by frequency. >>Page Down - enter vehicle data display. <<Page Up - Exit selection and back to last page. Home - Exit selection and back to main menu screen. Vehicle Specifications When selecting a vehicle model,press>> Page Down to enter specifications. Press F1 or Enter to play selected alignment adjustment diagrams. Press Enter or Page Dn to exit adjustment diagrams. Press F2 to print out data. Press F3 to enter vehicle weight specification screen and display manufacturer’s special requirement data. (F3 key is only available for certain vehicles models.) 33 Pre-Alignment After check back all data, press Page Down to enter Pre-Alignment screen. Pre-Alignment Inspection Press F1 under pre-alignment screen to enter visual inspection screen. Figure 40 Alignment Preliminaries Visual inspection has four screens. Press Up or Down arrow direction keys to select inspection item. Press Left and Right arrow direction keys to edit. Under any inspection screen, press F1 to print out a blank inspection form. Technician could fill the form during inspection, and enter result in computer later. Press F3 to set all item to normal. After finish one page, press Page Down to enter next page. Press F2 under page four to print out inspection result. These inspection results are important tools, but also may not relevant. Under many circumstances, damage of vehicle parts would affect quality of alignment. After finish pre-alignment inspection settings, press page down to back to pre-alignment screen. Press F1 to print out blank inspection form. Press F2 to print out inspection result. Run out Compensation Compensating for the amount of Run out of vehicle wheel assemblies is an important factor in the alignment process. If not correctly determined, there will be errors in the displayed camber and toe angles. Make sure to lock turn table and rear slip plate before continue to next step. To begin run out compensation, first put one of the rubber vehicle stop in front of rear driver side tire. This will mark the stop position once run out is done. 34 Figure 41 Run out Compensation 1 Follow the instruction indicated on the software Install and level all targets Install steering wheel Release hand brake. Once all three instructions are done, press “Next” icon on the screen or “PgDn” key to continue. Once hit the “Next icon” or “PgDn” key, please keep vehicle still. The software will take the first measurement. Attention: Please note the “STOP” sign on the top left corner. Once this sign is shown, please keep vehicle still. Any movement during this period will result in inaccurate result. Figure 42 Run out Compensation 2 Once the measurement is done, follow the on screen instruction to push the vehicle backward. Hint: You can move the vehicle by pushing one of the wheel clamps backward 45 degree. Put the other rubber wheel stop at the back of the same wheel that has the rubber wheel stop in the front to avoid rolling off the lift. 35 Figure 43 Run out Compensation 3 When the wheel is close to 45 degree, a clock tick will be shown. It will enter a short red zone then long green zone. After the clock turns blue, a stop sign will come up to the screen. The software will measure the second position. Figure 44 Run out Compensation 4 Once the 2nd position is taken, the software will instruct to push vehicle forward. The same clock will appear once the vehicle is back at 0 degree. Note: Since you have the rubber wheel stop in the front of one tire, the vehicle should stop very close to 0 degree. Figure 45 Run out Compensation 5 After the vehicle is rolled backed to 0 degree or original position, click “Next” icon on the screen or “PgDn” key on the keyboard to continue to next step. 36 Figure 46 Run out Compensation 6 Measuring Caster When Run out Compensation is finished press Page Down to go to Caster swing screen. Figure 47 Caster Swing Screen at 10 degree There are three different angles you can use to measure caster. The angle you choose is selected by pressing F3 or F4 or F5. The software is able to calculate caster by measuring at 7, 10 or 20 degree. Once an angle is selected, it will show a red circle with white text indicating the angle you have chosen. Enter the "Measure Caster" menu. The aligner will begin by completing a self-check and initialization. Following this the screen will direct you to the Straight Steering Wheel screen. Following the instructions on screen, move the front wheels to the straight ahead position. Figure 48 Straight Steering Wheel at 10 degree 37 When you have completed this, the screen will confirm that you are ready to start measuring caster. Start to measure caster. Figure 49 Caster Measurement Screen Follow the instructions on the screen to measure the caster angle. Begin by turning the front wheels to the left until the screen tells you to stop. Insure the front wheels maintain a steady position as the computer will take a measurement at this point. When the measurement is completed the screen will advise "OK" (see figure 50). Figure 50 Instruction to turn steering wheel left The screen will then ask you to turn the front wheels to the right and when you reach the correct point it will tell you to stop. Insure the front wheels maintain a steady position as the computer will take a measurement at this point. When the measurement is completed the screen will advise "OK". Figure 51 Instruction to turn steering wheel right The caster measurement is now complete and the screen will ask you to return the front wheels to the straight ahead position. Watching the on screen meter turn the wheels until it it tells you to stop and the meter reaches zero. 38 Figure 52 Instruction to return steering wheel to straight ahead position Warning Screen Note: If any target has a problem, the screen will display following warning screen: Figure 53 Warning Screen DO NOT block sightline of camera to target during measuring process. The aligner screen displays all measurement results. Any measurement with a RED text is not in manufacturer specs tolerance (adjustments are required). Measurements with a GREEN text are in manufacturer specs tolerance. The data with white text means the item cannot be adjusted or no manufacturer data has been provided. Figure 54 All Data Screen 39 Rear Axle Reading Press “PgDn” under Measuring Caster Menu to enter rear-axle reading screen. Press F8 under other screens to enter rear-reading screen. A colored background indicates the relationship between dynamic and prescribed values. A RED background indicates the angle value is out of range and has been disqualified by the computer. A GREEN background indicates the measurement is within range. A light blue background indicates it is close to range. When the angle value is out of prescribed range, the wheel illustration in the center on the side turns red and to inclined position Figure 55 Rear Axle Readings A picture of a wrench under the diagram suggests the item is adjustable. ZOOM IN—select item need to be zoomed in by arrow direction key and press Enter. Figure 56 Zoom Function Press F1 to see zoomed angle display. Press Page Dn or Page Up to close zoom in. Use the Arrow direction key to select a meter. Press Enter to zoom in. Front Axle Reading Press Page Down to enter front reading screen. Press F7 under other screen to enter front reading screen. 40 Figure 57 Front Reading Screen When working with front readings, the steering wheel must be kept in the straight ahead position and all sensors must be tightened. Front reading screen functions are similar to the rear reading screen. A picture of a wrench under the diagram indicates the item is adjustable. ZOOM IN—select the item you want to zoom in on using the arrow direction key Use arrow direction key to select a meter and Press Enter. Press Page UP to enter front reading. Front wheel adjusting sequence: 1. Caster 2. Camber 3. Toe If a caster measurement is out of range of manufacturers’ data, adjust caster first. Software Functions Live Caster Press F6 to enter measuring caster screen. Press F2 to enter adjusting caster screen. Live caster will only be available after completing the caster swing procedure. Caster swing must be redone if any adjustment has been made to the vehicle. Press F6-F2 or F5 under Front Axle reading to go back to live caster screen. Figure 58 Live Caster Screen Super Toe Press F7 to enter front reading screen. Then press 41 F2 to enter front toe screen. Figure 59 Super Toe Screen Enter super toe screen. The screen will instruct you to turn steering wheel straight ahead. Level and lock all sensors (see Figure 58 next page). Press Page Dn. Figure 60 Super Toe Screen The above diagram illustrates a condition that requires the operator to turn the front wheels to the left so that they are straight; following this the sensors should be checked for level and locked. The screen then instructs the operator to press Page Down to continue. Figure 61 Left Front Toe Reading Screen 42 The computer will measure the toe condition of the front left wheel first and display the reading. Turn the wheel left to calculate value. Figure 62 Left Front Toe After finishing left wheel adjusting, press Page Dn. Screen instructs to turn right wheel to repair required position. Then press PgDn to start measuring again. Figure 63 Right Front Toe Figure 64 Right Front Toe Turn right wheel to calculate value. 43 Figure 65 Front Toe Press PageDn to display adjusted front toe. Display and Print Measuring Result Press F9 from any screen to enter the all measurements screen or Page Dn from Front Axle reading. Figure 66 Result Screen This screen displays all measuring results. A RED background indicates the angle value is out of range and has been disqualified by the computer (further adjustments are required). A GREEN background indicates the measurement is within range. A light background indicates the manufacturer's set parameter or that it cannot be adjusted. Press F2 for vehicle factory data reference screen. Press F3 to enter vehicle inspection screen if inspection is not done. Press F1 to print out measuring result. 44 Customer Data Figure 67 Select Customer Screen Select an existing customer name by using Up or Down arrow direction keys. Press Page Dn to enter customer vehicle plate number screen. Select plate number by using arrow direction keys and press Page Dn. Enter vehicle odometer reading in following window and press PgDn to print out result. Figure 68 Existing Vehicle Plate Number If customer vehicle plate number is not listed, press F1 and enter plate number in the window Figure 69 New Vehicle 45 Press Page Dn when finished editing and follow the steps above. Press F2 to delete selected vehicle plate number and press Page Down to confirm. New Customer Information Figure 70 New Customer Screen Press F1 under customer menu to enter new customer information screen. Add new customer information. Select item by using Up or Down arrow direction keys. When finished, press Page Dn to display next window. Enter customer vehicle plate number in this window and press Page Dn. Enter customer’s vehicle odometer in this window and press Page Dn. Printer starts to print out result. Screen displays printing process pace. Part IV Aligner Maintenance Press F11 under main menu screen to enter Manager Screen. Figure 71 Aligner Maintenance Screen Lift Level Calibration (Follow initial setup procedure on page 20) 46 Database Manager Figure 72 Data Bank Manager Database manager includes Vehicle Data Manager and Customer Data Manager. Press F11 under main menu screen to enter manager screen. Press F3 to enter data manager screen. The manufacture provides vehicle data upgrades regularly, however, the Operator can add new vehicle data at any time by this function. Add New Vehicle Data Press F1 to display new vehicle data screen. Operator can add new vehicle data by using this screen. First select vehicle manufacturer by using up or down arrow direction keys. If the vehicle manufacturer is not listed, press F1 to add new vehicle manufacturer. Figure 73 Add New Vehicle Data Manager Press F1 to enter vehicle manufacturer country. 47 Select manufacturer country by using Up or Down arrow direction key. If the country is not listed, press F1 to add country, and press Page Down when finished. After inputting the country name, press Page Dn to add vehicle manufacturer. Press Page Dn when finished to enter vehicle data screen. Select item column by up or down arrow direction key. Input data in selected column. Figure 74 Add Vehicle Manufacturer Data Press Page Dn when finished to enter next page-front wheel. Press arrow direction key to skip item. Press Page Dn when finished to enter next page-rear wheel. Figure 75 Add Vehicle Specification Data Press Page Down when finished to enter next page-leaving factory data. Screen displays all data input. Check back and edit data by using Page Up to go back to previous page. Press Page Down to enter leaving factory data screen when finished editing. When all finished, press Page Down to save data. Go back to databank manager screen when finished. 48 Figure 76 Add Vehicle Specification Data Update Vehicle Database Warning: Only authorized technician should perform database update. Improper operation may cause database corrupted. Exit SureAlign alignment software by press ESC key once, then press F8 , enter service password. Get database update file from the manufacture or authorized local distributor Copy supply.xpd or replace.xpd in root of C drive >> ie. C:/ Note: Supply.xpd will add new data to the existing database, thus may duplicate data. Replace.xpd will check and compare existing database then add only newer data to the database. Attention: If customized data is entered and have the same vehicle name, year and model, the customized data may erased. Once either the supply.xpd or replace.xpd is under C:/ root drive, click “Minster” icon on the desktop to run alignment software. From the home screen, press F11-F3, enter service password, then F3. The alignment program will automatically upate vehicle data. The middle of screen displays processing window. When upgrade is finished, this window disappears. Internet Update Make sure your computer is connected to the internet. Press F4 to update. The software will download the database from the manufacture server and update the software automatically. Customer Information Manager Press F11- F3 to enter customer information manager screen. Customers’ names are listed on the left side of screen. Select customer name by Up or Down arrow direction key. Right side of screen displays information of selected customers. Press F9 or F10 or F11 to sort customers’ name by required sequence. Press F1 to add a new customer. Operator can input new customer data under new customer 49 screen. Press F2 to edit customer’s information. Press F3 to delete selected customer. Press Page Down to confirm. Press Page Down to exit customer information manager screen. Press HOME to go back to main menu screen. Please refer to this manual when performing alignments. For more information, please contact your local agent. 50 Appendix 1: Basic Shortcuts Keystroke Screen Rear Reading Screen; Front Reading Screen; Measuring Caster Menu; Easy Toe Screen. Front Reading Screen Measuring Caster Menu Function Enter Runout Compensation screen Enter Measuring Caster Menu Enter easy toe screen. Measuring Caster Menu High Precision selection Measuring Caster Menu Enter Difference of 20 Degree Steering Turn screen Enter Measuring Caster Menu Enter Front Reading screen Enter Rear Reading screen Enter measuring result screen All screens Help Enter next function screen Enter next function screen All screens Back to main menu screen To select item To Edit Rear Reading screen; Front Reading Screen Zoom In main menu screen Finish alignment and exit 51 Appendix 2: Troubleshooting Symptom Aligner No screen display Windows does not start Windows starts but does not load alignment Menu Possible Cause Suggested Repair Power Check power supply Check cable connection Power cable Check and change cable Check fuse Fuse Check voltage, change fuse Contact manufacture Change fuse Monitor power not on Check monitor power Monitor or video card failure Contact local computer service Windows problem Contact local computer service Bad computer components Contact manufacture Corrupted system files Contact local computer service Software damaged If reinstallation of alignment software is required, please contact the manufacture Voltage interference Press CTRL ALT and DEL keys at the same time to restart computer. Otherwise, switch off console and restart computer again. Program slow or stops Contact the manufacture. 52 Appendix 3: Technical Specifications Features: Measuring range and accuracy Parameter Total Toe Separate Toe Camber Set back Trust Angle Caster King Pin Accuracy ±2′ ±2′ ±1′ ±2′ ±2′ ±2′ ±2′ range ±50° ±25° ±15° ±9° ±9° ±22° ±22° Console Size Power Voltage: 110/220V 50/60Hz 53 Appendix 4: ProtoStar Aligner Components and Parts Lists 1 2 3 4 5 6 7 8 9 10 11 12 13 14 15 16 17 18 19 20 21 80330101 80330401 80330201 80330310 80330102 80330402 80330403 80330404 80330204 80330205 80330405 80330406 80330103 80330407 80330104 80330320 80330105 80330410 80330206 80330411 80330203 Front Camera Cover (Right) M16*12 Screw Camera Assembly Support Camera Assembly(Right) Rear Camera Cover(Right) M4*20 Screw M5*16 Socket head cap screw M6*12 Socket head cap screw Steel Rod Bracket for Steel Rod M6*10 Screw M5*8 Screw Center Cover(ProtoStar logo) M4*10 Screw Rear Camera Cover(Left) Camera Assembly(Left) Front Camera Cover (Left) M3*16 Screw Power Board for Assistant LED Ø4*8 Washer Aluminium Camera Bar 54 Appendix 4: Aligner Components and Parts Lists (continued) 1 2 3 4 5 6 7 8 9 10 11 Post main frame Track Rod Lower Holder MX screw MX screw Track Rod MX screw MX screw Counter weight back cover Counter weight back cover MX nuts MX screw 80340001 80340002 80340003 80340004 80340005 80340006 80340007 80340008 80340009 80340010 80340011 12 13 14 15 16 17 18 19 20 21 22 23 24 25 26 27 55 Bearing Screw of bearing (MX) MX screw Moveable Handle Adjustment Knob MX screw Track Frame O ring Camera beam support bracket MX screw MX screw Steel rod Spring holding screw spring washer MX nuts 80340012 80340013 80340014 80340015 80340016 80340017 80340018 80340019 80340020 80340021 80340022 80340023 80340024 80340025 80340026 80340027 Appendix 4: Aligner Components and Parts Lists (continued) Wheel Clamp (25 Inch) No. 1 2 3 4 5 6 7 8 9 10 11 12 13 14 15 16 17 18 19 20 21 22 23 24 Parts No. 80130100 80130101 80130102 80130103 80130104 80130105 80130106 80130107 80130108 80130109 80130110 80130111 80130112 80130113 80130114 80130115 80130116 80130117 80130118 80130119 80130120 80130121 80130122 80130123 80130124 80130130 80130131 Description Wheel Clamp Wheel Clamp End Nut Wheel Clamp End Plate Wheel Clamp Plastic Plug Wheel Clamp Standard Finger Wheel Clamp Standard Finger Holding Stud Wheel Clamp Lower Casting Wheel Clamp Slider Rod Wheel Clamp Main Treaded Shaft Wheel Clamp Spindle Lock Nut Wheel Clamp Center Spindle Casting Wheel Clamp Spindle Wheel Clamp Spindle Locking Bolt Spring Wheel Clamp Spindle Locking Bolt Bushing Wheel Clamp Spindle Locking Bolt Wheel Clamp Threaded Brass Bushing Upper Wheel Clamp Adjustment Knob Wheel Clamp Slider Rod Lock Thumb Screw Wheel Clamp Washer Wheel Clamp Stud Acorn Nut Wheel Clamp Stud Washer Wheel Clamp Locking Screw and Sleave Wheel Clamp Washer Wheel Clamp Threaded Brass Bushing Lower Wheel Clamp End Nut Locking Set Screw Wheel Clamp Meg Finger Wheel Clamp Hubcap Finger Optional Wheel Clamps 56 57