1
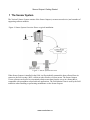
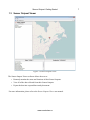
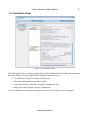
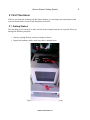
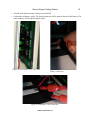
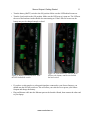
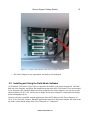
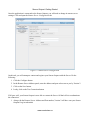
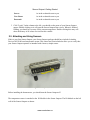
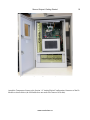
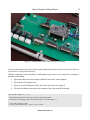
Sensor Outpost: Getting Started
http://www.versiontwo.ca
10 June 2014
Sensor Outpost: Getting Started
© 2014 by Version 2.0 Inc
Version 2.0 Inc.
P.O. Box 504
1476 Stittsville Main Street
Ottawa, Ontario K2S 1A6
Canada
Tel: (613) 663-3004
Fax: (613) 836-5153
Email: [email protected]
www.versiontwo.ca
Change Log
Author
Date
Changes made
Alex Van Leyen
2014-03-28
Original
Alex Van Leyen
2014-04-23
Standard Formatting fixes.
Alex Van Leyen
2014-06-06
Added photos, completed the getting started section.
Alex Van Leyen
2014-06-10
Updated manual references.
www.versiontwo.ca
2
Sensor Outpost: Getting Started
3
Table of Contents
1 The Sensor System.................................................................................................................................5
1.1 Sensor Outpost..............................................................................................................................6
1.2 Server.............................................................................................................................................6
1.3 Sensor Outpost Viewer..................................................................................................................7
1.4 Field Admin Client.........................................................................................................................8
2 First Time Users.....................................................................................................................................9
2.1 Getting Started................................................................................................................................9
2.2 Installing and Using the Field Admin Software..........................................................................12
2.3 Testing Data Transmissions.........................................................................................................14
2.4 Installing and Using the Sensor Outpost Viewer..........................................................................14
2.5 Attaching and Using Sensors........................................................................................................15
2.6 Installing Your Unit in the Field...................................................................................................18
3 Additional References..........................................................................................................................18
www.versiontwo.ca
Sensor Outpost: Getting Started
4
Figure Index
Figure 1: Sensor System Overview............................................................................................................5
Figure 2: The Sensor Outpost....................................................................................................................6
Figure 3: Sensor Outpost Viewer...............................................................................................................7
Figure 4: Field Admin Client.....................................................................................................................8
Figure 5: Battery cables disconnected for shipping...................................................................................9
Figure 6: All switches in the "off" state...................................................................................................10
Figure 7: The male and female battery connectors..................................................................................10
Figure 8: Red battery cable connected.....................................................................................................10
Figure 9: Battery switch turned on. Note the LED behind the switch.....................................................11
Figure 10: Load switch on. Note the three LEDs at the bottom, and the one behind the load switch.....11
Figure 11: Connect the ethernet cable to the Interface Board..................................................................12
Figure 12: Remote Server Configuration.................................................................................................13
Figure 13: Temperature Sensor................................................................................................................15
Figure14: Sensor Outpost Showing the IO and Interface Module locations...........................................16
Figure 15: Temperature Sensor attached to the IO Module.....................................................................17
www.versiontwo.ca
Sensor Outpost: Getting Started
5
1 The Sensor System
The Version 2 Sensor System consists of the Sensor Outpost (a remote sensor device) and a number of
supporting software modules.
Figure 1: Sensor System Overview Shows a typical installation:
Figure 1: Sensor System Overview
When Sensor Outpost is installed in the field, it will periodically transmit the data collected from its
sensors to the Server using a WiFi, cellular or other wired or wireless means. The Sensor Outpost
Viewer software can be used to conveniently obtain sensor data from the server in a format that is
compatible with spreadsheet related software applications. The Field Admin Client is used by the field
technician when installing or performing maintenance on the Sensor Outpost.
www.versiontwo.ca
Sensor Outpost: Getting Started
6
1.1 Sensor Outpost
The Sensor Outpost is designed to operate outside and exposed to most weather conditions. When
placed in the field, its purpose is to report all of the data it collects from the sensors attached to it. The
Sensor Outpost is completely modular: components can easily be swapped in the field for
reconfiguration, maintenance, or repair purposes.
.
Figure 2: The Sensor Outpost
1.2 Server
The Server receives and stores all incoming data from the Sensor Outposts that are registered to it. The
Server also handles all requests from the Sensor Outpost Viewer software.
www.versiontwo.ca
Sensor Outpost: Getting Started
1.3 Sensor Outpost Viewer
Figure 3: Sensor Outpost Viewer
The Sensor Outpost Viewer software allows the user to:
•
Remotely monitor the status and locations of their Sensor Outposts.
•
View all of the data collected from their Sensor Outposts.
•
Export the data into a spreadsheet-ready document.
For more information, please refer to the Sensor Outpost Viewer user manual.
www.versiontwo.ca
7
Sensor Outpost: Getting Started
8
1.4 Field Admin Client
Figure 4: Field Admin Client
The Field Admin Client is a technical application used by Field Operators for configuring and testing
the Sensor Outpost. This Java application is designed to allow the user to:
•
View the Sensor Outpost's Operating System status.
•
Edit, install, and uninstall sensor driver scripts.
•
Configure which Server the Sensor Outpost communicates with.
•
Manage the Sensor Outpost's network configuration.
For more information on this application, please refer to the Field Admin Client user manual.
www.versiontwo.ca
Sensor Outpost: Getting Started
2 First Time Users
If this is your first time working with the Sensor Outpost, we encourage you to participate in the
exercises listed in this section to help familiarize yourself it.
2.1 Getting Started
The first thing you'll want to do is make sure the Sensor Outpost unit runs as expected. Please go
through the following checklist:
•
Start by opening the door on Sensor Outpost's chassis.
•
Inspect the hardware inside, make sure there is nothing loose.
Figure 5: Battery cables disconnected for shipping
www.versiontwo.ca
9
Sensor Outpost: Getting Started
10
•
Turn all of the black switches on the power board off.
•
Connect the red battery cables. The female connector will be taped to the top of the battery. The
male connector will be taped to battery shelf.
Figure 6: All switches in the "off" state.
Figure 7: The male and female
battery connectors.
Figure 8: Red battery cable connected.
www.versiontwo.ca
Sensor Outpost: Getting Started
11
•
Turn the battery (BATT) switch to the ON position. Make sure the LED behind it turns on.
•
Turn the Load switch to the ON position. Make sure the LED next to it turns on. The LEDs on
the rest of the hardware inside should also start turning on. If the LEDs fail to turn on, the
battery may not be charged enough, or dead.
Figure 9: Battery switch turned on. Note
the LED behind the switch.
Figure 10: Load switch on. Note the three
LEDs at the bottom, and the one behind
the load switch.
•
If you have a solar panel or a solar panel simulator connected to your Sensor Outpost, you
should turn the SOLAR switch on. This will allow your solar device to power your Sensor
Outpost and charge the battery.
•
Plug an Ethernet cable into the Ethernet port on the Interface Board, then connect the other end
to your laptop.
www.versiontwo.ca
Sensor Outpost: Getting Started
12
Figure 11: Connect the ethernet cable to the Interface Board.
•
The Sensor Outpost is now operational, and ready to be configured.
2.2 Installing and Using the Field Admin Software
A CD labeled 'Field Admin Client Software' should be included in your Sensor Outpost kit. Load this
disk into your computer, and follow the installation instructions in the Field Admin Client user manual.
If you don't know the which IP address has been assigned to the Sensor Outpost, you can use its static
sub-net address (10.10.10.10). Just be sure to change record your computer's current network settings
before attempting to do so.
Once the software is installed, start the application. Enter the IP address of the Sensor Outpost ( or
10.10.10.10 ) and click Connect. When the application connects to the Sensor Outpost, the status at the
top of the screen should change from "Not Connected" to "Connected".
www.versiontwo.ca
Sensor Outpost: Getting Started
13
Once the application is connected to the Sensor Outpost, you will need to change its remote server
settings. Click and open the Remote Server Configuration tab:
Figure 12: Remote Server Configuration
On this tab, you will attempt to contact and register your Sensor Outpost with the Server. Do the
following:
1. Click the Configure button.
2. In the Remote Server Address panel, enter the address and port values sent to you by Version 2.
3. Click on the Save button.
4. Lastly, click on the Test Connection button.
If all goes well, your Sensor Outpost is now able to contact the Server. All that's left is to authenticate
the connection:
1. Along with the Remote Server Address and Port number, Version 2 will have sent your Sensor
Outpost's log-in credentials.
www.versiontwo.ca
Sensor Outpost: Getting Started
14
2. Enter your user name, password, developer key, and sensor number into their respective fields.
3. Click on "Login". The status should change to "Logged in".
4. You are now authenticated.
2.3 Testing Data Transmissions
Now that the Sensor Outpost is running, you should test if the Outpost is capable of sending data to the
Server you connected it to. Try the following:
1. In the Sensor Admin Client, click on the ASL Programs tab.
2. Set your workspace
3. Click the Change
somewhere appropriate, like a folder on your desktop called "asl".
button.
4. Click File > New. Set the file name to be "temp.asl"
5. Click the Edit button.
6. In the text pane below, copy the following code:
directive run_crontab("*/1 * * * *")
// This will make the script run once every minute.
var celsius current_temperature = 23 // Declare a variable of type Celsius.
send( current_temperature )
// Send the variable off to the Server.
7. Click File > Save
8. Click the Install Button. This will install the script into the Sensor Outpost.
The Sensor Outpost will now transmit the variable current_temperature to the Server once every
minute. The Sensor Outpost will continue to transmit every minute until you uninstall the script. The
next section will show how you can use the Data Viewer and Extraction Client to view the data the
Sensor Outpost has sent.
2.4 Installing and Using the Sensor Outpost Viewer
With the Sensor Outpost sending the "current temperature" to the Server, you'll need a way to check
that data. Inside your kit should be another CD labeled "Sensor Outpost Viewer". Load this disk into
your computer, and follow the installation instructions in the Sensor Outpost Viewer user manual. Once
the software is installed, start the application and then do the following:
1. Click "Log-in".
2. In the Log-in dialog box, use the following values:
www.versiontwo.ca
Sensor Outpost: Getting Started
Server:
As in the credentials sent to you.
User Name:
As in the credentials sent to you.
Password:
As in the credentials sent to you.
15
3. Click "Login". In the column to the left, you should see the name of your Sensor Outpost
appear. Double clicking on it will open the Sensor Outpost Data viewer. When it's finished
loading, you should see an entry for the current temperature. Double clicking this entry will
show the history of all values received for this variable.
2.5 Attaching and Using Sensors
If this is your first Sensor Outpost, your Sensor Outpost package should have included a Analog
Devices AD21100 based temperature sensor. This sensor has been included to allow you to verify that
your Sensor Outpost operates as intended with a known, simple sensor.
Figure 13: Temperature Sensor
Before installing the thermometer, you should turn the Sensor Outpost off.
The temperature sensor is attached to the IO Module in the Sensor Outpost. The IO Module on the left
wall of the Sensor Outpost as shown:
www.versiontwo.ca
Sensor Outpost: Getting Started
16
Figure14: Sensor Outpost Showing the IO and Interface Module locations
Attach the Temperature Sensor to the Section “A” Analog/Digital Configuration Connector of the IO
Module as shown below (the IO Module does not need to be removed to do this).
www.versiontwo.ca
Sensor Outpost: Getting Started
17
Figure 15: Temperature Sensor attached to the IO Module
For more information, please refer to the Analog Temperature Sensor section in the Sensor Software
and Hardware Configuration Manual.
With the temperature sensor installed, we shall update the previous current temperature example to
transmit a real reading:
1. Open and connect the Sensor Outpost Admin Client to the Sensor Outpost.
2. Click on the ASL Programs tab.
3. Mouse over to the Workspace table, and click on the entry for "temp.asl".
4. Click the edit button, then replace the contents of the script with the following:
directive run_crontab("*/1 * * * *")
// The following line gets the voltage input from the analog thermometer.
var volt input = v2io.analog_input( v2io.CONNECTOR_A, v2io.CHANNEL_1 )
// Convert the voltage to Celsius.
var celsius current_temperature = ( input - 1.375 ) / 0.0225
www.versiontwo.ca
Sensor Outpost: Getting Started
18
send( current_temperature )
5. Click on File > Save.
6. Click on install.
If temp.asl was already installed, clicking on install now will replace the previous script with the new
script on the Sensor Outpost. With the new script installed, the Outpost should now be transmitting the
real current temperature to the Server.
2.6 Installing Your Unit in the Field
Before moving your Sensor Outpost out to the field, do the following:
1. Turn off all of the power switches on the power board.
2. Safely secure the Outpost in your transport vehicle.
When installing the Sensor Outpost out in the field, check for the following:
1. If the device is mounted to a post, make sure the post is stable, and can withstand strong winds.
2. If your unit came with a solar panel, refer to the solar panel's installation instructions.
3. Before installing any power sources, make sure the switches on the Power Board are turned off
and that the polarity of the cables from the solar panel is correct.
4. When the power sources are connected to the Power Board, turn the switches on one by one. Do
not turn them on all at the same time. Save the load switch for last.
5. Verify that the Outpost is running correctly by checking its output on the Sensor Mapper and
Data Viewer .
6. When finished, be sure to lock the Outpost's case.
3 Additional References
For more information on the Sensor System's components, please refer to the following manuals:
•
Sensor Outpost Viewer Manual
This manual fully explains how to install and use the Sensor Outpost Viewer.
•
Adaptive Sensor Language (ASL)
This manual explains the Adaptive Sensor Language: the syntax, built-in variables, functions, and
additional resources. It also includes the sub-manuals for the plug-in packages that may come with
your Sensor Outpost.
www.versiontwo.ca
Sensor Outpost: Getting Started
•
Sensor Software and Hardware Configuration
This manual explains the concepts behind writing sensor drivers in ASL for the Sensor Outpost.
•
Sensor Outpost Mechanical Installation
This manual explains how to properly install and care for your new Sensor Outpost.
•
Field Administration Client
This manual fully explains how to install and use the Field Admin Client.
www.versiontwo.ca
19