1
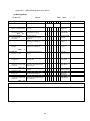
Tutor Guide to using the Grademark component of TurnitinUK This guide includes: How to access Grademark The grading tools and how to use them How to add comments and QuickMarks to a paper Working with rubrics (marking schedules/sheets) Viewing comments and QuickMarks Downloading and Printing marked up papers Version 2a February 2011 Centre for Academic Practice Queen Margaret University 1 Contents 1.0 Introduction ......................................................................................................... 3 2.0 Available Grading Tools ....................................................................................... 5 3.0 Comments/QuickMarks ....................................................................................... 6 3.1 3.2 3.3 3.3 3.4 Adding a comment to student text ................................................................... 6 Adding a QuickMark ........................................................................................ 7 Reviewing Comments and QuickMarks........................................................... 8 Creating your own QuickMark set ................................................................... 9 Reviewing Comments and QuickMarks......................................................... 12 4.0 Using rubrics in a paper .................................................................................... 12 4.1 4.3 4.4 4.5 Creating a rubric: .......................................................................................... 13 Modifying a rubric ......................................................................................... 16 Maintaining rubrics ........................................................................................ 17 Maintaining libraries ...................................................................................... 17 5.0 General Comments ........................................................................................... 18 6.0 Other Features .................................................................................................. 18 6.1 6.2 6.3 6.4 6.5 Entering a grade ........................................................................................... 18 Navigating between papers........................................................................... 18 Statistics, printing and downloading .............................................................. 19 Zooming page size........................................................................................ 19 Reverting to the old version (if available) ...................................................... 19 7. Releasing marks to students .............................................................................. 20 8. Archiving Marked Scripts (essential) ................................................................... 20 9. Support in using TurnitinUK/GradeMark .............................................................. 22 10. Some FAQs ....................................................................................................... 22 2 1.0 Introduction GradeMark is available from within the TurnitinUK “inbox”. With GradeMark you can edit and grade student papers online. You can also: add comments within the body of a paper point out grammar and punctuation mistakes with “QuickMarks” evaluate the paper against qualitative or quantitative rubrics enter a grade for the paper that is automatically entered into the WebCT gradebook for the originating module. For tutors, GradeMark can be a time-saving digital alternative to the traditional pen and paper grading process since being web based, it does not need coursework or essay scripts to be printed out and transported to where the marking is to take place. A further advantage is that students can view the marked up work immediately it is released. To use GradeMark, you will need to: create a link to TurnitinUK within your WebCT module, preferably using a plugin (http://mcs.qmu.ac.uk/plagiarism/Documents/UsingWebCTPlugIns.PDF) create an assignment within TurnitinUK via the link; introduce TurnitinUK to your students and make the student guide to TurnitinUK available in your WebCT module if not using a plug-in) http://mcs.qmu.ac.uk/plagiarism/Documents/TiiUKStudentGuide.PDF check if any of your students have special needs when using IT in the learning environment and that they have the appropriate support, for example, they have liaised with the Student Disability Advisor in Student Services; explain to the students that their assignments will be marked and returned to them online; remind students that it will not be necessary for them to submit their assignments electronically in any other way, such as through the assignment drop box in the school WebCT area. For more information on linking to TurnitinUK from within WebCT and for access to the student guide to TurnitinUK see: Tutor Guide to TurnitinUK http://mcs.qmu.ac.uk/plagiarism/Documents/TiiUKTutorGuide.PDF Students MUST submit their assignments through TurnitinUK for you to use GradeMark to mark the assignments. It is also recommended that you inform the following that you are using GradeMark: your programme leader; the school office; your external examiner. Please note: GradeMark now supports anonymous marking. 3 In your WebCT module, you can access GradeMark from within the TurnitinUK inbox in Teach mode by clicking on the Originality report icon next to the paper you want to mark OR on the greyed out icon in the GRADEMARK column. A new window will open displaying the GradeMark interface. Using this interface, you can add marks and grades to student papers. However please note that you should wait until after the hand-in date to start marking in case a student decides to resubmit to TurnitinUK. 4 2.0 Available Grading Tools GradeMark contains several tools and types of mark up that instructors can use in grading papers. In GradeMark terminology these are: • Comments • QuickMarks; • Rubrics; • General comments. Comments - a comment is equivalent to the notes you, as the tutor, would write in the margins of a student paper. A comment might be: “This paragraph does not relate to the question being asked.” Comments can be any length you would like. QuickMarks - QuickMarks are standard or commonly used editing comments (marks) that instructors can use when editing and grading papers, such as those about punctuation or grammar The number and type of QuickMarks added to each paper in an assignment can be displayed (see Section 3.2). QuickMarks are stored in sets or groups that are held in the QuickMark library and are added to the paper by dragging and dropping. GradeMark automatically provides four sets of QuickMarks consisting of commonly used editing marks and standard corrections. Instructors can use these sets, create their own sets, or use QuickMarks derived from a combination of sets. Rubrics - rubrics can be used to evaluate student work based on defined criteria and scales and are the direct equivalent of the marking sheets/schedules used by many of the subject areas in QMU. For examples of such sheets please see: http://www.qmu.ac.uk/quality/documents/Guidelines_assessment_specifications_fee dback.doc Most QMU marking sheets/schedules can be re-created as GradeMark rubrics. See Appendix 1 for an example of a QMU sheet transposed into a rubric. General Comments - If you would like to write a overall comment regarding the paper you can use the general comments tool, eg: “This essay is generally of a very high standard but you need to take more care when referencing websites”. This is the direct equivalent of the General Comment and Strengths/Weaknesses section at the bottom of many QMU marking sheets. 5 3.0 Comments/QuickMarks 3.1 Adding a comment to student text Click on the paper where you would like to add a new comment Enter text into the text field of the comment popup And click “Save” If you want to keep this comment for later use click on “More options” and select “My Clipboard” If your comment is to reference a specific area of the paper, highlight the area by dragging the mouse over the area and selecting the “Comment” button at top right. You can edit a mark at any time by hovering over it and clicking on the „Edit‟ button. If you would like to move a mark, drag the mark icon to the new location. When necessary, you can delete a mark by hovering over it and clicking on the rubbish bin symbol in the top right of the popup.. If you would like use a comment more than once, you can add it to the “My clipboard” set. The clipboard can be used to store commonly used comments in sets. Comments added to the clipboard can be used in any assignment in your account. Comments can be added to the clipboard by editing a comment and clicking on “More options”: The following popup appears: 6 Add a title for the comment (please note that the title can be up to 8 characters only in length). If required change the “set” but normally My Clipboard is appropriate. Finally click “Save”. All comments are saved in the Quickmark area at top right, organised into “sets” and a particular set can be accessed using the drop down link: 3.2 Adding a QuickMark Comments stored in the Clipboard are one instance of QuickMarks. Apart from the Clipboard, the Library also holds ready made standard sets. The QuickMark Library can be edited and organised using the „QuickMark Manager” link. To use any QuickMark drag it to the appropriate area of the students text. 7 3.3 Reviewing Comments and QuickMarks To review all comments and Quickmarks inserted in a student document, use this icon at the bottom right of the GradeMark screen: Here page 1 of the student work has three comments and one grademark: You can navigate to a comment or GradeMark in the paper by hovering the mouse over an entry in the list and then clicking on the “show on paper” link. 8 3.3 Creating your own QuickMark set All the supplied QuickMark sets are locked to prevent changes so first you will need to create a new set to hold your own QuickMarks. To create a new QuickMark set: Click on “QuickMark Manager” at the top of the Quickmark Library area Click on the plus sign: Type a suitable name into the text window and click “Save” 9 Enter a suitable name for your set and click on the „Save‟ button. Your set will appear in the list of sets on the left of the window. Make sure your new set is highlighted and click on the “+” sign in the middle column: 10 Enter the following information for your Quick-Mark set:: Title Description Click the Save button to save the new QuickMark (here called “English”) in your set. To edit the new QuickMark, select it and click the “Edit” button. 11 To add an additional QuickMark to your own set, start by clicking on the “+” sign in the middle column and continue as above. 3.4 Reviewing Comments and QuickMarks To review all comments and Quickmarks inserted in a student document, use this icon at the bottom right of the GradeMark screen: Here page 1 of the student work has three comments and one grademark: You can navigate to a comment or GradeMark in the paper by hovering the mouse over an entry in the list and then clicking on the “show on paper” link. 4.0 Using rubrics in a paper Rubrics can set up in GradeMark and then be used to score student work based on defined criteria and scales. You may already have an assessment marking sheet upon which you can base your rubric. (see Appendix 1) 12 4.1 Creating a rubric: Start by clicking on the rubric manager button at the bottom right of the GradeMark screen: Since no rubrics have been created the manager will be empty; click on the Rubrics Manager link The rubric template will appear . 13 • • Supply a name at the top of the screen – “Rubric 1” here Click inside each box to edit its contents (click the “+” to add additional Scales or Criterion if necessary) Please note that there are limits on the length of names of fields. • In QMU, rubrics are usually used as a “tick the box” exercise to initially assign grades to criteria so select 0 here (for alternatives see scoring a rubric below) Click on “Save” to finish To use the new rubric with the student work ,click on the chain symbol and then on “Close” • • The Rubric manager window will now mirror the rubric: 14 When marking the student work, click on the appropriate square to assign that grade to a criteria. Pausing the mouse over a square will show the details for that square. 4.2 Scoring a Rubric As mentioned above, in QMU rubrics are usually used as a “tick the box” exercise to initially assign grades to criteria however in GradeMark marks can be assigned to criteria and scales in one of the following ways 1. “0” – no marks(points) displayed: (QMU default) 15 2) “%” – lets the tutor assigns a mark for each column and then weights the rows using percentages. Total mark equals sum of all weighted marks. 3) “Tick box” – lets the tutor enter a mark directly into any rubric cell. Total mark equals sum of all marks. 4.3 Modifying a rubric To modify a rubric: Click on the Rubric Manager link and select the rubric that you want to edit Click on the text you would like to modify and make the changes Click “Save” and then “Close”. 16 WARNING: If you choose to make changes to a rubric that is attached to a current assignment, any scoring you have done to any paper in the assignment will be erased. Changes will not be applied to the rubric scorecard of previous assignments. 4.4 Maintaining rubrics When in any rubric, by clicking here a tutor can: Create another rubric Duplicate an existing rubric Rename an existing rubric Delete an existing rubric Select a rubric other than the one displayed 4.5 Maintaining libraries Both the QuickMarks and Rubrics can be maintained by clicking on the “libraries” tab at the top of the TurnitinUK inbox The appropriate library can be accessed by clicking on it‟s name, here we are in the QuickMark Manager.: 17 5.0 General Comments If you would like to write a general comment regarding the student‟s paper, you can use the general comments tool. To add a general comment: Click the appropriate icon at the bottom right of the GradeMark window The general comment window will open on the right, click on the “Edit” link at the bottom of the window to start the comment. 6.0 Other Features 6.1 Entering a grade To grade a paper, enter a numeric grade in the grade field at the top of the paper.. If you are using a scoring rubric, a grade will automatically be entered in the grade field when you complete the rubric scorecard. 6.2 Navigating between papers If you are grading several papers and would like to jump to the next or previous paper without returning to your inbox, you can do so using the navigation links at the top of each paper. At top right you can go to the next or previous submission for the current assignment: At top left you can go to the next or previous submission by this student: 18 Each time you jump from one paper to another, the paper you are grading is automatically saved. 6.3 Statistics, printing and downloading To see some summary statistics for the student paper, click on the information icon: To print a marked up paper, click on the print icon: To download a marked up paper to a local file space, click on the basket icon: 6.4 Zooming page size When the GradeMark screen opens the student work is often too small to read. In this case move the “slider” at the bottom of the screen to the right to enlarge it: 6.5 Reverting to the old version (if available) The previous GradeMark interface is still available and can be accessed at the bottom right of the new screen: 19 7. Releasing marks to students Your marked up papers should be released to students on the post date and time set in your assignment details created when setting up the TurnitinUK assignment in WebCT. After release, students can view their marked up paper via the TurnitinUK link in the WebCT module ie where they originally submitted. All your comments, QuickMarks etc will be visible as will the assigned mark. It is important to stop WebCt from releasing marks from the Gradebook as soon as GradeMark has placed one there. This is done automatically via the WebCT My Grades mechanism, not directly via GradeMark. Since My Grades is driven by the Gradebook, tutors are now advised to go into the Gradebook and set 'release to students' to "No" for the column created by GradeMark for the assignment. This can be done in Teach mode via Grade Book/Grade Book Options/Column Settings. In the “Released to Students” row and the appropriate assignment column click on “yes” to change it to “no”. The tutor does, of course, have to remember to set the 'release to students' back to "Yes" once they have completed marking all submissions in GradeMark. 8. Archiving Marked Scripts (essential) When a webCT module containing GradeMarked scripts is archived and copied forward at the end of an academic session, all marked scripts will become unavailable although the marks will continue to be available in the webCT Gradebook. 20 If asked. iParadigms can retrieve scripts but a better way is to proceed as below. This will create a pdf document containing all the student scripts identified by submission title. This works best if tutors encourage student to use their matric number at the start of their submission title eg “09001234 Essay”. a. Open TiiUK inbox b. Click on box at left of Author – Title – etc header line. This will select all submissions and reveal additional buttons. Note that if the TiiUK inbox has multiple pages, go to the last page to tick this box. c. Click on Download button and select “GradeMark Paper” d. Click Ok on “Do you wish to continue?” message A “When compression is complete a zip file will be available for download in your Turnitin Messages” message will appear: e. “Messages” is a link – click on it to see the list of downloaded zip files: 21 The link in the “messages” will exist for 1 week from creation. f. An alternative way to see messages is to use the tab at the top of the TiiUK inbox: 9. Support in using TurnitinUK/GradeMark The Plagiarism website at http://mcs.qmu.ac.uk/plagiarism has material on: TurnitinUK presentations and guides Plagiarism support Other relevant websites Referencing guides Relevant QMU assessment regulations The Centre for Academic Practice (CAP) website also has a range of support material including WebCT guides: http://www.qmu.ac.uk/cap/TELwebCT.htm Email Support If you have queries regarding GradeMark, please contact [email protected]. 10. Some FAQs Can I let another member of the programme team/external examiner/school administrator to see the graded paper before releasing it to another student? Yes – ask CAP to make the other party a Teaching Assistant on the module in question. This will allow the third party to see the papers in the TurnitinUK inbox. You may want to extend the post date of the assignment to delay release to students. What happens when my WebCT module is archived? WebCT modules are always archived at the end of the academic year. When this is done, the TurnitinUK link will no longer be available and so the marked up papers cannot be viewed. To create a pdf archive copy of the marked up scripts see section 8 above. 22 The School Office remains responsible for ensuring that student work is retained for the specific period required. If there are special issues eg a plagiarism case, then CAP should be informed so that archiving of that particular module can be delayed or the archive pdf copy can be used. What happens if I have a visually impaired student? You should contact the relevant disability co-ordinator to ascertain the particular needs of the student. It may be necessary to provide the output of GradeMark in paper form (see Section 9.7). When I have finished marking the assessment, does the student see it automatically? No – the student cannot see the assessment until the due date as specified when setting up the TurnitinUK assignment. 23 Appendix 1 – QMU Marking sheet as a Rubric a) Marking Sheet Student ID: Marker: Date: Mark A B C D E F G Pass Fail Marking criteria Grade A Report All aspects of model are covered Report is incomplete Manager appreciation level is maintained throughout Language is inappropriate Model handles all requirements with suitable functions Incorrect results obtained 1. Report is comprehensive 2. Description is in appropriate language Mark: /20 Spreadsheet Model Grade G 3. All functions are operational 4. User interface is suitable Interface is readily accessible and easy to understand Interface not present 5. Setup interface is suitable Interface is readily accessible and easy to understand Interface not present Mark: /40 6. Structure is clear Contents page present and correct Essential sections missing 7. Content is appropriate for its purpose All aspects of the model are documented Some aspects not present 8. Language used is suitable for non-technical personnel Mark: /20 All sections are written in clear terms with abbreviations kept to a minimum Language inappropriate Contents page present and correct Essential sections missing 10. Content is appropriate for its purpose All aspects of setting up the model are documented 11. Language used is suitable for non-technical personnel Mark: /20 All sections are written in clear terms with abbreviations kept to a minimum Model cannot be set up via instructions Language inappropriate User Manual Setup Manual 9. Structure is clear Comment 24 % Comments b) Rubric Spreadsheet Model Grading Scale Grade A Report1 10pts Report is comprehensive Report2 10 pts Description is in appropriate language Model1 20pts All model functions are operational Model2 10pts User interface is suitable Model3 10pts Setup interface is suitable UManual1 5pt User manual structure is clear UManual2 10pts User manual content is appropriate for its purpose UManual3 5pts User manual language is appropriate for its purpose SManual1 5pts Setup manual structure is clear SManual2 10pts Setup manual content is appropriate for its purpose SManual3 5pts Setup manual language used is suitable for nontechnical personnel 100% All aspects of model are covered A B C D E F G 100% 80% 60% 50% 40% 30% 0% Grade G 0% Points Report is incomplete 10pts Manager appreciation level is maintained throughout Language is inappropriate 10pts Model handles all requirements with suitable functions Incorrect results obtained Interface is readily accessible and easy to understand Interface not present Interface is readily accessible and easy to understand Interface not present Contents page present and correct Essential sections missing 5pts All aspects of the model are documented Some aspects not present 10pts All sections are written in clear terms with abbreviations kept to a minimum Language inappropriate Contents page present and correct Essential sections missing 20pts 10pts 10pts 5pts All aspects of setting up the model are documented Model cannot be set up via instructions All sections are written in clear terms with abbreviations kept to a minimum Language inappropriate 5pts 10pts 5pts 25