1
3. Genneral Functions
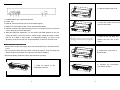
2. Open the glass base-cover.
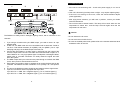
1. POWER INPUT: AC 120V/230V 60/50Hz
2. FUSE: 15A
3. Loose the screws of the lamp
3. DMX IN: XLR male socket, use to receive DMX signals.
wire from terminator.
4. DMX OUT: XLR female socket, use to transmit DMX signals.
5. Remote controller input: By connecting to the 1/4 “microphone jack to control the
unit for Stand by, Function and Mode.
6. DMX DIP SWITCH: Dipswitchs 1-9 are used to set DMX address of the unit.
Assign dip switch 10 ON, this unit is in master mode, assign dip switch 10 OFF,
this unit is in DMX or slave mode, In master/slave linking, you have to set
4. Take out the old lamp and
dipswitch 10 ON for the first unit, and set dipswitch 10 OFF for the other units.
replace the new one to the
fixture.
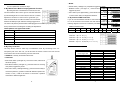
4. How To Change The Lamp
• Always switch off the main supply and never handle the lamp or luminaire when it
is hot.
5. Connect the lamp wire to
• Do not touch the bulb with bare hands. If this does happen, clean the lamp with
the terminator.
denatured alcohol and wipe with a lint free cloth before installing.
• Remember always replace the lamp with the same type lamp.
6. Reverse the procedures
1. Loose the screws on the
from step 2 to step 1.
metal base at bottom.
4-
5-