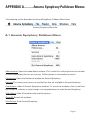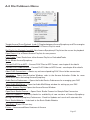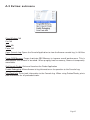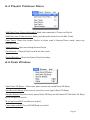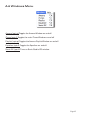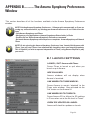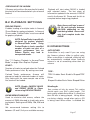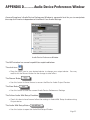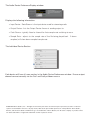
1
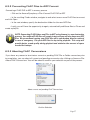
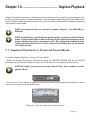
Amarra Symphony with IRC User Manual Table of Contents
Chapter 1.0 Welcome to Amarra Symphony with iRC........................................... 6
Chapter 2.0 Getting Started..................................................................................... 7
2.1 Connecting to your output device.............................................................................................7
2.2 Launching Amarra Symphony the First Time...........................................................................7
2.3 Launching Symphony Next Time ..............................................................................................8
2.4 Changing your Output Device...................................................................................................8
Chapter 3.0 Amarra Symphony User Interface....................................................... 9
1) Transport Buttons..........................................................................................................................9
2) Symphony Volume Slider............................................................................................................9
3) Symphony UI Window.................................................................................................................9
4) Playback Position Slider............................................................................................................. 10
5) Clear Button and Playlist Commands ...................................................................................... 10
6) Artwork window......................................................................................................................... 10
7) ‘M’ Button - Turning on Meters................................................................................................. 10
8) ‘I’ Button - Open ADP window................................................................................................... 10
9) CACHE Button - Turning on CACHE........................................................................................... 11
10) Amarra/iTunes Button to toggle between Amarra and iTunes.............................................. 11
11) PLAYLIST Button to enter Playlist mode ................................................................................ 11
12) TRACKS Button......................................................................................................................... 11
13) EQ Button to display EQ window............................................................................................ 11
14) iRC Button to display iRC Filter Bank......................................................................................12
15) Preload Tracks Button for Gapless Playback...........................................................................12
16) LINK Button to link Amarra window to iTunes.......................................................................12
17) Up/Down Arrow Button to display Artwork window.............................................................12
Chapter 4.0 Music Playback from your iTunes library ......................................... 13
4.1 Navigating within a Track......................................................................................................... 14
Chapter 5.0 Additional Features to Further Improve your Sound...................... 16
5.1 Setting up your Mac for optimum performance....................................................................16
5.2 Amarra Playlists........................................................................................................................17
5.2.1 General Information about Amarra Playlists.................................................................................................17
5.2.2 Amarra Playlist Window..................................................................................................................................18
5.2.3 ENTERING PLAYLIST MODE ........................................................................................................................19
5.2.4 LOADING TRACKS INTO A PLAYLIST..............................................................................................................19
5.2.5 USING YOUR AMARRA PLAYLIST...................................................................................................................19
5.2.6 SAVING A PLAYLIST FOR FUTURE RECALL................................................................................................. 21
5.2.7 OPENING AN EXISTING PLAYLIST................................................................................................................ 21
5.2.8 CLEARING YOUR PLAYLIST............................................................................................................................ 21
5.3 CACHE Mode.............................................................................................................................22
5.4 Amarra Symphony EQ..............................................................................................................23
5.4.1 Displaying the EQ Window............................................................................................................................. 23
5.4.2 Turning the EQ On........................................................................................................................................... 23
5.4.3 Adjusting EQ.................................................................................................................................................... 24
5.4.4 Setting Amarra EQ via iTunes........................................................................................................................ 24
5.4.5 Saving and Recalling EQ Settings.................................................................................................................. 24
Chapter 6.0 Playing FLAC Files............................................................................. 25
6.1 Playing FLAC Files Natively via Amarra Playlists...................................................................25
6.2 Playing FLAC Files from iTunes...............................................................................................26
6.2.1 Converting a FLAC Folder to AIFF Format..................................................................................................... 26
6.2.2 Converting FLAC Files to AIFF Format........................................................................................................... 27
6.2.3 Aborting FLAC Conversions........................................................................................................................... 27
Chapter 7.0 Gapless Playback............................................................................... 28
7.1 Gapless Playback in Amarra/iTunes Mode .............................................................................28
7.2 Gapless Playback in Amarra Playlist mode ............................................................................30
Chapter 8.0 Audio Playback from Streaming Sources......................................... 31
8.1 Installing Amarra sQ.................................................................................................................31
Run Uninstall AmarraSQ.app. This will remove all components installed...............................31
8.2 Launching, Licensing and Using Amarra sQ..........................................................................31
Chapter 9.0 Sonic Studio iRC - Impulse Response Correction............................ 32
9.1 Using iRC Measure to Measure your Listening Environment...............................................33
9.2 Using Sonic Studio iRC to use the Filter Files created..........................................................33
Chapter 10 Meters Display.................................................................................... 35
Chapter 11 Full Sonic EQ....................................................................................... 36
Chapter 12 Panner Window................................................................................... 37
Chapter 13 Licensing 2 machines with your Amarra Symphony License......... 38
Chapter 14 Registering Your Amarra Symphony with iRC Software................. 39
Chapter 15 Contacting Sonic Studio.................................................................... 40
APPENDIX A - Amarra Symphony Pulldown Menus............................................. 41
A.1 Amarra Symphony Pulldown Menu.......................................................................................41
A.2 File Pulldown Menu.................................................................................................................42
A.3 Extras: submenu......................................................................................................................43
A.4 Playlist Pulldown Menu...........................................................................................................44
A.5 Desk Window............................................................................................................................44
A.6 Windows Menu.........................................................................................................................45
APPENDIX B - The Amarra Symphony Preferences Window................................ 46
B.1 LAUNCH SETTINGS.................................................................................................................46
B.2 PLAYBACK SETTINGS .............................................................................................................47
B.4 PROCESSING SETTINGS.........................................................................................................48
B.5 HARDWARE SETTINGS...........................................................................................................48
B.6 ADDITIONAL SONIC HARDWARE SETTINGS........................................................................49
APPENDIX C - Your Amarra Symphony Folder...................................................... 50
APPENDIX D - Audio Device Preferences Window................................................ 52
NOTE : Translation to local language is available via google translate now. Please visit
translate.google.com/?tr=f&hl=en and set the appropriate ‘Translate to’ language.
Browse to your Amarra product folder in your Applications folder in Finder and select the
appropriate file to translate. This file is called ‘Amarra Symphony with IRC User Manual’
About This Manual
This manual, as well as the software described in it, is furnished under license and may only
be used or copied in accordance with the terms of such license. The information in this manual
is furnished for informational use only, is subject to change without notice, and should not be
construed as a commitment by Sonic Studio, LLC. Sonic Studio, LLC assumes no responsibility
or liability for any errors or inaccuracies that may appear in this book.
Except as permitted by such license, no part of this publication may be reproduced, stored in a
retrieval system, or transmitted, in any form or by any means, electronic, mechanical, recording,
or otherwise, without the prior written permission of Sonic Studio, LLC.
Notice of Liability
The author and publisher have made every effort to ensure the accuracy of the information herein.
However, the information contained in this document is provided without warranty, either express or
implied. Neither the authors, Sonic Studio, LLC, nor its dealers or distributors will be held liable for any
damages to be caused either directly or indirectly by the instructions contained in this book, or by the
software or hardware products described herein.
SONIC STUDIO, LLC MAKES NO WARRANTIES, EXPRESS OR IMPLIED, INCLUDING WITHOUT LIMITATION
THE IMPLIED WARRANTIES OF MERCHANTABILITY AND FITNESS FOR A PARTICULAR PURPOSE,
REGARDING THE APPLE SOFTWARE. SONIC STUDIO, LLC DOES NOT WARRANT, GUARANTEE, OR
MAKE ANY REPRESENTATIONS REGARDING THE USE OR THE RESULTS OF THE USE OF THE SONIC
STUDIO, LLC SOFTWARE
IN TERMS OF ITS CORRECTNESS, ACCURACY, RELIABILITY, CURRENTNESS, OR OTHERWISE. THE
ENTIRE RISK AS TO THE RESULTS AND PERFORMANCE OF THE SONIC STUDIO SOFTWARE IS ASSUMED
BY YOU. THE EXCLUSION OF IMPLIED WARRANTIES IS NOT PERMITTED BY SOME STATES. THE ABOVE
EXCLUSION MAY NOT APPLYTOYOU. IN NO EVENT WILL SONIC STUDIO, LLC, ITS DIRECTORS, OFFICERS,
EMPLOYEES, OR AGENTS BE LIABLE TO YOU FOR ANY CONSEQUENTIAL, INCIDENTAL, OR INDIRECT
DAMAGES (INCLUDING DAMAGES FOR LOSS OF BUSINESS PROFITS, BUSINESS INTERRUPTION,
LOSS OF BUSINESS INFORMATION, AND THE LIKE) ARISING OUT OF THE USE OR INABILITY TO USE THE
SONIC STUDIO SOFTWARE EVEN IF SONIC STUDIO HAS BEEN ADVISED OF THE POSSIBILITY OF SUCH
DAMAGES. BECAUSE SOME STATES DO NOT ALLOW THE EXCLUSION OR LIMITATION OF LIABILITY
FOR CONSEQUENTIAL OR INCIDENTAL DAMAGES,THE ABOVE LIMITATIONS MAY NOT APPLY TO YOU.
Notice of Rights
©2007-2014 Sonic Studio, LLC — All rights reserved. No part of this document may be reproduced, stored
in a retrieval system or transmitted in any form or by any means, without the prior written permission of
the publisher.
Sonic Studio, Amarra, Amarra Hifi, Amarra Symphony, Sonic Mastering EQ, Model 302, Model 303, Model
Four, Model 305 and the Sonic Studio and Amarra logos are trademarks of Sonic Studio, LLC. All other
company or product names are either trademarks or registered trademarks of their respective owners.
Page 5
Chapter 1.0 ....... Welcome to Amarra Symphony with iRC
Congratulations and welcome to the Amarra family. By now you should have successfully
downloaded, installed and activated Amarra Symphony with iRC (‘Symphony’) and are ready to
listen to your music! We have a few short notes to pass along to make your listening experience
better.
• If you haven’t Installed and Activated Symphony yet, please do the following:
- Double-click on the Amarra Symphony Installer Package to launch the installer
- Follow on screen instructions for installation
- Enter system admin password when prompted
- Symphony will auto launch as part of installation
• If you have any issues Activating Symphony, please refer to the Amarra Symphony Activation
Guide located in your Amarra Symphony folder in Finder. If problems persist, please contact us
at [email protected]
• Google Translate now provides for translating full documents into local languages. Please visit
http://translate.google.com/ , select the desired language to translate to and click on ‘translate a
document’. It’s not a perfect tool, but it may help those who prefer languages other than English
• Always launch Symphony first and let it launch iTunes to ensure proper operation
• If Symphony quits unexpectedly for any reason, please delete your Amarra Symphony
Preferences prior to re-launching Symphony. See Appendix B for information on Amarra
Symphony Preferences.
•A significant amount of additional information can be found at our support portal and on our
FAQ. Please visit our support page at http://www.sonicstudio.com/amarra/amarrasupport.
html to access these resources.
• Holding the Mouse over any button will display a Help Tip displaying what the button does.
It’s time to Enjoy the Music!!
Page 6
Chapter 2.0 .................................................... Getting Started
This section reviews the initial steps needed to ensure proper operation of Amarra Symphony.
2.1 Connecting to your output device
If you are using and external DAC (Digital to Analog Converter), ensure your device is connected
to your Mac, powered on and recognized by the Mac OS by verifying it is listed in Audio Midi Setup
or in the Sound item on the System Preferences window prior to launching Amarra Symphony.
You can access Audio Midi Setup in the Applications->Utilities folder in Finder.
As an alternative, you can set the output device using the Sound item on the System Preferences
window.
Once you’ve correctly connected the device for sound output, you are ready to launch Amarra
Symphony
2.2 Launching Amarra Symphony the First Time
As part of the installation process you will be asked to launch Amarra Symphony. Select ‘Yes’
when prompted and Amarra Symphony will launch as the installation process completes. You
will be asked if you would like to launch iTunes as well.
If you’d like to run in Amarra/iTunes mode or use iTunes to select your tracks, select ‘Yes’ and
iTunes will launch. If you’d like to run in Amarra Playlist mode, select ‘No’ and Amarra Symphony
will launch without iTunes.
In addition, Amarra Symphony checks to see if there is an excessive amount of Inactive OS
Memory and asks if you’d like to purge the inactive memory. Doing so can improve overall
performance, the process takes a short time during which Amarra is unavailable. Click ‘Yes’ to
run this script.
Page 7
You’ll need to enter your system administration password to run the script. Enter User Name
and Password in the spaces provided and click ‘OK’ to purge inactive memory.
2.3 Launching Symphony Next Time
After initial launch, to launch Symphony in the future, click on the Amarra Symphony icon in
your dock or navigate to your Applications->Amarra Symphony 3.0 folder in Finder and doubleclick on ‘Amarra Symphony.app’.
As long as your device is set as the device for sound output in Audio Midi Setup prior to launching
Symphony, Symphony should automatically find the device.
2.4 Changing your Output Device
NOTE: We strongly recommend pausing playback when changing output devices
to avoid any unwanted consequences.
To change output to a different device, you can use Amarra Symphony’s Audio Device Preferences
Window. Click the ‘I’ button on the Amarra Symphony User Interface (UI) to display the Audio
Device Preferences window.
Drag the clock icon in the left hand column to your desired device to direct playback to that
device. You may have to press the Rescan button at the top of the window for the change to take
effect.
In addition, if you plug in a device after Amarra has launched, press the Rescan button to update
the list of devices in the ADP window. You can then set the new device as your output device.
More details on using the Audio Device Preferences window can be found in “APPENDIX D
Audio Device Preferences Window” on page 52.
Chapter 3.0 ....................Amarra Symphony User Interface
Amarra Symphony no longer has the vertical UI available. The horizontal user interface is the
only UI and is shown below.
1
2
7 8
9
10
3
11
12
4
13
5
14
6
15 16 17
Amarra Symphony User Interface
1) Transport Buttons
<< Go to head of current track, double-click
to go to previous track
||/>
Pause/Play button
>>
Go to next track
2) Symphony Volume Slider
•iTunes and Amarra Symphony Volume are
kept in sync.
NOTE: You may notice a small delay
or echo while the iTunes Volume is
being moved.
3) Symphony UI Window
•Displays Track, Artist and Album Name
•Displays Gain level in dB (0.0dB to -144dB).
•If Cache selected - Displays amount of RAM
used to load selected tracks
•Displays file type
Use to adjust volume for Symphony
playback. If you are using external device, we
recommend leaving the Symphony volume at
full volume (all the way to the right) and use
your volume control on your external device
to adjust playback volume.
•The speaker icons are hot spots for 0, and
-144 dB.
•Displays sample rate of current track
•Displays position of Playhead via counter
•If EQ is on - Displays current EQ setting
NOTE: If Gain is less than 0.0,dB
dithering is enabled if auto-dither
is selected in Amarra Symphony
Preferences.
Page 9
4) Playback Position Slider
6) Artwork window
•Blue Slider corresponds to current playback position
and can be moved either direction to reposition the
playhead for playback.
•Displays available artwork
5) Clear Button and Playlist
Commands
The Clear Button is visible in Amarra mode
and clears any Preloaded Tracks and Cache.
When in Amarra Playlist mode, the following
buttons will be displayed. Note these are the
same functions found on the Amarra Playlist
window and the Amarra->Playlist pulldown
menu.
•Double-click on the Artwork window to open a
larger, independent Artwork window
NOTE: Not all tracks contain
artwork. Use the Get Album
Artwork command in iTunes to
get additional artwork.
NOTE: Amarra Symphony stores
artwork in your Macintosh HD/
Library/Applications Support/
Sonic Studio/Artwork folder
in Finder. If you are missing
artwork, ensure you have proper
permissions for this folder.
7) ‘M’ Button - Turning on
Meters
Add: Adds selected tracks from iTunes into
your Amarra Playlist
Finder: Opens a Finder window to navigate
to and select files to add to an Amarra Playlist
Click to display Sonic Meters in the Symphony
UI
Clear: Clears Playlist. Also clears preloaded
tracks when in Amarra mode
Open: Opens a saved Amarra Playlist - clears
current playlist
8) ‘I’ Button - Open ADP
window
Save: Opens a Finder window to save current
Playlist for future recall. See Section 5 for
more details on using Amarra Playlists.
Click to display the Audio Device Preferences
Window.
The Audio Device Preferences
window is used to set your output device when
using Streaming Playback mode and when
setting output devices independent of Audio
Midi Setup.
Page 10
9) CACHE Button - Turning
on CACHE
11) PLAYLIST Button
enter Playlist mode
CACHE mode is used to minimize disk access
and improve performance by loading tracks
into a specified amount of memory prior to
beginning playback. All of the disk access is
done at once before playback begins instead of
loading tracks from disk during playback.
Clicking on the Playlist button will illuminate
a green dot and enters Amarra Playlist mode.
When in Amarra Playlist mode, your Amarra
Playlist is the source for your music.
•Available in both Amarra and Playlist modes
•Toggle button to turn Cache On and Off when turned on, the next track loaded (or many
tracks if Preload Tracks is active) will be loaded
into Cache prior to beginning playback.
10) Amarra/iTunes Button
to toggle between Amarra
and iTunes
Indicates the engine being used to playback
music from your iTunes library. When the green
dot is lit and Amarra is displayed, Amarra is
the playback engine playing back your music.
When the button displays iTunes in grey, iTunes
is playing back your music.
Use this button to exit Playlist mode and go
back to Amarra/iTunes mode.
NOTE: A great way to do an A/B
comparison between Amarra
and iTunes is to simply toggle
the Amarra/iTunes button.
to
Use this button to bring the Amarra Playlist
window to the front if hidden behind other
windows.
NOTE: When in Playlist Mode, Amarra is
ALWAYS playing your music back.
12) TRACKS Button
Active in both Amarra Playlist mode and
when using Preload Tracks in Amarra/iTunes
mode.
Displays a list of tracks in your Playlist or
Preloaded. Tracks are selectable from the
TRACKS pulldown list.
13) EQ Button to display
EQ window
•Turns the Equalizer window on and off.
•Use Option-click to Bypass EQ
NOTE: This button only effects
the display of the EQ window.
Use the EQ button on the
Equalizer to turn the EQ on and
off.
Page 11
14) iRC Button to display iRC Filter Bank
•Turns on and off the Amarra iRC Filter Bank
•When green dot is lit, signifies that an iRC filter is engaged for playback.
15) Preload Tracks Button for Gapless Playback
Toggles the Preload Tracks function on and off
16) LINK Button to link Amarra window to iTunes
Links the Amarra UI to the iTunes window. Move your iTunes window and Amarra will follow.
NOTE: If you move your Amarra window, iTunes does not follow. This is useful if you
need to temporarily separate the windows.
17) Up/Down Arrow Button to display Artwork window
Toggles the Artwork Window display on and off.
Page 12
Chapter 4.0....... Music Playback from your iTunes library
Playing music from an iTunes library on a recognized disk drive using Amarra is a very simple
process. Launch Amarra the first time and you’ll be asked if you want to launch iTunes. Select
Yes and you will see both the Amarra and iTunes windows appear. Amarra can run with or
without Apple’s iTunes program. however for new users, we recommend initially using Amarra/
iTunes mode until you become familiar with the other features avaiable in Amarra. This allows
you to manage and access all your music through the main iTunes Music Library and get the
great sound of Amarra for play back.
You can use iTunes like you always have, select the songs / Playlists and hit the play button on
either the iTunes or Amarra Symphony UI. Amarra Symphony will automatically playback any
track it can and seamlessly switches to iTunes for playing back of protected files or other files that
Amarra may not be able to play back.
NOTE: If you don’t see the Amarra window, it is likely behind your iTunes window.
Make your iTunes window smaller (or exit Full Screen Mode) and you should find
the Amarra window on screen. Use the ‘link’ button on the Amarra Symphony UI
or choose Link Amarra window to iTunes in Amarra Preferences to link the Amarra
Symphony and iTunes windows together.
NOTE: Amarra plays most audio file formats including FLAC, MP3, AAC/m4a, Apple
Lossless (ALAC), AIFF and WAV files. In addition, Amarra Symphony now supports
playback of DSD files of type .dsf and .dff. Amarra does not play some variable bit
rate or low bite rate MP3 files.
You can verify that Amarra Symphony is playing back your music by seeing the Amarra button
with the green dot lit on the Amarra Symphony UI. If the button has turned grey and displays
‘iTunes’, it means that Amarra Symphony has passed control to iTunes for playback of the current
track. Amarra Symphony will automatically take over playback on the next track that it can play
back.
Amarra Symphony with iTunes
Page 13
4.1 Navigating within a Track
There are many ways to navigate within a track. Once you’ve started playback, you can:
• Use the Transport buttons to Play/Pause and move to the next track, beginning of current track
or previous track
• The blue Playhead slider in the Amarra UI is a song position slider that corresponds to the
current location of playback within a track. Drag the slider left or right to change the playback
position within a track
•Use the iTunes Playhead slider to move to a different location in the current track.
•Modify the Time Display in the Amarra UI
• Pause playback
• Double-click on the Time element you want to modify.
• Type in a new value and hit Return
or
• Click on a time element and drag your mouse left/right or up/down to modify
• Click Return to save the new setting
• Hit the Space bar or Play button to continue playback from the new location.
NOTE: KEYBOARD SHORTCUTS - Use the following key commands in place of menu
commands.
Cmd+5, 6Previous Track/Next Track
Cmd + 8,9Down/Up Volume
Cmd + ,
Opens Preferences Window
Cmd + HHide Amarra
Cmd + Option + H
Hide Others
Cmd + QQuit Amarra
Page 14
File Menu
Cmd + 1
Toggle Amarra/iTunes for Playback
Cmd + 2Toggles Playlist for Playback
Option + CClears Tracks
Cmd + Option + M
Mute
Cmd + E
Eject Disk
Playlist Menu
Cmd + Shift + I
Add Tracks from iTunes
Cmd + O
Add Tracks from Finder
Cmd + Option + C
Clear Tracks
Option + POpens Playlist Window
Desk Menu
Cmd + Option + M
Mute
Cmd + Option + C
Toggles Cache On/Off
Windows Menu
Option + AOpens Amarra Window
Option + I
Opens iTunes Window
Option + POpens Playlist Window
Option + EOpen EQ Window
Option + R
Opens Sonic IRC window
Page 15
Chapter 5.0 .Additional Features to Further Improve your
Sound
Efficiency is key to getting great sound from a computer music player and Amarra Symphony
is purpose built to deliver as good a signal as possible to your output device. This results in the
great sound you hear with Amarra Symphony right from the start. That said, Amarra Symphony
also has many features that can be used to further improve your sound. The following sections
review the additional features and what they do to improve sound.
NOTE: There are many suggestions on our FAQ for configuring your Mac for best
performance. Please visit our website for access to the FAQ.
5.1 Setting up your Mac for optimum performance
One of the addtions to Amarra Symphony is a MacOSX Optimization script designed to allow you
to choose some Operating System and System Application settings that may improve the overall
performance of your Mac during Playback. The script is located in your Amarra Symphony>Extras folder in Finder and when launched, displays the following window.
NOTE: Although we recommend Disable All for best performance, please ensure
you are familiar with Mac OS and System Application operation prior to using the
MacOSX Optimization Script.
MacOSX Optimization Script
Page 16
In addition to using the MacOS Optimization Script, we also recommend the following for best
sound quality.
• Use CACHE Mode and select Memory Amount to about 1/3 to 1/2 of available memory,
up to 3Gb.
• Load your Tracks into an Amarra Playlist and Quit iTunes.
• In Amarra Preferences select Gain Bypass and use your external device for volume
control
• In Amarra Preferences, select EQ Bypass if not using any EQ settings
• From the Amarra->File->Extras pulldown menu, select Quit/Launch Finder to quit Finder
• If you are presented with a dialog box to Purge Inactive Memory, always click ‘Yes’. The
process takes a moment before play back is available again.
5.2 Amarra Playlists
Amarra Symphony and Playlist windows
Using Amarra Playlists provides several benefits including:
• Processing your music more efficiently than in Amarra/iTunes mode resulting in better sound
quality
*Ability to run independently of iTunes
• Ability to play FLAC files natively, no conversion needed
5.2.1 General Information about Amarra Playlists
• You can load tracks of different sample rates and different file types into the same Playlist
without issue.
• Tracks can reside in more than one Playlist.
Page 17
• Amarra Symphony only stores a pointer and some other information about the file, it does not
make an additional copy of the file when adding to a Playlist
• If you move your tracks to another location on your disk, you will need to re-do your Amarra
Playlists
• Commands for Amarra Playlists can be accessed from the Amarra UI, the Amarra Playlist UI or
from the Amarra Symphony->Playlist pulldown menu.
•You will only be able to load tracks into an Amarra Playlist that Symphony can play back in the
current configuration. If you get a ‘sample rate not supported’ message, please check to make
sure your Mac, interface and DAC all support the sample rate of the track being loaded.
•You can also use a drag/drop method of loading tracks, including saved Amarra Playlists, into
your Amarra Playlist from either your iTunes library or a Finder window.
5.2.2 Amarra Playlist Window
Amarra Playlist mode provides an additional, independent Playlist window (optional) to manage
your Amarra Playlists. Here are some new buttons on the Amarra Playlist window to be aware
of.
The Playlist Display window:
The name of your currently loaded playlist is listed in the center window of your Amarra Playlist.
The default name is ‘Amarra Playlist’
The Link Button:
This button links the Amarra window to the Amarra Playlist window. As you move the Amarra
window, the Playlist window will follow.
The Repeat Playlist Button:
This button has 2 states and determines what Amarra should do at the end of a Playlist.
Stop at end of Playlist:
Repeat Playlist:
All other buttons on the Amarra Playlist UI have the same function as on the Amarra UI.
Page 18
5.2.3 ENTERING PLAYLIST MODE
Entering Playlist mode is easy. Simply press the Playlist button on the Amarra UI. The button
will display a green dot and typically the Playlist window is displayed. If you do not see the
Playlist window, click on the Amarra->Windows->Playlist pull down menu item at the top of the
screen.
The PLAYLIST BUTTON:
5.2.4 LOADING TRACKS INTO A PLAYLIST
There are 2 ways to load new tracks into an Amarra Playlist - selecting tracks from your iTunes
library or selecting tracks via Finder.
The ADD Button:
To select tracks via your iTunes library, please do the following:
• Bring your iTunes window to the front and select the desired tracks in iTunes. You can use the
command key and shift key to select individual tracks or a range of tracks.
• Click on the Amarra UI to bring Amarra to the front
• Click on the “ADD” button. The selected tracks in iTunes will load into your Amarra Playlist.
The FINDER Button:
To select tracks using the Finder, please do the following:
• Click on the Finder button on the Amarra UI
• Navigate to the tracks you’d like to load in the resulting Finder window.
* Highlight the desired tracks and click ‘Open’ to add the tracks to your Amarra Playlist
NOTE: Native FLAC File Playback: Use the Finder button to load your FLAC files
natively into an Amarra Playlist. Navigate to your desired FLAC files, select and
click ‘Open’ to add to your Playlist.
5.2.5 USING YOUR AMARRA PLAYLIST
Choosing Tracks in your Playlist
You can select tracks in your Playlist by doing the following:
• Select the track with your cursor and hit Play
Page 19
• Use the up or down arrow to move up and down in the Playlist
• Use the >> and << Transport buttons on the Amarra UI to move to the next track, to the
head of current track or to the previous track
You can also use the Tracks Button to see the list of tracks loaded and to select a desired Track
The TRACKS BUTTON:
Deleting Tracks
You can delete a track in the current Playlist by highlighting the track and hitting the Delete Key
on your keyboard
Moving Tracks
You can move tracks up and down in the current playlist by highlighting the track and holding
the mouse key down. You will see a white line that you can move around in the Playlist and
it indicates where the file will be placed when dropped. Release the mouse to drop the file in
place. It will take Amarra a moment to rebuild the Playlist so please be patient.
Page 20
5.2.6 SAVING A PLAYLIST FOR FUTURE RECALL
You can Save your Amarra Playlist for recall at a future time by using the Save button on the
Amarra UI, on the Amarra Playlist UI or from the Amarra->Playlist pulldown menu.
The SAVE Button:
• Press the Save button
• Set the desired name for the Playlist
• Click the Where pulldown item to navigate to the desired location for your Playlist
• Saving a Playlist with the same name and location will overwrite the existing Playlist
5.2.7 OPENING AN EXISTING PLAYLIST
You can recall an existing Amarra Playlist in one of 2 ways. You can either use the Open Button
on the Amarra UI or drag/drop an existing Playlist into the Amarra Playlist Window.
The Open Button:
• Click on this button to access a Finder window.
• Navigate to your saved Playlist and click Open to load into Amarra Playlists
OR
• Drag/Drop an existing Playlist from the Finder window into the Amarra Playlist Window.
NOTE: Loading a new Playlist will clear any tracks currently in your Amarra Playlist.
5.2.8 CLEARING YOUR PLAYLIST
To clear the contents of your current Playlist simply click on the Clear Button:
The Clear or Clear All Button:
• Click on either button to clear the current contents of your Amarra Playlist
• The Clear button also clears any Preloaded Tracks in Amarra mode.
Page 21
5.3 CACHE Mode
The ‘CACHE’ Button:
Cache mode pre-loads songs into RAM to minimize disk access resulting in better sound quality.
Cache can be used in Amarra/iTunes or Amarra Playlist Mode. Simply click on the ‘C’ button on
the Amarra UI prior to loading your tracks. The button will display a green dot to signify that
CACHE mode is engaged. Amarra will first load your tracks into RAM and then begin playback.
The amount of RAM used for loading your tracks is displayed in the Amarra UI Window. Choose
the amount of RAM to use for CACHE Playback via the Amarra Preferences window, Memory
Amount item.
Note: Currently Amarra will load a max of 2.8 Gb into Cache, typically between 2.62.8Gb depending on the track being loaded. Amarra will only load complete tracks
into CACHE. We recommend setting Memory Amount to 1/3 to 1/2 of the available
RAM on your machine for best performance.
Page 22
5.4 Amarra Symphony EQ
Note: Amarra Symphony Users also have access to the Sonic Mastering EQ via
the Amarra Preferences window. Please see Appendix C for details on the Sonic
Mastering EQ
This section presents an overview of the Amarra EQ. Use the Amarra EQ to alter the sonic
characteristics of the sound. Amarra provides three parametric filters to tailor your sound. All
processing is done using 64bit floating point arithmetic. The parametric filters are classic, three
parameter versions, with Resonant Frequency, gain, and Q.
Q or Quality Factor is defined as the resonant frequency, or center frequency in the case of a
symmetrical filter, divided by the bandwidth. The bandwidth is, in turn, defined as the one or two
frequencies at which the filter response is 3 dB up or down from unity gain.
Expressing the width of a filter as a Quality Factor, rather than bandwidth, provides a more
intuitive sense of the filter’s subjective “sound,” since the same value of Q will produce different
bandwidths at different frequencies. The higher the frequency, the wider the bandwidth will be
for a given Q value, which roughly corresponds to our auditory mechanism’s ability to perceive
a filter’s action. As an example, a parametric filter with a Q of 1 has a bandwidth of 100 Hz when
its center frequency is set to 100 Hz but, it has a bandwidth of 1000 Hz when the center frequency
is set to 1000 Hz.
Using the EQ takes 2 steps - first display the EQ window and then turn the Equalizer itself on.
Amarra EQ Window
5.4.1 Displaying the EQ Window
Click on the EQ button on the Amarra UI, below the center window. Use Option-Click on the EQ
button to bypass the EQ.
5.4.2 Turning the EQ On
Either click on the EQ button in the Amarra EQ window or choose one of the many presets
available from the pulldown menu.
Page 23
5.4.3 Adjusting EQ
Choose one of the presets available or manually adjust the values in any of the 3 parametric
filters by either moving the appropriate slider or typing the value in for Frequency, Gain and Q
factor.
5.4.4 Setting Amarra EQ via iTunes
• Select the ‘Link Amarra EQ to iTunes EQ’ in Amarra Symphony Preferences
• Either set the iTunes global EQ or Select a Track in iTunes and using “Get Info” select the
“Options”Tab and set the EQ Preset. Amarra EQ will follow the iTunes EQ presets.
NOTE: You can use the Amarra Symphony Preference ‘EQ Bypass’ to bypass any EQ
processing by Amarra during playback.
Note: The iTunes EQ is typically ‘On’ by default which may effect playback even if the
‘Link Amarra EQ to iTunes EQ’ preference is not selected. We recommend turning
the iTunes EQ ‘Off’ unless specifically using the iTunes EQ. The iTunes EQ can be
accessed from the iTunes->Windows menu.
5.4.5 Saving and Recalling EQ Settings
The Amarra->Desk menu items allows you to save and recall your EQ settings.
•Set your EQ Settings
•Go to the Desk menu and select Save Sonic EQ Setup to save your settings
•Use Open Sonic EQ Setup to open an existing EQ saved setting
•To save a new ‘DEFAULT’ setting:
•Set the EQ Preset menu to Default
•Make your desired adjustments to the Freq, dB and Q parameters
•From the Amarra->Desk pulldown menu, click on ‘Save as Default’
•If you quit with the Default EQ setting set, next time you launch, those values will be
automatically recalled
NOTE: You will need to make the EQ the Active Window for the Amarra Desk menu
items to be accessible. Click on the top bar of the Amarra EQ Window to make the
Amarra EQ Window active.
Page 24
Chapter 6.0.............................................. Playing FLAC Files
Amarra Symphony provides 2 means of playing back FLAC files - natively from an Amarra
Playlist and a converted file in your iTunes library. In addition, Amarra has built-in FLAC to AIFF
file conversion to allow easy integration with your iTunes Library.
Why convert FLAC to AIFF?
• Easy integration with iTunes
• Integration with iTunes Metadata
• Integration with Apple Remote
• Simplified ease of us (convert and forget)
• Less overhead on system resources.
6.1 Playing FLAC Files Natively via Amarra Playlists
Amarra provides for FLAC file playback natively via the PLAYLIST function, without using iTunes.
To playback FLAC Files via Amarra Playlists, do the following:
• Obtain your music in FLAC format from one or more of a variety of providers such as HD
Tracks among others. As part of the download process, please note where your music is being
downloaded to. Once the download completes (this may take some time depending on the
number and size of the tracks being downloaded), move on to the next step.
• Go into Playlist Mode (see chapter 5.1 about using Playlists). You can either Drag/Drop your
FLAC Files into the Playlist window, use the Finder button in either the Amarra UI or the Playlist
UI or select Open Tracks via Finder from the Amarra Symphony->Playlist pulldown menu.
If using the Finder window
• Navigate to your FLAC files, highlight the desired tracks.
Note: The Finder window supports both the shift and command keys for making
multiple selections.
•Once you are done making your selection(s), click on the Open button to add the files to your
playlist. Continue adding songs until you are satisfied with your playlist. Select File > Save
Playlist to save your playlist, giving it a meaningful name and saving it in a memorable location.
Page 25
• To play your playlist, just click on Amarra’s Play button. You can skip forward and back in the
playlist by using the forward and back buttons, using the Tracks list or by clicking on the desired
track in the Playlist window.
6.2 Playing FLAC Files from iTunes
iTunes does not natively support Flac Files. Your files will need to be converted to a format
supported by iTunes in order to be loaded into your iTunes library. Under the Amarra Symphony>FILE Menu there are two commands available for this function. You can convert a FLAC File to
AIFF or convert an entire FLAC Folder of Music to AIFF such as an album from a high resolution
music download site.
6.2.1 Converting a FLAC Folder to AIFF Format
Converting a FLAC Folder to AIFF is an easy process
• Click on the Amarra Symphony->File pulldown menu at the top of the screen and select
Convert FLAC Folder to AIFF
• In the resulting Finder window, navigate to and select the folder containing FLAC files
you want to convert and click Open.
• In the next window, specify the destination folder for the new AIFF files. You can create
a temporary folder for this or choose an existing folder for your new AIFF files. Click Open when
done.
• Lastly, you will have the opportunity to automatically add these files to iTunes and create
a playlist using the dialog below.
This will copy (and organize if your iTunes Preferences are set) with your iTunes library.
Page 26
6.2.2 Converting FLAC Files to AIFF Format
Converting a FLAC FILE to AIFF is an easy process
• Click on the Amarra Symphony->File->Convert FLAC FILE to AIFF
• In the resulting Finder window, navigate to and select one or more FLAC files to convert
and click Open
• In the next window, specify the destination folder for the new AIFF files.
• Lastly, you will have the opportunity to again, automatically add these files to iTunes and
create a playlist.
NOTE: Converting FLAC Folders and Files to AIFF using Amarra is a non-destructive
process. Your original FLAC files will remain intact and you will also have new AIFF
files. We recommend copying your FLAC files off to your backup drive for retrieval
in case of emergency. Use your AIFF files for day-to-day playback. This setup will
provide better sound quality during playback and minimize the amount of space
needed for backups.
6.2.3 Aborting FLAC Conversions
If you have any reason to terminate a current or pending FLAC File or Folder conversion prior
to completion, you can abort all current and pending conversions by clicking on Amarra->File>Abort FLAC Conversions. You will be asked to confirm your selection as part of the process.
Abort current and pending FLAC Conversions
Confirm Selection
Page 27
Chapter 7.0............................................... Gapless Playback
Gapless playback is perfect for contiguous performances such as symphonic recordings or live,
continuous performances. Gapless playback is now available in both Amarra/iTunes mode and in
Amarra Playlist mode however there are some minor differences between how gapless playback
is provided in each mode.
NOTE: Uncompressed files are required for Gapless Playback. Use AIFF, WAV, or
BWF files
NOTE: Preload Tracks is specifically designed for gapless playback in Amarra/iTunes
mode. Using Preload Tracks to load tracks not part of a gapless performance into an
Amarra Playlist may lead to unexpected results. We recommend disabling Preload
Tracks,select the desired tracks in ITunes and click the ADD button on the Amarra
UI in Playlist mode.
7.1 Gapless Playback in Amarra/iTunes Mode
To enable Gapless Playback in Amarra/iTunes Mode:
• Select the Amarra Symphony Preference setting for PRELOAD TRACKS and set the COUNT
parameter to the desired number of tracks (or a full album) in the gapless performance.
NOTE: We highly recommend only using Preload Tracks when loading an entire
gapless album.
• Ensure your iTunes library is sorted in the correct order for the gapless performance when
viewing your library from the SONG tab.
Setting up iTunes for Preloading a Gapless Album
Page 28
• Choose a track in iTunes and the number of tracks in the COUNT field will be loaded together,
based on current sort order, and played back. Those tracks that are part of a true gapless
performance will be played back without a gap.
NOTE: The sort order of your iTunes library is critical for gapless playback, especially
loading a full album. Please ensure your iTunes library is sorted in the correct order
when on the Songs tab prior to attempting to Preload Tracks. For best performance,
when Preloading an Album, sort your iTunes library by ‘Artist by Album’. We
recommend only using Preload Tracks with the Count field set to Album.
NOTE: Please ensure that you have disabled SHUFFLE mode in iTunes when using
PRELOAD TRACKS in Amarra
Page 29
7.2 Gapless Playback in Amarra Playlist mode
Using Amarra Playlists makes it very easy to have gapless playback. Amarra Symphomy will
attempt to play all tracks in an Amarra Playlist gaplessly as long as the sample rate is the same.
DO NOT select Preload Tracks when using Amarra Playlist mode, using Preload Tracks in Amarra
Playlist mode may produce unexpected results. To load several tracks or an album that is not
gapless, use the Add/Finder buttons in the Amarra Symphony UI or Playlist window, or drag/
drop your selected tracks into an Amarra Playlist.
Note: Gapless Playback is designed to work with true gapless performances such
as symphonic recordings, live performances and recordings that were mastered
as gapless. Gapless playback is not a substitute for mixing independent tracks
together.
Note: To load an Album into an Amarra Playlist, do the following:
- Disable Preload Tracks
- From the songs tab in iTunes, sort your library by ‘Album by Artist’.
- In iTunes, move to the Album tab.
- Select the album you’d like to load into your Amarra Playlist.
- Click the Playlist button to go into Amarra Playlist mode.
- Click the ‘Add’ button, the entire album will be loaded into your Playlist.
Page 30
Chapter 8.0 ...... Audio Playback from Streaming Sources
Amarra Symphony introduces another new capability, the ability to playbck audio from streaming
sources such as Pandora™, Internet Radio, Spotify™, and YouTube™ among others.
NOTE : We strongly recommend that you run either Amarra Symphony or Amarra
sQ but not both at the same time to avoid any playback issues between the two
applications.
NOTE : If you purchase Amarra sQ during a trial, you will need to wait until either the trial
is over to install your permanent license or wait until prompted to install your permanent
license when launching Amarra sQ.
8.1 Installing Amarra sQ
To install Amarra sQ, please click on the Amarra_sQ_Installer.pkg. You can download the Installer
from:
http://www.sonicstudio.com/sonic/support/sonic_support#DOWNLOAD
Follow the on-screen instructions to install your software.
You may uninstall the Amarra sQ as follows
Run Uninstall AmarraSQ.app. This will remove all components installed.
8.2 Launching, Licensing and Using Amarra sQ
There are two methods for licensing Amarra sQ:
1.Trial Mode: Free 15 day full-function trial.
2.Permanent Activation: You are delivered an Activation Code after purchase.
Learn: For your security and convenience, an iLok Account is required to
use or try Amarra sQ. Your personal account is free, secure and takes just a
few minutes to set up.
Amarra sQ software is protected with PACE Anti-Piracy’s InterLok copy
protection. Learn more at iLok.com.
Your Amarra sQ license is authorized on your Mac via ‘Machine License’ or iLok2 USB Smart
Key.
Please refer to the Amarra sQ User Manual for detailed instructions for launching, licensing and
using Amarra sQ in both trial mode and after permanent activation. The Amarra sQ User Manual
can be found at the link below:
Amarra sQ User Manual
Page 31
Chapter 9.0..............Sonic Studio iRC - Impulse Response
Correction
NOTE: New purchases of Amarra Symphony with iRC v2.6 and all newer versions
include the Sonic Studio iRC feature.
Amarra Symphony 2.5.1 and previous version upgrades to Amarra Symphony 2.6
do not include the Sonic Studio iRC feature. An upgrade to add this feature to your
copy of Amarra Symphony is available on our online store.
NOTE: You will need an omnidirectional full-bandwidth measurement microphone.
We recommend that the frequency response is within ± 1 dB in the area of the
speaker’s frequency response range. Failure to use a recommended microphone
may result in false measurement information.
The XTZ Microphone Pro from XTZ Audio is a cost efficient microphone kit that we
recommend. Other recommended mics can be found in our FAQ.
The listening room is usually the weakest link of any sound system. Loudspeakers have been
designed for a certain placement in a room, but in an imperfect environment, performance suffers
and it’s impossible get the full benefit from your DAC, amp and speaker investment. Imaging,
clarity, and bass tightness are all affected by the limitations imposed by your listening room, and
the result is that your listening experience can be significantly diminished.
Amarra Symphony now includes Sonic Studio iRC Impulse Response Correction capability. This
leading-edge room correction technology is designed to optimize the sound of your system in
your environment and to your taste.
Sonic Studio iRC measures the acoustic characteristics of your loudspeakers within your listening
environment and then optimizes for timing, phase and frequency anomalies imposed by your
room. The result is massively improved imaging and sound staging because now your room will
be working with your sound system, not against it.
Using Sonic Studio iRC is a 2 step process. First, measure and calibrate your listening environment
using the iRC Measure calibration tool and create filter files (.filter suffix) for your specific needs.
The second is to load the filter files into the Sonic Studio iRC filter bank in Amarra Symphony for
use during play back.
Page 32
9.1 Using iRC Measure to Measure your Listening
Environment
The iRC Measure application (iRC Measure.app) is installed as part of the Amarra Symphony
standard installation and can be found in your Applications->Amarra Symphony folder in Finder.
Please refer to the Sonic Studio iRC User Manual for details on installing and using the iRC
Measure application. The manual can be found in your Amarra Symphony folder.
9.2 Using Sonic Studio iRC to use the Filter Files created
Filter sets created by the iRC Measure application must be loaded into Sonic Studio iRC filter
bank. The Sonic Studio iRC filter bank window is accessed by pressing the iRC button on the
Amarra Symphony User Interface.
Pressing the button will launch the Sonic Studio iRC application, check for a valid license and
display the Sonic Studio iRC filter bank (see image below). Remember to click the On/Off button
on the filter bank to turn processing on and off.
NOTE: Filter names in the Sonic Studio iRC window will be set automatically according
to the ‘yournamehere.filter’ filename in Finder
Sonic Studio iRC filter bank
The SSiRC filter bank has four (4) pre-selection slots where filter files can be loaded for quick
selection. To load a filter file into an empty slot:
Page 33
• Double-Click on an empty filter slot. This opens a Finder dialog where you can navigate
to the folder where you stored your filter files using the iRC Measure application.
• Select the filter file that you want to load from the popup Finder window.
• Adjust Gain to an appropriate level for the filter you are using by typing a value in the box
provided.
NOTE: A value of 0.0 dB is full volume, positive numbers increase gain, negative
numbers decrease gain. Putting a value above 0.0 in the gain field will increase
your output signal, be careful when setting gain to avoid potential damage to your
equipment.
Listen to the result of applying the loaded filters by doing the following:
• Play a track through Amarra Symphony.
• Turn on the Sonic Studio iRC filter bank by pressing the on/off button until it reads On in
blue.
• Switch between loaded filters by clicking the corresponding filter slot. The active filter
slot has a blue indicator.
Note: Deleting Amarra Preferences will delete your pre-selected filters from Sonic
Studio iRC, they will need to be reloaded.
Page 34
Chapter 10...................................................... Meters Display
Amarra Symphony employs a high precision metering section to visibly display the audio signal.
Select the “M” button to show the Meters.
Amarra Symphony Track Area with Meters displayed
Note: Meters will not be displayed when the ‘Bypass EQ’ Preference is selected
Page 35
Chapter 11..........................................................Full Sonic EQ
Select the Amarra Symphony Preference ‘Full Sonic EQ’ to enable the advanced, full 4-band
Equalizer. The Full Sonic EQ Preference changes the Equalizer from the Amarra EQ Window to
the Full Sonic EQ window. A restart is required for this option to engage.
Full Sonic EQ has Full 4-Band EQ. Types supported include : Notch, Low Pass, High Pass, and
many more.
Global Sonic EQ Window
Page 36
Chapter 12.................................................... Panner Window
Amarra Symphony has a stereo panner that can be used to route the output with variable gain.
To open the panner select Amarra Symphony->File-> Panner, which brings up the Panner window.
The Panner in Stereo mode
By default, the panner opens in off mode. In the upper left corner, the channel to which the
panner currently applies is indicated. As this Track indicator is also a drop down menu, it operates
as a Strip selector for the panner as well.
Chapter 13..........Licensing 2 machines with your Amarra
Symphony License
Amarra Symphony allows for 2 machines to be activated with the same license. To activate
Amarra Symphony on two machines, please do the following:
Machine 1
- Download and launch the Amarra Symphony Installer on Machine 1
- Choose Easy Setup
- Select ‘Yes’ when asked to launch Amarra Symphony
- Click Activate to access the Activation Window
- Enter Your Activation Code, email address and create your own password up to 16 characters
long and enter in the spaces provided.
- Click ACTIVATE to activate your copy of Amarra Symphony on Machine 1.
Machine 2
- Download and launch the Amarra Symphony Installer on Machine 2
- Choose Easy Setup
- Select ‘Yes’ when asked to launch Amarra
- Click Activate to access the Activation Window
- Enter Your Activation Code, email address and the password created for machine 1 in the
spaces provided
- Click ACTIVATE to continue the process on Machine 2.
- You will be asked to enter a new password for Machine 2. Enter in a new, unused password up
to 16 characters in length. You should get a message that your software has been activated and
should not have any issues moving forward.
Note: Your password is attached to your license, not your computer. The password
created on machine 2 will become the active password for your license should you
need to activate any machine in the future.
Page 38
Chapter 14.Registering Your Amarra Symphony with iRC
Software
In order to receive warranty service, you must register your product with Sonic Studio. This
may be done at any time with proof-of-purchase. We strongly recommend that you register with
Sonic Studio as soon as you purchase your unit.
Why?
1. Your product will be registered with us.
Registration is used as proof of ownership if your product is ever lost or stolen.
2. Sonic Studio updates Amarra Symphony software on a regular basis.
This allows us to keep you informed of updates as they become available.
We strongly encourage you to create a License Control Panel Account. Please read the Amarra
Symphony Activation Guide for information on this important feature.
Please register your Amarra Symphony software using our automated registration Web page at:
http://www.sonicstudio.com and click on Support => Register
Alternatively, our mail address is:
Sonic Studio, LLC
Amarra Software Registration
1340 Mission Street
San Francisco, CA USA 94103
If you encounter issues using Amarra Symphony please refer to our Amarra Support Portal at
http://www.sonicstudio.com/amarra/amarrasupportportal.html. If none of these steps address
your problem please contact your dealer or Sonic Studio support for more help.
Page 39
Chapter 15......................................Contacting Sonic Studio
Thanks for using Amarra Symphony. We really appreciate your patronage and are always
interested in your experiences with Amarra Symphony.
For information on problems, resources please visit our FAQ page
http://www.sonicstudio.com/amarra/amarrafaq.html
For bug reports and support issues, visit:
http://www.sonicstudio.com/amarra/amarrasupport.html
or email us:
[email protected]
To suggest new features for our products, e–mail us at mailto:[email protected]
Page 40
APPENDIX A.............Amarra Symphony Pulldown Menus
The following section describes the Amarra Symphony Pulldown Menu Items
Amarra Symphony Menu Bar
A.1 Amarra Symphony Pulldown Menu
About Amarra: Opens the modal About window. This is useful for verifying the version number
of Amarra Symphony that you are running. Click anywhere in the window to close it.
Preferences: Opens the Preference window for Amarra Symphony.
Services: This menu proves access to any Services that are available to Amarra Symphony.
Hide Amarra: Hides all Amarra Symphony windows. To reveal the windows, click on the Dock
icon or tap the ‚+tab key to cycle through running applications to select Amarra Symphony.
Hide Others: Hides all windows other than Symphony.
Show All: Reveals all windows.
Quit Amarra: Quits Amarra Symphony.
Page 41
A.2 File Pulldown Menu
Toggle Amarra/iTunes Playback [cmd+1]:Toggles between Amarra Symphony and ITunes engine
for playback in Amarra/iTunes mode. N/A in Amarra Playlist mode
Set Playlist for Playback: [cmd+2]: Sets Amarra Symphony’s Playlist as the source for playback
Open Recent: List of Recent Amarra Playlists for easy access
Clear Tracks: Clears Tracks from either Amarra Playlist or Preloaded Tracks
Mute: Mutes Amarra Symphony
Convert FLAC File to AIFF... : Convert FLAC Files to AIFF Format - see chapter 6 for details
Convert FLAC Folder to AIFF... : Convert FLAC Folder to AIFF Format - see chapter 6 for details
Abort FLAC Conversions...: Aborts any active and pending FLAC file or folder conversions
Activation...: Opens the Activation Window, refer to the Amarra Activation Guide for more
information about Activating Amarra Symphony
Audio Device Preferences...: Opens the Audio Device Preferences for managing your DAC
Open Audio Midi Setup...: Open the Audio Midi Setup window for setting up your DAC
Panner - Amarra Playlist: Opens the Amarra Panner Window
Open Sonic Studio Process...: Opens Sonic Studio Process for Sample Rate Conversion
Check for Updates...: Manually checks for availability of new versions of Amarra Symphony.
Setting the Amarra Symphony Preferences - Check for Updates on Launch will automate this
Sonic Studio Website...: Links back to the Sonic Studio Website
Eject Disk...: Ejects CD from tray
Extras...: Accesses additional features of Amarra
Page 42
A.3 Extras: submenu
Close Window: NA
Cut: NA
Copy: NA
Paste: NA
Open Console Log: Opens the Console Application to view the Amarra console log ( in Utilities
Folder ).
Purge OSX Memory: Purges Inactivate OSX Memory to improve overall performance. This is
checked each time Amarra is launched. When purging inactive memory, Amarra is temporarily
unavailable.
Quit/Launch Finder: Quits and launches the Finder Application
Enable Debugging: Allows Amarra to log information on its operation to the Console Log.
Print Track Info: Prints track information to the Console log. When using Preload Tracks, prints
track information for all preloaded tracks.
Page 43
A.4 Playlist Pulldown Menu
Add Tracks From iTunes [shft+cmd+i]: Adds tracks selected in iTunes into Playlist
Add Tracks from Finder [cmd+o]: Select and add audio tracks from the Mac Finder.
Clear Tracks: Clears the current Playlist or when used in Amarra/iTunes mode, clears any
Preloaded Tracks
Open Playlist...: Open an existing Amarra Playlist
Save Playlist...: Saves a Playlist to disk for later recall
Playlist Window...: Opens the Amarra Playlist window
A.5 Desk Window
Open Sonic EQ Setup...: Allows you open a previously-saved Sonic EQ Setup.
Save Sonic EQ Setup: Allows you to save the current (open) Sonic EQ Setup.
Save As Default: Save the current (open) Sonic EQ Setup as the Default EQ. The Sonic EQ Setup
will be recalled on launch.
Mute [opt+cmd+M]: Turns Mute on and off.
Cache [opt+cmd+M]: Turns CACHE Mode on and off.
Page 44
A.6 Windows Menu
Amarra [opt+a]: Toggles the Amarra Window on and off
iTunes [opt+i]: Toggles the main iTunes Window on and off
Playlist: [opt+p]: Toggles the Amarra Playlist Window on and off
Equalizer [opt+E: Toggles the Equalizer on and off
Sonic iRC [opt+R: Turns on Sonic Studio iRC window
Page 45
APPENDIX B..............The Amarra Symphony Preferences
Window
This section describes all of the functions available via the Amarra Symphony Preferences
window.
NOTE: Deleting Amarra Symphony Preferences - if Amarra quits unexpectedly or if you are
seeing any unusual behavior, try deleting your Amarra Preferences to see if this clears the
issue
• Quit Amarra Symphony and iTunes
• Navigate to your Applications->Amarra Symphony->Extras folder in Finder
• Double-click on ‘Delete Amarra Symphony Preferences.command’
• Re-launch Amarra Symphony when the process completes. Amarra Symphony will launch
iTunes
NOTE: By de-selecting the Amarra Symphony Preference item ‘Launch/Quit Amarra with
iTunes’, you will stop iTunes from automatically launching when you launch Symphony.
This is helpful if you wish to operate independent of iTunes, using Amarra Playlists to play
your music.
B.1 LAUNCH SETTINGS
LAUNCH / QUIT Amarra with iTunes:
Forces iTunes to launch or quit when you
launch or quit Amarra.
HIDE ON LAUNCH:
Amarra windows will not display when
Amarra is launched.
LINK AMARRA TO ITUNES WINDOW :
Forces Amarra to remain ‘attached’ to the
iTunes main window. Also activated via the
‘link’ button on the Amarra UI.
LINK AMARRA EQ TO ITUNES EQ :
Forces Amarra EQ to follow the EQ settings
in iTunes when set at the file level in iTunes.
CHECK FOR UPDATES ON LAUNCH:
Amarra will check for updates on launch.
Page 46
OPEN PLAYLIST ON LAUNCH:
If Amarra quits with an Amarra playlist loaded,
the playlist will be reloaded when you re-launch
Amarra.
-------------------------------------------------
Playback will start when CACHE is loaded
with selected tracks. The last piece of
information updated is the amount of CACHE
used in the Amarra UI. Please wait for this to
complete before beginning playback.
B.2 PLAYBACK SETTINGS
Note: Amarra will load a max of
2.8 Gb and typically between
2.6-2.8Gb depending on the
track being loaded. Amarra will
only load complete tracks into
CACHE.
PRELOAD TRACKS :
Enables loading of multiple tracks in Amarra/
iTunes Mode for gapless playback. In Amarra/
iTunes mode, Preload Tracks must be enabled
for gapless playback.
NOTE: Preload Tracks is specifically
designed for gapless playback
in Amarra/iTunes mode. Using
Preload Tracks to load a specified
number of tracks not part of a
gapless performance into an
Amarra Playlist may lead to
unexpected results.
See “7.1 Gapless Playback in Amarra/iTunes
Mode” on page 28 on Gapless Playback
COUNT :
Number of tracks to preload when the Preload
Tracks preference is set. By setting count and
Preload Tracks preferences, Amarra will
attempt to load the selected number of tracks.
Only tracks with the same sample rate of the
first track will be loaded.
NOTE: Disable SHUFFLE MODE
and REPEAT MODE in iTunes
when using PRELOAD TRACKS.
CACHE MEMORY AMOUNT:
Used to minimize disk access, reflects the
amount of RAM allocated to load tracks prior
to playback. Settings are 512Mb, 1Gb, 2Gb and
3Gb.
We recommend between setting this to
between 1/3 and 1/2 of your available memory.
.
------------------------------------------------
B.3 DITHER SETTINGS
AUTO-DITHER:
Auto-dither is only used if you are using
the Amarra volume slider to adjust gain.
When auto-dither is selected, dithering will
be automatically enabled when Amarra’s
volume is set to something other than full
volume.
TYPE :
TPDF: Enables Sonic Studio’s Shaped TPDF
Dither.
Shaped: Enables Sonic Noise Shaped Dither
Wordlength:
Sets number of bits for output. This setting
should match your DAC’s word length. For
best quality enable Auto-dither if a track less
than 24 bits is being played. Using dither
can bring a better sound when gain or EQ
is being used. When dither is enabled the
Page 47
output of Amarra will be dithered to the setting
of the Output Wordlength specified. This can be
useful for providing a better sound when Gain
is used or if your DAC only supports a limited
word length (16 or 20 bits).
NOTE:
When
the
Output
Wordlength is set to 24 bits the
dither will be “disabled” if the
Gain has not been modified (at
full volume). Once the Gain is
adjusted then dither is re-enabled.
NOTE: Amarra provides two
dither options: Sonic TPDF and
Sonic’s advanced psycho-acoustic
noise shaped dither. Your personal
experience may decide which one
you prefer.
-------------------------------------------------
B.4 PROCESSING SETTINGS
FULL SONIC EQ:
Access to the Global Sonic EQ - restart required
after selecting Preference.
EQ BYPASS:
Bypasses all EQ processing in effect in Amarra.
Must be disabled to use DSD Filter for DSD
file playback. Use EQ Bypass to improve
performance if no EQ is being used.
GAIN BYPASS:
Bypasses all gain processing in Amarra.
Amarra will play back tracks at full volume (0.0
dB). Use Gain Bypass to improve performance
if using external device for Gain control.
BRICKWALL LIMITER:
Used to protect equipment from damage from
some overloads present in streaming audio and
downloadable files. Attenuates any playback
over 0dB to -0.5dB. Playback levels below 0dB
are not effected.
DSD FILTER:
Used only for DSD (.dsf and .dff files) file
playback, emulating the low-pass filter option
present on SACD players. Requires EQ Bypass
to be de-selected.
DSD GAIN:
Applies the selected gain to playback of .dsf
and .dff files.
-------------------------------------------------
B.5 HARDWARE SETTINGS
Follow Audio Midi Setup:
Enables Amarra to follow Audio Midi Setup
when changed to set output device. Amarra
will use the same output device as specified in
AMSU. A re-scan in Audio Device Preferences
may be required. To select a different Audio
Device independent of Audio Midi Setup, deselect this Preference and use Audio Device
Preferences to set your Output Audio Device o
a different Audio Device. De-selecting Follow
Audio Midi Setup is required for playback of
streaming audio.
Audio Device Button:
Opens the Audio Device Preferences Window.
Use this window to set your output device
when Follow Audio Midi Setup is de-selected
and when playing streaming audio.
Audio Midi Button:
Opens the Audio Midi Setup window
Optimize Button:
Runs the Mac OS Optimization script allowing
you to configure your Mac environment for
best performance.
Page 48
NOTE: Although we recommend
Disable All for best performance,
please ensure you are familiar with
Mac OS and System Application
operation prior to using the
MacOSX Optimization Script.
NOTE: Requires Sonic Studio
Hardware and the Amarra
Console Software.
Launch/Quit Console:
Forces Sonic Console to launch or quit in
sync with Amarra.
Dim Front Panel:
Dims the front panel display.
Control Volume:
Interlocks Amarra’s gain control with the
hardware gain control so either can be used.
Gain Adjustment:
Set the system gain to match professional
(0 dB) or consumer electronic (-10 or -14 dB)
standard.
Mac OS Optimatization Script
-------------------------------------------------
B.6 ADDITIONAL SONIC
HARDWARE SETTINGS
Amarra provides additional preferences when
used with a Sonic Audio Interface. These
controls allow integration of Analog Gain
Control and more.
Additional Sonic Hardware Preferences
Page 49
APPENDIX C.......................Your Amarra Symphony Folder
This section describes the files installed in your Applications->Amarra Symphony folder in
Finder as part of the Amarra Symphony installation process.
• Amarra Videos.webloc - check out ‘how-to’
videos for Amarra and IRC.
• Amarra Support Portal.webloc - access the
Amarra support portal and FAQ, a great source
of technical information and assistance.
• Amarra Learning Center.webloc - go directly
to the Amarra FAQ
• Amarra Support Page.webloc - direct access
to the Amarra support page with downloads,
videos, tips and tricks, and other information.
Extras Folder: (these items run only when
launched manually)
• Amarra_30_License_Manager.app - use
this app to manually manage backing up and
removing your Amarra license.
Amarra Symphony.app: The Amarra Symphony
application
• Amarra_Symphony_Setup.app - runs
the Amarra setup application allowing for
personalized setup.
Support Folder: (these links take you to various
important webpages for support)
•
MacOSX_Optimization_Setup.app
launches the Mac OSX Optimize script.
Ensure you have sufficient knowledge of Mac
OS and System Applications prior to using
the Mac OSX Optimization script.
• Download Amarra sQ.webloc - directs you to
the Sonic Studio downloads page to access the
Amarra sQ Installer and Manuals
• Delete Amarra Preferences.command - use
this utility to reset Amarra Symphony to a
factory default setting
• Sonic_Studio_QuickSupport_v9.app - Amarra
support app allowing Sonic Studio to log
into customer system and assume control of
environment.
• Amarra sQ Page.webloc - directs you to the
Amarra sQ product page on the Sonic Studio
Website
iRC Measure.app: Impulse Response Correction
measurement and calibration tool
• Lost Activation Code?.webloc - directs you to
the Sonic Studio Activation Code Control Panel
to find a lost license.
•Scripts Folder - contains scripts used during
the installation of Amarra Symphony
Page 50
•Installers Folder - contains uninstallers for Amarra Symphony, IRC and the License Manager.
•MicCalFiles Folder - contains calibration file for the XTZ mic to be used with IRC.
Manuals:
•Amarra Symphony Activation Guide.pdf - refer to this manual for Installation and Activation
instructions
•Amarra Symphony Read Me.pdf - important notes about Amarra Symphony version 3.0
•Amarra Symphony User Manual - refer to this manual for detailed information about operating
Amarra Symphony
• iRC - iRC(b) Measure User Manual.pdf - refer to this manual for detailed information on using
the Impulse Response Correction capability within Amarra Symphony.
Page 51
APPENDIX D..............Audio Device Preferences Window
Amarra Symphony’s Audio Device Preferences Window is a powerful tool for you to manipulate
the output of Amarra independent of the Mac’s Core Audio Settings.
Audio Device Preferences Window
The ADP window has several capabilitites explained below.
The clock icon
• Drag the clock icon to your desired device to change your output device. You may
need to hit the Rescan button for the change to take effect.
The Rescan Button
• Use this button to force Amarra to rescan the Mac for Audio Output Devices
The Save Button
• Use this button to save the current Audio Device Preferences Settings
The Follow Audio Midi Setup Checkbox
• Check this box to have Amarra follow the settings in Audio Midi Setup for determining
Output device.
The Audio Midi Setup Button
• Use this button to open the Audio Midi Setup Window
Page 52
The Audio Device Preference Display window
Displays the following information:
• Input Device - SonicStream is the input device used for streaming audio
• Output Device - lists the Output Device Amarra is sending output to
• Clock Source - typically listed as Internal for Auto-sample rate switching to occur
• Sample Rate - adjusts to the sample rate of the file being played back. If downsampled, will show down-sampled sample rate.
The Individual Device Section
Each device will have it’s own section in the Audio Device Preferences window. Ensure output
channels are set correctly via the Out1 and Out2 pulldown menus.
©2007-2014 Sonic Studio, LLC — All rights reserved. No part of this document may be reproduced, stored in a retrieval
system or transmitted in an form or by any means, without the prior written permission of the publisher. Sonic Studio,
Amarra, and the Sonic Studio and Amarra logos are trademarks of Sonic Studio, LLC. All other company or product names
are either trademarks or registered trademarks of their respective owners.
Amarra Symphony with IRC User Manual Index
A
AMSU 50
Artwork 2, 10, 12
Audio Device Preferences 50
Audio Midi Setup 7, 44, 50
C
CACHE 46
conversion 17, 25
D
DAC 18, 34, 44
E
EQ 5, 9, 15, 23, 37, 38, 46
F
FLAC 17, 25, 26, 27, 44
G
Gapless Playback 28, 30
I
Installer 6, 31, 40, 52
iRC 6, 34, 35, 36, 41, 47, 52
L
launch 6, 7, 8, 24, 35, 40, 46, 48, 51
Launch 45
License 40, 41
M
menu 10, 14, 17, 18, 19, 21, 23, 24, 25, 26, 39, 43
O
output device 7
P
Playlist 2, 3, 4, 7, 10, 11, 15, 17, 18, 19, 20, 21, 22, 25, 26, 28, 30, 44, 46, 47
Preload 28, 29, 45, 49
S
sample rate 9, 18, 30
Sample Rate Conversion 44
U
UI 9, 10, 14, 18, 25
User Interface 9, 35
V
Volume 9, 14