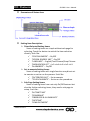
1
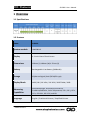
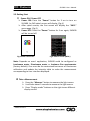
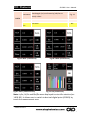
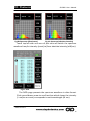
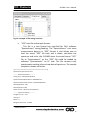
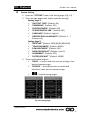
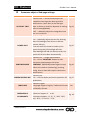
OTO Photonics SSSSHSH2400 User Manual SH2400 User Manual Description SH2400 is a lightweight, portable, and easy-to-operate light meter with a 4.3-inch colored touch screen and simple interface keep up with the times. This product has basic features for fast and easy measurements for illumination/luminance applications. Measuring Capabilities: Peak Wavelength, Illuminance/luminance, Irradiance per wavelength, Color Temperature, CIE x, CIE y, CIE u, CIE v, CIE 1931, CIE 1976, and CRI. Six kinds of display mode: INFO, CRI, CIE 1931, CIE 1976, SPECTRUM, and DATA. All-in-one light meter: no other equipment is necessary. (e.g. PC or power supply etc.) Can be used with the SpectraSmart (OTO software) to interface with PCs. ※ You have to buy additional parts (such as a cosine corrector or a fiber-collimator) and do standard illuminance/luminance calibrations for ensuring “Illuminance/luminance” and “Irradiance” values correctly. SH2400-503 Rev. 1 1 OTO Photonics SSSSHSH2400 User Manual Index Overview 1.1 Specifications ……………………………………………………………………. P3 1.2 Features ……………………………………………………………………………. P3 Interface Introduction 2.1 Product Description ………………………………………………………….. P4 2.2 Getting Start …………………………………………………………………….. P5 2.3 Additional Setup and Notes ………………………………………………. P11 SH2400-503 Rev. 1 2 OTO Photonics SSSSHSH2400 User Manual 1 Overview 1.1 Specifications 6 1.2 Features Items SH2400 Spectro-module UM2280-V2 Display 4.3 inch Colored Touch Screen Dimensions 138mm (L) X 80mm (W) X 27mm (H) Battery Rechargeable Li-ion Battery (3000mAh) Storage SD(Secure Digital) Card (FAT16/32 type) Display Mode INFO/ CRI / CIE 1931 / CIE 1976 / SPECTRUM / DATA Measuring Capabilities Peak Wavelength, Illuminance/luminance, Irradiance/Radiance, Color Temperature, CIE x, CIE y, CIE u, CIE v, CIE 1931, CIE 1976, and CRI Language English / Traditional Chinese / Simplified Chinese SH2400-503 Rev. 1 3 OTO Photonics SSSSHSH2400 User Manual 2 Interface Introduction 2.1 Product Description Fig.1 SH2400 Front view Fig.2 SH2400 Back view SH2400-503 Rev. 1 4 OTO Photonics SSSSHSH2400 User Manual Operating Description “Power”:Power key-> Turn on / Turn off the system. Press Power button once to screen off immediately. Press again to recall the screen on. “Measure”:Start a measurement. If necessary, force a shutdown by pressing Power & Measure buttons simultaneously for ten seconds. “Setting”:Set the configurations for measuring parameters. “Display mode”: INFO/CRI/CIE1931/CIE1976/SPECTRUM/DATA -> Change display screen for different measuring results. “Save”:Save current measure result to SD card. Fig.3: SH2400 Front view SH2400-503 Rev. 1 5 OTO Photonics SSSSHSH2400 User Manual 2.2 Getting Start Power ON / Power OFF Power ON: Press the “Power” button for 3 sec to turn on SH2400. An OtO splash screen will display. (Fig.4) After splash screen, the first screen will display the “INFO.” menu page. (Fig.5) Power OFF: Press the “Power” button for 3 sec again; SH2400 will be turned off. Fig.4 Power ON Screen Fig5: Default screen (INFO.) Note: Depends on users’ application, SH2400 could be configured as Luminance meter, Illuminance meter or luminous flux spectrometer (factory default). User must do the customized luminance or illuminance calibration and update the intensity table to make the measurement corresponding to user interface displayed. Take a Measurement Press the “Measure” button to measure the light source. It will take about 3 seconds to measure the light source. Press “Display mode” buttons on the right to see different display results. SH2400-503 Rev. 1 6 OTO Photonics SSSSHSH2400 User Manual Display Mode Mode Purpose Measure result Figure CCT, Luminance (Lv), Luminance radiance (Le), and Peak wavelength (Peak). Fig.6a INFO. CCT, Illuminance (Ev), Irridiance (Ee) and Peak Illuminance (default) wavelength (Peak). Fig.6b Luminance CRI Luminous Flux CCT, Lumious flux (Φv), Radiant flux (Φe) and Peak wavelength (Peak). Fig.6c Luminance Lv, CCT, CRI value (Ra), and histogram of CRI results (R1~15 and Ra). Fig.7a Illuminance CRI value (Ra), and histogram of CRI results (R1~15 and Ra). Fig.7b Luminous Flux Same to Illuminance. Luminance Lv, CCT, (x, y) coordinate value and cross-mark on CIE1931 spot chart. Fig.8a (x, y) coordinate value and cross-mark on CIE1931 spot chart. Fig.8b CIE 1931 Illuminance Luminous Flux Same to Illuminance. Luminance Lv, CCT, (u, v) coordinate value and cross-mark on CIE1976 spot chart. CIE 1976 Illuminance (u, v) coordinate value and cross-mark on CIE1976 spot chart. NA NA Fig.9a Fig.9b Luminous Flux Same to Illuminance. Luminance Lv, CCT, Peak wavelength (PEAK), and spectrum waveform. Fig.10a Peak wavelength (PEAK), and spectrum waveform. Fig.10b SPECTRUM Illuminance Luminous Flux Same to Illuminance. NA NA SH2400-503 Rev. 1 7 OTO Photonics Luminance DATA SSSSHSH2400 User Manual Wavelength (nm) and intensity (uW/nm or count) values. Fig. 11 Illuminance The same. NA Luminous Flux NA The same. Fig.6a: INFO. (Luminance) Fig.6c: INFO. (Luminous flux) Fig.6b: INFO. (Illuminance) Fig.7a: CRI (Luminance) Note: Lv/Le, Ev/Ee and Φv/Φe were displayed in scientific notation (ex: 1.00E-03). It allows user to switch to decimal digital point (0.0001) by touch the measurement area. SH2400-503 Rev. 1 8 OTO Photonics SSSSHSH2400 User Manual Fig.7b: CRI (Illuminance) Fig.8a: CIE1931 (Luminance) Fig.8b: CIE1931 (Illuminance) Fig.9a CIE1976 (Luminance) Fig.9b CIE1976 (Illuminance) Fig.10a Spectrum (Luminance) SH2400-503 Rev. 1 9 OTO Photonics Fig.10b Spectrum (Illuminance) SSSSHSH2400 User Manual Fig.10c Spectrum (absolute intensity) Touch top-left side unit area of plot area will switch the spectrum waveform from/to intensity (count) to/from absolute intensity (uW/nm). Fig.11 Data The DATA page presents the spectrum waveform in data format. Click up and down arrow to scroll text box which shows the intensity (I. uw/nm or count) corresponds to each wavelength (W. nm). SH2400-503 Rev. 1 10 OTO Photonics SSSSHSH2400 User Manual 2.3 Additional Setup and Notes Save a measurement data Save: Save out current measurement data on SD card (only support for FAT16/32 type) It is written to “Spectrasmart PC software format” (.sps). User could read the .sps file in any Text Editor tool, like excel, WordPad …etc. Description of “SaveOut” page conditions: Message Figure Description Saving While recording data, please do not remove the SD card or power down the machine. Save fail Cannot record the data. Please check the SD card status. SH2400-503 Rev. 1 11 OTO Photonics SSSSHSH2400 User Manual File saving format and rule While pressing ”Save” button to save current measurement data on the SD card with “.SPS” files in Text Format. And system will construct specified folder and the rule of file naming is shown as below: Memory card is New formatted or Never Use on SH series system: System will automatically construct the “SPECXXX” folder and in which XXX.sps files are generated while saving process. The XXX is 3 digits index assigned by system started from 000 to 999. Current system defines maximum 1000 folders (000-999) can be saved and each folder allows maximum 1000 (000-999) files index. The number of file index will increase 1 every time when user executes saving file request. And if the file index reaches to 999, system will generate a new folder by increasing 1 on folder index name. Memory card Has Been Used to save files on SH series System: System will search the card disk while saving request; it will find out the largest folder index. Then check the folder’s .sps file index number. If the file index < 999, it will save the current .sps file with the new index increase 1. For example, if the last file index is 015, the new saving files will be 016.sps. But if the file index in this folder has reached 999, it will construct a new folder with folder index increase 1 and save file index from 000 in new folder. Note. If the disk contains too many dummy files, it will make the searching process slow. SH2400-503 Rev. 1 12 OTO Photonics SSSSHSH2400 User Manual Fig.12: example of file saving structure “.SPS” text file and sample format: This file is a text format but specified for OtO software “SpectraSmart” saving/loading. The “SpectraSmart” tool saves measurement data to in “.SPS” format. It also allows user to load the saved “.SPS” file back and it draws, calculates the spectrum and color info. SH2400 saves the same format “.SPS” file to “Spectrasmart”, so the “.SPS” file could be loaded by software “Spectrasmart” on PC side. The file contains only spectrometer setting info and raw data of spectrum. The sample template is shown as below. //*******************************************// SpectraSmart Spectrum 0.0.0.0 --------- Device Information ----------Saving Time : 2015/01/01 08:30:55 Spectro-Module Model Name : UM1000S3-V2 Spectro-Module Serial Number : OS361HC56002176 Wavelength Start : 340 Wavelength End : 850 Spectrum Unit : Absolute Count(uW/nm) -----------Spectrum Setting -----------Integration Time : 1 ms Average : 1 Boxcar : 0 Background removal : enabled SH2400-503 Rev. 1 13 OTO Photonics SSSSHSH2400 User Manual linearity correction : enabled Intensity correction : enabled savitzky-golay : disabled ---------------Measuremnet-------------------Type : Absolute Emission Observer : 2 degree Illuminate : A Luminance: 6.5088E-03 cd/m2 Radiance: 4.9968E-05 uW/m2*sr Peak Wavelength: 671.90 nm CIE1931(x,y): (0.2947,0.3584) CIE1976(u,v): (0.1756,0.4806) X : 5.3517e-03 Y : 6.5088e-03 Z : 6.2983e-03 CIE_x : 0.2947 CIE_y : 0.3584 CIE_z : 0.3468 CRI_R1 : 0.35 CRI_R2 : 1.50 CRI_R3 : 0.90 CRI_R4 : 1.61 CRI_R5 : 1.73 CRI_R6 : 0.49 CRI_R7 : 1.59 CRI_R8 : 0.00 CRI_R9 : 0.00 CRI_R10 : 0.00 CRI_R11 : 1.88 CRI_R12 : 0.00 CRI_R13 : 0.26 CRI_R14 : 31.68 CRI_R15 : 0.01 CRI_RA : 1.02 CCT : 7146.66 DominantWavelength(nm) : 489.27 SH2400-503 Rev. 1 14 OTO Photonics SSSSHSH2400 User Manual Purity : 0.3833 CIE1976u : 0.1756 CIE1976v : 0.4806 CIE1976w : 0.3437 ---------------BEGIN-------------------Wavelength Intensity(uW/nm) 340.00 0.0000E+00 340.50 0.0000E+00 341.00 0.0000E+00 341.50 0.0000E+00 … … … 848.50 2.5163E-05 849.00 2.5289E-05 849.50 2.5480E-05 850.00 2.5673E-05 //*******************************************// SH2400-503 Rev. 1 15 OTO Photonics SSSSHSH2400 User Manual System Setting Press the “SETTING” button into setting page. (Fig. 13) There are two pages with twelve systemic settings: Setting Page-1: “AUTO INT. TIME” (Default: On) “POWERSAVE” (Default: Off) “CONTINUEMODE” (Default: Off) “SCREEN REVERSE 180°” (Default: Off) “LANGUAGE” (Default: English) “OBSERVERS & ILLUMINANTS” (Default: 2∘/ Illuminant A) Setting Page-2: “DATETIME” (Default: 2015/01/01/00:00:00) “TOUCHCALIBRATE” (Default: NONE) “LOWLIGHTMODE” (Default: OFF) “BACKLIGHTADJUST” (Default: Level 5) “ALARMBEEP” (Default: OFF) “FACTORYDEFAULT ” (Default: NONE) Three confirmable buttons: “DONE” – Confirm and save current settings, then back to measure page. “RETURN” – Discard previous un-confirmed selections, then back to measure page. “ ” – Switch setting pages. Fig. 13 Setting Pages SH2400-503 Rev. 1 16 OTO Photonics SSSSHSH2400 User Manual Parameter adjust of Sub-page settings: Settings Parameter adjust AUTO INT. TIME POWER SAVE CONTINUE MODE • Default: ON --> Automatically adjust the integration time to get the best signal of a measurement. (1ms~3sec) In the low light mode, it allows up to 60 sec depends on setting. Fig.14 (refer to LowLightMode) • OFF --> Manually adjust the integration time from 1 ms to 60 sec. • Default: Off • On --> Manually adjust the time for shutting down LCD backlight from 30 sec to 300 sec (Interval: 30 sec). • You can touch the screen to wake up the system during the LCD backlight off time. •After backlight off 180 sec without recall, the system will all shut-down automatically. • Default: Off --> Single measurement. • On --> Press “MEASURE” button to start continuous measurement until press “CONTINUE” (MEASURE) button again to stop. • When this mode on (measuring), pressing Setting, Save or Data will stop the continuous measurement. • Default: OFF SCREEN REVERSE 180° • On --> All the display and touch operation will upside down. LANGUAGE OBSERVERS & ILLUMINANTS Figure • Default: English • Language Support: English, Traditional Chinese and Simplify Chinese. • Default: 2∘/ Illuminant A • Observer Support: 2∘or 10∘ • Illuminant Support: ‘A’, ‘B’, ‘C’, ‘D50’, ‘D55’, ‘D65’, ‘D75’, ‘E’ and ‘F1’ ~ ‘F12’. Fig.15 Fig.16 Fig.17 NA Fig. 18 SH2400-503 Rev. 1 17 OTO Photonics SSSSHSH2400 User Manual DATE TIME • Default: 2015/01/01 00:00:00 • Setting Range: Year: 2015 ~ 2030; Month: 01~12; Day: 01~31; Hour: 00~23; Minute: 00~59; Second: 00~59. Fig. 19 TOUCH CALIBRATE • Default: a factory default has built in. • 3 points calibration for user re-calibration. NA LOW LIGHT MODE • Default: Off --> Auto integration time search maximum is 3 sec. • On --> Low light mode, maximum auto Fig. 20 integration time configurable from 3sec to 60sec. BACKLIGHTADJUST ALARMBEEP FACTORYDEFAULT • Default: Level 5. • Adjustable 5->4->3->2->1 repeat. NA • Default: Off • On --> Hot key "measure" with a "beep" tone. NA • Set to make all items restore to default setting (Except DATE TIME). NA • Set "Done" to confirm and "Return" to discard. AUO INT TIME (On) AUTO INT TIME (Off) Fig. 14 AUTO INT. TIME SH2400-503 Rev. 1 18 OTO Photonics SSSSHSH2400 User Manual POEWR SAVE (Off) POWER SAVE (On) Fig. 15 POWER SAVE CONTINUE (On) CONTINUE (Off) Fig. 16 CONTINUEMODE SH2400-503 Rev. 1 19 OTO Photonics SSSSHSH2400 User Manual SCREEN REVERSE 180°(Off) SCREEN REVERSE 180°(On) Fig. 17 SCREEN REVERSE 180° Fig. 18 OBSERVERS & ILLUMINANTS SH2400-503 Rev. 1 20 OTO Photonics SSSSHSH2400 User Manual Touch to select item and use +/- to adjust. Fig. 19 DATE TIME LOWLIGHTMODE (On) LOWLIGHTMODE (Off) Fig. 20 LOWLIGHTMODE SH2400-503 Rev. 1 21 OTO Photonics SSSSHSH2400 User Manual Parameters of Status Area: Setting Item Description: Direct Selected Setting Items: Some of setting items are simple without sub-page for selecting. Touch the button to switch the item selection directly. Such like: “CONTINUEMODE” – On/Off “SCREEN REVERSE 180°” –On/Off “LANGUAGE” – English/Trad.Chinese/Simp.Chinese “BACKLIGHTADJUST” – Lv5->Lv4->Lv3->Lv2->Lv1 “ALARMBEEP” – On/Off Set to execute Setting Items: Some of setting items with single function may direct set to execute or set to run the process. Such like: “FACTORYDEFAULT” – Set to execute “TOUCHCALIBRATE” – Set to run the procedure. Sub-Page Setting Items: Some of setting items have not only On/Off features but also the further selecting items; they need a sub-page to setup. Such like: “AUTOINT.TIME” “POWERSAVE” “OBSERVERS & ILLUMINANTS” “DATETIME” “LOWLIGHTMODE” SH2400-503 Rev. 1 22