1
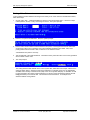
OPTIONAL
MODULES
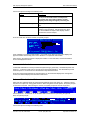
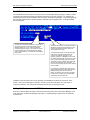
RDP Property Management Systems
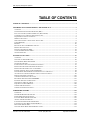
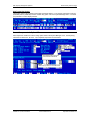
Table of Contents
TABLE OF CONTENTS
TABLE OF CONTENTS ............................................................................................................................. 1
SOUTHERN DATACOMM CREDIT CARD INTERFACE ................................................................... 3
OVERVIEW ................................................................................................................................................... 3
SOUTHERN DATACOMM INCORPORATED (SDC) ......................................................................................... 3
LIST OF AVAILABLE SOFTRANS MODULES (PROCESSORS) .......................................................................... 5
COMPONENTS OF A CREDIT CARD TRANSACTION ........................................................................................ 7
REQUIREMENTS FOR SDC INTERFACE............................................................................................................ 8
WORKSTATION SETUP .................................................................................................................................. 8
PROCESSING CREDIT CARD TRANSACTIONS IN RDP ....................................................................................... 9
USING PBADMIN ....................................................................................................................................... 18
REPORTS .................................................................................................................................................... 26
BALANCING RDP AND PBADMIN NIGHTLY................................................................................................. 32
DEPOSIT TRANSACTIONS ........................................................................................................................... 37
TRANSACTION HISTORY MENU ................................................................................................................. 38
DATABASE MANAGEMENT MENU .............................................................................................................. 41
TROUBLESHOOTING ................................................................................................................................... 44
OWNER ACCOUNTING .......................................................................................................................... 67
OVERVIEW ................................................................................................................................................. 67
CREATING AN OWNER MASTER ................................................................................................................. 68
TRANSFERRING ROOM OWNERSHIP ........................................................................................................... 74
SECONDARY OWNERS................................................................................................................................ 75
FOLIO TRANSACTIONS AND OWNER STATEMENTS .................................................................................... 76
PROCESSING OWNER INCOME WITH OPTION 912 ....................................................................................... 85
PROCESSING OWNER REVENUE: AN EXAMPLE .......................................................................................... 87
POSTING TRANSACTIONS TO OWNER MASTERS ......................................................................................... 94
TRANSFERRING OWNER RESERVATION BALANCES AT CHECKOUT ............................................................ 98
AUTOMATICALLY POSTING RESERVATION CLEANING CHARGES .............................................................. 99
PRINTING OWNER STATEMENTS .............................................................................................................. 103
CHANGING OWNER MTD/YTD TOTALS ...................................................................................................... 110
RECORDING PAYMENTS FROM OWNERS ............................................................................................... 116
ENTERING PAYMENT CORRECTIONS ........................................................................................................ 118
GENERATING A REFUND CHECK .............................................................................................................. 119
INQUIRING ON OWNER HISTORY .............................................................................................................. 120
OWNER 1099 STATEMENTS ..................................................................................................................... 121
OWNER STATEMENT CHECKLIST ............................................................................................................. 123
TIMESHARE OWNERS ......................................................................................................................... 125
OVERVIEW ............................................................................................................................................... 125
TIMESHARE METHODS SUPPORTED ......................................................................................................... 125
FIXED WEEK OWNER OVERVIEW ............................................................................................................ 126
FLOATING WEEK OWNER OVERVIEW ...................................................................................................... 127
ADDING THE OWNER MASTER ................................................................................................................ 128
LOADING FIXED WEEK OWNERSHIP DATA .............................................................................................. 130
LOADING FLOATING WEEK OWNERSHIP DATA ....................................................................................... 132
DEVELOPER OWNED TIME ....................................................................................................................... 133
CREATING FIXED WEEK OWNER RESERVATIONS .................................................................................... 133
Resort Data Processing, Inc.
P.O. Box 1170, Vail, CO 81658
(11/99)
Phone: (970) 845-1140
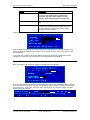
TOC
http://www.resortdata.com
RDP Property Management Systems
Table of Contents
TIMESHARE RESERVATIONS ..................................................................................................................... 136
CENTRAL RESERVATIONS................................................................................................................. 139
OVERVIEW ............................................................................................................................................... 139
CENTRAL RESERVATION PHILOSOPHY ..................................................................................................... 139
UPLOADING AT THE PROPERTY............................................................................................................... 142
DOWNLOADING FROM THE PROPERTY .................................................................................................... 143
USING A RANGE OF RESERVATION NUMBERS.......................................................................................... 143
INSTALLATION ......................................................................................................................................... 144
LONG TERM AND MONTHLY RESERVATIONS............................................................................ 145
OVERVIEW ............................................................................................................................................... 145
MONTHLY RENTALS ................................................................................................................................ 145
ADDITIONAL FEATURES........................................................................................................................... 147
LONG TERM AND MONTHLY RESERVATIONS WITH R3 (OWNER ACCTG) .................................................... 148
VENDORS & GUEST ITINERARY ...................................................................................................... 149
OVERVIEW ............................................................................................................................................... 149
CREATING VENDOR MASTERS ................................................................................................................. 150
SEARCHING FOR VENDORS ...................................................................................................................... 154
ASSIGN ACTIVITIES TO GUESTS AND GROUP LEADERS .............................................................................. 154
FIELDS ON ACTIVITY SCREENS 1 AND 2................................................................................................... 156
FILE, EXIT, DELETE, COPY, TRANSFER, FIELD NUMBER ......................................................................... 159
READING THE GUEST ITINERARY DISPLAY .............................................................................................. 160
SCANNING FOR OPEN ACTIVITIES AT CHECKOUT .................................................................................... 161
MULTIPLE ACTIVITIES AND SEASONAL PRICING FOR VENDORS .............................................................. 162
USING THE ITINERARY MODULE WITH GOLF PACKAGES ............................................................................ 173
PRINTING GUEST ITINERARIES ................................................................................................................. 182
PRINTING T ICKETS FOR GUESTS .............................................................................................................. 183
PRINTING ACTIVITIES BY VENDOR ........................................................................................................... 183
RECONCILING ACTIVITY TICKETS............................................................................................................ 184
INDEX ....................................................................................................................................................... 185
Resort Data Processing, Inc.
P.O. Box 1170, Vail, CO 81658
(11/99)
Phone: (970) 845-1140
TOC
http://www.resortdata.com
RDP Property Management Systems
SDC Credit Card Interface
SOUTHERN DATACOMM CREDIT
CARD INTERFACE
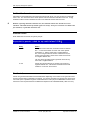
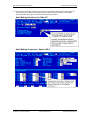
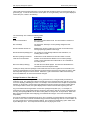
OVERVIEW
The Southern DataComm (SDC) credit card interface enables the RDP Property Management System to
transmit credit card transactions to various third-party processors. The SDC module includes the following
features:
•
Ability to select from many processors.
•
Certified to the CPS (Custom Payment Service) standards, required for the lowest rate.
•
Fast transactions processing.
•
Only one modem line required for multiple workstations.
•
Inexpensive card swipes.
•
A wide variety of printers are available.
•
Reconcile RDP to credit card nightly transmission.
This chapter covers the use of the SDC credit card interface in both the RDP system and Southern
DataComm's PBAdmin software. Topics include:
Overview of Southern DataComm
Available Softrans Modules (Processors)
Components of a Credit Card Transaction
Requirements for SDC Interface
Workstation Setup
Processing Credit Card Transactions in RDP
Using PBAdmin
PBAdmin Reports
Balancing RDP and PBAdmin Nightly
Deposit Transactions
Transaction History Menu
Database Management Menu
Troubleshooting
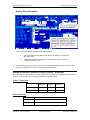
SOUTHERN DATACOMM INCORPORATED (SDC)
RDP’s clients do business with over a dozen different credit card processing companies (third-party
processors). It would be virtually impossible for RDP to create an interface to each processor. Additionally,
software maintenance would be very difficult since these processors change their systems constantly.
Southern DataComm Incorporated (SDC) solves these problems by providing their integrated software
utility, ProtoBase, with accompanying SofTrans modules. The SofTrans modules interface to the third-party
processors. RDP only needs to interface with ProtoBase. As processors change their rules and
procedures, SDC makes the appropriate changes and RDP’s interface remains the same.
SDC offers a variety of products designed to improve credit card processing. A description of these
products follows.
ª
Protobase and PBAdmin are registered trademarks of Southern DataComm, Inc.
Resort Data Processing, Inc.
P.O. Box 1170, Vail, CO 81658
(11/99)
Phone: (970) 845-1140
1-3
http://www.resortdata.com
RDP Property Management Systems
SDC Credit Card Interface
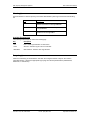
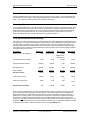
SDC Product
Description and Price
ProtoBase for
Win95 with
SofTrans
ProtoBase is a communications utility integrated into the RDP system. Using thirdparty processor-specific SofTrans modules, ProtoBase has the ability to interface to a
variety of third-party processors. When a credit card payment is authorized in the
RDP system, the transaction is stored both in the RDP database and in ProtoBase.
PBAdmin
PBAdmin is a “back office” database utility that performs settlement, reporting, history,
and maintenance functions. It is used to reconcile and transmit the daily deposit from
the database to your bank. It is also used for tracking CPS data and "charge back"
research.
Modem
Gateway
SDC provides software that is installed on a Windows '95 “modem Gateway” machine.
This software communicates with RDP workstations to provide instantaneous credit
card authorizations and verification. Only one modem Gateway PC and phone line is
required to quickly service many RDP workstations. This product is included with
ProtoBase.
Multi-Merchant
Module
This module is only required if a property wishes to separate the nightly deposit into
more than one bank account. Most RDP customers will not require this module.
Lodgelink
Connects non-RDP credit card location to the Protobase database allowing for a
consolidated bank reconciliation and deposit. For example, a Veriphone 395 could be
placed in the gift shop. All transactions would store in the same ProtoBase database
as RDP transactions.
Network
ProtoBase
Connects non-RDP point of sale systems, such as Remanco, to ProtoBase. Allows
one settlement and reporting point.
Annual
Maintenance
There is an additional support cost of $600/year for the credit card module.
Resort Data Processing, Inc.
P.O. Box 1170, Vail, CO 81658
(11/99)
Phone: (970) 845-1140
1-4
http://www.resortdata.com
RDP Property Management Systems
SDC Credit Card Interface
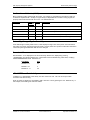
LIST OF AVAILABLE SOFTRANS MODULES (PROCESSORS)
SofTrans Module Name
SofTrans
Module #
Communications
Method
Capture
Method
Tender
Type
Transaction Types
American Express
Authorization Only
13
Dial-up
Auth Only
Credit
01
American Express
Authorization/Settlement
40
Dial-up
Terminal
Credit
01, 02, 07, 09, 11, 13, 17
American Express
Authorization X4
89
TCP/IP
Auth Only
Credit
Check
01
BancTec (CPS)
110
Dial-up
Terminal
Credit
Check
01, 02, 07, 09, 11, 13, 17
FDMS/CES (CPS)
77
Dial-up
Terminal
Credit
Debit
Check
01, 02, 07, 09, 11, 13, 17,
FDMS/CES UDP (CPS)
83
UDP/IP
Terminal
Credit
Debit
Check
01, 02, 07, 09, 11, 13, 17
FDMS/CES ISDN (CPS)
103
ISDN
Terminal
Credit
Debit
Check
01, 02, 07, 09, 11, 13, 17
FDMS/Envoy (CPS)
84
Dial-up
Terminal
Credit
Check
01, 02, 07, 09, 11, 13, 17
FDMS/FDR (CPS)
65
Dial-up
Terminal
Credit
Debit
01, 02, 07, 09, 11, 13, 17
First Hawaiian Bank
(CPS)
90
Dial-up
Terminal
Credit
01, 02, 07, 09, 11, 13, 17
First Tennessee Bank
(CPS)
42
Dial-up
Terminal
Credit
01, 02, 07, 09, 11, 13, 17
First USA (CPS)
66
Dial-up
Terminal
Credit
01, 02, 07, 09, 11, 13, 17
Gensar (CPS)
47
Dial-up
Terminal
Credit
Check
01, 02, 07, 09, 11, 13, 17
GPS/MAPP (CPS)
45
Dial-up
Host
Credit
Debit
Check
01, 02, 07, 09, 11, 13, 17
GPS/MAPP (CPS)
52
Dial-up
Terminal
Credit
Check
01, 02, 07, 09, 11, 13, 17
FDMS/NaBANCO (CPS)
6
Dial-up
Terminal
Credit
Check
01, 02, 07, 09, 11, 13, 17
FDMS/NaBANCO-Mexico
(CPS)
91
Dial-up
Terminal
Credit
01, 02, 07, 09, 11, 13, 17
FDMS/NaBANCOCaribbean (CPS)
92
Dial-up
Terminal
Credit
01, 02, 07, 09, 11, 13, 17
FDMS/NaBANCOCanada (CPS)
102
Dial-up
Terminal
Credit
Check
01, 02, 07, 09, 11, 13, 17
FDMS/NaBANCO-(CPS)
123
Dial-up
Host
Debit
09, 13
Leased line
Terminal
Credit
Debit
Check
01, 02, 07, 09, 11, 13, 17
GPS/NDC (CPS)
46
Resort Data Processing, Inc.
P.O. Box 1170, Vail, CO 81658
(11/99)
Phone: (970) 845-1140
1-5
http://www.resortdata.com
RDP Property Management Systems
SofTrans Module Name
SofTrans
Module #
SDC Credit Card Interface
Communications
Method
Capture
Method
Tender
Type
Transaction Types
GPS/NDC (CPS)
95
Dial-up
Terminal
Credit
Debit
Check
01, 02, 07, 09, 11, 13, 17
GPS/NDC Canada (CPS)
117
Dial-up
Terminal
Credit
Debit
Check
01, 02, 07, 09, 11, 13, 17
NOVA (CPS)
68
Dial-up
Terminal
Credit
Check
01, 02, 07, 09, 11, 13, 17
FDMS/TeleMoney (CPS)
73
Dial-up
Host
Credit
Debit
Check
01, 02, 07, 09, 11, 13, 17
FDMS/TeleMoney (CPS)
101
Leased line
Host
Credit
Debit
Check
01, 02, 07, 09, 11, 13, 17
VisaNet K (CPS)
88
Leased line
Terminal
Credit
Debit
01, 02, 07, 09, 11, 13, 17
VisaNet (CPS)
112
ISDN
Terminal
Credit
Debit
01, 02, 07, 09, 11, 13, 17
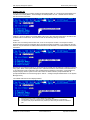
The following table describes the settlement types listed above:
Settlement Type
Description
RDP Equivalent
01
Authorization Only
RDP120 Power User Option "Y" or
Authorization at Check-in.
02
Sale
RDP120 Power User Option "D",
Payment at Checkout, or Advance
Deposit
07
Prior Authorized Sale
RDP120 Power User Option "D" or
Checkout
09
Return
RDP120 - Canceling a Reservation
with a Deposit ("C") or a Negative
Payment ("D")
11
Void
<F8 - CHANGE>
13
Settlement/Deposit
RDP120 Power User option "D"
17
Void a Return
<F8 - CHANGE>
Resort Data Processing, Inc.
P.O. Box 1170, Vail, CO 81658
(11/99)
Phone: (970) 845-1140
1-6
http://www.resortdata.com
RDP Property Management Systems
SDC Credit Card Interface
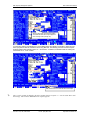
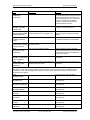
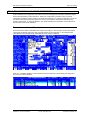
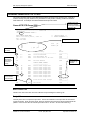
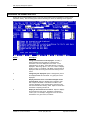
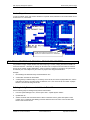
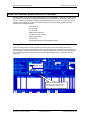
COMPONENTS OF A CREDIT CARD TRANSACTION
Processing a credit card transaction involves many companies and computer systems, including:
NETWORK HUB
RECEIPT
PRINTER
WORKSTATION
#1
CREDIT CARD
GATEWAY PC
FOLIO PRINTER
MODEM
NOVELL OR
WINDOWS NT
FILESERVER
YOUR BANK
CREDIT CARD
PROCESSOR
VISA/MC
Resort Data Processing, Inc.
P.O. Box 1170, Vail, CO 81658
AMERICAN EXPRESS
(11/99)
Phone: (970) 845-1140
DISCOVER
1-7
http://www.resortdata.com
RDP Property Management Systems
SDC Credit Card Interface
REQUIREMENTS FOR SDC INTERFACE
In order to use the SDC Credit Card Interface, the following RDP items are required.
•
RDP Version 12.01 (or higher). The version is displayed in the middle of the third line on every RDP
screen.
•
The Credit Card Module (RQ) must be purchased and installed.
•
A support fee of $600/year, in addition to RDP's normal support contract.
•
For site activation, Southern DataComm charges activation and license fees. RDP is a reseller of the
SDC products. Once RDP receives payment for the SDC module, the payment is forwarded to SDC with a
completed site activation form to create a merchant file. Site activation takes a minimum of 30 days. The
cost for the SDC software and site activation starts at $1,200, including a certified SDC modem.
Credit Card Workstation Required
The credit card interface requires at least one dedicated Windows 95 Pentium workstation with a minimum
of 32 Megabytes (MB) of RAM and 500 MB of disk storage. This machine is termed the "credit card
gateway PC" and must be connected to the network and have the SDC software and modem installed.
Dedicated Phone Line and Modem
A direct, dedicated telephone line is required for the Gateway PC modem. This phone line cannot access
the switchboard and cannot be shared by any other device, such as a fax machine.
Support Hours
RDP provides support for the credit card module during regular support hours only. While 24-hour/365 day
support is available for the RDP software, most credit card processors, banks, and Southern DataComm do
not offer 24-hour support, so it is not possible to support all aspects of the credit card module during nonbusiness hours.
To ensure the smoothest interface installation, RDP strongly suggests all deposit and balancing functions be
scheduled during normal work hours. For example, RDP suggests reconciling and settling weekend
transactions on Monday morning. Separate deposits are still possible for each day.
WORKSTATION SETUP
Card Swipes and Receipt Printers
A card swipe is required for every workstation that processes credit cards. Receipt printers should be
purchased for any workstation where printed receipts are necessary. For example, a workstation at the front
desk requires both a card swipe and a receipt printer. However, a workstation in the reservations
department may not require either a card swipe or receipt printer if all credit card transactions from that
workstation are done over the phone.
A given workstation can have a folio/report printer connected to LPT1 and the credit card receipt printer
connected to LPT2. Since most computers are initially configured with only one LPT port, an additional
parallel port (LPT2) may be required.
RDP does not sell credit card swipes or receipt printers. These devices may be purchased from Ann Rosko
at Instruments and Equipment Company, (800) 432-1255.
Resort Data Processing, Inc.
P.O. Box 1170, Vail, CO 81658
(11/99)
Phone: (970) 845-1140
1-8
http://www.resortdata.com
RDP Property Management Systems
SDC Credit Card Interface
Part # and Description
Price
WA6920-3 Card swipe with connector for PS2 type keyboard (small)
$119
WA6920-1 Card swipe with connector for AT type keyboard (large)
$119
SP-212-FC-120 Printer, 2.5 lines per second
$172
SP-312-FC-120 Printer, 3.1 lines per second
$286
CR-14M Parallel Printer Cable
$7
A second LPT port may be necessary if two local printers are utilized on one
workstation. The second LPT port may be purchased from your hardware vendor.
Configuring a Workstation for the SDC Interface
Perform the following steps at EACH workstation where credit card transactions are processed.
1.
Using option "094" - "Update File Paths" on the System Manager menu, set field "#12” – “CCard
Scanner" to YES.
2.
Again using option "094" - "Update File Paths" on the System Manager menu, set field "#13” – “CC
Receipt Printer (LPTx)" to the appropriate LPT number (0, 1, or 2.)
0
No credit card printer for this workstation
1
Credit card printer attached to LPT1
2
Credit card printer attached to LPT2
F
Credit card receipt printed on folio
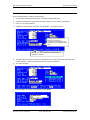
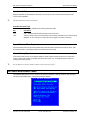
PROCESSING CREDIT CARD TRANSACTIONS IN RDP
Authorizations
During check in, the system prompts:
For authorizations, choose option two (2). The system prompts for the authorization amount. The default
amount is based on the individual balance due and the system's configuration. Press <ENTER> to use the
default authorization amount or enter an amount from the keyboard. The system then prompts:
Resort Data Processing, Inc.
P.O. Box 1170, Vail, CO 81658
(11/99)
Phone: (970) 845-1140
1-9
http://www.resortdata.com
RDP Property Management Systems
SDC Credit Card Interface
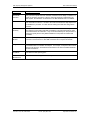
Choose the option according to the following chart:
Option
Description
3-Scan a card
Use this option whenever the credit card is available to
be swiped. If the credit card is not swiped, the
transaction will not be CPS compliant, and the
property will be charged a higher processing fee.
2-Enter card from keyboard
Use this option if the card swipe cannot read the credit
card.
1-Use the card above
This option will appear only if there is a credit card
number on the reservation. Use this option only when
the card CANNOT be swiped. RDP displays cards in
red that have not been swiped.
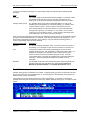
Once the credit card number is entered, the system prompts:
Press <ENTER> to process the authorization. If the credit card is approved, the system displays the
approval number and a receipt prints. Press <ENTER> to complete the authorization.
After check-in, the approval number is displayed in Field 27 on the reservation, and the authorization
amount is displayed in Field 29.
Incremental Authorizations
Incremental authorizations can be processed at anytime during a guest's stay. Use RDP120 power user
option "Y" - "Authorize Credit Card" to process the incremental authorization. The authorization process
used with option "Y" is identical to the "Authorization" steps described above.
Once the incremental authorization is complete, field 27 on the reservation displays the new approval
number, and Field 29 displays the total amount authorized.
Sales and Prior Authorized Sales
Sales and prior authorized sales are performed using RDP120 power user option "D" - "Deposit or Guest
Payment" or in option 131 during guest checkout. When using either of these options, the system prompts
for the amount received. After entering the amount, the system prompts for the form of payment.
Choose option "4" - "Ccard-Auto" to use the SDC credit card interface for processing the payment.
Next, the system prompts:
Choose the option according to the following chart:
Resort Data Processing, Inc.
P.O. Box 1170, Vail, CO 81658
(11/99)
Phone: (970) 845-1140
1-10
http://www.resortdata.com
RDP Property Management Systems
SDC Credit Card Interface
Option
Description
3-Scan a card
Use this option whenever the credit card is available to
be swiped. If the credit card is not swiped, the
transaction will not be CPS compliant, and the
property will be charged a higher processing fee.
2-Enter card from keyboard
Use this option if the card swipe cannot read the credit
card.
1-Use the card above
This option will appear only if there is a credit card
number on the reservation. Use this option only when
the card CANNOT be swiped. RDP displays cards in
red that have not been swiped.
After the credit card number has been entered, the system prompts:
Press <ENTER> to process the sale. If the credit card was authorized prior to this sale and there is an
amount in field 29 and approval code in field 27, the word "Sale" at the top of the box changes to "Prior
Authorized Sale".
If the credit card is approved, the system displays the approval number and a receipt prints. Press
<ENTER> to complete the sale. A transaction is generated in RDP and in PBAdmin.
Deposit Refunds
When a reservation with an advance deposit is cancelled, the system prompts:
Once the refund amount is entered, the system displays the amount of the refund along with the forfeited
amount and the above prompt to continue. After answering YES to continue, the system prompts for the
form of refund, i.e. - cash, check, credit card. Here, choose option "4" "Ccard-Auto". Next, the system
displays the following prompt:
Resort Data Processing, Inc.
P.O. Box 1170, Vail, CO 81658
(11/99)
Phone: (970) 845-1140
1-11
http://www.resortdata.com
RDP Property Management Systems
SDC Credit Card Interface
Choose the option according to the following chart:
Option
Description
3-Scan a card
Use this option whenever the credit card is available to
be swiped. If the credit card is not swiped, the
transaction will not be CPS compliant, and the
property will be charged a higher processing fee.
2-Enter card from keyboard
Use this option if the card swipe cannot read the credit
card.
1-Use the card above
This option will appear only if there is a credit card
number on the reservation. Use this option if the card
will not swipe and the number on the reservation is
correct.
Once the credit card number is entered, the system prompts:
Note the amount is displayed
as a negative when
processing a return.
Press <ENTER> to process the return. When the transaction is processed, a receipt prints and the system
prompts:
"COMPLETE - Press <ENTER>"
Press <ENTER> and a credit transaction is generated in both RDP and PBAdmin.
Resort Data Processing, Inc.
P.O. Box 1170, Vail, CO 81658
(11/99)
Phone: (970) 845-1140
1-12
http://www.resortdata.com
RDP Property Management Systems
SDC Credit Card Interface
Voids/Refunds
Use the following steps for voiding a credit card sale.
1.
Choose option 120 from the Reservations, Front Desk, or Night Audit menu.
2.
Access the reservations by guest name, reservation number, or room number (if checked-in).
3.
Press <F7> to view transactions.
4.
Highlight the credit card sale, and press <F8 - CHANGE>. The system prompts:
The SDC “Reference Number” is
stored on the transaction.
Transactions entered manually are
denoted by the text “MANUAL” in this
field.
On SDC Credit Card transactions, the "Delete" option is
replaced with "Refund".
5.
The option "Refund" appears in the place of "Delete" when the credit card has been processed using
the SDC interface. Type R to process a refund and reverse the transaction.
6.
The system prompts:
7.
Press <ENTER> to continue. The following window displays.
Resort Data Processing, Inc.
P.O. Box 1170, Vail, CO 81658
(11/99)
Phone: (970) 845-1140
1-13
http://www.resortdata.com
RDP Property Management Systems
8.
SDC Credit Card Interface
Press <ENTER> to process the refund. If the sale being voided has already been deposited in
PBAdmin, the word "Void" changes to "Return". When the process is complete, the system displays the
approval number and a receipt prints. Press <ENTER> to complete the void. A transaction is generated
in both RDP and PBAdmin.
Reprinting Credit Card Receipts
Use the <F8 – CHANGE> key for reprinting credit card receipts in the RDP system. The following steps
outline the process.
1.
Access the reservation using option 120 on the Reservations, Front Desk, or Night Audit menu.
2.
Press <F7> to view reservation transactions.
3.
Use the directional arrow keys to highlight the credit card transaction.
4.
Press <F8 – CHANGE>, the following window displays.
5.
Use option “P” – “Print Receipt” to print another credit card receipt.
Non-Swiped Credit Cards and Payment Defaults
RDP tracks whether the credit card appearing on a reservation has been swiped using the PBADMIN
database. By ensuring that credit cards are swiped, the property benefits by receiving "preferred" credit card
processing rates.
When a credit card has not been swiped, the card number is displayed in error message colors (usually red)
in the RDP100 and RDP120 screens.
Resort Data Processing, Inc.
P.O. Box 1170, Vail, CO 81658
(11/99)
Phone: (970) 845-1140
1-14
http://www.resortdata.com
RDP Property Management Systems
SDC Credit Card Interface
With the SDC credit card interface installed,
cards that have NOT been swiped appear in
error message colors (usually red).
In conjunction with the card displaying in red, the RDP system also displays a reminder to swipe the card
when a payment is taken at checkout or when using RDP120. The following "Card has not been swiped"
message displays after selecting option "4" - "CCard Auto". In addition, the default format for entering the
card number is "3" - "Scan a Card".
RDP alerts users that a card has NOT been swiped.
ª
After a card is swiped, the default to the above prompt changes to option "1" - "Use the Card Above" and
the message "This card has ALREADY been swiped" appears.
Resort Data Processing, Inc.
P.O. Box 1170, Vail, CO 81658
(11/99)
Phone: (970) 845-1140
1-15
http://www.resortdata.com
RDP Property Management Systems
SDC Credit Card Interface
Printing Credit Card Information on the Guest Folio
With the SDC credit card interface it is possible to print credit card receipt information directly on the guest
folio. For example, in addition to the RDP description "Guest Payment Received - VISA" appearing on a
credit card transaction, additional information including the transaction type, account number, merchant
number, transaction identification number, and authorization number can be included on the guest folio.
A sample guest folio follows.
In order to activate the above folio feature, set field #13 (CC Receipt Printer) in option "094" - "Update File
Paths" on the System Manager menu to "F". In addition, a signature line and disclosure statement should
be printed on the guest folio.
SDC Credit Card Transactions and <F8 - CHANGE>
<F8 - CHANGE> CANNOT be used to delete a batch of transactions that include a credit card payment
processed using the SDC interface. This change was made in an effort to keep RDP and PBADMIN in
balance. In past versions, when a credit card transaction was deleted in a batch with <F8 - CHANGE>, the
refund had to be manually entered in PBADMIN. The following message is displayed when an SDC credit
card transaction is being deleted in a batch.
In the example below, the credit card payment and "Cart Fees" transactions are selected. (In order to multiselect transactions, use the <RIGHT ARROW> key)
Resort Data Processing, Inc.
P.O. Box 1170, Vail, CO 81658
(11/99)
Phone: (970) 845-1140
1-16
http://www.resortdata.com
RDP Property Management Systems
SDC Credit Card Interface
After transactions are selected, use <F8 - CHANGE> and choose the option for delete. The following
message displays.
The pop-up window above warns that one transaction will NOT be deleted. For an explanation of why the
transaction will remain, press the <ALT> and <F1> keys simultaneously.
Resort Data Processing, Inc.
P.O. Box 1170, Vail, CO 81658
(11/99)
Phone: (970) 845-1140
1-17
http://www.resortdata.com
RDP Property Management Systems
SDC Credit Card Interface
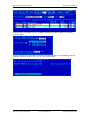
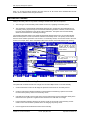
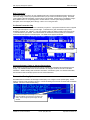
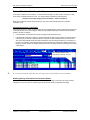
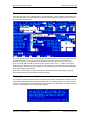
USING PBADMIN
To start PBAdmin, double click on the PBAdmin icon, or from the RDP\PB> prompt, type PBAdmin. The
system prompts:
Enter a valid login name and password.
ª
PBAdmin logins and passwords are case sensitive.
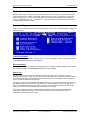
Main Menu
After correctly entering a valid login name and password, the system displays the Main Menu.
Resort Data Processing, Inc.
P.O. Box 1170, Vail, CO 81658
(11/99)
Phone: (970) 845-1140
1-18
http://www.resortdata.com
RDP Property Management Systems
SDC Credit Card Interface
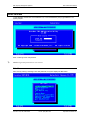
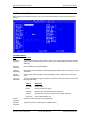
Select/Edit Transactions
Use the Select/Edit Transactions option to prepare working transactions for settlement, as well as routine
maintenance.
The main select screen lists all transactions for the current location.
Field Information
The following information displays on the main selection screen:
Option
Description
Select
√) indicates that the transaction
Indicates the current status of this transaction. A check mark (√
is currently marked for settlement next time the Deposit routine is run. Additional indicators
display immediately to the right of the close bracket (]) in the form of alphabetic characters.
They are:
Symbol
Transaction Status
I
Currently being settled by another process.
*
Authorization Only. It cannot be settled in this state.
F
“Forced” Authorization Only.
V
Void
Ref Num
The 12 position reference number assigned to this transaction by RDP.
Account
Number
The credit card information represented by this transaction. This field is 24 positions.
Amount
The transaction settlement amount. Field is right justified, space filled.
Date
Date transaction was authorized/added to database. It is in MM/DD/YY format.
Auth #
Transaction approval code assigned by the processor.
Terminal
Eight position terminal identifier. Represents the terminal to settle this transaction to. Defaults
to the authorized terminal ID.
Resort Data Processing, Inc.
P.O. Box 1170, Vail, CO 81658
(11/99)
Phone: (970) 845-1140
1-19
http://www.resortdata.com
RDP Property Management Systems
SDC Credit Card Interface
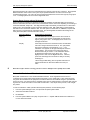
Available Function Keys
The following key commands are available on the main select screen:
Key(s)
Description
<SHIFT><F3>
Key Listing - Displays window that lists available keys for this screen. Press the <ESCAPE>
key to exit window.
<F1>
Help – Displays help for current screen.
Keys <F3>, <F4>, <F6>, <F8>, and <F9> are explained in further detail in the next section.
<F3>
Add new transaction - Adds a new transaction to the location’s database. Available transaction
types are Prior Auth, Return, Void Sale, and Void Return.
<F4>
Transaction search - Allows entry of search criteria information and then searches database
for first matching record that falls after the current record position indicated at the top of the
screen.
<F6>
Detail information - Modifies transaction detail information. Transactions can also be deleted in
this selection.
<F8>
Select Transactions. Allows for group selection of all transactions that match the entered
criteria. Transactions can be processed by date, terminal ID, and/or cashier ID.
<F9>
Deselect Transactions. Allows for group deselection of all transactions that match the entered
criteria. Transactions can be processed by date, terminal ID, and/or cashier ID.
<SHIFT><F4>
Select Display Mode - Used to select which type of transactions to display on the main
Select/Edit screen.
<SHIFT><F6>
Toggle Host Pending Status - Used to toggle a transaction between host pending and
selected. Used for host capture processors only.
<SHIFT><F7>
Top of Database
<SHIFT><F8>
End of Database
<SPACEBAR>
√).
Toggle - Used to toggle selection status value between unselected (blank) and selected (√
<ESCAPE>
Exit – Returns to the main menu. Any changes to the selection status field WILL NOT be
undone.
Resort Data Processing, Inc.
P.O. Box 1170, Vail, CO 81658
(11/99)
Phone: (970) 845-1140
1-20
http://www.resortdata.com
RDP Property Management Systems
SDC Credit Card Interface
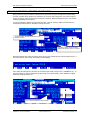
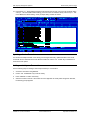
Add Transaction (<F3>)
After choosing the “Add New Transaction” key (<F3>) from the main selection screen the following screen
displays:
Field Descriptions
Field
Description
Reference
(required)
12 position alphanumeric reference that must be unique. RDP suggests using 55mmddyyXX
(where XX is a number starting with 01 in case there are multiple manual transactions in the
same day).
Host Ref
(Optional)
Press <ENTER> to leave this field blank.
Terminal
(Required)
Eight position terminal identifier of authorizing/settling terminal. Press the <F2> key for a list of
valid values.
Cashier
(Required)
Seven position cashier identifier of authorizing/settling cashier. RDP uses the user’s login
name.
Tran Type
(Required)
Ten position description of type of transaction. Press the <F2> key to select from a list of the
following valid values.
Option
Description
Prior Auth
Used for sales.
Refund
Used for credits to the guest.
Void Sale
Used to void a sale that has not been settled yet.
Void Ret
Used to void a credit to the guest that has not been settled yet.
AO-Forced
Used for authorizations only
Account
(required)
24 position credit card number for this transaction.
Exp Date
(required)
The date the account number expires. In MM/YY format.
Resort Data Processing, Inc.
P.O. Box 1170, Vail, CO 81658
(11/99)
Phone: (970) 845-1140
1-21
http://www.resortdata.com
RDP Property Management Systems
SDC Credit Card Interface
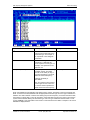
Field
Description
Amount
(required)
Transaction dollar amount. Nine positions including two decimal positions.
Customer
(optional)
26 position customer name. RDP puts the name in the format of Last Name/First Name.
Date (required)
Press <ENTER> and the date will default to the current date set on this workstation.
Time
(required)
Press <ENTER> and the time will default to the current time set on this workstation.
Date in
Parenthesis
Press <ENTER> to accept the default business date.
Auth #
Authorization approval number returned by the processor. This field is required for prior auth
type transactions.
PS2000
(optional)
Press <ENTER> four times to leave this line blank.
Inc. Info
(optional)
Press <ENTER> twice to leave this line blank.
CPS Date
Press <ENTER> four times to skip this line.
Merit
Press <ENTER> five times to skip this line.
Folio
Enter the reservation number.
Charge Desc
Press <F2> and then choose "Lodging".
Hotel Code
Press <F2> and then choose "Adv Deposit" for advance deposits, or "Sale" for all other
payments.
Check-In
Enter the check-in date.
Checkout
Enter the checkout date.
Room Number
Enter the room number.
Room Rate
Enter the daily room rate.
Tax Amount
Enter the tax amount.
Duration
Enter the number of nights.
Operator/Svr
Press <ENTER> to skip this field
ROC Number
Press <ENTER> to skip this field
Extra Charge
Press <ENTER> to skip this field
X Chg Reason
Press <ENTER> to skip this field
Guest
Enter the guest name as Last/First
Press <F10> to save the transaction.
ª
Any transaction added manually must be entered in the RDP system using option “3” – “Ccard-Manual”.
Resort Data Processing, Inc.
P.O. Box 1170, Vail, CO 81658
(11/99)
Phone: (970) 845-1140
1-22
http://www.resortdata.com
RDP Property Management Systems
SDC Credit Card Interface
Available Function Keys
The following function keys are active while adding a transaction.
Key
Description
<F1>
Help - Provides help information based on the current field.
<F10>
Save - Saves all changes made to the detail screen.
<ESCAPE>
Abort - Returns to the main select screen, discarding any changes made. If any information
has been modified, a warning message displays to confirm the escape by toggling the yes/no
field to “Yes” to continue.
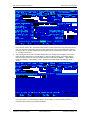
Search for Transaction <F4>
Pressing <F4> from the View/Select/Edit Transactions screen displays the “Search Criteria” screen below.
Enter any combination of search criteria. The system performs the search by starting at the top-most record
in the database. It compares the search criteria entered with each transaction in the database and displays
a list of matching transactions. Select the desired record from this list. Below is a sample of the screen that
appears, showing the records that match the search criteria.
The message, "No Matching Records Found" appears when no records in the database match the search
criteria. After selecting the desired record, PBAdmin returns to the Select/View/Edit Transactions screen
with the selected record at the top of the screen.
Resort Data Processing, Inc.
P.O. Box 1170, Vail, CO 81658
(11/99)
Phone: (970) 845-1140
1-23
http://www.resortdata.com
RDP Property Management Systems
SDC Credit Card Interface
Available Function Keys
The following function keys are available while searching for a transaction.
Key
Description
<F1>
Help - Provides help information based on the current field.
<F4>
Search - Accepts search criteria entered and performs actual search.
<ESCAPE>
Abort - Returns to the main select screen, discarding any changes made. If any information
has been modified, a warning message displays to confirm the escape by toggling the yes/no
field to “Yes” to continue.
View/Modify Detail (<F6>)
<F6> displays detail data for the selected transaction. From the detail screen, the user may modify or delete
the transaction.
Available Function Keys
The following function keys are active while modifying transaction detail.
Key
Description
<F1>
Help - Provides help information based on the current field.
<F8>
Delete - Removes transaction from the database and returns the user to the main select
screen. An “Are You Sure?” prompts the user to toggle “Yes” before continuing.
<F10>
Save - Saves all changes made to the detail screen.
Resort Data Processing, Inc.
P.O. Box 1170, Vail, CO 81658
(11/99)
Phone: (970) 845-1140
1-24
http://www.resortdata.com
RDP Property Management Systems
SDC Credit Card Interface
Select/Deselect Transactions (<F8>/<F9>)
This function selects or deselects groups of transactions, based on specific criteria, to indicate they are
ready to be settled or included in reports. Use the <F8> key to select transactions based on input criteria.
Use the <F9> key to deselect transactions. Press the <F8> or <F9> key to display the following screen:
Select up to ten values for each of the five criteria types. Pressing the <TAB> key moves the cursor between
criteria types. To select/deselect all transactions, leave the fields blank. Press the <F10> key to begin the
process. The record count displays after completion.
Criteria Types
Criteria
Description
Card Type
2 character code for type of credit card. (For example: MC, VI)
Business Date
Not used by RDP users
Transaction Date
Authorization date of the transactions. Format = MM/DD/YY
Terminal
Eight character terminal designator for transactions.
Cashier
15 character cashier identifier for transactions.
Resort Data Processing, Inc.
P.O. Box 1170, Vail, CO 81658
(11/99)
Phone: (970) 845-1140
1-25
http://www.resortdata.com
RDP Property Management Systems
SDC Credit Card Interface
Available Function Keys
The following function keys are active when Selecting and Deselecting Transactions.
Key
Description
<F1>
Help - Provides help information based on the current field.
<F10>
Accept - Accepts the input criteria and begins the selection/deselection process.
If the criteria fields are left blank, pressing <F10> causes all transactions to be selected.
<ESCAPE>
Abort - Aborts selection process.
REPORTS
From the Main Menu, selecting the Reports Menu displays the following screen.
After selecting a report, PBAdmin prompts for the type of transactions to include on the report - All, Selected,
or Pre-Settlement. The default is Pre-Settlement.
Find a brief description of each report below. Each report is displayed on the screen prior to printing. Print
the report by pressing <F7> or abort without printing by pressing <ESCAPE>. Examples of selected reports
are also included in this section.
Resort Data Processing, Inc.
P.O. Box 1170, Vail, CO 81658
(11/99)
Phone: (970) 845-1140
1-26
http://www.resortdata.com
RDP Property Management Systems
SDC Credit Card Interface
Cashier Summary Report
Provides a summary of all transactions sorted by cashier ID. Features include:
•
•
•
Breakpoints by cashier, with totals
Totals by card type
Grand totals
Cashier Detail Report
Provides a standard detail list of all transactions, sorted by cashier ID. Features include:
•
•
•
•
Standard detail only
Breakpoints by cashier, with totals
Totals by card type
Grand totals
Resort Data Processing, Inc.
P.O. Box 1170, Vail, CO 81658
(11/99)
Phone: (970) 845-1140
1-27
http://www.resortdata.com
RDP Property Management Systems
SDC Credit Card Interface
Cashier Extended Detail
Provides an extended detail list of all transactions, sorted by cashier ID. Features include:
•
•
•
•
•
Standard detail
Industry specific detail
Breakpoints by cashier, with totals
Totals by card type
Grand totals
Terminal Summary Report
Provides a summary of all transactions sorted by terminal ID. Features include:
•
•
•
Breakpoints by terminal, with totals
Totals by card type
Grand totals
Resort Data Processing, Inc.
P.O. Box 1170, Vail, CO 81658
(11/99)
Phone: (970) 845-1140
1-28
http://www.resortdata.com
RDP Property Management Systems
SDC Credit Card Interface
Terminal Detail Report
Provides a standard detail list of all transactions, sorted by cashier ID. Features include:
•
•
•
•
Standard detail
Breakpoints by terminal, with totals
Totals by card type
Grand totals
Terminal Extended Detail
Provides an extended detail list of all transactions, sorted by terminal ID. Features include:
•
•
•
•
•
Standard detail
Industry specific detail
Breakpoints by terminal, with totals
Totals by card type
Grand totals
Resort Data Processing, Inc.
P.O. Box 1170, Vail, CO 81658
(11/99)
Phone: (970) 845-1140
1-29
http://www.resortdata.com
RDP Property Management Systems
SDC Credit Card Interface
Deposit Status Report (Log)
Displays the settlement (deposit) log. This report provides all settlement deposit attempts, both successful
and unsuccessful.
In addition to selecting the Deposit Status Report from the Reports Menu, this report can be generated in
two other ways:
1.
Select “View Deposit Log” from the PBAdmin Main Menu
or
2.
Select the “Database Management Menu” from the PBAdmin Main Menu, select “View Log”, and then
choose “Settlement”.
Authorization Date & Time Report
Lists transactions sorted by Authorization Date, and within each date, by Authorization Time. Totals are
provided for each date by card type and then totals for all dates by card type.
Incremental Authorization Report
Lists transactions by location and terminal, showing the original and total authorization amounts.
Card Type Summary Report
Provides a summary of all transactions sorted by card type. This includes any “card type” defined in the
ProtoBase configuration, including CHECK and DEBIT. Features include:
•
Sort by card type, with separate totals for credits and returns by card type.
•
Totals by card type
•
Totals for all card types
Resort Data Processing, Inc.
P.O. Box 1170, Vail, CO 81658
(11/99)
Phone: (970) 845-1140
1-30
http://www.resortdata.com
RDP Property Management Systems
SDC Credit Card Interface
Card Type Detail Report
Provides a standard detail list of all transactions, sorted by card type. This includes and “card type” defined
in the ProtoBase configuration, including CHECK and DEBIT. Features include:
•
Standard transaction detail only (no extended industry data)
•
Sort by card type, with separate totals for credits and returns by card type
•
Totals by card type
•
Totals for all card types
Merchant Key Summary Report
Provides a summary of all transactions sorted by merchant key (ID). Features include:
•
Sort by merchant key
•
Totals by card type for each merchant key
•
Totals by card type for all merchant keys
Merchant Key Detail Report
Provides a standard detail list of all transactions, sorted by merchant key. Features include:
•
Standard transaction detail only ( no extended industry data)
•
Sort by merchant key
•
Totals by card type for each merchant key
•
Totals by card type for all merchant keys
Report Criteria
Each of the above reports allow for printing three different record criteria:
Criteria
Description
Pre-Settlement
Reports on all transactions selected for
settlement, excluding “authorization
only” transactions.
Selected
Reports on all transactions selected for
settlement, including “authorization
only” transactions.
All
Reports on all unsettled transactions
for the current location, regardless of
status.
Resort Data Processing, Inc.
P.O. Box 1170, Vail, CO 81658
(11/99)
Phone: (970) 845-1140
1-31
http://www.resortdata.com
RDP Property Management Systems
SDC Credit Card Interface
BALANCING RDP AND PBADMIN NIGHTLY
Prior to depositing the day’s credit card transactions using PBAdmin, it is critical that the total credit card
transactions in RDP match the total credit card transactions in PBAdmin. To verify these totals, use the
following steps.
1. From the Night Audit Reports Menu, print the “719” – “Credit Card Transactions by Card #”.
2. From PBAdmin, go to the Reports menu and print the “Terminal Detail Report”.
3. Compare the total credit card transactions on these two reports. It is CRITICAL that these totals match
exactly! If the totals do NOT match, continue to step #4. If the totals DO match, go directly to step #6.
4. Make manual corrections to RDP and/or SDC.
5. Repeat steps 1 –3.
6. Once the reports generated in steps 1 and 2 match, use PBAdmin to transmit the credit card
transactions.
Each step is described in detail below.
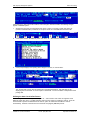
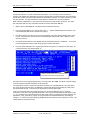
Step 1 – Run Report 719
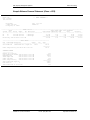
Use report 719 on the Night Audit Reports Menu for balancing credit card transactions prior to processing a
deposit. This RDP report is designed to match the layout of PBAdmin’s “Terminal Detail Report”.
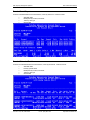
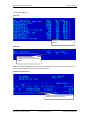
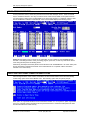
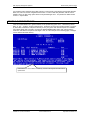
A sample “719” – “Credit Card Transactions by Card#” follows.
In the example above, there are four credit card transactions for February 24, 1998 that should be included
in the day’s deposit. The first transaction, for $150.00, is a MANUAL charge, one that has NOT been added
to the PBAdmin database automatically. All manual transactions must be added to PBAdmin prior to
processing the day’s deposit.
ª
See the section titled Add Transaction under the heading Using PBADMIN in this chapter for more
information about manually adding transactions to PBADMIN.
Resort Data Processing, Inc.
P.O. Box 1170, Vail, CO 81658
(11/99)
Phone: (970) 845-1140
1-32
http://www.resortdata.com
RDP Property Management Systems
SDC Credit Card Interface
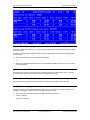
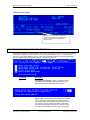
Step 2 – Run the Terminal Detail Report
Use PBAdmin’s Terminal Detail Report for verifying credit card totals in PBAdmin against credit card
transactions in RDP. A sample Terminal Detail Report is shown below.
:
The totals on the Terminal Detail Report MUST match RDP’s 719 report PRIOR to sending the daily
credit card batch.
Resort Data Processing, Inc.
P.O. Box 1170, Vail, CO 81658
(11/99)
Phone: (970) 845-1140
1-33
http://www.resortdata.com
RDP Property Management Systems
SDC Credit Card Interface
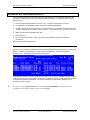
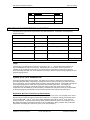
Step 3 - Compare Credit Card Totals
It is absolutely critical that the total credit card balance on PBAdmin’s Terminal Detail Report match the
credit card total on RDP’s 719 report. For example, these totals do NOT match below. Any time these
totals do NOT match, further investigation must be done in order to find those transactions that are missing
from one database.
In this example, the totals do NOT match on the 719 report and
PBADMIN’s Terminal Detail Report. The total on the 719 is $339.00, while
the total on the Terminal Detail Report is $189.00.
In the case where the totals on the RDP report is higher than that in PBAdmin (as seen above), first check
for MANUAL transactions on the 719. A MANUAL transactions is designated by the text “MANUAL” in the
first column on the 718 (Ref. #). If MANUAL transactions exist on the 719 they must be added to the
PBAdmin database.
The second scenario for the two reports not balancing is a transaction being added manually to the SDC
system and not recorded on the reservation folio in RDP. In this scenario, the credit card payment must be
recorded in RDP.
Resort Data Processing, Inc.
P.O. Box 1170, Vail, CO 81658
(11/99)
Phone: (970) 845-1140
1-34
http://www.resortdata.com
RDP Property Management Systems
SDC Credit Card Interface
Step 4 - Manual Credit Card Transactions
As explained above, if the 719 report in RDP does NOT match PBAdmin’s Terminal Detail Report, a manual
credit card transaction must be added to one of the systems.
Adding a Manual Transaction to PBAdmin
Please see the section titled Add Transaction <F3> in the Using PBAdmin section of this chapter for
specific steps for adding a transaction manually to the PBAdmin database.
Adding a Manual Transaction to RDP
Use the following steps for adding a manual credit card transaction to a reservation folio in the RDP system.
1.
Access the reservation with option 120 on the Reservations, Front Desk, or Night Audit Menus.
2.
Select RDP120 Power User option “D” – “Deposit or Guest Payment”.
3.
Enter the payment amount.
4.
Choose the payment type “3” – “ Ccard-Manual”.
5.
Either use the card already entered on the reservation or enter a new card from the keyboard.
6.
Enter the authorization number.
7.
File the transaction.
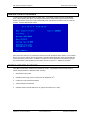
Step 5 – Compare Totals Again
Now that all manual transactions are entered in both RDP and PBAdmin, run the balancing reports again.
This time, the credit card totals should match exactly.
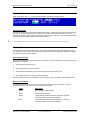
After adding the manual transaction to PBADMIN, the total on the 719
report matches the total on the Terminal Detail Report. Once the totals
match, a deposit may be processed.
Resort Data Processing, Inc.
P.O. Box 1170, Vail, CO 81658
(11/99)
Phone: (970) 845-1140
1-35
http://www.resortdata.com
RDP Property Management Systems
SDC Credit Card Interface
Step 6 - Send Credit Card Batch
Once the totals in both RDP and PBAdmin match, use the steps outlined in the section below to deposit the
credit card transactions.
Worksheet for Balancing RDP to PBAdmin
Use the following worksheet for balancing RDP to PBAdmin.
BALANCING RDP AND PBADMIN
1) Total Credit Card Transactions from 719………………….$
2) Total Credit Card Transactions from PBADMIN’s Terminal
Detail Report……………………………………………………………..$
Do the figured entered in steps 1 and 2 match?
YES – Continue with depositing credit card batch.
NO – Do NOT continue depositing credit card batch. First, identify manual transactions in
the RDP system. Add these transactions to the PBADMIN database. (MANUAL credit card
transactions have a reference number “MANUAL” on RDP’s 719 report) Identify any
transactions entered manually in the PBADMIN database. These transactions begin with
“55” in the “Select/View/Edit Transactions screen. Verify that these transactions are in the
RDP system.
Once all manual transactions are accounted for, re-run reports 718/719 and PBADMIN’s
Terminal Detail Report.
3) Total Credit Card Transactions from 719………………….$
4) Total Credit Card Transactions from PBADMIN’s Terminal
Detail Report……………………………………………………………..$
The figures entered above in (3) and (4) should now match. Continue with credit card
deposit in PBADMIN.
** If the totals in steps (3) and (4) do NOT match, contact RDP Support during normal
support hours. (RDP does NOT provide credit card interface support on a 24 hour basis)
Resort Data Processing, Inc.
P.O. Box 1170, Vail, CO 81658
(11/99)
Phone: (970) 845-1140
1-36
http://www.resortdata.com
RDP Property Management Systems
SDC Credit Card Interface
DEPOSIT TRANSACTIONS
Use the “Deposit Selected” option on the Main Menu to settle all transactions marked for deposit through the
Select/Edit Transaction selection. After selecting “Deposit Selected”, PBAdmin calculates and displays the
number of transactions currently marked for deposit:
Available Function Keys
The following function keys are active when depositing transactions.
Key
Description
<F1>
Help - Provides help information based on the current screen.
<F10>
Normal Settlement - Accepts values and continues with normal settlement process.
<ESCAPE>
Abort - Abort settlement
Continuing here initiates the settlement procedure, which can be quite lengthy. Upon completion, the View
Deposit Log selection on the Main Menu views the results.
Resort Data Processing, Inc.
P.O. Box 1170, Vail, CO 81658
(11/99)
Phone: (970) 845-1140
1-37
http://www.resortdata.com
RDP Property Management Systems
SDC Credit Card Interface
View Deposit Log
Use the View Deposit Log selection on the Main Menu to check the current location’s deposit status.
Available Function Keys
The following function keys are available when viewing the deposit log.
Key
Description
<F1>
Help - Provides help information based on the display screen.
<F7>
Print - Prints the settlement log.
<ESCAPE>
Exit - Returns to Main Menu.
TRANSACTION HISTORY MENU
Use the Transaction History Menu to research previously settled transactions. The following features are
available from this menu.
•
•
•
•
Search for transactions
View historical transaction detail
Move history transactions to the current working database
Print various historical reports
Resort Data Processing, Inc.
P.O. Box 1170, Vail, CO 81658
(11/99)
Phone: (970) 845-1140
1-38
http://www.resortdata.com
RDP Property Management Systems
SDC Credit Card Interface
After selecting the Transaction History Menu, the following screen displays:
Transaction History Search
Use the Transaction History Search option for viewing historical data and transferring previously settled
transactions to the current database. The first screen prompts for the initial history month to view. Since the
Administrator system stores all settled transactions by month, this is necessary as a starting point. If the
entered month/year combination is not found, an error message displays and the system returns to the
Transaction History submenu. If the month/year combination is found, the view screen displays.
This screen is similar to the Select/Edit Transactions screen. The difference being that the authorization
number column is replaced with the six-digit batch number. The screen lists all transactions in the database
for the current location by entered month/year.
Resort Data Processing, Inc.
P.O. Box 1170, Vail, CO 81658
(11/99)
Phone: (970) 845-1140
1-39
http://www.resortdata.com
RDP Property Management Systems
SDC Credit Card Interface
Available Function Keys
The following key commands are available on the main select screen:
Key
Description
<SHIFT><F3>
Key Listing - Displays window that lists available keys for this screen. Press the [ESC] key to
exit window.
<F1>
Help - Displays help for current screen.
Keys <F4> and <F6> are explained in further detail in the next section.
<F4>
Transaction search - Allows entry of search criteria information and then searches database
for first matching record that falls within a given month/year date range.
<F6>
Detail information - Allows for viewing and transfer of detail information.
<F8>
Select transactions. Allows for group selection of all transactions that match the entered
criteria. These transactions may then be copied back to the main working file for reprocessing.
See the Select/Edit transaction section for a more detailed explanation.
<F9>
Deselect transactions. Allows for group deselection of all transactions that match the entered
criteria. These transactions may then be copied back to the main working file for reprocessing.
See the Select/Edit transaction section for a more detailed explanation.
<SHIFT><F6>
√) back
Copy selected transactions back to main - Copies all transactions marked as selected (√
to the main working file.
<SPACE>
√).
Toggle - Used to toggle selection status value between unselected (blank) and selected (√
<SHIFT><F7>
Top of database
<SHIFT><F8>
End of database
<ESCAPE>
Exit - Returns to the main menu. Any changes to the selection status field will not be undone.
Search for Transaction (<F4>)
Displays the base detail screen. Enter any combination of search criteria. To accept the input data and
perform the actual database search, press the <F4> key.
A message prompts the user for a start month/year and end month/year. The system performs the search by
starting at the first date entered and searches through the entire month/year range until a match is found. It
compares the search criteria entered with each transaction in the database and displays a list of matching
transactions. Select the desired record from this list.
The message, "No Matching Records Found" appears when no records in the database match the search
criteria.
Available Function Keys
The following keys are available when searching for a transaction.
Key
Description
<F1>
Help - Provides help information based on the current field.
<F4>
Search - Accepts search criteria entered and performs actual search.
Resort Data Processing, Inc.
P.O. Box 1170, Vail, CO 81658
(11/99)
Phone: (970) 845-1140
1-40
http://www.resortdata.com
RDP Property Management Systems
SDC Credit Card Interface
View Detail (<F6>)
Displays detail data for the transaction selected. The user may choose to transfer this transaction to the
current working database.
ª
The detail information may not be edited.
Available Function Keys
The following function keys are available when viewing transaction detail.
Key
Description
<F1>
Help - Provides help information based on the current field.
<F8>
Transfer - Moves a copy of the transaction from the history database to the current working
database. An “Are You Sure?” prompts the user to toggle “Yes” before continuing.
Deposit Date and Time Report
The Deposit Date and Time report lists settlements by date and time and includes net totals for each. After
choosing this report, a message prompts for the historical month and year.
Various History Reports
In the same format as those on the Reports submenu, these reports are listed by terminal or cashier and
contain various levels of data. A message prompts for the month, year, and beginning batch number for
creating each historical report.
ª
See the Reports section for examples similar to these historical reports.
DATABASE MANAGEMENT MENU
The DataBase Management menu is used for miscellaneous database “cleanup” functions. After choosing
this option from the Main menu, the following submenu displays:
Resort Data Processing, Inc.
P.O. Box 1170, Vail, CO 81658
(11/99)
Phone: (970) 845-1140
1-41
http://www.resortdata.com
RDP Property Management Systems
SDC Credit Card Interface
Modify Transaction Status
Use this option for changing the transaction status indicator viewed through the Select/Edit Transactions
selection on the Main Menu. Occasionally, errors may occur that leave transactions in an invalid status. This
selection enables the status to be changed.
Purge Old Authorizations
This function deletes all expired authorization transactions from the main database for a particular location.
Check Settlement Information
This option checks for discrepancies between settlement information on all transactions, and the current
settlement terminal and settlement merchant key configuration. Use this function to check settlement
information before running settlement.
Fix Settlement
This function fixes transactions if there are discrepancies between settlement information for a transaction
and the current terminal and merchant key information. Use this function to fix corrupted transactions, as
indicated by the Check Settlement Information option.
Rebuild Transaction Database
Rebuilds (re-indexes) the main transaction database pbadmain.dat (idx). From time to time, the index to this
file may become corrupted. Use this selection to create new indexes.
Purge Transaction Database
This option removes all records from the main transaction database. Use this only in extreme cases where
the database cannot be recovered through the rebuild function. It is recommended that the files
pbadmain.dat and pbadmain.idx be backed up prior to purging.
Rebuild History File
Rebuilds (re-indexes) specific history files.
Purge History Databases
Removes all records from a given range of history databases. Use this only in extreme cases when the
indexes cannot be rebuilt or in the case of periodic system cleanup. It is recommended that the following
range of files be backed up before purging:
pbad<mmyy>.dat and pbad<mmyy>.idx
Resort Data Processing, Inc.
P.O. Box 1170, Vail, CO 81658
(11/99)
Phone: (970) 845-1140
1-42
http://www.resortdata.com
RDP Property Management Systems
SDC Credit Card Interface
View Log(s)
Use this selection to view and print any of the three Administrator system logs. Choose from the following
list:
Log
Description
Administrator
The main Administrator log. Lists process
statuses of functions run through PBAdmin.
Settlement
Lists settlement statuses of all deposits initiated
through PBAdmin.
Transaction
The main front end log. Lists statuses of all
transactions run through PBFE.
Available Function Keys
The following function keys are active when viewing logs.
Key
Description
<F7>
Print - Prints log information on view screen.
<F10>
Save As – Save the log as a file on a hard disk.
<ESCAPE>
Quit Selection - Exits the View Log selection.
Purge Log(s)
Clears the selected log of all transactions older than the configured number of days on the Location
Information Screen. Choose the appropriate log to purge from the list provided above (Administrator,
Settlement, or Transaction).
Resort Data Processing, Inc.
P.O. Box 1170, Vail, CO 81658
(11/99)
Phone: (970) 845-1140
1-43
http://www.resortdata.com
RDP Property Management Systems
SDC Credit Card Interface
TROUBLESHOOTING
PBAdmin Setup Errors
The following errors may occur when accessing PBAdmin during the initial installation.
Error # Error Message
-1
Reason/Solutions
INTERNAL ERROR For reasons unknown, an error occurred while attempting to access any of the
c-tree databases. Possible reasons:
Insufficient memory
The database is corrupted
Try reindexing the databases by using the "admbuild -a" command in the
Administrator subdirectory or increasing memory size.
-2
INVALID
DATABASE
An invalid database number was given while trying to process a command.
Call help desk.
-3
DATABASE
An attempt was made to create a database that already exists. Call help desk.
ALREADY EXISTS If you have attempted to delete a database, make sure you remove both the
.DAT and .IDX files.
-4
DATABASE DOES An attempt was made to open a database that does not exist. Probable cause
NOT EXIST
is that the paths on the Global/Local INI File screens were not set up.
Log into PbAdmin, go into Administrator Setup->Global/Local INI File screens
and save the information.
Verify paths on the Global/Local INI File screens and the environment
variables.
-5
DUPLICATE
ERROR
A transaction currently being processed or previously processed has been
received a second time. If the duplicate is of a previous transaction, setting the
“Duplicates Allowed” flag to “Yes” in the Location Information screen will allow
this transaction into the database.
-6
FIND FIRST OR
LAST
An error occurred during a search procedure. Call help desk.
-7
NO MATCHING
RECORDS
No matching records were found when at least one was expected. Verify
information.
-8
RECORD NOT A
SUBSET
Same as above
-9
OUT OF MEMORY The program has run out of memory during processing. Increase memory or
reduce the number of transactions being processed.
-10
RECORD LOCKED An attempt was made to modify a record that was already locked by another
process. Retry the transaction, and if that fails, try reindexing the file using the
DataBase Management->Rebuild Database selection in the Administrator
System.
Resort Data Processing, Inc.
P.O. Box 1170, Vail, CO 81658
(11/99)
Phone: (970) 845-1140
1-44
http://www.resortdata.com
RDP Property Management Systems
SDC Credit Card Interface
Error # Error Message
Reason/Solutions
-11
DATABASE NOT
INITIALIZED
A transaction could not be processed due to an internal logic error. Call help
desk.
-12
LOCATION NOT
SET UP FOR
MERCHANT
The terminal given in field 109 does not reference back to a valid card
number/merchant key/location combination. Log into the Administrator Setup>ProtoBase Configuration area and verify that:
The terminal belongs to the proper location (Terminals).
The terminal and card type combination is setup with the proper merchant key
(Card Tables->Edit).
The settings were successfully configured with ProtoBase (Run Configuration).
-13
UNABLE TO OPEN An attempt was made to open a file that does not exist. Probable cause is that
FILE
the paths on the Global/Local INI File screens were not set up.
Log into PbAdmin, go into Administrator Setup->Global/Local INI File screens
and save the information.
Verify paths on the Global/Local INI File screens and the environment
variables.
Make sure the file MKEYLIST.DAT exists in the DB directory.
Verify that all of the files in the DB directory have read/write permissions set for
all users.
-14
PROTOBASE
ProtoBase did not respond with an output file.
OUTPUT FILE NOT
Verify paths are set properly on the Global/Local INI File screens and
FOUND
environment variables.
Verify ProtoBase is currently running.
-15
TRANSACTION
NOT YET
SUPPORTED
A transaction was received in the input file that is not currently supported by
the Administrator System. Call help desk.
-16
FINAL AMOUNT
TOO LARGE
A prior authorization or close transaction was received whose final amount
exceeds the previously authorized amount for the matching reference/card
number. Solutions:
Issue an authorization for the difference
OR
Setup the Administrator System to automatically do so by setting the "Auto
Authorize Difference" flag to "Yes" in Location Information.
-17
SETTLEMENT IN
PROGRESS
Transactions cannot currently be run because a settlement is in progress for
this location. Try again later. If the problem persists and is confirmed that no
settlement is actually in progress, set the "Settlement in Progress" flag to "No"
in Location Information. (<Shift> + <F3> is the “hot key” combination to go to
this field.) Also, go to Database Management->Modify Transaction Status and
move "In Progress" to "Selected".
-18
INVALID DATA IN
FIELD
The field number listed contains invalid data. Consult the "Input Fields with
Descriptions" section for validation criteria.
-19
INVALID LENGTH
FOR FIELD
The field number listed is either missing or contains invalid data. Consult the
"Input Fields with Descriptions" section for valid lengths.
Resort Data Processing, Inc.
P.O. Box 1170, Vail, CO 81658
(11/99)
Phone: (970) 845-1140
1-45
http://www.resortdata.com
RDP Property Management Systems
SDC Credit Card Interface
Error # Error Message
Reason/Solutions
-21
The reversal file "pbrevsup.txt" or history file "pbhstbl.tbl" could not be
accessed.
CANNOT OPEN
TABLE FILE
Verify paths on the Global/Local INI File screens and environment variables.
Verify the files exist in the DB directory.
Verify files have read/write permissions for all.
-22
BATCH OUT OF
BALANCE
For host capture systems only. The batch totals of the Administrator "shadow"
file do not match what the host processor expects. Extra reconciliation with the
processor should take place.
-23
ERROR MOVING
TO HISTORYBATCH GOOD
An error occurred while moving an approved settlement to history. These
records will usually show up with a status of "I" on the Select/View/Edit
Transactions screen.
Confirm with the processor that the settlement was accepted.
If batch was accepted, use the Database Management->Modify Transaction
Status utility to move the in-progress (I) transactions to history.
If batch was not accepted, use the Database Management->Modify
Transaction Status utility to change all of the in-progress (I) back to selected
(X).
-24
ERROR
An error occurred while moving an approved settlement to history. These
RESETTING
records will usually show up with a status of "I" on the Select/View/Edit
WORKING FLAGS- Transactions screen. See above for procedures.
BATCH BAD
-25
ERROR
An error occurred while moving an approved settlement to history. These
RESETTING
records will usually show up with a status of "I" on the Select/View/Edit
WORKING FLAGS- Transactions screen. See above for procedures.
BATCH GOOD
-26
FILE NOT FOUND
An attempt was made to open a file that does not exist.
Verify paths on the Global/Local INI File screens and the environment
variables.
-27
RETURN CODE
NOT FOUND
-28
SHELL PROGRAM An error occurred while attempting to run the Administrator System on an OS/2
NOT RUNNING
operating system and the shell program has not been started. Start shell
program (PBSHELL.EXE).
-29
UNABLE TO
CREATE CHILD
PROCESS
An error occurred while attempting to spawn a process. Call help desk.
-30
FILE LOCKED
An attempt was made to access a file that is already locked by another
process. Try again later, or look for *.LCK files in the subdirectory. If message
continues, call help desk.
-31
UNABLE TO
The specified file could not be opened. Check permissions, see if the
OPEN VALID.DAT file still exists, or look for *.LCK files.
-32
UNABLE TO
OPEN
REVSUP.TXT
The specified file could not be opened. Check permissions, see if the
file still exists, or look for *.LCK files.
-33
(Not used at this
time)
(Reserved for future use.)
Resort Data Processing, Inc.
P.O. Box 1170, Vail, CO 81658
An error occurred when trying to access file. Call help desk.
(11/99)
Phone: (970) 845-1140
1-46
http://www.resortdata.com
RDP Property Management Systems
SDC Credit Card Interface
Error # Error Message
Reason/Solutions
-34
UNABLE TO
OPEN
PBERROR.TXT
The specified file could not be opened. Check permissions, see if the
file still exists, or look for *.LCK files.
-35
UNABLE TO
The specified file could not be opened. Check permissions, see if the
OPEN
file still exists, or look for *.LCK files.
PBADERRS.TXT
-36
UNABLE TO
OPEN
MKEYLIST.LCK
The specified file could not be opened. Check permissions, see if the
file still exists, or look for *.LCK files.
-37
UNABLE TO
OPEN
MKEYLIST.DAT
The specified file could not be opened. Check permissions, see if the
file still exists, or look for *.LCK files.
-38
UNABLE TO
The specified file could not be opened. Check permissions, see if the
OPEN TERM.DAT file still exists, or look for *.LCK files.
-39
MASTER
INDUSTRY
ERROR
A transaction cannot be run through a terminal set to a “Master
Industry” location.
-40
DEBIT CODE
ERROR
A transaction illegal for Debit was attempted with the Debit qualifier
set. This is an integration error.
-41
UNABLE TO
OPEN
PROTOBASE
BATCH FILE
A batch file was not successfully created for ProtoBase to settle, or
PbAdmin could not open a batch file after settlement. Check the batch
file or other files in the settlement directory for errors. Call help desk.
-42
UNABLE TO
OPEN
PROTOBASE
OUTPUT FILE
PbAdmin could not open the output file after a transaction was run
through ProtoBase. This indicates ProtoBase abnormally terminated
without returning an output file. Call help desk.
Any # UNDEFINED
not in ERROR
this
table
Resort Data Processing, Inc.
P.O. Box 1170, Vail, CO 81658
An unknown error was encountered. Call help desk and report the
error number.
(11/99)
Phone: (970) 845-1140
1-47
http://www.resortdata.com
RDP Property Management Systems
SDC Credit Card Interface
PBAdmin Errors
The following errors may be displayed when accessing PBAdmin.
Error
Description/Solution
Access Denied!
The logged in user does not have security
permissions to perform this function.
American Express Pending
There is already an American Express settlement
pending. This deposit must be cleared either
manually or by calling the processor to check the
status via the "View Deposit Log" option. If there is
no actual batch pending, change the "American
Express Pending" flag to "No" in Location
Information.
At least two fields must be used
At least two fields must be entered to perform a
proper search.
Cannot access settlement file
The settlement file could not be accessed.
ProtoBase is currently settling another batch. Try
again later. Make sure permissions for the
ProtoBase directory are set for read/write.
Cannot lock file. Already in use
The record is already in use by another process.
The changes could not be saved. Try again later.
Cannot remove current user. NOT DELETED!
An attempt has been made to remove the logged in
user. This is not allowed.
Card type not valid for this location
This card type is not set up for the location in
question.
Changes have been saved
The changes have been successfully saved
Comm Director not running
During settlement, PbAdmin determines that the
ProtoBase communications director is not running.
Ensure the director is running.
c-tree Error
C-tree encountered a memory error. Increase the
largest executable size (available memory)
c-tree Internal Error
For unknown reasons, an error occurred while
attempting to access any of the c-tree databases.
Possible reasons:
Delete program not found
Error configuring card types
•
Insufficient memory
•
The database is corrupted
•
Try reindexing the databases by using the
"admbuild -a" command in the Administrator
subdirectory or increasing the memory size
The program "admpurge" was not located in the
base Administrator System directory.
The file "master.crd" in the Administrator DB
directory could not be accessed.
•
Verify file paths on the Global/Local INI File
screens and environment variables.
•
Verify the directory and file permissions for the
DB directory are set to read/write for all.
•
After running "Run Configuration", confirm the
"master.crd" file exists.
Resort Data Processing, Inc.
P.O. Box 1170, Vail, CO 81658
(11/99)
Phone: (970) 845-1140
1-48
http://www.resortdata.com
RDP Property Management Systems
SDC Credit Card Interface
Error
Description/Solution
Error configuring modems
The file "ucomm.dat" in the Administrator DB
directory could not be accessed.
Verify file paths on the Global/Local INI File screens
and environment variables.
Verify the directory and file permissions for the DB
directory are set to read/write for all.
After running "Run Configuration", confirm the
"ucomm.dat" file exists.
Error configuring processors
The file "uproc.dat" in the Administrator DB directory
could not be accessed.
Verify file paths on the Global/Local INI File screens
and environment variables.
Verify the directory and file permissions for the DB
directory are set to read/write for all.
After running "Run Configuration", confirm the
"uproc.dat" file exists.
Error configuring terminals
The file "uterm.dat" or "<terminal>.dat" files in the
Administrator DB directory could not be accessed.
Verify file paths on the Global/Local INI File screens
and environment variables.
Verify the directory and file permissions for the DB
directory are set to read/write for all.
After running "Run Configuration", confirm the files
exists.
Error deleting record
The selected record could not be deleted:
Record is already locked by another user. Try again
later.
c-tree encountered a memory error.
The files in the Administrator System DB directory
do not have read/write permission.
Error during status check
An error occurred during the American Express
status check. Either no status was available, or
some other error occurred. Try again later.
Error executing ProtoBase configuration program
The ProtoBase configuration program "pbconfig"
could not be executed. Possible reasons are:
"Pbconfig" is not located in the ProtoBase directory.
You are running 32 bit ProtoBase with PBOS=DOS
or PBOS=Client.
The paths on the Global/Local INI File screens and
in environment variables are invalid.
"Pbconfig" does not have read/write/execute
permissions set for all.
Error Loading File – Not enough Memory
Resort Data Processing, Inc.
P.O. Box 1170, Vail, CO 81658
The program is running out of memory. In a DOS
system, increase available memory (largest
executable program size).
(11/99)
Phone: (970) 845-1140
1-49
http://www.resortdata.com
RDP Property Management Systems
SDC Credit Card Interface
Error
Description/Solution
Error purging file
An error occurred while attempting to purge records
from a file. Make sure that the Administrator System
DB directory and all of its files have read/write
permissions set for all.
Error rebuilding index
An error occurred attempting to reindex a file. Make
sure that the Administrator System DB directory and
all of its files have read/write permissions set for all.
Error saving file NOT SAVED
An error occurred while attempting to save a file.
Verify file permissions.
Error setting up choice list
The choice list file could not be created and read
into memory. Possible reasons:
•
Not enough memory on machine
•
Choice list file "admlist.txt" is missing in the
Administrator System DB directory
•
File paths on the Global/Local INI File screens
or environment variables are incorrect
•
All files in the Administrator System DB
directory do not have read/write permissions set for
all.
Possible Solutions:
Error writing to printer
•
Add memory to machine
•
Verify file exists in the DB directory
•
Verify paths are correct on the Global/Local INI
File screens and environment variables
•
Verify that directory permissions for all
ProtoBase and Administrator directories are set for
read/write for all
Check printer and printer settings.
File Saved Successfully
Your file was saved. (Not an error.)
File too Large for Default Viewer
File is too large to view with default viewer. Either
install an optional internal viewer, or save/print file
when prompted.
Insufficient Memory Available
Increase largest executable program size.
Invalid account number
The account number is invalid.
The card type is not setup to be accepted by this
terminal.
The card did not pass a MOD 10 check.
The card number contained invalid data.
The length is incorrect.
Re-enter, or check configuration.
Invalid amount entered
The dollar amount entered is invalid.
Missing decimal point.
Too many numbers to add decimal point.
Amounts may not be negative.
Invalid expiration date
Resort Data Processing, Inc.
P.O. Box 1170, Vail, CO 81658
The card is expired or the date entered is not a
proper date.
(11/99)
Phone: (970) 845-1140
1-50
http://www.resortdata.com
RDP Property Management Systems
SDC Credit Card Interface
Error
Description/Solution
Invalid login. Access denied
The permissions set for this user do not allow
access to this selection/function.
Invalid mag stripe info entered
The track information does not match between track
1 and 2.
Invalid Merchant Key
One of two errors have occurred:
•
The merchant key entered does not exist in the
ProtoBase file "pbmerc.dat".
•
While saving a terminal card table, a blank
merchant key was encountered for a selected
(checked" card range.
The password corresponding to the previous login is
incorrect.
Invalid password. Please reenter
Invalid printer parameters in file
The Administrator file "print.txt" contains invalid data,
or is corrupted. Try selecting a different printer.
Invalid printer port
The port specified in the Location Information screen
cannot be accessed
Invalid processor
The processor entered is not in the ProtoBase
merchant file "pbmerc.dat". Please verify. Call help
desk.
Invalid Range Entered for Card
A card BIN range must have a lower number on the
left and a greater number on the right.
Invalid Record -- Duplicates Existing Entry
The entry you are saving already exists in the
database.
Invalid selection
The value entered in this field is invalid. Press the
[F2] key to view a list of valid values.
Invalid terminal/location combination entered
The terminal selected for this transaction does not
belong to the currently logged in location.
No printer defined
No printer type has been defined in Location
Information.
No records available for selection
PbAdmin cannot find any records of the requested
type in the database.
No settlement pending
There is not settlement currently pending with
American Express so the status check could not be
performed. If this is incorrect, change the "American
Express Pending" flag to "Yes" in Location
Information and run again.
Printer is currently busy
Printer has sent back a busy signal, try again later.
Printer is out of paper
Printer is offline or out of paper
Printer is turned off or is offline
Printer is offline or not turned on.
Processor setup files not found
The ProtoBase setup files "pbset#.dat" and
"pbmrc#.dat" are not currently located in the
ProtoBase directory. Please verify. Call help desk.
Resort Data Processing, Inc.
P.O. Box 1170, Vail, CO 81658
(11/99)
Phone: (970) 845-1140
1-51
http://www.resortdata.com
RDP Property Management Systems
SDC Credit Card Interface
Error
Description/Solution
ProtoBase Configuration program not found
The program "pbconfig" was not found in the
ProtoBase directory:
•
Verify the ProtoBase directories specified in the
Global/Local INI File screens and environment
variables are correct.
•
Verify that the executable "pbconfig" is located
in the ProtoBase directory.
•
Verify the "pbconfig" program has
read/write/execute permissions for all.
The reconfiguration could not be completed because
ProtoBase is currently running a settlement. Try
again later.
ProtoBase is currently running a deposit
Record is No Longer Valid
A record on the screen has been deleted or
changed. Exit and re-enter the Select/View/Edit
Transactions screen to refresh the display.
Reference number not found
The reference number entered is not located in the
current work file.
Report generator not found
The program "pbadrep" was not located in the base
Administrator System directory.
Required Field not Entered – Not Saved
The cursor will be placed on the missing field when
the message is cleared. Please enter a value for
this field.
Restart ProtoBase to activate new settings
Upon successful completion of "Run Configuration"
ProtoBase must be brought down and restarted for
the updated values to be activated.
Sale not Valid—Use Prior Auth
Indicates that a Sale transaction has been entered
for a non-host processor. Enter as a Prior
Authorization transaction instead.
Selected file not found
The Administrator could not locate a required file.
This can also happen if you perform a report that
generates no data, or if your database contains no
data. Call help desk.
Sorting program not found
PBSORT (for non-UNIX) or SORT (for UNIX) could
not be executed.
Terminal Mkey does not match transaction Mkey
The terminal deposit Mkey currently defined does
not match information in the transaction. You may
attempt to fix this on the Database Management
menu.
Terminal not valid for this location
The specified terminal is not set up for the current
location. Select a valid terminal.
Transaction not found
No transaction was found that matched the entered
criteria. Make sure the cursor is at the top of the
database ([Shift]-[F7]) and try again.
Transaction status error - change not allowed
The status flag indicator of this transaction is set to a
value that does not allow editing. Status flags that
cannot be edited are:
•
•
•
Resort Data Processing, Inc.
P.O. Box 1170, Vail, CO 81658
‘U’ = Host Pending
‘P’ = American Express Pending
‘I’ = In progress for Settlement
(11/99)
Phone: (970) 845-1140
1-52
http://www.resortdata.com
RDP Property Management Systems
SDC Credit Card Interface
Error
Description/Solution
Transaction type error - change not allowed
The transaction type/code of this transaction is set to
a value that does not allow editing. Current
transaction types that cannot be edited are:
Unable to access choice list file
•
Checks
•
Debit Sale
•
Debit Return
•
Debit Void
The choice list file could not be created and read
into memory. Possible reasons:
•
Not enough memory on machine
•
Choice list file "admlist.txt", "admmodem.txt", or
"admproc.txt" is missing in the Administrator System
DB directory
•
File paths on the Global/Local INI File screens
or environment variables are incorrect
•
All files in the Administrator System DB
directory do not have read/write permissions set for
all.
•
Exiting ProtoBase and *.lck files still exist.
Possible Solutions:
Unable to access help text file
•
Add memory to machine
•
Verify file exists in the DB directory
•
Verify paths are correct on the Global/Local INI
File screens and environment variables
•
Verify that directory permissions for all
ProtoBase and Administrator directories are set for
read/write for all
The help text file could not be read into memory.
Possible reasons:
•
Not enough memory on machine
•
Choice list file "admhelp.txt" or "pbcfghlp.txt" is
missing in the Administrator System DB directory
•
File paths on the Global/Local INI File screens
or environment variables are incorrect
•
All files in the Administrator System DB
directory do not have read/write permissions set for
all.
Possible solutions:
Unable to access modem file
See Error message above
The file "ucomm.dat" in the Administrator System DB
directory could not be accessed.
Verify file paths on the Global/Local INI File screens
and environment variables.
Verify the directory and file permissions for the DB
directory are set for read/write for all.
If running "Run Configuration", confirm the
"ucomm.dat" file exists.
Resort Data Processing, Inc.
P.O. Box 1170, Vail, CO 81658
(11/99)
Phone: (970) 845-1140
1-53
http://www.resortdata.com
RDP Property Management Systems
SDC Credit Card Interface
Error
Description/Solution
Unable to access PBMERC.DAT
The ProtoBase setup file "pbmerc.dat" cannot be
accessed:
Unable to access printer defs file
Unable to access processor file
Unable to access report file
•
Check ProtoBase paths on the Global/Local INI
File screens and the environment variables for
accuracy.
•
Verify the file "pbmerc.dat" exists in the
ProtoBase directory.
•
Verify the file "pbmerc.dat" has read/write
permissions set for all.
The Administrator file "print.txt" was unable to be
accessed.
•
Verify paths on the Global/Local INI File screens
and environment variables.
•
Verify the file "print.txt" exists in the
Administrator System DB directory.
•
Verify the file "print.txt" has read/write
permissions for all.
The file "uproc.dat" in the Administrator System DB
directory could not be accessed.
•
Verify file paths on the Global/Local INI File
screens and environment variables.
•
Verify the directory and file permissions for the
DB directory are set for read/write for all.
•
If running "Run Configuration", confirm the
"uproc.dat" file exists.
The report file could not be accessed. No records
were found to generate the report.
Unable to access selection list
The processor, terminal, or device list could not be
built. Verify the Administrator System DB directory
has read/write permissions set.
Unable to access terminal file
The file "uterm.dat" or "<terminal>.dat" files in the
Administrator System DB directory could not be
accessed.
Unable to build selection list
Unable to change directory
•
Verify file paths on the Global/Local INI File
screens and environment variables.
•
Verify the directory and file permissions for the
DB directory are set for read/write for all.
•
If running "Run Configuration", confirm the files
exists.
The processor, terminal, or device list could not be
built. Verify the Administrator System DB directory
has read/write permissions set.
An unsuccessful attempt was made to change to a
specific directory.
•
Verify the ProtoBase directory paths on the
Global/Local INI File screens and environment
variables.
•
Verify the ProtoBase directory has read/write
access set for all.
Resort Data Processing, Inc.
P.O. Box 1170, Vail, CO 81658
(11/99)
Phone: (970) 845-1140
1-54
http://www.resortdata.com
RDP Property Management Systems
SDC Credit Card Interface
Error
Description/Solution
Unable to change industry because unsettled
records exist
An attempt has been made to change the location
industry code while unsettled transactions are still in
the current working database. Settle or remove
existing settleable transactions.
Unable to execute Editor command
Unable to execute the optional internal viewer
program. Check path on the Global/Local INI File
screens.
Unable to execute settlement program PBADSET
The settlement program "pbadset" could not be
executed. Possible reasons:
•
"Pbadset" is not located in the ProtoBase
directory.
•
The paths on the Global/Local INI File screens
and in environment variables are invalid.
•
"Pbadset" does not have read/write/execute
permissions set for this user.
Unable to execute System command
Unable to “shell” to a subprogram. Check for bad
COMPSEL (DOS) or PBOS setting.
Unable to open file
An error occurred while attempting to open a file.
Unable to open PBCONFIG.CFG
•
Verify paths specified on the Global/Local INI
file screens and environment variables.
•
Verify all files in the Administrator System DB
directory have read/write permission set for all.
The ProtoBase file "pbconfig.cfg" in the ProtoBase
directory could not be accessed. Verify the directory
and file permissions for this directory are set to
read/write for all.
Unable to update selection list
The processor, terminal, or device list could not be
built. Verify the Administrator System DB directory
has read/write permissions set.
Unable to write to Administrator Log
The location’s Administrator Log could not be
updated. Make sure all of the files in the
Administrator System DB directory have read/write
permissions set for all.
Unable to write to printer port
The port specified in Location Information cannot be
accessed. Check permissions, verify path, and
configure the device name.
Resort Data Processing, Inc.
P.O. Box 1170, Vail, CO 81658
(11/99)
Phone: (970) 845-1140
1-55
http://www.resortdata.com
RDP Property Management Systems
SDC Credit Card Interface
ProtoBase Response Messages
Protobase issues the following messages when processing a credit card through RDP.
Error
Description
Solution
0000
COMPLETE
This transaction is successful.
None necessary.
0001
BAD DEVICE
ProtoBase has been configured to use a
malfunctioning or nonexistent device.
Make sure a valid device is configured
(modem or line). Make sure the
configured device works.
0002
COMM DIRECTOR
NOT RUNNING
Pbdirect, the communications director
process, is not running
Ensure the Pbdirect is running and the
pbd.LCK is present when Pbdirect is
running.
0003
COMMUNICATIONS
ERROR
ProtoBase was unable to complete the
transaction due to an interruption in
communications.
Retry the transaction. If continued failure,
check phone and modem connections.
Run the transaction again and watch the
modem for proper operation. Check baud
rate. Most third-party transaction
processors communicate at 1200 baud.
0004
COMMUNICATIONS
FAILURE
A fatal communications error has
occurred. Similar to error #0003, but
usually indicates a failure in the modem.
Retry the transaction. If continued failure,
check phone and modem connections.
Test modem with another communication
software package. If these are OK, report
problem to help desk.
0005
ERROR INITIALIZING
PORT
Could not initialize port.
Check and repair malfunctioning
communications port. Make sure
configured port actually exists. Make sure
that the device name matches that
specified in the pbconfig.cfg file.
0006
MODEM DIAL ERROR
ProtoBase is unable to dial the modem.
Repair malfunctioning modem. Make sure
a phone or data line is connected. Make
sure correct Dial String, such as ATDT, is
in the Device Configuration entry in the
Configuration file, pbconfig.cfg.
0007
MODEM RESPONSE
ERROR
Modem is not responding correctly.
Check and repair broken modem. Be sure
modem is turned on and attached to
correct port. Ensure that the Init string is
defined properly in the Configuration file.
Make sure that the max baud rate is larger
or equal to the modem speed in the
configuration file.
0008
NO ANSWER FROM
HOST
Host did not answer.
Check phone number in the Processor
Configuration entry in the Configuration
file, pbconfig.cfg. Try transaction again.
0009
NO DIAL TONE
No dial tone.
Check and, if necessary, connect phone
line to modem. If necessary, have phone
line repaired. Be sure line is not in use.
0010
NO ENQ FROM HOST
Host did not send ENQ. A transaction or
deposit was attempted and ProtoBase
was unable to receive the initial character
sent from the host computer.
Verify the phone number and baud rate
are valid.
Resort Data Processing, Inc.
P.O. Box 1170, Vail, CO 81658
(11/99)
Phone: (970) 845-1140
1-56
http://www.resortdata.com
RDP Property Management Systems
SDC Credit Card Interface
Error
Description
Solution
0011
NO HOST
CONNECTION
No response from host on initial
connection attempt.
Try again. Network connection not
established. Check phone number and
baud rate.
0012
NO PHONE NUMBER
No phone number in the Processor
Configuration entry in the Configuration
file, pbconfig.cfg.
Check Processor Configuration, and enter
a valid phone number.
0013
NO RESPONSE FROM
HOST
Host did not respond to transaction.
Try transaction again.
0014
NO RESPONSE FROM
MODEM
Modem is not responding.
Check and repair malfunctioning modem.
Verify the modem is turned on and
attached to the correct port. Verify the Init
string is defined properly in
PBCONFIG.CFG. Verify the Max Baud
Rate is greater than or equal to the
modem speed in PBCONFIG.CFG.
0015
RECEIVE TIME OUT
Host did not respond in time.
Try transaction again.
0016
TRANSMISSION
ERROR
A transmission error occurred.
Try transaction again.
0017
UNEXPECTED
DISCONNECT
The telephone line disconnected before
the transaction completed.
Try transaction again. Make sure Call
Waiting feature is disabled.
0018
UNKNOWN
PROCESSOR
SofTrans module for selected processor
not present.
Check Define Terminal Section of Config
File to be sure that proper processor is
defined. Contact Help Desk to purchase
appropriate SofTrans module, or select
another processor.
0019
UNKNOWN
PROTOCOL
PBCOM.DAT is missing a
communications protocol definition or the
file is corrupt.
Contact help desk.
0020
UNKNOWN DEVICE
ProtoBase has been configured to use a
malfunctioning or nonexistent device.
Make sure a valid device (modem or line)
is configured. Make sure the configured
device works.
0022
BATCH FILE IS EMPTY
The user attempted to run a report or
deposit with no current credit card
transactions in the current batch file. The
batch file must contain transactions to run
a report or settlement from it.
Continue processing as usual.
0023
CANNOT CREATE
HISTORY FILE
Unable to create batch History file.
Ensure that disk is not full and that
permissions are set correctly.
0024
DEVICE FILE ERROR
Error in the Device Configuration entry of
the Configuration file, pbconfig.cfg.
Usually caused by a scrambled file. Edit
and repair the file. Run pbconfig.exe.
0025
INVALID
TRANSACTION FILE
Bad or nonexistent input file.
Repair file; ensure that it is in the current
working directory. Be sure path of input
file points to the ProtoBase directory.
Resort Data Processing, Inc.
P.O. Box 1170, Vail, CO 81658
(11/99)
Phone: (970) 845-1140
1-57
http://www.resortdata.com
RDP Property Management Systems
SDC Credit Card Interface
Error
Description
Solution
0026
PROCESSOR FILE
ERROR
The Processor Configuration entry of the
Configuration file, pbconfig.cfg, is missing,
corrupt or contains an error.
Recreate the Processor Configuration
entry in the Configuration file, pbconfig.cfg
and run pbconfig.exe. If error persists, call
Help Desk.
0027
PROTOCOL FILE
ERROR
Pbcom.dat, the protocol file, is missing,
corrupt, or contains and error.
Call Help Desk.
0028
UNABLE TO ACCESS
BATCH FILE
Either no pbbatch.dat file exists, or the
path to the file is incorrect. May be caused
intermittently by transactions being
recorded at the same time.
Check permissions. Supply correct path.
Verify upload criteria. Delete any
pbbatch.LCK files.
0029
UNABLE TO CREATE
FILE
Cannot create any file.
Check permissions; make room on disk.
0031
UNABLE TO OPEN
MERCHANT FILE
Cannot open pbmerc.dat, the merchant
data file.
Make sure the live merchant file has been
installed. Check permissions, supply
correct path.
0032
UNABLE TO OPEN
OUTPUT FILE
Cannot open output file, the data file to
which the results of each transaction are
written.
Check permissions, make room on disk.
0035
UNABLE TO OPEN
TERMINAL FIELD
#0109
Could not open TTTTTTTT.trm, the
Terminal file.
Enter a valid value for field #109, Terminal
ID as defined in pbconfig. Supply a valid
correct entry for field #105, Data Files
Path. Create a valid TTTTTTTT.trm
terminal file. Note: The pbconfig.exe file
entries are case sensitive.
0036
UNABLE TO OPEN
TRANS FILE
Bad or nonexistent input file.
Repair file; ensure that it is in the current
working directory.
0037
UNABLE TO READ
FROM FILE
Corrupted disk.
Repair disk or reinstall ProtoBase.
0038
UNABLE TO WRITE
TO FILE
Corrupted disk or permissions not set
correctly.
Verify permissions; repair disk or reinstall
ProtoBase.
0039
UNABLE TO OPEN
DEVICE FILE
Cannot open pbdev.dat, Device
Configuration data file.
Be sure file is in ProtoBase files directory.
Check permissions. Run pbconfig and
retry trans.
0040
UNABLE TO OPEN
REPORT FILE
Cannot open file supplied in field #107,
Report File.
Supply correct path and file name.
0041
INVALID ACCOUNT
NUMBER FIELD #0003
Account number data is invalid. If the data
was manually input, the account number
may have been miskeyed.
Re-swipe or reenter the card data. If error
occurs again, manually enter the account
number and expiration date. If the error
condition continues, ask the customer for
another credit card or type of payment.
0042
INVALID
ADJUSTMENT
AMOUNT
The amount entered or passed from the
POS product is invalid.
Re-enter the amount in the format
9999.99.
Resort Data Processing, Inc.
P.O. Box 1170, Vail, CO 81658
(11/99)
Phone: (970) 845-1140
1-58
http://www.resortdata.com
RDP Property Management Systems
SDC Credit Card Interface
Error
Description
Solution
0043
INVALID AMOUNT
The transaction amount (field 2) entered
or passed from the POS product is invalid.
Re-enter the amount in the format
9999.99.
0045
INVALID BATCH
DEPOSIT LEVEL
Batch Deposit Level is not 1, 2, 3, or 4.
Check Configuration file for value of Batch
Deposit Level field, Value must be 1 - all,
2 - deposit, for merchant number
specified, 3 - deposit for cashier ID
specified, or 4 - Deposit for terminal ID
specified.
0046
INVALID CARD
INFORMATION FIELD
#0003
Account number data is invalid. If the
credit card was input via a card reader,
the magnetic stripe on the credit card may
be damaged or the credit card may be
fraudulent.
Re-swipe or re-enter the credit card. If
error occurs again, manually enter the
account number and expiration date. If the
error conditions continues, ask the
customer for another credit card or type of
payment.
0047
INVALID CARD TYPE
The credit card being used for payment is
not listed in the Card Type section of
PBCONFIG.CFG for this terminal, or the
BIN does not match any defined ranges in
the CardType section. If the credit card
was manually entered, the account
number may have been typed incorrectly.
Try the transaction again. If error condition
recurs, ask customer for another credit
card or form of payment. Call Help Desk
for assistance in customizing the Card
Type entry in the Configuration file to
include this type of credit card. Check the
Processor configuration entry and
Terminal Configuration entry to add the
card type information and save the file.
Acceptance of this card type must be
input into the merchant's file on the thirdparty transaction processor computer as
well.
0048
INVALID DATE
ENTERED
Date entered is invalid.
Enter a valid date in format MMDDYY.
0049
INVALID EXPIRATION
DATE FIELD #0004
Date entered is invalid.
Enter a valid date in format MMYY.
Ensure that no spaces exist in card
account number.
0050
PIPE OPEN FAILURE
Indicates a system level failure. The
system could not open the Interprocess
Communication (IPC) link between the
various elements of the ProtoBase
system.
Check system permissions and system
resources.
0051
INVALID INDUSTRY
CODE ENTERED
Critical system error. Industry code read is
not valid.
Call Help Desk.
0053
INVALID MAG STRIPE
FIELD #0003
Invalid CRC (cyclical redundancy check)
via a card reader. The magnetic stripe on
the credit card may be damaged or the
credit card may be fraudulent.
Re-swipe or re-enter the credit card. If
error occurs again, manually enter the
account number and expiration date. If the
error condition continues, ask the
customer for another credit card or type of
payment.
0054
INVALID REFERENCE
NUMBER
The reference number in Field 7 is either
less that 1 or greater than 99999999.
Verify and re-enter a valid reference
number, or call the Help Desk.
Resort Data Processing, Inc.
P.O. Box 1170, Vail, CO 81658
(11/99)
Phone: (970) 845-1140
1-59
http://www.resortdata.com
RDP Property Management Systems
SDC Credit Card Interface
Error
Description
Solution
0057
INVALID TERM ID
Terminal ID in Field 109 is invalid.
Supply a valid terminal ID as defined in
"Terminal Configuration Section," or
define the terminal in the Terminal
Configuration entry in the Configuration
file, pbconfig.cfg file.
0058
INVALID TIME
ENTERED
Time entered is invalid.
Enter a valid time in HHMMSS. Verify the
system time is correct. Retry the
transaction.
0059
INVALID
TRANSACTION CODE
Critical system error. Transaction code in
Field 1 is not valid.
Verify integration with POS System. Call
Help Desk.
0060
UNDEFINED
VALIDATION ERROR
The response from the host, as
interpreted by ProtoBase, did not fit the
pattern for an approved or accepted
transaction. (this may be a DECLINE,
HOLD CARD, CALL CENTER, etc.)
Retry transaction. If error condition recurs,
request another form of payment. If this
error occurs during testing, check the
input data.
0061
CARD NOT MARKED
FOR EDC IN BIN
A transaction type other that Authorization
Only is being performed on a card type
that has no Depositor set up for it in the
Configuration file.
Ask to use another credit card or type of
payment. Perform an Authorization Only
transaction and then mail receipts to the
bank via existing company procedures.
Call Help Desk for assistance in
customizing the Card Type section to
include the desired credit card type.
Check the Processor and Terminal
sections in PBCONFIG.CFG to add the
card type information. The merchant file,
PBMERC.DAT, may also need to be
edited for the desired card type to be
accepted.
0062
MERCHANT NUMBER
NOT IN PBMERC.DAT
PBMERC.DAT contains an invalid or test
merchant number, or the Terminal section
in PBCONFIG.CFG contains invalid
merchant keys.
Edit the merchant keys in
PBCONFIG.CFG. If the error continues,
contact Help Desk for merchant update.
0063
PIPE READ FAILURE
Indicates a system level failure. The
system could not read the Interprocess
Communication (IPC) link previously
opened between the various elements of
the ProtoBase system.
Check system permissions and system
resources.
0064
PIPE WRITE FAILURE
Indicates a system level failure. The
system could not write to the Interprocess
Communication (IPC) link previously
opened between the various elements of
the ProtoBase system
Check system permissions and system
resources.
0065
TRANSACTION NOT
FOUND
An invalid reference number in Field 7
was entered during a Void operation.
Edit Field 7 in the input file. Retry the
transaction.
0066
NO DELIMITER IN
INPUT LINE
The comma is missing from a line in the
input file. Can also be caused by blank
line in input file.
Correct the input file.
0067
MISSING OR INVALID
FIELD #
Field #xxxx is missing or invalid in input
file. This field is required for the
transaction.
Add or supply a valid value for the field
number specified.
Resort Data Processing, Inc.
P.O. Box 1170, Vail, CO 81658
(11/99)
Phone: (970) 845-1140
1-60
http://www.resortdata.com
RDP Property Management Systems
SDC Credit Card Interface
Error
Description
Solution
0068
INPUT LINE GREATER
THAN 256 CHARS
An input line is too long.
Correct the input.
0069
INCORRECT ACCT
LENGTH
Credit card # is incorrect.
Check credit card #. Verify that Card Type
entry is pbconfig file is correct.
0071
NO DEPOSITORS
FOUND IN BIN
Could not find a depositor in
TTTTTTTT.trm, the terminal file.
Make sure that the depositor is specified
for each card type for each terminal in the
Configuration file.
0072
ERROR IN BATCH
UPLOAD
There was an error during the settlement
process.
Contact your processor and retry the
settlement.
0073
INVALID BATCH
DEPOSIT LEVEL
Deposit level in input file is incorrect.
Enter a valid value in field 111. Valid
values are:
1 = All
2 = Deposit for merchant number
specified
3 = Deposit for cashier ID specified
4 = Deposit for terminal ID specified.
0074
NO MATCHING
RECORDS IN BATCH
Could not find record to void or modify.
Select a valid record.
0077
AWK FAILED
Awk failed to execute. Awk is a
transaction and reporting system used
with UNIX related systems. ProtoBase
uses awk for file handling during batch
deposits.
Check the path, and make sure the awk
executable is not named differently.
0078
DEPOSIT IN
PROGRESS, TRY
LATER
Deposit for this merchant in progress.
Retry the transaction after the deposit is
complete.
0079
UNABLE TO LOCK
BATCH, TRY LATER
Could not lock Batch file to add
transaction.
Try the transaction again later.
0081
UNABLE TO CHANGE
DIRECTORY
Incorrect path given in field 105, 106, 107,
or 108.
Supply valid paths for data files, batch file,
report file, and history files. Make sure the
trailing slash (\) character exists.
0084
NOT ENOUGH
MEMORY
ProtoBase was unable to allocate enough
memory to run the requested transaction.
Add memory to the system, or fire up
existing memory. Be sure that the
Softrans files or Merchant file were
compiled on the proper system, intel vs
non-intel.
0085
COMM PROCESS
TERMINATED
Pbcom processing ended abnormally.
Run pbkill to shut down pbdirect. Check
configuration; retry transaction. If problem
persists, call Help Desk. If pbcom is not
present, delete UNX* and *.LCK files, kill
the pbdirect process and restart pbdirect.
Resort Data Processing, Inc.
P.O. Box 1170, Vail, CO 81658
(11/99)
Phone: (970) 845-1140
1-61
http://www.resortdata.com
RDP Property Management Systems
SDC Credit Card Interface
Error
Description
Solution
0086
COMM NOT
AVAILABLE
Pbdirect cannot locate pbcom.
Check Configuration file to make sure that
the correct devices are configured and the
number of requests for each device have
not exceeded their limits. Also make sure
a device Is available for the desired
processor. Stop and restart pbdirect.
Check permission of pbcom.
0087
UNABLE TO OPEN
CUHIST.NDX
Could not open history index.
Supply valid path for field #108, History
file path, or correct permissions.
0088
NO RESPONSE FROM
COMM DIRECTOR
Pbdirect not running. Pbd.LCK exists and
pbdirect appears to be running but is not.
Remove pbd.LCK and UNX*. Kill the
pbcom process if necessary and restart
pbdirect.
0089
CANNOT FIND FILE
PATH
Batch file cannot be located.
Check file path for input file. Check history
or bad files for batch file to be deposited.
0090
COULD NOT ACCESS
FIELD CHK DATA
Wrong version of SofTrans module loaded
for this processor.
Call Help Desk.
0091
NO DEVICES ARE
AVAILABLE
Cannot access comport specified.
Check config file for device specified.
Ensure that the Max Baud in the device is
greater than or equal to the Baud Rate in
the processor section.
0092
UNABLE TO RESTORE
VOID TRANSACT
Unable to restore void.
Check reference # to match with voided
transaction.
0093 – 0100
UNDEFINED MISC
ERROR (S)
An error has occurred and ProtoBase was
unable to define the cause
Try transaction again. If this persists, call
Help Desk.
Note: Responses to messages numbered from 101 to 117 are normally status responses for ongoing transactions.
Numbers 101, 102, and 103 may be returned if the maximum number of tries have been exceeded in any one
transaction. These status messages return during the course of each transaction and may be directed to the
terminal device if desired.
0101
MODEM ERROR
No fix necessary. See note above.
0102
MODEM BUSY
No fix necessary. See note prior to
message 0101.
0103
MODEM NO ANSWER
No fix necessary. See note prior to
message 0101.
0104
MODEM RINGING
No fix necessary. See note prior to
message 0101.
0105
DIALING
No fix necessary. See note prior to
message 0101.
0106
WAITENQ
No fix necessary. See note prior to
message 0101.
0107
ONLINE
No fix necessary. See note prior to
message 0101.
0108
TRANSMIT
No fix necessary. See note prior to
message 0101.
Resort Data Processing, Inc.
P.O. Box 1170, Vail, CO 81658
(11/99)
Phone: (970) 845-1140
1-62
http://www.resortdata.com
RDP Property Management Systems
Error
SDC Credit Card Interface
Description
Solution
0109
WAITING
No fix necessary. See note prior to
message 0101.
0110
RECEIVE
No fix necessary. See note prior to
message 0101.
0111
COMPLETE
No fix necessary. See note prior to
message 0101.
0112
RESPONSE
No fix necessary. See note prior to
message 0101.
0113
HEADER
No fix necessary. See note prior to
message 0101.
0114
PACKET
No fix necessary. See note prior to
message 0101.
0115
HANGUP
No fix necessary. See note prior to
message 0101.
0116
INACTIVE
No fix necessary. See note prior to
message 0101.
0117
ACK
No fix necessary. See note prior to
message 0101.
0118
NO DIRECT
PROCESSOR
A direct processor has been indicated in
the Processor Configuration entry in the
Configuration file, when no direct line is
present.
Resort Data Processing, Inc.
P.O. Box 1170, Vail, CO 81658
(11/99)
Phone: (970) 845-1140
Add direct line or reconfigure for dial-up
processor.
1-63
http://www.resortdata.com
RDP Property Management Systems
SDC Credit Card Interface
Input Fields with Descriptions
This section describes the fields that are in the input file that RDP creates.
Field Number
Field Name
Data Type
1
Transaction Type
Numeric
2
Transaction Amount
Decimal Amount
3
Account Number/ Track
Anything
128
4
Expiration Date
Numeric
MMYY
6
Authorization Number
Anything
6
7
Reference Number
Alpha Numeric
12
9
Batch Number
Numeric
8
12
Force Flag
Numeric
1
15
PS2000 Data
Alpha Numeric
23
16
PS2000 Amount
Alpha Numeric
9999.99
18
Debit PIN Number
Alpha Numeric
20
32
Transaction Date
Date
MMDDYY
33
Transaction Time
Time
HHMMSS
34
CPS PSI Indicator
Alpha Numeric
1
35
CPS Transaction Code
Alpha Numeric
4
36
CPS Transaction ID
Alpha Numeric
15
37
CPS Authorizer
Alpha Numeric
1
38
Reason Code
Alpha Numeric
2
39
POS Entry Mode
Alpha Numeric
4
40
CVC Error Indicator
Alpha Numeric
1
41
Mag Strip Quality Indicator
Alpha Numeric
1
42
Authentication Code
Alpha Numeric
6
100
X Display Coordinate (DOS Only)
Numeric
2
101
Y Display Coordinate (DOS Only)
Numeric
2
105
ProtoBase Data Path
Alpha Numeric
50
106
Batch Path
Alpha Numeric
50
107
Report Path
Alpha Numeric
50
108
History Path
Alpha Numeric
50
109
Terminal ID
Alpha Numeric
8
110
Cashier ID
Alpha Numeric
7
112
Processor ID
Numeric
2
115
Transaction Qualifier
Numeric
3
118
Reversal ID
Numeric
1
Resort Data Processing, Inc.
P.O. Box 1170, Vail, CO 81658
(11/99)
Phone: (970) 845-1140
Size/Format
2
99999.99
1-64
http://www.resortdata.com
RDP Property Management Systems
Field Number
SDC Credit Card Interface
Field Name
Data Type
Size/Format
125
Retrieval Reference Number
Numeric
8
126
Acquiring ICA
Alpha Numeric
2
127
Authorization Characteristic Indicator
Alpha Numeric
1
128
Original Authorization Amount
Numeric
9
129
Preferred Customer Indicator
Alpha Numeric
1
130
Total Authorized Amount
Numeric
9
Lodging
300
Change Description
Numeric
24
301
Folio Number
Numeric
8
302
Room Rate
Decimal Amount
303
Check-in Date
Date
MMDDYY
304
Check-out Date
Date
MMDDYY
305
Program Code
Numeric
306
Tax Amount
Decimal Amount
307
Length of Stay
Numeric
6
308
Ticket Number/ROC Number
Alpha Numeric
10
309
Operator/Server ID
Numeric
6
310
Room Number
Alpha Numeric
4
311
Extra Charges
Decimal Amount
312
Extra Charges Reason
Numeric
999.99
2
9999.99
9999.99
65
4
Charge Description values: 00-Health Spa, 01-Lodging, 02-Food/Beverage, 03-Gift Shop, 04-Beauty Salon,
05-Convention Fees, 06-Tennis/Pro Shop, 07-Golf/Pro Shop, 08-Unassigned, 09-Unassigned
5
Extra Reason Codes: 0-None, 2-Restaurant, 3-Gift Shop, 4-MiniBar, 5-Telephone, 6-Other, 7-Laundry
Resort Data Processing, Inc.
P.O. Box 1170, Vail, CO 81658
(11/99)
Phone: (970) 845-1140
1-65
http://www.resortdata.com
RDP Property Management Systems
Resort Data Processing, Inc.
P.O. Box 1170, Vail, CO 81658
SDC Credit Card Interface
(11/99)
Phone: (970) 845-1140
1-66
http://www.resortdata.com
RDP Property Management Systems
Owner Accounting
OWNER ACCOUNTING
OVERVIEW
This chapter is designed for customers using RDP's whole ownership system (one owner per room). It
provides an explanation of owner accounting features. Topics include:
Creating an Owner Master
Transferring Ownership Of Rooms
Secondary Owners
Folio Transactions and Owner Statements
Processing Owner Income with Option 912
Posting Transactions to Owner Masters
Transferring Owner Reservation Balances at Checkout
Automatically Posting Reservation Cleaning Fees
Printing Owner Monthly Statements
Changing Owner MTD/YTD Statements
Recording Payments from Owners
Making Payment Corrections
Generating Refunds
Inquiring on Owner History - Option 502
1099 Statements
Owner Statement Checklist
Order of Events
Following is a summary of the steps required to properly handle owner accounting. A complete explanation
of each step follows this summary.
1.
Rooms are defined and owners are entered. (See the Rooms chapter in the User’s Manual for more
information)
2.
Create owner masters with option 200 on the Owner Master menu.
3.
Reservations are entered, checked-in, and checked-out.
4.
Option 912 processes reservation income to owners.
5.
Transactions can be posted directly to owner masters for owner charges.
6.
Statements are printed, reviewed, and re-printed.
7.
Payments are collected.
8.
Historical inquiry is available.
9.
1099 statements can be printed.
Resort Data Processing, Inc.
PO BOX 1170, Vail, CO 81658
(11/99)
Phone: (970) 845-1140
2−67
http://www.resortdata.com
RDP Property Management Systems
Owner Accounting
CREATING AN OWNER MASTER
Add owner masters with option “200” - “Add Owner Information” on the Owner Master menu (12). A sample
completed owner master follows:
It is very important to pay attention to the use of the terms "room number" and "owner number" in this
documentation. Room numbers apply to the physical room rented, and are added with option 200 on the
Room Master menu. Owner numbers refer to the owner of a given room number. Owner numbers are
added with option 200 from the Owner Master Menu. The room must always be created before the owner
master. All reservations are made for room numbers and not owner numbers. The owner number
usually matches the room number.
Owner Type
The owner type should match the room type. For example, if the owner owns a 1B (one-bedroom) room, the
owner type should be 1B. Owner types must be defined in table C2 before they can be assigned to either
room numbers or owner numbers.
Option “212” - “Global Post Owner Charge” allows transactions to be posted to all owners of one owner type
at the same time. For example, if a $100 management fee is charged to all owners of type 1B, option 212
can post a charge to all owners of type 1B with only a few keystrokes.
There are two special owner types, Z and OLD. Type Z is reserved for entering “secondary” owners,
defined as more than one owner of the same room. See Secondary Owners in this chapter. Use type OLD
when an owner sells his room and the history of both the old owner and the current owner need to be
maintained. See Transferring Ownership of Rooms in this chapter.
Resort Data Processing, Inc.
PO BOX 1170, Vail, CO 81658
(11/99)
Phone: (970) 845-1140
2−68
http://www.resortdata.com
RDP Property Management Systems
Owner Accounting
Property Code
Prior to Version 12, Property Code was a multi-purpose field used in the following ways:
1.
As an accounting feature to have a single transaction code, such as room charge, be disbursed
amongst multiple GL accounts based on the property code field.
2.
For determining availability displays, including 142 (Tape Chart), 143 (Display Group Blocks), 172
(Room Calendar Report), 173 (Group Master Room Block Report), 360 (Occupancy Forecast) & 362
(View Current Occupancy Forecast).
3.
As a "maid zone". Properties qualified on a room's property code in order to print various housekeeping
reports by location.
4.
Group status for Tentative, Definite, and Verbal Definite were stored in the same table as property
codes.
The Version 12 system maintains and enhances the features described in 1 & 2 above for the property code
field. There is a new field for rooms called "maid zone" to allow the customer to do both property code
accounting and maid reports independently. The Group Tentative/Definite status codes are moved to a new
look-up table to separate them from property codes entirely.
Summary of Property Codes
Switch #422-12 turns on the property code features system-wide. Prior to Version 12, the existence of
record "00" in Table R2 activated the property code features. This record is no longer used.
The property code field has been moved to a new location in the units file. It is a display only field and
cannot be changed using option "202" - "Change Room Information" on the Room Master menu (11). With
Version 12, table C2 determines the value of the property code field displayed in RDP200. A sample C2
sub-record follows. Note field #6 is now property code. And, all rooms added to the system with a room type
of "King Ambassador (KA)" default to a property code 20.
General Ledger Enhancements
It is now possible to enter a "PC" in the offset accounts for the B1, B2, B7, and TAX1 - TAX4. This allows
true separation of G/L accounts based on property code. When this feature is activated, room moves
between property codes are NOT allowed.
Resort Data Processing, Inc.
PO BOX 1170, Vail, CO 81658
(11/99)
Phone: (970) 845-1140
2−69
http://www.resortdata.com
RDP Property Management Systems
Owner Accounting
Room Moves and Property Codes
With the property code features activated in Version 12, the system automatically determines if room moves
are allowed. The determining factors are the general ledger account numbers assigned to the offset ledgers
(B1 - TAX4). If any ledger accounts contain a "PC", the system does NOT allow room moves from one
property code to another.
Room Moves for Future Reservations
If the reservation is type 1-4, and there is no paid deposit, room moves are processed normally. Because
there are no real transactions associated with the reservation, the general ledger has not been updated,
therefore a room move is allowed between property codes. On a future reservation, the only possible actual
transaction is a deposit. Pre-posted transactions are realized in the accounting totals upon check-in.
The property code is displayed on the second reservation screen, in the upper right hand corner.
The property code is listed on the second reservation page.
Resort Data Processing, Inc.
PO BOX 1170, Vail, CO 81658
(11/99)
Phone: (970) 845-1140
2−70
http://www.resortdata.com
RDP Property Management Systems
Owner Accounting
Enabling Property Codes
Use the following steps for implementing the property code features described above. Please contact RDP
Support with any questions.
1.
Set switch 422-12 to "Yes".
2.
Build the R2 table with the required Property Codes.
3.
Add the Property Code to field #6 for every Room Type in the C2 Table.
4.
Run RDP995 to set the PC on all rooms based on field #6 of the room type in Table C2.
5.
Add all GL Account numbers using 182-6, include accounts for all PC combinations.
6.
Using 182-1 set the offset accounts using the PC logic for the desired accounts.
7.
Using 182-2 and 182-3 add the Transaction codes and GL accounts as desired.
Last/First Name
Enter the owner's name, last name first, followed by a "/" and then the first name. For sorting purposes, it is
critical to enter the "/" character to separate the last name from the first. Additionally, be consistent with the
use of upper and lower case letters. A maximum of 24 characters is allowed, including the slash.
Address
Enter the owner's address, city, state, zip, country, spouse name, and phone numbers.
Unique Charge
Each owner is allowed one “unique” charge. A unique charge is posted to all owners at the same time, but
is a different amount for each owner. An example might be a monthly management fee that is unique per
owner. One owner might be $150/month, another $155/month, a third $160/month, etc. The system allows
up to 1000 charges per month for each owner. The unique charge field on the owner master should only be
used for a unique recurring charge per owner. The various charge methods allowed for owners are:
ª
1.
A specific charge can be posted to one owner.
2.
The same dollar amount can be posted to all owners of one owner type, or all types.
3.
A recurring charge that is unique for each owner can be posted to all owners automatically.
See Posting Transactions Directly to Owner Masters in this chapter.
Resort Data Processing, Inc.
PO BOX 1170, Vail, CO 81658
(11/99)
Phone: (970) 845-1140
2−71
http://www.resortdata.com
RDP Property Management Systems
Owner Accounting
Room # Owned
The Room Number field on the owner master refers to the room number owned. The system defaults this
field to match the owner number. RDP strongly suggests that owner numbers and room numbers are the
same. <F3 - LOOK> provides a list of all room numbers in the system.
Percentage (%)
The percentage that appears to the right of the Room Number field is a display only field that is either 100 or
0. A 100 indicates the owner for the room number. All reservation revenue processed with option 912 is
always posted to the current active owner. Any owner with a type other than Z or OLD is considered the
active owner and is displayed as 100. Any type Z (secondary owner) or OLD (old owner of the room)
owners are displayed as zero and will never receive any reservation revenue.
Trust Amount (Withhold from Revenue)
The system can hold a trust balance that is unique for each owner when statements are printed and closed
with option 564. For example, assume $500 is the trust amount. When statements are printed and closed
with option 564, the system only generates a check to the owner for an amount greater than $500. The
following example looks at the effect of the trust amount field on a series of statements. When looking at
this example, keep in mind that a negative balance is an amount owed to the owner and a positive balance
is an amount due from the owner.
Statement 1
Statement 2
Statement 3
Statement 4
Balance From Last Statement
0.00
500.00 (Trust)
295.00
(Balance from
Statement 2)
150.00
Payments Recvd From Owner
0.00
0.00
205.00
350.00
Gross Reservation Revenue
1000.00
300.00
0.00
1500.00
Management Fee
(350.00)
(105.00)
0.00
(525.00)
Direct Charges
(100.00)
(400.00)
(350.00)
(250.00)
Net Due to Owner
550.00
295.00
150.00
1225.00
Trust Amount to Hold
500.00
500.0
0
500.0
0
500.0
0
50.00
0.00
0.00
725.00
N/A
205.00
350.00
N/A
Description
Amount of Actual Check
Amount Due From Owner
Notice on the first statement, the net due to the owner is $550. However, since the trust amount on this
owner is $500, the system generates a check for $50.00. The balance forward to the next statement is
$500 (the trust amount). On statement two there were more direct charges than revenue, resulting in a
balance due the owner of $295. Since this amount is less than the trust amount of $500.00, the system
generates no check at all and carries the balance due of $295 to statement three. Please note that the
system does not attempt to bill the owner for the difference between the trust balance and amount due. On
statement two, $500-295=205 is the amount that the owner needs to pay to reach the trust balance of $500.
To bill the owner for $205, a different procedure is used - see Trust Billing below.
Resort Data Processing, Inc.
PO BOX 1170, Vail, CO 81658
(11/99)
Phone: (970) 845-1140
2−72
http://www.resortdata.com
RDP Property Management Systems
Owner Accounting
Remarks
Remark-1 is used for the owner’s social security number for 1099 statements. Remark fields 2 - 12 can be
used to track any miscellaneous information, such as secondary addresses or important dates (purchase
date, sale date, etc.) These comment fields can be changed to reflect the data entered.
Open Item (N) or Balance Forward (Y)
“N” - No
Do NOT allow automatic payment of the oldest open
transactions. Payments must be matched with specific
charges. Enter an N if Open Item statements are used.
“Y” - Yes
RDP has the ability to automatically pay off the oldest open
transaction for an owner. With this method, the payment is
recorded WITHOUT matching it to specific charges. Enter a
Y if Balance Forward statements are used. RDP
recommends the use of Balance Forward statements for
owners.
Generate Checks
When balance forward statements are printed and closed with option 564 on the Owner Master menu, the
system provides the option to generate checks for all owners with a negative balance due. A Yes answer to
this question generates a check for the owner if his balance due is negative. Answering “No” will not
generate a check even though the owner may have a negative balance due. Most customers pay owners
their share of rental income, less direct charges. In this scenario, enter “Y” (YES). However, if all income is
held on account for a particular owner, enter “N” (NO).
Trust Billing
The trust amount in the owner master explained above can only be used as an automatic device to withhold
payment of reservation revenue. In the previous example, the owner has a trust amount of $500, telling the
system to only pay the owner when the balance due exceeds $500.00. On statement number 1, there was a
Net Due to Owner of $550.00, but the system only paid the owner $50.00 because of the trust amount of
$500.00. On statement 2, the Net Balance Due to the Owner was $295.00, which is below the trust amount
of $500.00, and the owner is paid nothing.
However, some properties wish to bill the owner to replenish the trust. Their view is the owner still owes
$205.00 (the trust target of $500.00 less the balance already held from the owner of $295.00). The system
will not automatically print a statement billing the owner for the $205.00. If owners should be billed for the
trust amount, a procedure requiring manual transfer codes must be implemented. For example, assume a
new owner (number 123) requiring a $500.00 trust balance at all times is entered into the system. The
procedure for replenishing the trust amount follows:
1.
Add owner number 123 as the regular owner. Set the owner to have a trust amount of zero.
A.
Add a second owner (the trust owner) to the system with the following characteristics:
Use a number of "xxxTR", where "xxx" is the owner’s actual number. In this example, 123TR.
B.
Use owner type ZTRUST. (Add to C2 table first).
C.
Use a name of "Last/First (Trust)", for example, Agassi/Andre (TRUST). Use the owner’s actual
address.
D.
The room number, field #14, should be blank.
Resort Data Processing, Inc.
PO BOX 1170, Vail, CO 81658
(11/99)
Phone: (970) 845-1140
2−73
http://www.resortdata.com
RDP Property Management Systems
Owner Accounting
E.
Set field #16 - Generate Checks for Balance Due When Statements are Printed to NO. This prevents
the system from generating refund checks to the trust owner.
2.
Make sure the trust amount in field #17 is zero.
3.
To bill the owner for the original trust requirement of $500.00, define a B7 transaction code 90 as "Trust
Transfer
*". Make sure the asterisk is in the last character of the description to allow a different
description each time code 90 is used.
4.
Use option 210 from the Owner Master menu to post code 90 to the actual owner for $500.00, with a
description of “Initial Trust Balance”. A statement can then be printed for the owner showing a balance
due of $500.00.
5.
Use option 210 from the Owner Master menu to post code 90 to the trust owner for $-500.00 (negative
500). Use a description of “Transfer from Owner”. This statement will be printed in the "all" mode but is
not normally sent to the owner.
6.
The actual balance due from the owner is the sum of the balance due on owner 123 and 123TR. In this
example, when the owner is first billed, owner 123 has a balance due of $-500.00 and owner 123TR
has a balance due of $500.00, giving a "settlement balance due" at this instant of $0.00.
7.
When the owner makes the payment of $500, apply this in the autopay mode to the actual owner
number 123. This brings the balance due on owner 123 to $0.00.
8.
Use code 90 to move the balance from owner 123 to and from 123TR as needed.
<F6 - NOTES>
The <F6 - NOTES> feature is available for reservations, travel agents, rooms, group masters, past guests,
credit card masters, and owners. <F6 - NOTES> is particularly useful for owners. Many customers use
notes to track additional owner information. Use <F4 - USER HELP> for "static" information on rooms or
owners (room inventory, room description, etc.), and the notes feature for variable information that changes
frequently. <F6 - NOTES> can be attached to the room or any owner including owner type OLD and can be
customized so that a “standard” <F6 - NOTES> screen appears when the additional information is
accessed.
TRANSFERRING ROOM OWNERSHIP
The system separates the room number and the owner number to facilitate the processes of transferring
ownership and maintaining old owner history. The procedure is:
1.
The Room# Owned field (#14) is blanked out on the old owner and the room type changed to OLD.
Ensure all owner revenue has been processed with option 912 before blanking out this field.
2.
The new owner is entered. If desired, a comment field can be used to record the date of transfer. The
Room# Owned field is entered with the correct room number, forcing the 912 program to transfer all
reservation revenue to the new owner.
3.
All historical transactions are still linked to the old owner. All reservation activity (future and past) is still
linked to the room number. The change is complete.
4.
1099's can be printed for both owners.
From this point on, any attempt to access the old owner will begin with the following warning:
Resort Data Processing, Inc.
PO BOX 1170, Vail, CO 81658
(11/99)
Phone: (970) 845-1140
2−74
http://www.resortdata.com
RDP Property Management Systems
Owner Accounting
Enter a “Y” to continue posting charges to the “OLD” owner or an “N” to return to the standard owner access
screen, where a different owner may be accessed.
SECONDARY OWNERS
Adding a secondary owner is very similar to adding a standard owner with two exceptions:
1.
The room type on the secondary owner master record is "Z”, signifying a secondary owner.
2.
The percentage of ownership will automatically default to zero. Charges may be posted directly to a
secondary owner, payments may be received and statements generated. However, all revenue from
the room owned will appear on the primary owner's statement. The system does not automatically
divide revenue based on an ownership percentage.
The example presented earlier in this chapter showed Andre Agassi owning room 123. If Andre's brother
Emile owned a portion of room 123, Emile is entered as a secondary owner. The primary owner should
have the owner number equal to the room number. For secondary owners, use a number close to the room
number, for example 123A. When completed, Emile's owner master record looks similar to the following:
For our example we have
decided that all secondary
owners have an “A” after their
owner number.
The owner type
secondary owners.
is
“Z”
for
The percentage owned defaults to zero
for secondary owners.
The unit number owned is the actual
unit.
Rental Revenue for Secondary Owners
The system will not divide revenue from a single room across multiple owners. To do this manually:
1.
Create a transaction code in the B7 ledger to represent rental income for secondary owners.
2.
Create a rental income transfer transaction in the B7 ledger for transferring a portion of the rental
income from the primary owner to the secondary owner.
3.
Calculate the secondary owner's share of the revenue and post the revenue transaction directly to the
master. Be sure to post it as a negative number since this is a credit and not a charge.
4.
Post the transfer transaction directly to the primary owner for the amount of the secondary owner's
rental income. This should be a positive since it is "charging" the primary owner.
5.
Process payments and statements for both owners normally.
Resort Data Processing, Inc.
PO BOX 1170, Vail, CO 81658
(11/99)
Phone: (970) 845-1140
2−75
http://www.resortdata.com
RDP Property Management Systems
Owner Accounting
FOLIO TRANSACTIONS AND OWNER STATEMENTS
Owner statements are comprised of reservation revenue less management commission and direct charges.
Owners are paid based on folio transactions. Whenever a transaction is posted to a folio, the system
immediately calculates the owner’s portion and places the transaction in a queue to be paid to the owner the
next time revenue is processed with option 912. Owners are not paid on transactions posted to group
masters, travel agents, or credit card masters. This section describes how reservation revenue flows from
the reservation to the owner statement.
Transactions on Advance Reservations
Reservations show totals for estimated room charge, other charge-1, other charge-2, and security deposit.
These totals are always equal to the sum of the transactions on the reservation. In the example below,
Travis McGee has a reservation with estimated total room charges of $195.00.
Press <F7 - TRANSACTIONS> to view the B200 code that corresponds to the $195.00 room charge and
$13.65 tax for a total of $208.65:
Resort Data Processing, Inc.
PO BOX 1170, Vail, CO 81658
(11/99)
Phone: (970) 845-1140
2−76
http://www.resortdata.com
RDP Property Management Systems
Owner Accounting
B200 Transaction
Every future reservation with a non-zero estimated total room charge has a B200 transaction equal to the
total room charge. These are pre-posted transactions (not yet "real" to the financial reports). This B200
code includes a rate plan description, Frequent Flyer in this example. Switch #421-2, Use Nightly Charge Room #### as desc. on non-package plans, controls whether or not the system displays the above
description or the text “Nightly Room Charge - Room 716” on the guest folio.
Pre-Posted Transaction Flag
Transactions on future reservations are considered "pre-posted". A pre-posted transaction does not appear
on any night audit reports or in the general ledger. To determine if a given transaction is pre-posted,
highlight it and press <F3 - DETAIL>. If the "Pre-posted?" field in the bottom middle of the screen has an
"*", the transaction is pre-posted. If this field is blank, the transaction has been posted on a checked-in
reservation and will appear on all audit reports. The detail screen appears as follows:
The asterisk (*) indicates a pre-posted transaction.
Changing Estimated Totals on Advance Reservations
When advance reservations are changed the system automatically recalculates the estimated total room
charge. The estimated totals shown on the reservation are changed as well as the total on the B200
transaction. Whether dealing with an advance reservation, a checked-in guest, or a historical reservation,
the reservation totals are always equal to the sum of the transactions.
Reservation Posting Options
With RDP's Enhanced Rates and Packages module (RN), room charges must be posted nightly. Switch
#109-13, Default to Daily Post Room and Tax, controls this setting and cannot be accessed with module RN
installed. This is the recommended setting.
With Enhanced Rates and Packages (RN) installed, switch
#109-13 CANNOT be changed from its default YES
setting. Room charges are posted nightly with RN
installed.
Resort Data Processing, Inc.
PO BOX 1170, Vail, CO 81658
(11/99)
Phone: (970) 845-1140
2−77
http://www.resortdata.com
RDP Property Management Systems
Owner Accounting
With switch #109-13 set to YES, the estimated total room charge is reset to zero at check-in. All pre-posted
B200 transaction codes remain in the system as pre-posted transactions in order to account for prescheduled rate changes. The room rate is then posted and declared as revenue each night by using option
“212” - “Post Nightly Room & Tax” from the Night Audit menu.
Posting Room Charges without RN Installed
Without the Enhanced Rates and Packages module (RN) installed, the estimated total room charges on
advance reservations are either reset to zero or declared as revenue at check-in depending on the setting of
reservation field #38, "Daily Post". The daily post field (#38) is tied directly to switch #109-13. With switch
#109-13 set to YES, field #38 on each reservation defaults to YES. With a NO setting in switch #109-13,
field #38 on each reservation defaults to NO. The final option for switch #109-13, PROMPT, requires field
#38 to be set on a reservation-by-reservation basis. The following table summarizes the settings of the
"Daily Post" field (#38 on the first reservation screen).
Daily Post Setting
System Action at Check-in
YES (Y)
The estimated total room charge is reset to zero at check-in.
The room rate is then posted and declared as revenue each
night by using option “212” - “Post Nightly Room & Tax” from
the Night Audit menu.
NO (N)
If the Daily Post field on the reservation is NO, the estimated
total room charge is declared at check-in. The "pre-posted"
flag on this transaction is changed from "*" to " ". The
transaction now appears on all night audit reports and in the
general ledger. The revenue for the entire guest stay is
declared on the day of check-in. This reservation will then
be skipped each night when using option “212” - “Post
Nightly Room & Tax” from the Night Audit menu. However,
option 212 will change the room status to "Dirty" if the daily
maid flag is Y.
When using the NO setting, also set system switch #319-4
(Always mark folios as allow move=NO at Check-in?) to
YES.
:
Room moves after check-in can only generate revenue to multiple owners if Daily Post is YES.
Automatic Check-In and Checkout
Many RDP customers are in the "Vacation Rentals" business. These organizations rent homes or
condominiums to guests and do NOT operate a front desk or run a nightly audit. These customers rarely
see guests since all balances are paid prior to arrival and there are no incidental charges to post while the
guest is in-house. For these customers, the RDP system can be configured with a new feature that changes
a guest from a future reservation to a checked-out reservation. And, as part of this process, room charges
are posted.
In order to activate the "VRS" (Vacation Rental System) features, use the following steps.
1.
From the System Manager menu, use option 090 to update system tables.
2.
Add sub-record VRS to table C1.
3.
Re-start RDP.
4.
From the System Utilities menu (99), use option "997-1" - "Update TABLFILE.DAT from UPD File" to
run the "AUTOCICO.UPD".
Resort Data Processing, Inc.
PO BOX 1170, Vail, CO 81658
(11/99)
Phone: (970) 845-1140
2−78
http://www.resortdata.com
RDP Property Management Systems
Owner Accounting
After entering the VRS sub-record in table C1 and running the AUTOCICO.UPD, the following changes
appear in the RDP system.
1.
All options for check-in are removed from the menus. There is no longer a power user option "8"
(Check-in this Reservation) in RDP120 or an option "Check-In" in the RDP120 full-screen mode.
2.
A new option exists in the RDP131 power user menu, "Z" - "Auto Check-In and Checkout".
3.
A new prompt displays when posting direct charges to owners, an "Invoice Date".
The "Invoice Date" can be used as another form of tracking transactions. Use data item OH for
displaying the "Invoice Date" on owner reports or statements. The "Invoice Date" is independent of the
posting date.
Utilizing the Auto Check-In/Out Feature
After running AUTOCICO.UPD, power user option “Z” - “Auto Check-in and Check-out” appears on the
RDP131 power user menu. For VRS customers, this is the only option for checking in and out. Since all
manual check-in options are deleted from the menus, option “Z” checks the reservation in and out
automatically. Features of the auto check-in and check-out program (RDP940) include:
Resort Data Processing, Inc.
PO BOX 1170, Vail, CO 81658
(11/99)
Phone: (970) 845-1140
2−79
http://www.resortdata.com
RDP Property Management Systems
Owner Accounting
1.
VRS customers should have “Daily Post” set to NO so that all room charges are posted at check-in as
part of RDP940.
2.
Enhanced Rates and Packages cannot be used in conjunction with the automatic check-in features
(“Daily Post” must be set NO).
3.
The room must be assigned and the reservation must have correct dates.
4.
All check-in prompts are skipped.
5.
Early departure prompts are skipped.
6.
Currently, balance transfers are not supported between group members and leaders/masters. This is a
feature that will be released in a future update.
7.
Amount received prompt is skipped.
8.
If guest is not in guest history, the system will prompt to add.
9.
"Checkout with a Balance Due" warning defaults to Yes.
10. "File, Exit" prompt is defaulted to File.
Calculation of Net Owner Amount
The system calculates the net owner amount on folio transactions as follows:
1.
First, the system attaches the transaction to the folio and recalculates the total balance due. The
transaction increments the Room Charge (Bucket 0), Other Charge-1 (Bucket 1), or Other Charge-2
(Bucket 2) based on the "bucket number" assigned to the transaction. See the Transaction Codes
chapter in the System Administrator manual for details.
2.
Next, the system looks at the room number on the folio. The system checks field #12 on the room
master record to see if the room is owned. If the Owner Billing field is set to Yes, the system continues
to the next step. If the Owner Billing field is set to No, there will never be an owner payment on any
folio for that room number even if the room is assigned an owner.
3.
The system now looks at the owner payment code assigned to the reservation. This code appears on
the second reservation screen, field #62, as shown on the next page:
Resort Data Processing, Inc.
PO BOX 1170, Vail, CO 81658
(11/99)
Phone: (970) 845-1140
2−80
http://www.resortdata.com
RDP Property Management Systems
Owner Accounting
The owner payment code appears on the
second reservation screen in the middle of
the right hand column, to the right of the
room number.
In this example, the folio is in room number 716 with an owner payment code of OA. The owner portion for
all transactions already posted to this folio is $126.75. Owner payment codes are defined in table C7 and
assigned to room masters. Each reservation uses the owner payment code assigned to the room master as
a default, but allows an override on a reservation-by-reservation basis. In this example, assume that owner
payment code OA has been defined as: OA = 65, 0, 0, signifying that the owner receives 65% of room
revenue (bucket 0), and 0% of incidentals (buckets 1 & 2).
1.
The system multiplies the owner payment code percentage for the transaction bucket times the amount
of the transaction. In this example, the B200 transaction was for $195.00 (the Room Charge field).
Since the owner payment code of OA for bucket 0 is 65%, the owner portion for this transaction is
calculated as:
$195.00 X .65 = $126.75 (the owner portion of this transaction)
2.
The system stamps the room number, owner portion, and owner payment code on the transaction’s
second detail screen, illustrated in the following section.
Viewing Transactions
After the owner portion is calculated, the system increments the total owner portion for the reservation. The
total owner portion for the folio is always displayed on the second reservation screen to the right of field #62.
The owner portion for any one transaction can be viewed as follows:
1.
Use menu option 120 to access the reservation.
2.
<PAGE DOWN> to display the second reservation screen. The total owner portion for the entire
reservation is displayed to the right of field #62.
3.
From either reservation screen or from the 120 Change Individual/Group Reservations screen, press
<F7 - TRANSACTIONS>. This displays a list of all folio transactions.
4.
Move the highlight bar to the transaction in question and press <F3 - DETAIL> to view the first
transaction detail screen. Press <PAGE DOWN> to display the second transaction detail screen,
appearing similar to the following:
Resort Data Processing, Inc.
PO BOX 1170, Vail, CO 81658
(11/99)
Phone: (970) 845-1140
2−81
http://www.resortdata.com
RDP Property Management Systems
Owner Accounting
The amount the owner
will receive for a given
transaction
can
be
viewed on the second
transaction
detail
screen.
The room number and pay code are stamped on
the transaction, along with the system “key”.
Checked-In Guest Room Moves
Each transaction on a given guest folio can be assigned to a different owner number. As a result, if the
property posts room and tax nightly, it is possible to move a checked-in guest from room to room with the
system automatically paying the appropriate owners. For example, assume a guest is in-house for 10 days
and changes rooms on the seventh day. All transactions for the first seven days will pay the owner of the
first room and the transactions for the last three days will pay the owner of the second room. Reservations
may be moved as many times as needed after check-in, provided the following conditions are met:
1.
The reservation is posted daily with option 212.
2.
The “Allow Move” flag is set to YES.
3.
The folio is not a lump sum package reservation. For example, if a guest is charged $650 for seven
nights and the entire stay is posted as one transaction, room moves after check-in are not allowed since
there is only one transaction.
4.
The system allows any reservation to be moved after check-in if the “Allow Move” field on the first
reservation screen is set to Yes, including owners, guest of owners, and lump sum package
reservations. If the property utilizes lump sum packages, switch #319-12, Always Mark Folios as 'Allow
Move=No' at Check-in, should be set to Yes. This will set the Allow Move field to NO at check-in for
every reservation.
5.
If the above criteria are NOT met, and a room move is necessary, adjustments to owner revenue must
be made through direct charges with a code defined in the B7 (Owner) ledger.
Room Moves as Multiple Reservations
If an in-house guest is moved from one room to another, the owner statement shows the actual arrival and
departure dates on both owner statements, not the dates the reservation occupied the owner's room. These
dates often confuse owners. To show the actual dates the reservation occupied the owner's room, do not
"move" in house reservations. Instead:
1.
Set switch #319-4, Always Mark folios Allow Move=No, to YES. With switch 319-4 set to YES, in-house
guests cannot be moved without changing field #39 on the first reservation screen to "Y".
Resort Data Processing, Inc.
PO BOX 1170, Vail, CO 81658
(11/99)
Phone: (970) 845-1140
2−82
http://www.resortdata.com
RDP Property Management Systems
Owner Accounting
An in-house guest cannot be moved
with field #39 set to "N".
2.
Change the reservation's departure date to today's date.
3.
Check the reservation out with a balance due.
4.
Make a new reservation, with the arrival date equal to today's date. Check the new reservation into the
new room.
Transfer the reservation balance from the first reservation to the new reservation. To transfer a reservation
balance, use a B2 transaction code, similar to the one shown below.
Assign the transaction code to the RDP transfer
account. The transfer account should always
have a zero balance.
Post the transfer code as a credit (negative) to the checked-out reservation and as a charge (positive) to the
new reservation. Because the transaction code does not effect room revenue, the second owner will not
receive revenue on the transfer charge.
Resort Data Processing, Inc.
PO BOX 1170, Vail, CO 81658
(11/99)
Phone: (970) 845-1140
2−83
http://www.resortdata.com
RDP Property Management Systems
Owner Accounting
The two folios appear as:
Folio One
The transfer code is used to zero-out
the folio.
Folio Two
A charge is applied to the second
reservation to account for the outstanding
balance.
After room charges are applied to folio number two, a statement can be produced for each owner with the
correct arrival and departure dates for their units, seen below.
Statement for Owner# 111
The owner statement includes the actual dates the
reservation occupied the owner's unit.
Resort Data Processing, Inc.
PO BOX 1170, Vail, CO 81658
(11/99)
Phone: (970) 845-1140
2−84
http://www.resortdata.com
RDP Property Management Systems
Owner Accounting
Statement for Owner #208
Although the one reservation occupied two
rooms, the owner statements are clear and
concise, including the correct arrival and
departure dates.
PROCESSING OWNER INCOME WITH OPTION 912
Owners are paid based on folio transactions. The system calculates the owner portion of a folio transaction
immediately. However, the owner balance due is not changed until option “912 - 4” - “Process Owner
Revenue”, on the Owner Master menu is run. This option provides the ability to review folio transactions
and, in a separate step, process owner revenue. The options in 912 are:
912 Option
Description
1
Change Processing Flags. Option 1 provides access to
the critical system flags that control the operation of 912.
Set these flags prior to processing owner revenue.
Flag 1 = YES: Indicates that owners are paid once and only
once a month. With a Yes setting, the system processes
folio transactions with a transaction date in the prior month.
For example, if the current date is 9/16/98, a YES setting
processes folio transactions dated prior to 8/31/98. This is
the setting most customers use, since they are processing
Resort Data Processing, Inc.
PO BOX 1170, Vail, CO 81658
(11/99)
Phone: (970) 845-1140
2−85
http://www.resortdata.com
RDP Property Management Systems
Owner Accounting
August owner statements in September. Use a YES setting
to process owner statements monthly.
Flag 1 = NO: Indicates that owners are paid more than
once a month. With a NO setting, the system processes all
folio transactions through the current system date. For
example, if the current date is 9/16/98, a NO setting
processes folio transactions with a date of 9/16/98 and
earlier. Use a NO setting to generate owner statements on a
non-monthly basis.
Flag 2 = YES: Indicates that owners are only paid one time
for each folio, based on the check-out date. A YES setting
forces 912 to only process checked-out reservations.
FLAG 2=NO: Indicates that owners are paid more than
once on the same reservation. For example, a reservation
from 08/28/98 to 09/03/98 will be paid in August for the
revenue from 08/28/98 through 08/31/98 and in September
for the revenue from 09/01/98 through 09/03/98. With a No
setting, 912 processes transactions on in-house and
checked-out reservations.
ª
As a general rule, if flag 2 is NO, flag 1 should be Yes since revenue is processed monthly.
912 Option
Description
1 (Continued)
FLAG 3=YES: Indicates that travel agents are paid once
and only once a month. With a YES setting the system
processes reservation transactions with a transaction date in
the prior month. For more information on this topic, see the
Travel Agent chapter in the User’s Manual.
FLAG 3=NO: Indicates that travel agents are paid more
than once a month. With a NO setting, the system
processes all transactions on reservations through the
current system date. Most customers use a NO setting for
flag 3, allowing travel agents to be paid more than once a
month. For more information on this topic, see the Travel
Agent chapter in the User’s Manual.
2
Review owner revenue prior to processing - Detail &
Recap. The review mode of 912 reads and prints each folio
transaction that has not been posted by 912 and prints a
sub-total for each folio. This detailed report is useful to
provide an audit trail showing that each folio transaction was
paid. Since this is a print-only function, no transactions are
generated, it can be used as often as required.
3
Review owner revenue prior to processing - Recap
Only. This produces a report with a single total printed for
each folio. The detailed transactions are not printed. This is
also a print only function and can be run as often as
necessary.
4
Process Owner Revenue. Option 4 generates transactions
for owner masters based on the folio transactions.
Statements for owners cannot be printed until owner
revenue has been processed with option 4. One set of
codes is generated for each folio, not each transaction on
the folio. For example, assume there was a 10 day
reservation for $100/day, with a 10% travel agent and a 65%
owner split. There would be 10 daily room charges of $100
each. Option 912-4 generates the following codes:
Resort Data Processing, Inc.
PO BOX 1170, Vail, CO 81658
(11/99)
Phone: (970) 845-1140
2−86
http://www.resortdata.com
RDP Property Management Systems
Owner Accounting
Code
Description
Amount
B7DF
Gross Revenue Room #/Res#
$-1000.00
B7DG
Mgt Fee Room#/Res#
$350.00
B7DH
TA Commission Room#/Res#
$100.00
PROCESSING OWNER REVENUE: AN EXAMPLE
Use option 912-4 to process all owner revenue from folio transactions. To illustrate, use the following
sample reservation:
Reservation number:
314
Owner Number :
130
Arrival Date:
03/01/98
Owner Payment Code:
OA (65, 0, 0)
Departure Date:
03/03/98
Travel Agent-1:
ABC
Daily Rate:
$50.00
Travel Agent-1 Code:
CA (10, 0, 0)
Total Room Charge:
$100.00(2 days at
50)
Pre-deduct Flag:
N
Tax:
$6.00
Owner TA Share Flag:
S (Owner Shares)
Total Charge:
$106.00
Guest Pays at Checkout:
$106.00
Room Number:
130
Flags
The first step in processing owner revenue is using option ”912 - 1” - “Change Processing Switches” to
ensure that flags #1 and #2 are set correctly. Assume flag #1 is set to YES to process revenue on a
calendar month, and flag #2 is set to NO to pay owners twice on reservations staying over month-end.
Once these flags have been set, do not alter them unless there has been a policy change regarding the time
period for paying owners.
Options 912-2, 912-3, and Report 830
Once the processing flags are set correctly, use option 912-2 or 912-3 to review owner revenue prior to
processing (Detail or Recap, respectively). Review this printout to ensure all owner pay codes are correct
prior to processing. Since the system allows reservation changes after checkout, it is possible to change the
revenue percentage due an owner prior to processing revenue with option 912-4. For example, if a
reservation has an owner pay code of OB, where the owner receives 50% of the revenue, and was
supposed to have the default pay code of OA (65%), use RDP120 to change the owner pay code field (#62
on the second page of the reservation screen) and then process owner revenue with option 912-4.
Report 830 - No Print Transactions by Room Number
In addition to verifying all owner revenue amounts with option 912-2 or 912-3, use report 830 on the Owner
Reports menu to review all no-printed reservation transactions. For example, assume a reservation was in
rd
nd
house from May 30th - June 3 , and a room charge adjustment was made on June 2 for an incorrect
th.
posting on May 30 Properties using monthly owner revenue statements capture one transaction on the
May statement and the reversal and correction on the June statement. Many properties want to eliminate
this scenario and display the revenue only once (on the June statement).
Resort Data Processing, Inc.
PO BOX 1170, Vail, CO 81658
(11/99)
Phone: (970) 845-1140
2−87
http://www.resortdata.com
RDP Property Management Systems
Owner Accounting
Option 912-4
When using option “912 - 4” - “Process Owner Revenue”, the following prompts appear:
Finding the Room
By entering 130 as both the starting and ending owner numbers, option 912-4 processes revenue for owner
130 only. The system reads the owner master record for owner 130 to load the correct room number. In
this example, both the owner number and the room number are 130. However, if the room had been sold in
the past, the owner number could be 130A and the room 130.
ª
The revenue from a lock-off room is placed on the statement for the owner of the master room.
Reading Transactions
After finding the room number, option 912-4 reads the transaction file for any folio transactions from room
130, starting with the first transaction through the ending processing date of 08/31/98. Transactions already
processed by option 912-4 are skipped.
Calculating Amounts
Next, the system groups transactions together by reservation. For each reservation in room 130, the system
calculates four numbers:
1.
The reservation's gross revenue
2.
The management fee for the reservation
3.
The travel agent commission (if there is a travel agent on the reservation), and
4.
The owner’s portion of the credit card fee (if applicable).
These four dollar amounts are calculated for each reservation in room 130 based on all transactions read.
Posting The Amounts
The system posts a transaction code with each of the four amounts to the owner master. For each
reservation that effects the owner, four codes are posted, including:
Code
Description
B7DF
The reservation's gross revenue
B7DG
The management portion
B7DH
The percentage of the travel agent's commission the owner
should pay if there is one on the reservation.
B7DJ
The percentage of the credit card company’s fee the owner
should pay if there is one on the reservation.
Resort Data Processing, Inc.
PO BOX 1170, Vail, CO 81658
(11/99)
Phone: (970) 845-1140
2−88
http://www.resortdata.com
RDP Property Management Systems
Owner Accounting
Calculation of Gross Amount (B7DF Code)
The B7DF code reflects the gross amount of the reservation on the owner statement. For the sample
reservation #314 below, there are two B200 codes for $50 each, equaling total gross revenue of $100. The
B7DF code for this example is -$100, with a description of "Revenue O# 130 R# 314." It is calculated by
adding the dollar value of every transaction (that hasn't already been processed) for reservation #314 with a
date less than or equal to the processing date. The calculation follows:
Item
Room
Other-1
Other-2
Revenue values for first B200 code on res #314
$50.00
0.00
0.00
Owner Pay Code on first B200 = OA
65.00%
0.00
0.00
Factor used for calculation of code B7DF-GROSS
1.00
0.00
0.00
$ 50.00
0.00
0.00
$ 50.00
0.00
0.00
$100.00
0.00
0.00
(If OA code value = 0 this is 0.00 otherwise the factor is
1.00)
If the owner split is zero on a given bucket,
it does not count in the gross total. However,
if the owner gets any percentage of a bucket, the entire
total appears in the gross total of B7DF.
Dollar value for B7DF code (gross amount) for first B200
code. This is calculated by multiplying the factor times the
revenue value. For room charge this is 1.00 X $50.00 =
$50.00.
Dollar value for B7DF code (gross amount) for 2nd B200
code. This is a repeat of the above steps for the second
code.
Total B7DF code for all transactions on this res. (This is the
sum of the two codes on the res.)
Management Fee (B7DG Code)
The B7DG code shows the management fee on a given reservation. In the example of reservation #314,
the owner payment code is 65, 0, 0, therefore the management fee is the reciprocal, or 35, 0, 0. In this
example, the management fee on $100 worth of transactions is a positive $35.00, with a description reading
"Mgt Fee O# 130 R# 314." It is calculated as follows:
ª
Item
Room
Other-1
Other-2
Revenue values for first B200 code on res #314
$ 50.00
0.00
0.00
Owner Pay Code on first B200 = OA
65.00%
0.00
0.00
Management percentage based on OA code (reciprocal)
35.00%
0.00
0.00*
Dollar value for BFDG code (mgt fee) for the first B200 Code
$ 17.50
0.00
0.00
Dollar value for BFDG code (mgt fee) for the second B200
Code
$ 17.50
0.00
0.00
Total of the B7DG code generated for res. #314:
$ 35.00
0.00
0.00
Notice that the management fee is 35.00, 0.00 and 0.00. Because the owner percentage of Other Charges-1
& 2 are zero, the amounts in these fields on the reservation are not used in the calculation of owner
revenue.
Resort Data Processing, Inc.
PO BOX 1170, Vail, CO 81658
(11/99)
Phone: (970) 845-1140
2−89
http://www.resortdata.com
RDP Property Management Systems
Owner Accounting
Travel Agent Commission (B7DH Code)
The B7DH code reflects the owner's portion of a travel agent commission. In the example for reservation
#314, there is a $10 total commission. The reservation has an “S” in the Owner/T.A. commission field,
meaning the owner will share the travel agent commission based on the owner's revenue percentage. In
this case, the owner pays 65% of the commission (identical to owner pay code “OA”):
$10 (commission) X .65 (owner percentage) = $6.50 (owner share of the commission).
This is a positive number with the description “TA Comm O# 130 R# 314”. It is calculated as follows:
Item
Room
Other-1
Other-2
TA-1 commission on first B200, as stored in the res. transaction
$ 5.00
N/A
N/A
TA-1 commission on second B200, as stored in the res. transaction
$ 5.00
Owner Pay Code on first B200 = OA
65.00%
Owner Share flag from TA code in res. transaction
"S"
Dollar value for B7DH code for the first B200 code on res. 314.
$ 3.25
Dollar value for B7DH code for the second B200 code on res. 314.
$ 3.25
Total value of B7DH code for owner travel agent reimbursement:
$ 6.50
The setting of the Owner Share field on the reservation is critical to the calculation of the B7DH code, as
follows:
Owner Share Setting
Calculation used for creation of the B7DH code
S = Share
Multiply the owner pay code percentage for room charge times the T.A
commission. In this example: .65 x 5.00 = 3.25.
M = Management Pays
The B7DH is always 0 since the owner is reimbursing nothing to management.
O = Owner Pays
The B7DH is always the total commission since the owner is paying 100%.
E = Even Split
The B7DH is always 50% of the commission.
Credit Card Fees (B7DJ)
Owners may share any applicable credit card company fees on a reservation by reservation basis. In order
to activate this feature:
1.
Set switch #420-14, Owner fee on credit card payments (P, M, S, or E) to the proper setting, similar to
travel agent commission splits. The options include:
Setting
Description
P
The owner pays for the entire credit card fee.
M
Management pays for the entire credit card fee.
S
The credit card fee is split between owner and management, based
on the owner’s room charge split.
E
2.
The credit card fee is split evenly between the owner and
management.
Enter the credit card fee percentage in field number 27 on the credit card master.
Resort Data Processing, Inc.
PO BOX 1170, Vail, CO 81658
(11/99)
Phone: (970) 845-1140
2−90
http://www.resortdata.com
RDP Property Management Systems
Owner Accounting
The credit card fee appears as an owner charge:
Net to Owner
The net paid to the owner for reservation #314 is $57.44, the sum of the B7DF, B7DG, B7DH, and B7DJ
codes, as follows:
Activity Date
Code
Code Description
Code Total
Running Balance
08/04/98
B7DF
Revenue U#130 U# 314
-100.00
-100.00
08/04/98
B7DG
Mgt Fee U#130 R# 314
+35.00
- 65.00
08/04/98
B7DH
TA Com U#130 R# 314
+6.50
- 58.50
08/04/98
B7DJ
CC Fee U#130 R#314
+1.06
- 57.44
Resort Data Processing, Inc.
PO BOX 1170, Vail, CO 81658
(11/99)
Phone: (970) 845-1140
2−91
http://www.resortdata.com
RDP Property Management Systems
Owner Accounting
Posted Flag on Transactions
After 912 generates the B7DF, B7DG, B7DH, and B7DJ codes for all reservation transactions, several
changes are made indicating the transactions are processed, providing an audit trail and preventing
duplicate processing. These changes include:
1.
The room key is removed from the transaction. This key drives the 912 program.
2.
A “Y” (for processed = yes) is placed next to the owner payment code in the transaction.
3.
The B7DF, B7DG, B7DH, and B7DJ sequence numbers are stamped on the transaction code.
Sequence Numbers
When the B7DF, B7DG, B7DH, and B7DJ codes are posted to an owner master, they are assigned a unique
number called a sequence number. This number is also stamped on each folio transaction that created the
code providing an audit trail from individual folio transactions to the owner statement.
For example, two room charge transactions for $50 created the B7DF gross revenue code for $100 posted
to the owner master from the sample reservation #314 above. The B7DF code was assigned sequence
number 1145 after being posted to the owner master. This same number, 1145, was also stamped on both
room charge folio transactions (seen below).
A Processed Transaction
Use the steps outlined in the Viewing Transactions section earlier in this chapter to display the second
page of the transaction detail screen. The "Y" after the owner payment code on this transaction and the
sequence numbers indicate that this transaction has been processed by option 912-4.
This transaction is processed
because:
1)A “Y” is entered in the “912
Process” field, and
2)Sequence numbers
are
stamped on the B7DF, B7DG,
and B7DJ transaction codes.
Resort Data Processing, Inc.
PO BOX 1170, Vail, CO 81658
(11/99)
Phone: (970) 845-1140
2−92
http://www.resortdata.com
RDP Property Management Systems
Owner Accounting
Recap Mode
Given our sample reservation #314, 912 prints the following recap:
912 Review - Detail & Recap
----------------------------------------------------------------------------------------------------------------------------------Condominium Control System
Time: 11:15
Tue, Sept 3, 1998
Report# 912
Review Owner Activity - Detail
Page 1
----------------------------------------------------------------------------------------------------------------------------------Owner Room
Res Tx
Room
Other
Other
Gross Rev Mgmt. Fee Owner T/A CCard Fee
Number Number
Res # Ty Code Tx Date Charge
Charge-1
Charge-2
Cd Code B7DF Code B7DG Code B7DH Code B7DJ Owner Net
-------- -------- ------ -- ---- -------- ---------- ---------- ---------- -- ---------- ---------- ---------- ---------- --------130
130
314 P8 B200 08/04/98
50.00
0.00
0.00 OA
50.00
17.50
3.25
.50
29.25
130
130
314 P8 B200 08/05/98
50.00
0.00
0.00 OA
50.00
17.50
3.25
.50
29.25
---------- ---------- ------------------- ---------- ---------- ---------- --------Moran/Sean
50
100.00
0.00
0.00
100.00
35.00
0.00
1.00
68.50
----------------------------------------------------------------------------------------------------------------Condominium Control System
Time: 11:15
Tue, Sep 3, 1998
Report# 912
Review Owner Activity - Detail
Page 2
----------------------------------------------------------------------------------------------------------------Owner
Room
Room
Other
Other
Gross Rev Mgmt. Fee Owner T/A CCard Fee Owner Net
Number
Number
Res # Charge
Charge-1
Charge-2
Code B7DF Code B7DG Code B7DH Code B7DJ DF-DG-DH-DJ
-------- -------- ------ ---------- ---------- ---------- ---------- ---------- ---------- ---------- ----------130
130
314
100.00
0.00
0.00
100.00
35.00
6.50
1.00
58.50
========== ========== ========== ========== ========== ========== ========== ==========
Grand Totals
100.00
0.00
0.00
100.00
35.00
0.00
1.00
58.50
Resort Data Processing, Inc.
PO BOX 1170, Vail, CO 81658
(11/99)
Phone: (970) 845-1140
2−93
http://www.resortdata.com
RDP Property Management Systems
Owner Accounting
POSTING TRANSACTIONS TO OWNER MASTERS
When an owner is first entered into the system, the balance due is zero, and there are no transactions. The
balance due is only incremented by transactions, including revenue generated by option
“912 - 4” - “Process Owner Revenue”, direct charges to owners, payments from owners, and checks
generated to the owner.
Any transaction applied to an owner (or any other entity) increments the balance due immediately. For
example, when a direct charge is posted to an owner with option “210” - “Post Charge to Owner”, a B7xx
transaction code increments the balance due immediately. The balance due field on the owner master is
always equal to the sum of all transactions.
Accessing Owners
In order to post a charge to an owner use option “210” - “Post Charge to Owner” from the Owner Master
menu. When choosing option 210, and entering the posting date, the standard owner access screen
displays, similar to the following:
Access owners using
three identifiers:
1) Owner Name
2) Room Number
3) Owner Number
This is the identical access screen used in options 202, 204, 215, 500, and 502 on the Owner Master menu.
Access owners by name, number, or room number, which is particularly useful after a room is sold. For
example, assume owner #100 originally owns room #100. The room is sold to a new owner, assigned
number “100A”. In the owner master record, owner 100A is now marked as owning room 100. With the
standard access screen, the current owner of room 100 can be found by entering 100 in the “room#” field. It
is not necessary to remember that owner “100A” is the current owner of room 100.
Resort Data Processing, Inc.
PO BOX 1170, Vail, CO 81658
(11/99)
Phone: (970) 845-1140
2−94
http://www.resortdata.com
RDP Property Management Systems
Owner Accounting
Defining Transactions and Posting Options
All transactions that effect owners must first be defined with option “182 - 2” - “Add Transaction Code” in the
B7-Owner Ledger prior to posting the charge in option 210. There are various methods for posting
transactions to owners, including:
1.
Posting to one owner with option “210” - “Post Charge to Owner”.
2.
The same dollar amount, or a percentage, can be posted to all owners of a certain type through option
“212” - “Global Post Owner Charge”.
3.
A recurring charge that is unique to each owner can be posted automatically through option
“212” - “Global Post”.
Posting to an Individual Owner
Follow these steps to post a charge to an owner or to make a manual correction to an owner statement after
processing revenue with option 912-4:
1.
Choose option “210” - “Post Charge to Owner” from the Owner Master menu.
2.
Enter a posting date. The system prompts for a posting date based on the setting of switch
#219 -16, Prompt for transaction posting date for masters. The default posting date is today’s date.
3.
Choose the correct owner using the standard owner access screen described in the previous section.
4.
Enter the transaction code to post as defined in the B7 ledger along with the price (positive to charge
the owner, negative to “credit” the owner) and quantity.
5.
File the transaction.
6.
Enter a reference number, i.e. - the initials of the person posting the charge or a work order number.
Option 212 - Global Post
The following options are available in option "212 - Global Post Owner Charge":
Resort Data Processing, Inc.
PO BOX 1170, Vail, CO 81658
(11/99)
Phone: (970) 845-1140
2−95
http://www.resortdata.com
RDP Property Management Systems
Owner Accounting
Option
Description
A
Option A posts the same charge to all owners, except those beginning with
“N/R" or "OLD". Note the owner types only have to begin with these letters. It
is possible to add several categories of non-rental owners to the C2 table, for
example "N/R1B" for a non-rental one bedroom and "N/R2B" for a two
bedroom. Option "A" skips both types "N/R1B" and "N/R2B".
B
Option B posts to all owners except those that begin with type "OLD".
T
Option T posts the same charge(s) to all owners of one particular owner type.
This option could be used to post a $50.00 management fee to all owners of a
"1B" condominium and $75.00 to all owners of a "2B". This is an "exact
match" feature. Selecting owner type "N/R", the system only posts to owners
that are "N/R", not "N/R1B" or "N/R2B".
P
Option P is designed to post a late fee to owners with a balance due as of a
specific date. The following page details the sequence of events for automatic
late fee posting.
Automatic Late Fee Posting
Before using option 212-2 to post a late fee to all owners, use option 182-2 from the System Manager menu
to define a new "B7??" code used for "Late Fee Charge". Assign a general ledger account to this
transaction code and leave the price blank. To post a late charge to all overdue owners, use option
“212” - “Global Post Owner Charge” from the Owner Master menu and select option "2” - “Post late fee to
owners with Balance Due". The system prompts for the owner type and then:
P - Percentage
Enter a "P" to post a percentage late fee. The system prompts for the "late fee
percentage". Enter 2.25 percent as "2.25", not ".0225". This amount is
charged to the total of all open items that are older than the transaction cut-off
date entered. For example, if the owner had 2 transactions of $250.00 each
that were older than the cut-off date, the system would post:
(250+250) * .0225=$11.25
D - Flat Dollar Amount
Enter a "D" and the system prompts for a flat dollar amount to post to any
owner that has at least one open transaction older than the cut-off date input.
For example, if the flat amount entered was $30.00, and the owner had 1
transaction of $10.00 that was older than the cut-off date, the system would
post a $30.00 charge. If the owner had 10 transactions of $250.00 each, the
system would still only charge $30.00.
Resort Data Processing, Inc.
PO BOX 1170, Vail, CO 81658
(11/99)
Phone: (970) 845-1140
2−96
http://www.resortdata.com
RDP Property Management Systems
Owner Accounting
Next, the system then prompts:
The function of the transaction cut-off date prompt is different for "P = Percentage" or "D = Flat Dollar
Amount", as described above. After entering the date, the system prompts:
After inputting the transaction posting date, the system prompts for a B7 transaction code. This code is
defined with option 182-2 on the System Manager menu. After selecting a valid B7 code, the system
prompts:
Enter "P" and the system posts the late fee transaction code to all appropriate owners.
Posting a Recurring Charge
A recurring charge is a unique dollar amount for each owner and is defined in the owner master. A recurring
charge example is a yearly cleaning fee that is different for each owner, as opposed to being different for
each owner (room) type. Once the charge is defined for each owner, add a transaction code in the B7
ledger through option 182-2. In order to flag this code as the recurring charge, enter a “1” in the bucket field.
RDP allows only one transaction to be designated as the recurring charge with a bucket of “1” in the B7
ledger.
After entering the recurring charge to the B7 ledger, use option 212 to globally post the charge to selected
owners. When choosing the unique transaction code, the system responds with “FromFile” in the price field:
“FromFile” refers to the dollar
amount stored in the “Recurring
Charge” field in the owner master.
After entering the transaction, the system prompts:
Choose Option “P” to post the recurring charge to all selected owners based on the dollar amount stored in
the owner master.
Resort Data Processing, Inc.
PO BOX 1170, Vail, CO 81658
(11/99)
Phone: (970) 845-1140
2−97
http://www.resortdata.com
RDP Property Management Systems
Owner Accounting
Unlimited History
All transactions for an owner can be viewed in date order using options 502 and 215 on the Owner Master
menu, or a pop-up window can be accessed at any time using <F5 - INQUIRE>. See Inquiring on Owner
History in this chapter.
Exploding Transactions
Each transaction in the system is defined with a debit and credit account. When transactions are posted to
owners, reservations, travel agents, group masters, or credit card masters, the balance due increments
immediately. However the debit/credit effect to the general ledger does not occur until the
“900 - E” - “Explode Transactions” option is used. Option 900 can be used as often as required.
Revenue Totals
Owner transaction totals are provided in a variety of fashions, including:
1.
Daily, month-to-date, and year-to-date totals by transaction code are printed on the Daily Manager’s
Report (370) from the Night Audit Reports menu.
2.
Transaction detail to audit the 370 report is available on-line with option 184 on the System Manager
menu.
3.
All transactions for any given owner can be viewed with option 502 on the Owner Master menu.
4.
Option “560” - “Running Balance Statements” can be used from the Owner Master menu to print all
transactions for any given owner or range of owners.
5.
Month-to-date and year-to-date totals for each owner are available with option 551 on the Owner
Reports menu.
6.
Balance forward statements (option 564) can be re-printed for any past period.
TRANSFERRING OWNER RESERVATION BALANCES AT CHECKOUT
RDP can be configured to transfer owner reservation balances to the master record at checkout. For
example, assume an owner accrues telephone and dining room charges during his stay at the property. With
this feature, RDP can automatically transfer these charges to the owner master record at checkout. With this
transfer, similar to a group master transfer, the one-line charge appears on the owner statement at monthend, deducting the charges from reservation revenue.
Switch #423-6 activates this feature.
With switch #423-6 set to YES (the default), prompts are added to the owner checkout process, assuming
the owner has a balance due. These prompts are seen below.
Resort Data Processing, Inc.
PO BOX 1170, Vail, CO 81658
(11/99)
Phone: (970) 845-1140
2−98
http://www.resortdata.com
RDP Property Management Systems
Owner Accounting
When an owner checks out with a balance due, the system includes the following prompt for transferring the
balance to the owner master record.
Once the transfer is complete, the owner sees a line item on his monthly statement for the reservation
balance. This balance is deducted from any reservation revenue received for the statement period.
AUTOMATICALLY POSTING RESERVATION CLEANING CHARGES
Option "914" - "Process Owner Cleaning Fees" on the Owner Master menu (12) reads in-house and active
reservations by departure date and posts cleaning fees to owners. The system uses reservation comment-2
and the EG table for determining cleaning fees on a reservation-by-reservation basis.
Table EG contains the cleaning fee for each combination of reservation and room types.
Resort Data Processing, Inc.
PO BOX 1170, Vail, CO 81658
(11/99)
Phone: (970) 845-1140
2−99
http://www.resortdata.com
RDP Property Management Systems
Owner Accounting
The following table describes a sub-record in table EG.
Sub-Record Characteristic
Description
Example
The first character in a table EG
sub-record is the first letter of the
reservation type. For example, a
"P" represents a "Pre-assigned"
reservation.
P
- 6 Characters
The second through sixth
characters in a table EG subrecord represent a room type. For
example, "1B" represents a onebedroom unit.
1B
Description (Field #1)
The description holds the cleaning
fee dollar amount. This dollar
amount can be either per day or
once per reservation. The format
MUST be "amount/frequency".
$5.00/Day
st
1 Character
2
nd
th
Example: $5.00/Day or
$10.00/Res
The "$" is optional. The frequency
can be upper or lower case. The
"/" must be used to separate the
dollar amount from the frequency.
When using RDP914 to automatically post cleaning fees to owners, reservation comment-2 should be left
blank. If comment-2 is blank, RDP914 finds the appropriate reservation type and room type combination in
table EG. The data in field #1 is used for the cleaning fee price and frequency. As noted in the above table,
the frequency is either daily or once per reservation. If the reservation type and room type is not found, the
system uses the default cleaning fee reservation type and room type combination stored in table C1 subrecord "OWMAID". This combination is then used to cross-reference the EG table. A sample C1 sub-record
OWMAID is displayed below.
Resort Data Processing, Inc.
PO BOX 1170, Vail, CO 81658
(11/99)
Phone: (970) 845-1140
2−100
http://www.resortdata.com
RDP Property Management Systems
Owner Accounting
By adding C1 sub-record OWMAID, all reservations have a cleaning fee posted. The standard cleaning fees
entered in table EG can be overridden by manually entering a cleaning fee in reservation comment-2. When
entering a cleaning fee manually, the format MUST be "amount/frequency". For example, enter "$5.00/Day"
to post a $5 per day cleaning charge. The "$" is optional and the frequency can be entered in upper or lower
case. The "/" must be used to separate the dollar amount from the frequency.
ª
To avoid a cleaning fee, enter "No Cleaning Fee" in Comment-2.
Processing Owner Cleaning Fees
Option 914 on the Owner Master menu (12) should be run once a month. After selecting option 914, the
following prompt displays.
Option "1" - "Review owner cleaning charges prior to processing", generates a review of owner cleaning
charges that will be posted based on existing reservations. When reviewing charges, comment-2 is updated
with the cleaning fee found in Table EG for the reservation and room type. The "914 Comment" column
reads "Will Post". Option 2 posts the charges. The printout for option 2 changes the "914 Comment" from
"Will Post" to "Posted".
Both selections prompt for an "ending date" for posting owner cleaning charges. The default is the last day
of the previous month.
Resort Data Processing, Inc.
PO BOX 1170, Vail, CO 81658
(11/99)
Phone: (970) 845-1140
2−101
http://www.resortdata.com
RDP Property Management Systems
Owner Accounting
If the cleaning fee frequency is once per reservation, the fee will not be not posted to the owner until the
reservation has checked-out. If the cleaning fee is daily, the fee is posted upon departure or month-end,
whichever is first.
th
For example, a reservation arrives September 25 and departs October 5th. The cleaning fee is set to post
th
st
daily. The owner charge will post on September 30 for the days in September and then again October 31
for the days in October.
ª
The cleaning fee transaction date is the reservation's departure date or the posting date (last day of
previous month).
Owner Transactions
Option 914-2 posts a B7DK transaction to the owner for the cleaning fee. The B7DK transaction includes the
room number and reservation number, seen below.
To Enable
1.
Update to the most current revision of Version 12.02.
2.
Using option 997 on the System Utilities menu, run the "CLEANJA.UPD".
3.
Populate table EG.
4.
Enter C1 sub-record OWMAID with the default reservation and room type combination.
Resort Data Processing, Inc.
PO BOX 1170, Vail, CO 81658
(11/99)
Phone: (970) 845-1140
2−102
http://www.resortdata.com
RDP Property Management Systems
Owner Accounting
PRINTING OWNER STATEMENTS
After revenue is processed with option 912 and all direct charges posted, owner statements are printed with
option “562” - “Open Item Statements” or option “564” - “Balance Forward Statements”.
For owners, RDP recommends using the balance forward statement since it provides the balance due from
the last billing period plus any new reservation activity and direct charges. On the other hand, the open item
statement is better suited for company billing. Specifically, the scenario where an organization uses the
property on a periodic basis and needs a bill reflecting outstanding reservations (open items).
There is one other type of statement which is intended strictly for internal use, the “560” - “Running Balance
Statement”. Use this statement format as an “audit trail”, displaying a range of transactions for a certain
owner. When using the Running Balance Statement remember that:
1.
ALL transactions for a range of dates are, including “No-Printed” items.
2.
The statement is not divided into sections for reservations and direct charges.
3.
The date range allows various starting and ending dates, eliminating many transactions required for an
accurate balance due.
Changing Statements
All statement forms can be changed with Report Writer. The columns that appear may also be changed to
display information stored in the reservation record. Please see the chapter titled Advanced Report Writer
for more information on altering statements.
Printing a Running Balance Statement
The running balance statement prints all transactions for an owner in transaction date order. Transactions
include payments received, direct charges, transfers from reservations, and refunds. A range of owners
and/or transactions can be printed.
To print a running balance statement, choose option “560” - “Running Balance Statements” on the Owner
Master menu, and choose option “P” to Print. The system displays the following prompt:
After selecting either option, the system prompts for a range, either numeric or alphabetic (Numeric in this
case), and three questions pertaining to the type of owner:
Resort Data Processing, Inc.
PO BOX 1170, Vail, CO 81658
(11/99)
Phone: (970) 845-1140
2−103
http://www.resortdata.com
RDP Property Management Systems
Owner Accounting
Next, the system prompts for a beginning and ending transaction date:
560 - Running Balance Statement
“No-Printed” transactions appear on the
Running Balance Statement.
Reservation revenue appears along with
direct charges.
Printing Balance Forward Statements
Balance forward statements print the balance due from the last statement plus all new transactions that are
not marked as no-print. Transactions include:
1.
All direct charges or adjustments applied to the owner with options 210 and 212.
2.
Reservation revenue for the period.
3.
Payments from the owner.
4.
Refunds to the owner.
Resort Data Processing, Inc.
PO BOX 1170, Vail, CO 81658
(11/99)
Phone: (970) 845-1140
2−104
http://www.resortdata.com
RDP Property Management Systems
Owner Accounting
No-Print Transactions
Transactions marked as non-printing (with an "*") do not print on the balance forward statement. The sum of
all non-printing transactions must be zero or statements do not print.
Closing Statements
A balance forward statement can be printed at any time for an owner. The statement shows all transactions
since the last time statements were closed. After a statement is closed, no additional corrections can be
made for that time period. Corrections after closing a balance forward statement must be made in the next
period.
Statement Markers
When a balance forward statement is closed, the system generates a statement marker transaction, defining
the end of one statement and the beginning of the next. Statement markers appear as a B7D@ transaction
code whenever owner transactions are viewed with option “502” - “Inquire on Owner History” or when
running balance statements are printed with option 560. In the following example, the statement markers
are the first and last transactions.
B7D@ = Statement Marker
Balance forward statements can be reprinted for any past period from one statement marker to the next.
Open Item (YES) or Balance Forward (NO)
When owners are created with option “200” - “Add Owner Information”, field #28 reads:
It is critical to set this field to YES (Y) in order to print balance forward statements. Balance forward
statements allow payments to be quickly applied towards an owner without allocating the payment against
individual open transactions.
Resort Data Processing, Inc.
PO BOX 1170, Vail, CO 81658
(11/99)
Phone: (970) 845-1140
2−105
http://www.resortdata.com
RDP Property Management Systems
Owner Accounting
Printing A New Statement
To print a balance forward statement showing all new activity for an owner since the last statement marker,
follow these steps:
1.
Choose option “564” - “Statements Balance Forward” on the Owner Master menu. Choose an output
method (Printer, Screen, or File), and a range of owners. The system prompts:
2.
Enter an A to print a new statement. Next, the system prompts:
3.
Enter an N the first time balance forward statement are printed. Entering NO the first time statements
are printed is critical, since corrections cannot be posted after statements are closed. Also, when
printing statements with CLOSE = NO, the last line on the statement reads:
"Total Balance Due (held on account)"
4.
This line indicates a “first draft” statement. The balance due is paid to the owner and a check generated
when CLOSE = YES is used.
5.
The next prompt is:
The ending statement date defaults to the current system date, 03/01/98 in this example. Based on the
setting off switch #912-1, Always process owner statements on calendar month only, the default date
will either be the last day of the last month (YES) or the current system date (NO). If <ENTER> is used
to select the default, the system prints transactions from the end of the last statement marker (the last
B3D@ transaction) to the current date. This includes all new transactions. An example of the
statement without closing follows:
Resort Data Processing, Inc.
PO BOX 1170, Vail, CO 81658
(11/99)
Phone: (970) 845-1140
2−106
http://www.resortdata.com
RDP Property Management Systems
Owner Accounting
First Draft of Balance Forward Statement (Close=NO)
YOUR COMPANY NAME HERE
PO Box 1170
Vail, CO 81658
(970) 845-1140
** BALANCE FORWARD STATEMENT **
** OWNER STATEMENTS **
Paula Abdul
Date
09/17/98
1 Laker Girl Lane
Number 130
Los Angeles, CA 99906
------------------------------------------------------ RENTAL ACTIVITY ---------------------------------------------------------Share
Travel Agent Credit Card Management
Ty Res#
With
Arrive
Depart
Nts Description
Gross Amount Commissions Fees
Fees
Due Owner
-- ------ ------ -------- --------- ---- ----------------------- ------------ ------------ ------------ ------------ -----------P8
48
09/06/96 09/07/98
2 Preassign
-273.00
17.75
2.73
95.55
-156.97
P8
75
09/07/96 09/09/98
2 Preassign
-260.00
0.00
2.60
91.00
-166.40
============ ============ ============ ============ ============
Res Activity from 09/06/98 to 09/17/98
-533.00
17.75
5.23
186.55
-323.47
---------------------------- OWNER CHARGES -------------------------------Date Code Refer# Description
Charge
Tax
Total
----- ---- ------ ---------------------------- ---------- ------ ---------09/10 B7MN 0090
Maintenance Fee - Carpet Cln 135.00
135.00
==========
Direct Charge Activity from 09/06/98 to 09/17/98
135.00
STATEMENT SUMMARY
----------------Balance as of 08/06/98
Gross Reservation Revenue
Management Fees
Travel Agent Commissions
Credit Card Fees
Direct Charge Activity
from
from
from
from
from
09/06/98
09/06/98
09/05/98
09/05/98
09/06/98
to
to
to
to
to
09/17/98
09/17/98
09/17/98
09/17/98
09/17/98
Total balance due (held on account)
0.00
-533.00
186.55
17.75
5.23
135.00
============
-188.47
Review and Correct
After printing the balance forward statement, review it carefully. Correct any errors before printing the final
copy for the owner. Possible errors include:
1.
The format of the form is wrong. For example, the text "YOUR COMPANY NAME HERE" may still
appear on the form. The statement forms must be modified with the Report Writer prior to printing.
2.
The ending statement date is incorrect, causing transactions not to appear.
3.
Transactions that should appear do not appear because of incorrect use of the "*" no-print flag.
4.
Transactions are printing that should not print because they were not marked as non-printing.
5.
Transactions are missing because they were not posted with option “210” - “Post Charge to Owner”.
6.
Payments are missing because they were not posted with option “500” - “Apply Payment from Owner”.
7.
The statement may have already been closed, in which case the re-print mode should be used instead
of the new activity mode.
Resort Data Processing, Inc.
PO BOX 1170, Vail, CO 81658
(11/99)
Phone: (970) 845-1140
2−107
http://www.resortdata.com
RDP Property Management Systems
Owner Accounting
Re-Print After Corrections
After balance forward statements are printed the first time with Close = No, they must be re-printed with
Close =Yes. The Yes answer to the Close question ends one statement and starts a new one. A D@
statement marker is used to delineate the end of one statement and the start of the next.
:
Without re-printing statements with Close=Yes, the statement will not close and the next owner
statement will include all activity instead of just new activity. Even if no corrections were made to the
first statement, re-print them with Close=Yes.
Generate Checks
When statements are closed, the system prompts:
Entry
Action
Y - YES
The system looks in field #16, “Generate Checks for balance
due...” on the owner master record for each owner printed.
If field #16 is Y, and the master has a negative balance
due, a check is generated for the total. If field #16 is N, the
system never generates a check for the master even if there
is a negative balance due.
The Yes answer should be used to generate checks for any
owner with a negative balance.
N - No
Checks are not generated for any master even if there is a
negative balance due. A No answer should be used to hold
a balance “on account” for the owner.
The Check Queue
Checks are generated with balance forward statements depending on the answer to the "generate check"
question and the setting of field #20 in the master. If a check is generated, it is placed in the check queue.
The check queue is printed through the Check Maintenance menu (80) on the RDP Main Functions menu.
Check forms can be purchased from the RDP forms department at 1-800-RDP-PAPR (1-800-737-7277).
Resort Data Processing, Inc.
PO BOX 1170, Vail, CO 81658
(11/99)
Phone: (970) 845-1140
2−108
http://www.resortdata.com
RDP Property Management Systems
Owner Accounting
Sample Balance Forward Statement (Close = YES)
YOUR COMPANY NAME HERE
PO Box 1170
Vail, CO 81658
(970) 845-1140
** BALANCE FORWARD STATEMENT **
** OWNER STATEMENTS **
Paula Abdul
1 Laker Girl Lane
Los Angeles, CA 99906
Date
09/17/98
Number 130
-----------------------------------RENTAL ACTIVITY ---------------------------------------------------------------------------- ---Share
Travel Agent Credit Card Management
Ty Res#
With
Arrive
Depart
Nts Description
Gross Amount Commissions Fees
Fees
Due Owne r
-- ------ ------ -------- --------- ---- ----------------------- ------------ ------------ ------------ ------------ -------- ---P8
48
09/07/98 09/09/98
2 Preassign
-273.00
17.75
2.73
95.55
-15 6.97
P8
75
09/11/98 09/13/98
2 Preassign
-260.00
0.00
2.60
91.00
-16 6.40
============ ============ ============ ============ ======== ====
Res Activity from 09/06/98 to 09/17/98
-533.00
17.75
5.23
186.55
-32 3.47
---------------------------- OWNER CHARGES -------------------------------Date Code Refer# Description
Charge
Tax
Total
----- ---- ------ ---------------------------- ---------- ------ ---------09/10 B7MN 0090
Manitenance Fee - Carpet Cln
135.00
135.00
==========
Direct Charge Activity from 09/06/98 to 09/17/98
135.00
STATEMENT SUMMARY
----------------Balance as of 08/06/96
Gross Reservation Revenue
Management Fees
Travel Agent Fees
Credit Card Fees
Direct Charge Activity
from
from
from
from
from
09/06/98
09/06/98
09/06/98
09/06/98
09/06/98
to
to
to
to
to
09/17/98
09/17/98
09/17/98
09/17/98
09/17/98
Total balance due Owner 130
Paid Owner 130
6
Total balance due as of 09/17/98
Resort Data Processing, Inc.
PO BOX 1170, Vail, CO 81658
0.00
-533.00
186.55
17.75
5.23
135.00
============
-188.47
188.47
0.00
(11/99)
Phone: (970) 845-1140
2−109
http://www.resortdata.com
RDP Property Management Systems
Owner Accounting
CHANGING OWNER MTD/YTD TOTALS
This section describes features of the RDP450 Report Writer program for the OTOTALyy file. OTOTALyy
contains monthly and yearly totals for every transaction for every master, including owners and totals for
1099 statements. An example of the Owner MTD/YTD Recap form follows:
“TYPEZ” in the main
control line indicates
that the report reads the
OTOTALYY file.
Owner MTD/YTD Recap (558)
-------------------------------- FOR558.FOR ---------------------------------..FOR558.FOR
;TYL;TYPEZ;STATEMENT MONTH=?;
YOUR COMPANY NAME HERE
1650 E. Vail Valley Drive., Suite C1
Vail, CO 81657
(303) 476-9244
OTOTALYY Line
(YY=Year)
First 25
characters of
each print line
control form
printing.
Direct charges
accrue into both
TOT2 and TOT3.
[A4
[A5
[A6
[A7
&
&
&
&71
&71
&71
&
&71
&
&
&71X
&71X
&71X
&71X
&71X
&71X
&71X
&71X
&71X
&
&71
&
&71
1 3
1 3
1 3
23
23
23
23
23
23
23
23
23
] [A8
]
]
]
[A9
**
**
MTD/YTD RECAP **
OWNER STATEMENTS **
H1 Report Writer data items.
Date
[05
Number [A2
]
]
]
B7DF
B7DG
B7DH
Rental Activity
-------------------------------Gross Room Revenue
Less Management Fee
Less Owner share of TA Comm.
TOT1
Net Room Revenue
B701
B702
B703
B704
B705
B706
B707
B708
B709
DIRECT OWNER CHARGES
-------------------Direct Owner Charge B701
Direct Owner Charge B702
Direct Owner Charge B703
Direct Owner Charge B704
Direct Owner Charge B705
Direct Owner Charge B706
Direct Owner Charge B707
Direct Owner Charge B708
Direct Owner Charge B709
TOT2
Total Direct Owner Charges
TOT3
Net Income
[80
Totals
-----------{H$B
}
{H$B
}
{H$B
}
============
{H$B
}
Data item format
controlled by “{}”
characters.
{H$B
}
{H$B
}
{H$B
}
{H$B
}
{H$B
}
{H$B
}
{H$B
}
{H$B
}
{H$B
}
============
{H$B
}
-----------{H$B
}
Main Control Line
TYPEZ in the main control line of the form indicates a report reading the OTOTALyy file.
Body of Form
The body of the form is composed of print lines. The first 25 characters of each print line are reserved for
control information. When the report prints, these 25 characters are ignored, and the actual data prints left
justified. Print lines can either be normal report writer lines or "&" lines. "&" lines read OTOTALyy.
Resort Data Processing, Inc.
PO BOX 1170, Vail, CO 81658
(11/99)
Phone: (970) 845-1140
2−110
http://www.resortdata.com
RDP Property Management Systems
Owner Accounting
Sample Print Line:
Column Location:
1
2
3
4
5
6
7
1234567890123456789012345678901234567890123456789012345678901234567890123
&71X
23
B701
Direct Owner Charge B701
{H$B
}
Loc#
Character
Definition
1
&
Location #1 is always an "&", indicating control information for the
OTOTALyy file. The report can have a mixture of "&" lines and
normal report writer lines. These data items can also be mixed with
normal "[" data items and the OTOTALyy "{" data items.
2-3
7?
Locations 2-3 contain the master file number. A "&71" indicates File
71 (Owner) information. A mixture of different master lines can be
used on a given report, including file 70 (units).
4
“ “ or “X”
File Name
File Number
Units
70
Owners
71
Groups
72
Travel Agents
73
If it is " ", the line always prints. If it is an "X", RDP450 does not print
the line if all values are 0.00. For example, in report FOR558, the
"direct owner charge" has the line:
Column Location:
1
2
3
4
5
6
7
1234567890123456789012345678901234567890123456789012345678901234567890123
&71X
23
B703
Direct Owner Charge B703
{H$B
}
Loc#
Character
Definition
If transaction "B703" has never been used or totals to zero for a
given owner, it will not print.
5
“ “ or “X”
Location #5 will also be " " or "X". If it is " ", RDP450 prints the
line. If it is "X", RDP450 NEVER prints the line, but the amounts
on this line will be included in the TOTALS lines. In the bottom
section of FOR558, there is a line:
Column Location:
1
2
3
4
5
6
7
1234567890123456789012345678901234567890123456789012345678901234567890123
&70 XX
67
MC01
Paying Guest-Market Code 01 {HCA
}
This line is never actually printed. However, the values are
included in totals 6 and 7 because of the totals marked "67".
6
“ “ or “X”
Controls a "repeat on lockoff" routine. This is used in the "owner
day" count to provide separate counts for each lockoff room.
Resort Data Processing, Inc.
PO BOX 1170, Vail, CO 81658
(11/99)
Phone: (970) 845-1140
2−111
http://www.resortdata.com
RDP Property Management Systems
Owner Accounting
Column Location:
1
2
3
4
5
6
7
1234567890123456789012345678901234567890123456789012345678901234567890123
&70 XX
67
MC01
Paying Guest-Market Code 01 {HCA
}
Loc#
Character
Definition
The "&70" indicates Room totals for the owner being printed.
Read the master room for this owner and print the line. Then
read the first "sub-lockoff" room for the master room and print the
line. Read the remaining sub-lockoffs for this room.
7-15
123456789
Locations 7-15 indicate totals 1 through 9. The sample form has
3 totals lines. If location 7 is a "1", this indicates that the
amounts on this line are to be included in total #1. If the
character is blank, we do NOT include this line in total #1.
Locations 7-15 must be used specifically for totals 1-9. Example:
Total 4 must be indicated with a "4" specifically in location 10
and not in location 9 or 12. Each line may be added into more
than one total. The sample form shows that the direct charges
are added into totals 2 and 3.
18-25
B*??
Locations 18-25 specify which code to use from the OTOTALyy
file for this particular master. The format is "B*??" where "B*" is
the ledger for the master and "??" is the transaction code in that
ledger. Currently, all codes must be specified individually.
There are no range functions. The ledger codes are:
Master
Ledger
Room
None
Group
B3
Travel Agent
B6
Owner
B7
Other special records found in the OTOTALyy file can also be
used. These differ according to the type of master:
Code
Description
XXUN
Room - Room revenue and guest nights
MC??
Room - Revenue & guest nights by market
code ??
MCON
Room - Number of owner nights
MCOG
Room - Number of guest of owner nights
XXGMR
Group master - Room revenue and guest
nights
XXGMT
Group master - All revenue and guest nights
XXTAR
Travel agent - Room revenue and guest
XXTAR
Travel agent - Room revenue and guest
XXTAT
Travel agent - All revenue and guest nights
XXOWR
Owner - Room revenue and guest nights
XXOWT
Owner - All revenue and guest nights
Resort Data Processing, Inc.
PO BOX 1170, Vail, CO 81658
(11/99)
Phone: (970) 845-1140
2−112
http://www.resortdata.com
RDP Property Management Systems
Owner Accounting
Loc#
Character
Definition
18-21
TOT?
Bytes 18-21 may also indicate that a total is to be printed. The
lines below show examples of totals lines.
Column Location:
1
2
3
4
5
6
7
1234567890123456789012345678901234567890123456789012345678901234567890123
&70 X
5 7
MCOG
Guest Days - Room [A2
{HCA
}
&
-----------&70
TOT5
Total Guest Days
{HCA
}
On the first line of the example, the "5" in location 11 tells Report
Writer to add the amounts on this line to Total #5. Line #2 is text
only. Line #3 has "TOT5" starting in location 18 so the Report
Writer will now print Total #5 on this line. Notice also that Line
#1 has "7" in location 13. The amounts on this line are also
included in Total #7.
Data Items
All data items for the OTOTALyy file are enclosed with "{ }" characters. The print length is the number of
spaces between these characters + 2. H1 data items may be intermixed on the "&" lines as well.
A typical format for a data item is:
{H$B
}
Statement Month Dollar amount (Output "123.33")
{HCA
}
Guest Nights (Output "367")
Data Item Location #1
The character in this location tells the Report Writer which
monthly totals to use. The options are listed below.
Location #1 Character
Resort Data Processing, Inc.
PO BOX 1170, Vail, CO 81658
st
1=
January
7=
July
D=
1 Quarter
1+2+3
2=
February
8=
August
E=
2 Quarter
(4+5+6)
3=
March
9=
September
F=
3 Quarter
(7+8+9)
4=
April
10=
October
G=
4 Quarter
(10+11+12)
5=
May
11=
November
H=
Statement
Month (see
below)
6=
June
12=
December
I=
YTD through
statement
month
J=
YTD – All 12
Months
(11/99)
Phone: (970) 845-1140
nd
rd
th
2−113
http://www.resortdata.com
RDP Property Management Systems
Owner Accounting
H=Statement Month and I=YTD through Statement Month
In order to use "H", the main control line must contain the text STATEMENT MONTH=?. The system will
prompt:
“Statement Month (YYMM) [
] Default = Current month.”
The report form may contain 2 data items to print the response:
[80
[81
Data item [80] prints the statement month ("January", "February", etc.).
Data item [81] prints the statement year ("1998", "1999", etc.).
Data Item Location #2
The character in this location determines what total is used and the
numeric format.
Character
Description
$
Prints the dollar value for the month and code. The
currency format is used (Example 3342.34).
D
This is the same value as above but prints the amount without the
decimal point (Example 334234). This is used for 1099 magnetic
media output.
C
The value printed is the "count" for the month and code. This can be
the number of occurrences of a transaction code or, for some codes,
the number of nights.
Data Item Location #3
This character determines the format of the number.
Character
Description
A
Prints the count value without a decimal point. Normally used with
"$" above.
B
Prints the dollar value with a decimal point. Normally used with "C"
above.
Z
Prints the dollar value right justified and zero filled. Used for 1099
magnetic media. Normally used with "D" above.
Data Item Location #4
If a "-" appears in this location, the system negates the value to be
printed. This is used on 1099 statements since the normal revenue
amount for masters is a negative number.
Resort Data Processing, Inc.
PO BOX 1170, Vail, CO 81658
(11/99)
Phone: (970) 845-1140
2−114
http://www.resortdata.com
RDP Property Management Systems
Owner Accounting
Owner 1099 Statements
Owner 1099 statements consist of 3 reports used by RDP450 to access the OTOTALyy file. These reports
are:
Menu
Report
Form File
Description
XQ
845
FOR845.FOR
Owner - Review 1099 Amounts
XQ
846
FOR846.FOR
Owner - 1099 Statements - Paper Media
XQ
847
FOR847.FOR
Owner - 1099 Statements - Magnetic Media
Table CZ must be filled out with company information for 1099 reporting. The sub-records and
corresponding data items are:
Sub-Record
Data Item
Length
Description
01
30
9
Tax Payer ID# (No Dashes, Only Numbers)
02
31
5
Transmitter Control Number (Only Numbers)
03
32
40
Company Name
04
33
40
Company Address
05
34
40
Company City, State, & Zip
Special Main Control Line Keyword for Paper 1099 forms
The 1099 forms for paper media must have the amount as the first line on the form. It must also have the
following in the main control line:
QUALJ$0;1099;
This tells Report Writer to skip the entire 1099 form if the owner has no revenue. The magnetic media form
uses the "X" at location 4 of the specific owner line to skip zero revenue owners.
Resort Data Processing, Inc.
PO BOX 1170, Vail, CO 81658
(11/99)
Phone: (970) 845-1140
2−115
http://www.resortdata.com
RDP Property Management Systems
Owner Accounting
RECORDING PAYMENTS FROM OWNERS
Payments are applied to owners with either the autopay or manual pay methods. However, autopay is
required when using Balance Forward statements and manual pay for Open Item statements. Since most
properties will use Balance Forward statements for owners, this section will detail taking payments with the
autopay method.
Overview of Option 500 - Apply Payment from Owner
Option “500” - “Apply Payment from Owner” contains the following options:
Option
Description
A
Posts a payment and then automatically applies the
payment against open transactions. Autopost should only
be used with balance forward masters. Any customer using
open item statements should never use autopost.
M
Manually posts a payment. The user allocates the payment
against one or more open transactions. Manual post must
be used with open item statements.
O
The offset option is used with open item statements to offset
one open transaction against others without receiving a
payment. For example, assume a deposit is received for
$1000. Two weeks later a folio is checked-out and billed to
the group master for $1000. Both of these transactions
would show on the open item statement. The deposit shows
in the Unallocated Payment section. The offset mode is
used to apply one transaction against the other, thus
removing both transactions from the open item statement.
The offset mode should never be used with balance forward
statements.
Resort Data Processing, Inc.
PO BOX 1170, Vail, CO 81658
(11/99)
Phone: (970) 845-1140
2−116
http://www.resortdata.com
RDP Property Management Systems
Owner Accounting
Option
Description
R
The refund mode is the only method available to generate a
refund check when using open item statements. With
balance forward statements, refund checks are generated
with option 500 - Refund or when statements are printed
with Close=Yes.
Refunds can only be generated if the balance due on the
master is negative. The default refund amount is always the
full balance due. When refunding the full balance due, the
system automatically sets the open balance on all
transactions to zero. If a partial amount is refunded, no
items are set to zero and offset mode must be used for
bringing closed balances to zero.
Autopost a Payment
To autopost an owner payment:
1.
From option 500, enter the posting date and correct owner.
2.
Choose option “A” - “Autopost a payment to the oldest open transactions”.
3.
Enter the payment amount and the form of payment.
Payment Types
Payment Amount
4.
File the payment.
Resort Data Processing, Inc.
PO BOX 1170, Vail, CO 81658
(11/99)
Phone: (970) 845-1140
2−117
http://www.resortdata.com
RDP Property Management Systems
Owner Accounting
ENTERING PAYMENT CORRECTIONS
If a payment correction has to be made for an owner utilizing balance forward statements, use option
“500 - A” - “Autopost a payment…”. For example, assume a check is received for $500 from owner #123
and this was autoposted by mistake to owner #456. This mistake can be corrected as follows:
1.
Use option 500-A and select owner 456. Enter the amount received as -500.00 (negative $500). The
system prompts for the type of payment (cash, check, and credit card).
2.
Select "2=Check" since the original $500 was posted as a check. The system prompts:
Notice that the "R=Refund" choice is not allowed. The system assumes that any negative amount
entered with the "A=Autopay" option of RDP500 is always a correction and never an actual refund. In
this example, use option C to correct the $500 payment that was applied by mistake to owner #456.
3.
Enter "C" for Correction and a check number of "CORRECT". The system generates a
"B7D1- Rcv from Owner" code for +500.00 to offset the B7D1 code for -500.00 already generated.
4.
Use option 500-O and offset the two payments against each other making the open balance for
both transactions 0.00.
5.
Use option 215 from the owner menu to select owner 456 and display transactions with <F7TRANSACTIONS>. Use <F10 - NO PRINT> to mark the original B7D1 for -$500 and the
correcting
B7D1 codes as "non printing". The owner will not see either of these transactions.
6.
Autopost the correct payment to owner 123.
Resort Data Processing, Inc.
PO BOX 1170, Vail, CO 81658
(11/99)
Phone: (970) 845-1140
2−118
http://www.resortdata.com
RDP Property Management Systems
Owner Accounting
GENERATING A REFUND CHECK
RDP500 option "R-Refund" is used to generate a refund, not to enter a correction. For example, assume an
owner has a $1500 credit balance held to offset against possible expenses. However, the owner wants a
refund of $500 of the credit balance. In this case, use RDP500, option "R-Refund". The system prompts:
To refund $500, enter "500" not "-500". The system prompts for the refund payment type, i.e. - cash, check,
credit card. Select the method of refund. If "2=Check" is selected, the system prompts:
The system generates a "B7D7 - Owner Refund" transaction and check voucher on both a "Y" and "N"
response. Check vouchers can be viewed at any time with <F5 - INQUIRE>. With a "YES" response, print
the check voucher through option 323 on the Check maintenance menu (80).
Resort Data Processing, Inc.
PO BOX 1170, Vail, CO 81658
(11/99)
Phone: (970) 845-1140
2−119
http://www.resortdata.com
RDP Property Management Systems
Owner Accounting
INQUIRING ON OWNER HISTORY
Option 502 on the Owner Master menu is one of the most powerful options available for viewing owner
transaction history. After choosing option 502 and selecting an owner, the following screen appears:
Option
Description
1
Change the transaction code displayed. Choosing 1
allows the MTD and YTD totals for a different B7xx
transaction code to be displayed for this owner. In the
example above, the B710 - Extra Maid Service is currently
displayed. After using option 1, use <F3 - LOOK> to display
all B7xx codes. For example, code B7DF can be entered to
display the MTD and YTD gross reservation activity for this
owner.
2
Change the year displayed. Option 2 changes the year for
the displayed MTD and YTD totals. Any past year can be
displayed.
3
Display transactions for a selected month/year for the
TX code above. Option 3 displays each transaction code
that comprises the MTD or YTD total for the B7xx code
currently displayed. In the example above, the B710 code
has a $15.00 total for February, 1998. Option 3 shows each
transaction comprising the $15.00.
4
Display all transactions for this owner. Option 4 displays
all transactions for this owner, regardless of transaction
code or year. For example, using option 4 we can see all
transactions on a given owner, as follows:
Resort Data Processing, Inc.
PO BOX 1170, Vail, CO 81658
(11/99)
Phone: (970) 845-1140
2−120
http://www.resortdata.com
RDP Property Management Systems
Owner Accounting
Option
Description
5
Display reservations for this owner. Reservations can be
displayed for the owner with option 5, including future, inhouse, active history, and non-active history.
C-Change
Option 502-Change is specifically designed for adjusting
1099 totals. Any adjustments made with 502-Change will
alter the displayed monthly totals for the transaction code,
but will NOT appear on the night audit, accounts receivable,
or statements. The balance due on the master is NOT
changed. Normally, changes are made to masters with
option 210-Post Charge or option 500-Post Payment.
Option 502-Change should only be used to adjust 1099
totals or on specific direction by RDP Support.
OWNER 1099 STATEMENTS
Owner 1099 statements can be printed to paper or magnetic media. The proper procedure for 1099's is to
first enter the "static" information in table "CZ" with RDP090 as follows:
Sub-Record
Description
01
Taxpayer ID#, 9 numbers, no "-"
02
Transmitter Control Number, 5 numbers, no "1"
03
Company name, maximum of 40 characters
04
Street address, maximum of 40 characters
05
City, state, and zip, maximum of 40 characters
Resort Data Processing, Inc.
PO BOX 1170, Vail, CO 81658
(11/99)
Phone: (970) 845-1140
2−121
http://www.resortdata.com
RDP Property Management Systems
Owner Accounting
After entering the above information, use the following steps for completing owner 1099’s.
1.
From the Owner Reports menu, run report "845” - “Review 1099s Before Printing". This report displays
1099 information for each owner, including the taxpayer ID number, and totals for this year and last
year.
2.
Verify ALL information on the printout, including:
A.
:
Are all owners on the report?
B.
Are the taxpayer ID numbers correct. These can be changed by updating the "remark-1" field
with option “202” - “Change Owner Information” (menu 12).
C.
Any property filing on magnetic media cannot have any "-" characters in the taxpayer ID number.
3.
Verify that totals are correct for each owner. These can be changed from the owner master menu with
option 502-C.
4.
After verifying all data and making corrections, 1099 forms are printed with the correct option from
the Owner Reports menu. Please contact the IRS for tractor feed 1099 paper forms.
5.
Verify the 1099 forms for correctness.
Verify1099 totals. Since the user can change these totals, RDP does not guarantee accuracy. The filing
of 1099 information is the responsibility of the user, not RDP. RDP shall not be held liable for the
accuracy or procedures used for filing 1099 information. Please be aware that the IRS has penalties
relating to exact 1099 filing procedure and it is completely THE PROPERTY’S responsibility to follow
the correct procedure.
Resort Data Processing, Inc.
PO BOX 1170, Vail, CO 81658
(11/99)
Phone: (970) 845-1140
2−122
http://www.resortdata.com
RDP Property Management Systems
Owner Accounting
OWNER STATEMENT CHECKLIST
Prior to beginning the process of printing owner statements, double-check the 912 Owner Processing
switches:
As a review, the settings of these switches refer to:
Switch
Description
1
Does the property pay owners all revenue for one month in
the following month? (YES/NO)
Example: Do you pay owners all revenue for July in
August? If so, set switch #1 to YES.
OR
Do you pay owners at various times during the month, once
on the 15th and once on the 30th? If the answer to this
question is yes, set switch #1 to NO.
2
If a reservation stays over the end of a month (July 29 August 3) is the owner paid twice on the reservation, once
on July’s statement and once on August’s, or does the
owner receive ALL revenue on August’s statement?
If the answer is “Pay the owner twice”, set switch #2 to NO.
If the answer is “Pay the owner once”, set switch #2 to YES.
After verifying these switches, proceed with the following checklist:
STEP
DESCRIPTION
DONE?
√
1. Review Owner Revenue Prior to Processing
Option 912 - 2 or 3
2. Make any necessary corrections
Change incorrect pay codes in option 120
3. Process Owner Revenue
Option 912 - 4
4. Post direct charges
Use option 210 for one owner, 212 for
several owners
5. Post applicable late fees
Use option 212
6. Post any owner payments
Use option 500
7. Review owner statements
Option 564 - NO to Close
8. Close owner statements
Option 564 - YES to Close, YES to Print
Checks
9. Print owner revenue checks
Option 322 from the Check Maintenance
menu (80)
Resort Data Processing, Inc.
PO BOX 1170, Vail, CO 81658
(11/99)
Phone: (970) 845-1140
2−123
http://www.resortdata.com
RDP Property Management Systems
Resort Data Processing, Inc.
P.O. Box 1170, Vail, CO 81658
Owner Accounting
(11/99)
Phone: (970) 845-1140
2-124
http://www.resortdata.com
RDP Property Management Systems
Timeshare Owners
TIMESHARE OWNERS
OVERVIEW
The Timeshare Control System (TCS) is the most powerful system in RDP's portfolio. TCS includes a
superset of all Condominium Control System (CCS) features for whole ownership, and the Hotel Control
System (HCS) for full function hotels. Since TCS includes all features of the CCS system for whole
ownership, please read the Owner Accounting chapter of the manual before reading this section. Only the
unique TCS aspects are presented here. Topics include:
Timeshare Methods Supported
Fixed Week Owner Overview
Floating Week Owner Overview
Adding the Owner Master
Loading Fixed Week Ownership Data
Loading Floating Week Ownership Data
Developer Owned Time
Creating Fixed Week Owner Reservations
Reservation Types
Timeshare Owner Reservations
TIMESHARE METHODS SUPPORTED
TCS is designed for the management of interval ownership resorts. TCS provides full reservations, front
desk and complete owner accounting. Mailing labels and letters to past guests or owners can be printed to
market the resort. TCS tracks all owner reservations and processes rental revenue. A variety of time-share
resorts are supported, including:
Fixed Week
Fixed week resorts assign an owner to a specific week in a specific room. The weeks run from Friday to
Friday, Saturday to Saturday, or Sunday to Sunday. For example, if an owner owns week #01 on a
Saturday-Saturday resort, his ownership runs from 01/02/98 to 01/09/98, 01/01/99 to 01/08/99, 01/07/00 to
01/14/00, etc. The dates vary slightly each year and are known many years in advance.
Floating Week
In floating week ownership, an owner does not own any specific week or specific room number, instead he is
allowed to stay at the resort for a specific number of days. The owner may be able to stay at any time during
the year and in any type of room he wishes, on a first come first serve basis. Other floating methods allow
different classes of owners. For example, the "silver" membership may only be allowed to rent in the off
season, while the "gold" membership allows rental during any period. TCS tracks each owner usage as well
as seasonal limitations per owner.
Resort Data Processing, Inc.
PO BOX 1170, Vail, CO 81658
(11/99)
Phone: (970) 845-1140
3−125
http://www.resortdata.com
RDP Property Management Systems
Timeshare Owners
Quartershare
With quartershare each owner owns one fourth interest (13 weeks/year) in a specific room number. This
method is similar to fixed week, but the owner owns 13 weeks during the year instead of just one. The
weeks are distributed throughout the year.
Combination Resorts
Many resorts offer a combination of different vacation ownership methods. For example, building A may be
set up as fixed week, Friday to Friday. Building B may be fixed week, Saturday to Saturday. Building C may
be floating week, and building D is quartershare. All combinations are allowed within TCS. In addition, each
room number can be a combination of fixed, floating, developer time, bonus time, etc. The resort can also
mix "pure" hotel rooms with time-share rooms.
FIXED WEEK OWNER OVERVIEW
A fixed week owner is one who owns a specific room number for a specific week number, for a specific
starting day. For example, the owner may own room number 1000, for week number 01, starting on Fridays,
meaning the owner always arrives and departs on a Friday, for week 01, for room 1000. The procedure for
fixed week owners is:
1.
The room master must be created first with option 200 on the Room Master menu.
2.
The owner master is added with option 200 on the Owner Master menu. A room number is assigned to
the owner, along with a week number and week starting day.
3.
After all owners are added, reservations for the current year and the next year can be entered
automatically with option “220 - 2” - “Generate Timeshare Owner Reservations For All Fixed Week
Owners”. This option uses the owner week number, room number, and starting date to make a
reservation for the appropriate days. See Creating Fixed Week Owner Reservations later in this
chapter.
4.
Ownership information is automatically loaded with option “220 - 1” - “Process Fixed Week Owners Into
Ownership Cross Reference File”. This allows the system to automatically pay the correct owner or
owners for reservation revenue if the owner elects to rent his time. See Loading Fixed Week
Ownership Data later in this chapter.
5.
If the owner uses his time, the reservation is checked-in, charges are posted, and the reservation is
checked-out using the normal procedures explained in this manual.
6.
If the owner exchanges his week with an exchange organization such as RCI or Interval International,
the owner reservation is deleted and a type “E” reservation is made with option 100 to hold the room for
the exchange guest.
7.
If the owner decides to rent his week, the reservation is deleted. If the owner's week (or part of his
week) is rented, the system automatically pays the owner his share.
8.
Charges are posted globally to all owners of a given owner type with option “212” - “Global Post Owner
Charges” on the Owner Master menu.
9.
Charges are posted individually to selected owners with option “210” - “Post Charge to Owner” on the
Owner Master menu.
10. Statements are printed to owners with the standard owner statement process described in the Owner
Accounting chapter of the manual.
Resort Data Processing, Inc.
PO BOX 1170, Vail, CO 81658
(11/99)
Phone: (970) 845-1140
3−126
http://www.resortdata.com
RDP Property Management Systems
Timeshare Owners
FLOATING WEEK OWNER OVERVIEW
With floating week ownership, an owner does not own a specific week or specific room number. Instead he
is allowed to stay at the resort for a specific number of days. The owner may be able to stay at any time
during the year and in any type of room on a first come first serve basis. Other floating week methods allow
different classes of owners. For example, the "silver" membership may only be allowed to rent in the off
season, while the "gold" membership allows rental during any period. There are many possible floating
owner types, and TCS can handle them all using variations of the following steps.
1.
The room master must be created first with option 200 on the Room Master menu.
2.
The owner master is added with option 200 on the Owner Master menu. Room numbers and week
number are not assigned to the owner.
3.
Owner reservations cannot be automatically loaded for floating owners. Reservations are made one
owner at a time, using the “T” (timeshare owner) option of the reservation program. More than one
reservation can be made for the same owner if needed. See Loading Floating Week Ownership Data
later in this chapter.
4.
Use the comment fields in the owner master to track the days used. For example, if a four day
reservation is made for an owner, Comment-2 on the owner master can be changed to "days used = 4"
to track owner usage. All reservations for any given owner can also be displayed during the reservation
process using <F3 - LOOK>.
5.
Ownership information for floating week owners cannot be loaded automatically, since, by definition, the
ownership period is different each year. Ownership information is manually loaded with option
“220 - 3” - “Enter Floating Week Owners Into Ownership Cross Reference File”. This information allows
the system to automatically pay the floating week owner if he rents his time.
6.
If the owner uses his time, the reservation is checked-in, charges are posted, and the reservation is
checked-out using the normal procedures explained in this manual.
7.
If the owner exchanges his week with an exchange organization such as RCI or Interval International,
the owner reservation is deleted and a type “E” reservation made with option 100 to hold the room for
the exchange guest.
8.
If the owner decides to rent his week, the reservation is deleted. If the owner's week (or part of his
week) is rented, the system automatically pays the owner his revenue share.
9.
Charges are posted globally to all owners of a given owner type with option “212” - “Global Post Owner
Charge” on the Owner Master menu.
10. Charges are posted one at a time to select owners with option “210” - “Post Charge to Owner” on the
Owner Master menu.
11. Statements are printed to owners with the standard owner statement process described in the Owner
Accounting chapter.
Resort Data Processing, Inc.
PO BOX 1170, Vail, CO 81658
(11/99)
Phone: (970) 845-1140
3−127
http://www.resortdata.com
RDP Property Management Systems
Timeshare Owners
ADDING THE OWNER MASTER
The process of adding an owner master is explained in the Owner Accounting chapter. Specific fields for
timeshare systems appear below.
Field
Description
Owner Number
The owner number is an eight character alpha-numeric field.
In fixed week situations, RDP suggests the numbering
convention of "room number - week number." For example,
owner number 1000-01 would own room 1000 in week 01.
Room Number
Owner 1000-14 would own room number 1000 for week
number 14.
Owner Type
The owner type is a six character alpha-numeric field,
defined in table C2. Up to 1000 owner types may be
defined. The system allows charges to be globally posted to
all owners of a specific type.
Room Number Owned
If the room number owned field is left blank, the system
assumes this is a floating week owner and the Fixed Week
field is be set to NO. If a room number is assigned to an
owner, the fixed week field is set to YES. The automatically
loads all reservations for fixed week owners.
<F9 – Weeks>
Once the owner master is complete, use the <F9 – WEEKS> key for adding owner weeks. After pressing
<F9 – WEEKS>, the system prompts:
Answer “Y” to add owner weeks. Next, the system prompts for the week number owned, the starting day,
and other information describing the owner week. A sample “Timeshare Week Maintenance” screen follows.
Field
Description
Fixed Week
Fixed week owners own the same room the same week,
every year. Enter a “Y” if the owner is fixed week. Switch
#422-16 sets the default for this field.
Week Number
Enter the week number and year for Fixed Week ownership
weeks. By definition access to this field is restricted and is
blank for floating week ownership. After entering the Week
Number the Period is computed automatically by scanning
the Period Definition table - Table DA.
Resort Data Processing, Inc.
PO BOX 1170, Vail, CO 81658
(11/99)
Phone: (970) 845-1140
3−128
http://www.resortdata.com
RDP Property Management Systems
Timeshare Owners
Field
Description
Week Starts On
Enter a number, 1- 7, that corresponds to the day the
owner’s week begins. (1 = Monday, 7=Sunday) Switch
#422-15 controls the default starting date for all fixed week
timeshare owners (Sunday (1) - Saturday (7).
Period
Access to this field is only allowed when the Fixed Week
field is NO. Periods are defined in Table DA. If only one
period is required, enter a default of A for the sub-record
and 01 for field #3 and either 52 or 53 in field #4.
Room Number Owned
Defaults to the room number owned on the owner master.
The "Room Number Owned" is optional in each "ownership
record".
Autoload Reservation
Enter a “Y” if the owner’s reservation is loaded automatically
using option “220 – Process Timeshare Owners” on the
Owner Master menu.
Load Ownership File?
Enter a “Y” if the owner’s reservation is loaded automatically
using option RDP220–2 or RDP220-4 "Process Timeshare
Owners” on the Owner Master menu.
Rotate Week Forward?
Enter a “Y” if the owner’s week automatically moves forward
one week each year within the period. Option RDP220-5 is
used once a year to rotate the weeks forward, for example,
enter a “Y” if the owner owns week #1 in 1999, week #2 in
2000, week #3 in 2001, etc. If the owner owns the last week
of the period, then the owner will be assigned the first week
of the period when rotating. If the owner always owns the
same week, enter an “N” in this field.
Billing Type
This field is optional. It is possible to globally post charges
to owners using option 212 based on this field. For
example, create a "GOLD" ownership record, and use
option 212-W to globally post code 16 to all owners of type
"GOLD".
Skip Global Posting
If this field is "Y", the owner will not be charged during the
global post process when posting based on owner weeks.
Unique Posting Amount
This field allows a unique posting amount for a particular
ownership record. If the user selects code 88, the system
globally posts a code "B788" to all "timeshare ownership
records" using the unique posting amount.
Posting Description
If this field is NOT blank, option 212 uses this description
when posting charges based on the weeks owned.
Remarks 1 – 5
Enter any additional remarks regarding this owner week.
A single owner can own multiple weeks, as seen below for owner #1000 below. Use the <F9 – WEEKS>
key from option “202” – “Change Owner Information” on the Owner Master menu (12) for displaying and
adding owner weeks.
Resort Data Processing, Inc.
PO BOX 1170, Vail, CO 81658
(11/99)
Phone: (970) 845-1140
3−129
http://www.resortdata.com
RDP Property Management Systems
Timeshare Owners
Additional weeks may be added by pressing the <INSERT> key and completing a “Timeshare Week
Maintenance” form.
LOADING FIXED WEEK OWNERSHIP DATA
The TCS system automatically pays the correct owner his share of reservation rental income if the owner
elects to rent the room. To correctly pay the owner, TCS maintains a file called TCSOWNER.DAT,
indicating which owner owns each room for each day of every year. After all owners are entered into the
system, the ownership file is created using option “220” - “Process Timeshare Owners” on the Owner
Master menu, Selecting option 220 displays the following screen:
Use option 1 to load fixed week ownership data. After selecting option 1, enter “Y” for a printout followed by
the current year. When prompted for starting and ending owner numbers, use <ENTER> as the default to
automatically load all ownership information for fixed week owners.
Option 1 is normally only used once for a given owner and year. However, it can be used more than once
for the same time period. Whenever option 1 is used, the system erases all fixed week ownership
information for the owner (record type "1"), and regenerates this information based on the current week
number owned. Any ownership information manually entered for floating week owners with option “220-3” is
not changed. Each day displays three pieces of information, the date, the owner number, and the method
used to enter the data.
Resort Data Processing, Inc.
PO BOX 1170, Vail, CO 81658
(11/99)
Phone: (970) 845-1140
3−130
http://www.resortdata.com
RDP Property Management Systems
Timeshare Owners
There are two methods available for entering timeshare owner data, including:
Method
Description
1
Indicates ownership information was automatically
generated for a fixed week owner option “220-1”.
3
Indicates ownership information was manually
inserted into the TCSOWNER.DAT file with option
“220-3”.
Use option 2 for generating fixed week-fixed room owner reservations. Use option 4 to automatically
generate ALL fixed week (fixed room T-type and floating room Q-type) reservations for timeshare owners.
When using option 4, the system checks for future owner reservations and will not generate an additional
reservation if one already exists.
ª
Use option 2 or option 4, but NOT both!
Option 5 is reserved for those properties that rotate owner weeks forward each year. For example, owner
#1000 owns week #1 in 1999, week #2 in 2000, and week #3 in the year 2001.
Resort Data Processing, Inc.
PO BOX 1170, Vail, CO 81658
(11/99)
Phone: (970) 845-1140
3−131
http://www.resortdata.com
RDP Property Management Systems
Timeshare Owners
LOADING FLOATING WEEK OWNERSHIP DATA
Floating week owners can also rent their week. A floating week owner selects a week or time period over a
range of months. If a floating week owner rents his week, use option 220 from the Owner Master menu to
define the ownership data. Use option “3” - “Enter Floating Week Timeshare Owners Into Ownership Cross
Reference File”. The system displays:
The day of the week is
included in order to
simplify
ownership
entry.
Above, the ownership information for room 101 is displayed, starting with 03/13/98. At present, there is no
owner assigned to room 101 for the week beginning Saturday, March 14. After entering a starting date of
03/14/98 and ending of 03/21/98 for owner number 101-01, the screen would appears as:
Resort Data Processing, Inc.
PO BOX 1170, Vail, CO 81658
(11/99)
Phone: (970) 845-1140
3−132
http://www.resortdata.com
RDP Property Management Systems
Timeshare Owners
DEVELOPER OWNED TIME
At many timeshare resorts, certain time periods are left unsold and developer owned. There are several
ways to handle this situation. One way is to add an owner master record, NONE, to the system and then
use option 220-3 to assign owner number NONE to any time frame required. For example, entering a start
date of 03/08/98 and end date of 03/15/98 with owner number NONE displays the following screen:
NONE tells the system to pay no owner for any reservation in room number 101 from 03/08/98 through
03/13/98. This setting forces the owner processing program, option 912, to mark any reservations for the
room during this time period as already posted.
Alternatively, developer owned time periods can be left blank in the TCSOWNER file. No owner will be paid
and the reservation transactions will remain in the transaction file as “not posted” until the reservation
transfers to non-active history.
CREATING FIXED WEEK OWNER RESERVATIONS
After entering timeshare owner masters, reservations for fixed week timeshare owners are automatically
created using option 220 on Owner Master menu. After selecting option 220, the system prompts:
Enter option “2” to generate timeshare owner reservations and then a “Y” for a printout. Option 2 generates
type T (i.e. timeshare owner) reservations for every fixed week owner. Please check the printout to make
sure all reservations are made correctly.
Resort Data Processing, Inc.
PO BOX 1170, Vail, CO 81658
(11/99)
Phone: (970) 845-1140
3−133
http://www.resortdata.com
RDP Property Management Systems
Timeshare Owners
Re-Execution of Option 2
Normally option 220-2 is executed only once for each calendar year. However, it is possible to re-execute
option 2 several times if needed. For example, if option 2 is used on June 1, 1998 for the year 1999, the
system loads type T (i.e. timeshare owner) reservations for all fixed week owners for 1999. If 400 more
owners are added between June 1, 1998 and July 1, 1999, and option 2 re-executed, only reservations for
the additional 400 owners are made.
Reservation Types
There are several reservation types in the timeshare system. Option “100” - “New Reservation” displays the
following choices:
Inventory Availability
Option “A” - “Inventory Availability” is a quick option for checking availability. Option A is described in detail
in the Reservations chapter of the User’s Manual.
Room Availability
Choose Option “R” - “Room Availability” to display actual room numbers available for specific dates. Option
R is described in detail in the Reservations chapter of the User’s Manual.
Bonus Time
A Bonus time owner reservation is an optional reservation type used by some properties to reserve
additional time for owners. Many resorts use this as part of the sales effort. In effect, the owner purchases
his week but is allowed to reserve additional time at a reduced rate if it is not already sold to a full paying
guest. Policies are different at each property.
For example, an owner may be allowed to book bonus time up to 7 days prior to the arrival date, at a rate of
$20.00/day. Rates can be automatically calculated using unique rate plans for bonus time. See switch
#319-11, Calculate rates for bonus time owner reservation, to turn on/off rate calculation for bonus time
reservations. Bonus owner reservations are checked-in and out normally.
If the yield management module is installed a unique rate plan should be established for Bonus time
reservations. This allows the system to automatically calculate the correct rental rate for type “B”
reservations. (Set switch #319-11 to YES)
Resort Data Processing, Inc.
PO BOX 1170, Vail, CO 81658
(11/99)
Phone: (970) 845-1140
3−134
http://www.resortdata.com
RDP Property Management Systems
Timeshare Owners
Exchange Week
An exchange week reservation is used to reserve a room for a timeshare exchange reservation. The flow of
events is:
1.
The owner reservation is pre-loaded for a fixed week owner with option 220-2 or manually loaded with
option 100 as a type “T” reservation.
2.
If the owner exchanges his week, the type “T” reservation is deleted and a new type “E” reservation is
put in its place. This reserves the room for the correct days for the exchange guest. The name on the
reservation is normally set to "Exchange Guest" at this point and NOT added to guest history. These
reservations are indicated with an “E” on the tape chart.
3.
The system can calculate rates for exchange week reservations or set the rate to $0. This is controlled
by system switch #319-12 on the System Manager menu.
4.
When the resort is notified of the exchange guest's name, option 120 is used to change the name on
the correct reservation to the guest's name. The address is also added at this time. If there is a charge
to this guest to be collected by the property, it can also be added.
5.
Exchange week reservations are checked-in and out normally, with full folio and night audit functions.
Timeshare Owner Pre-assign
The letter “T” on the tape chart indicates Timeshare owner pre-assign reservations. They are automatically
made for all fixed week owners for each future year with option “220” - “Process Timeshare Owners” on the
Owner Master menu. Type T reservations are made for floating week owners with option T from the New
Reservation option (100). Rates can be calculated for type T reservations or automatically set to $0 by
using switch #319-13 on the System Manager menu.
Timeshare Owner Inventory
Timeshare owner inventory reservations are used for floating week or floating time period owners. However,
only a room type is assigned, not a specific room number, very similar to an inventory type reservation for a
paying guest. These reservations are not indicated on the 142 calendar since a room number has not been
assigned. Timeshare owner inventory reservations are designated as a type “Q”. For example, if a floating
week owner has the right to any two bedroom room for his week, a type Q reservation is used. Rates can
be calculated based on the setting of switch #319-14. The flow of events is:
1.
When the floating week owner calls to reserve his time period, a type Q reservation is made with option
100. The owner name, room type, arrival, and departure dates are entered.
2.
Any time prior to arrival, or when the owner arrives, a room is assigned and the system prompts:
If timeshare owner inventory reservations (type Q) should always be converted to type “T” reservations, set
switch #109-10, Convert inventory res. to pre-assign when room assigned, to YES. (RDP recommends the
YES setting for switch #109-10)
Resort Data Processing, Inc.
PO BOX 1170, Vail, CO 81658
(11/99)
Phone: (970) 845-1140
3−135
http://www.resortdata.com
RDP Property Management Systems
Timeshare Owners
Pre-Assign
Pre-assign reservations in the timeshare system are identical to pre-assign reservations in any other RDP
system. Please see the Reservations chapter for more information. Any pre-assign reservation
automatically pays the correct owner or owners based on the ownership calendar established in
TCSOWNER.DAT with option 220 on the Owner Master menu. For example, assume a reservation is from
01/10/98 to 01/20/98. This time period may overlap three owners, as follows:
Dates
Owned By
01/10/98-01/12/98
1000-01
01/12/98-01/18/98
1000-02
01/18/98-01/20/98
1000-03
In this example, the system automatically pays owner 1000-01 for the first two days, owner 1000-02 for the
next 6 days, and owner 1000-03 for the last two days.
Inventory
An inventory reservation in the timeshare system is identical to an inventory reservation in any other RDP
system. A room type is assigned, not a room number. Any time prior to check-in, a room number is
assigned and the reservation is converted to a type “T”, appearing on the reservation tape chart (142).
TIMESHARE RESERVATIONS
Additional features are included in the timeshare system when making a reservation with RDP100.
Specifically, the system prompts for an owner number when using reservation types B, T, and Q. After
entering an owner name or number, the system displays the owner master record, where important data is
viewed, including the owner’s balance due and the number of nights used, by year. The number of nights is
displayed using the <F9 - OWNER NIGHTS> key. A sample owner master record in RDP100 follows:
The <F9 - OWNER NIGHTS> key displays the number of owner nights per year.
Resort Data Processing, Inc.
PO BOX 1170, Vail, CO 81658
(11/99)
Phone: (970) 845-1140
3−136
http://www.resortdata.com
RDP Property Management Systems
Resort Data Processing, Inc.
PO BOX 1170, Vail, CO 81658
Timeshare Owners
(11/99)
Phone: (970) 845-1140
3−137
http://www.resortdata.com
RDP Property Management Systems
Resort Data Processing, Inc.
PO BOX 1170, Vail, CO 81658
Timeshare Owners
(11/99)
Phone: (970) 845-1140
3−138
http://www.resortdata.com
RDP Property Management Systems
Central Reservations
CENTRAL RESERVATIONS
OVERVIEW
This chapter is designed to provide an overview of the Central Reservations module. Topics covered
include:
Central Reservation Philosophy
Downloading From Central Reservations
Uploading at the Property
Downloading From the Property
Using a Range of Reservation Numbers
Installation
CENTRAL RESERVATION PHILOSOPHY
RDP systems allow the customer to have a central reservation office that is at a different physical location
from the property. For example, one customer has a reservation office in Texas with the property in Belize.
Another customer has reservations in Honolulu, and six resorts on different islands. The RDP Central
Reservations module (RL) allows a mixture of RDP systems. Central reservations can be made for one
resorts that is a hotel, another that is a full ownership condominium, and a third that is a timeshare resort.
Module Required
To use the RDP Central Reservations module, a copy of RDP software is required for each property.
Additionally, the Central Reservation module (RL) must be purchased which allows reservations to be
uploaded and downloaded.
Terminology
The term "central reservations" applies to the physical location that will make all advance reservations. The
term "property" refers to the actual property the guest visits. A central reservations site can make
reservations for multiple properties.
Reservation Control
The central reservations site is in control of all future reservations. Future reservations are defined as all
reservations prior to check-in, or reservation types 1, 2, 3, and 4. Reservations are made and stored on the
central reservations network, then downloaded (copied) nightly to the property. Advance reservations are a
one way information flow, from central to the property. Only central reservations can make new
reservations, changes, or deletions.
Simultaneous Reservations
If the environment requires simultaneous advance reservations at central and the property, implementing
central reservations with a full time modem to the property, and NOT using the RDP930 upload/download
process can accomplish this goal. Please contact RDP support for details.
Resort Data Processing, Inc.
PO BOX 1170, Vail, CO 81658
(11/99)
Phone: (970) 845-1140
4−139
http://www.resortdata.com
RDP Property Management Systems
Central Reservations
Reservation Changes
All changes to advance reservations must be made at central reservations. No changes to advance
reservations can be made by the property. For example, if a new reservation is made and the guest name is
spelled incorrectly, this new reservation is transferred to the property the first night. If the property notices
the name is spelled incorrectly, it should notify central to make the change. This change is then made at
central, and the changed reservation is downloaded the next day, along with all other changes, deletions,
and new reservations. If the property were to correct the spelling on an advance reservation directly on their
system, this information would not appear on the central reservations system. If central then changed some
other aspect of this reservation, such as the arrival date or address, this reservation would be copied to the
property and all properly level changes would be lost.
Control After Check-in
Control passes from central reservations to the property after the guest checks-in. The property can now
make changes to reservations, post transactions, perform a full night audit, and use all other aspects of the
system. If central reservations makes a change to a reservation that has been checked-in at the property,
the 930 upload process ignores this reservation and keeps the property’s version of the reservation. All
changes after check-in should be made by the property, not central.
Date Changes After Check-in
Date changes on a reservation after check-in provide a special case. For example, assume a guest decides
to stay an extra day. If the date is changed on the reservation at the property, central must be notified of this
change so they do not rent the room during the same time frame. RDP suggests any date changes to inhouse guests at the property are tracked manually, and a FAX sent to central at the end of the day so that
central can change the dates on the same reservation number, keeping availability in balance.
Walk-In Guests
If a guest wishes to make a reservation for a future date, this reservation must be entered into the system at
central reservations. However, if a guest walks-in to the property and wants a room immediately, the
reservation can be entered at the property. However, if this walk-in is for more than one night, the
reservation should be added to the list of date changes that is FAXED to central each day to ensure that
availability is updated.
The starting reservation number and guest history number at the property must be set to 700,000 during
initial system set-up. This allows walk-in reservations at the property without reservation number conflict at
central.
In addition, the transaction sequence number at the property should be changed to 1,000,000 in order to
prevent transaction number conflicts between central and the property.
Control After Checkout
Control of the reservation after checkout can be maintained at either the property or central reservations, but
not both. Most customers keep the completed folio and transaction detail only at the property, and all
accounting functions for travel agents, group leaders, group masters, and owners is done by the property.
This is the suggested approach. However, after checking out the folio all transactions can be transferred
from the property back to central reservations. See Downloading From the Property in this chapter.
Resort Data Processing, Inc.
PO BOX 1170, Vail, CO 81658
(11/99)
Phone: (970) 845-1140
4−140
http://www.resortdata.com
RDP Property Management Systems
Central Reservations
Downloading From Central Reservations
Central reservations is in control of all advance reservations. Once each day, all new reservations,
changes, and deletions are downloaded to temporary transfer files at central reservations. These temporary
transfer files are then compressed with "PKZIP" and transmitted via modem or e-mail to the property, where
they are uploaded. This section details the steps required to download from central reservations.
Make a directory \RDP\RDPTR. This will become the temporary storage location for all files. Use option
094 and set file path #5 on any workstation that will be used for download to RDPTR\.
1.
Make a directory \RDP\RDPTR. This will be used as the transfer directory.
2.
From the System Utilities menu, choose option “997 - 1” - “Update TABLFILE.DAT from UPD file” and
load the RDP930.UPD at both central and the property.
3.
Use option 090 and put a fence level on sub-record XS930. This is the System Manager menu option
for 930. This power level controls access to the upload/download features of 930. Repeat for each
directory at central.
4.
Use option 090 and add sub-record CRSBC with the special data field set to “CENTRAL”. This is used
for controlling specific options at both the property and central reservations.
5.
From the System Manager menu, choose option 930 and use option 1 to change the system flags. At
central reservations, they should appear as:
Field #10 should only be set to YES if the central
reservations site processes all group billing.
Use option 219 from the System Manager menu to change switch #6 to YES. This allows a manual change
of the Changed By Date field. Repeat this for all directories.
The 930 program creates a report of all reservations included in the upload/download, if any reservations
are on the report that should not be, use RDP120 to change field 58 (last changed date) to a date prior to
the upload/download date. This prevents the reservation from being downloaded.
From the central reservations site, select option 930-2 on the System Manager menu to download
reservations. Enter the correct upload/download date. Next, the system downloads all reservations of type
1, 2, 3, 4 and 9 from the central reservations site with a date equal to or greater than the date specified. All
transactions, notes, guest history, agents, and group masters are downloaded based on the settings of
switches 3 - 8. Option 930 creates temporary BTRIEVE files in file path #5, with an extension of *.930. The
transfer directory contains these files:
Resort Data Processing, Inc.
PO BOX 1170, Vail, CO 81658
(11/99)
Phone: (970) 845-1140
4−141
http://www.resortdata.com
RDP Property Management Systems
Central Reservations
HRESERVE.930
HEXPENSE.930
NOTEFILE.930
GROUPMST.930
AGENTS.930
GUESTS.930
ITINCURR.930
VENDORS.930
After running 930, review the printout carefully. Verify that all reservations included on the report should be
downloaded to the property. If any reservations are on the printout do not belong, use RDP120 to change
field #58, adjusting the "last changed by" date. Then, repeat the download.
After valid files are created in \RDP\RDPTR\*.930, exit the system to the DOS level. To change to the
transfer directory type:
CD\RDP\RDPTR
To minimize the cost of copying the temporary files to the property, the program PKZIP.EXE can be used to
compress the files. Compressing the files can significantly reduce the modem transfer time, reducing
telephone costs. To compress the files, enter the following command from the \RDP\RDPTR directory.
PKZIP PCYYMMDD.ZIP \RDP\RDPTR\*.930
In the above command, substitute a logical file name for the text PCMMDDYY, for example 0119970224
(Property Code followed by date).
Send the ZIP file to the property via the modem or internet e-mail. In this example, the only file sent would
be \RDP\RDPTR\0119970224.
After the ZIP file has been successfully uploaded by the property, erase the temporary files and the
temporary ZIP file by typing the following:
ERASE \RDP\RDPTR\*.930
ERASE \RDP\TRANSFER\*.ZIP
UPLOADING AT THE PROPERTY
New reservations, changes, and deletions from central reservations are transferred to the property in the ZIP
file. These changes must be uploaded from the transfer directory to the property’s database as follows:
1.
Make a directory \RDP\RDPTR. This will become the temporary storage location of the transfer file.
Use option 094 and set file path #5 on any workstation that will be used for upload to \RDP\RDPTR\.
(Only perform this step during installation)
2.
Use option “997 - 1” - “Update TABLFILE.DAT…” on the System Utilities menu and enter file name
RDP930.UPD. (Only perform this step upon installation)
3.
Use option 090 to put a fence level on sub-record XS930. This is the System Manager menu option for
930. This will control access to the upload/download features of 930 at the property. (Only perform this
step upon installation)
4.
Use option 090 to add sub-record CRSBC with the special data of “PROPERTY”. (Only perform this
step upon installation)
5.
From the System Manager menu, run 930 and use option 1 to change the system flags. At the
property, they should appear as:
Resort Data Processing, Inc.
PO BOX 1170, Vail, CO 81658
(11/99)
Phone: (970) 845-1140
4−142
http://www.resortdata.com
RDP Property Management Systems
6.
Central Reservations
Exit to DOS. Make sure the transfer files from yesterday are erased with the following command.
ERASE \RDP\RDPTR\*.930
7.
Unzip the daily upload file from central reservations. The unzip command is:
UNZIP \RDP\RDPTR\*.ZIP
8.
Use option 930 from the System Manager menu and select option 3 to upload. A printout will be
created. Review this carefully as these are the changes to the system at the property. The upload
process deletes and adds any reservations sent from central. For example, if reservation #2 already
exists at the property and is changed by central, the upload process deletes reservation #2 from the
property, along with all <F6 - NOTES> and <F7 - TRANSACTIONS>. The complete reservation, notes,
and transactions are then copied from the file uploaded from central.
DOWNLOADING FROM THE PROPERTY
The property has the option of downloading checked-out reservations along with transactions and sending
them back to central for billing purposes. The process is identical to the download from central. However,
the flags at the property should be set so flag #2 is YES and flag #3 is YES, as seen above.
USING A RANGE OF RESERVATION NUMBERS
In order to avoid confusion, properties with RDP's central reservations module use different reservation
number ranges for bookings made at the central reservations office versus those bookings made at the
property. During installation, these ranges are set.
For example, the central reservations office starts at reservation number "1" while the property starts with
reservation number 950,000. Because the RDP reservation number is limited to six characters, properties
with a high volume of reservations are nearing the end of the reservation number range. If this were to
happen, the reservation counter starts over, overwriting existing reservations. In order to solve this problem,
RDP has added a feature that allows properties to take advantage of a range of reservation numbers. For
example, in the example outlined above, the property can take advantage of reservation numbers
700,000 - 949,999.
1.
Use the following steps in order to define a range of reservation numbers.
2.
From the System Manager menu, choose option "090" - "Update System Tables".
3.
Select option "U" to "Update Table Records".
4.
Enter table number C1.
5.
Choose option "S" for "Sub-record".
Resort Data Processing, Inc.
PO BOX 1170, Vail, CO 81658
(11/99)
Phone: (970) 845-1140
4−143
http://www.resortdata.com
RDP Property Management Systems
Central Reservations
6.
Enter sub-record "RESNUM".
7.
In the "Special Data" field, enter the range of reservation numbers, as seen below.
INSTALLATION
The following steps are critical to the successful installation of the RDP Central Reservations module (RL):
:
1.
Install the Central Reservations module.
2.
Run RDP930.UPD with option “997 - 1” - “Update TABLFILE.DAT from a UPD file”
3.
Add sub-record CRSBC at the property with special data of PROPERTY.
4.
Add sub-record CRSBC at central with special data of CENTRAL.
5.
Create the transfer sub-directory (RDP\RDPTR)
6.
Change RDP094 to reflect the 930 transfer directory (Usually set to RDPTR\)
7.
Change the default reservation number at the property to 700,000 in order to avoid conflicts between
reservation numbers.
8.
Change the default transaction sequence number in file 85 to avoid duplicate transaction sequence
numbers.
9.
Set the 930 switches at both central and the property.
Contact RDP Support for assistance with steps 1 - 9 above.
Resort Data Processing, Inc.
PO BOX 1170, Vail, CO 81658
(11/99)
Phone: (970) 845-1140
4−144
http://www.resortdata.com
RDP Property Management Systems
Long Term Reservations
LONG TERM AND MONTHLY
RESERVATIONS
OVERVIEW
RDP’s Long Term module posts rent every 30 days using the Global Post Room and Tax option, RDP212.
The module is designed to post rent once a month, based on a user-defined variable. This chapter outlines
installation and use of the Long Term module, RT.
MONTHLY RENTALS
The monthly feature is designed to post rent once a month - regardless of the number of days in the month.
Installation
After purchasing the Long Term module, specify the day of the month rent is posted using the following
steps.
ª
1.
From the System Manager menu, choose option "090" - "Update System Tables".
2.
Choose option "U" - "Update Table Records".
3.
Update table C1 and choose option "S" for "sub-record".
4.
Add sub-record "MONTH", with the special data field equal to the day rent is posted.
In the example above, rent is posted on the first day of the month.
Resort Data Processing, Inc.
PO BOX 1170, Vail, CO 81658
(12.1ΜΚ)
Phone: (970) 845-1140
5−145
http://www.resortdata.com
RDP Property Management Systems
Long Term Reservations
Features
With the monthly rental features installed, RDP100 contains the following reservation types, including those
for long term reservations:
Using options "K" - "Inventory – Long Term (Monthly)” or “L” – “Preassign – Long Term (Monthly)” the
monthly rent amount is entered on reservation screen one. The system displays an “M” for monthly at the
top of screen one.
The “M” designates a long-term
(monthly) reservation.
RDP posts a pro-rated rent for the first month from the check-in date until the last day of the current month.
For example, a reservation arrives on March 7 with a monthly rent charge of 500.00. RDP212 posts 403.23
upon check-in on March 7, with the dates 3/7 - 3/31 on the transaction.
The last long term posting date is stored on the second reservation screen.
Resort Data Processing, Inc.
PO BOX 1170, Vail, CO 81658
(12.1ΜΚ)
Phone: (970) 845-1140
5−146
http://www.resortdata.com
RDP Property Management Systems
Long Term Reservations
The last long term posting date is
stored on the second reservation
screen.
ADDITIONAL FEATURES
1.
When rent is posted for the last month of a reservation, the system pro-rates the rent from the first day
of the month to the departure date.
2.
If rent has been posted for the month, and the guest checks out early, a manual adjustment must be
made.
3.
If the reservation is attached to a group, and the group is paying rental charges, option 212 posts a
"B202" - "Billed to Group Master" for a negative amount. On the group master, the system posts a
"B303" transaction code with the reservation name and rent dates for the rental amount. The property
can then send a billing to the company before the rent is actually due to collect a payment. An example
follows:
The reservation transactions appear similar to the following once rent is posted.
Resort Data Processing, Inc.
PO BOX 1170, Vail, CO 81658
(12.1ΜΚ)
Phone: (970) 845-1140
5−147
http://www.resortdata.com
RDP Property Management Systems
Long Term Reservations
And, for billing purposes, the group master has the following transaction:
Set switch 419-12 to YES to prompt for a starting date when printing folios to generate a statement for the
current month only. The system starts the folio with a beginning balance line that includes the total of all
transactions to the starting date entered.
LONG TERM AND MONTHLY RESERVATIONS WITH R3 (OWNER ACCTG)
RDP supports both long term and monthly reservations for individually owned units. The process for paying
owners on these long term reservations is identical to the process for paying owners on short term rentals.
In order to pay owners for long term reservations, verify the following:
1.
The owner pay code defined in the C7 table pays the owner on the correct reservation buckets.
2.
The reservation has the correct owner pay code assigned.
3.
The switches in option "912" - "Process Owner Revenue" are set according to your property's owner
accounting procedures.
Resort Data Processing, Inc.
PO BOX 1170, Vail, CO 81658
(12.1ΜΚ)
Phone: (970) 845-1140
5−148
http://www.resortdata.com
RDP Property Management Systems
Guest Itinerary and Concierge
VENDORS & GUEST ITINERARY
OVERVIEW
Many RDP customers do extensive group business requiring activity scheduling. Activities can include a
conference room rental on Monday morning, lunch in the afternoon, a different conference room in the
evening, projector rentals, food service, and much more. Guest itineraries provide the ability to schedule up
to 500 activities for a group and provide the group leader with an itinerary detailing each of them.
Guest itineraries are also used by the concierge or guest services department. For example, if a guest
requests a dinner reservation, the concierge can schedule the activity and charge the guest a service fee. A
wide variety of activities can be sold by the concierge, including balloon rides, golf, skiing, etc.
Using the Guest Itinerary module includes:
Creating Vendor Masters
Searching for Vendors
Assigning Activities to Guests and Group Leaders
Fields on Activity Screens 1 & 2
Reading the Guest Itinerary Display
Scanning for "Open" Activities at Checkout
Multiple Activities and Seasonal Pricing for Vendors
Using the Itinerary Module with Golf Packages
Printing Tickets for the Guest.
Printing Complete Guest Itineraries
Printing Activitities by Vendor
Reconciling Tickets from Vendors
Resort Data Processing, Inc.
PO BOX 1170, Vail, CO 81658
(11/99)
Phone: 970/845-1140
6−149
http://www.resortdata.com
RDP Property Management Systems
Guest Itinerary and Concierge
CREATING VENDOR MASTERS
Every activity on a guest itinerary must be associated with a vendor. Vendors are defined using option
“200” - “Add Vendor Master” from the Vendor Master menu (14). A completed vendor screen follows:
Vendor Number
The Vendor number is an eight character alphanumeric field that uniquely identifies each vendor. Prior to
adding activities to a guest or group leader, the vendor number must be selected.
:
Once a vendor number has been assigned it cannot be changed. Please select vendor numbers carefully.
Vendor Type (Field #1)
The vendor type is a six character alphanumeric field that categorizes vendors, such as golf, dinner, etc.
Prior to assigning vendor types, first define them using option 090 on the System Manager menu, updating
table VT.
The vendor type is used as a sorting qualifier on vendor reports. For example, a report can be printed
showing all golf vendors (i.e. golf courses), or all tee times by date range for each course.
Property Code ( #2)
Vendors can also be sorted by property code. To activate the property code feature, please contact RDP
support.
Vendor Name and Address (#s 3-12)
The vendor name, address, contact name, and two phone numbers are held in fields 3-12. The system
allows mailing labels and letters to be generated for all vendors, or selected vendors. Additionally, ticket
vouchers may contain address information or any other fields on the vendor master screen.
Resort Data Processing, Inc.
PO BOX 1170, Vail, CO 81658
(11/99)
Phone: 970/845-1140
6−150
http://www.resortdata.com
RDP Property Management Systems
Guest Itinerary and Concierge
Start/End Time (#13)
The activity starting and ending times are stored in the vendor master and transferred to each new guest
activity. In this example, the starting and ending times for Singletree Golf Course are blank, meaning tee
times are entered on a guest by guest basis.
If a vendor called “Dinner” is created for an activity “Dinner at Our Restaurant” the starting and ending times
can be entered as 5:30PM and 10:30PM, respectively, indicating the dining room hours. These hours then
display on the itinerary for every guest with the activity “Dinner in Our Restaurant”.
Auto Repeat (#15), Starting Day (#16), and Repeat on Checkout (#17)
The auto repeat, starting day, and repeat on checkout fields are used together to control activities that are
repeated during each day of a guest stay. In our example, golf at Singletree does not automatically repeat
for each day of the guest’s stay, so all three fields are NO or blank. However, assume breakfast, lunch and
dinner are included every day. Three separate vendors could be created, as follows:
Vendor
Name
Activity Description
Starting
Time
Ending
Time
Singletree
Golf at Singletree
Michael’s
Breakfast at Michael’s
6:30 AM
9:30 AM
Picasso’s
Lunch at Picasso’s
11:30 AM
Courtney’s
Dinner at Courtney’s
6:00 PM
Auto
Repeat
Start
Day
Repeat on
Checkout
YES
2
YES
2:00 PM
YES
1
NO
10:00 PM
YES
1
NO
NO
In the table above, an activity for a guest from the vendor “Singletree”, is a “one time” activity. Each time
this activity is added for a guest the system prompts for the starting time (the tee time). When a “Breakfast
at Michael’s” is added, the system automatically repeats this activity, starting with the day after arrival (start
day = 2). This activity is repeated on the departure day, since breakfast is included on departure.
Lunch and dinner are also set to auto repeat for each day of the reservation. However, the starting day is
“1”. Lunch and dinner in this example are included on the arrival day, but not the departure day.
A sample guest itinerary using these three vendors for a reservation from 03/1/98 to 03/5/98 appears below:
Resort Data Processing, Inc.
PO BOX 1170, Vail, CO 81658
(11/99)
Phone: 970/845-1140
6−151
http://www.resortdata.com
RDP Property Management Systems
Guest Itinerary and Concierge
Form Code (18)
A ticket voucher can be printed for every activity. For example, a voucher is printed as “Golf for One at
Singletree”. The ticket is given to the guest, who hands it to the starter at the golf course. The golf course
then returns the same ticket to the property for payment.
The form code on the vendor master controls which ticket form prints for the vendor. Each vendor can have
a different form if required. In the Singletree example, form code “401” indicates the vendor ticket is printed
using form file \RDP\FORMS\FOR401.FOR. This form is modified with RDP’s Report Writer and includes
any data from the vendor, activity, or reservation.
Ticket Quantity Code (19)
The ticket quantity code controls whether one ticket is printed per activity or per person. This field is set as
follows:
Code
Description
A
One Person Per Activity
P
One Ticket Per Person
X
No Ticket Printing for this Vendor
For example, assume four people are staying in two rooms making a foursome at the Singletree golf course.
A setting of “A” prints only one ticket (“Golf for 4 at Singletree), the “P” setting prints four tickets (“Golf for 1
at Singletree”), and “X” prints no tickets.
Activity Name (20)
The activity name is a 32 character alphanumeric field that transfers from the vendor master to the guest
activity, itinerary, and ticket. Standardize activity names by adding sub-records to table LR using option 090.
Table LR provides an optional look up table for activity names. Using <F3 - LOOK> from field #20 displays
activity choices from table LR. An activity can either be selected from the table or a new one can be
entered.
Remark Fields (21-38)
There are a variety of remark fields available on the vendor master. These fields can be labeled to reflect
the property’s needs using a text editor and modifying file \RDP\FORMS\RDP200V.SCR. The field sizes
are:
Field Name
Size
Remarks 1 & 2
32
Remarks 3 - 10
3
Remarks 15 - 17
20
When utilizing remark fields keep sizes in mind. For example, field 25 (a three character field) may be
labeled “Golf Range”, and a YES or NO entered indicating whether or not a golf course has a driving range.
Print on Guest’s Itinerary Y/N (39
Field 38, “Print on Guest’s Itinerary” controls whether an activity for this vendor prints on the guest’s
itinerary. Normally this is set to “YES”, however it can be used to post a charge on the guest folio without a
corresponding activity printing on the Itinerary, such as a service charge for booking a golf tee time.
Resort Data Processing, Inc.
PO BOX 1170, Vail, CO 81658
(11/99)
Phone: 970/845-1140
6−152
http://www.resortdata.com
RDP Property Management Systems
Guest Itinerary and Concierge
Persons Per Ticket (40)
An activity on a guest itinerary prints a ticket for one or more individuals. For example, the concierge
frequently makes dinner reservations as part of the Honeymoon Package component “dinner for two”. This
activity has “persons per ticket” set to 2. On the other hand, an adult ski lift ticket is set to 1. The value for
“persons per ticket” is transferred from the vendor master to the guest activity record and can be overridden
as needed.
Open Item or Balance Forward (41)
This field is not currently active. Vendor statements will be released in a future version of the Guest Itinerary
and Concierge module.
Generate Checks if Balance Due (42)
This field is not currently active. Vendor statements will be released in a future version of the Guest Itinerary
and Concierge module.
Transaction Code (43) and Surcharge (44)
It is possible to automatically apply a surcharge to the guest or group leader folio when adding or changing
an activity on the itinerary. Field #42 indicates which guest ledger (B2) transaction code to use. This code
is defined in option 182 on the System Manager menu prior to adding it to a vendor master. This transaction
code may be posted in excess to the standard package price.
For example, if the property sells golf packages to twenty golf courses in the area and the guest decides
which course to play, it is likely that certain courses cost more than others. In these cases, it is possible to
use the surcharge field as an “extra” charge, above and beyond the normal package price. Another
example of using this surcharge field is the concierge who sells a guest tickets to the local baseball game.
In this instance, the concierge would add the activity and the price would automatically transfer from field
#42 in the Vendor Master. The charge can be overridden on an activity by activity basis.
:
A surcharge is NOT necessary for “standard” package components, such as breakfast or lift tickets. The
price for standard components is defined in option 186-8, Maintain Variable Packages - Package
components from the System Manager menu
Balance Due
This field is currently not active. An active Balance Due field will be released in a future version of the Guest
Itinerary and Concierge module.
ª
The labels on the vendor screen can be changed to meet your requirements. For example, the field
“Phone-2” can be changed to “FAX Number”, or “Remark-17” to “E-Mail Address”. To change these
fields, exit to the DOS prompt and use a text editor to modify the file \RDP\FORMS\RDP200V.SCR. Any
text on the screen can be edited, but the bracket (“[“ and “]”) characters cannot be moved or their lengths
changed.
Resort Data Processing, Inc.
PO BOX 1170, Vail, CO 81658
(11/99)
Phone: 970/845-1140
6−153
http://www.resortdata.com
RDP Property Management Systems
Guest Itinerary and Concierge
SEARCHING FOR VENDORS
It is possible to search for vendors by name, number, or type. When adding an activity to a reservation,
pressing <F3 - LOOK> at the Vendor Name field displays the following look screen.
ASSIGN ACTIVITIES TO GUESTS AND GROUP LEADERS
Once vendors are created, activities can be added to guests and group leaders. From the Front Desk
menu, use option 120 and select the guest. The “Change Individual/Group Reservations” screen displays:
The <F8 - ITINERARY> key accesses
all guest itinerary functions.
Resort Data Processing, Inc.
PO BOX 1170, Vail, CO 81658
(11/99)
Phone: 970/845-1140
6−154
http://www.resortdata.com
RDP Property Management Systems
Guest Itinerary and Concierge
Using <F8 - ITINERARY>
When <F8 - ITINERARY> is pressed, the system does one of the following:
1.
Displays all existing activities for this guest.
2.
Displays the following prompt:
When a new activity is added, the screens on the following page are displayed:
Individual Activity Screen #1
Reservation comments 4-6 should be used to
define activities, making them convenient for the
concierge to view when accessing the itinerary.
Information
above
the
“Individual Activity - Screen 1”
line is transferred directly from
the reservation screen.
Add activities iin “Individual Activity - Screen 1”
including the name, start/end times, ticket
information, and cost.
Resort Data Processing, Inc.
PO BOX 1170, Vail, CO 81658
(11/99)
Phone: 970/845-1140
6−155
http://www.resortdata.com
RDP Property Management Systems
Guest Itinerary and Concierge
Individual Activity Screen #2
The second activity screen displays
the same reservation header. In
addition, multiple comments may be
added to further describe the activity.
FIELDS ON ACTIVITY SCREENS 1 AND 2
Fields from the Vendor Master
The following fields on the activity detail screens come directly from the vendor master. The field number on
the activity detail screen is in parenthesis (certain fields cannot be accessed from the activity detail screen,
i.e. - Ticket Form Code). Refer to the above vendor master section for detailed field explanations.
Vendor Name (1)
Starting Day (6)
Print on Itinerary (8)
Vendor Number (1)
Auto Repeat (3)
Ticket Quantity Code (9)
Vendor Type (1 - Page 2)
Repeat on C/O (4)
Ticket Form Code
Activity Name (2)
Start/End Time (7)
Persons Per Ticket (10)
Activity Date ( 5)
A date greater than or equal to the reservation’s arrival date and less than or equal to the reservation’s
departure date must be entered for each activity. Activities are always sorted on the guest itinerary in
date/time order.
Activity Sequence Number
A unique sequence number is assigned by the system to every activity record. This is an eight digit number,
and is displayed in the top right hand corner of activity detail screens 1 and 2. This unique number can be
used for reconciliation with vendors to be sure the same vendor invoice is not paid more than once.
Resort Data Processing, Inc.
PO BOX 1170, Vail, CO 81658
(11/99)
Phone: 970/845-1140
6−156
http://www.resortdata.com
RDP Property Management Systems
Guest Itinerary and Concierge
Persons Billed, Cost, Total Cost (11 - 13)
A surcharge is optional on each activity. To activate the surcharge on a given vendor, field (43), Tx code,
must contain a valid B2 transaction code. The system always calculates the total charge as:
(Cost Per Person [Surcharge]) x (Persons billed) = Total Cost (field 11)
When the new activity is filed to the guest itinerary, the system automatically posts the correct B2
transaction code.
Changing Surcharges on Activities
The cost per person or number of persons billed can be changed after the activity is filed and the system will
recalculate the total cost. When filing the activity change, RDP automatically corrects the B2 transactions
posted to the folio, as follows:
•
If the transaction is pre-posted, the system changes the B2 transaction code.
•
If the reservation has been checked-in, and the transaction is real (not pre-posted), the system posts a
reversing entry to offset the original transaction and posts another transaction for the correct amount.
The system automatically marks the original transaction and correcting transaction as “non-printing” on
the folio. For example, if the following activity (Golf at Singletree) is changed from billing one person to
billing two people, and the surcharge is $15.00 per person, the system posts the reversing entry and the
actual charge.
The correcting transactions are
automatically marked as "No-Print".
ª
If a correction is made for a past date, the correcting entries will be dated the current system date.
Realizing Activity Transactions for Checked-In Guests
When the system date is changed with option 900, the pre-posted flag is removed on all activity-related
transactions for the new date on checked-in guests and the folio totals are adjusted accordingly.
Resort Data Processing, Inc.
PO BOX 1170, Vail, CO 81658
(11/99)
Phone: 970/845-1140
6−157
http://www.resortdata.com
RDP Property Management Systems
Guest Itinerary and Concierge
Confirmation with Vendor (12-15)
Many properties confirm activities with the vendor. For example, a guest makes a reservation on May 1st
for arrival on September 6th. On May 1st a golf activity for September 6th is created. During August, the
property confirms this tee time with the course. The related fields are:
Field Name
Field
Number
Length
Description
Confirmation Number
14
12
Stores the confirmation number from the vendor for this activity
Confirmed With
15
6
Name of vendor employee who confirmed the confirmation.
Confirmed Date
15
8
System automatically inserts the date of the confirmation.
Confirm Note 1
16
18
Note1 about the confirmation (i.e. - “No golf carts available”
Confirm Note 2
17
18
Note2 about the confirmation (i.e. - “arrive early”)
Entered By, Changed By, Confirmed By
At the bottom right of activity detail screen 1, RDP displays the login name of the person who first entered
this activity, the person who last changed the activity, and the person who input the confirmation information.
These are system-generated fields that cannot be changed.
Remarks 1-17
Remark fields 1-17 are displayed on the second itinerary detail screen, displayed by pressing
<PAGEDOWN> from the first detail screen. These fields can be re-labeled using a text editor, modifying
\RDP\FORMS\RDP200V.SCR. Field sizes are:
Field Name
Size
Remark 1 & 2
32
Remark 3 -14
3
Remark 15 - 17
20
<F6 - NOTES> on Each Activity
In addition to 17 remark fields, each activity can have a free form note. The note can be up to 4000
characters and 100 lines long.
When an activity is displayed, it is possible to add a “free-form” note by pressing the <F6 - NOTES> key. In
this example, the following note has been added:
Resort Data Processing, Inc.
PO BOX 1170, Vail, CO 81658
(11/99)
Phone: 970/845-1140
6−158
http://www.resortdata.com
RDP Property Management Systems
Guest Itinerary and Concierge
Any time the activity is accessed by pressing <ENTER>, the <F6 - NOTES> key displays in red, alerting the
concierge that special care is required for this activity.
FILE, EXIT, DELETE, COPY, TRANSFER, FIELD NUMBER
When accessing activity records, the following options are available:
Option
Description
File
Files the new or changed activity to the guest itinerary.
Exit
Exits the activity without filing.
Delete
Deletes the entire activity and corresponding surcharge transaction code. If
the transaction code has already been exploded through option 900, the
system posts an offsetting correction instead of deleting the transaction.
Copy
Allows an activity and its surcharge transaction to be copied from one guest or
group leader to another. For example, if two couples are staying in separate
rooms and playing golf in a foursome, an activity record can be created for one
guest and copied to the other three. Any surcharges are also copied.
Resort Data Processing, Inc.
PO BOX 1170, Vail, CO 81658
(11/99)
Phone: 970/845-1140
6−159
http://www.resortdata.com
RDP Property Management Systems
Guest Itinerary and Concierge
READING THE GUEST ITINERARY DISPLAY
To display a guest itinerary, follow these steps:
1.
Select the guest using option 120 from the Reservations, Front Desk , or Night Audit menu.
2.
With the correct guest highlighted on the “Change Individual/Group Reservations” screen, use
<F8 - ITINERARY> to display the itinerary screen. Each line is one activity and the entire screen is the
guest’s Itinerary.
Available Options from Guest Itinerary Screen
The following options are available from the guest itinerary screen above:
Entry
Action
<ESCAPE>
Returns to the previous screen
Scrolling Keys
The highlight bar can be moved from one activity to another with the <ARROW
KEYS>, <PAGEUP>, <PAGEDOWN>, <HOME>, and <END>.
<ENTER>
Allows the highlighted activity to be changed, deleted, copied, or transferred.
<INSERT>
Adds a new activity for this guest
<F10 - NO PRINT>
Activities can be toggled to print or not-print on the guest’s itinerary. In the
“ITN” column there is a “Y” or “N”, indicating whether or not a given activity is
flagged to print on the itinerary. (The default comes from the Vendor master)
<DELETE>
Used to delete the highlighted activity. This has the same effect as pressing
<ENTER> and then using <D> to delete from the activity detail screen.
Resort Data Processing, Inc.
PO BOX 1170, Vail, CO 81658
(11/99)
Phone: 970/845-1140
6−160
http://www.resortdata.com
RDP Property Management Systems
Guest Itinerary and Concierge
SCANNING FOR OPEN ACTIVITIES AT CHECKOUT
Many properties using the Vendor and Guest Itinerary module for renting or loaning items to guests during
their stay, perhaps sports equipment or amenities such as an iron and ironing board. And, when the guest
leaves, the property wants to be sure the loaned item is returned. RDP has developed "Open" and "Closed"
activities specifically for this purpose.
In order to activate this feature set switch #422-8 to YES. When an activity is added to a reservation, it is
automatically marked "Open" in field #18 on Activity Screen #1.
The Activity Name (field #2) describes the item(s)
loaned to a guest.
Field #18 on Activity Screen #1 tracks
whether the activity is "Open" or "Closed".
With switch #422-8 set to YES, the system checks for any open activities as part of the checkout process. If
the system finds an open activity, the following prompt displays.
Upon seeing the above prompt, the clerk can access the open activity using the <F8 - ITINERARY> key. To
change the activity to closed, highlight the proper activity on the guest itinerary, press <ENTER> to display
detail and change field #18 to "Y".
A "Y" in field #18 indicates a closed activity.
Resort Data Processing, Inc.
PO BOX 1170, Vail, CO 81658
(11/99)
Phone: 970/845-1140
6−161
http://www.resortdata.com
RDP Property Management Systems
Guest Itinerary and Concierge
Vendor Properties
In order to activate "open" and "closed" activities for a specific vendor, field #45 on the vendor master record
must be set to "Y", seen below.
In order for an activity to be marked "open" or
"closed", the vendor must have a "Y" in field #45.
MULTIPLE ACTIVITIES AND SEASONAL PRICING FOR VENDORS
It is possible to assign multiple activities and seasonal pricing to vendors, helping automate the addition of
reservation activities. With RDP, an activity can be tied to both a component record to allow for seasonal
pricing and to an RDP "people classification". When an activity is added to a reservation, the system finds
its seasonal price and multiplies it by the number of people in the assigned classification.
Example:
1.
River Rafting is 30.00/Adult in May and 40.00/Adult in June.
2.
A reservation is booked for three adults.
3.
A rafting activity is added for May 31, the activity cost is 30.00, the number of people billed is 3, and the
total charge is 90.00. If the rafting activity is added for June 1, the cost is 40.00, the number of people
billed is 3, and the total charge is 120.00.
Defining Activity Batches and Activities in Table VP
Use the following steps for adding activity batches and activities.
1.
From the System Manager menu, choose option "090" - "Update System Tables".
2.
Update table VP.
3.
Add two-character sub-records that define a batch of activities. Enter a generic description in field
number one. For example, River Rafting has been added as sub-record "RR". Leave all other fields
blank on this first sub-record.
Resort Data Processing, Inc.
PO BOX 1170, Vail, CO 81658
(11/99)
Phone: 970/845-1140
6−162
http://www.resortdata.com
RDP Property Management Systems
Guest Itinerary and Concierge
4.
File the new sub-record.
5.
For each activity within the batch, define a sub-record that includes the batch code and a sequence
number. Example: "RR0010" for "River Raft – Adult", "RR0020" for "River Raft – Child".
6.
For all sub-records with a batch code and sequence number (i.e. - River Raft - Child), define a
component number (field #3), a transaction code (field #4), and a people category (classification - field
#5).
7.
The four-character component record in field #2 relates to a Variable Package component defined with
Option "186-8" - "Package Component". By defining the component with option 186-8, seasonal price
changes are allowed. A sample "River Rafting - Adult" component is seen below.
If the activity has no cost, define a component FREE and enter this in Table VP for the component
number.
8.
Enter the activity's transaction code in field #3 of table VP. Define the transaction code with Option
"182-2" - "Add Transaction Code" on the System Manager menu. Leave this field blank if the activity is
free.
9.
In field #4, enter the people classification this activity applies to, 1 - 4, or "A" for "All". Use an "A" if the
system should add the number of people entered in each classification (for a specific reservation) for
billing purposes. People classifications are found in option "186-10" - "Configure People Classifications"
on the System Manager menu. Leave this field blank if the activity is free.
Resort Data Processing, Inc.
PO BOX 1170, Vail, CO 81658
(11/99)
Phone: 970/845-1140
6−163
http://www.resortdata.com
RDP Property Management Systems
Guest Itinerary and Concierge
10. Each "batch" (i.e. - River Rafting) should have at least two sub-records, one for the two-character batch
code (i.e. - sub-record RR for River Rafting), and one for the six-character activity sub-record (i.e. - subrecord RR0010 for River Rafting - Adult). A sample listing of table VP follows.
Updating a Vendor Record
If a vendor has multiple activities or the activity price changes seasonally, update field #46 on the vendor
record with the two-character batch code defined in Table VP. Use the <F3 - LOOK> key in field #46 for a
list of batch code options.
Adding an Activity to a Reservation
Use the following steps for adding a seasonal priced activity to a reservation.
1.
Access the reservation using RDP120.
2.
Use the <F8 - ITINERARY> key to add an activity.
3.
Press <INSERT> to add a new activity.
4.
Select the vendor in field #1. If the vendor has a two-digit table VP activity batch assigned in field #46,
the following prompt appears:
Resort Data Processing, Inc.
PO BOX 1170, Vail, CO 81658
(11/99)
Phone: 970/845-1140
6−164
http://www.resortdata.com
RDP Property Management Systems
Guest Itinerary and Concierge
Here, enter the activity date. The default activity date for a future reservation is the reservation's arrival
date. For checked-in reservations, the activity date default is set to the current system date. Based on
the activity date, the system calculates the price based on the component data, entered in option "1868" - "Package Component".
5.
After entering the activity date, the system displays those VP activities that correspond to the activity
batch entered in field #46 on the Vendor Master. In this river rafting example, the assigned batch is
defined as "RR" in table VP. The corresponding activities in table VP are "RR0001" - "River Rafting Adult" and "RR0002" - "River Rafting - Teen". Therefore the system displays the following activity
options.
Here, enter option 1 for adult rafting and option 2 for teen rafting. If only one activity exists for a
particular batch, the above screen does not display.
Resort Data Processing, Inc.
PO BOX 1170, Vail, CO 81658
(11/99)
Phone: 970/845-1140
6−165
http://www.resortdata.com
RDP Property Management Systems
6.
Guest Itinerary and Concierge
Next the system calculates the activity price based on the seasonal data entered in option 186-8, the
sub-records in the VP table, and the number of people entered on the reservation. For example,
assume that adult rafting trips are entered with the following information.
Adult Rafting Sub-Record in Table VP
Adult Rafting Component - Option 186-8
Resort Data Processing, Inc.
PO BOX 1170, Vail, CO 81658
(11/99)
Phone: 970/845-1140
6−166
http://www.resortdata.com
RDP Property Management Systems
Guest Itinerary and Concierge
Activity Price Calculation
There are two possible error messages when adding activities:
7.
A.
“Component Not Found” displays if the component in Table VP is not defined
with option 186-8.
B.
“Transaction Code Not Found” displays if the transaction code in Table CP is
not defined with option 182-2.
After calculating the price, the system returns to the "Auto Repeat" field on the itinerary screen. Here,
the user can change the surcharge or people billed fields if necessary.
Multiple Activities and Seasonal Pricing for Vendors - An Example
With the information outlined above, this section provides an example using the multiple activity feature for
vendors. In this example, input the following activities into the RDP system.
Vendor - Vail Ski Area
Activity
Season A
(Early/Late)
Season B
(Regular)
Season C
(Holiday)
Adult Lift Tickets
$45
$58
$62
Child Lift Tickets
$35
$48
$52
Season Definition
Season A
November 10 - 24, March 15 - April 15
Season B
November 29 - December 23, January 3 - March 14
Season C
November 25 - 28, December 24 - January 2
Resort Data Processing, Inc.
PO BOX 1170, Vail, CO 81658
(11/99)
Phone: 970/845-1140
6−167
http://www.resortdata.com
RDP Property Management Systems
Guest Itinerary and Concierge
Create Vendor Seasonal Table
The first step to automating activities for a specific vendor is to create a unique seasonal table. All unique
seasonal tables begin with the letter "Q". In our example, the Vail Ski Area seasonal calendar is the Q1
table. In order to add the table, use the following steps.
1.
From the System Manager menu, choose option "090" - "Update System Tables".
2.
Choose option "U" to "Update System Tables" and enter table number Q1.
3.
The system returns the following message:
4.
Press the <ALT> and <C> keys simultaneously to create the new table.
5.
Enter a name for the new table.
6.
<ESCAPE> back to the "Enter Table Number" prompt and enter table Q1. Enter "S" for sub-record.
Add sub-records to the Q1 table using the information provided above. For example, November's
seasonal calendar appears as:
Complete the Q1 table.
7.
Add the Q1 table to the Q0, Enhanced Package Season, table. The sub-record in table Q0 is Q1. The
description is "Vail Ski Area Seasons".
For more information regarding seasonal calendars, please see the Maintaining System Tables
chapter in the System Administration manual.
Resort Data Processing, Inc.
PO BOX 1170, Vail, CO 81658
(11/99)
Phone: 970/845-1140
6−168
http://www.resortdata.com
RDP Property Management Systems
Guest Itinerary and Concierge
Update Table VP
Once the seasonal table is complete, update the Activity Batch table, VP. The first sub-record added to the
VP table is the "Activity Batch". In this example, the "Activity Batch" is "VS" - "Vail Ski Area Lift Tickets".
Sub-record VP is seen below.
Fields 2, 3, and 4 are blank in the "Activity Batch" sub-record. Next, add sub-records to the VP table for the
activities sold for Vail Ski Area. These sub-records use the following naming convention:
"XXYYYY"
Where "XX" is the activity batch number and "YYYY" is the sequence number. The sequence number
determines how the sub-record displays when reservation activities are added. In our example for the Vail
Ski Area, only two activities are added, adult lift tickets and child lift tickets. The adult lift ticket sub-record is
seen below.
With the sub-record displayed above, a component named "VAAD" must be added as a package component
using option 186-8 on the System Manager menu. With the transaction code entered in field number three,
a "VA" transaction code is posted any time an adult lift ticket is added to a reservation. Field number four,
People Category, tells the system to look at the number of adults entered in people classification #1.
(People classifications are entered using option "186-10" - "Configure People Classifications" on the System
Manager menu).
The child lift ticket sub-record is displayed below.
1.
2.
3.
Component number "VACH" must be added using option 186-8.
The transaction code VC is posted any time a child lift ticket is added to a guest itinerary.
The system uses people classification two (children) for determining the number of lift tickets to
post.
Resort Data Processing, Inc.
PO BOX 1170, Vail, CO 81658
(11/99)
Phone: 970/845-1140
6−169
http://www.resortdata.com
RDP Property Management Systems
Guest Itinerary and Concierge
Add Transaction Codes
Transaction codes must be added for both adult and child lift tickets. In our example, transaction codes VA
(Adult lifts) and VC (Child Lifts) must be created using option 182 on the System Manager menu. The adult
(VA) transaction code is displayed below.
Create Components in Option 186
Add components "VAAD" and "VACH" using option 186-8 on the System Manager menu. Include pricing
information for seasons A, B, and C. The completed components are seen below.
The adult lift ticket component
uses seasonal calendar Q1.
Rates vary by season for adult lift tickets.
Resort Data Processing, Inc.
PO BOX 1170, Vail, CO 81658
(11/99)
Phone: 970/845-1140
6−170
http://www.resortdata.com
RDP Property Management Systems
Guest Itinerary and Concierge
Child lift ticket rates are entered according to seasons defined
in the Q1 table.
Update the Vendor Master
After adding components for adult and child lift tickets using option 186-8 on the System Manager menu,
update the vendor master record to include the correct batch code. The batch code is stored in field number
46 on the vendor master. Batch codes are stored in table VP, described above.
With the transaction code field blank, the system uses the
code defined in the VP table for specific activities, VA and
VC in our example.
Enter the activity batch code in field #46.
The transaction code field (#43) is blank in this example. With field #43 blank, the system uses the
transaction code defined in field #3 of table VP.
Adding Activities
After completing the setup tasks outlined above, activities may be added to reservations. In our example,
the Vail Ski area has three seasons in the month of November, A, B, and C. The Q1 sub-record for
November is listed below.
Resort Data Processing, Inc.
PO BOX 1170, Vail, CO 81658
(11/99)
Phone: 970/845-1140
6−171
http://www.resortdata.com
RDP Property Management Systems
Guest Itinerary and Concierge
th
th
A given reservation is arriving on November 24 and departing November 30 , spanning three seasons at
the ski area. The RDP itinerary module will automatically calculate adult and child lift tickets for all three,
seen below.
RDP calculates adult and child lift
ticket prices for season A.
Adding an activity in season C causes
RDP to display season C rates.
th
Adding an activity for November 30
displays Vail's season B rates.
Resort Data Processing, Inc.
PO BOX 1170, Vail, CO 81658
(11/99)
Phone: 970/845-1140
6−172
http://www.resortdata.com
RDP Property Management Systems
Guest Itinerary and Concierge
USING THE ITINERARY MODULE WITH GOLF PACKAGES
The RDP system can be used for tracking golf packages on guest itineraries. Specifically, the RDP system
has the ability to automatically calculate the number of golf rounds available on a reservation, the available
courses, course prices, and what constitutes a “standard package round” versus an “extra round” (one not
included in the package). This section includes the following sections specifically regarding the RDP
itinerary system and golf packages:
Package Setup
The VY Table
The VZ Table
Adding Golf Components
The "Count as Golfer" Switch
Adding Golf Activities
Activity Screen
Changing Reservations and Scheduled Activities
Package Setup
There are various switches, fields, and tables in the RDP system used to automatically monitor the
assignment of golf rounds to reservation itineraries. The first switch, #421-13, Prompt to count activities as
part of packages, “activates” RDP’s ability to cross reference packages and itineraries. With switch #421-13
set to YES, two new fields are activated as part of the package definition screen, “Golf Days” and “Pkg
Activity Grp”.
The fields “Golf Days” and “Pkg
Activity Grp” can only be accessed
with switch #421-13 set to YES.
Resort Data Processing, Inc.
PO BOX 1170, Vail, CO 81658
(11/99)
Phone: 970/845-1140
6−173
http://www.resortdata.com
RDP Property Management Systems
Guest Itinerary and Concierge
In order to cross reference packages to a guest itinerary, RDP uses two fields when defining variable
packages:
Field
Description
Golf Days
The number of golf rounds associated with this package. For example, a daily
golf package could have tee times in the morning, early afternoon, and
evening. So, for this particular package, the golf days would be set to three.
Package Activity Group
The “package activity group” field accesses RDP table VY in order to list
available golf course groupings for a particular package. For example, there
could be “Classic Courses”, “Choice Courses”, and “Platinum Courses”.
In the setup described in the previous sentence, a code is associated with
each golf course grouping. For example, “CL” for Classic, “CH” for Choice
courses, and “PL" for Platinum courses. These codes are used along with a
second RDP table, VZ, in order to calculate surcharges.
When creating a golf package, the components are built along the same lines as normal packages, with the
exception of the two fields listed able. For example, a rate set is still assigned to the package (i.e. - 10%
Discount) and components are still built in to the package. Using the example terminology above, a
"Classic" golf package might include the following:
Package Component
Description
Rate Set
The rate set is defined using option 186-4. The rate set is the room portion of
the package. In our example, the rate set may be 10DC for a 10% discount.
Golf
A component is added to the Classic golf package for the amount of the
package allocated to golf. This component is created using option 186-8. For
example, the package may include $50 for golf. However, there may be
certain courses that cost more that $50 for the guest to play. For these
courses, RDP allows a surcharge to be applied to the guest while making the
reservation. See the following section titled "The VZ Table" for more
information.
Breakfast
The breakfast component is also created using option 186-8 and following the
standard component rules described in the chapter titled Creating and
Maintaining Variable Packages in the System Administrator manual.
The VY Table
Package activity groups are defined in the VY table. A package activity group is a two-character code that
groups golf courses into various classifications. In our example above, three package activity groups are
defined, Classic, Choice, and Platinum.
These groups are used for defining charges for various golf packages. For example, a "Classic Golf
Package" allows the guest to play those courses in the "Classic" package activity group. A sample VY table
follows.
Resort Data Processing, Inc.
PO BOX 1170, Vail, CO 81658
(11/99)
Phone: 970/845-1140
6−174
http://www.resortdata.com
RDP Property Management Systems
Guest Itinerary and Concierge
The VZ Table
The VZ table stores sub-records for each golf course in each package activity grouping (VY table). Certain
courses may be entered twice if they are offered in more than one course “grouping”. For example, the
Tidewater golf course may be available in both the Classic and Platinum groupings. In the Classic grouping,
the surcharge is $30 and in the Platinum grouping Tidewater may be played for free. A sample VZ table
sub-record follows:
The sub-record is entered as ZZYYYY. Where “ZZ” is
the grouping from the VY Package Activity Groups
Definition Table, and “YYYY” is the user-defined
numerical sequence number. This sequence number
controls the order golf courses display when adding
them to a guest itinerary. For example, 0010 displays
before 0020.
The Vendor Number is a unique eight character
alphanumeric field for the selected golf course.
Vendors are added using option 200 on the
Vendor Master menu (14).
The Component Number is a unique four-digit
code used to calculate surcharges for this
course in the particular grouping. In this
example, playing the “TIDEWTR” course under
the “Classic Golf Package” (CL) finds the course
price by cross-referencing component “CLTW”.
Component “CLTW” is added using option 186
on the System Manager menu, option #8. If
there is no surcharge to play the course, field #2
is set to “FREE”.
For consistency purposes, RDP recommends
beginning all component codes under the same
package activity group with the same two
letters. For example, all golf course surcharge
components for "Classic" (CL) golf packages
should begin with the letters "CL".
In addition to sub-records for each course grouping, the VZ table also contains sub-records for “extra”
rounds – those not included with the package. All extra round sub-records begin “EX” and contain a
component in field #2. This component number lists the full price for playing the course.
Adding Golf Components with RDP186
Once the VY and VZ tables are defined, add components using option 186 on the System Manager menu.
From option 186, use #8 to add package components. A sample package component for the Tidewater
course follows:
Resort Data Processing, Inc.
PO BOX 1170, Vail, CO 81658
(11/99)
Phone: 970/845-1140
6−175
http://www.resortdata.com
RDP Property Management Systems
Guest Itinerary and Concierge
Each golf course
can have its own
seasonal calendar.
Each golf course can have its own seasonal calendar, defined in field #8. The seasonal calendar tells the
system what rates are charged every day of the year. Many courses change rates based on the season, or
the weekend. For more information on adding package components, please see Creating and Maintaining
Variable Packages in the RDP System Administration manual.
Included Rounds
A component "FREE" must be added with rates of $0.00 for each season. This component is used for all
package rounds without a surcharge (field #2 in the VZ table set to "FREE").
Resort Data Processing, Inc.
PO BOX 1170, Vail, CO 81658
(11/99)
Phone: 970/845-1140
6−176
http://www.resortdata.com
RDP Property Management Systems
Guest Itinerary and Concierge
Updating Vendor Masters
Once the VZ and VY tables are complete and golf components are added using option 186-8, each vendor
master must be updated to include a transaction code that is posted every time a surcharge or extra round is
added to a guest itinerary. This transaction code is posted when the guest checks in. A sample vendor
master for the Tidewater golf course is displayed below.
In this example, transaction code XA is posted
every time a surcharge or extra round for the
Tidewater golf course is added to a guest
itinerary.
Enter the transaction code that is posted for surcharge and extra rounds in Field #43, Tx (Transaction)
Code. For reconciliation purposes, RDP recommends creating a unique transaction code for each vendor.
With unique transaction codes for each vendor, a unique general ledger account number can be tied to each
golf course, allowing revenue to be easily broken out using the 370 - Daily Manager's Report (option 3 general ledger account number sequence).
Count as Golfer?
With switch #421-13 set to YES, an additional field for defining people classifications appears in option 18610. The new field, “Count as Golfer” determines how many guests are playing golf on a reservation by
reservation basis. All room charge calculations are based on the number of adults, children, teenagers,
pets, etc. However, for determining the number of golfing rounds and the price, the system uses the “Count
as Golfer” field.
For example, two couples are spending the weekend in Myrtle Beach and the wives do not care to play golf.
However, they are splitting a two-bedroom suite. In this example, the number of adults would be set to four
in order to calculate the correct room rate. However, the number of golfers on the reservation would be two,
and all golf surcharges would calculate correctly.
The “Define People Classifications” screen follows. This screen is accessed through option 186 on the
System Manager menu.
Resort Data Processing, Inc.
PO BOX 1170, Vail, CO 81658
(11/99)
Phone: 970/845-1140
6−177
http://www.resortdata.com
RDP Property Management Systems
Guest Itinerary and Concierge
The “Count as Golfer” column
only displays with switch #421-13
set to YES.
The only People Classification with “Count as Golfer” set to “Y” is #3 – Golfer. With this configuration, the
system bases all per person golf charges based on the number of “golfers”. Also, the system calculates
room charges based on the number of adults and teenagers (the “Y” in the Count in Min/Max field). The
people classifications would appear as follows for the two couples whose wives are not playing golf.
Adding Golf Activities
Once packages are built using option 186 on the System Manager menu, and reservations are made using
RDP100, a guest itinerary can be added using option 120 on the Reservations, Front Desk, or Night Audit
menus. (It is also possible to add an activity using the <F8 - ITINERARY> key from the "Reservation
Complete box in RDP100) From option 120, access the guest reservation by name or reservation number.
Next, use the <F8 – ITINERARY> key to add activities, i.e. – golf tee times. If no activities exist on the
reservation, the system prompts:
Resort Data Processing, Inc.
PO BOX 1170, Vail, CO 81658
(11/99)
Phone: 970/845-1140
6−178
http://www.resortdata.com
RDP Property Management Systems
Guest Itinerary and Concierge
With a YES answer and with switch #421-13 set to YES, RDP prompts for either a normal activity (N) or a
golf activity (G). In order to add a tee-time choose option “G” for a golf activity. Next, the system displays a
“Golf Activity” box, similar to the following:
The “Golf Activity” box contains the following fields:
Field
Description
Golfers on Reservation
Sum of the “Count as Golfer” field. The total number of “Golfers” on
the reservation.
Res. Golf Days
The total of the “Golf Days” on each package assigned to this
reservation.
Rounds Included with this res.
Multiplies the number of golfers by the number of reservation days
with a golf package. (Golfers x Res. Days)
Rounds booked at package price
The number of rounds already booked for this reservation, not
including “Extra” rounds.
Number of package rounds left
Subtracts the rounds booked from the total number of rounds.
Total extra rounds booked
Number of rounds booked in addition to the “included” package
rounds. These reservations are marked with an “E” in field #35 on
the activity screen.
New round date (mm/dd/yy)
The date the round will be played. This date must fall between the
reservation’s arrival and departure dates.
If adding an activity and fewer package rounds remain than the number of golfers on the reservation, the
number of people billed is set to the package rounds remaining as opposed to the number of golfers. With
this setup, RDP charges the correct amount. Otherwise, a golf round would be added at the surcharge
amount or FREE when an extra round should be charged.
Package Rounds vs. Extra Rounds
Any time the “Number of Package Rounds Left” is greater than zero, a new golf activity is booked as a
“Package” round. The system then uses the first rate plan on the reservation that has “golf days” not equal
to zero for displaying available golf courses. For example, if the reservation has a rate plan of “Original Golf
Package” on the first day, and the original golf package has golf days equal to one with an activity table of
“SS” for Super Saver courses, the system displays those courses in the VZ table beginning with “SS”.
Any pre-scheduled rate changes MUST use the same package activity table (VY). For example, if a
reservation is on the “Original Golf Package” the first two days and the “Golf ‘til You Drop” package the last
two days, both packages MUST use the same activity table, for example “SS” for Super Saver. RDP does
NOT check the activity table when assigning pre-scheduled rate changes – this is the reservationist’s
responsibility.
Any time the “Number of Package Rounds Left” is zero or negative, the system flags the new golf activity as
an “Extra” round. Extra rounds are calculated using the sub-records beginning with “EX” in the VZ table. All
“EX” sub-records have a component listed in field #2. This component is added using option 186-8 on the
System Manager menu. The component lists the full price for playing the course.
Resort Data Processing, Inc.
PO BOX 1170, Vail, CO 81658
(11/99)
Phone: 970/845-1140
6−179
http://www.resortdata.com
RDP Property Management Systems
Guest Itinerary and Concierge
Entering a New Round Date
Once the “New Round Date” is entered and the system determines whether the new activity is an extra
round or an included round, the available courses display based on the package and the VZ table. Up to
forty-four golf courses appear on each screen. Use the <PAGEUP> and <PAGEDOWN> buttons to scroll
between screens. The maximum number of courses for any grouping is 200. Notice, at the bottom of the
screen, the text “Select course for golf included in package” alerts the reservationist that the reservation has
NOT exceeded the maximum number of rounds. If the reservation has exceeded the maximum number of
rounds the text at the bottom of the screen appears as:
The text at the bottom of the “Select Course” screen
changes based on included rounds or extra rounds.
Golf courses display based on the user-defined sequence numbers assigned in the VZ table.
Courses display based on their user defined
sequence number in the VZ table. In this example,
“ARCADIAN” has the lowest sequence number,
followed by “AZALEA”, “BAYGOLD”, and
“BAYGREEN”.
Courses listed with a price of 0.00 are
FREE with the package purchased.
All courses with a price of 0.00 are listed
as “FREE” in field #2 of the VZ table.
Once a course is selected, the clerk verifies the vendor and completes the “Individual Activity Screen”.
If the price column reads "NOVEND", the vendor number was entered in Table VZ, but there is no vendor
master record. If the price column says "NOCOMP", a component was entered in Table VZ, but the
component was not defined with Option 186-8. These messages display in red.
Resort Data Processing, Inc.
PO BOX 1170, Vail, CO 81658
(11/99)
Phone: 970/845-1140
6−180
http://www.resortdata.com
RDP Property Management Systems
Guest Itinerary and Concierge
The Individual Activity Screen
The upper right portion of the “Individual Activity” screen displays the number of golfers, the reservation golf
days, the total number of rounds available, the package rounds booked, the package rounds left, and the
number of extra rounds booked.
Prices are displayed based on the VZ table and package components defined using option 186-8. All prices
are per person, with the total cost (#13 above) based on the number of golfers on the reservation
($15.00 x 2 = $30.00). The cursor starts at the “Start/End Times” field, since the vendor name, activity
name, and activity date are filled in from the previous "choose course" screen. In addition, the “Persons
Billed” field (#11) defaults to the number of golfers on the reservation, the Package/Extra Round field (#35)
defaults based on the number of rounds booked, and, for audit purposes, the component number defined in
option 186-8 displays below field #35.
Once the new activity is filed, the system returns to the “Normal Activity (N) or Golf Activity (G)” prompt
where additional tee times may be added to the guest itinerary.
Changing Reservations and Activities
If a reservation’s arrival and departure dates are changed, any activities and transactions outside of the new
dates are automatically deleted from the guest itinerary. Also, if an activity requires a new vendor or a date
change, the original activity must be deleted and a new one added. If a clerk attempts to change the vendor
name on an existing activity, the following warning displays:
Resort Data Processing, Inc.
PO BOX 1170, Vail, CO 81658
(11/99)
Phone: 970/845-1140
6−181
http://www.resortdata.com
RDP Property Management Systems
Guest Itinerary and Concierge
It is possible to add a password to the RDP system to control access to the following activity fields: #people
billed, cost, total cost, and the "Pkg/Extra Round" field. In order to utilize this password; add sub-record
PKGACT to the C1 table using option 090 on the System Manager menu. The password is added in field
number 1 – Special Data.
PRINTING GUEST ITINERARIES
From the Vendor Master menu, guest itineraries can be printed using option “670” - “Itineraries by Arrival
Date”, or “671” - “Itinerary - Select by Res Number”. Option 670 is used to print guest itineraries in a “batch”
by arrival date, whereas 671 will print an itinerary for only one guest. Both of these reports are modifiable
using Report Writer and a text editor, changing file \RDP\FORMS\FOR670.FOR. Both reports read the
same form, with different sequences and ranges. Also, as in the example on the following page, messages
can be added to the basic itinerary:
Customized notes can be added to the itinerary, in order to inform guests of vendor rules or
special offers!
Resort Data Processing, Inc.
PO BOX 1170, Vail, CO 81658
(11/99)
Phone: 970/845-1140
6−182
http://www.resortdata.com
RDP Property Management Systems
Guest Itinerary and Concierge
PRINTING TICKETS FOR GUESTS
In order to print a guest activity ticket, use option “650” - “Print Activity Tickets” from the Vendor Master
menu. When selecting this option, enter the guest reservation number and the system uses the vendor
master to access the correct form code, ticket quantity code, and persons per ticket in order to create the
voucher. A sample “Bike Rental” follows:
Each vendor form code can be customized to reflect its use with the Report Writer module. In the example
above, one “generic” ticket is used for all activities. This ticket details the activity name, the valid date, the
number in the party, and the time. In addition, the sequence number appears for reconciliation purposes.
Any vendor master comment fields can be included, such as Comment-17 - Additional Information.
PRINTING ACTIVITIES BY VENDOR
Using RDP's report writer, activities can be printed by vendor. It is possible to create a wide variety of
reports showing activities in different formats, including:
1.
All activities for the vendor.
2.
Activities by date range, such as “all tee times for September 16 ”.
3.
Confirmed vs. Non Confirmed activities.
4.
Total surcharge for all activities.
5.
Activities sorted by remark fields (such as “golf tee times where cart = YES).
th
Resort Data Processing, Inc.
PO BOX 1170, Vail, CO 81658
(11/99)
Phone: 970/845-1140
6−183
http://www.resortdata.com
RDP Property Management Systems
Guest Itinerary and Concierge
RECONCILING ACTIVITY TICKETS
Reconcile activity tickets using the unique number assigned to each activity. The activity number displays in
the upper-right hand corner of each activity, seen below.
RDP assigns a unique number to each
reservation activity.
Often times, vendors bill a property based on tickets collected from guests. By printing the activity number
on the activity ticket, the property can easily reconcile tickets to invoices.
Resort Data Processing, Inc.
PO BOX 1170, Vail, CO 81658
(11/99)
Phone: 970/845-1140
6−184
http://www.resortdata.com
RDP Property Management Systems
Guest Itinerary and Concierge
INDEX
1
1099’s........................................73, 110, 114, 115, 121
A
Accessing Owners ........................................ 75, 94, 95
Activities
Assigning ........................................................... 154
Changing............................................................ 159
Defining ............................................................. 151
Deleting.............................................................. 159
Open................................................................... 161
Printing .............................................................. 182
Surcharges.......................................................... 153
Ticket Vouchers................................................. 152
Activity Screens ..................................................... 156
Activity Start & End Times.................................... 151
Activity Tickets ...................................................... 183
Assigning Activities ............................................... 154
Using <F8> ........................................................ 155
Automatic Check-In/Out .......................................... 78
B
Depositing ............................................................37
Errors....................................................................56
Folios....................................................................16
Incremental Authorizations ..................................10
Refunds ................................................................11
Sales .....................................................................10
Voids ....................................................................13
D
Daily Post Flag .........................................................78
Developer Owned Weeks .......................................133
Downloading Reservations .....................................141
E
Exchange Weeks.....................................................135
F
Fixed Week Owners
Loading Weeks...................................................130
Reservations .......................................................133
Review ...............................................................126
Floating Week Owners ...........................................127
Loading Weeks...................................................132
Balancing Credit Cards ............................................ 32
G
C
Calculating Owner Revenue..................................... 88
Calculation of Owner Revenue .......................... 80, 88
Central reservations
Walk-Ins ............................................................ 140
Central Reservations
After Check-In ................................................... 140
After Check-Out ................................................ 140
Changing Future Reservations ........................... 140
Download from Central ..................................... 141
Future Reservations ........................................... 139
Installation ......................................................... 144
Optional Property Download ............................. 143
Simultaneous Reservations ................................ 139
Upload at Property ............................................. 142
Checklist................................................................. 123
Closing Statements................................. 105, 106, 108
Confirmations
Vendors.............................................................. 158
Creating Owner Masters.................................... 68 - 74
Credit Card Fees....................................................... 90
Credit Card Fees and Owners............................ 88 - 93
Credit Cards
Authorizations........................................................ 9
Balancing ............................................................. 32
Resort Data Processing, Inc.
PO BOX 1170, Vail, CO 81658
Generating Checks...................................... 73, 74, 108
Globally Posting Owner Charges.. 68, 95, 96, 126, 127
Golf Packages .........................................................173
Gross Owner Revenue .......................88 - 93, 110, 120
Guest Itineraries.............................................. 152, 155
Printing...............................................................182
I
Individual Owner Charges ........................................95
Inquiring on Owner Transactions ...........................120
Interval Ownership Resort Types ................... 125, 126
Itineraries
Golf ....................................................................173
L
Late Fees...................................................................96
Late Fees - Owners ...................................................96
Loading Fixed Week Owners (Timeshare)130, 131,
136
Loading Fixed Week Reservations .........................133
Loading Floating Week Owners (Timeshare)130, 132,
133, 134, 135, 136
(11/99)
Phone: 970/845-1140
6−185
http://www.resortdata.com
RDP Property Management Systems
Guest Itinerary and Concierge
Long Term Reservations
and Owners ........................................................ 148
Group Billing ..................................................... 148
Installation ......................................................... 145
Pro-Rating Rent ................................................. 147
Rental Charges................................................... 146
Reservation Types.............................................. 146
M
Management Fees...................................... 88 - 93, 110
N
Net Revenue - Owners ............................................. 91
Non-Owned Weeks ................................................ 133
Notes (F6) .............................................................. 158
O
Open Activities....................................................... 161
Owner Masters
Adding ................................................................. 68
Ownership Percentage ......................................... 72
Recurring Charge ................................................. 71
Trust Balance ....................................................... 72
Owner Revenue
Daily Post Flag..................................................... 78
Net Revenue......................................................... 80
Pre-Posted Transactions....................................... 77
Transactions ................................................... 76, 85
Viewing Transactions .......................................... 81
Owner Statements…………………………..103 - 110
Closing............................................................... 105
Correcting .................................................... 95, 107
Reservation Dates ................................................ 82
Room Moves........................................................ 82
Owner Transaction History ...................... 67, 120, 121
Owner Types ............................................................ 68
Owners
1099’s ................................................................ 121
Accessing................................................. 75, 94, 95
Calculating Revenue ............................................ 88
Cleaning Fees....................................................... 99
Correcting Payments.......................................... 118
Credit Card Fees .................................................. 90
Globally Posting Charges..................................... 96
Gross Revenue ..................................................... 89
Late Fees .............................................................. 96
Payments............................................................ 116
Posting Recurring Charge .................................... 97
Posting Transactions ...................................... 94, 95
Processing Cleaning Fees................................... 101
Processing Revenue - Example............................ 87
Processing Revenue (912).............................. 85, 87
Refunds ...................................................... 117, 119
Revenue Checklist ............................................. 123
Reviewing Revenue (912).................................... 86
Secondary ............................................................ 75
TA Commissions ................................................. 90
Transaction History............................................ 120
Transfer Res. Balances......................................... 98
Resort Data Processing, Inc.
PO BOX 1170, Vail, CO 81658
Transferring Ownership .......................................74
Trust Billing .........................................................73
Owners and Report Writer......................................110
P
Payments from Owners..................................... 74, 116
PBAdmin
Access Errors .......................................................48
Adding Transactions ............................................21
Balancing to RDP.................................................32
Database Management .........................................41
Deposits................................................................37
History..................................................................38
Logging On ..........................................................18
Multiple Transactions...........................................25
Report Criteria......................................................31
Reports .................................................................26
Searching..............................................................23
Selecting Transactions..........................................19
Setup Errors..........................................................44
Posting Charges to Owners……………………94 - 98
Posting Transactions to Owners................................94
Printing Activities...................................................182
Printing Tickets.......................................................183
Processed Transactions.............................................92
Processing Flags .......................................................85
Processing Owner Revenue……………………85 - 94
Example ...............................................................87
Flags ...............................................................85, 86
Review Mode .......................................................86
Property Codes .........................................................69
Protobase Response Messages..................................56
R
Reconciling Tickets ................................................184
Recurring Charges ........................................ 71, 95, 97
Posting..................................................................97
Refund Checks - Owners ................................ 117, 119
Refunds........................................................... 117, 119
Rent Charges (Long Term) .....................................147
Report Writer
Sequence ............................................................156
Reservation Types ..................................................134
Revenue Recap .........................................................93
Revenue Totals - Owners..........................................98
Room Moves ............................................................82
S
SDC Interface
SDC Products .........................................................4
Secondary Owners ....................................................75
Southern DataComm
Folios....................................................................16
Interface Requirements...........................................8
Overview............................................................3, 7
Processors...............................................................5
Workstations ..........................................................9
Statements...............................................................103
Closing ...............................................................105
(11/99)
Phone: 970/845-1140
6−186
http://www.resortdata.com
RDP Property Management Systems
Guest Itinerary and Concierge
Correcting .......................................................... 107
T
Ticket Vouchers ..................................................... 152
Tickets
Printing .............................................................. 183
Timeshare
Periods ............................................................... 129
Rotating Weeks.................................................. 129
Timeshare Methods ................................................ 125
Timeshare Owners
Adding Masters.................................................. 128
Nights Used ....................................................... 136
Timeshare Reservation Types ................................ 134
Transactions
Posting to Owners ................................................ 94
Transferring Ownership ........................................... 74
Travel Agent Commission Splits.............................. 90
Travel Agent Commissions and Owners ... 88 - 93, 110
Trust Balances .......................................................... 72
Trust Billing ...................................................... 72 - 74
U
Uploading Reservations ......................................... 142
V
Vendors
Activities............................................................ 151
Activity Surcharge ............................................. 153
Confirmations .................................................... 158
Confirming Activities ........................................ 158
Creating.............................................................. 150
Defining ............................................................. 150
Golf Packages .................................................... 173
Itineraries ........................................................... 152
Reconciling Tickets ........................................... 184
Searching for...................................................... 154
Ticket Vouchers................................................. 152
Viewing Transactions............................................... 81
Resort Data Processing, Inc.
PO BOX 1170, Vail, CO 81658
(11/99)
Phone: 970/845-1140
6−187
http://www.resortdata.com