1
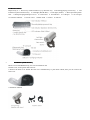
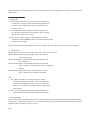
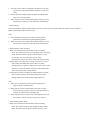
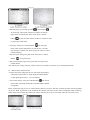
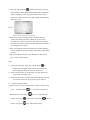
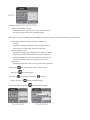
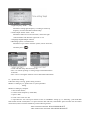
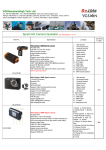
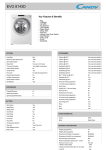
RD32 USER MANUAL
Preface
Thank you for purchasing RD32, HD Digital waterproof video camera. This product is quite small and delicate
with wonderful waterproof humanity design. With a multipurpose stand, it can help you achieve omni-directional
video / monitoring under all kinds of outdoor conditions.
The User's Manual will instruct in detail how to use and install the product and provide detailed information
regarding to use, operation, installation notes and technical specifications etc. Before using the product, please
read this manual carefully and keep it properly. We hope that this product can meet your demands and provide a
long-term service for you!
Product Assurance
Certificated by FCC & CE etc. authoritative institutions, this product shall be in line with the recommended index
and provide safe assurance when being used by users.
Product Overview
As an underwater activity fan, you are always impressed by the beautiful scene in the sea or lakes, then are
you still looking for a companion that can help you record your unforgettable experiences?
Try our RD32. It is specially designed for diving. Water-proof feature makes it possible to take photos and
record videos under water up to 20 meters within 180mins. With high-definition camera lens and low light level
sensitivity, you will never miss any chance to enjoy the beautiful view of the deep blue ocean with such a good
underwater companion.
Products Feature
> The product not only has dynamic appearance and elegant lines, but also has a waterproof function. It can
work underwater 20 meters within 180mins. It will be the best choice for your outdoor sports and diving.
> Professional monitor design, with motion-detect function. Once connect to the monitor, it will become a
professional security camera
> Advanced vibration effect, makes mode transfer more convenient, easier to operate
> 120 degree wide-angle, HD camera lens, let you shoot more freely.
> Selectable Motion-detect video recording time setting: 10 seconds, 1 minute, 5 minutes, 10 minutes
> In motion-detect mode,users are free to choose whether to use loop recording & coverage function
> Three major selectable video quality: superior, standard, economic
> Video resolution: 1280*720p AVI, 30fps
> 8 high brightness white LED lights for night using
> Built-in high capacity Li-battery lasting video recording for 3 h.
> 2GB mini TF card (optional), support up to 32 GB
> PC camera function, makes your network life more colorful
> TV-out function, easy to share more funs
> USB2.0 high-speed device,data transmission freely
Product Structures
Respectively is: 1. Power key/ model transfer key/ up direction key 2.Recording/playing execute key 3. Led
indicator key/down direction key 4. LED light (Red & Blue) 5. LED light (Yellow) 6. Reset port/microphone
hole 7. Waterproof plug/Waterproof cover 8. Camera lens 9. Led indicator 10. USB port 11. TF card port
12.Charging indicator 13.TV-OUT port 14.Base stand 15.Stand 16.Tail dot
•
Installation (With Pictures)
RD32 Can use handheld directly, also can be installed on the
bracket to use, as the picture below shows:
1.Remove the back cover: Rotate the back over simultaneously to push back outside, then you can remove the
back cover
2.Installtion of RD32
Power
This product shall adopt the power certified by authority.
UL Mark
U.S. Power Certification
C-TICK Mark
Australia Power Certification
CE Mark
European Union Power Certification
GS Mark
German Power Certification
CCC Mark
China Power Certification
PSE Mark
Japan Power Certification
BS Mark
UK Power Certification
Notes: During the service of power, rising of surface temperature is a normal phenomenon. If portable power
supply is needed, please remove power source from the outlet.
Packaging & Accessories
Notes: Picture may be slightly different from the actual product and packaging shall be subject to change without
further notice.
Functional specification
1. Starting up
> Insert TF Card, press power key for 2 seconds, blue LED will
be always on, then open your hand. When the product stops
to vibrate, which indicates that it turns on and enters into
Standby mode.
> Cause the difference of the capacity and data storage for the
TF Card, the camera need a few seconds to ready, so please
wait for the prompt of the vibrates.
> For the product video resolution is HD 720P, please use the
brand high-speed(CLASS6)TF card to avoid the recording effect
reducing or in operation.
Note: The blue indicator flash quickly when turns on without TF Card. Please turn off and insert TF card again.
2. Mode transfer
When it turns on, press the mode transfer key short, it will circle in 4 modes:
Mode1: Manual video recording standby mode, blue indicator
will be constantly on
Mode2: Manual photo taking standby mode, red indicator will
be constantly on
Mode3: Motion-detect video recoding standby mode, blue and
yellow indicator are( motion-detect start) constantly on
together.
Mode4: Motion-detect photo taking, red and yellow ( motiondetect ) indicator are constantly on together.
Note:
1、The camera will shake once after press the key which
indicates that the key is in effect, if the status indicator is
not changed immediately, please don't press it again, the
camera is saving data. It is a normal situation, please have a
little patience
2、When it is transferred to other modes from motion-detect
mode, the reaction will be faster if you shut out the lens.
3. Video Recording
In the manual video recording mode, press the execute key shortly, the camera will shake once, and blue indicator
flash slowly and the camera begins to record video. Press the key again, the camera will shake once and blue
indicator will be constantly on, stop to record.
Note :
1、The unit can last video recording for 20 minutes every time
and save the video automatically, and then records next
video.
2、Please open the waterproof plug for better recording effect
when not use it underwater.
3、When the TF Card was fully loaded, battery used up or stop
operated for 3 minutes, it will shut down automatically.
4. Photo Taking
In the manual photo taking standby mode, press the execute key, then please keep the camera until it vibrates, a
photo has been taken after vibration stops.
Note:
1、The red indicator will goes out when it is taking photo,
please keep it still for better photographing quality!
2、When the TF Card was fully loaded, battery used up or stop
operated for 3 minutes, it will shut down automatically.
5. Motion-detect video recording
> When it is transferred to motion-detect video recording
mode, the camera will enters into intelligent video recording
mode. When the camera captures mobile objects, it will
record video for 10 seconds and save the video
automatically, then it record next video and loop recording.
> Motion-detect recording loop coverage: when the TF Card is
fully loaded, will delete the former videos or photos
automatically to acquire the space to store new videos. If the
function is closed, the camera will power off automatically
when the storage space is fully loaded.
> Lasting time of video recording and motion-detect recording
loop coverage function can be amended by the system
settings, please refer to the system setup instruction.
Note:
1、When not use underwater, please open the waterproof
plug for better recording effect.
2、When the TF Card was fully loaded ( the loop coverage
function closed) , battery used up or stop operated for 3
minutes, it will shut down automatically.
3、Enter into this mode 3 minutes later, LED light will turn off,
the camera is still at work, press any key to instruct.
6. Motion-detect photo taking
> When it is transferred to motion-detect video recording
mode, the camera will enter into intelligent photo-taking
mode. When the camera captures mobile objects, it will
takes a photo automatically.
> Motion-detect photo taking loop coverage: when the TF
Card is fully loaded, it will delete the old videos or photos
automatically to acquire the space to store the new photos. If
the function is closed, the camera will power off
automatically when the storage space is fully loaded.
Note:
1、When the TF Card was fully loaded ( the loop coverage
function closed) , battery used up or stop operated for 3
minutes, it will shut down automatically.
2、Enter into this mode 3 minutes later, LED light will turn off,
the camera is still at work, press any key to instruct.
7. Turn on the led light
The camera provides 8 high brightness white LED lights. Please turn on it as below:
Short press" Led light key "in the state of any mode( except TVout playback mode),the led light will circle in 3 modes, please
choose it on your own will
Mode1: Turn on the 8 white LED lights, it can record color video in the dark.
Mode2: Turn on 4 LED white lights, Brightness abates and it can reduce power consumption.
Mode3: Turn off all the white LED light
Note: Press and hold down the led light "
operated successfully.
" to turn off all the led functions. The camera will shake when it is
8. Turn off and automatic turn off
In the standby mode, press and hold down the "power key" for two seconds, the blue light flashes 3 times and
goes out, and then release your hand. At the mean time the camera shakes twice, and then turn off the camera.
Note: The camera will turn off automatically when the TF Card
is fully loaded( the loop coverage function closed)、the battery is used up, the AV cable is disconnected, or there is
no operation after 3 minutes, the red & blue light will flash alternately when you turn off the camera.
9. Down load a video and removable disk.
> Please turn off the camera first, then connect it with
computer.
> The camera turns on automatically, and a removable disk
will appear in " my computer", you can view the pictures or
videos in the removable disk " DCIM/100DSCIM", and you
can also copy these files to your computer.
> When it is connected with USB1.1 port on computer, please
copy the video to your computer desktop, and then replay it
to avoid ragged playback.
Note: in the state of this mode, you can short press the " led light
" to turn on the light, can be used as a USB
table lamp.
10. PC camera function
> Install the CD driver software at the computer.
> Turn on the camera, after the vibration stopped, please
connect it with the computer, at that time, a " camera" Icon
will be appeared in "my computer", it enters into PC camera
function.
> Using the " third-party" applications software can also view
real-time video of PC camera and save real-time video into
the local computer, e.g. Amcap etc.
Note: in the state of this mode, you can turn on the white LED lights for a better image effect.
11. Charging
> Put the matched AC adaptor into socket, then connect with
camera for Li-battery recharging. The red indicator turns on
when charging, it turns off after the battery is full charged.
The charging time is about 3 hours.
> To avoid the charge time be longer, it is proposed to charge
with the adapter, and the computer charging is not
recommended.
Note: After connect with charger, camera will turn off automatically after 3 minutes, it's still charging after turns
off.
12. Taking video when charging
Put the AC adaptor into socket, then connect with camera, the camera will turn on automatically and enter into the
standby mode. The red light will constantly on indicating it's charging. In the mean time, each function is still
available for operating.
Note: when the camera turns off automatically, if you want to use it again, disconnect the camera from the adaptor
for about 5 seconds and then connect it again, the camera will restart
13.TV-out function
> Please connect the plug of 2.5' AV cable with the camera’s
TV-OUT port, the yellow plug connect with TV video input
port(yellow), white plug connect with TV audio input
port(white). Please set the signal input according to the user
manual of TV.
> Turn on camera, after few seconds, the red and blue light
turn on at the same time, the last photo or video will be
appeared on the TV. The interface is shown as picture 1.
> Manually play: by pressing 'up button
'or 'down button
'
for browsing, when video camera Icon appears on the top
right corner, it indicates the file is video, press "confirm
button
"to play the video. Please set the TV volume in order
to get proper sound effect.
> Auto play: short press "confirm button
"into auto play
mode, when it plays the pictures, it will stay for 5 seconds
then change to another one, when it plays the video, it will be
replayed directly.
> Stop auto play: during auto play mode, short press "confirm
Button
"to stop auto play
> Stop TV-OUT: Please press the "power key" for long to turn
off the camera.
Note: When play a large video file, need to wait a few seconds to a minutes, it's a normal phenomenon.
14、Motion detect monitor mode
>Connect the yellow plug with the TV video input port(yellow)
white plug connect with TV audio input port(white).Please
set the signal input refer to TV user manual.
> Turn on the camera, short press "Mode button
"into motion
detect video recording mode(yellow and blue light will hold
on together)
Please connect the plug of 2.5' AV cable with the camera’s TV-OUT, after few seconds, the video will be appeared
on the TV. Refer to picture2, in the meantime the camera will enter into the state of intelligent video recording,
When object moves before the camera, the camera will start to record a 10 seconds video file, and so the cycle.
> Short press "Mode button
",camera will change to motion
detect monitor photo taking mode(yellow and red light will
hold on together), Show as picture 3.When object moves
before the camera, it will start to take a photo automatically,
and so the cycle.
> Motion detect loop recording: when TF card is full ,the
camera will delete old video or photo to get new space
recording new videos or photos. If turn off loop recording
function, the camera will turn off automatically when there is
no enough space to record.
> Video recording time and turn on/off loop recoding function
can be changed by system setting, please refer system setting
instruct.
> Stop motion detect monitor mode: Please press the "power
key" to turn off the camera
Note:
1、During the recording, short press "Mode button
can
change video and photo mode. Please obstruct the lens
when change the mode, the reaction will be fast
2、If the camera doesn't use underwater, can open back cover
to get better recording voice.
3、Enter into this mode 3 minutes later, LED light will turn off,
the camera is still at work, press any key to instruct.
15、system parameter setting
> Please refer to TV- OUT operation into TV-OUT mode. Long
press
"confirm button
> Button function: short press "
", TV will show the picture 4.
" choose or quit different
setting, short press"
"as up button, short press "
button, long press "
"save and quit the setting.
"as down
> setting items:
1.quality:fine,standard,economy
Introductions: set the quality of the video, the consume of
the insert storage will increase with high quality.
Note: Please use the brand high-speed (CLASS 6) TF Card, to avoid the video pause when you record the video!
2.MD capture time:10 seconds, 1 minute, 5 minutes, 10
minutes
Illuminate: Setting motion detect video recording time, it
will save the recording video when reach this time.
3.MD auto delete: on/off
Illuminate: Setting loop recording function. When TF card is
full under the motion detect mode, the camera will delete
old file automatically to start new recording. If turn off this
function, the camera will turn off when TF card is full.
4.Input time:
Illuminate: If the time stamp is wrong, please setting as below:
> Short press"
short press "
> short press"
"into further menu, choose "setting ",then
"into below photos:
"as up button, short press "
button, short press "
"as down
"change to another setting.
After finish setting, long press "
"save and quit the setting.
5.Light frequency: 60Hz 、50Hz
Illuminate: Setting light frequency according to electricity
frequency to cancel the flash under the lamp.
6.Video output format: NTSC、PAL
Illuminate: When use TV-OUT function, choose the right
video formation will show the right color on TV
7.Language:English/Simple Chinese
8.Resetting system: Cancel/Execute
Illuminate: If you want to reset the system, choose "Execute",
and short press "
".
9.Time and date stamp: date and time, off
Note: it is used for opening or closing images watermark markers
10.Version
Note: Use for viewing the software version and related information
16、System time setting
If the time stamp is wrong, please setting as below:
Method 1: Setting by TV, please refer to system parameter
setting.
Method 2: Setting by computer
1. Turn off the camera;
2. Connect with computer by USB cable;
3. Open U-disk
4. Create a new "time.txt" file.
5. Open"time.txt" file and input relevant words of time&date setting up, as following "year.month.date
hour:minute:second on/off"(there is a space between date and time, and another space between time and water
mark switch). Please set time and date as per the following format:
Video with time watermark: 2011.03.22 20:00:00 Y
Video without time watermark: 2011.03.22 20:00:00 N
Precautions:
The time character strings in the above-mentioned format is the time value you want to set up and pay attention to
type a spacebar between date and time, another spacebar between time and watermark switch. Y and N at the end
serve as the control character on the video file for adding the time&date watermark, Y indicates Yes-Add
watermark and N indicates No-Hide watermark.
6.Save "time.txt" file and safely exit the movable disk.
7.Then turns on the power, the system time will be updated.
17.Reset the system
Camera maybe can't use normally cause the outside influence, such as ESD etc. Please use a pin to press the pin
hole, then the camera will shut down, you can restart to use.
Parameters
Effective Pixels
5.0 Mega CMOS SENSOR
Photo format
JPG
2560*1920
Video format
AVI
HD
Frames
30fps
MD time setting
10sec、1min、5 min、10 min
MD loop coverage
Support turn on and off
Video quality setting
Superior、Standard、economic
Shooting Angle
120 degree wide-angle
Illuminant frequency set
60Hz、50Hz
Video output format
NTSC、PAL
Vibrating alert
Support
Battery Capacity
3.7V/ 850mAh
Power consumption
Below 1W
Continuous video recording time
About 3 hours(led indicator closed)
AC Adaptor spec
DC5V 1A or more
Charge time
About 3 hours
USB Interface
USB2.0 High Speed
Memory type
Micro SD Card (TF card)
Memory card
1GB-32GB
Waterproof Depth
20 meters
Weight
75g
Product Dimensions
90*41*36mm
1280* 720
Notes: The above-said parameters may be changed with upgrading or updating, if there is any changes, they
shall be subject to the actual items.
System
1. Operation system: Microsoft Windows2000/XP/VISTA/WIN 7
2. CPU:Intel Pentium III processing 667MHZ or equivalent CPU
3. 256MB sound card and graphics card support DircetX8 or more advanced version. More than a multiple
drive, a standard USB1.1 or USB2.0 interface, 1GB or more free disk space.