1
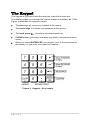
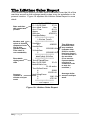
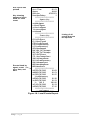
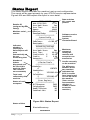
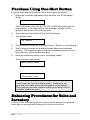
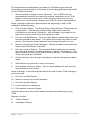
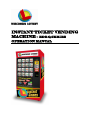
INSTANT TICKET VENDING
MACHINE - EDS-Q SERIES
OPERATION MANUAL
NOTE: This equipment has been tested and found to comply with the
limits for a Class A digital device, pursuant to Part 15 of FCC Rules.
These limits are designed to provide reasonable protection against
harmful interference when the equipment uses, generates, and can
radiate radio frequency energy and if not installed in accordance with the
operation manual, may cause harmful interference to radio
communications. Operation of this equipment in a residential area is
likely to cause interference in which case the user will be required at his
own expense to correct the interference.
Copyright © 2004 by GTECH Corporation
Printed in the United States of America
All rights reserved. Reproduction or translation of any part of this work
beyond that permitted by Sections 107 or 108 of the 1976 United States
Copyright Act without permission of the copyright owner is unlawful. No
part of this publication may be utilized by any information storage and
retrieval system, or transmitted, in any form or by any means, electronic,
mechanical, photocopying, recording, or otherwise, without prior written
permission from the publisher.
Information in the document is subject to change without notice. GTECH
reserves the right to improve, and/or make changes to this publication and
the product it describes, at any time and without prior notice.
About GTECH’s ITVM
Thank you for choosing this quality product from GTECH. GTECH has
become the leading provider of dependable Instant Ticket Vending
Machines (ITVMs) for the US and worldwide lotteries. GTECH
designs, manufactures, sells, leases, and services state-of-the-art
ITVMs for use in retail locations by public lotteries operated by states
and foreign public entities.
GTECH’s commitment to you –
Reliable performance
Solid design
Outstanding support from field service representatives
Continuing product development and innovation
EDS-Q Models
Instant Ticket Vending Machines (ITVMs)
The ITVM is the lottery’s most efficient tool for dispensing a variety of
different instant games. Tickets are dispensed quickly and securely.
Using a patented bursting technology, GTECH’s ITVMs dispense one
cleanly separated instant or scratch-off lottery ticket with every push of
the button. For your convenience, the ITVM is able to dispense
through the last ticket of every book without the use of taping or special
devices. More than one book of tickets may be taped together as
necessary.
GTECH’s ITVMs reduce labor costs and eliminate theft. Highly
efficient and easy-to-use software controls all basic functioning.
Accurate accounting reports are easily printed. Retail agents
recognize productivity gains immediately.
Specifically designed with floor space in mind, the EDS-Q (Expandable
Dispensing System – Quad Burster) machine fits in most high traffic
areas, yet it stores up to 24 different instant lottery games. The
machine features an attractive design and an easy-to-use interface.
Customers are attracted to the machine by:
Bright vacuum fluorescent display (VFD) for all instructions
Lighted ticket window push buttons
Brightly lit price displays
Highly visible backlit signage
Dedicated sales and service personnel continually solicit customer
feedback on the machines. This input is the basis for continuous
product refinements.
iii
Specifications
EDS-Q machines are the lottery’s most efficient tool for dispensing a
variety of different instant games, quickly, securely, and without any
problems.
UL listed and FCC approved
Stores up to 1000 tickets per game
Ticket Size Capability:
Width: Up to 4.25” (10.79 cm)
Length: Up to 12” (22.86 cm)*
*NOTE: Maximum ticket length may vary by machine
software version.
Accepts $1, $5, $10, and $20 US bills
State-of-the-art bill acceptors
The GTECH difference
Our unique patented burster delivers one cleanly separated ticket with
every push of the button. There is absolutely no cutting, tearing,
scratching, or mutilating of tickets in any way. No competitor can make
these claims.
It’s very smart
Highly efficient, yet simple to understand software controls all
accounting functions. The retailer has access to reports such as:
Inventory, Audit Trail, Local Events, Local Security, and Status.
Sales reports are also available for a variety of time periods
including Local Shift, Today, Yesterday, Last 7 Days, This Week,
Last Week, Last 4 Weeks, This Month, Last Month, Last 6 Months,
This Quarter, Last Quarter, This Fiscal Year, Last Fiscal Year, and
Lifetime.
GTECH’s SmartLoad feature stores data on each individual game.
When the same game is reloaded, SmartLoad accesses the
game’s specifications and loads them automatically.
A battery back-up allows the system to retain all sales and set-up
data in case of power failure.
iv
Security is top priority
14 gauge sheet metal cabinet
Patented four-point locking system for vault-like security
Bullet-proof Lexan
TM
ticket windows backed by steel plates
Separately keyed bill acceptor vault is placed inside the cabinet for
added protection
Audible front door alarm.
110-decibel tilt alarm
Available options
LED message display
Barcode scanner
Smart modem allowing off-site communication and data access
Connectivity to on-line terminal
Remote shut-off
Coin acceptor
Custom painting and labeling
Electronic signage
v
CONTENTS
INSTANT TICKET VENDING MACHINE - EDS-Q SERIES ........................ I
OPERATION MANUAL ....................................................................... I
ABOUT GTECH’S ITVM ........................................................................ III
EDS-Q MODELS .................................................................................. III
SPECIFICATIONS .................................................................................... IV
CONTENTS ...................................................................................... VI
GETTING TO KNOW THE ITVM ................................................................ 4
THE EXTERIOR COMPONENTS .................................................................. 4
THE INTERIOR COMPONENTS .................................................................. 6
THE KEYPAD ........................................................................................ 7
BASIC OPERATION AND MENUS ............................................................... 8
ACCESS ALARM .................................................................................... 8
POWER FAIL ALARM.............................................................................. 8
TILT ALARM ......................................................................................... 8
REMOTE DISABLE.................................................................................. 8
LOCKING SYSTEM.................................................................................. 9
OPENING THE ITVM ............................................................................. 9
CLOSING AND LOCKING THE ITVM ........................................................... 9
THE MAIN MENU (ADMINISTRATOR) ..................................................... 10
THE OPTIONS MENU ........................................................................... 11
OPERATING PROCEDURES..................................................................... 13
UNLOADING TICKETS ........................................................................... 16
PRINTING AND VIEWING REPORTS.......................................................... 16
LOADING PRINTER PAPER IN THE ITVM .................................................. 17
REMOVING MONEY FROM THE BILL ACCEPTOR......................................... 18
REMOVING BILL MAGAZINE FROM THE BILL ACCEPTOR .............................. 19
REPORTS ........................................................................................... 19
AVAILABLE REPORTING PERIODS ............................................................ 20
UNDERSTANDING SALES REPORTS .......................................................... 22
ADDITIONAL REPORTS ......................................................................... 25
LOCAL SHIFT REPORT........................................................................... 25
INVENTORY REPORT ............................................................................ 27
THE LIFETIME SALES REPORT................................................................. 28
AUDIT TRAIL REPORT........................................................................... 29
LOCAL EVENTS REPORT ........................................................................ 30
SECURITY REPORT ............................................................................... 32
STATUS REPORT ................................................................................. 33
PURCHASING TICKETS .......................................................................... 35
TYPICAL PURCHASE ............................................................................. 35
PURCHASE USING ONE SHOT BUTTON .................................................... 36
BALANCING PROCEDURES FOR SALES AND INVENTORY ............................... 36
MAXIMIZING ITVM SALES THROUGH MERCHANDISING ............................. 38
TIPS TO AVOID UNDERAGE PURCHASING ................................................. 39
TROUBLESHOOTING............................................................................. 40
PRODUCT SAFETY ............................................................................... 42
PLAN-O-GRAM EXAMPLE..................................................................... 43
NOTES ............................................................................................ 44
Optional LED
message
display
Ticket display
and selection
window
ITVM display
One Shot
button
Electronic
price display
Main door lock
Bill acceptor
Main door
Ticket tray
Figure 1: Exterior of ITVM
Getting to Know the ITVM
The Instant Ticket Vending Machine (ITVM) is designed to dispense
lottery scratch-off tickets. This section describes the major components of
the ITVM.
The Exterior Components
Figure 1 shows the exterior components of the EDS-Q machine. The
components are explained in detail below.
The customer pushes the ticket display and selection window to
purchase a ticket. If the bin is out of service, the electronic price
display will show a series of dashes across the middle of the display.
If the ticket bin is empty, “Out” will appear on the electronic price
display.
The One Shot button allows customers to purchase tickets in bulk
from any selected bin.
Instructions are given to the customer via the ITVM display.
The bill acceptor accepts and validates the customer’s cash. An
optional coin acceptor accepts and validates the customer’s coins.
The customer retrieves the purchased ticket from the ticket tray.
The main door provides access to the ticket drawers, keypad, printer,
and all other internal components.
Locks protect components inside the main and bill acceptor doors.
4|Page
Barcode
Scanner
Printer
Keypad
Ticket
drawers
Ticket
chute
Bill
Acceptor
Power
Switch
Reports
Barcode
Label (on
front of chute,
see inset
below)
Storage
Area
Figure 2: Interior of ITVM
5|Page
The Interior Components
Figure 2 shows the interior components of the ITVM. The components
are explained in detail below.
The barcode scanner enables the retailer to maximize the benefits of
SmartLoad ticket loading software. In addition, it simplifies ticket
activation, running machine reports and bin-loading.
The keypad enables you to navigate through menus, which you use
when loading tickets and printing reports.
Mounted within the ticket drawers, the bins hold and dispense tickets
available for purchase.
The printer is used to print several types of reports. A full explanation
of reports is given in the Reports section of this manual.
The bill acceptor is a device that validates and holds the cash the
customer deposits to purchase a ticket. The coin acceptor (optional)
is a device that validates the coins the customer deposits to purchase
a ticket.
The power switch turns the machine on and off.
The door open switch (not pictured) triggers an audible alarm. See
“Access Alarm” for more information.
The QuadBurster
TM
(not pictured) is the dispensing mechanism.
The storage area of the machine is designed to hold packs of tickets
and other lottery items in a secure environment.
QuadbursterTM is a registered trademark of GTECH.
6|Page
The Keypad
The keypad is mounted inside the machine, behind the main door.
The display guides you through the menus needed to maintain the ITVM.
Figure 3 describes the keypad in detail.
The plus sign (+) moves you forward in the menus.
The minus sign (-) moves you backward in the menus.
The back arrow (
) functions as a backspace key.
CLEAR erases your entry and takes you back to the previous menu
option.
When you press ENTER/YES, you answer “yes” to the questions on
the display, or you enter your input into memory.
Figure 3: Keypad – Key Labels
7|Page
Basic Operation and Menus
This section describes basic operations such as managing the ITVM
alarm system, opening and closing the machine, and accessing the
menus.
Access Alarm
The ITVM is protected from unauthorized entry by an audible door open
alarm. The alarm sounds continuously until a valid password is entered.
To silence the alarm:
1.
Immediately upon opening the door, enter a valid password. Note:
This is required only in systems where the full menu is password
protected.
2.
Absence of any keypad activity causes the system to emit periodic
alert tones. Press any key to reset the keypad inactivity monitor.
Power Fail Alarm
The power fail alarm is activated when the machine is unplugged or loses
power.
To disarm the alarm:
1.
Open the main door.
2.
Flip the toggle switch (located above the bill acceptor) to the down
position.
Tilt Alarm
The tilt alarm is activated when the machine is suddenly jostled.
To disarm the alarm:
1.
Open the main door.
2.
Flip the toggle switch (located above the bill acceptor) to the down
position.
Remote Disable
Remote disable is an optional feature on the ITVM and is intended to
discourage underage use. This feature allows store personnel to
“shutdown” the machine via remote control.
To disable the machine, press the button on the remote transmitter. To
re-activate, press the button on the remote transmitter again. The remote
does not require careful aiming or close range.
8|Page
Locking System
GTECH’s ITVMs include a patented high-security locking system.
The main door provides access to the keypad, printer, and ticket bins.
The bill acceptor is housed in a separately keyed vault behind the main
door.
The primary locking system consists of a removable locking barrel and an
inserted “T” handle.
Each set of keys has 2 keys, one that opens the removable lock cylinder
from the main door and a different key for the lock on the bill acceptor
vault.
Opening the ITVM
To open the main door:
1.
Remove the lock barrel:
a. Insert the key.
b. Rotate the lock one-quarter turn (in either direction) to the
unlocked position.
c. Pull the barrel out.
2.
Insert the “T” handle.
3.
Push in and rotate the handle counter-clockwise one-half turn.
4.
Open the main door.
Closing and Locking the ITVM
To close and lock the ITVM:
1.
Push the door closed.
2.
Rotate the “T” handle one-half turn clockwise. When the latch is
secure, the ITVM Display shows the prompt:
Please Insert Money
3.
Remove the “T” handle from the barrel.
4.
Insert the lock cylinder.
5.
Rotate the key until the machine is locked.
6.
Remove the key.
9|Page
The Main Menu (Administrator)
When the door is closed, the ITVM Display provides instructions to the
customer. When the door is opened and the password is entered the
Main Menu displays.
NOTE: In all menu commands shown in this manual, n
designates the ticket bin selected, and X designates a
value to be entered.
The Main Menu has the following choices:
Select bin:
n
(Bin n selected)
Print/View reports?
(Bin n selected)
n: Load inventory?
(Bin n selected)
n:Unload bin?
(Bin n selected)
Options?
(Bin n selected)
Press the plus (+) or minus sign (-) to scroll through all menu options.
The Main Menu options are discussed in detail in the Operating
Procedures section of this manual.
The hierarchy of the Main Menu is displayed below in Figure 4.
Main Menu
Options Menu
Select bin:
Print/View Reports?
n:Load inventory?
n:Unload bin?
Options?
Zero inventory?
Zero credit?
Load paper?
n: Test bin?
Change time?
Autoprint report of
sales at acct. time?
Test bill acceptor?
Change passwords?
Figure 4: Menu Hierarchy
10 | P a g e
The Options Menu
The Options Menu is accessed through the Main Menu. Press ENTER at
the Options? prompt to view the list of options. The Options Menu has the
following choices:
Zero inventory? XXX
(Bin n selected)
Zero credit?
$ X.XX
(Bin n selected)
Load paper?
(Bin n selected)
n: Test bin?
(Bin n selected)
Change time?
(Bin n selected)
Autoprint report of
sales at acct. time
Test bill acceptor?
(Bin n selected)
Change passwords?
(Bin n selected)
You may not use all of these functions. Those you are most likely to use
are discussed in detail in the Operating Procedures section of this
manual. The others are described below.
Press the plus sign (+) or minus sign (-) to scroll through the menu
options. Press ENTER to select a menu option.
Zero Inventory
Use the Zero Inventory function to zero out the selected bin’s inventory
count when tickets have been unloaded from the bin.
Zero Credit
Use the Zero Credit function to clear customer credits from the machine.
To clear credits, press ENTER. When this function is used, it is recorded
on the Events Report along with the login ID.
11 | P a g e
Load Paper
Refer to the Operating Procedures section of this manual.
Test Bin
Use the Test Bin function to verify a bin is working properly. NOTE: The
Test Bin function verifies the selected bin only. To select a different bin,
key in its number at the Test Bin prompt and press ENTER twice. If the
bin is in working order, the display will read: Bin tests good. If there is a
problem, a Bin tests bad message will be displayed, followed by a
description of the problem.
Change Time
Use the Change Time function to change the time. Enter the new time
using the 24-hour clock, with decimal points (e.g., 5:00 PM would be
entered as 17.00.00). Press ENTER.
Autoprint Report
Use the Autoprint Report function to print the Yesterday’s Sales Report at
the preset accounting time. The preset accounting time is 12:01 AM and
can only be changed by a GTECH service representative. To enable this
function, press ENTER. Disable the function by pressing ENTER again.
The Status Report indicates if this function is enabled and what times the
reports print.
Test Bill Acceptor
Use the Test Bill Acceptor function to verify the bill acceptor is working
properly. Test the bill acceptor by pressing ENTER and inserting a test
bill.
Change Passwords
Use the Change Passwords function to change Administrator and Retailer
passwords. Passwords can be between 2 and 6 digits. This function is
available to the administrator only, not the retailer.
12 | P a g e
Operating Procedures
You will perform the necessary functions of loading and unloading tickets,
collecting money, and printing accounting reports.
Loading Tickets
SmartLoadPlus feature makes loading tickets quick, accurate, and hasslefree. The EDS-Q stores individual game data (pack size, ticket size, and
price) so this information will not have to be re-entered every time tickets
are loaded.
To load tickets:
1.
Open the hinged ticket chute and remove the barcode scanner from
its holder.
2.
From the Select Bin prompt, scan the LOAD label on the bin you
wish to load. If this bin already has inventory, the old inventory
amount will be displayed. Press 0 and ENTER to clear this inventory
or scan or press ENTER to add it to the new inventory. The display
will read:
ProductID:
xxxxxx
(Bin n selected)
3.
Scan the barcode on the new ticket pack.
If the system recognized the Product ID for this ticket, the
display will read:
PID:xxxxxx, PS:XXX
UL:X.XX”, UV:$X.XX
This is the data currently stored for this Product ID (Product ID, Pack
Size, Unit Length, and Unit Value).
To accept these values: Scan the ENTER barcode or press
ENTER on the keypad. Proceed to step 7.
To change one or more of these values: Scan or press
CLEAR, then scan or press ENTER to continue. Proceed to
step 4.
If the system did not recognize the ticket’s Product ID, its
data must be entered. The display reads:
ProductID:
xxxxxx
(Bin n selected)
Scan or press ENTER. Proceed to step 4.
13 | P a g e
4.
If the system did not recognize this ticket or if you wish to change any
of its stored data, the new information must be keyed in.
NOTE: The data stored for any Product ID may not be
changed if that product is currently loaded in another bin.
A “Mixed Overload” advisory indicates that an attempt
has been made to load a product into a bin already
loaded with a different product.
A “Property Locks” advisory indicates that an attempt
has been made to load multiple bins with the same
product. During this operation, an attempt has been made
to assign different properties to the new load.
Pack size
XXX
(ProductIDxxxxxx)
The display reads:
Press ENTER to accept the displayed value (if any) or key in the
number of tickets you are loading and press ENTER on the keypad
twice.
The display may prompt:
Loading full pack?
ENTER=Yes, CLEAR=No
NOTE: Answering yes to this question will store this
value as the pack size for this Product ID. If you are
loading a partial pack, be sure to press CLEAR to avoid
affecting future loads.
5.
The display reads:
Ticket Length
X.XX
(ProductIDxxxxxx)
Scan or press ENTER to accept the displayed value or key in the
ticket length and press ENTER on the keypad twice.
6.
The display will read:
Unit Value
$ X.XX
(ProductIDxxxxxx)
Scan or press ENTER to accept the displayed value or key in the unit
value and press ENTER on the keypad twice.
14 | P a g e
7.
If new inventory is being added to existing inventory, the display will
read:
NewInventory:
Load Bin n?
XXX
Scan or press ENTER to accept the new inventory amount. Pressing
CLEAR will abort the ticket loading process.
8.
The display will read:
Load Bin n now
(ProductIDxxxxxx)
Pull out the appropriate ticket drawer. Insert the ticket pack into the
bin so that the lowest numbered ticket feeds first (see Figure 5A).
9.
Feed the first ticket over the roller (see Figure 5B) and insert under
the ticket guide (see Figure 5C) until the leading edge firmly touches
the black rubber feed rollers. This will activate the ticket sensor
switch and tickets will load automatically.
Figure 5A:
Insert Ticket Pack
Figure 5B:
Feed Over Roller
Figure 5C:
Under Ticket Guide
Multiple packs of tickets can be loaded by taping the end of one pack to
the beginning of another pack. To connect two packs of tickets, use
GTECH’s perforated tape (Part No.: 10-205-0007-01).
15 | P a g e
Unloading Tickets
Use the Unload Tickets function to remove tickets without damaging the
bursters. GTECH’s SmartLoadPlus feature allows tickets to be unloaded
in one easy step.
From the Select Bin prompt, scan the UNLOAD label on the bin to
unload. The burster reverses feed and the tickets unload.
After the tickets are unloaded the display will read “Reload or CLEAR”.
This will prompt the user to either reload the tickets or CLEAR the
inventory. By reloading the tickets the game is restored to active. By
selecting the CLEAR option the inventory in the bin is set to zero.
Printing and Viewing Reports
The Print/View Reports feature allows you to print or view the following
ITVM accounting reports:
Local Shift Report
Inventory Report
Today’s Report
Yesterday’s report
Last 7 Days Report
This Week’s Report
Last Week’s Report
Last 4 Weeks Report
This Month’s Report
Last Month’s Report
Last 6 Months Report
This Quarter’s Report
Last Quarter’s Report
This Fiscal Year’s Report
Last Fiscal Year’s Report
Lifetime Sales Report
Audit Trail Report
Local Events Report
Local Security Report
Status Report
Lost Sales Report
See the Reports section of this manual for more information on these
reports.
The Print Reports feature allows you to print a hard copy of any of the
reports listed above. The View Reports feature allows you to view any
report line by line on the ITVM display.
NOTE: When you run a Local Shift Report, all accounting data is
reset to zero.
Printing Reports
The QuickPrint feature allows immediate access to sales and inventory
data with just a click of the barcode scanner. To print reports:
1.
Make sure you have enough paper in the printer.
2.
From the Select Bin prompt, scan the barcode of the desired report
on the Report Barcode Label located inside the machine on the
hinged ticket chute. The report will begin printing.
16 | P a g e
Viewing Reports
To view reports:
1.
Press the plus sign (+) once. The display reads:
Print/View reports?
(Bin n selected)
Press ENTER.
2.
Press the plus sign (+) once. The display reads:
View reports?
(Bin n selected)
3.
Press ENTER.
4.
Use the plus sign (+) or minus sign (-) to scroll through the report
list. (The reports are shown in the order listed on page 18.) When
the correct report is displayed, press ENTER. Use the plus sign (+)
or minus sign (-) to scroll through the report line by line.
5.
Press CLEAR twice to return to the Main Menu.
Loading Printer Paper in the ITVM
Make sure the new roll of paper has a straight edge (if necessary, re-cut
the paper so the edge is straight.)
1.
From the Select Bin prompt, press the minus sign (-) once, or
press the plus sign (+) four times. The display reads:
Options?
(Bin n selected)
Press ENTER.
2.
Press the plus sign (+) once. The display reads:
Load paper?
(Bin n selected)
3.
The paper must be loaded as shown in Figure 6.
a.
b.
c.
d.
e.
f.
g.
Remove the empty spool. Slide the white spool holder up and
toward you.
Install a new roll of paper on the white spool holder. Paper feeds
from the back of the roll.
Pull the black platen forward to the open position.
Slide the clean, straight edge of the new paper into the printer
feed opening.
Return the platen to the closed position.
Press ENTER. The paper begins to feed through the roller.
Press and hold down any key to stop feeding.
17 | P a g e
Figure 6: Loading Printer Paper
Removing Money from the Bill
Acceptor
1.
Open the bill acceptor door.
2.
Lift the cassette door to expose currency.
3.
Remove the bills from the acceptor (see Figure 7).
4.
Print a Shift Report to reset the system’s cash counters.
Figure 7: Removing Money from the Bill
Acceptor
18 | P a g e
Removing Bill Magazine from the
Bill Acceptor
Rather than removing the money at the machine, the entire bill magazine
may be removed. To remove money from the bill magazine:
1.
Press the small black button at the end of the bill stacker and lift out
the bill magazine (see Figure 8).
2.
Remove the bills from the magazine. Replace the magazine by
reinserting it into its holder and sliding it toward the bill acceptor until
it locks into position.
Figure 8: Removing Bill
Magazine
Reports
Reports are used for tracking sales, transactions, inventory, and other
useful information. Instructions for printing or viewing reports are in the
Operating Procedures section of this manual. This section describes the
ITVM reports.Sales Reports
Sales information can be reported for a variety of different time periods as
described below. Each sales report states, by bin, the quantity and value
of tickets sold in the given time period as well as the total quantity and
value of all tickets sold in that period. These reports also show the
product number loaded into each bin and an estimate of sales lost due to
bin-out-of-stock time. Figures 10-15 explain these reports in more detail.
19 | P a g e
Available Reporting Periods
Local Shift Report
The Local Shift Report reflects sales since the last time this report was
taken. Because this report does not follow the standard sales report
format, it is described in detail on page 30.
Today’s Report
Today’s Report summarizes all of the transactions that have taken place
for the current day (from the previous midnight, or a time you select, to the
time the report was printed).
Yesterday’s Report
Yesterday’s Report summarizes sales data for the previous day. This 24hour reporting period is selected by you (typically from last midnight to the
previous midnight, or settable accounting time).
Last 7 Days Report
The Last 7 Days Report summarizes sales information for each of the
past seven days, providing daily totals for each bin as well as daily totals
for these days. Note that Day 7 sales are for the current day, and each
previous day is listed in reverse-chronological order.
This Week’s Report
This Week’s Report offers you access to sales information for the current
week (typically Monday 12:00 AM to 11:59 PM Sunday, unless
programmed differently by your service agent). This Week’s Report can
be obtained as many times as necessary during the current week and
reflects sales beginning Monday 12:00 AM through the time that the report
is taken.
Last Week’s Report
Last Week’s Report reflects sales for the previous seven-day reporting
week (typically Monday 12:00 AM to 11:59 PM Sunday, unless
programmed differently by your service agent). This report enables you to
obtain a weekly sales report. For example, a report taken on Monday
morning will reflect the previous week’s (seven days’) sales.
Last 4 Weeks Report
The Last 4 Weeks Report summarizes sales information for each of the
last four weeks. Week 4 is the current week and reflects sales up until the
time the report is taken. Each previous week is listed in reverse-
20 | P a g e
chronological order. Start and end dates for each week are shown on the
report.
This Month’s and Last Month’s Reports
This Month’s Report reflects sales for the current month to the time the
report is taken. Last Month’s Report reflects sales for the last month.
Last 6 Months Report
Similar to the Last 4 Weeks and Last 7 Days reports, the Last 6 Months
Report summarizes sales information for each of the last six months.
Month 6 is the current month to date, and each previous month is listed in
reverse-chronological order with start and end dates for each listed under
the month heading.
This Quarter’s and Last Quarter’s Reports
This Quarter’s Report reflects sales for the current quarter to the time the
report is taken. Last Quarter’s Report reflects sales for the last quarter.
This Fiscal Year’s and Last Fiscal Year’s Reports
The This Fiscal Year’s Report reflects sales for the current fiscal year to
date. The Last Fiscal Year’s Report reflects sales for the last fiscal year.
The fiscal year start date can be programmed into the machine by your
service representative.
Lifetime Sales Report
The Lifetime Sales Report provides sales information over the life of the
machine. Because this report does not follow the standard sales report
format.
Lost Sales Report
The Lost Sales Report provides estimated sales information as it relates
to machine/bin downtime. This report gives an average of the amount of
sales lost due to empty bins, full bill acceptor magazines, etc. This report
is listed as “Site Management” shown on the bottom of each printed sales
report.
21 | P a g e
Understanding Sales Reports
While the reporting period differs between the various available sales
reports, the report format is basically the same. Each report is divided
into four sections: the report header, the product ID listing, sales data, and
site management statistics.
The Report Header
The header of each report states the name of the report and the time
period reflected in the report. Figure 10 shows an example of a sales
report header in more detail.
Name of report
Date and time
this report was
printed
Time set as
beginning of
accounting day
Retailer’s ID
number
(assigned by
lottery)
SALES THIS WEEK
Sales Since
03/03/2003
Fri 03/07/2003 17:54
Acct Week Start:
Mon
Acct Time:
00.01
Agent:
40444
Machine:
87654321
DoorOpenToday:
2
********************
First day of the
reporting period
Day set as the
first day of the
accounting
week.
Machine serial
number
Number of times
the door has
been opened
today
Figure 10: Sales Report Header
The Product ID Listing
After the report header, each sales report has a section listing the product
ID and value of the tickets loaded into each bin. Figure 11 shows this
section in more detail.
“+” indicates
change in
product ID
occurred
during this
sales interval
********************
Product ID & Value
********************
B01: #437281,
$ 1.00
B02: #655209,
$ 5.00
B03: #844763
$10.00
B04: +#288543
$ 2.00
********************
Current
selections
loaded listed by
bin#, product
ID#, and ticket
value
Figure 11: Product ID & Value Listing
22 | P a g e
Sales Data
This section reports sales data for the reporting period shown in the report
header. Ticket quantity sold and dollar value of tickets sold are listed for
each bin and are summed to show total sales during the reporting period.
Total number
of tickets
dispensed
during this
reporting
period
These lines
shown only on
summary
reports (Last 7
Days, Last 4
Weeks, Last 6
Months). Note
that listings are
in reversechronological
order
Sales Qty & Value
********************
------Week4--------(From 02/24/2003)-(Thru 02/25/2003)-Bin#01:
125 ($
250.00)
Bin#02:
142 ($
142.00)
Bin#03:
63 ($
315.00)
Bin#04:
50 ($
100.00)
Bin#05:
58 ($
580.00)
----- --------438 ($
1387.00)
CheckTotals:
438($
1387.00)
------Week3--------(From 02/17/2003)-(Thru 02/23/2003)-Bin#01:
110 ($
220.00)
Figure 12: Sales Qty & Value Section
23 | P a g e
These lines are
shown only on
the summary
reports (Last 7
Days, Last 4
Weeks, Last 6
Months).
Reporting period
is stated for each
listing. Note that
most recent time
period is listed
first.
Quantity and
dollar value of
tickets sold from
Bin 4 this
reporting period
Total dollar value
of tickets
dispensed
during this
reporting period
Site Management Statistics
The last section of each sales report provides an estimate of revenue lost
during the reporting period due to bins being out of stock. The Lost Sales
Estimate is derived from actual machine sales and the percentage of outof-stock time during the reporting period.
Number of
times in
reporting
period that
system
checked for
out-of-stock
conditions
********************
Site Management
********************
------Summary------OutOfStockFactor:
13.7%
LostSalesEstimate:
$
220.37
---TimeLostDetail--QOS_Samples:
125
NotAcceptingCash:
2.0%
BinOutOfStock:
01:
4.0%
02:
35.0%
03:
2.8%
04:
6.0%
********************
--- end report ----
Estimate of sales
lost by this
machine during
the reporting
period based on
actual sales and
bin-out-of-stock
time
Percent of time
in the reporting
period that Bin 1
was out of stock
Figure 13: Site Management Statistics
24 | P a g e
Additional Reports
In addition to sales information for a variety of time periods, your ITVM
reports accurate inventory, transaction, event history, and set-up
information.
Local Shift Report
The Local Shift Report reflects sales since the last time the report was
taken. For example, if you take a Shift Report at 9:00 AM, and another
one at 5:00 PM, the second report will include only sales for that eight-hour
period. This report is useful in retail establishments (such as a 24-hour
store) that require that more than one person empty the machine.
Money should be removed every time a Local Shift Report is printed.
Failure to do so will result in inaccuracy of the system’s cash counters.
Figures 14A and 14B explain the report in more detail.
Date and time
the last Shift
Report was
printed
“+” indicates
change in
product ID
occurred
during this
sales interval
LOCAL SHIFT REPORT
Sales Since
14:37 03/06/2003
Fri 03/07/2003
17:54
Acct Week Start:
Mon
Acct Time:
00.01
Agent:
40444
Machine:
87654321
DoorOpenToday:
2
********************
Product ID & Value
********************
B01: #437281,
$ 1.00
B02: #655209,
$ 5.00
B03: #844763,
$ 10.00
B04: +#288542,
$ 2.00
********************
Sales Qty & Value
********************
Bin#01:
125 ($
250.00)
Bin#02:
142 ($
142.00)
Figure 14A: Local Shift Report
continued
25 | P a g e
Date and time
this Shift Report
was printed
Current
selections
loaded listed by
bin#, product
ID#, and ticket
value
Quantity and
dollar value of
tickets sold from
Bin 1 this shift
Total number of
tickets
dispensed this
shift
Total value of
all coins and
bills collected
this shift
Number of
times this shift
that system
checked for
out-of-stock
conditions
Bin#03:
63 ($
315.00)
Bin#04:
50 ($
100.00)
Bin#05:
58 ($
580.00)
----- --------438 ($
1387.00)
CheckTotals:
438 ($
1387.00)
********************
********************
---Cash Collected--********************
#Bills:
$20 ---->
6
$10 ---->
32
$5 ---->
124
$1 ---->
327
BillTotal:$
1387.00
CashTotal:$
1387.00
********************
Site Management
********************
-------Summary-----OutOfStockFactor:
13.7%
LostSalesEstimate:
$
220.39
---TimeLostDetail--QOS_Samples:
125
NotAcceptingCash:
2.00%
BinOutOfStock:
01:
4.00%
02:
35.00%
03:
2.80%
04:
6.00%
********************
--- end report ----
Figure 14B: Local Shift Report
26 | P a g e
Total sales this
shift
A difference
between these
two values will
result only from
erroneous unit
values or an
overload of the
SmartLoad
buffer (use of
more than 100
different
products within
the reporting
period)
Number of $10
bills collected
this shift
Total value of all
bills collected
this shift
Estimate of sales
lost by this
machine this
shift based on
actual sales and
bin-out-of-stock
time
Percent of time
this shift that Bin
2 was out of
stock
Inventory Report
The Inventory Report shows, by bin number, the value and quantity of
tickets presently in the machine. The software lowers the inventory count
each time a ticket is dispensed; therefore, the report reflects the most upto-date inventory reading. The report also displays the total number of
tickets in the machine and their total value. Figure 15 shows the Inventory
report from the ITVM.
NOTE: The inventory report reflects the numbers entered when tickets
were loaded. Be sure to enter the correct inventory at the Pack Size
prompt.
Date and time
this report was
printed
“+” indicates
change in
product ID
occurred
during this
sales interval
Number of
tickets on hand
for Bin 1
“*” indicates
bin out of
service
Total number of
tickets in the
machine
INVENTORY REPORT
Fri 03/07/2003 17:54
Acct Week Start:
Mon
Acct Time:
00.01
Agent:
40444
Machine:
87654321
DoorOpenToday:
2
********************
Product ID & Value
********************
B01: #437281,
$ 1.00
B02: #655209,
$ 5.00
B03: #844763,
$10.00
B04: +#288542,
$ 2.00
********************
UnitsOnHandQty&Value
********************
01: 175 ($
175.00)
02:
97 ($
485.00)
03:* 111 ($
1110.00)
04: 225 ($
450.00
----- --------608 ($
2220.00)
********************
--- end report ----
Current
selections
loaded listed by
bin#, product
ID#, and ticket
value
Value of tickets
on hand for Bin 1
Total value of
tickets in the
machine
Figure 15: Inventory Report from the ITVM
27 | P a g e
The Lifetime Sales Report
The Lifetime Sales Report provides sales information over the life of the
machine as well as the average weekly sales since its installation in its
present location. Figure 16 explains the Lifetime Sales Report in more
detail.
Date and time
this report was
printed
Number and
value of tickets
dispensed over
life of this
machine (Note:
This value is
non-resettable)
Resettable
deployment
date
Average
number of
tickets sold per
week
SALES LIFETIME
Fri 03/07/2003
17:54
Acct Week Start:
Mon
Acct Time:
00.01
Agent:
40444
Machine:
87654321
DoorOpenToday:
2
********************
Lifetime Totals
********************
VendsQty:
#
6587876
VendsValue:
$
12503192.00
SalesValue:
$
12503062.00
********************
WeeklyAvgLifeSales
********************
InstallDate&Time:
Mon 03/05/2002
15:41
WeeksInService:
53.48 weeks
TotalSalesSince:
#
61308
$
253276.00
WeeklyAvgSince:
#
1146.37
$
4735.90
********************
--- end report ----
Figure 16: Lifetime Sales Report
28 | P a g e
The difference
between these
two numbers
indicates that
$130 in credits
has been keyed
in over the life of
the machine
(Your service
representative
may key in
credits in order
to test the
machine.)
Average dollar
amount sold per
week
Audit Trail Report
The Audit Trail Report gives you an up-to-the-minute description of the
ITVM’s last ten transactions. All transactions are time- and date-stamped
on the transaction header. In particular, this report provides you with
details of the last or pending transaction, should a customer dispute the
status of the machine during current play. Figures 17A and 17B explain
this report in more detail.
Date and time
this report was
printed
All bills
accepted
during this
transaction,
listed by
denomination
and in order of
insertion
Bins selected
for play
AUDIT TRAIL REPORT
Last 10 Transactions
Fri 03/07/2003
17:54
Acct Week Start:
Sun
Acct Time:
00.01
Agent:
40444
Machine:
87654321
DoorOpenToday:
2
********************
Transaction Detail
********************
---Transaction1---Fri 03/07/2003
14:05
Bills:
5+1+1
BillTotal:
$
7.00
CoinTotal:
$
0.00
MoneyTotal:
$
7.00
UnitsSoldByBin:
Bin#01:
2($
2.00)
Bin#02:
1($
5.00)
----- --------3($
7.00)
CheckTotal:
3($
7.00)
continued
Figure 17A: Audit Trail Report
29 | P a g e
Oldest
transaction first
Dollar value of
tickets
dispensed from
Bin 1 during this
transaction
Number of
tickets
dispensed from
Bin 3 during
this transaction
Most recent
transaction last
----Transaction9---Fri 03/07/2003
17:37
Bills:
10
BillTotal:
$
10.00
CoinTotal:
$
0.00
MoneyTotal:
$
10.00
UnitsSoldByBin:
Bin#03:
1($
10.00)
----- --------1($
10.00)
CheckTotal:
1($
10.00)
----Transaction10--Fri 03/07/2003
17:42
Bills:
1+1
BillTotal:
$
2.00
CoinTotal:
$
0.00
MoneyTotal:
$
2.00
UnitsSoldByBin:
Bin#01:
2($
2.00)
----- --------2($
2.00)
CheckTotal:
2($
2.00)
********************
--- end report ----
(Note: Several
transactions
were skipped for
this illustration)
Total credits
accumulated for
this transaction
A difference
between these
two values will
result only from
erroneous unit
values or an
overload of the
SmartLoad
buffer (use of
more than 100
different
products within
the reporting
period)
Figure 17B: Audit Trail Report
Local Events Report
The Events Report tracks all events that have occurred since the current
shift began. Events are all activity related to the machine except the
dispensing of tickets. The report is limited to the newest one hundred
events. Figure 18 explains the report in more detail.
Date and time
30 | P a g e
LOCAL EVENTS REPORT
Wed 03/26/2003 17:13
this report was
printed
Key showing
password login
used for each
event
Events listed by
agent, event
type, date, and
time
Acct Week Start:
Mon
Acct Time:
00.01
Agent:
40444
Machine:
87654321
DoorOpenToday:
2
********************
Agents Key
********************
a=AdminAgent
r=RetailAgent
s=ServiceAgent
l=LotteryAgent
u=Unknown
********************
Events Key
********************
CLD:ColdStart
CLS:DoorClosed
CZR:CreditZeroed
LOD:LoadInventory
LOI:LowInventory
OPN:DoorOpened
RAC:RAC_CallAttempt
RDC:RDC_CallAttempt
SHT:ShiftStart
STL:SettlementStart
SWR:SoftwareReset
ULD:UnloadInventory
UNK:UnknownEvent
WDR:WatchdogReset
WRM:WarmStart
********************
aSHT03/26/2003
10:09
uWRM03/26/2003
10:21
uLOI03/26/2003
10:25
3:LowInventory
sOPN03/26/2003
10:30
sLOD03/26/2003
10:31
3: 100 $
100.00
sCLS03/26/2003
10:33
sOPN03/26/2003
17:12
********************
--- end report ----
Figure 18: Local Events Report
31 | P a g e
Listing of all
events that can
be reported
Security Report
The Security Report describes when the door was opened and closed and
by whom during the current shift. Figure 19 explains the report in more
detail.
Date and time
this report was
printed
Key showing
password login
used for each
event
Times door
opened and
closed listed by
agent, event
type, date, and
time
LOCAL SECURITY RPT
Wed 03/26/2003 17:13
Acct Week Start:
Mon
Acct Time:
00.01
Agent:
40444
Machine:
87654321
DoorOpenToday:
2
********************
Agents Key
********************
a=AdminAgent
r=RetailAgent
s=ServiceAgent
l=LotteryAgent
u=Unknown
********************
Events Key
********************
CLS=DoorClosed
OPN=DoorOpened
********************
SecurityEventsDetail
********************
sOPN03/26/2003
10:30
sCLS03/26/2003
10:33
sOPN03/26/2003
17:12
********************
--- end report ----
Figure 19: Security Report
32 | P a g e
Listing of events
that can be
reported
Status Report
The Status Report describes the machine’s set-up and configuration.
This report will be used primarily by your GTECH service representative.
Figures 20A and 20B explain the report in more detail.
Retailer ID
(assigned by the
lottery)
Machine serial
number
Indicates
whether a
Yesterday’s
Sales Report will
print
automatically at
the set
accounting time
Number of
tickets
dispensed over
the life of this
machine (Note:
This value is
non-resettable)
Total cash
collected by this
machine
Status of cash
acceptors
STATUS REPORT
Wed 03/26/2003
17:13
Acct Week Start:
Sun
Acct Time:
00:01
Agent:
40444
Machine:
87654321
DoorOpenToday:
2
********************
System Config
********************
SwRelease:
v9.999.99
BootLoader:
1.2
********************
Accounting Settings
*******************
Acct Week Start:
Mon
Acct Time:
00.01
CreditLimit: $
40.00
Credit:
$
0.00
Autoprint:
OFF
********************
Lifetime Totals
********************
VendsQty:
#
6587876
VendsValue:
$
12503192.00
SalesValue:
$
12503062.00
********************
Error Registry
********************
BillAcceptor:
PASS
CoinAcceptor:
PASS
NumBillsOvrLmt:
NO
CashOverLimit:
NO
Figure 20A: Status Report
Status of bins
BinsLowInventory:
continued
33 | P a g e
Date and time
this report was
printed
Software version
installed in
System
Controller Board
Maximum
amount of
money the
machine will
accept for one
transaction
Credits currently
on the machine
The difference
between these
two numbers
indicates that
$130 in credits
have been keyed
in over the life of
the machine
(Your service
representative
may key in
credits in order
to test the
machine.)
VuLink Settings
Status of Bin 1
Any problems
with bin will be
reported here
Factory-set
values for this
bin’s dispenser
6 7 14
BinsJammed:
None
BinsMute:
None
********************
VuLink Settings
********************
MessageFormat
3
Address Offset:
0
ActivateOnLoad: Enbld
SolicitationTO(s)
5
LoadNoLink:
Proceed
********************
Bin Status
********************
----- Bin 1 -----ProductID:
437281
Status:
BinOK
SwRelease:
1.000
UnitLength[in]:
2.00
UnitValue[$]:
1.00
Inventory:
175
EdgeGap:
257
TickPitch:
150.25
----- Bin 2 -----ProductID:
655209
Status:
BinOK
SwRelease:
1.000
UnitLength[in]:
6.00
UnitValue[$]:
5.00
Inventory:
97
EdgeGap:
257
TickPitch:
150.25
----- Bin 3 -----ProductID:
844763
Status:
BinOK
SwRelease:
1.000
UnitLength[in]:
12.00
UnitValue[$]:
10.00
Inventory:
111
EdgeGap:
257
TickPitch:
150.25
********************
--- end report ----
Figure 20B: Status Report
34 | P a g e
ID number of
ticket loaded in
Bin 1
Software version
in this bin’s
control board
Size and value
of tickets loaded
in Bin 2
Current ticket
inventory for
this bin
Purchasing tickets
Your primary concern is maintaining the machine. Still, it is helpful for you
to know what happens during a typical transaction, so you’ll be able to
help customers who are curious about the ITVM, or who are having
difficulty making a purchase.
Typical Purchase
A typical purchase goes as follows:
1.
When the customer approaches the machine, the ITVM display
reads:
Please Insert Money
The ITVM takes cash only ($1, $5, $10, or $20 bills) and does not
give change. If equipped with a coin acceptor, nickels, dimes,
quarters, and dollar coins may be used.
2.
The customer inserts the bill into the bill acceptor.
3.
The display reads:
X.XX credits
4.
As the customer selects a ticket, the ticket is burst, and then
dispensed in the ticket tray. The ITVM display reduces the number of
credits by the cost of the ticket. (The number of credits reflects the
amount of money the customer deposited. Some games cost $1 [1
credit]. Others may cost more.)
5.
Once all credits have been used, the display reads:
Credits used. Thank
You and good luck!
Then returns to the prompt:
Please Insert Money
35 | P a g e
Purchase Using One Shot Button
A typical purchase using the One Shot button goes as follows:
1.
When the customer approaches the machine, the ITVM display
reads:
Please Insert Money
The ITVM takes cash only ($1, $5, $10, or $20 bills) and does not
give change. If equipped with a coin acceptor, nickels, dimes,
quarters, and dollar coins may be used.
2.
The customer inserts the bill into the bill acceptor.
3.
The display reads:
X.XX credits
4.
The customer pushes the One Shot button. (Button is now flashing.)
5.
The customer pushes the preferred ticket display and selection
window. The tickets are burst, and then dispensed continuously in
the ticket tray until all credits are used.
6.
Once all credits have been used, the display reads:
Then returns to the prompt:
Please Insert Money
Credits used. Thank
You and good luck!
NOTE: To stop One Shot dispensing before all credits are
used, press the One Shot button again. Dispensing will
stop and the credits remaining will appear on the display.
The customer can then continue making purchases until all
available credits are used.
Balancing Procedures for Sales and
Inventory
GTECH ITVMs come equipped with several reports designed to guide the
sales agent to accurate daily balancing of sales and inventory.
36 | P a g e
The steps below are designed to provide the ITVM sales agent with the
necessary reporting structure to facilitate all accounting and balancing needs
for the ITVM profit center.
1.
Set accounting time/day of week (optional). Your GTECH service
representative sets this time upon the original installation of the ITVM
based on store personnel input. If the set accounting time does not
reflect your current needs, contact your GTECH service representative.
Steps 2 through 8 should be performed at the beginning of each ITVM
manager’s accounting day.
2.
Print a Status Report. The Status Report describes the ITVM setup and
configuration. It details any problems that might exist as well as
information on the setup of each bin. Also included in this report is the
amount of revenue taken in by this machine to date.
3.
Print a Local Shift Report. The Local Shift Report reflects sales since the
last time the report was taken. The report will include only sales for that
period. Running this report resets all accounting information to zero.
4.
Remove money from the bill acceptor. Money should be removed every
time a Local Shift Report is printed.
5.
Print an Inventory Report. The Inventory Report shows by bin number
the value and quantity of tickets presently on hand in the machine. The
report reflects the most up-to-date inventory reading. The date and time
of the report are also included.
6.
At this point you have enough information to balance the previous day’s
sales.
7.
Add tickets to any bin that is low on inventory.
8.
Print another Inventory Report. This is recommended for total security
and confidence in accuracy.
Steps 9 through 13 should be performed at the end of each ITVM manager’s
accounting day.
9.
Print a Local Shift Report.
10. Remove money from the bill acceptor.
11. Print an Inventory Report.
12. Load inventory as necessary.
13. Print another Inventory Report.
Using the above procedures will lead to accurate daily balancing of your
ITVM.
Reports to check:
A.
Today’s Report
B.
Yesterday’s Report
37 | P a g e
Maximizing ITVM Sales Through
Merchandising
GTECH offers marketing support in the form of brochures, historical sales
information, retailer demographics, instructional manuals, and various
other tools used for recruiting locations for placement of ITVMs. These
factors are critical to the success of the ITVM:
Place the ITVM in a high traffic location. Placement at the entrance
or exit of a location provides ideal visibility for customers.
Keep tickets in all bins at all times.
Always keep the latest and most popular games loaded in the ITVM.
Encourage new customers to use the ITVM.
Let customers know when a significant amount is won on a ticket sold
by the ITVM.
Keep the ITVM clean and operational.
Understand the importance of exterior and interior P.O.S.
Understand the importance of selling from a secondary location.
Use promotional aids and sample ticket display.
Understand proper game mix and placement (plan-o-gram).
38 | P a g e
Tips to Avoid Underage Purchasing
GTECH believes that all its machines should be operated in accordance
with your state’s laws. GTECH recommends the following guidelines to
ensure that purchases are not made by those who are underage:
The ITVM should be located in a controlled environment that is within
eyesight of store personnel at all times.
The ITVM may be equipped with a remote-controlled disable feature
(optional). If so, this device should be accessible at all times to store
personnel responsible for oversight of the machine. In addition, this
functionality is available through the ISYS terminal.
The ITVM should not be placed close to children’s rides, children’s
vending machines, or video games.
The state laws prohibiting the purchase of lottery tickets by minors
should be followed by all store personnel.
Store personnel should be instructed to ask for ID of any person they
suspect of being underage.
39 | P a g e
Troubleshooting
If you have problems with your ITVM, please check this section of the
manual before calling for service.
All of the lights are out, the display is not lit, and the machine will
not take money
The ITVM may be unplugged. Check the power cord at both ends.
The machine may be turned off. The power switch is located inside
the main door below the bill acceptor compartment.
The house power may be off. Check the house power.
The machine may have blown a fuse. Call for service.
The bill acceptor will not take money
The bill acceptor may be full. Empty it and print a Shift Report.
A bill may be stuck in the bill acceptor.
To remove a jammed bill:
1.
Turn the machine off.
2.
Unlock and open the bill acceptor door.
3.
Remove the stacker by pressing the black release latch, sliding
down, and lifting out.
4.
If the jam is not found, remove the scan head by pushing the
silver rod forward and lifting out.
5.
Any jammed bills should now be visible and easily removed.
6.
After removing the jammed bills, snap the head and stacker back
into place, and close and lock the bill acceptor door.
7.
Turn the machine on.
8.
Use the Test Bill Acceptor function in the Options Menu to
determine if the jam has been cleared.
The printer won’t let me load or change ticket values
Property Locks or Mixed Overload are in place for this game. Verify
that this game is not loaded into another bin. If this product is loaded
into another bin, verify the correct values for this game.
40 | P a g e
The printer won’t print
Make sure the printer paper is loaded properly.
Make sure the platen is in the “closed” position.
Price display reads “Out”
The bin may be out of tickets. Reload it.
Price display reads “----”
Tickets may be jammed. Unjam the appropriate bin (see Unloading
Tickets). Turn the machine off, then on, and reload the tickets.
Check to make sure the tickets are under the feeder wheels.
Ticket inventory may have been entered incorrectly. If inventory
shows a number greater than zero and the ticket bin is empty, reset
inventory to zero by entering “0” at the Old Inventory prompt in the
Load Tickets Menu or by selecting Zero Inventory from the Options
Menu. Then add and load new inventory.
If there is a problem with a bin or machine that you cannot resolve after
reviewing the Troubleshooting guide, please contact GTECH directly at:
1-800-950-5686
Our technicians will be happy to assist you.
Have this information ready before placing a call to GTECH
Customer Service:
Agent number
Store name
Name of manager placing call
Specific problem
Troubleshooting techniques already tried
Key availability and /or ITVM manager availability
41 | P a g e
Product Safety
Safety Instructions
The machine may only be installed by qualified personnel.
If the machine is brought into the room in which it is to be
installed from a cold environment, condensation can occur. In
order to prevent condensation, wait for an acclimatization time of
3 to 4 hours before opening the package.
Check whether the set nominal voltage of the machine
corresponds to the voltage of the local line.
This machine is equipped with a safety-tested power cable and
may only be connected to a grounded power outlet.
Ensure that the power outlet of the building installation is freely
accessible. Never pull the power or data cables from the sockets
by the cables; always grip the plug.
Lay leads and cables so that no one can stand on or trip over
them.
Data transmission lines must not be connected or disconnected
during a thunderstorm.
Ensure that no objects (e.g. jewelry, paper clips, etc.) are
allowed to drop inside the machine.
In emergencies (e.g. damaged housing, operating elements or
power cable, entry of moisture or objects), switch off the
machine, pull out the power cable plug and contact the
responsible customer support department.
Repairs or modifications to the machine may only be carried out
by authorized specialist personnel. Unauthorized opening of the
machine and inexpert repairs can result in considerable danger
for the user and jeopardize the warranty coverage.
Replaceable Batteries
CAUTION!
RISK OF EXPLOSION IF BATTERY IS REPLACED BY AN
INCORRECT TYPE. DISPOSE OF USED BATTERIES ACCORDINGTO
THE INSTRUCTIONS.
42 | P a g e
Plan-O-Gram Example
43 | P a g e
NOTES
_______________________________________________________________________________
_______________________________________________________________________________
_______________________________________________________________________________
_______________________________________________________________________________
_______________________________________________________________________________
_______________________________________________________________________________
_______________________________________________________________________________
_______________________________________________________________________________
_______________________________________________________________________________
_______________________________________________________________________________
_______________________________________________________________________________
_______________________________________________________________________________
_______________________________________________________________________________
_______________________________________________________________________________
_______________________________________________________________________________
_______________________________________________________________________________
_______________________________________________________________________________
_______________________________________________________________________________
_______________________________________________________________________________
_______________________________________________________________________________
_______________________________________________________________________________
_______________________________________________________________________________
_______________________________________________________________________________
_______________________________________________________________________________
_______________________________________________________________________________
_______________________________________________________________________________
_______________________________________________________________________________
44 | P a g e