1
Sony Installation
Configuration and Connections
Connecting System 4xi to Sony
If the System 4xi is already configured for a Sony projector, go to step 4. If it is
not set up correctly, it will be necessary to change switch settings on the
System 4xi ’s Main Controller Board. Begin at Step 1 to verify the correct
configuration.
1. Use the Front Panel to display the Information Menu to verify that the System 4xi
is already set up for the Sony projector. Apply power to the System 4xi and do
the following:
a. Press
b. Press
[System 4 model and software
version displayed here]
(See note.)
(See note.)
(See note.)
(See note.)
(Note: Information depends on
System 4 setup.)
}
c. Press
to display the MENU SELECT on the LCD screen.
or
to step to Menu 8.
to select this menu.
d. Press
or
to display the configuration. The example to the left is general,
yours will show the System 4xi model name, the software version and the
following information:
PRJ = SONY
PRJ BAUD = 9600
UNIT No. = 000
HST BAUD = 9600 (value depends upon setup Menu 3)
2. Go to the procedure on page 2-3 of the System 4xi User’s Manual to remove the
System 4xi cover. Then go to page 2-4 and refer to the configuration below to
set up the Main Controller board. Continue with Step 3 (below) when the
configuration is correct.
Config
as
✔
Projector
Sony
SW1: 1-2-3-4 SW2 SW3
off-on-off-on
0
0
SW4 SW5 SW6 Prj Cable
3
5
0
Comm
Adapter
J15
SW3
26-312-01
SW5
SW2
J15
SW1
1
2
3
SW4
4
ON
3. Double-check your work and be sure the System 4xi cover is on securely.
4. Install the System 4xi in its place of operation (i.e. rack), but not powered on.
__________ Changes in some switch configurations are not detected until the power is
removed at the AC cord, and then restored.
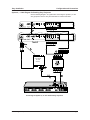
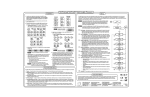
Refer to the following connection diagram and continue.
Extron • System 4xi Switcher Series • User’s Manual • P/N 68-408-02 Rev. A
Page 1