1
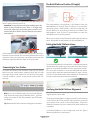
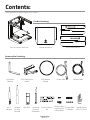
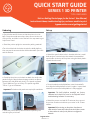
QUICK START GUIDE
SERIES 1 3D PRINTER
TYPE A MACHINES
Visit our Getting Started page for the Series 1 User Manual,
instructional videos, troubleshooting tips, and more models to print.
typeamachines.com/gettingstarted
Unboxing
Set up
• Open the box and tilt it over so that the printer is on its
back. Grasp the metal arms where they connect to the rest
of the printer, and slide it out of the box. You may want to get
help from a friend.
• Stand the printer upright to remove the packing material.
•Turn the white knob clockwise to raise the build platform,
then remove the accessories box held underneath. Open this
and the flat box.
• Gently lay the printer on its back to attach the acrylic side
panels using the large bolts and spacers (which are placed
between the side panel and printer). The panels engraved
“Type A Machines” go on the top. The panels engraved
“Series 1” go on the bottom.
Important: The bottom side panels are required for ventilation.
• Attach the spool holder to the L-bracket with the 4 small
bolts and pre-inserted nuts, then attach the assembled
spool holder to the top of the printer using the black plastictopped thumb screws.
• Press the aluminum build platform onto the standoffs,
then slide the build platform to lock it in place. Inspect each
standoff to ensure the build platform is fully engaged.
Important: The build platform standoffs are factory
calibrated and should not need to be adjusted unless
troubleshooting indicates it is necessary.
• Attach the power cord and Wi-Fi antenna, then connect
the printer via ethernet cable to your router or Wi-Fi base
station.
• Stand the printer back up and remove the yellow zip-tie
restraining the print head.
Important: Before turning on the printer, the ethernet
cable must be connected to the printer and either a router
or base station in order for the printer to configure its
network.
Page 01 of 04
Version 1.3
The Build Platform Position (Z Height)
• Ensure the button on the front panel is not depressed, then
use the power switch to turn it on.
Important: To stop all printer activity immediately, press the
button on the front panel of your Series 1. To begin using
your printer again, press the button again to return it to its
normal state, then click the ‘Connect’ button in your printer’s
web interface.
The build platform home position is the distance from the
build platform to the print head. To verify it is set correctly,
open your printer’s web interface, click the Control tab, use
the X/Y buttons to move the print head to the middle of the
build platform, then click the Z Home button to move the
build platform to the home position.
When set correctly, the tip of the print head nozzle should just
touch, but should not put pressure on the build platform.
Setting the Build Platform Home
• Place filament onto the spool holder and trim the end of the
filament to ensure a clean end. Press and hold the lever on the
right side of the print head, then insert filament until you feel
resistance, approximately the depth of the print head.
Connecting to Your Printer
To access the printer’s web interface, enter the URL shown
below into your web browser, replacing XXXX with the last
four digits of the serial number on your pritners front panel.
If you’re unable to connect, ensure you’ve entered the URL
correctly.
To set the build platform home position, rotate the black knob
shown below one quarter turn, then click the Z Home button
again to move the build platform to the new home position.
Turn the knob clockwise to move the build platform farther
from the print head and counterclockwise to move it closer,
click the Z Home button after each adjustment. Repeat until
the print head nozzle just touches the surface.
Verifying the Build Platform Alignment
Note: If you are a Windows user, you must have Bonjour
Print Services to connect your PC with the Series 1. If you are
a Mac user or your PC has iTunes installed, your PC already
has Bonjour.
Tip: Bookmark this URL to connect easily again in the future.
To achieve consistent prints the build platform must be
aligned with the print head.
To verify your build platform is aligned, use the X and Y buttons
in the Control tab of the printer’s web interface to move the
print head to each corner of the build platform. Ensure the
distances between the print head and the build surface are
consistent.
If the build platform is out of alignment, visit the Type A
Machines website for instructions.
Page 02 of 04
Version 1.3
Preparing to Print
To ensure your print adheres to the build platform, apply an
even layer of glue using the included gluestick and allow the
surface to dry to the touch before printing. An even application
of blue painter’s tape can also be effective.
Getting More Out of Your Series 1
Setting Up Wi-Fi
In the printer’s web interface click “Settings” in the top right,
then click “Network” at the bottom of the page.
Your First Print
Open the printer’s web interface. In the bottom left corner
you will see a list of files loaded on the printer. Click the
Printer icon to the right of “FirstPrint.gcode,” then click the
large blue Print button, just above.
The printer will process the file for a few moments, heat to
the specified temperature, and begin printing.
Enter or select your Wi-Fi network in the “SSID (Network
Name)” field, and enter a password if required.
After configuring Wi-Fi, click “Save”. Unplug the ethernet cable
from the printer, then restart the printer using the switch on
the back.
Tip: Once completed you can access your printer via Wi-Fi
using the same bookmark saved earlier
Monitoring the temperature: To monitor the current
temperature of the print head, click on the Temperature tab.
Next Steps
Not Printing Correctly? If the first layer is not adhering to the
surface, raise the build platform home position. If the print
head is not extruding filament and is making a clicking sound,
lower the build platform home position.
To prepare your own models to print in OS X, Windows, or
Ubuntu Linux, download our latest desktop slicing application
optimized for your Series 1 3D Printer.
Visit our Getting Started page for the Series 1 User Manual,
instructional videos, troubleshooting tips, and models to print.
Congratulations, you’re 3D printing.
Welcome to the future!
typeamachines.com/gettingstarted
Visit our web store for high quality, compatible filament,
documentation, accessories, and service offering for
your Series 1 3D Printer.
©2015 Type A Machines Inc.
This document is licensed by Creative Commons Attribution-NonCommercial-ShareAlike
(CC BY-NC-SA).
Products in this manual may be covered by US and International Patents. Type A Machines is a
registered trademark of Type A Machines Inc. Any product names mentioned in this manual are
the property of their respective parties.
Quick Start Guide 1.3
Page 03 of 04
Version 1.3
Contents:
*Parts appearance may differ slightly due to revisions
Flat Box Containing:
Your 2014 Series 1 3D Printer
Acrylic Side Panels (4)
Glass Build Platform
Accessory Box Containing:
Spool Holder
L-Bracket
Wi-Fi
Antenna
3D Printed Spool
Holder
Spatula
For Print
Removal
Glue Stick
PLA Filament
Sample
Insulated
Printer’s Wrench
(Ceramic)
Kit
Screwdriver
Page 04 of 04
Version 1.3
Power Cable
Ethernet Cable
2 Black Topped 8 Large Bolts Hex Wrenches
Thumb Screws 8 Spacers
4,3,2.5,2,1.5mm
4 Small Bolts