1
5
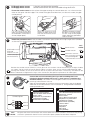
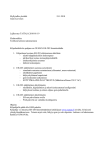
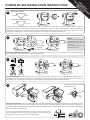
H1 Supply water sensor is already attached to the controller.
H2 Supply water sensor connect the external unit to the controller using the RJ45-2
Fasten the surface sensor to the surface of the pipe entering the network about 0.5...1.5 m from the valve
either on the top or side of the pipe. The surface of the pipe should be clean, rust free and smooth; the pipe
can be painted.
Cut the corner of the bag
open and squeeze the grease
on the bottom surface of the
sensor (cooper plate) .
6
Wrap the fastening strap
around the pipe. Make sure
that that the surface sensor
is not loose.
Wrap the strap around the pipe again if it is long enough.
Cut the strap to the proper
length along the groove between the holes.
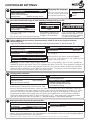
Detach the protective cover of the controller’s connection space (slides off at a right angle to the controller)
and connect the outdoor sensor to the controller.
Power source
GSM modem and
EXU-800
external unit connection (see separate instructions)
24 V
AC/DC
Outdoor sensor
Additional connections using the cord
and connecting box
(measurements 3 and 4)
Position the outdoor sensor (TMO) in a shady place on the northern side of the building at a height of about
2.5 meters. Do not install the sensor directly above a window, door, vent or sensor cable protection tube
coming from indoors, or next to an exhaust duct or any other source of heat. If necessary, the cable can be
either shortened or lengthened using a screw connector. (No special requirements for cable type).
Connect the cord and connecting box if you take something that is not
included in the basic package into use (e.g., room sensor or something else
mentioned below). The cord and connecting box can be used to connect 2 different things (measurements 3 and 4).
Open the connecting box and make the necessary connections (see the list below)
Select the use for measurements 3 and 4. (section 11) during controller initialization
(heating controller use).
7
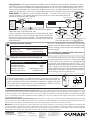
Connecting box
Wh
Bl
Re
Meas. 3
Meas. 4
Measurement 3
Not in use
TMR Room measurement
TMR / SP Room measurement
Return water
Temperatur of accumulator
Temperature of boiler
Measurement 3 (labelled)
Measurement 4
Not in use
Home/Away -switch
8
24 V
AC/DC
TMR / SP Room temp.potentiometer
Return water
TMR / P Room compensation
Temperatur of accumulator
Temperature of boiler
Measurement 4 (labelled)
Pressure alarm
Burner alarm
Pump alarm
Boiler alarm
Alarm (labelled)
Plug one end of the cord into the wall and the other end into the controller. We recommend putting
the cord in a protective sleeve. Put the connection space’s protective cover back into place.