1
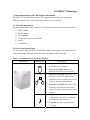
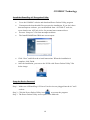
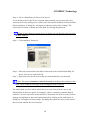
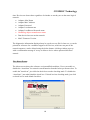
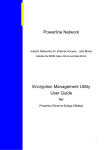
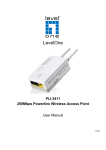
COMSOC Technology APOLCO™ - 200ETH HomePlug AV Power Line Ethernet Adapter User’s Manual COMSOC Technology Pte., Ltd. 1 COMSOC Technology Safety Summary Message WARNIING HIGH VOLTAGE is used in the equipment. Make sure equipment is properly grounded before opening. Failure to observe safety precautions may result in electric shock to user. CAUTION! Please check supplied voltage level before PLC adapter is connecting to power supplies. Out boundary of voltage level against PLC adapter electrical specification may cause in non-working and damage to equipment. 2 COMSOC Technology Important Safety Instructions Please read and follow below instructions carefully for your safety 1. To clean the APOLCO™-200ETH Power Line Ethernet Adapter, unplug adapter from the wall outlet before cleaning. 2. Do not use liquid cleaners or aerosol cleaners. Use a damp cloth for cleaning. 3. Do not use APOLCO™-200ETH Power Line Ethernet Adapter near water or any other liquid materials. 4. The APOLCO™-200ETH Power Line Ethernet Adapter should be operated from the type of power indicated on the making label or packing box. If you are not sure the type of power available, contact your dealer or local power company to get consultant. 5. The APOLCO™-200ETH Power Line Ethernet Adapter relies on the building’s electrical installation for short circuit (over current) protection. Ensure that a fuse or circuit breaker no larger than 110 VAC or 230 VAC (depends on the power supply type in your country) is used on the phase conductors (al current-carrying conductors). 6. Plug the APOLCO™-200ETH Power Line Ethernet Adapter directly into a 120 VAC or 230 VAC wall outlet which is depends on the power supply type in your country. Do not use an extension cord between the adapter and the AC power source. 7. Do not open and remove the cover the APOLCO™-200ETH Power Line Ethernet Adapter to attempt service yourself. It may expose you to dangerous electric shocks or other risks as well as ruin the product warranty. Refer all servicing to qualified service personal only. 8. Do not block air ventilation hole and slots. 9. Please use APOLCO™-200ETH Power Line Ethernet Adapter away from water. 10. The APOLCO™-200ETH Power Line Ethernet Adapter should never be placed near or over a radiator or heat Register, or in a built-in installation unless proper ventilation provided. 3 COMSOC Technology 11. Unplug the APOLCO™-200ETH Power Line Ethernet Adaptor from the wall outlet and refer the product to qualified service personnel for the following conditions: If liquid has been spilled into the product. If the product has been exposed to rain or water. If the product does not operate normally when the operating instructions are followed. If the product exhibits a distinct change in performance. User Checks This device can ONLY work with Intellon 200Mbps (HovePlug AV)devices. Any person who uses this device should look critically at the equipment they use. There is damage, apart from been light scuffed, to the cable sheath; The plug is damaged, e.g. the outlet casing is cracked or chipped or the two pins are been bent; There are inadequate joints, including joints in the cable; There is damage to casing of the equipment or there are some loose parts or screws, There is evidence of overheating (e.g. burned marks or discoloration). These checks should be undertaken by the user when the equipment is taken into use and during use. Any faults should be reported to local management and the equipment taken out of use immediately. 4 COMSOC Technology Table of Contents Warnings and Cautions ------------------------------------------------------------------ 2 Important Safety Instructions ----------------------------------------------------------- 3 Table Contents --------------------- ------------------------------------------------------ 5 1. Introductions -------------------------------------------------------------------------- 6 2. Package Contents -------------------------------------------------------------------- 7 3. Label Information and LED Lights Information --------------------------------- 8 3.1 The Label Information ----------------------------------------------------------- 8 3.2 Front Panel Status Lights -------------------------------------------------------- 8 4. How APOLCO™-200ETH work together with your network?----------------- 9 5. Installation and Connection -------------------------------------------------------- 10 5.1 Start Hardware Installation with Router -------------------------------------- 11 5.2 Start Hardware Installation with Other device ------------------------------ 11 5.3 Install the APOLCO™-200ETH Encryption Utility to setup the secured network --------------------------------------------------------------------------- 12 Contacts ----------------------------------------------------------------------------------- 20 5 COMSOC Technology 1. Introductions The APOLCO™-200ETH provides no new wires communications to any rooms, over any power line wires, at the speed of up to 200Mbps. The Ethernet port is to connect to Ethernet based device in the home or small office network. The APOLCO™-200ETH User Guide describes how to install, configure, and troubleshoot the product. The information in this manual is intended for readers with intermediate computer and internet skills. To get more information about the product features, please contact our sales office or see our COMSOC website at http://www.comsoc.com. Conventions, Formats, and Purpose 9 This manual uses the following typographical conventions. • Italics: Emphasis, books, CDs, URL names • Bold: User input 9 This manual uses the following formats to highlight special messages. • Note: This format is used to highlight information of importance or special interest. • Tip: This format is used to highlight a procedure that will save time or resources. • Warning: Ignoring this type of note may result in a malfunction or damage to the equipment. 9 Purpose: This manual is written for the APOLCO™-200ETH according to its specifications. 6 COMSOC Technology 2. Package Contents The product package should contain the following items: Depending on the package, one or two APOLCO™-200ETH Wall-Plugged Ethernet Adapter: QTY:1 for Single Pack ; QTY:2 for Twin Pack 1.83m Ethernet cable: QTY:1 for Single Pack ; QTY:2 for Twin Pack If any of the parts are incorrect, missing, or damaged, contact your APOLCO™ dealer. Keep the carton, including the original packing materials, in case you need to return the Ethernet adapter for repair. 7 COMSOC Technology 3. Label Information and LED Lights Information The APOLCO™-200ETH has a label with important information and status light indicators. Familiarize yourself with these features of your product. 3.1 The Label Information The label on the back of the APOLCO™-200ETH provides the following information: MAC address Model number Serial number Unique device password (PWD) Power Certification 3.2 Front Panel Status Lights The front panel of the APOLCO™-200ETH contains status lights. You can use them to verify connections. The table below describes the lights on the front panel. Table 1. Front Panel Status Light Descriptions Front Panel Status Light Description Power 9 Keep on Green Light: Power is supplied to the APOLCO™-200ETH. 9 Keep off green light: Power is not supplied to the APLOCO™-200ETH. 9 Keep on Green Light: The Power Line P-LNK Network is linked. The APOLCO™200ETH has detected another Power Line device on the Power Line network 9 Keep off Green Light: The Power Line Network is not linked. No other Power Line devices detected on the Power Line network. 9 Keep on Blinking: Data is being DATA transmitted or received on the Ethernet port and power line network 9 Keep Off: No data transmitting and receiving. 8 COMSOC Technology 4. How APOLCO™-200ETH work together with your network? – Explanation of hardware installation to fit in your network. You can use the APOLCO™-200ETH to extend an Ethernet local area network (LAN) anywhere in your house using your existing electrical power line. The following figure shows an example of a network that includes 3 pieces of APOLCO™-200ETH and several other network connections. PLC APOLCO ™ 85Mbps PLC PLC Power Line APOLCO ™ 85Mbps Internet ADSL MODEM Router 9 APOLCO ™ 85Mbps COMSOC Technology 5. Installation and Connection Before start hardware installation Check that these minimum requirements are met. Your Ethernet network is set up and an Ethernet LAN port is available on your router. Each computer or device to be used on your network has an Ethernet port. Warning: Do not connect the Ethernet bridges to power strips, extension cords, or surge protectors as this may prevent them from working properly or degrade the network performance. Do not tie or twist the APOLCO™-200ETH power cord with the dual output cable, or any other Ethernet cable, as this may degrade the network performance. System Requirements APOLCO™-200ETH Power Line Adaptor is applicable with all TCP/IP operating systems through the Ethernet port. Drivers are not required for this adapter. But the software for setting up of network password to establish a secured network operates only with Microsoft Windows™ operating systems. Your computer must meet the below mentioned minimum requirements in order to use the APOLCO™-200ETH Ethernet Adaptor Configuration Utility: Windows™ Operating Systems: Windows 98SE, Windows Me, Windows 2000 Windows XP, or Windows Vista with Ethernet connection Pentium III 300 MHz MMX-Compatible PC or greater 128MB hard disk space and memory Note: Your computer or the device to which you want to connect the APOLCO™200ETH Ethernet Adaptor must have an Ethernet port, i.e. a network card or a network adaptor. 10 COMSOC Technology 5.1 Start Hardware Installation with Router 1) Disconnect your router from its power adapter. 2) Plug the APOLCO™-200ETH into a power outlet. Make sure that the power outlet is not controlled by a wall switch so as to avoid someone unknowingly turning off power. Check that the APOLCO™-200ETH power LED light comes on. 3) Use the provided Ethernet cable to connect the APOLCO™-200ETH Ethernet port to an available Ethernet LAN port on your router. 4) Apply power to your router. Wait for the router to indicate that the LAN port that is connected to the APOLCO™-200ETH is linked and active. Then, check that P-LINK and DATA LEDs are on and blinking if another APOLCO™-200ETH adapter is plugged into power outlet. If another APOLCO™-200ETH adapter is not plugged into power outlet, the P-LINK LED will not on. Only the power LED and DATA LED are on. 5.2 Start Hardware Installation with Other device Hint 1: Before connecting the APOLCO™-200ETH Ethernet Adaptor, please note its Security ID / Device Password and keep it available for configuration of the network. Hint 2: Before plugging in your other APOLCO™-200ETH Ethernet Adaptor, write down the device password on the label. You will need it if you want to set up a secured HomePlug AV Power Line network. If you are working with several HomePlug AV Power Line devices, write down their MAC addresses. Note: No drivers are required for installation of the APOLCO™-200ETH Power Line Ethernet Adaptor. 1) Plug your other HomePlug AV Power Line devices into power outlets in your home near to the other computers and peripherals to be included in your HomePlug AV Power Line local area network. 2) Use an Ethernet cable to connect an Ethernet port on each of the computers and peripherals to the nearest HomePlug AV Power Line device. 11 COMSOC Technology 3) When you plug in a second HomePlug AV Power Line Ethernet Adapter into a power outlet, check the Adapter LEDs. The P-LINK LED should turns on and DATA LED briefly blinks at the same time. If you are connected with PC, PC icon for network status is enabled. If icon display with red color cross bar, connection between Adapter and PC is not established. See below picture. text text text Network Disconnected (From Windows Task Bar) (Network Disconnected) text text text Network Connected (Network connected) 5.3 Install the HomePlug AV Power Line Encryption Utility to setup the secured network (Highly Recommended) This utility gives you the option of setting a unique encryption HomePlug AV Power Line network. This utility program can be downloaded from COMSOC technology web site, www.comsoc.com. Understanding of HomePlug AV Network Password The encryption password is not case-sensitive. Each device must be set to exactly the same encryption password—if they are to communicate on the same network. HomePlug AV Power Line devices on different networks will not be able to communicate. A default button resets the encryption password to the default password HomePlugAV. The encryption password can protect your network from unauthorized access through the HomePlug AV Power Line network. A device password is printed on each APOLCO™-200ETH adapter. This is not the network password, but you must enter it if you are setting the network password with another HomePlug AV Ethernet bridge device. 12 COMSOC Technology Install the HomePlug AV Encryption Utility Go to the COMSOC website and download Power Packet Utility program. Uncompress the downloaded file to prepare the installation. If you don’t have data uncompress software, you can download from “ALTOOLS” web site, www.altools.com. ALTools is free for personal non-commercial use. Execute “Setup.exe” file from uncompressed data. The Install ShieldWizard Welcome screen opens. Click “Next” and follow the wizard instructions. When the installation is complete, click Finish. After the installation, you can see the ICON with “Power Packet Utility” like below image. Setup the Device Password Step 1. Make sure all HomePlug AV Power Line devices are plugged into the AC wall sockets. Step 2. Click the Power Packet Utility icon to execute the program. Step 3. The Power Packet Utility screen opens to the Main tab. 13 COMSOC Technology The top panel shows all local HomePlug AV Power Line devices found connected to the computer’s NIC (Network Interface Card). In most cases, only one device will be seen. In situations where there are more than one device connected, such as a USB and also an Ethernet device, the user may click to select the one to manage through and then click the Connect button to it’s right. The status area above the button indicates that your PC is connected to that same device. The lower panel displays all the HomePlug AV Power Line devices, discovered on the current logical network (remote devices). Displayed immediately above this panel is the number of remote devices found, the type of logical network (Public or Private), and a message area that reports connectivity and scan status. The following information is displayed for each of the devices discovered that appear in the lower panel. The Device Name column shows the default device name, which may be user re-defined. A user may change the name by clicking on the name and editing in-place, or by using the Rename button. The MAC Address column shows the device’s MAC address. The Password column shows the user-supplied Device Password (initially left blank). The Device Password can be found on the label at the back of the unit. A user may enter the password by using the Enter Password button (explained below). 14 COMSOC Technology Step 4. Select a HomePlug AV Power Line device. To set the Password of the device (required when creating a private network), first select the device by clicking on it’s name in the lower panel and then click on the Enter Password button. A dialog box will appear as shown as below Step 5 image. The selected device name is shown above the field for entering the password. Note: If more than one remote device is listed, you can identify each one from its MAC address. Step 5. Click and Enter Password. Step 6. Enter the password from the label on the back of the selected HomePlug AV Power Line device, and click OK. Step 7. Repeat this step for all devices that you want attached to your network. Note: The password must be entered correctly according to the printing on the label. There is NO error message if the wrong password is entered. The Add button is used to add a remote device to your network that is not on the displayed list in the lower panel, for example, a device currently on another logical network. Users are advised to locate the Device Passwords for all devices they wish to manage and add them to the local logical network by clicking on the Add button. A dialog box will appear as below image. The dialog box allows the user to enter both a Device Name and the Device Password. 15 COMSOC Technology A confirmation box will appear if the password was entered correctly and if the device was found. If a device is not found, the user will be notified and suggestions to resolve common problems will be presented. Note: The device must be present on the HomePlug AV (plugged in) in order for the password to be confirmed and added to the network. If the device could not be located, a warning message will be shown. Note: The Scan button is used to perform an immediate search of the HomePlug AV Power Line devices connected to the computer. By default the utility automatically scans every few seconds and updates the display. Setting the Privacy Screen The Privacy dialog screen provides a means for managing the local network and providing additional security. All HomePlug AV Power Line devices are shipped using a default logical network (network name), which is normally “HomePlug” for HomePlug 1.0 and Turbo devices and “HomePlugAV” for HomePlug AV devices. The Privacy dialog screen allows user to make the network private by changing the network name (network password) of devices. The user can always reset a HomePlug Power Line network to the universal one (public) by entering “HomePlug” (for HomePlug 1.0 and Turbo) or “HomePlugAV” (for HomePlug AV) as the network name or by clicking on the Use Default button. See the below image. 16 COMSOC Technology Note: Changing the network name to any other name other than HomePlug will show the network type on the main screen as Private. The Network Name is between 4 to 24 characters. Step 1. Click the Privacy tab on the main menu. Step 2. Type your Private Network Name. Step 3. Click Set Local Device Only or Set All Devices. (Privacy Screen) The Set Local Device Only button is used to change the network name (network password) for the local device only. After doing this, all the devices seen on the Main panel prior to this will no longer be able to communicate or respond to the computer, as they will be on a different logical network. Devices previously set up with the same logical network (same network name) will appear in the device list after selecting this option. The Set All Devices button is used to change the logical network of all devices that appear on the Main panel. The user must have entered the Device Password in order to set it to the new logical network. A notification message will appear to report the success of this operation. 17 COMSOC Technology Understanding of the Diagnostics Screen The Diagnostics screen shows system information and a history of all devices seen. See below image. The upper panel shows technical data concerning software and hardware on the host computer used to communicate over HomePlug AV Power Line. It shall include the following: Operating System Type/Version Host Network Name User Name MAC Address of all NICs (network interface card) Identify versions of all Driver DLLs and Libraries used (NDIS) and optionally HomePlug AV Power Line chipset manufacturer name (Turbo Only devices) MAC Firmware Version MAC addresses of all devices connected locally to the host Version of the Configuration Utility Vendor name (Diagnostics Screen) The lower panel contains a history of all remote devices seen on the computer, over 18 COMSOC Technology time. Devices are shown here regardless of whether or not they are on the same logical network. Adapter Alias Name Adapter MAC Address Adapter Password Adapter Last known rate Adapter Last Known Network name HomePlug chipset manufacturer name Date device last seen on the network MAC Firmware Version. The diagnostics information displayed may be saved to a text file for later use, or can be printed for reference for a technical support call. Devices, which are not part of the network anymore, can be deleted using the delete button. A dialog window pops up with a confirmation message if we try to delete a device whose password has been entered. For About Screen The About screen shows the software version and Released date. Users can enable or disable the “AutoScan” for network search function from the below preferences box. To enable the”AutoScan”, just click the check box to make checking mark. To disable the “AutoScan”, just make blank the check box. If check box has checking mark, just click on check box to make blank check box. 19 COMSOC Technology Contacts • ComSOC Technology Pte Ltd Singapore HQ Office 8 Boon Lay Way, #07-09 to #07-13, TradeHub21, Singapore 609964 Tel: 65-6425-2212 Fax: 65-6425-2022 • Hong Kong Office ComSOC Technology H.K. Limited Unit E, 20/f., Infotech Centre, No 21, Hung To Road, Kwun Tong, Kowloon, Hong Kong Tel: 852-2357-4753 Fax: 852-2357-9857 • China-ShenZhen Office 510-512, 5/f, China Academy of Science & Tech Development, No 1 High Tech South St, ShenZhen, China 518057 Tel: 86-755-2699-5143 Fax: 86-755-2699-5146 • Malaysia-Penang Office S-2-G Menara Northam, Jalan Sultan Ahmad Shad 10050 Penang, Malaysia Tel: 604-228-8001 / 226-8001 Fax: 604-227-7286 • Company Website http://www.comsoc.com 20