1
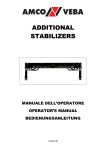
Owners manual Topper
8/2/06
12:34
Page 1
Topper Owners Manual
Owners manual Topper
8/2/06
12:34
Page 2
I
P2. Components
Each of the components of your new Topper
sailing dinghy has a special name and a place.
We recommend that you study the diagrams and
the instructions given in the handbook before
setting sail.
A.
B.
C.
D.
E.
F.
G.
H.
I.
J.
K.
L.
M.
N.
P.
Q.
R.
S.
T.
U.
V.
W.
X.
Y.
K
Halyard loop
Kicking Strap (Boom Vang)
Downhaul
Mainsheet Assembly
Bow Painter
Outhaul
Rope Horse
Clew Strop
Masthead Crane
2-part Aluminium Mast
Topper Sail Insignia
Self-Adhesive sail numbers
Mainsail
Aluminium Boom
Daggerboard
Rudder and Tiller Assembly
Tiller Extension
Locking Mastgate
Daggerboard Casing
Self Bailer
Toe Strap Cord
Side Toe Strap
Centre Toe Strap
Transom Plate
L
J
M
A
C
E
F
B
N
H
D
R
G
P
Q
Owners manual Topper
8/2/06
12:34
Page 3
S
T
U
V
W
X
Y
The Topper is built to the One-Design of Ian Proctor under
licence of the Copyright from Ian Proctor Designs Limited.
Topper is a registered Trade Mark of Ian Proctor Designs Ltd.
Owners manual Topper
8/2/06
12:34
Page 4
P4. Contents
Your Topper
The Control Lines - Identification
Sail Numbers - How to apply them
Preparing the mast
Sleeving the sail
p9.
Stepping the mast
Fitting the boom
p10.
Mainsheet & Rope Horse
Downhaul and Kicking Strap
p11.
Rudder and Daggerboard
Reefing the sail
p12.
The Topper Race Pack
p16.
Adjusting the Sail
p17.
Tuning for Performance
p18.
Car Topping
p19.
Care and maintenance
p20.
Guarantee
Join the Club! - ITCA
p21.
ITCA membership
Register of Guarantee
I.B.C.
Declaration of Conformity
back cover Topper International contact details
p5.
p6-7.
p8.
Welcome to the
Topper Class
Congratulations on becoming the owner of a brand new
Topper sailboat. We at Topper International believe that
Topper’s advanced design and sophisticated construction
process will ensure that you enjoy many years of troublefree and exciting sailing.
To enhance the enjoyment of your new Topper we
have arranged for new Topper owners to receive FREE
membership of the Topper International Class Association
for the first year of ownership.
There are many benefits and full details are included in this
Owner’s Manual.
If you should incur any problems with your Topper, our sales
staff will be pleased to offer advice and supply any spare
parts and accessories you may need. Your International
Topper Class Secretary will be pleased to advise you on the
many aspects of Topper ownership.
Owners manual Topper
8/2/06
12:34
Page 5
P5. Control lines
A Centre Mainsheet and an Aft Rigged Mainsheet are
available. The Aft Rigged Mainsheet kit is pictured below.
The Centre Mainsheet kit is pictured on page 12.
Before attempting to assemble your Topper, carefully study
the diagram on the inside front cover of this handbook and
thoroughly familiarise yourself with all the components, their
correct names and places on the boat.
If you follow these rigging instructions, stage-by-stage you
will find Topper incredibly simple and quick to prepare for
the water. When you have unpacked everything, lay out the
various control lines on the foredeck and identify them:
A.
B.
C.
D.
E.
F.
G.
H.
I.
Main Halyard Loop
Kicking Strap
Downhaul
Mainsheet
Bow Painter
Outhaul
Traveller
Daggerboard Shockcord
Toe Strap Shockcord
D
A
H
B
I
G
E
F
C
On the following pages we have continued this coding
system on the photographs so that you can immediately
identify each control line.
Owners manual Topper
8/2/06
12:34
Page 6
P6. Standard Topper
Sail numbers and
National lettering
SAIL NUMBERS (please note all measurements are
minimums)
- Should be placed on both sides of the sail with the
numbers on the starboard side being above the ones on the
port side.
- They should be placed two panels below the Top
Hat logo.
- The height of the numbers should be 230mm.
- The numbers are supplied as ‘digital eights’ from which
you can produce your own sail number.
- The preferred style of cutting numbers from ‘digital eights’
is shown below.
- There should be 45mm between each element of the
complete number.
- The numbers should be in a contrasting colour to the
white sailcloth.
STARBOARD SIDE
- The upper edge of the letters should be placed 45mm
from the upper seam of that panel.
- They should start 45mm from the back of the sail.
PORT SIDE
- The upper edge of the port letters should be 45mm below
the ones on the starboard side.
- They should finish 45mm from the back of the sail.
ATTACHING NUMBERS & LETTERS
In our experience the best way to stick
the numbers down is to peel away a
corner, line up the letter and then
attach the corner. Pull away the
backing paper slowly as you push
the number onto the sail. Fiddly
but it works!
If in doubt please ask
STARBOARD SIDE
- The upper edge of the numbers should be placed 45mm
from the upper seam of that panel.
- They should start 45mm from the back of the sail.
PORT SIDE
- The upper edge of the port numbers should be 45mm
below the starboard side numbers.
- They should finish 45mm from the back of the sail.
GBR LETTERS
- Should be placed on both sides of the sail with the letters
on the starboard side being above the ones on the port
side.
- They should be placed in the panel beneath the Top Hat
logo.
- The height of the letters should be 230mm.
- They should be pre-formed letters at least as clear as
helvetica.
- There should be 45mm between each element of the
complete letter.
- The letters should be the same colour as the sail numbers.
* NOTE: TOPPER Sail Numbers are derived from digital 8 numbers. Ten digital 8 numbers are supplied, from which any
number from 0-9 can be obtained. Above you will find a simple chart showing how to obtain the number you require.
Owners manual Topper
8/2/06
12:34
Page 7
P7. Championship
Sail numbers
If in doubt please ask
Before you sail your new boat for the first time, it is most
important to apply the self-adhesive numbers to the sail.
The sail numbers are exclusive to the boat and correspond
with the serial number/sail number plate. These are always
located inside the boat attached to the toe strap.
Follow these instructions carefully it is not a job to be
hurried.
CHAMPIONSHIP NUMBERS
(please note all measurements are minimums)
- Should be placed on both sides of the sail with the
numbers on the starboard side being above the ones on the
port side.
- The height of the numbers should be 230mm.
- The numbers are supplied as ‘digital eights’ from which
you can produce your own sail number.
- The preferred style of cutting numbers from ‘digital eights’
is shown below.
- The outside corners should be snipped as shown above.
- There should be 45mm between each element of the
complete number.
- Both sets of numbers should be in the 2nd coloured panel
from the
bottom of the sail.
- The numbers should be in a contrasting colour to the
sailcloth.
- Use white numbers on red/ dark blue/purple sail panels.
- Use black numbers on grey/ light blue/ yellow/ orange sail
panels.
STARBOARD SIDE
- The start of the number should be placed 45mm from the
leech of the sail.
- The upper edge of the number should be 45mm from the
upper seam of the panel.
PORT SIDE
- On the port side of the sail, the upper edge of the
numbers should be 45mm from the lower edge of the
starboard numbers.
- The end of the last number should finish 20mm from the
reinforcement patch.
ATTACHING NUMBERS
In our experience the best way to stick the numbers down
is to peel away a corner, line up the letter and then attach
the corner. Pull away the backing paper slowly as you push
the number onto the sail. Fiddly but it works!
Snip 2/3mm off the corner of
all championship numbers
Panel
Red
Dark Blue
Light Blue
Grey
Yellow
Purple
Orange
Number
White
White
Black
Black
Black
White
Black
Owners manual Topper
8/2/06
12:34
Page 8
P8. Preparing the
mast
Preparing the mast
1.
1. Slot the two mast sections together, making sure that the
slots in the upper section have properly engaged with the
rivets in the lower section.
sleeving the sail
1. Unfold the sail and lay it on the ground with the bottom
edge of the luff sleeve adjacent to the top of the mast.
2. Insert the mast into the luff sleeve and pull the sail down
the mast. If it is windy, keep your back to the wind!
Sleeving the sail
2.
3. Continue until the whole sail is sleeved and the masthead
has appeared through the top of the sail.
4. Use the Halyard Loop to attach the sail to the top of the
mast as shown.
5. Tuck any surplus rope neatly inside the luff sleeve and
insert the burgee into the special socket.
2-3.
4.
A
A
Owners manual Topper
8/2/06
12:34
Page 9
Stepping the mast
Stepping the mast
1-2
1. Point the Topper into the wind, support the mast at a 45
degree angle and engage the base of the mast into the cup
under the mastgate.
2. Walk the mast forward into an upright position, ensuring
that the collar is underneath the mastgate.
4.
3.
3. Pull the cord to close the gate.
4. Push the toggle in firmly to lock.
Fitting the boom
Fitting the boom 1.
1. Engage the gooseneck end of the boom on to the mast
immediately above the collar.
2. Thread the outhaul (F) through the boom end fitting as
shown, knotting the end securely.
3. Thread the inboard end of the outhaul through the kicking
strap eye and then through the tube cleat on the underside
of the boom.
4. Engage the outhaul and clew strop hooks in the clew
cringle of the sail. Tighten and cleat the outhaul.
3.
2.
F
4.
F
F
Owners manual Topper
8/2/06
12:34
Page 10
P10. Mainsheet and
traveller rope
Mainsheet and traveller rope
1.
G
1. Thread the traveller rope (G) through the eyes on the
stern of the boat, through the loop in the rope end and
down through the cleat on the aft of the bulkhead. Tie a
stop knot in the end.
2. Shackle the mainsheet block on to the rope traveller,
making sure that the shackle itself - and not the pin runs on the rope.
2.
D
3. Attach the other mainsheet block to the boom end with
the cotter pin and split ring as shown.
4. Lead the free end of the mainsheet forward and tie a
stop knot in the end.
3.
D
4.
Downhaul and
kicking strap
D
1. Clip the kicking strap hook onto the webbing strop’s
metal ring on the underside of the boom.
2. Clip the downhaul hook through the webbing eye on the
sail. And attach opposite end with carbine hook to kicking
strop on lower mast as shown.
3. Attach the kicking strap block to the ring on the mast
webbing strop with the split pin. One end of the kicking
strap rope is attached to the block.
Downhaul & kicking strap
1.
B
2.
2 - 3.
C
F
B
Owners manual Topper
8/2/06
12:34
Page 11
P11. Rudder and
daggerboard
Rudder
1 - 2.
G
1. Bolt the tiller to the rudder blade ensuring that it is adjusted
correctly as described in the maintenance section.
2. With the blade in the raised position, pass the tiller under the
traveller and lower the rudder on to the transom fitting. Ensure
that it is completely home and that the spring retaining clip has
engaged to prevent the rudder becoming detached in the event
of a capsize. The blade is lowered by lifting and pushing back on
the tiller. Lower the tiller again when the blade is vertically down.
3. With the shockcord (I) provided on the boat, tie the toe straps
tightly towards each other. When not in use - you can stow the
daggerboard behind one of the toe straps.
4. The daggerboard is retained in the desired position by the
tension of the shockcord (H) creating a forward wedging action in
the daggerboard housing. Loop the shockcord round the mast
between the webbing strap and mastgate and clip onto itself with
the hook. Pass free end of shockcord through the top of the hole
in the daggerboard rim. Tie a retaining knot having first adjusted
the tension to suit.
Reefing the sail
The Topper sail can be quickly reduced in size by furling it around
the mast. This will make the boat more manageable for novices
and children as they can set precisely the amount of sail that they
can confidently handle. As ability increases so can the sail area.
Consider two rolls around the mast as the minimum.
Disconnect the kicking strap and tidy it on the downhaul cleat.
Ease outhaul, laying loose end over boom and rotate the mast
ensuring that the downhaul and halyard are revolving inside the
boom gooseneck. Three complete rolls will reduce sail area by
over 30%.
Re-connect the kicking strap and tension the outhaul.
The Topper will remain perfectly balanced although
obviously less lively.
For a Worlds Race Rigged Topper follow instructions but first
ensure that the downhaul is fed through the inside of the
gooseneck and is tight enough for only the rope strop to run
inside. You should also disconnect the 4:1 outhaul blocks at the
ring on the webbing strap attached to the boom to give a straight
rope connection and more rope for reefing. Clip the hook onto the
outhaul rope for neatness.
3.
I
4.
H
Owners manual Topper
8/2/06
12:34
Page 12
P12. Topper Worlds
Race Pack
The all new Topper Worlds Race Pack exploits the class
rules and modern technological advances to give the racing
sailor full and easy control of his rig.
You can customise your Topper by purchasing a Worlds
Race Rig either with your new Topper or as an accessory.
In principle the rigging instructions for setting up the
Standard and Race Rigged versions of the Topper are the
same. This section aims to highlight the areas that differ.
control lines
Begin by laying out the Race Rig items and
identifying them all:
A. Centre-mainsheet system
B. 3:1 kicker system
C. 6:1 downhaul system
D. 4:1 outhaul system
E. 2:1 traveller system
F. Halyard loop
G. Bow painter
H. Toe Strap Shockcord
I. Daggerboard Shockcord
J. Measurement stickers
A
B
H
G
F
I
J
D
E
C
Owners manual Topper
8/2/06
12:34
Page 13
3:1 kicker system
To rig the 3:1 Worlds Kicker System (B) firstly attach the
smaller block with the twisted shackle onto the metal ring
on the underside of the boom. Then clip the main kicking
strap block to the mast.
(The kicker should be supplied pre-rigged as described
here; One end of the kicking strap rope attached to the
block on the boom. The rope runs down to the main block
and under the sheave at the top of this block then back up
over the sheave on the boom block and then back down
and through the main block and out through the jamming
cleat. And a loop handle tied into the end of the rope).
2:1 halyard loop
(see notes and images on page 7)
4:1 outhaul
To rig the 4:1 outhaul (D), drill a hole through the gooseneck
and attach block with stopper knot.
Attach the outhaul carbine hook in the clew cringle of the
sail. Thread the outhaul line through the boom end fitting
and tie off with a figure of eight knot. Feed line through
boom end fitting as illustrated. Using the remaining line in
pack D attach the carbine to the kicker fitting, lead the rope
back along the boom to the block attached to the rope
from the sail clew. This line is then brought forward through
the cam cleat through the pulley to allow adjustment from
the cockpit.
drill hole through gooseneck and
attach block with stopper knot
clamcleat with loop
attached to adapter plate
attach adapter plate with 5mm monal rivets supplied.
use original v cleat holes
Owners manual Topper
8/2/06
12:34
Page 14
To attach the 6:1
downhaul
This is set up ready, all you need to do is attach the carbine
hook with the single block on it to the webbing loop
towards the front of the sail and the carbine clip with two
pulleys to the kicker fitting on the mast.
Centre-mainsheet
system
The extra length mainsheet (A) features a ratchet block
which fits on the back of the daggerboard and three other
blocks, one on the traveller, one on the outer end of the
boom and the final one on a short length of rope behind the
kicking strap webbing.
1. Attach the becket block onto the boom end fitting with
the short rigging link supplied and the simple loop-top block
onto the traveller rope with the forged shackle.
Lead the mainsheet as follows:
Tie the mainsheet to the becket of the block attached to the
end of the boom.
2. Take the free end of the mainsheet down through the
block attached to the traveller, from front to back, and back
up through the boom end block from the rear.
Owners manual Topper
8/2/06
12:34
Page 15
Centre-mainsheet
system (continued)
3. Lead along the boom, through the sailcloth loop, and
then through the block hanging just behind the kicker.
4. Finally take the mainsheet down to the ratchet block,
making sure it clicks as you feed it through.
Tip; Tie a stopper knot in the rope at a point so that it is in
the helmsmans hand when the boom is at a 90 degree
angle to the boat.
This PolyLite type mainsheet is constructed to prevent
knots forming in use. The construction requires lanolin
which is best removed before use. A low temperature
washing machine program is fine. Occasionally allow the
rope to trail over the side to prevent twists building up.
The blocks will continue to give excellent service if washed
regularly.
2:1 Traveller
To rig the 2:1 Traveller system firstly attach the clamcleat to
the aft of the bulkhead (replacing the standard cleat). The
traveller is tied across the back of the boat with a bowline
(with a long tail). Tie loop in tail. Feed the tail down to cleat
and round the pulley (see below). Then feed back up to
the loop and then back down and through the clamcleat.
Tie a stop knot in the end. You can now pull the bowline
tight over the tiller arm.
measurement
stickers
Three measurement stickers are provided so sail
settings can be readily remembered. To apply pull the
outhaul to maximum tension with sail rigged. Then apply
the graduated stickers onto both sides of the boom with the
no.9 against the block and the no.1 facing towards the end
of the boom. On the lower mast stick the graduated sticker
vertically 5cm above the gooseneck collar in line with the
kicking strap attachment eye.
Owners manual Topper
8/2/06
12:35
Page 16
P16. Adjusting the sail
Your new sail is made from the highest quality Dacron
material which has exceptional durability and resistance
to stretching. These properties ensure that your sail will
retain its shape throughout its long life.
Follow the simple setting instructions given below to obtain
optimum performance from your sail throughout the range of
wind strengths.
The basic principles
In strong winds it is best to have a flat sail, achieved by
using lots of downhaul and lots of kicker but keeping some
shape in the bottom of the sail with the outhaul.
In medium winds it is best to have a full sail, achieved by
using no downhaul, only a little kicker and by having the
outhaul at a looser setting.
In light winds a flat sail is needed again. Achieve this with
the outhaul set quite tight. Do not use downhaul or much
kicker in these conditions.
v. light force 0-2
Kicker – sheet in the mainsheet so the mainsheet blocks are
200mm apart.
Take up the slack on the kicker.
Downhaul – none.
Outhaul – tight but not so tight that there is a crease in the
foot of the sail.
Traveller – Tight but just loose enough that the shackle can
slide across the tiller without catching.
Hunting for extra
power force 2-4
Kicker – sheet in the mainsheet so the mainsheet blocks are
75mm apart.
Take up the slack on the kicker plus a little more.
Downhaul – none.
Outhaul – so there is a maximum distance from the boom
to the sail of about your hand length.
Traveller – very tight.
being overpowered
force 4-6
Kicker – as much as you can pull on.
Downhaul – as much as you can pull on.
Outhaul – tight but just little enough to maintain a curvature
in the foot of the sail.
Traveller – very tight.
These are a guide only. Much depends on your experience,
weight and strength.
In waves you will need a fuller sail – use less outhaul for a
given windstrength.
Owners manual Topper
8/2/06
12:35
Page 17
P17. Tuning for
performance
The performance of the Topper gives very exciting racing,
yet her simplicity and handling qualities make it quite
feasible for those with little experience to sail competitively.
The class rules aim to ensure that the one-design principles
of the class are maintained and the racing is a true test
of the helmsman’s sailing skills. No one is able to gain
advantage by making expensive modifications or adding
sophisticated or specialised gadgets.
However, although the rig is very simple there is some
scope for tuning to improve performance which is given in
these notes. More detailed information can be obtained
from the Dave Cockerill and John Caig Sailing book which
is recommended for both the novice and the expert.
sail foot tension
Outhaul: In light winds the tension on the foot of the sail
should be less than in strong wind but never slack.
For windward sailing the sail should never be baggy. In
moderate winds, tension the foot of the sail so that it is just
pulled into horizontal creases at the foot. In light winds ease
the outhaul so that the creases just disappear.
footline
For sails with a footline, with the outhaul pulled slightly
tension the footline so that the edge of the sail just curls.
rope traveller
This controls the position the boom takes up relative to the
boat when the sheet is pulled hard in. In stronger winds
going to windward, the boom should be out towards the
corner of the stern. This is achieved by tightening up the
traveller as hard as possible so that the mainsheet slides
across easily from one side to another. In light winds going
to windward you may choose to let out the traveller so that
the mainsheet does not travel so far across the boat.
The position of the boom is of course also controlled by
the mainsheet itself, but the tension of this is constantly
under adjustment, whereas the traveller is only occasionally
adjusted to suit the general prevailing conditions.
Owners manual Topper
8/2/06
12:35
Page 18
kicker
car topping
This is an important piece of equipment as it not only
improves performance by controlling the shape of the sail,
it also helps to prevent uncontrollable gybes. The function is
to hold down the boom and control the tension in the leech
of the sail and reduce inefficient twist.
Your Topper is simplicity itself to carry on the roof rack.
A tighter kicking strap is required in strong winds. Push
down on the boom with one hand and haul in on the
kicking strap with the other and jam it. In light winds the
kicking strap should be just tight when the sail is hauled in
when going to windward. It will then be just about right for
running and reaching.
Always secure the straps or ropes around the bars.
For the best performance use sufficient tension to
pre-bend the mast so the sail takes up an even curve
close to the mast.
daggerboard
This should be fully down when going to windward in light
airs, but may be raised slightly for windward sailing in strong
winds. It can be raised about half way when reaching and
nearly all the way when running.
Take care when the board is raised, not to gybe and hit it
with the kicking strap - or it may cause a capsize.
rudder
The rudder blade should generally be fully down. In very
light airs, beating to windward, it may help to push the
boat round from one tack to another if the blade is raised
two notches. The strains on the rudder assembly are
considerably increased when the rudder blade is partially
raised, so do not sail with it partly up in strong winds at full
power. Only use in partially raised position in strong winds
when negotiating shallows at reduced speed.
self bailer
This clears the water from the cockpit by suction under the
hull. It pays to have the self-bailer operating and the boat
kept free of water and as light as possible, but the bailer in
the operating position does cause drag, so it is best to have
it open only if it is really needed.
Load the boat upside down, bow forwards and ensure that
the front bar supports the boat immediately behind the aft
end of the foredeck.
Ensure that both the bow and the stern are tied down
tightly to the car’s bumpers. The spars can be neatly carried
alongside the boat. If you have a launching trolley, this can
also be carried on the upside down hull of the Topper or
packed down in the boot.
Owners manual Topper
8/2/06
12:35
Page 19
P19. maintenance
Very little maintenance is required to your Topper, but some
care and attention will produce better sailing performance.
Hull and deck
The polypropylene from which the hull and deck are
moulded is very strong but can be scratched so avoid
pulling the boat over shingle or scraping it on anything
hard and always try to rig the boat on a reasonably soft
surface.
The moulding material has special additives to provide
resistance to the effects of ultra-violet light, but very
prolonged exposure to strong sunlight may affect the
surface over the period of a number of years. Therefore
it is recommended that you cover the boat or store it in the
shade.
Tiller extension
No maintenance is required but check that the universal
linkage is secure.
Rudder Pintle on Hull
This is the stainless steel transom plate on which the rudder
pivots. Check occasionally that the fixing screws are secure
and that there is not undue wear on the pivot pin.
Mastgate
Keep washed out and free from grit and sand. Do not
lubricate.
Top mast
This is designed to be water tight. The upper end fitting
is sealed in with mastic and the lower end is plugged. It
is difficult to check the top mast for leakage and the only
practical way is by prolonged immersion.
Static electricity on a polypropylene surface attracts dust.
The harder you rub it with a duster the more dust will stick.
So it is best to wash it or try an anti-static polish.
Lower mast and boom
An annual check of screw tightness is a good discipline, but
be careful not to overtighten.
Sail
Mast Cup
Clean out the grit and sand. The base of the cup can may
get worn from the repeated movement of the mast heel. If
the cup becomes worn, remove the central screw holding
the cup in position and fit a replacement cup and disc. Do
not tamper with the bolt beneath the cup.
Self bailer
Keep clean and wash out grit. Ensure screws are tight but
be careful not to overtighten.
Drainplug
It is recommended that this is removed at night and for
winter storage.
Rudder
The rudder blade is intended to stay down in the fully lowered
position when the tiller is lowered onto the pillar of the
rudder stock (aluminium casting). If the rudder blade hits a
submerged object hard, the blade will force the tiller to slide
up on the pillar to allow it to move forward, thus releasing a
locking mechanism and letting the rudder blade come up.
In order to do this correctly - yet not allow the blade to
come up during normal sailing - the friction at the joint
between the tiller and rudder must be adjusted correctly.
This is done by adjusting the spring nut on the tiller pivot
bolt. You must get this right by trial and error. It is also
important that the bearing surfaces between the locking
pegs on the tiller and the notches on the rudder stock pillar
are smooth and clean, otherwise the tiller will not slide
upwards when the rudder blade hits an obstacle.
Check screws and rivets on fittings regularly.
The sail is very strong and will not rot, but can be spoiled
by unsympathetic use. Occasionally wash any salt off the
sail with fresh water with a hose, do not use a washing
machine. Dry and fold carefully. Roll up the folded sail
and stow it in its bag. If you crumple up the sail or stuff it in
the bag unfolded you are liable to breakdown the smooth
surface of the cloth and affect the performance of the sail.
It will not ruin it but it will become less efficient.
Blocks
Wash these occasionally and keep them free from grit. Do
not lubricate.
Ropes
Check these occasionally for chafe and wear and tear.
Storage
The Topper may be stood on its transom, providing pintle
and gudgeon are kept clear of the ground. It can be slung
in straps or stored upside down in the same way that it is
supported on a roof rack. If the hull is put in a rack the right
way up, it is important to ensure that the forward support
lies directly under the mast step, and that the load is spread
as much as possible.
Owners manual Topper
8/2/06
12:35
Page 20
International topper register of guarantee
guarantee
Please refer to terms and conditions of sale.
Please complete and return your register of guarantee.
3-year hull
warranty
conditions
Topper International Ltd warrants to the original retail
purchaser that each boat will be free from defects in
material and workmanship under normal use and service
for a period of three years (36 months) from date of
delivery to said purchaser.
This warranty does not cover defects or breakages caused
by misuse, owner error or omission.
Within this three year period, warranty repairs will be
made by Topper International at its premises or at the
option of Topper International by an authorised Topper
International dealer.These repairs will be made at no charge.
The transportation costs are the sole responsibility of the
boat owner.
Notice of each warranty claim must be submitted in writing
to Topper International within a reasonable period of time
after discovery of any claimed defect and must be approved
by an authorised representative of Topper International who
will determine whether the claim is valid or/ and covered by
this limited warranty and whose decision shall be final.
Any boat which has been subjected to misuse, negligence
or accident, or that has been used for commercial or
rental use, or that has been operated contrary to accepted
good boating practice is not covered by this warranty. This
warranty does not cover loss of time, inconvenience, loss of
use of boat or any other expenses incurred.
parts warranty
conditions
All equipment or accessories which are not manufactured
by Topper International whether or not warranteed by such
other manufacturers are guaranteed for a period of twelve
months.
join the club
Topper is one of the world’s largest and fastest growing
dinghy classes!
We are so sure that you will want to keep in touch with the
Topper scene internationally that, for the remainder of the
year in which you bought your new Topper we are offering
you a FREE membership of the International Topper Class
Association.
ITCA will send you regular newsletters and a magazine
containing information on Topper activities and regattas,
technical advice and sailing and rigging hints.
ITCA will put you in touch with Topper sailors in countries to
which you may be planning a visit.
ITCA will offer you a range of clothing and accessories
designed specially for the Topper sailor.
ITCA will liaise between your own national or regional
Association, other regional Topper Associations and
International Yachting Administrators.
Free membership is available now to first year owners.
Contact the International Topper Class Association at
ITCA (GBR) 17 Woods Hill Lane, Ashurst Woods,
West Sussex, RH19 3RW or telephone on01342 311873.
We will then directly process your membership.
Owners manual Topper
8/2/06
12:35
Page 21
Ê
ITCA membership
Welcome to Topper Sailing!
Welcome to what is probably one of the world’s largest and
still fastest-growing dinghy class. To keep you in touch with
the Topper scene internationally, ITCA (International Topper
Class Association) will allow you free subscription for the
remainder of the year in which you bought your Topper.
your membership card and details of many other benefits of
ITCA membership.
So when you buy a Topper, you are not just treating
yourself to the best small boat in the world - you are also
becoming part of the exclusive Topper family.
Just fill in the form below and return it to us; we will pass it
on immediately to your National Secretary for processing
and you will then receive your first copy of Topper Times,
To: Topper International Ltd, Kingsnorth Technology Park, Wotton Road, Ashford, Kent TN23 6LN
Please enroll me as a full member of the International Topper Class Association.
Name
Age (if under 21)
Address
Daytime telephone number
Mobile number
Evening telephone number
Topper Sail number
Deck Colour
Date purchased
Where purchased
Sailing Club
Signed
Date
Register of Guarantee
I have just bought the following Topper and wish this to be registered for the guarantee:
Sail Number
Colour
Date purchased
Where purchased
What prompted you to buy a Topper? (please tick from list below)
Advertisement
Boat Show
Sailing Club
Demo Day
Local Topper Centre
Friend
Other (please specify)
Who will be using this Topper? (please tick from list below)
Adult Male
Adult Female
Child
What price did you pay? £
If Child (please state age)
Family
Did you part exchange YES/ NO
Please send me a Topper Accessories and Parts List
Name
Address
Daytime telephone number
Return to: Topper International Ltd, Kingsnorth Technology Park, Wotton Road, Ashford, Kent TN23 6LN
Owners manual Topper
8/2/06
12:35
Page 22
Owners manual Topper
8/2/06
12:35
Page 23
P22. declaration
of conformity
Principal Dimensions Dimensions Principales Hauptabmessungen Dimensioni Principali Dimensiones Principales
Declaration of conformity
This craft has been designed and constructed in accordance with the Essential Safety Requirements of the Recreational Craft Directive:
(94/25/EC) for Design Category C.
Déclaration de conformité
Cette embarcation a été conçue et construite conformément aux obligations Essentielles de Sécurité de la Directive des Bateaux de
Plaisance: (94/25/CE) pour la Catégorie de conception C.
Konformitätserklärung
Dieses Boot wurde in Ubereinstimmung mit den grundlegenden Sicherheitsforderungen der Sportboote Richtlinie: (94/25/EC) für
Konstruktionsklasse C entwickelt und konstruiert.
Dichiarazione di Conformità
Questo scafo è stato disegnato e costruito in accorda con i Reqisiti essenziali di Sicurezza del recreational craft Directive: (94/25/EC) per il
Disegno della Categoria C
Declaración de Conformidad
El presente barco se ha diseñado de acuerdo con la Directiva (94/25/EC) titulada Requisitos de Seguridad Esenciales para Barcos de Uso
Recreativo para la Categorîa de Diseño C.
Issued on behalf of Topper International Ltd. CE0609
Martin Fry, Managing Director
Martin Fry
ENG
Boat
Principal Dimensions
Design Type Length Category
Monohull Sailing Dinghy C
FRA
Monohull Sailing Dinghy C
Monohull Sailing Dinghy C
Longueue de la coque
Charge maximum
ML
160kg
Nombre de personnes max
CL
2
3.40m
Höchstlast
ML
160kg
Besatzung Maximale
CL
2
maximo
ML
160kg
di personne
CL
2
scarico
Lh
43kg
máxima
ML
160kg
de personas
CL
2
sin carga
Lh
43kg
Poids à vide
Lh
43kg
Rumpflange
3.40m
Leersgewicht
Lh
43kg
Dimensioni Principali
Categoria
Monohull Sailing Dinghy C
ESP
Unladen weight
Lh
43kg
Hauptabmessungen
Kategorie
ITA
Max no. of persons
CL
2
Dimensions Principales
Catégorie
DEU
3.40m
Max load of hull
ML
160kg
scafo
3.40m
Dimensiones Principales
Categoria
Monohull Sailing Dinghy C
Eslora
3.40m
Owners manual Topper
8/2/06
12:35
Page 24
Topper Owners Manual
Topper International Ltd
Kingsnorth Technology Park
Wotton Road
Ashford
Kent TN23 6LN
Telephone 01233 629186
Fax 01233 645897
email [email protected]
www.toppersailboats.com
International Topper Class Association
ITCA (GBR)
17 Woods Hill Lane
Ashurst Woods
West Sussex
RH19 3RW
Telephone 01342 311873