1
ADDO/Facit
N1068
NC Satellite
U s e r ’ s
M a n u a l
Edition 2.0
Contents
1.
1.1
1.2
1.2.1
1.2.2
Introduction………………………………………………
How to start the N1068…………………………………....
Selection of mode………………………………………….
Off Line Mode (standard operations)……………………...
Remote Mode……………………………………………...
1
2
4
4
4
2.
Keyboard………………………………………………..….
5
3.
3.1
3.1.1
3.1.2
3.1.3
3.1.4
3.1.5
3.1.6
3.1.7
3.1.8
3.1.9
3.1.10
3.1.11
3.1.12
3.1.13
3.1.14
3.1.15
3.1.16
3.1.17
3.1.18
3.1.19
3.1.20
3.2
3.2.1
3.2.2
3.2.3
3.3
3.3.1
3.3.2
3.3.3
3.3.4
3.4
3.4.1
3.4.2
3.4.3
3.4.4
Functions…………………………………………..……….
Parameter setup…………………………………...…………
Interface……………………………………………...………
Code…………………………………………………...…….
File Mark…………………………………………...………..
Baud Rate………………………………………...………….
Protocol……………………………………………..……….
XOFF=13/93………………………………………..……….
Stop bits…………………………………………...…………
Undo………………………………………………...……….
Automatic name…………………………………...…………
EOB-character……………………………………...………..
Leader………………………………………………..………
Leader character…………………………………...…………
Trailer………………………………………………………..
Trailer character………………………………...……………
Extension………………………………………...…………..
M98P……………………………………………...…………
Backlight…………………………………………...………..
Set Date………………………………………...……………
Set Time……………………………………...……………...
Saving the parameters……………………...………………..
List/Capacity………………………………...……………….
List files (Shorts)………………………...…………………..
Viewing a file / Long file names…………………………….
Capacity...................................................................................
Input……………………………………………………….....
Input with new name (Figures)………………………………
Input with new name (Alphanumeric)………………………
Input, Overwrite……………………………………………..
Input, Automatic filename generation……………………....
Output……………………………………………………….
Output of single File…………………………………….......
Creating Output list……………………………………..…..
Output of old list…………………………………….……...
Output of subfiles……………………………….…………..
6
7
7
8
8
10
10
10
11
11
11
12
12
13
13
13
14
14
14
15
15
15
16
16
16
16
17
17
18
18
19
21
21
21
22
22
I
7D9C16a
3.5
3.5.1
3.5.2
3.6
3.6.1
3.6.2
3.6.3
3.7
Delete……………………………………………..…………
Delete single File……………………………..……………..
Delete All Files……………………………..……………….
Directory List……………………………..…………………
List Directories………………………..…………………….
Move Current Directory……………..………………………
Create a New Directory……………………………………..
Show Directories Tree………………...…………………….
4.
4.1
4.2
Interface……………………………….…………………... 26
V.24/RS-232-C serial interface…….………………………. 26
Current Loop interface..………..…………………………… 27
5.
5.1
5.2
5.3
5.4
Protocol…………………………..…………………………
DC-codes…………………………..………………………..
XON/XOFF………………………..………………………..
Hardware……………………………..……………………..
NC……………………………………..……………………
28
28
28
29
29
6.
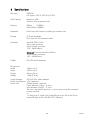
Specifications…………………………..…………………..
30
7.
7.1
7.2
7.3
7.4
7.5
Error codes………………………..……………………….
Disk Errors……………………..……………………………
Parameter Errors……………..……………………………...
Interface Errors…………..………………………………….
Input/Output Errors................................................................
Other Errors………………………………………………....
31
31
32
32
33
34
II
23
23
23
24
24
24
25
25
7D9C16a
1 Introduction
ADDO/Facit N1068
The
is a light weight, portable unit intended for
storing and transferring NC-programs in connection with NC-equipment and computers.
The medium for storing data is a USB-Disk (USB-Drive).
Three types of file system can be used, one with FAT12, two with FAT16, and the other
with FAT32. The capacity of a USB-Disk less than 4GB can be used.
The ADDO/Facit N1068 is not available to Format a USB-Disk, Copy Data files and
Delete Directories.
The ADDO/Facit N1068 is available to use sub-directories however the files transferred
with output of files from a list or with output of files by sub-program function must be
stored on the same directory.
The maximum number of files and directories stored on the root directory is 511.
The maximum number of files and directories stored on a sub-directory is 509.
The maximum number of directory passes on a USB-Disk is 32767.
When the parameter values are stored on the disk, the values are saved into the current
directory as a file named “parm”.
Changing current directory, the parameter values are automatically read into the RAM if
the file named “parm” will exist in the alternated directory and then the parameter values
in the RAM are used.
This “User’s manual Edition 2.0” applies for the System program version later than V.J30.
Power adapter
The ADDO/Facit N1068 has no built in Power Supply. Power can be fed in three ways:
1. Either via a chassis connector on the upper short side of the ADDO/Facit N1068.
In this case an external Mains Adapter has to be used, capable of delivering 9-24V DC,
10W. See section 6 Specifications.
2. Via pin 9 of the 9-pins RS-232-C Interface cable i.e. from the host.
3. Via pin 25 of the 25-pins RS-232-C Interface cable i.e. from the host.
1
7D9C16a
1.1
How to start the N1068
At delivery the ADDO/Facit N1068 has installed English version.
1. Connect the Mains adapter to the Mains outlet.
2. Connect the DC connector from the Mains adapter to the ADDO/Facit N1068
or
3. Connect a V.24/RS-232-C cable having +24V connected at pin 9 or pin 25 (See
section 4 Interface) to the V.24/RS-232-C connector
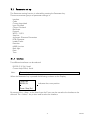
4. Turn the N1068 ON. The display shows:
Welcome to
ADDO/Facit N1068
L.0916c
RAM Test:xxxK
5. Finished RAM Test:512K.
If a System disk is inserted, the Display shows:
ADDO/Facit N1068
Loading System
from USB-Disk
If a System disk not is inserted, the Display shows:
ADDO/Facit N1068
Loading System
from Flash ROM
6. When the System program is loaded the Display shows:
N1068.
V.XXXrr
Ready off Line
Remote<Protocol>
<Date> HH:mm:ss
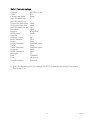
7. At delivery a Default Parameter Set is stored into the internal C-MOS RAM.
Check if these parameters are OK for your purpose (See table below), otherwise
proceed to the Parameter Set Up, (Section 3.1).
2
7D9C16a
Default Parameter settings
Interface:
Code:
Current Loop Mark:
Input File Mark Start:
Input File Mark End:
Output File Mark Start:
Output File Mark End:
Input File Mark Include:
Baud Rate:
Protocol:
XOFF-value:
Stop Bits:
Automatic name:
EOB-Character:
Leader:
Leader Character:
Trailer:
Trailer Character:
Extension:
M98P Command:
Back light:
Date:
Time:
Save Parameters:
RS-232-C (V.24)
ISO
Ready
%
%
None
None
Yes
9600
XON/XOFF
0x13h
1
No
CR-LF
None
Feed hole (NUL)
None
Feed hole (NUL)
NWD
None
On
YYMMDD
HH:mm:ss
Store disk
8. Select the desired function, for example OUTPUT, by pressing the proper Function key.
(See section 3.4)
3
7D9C16a
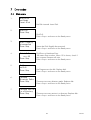
1.2
Selection of mode
When the ADDO/Facit N1068 is started 2 modes can be selected:
Off line or Remote.
Default is always OFF line, which is N1068 started operation.
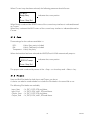
1.2.1 In Off line (Default mode) all standard operations can be immediately accessed.
To change mode press <Step> and cursor moves to Remote:
N1068.
V.XXXrr
Ready off Line
Remote<Protocol>
<Date> HH:mm:ss
Now press <Select> and displays changes to:
N1068.
V.XXXrr
Remote<Protocol>
Press Stop
<Date> HH:mm:ss
Press <Stop> to go back to OFF line mode.
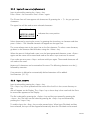
1.2.2 Remote mode
Remote Mode means that the selected remote protocol can be used.
There are now three protocols available.
Special information is available for the remote protocols.
4
7D9C16a
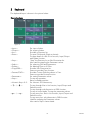
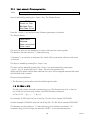
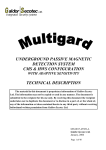
2
Keyboard
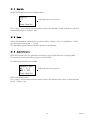
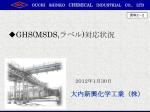
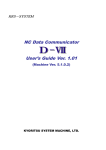
The keyboard layout is shown in the picture below.
Operation keys:
Figure 2
<Input>:
<Output>:
<List>:
<Enter>:
<Step> :
<Select>:
<Delete>:
<Copy/DIRL>:
<Format/CWD>:
<Parameter>:
<Stop>:
<Numeric Keys>0-9:
<↑> / <↓>:
<←> / <→>:
For input of data.
For output of data.
Provides a Directory list.
To enter File Names (Digits or Letters).
To show detail of a file in List function, Input/Output
and Delete function.
“Step” the Directory list or Sub-Directories list.
Also used for stepping the Parameter values.
For selecting Files and Parameters.
For deleting One or All Files.
Provides Sub-Directories list.
Does not provide Copy function.
Provides Current Directory shown in Tree.
Does not provide Format function.
For setting Parameter values.
To stop an operation.
Return to Ready position.
For Numeric File Name entry.
To step through files in List function, Input/Output and
Delete function.
To step through sub-directories in DIRL function.
To step in Letter Mode, To step the parameter values.
To step every four files in List function, Input/Output and
Delete function.
To step every four sub-directories in DIRL function.
Used for stepping the Parameter values.
Also used to step in Letter Mode.
5
7D9C16a
3
Functions
The functions of the ADDO/Facit N1068 can be divided into two groups.
1. Parameter setting
Interface
Code
Current Loop Mark
Input File Mark
Output File Mark
Baud rate
Protocol
XOFF=13/93
Stop bits
Automatic Filename Generation
EOB-Character
Leader/Trailer
Extension
M98P function
Back light
Date
Time
2. File handling
Input
Output
List
Capacity
Delete
6
7D9C16a
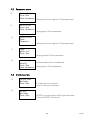
3.1
Parameter set up
The Parameter setting function is selected by pressing the Parameter key.
There are seventeen groups of parameter settings i.e.
Interface
Code
Current Loop Mark
Input File Mark
Output File Mark
Baud rate
Protocol
XOFF=13/93
Stop bits
Automatic Filename Generation
EOB-Character
Leader/Trailer
Extension
M98P function
Back light
Date
Time
3.1.1
Interface
Two different Interfaces can be selected:
RS-232-C (V.24), Serial
Current Loop 20mA, Serial
Note:
Current Loop is optional.
When the Parameter key is pressed the following is shown on the Display:
Interface
RS232C/CL
indicates the cursor position
Press Step/Sel.
By means of the <Step> or the Arrow keys the Cursor can be moved to the Interface to be
selected. The <Select> key is then used to select the Interface.
7
7D9C16a
When Current Loop has been selected, the following parameter should be set:
CL Mark=
Ready/Busy
indicates the cursor position
Press Step/Sel.
When Ready is selected the READY status of the current Loop interface is indicated/sensed
as Current.
When Busy is selected the BUSY status of the current Loop interface is indicated/sensed as
Current.
3.1.2
Code
Three settings for the code are available i.e.
ISO:
8 bits, Even parity included
EIA:
8 bits, Odd parity included
Transparent: 8 bits, No parity
When the Interface has been selected the ADDO/Facit N1068 automatically steps to:
Code
ISO/EIA/Transp.
indicates the cursor position
Press Step/Sel.
The proper code is selected by means of the <Step> or Arrow keys and <Select> key.
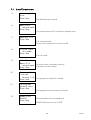
3.1.3
File Mark
Start and End File Marks for both Input and Output can be set.
A choice can also be made whether to include the File Marks in the saved file or not.
The following File Marks are available;
Input, Start
Input, End
Output, Start
Output, End
: %, DC1, DC2, STX and None.
: %, DC3, DC4, M30, ETX and None.
: %, DC1, DC2, STX and None.
: %, DC3, DC4, M30, ETX and None.
8
7D9C16a
The Display shows;
For Input Start File Mark:
Input File Mark
Start
%/DC1/DC2/STX
None
indicates the cursor position
For Input End File Mark:
Input File Mark
End
%/DC3/DC4/M30
ETX/No
indicates the cursor position
For Output Start File Mark:
Output File Mark
Start
%/DC1/DC2/STX
None
indicates the cursor position
For Output End File Mark:
Output File Mark
End
%/DC3/DC4/M30
ETX/No
indicates the cursor position
The File Marks are stepped to by stepping with the <Step> or the Arrow keys and selected
with the <Select> key.
When the Input File Marks have been set, the Display shows:
Input File Mark
Include
Yes/No
Press Step/Sel.
indicates the cursor position
YES or NO is selected by means of the <Step> and <Select> keys.
When YES is selected the Input File Marks will be stored in the file.
When all File Marks have been set, the ADDO/Facit N1068 will proceed to BAUD RATE.
9
7D9C16a
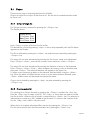
3.1.4
Baud Rate
The Display shows:
Baud Rate
150/300/600
1200/2400/4800
9600/19200/38400
indicates the cursor position
The <Step> or the Arrow keys are used to step to the desired Baud Rate which is then
selected by the <Select> key.
3.1.5
Protocol
When the Baud Rate has been set the Display shows:
Protocol
DC-Codes
XON/XOFF
Hardware NC
indicates the cursor position
Four different protocols can be selected.
DC-Codes
XON/XOFF
Hardware
NC
The <Step> or the Arrow keys are used to step to the desired Protocol which is then
selected by the <Select> key. See section 5 Protocols.
3.1.6
XOFF=13/93
In Transparent mode the XOFF can be set to either 13 Hex or 93 Hex.
The Display shows:
Transpar. Input
Sel. XOFF code
13Hex/93Hex
Press Step/Sel.
indicates the cursor position
The <Step> or the Arrow keys are used to step to the desired XOFF value which is then
selected by the <Select> key.
10
7D9C16a
3.1.7
Stop bits
When XOFF has been set the Display shows:
Stop bit
1/2
indicates the cursor position
Press Step/Sel.
The <Step> or the Arrow keys are used to step to the desired number of Stop bits which is
then selected by the <Select> key.
3.1.8
Undo
When the parameter has been set by means of the <Select> key, it is possible to “Undo”
this setting by pressing the <↑>key.
The parameter group last set will then appear on the Display.
3.1.9
Automatic name
With this function you can generate a filename in the N1068 from the incoming data.
This function is only active during input to the N1068.
The following settings are available.
Automatic name
NO / % O
PGM L DFS,
Press Step/Sel.
indicates the cursor position
NO is the default value.
The <Step> or the Arrow keys are used to step to the desired value which is then selected
by the <Select> key.
11
7D9C16a
3.1.10 EOB-character
The Display shows:
EOB Character
CR-LF LF-CR
LF-CR-CR CR LF
Transparent
indicates the cursor position
A parameter to convert CR-LF (carriage return, line feed) to one of the parameters above
during output from N1068.
During input the N1068 looks for the first CR or LF and this character is converted to CRLF.
Transparent means no conversion of EOB character.
The <Step> or the Arrow keys are used to step to the desired EOB-characters.
Press the <Select> key and you move to the next parameter in the parameter list.
3.1.11 Leader
The Display shows:
Leader
None
Quantity:
Press Step/Sel.
indicates the cursor position
With this parameter you select the number of characters sent before a file (leaders), during
output from N1068.
The <Step> or Arrow keys are used to step between None (no leaders) and quantity.
If none is desired, step to None and press the <Select> key.
You move to the parameter trailer.
If leader is desired, step to quantity, press <Enter> and input the number of characters.
The number can be between 1-512. Enter 1, 2 or 3 digits and press the <Enter> key.
You move to the next parameter in the parameter list.
The default value for Leader is None.
Leader
Quantity:100
Press Step/Sel./
Ent then 000-512
indicates the cursor position
If a quantity is selected and you want to change to None, Press the <Step> key and press
the <Select> key. You move to the parameter trailer.
12
7D9C16a
3.1.12 Leader character
The Display shows:
Leader Character
Feed hole (NUL)
Delete (FF)
Press Step/Sel.
indicates the cursor position
By using the <Step> key you can toggle between NUL (Feed hole) and FF (Delete). Press
the <Select> key to confirm, and you move to the next parameter in the parameter list.
3.1.13 Trailer
The Display shows:
Trailer
None
Quantity:
Press Step/Sel.
indicates the cursor position
The same procedure as for leader but instead of before, the trailer are sent after the file.
3.1.14 Trailer character
The Display shows:
Trailer Characte
Feed hole (NUL)
Delete (FF)
Press Step/Sel.
indicates the cursor position
The same procedure as for leader character.
The trailer can be either NUL (Feed hole) or FF (Delete).
13
7D9C16a
3.1.15 Extension
There is a parameter to select automatic extension as follows:
Extension
NWD
New
Press Step/Sel.
indicates the cursor position
NWD is default. Press <Step> to go to New. Press <Select> and <Enter> and you will
go into Character mode (See Chapter 3.3.4).
If no extension is wanted press <Enter> and New Extension will be blank. If New
extension is wanted insert maximum 3 characters as New Extension and press <Select>to
confirm each character. (For more information how to enter characters see page 22,
chapter 3.3.2 Input with new name (alphanumeric)).
3.1.16 M98P Command
There is a parameter to select how to handle M98P Command.
The <Step> or the Arrow keys are used to step to the desired handling procedure.
Press the <Select> key and you move to the next parameter in the parameter list.
The default value for M98P Command is None.
3.1.17 Back light
The <Step> key is used to step between back light ON/OFF which is then selected by the
<Select> key.
Back Light
On/Off
indicates the cursor position
Press Step/Sel.
Back light OFF means that back light is switched off, when Remote mode is used.
You then normally have no need for the display.
14
7D9C16a
3.1.18 Set Date
Step to method and select by pressing the <Select> key.
Set Date
YYMMDD/DDMMYY
MMDDYY
Press Step/Sel.
indicates the cursor position
Press <Enter> and enter 6 digits and press <Enter>.
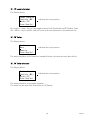
3.1.19 Set Time
Press <Enter> and enter 6 digits and press <Enter>.
Set Date
YYMMDD 091210
HHmmss 211008
Ent then Time
Midnight is 00:00:00.
Default for Date and Time is Japanese Standard Time.
Date and Time appear in the Ready menus.
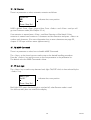
3.1.20 Saving the Parameters
When the last group of parameters has been set the Display will show:
Save Parameters
Store Disk
Store Internally
No
The <Step> key is used to step between the three values and is then selected by pressing
the <Select> key.
“Store Disk” means that the parameter values are stored into the current directory on the
disk. “Store Internally” means that the parameter values are stored internally in C-MOS.
“No” means that the parameter values not are stored.
When the N1068 is started the parameter values are read into the RAM if there is a
parameter file in the root directory on the disk. If not, the parameter values in the C-MOS
are read into the RAM. And then the parameter values in the RAM are used.
15
7D9C16a
3.2
List/Capacity
The List function is used to see which files are stored in the current directory on the Disk
and to find out the remaining capacity of the Disk.
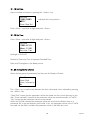
3.2.1
List files (Short)
Press <List>, the first 4 files appear on the Display:
AAAAAAAA YYMMDD
BBBB.NWD YYMMDD
XXXXXXXX.XYYMMDD
ZZZZZ.Z
YYMMDD
indicates the cursor position
When filename with extensions is in full length the date
will overwrite part of the Extension.
Press <Step> or <↑> or <↓> to step into the file list.
Press <→> and the next 4 files will be displayed.
Press <←> and the previous 4 files will be displayed.
By pressing the <Enter> key you can display extended file information and view the file
contents. (See Chapter 3.2.2 Viewing a file / Long file names)
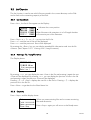
3.2.2
Viewing a file / Long file names
The Display shows:
NNNNNNNN.EXT
YY-MM-DD HH:mm
Size:xxxxxxxxxx
Data line 1
By pressing <→> you can display the next 4 lines in the file and pressing it again the next
4 lines will be displayed. By pressing <←> you can display the previous 4 lines in the file
and pressing it again the previous 4 lines will be displayed.
Pressing <↓> or <Step> displays the next file in the file list. Pressing <↑> displays the
previous file in the file list.
Press <Enter> to get back to the Short Name List.
3.2.3
Capacity
Press <Stop> and the display shows:
Files: xxx (rrr)
Total:tttttttttt
Space:ssssssssss
Press Stop
Where xxx means existing files and rrr means remaining
files and directories.
Press <Stop> again you will return to the Ready-menu.
16
7D9C16a
3.3
Input
Input to the ADDO/Facit N1068 can be done in three ways.
Creating a new file with new name with figures or letters overwriting an old file and
automatic filename generation.
3.3.1
Input with new name (Figures)
The input is started by pressing the <Input> key. The Display shows:
Input<RS232
Overwrite:Step
New Name:Enter
Press Step/Enter
<Enter> is pressed and the N1068 then asks for the File Name.
The File Name can be maximum eight digits long. The N1068 will add the extension
NWD or selected.
For example, File Name entered: 12345678, actual File Name: 12345678.NWD.
The File Name is entered by pressing the proper digit keys and then pressing the <Enter>
key.
When the File Name has been entered the input starts by pressing the <Input> key.
If the File Name already exists in the current directory on the USB-Disk the following
message appears:
Input<RS232
File exists
New Name:Step
Overwrite:Select
The input is monitored on the Display by showing the transferred number of Bytes.
The input can be halted by pressing the <Stop> key and restarted by pressing <Input>.
To end the Input the <Stop> key must be pressed twice. When Input File Mark end has
been selected, the input will be stopped automatically when the File Mark end is sensed.
When the input is finished the total File length will be shown on the Display.
17
7D9C16a
3.3.2
Input with new name (alphanumeric)
Input is selected by pressing the <Input> key.
Press <Enter> for new name. Press <Enter> again.
The 2 lower lines will now appear with characters. By pressing the <↑> key you get more
characters.
The upper line will be used to enter selected characters:
Enter File Name:
ABCDEFGHIJKLMNOP
QRSTUVWXYZ012345
indicates the cursor position
Select characters by moving the cursor, by pressing the Arrow keys, to character and then
press <Select>. The Selected character will appear on the upper line.
The cursor always starts in the upper line on the first character. To select a new character,
go down in the character field and select using the <Select> key.
When the name is finished and cursor is on the latest generated character, press <Enter>
again and the name will be stored and used as file name. Input continues as normal.
If you make an error press <Stop> and start with Input again. The entered characters will
not make a file name.
Maximum 8 characters can be entered as file name. The following character must be (.),
followed by extension.
If no extension is defined an automatically defined extension will be added.
See Extension. (3.1.15)
3.3.3
Input, overwrite
Input is selected by pressing the <Input> key.
The <Step> key is then pressed and the name of the first file in the current directory on
the
disk will appear on the Display. The <Step> key or Arrow keys is then used until the file to
be overwritten appears on the Display.
The file is selected by pressing the <Select> key and the input started by pressing the
<Input> key. The Input can be halted by pressing the <Stop> key and restarted by
pressing the <Input> key.
To end the Input the <Stop> key must be pressed twice. When Input File Mark end has
been selected, the input will be stopped automatically when the File Mark end is sensed.
18
7D9C16a
3.3.4
Note:
Input, automatic filename generation
Automatic filename generation must be selected in the parameter set up.
Input is selected by pressing the <Input> key. The Display shows:
Input<RS232
Overwrite:Step
New Name:Enter
Auto Name:Select
Press the <Select> key and automatic filename generation is selected.
The Display shows:
Input<RS232
Autoname
Space:xxxxxxxxxx
Press Input
This function gives you the possibility to name a file from the incoming data.
The filename can be maximum 11 characters long.
“Autoname” is a name for a temporary file, which will be overwritten when the real name
is received.
The Input is started by pressing the <Input> key.
The Input can be halted by pressing the <Stop> key and restarted by pressing the
<Input> key. To end the Input the <Stop> key must be pressed twice.
When Input File Mark end has been selected, the input will be stopped automatically when
the File Mark end is sensed.
There are two possibilities:
1. The filename is written after one of the following file marks:
/, %, O, PGM, L, DFS,
The file mark used is selected in parameter set up. The filename has to be in the first
line of the file and must only contain valid DOS filename characters,
A-Z a-z 0-9 $ ‘ - @ { } ~ ` ! # ( ) &
For example: %1000 (the first line of the file). This file will be named 1000.NWD.
Another example: PGM5555 (the first line of the file). This file will be named 5555.NWD.
The filename can be maximum 11 characters long. If the filename is between 1-8
characters long, the file will get the extension “NWD”, or the selected extension.
19
7D9C16a
If the filename is 9 characters long, the file will get the extension “X”, where character X is
the last character in the filename.
If the filename is 10 characters long, the extension will be “XX”.
If the filename is 11 characters long, the extension will be “XXX”.
Another example: DFS,12345678901. This file will be named 12345678.901.
If no filename is written after the selected file mark or if no correct file mark exists, the file
will be named “1.ERR” and if there already is a file with this name “2.ERR” etc.
2. The automatic filename can also be generated from one line of the file. The filename
then must be entered between brackets and started with /.
For example:
N10 G0
N20 (/WHEEL)
This file will be named WHEEL.NWD
Another example:
N10 G0
N20 (/AAAABBBBCCC)
This file will be named AAAABBBB.CCC
20
7D9C16a
3.4
Output
There are two ways of outputting files from the N1068;
Output of single file or output of files from a list. The list can be created and then saved
for future use.
3.4.1
Output of single file
The Output function is selected by pressing the <Output> key.
The Display shows:
Output>RS232
File:Press Step
Name:Press Enter
List:Press List
Press <Step> to output a file from the list of files.
The desired file is found by pressing <Step> or Arrow keys repeatedly until the File Name
appears on the Display.
The File is selected by pressing the <Select> key and the output started by pressing the
<Output> key.
The output file can also be selected by entering the file numeric name on the Keyboard.
Press <Output><Enter>, enter the file numeric name and press <Enter><Output>.
The output file can also be selected by entering the filename in letters on the Keyboard.
Press <Output><Enter><Enter>, select characters by moving cursor to character and
then press <Select>. The selected character will appear on the upper line.
To select a new character go down in the character field and select using the <Select>
key. When the name is finished and the cursor is on the latest character selected, press
<Enter> and the name will be stored and used as file name.
Output can be halted by pressing the <Stop> key and restarted by pressing the
<Output> key.
3.4.2
Creating output list
The creating of an Output list starts by pressing the <Output> and then the <List> key.
Press the <Step> key to create a new list. The <Step> or Arrow keys are used to find the
first file of the list. When the file is found it is selected by the <Select> key. The selection is
indicated by a number e.g. (001) added to the file name. To continue the creation of the
list, the <Step> and <select> keys are used.
When the list is complete all selected files are sent by pressing the <Output> key.
The list can be saved, when the files have been sent, pressing the <Enter> key.
21
7D9C16a
3.4.3
Output of old list
An old list can be sent by pressing <Output>, <List> and <Select> and then pressing
the <Output> key.
3.4.4
Output of subfiles (subprograms)
A file including subfile can look like this:
ABCD.NWD (filename)
N10 G01X10Y5
N20 G02
*-SUB1.NWD (subfile)
N30 G63X10Y20
SUB1.NWD shall be called
Several subprograms can be called from the main program.
The subprogram can call another subprogram.
Note:
Maximum eight levels.
Output of files including subfiles is done in the same way as Output of single file (3.4.1).
A “*-“ in the beginning of a line indicates that a subfile shall be called.
Another example:
O1234 (filename)
N10 G01X10Y5
N20 G02
M98P0001 (subfile)
N30 G63X10Y20
O0001 shall be called
A “M98P“ in the beginning of a line indicates that a subfile shall be called.
Note:
M98P Command must be selected in the parameter set up. (See 3.1.16)
Several subprograms can be called from the main program.
The subprogram can call another subprogram.
Note:
Maximum eight levels.
22
7D9C16a
3.5
Delete
Either a single File or All files can be deleted.
Press the <Delete> key.
The Display shows:
Delete
File:Press Step
Name:Press Enter
All:Press Delete
3.5.1
Delete single file
Press <Step> key and the desired file is found by pressing <Step> or Arrow keys
repeatedly until the File Name appears on the Display.
Press <Select> key and then <Delete> key.
or
Press <Enter>, enter the file numeric name and press <Enter><Delete>.
or
Press <Enter><Enter>, enter the filename in letters (see 3.3.4 how to enter filename in
letters) and press <Enter><Delete>.
3.5.2
Delete all files
Press the <Delete> key.
The Display shows:
Delete All Files
Are you sure?
Yes:Delete
No:Stop
Press the <Delete> key again to delete all files in the current directory on the Disk.
If not delete all files, press the <Stop> key and you will return to the Ready-menu.
23
7D9C16a
3.6
Directory List
The Directory List function is used to see which directories are stored in the current
directory on the Disk, move current Directory to another Directory and create a new
Directory.
3.6.1
List directories
Press <DIRL>, the first 4 lower directories appear on the Display:
AAAAAAAA YYMMDD
BBBB.CCC YYMMDD
XXXXXXXX.XYYMMDD
ZZZZZ.Z
YYMMDD
indicates the cursor position
When directory name with extensions is in full length the
date will overwrite part of the Extension.
Press <Step> or <↑> or <↓> to step into the directory list.
Press <→> and the next 4 directories will be displayed.
Press <←> and the previous 4 directories will be displayed.
3.6.2
Move current directory
By pressing the <Select> key you can move current directory down to the lower directory
indicated by the cursor position.
The Display shows one upper and the first three lower directories.
..
EEEEEEEE YYMMDD
FFFFFFFF.GYYMMDD
JJJ
YYMMDD
indicates the cursor position
When directory name with extensions is in full length the
date will overwrite part of the Extension.
When the cursor locates on the .. position, press the <Select> key and then you can
move current directory up to the upper directory.
Press <Step> or <↑> or <↓> to step into the directory list.
Press <→> and the next 4 directories will be displayed.
Press <←> and the previous 4 directories will be displayed.
24
7D9C16a
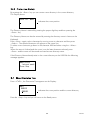
3.6.3
Create a new directory
By pressing the <Enter> key you can create a new directory in the current directory.
The Display shows:
Enter Dir. Name:
indicates the cursor position
The Directory Name is entered by pressing the proper digit keys and then pressing the
<Enter> key.
The Directory Name can also be entered by entering the directory name in letters on the
Keyboard.
Press <Enter> again, select characters by moving cursor to character and then press
<Select>. The selected character will appear on the upper line.
To select a new character go down in the character field and select using the <Select>
key.
When the name is finished and the cursor is on the latest character selected, press
<Enter> and the name will be stored and used as new directory name.
If the Directory Name already exists in the current directory on the USB-Disk the following
message appears:
Name exists
<entered name>
Press Stop
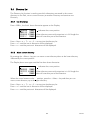
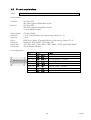
3.7
Show Directories Tree
Press <CWD>, the Directories Tree appears on the Display:
ROOT
SUBDIR1
SUBDIR2
indicates the cursor position and the current directory
Press the <Stop> key and you will return to the Ready-menu.
25
7D9C16a
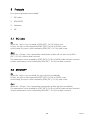
4
Interface
The ADDO/Facit N1068 is equipped with two Interfaces i.e. one serial and one current
loop interface. The different interfaces are described below.
Interfaces
1.
Serial V.24/RS-232-C
2.
20mA Current Loop
4.1
V.24/RS-232-C serial interface
Data bits:
Stop bits:
Parity:
Protocols:
Baud rates:
Connectors:
7 or 8. (Controlled by the Code setting, Section 3.1.2)
1 or 2.
Odd, Even, None. (Controlled by the Code setting, Section 3.1.2)
Hardware, XON/XOFF, DC-Codes, NC
150, 300, 600, 1200, 2400, 4800, 9600, 19200 and 38400 Baud.
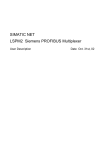
9-pin male DB-type and 25-pin female DB-type.
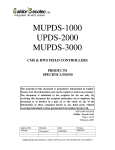
Pin configuration:
9-pin
25-pin
N1068 use
Male
Female
1 FG
In → 1 CD
6 CD Ready/Busy (1) for output *
In → 2 RD
3 RD
Input
Out ← 3 TD
2 TD
Output
Out ← 4 RTS
4 RTS Ready/Busy for input
5 SG
7 SG
Signal Ground
In → 6 DSR
8 DSR Ready/Busy (2) for output *
Out ← 7 DTR 20 DTR Always High
In → 8 CTS
5 CTS Ready/Busy (0) for output *
In → 9
25
DC+9 ~ 24V external power
* With internal pull up to +10V. Any of these inputs may be used
for Ready/Busy signaling for the Output function.
Dir.
26
7D9C16a
4.2
Current Loop interface
Note:
Current Loop Interface is optional.
20mA Passive
Transmit:
Receive:
(A). Data (TD)
(B). Status signals (Ready/Busy levels)
(C). Data (RD)
(D). Status signals (Ready/Busy levels)
i.e. four different loops.
Status signals:
Data bits:
Stop bits:
Parity:
Protocols:
Baud rates:
Connector:
Current=Ready
7 or 8. (Controlled by the Code setting, Section 3.1.2)
1 or 2.
Odd, Even, None. (Controlled by the Code setting, Section 3.1.2)
Hardware, XON/XOFF, DC-Codes, NC
150, 300, 600, 1200, 2400, 4800, 9600, 19200 and 38400 Baud.
25-pin female DB-type.
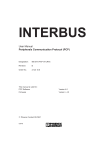
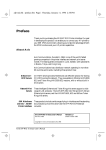
Pin configuration:
Dir.
In
In
In
In
Out
Out
Out
Out
→
→
→
→
←
←
←
←
Pin
14
15
13
18
16
17
19
23
Signal
Receive Data, + current
Receive Data, - current
Transmit Status, + current
Transmit Status, - current
Transmit Data, + current
Transmit Data, - current
Receive Status, +current
Receive Status, - current
RD+
RDCTS+
CTSTD+
TDR/B+
R/B-
27
7D9C16a
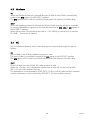
5
Protocols
Four types of protocols are available:
1.
DC-codes
2.
XON/XOFF
3.
Hardware
4.
NC
5.1
DC-codes
IN
When the <Input> key is pressed, a XON (DC1, 0x11h) code is sent.
At busy, the input is then stopped by XOFF (DC3, 0x13h or 0x93h) is sent.
And at ready, the input is then restarted by XON (DC1, 0x11h) code is sent.
OUT
When the <Output> key is pressed the transmission of data will not start until a XON
(DC1, 0x11h) code has been received.
The transmission is then stopped by XOFF (DC3, 0x13h or 0x93h) code has been received.
And the transmission is then restarted by XON (DC1, 0x11h) has been received.
5.2
XON/XOFF
IN
When the <Input> key is pressed, the input will start immediately.
At busy, the input is then stopped by XOFF (DC3, 0x13h or 0x93h) is sent.
And at ready, the input is then restarted by XON (DC1, 0x11h) code is sent.
OUT
When the <Output> key is pressed the transmission of data will start immediately.
The transmission is then stopped by XOFF (DC3, 0x13h or 0x93h) code has been received.
And the transmission is then restarted by XON (DC1, 0x11h) has been received.
28
7D9C16a
5.3
Hardware
IN
When the Hardware protocol is selected the Input of data to the N1068 is controlled by
means of the RTS signal of the RS-232-C interface.
The RTS signal is HIGH when the N1068 is Ready and LOW when the N1068 is Busy.
OUT
When the Hardware protocol is selected the Output of data from the N1068 is controlled
by means of Ready/Busy signals from the host are monitored at CTS, DSR or CD signals of
the RS-232-C interface.
When they are Not Connected they are held at +10V (HIGH) by internal pull-up resistors
of 10KΩ. See section 4 interface.
5.4
NC
NC is a combined protocol which means one type for output and one type for input as
follows:
IN
Input of data to the N1068, Hardware protocol is used.
The Input of data is controlled by means of the RTS signal of the RS-232-C interface.
The RTS signal is HIGH when the N1068 is Ready and LOW when the N1068 is Busy.
OUT
Output of data from the N1068, DC-codes protocol is used.
When the <Output> key is pressed the transmission of data will not start until a XON
(DC1, 0x11h) code has been received.
The transmission is then stopped by XOFF (DC3, 0x13h or 0x93h) code has been received.
And the transmission is then restarted by XON (DC1, 0x11h) has been received.
29
7D9C16a
6
Specifications
Disk type
USB Disk
File system: FAT12, FAT16 or FAT32
Disk Capacity
Maximum 4GB
Partition: Primary partition only
Memory
DRAM:
512KByte
Flash-ROM: 512KByte
Keyboard
Eleven keys for functions including ten numeric keys.
Display
LCD with backlight.
Four lines with 16 characters each.
Interfaces
Serial RS-232-C/V.24:
9-pin male connector
25-pin female connector
150 – 38400 Baud
Optional Current Loop Passive/20mA:
25-pin female connector
150 – 38400 Baud
Codes
ISO, EIA and Transparent
Dimensions:
Width
Depth
Height
Weight
126mm (5 in)
205mm (8 in)
60mm (2.4 in)
1.2Kg (2.6 lb)
Supply Voltage:
DC IN 9-24V, Mains adapter
Power consumption 10W, Maximum
Power inlet
Coaxial chassis connector.
Outer diameter of plug: 5-6mm.
Inner diameter of plug: 2.1mm.
The unit is not polarity sensitive i.e. plus or minus may be connected
to inner terminal.
or
+9-24V at pin 9 of the 9-pin male DB type or pin 25 of the 25-pin
female DB type of the V.24/RS-232-C Interface.
30
7D9C16a
7
7.1
1.
2.
3.
Error codes
Disk errors
Disk Drive
not Ready
Insert Disk
Disk Full
Press Stop
Disk illegally
disconnected
Press Stop
4.
Disk I/O Error
err=-XX
Press Stop
5.
No Programs
on Disk
Press Stop
6.
7.
Too many
Directory Paths
Press Stop
Too many Entries
in a Directory
Press Stop
No Disk inserted. Insert Disk.
Disk Full.
Press <Stop> and return to the Ready-menu.
Sense that Disk illegally disconnected.
Press <Stop> and return to the Ready-menu.
Disk Error or Hardware Error.
-XX means Error number. When -25 is shown, check if
any incorrect filename will exist.
Press <Stop> and return to the Ready-menu.
No Programs on the disk. Replace disk.
Press <Stop> and return to the Ready-menu.
There are too many directory paths. Replace disk.
Press <Stop> and return to the Ready-menu.
There are too many entries in a directory. Replace disk.
Press <Stop> and return to the Ready-menu.
31
7D9C16a
7.2
8.
9.
10.
11.
12.
7.3
13.
14.
Parameter errors
Framing Error
Press Stop
Check Parameters
Parity Error
Press Stop
Check Parameters
Overrun Error
Check
Parameters
Input
Buffer Full
Press Stop
Data Code Error
Data=XX
Press Stop
Check Parameters
Wrong baud rate or stop bits. Check parameters.
Wrong parity. Check parameters.
Wrong baud rate or stop bits. Check parameters.
Wrong protocol. Check parameters.
XX means data value in hexadecimal.
Wrong parity. Check parameters.
Interface errors
Current Loop
Not Ready
Press Stop
RS-232C
Not Ready
Press Stop
Current loop not connected.
Insert Current loop connector
RS-232C not connected or BUSY signal from host.
Connect RS-232C. Check host.
32
7D9C16a
7.4
15.
16.
17.
18.
19.
20.
21.
22.
Input/Output errors
Input length 0
Error
Press Stop
Name exists
<entered name>
Press Stop
Read Only File
Press Stop
File not found
<file name>
Press Stop
No data has been received.
The entered name of File or Directory already exists.
File write protected.
Remove write protection or insert new disk.
File not found.
It’s Directory
Name a File
<entered name>
Press Stop
Directory name is entered incorrectly.
Filename must be entered.
Necessary file
is missed
<missing file>
Press Stop
Sub-program or listed file is missed.
Sub-programs
exceed 8 nests
Press Stop
BINARY Error
Data=XX
Press Stop
Sub-programs must be maximum 8 levels.
XX means data value in hexadecimal
BINARY Data error occurs at FAPT.
33
7D9C16a
7.5
23.
Other errors
RTC err
Press Stop
RTC Hardware error.
24.
Load System
FPROM error
Press Stop
Flash-ROM Hardware error.
34
7D9C16a
Edition 2.0: December 10, 2009
ADDO-Japan Corporation
Home Page: http://www.addo-japan.com
Inquiry: http://www.addo-japan.com/contact.html
Shin-Edobashi Bldg. 4F, 8-6 Nihombashi Kobuna-cho,
Chuou-ku, Tokyo 103-0024 JAPAN
TEL:
+81 (3) 5652-1715
FAX:
+81 (3) 3660-5650
7D9C16a