1
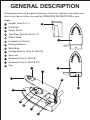
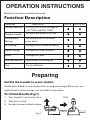
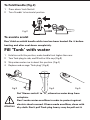
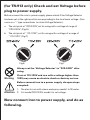
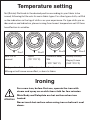
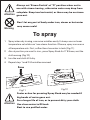
Travel Iron
Model No: TR-913/TR-913-SV
Household only!
INSTRUCTION MANUAL
IMPORTANT SAFEGUARDS
When using your iron, basic safety precautions should always be followed
to reduce the risk of fire, electric shock, and injury to persons, including the
following
READ ALL INSTRUCTIONS BEFORE USING
1. Use this appliance only for its intended use as described in this manual.
2. Use a power supply as which indicated on rating label.
3. <Only for model TR-913> Before connect the iron to a power supply, please
check and make sure the voltage selector have set to a proper voltage. The
wrong set may destroy the iron, even injury to person, or you can’t perform
the iron with expectant function.
4. When placing the iron on its stand, ensure that the surface on which the
stand is placed is stable’.
5. The iron must be used and rested on a stable surface.
6. To protect against a risk of electric shock, do not immerse the iron in water
or other liquids. (Picture)
7. The iron must be unplugged from the socket-outlet before filling ‘tank’ with
water and emptying, or when not in use.
8. Do not allow power cord to touch hot surface.
9. The dial knob should always be turned to “0” before unplugging from outlet.
10. Never yank the cord to disconnect from outlet; instead, grasp plug and pull
to disconnect.
11. To avoid electric shock, don’t grasp cord plug with wet hand.
12. The appliance is not intended for use by children or other persons without
assistance or supervision if their physical, sensory or mental capabilities
prevent them form using it safely. Children should be supervised to ensure
that they do not play with the appliance. (Picture)
13. The iron must not be left unattended while it is connected to power supply.
14. Burns can occur from touching hot metal parts, hot water, or steam. Use
caution when you turn a steam iron upside down -there may be hot water in
the reservoir. And never perform steam ironing directly to person. (Picture)
15. Let the iron cool completely before storing.
16. Do not use outdoors.
17. Do not use another high wattage appliance on the same circuit.
18. If the supply cord is damaged, take to manufacturer, or its service agent or
similar qualified person to replace it in order to avoid a hazard.
19. The iron is not to be used if it has been dropped, if there are visible signs of
damage or if it is leaking.
20. If the iron malfunction, the iron is not operating normally, do not
disassemble the iron, take it to a qualified serviceman for examination and
repair. Incorrect reassemble can cause a risk of electric shock when the iron
is used.
SAVE THIS INSTRUCTION
MANUAL
GENERAL DESCRIPTION
Following pictures list the general features of the iron. And you can easily know
how to use the iron after you read the OPERATION INSTRUCTIONS in next
pages.
13
1 Handle, Tank (2 in 1)
2 Dial Knob
3 Steam Switch
4 Tank Plug, Spray Knob (2 in 1)
5 Water Guide
12
6 (handle)Lock Switch
7 Heating Indicator
8 Main Body
9 Voltage Selector (Only for TR-913)
10
Spray Let
11
Soleplate (Only for TR-913)
12
Soleplate (Only for TR-913-SV)
13
Cup
4
11
1
10
5
9
8
3
2
7
6
OPERATION INSTRUCTIONS
Read all instructions carefully before use.
Function Description
Functions
Foldable Handle
Description
Can use this iron with voltage of
110~120V and 220~240V
To save place when not in use.
Temperature
Setting
Set temperature for different
types fabric
Dry Ironing
Ironing without steam and spray.
Steam Ironing
Ironing with steam function.
Spray
Ironing with spray.
Heating Indicator
Light when iron heating up
Cup
Tool to refill tank
Voltage Selection
TR-913
TR-913-SV
Preparing
Unfold the handle to work station
Handle been folded to save the place for carrying and storage. Before use, you
need Unfold it, before storage, you can fold it to save place.
To Unfold Handle (Fig.1)
1. Turn ‘Handle’ to vertical position.
2. Then hear a “click”
3. Handle has been locked in place.
Fig.1
Click
To Fold Handle (Fig.2)
1. Press down ‘Lock Switch’
2. Turn ‘Handle’ to horizontal position.
Fig.2
To avoid a scald:
Don’t fold or unfold handle while iron has been heated. Do it before
heating and after cool down completely.
Fill ‘Tank’ with water
1.
2.
3.
4.
Hold iron with this position, make handle front higher than rear.
Turn Tank plug to side, and fill with a little cup. (Fig.3)
Stop when water rise to about this position. (Fig.4)
Replace and arrange “Tank plug”. (Fig.5)
Fig.3
Fig.4
Fig.5
Set ‘Steam switch’ to “O”, otherwise water drop from
soleplate.
Don’t make water overflow in order to protect against
electric shock caused. If have made overflow, clean with
Attention
dry cloth. Don’t pull Tank plug heavy: may be pull out it.
(for TR-913 only) Check and set Voltage before
plug to power supply.
Before connect the iron to power supply, please check if the Voltage Selector
has been set at the right position corresponding to the local main voltage. (Use
a coin or a “-” type screw driver to rotate Voltage Selector.)
a. The slot point at “220-240V”,set for using with a voltage of range of
“220-240V”. (Fig.6)
b. The slot point at “110-120V”, set for using with a voltage of a range of
“110-120V”. (Fig.7)
Fig.6
Fig.7
Always set the ‘Voltage Selector’ to “220-240V” after
using.
If set at 110-120V and use with a voltage higher than
Warning 120V,may cause an electric shock or destroy on iron
Before connect iron to a power supply, do upon steps
excepted:
1. No plan to iron with steam and spray, needn’t to fill water.
Attention 2. For model TR-913-SV, needn’t to set voltage.
Now connect iron to power supply, and do as
following.
Temperature setting
Set (Rotate) Dial knob to the desired position according to your fabric to be
ironed, following list the sets for main fabric types. For other types cloth, set Dial
as the indication on the tag of cloth or as your experience. If a type cloth you no
idea and no and indication, please ironing from lowest temperature set till there
has effection to wrinkles.
Pos.1
Min: Off in
normal
Pos.3
Pos.2
Nylon
(70~110°C)
Chemical fibre/
Silk
(100~160°C)
Pos.4
Wood/Cotton/
Rayon/ Linen
(160~210°C)
Only position from pos.4(Max.) can be set for steam ironing.
Wrong set will cause none effect, or burn to fabric.
Ironing
For a new iron, before first use, operate the iron with steam and spray on an old clean cloth for few minutes.
Main Body and Soleplate are hot surface when iron
Attention heated.
Never touch hot surface when using iron or before it cool down.
To dry ironing
1. ‘Steam Switch’ should be set to “O”.
2. After Temperature setting, iron heating up, heat indicator light up (heating),
it will goes off when temperature high enough and stop heating, and will
light up again (reheat) while temperature comes down.
3. Ironing after the second light (after second heating). The first heating make
higher temperature than require, it is harmful to your cloth.
4. When iron heated and not in use, do not place the iron with soleplate
surface directly to anythings. It may cause burn because high temperature.
Instead, place the iron vertical on a horizontal board, or place the iron with
the soleplate on a special board.(Fig.8, Fig.9)
Fig.9
Fig.8
To steam ironing
1. First, ensure that: Tank has filled with water. “Dial Knob” should set to
around ‘MAX’ position.(Fig.10)
2. After heating up, turn ‘Steam Switch’ to steam mark, then start steam
performance. Now, start steam ironing.
Fig.10
Attention
Always set ‘Steam Switch’ at “O” position when not in use with steam ironing , otherwise water may drop from soleplate. Keep iron horizontal, or there may be no steam
gose out.
Warning
Don’t let any part of body under iron, steam or hot water may cause scald.
To spray
1. Spray when dry ironing, can move wrinkles easily. It always use on lower
temperature set while can’t use steam function. Ofcause, spray can use on
all temperature sets. First, cofirm there has water in tank. (Fig.11)
2. Aim at position you want to iron., press Spray Knob for 2~8 times, wet the
cloth averag. (Fig.12)
3. Iron the wet cloth till it dry.
4. Repeat step 1 and 2 till wrinkles removed.
Fig.11
Attention
Fig.12
Faster action for pressing Spray Knob may be needed if big beads of water goes out .
For a longer life of iron, or to prevent dirty your cloth:
Use clean water to fill tank.
Best to use purified water.
Caring for your iron
1. 2. 3. 4. 5. After use of the iron, before storage, please:
Wait it cool down.
Turn Dial Knob to “MIN” (Fig.13)
Turn Steam Switch to “O”
Turn Voltage Selector to “220-240V” (Fig.14)
Empty the tank.(Fig.15)
Fig.14
Fig.13
Fig.15
Fold the handle after the iron cool down (refer to the instruction
mentioned in “Unfold the handle to work station”). Keep the iron
in original package box from manufacturer to pack the iron.
Always store the appliance in a horizontal dry place, and high
enough to prevent children from touching it.
Troubleshooting
NOTES: If your iron has any problem in using, do not try disassembling and
repairing it. Please check as the following or send it to the nearest specified
repair site, or return to the supplier.
Iron won’t heat- Check and do as following
Iron should be connect a right and working power supply.
Dial Knob should be set at right position.
If problem still has, please send iron to the specified repair site.
Soleplate not hot enough- Check and do as following
The Dial Knob should be set at a proper position.
Voltage Selector should be set at a right side.
If problem still has, please send iron to the specified repair site.
If the first time heated, please wait few minutes for temperature steady.
Dial Knob should be set at a proper position.
If problem still has, please send iron to the specified repair site.
Tank should have enough water.
Steam Switch should turn ON.
Dial Knob should be set at around “MAX” position.
Iron should be heated.
If problem still has, please send iron to the specified repair site.
Check if the Tank Cover is tight enough.
For steam ironing, Dial Knob should be set to “MAX” position.
Should use clean water.
ALWAYS empty the water tank after use.
If problem still has, please send iron to the specified repair site.
Dial Knob should be set at a proper position.
Voltage Selector should be set at a right side.
If problem still has, please send iron to the specified repair site.
Iron too hot- Check and do as following
Without steam going out- Check and do as following
Water leakage- Check and do as following
Iron leaves spots on clothing- Check and do as following
Wrinkles can not be removed- Check and do as following
KIB TR913 GS/20