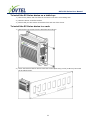
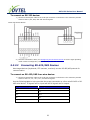
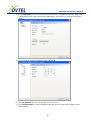
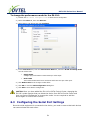
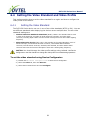
1
DVTel EV Series User Manual DVTel EV Series User Manual User Guide for Multi-Port Encoders and Single-Port Decoders Single-port decoders EV-101-D EV-401-D Multi-port encoders EV-116 EV-208 EV-208-A EV-216 EV-216-A Copyright © 2012, DVTel Inc., All Rights Reserved. All text and figures included in this publication are the exclusive property of DVTel Inc., and may not be copied, reproduced or used in any way without the express written permission of DVTel Inc. Information in this document is subject to change without notice. This document also contains registered trademarks and service marks that are owned by their respective companies or organizations. UM20120222as1.0 DVTel EV Series User Manual Contents 1 Safety .................................................................................................................... 1 2 Preface .................................................................................................................. 2 2.1 Audience ................................................................................................................ 2 2.2 Related Documentation .......................................................................................... 2 3 Overview of the DVTel EV Series ........................................................................ 3 3.1 EV Series Single-Port Decoders ............................................................................ 4 3.2 EV Series Multi-Port Encoders ............................................................................... 5 3.3 Security .................................................................................................................. 6 3.4 EV Series Single-Port Decoder Frame Rate and Performance .............................. 6 3.5 EV Series Multi-Port Encoder Frame Rate and Performance ................................ 7 3.6 Using Audio ............................................................................................................ 7 3.7 Understanding the LED Indicators ......................................................................... 8 3.7.1 System Status LED ............................................................................................ 8 3.7.2 Video Status LEDs ............................................................................................. 9 4 Installing the EV Series Single-Port Decoder .................................................. 10 4.1 Package Contents ................................................................................................ 10 4.2 Optional Accessories ........................................................................................... 10 4.3 Installation and Connection Instructions ............................................................... 10 4.3.1 Table-top or Rack-mount Installation ................................................................ 10 4.3.2 Connecting Video, Network and Power Wiring ................................................. 12 4.3.3 Connecting a Serial Device .............................................................................. 14 5 Installing the EV Series Multi-Port Encoder..................................................... 18 5.1 Package Contents ................................................................................................ 18 5.2 Optional Accessories ........................................................................................... 18 5.3 Installation and Connection Instructions ............................................................... 18 5.3.1 Table-top or Rack-mount Installation ................................................................ 19 5.3.2 Connecting Video, Audio, Network and Power Wiring ...................................... 20 5.3.3 Connecting a Serial Device .............................................................................. 21 6 Configuring the EV Series Devices .................................................................. 26 6.1 Obtaining and Setting the IP Address .................................................................. 27 6.2 Changing the Performance Mode for the EV-116 ................................................ 33 6.3 Configuring the Serial Port Settings ..................................................................... 34 6.4 Setting the Video Standard and Video Profile ...................................................... 38 6.4.1 Setting the Video Standard ............................................................................... 38 6.4.2 Setting the Video Profile from Latitude ............................................................. 40 6.5 Configuring the Input Properties........................................................................... 40 6.6 Configuring the Device Video Properties ............................................................. 40 6.7 Configuring the Camera Tampering Properties .................................................... 40 6.8 Configuring the Motion Detection Properties ........................................................ 40 6.9 Setting the SNMP Properties ............................................................................... 41 6.10 Viewing MIB Information ...................................................................................... 44 6.11 Setting the Audio Properties................................................................................. 45 DVTel EV Series User Manual 6.12 6.13 6.14 7 7.1 7.2 7.3 7.4 7.5 7.6 8 8.1 8.2 8.3 8.4 Setting the On-Screen Display for the Single-Port Decoders ............................... 46 Enabling Decoder Quad Operation for Latitude Discovery ................................... 48 Configuring the Input/Output Terminals ............................................................... 50 Maintaining and Troubleshooting the Device .................................................. 51 Updating the Firmware ......................................................................................... 51 Using Recovery Mode .......................................................................................... 54 Performing a Hardware Reset .............................................................................. 54 Rebooting the EV Series Device .......................................................................... 54 Restoring the Factory Default Settings ................................................................. 55 Losing Connection to a Camera ........................................................................... 57 Appendix ............................................................................................................. 58 Technical Specifications ....................................................................................... 59 Factory Default Configuration............................................................................... 63 Contacting DVTel Service and Support ................................................................ 65 Glossary ............................................................................................................... 66 DVTel EV Series User Manual 1 Safety Always observe the following precautions to reduce the risk of injury and equipment damage: The DVTel EV Series devices are for indoor use only. Do not connect the DVTel EV Series devices to any cabling (BNC, PoE or otherwise) that runs outdoor without proper protection. The DVTel EV Series devices should be placed on a secure flat surface or mounted using optional hardware. The DVTel EV Series devices should only be operated in a clean, dry environment. For the multi-port encoders, the operating temperature is 32ºF to 131ºF (0ºC to 55ºC), with maximum humidity at 95% non-condensing. For single-port devices, the operating temperature is 32ºF to 140ºF (0ºC to 60ºC), with maximum humidity at 95% non-condensing. Only use the recommend power cable for powering the DVTel EV Series devices. Do not install the DVTel EV Series devices in an enclosed cabinet or other small area without ventilation. 1 DVTel EV Series User Manual 2 Preface The DVTel® EV Series User Manual presents information and procedures on installing, configuring, and using the DVTel encoders and decoders. 2.1 Audience This manual has been prepared for the following audience: Managers IT system administrators Engineers Technicians 2.2 Related Documentation The following documentation contains related information: EV Series Quick Installation Guide for Single-Port Decoders EV Series Multi-port Encoder Quick Installation Guide Latitude Lite Installation Guide iSOC NVMS Quick Start Guide Latitude AdminCenter Quick Start Guide Device Configurator User Guide Web Interface User Guide DVTel Administration Guide Latitude User Guide 2 DVTel EV Series User Manual 3 Overview of the DVTel EV Series The DVTel EV Series encoders and decoders are enterprise-class, H.264-enabled video devices designed for large-scale, geographically distributed operations. They offer a comprehensive feature set that includes full frame rate with high resolution video on all ports. The devices deliver superior video quality and excellent performance in enterprise, critical infrastructure, and other video surveillance applications. EV Series single-port decoders are ideal for integration in distributed networks, including point-to-point applications. These compact decoders deliver 30 frames per second (fps) at 4CIF on a single stream or 30 fps at 2CIF for a dual-stream. EV Series multi-port encoders are perfect for the most demanding security and surveillance applications that require the conversion of up to 8 or 16 analog video inputs to digital IP video on the edge. EV Series encoders provide high quality H.264 video resolution starting at less than one megabit per stream. They maintain a significantly smaller file size, while providing improved network and storage management. The EV-100 Series multi-port encoder delivers single-stream H.264 at 15 fps (NTSC)/12.5 fps (PAL) with 4CIF resolution or dual-stream 15 fps (NTSC)/12.5 fps (PAL) with 2CIF resolution on two channels simultaneously, starting at less than one megabit per stream. EV-200 Series multi-port encoders can deliver dual-stream H.264 video at up to 45 fps (NTSC)/37.5 fps (PAL) simultaneously on two channels at 4CIF resolution. The DVTel EV Series consists of the following models: Single-port decoders EV-101-D EV-401-D Multi-port encoders EV-116 EV-208 EV-208-A EV-216 EV-216-A The EV-208 and EV-208-A are eight-port models. The EV-116, EV-216, and EV-216-A are 16-port models. The “-A” models support audio. CAUTION: DVTel EV Series devices are indoor devices that are enclosed in a nonweatherproof casing. They must be placed in a location that is not exposed to the outdoor environment. 3 DVTel EV Series User Manual Related Links EV Series Single-Port Devices DVTel Onboard Analytics Product Dimension and Weight Security EV Series Single-Port Decoder Frame Rate and Performance EV Series Multi-Port Encoder Frame Rate and Performance Using Audio System Status LED Video Status LEDs 3.1 EV Series Single-Port Decoders DVTel EV Series single-port decoders couple superior video resolution over one or two H.264 video streams with a dramatically lower bit rate, which reduces bandwidth and storage utilization by up to 50%. EV Series single-port decoders are available in two models: EV-101-D, with a BNC video output connector, delivers 30 fps at D1 EV-401-D, with an HDMI output connector, delivers 30 fields per second at 720p/1080i Both models support bidirectional audio. They also provide storage on the edge, ensuring that video is recorded in case connection with the management software is lost. The devices deliver the high reliability of DVTel's third-generation encoders, plus IT-friendly features, easy implementation and maintenance, and an environmentally friendly design. EV Series single-port decoders are ideal for integration in distributed networks, including point-to-point applications. EV-101-D EV-401-D Figure 1.1: DVTel EV Series - Single Front View 4 DVTel EV Series User Manual Figure 1.2: DVTel EV Series - Single-Port Rear View 3.2 EV Series Multi-Port Encoders DVTel EV Series multi-port encoders deliver high-resolution images for both recording and viewing live video. Incorporating the H.264 industry-leading video standard, the DVTel EV Series offers excellent image clarity, while reducing use of network bandwidth and storage by up to 50 percent. The eight-port EV-208 and EV-208-A and 16-port EV-216 and EV-216-A video encoders support H.264 video up to 4CIF/30 frames per second (fps) on all ports. EV-208-A and EV216-A video encoders include four ports (EV-208-A) or eight ports (EV-216-A) for bidirectional audio input and output. Audio input allows sending synchronized video with audio signals for listening to either live or recorded sounds. Audio output can be used to communicate back to the encoder location by connecting a speaker. The EV-116 is a cost-effective version with performance of up to D1/15 fps and a comprehensive feature set. Figure 1.3: DVTel EV Series - Multi-Port Front View 5 DVTel EV Series User Manual Figure 1.4: DVTel EV Series - Multi-Port Rear View 3.3 Security Every DVTel EV Series device comes with a unique SSL (Secure Sockets Layer) certificate for securing its IP link. SSL is a commonly used protocol for managing the security of IP message transmission, securing the Web Control Data and VSIP communication.. For more information on activating SSL security, refer to the Device Configurator User Guide, Web Interface User Guide or your DVTel Administration Guide. 3.4 EV Series Single-Port Decoder Frame Rate and Performance The following table lists the video resolutions supported by the EV Series single-port decoders. NOTE: EV Series single-port decoders are available in two models: EV-101-D with a BNC connector and EV-401-D with an HDMI connector. EV-401-D uses the HDTV standard, which is different from NTSC and PAL. Resolution NTSC PAL Frames Per Second Number of Tiles CIF 352 × 240 352 × 288 30 16 2CIF 704 × 240 704 × 288 30 8 4CIF 704 × 480 704 × 576 30 4 D1 720 × 480 720 × 576 30 4 6 DVTel EV Series User Manual 3.5 EV Series Multi-Port Encoder Frame Rate and Performance EV-208, EV-208-A, EV-216 and EV-216-A encoders support H.264 and video up to 4CIF/30 frames per second (fps) on all ports. EV-116 is a cost-effective encoder and supports H.264 video up to D1/15 fps on all ports. It can be configured in dual-stream mode. The available video frame rates of each encoder are: NTSC: 1, 2, 3, 3.75, 5, 6, 7.5, 10, 15, or 30 fps PAL: 1, 2.5, 5, 6.75, 8.33, 12.5, or 25 fps Encoders 1 and 2 are H.264. You can customize each encoder to meet your system requirements in terms of frame rate and resolution. A typical scenario regarding the encoders would be using Encoder 1 as the recorder, since it is the primary H.264 encoder. Encoder 2 can be used for viewing or recording. The following table lists the video resolutions supported by the multi-port encoders. Resolution NTSC CIF 2CIF 4CIF D1 PAL 352 × 240 704 × 240 704 × 480 720 × 480 352 × 288 704 × 288 704 × 576 720 × 576 The following table lists the performance that each DVTel EV Series video encoder can achieve with the H.264 compression mode using single-stream encoding. NTSC Resolution PAL EV-116 Single Dual H.264 H.264 EV-208 and EV-216 EV-208 and EV-216 Single H.264 EV-116 Dual H.264 CIF 30 fps 30 fps 30 fps 25 fps 25 fps 25 fps 2CIF 30 fps 30 fps 30 fps 25 fps 25 fps 25 fps 4CIF 30 fps 15 fps N/A 25 fps 12.5 fps N/A D1 30 fps 15 fps N/A 25 fps 12.5 fps N/A 3.6 Using Audio The EV-208-A and EV-216-A support bidirectional audio input and output. Audio input allows you to capture audio signals from a camera that supports audio at the same time as it captures video. The EV Series devices support the following audio formats: Codec Sampling Frequency Bits per Sample Bit Rate PCM (no compression) 8 kHz 16 bits/data 28 kbits/sec (8 kHz) G.711/μ-Law (8 bits) 8 kHz 14 bits signed/data 64 kbits/sec 7 DVTel EV Series User Manual 3.7 Understanding the LED Indicators The DVTel EV Series devices have two types of tri-colored (red-orange-green) LEDs: One system status LED and either one, 8, or 16 video status LEDs, depending on the model. 3.7.1 System Status LED The system status LED provides a visual indication of the current state of the device. LED Pattern De LED Pattern Description Steady orange The encoder is powering up in phase 1 (boot loader section). Steady green The encoder is powering up in phase 2 (operating system is starting up). Flashing red The IP address is assigned to another device on the network. The encoder is now using APIPA addressing format. (1 sec. intervals) Flashing green (1 sec. intervals) Flashing green (0.2 sec. intervals) Flashing green (3 sec. intervals) The firmware has started, the encoder is connected to the network, but no serial data is transmitted. The firmware has started, the encoder is connected to the network, and serial data is transmitted. The firmware has started, but the encoder is not connected to the network. Flashing green-red (1 sec. intervals) The encoder is undergoing a firmware update. Flashing red The encoder is being identified. (0.1 sec. intervals) Flashing orange (1 sec. intervals) The encoder failed to boot normally and entered recovery mode. The firmware needs to be updated through Device Configurator or the Web Interface. The encoder is using the static IP address assigned by the user. Flashing orange (3 blinks at 1 sec. intervals) and 2 quick red pulses (0.5 sec. interval) The encoder failed to boot normally and entered recovery mode. The firmware needs to be updated through Device Configurator or the Web Interface. The encoder is using the APIPA addressing format. Flashing red-orange (1 sec. intervals) There is an internal error that is preventing the encoder from starting normally. Shut down the encoder, wait 30 seconds, then start it again. If the condition persists, call DVTel Video Solutions support. LED not lit Check the power supply and cabling. If power is available and the LED stays off, call DVTel Video Solutions support. 8 DVTel EV Series User Manual 3.7.2 Video Status LEDs The video status LEDs provides a visual indication on the current state of the video connection between the encoder and each analog video source. LED Pattern Description Steady green An analog video source is connected to the corresponding input but video is not transmitted. Flashing green An analog video source is connected to the corresponding input and encoded video is transmitted. (0.2 sec. interval) Steady red No analog video source is detected on the corresponding input and encoded video is not transmitted. Flashing red (0.2 sec. intervals) No analog video source is detected on the corresponding input but encoded video (red/blue frame) is transmitted. Flashing green-red The encoder is undergoing a firmware update. (1 sec. intervals) For multi-port encoders: Steady orange Video cable is connected, but the video standard is incorrect and no video is streaming from the input. For single-port decoders: Flashing green (3 times) and orange (1 time) Flashing orange Video cable is connected and video is streaming from the input, but the video standard is incorrect. 9 DVTel EV Series User Manual 4 Installing the EV Series Single-Port Decoder This section describes the installation and configuration steps you need to perform to prepare the EV Series devices for operation. CAUTION: The EV Series devices are enclosed in a non-weatherproof steel casing and should be placed in an indoor environment. 4.1 Package Contents Each installation kit comes with the following: One EV-101-D or EV-401-D device One set of rack-mount brackets with four screws (Philips M3 x 6 mm pan head) One DVTel EV Series Quick Installation Guide for Single-Port Decoders PS121 Efficiency Level V-compliant power supply 4.2 Optional Accessories The EV rack-mount panel is an optional accessory that you can order when purchasing the EV Series device. 4.3 Installation and Connection Instructions This section explains how to install and connect your EV Series device on your network. Related Links Table-top or Rack-mounting Installation Connecting Video, Network and Power Wiring Connecting a Serial Device Connecting RS-232 Devices Connecting RS-422/485 Devices 4.3.1 Table-top or Rack-mount Installation This section explains how to install an EV Series single-port device on a table-top or mount the device in a rack. NOTE: This equipment must be used in compliance with local laws and regulations. 10 DVTel EV Series User Manual To install the EV Series device on a table-top: 1.) Remove any debris and dust from the surface as well as the surrounding area. 2.) Place the device on the flat surface. 3.) Ensure that you have access to both the front and rear of the device. To install the EV Series device in a rack: 1.) Remove the two screws from the DVTel EV Series device. 2.) Screw the DVTel EV Series device to the rack-mount plate using 5 in-lb (0.56 N-m) force with the provided screws. 11 DVTel EV Series User Manual 3.) Slide the device into the 3U mounting space in the rack cabinet. 4.) Secure the device to the rack cabinet using the screws supplied with the rack. 4.3.2 Connecting Video, Network and Power Wiring This section explains how to connect the video, network and power cables to the EV Series single-port devices. To connect the video and network cables: 1.) Connect the video cables from the analog cameras to the BNC connectors on the rear of the device. 2.) Plug an Ethernet cable into the LAN 10/100 (RJ-45) network connector on the back of the device. 12 DVTel EV Series User Manual To connect the power wiring: 1.) Remove the terminal block plug from the rear of the device. 2.) Verify the polarity of each wire from the power supply according to the attached label. 3.) Connect the positive power wire in the corresponding +12V pole and the negative power wire in the corresponding GND pole on the terminal block plug. 4.) Connect the terminal block plug to the on the rear of the device. 5.) Connect the power supply to an outlet or UPS. 6.) If required, connect the serial ports of the EV Series device to a PTZ camera. 13 DVTel EV Series User Manual 4.3.3 Connecting a Serial Device This section explains how to connect RS-232, RS-422 (four-wire) or RS-485 (two-wire or four-wire) serial device to the EV Series device. RS-232, RS-422 and RS-485 are communication standards between a Data Terminal Equipment (DTE) and a Data Circuit-terminating Equipment (DCE) using the asynchronous serial communication method. Most serial equipment, such as PTZ cameras, keyboards, matrixes, multiplexers, or access cards, conforms to the RS-232 or RS-422/485 standards. The EV Series devices support the RS-232, RS-422, and RS-485 asynchronous protocols using pluggable screw-terminal strips. For any other protocol, you may need a converter. NOTE: The EV Series devices come with a terminal block plug to attach RS-232 and RS-422/485 devices. 4.3.3.1 Connecting RS-232 Devices The RS-232 standard is used in some analog cameras and computer serial ports. Before connecting the EV Series device to RS-232 serial equipment, you need to determine if it is DTE (Data Terminal Equipment) or DCE (Data Circuit-terminating Equipment). When connecting two modules of the same type (for example, DTE to DTE), you need a cross-cable for communication. When connecting a DTE with a DCE, a straight cable is required. 14 DVTel EV Series User Manual To connect an RS-232 device: 1.) Connect a twisted pair cable to the multi-pin connector on the device. The connector provides access to the TX, RX, RTS, CTS and Ground signals. DVTel EV Series device 2.) Once the connection is done, see Configuring the EV Series Devices to set the right operating mode in Device Configurator, Latitude, or the Web Interface. 4.3.3.2 Connecting RS-422/485 Devices Most target devices (keyboards, PTZ cameras, and monitors) use the RS-422/485 protocol for communication. To connect an RS-422/485 four-wire device: 1.) Connect a twisted pair cable to the multi-pin connector on the devices. The connector provides access to the TX+, TX-, RX+, RX-, and Ground signals. Use the following table to help you make the proper connection to a four-wire RS-422 or RS485 serial device. TX signals are for input and the RX signals are for output. Signal on Peripheral Signal on DVTel EV Series TX+ TX+ TX- TX- RX+ RX+ RX- RX- Ground Ground 15 DVTel EV Series User Manual NOTE: On some equipment, signal terminology may vary. Refer to the peripheral documentation to find the equivalent terms. DVTel EV Series device 2.) Once the connection is done, see Configuring the EV Series Devices to set the right operating mode in Device Configurator or the Web Interface. To connect an RS-485 two-wire device: 1.) Create the Data- signal by shorting the RX- and TX- pins together. DVTel EV Series device 16 DVTel EV Series User Manual 2.) Create the Data+ signal by shorting the RX+ and TX+ pins together. Signal on Peripheral Signal on DVTel EV Series Data+ Data+ Data- Data- Ground Ground 3.) Once the connection is done, see Configuring the EV Series Devices to set the right operating mode in Device Configurator or the Web Interface. 17 DVTel EV Series User Manual 5 Installing the EV Series Multi-Port Encoder This section describes the installation and configuration steps you need to perform to prepare the EV Series devices for operation. CAUTION: DVTel EV Series devices are indoor devices that are enclosed in a nonweatherproof casing. They must be placed in a location that is not exposed to the outdoor environment. 5.1 Package Contents Each installation kit comes with the following: One EV-116, EV-208, EV-208-A, EV-216, or EV-216-A device One set of rack-mount brackets with four screws (Philips M3 x 6mm pan head) One DVTel EV Series Multi-port Encoder Quick Installation Guide 5.2 Optional Accessories The following power supplies are optional accessories that you can order when purchasing the EV Series device: DVT-PWR-40W: Power supply, 12VDC, 40W for a single multi-port encoder. DVT-PWR-275RM1: Power supply without meters, rack-mount, 12VDC. 275W for up to 8 multi-channel encoders. Requires one DVT-WH-4UA per three units. DVT-PWR-275RM2: Dual power supply without meters, rack-mount (550W total), 12VDC. 275W per supply for up to 16 multi-channel encoders. Requires one DVT-WH-4UA for three devices. DVT-WH-4UA: 8A fused wiring harness for up to three multi-port encoders. 5.3 Installation and Connection Instructions This section explains how to install and connect your EV Series multi-port encoder on your network. Related Links Table-top or Rack-mount Installation Connecting Video, Network and Power Wiring Connecting a Serial Device Connecting RS-232 Devices Connecting RS-422/485 Devices NOTE: This equipment must be used in compliance with local laws and regulations. 18 DVTel EV Series User Manual 5.3.1 Table-top or Rack-mount Installation This section explains how to install an EV Series multi-port device on a table-top and mount the device in a rack. To install the EV Series device on a table-top: 1.) Remove any debris and dust from the surface as well as the surrounding area. 2.) Place the device on the flat surface. 3.) Ensure that you have access to both the front and rear of the device and that the fan airflow is not blocked. To install the EV Series device in a rack: 1.) Align the mounting brackets with the holes on the side of the EV Series device. 2.) Screw the rack-mount brackets to the device using 5 in-lb (0.56 N-m) force with the provided screws. 3.) Slide the device into the 1U mounting space in the rack cabinet and ensure that the fan airflow is not blocked. 4.) Secure the device to the rack cabinet using the screws supplied with the rack. 19 DVTel EV Series User Manual 5.3.2 Connecting Video, Audio, Network and Power Wiring This section explains how to connect the video, audio, network and power cables to the EV Series devices. To connect the video and network cables: 1.) Plug the video cables from the analog cameras to the BNC connectors on the rear of the EV Series device. 2.) Plug an Ethernet cable into the LAN 1 network (RJ-45) connector on the front of the EV Series device. LAN 2 on the device is used by DVTel support for debugging purposes. To connect audio cables on the EV-208-A and EV-216-A: The EV-208-A and EV-216-A support audio input and output. Plug the audio cable from an audio source such as a microphone to the audio/MIC input connectors on the rear of the encoder. To connect the power wiring: NOTE: You can use the DVT-PWR-40W or any other certified power supply to connect to the EV Series devices. If you plan on using a power supply other than the DVT-PWR-40W, ensure that it is certified with an output voltage rating of 12VDC and an output current rating of 1.8A up to 3A. The power wire gauge should be in the wire range of 28-16 AWG in order to properly engage the terminal block plug. 1.) Remove the terminal block plug from the rear of the device. 2.) Verify the polarity of each wire from the power supply according to the attached label. 20 DVTel EV Series User Manual 3.) Connect the positive power wire in the corresponding +12V pole and the negative power wire in the corresponding GND pole on the terminal block plug and screw them into place using 1.7 inlb (0.19 N-m) force. 4.) Connect the terminal block plug to the on the rear of the device. 5.) Connect the power supply to an outlet. 6.) If required, connect the serial ports of the EV Series device to a PTZ camera. NOTE: If you are using the DVT-PWR-275 power supply with a DVT-WH-4UA power distribution panel, refer to the DVT-WH-4UA Installation Guide that is shipped with the DVT-WH-4UA to set up the power distribution panel. 5.3.3 Connecting a Serial Device This section explains how to connect an RS-232, RS-422 (four-wire) or RS-485 (two-wire or four-wire) serial device to the EV Series device. RS-232, RS-422 and RS-485 are communication standards between a Data Terminal Equipment (DTE) and a Data Circuit-terminating Equipment (DCE) using the asynchronous serial communication method. Most serial equipment, such as PTZ cameras, keyboards, matrixes, multiplexers, or access cards, conforms to the RS-232 or RS-422/485 standards. EV Series devices support the RS232, RS-422, and RS-485 asynchronous protocols using pluggable screw-terminal strips. For any other protocol, you may need a converter. NOTE: The EV Series devices come with a terminal block plug to attach RS-232 and RS-422/485 devices. 21 DVTel EV Series User Manual 5.3.3.1 Connecting RS-232 Devices The RS-232 standard is used in some analog cameras and computer serial ports. Before connecting the EV Series device to RS-232 serial equipment, determine if they are DTE (Data Terminal Equipment) or DCE (Data Circuit-terminating Equipment). When connecting two modules of the same type (for example, DTE to DTE), you need a cross-cable for communication. When connecting a DTE with a DCE, a straight cable is required. 22 DVTel EV Series User Manual To connect an RS-232 device: 1.) Connect a twisted pair cable to the multi-pin connector on the device. The connector provides access to the TX, RX, RTS, CTS and Ground signals. DVTel EV Series device 2.) Once the connection is done, see Configuring the EV Series Devices to set the right operating mode in Device Configurator, DVTel Latitude, or the Web Interface. 5.3.3.2 Connecting RS-422/485 Devices Most target devices (keyboards, PTZ cameras, monitors) use the RS-422/485 protocol for communication. To connect an RS-422/485 four-wire device: 1.) Connect a twisted pair cable to the multi-pin connector on the device. The connector provides access to the TX+, TX-, RX+, RX-, and Ground signals. Use the following table to help you make the proper connection to a four-wire RS-422 or RS485 serial device. TX signals are for input and the RX signals are for output. Signal on Peripheral Signal on DVTel EV Series TX+ TX+ TX- TX- RX+ RX+ RX- RX- Ground Ground 23 DVTel EV Series User Manual NOTE: On some equipment, signal terminology may vary. Refer to the peripheral documentation to find the equivalent terms. DVTel EV Series device 2.) Once the connection is done, see Configuring the EV Series Devices to set the right operating mode in Device Configurator or the Web Interface. 24 DVTel EV Series User Manual To connect an RS-485 two-wire device: 1.) Create the Data- signal by shorting the RX- and TX- pins together. DVTel EV Series device 2.) Create the Data+ signal by shorting the RX+ and TX+ pins together. Signal on Peripheral Data+ DataGround Signal on DVTel EV Series Data+ DataGround 3.) Once the connection is done, see Configuring the EV Series Devices to set the right operating mode in Device Configurator or the Web Interface. 25 DVTel EV Series User Manual 6 Configuring the EV Series Devices This section describes the configuration steps you need to perform to prepare the EV Series devices for operation. Related Links Obtaining and Setting the IP Address Setting the H.264 Encoding Mode for the EV-116 Configuring the Serial Ports Settings Setting the Video Standard, Video Profile and Camera Tampering Properties Setting the Video Standard Setting the Video Profile Configuring the Input Properties Configuring the Device Video Properties Configuring the Camera Tampering Properties Configuring the Motion Detection Properties Setting the SNMP Properties Viewing MIB Information Setting the Audio Properties Setting the On-Screen Display for the Decoders Enabling All Four Channels of a Dual-Port Decoder for Latitude Discovery Configuring the Input/Output Terminals CAUTION: DVTel EV Series devices are indoor devices that are enclosed in a nonweatherproof casing. They must be placed in a location that is not exposed to the outdoor environment. 26 DVTel EV Series User Manual Once you have connected all the equipment to the device, you can begin configuring the device to ensure that it can communicate with the attached devices and with Latitude over the network. In order to configure the device, you first need to obtain the IP address using Device Configurator. 1.) Using Device Configurator: Device Configurator is a PC-based administration tool that you can use over any TCP/IP network. You can use Device Configurator to: Configure DVTel edge devices Add security in your system Get information on the devices connected on the network Connect edge devices together Update the firmware of the devices Align the antennas of wireless devices Manage licenses 2.) Using Network Video Management System (NVMS): You can use any VNMS, such as Latitude, to configure the device. CAUTION: Any changes made using Latitude software will override the changes made using Device Configurator or the Web Interface. 3.) Using the Web Interface: The EV Series devices have a self-contained web server allowing you to connect directly to them via a web browser. The Web Interface is a browser-based tool that allows you to configure the EV Series devices. For complete information on the Web Interface, refer to the Web Interface User Guide. NOTE: The default username and password for the Web Interface is admin. We recommend that you change the default password for the edge device to a more secure password. 6.1 Obtaining and Setting the IP Address By default, all DVTel EV Series devices are APIPA (Automatic Private IP Addressing)-enabled. The APIPA scheme, available on the Windows operating systems, allows a device to assign itself a temporary IP address until it receives a complete network configuration, either manually or from a DHCP server. A device in APIPA mode does not reside on the same subnet as the other devices on the IP network. Therefore, it may not be able to view or be visible by the other devices. All DVTel edge devices use the following temporary APIPA configuration: IP address: 169.254.X.Y (where X and Y are based on the last two octets of the MAC address of the device) Subnet mask: 255.255.0.0 Gateway: 169.254. *. * 27 DVTel EV Series User Manual To obtain the IP address of the EV Series device using SConfigurator: 1.) Launch the Unified Device Configuration Tool, available under the Applications menu in the AdminCenter Sidebar, or from the Latitude installation CD. 2.) Extract the executable file (EV Device Configurator.exe) to the desktop of the computer. 3.) Double-click EV Device Configurator.exe to start SConfigurator. 4.) In the General tab, click Program Options. 5.) Select the correct IP Address of the correct LAN interface (IP Address of the PC) from IP Address of the PC list. 6.) Check Detect All Units on LAN. 7.) Ensure that the VSIP Port is 5510; otherwise, click Default. 8.) Ensure that the Discovery IP Address is 255.255.255.255; otherwise, click Broadcast. 9.) Click OK. 28 DVTel EV Series User Manual 10.) Select the Units tab, then click Discover. The information displayed for the EV Series device varies depending on whether your network is using a DHCP server. In a DHCP environment, the Unit Name column in the Units box displays the model name and a unique alpha-numeric value that corresponds to the MAC address of the device. In APIPA mode, the Unit Name column in the Units box displays Unknown and the first two octets of the IP address in the Address column are 169.254. Use the following procedure to set the IP address for the device. To set the IP address of the device manually using Device Configurator: 1.) Double-click EV Device Configurator.exe to start Device Configurator. 2.) Select the Units tab, then click Discover. 3.) Select the unknown device with an IP address that begins with 169.254 in the Address column, then click Configure. 29 DVTel EV Series User Manual 4.) In the Unit Name box, type a unique name for the device. In a DHCP environment, DVTel uses a combination of the model name and the MAC address of the device to uniquely identify each device. 5.) In the tree view, expand the Network node and click IP. 6.) In the IP Address box, type the IP address for the device. 7.) In the Subnet Mask box, type the address specifying to which subnet the IP address of the device belongs. 30 DVTel EV Series User Manual 8.) In the Gateway box, type the IP address of the server that acts as an access point to another network. NOTE: You do not need to use a gateway if the device communicates with other devices on the same subnet. 9.) Click OK to close the Unit Configuration dialog box. 10.) Click Exit to close Device Configurator. To set the device to obtain an IP address automatically (DHCP) using the Web Interface: NOTE: The EV Series devices automatically obtain the IP network configuration from a DHCP server. Use this procedure if you are switching an encoder from manual configuration to one using a DHCP server. 1.) In a web browser, type the IP address of the encoder in the Address bar, and then press ENTER. 2.) Type the username and password. 3.) From the Configuration folder, select Network. 4.) In the Hostname box, type a unique name for the edge device. 5.) In the Default Gateway box, type the IP address of the server that acts as an access point to another network. You can obtain the IP address of the default gateway by asking the network administrator. NOTE: You do not need to use a gateway if the edge device communicates with other edge devices on the same subnet. 6.) Click the Ethernet Adapter 1 tab. This corresponds to LAN 1 on the EV Series encoder and should be used as the main connectivity to the LAN. NOTE: The Ethernet Adapter 2 tab corresponds to LAN 2 on the EV Series encoder and is used by support for debugging purposes. The default IP address of LAN 2 is set to 172.29.204.254 with subnet mask 255.255.255.252. Any computer connecting to the EV Series encoder must use IP address 172.29.204.253. 31 DVTel EV Series User Manual 7.) In the Link Speed list, select the speed and mode of the network. You can select from the following: Auto detect The unit automatically detects the network speed and mode. 1 Gbps full-duplex The unit sends and receives 1 Gbps of data in both directions at the same time. 1 Gbps half-duplex The unit sends and receives 1 Gbps of data in both directions, but not at the same time. 100 Mbps full-duplex The unit sends and receives 100 Mbps of data in both directions at the same time. 100 Mbps half-duplex The unit sends and receives 100 Mbps of data in both directions, but not at the same time. 10 Mbps full-duplex The unit sends and receives 10 Mbps of data in both directions at the same time. 10 Mbps half-duplex The unit sends and receives 10 Mbps of data in both directions, but not at the same time. NOTE: If you are unsure of the network settings, select Auto detect to automatically detect the speed and mode of the network. You can also contact the network administrator to provide you with the correct settings. 8.) Click Obtain an IP address automatically. 9.) Click Apply. Use the following if you do not have DHCP server or you would like to manually set the network configuration for the edge device. To set the IP address of the device manually using the Web Interface: 1.) In a web browser, type the IP address of the encoder in the Address bar, and then press ENTER. 2.) Type the username and password. 3.) From the Configuration folder, select Network. 4.) In the Hostname box, type a unique name for the edge device. 5.) In the Default Gateway box, type the IP address of the server that acts as an access point to another network. You can obtain the IP address of the default gateway by asking the network administrator. NOTE: You do not need to use a gateway if the edge device communicates with other edge devices on the same subnet. 6.) Click the Ethernet Adapter 1 tab. This corresponds to LAN 1 on the EV Series encoder and should be used as the main connectivity to the LAN. 32 DVTel EV Series User Manual NOTE: The Ethernet Adapter 2 tab corresponds to LAN 2 on the EV Series encoder and is used by Support for debugging purposes. The default IP address of LAN 2 is set to 172.29.204.254 with subnet mask 255.255.255.252. Any computer connecting to the EV Series encoder must use IP address 172.29.204.253. 7.) In the Link Speed list, select the speed and mode of the network. You can select from the following: Auto detect The unit automatically detects the network speed and mode. 1 Gbps full-duplex The unit sends and receives 1 Gbps of data in both directions at the same time. 1 Gbps half-duplex The unit sends and receives 1 Gbps of data in both directions, but not at the same time. 100 Mbps full-duplex The unit sends and receives 100 Mbps of data in both directions at the same time. 100 Mbps half-duplex The unit sends and receives 100 Mbps of data in both directions, but not at the same time. 10 Mbps full-duplex The unit sends and receives 10 Mbps of data in both directions at the same time. 10 Mbps half-duplex The unit sends and receives 10 Mbps of data in both directions, but not at the same time. NOTE: If you are unsure of the network settings, select Auto detect to automatically detect the speed and mode of the network. You can also contact the network administrator to provide you with the correct settings. 8.) Click Use the following IP address. 9.) In the IP Address box, type the IP address for the device. 6.2 10.) In the Subnet Mask box, type the mask to determine what subnet the IP address belongs. 11.) Click Apply. Changing the Performance Mode for the EV116 The EV116 supports H.264 and MPEG-4 video on all 16 ports and can be configured in single or dual stream modes. By default, the EV116 is set to single stream mode consisting of a single high-performance H.264 stream and a single MPEG-4 stream per video input. However, you can set it to dual stream mode consisting of two H.264 streams with lower resolution and frame rate and a single MPEG-4 stream per video input. NOTE: Prior to adding the EV-116 encoder to Latitude, use the Device Configurator to set the mode of the unit. The change takes effect after rebooting the unit. 33 DVTel EV Series User Manual To change the performance mode for the EV-116: 1.) Double-click EV Device Configurator.exe to start Device Configurator. 2.) Select the Units tab, then click Discover. 3.) Select the EV-116 device and click Configure. 4.) In the Unit Name box, from the Performance Mode list, select the H.264 streaming mode. You can select from: Single H.264 A single high-performance H.264 stream per video input. Dual H.264 Two H.264 streams with lower resolution and frame rate per video input. 5.) Click Reboot Unit for the change to take effect. 6.) Click OK to close the Unit Configuration dialog box. 7.) Click Exit to close Device Configurator. CAUTION: Once you have added the EV-116 to DVTel Control Center, changing the EV-116's mode requires that you delete the device from DVTel Control Center and then use Device Configurator to change the mode. You are required to add the device again in DVTel Control Center. 6.3 Configuring the Serial Port Settings Once the serial equipment is connected to the device, you need to ensure that both devices can communicate with each other. 34 DVTel EV Series User Manual NOTE: For complete information about serial port parameters and the settings to use, refer to the serial equipment documentation or contact the product manufacturer. To set the serial port parameters for RS-232 equipment using Device Configurator: 1.) Double-click EV Device Configurator.exe to start Device Configurator. 2.) Select the Units tab, then click Discover. 3.) Select the EV Series device and click Configure. 4.) In the tree view, expand the Serial Port node and select one of the following: RS-232/422/485 for single-port devices RS-232 for multi-port devices 5.) In the Baud Rate list, select the data rate used by the serial equipment. 6.) In the Parity list, select the parity bit used by the serial equipment. Parity bits determine if the data has been sent accurately over the network. 7.) In the Stop bits list, select the stop bits used by the serial equipment. Stop bits let the receiver know that the byte being transmitted has ended. 8.) In the Data bits list, select the data bits used by the serial equipment. Data bits represent the number of bits in each data that is sent over the network. Eight data bits are universally used in most applications. 9.) In the Operation Mode, select the way the serial equipment will interface with the device. 10.) Click OK to close the Unit Configuration dialog box. 11.) Click Exit to close Device Configurator. To set the serial port parameters for RS-232 equipment using the Web Interface: 1.) In a web browser, type the IP address of the device in the Address bar, and then press ENTER. 2.) Type the username and password. 3.) From the Configuration folder, select Serial ports. 4.) In the Serial ports panel, select one of the following. RS-232/422/485 tab for single-port devices RS-232 tab for multi-port devices Multi-port devices Single-port devices 35 DVTel EV Series User Manual 5.) In the Bit Rate (bps) list, select the data rate used by the serial equipment. 6.) In the Parity list, select the parity bit used by the serial equipment. Parity bits determine if the data has been sent accurately over the network. 7.) In the Stop bits list, select the stop bits used by the serial equipment. Stop bits let the receiver know that the byte being transmitted has ended. 8.) In the Data bits list, select the data bits used by the serial equipment. Data bits represent the number of bits in each data that is sent over the network. Eight data bits are universally used in most applications. 9.) Single-port devices only: In the Mode list, select the way the serial equipment will interface with the edge device. 10.) Click Apply. To set the serial port parameters for RS-422/485 equipment using Device Configurator: 1.) Double-click EV Device Configurator.exe to start Device Configurator. 2.) Select the Units tab, then click Discover. 3.) Select the EV Series device and click Configure. 4.) In the tree view, expand the Serial Port node. 5.) In the Operation Mode, select the way the serial equipment will interface with the device. RS-232/422/485 for single-port devices RS-232 for multi-port devices 6.) In the Baud Rate list, select the data rate used by the serial equipment. 36 DVTel EV Series User Manual 7.) In the Parity list, select the parity bit used by the serial equipment. Parity bits determine if the data has been sent accurately over the network. 8.) In the Stop bits list, select the stop bits used by the serial equipment. Stop bits let the receiver know that the byte being transmitted has ended. 9.) In the Data bits list, select the data bits used by the serial equipment. Data bits represent the number of bits in each data that is sent over the network. Eight data bits are universally used in most applications. 10.) In the Operation Mode list, select the way the serial equipment will interface with the device: For multi-port devices: Select the operation mode from RS-422/485 Mode list For single-port devices: Select the operation mode from Operation Mode list 11.) Click OK to close the Unit Configuration dialog box. 12.) Click Exit to close Device Configurator. To set the serial port parameters for RS-422/485 equipment using the Web Interface: 1.) In a web browser, type the IP address of the device in the Address bar, and then press ENTER. 2.) Type the username and password. 3.) From the Configuration folder, select Serial ports. 4.) In the Serial ports panel, select one of the following. RS-232/422/485 tab for single-port devices RS-422/485 tab for multi-port devices Multi-port devices Single-port devices 5.) In the Bit Rate (bps) list, select the data rate used by the serial equipment. 6.) In the Parity list, select the parity bit used by the serial equipment. Parity bits determine if the data has been sent accurately over the network. 7.) In the Stop bits list, select the stop bits used by the serial equipment. Stop bits let the receiver know that the byte being transmitted has ended. 8.) In the Data bits list, select the data bits used by the serial equipment. Data bits represent the number of bits in each data that is sent over the network. Eight data bits are universally used in most applications. 9.) In the Mode list, select the way the serial equipment will interface with the edge device. 10.) Click Apply. 37 DVTel EV Series User Manual 6.4 Setting the Video Standard and Video Profile This section explains how to set the video standard for a region and how to configure the video profile for the device. 6.4.1 Setting the Video Standard The DVTel EV Series device can run in one of two video standards (NTSC or PAL). You can use different standards when deploying the devices across multiple sites. The two video standards settings are: National Television Standards Committee (NTSC): NTSC is the standard that is used in most of the Americas, a number of South American countries, and some Asian countries, including Japan. NTSC uses the format of 525 picture lines and a 60Hz lighting frequency. Phase Alternation by Line (PAL): PAL is the standard in the United Kingdom, much of Western Europe, several South American countries, some Middle East and Asian countries, several African countries, Australia, New Zealand, and other Pacific island countries. PAL uses the format of 625 picture lines and a 50Hz lighting frequency. CAUTION: You should change the video profile settings using Latitude. Use Device Configurator or the Web Interface to change the video profile for troubleshooting operations. To set the video standard using Device Configurator: 1.) Double-click EV Device Configurator.exe to start Device Configurator. 2.) Select the Units tab, then click Discover. 3.) Select the EV Series device and click Configure. 38 DVTel EV Series User Manual 4.) In the tree view, click the Video node. 5.) In the Standard list, select the analog display standard of the region. You can select from the following: NTSC PAL NOTE: Changing the video standard reboots the device after you click OK. 6.) Click OK to close the Unit Configuration dialog box. 7.) Click Exit to close Device Configurator. To set the video standard using the Web Interface: 1.) In a web browser, type the IP address of the device in the Address bar, and then press ENTER. 2.) Type the username and password. 3.) From the Configuration folder, select Video. 4.) From the Video standard list, select the analog display standard of the region. You can select from the following: NTSC PAL NOTE: Changing the video standard requires that you reboot the edge device. A dialog box appears warning you of the changes to the video standard. 39 DVTel EV Series User Manual 5.) Click Yes to make the changes. 6.) Click Apply. 7.) Click OK to reboot the edge device. 6.4.2 Setting the Video Profile from Latitude Video Profiles can be set only from Latitude. They define both the quality of the video images and the storage and bandwidth requirements of the video files. All Video Profiles include at least the following settings: frame rate, resolution, and bit rate. For each video input, you can configure the image parameters. With each video input, the EV Series devices support up to quad-stream encoding. Encoding the video inputs provides either multiple live-view streams or a single recording stream. Selecting multiple live-view streams enables you to use different sets of parameters to provide high or low quality video for analysis. Selecting a single recording stream using H.264 video compression provides high quality video at substantially lower bit rates than previous standards. 6.5 Configuring the Input Properties Input Properties can be configured only from Latitude. The number of video inputs varies depending on the device. For each video input, you can enhance the video image by adjusting the value of brightness, contrast, hue, and saturation. 6.6 Configuring the Device Video Properties Device Video Properties can be configured only from Latitude. For each video input, EV Series devices can send video with different sets of parameters to different locations. The multi-port devices support triple-stream encoding and provide two streams using H.264 compression. You can customize each device in terms of frame rate and resolution to meet each system requirements. 6.7 Configuring the Camera Tampering Properties Camera Tampering Properties can be configured only from Latitude. The camera tampering feature is a real-time automated feature that generates an alarm whenever the camera is repositioned or out of focus. 6.8 Configuring the Motion Detection Properties Motion Detection Properties can be configured only from Latitude. The DVTel EV Series encoders support motion detection on each video input. For each video input, you can configure the motion detection settings by adjusting the values for each input. CAUTION: You must have a good understanding of video technology to use these settings. If you are unsure, do not modify these settings. 40 DVTel EV Series User Manual 6.9 Setting the SNMP Properties Simple Network Management Protocol (SNMP) is a protocol used by network management systems to manage network equipment from a central location. The EV Series devices are SNMP-compliant and store data about themselves in Management Information Bases (MIBs) and return this data (SNMP Traps) to the SNMP requesters. To set the SNMP parameters using Device Configurator: 1.) Double-click EV Device Configurator.exe to start Device Configurator. 2.) Select the Units tab, then click Discover. 3.) In the Units box, right-click the EV Series device and select Batch Network Configuration to display the Batch Network Configuration dialog. 4.) In the Batch Network Configuration dialog, do the following: a.) In the SNMP panel, select the Enabled check box enable the SNMP service. b.) In the System Location box, enter the location for the edge device. c.) In the System Contact box, enter the e-mail address of the network administrator. 41 DVTel EV Series User Manual d.) In the Primary Trap Destination Address box, enter the IP address of the primary server that will receive the SNMP Traps. e.) In the Backup Trap Destination Address box, enter the IP address of the backup server that will receive the SNMP Traps in case the primary server is unavailable. f.) In the Community Name box, enter the name of the group where you want the edge device to be a member. NOTE: The edge device only responds to requests from management servers that belong to the same community. g.) In the SNMPv3 User Name box, enter the name of the SNMP user. h.) In the SNMPv3 User Authentication Type list, select the authentication algorithm for SNMP requests. You can select from the following: No Authentication No authentication is used. MD5 Authentication The Message Digest Version 5 (MD5) hash function is used to determine that the message is from a valid source. SHA Authentication The Secure Hash Algorithm (SHA) has function is used to determine that the message is from a valid source. i.) In the SNMPv3 User Auth Password box, enter a password for the user. j.) In the SNMPv3 Privacy Protocol list, select the privacy protocol to encrypt the contents of the data. You can select from the following: No Encryption No encryption is used. DES Encryption The Data Encryption Standard (DES) algorithm is used to encrypt the data. AES Encryption The Advanced Encryption Standard (AES) algorithm is used to encrypt the data. k.) In the SNMPv3 Privacy Password box, enter a password for the privacy protocol. l.) Click Apply. 5.) Click Close. The device reboots with the new configuration. 42 DVTel EV Series User Manual To set the SNMP parameters using the Web Interface: 1.) In a web browser, enter the IP address of the device in the Address bar, and then press ENTER. 2.) Type the username and password. 3.) From the Configuration folder, select SNMP. 4.) In the SNMP panel, select the Enabled check box to enable the SNMP service. 5.) In the System Location box, enter the location for the edge device. 6.) In the System Contact box, enter the e-mail address of the network administrator. 7.) In the Primary Trap Destination Address box, enter the IP address of the primary server that will receive the SNMP Traps. 8.) In the Backup Trap Destination Address box, enter the IP address of the backup server that will receive the SNMP Traps in case the primary server is unavailable. 9.) In the Community Name box, enter the name of the group where you want the edge device to be a member. 43 DVTel EV Series User Manual NOTE: The edge device only responds to requests from management servers that belong to the same community. 10.) In the User Name box, enter the name of the SNMP user. 11.) In the User Authentication Type list, select the authentication algorithm for SNMP requests. You can select from the following: No Authentication No authentication is used. MD5 Authentication The Message Digest Version 5 (MD5) hash function is used to determine that the message is from a valid source. SHA Authentication The Secure Hash Algorithm (SHA) has function is used to determine that the message is from a valid source. 12.) In the User Authentication Password box, enter a password for the user. 13.) In the User Privacy Protocol list, select the privacy protocol to encrypt the contents of the data. You can select from the following: No Encryption No encryption is used. DES Encryption The Data Encryption Standard (DES) algorithm is used to encrypt the data. AES Encryption The Advanced Encryption Standard (AES) algorithm is used to encrypt the data. 14.) In the User Privacy Password box, enter a password for the privacy protocol. 15.) Click Apply. 6.10 Viewing MIB Information To view MIB information about the EV Series device, click on Download DVTel SNMP MIBs and extract the contents to a location where you can use a SNMP application to view the information. The EV Series device sends a coldStart trap when it is initialized and sends the following DVTel-Specific SNMP traps: Video Signal Loss edVinMediaStateAnalogNotif trap. This trap is generated if an analog video input of an EV Series device is disconnected or reconnected with the following information: Input number (1 to 16 for EV-216 and EV-116, 1 to 8 for EV-208) New state (0: not connected, 1: connected) Dry Input State Change edDigitalinPinStateNotif trap. This trap is generated if the status of a digital alarm dry contact input of the EV Series device has changed with the following information: Input number (1 to 16 for EV-216 and EV-116, 1 to 8 for EV-208) New state (0: not connected, 1: connected) 44 DVTel EV Series User Manual edVinCamtampOofAlarmStateNotif trap. This trap is generated if the Out Of Focus status of an input has changed with the following information: [0x00]= Not Out Of Focus [0x01]= Out Of Focus 6.11 Setting the Audio Properties The EV-208-A and EV-216-A support bidirectional audio input and output. Audio input allows you to capture audio signals from a camera that supports audio at the same time as it captures video. EV Series device audio parameters can be configured via SConfigurator or DVTel Latitude. WARNING: Changing audio parameters via the web might cause a conflict with Latitude AdminCenter and affect the quality of recordings. To set the audio parameters using SConfigurator: 1. Double-click SConfigurator.exe to start SConfigurator. 2. Select the Units tab, then click Discover. 3. Select the EV-208-A or EV-216-A encoder and click Configure. 4. In the tree view, click the Audio node. 5. From the Sampling Rate list, select 8 kHz. 6. Expand the Audio node. 7. Select an encoder to configure. 45 DVTel EV Series User Manual 8. Set the value for the following settings: Input Type: Select Line-in or Mic (with pre-amp). Input Compression: Select Uncompressed PCM (128 kbps) or μ-LAW (64 kbps). Gain State: Select Enabled or Disabled. Gain Level: Move the slider to the left or right. Bias State: Select Enabled or Disabled. Bias Level: Move the slider to the left or right. 9. Repeat Step 7 and Step 8 for the remaining encoders. 10. Click OK. 11. Click Exit to close SConfigurator. To set the audio parameters using DVTel Latitude: 1.) In the Latitude AdminCenter, select an encoder or decoder to configure. 2.) Set the following parameters: Data Format: Select PCM or ULAW. The default setting is PCM. Audio Mode: Select Full-duplex or Push to Talk. The default setting is Fullduplex. Sampling Rate: Set to 8 kHz and cannot be changed. Sensitivity: Move the slider to adjust gain. 6.12 Setting the On-Screen Display for the SinglePort Decoders On the EV-101-D and EV-401-D, you can configure the information about the video that is displayed on the external monitor. To set the on-screen display: 1.) In a web browser, type the IP address of the device in the Address bar, and then press ENTER. 2.) Type the username and password. 46 DVTel EV Series User Manual 3.) From the Configuration folder, select On Screen Display. 4.) In the Display Option list, select the information that you want to display on the monitor. You can select from: Date and Time Uptime Nothing 5.) In the Display Logo list, select Displayed or Not Displayed to show the DVTel logo on the monitor during the device start up. 6.) In the Starve Mode list, select what to display on the monitor when there is no video. You can select from: Screen Saver Black Last Decoded Image 7.) Enter a value in the Transparency box to the set transparency level of the text on the monitor. 8.) From the Tiles tab, for each tile, select if you want to display the name of the device transmitting video and enter the name of the transmitter. 9.) Click Apply. 47 DVTel EV Series User Manual 6.13 Enabling Decoder Quad Operation for Latitude Discovery By default, the EV-101-D and EV-401-D decoders only expose a single video stream to DVTel Latitude for adding a monitor. In order to expose all four decoded streams, you should set the decoder to expose all four output streams. Optimally, this should be done before running the Latitude Discover process. The Web Interface console allows setting the Output Properties as Quad: To enable decoder quad operation for Latitude discovery: 1.) Open the Device Configurator for the EV Series decoder. 2.) In the search results, click on the decoder to select it and then right-click and select Browse from the shortcut menu. The browser window opens and prompts for login. 3.) Log into the Decoder's web page (Default user: admin, password: admin). 4.) In the navigation tree, click Video. 5.) In the settings area, select the Outputs Properties tab. 6.) Do the following: a.) Click on the cell of the Output 1 row below Receiver Mode. The Receiver Mode menu becomes enabled. b.) Click on the right of the Receiver Mode cell and select Quad from the Receiver Mode menu. 7.) Click Apply. The unit resets. You can now run the Latitude Discovery process. Refer the Latitude online help or Latitude Quick Start Guide for more information on discovering a unit. 48 DVTel EV Series User Manual 8.) If you have already discovered the decoder as a single channel, do the following in the Latitude AdminCenter application: a.) On the Latitude sidebar menu, select Physical View, right-click on the decoder unit in the Navigation Tree, and select Rediscover Unit from the shortcut menu. The Add Unit dialog appears. b.) Select the Pro-Line unit type from the Unit type menu. c.) Click OK. A confirmation message that the unit has been rediscovered appears once the process is complete. 49 DVTel EV Series User Manual 6.14 Configuring the Input/Output Terminals The rear panel of the EV Series device has one, two, 8 or 16 dry contact inputs and one, two, or four relay output terminals for triggers and alarms, depending on the model. Video management software such as Latitude enables you to create event-driven Actions to generate a response (a) through the relay outputs to a pre-defined system and (b) through sensors connected to the dry contact inputs for detected motion events. For complete information on using DVTel Latitude Events and Actions, refer to the Latitude User Guide. DVTel Latitude EV Series device 50 DVTel EV Series User Manual 7 Maintaining and Troubleshooting the Device This section discusses how to perform maintenance and troubleshooting tasks on the EV Series devices using either Device Configurator or the Web Interface. Additional troubleshooting tasks can be performed using video management software such as DVTel Latitude. Related Links Updating the Firmware Using Recovery Mode Performing a Hardware Reset Rebooting the EV Series Device Restoring the Factory Default Settings Losing Connection to a Camera 7.1 Updating the Firmware You can use Device Configurator to update the firmware of the EV Series device when a new version becomes available. Updating the firmware allows you access to new features for the device while retaining its configuration. CAUTION: Firmware downgrade is not supported. If you perform a downgrade, any problem encountered will not be covered by the product warranty. To update the firmware using Device Configurator: 1.) Double-click EV Device Configurator.exe to start Device Configurator. 2.) Select the Units tab, then click Discover. The information displayed for the EV Series device varies depending on whether you are using a static IP address or one assigned by a DHCP server. 3.) Select the device. 51 DVTel EV Series User Manual 4.) Select Using an IP network connection and click Start. 5.) In the Firmware File Selection dialog box, click Browse and select the correct firmware file. 6.) Click Next to view the verification screen. 7.) Click Start to begin the firmware update. To update the firmware from the Home panel: 1.) In a web browser, type the IP address of the device in the Address bar, and then press ENTER. 2.) Type the username and password. 3.) From the Home panel, click Update located beside the firmware version. 4.) In the Firmware Update dialog box, click Browse and select the firmware file. 5.) Click Open. 6.) Click Start to begin updating the firmware of the unit. 52 DVTel EV Series User Manual To update the firmware from the Diagnose panel: 1.) In a web browser, type the IP address of the device in the Address bar, and then press ENTER. 2.) Type the username and password. 3.) From the Support folder, select Diagnose. 4.) From the Diagnose panel, click Update Firmware. 5.) In the Firmware Update dialog box, click Browse and select the firmware file. 6.) Click Open. 7.) Click Start to begin updating the firmware of the unit. To perform a batch firmware update: The Device Configurator enables you to easily update the firmware for multiple devices via a network IP connection at the same time, rather than updating them individually. 1. On Latitude, select the network in which the devices are located. 2. Click on United Configurator and select Pro Line. 3. Click on the Discovery tab on the Navigation Bar and select all the EV devices that you wish to update. 4. Right-click on your mouse and select Batch Network Configuration. The Batch Network Configuration window opens. 5. You can select Use DHCP to automatically enter the network IP addresses or Static Configuration to manually enter the network IP addresses. 6. If you select Static Configuration, enter the Starting IP address and Ending IP Address that you wish to use. Also enter the Subnet Mask and Gateway addresses. 7. Click Apply. The system automatically performs the batch firmware update. 53 DVTel EV Series User Manual 7.2 Using Recovery Mode A device can reboot into recovery mode in one of the following situations: The device failed to boot normally The power or network connection to the device is lost during a firmware upgrade A flashing orange LED (at one second intervals) or flashing orange LED (three blinks at one second intervals) and two quick red pulses (at half-second intervals) indicate the device failed to boot normally and has entered recovery mode. For more information on LED status, refer to Understanding the LED Indicators. When the device is in recovery mode, the only way to access the device is using Device Configurator or the Web Interface with reduced functionality. NOTE: If you are going to use Device Configurator to update the firmware of a device in recovery mode, you need to know the IP address of the device in order to access it. The Web Interface with reduced functionality is only accessible using the unsecure Hypertext Transfer Protocol (HTTP). A flashing orange LED (at one second intervals) indicates that the device is using a static IP address. A flashing orange LED (three blinks at one second intervals) and two quick red pulses (at half-second intervals) indicate that the device is using the APIPA address format. For more information on APIPA addressing, see Obtaining and Setting the IP Address. Once you have access to a device in recovery mode, the only way to exit recovery mode is to update the firmware using a valid firmware file. 7.3 Performing a Hardware Reset Depending on the severity of the situation, you can reboot the device and load its default configuration, or perform both these actions if the device does not function the way it should. Start by rebooting the device to see if this restores functionality back to the device. See Rebooting the EV Series Device. If the device still does not function normally, restore the default configuration. See Restoring the Factory Default Settings. 7.4 Rebooting the EV Series Device If the EV Series device does not function the way it should, you can reboot the device to reinitializes the settings. 54 DVTel EV Series User Manual To reboot the EV Series device using Device Configurator: 1.) Double-click EV Device Configurator.exe to start Device Configurator. 2.) Select the Units tab, then click Discover. 3.) Select the malfunctioning device and click Reboot. 4.) Click OK to confirm the reboot. 5.) Click Exit to close Device Configurator. To reboot the edge device: 1.) In a web browser, type the IP address of the device in the Address bar, and then press ENTER. 2.) Type the username and password. 3.) From the Quick Launch bar, click the Reboot icon. To reboot the EV Series device from the device: 1.) On device, press the Reset button. 7.5 Restoring the Factory Default Settings If the device still does not function the way it should after rebooting, you can load the factory default configuration. This operation restores the factory default settings to the device and deletes all user-defined values. To restore the factory default settings using Device Configurator: 1.) Double-click EV Device Configurator.exe to start Device Configurator. 2.) Select the Units tab, then click Discover. The information displayed for the EV Series device varies depending on whether you are using a static IP address or one assigned by a DHCP server. 3.) Select the device and click Configure. 55 DVTel EV Series User Manual 4.) Click Load Default Settings. 5.) Click OK. The device reboots automatically. 6.) Click Exit to close Device Configurator. To restore the factory default settings using the Web Interface: 1.) In a web browser, type the IP address of the device in the Address bar, and then press ENTER. 2.) Type the username and password. 3.) From the Administration folder, select Factory Default Settings. 56 DVTel EV Series User Manual 4.) From the Factory Default Settings panel: Select Restore to Factory Default Settings (Partial) if you want the unit to keep the network settings while restoring the default configuration Select Restore to Factory Default Settings if you want to restore the unit back to the factory default configuration and remove all user settings 5.) Click Restore. To restore the factory default settings using the hard reset: 1.) Press and hold the Reset button on the device until the status LED flashes red very rapidly. NOTE: It can take up to 10 seconds for the system status LED to begin flashing red. 2.) Hold the button for an additional five seconds until the status LED changes color. 7.6 Losing Connection to a Camera If the connection to a camera is lost while streaming video to Latitude, the software displays an error message on the screen and the streaming video displays red/blue frames. On the device, a steady red on any of the video status LEDs indicates that a connection to a camera is lost. In this case, perform the following tasks: Check the connection between the device and the camera Check the camera to ensure that it is transmitting video or that it is functioning correctly Check the device to ensure that it is functioning correctly 57 DVTel EV Series User Manual 8 Appendix The following items are included in this section: Technical Specifications Factory Default Configuration Contacting DVTel Service and Support Glossary 58 DVTel EV Series User Manual 8.1 Technical Specifications The following table presents the technical specifications for the DVTel EV Series devices: EV-208 EV-208-A EV-216 EV-216-A EV-116 Encoders EV-101-D Decoder EV-401-D Decoder One composite, 1V p-p into 75Ω NTSC/ PAL, BNC female, 1 audio in, and 1 audio out One HDMI output, 1 audio-in, and 1 audio-out Video Input Outputs/Connectors H.264 Encoding Quadruple Stream Performance Compression Resolution Bandwidth One, two, 8 or 16 composites, 1V p-p into 75Ω, NTSC/PAL, BNC female Two RJ-45, 8 or 16 BNC female video connectors, 4 or 8 3.5mm PL audio connectors (EV-208A and EV-216-A, respectively), one USB Dual-stream N/A EV-208 and EV216: 4CIF/30 fps + 2CIF/30 fps + CIF/15 fps on all channels simultaneously EV-116: D1/15 fps (H.264) H.264 Main Profile NTSC: Scalable from CIF (352 x 240 pixels) to 4CIF (704 x 480 pixels) PAL: Scalable from CIF (352 x 288 pixels) to 4CIF (704 x 576 pixels) Each stream configurable from 9 Kbps to 6 Mbps Maximum Latency 115 msec Tiles N/A N/A N/A Yes 4 x D1/30 fps NTSC: Scalable from CIF (352 x 240 pixels) to D1 (720 x 480 pixels) PAL: Scalable from CIF (352 x 288 pixels) to D1 (720 x 576 pixels) N/A Scalable from SD to 720p or 1080i Maximum of four tiles on one monitor. Tile display options: 1 x 1 and 2 x 2 59 DVTel EV Series User Manual EV-208 EV-208-A EV-216 EV-216-A EV-116 Encoders EV-101-D Decoder EV-401-D Decoder Network Interface 1 Interface 2 Protocols Security RJ-45 Ethernet RJ-45 Ethernet (10/100 Mbps) (10/100/1000 Mbps) RJ-45 Ethernet N/A (10/100/1000 Mbps) for maintenance only RTP/IP, UDP/IP, TCP/IP or multicast IP, DNS, NTP, SNMP v1/v2/v3 (MIB-II), HTTP, HTTPS, DHCP and 802.1x SSL-based authentication, password protected, HTTPS Serial and USB Ports Electrical Operating Mode USB Port 1: RS-232 (max. 230 kbps) pluggable screw terminal strip. RS-232 (max. 230 kbps) pluggable clip terminal strip or RS-422/485 two/four wires (max. 230 kbps) pluggable clip terminal strip. Port 2: RS-422/485 two/four wires (max. 230 kbps) pluggable screw terminal strip. Transparent serial port supporting any asynchronous serial protocol 1 USB host port N/A (USB drive not included) Alarm Input Output EV-208: 8 dry contacts EV-216: 16 dry contacts EV-208: Two relay contacts (48V AC/DC at 500 mA max.) Two dry contacts One relay contact (48V AC/DC at 100 mA max.) EV-216: Four relay contacts (48V AC/DC at 500 mA max.) 60 DVTel EV Series User Manual EV-208 EV-208-A EV-216 EV-216-A EV-116 Encoders EV-101-D Decoder EV-401-D Decoder Audio Bidirectional Audio Connectors Available only on EV-208-A and EV216-A: 3 dB frequency response (1kΩ load): 60 to 3600 Hz,(16Ω load): 350 to 3600 Hz Maximum input voltage (-12 dB input attenuation): 1.4 Vrms Maximum output voltage/power (16Ω load): 800mVrms/ 40mW Microphone BIAS voltage: 3V EV-208-A: 4 audio-in jacks (1/8 in./3.5 mm); 8 audio-out jacks (1/8 in./3.5 mm) Input: -46 to -3 dBV into 30kΩ (line or microphone input) Output: -46 to -3 dBV into 16Ω min. 1/8 in./3.5 mm (1audio-in/1 audio-out) EV-216-A: 8 audio-in jacks (1/8 in./3.5 mm); 16 audio-out jacks (1/8 in./3.5 mm) 61 DVTel EV Series User Manual EV-208 EV-208-A EV-216 EV-216-A EV-116 Encoders EV-101-D Decoder EV-401-D Decoder Power Supply Voltage Power Supply Power Consumption 12VDC ±10% 12VDC (not included) EV-116: 23W max. (2.1A at 12VDC) 12VDC (included) Max. 4W EV-208: 20W max. (1.7A at 12VDC) EV-208-A: 22W max. (2.2A at 12VDC) EV-216: 25W max. (2.1A at 12VDC) EV-216-A: 28W max. (2.2A at 12VDC) Physical Enclosure Dimensions Weight Operating Temperature Humidity Firmware 1U Metal case with Non-weatherproof steel case for tableflange mount (black) top or rack-mount installation 17L x 6.6W x 1.7H 4.2L x 3.5W x 1.7H in. (106L x 90W x in. (430L x 167.68W 42H mm) x 42.6H mm) 4.0 lb. (1.8 kg) 9.2 oz. (260 g) 32ºF to 131ºF 32ºF to 140ºF (0ºC to 55ºC) (0ºC to 60ºC) 95% non95% non-condensing at 140ºF (60ºC) condensing at 131ºF (55ºC) Embedded Linux-based operating system Management Configuration and Firmware Upgrade Latitude VNMS, Device Configurator, and Web browser interface (single device firmware upgrade and batch firmware upgrade) 62 DVTel EV Series User Manual EV-208 EV-208-A EV-216 EV-216-A EV-116 Encoders EV-101-D Decoder EV-401-D Decoder Optional Accessories Firmware Version 8.2 DVT-PWR-40W power supply; DVT-PWR-275RM1 power supply; DVT-PWR-275RM2 dual power supply; DVT-WH-4UA wiring harness Version 2.0 PS121 rack-mountable power supply; rack-mount panel Factory Default Configuration DVTel EV Series encoders are programmed at the factory with the following configuration: Type Serial port Configuration Bit rate: 4800 bps Data bits: 8 Parity: none Stop bit: 1 RS-232 RS-422/485 operating mode: RS-422 four-wire Access management IP firmware update: Enabled Global security profile: Disabled SSL passkey: <empty> Network DHCP configuration: Enabled 63 DVTel EV Series User Manual Type Video settings Configuration EV-208 and EV-216: Encoder 1: Compression type: H.264 Resolution: 4CIF Target frame rate: 30 fps (NTSC)/25 fps (PAL) Target bit rate: 1200 kbps Minimum quantizer: 14 Maximum quantizer: 24 Encoder 2: Compression type: H.264 Resolution: CIF Target frame rate: 30 fps (NTSC)/25 fps (PAL) Target bit rate: 300 kbps Minimum quantizer: 14 Maximum quantizer: 24 Video settings VSIP EV-116 Single H.264: EV-116 Dual H.264: Encoder 1: Encoder 1: Compression type: H.264 Compression type: H.264 Resolution: 4CIF Resolution: 2CIF Target frame rate: 15 fps Target frame rate: 15 fps (NTSC)/12.5 fps (PAL) (NTSC)/12.5 fps (PAL) Target bit rate: 600 kbps Target bit rate: 300 kbps Minimum quantizer: 14 Minimum quantizer: 14 Maximum quantizer: 24 Maximum quantizer: 24 Encoder 2: Encoder 2: Compression type: MPEG4 Compression type: H.264 Resolution: CIF Resolution: 2CIF Target frame rate: 15 fps Target frame rate: 15 fps (NTSC)/12.5 fps (PAL) (NTSC)/12.5 fps (PAL) Target bit rate: 500 kbps Target bit rate: 300 kbps Minimum quantizer: 2 Minimum quantizer: 14 Maximum quantizer: 30 Maximum quantizer: 24 VSIP Port: 5510 VSIP Discovery IP Address: 255.255.255.255 64 DVTel EV Series User Manual 8.3 Contacting DVTel Service and Support DVTel, Inc. is a multiple award-winning market leader in the development and delivery of intelligent security solutions over IP networks. We provide unified solutions that leverage existing network infrastructure while providing unmatched levels of flexibility, scalability, and cost-effectiveness—all backed by superior customer support. To contact us: CORPORATE HEADQUARTERS DVTel, Inc. 65 Challenger Road Ridgefield Park, NJ 07660 USA Tel: 201.368.9700 Fax: 201.368.2615 Order Fax: 201.712.0343 [email protected] ANZ AND THE PACIFIC ISLANDS DVTel 37 Victoria Street Henley Beach SA 5022 Australia Tel: +61 8 8235 9211 Fax: +61 8 8235 9255 Mobile: +61 419 850 166 [email protected] INDIA AND SAARC DVTel Gesco Corporate Centre The Great Eastern Centre 70, Nehru Place New Delhi 110019 India Tel: +91 11 26209202 Fax: +91 11 26209302 [email protected] China DVTel China Room 607. Block 3 Zhubang 2000 Office Tower No.98 Balizhuang Xili Chaoyang District Beijing 100025 China Tel: +86-10-8586-8836 Mobile: +86-13501266857 [email protected] ASIA PACIFIC REGION DVTel 111 North Bridge Road, #27-01/02 Peninsula Plaza, Singapore 079098 Tel: +65 6389 1815 Fax: +65 6491 5660 [email protected] EMEA DVTel UK LTD. 7 Lancaster Court Coronation Road High Wycombe, HP12 3TD England Tel: +44 (0) 1494 430240 Fax: +44 (0) 1494 446928 [email protected] CALA DVTel Mexico S.A.P.I. de C.V Ave. Paseo de la Reforma No. 505 Piso 31 Col. Cuauhtémoc México, Distrito Federal, C.P. 06500 México Tel: +52 443 279 3746 Fax: +52 55 8503 4299 [email protected] DVTel 中国. 北京市朝阳区八里庄西里98号住邦2000商务中心3号 楼607室 100025 座机: +86-10-85868836 手机: +86-13501266857 传真: +86-10-85868815 邮件: [email protected] To request the latest versions of firmware and software or to download other product-related documents, visit http://www.dvtel.com/support. If you have obtained a login account, go to our support gateway. For assistance, e-mail us at [email protected] or phone 1-888 DVTEL 77. Type Configuration 65 DVTel EV Series User Manual 8.4 Glossary Access Point A communication hub for connecting wireless edge devices to a wired LAN. AES (Advanced Encryption Standard) An encryption standard used in the WPA2 authentication method. APIPA (Automatic Private IP Addressing) A feature of Windows-based operating systems that enables a device to automatically assign itself an IP address when there is no Dynamic Host Configuration Protocol (DHCP) server available to perform that function. Also known as AutoIP. Bridge See Wireless Bridge. CCTV (Closed Circuit Television) A television system in which signals are not publicly distributed. Cameras are connected to television monitors in a limited area such as a store, an office building, or on a college campus. CCTV is commonly used in surveillance systems. CIF (Common Intermediate Format) A video format that easily supports both NTSC and PAL signals. Many CIF flavors are available, including CIF, QCIF, 2CIF, and 4CIF. Each flavor corresponds to a specific number of lines and columns per video frame. CLI (Command Line Interface) A textual user interface in which the user responds to a prompt by typing a command. Codec (Coder/Decoder) A software library that compresses or decompresses a video stream following a specific protocol. Configuration Assistant A proprietary graphical program used to configure and update the firmware of the S1100 edge devices. Decoder See Receiver. Device Configurator A proprietary graphical program used to configure and update the firmware of edge devices. DHCP (Dynamic Host Configuration Protocol) A communication protocol that lets network administrators manage centrally and automate the assignment of Internet Protocol (IP) addresses in a network. DVR (Digital Video Recorder) A device (usually a computer) that acts like a VCR in that it has the ability to record and play back video images. The DVR takes the feed from a camera and records it into a digital format on a storage device which is most commonly the hard drive. Edge Device A DVTel device transmitting or receiving video signals through an IP network. The devices can be wireless or wired. Some transmitters are IP cameras. Encoder See Transmitter. Ethernet A local area network (LAN) architecture using a bus or star topology and supporting data transfer rates of 10, 100, and 1000 Mbps. It is one of the most widely implemented LAN standards. The 802.11 protocols are often referred to as “wireless Ethernet.” Firmware Software stored in read-only memory (ROM) or programmable ROM (PROM), therefore becoming a permanent part of a computing device. H.264 Also known as MPEG-4 AVC (Advanced Video Coding), H.264 is a video compression standard that offers significantly greater compression than its predecessors. IP (Internet Protocol) The network layer for the TCP/IP protocol suite widely used on Ethernet networks. 66 DVTel EV Series User Manual LAN (Local Area Network) A computer network that spans a relatively small area. A LAN can connect workstations, personal computers, and surveillance equipment (like edge devices). See also WAN. PSK (Pre-Shared Key) A mode of the WPA and WPA2 security protocols, designed for home and small office networks that cannot afford the cost and complexity of an authentication server. It is also known as personal mode. Multicast Communication between a sender and multiple receivers on a network. The devices can be located across multiple subnets, but not through the Internet. Multicast is a set of protocols using UDP/IP for transport. PTL Push-To-Listen. In a two-way system, this is the communication mode in which the listener must push a button while listening. PTT Push-To-Talk. In a two-way system, this is the communication mode in which the talker must push a button while talking. NTSC (National Television Standards Committee) The North American standard (525-line interlaced raster-scanned video) for the generation, transmission, and reception of television signals. In addition to North America, the NTSC standard is used in Central America, a number of South American countries, and some Asian countries, including Japan. Compare with PAL. PTZ Camera Pan-Tilt-Zoom. An electronic camera that can be rotated left, right, up, or down as well as zoomed in to get a magnified view of an object or area. A PTZ camera monitors a larger area than a fixed camera. QoS Quality of Service. A set of low-level networking protocols that give higher priority to more important data flows while ensuring that the less important ones do not fail. NTP (Network Time Protocol) A protocol designed to synchronize the clocks of devices over a network. OSD On-screen Display. Status information is displayed on the video monitor connected to a receiver edge device. Receiver A device that converts a digital video signal into an analog form. Also called decoder. Repeater A range extender for wireless links. PAL (Phase Alternation by Line) A television signal standard (625 lines) used in the United Kingdom, much of Europe, several South American countries, some Middle East and Asian countries, several African countries, Australia, New Zealand, and other Pacific island countries. Compare with NTSC. RF Radio Frequency. Any frequency within the electromagnetic spectrum that is associated with radio wave propagation. When a modulated signal is supplied to an antenna, an electromagnetic field is created that is able to propagate through space. Many wireless technologies are based on RF field propagation. PEAP Protected Extensible Authentication Protocol. A method to securely transmit authentication information, including passwords, over a wireless network. RS-232 A standard interface approved by the Electronic Industries Alliance (EIA) for connecting serial devices. Point-to-Point Connection The association of a transmitter and a receiver to view video coming from an analog camera on an analog monitor. 67 DVTel EV Series User Manual RS-422 A standard interface approved by the Electronic Industries Alliance (EIA) for connecting serial devices that was designed as an alternative to the older RS-232 standard because it supports higher data rates and greater immunity to electrical interference. between a computer and a DVTel edge device, or between two devices. WAN Wide Area Network. A computer network that spans a relatively large geographical area. Typically, a WAN consists of two or more local area networks (LANs). RS-485 An Electronics Industry Alliance (EIA) standard for multi-point communications. WEP Wired Equivalent Privacy. A security protocol for wireless local area networks (WLANs) defined in the 802.11b standard. It is designed to afford wireless networks the same level of protection as a comparable wired network. Serial Port An interface that can be used for serial communication, in which only one bit is transmitted at a time. A serial port is a general purpose interface that can be used for almost any type of device. Wireless Bridge A link between two networks (wired or wireless). Wireless Cell A group of wireless devices that communicate together on the same radio frequency channel and share the same wireless passkey. SSL Secure Sockets Layer. A commonly used protocol for transmitting private documents via the Internet. SSL works by using a public key to encrypt data that is transferred over the SSL connection. The SSL protocol secures the following data: I/O, serial port, and VSIP communication. It does not apply to audio and video transmission. Wireless Transmission A technology in which electronic devices send information to receivers using radio waves rather than wiring. WPA1 Wi-Fi Protected Access version 1. An authentication method used to secure wireless systems that is the successor to WEP. WPA implements the majority of the IEEE 802.11i standard. TKIP Temporal Key Integrity Protocol. A security protocol used in the WPA authentication method. TLS Transport Layer Security. A cryptographic protocol that provide secure communications on a wireless network. WPA2 (Wi-Fi Protected Access version 2) An authentication method that implements the full 802.11i standard, but will not work with some older network cards. Also known as 802.11i. Transceiver Transmitter/Receiver. A device that transmits and receives analog or digital signals. Transmitter A device that sends video signals captured with a connected camera to a receiver. The transmitter converts the analog signal into a digital form before transmitting it. Also called encoder. TTLS Tunneled Transport Layer Security. A cryptographic protocol that creates a secure TLS tunnel. VSIP Video Services over IP. A proprietary communication protocol for sending messages 68