1
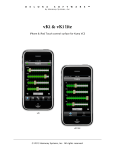
D
E
L
O
R
A
S
O
F
T
W
A
R
E
b y Ha rmo ny S yste ms, I nc .
vKiP
Version 2.0
iPad control surface for Kyma VCS
© 2012, 2015 Harmony Systems, Inc. All rights reserved.
™
Under the copyright laws, this manual may not be copied, in whole or part,
without the written consent of Harmony Systems, Inc. Your rights to the software are governed by the accompanying software license agreement.
Delora Software and vKiP are trademarks of Harmony Systems, Inc.
Other company and product names mentioned in this manual are trademarks of
their respective companies. Mention of third-party products is for informational
purposes only. Harmony Systems assumes no responsibility with regard to the
performance or use of these products.
Every effort has been made to ensure the accuracy of this manual. Please contact Delora Product Support ([email protected]) should you have questions
regarding information in this manual.
4
D el or a So f t wa r e ™ b y H a rm on y S y s te m s , I nc . -
vK iP
D
E
L
O
R
A
S
O
F
T
W
A
R
E
™
b y Ha rmo ny S yste ms, I nc .
Table of Contents
Requirements
1
Introduction to vKiP
2
Set-Up
4
Paca and Pacarana sound engines
4
Capybara 320 sound engines
7
Using vKiP
10
Connect using MIDI
10
Connect using OSC
11
Main Screen
13
Orientation
14
Matrix of 32 Switches
15
Faders/Rotaries and Associated Controls
15
Snap Shots
19
Master Volume Controls
20
Optional Sound Engine Controls
20
Info Button
20
vKiP Preferences
23
Getting the Most Out of vKiP With the Kyma VCS
25
Troubleshooting
27
General Connection Issues
27
Important Notes About the VCS
30
Contact Delora Support
32
Appendix
33
Using Network MIDI
33
Setting Up An Ad-Hoc Wi-Fi Network
37
Acknowledgements
D el or a So f t wa r e ™ b y H a rm on y S y s te m s , I nc . -
41
vK iP
Requirements
• Apple iPad
• Symbolic Sound Kyma X.82 (or later) system and Paca or Pacarana sound engine with most recent firmware installed. Capybara sound engines are supported provided one of the following is true:
• You are using a Mac that has a bidirectional MIDI connection to the Capybara, and that Mac is running with CapyLink or KymaConnect, or
• You are using a Mac that has a bidirectional MIDI connection to the Capybara, and you connect vKiP using network MIDI, or
• You are using a Windows PC that has a bidirectional MIDI connection to the
Capybara, it is running rtpMIDI (http://www.tobias-erichsen.de/rtpMIDI.html), and you connect vKiP using network MIDI, or
• You have an iPad compatible MIDI interface that connects bidirectionally to
the Capybara, and you connect vKiP using regular MIDI
• Wireless connection, including network MIDI, requires Wi-Fi access between
the iPad and the Paca or Pacarana. Or, Wi-Fi access between the iPad and the
Mac where CapyLink, PacaConnect, or KymaConnect are installed.
1
D el or a So f t wa r e ™ b y H a rm on y S y s te m s , I nc . -
vK iP
Introduction to vKiP
Harmony Systems “v” family of Delora software products expand the control
surface options for Symbolic Sound’s Kyma X sound design workstation beyond
the computer oriented mouse, keyboard and display monitor. vKiP transforms
your iPad into a touch oriented wireless “Virtual Control Surface” (VCS) controller for your Kyma system.
vKiP provides full VCS functionality, equivalent to that provided in our Delora
vM2 product. If you have used a CM Labs Motormix or our vM2 application, you
will feel right at home with vKiP. However, vKiP has been designed for optimal
functionality on the iPad device - controls (including rotaries) are large enough
for accurate touch control, visual feedback of various selected states is provided, and the layout is appropriate for the iPad screen size. Now you can enjoy
the power of Kyma sound creation without being physically tethered to your
computer!* (* For a true one-handed “wireless remote control” option, check out
our Delora vKi application for the iPhone/iPod touch.)
Built for Open Sound Control (OSC)
vKiP is designed from the ground up to work with the Paca(rana)’s native Open
Sound Control (OSC). Since Kyma’s MotorMix VCS support relies on traditional
MIDI, vKiP uses “MIDI-over-OSC” to send MIDI back and forth between the iPad
and Paca(rana).
Legacy MIDI Support
vKiP can also connect using conventional MIDI. This can be accomplished over a
Wi-Fi network to a Mac (or Windows PC running rtpMIDI, http://www.tobiaserichsen.de/rtpMIDI.html ) that has a MIDI connection to the Paca, Pacarana,
or Capybara, or using traditional MIDI cables if the iPad is equipped with an
iPad compatible USB MIDI interface.
2
D el or a So f t wa r e ™ b y H a rm on y S y s te m s , I nc . -
vK iP
Enhanced operation with KymaConnect
When vKiP is connected to the Paca, Pacarana, or Capybara through Delora
Software’s KymaConnect application, additional capabilities are enabled. These
include remote control of the Kyma sound engine, plus playing and pausing
Kyma sounds.
Legacy Capybara 320 Kyma Systems
Capybara 320 sound engines do not offer network connections so they are not
compatible with OSC. These systems require a traditional bidirectional MIDI
connection between the Capybara and the VCS controller. vKiP supports this
usage through the following methods:
• Direct physical MIDI connection between the Capybara and an iPad
equipped with an iPad compatible USB MIDI interface.
• Wi-Fi network MIDI connection between the iPad and a Mac, or Windows PC
running rtpMIDI. The computer then connects directly to the Capybara using a bidirectional MIDI interface.
• Wi-Fi OSC connection to a Mac running Delora Software KymaConnect or
Delora Software CapyLink, with the Mac also connected to the Capybara
through a bidirectional MIDI interface
3
D el or a So f t wa r e ™ b y H a rm on y S y s te m s , I nc . -
vK iP
Set-Up
Once you have the vKiP application on your iPad, you can use vKiP simply by
completing these actions each time you run the application. Note that the steps
depend upon what type of sound engine you have (Paca/Pacarana or Capybara),
and how you are connecting your iPad to the sound engine. You can use one of
three methods to connect the iPad: Wi-Fi network OSC, W-Fi network MIDI, or
iPad USB MIDI.
Note: Paca(rana)s can connect to your Wi-Fi network either directly or through
Delora Software’s KymaConnect and PacaConnect OS X applications. KymaConnect and PacaConnect connections are similar so in the instructions that follow,
only KymaConnect will be mentioned. For complete information about using
these two applications please see their respective user guides (available on our
website www.delora.com).
Note
Every Kyma system must be configured for remote VCS control before you
can use vKiP. This one-time set up is performed as follows:
• Bring up Kyma’s preferences and press the “Performance” button.
• On the displayed “Performance Preferences” panel, select “MotorMix” under “External Midi Controller”.
• Close this panel, and then preferences, and Kyma should be ready to use
vKiP anytime going forward.
Paca and Pacarana sound engines
Wi-Fi network OSC directly to Paca(rana)
Preliminaries:
4
D el or a So f t wa r e ™ b y H a rm on y S y s te m s , I nc . -
vK iP
The Paca(rana) must have its Firewire connection to the Mac or Windows PC
where you run Kyma. Its network Ethernet connection must be connected to
your Wi-Fi network through a switch/router/access point. Also your Wi-Fi network must automatically assign IP numbers using DHCP, and it must properly
support Bonjour, or you will not be able to locate and connect to your
Paca(rana).
Each time you use vKiP:
1. Power up the Paca(rana) and your other network components if they are not
already powered.
2. Make sure Wi-Fi is enabled on your iPad. You use the iOS Settings app for
this step.
3. Start Kyma.
Wi-Fi network OSC to Paca(rana) through KymaConnect
Preliminaries:
The Paca(rana) must have its Firewire connection to the Mac or Windows PC
where you run Kyma. Its network Ethernet connection must be connected to the
Mac running KymaConnect Ethernet port. This Mac must also have a second
network connection (usually its built-in Airport Wi-Fi) to the same Wi-Fi network
you connect your iPad. KymaConnect must be running before vKiP can connect.
Each time you use vKiP:
1. Power up the Mac running KymaConnect. If KymaConnect is configured for
manual starting also start it up. Power up your other network components if
they are not already powered.
2. Power up the Paca(rana).
3. Make sure Wi-Fi is enabled on your iPad. You use the iOS Settings app for
this step.
5
D el or a So f t wa r e ™ b y H a rm on y S y s te m s , I nc . -
vK iP
4. Start Kyma.
Network or USB MIDI connection from iPad to Paca(rana)
It is possible to connect vKiP to a Paca or Pacarana using a direct USB MIDI connection. This has a few advantages, such as eliminating any possible connection
issues due to Wi-Fi performance. However such a method requires additional
hardware: an iPad compatible USB MIDI interface, and a USB or FireWire MIDI interface for the Paca(rana). A couple of MIDI cables complete the picture.
The disadvantage of such a scheme, besides the extra components and cost, is
that the iPad is now physically tethered to the Paca(rana). On the other hand
this type of connection may make sense if you use a special “MIDI dock” with
your iPad that also serves as a tabletop stand.
A slightly different variation of the physical MIDI connection is to connect the
iPad’s MIDI interface to a MIDI interface connected to a Mac. The Mac also
would require either KymaConnect, PacaConnect (or the now discontinued
PacaMidi) application. Here the MIDI connection to and from the Paca(rana) is
accomplished using the virtual Paca(rana) MIDI port those applications provide.
The MIDI path from iPad to Paca(rana) is completed by assigning the Mac MIDI
interface that connects to the iPad to one of KymaConnect’s (or PacaConnect or
PacaMidi) external MIDI ports.
Network MIDI can also be used to form the MIDI connection from the iPad to the
Paca(rana) provided a Mac or Windows PC serves as a “middle man”. With either
type of computer there remains a need to have a MIDI connection from the
computer to the Paca(rana).
Network MIDI performance when used over Wi-Fi is subject to constraints similar to OSC performance. For this reason you are probably better using an OSC
style connection.
6
D el or a So f t wa r e ™ b y H a rm on y S y s te m s , I nc . -
vK iP
Capybara 320 sound engines
Wi-Fi network OSC to Capybara through KymaConnect or CapyLink (PacaConnect not supported)
Preliminaries:
The Capybara must have its Flame Firewire connection to the Mac or Windows
PC where you run Kyma. Its MIDI input and output must connect to a MIDI interface that connects to the Mac where KymaConnect or CapyLink run. This Mac
must also connect to the same Wi-Fi network you connect your iPad. KymaConnect/CapyLink must be running before vKiP can connect. Note: it is not required
that the Mac running KymaConnect or CapyLink be the same as the computer
running Kyma.
Each time you use vKiP:
1. Power up the Mac running KymaConnect/CapyLink. If KymaConnect/
CapyLink is configured for manual starting, also start it up. Power up your
other network components if they are not already powered.
2. Power up the Capybara; verify its MIDI connection to the Mac is also fully
powered.
3. Make sure Wi-Fi is enabled on your iPad. You use the iOS Settings app for
this step.
4. Start Kyma.
USB MIDI from iPad to Capybara
This is one of the simplest and most direct ways to control the Capybara from
the iPad!
Preliminaries:
7
D el or a So f t wa r e ™ b y H a rm on y S y s te m s , I nc . -
vK iP
The Capybara must have its Flame Firewire connection to the Mac or Windows
PC where you run Kyma. Its MIDI input and output must connect to the USB MIDI
interface that connects to iPad.
Each time you use vKiP:
1. Power up the Capybara
2. Make sure that the iPad’s USB MIDI interface is also powered
3. Start Kyma
Network MIDI from iPad to Capybara
Preliminaries:
This set up requires a computer with a network connection to the same Wi-Fi
network you connect the iPad. If that computer is also a Windows PC then it
must also have rtpMIDI installed and running. The network MIDI connection
must also be properly configured on the computer.
Additionally the computer must also have a physical bidirectional MIDI connection to the Capybara. A “MIDI patchbay” application must also run on the computer to form the connection between the physical MIDI port that connects to
the Capybara, and the network MIDI port the iPad connects to.
The Capybara must have its Flame Firewire connection to the Mac or Windows
PC where you run Kyma. Its MIDI input and output must connect to the USB MIDI
interface that connects to iPad.
Each time you use vKiP:
1. Power up the Mac or Windows PC that provides the network MIDI connection.
Power up your other network components if they are not already powered.
Power up the computer’s MIDI interface (to the Capybara) if necessary.
2. Power up the Capybara.
8
D el or a So f t wa r e ™ b y H a rm on y S y s te m s , I nc . -
vK iP
3. Make sure Wi-Fi is enabled on your iPad. You use the iOS Settings app for
this step.
4. Start Kyma.
9
D el or a So f t wa r e ™ b y H a rm on y S y s te m s , I nc . -
vK iP
Using vKiP
When you start vKiP it begins with its main screen. If you have connected to
your Kyma setup in the past, and that connection is still valid, then you will see
vKiP display the current VCS values. However the first time, and any time connections change, you will have to manually connect to your Kyma system.
The “iButton”
is used to make this connection. It also notifies you when the
connection has not yet been established, or it has somehow disconnected. The
iButton will pulse a red glow when there is no working connection.
Tap the iButton to show vKiP’s main info screen. One of the items, “Connect to
Kyma” shows the current connection status. Tap this item to show the main
connection screen.
vKiP offers two main ways to connect to Kyma: MIDI and OSC. You select whichever you wish to use using the selector switch at the top. Once you have chosen
the connection type you can then press the item under the label “Kyma Host
Connection” to make, or change, the active connection. What you see next depends whether you are connecting using MIDI or OSC.
Connect using MIDI
MIDI connections are made
one each for input and output. Each of these can choose
one of the MIDI ports your
iPad currently has. For example if you have a USB MIDI interface connected through the
Apple Camera Connection Kit,
then that port shows as a
possible input (or output). iOS
MIDI supports multiple MIDI
10
D el or a So f t wa r e ™ b y H a rm on y S y s te m s , I nc . -
vK iP
interfaces at the same time, though it is somewhat unusual to use such a set
up. So normally you will only see a single choice for input or output.
If you wish to use a network MIDI connection then you must first select a “host”.
Apple’s network MIDI system, which the iPad uses, uses Bonjour to “advertise”
hosts that the iPad can connect to. When you tap the item under “Network MIDI
Hosts” you will see a list of the available computers (or other devices) that offer
a network MIDI connection. Select the computer that you are using to form the
connection to your Paca(rana) or Capybara.
If you do not see any possible network MIDI hosts then there is probably an issue with your Wi-Fi setup. See the “Troubleshooting” section for guidance.
Once you have selected a network MIDI host, then a new option “Network Session 1” appears as a possible MIDI input and output. iOS network MIDI support
currently has a single MIDI port named “Network Session 1” for all connected
hosts. Select this as the active MIDI input and output. Once selected you should
see vKiP refresh its screen with the current Kyma VCS information after a brief
delay.
Connect using OSC
When you connect using OSC you are connecting directly to a Paca(rana), or
through an intermediary “proxy” application that is running on your Mac that is
connected to your Paca, Pacarana, or Capybara. vKiP differentiates between
these different types of connections so that you can choose the one best suited
to your needs.
When you tapped the “Kyma Host Connection” item you are taken to a new
screen labeled “Kyma Hosts”. vKiP scans its network connection to locate possible Kyma hosts and displays them as a list divided into three different sections:
Paca(rana)s, PacaProxies, and Capybaras.
Paca(rana)s represents all of the Paca and Pacaranas currently visible on the
same network the iPad is connected. If you have connected your Paca(rana)’s
Ethernet network port to your Wi-Fi router or another hub then it will show up in
this section. If you do not see it then there is likely a networking issue; see the
11
D el or a So f t wa r e ™ b y H a rm on y S y s te m s , I nc . -
vK iP
“Troubleshooting” section
for guidance.
PacaProxies displays any
Macs currently running KymaConnect or PacaConnect
(provided the “PacaProxy”
feature is turned on. See
the KymaConnect or PacaConnect user guide for information). If the Mac is
currently running and connected to the same Wi-Fi
network as the iPad, and
KymaConnect/PacaConnect are active, then the Paca(rana) connected to KymaConnect/PacaConnect will show up as a PacaProxy. If you do not see it then
consult the “Troubleshooting” section for guidance.
Capybaras displays any Macs currently running KymaConnect or CapyLink (provided KymaConnect has the “CapyLink” feature turned on. See the KymaConnect
user guide for information). If the Mac is currently running and connected to
the same Wi-Fi network as the iPad, and KymaConnect/CapyLink are active, then
that computer’s name will display as a “Capybara”. If you do not see it then
consult the “Troubleshooting” section for guidance.
Under some set ups it is possible for the same Paca(rana) to display in both the
Paca(rana) and PacaProxy sections. Typically this indicates that the network is
not quite configured properly (normally the Paca or Pacarana is on its own “private” network when using KymaConnect/PacaConnect). You can operate your
set up in this manner if you wish but we suggest reviewing your set up to see if
this is really what you intended and need. Regardless we suggest connecting
through the PacaProxy item, and not the Paca(rana) item, as this then lets you
access some of vKiP’s option features.
12
D el or a So f t wa r e ™ b y H a rm on y S y s te m s , I nc . -
vK iP
vKiP is designed to work in an environment that has a mix of Capybaras and
Paca(rana)s; even multiples of each. An example of this type of situation might
be a sound design studio with multiple Kyma workstations, or a university media lab. Paca(rana)’s each have a unique name in the form of “beslime-XXX”,
where XXX is the device’s serial number. This serial number is visible from the
Paca(rana)’s front panel display in the Help section. If you have multiple Paca or
Pacaranas you may find it helpful to label the Kyma workstation with the name
of the device it is associated with (the one that connects over FireWire).
You can switch between different hosts at any time. Once the connection is established vKiP “resyncs” with Kyma so that vKiP’s display shows the current values of the VCS.
vKiP also remembers the last host whenever you leave the app. It will attempt to
reconnect to this last host the next time you start vKiP. If that host is unavailable for any reason vKiP will still show the host name but with “offline” after it.
Main Screen
Virtually all of vKiP’s functionality is located on one screen; additional information and preference selections are available by pressing the
icon. The main
screen has three general “sections”:
• 4x8 matrix of switches (buttons)
• faders, rotaries & LCD
• general controls area
13
D el or a So f t wa r e ™ b y H a rm on y S y s te m s , I nc . -
vK iP
Orientation
vKiP automatically creates an optimized layout for both the vertical (portrait)
and horizontal (landscape) orientations. You can select either one at any time
simply by rotating the iPad. If you wish to “lock” a particular orientation use the
iPad’s orientation lock feature.
Note to vKiP 1 users: The original version of vKiP offered two different landscape layouts, “left handed” and “right handed” . The current vKiP now only offers a single landscape layout.
14
D el or a So f t wa r e ™ b y H a rm on y S y s te m s , I nc . -
vK iP
Matrix of 32 Switches
Kyma always assigns the top four rows of eight switches to the first 32 switches
used by the currently active virtual control surface “layer”. These are not
“banked”. vKiP emulates the functionality of this matrix, including an indication
(by the button’s illuminosity) of the on/off state if toggle buttons are used.
Note
Faders/Rotaries and Asso-
If you adjust a fader using the comput-
ciated Controls
er mouse, be aware that Kyma does not
The eight faders and eight rotaries
work as you would expect. Slide
the “thumb” up and down to adjust each fader, or move your finger in a circle around the center of
a rotary. You can see (and hear)
send the updated value to its control
surface until you release the mouse
button after dragging the fader. Thus,
you won’t see the fader change on the
vKiP screen until you release the mouse
button.
15
D el or a So f t wa r e ™ b y H a rm on y S y s te m s , I nc . -
vK iP
fader changes made on vKiP reflected in the value and position of the fader on
your computer screen.
Rotaries by default are adjusted using a circular motion. You may find though
that you prefer to use a more “up and down” motion. You can select this by exiting vKiP and opening the iOS Settings app, then select vKiP. Here you will find
the “Linear Rotaries” option, as well as these other preference settings: (See the
chapter “vKiP Preferences” for more information on all preference options).
“Jump to Touch” Option
Enable if you wish taps within the fader bar to move the fader to that value immediately. The default setting for “Faders Jump to Touch” is OFF.
“Control Touch Shows Value” Option
If you want to see the real time value changes in the “LCD” display when manipulating an individual fader or rotary, you can enable the Preference option “Control Touch Shows Value”.
When “Control Touch Shows Value” is enabled, vKiP will request
that Kyma displays the rotary
and fader value for the latest rotary or fader you have touched.
The “LCD” will show these values, plus the rotary and fader
Note
You must touch the fader’s “knob” to
cause the values and labels to appear.
Touching anywhere else on the fader
will not change the LCD display.
complete label names. These will
remain showing as long as you
touch the rotary or fader. Once you release, the value display will remain showing for about a second before reverting to the LCD showing short labels for all
rotaries and faders. If you move from one rotary/fader to one in a different column the display will immediately update to show the new column’s rotary and
fader labels plus values.
16
D el or a So f t wa r e ™ b y H a rm on y S y s te m s , I nc . -
vK iP
Selector Buttons
The eight buttons at the bottom of the screen are the selector switches. Pressing one of these will “illuminate” that selector switch and cause the “LCD” display to show the current setting names and values for the corresponding rotary
and fader. Press it again to return to normal display usage.
BANK
Kyma allows for a large number of rotaries and faders, more than just the eight
shown on the vKiP screen. To handle this, Kyma uses a “bank system” to
choose which of the eight virtual control surface faders and rotaries are currently affected by vKiP. The blue arrows and BANK button in the General Controls
area handle this. When BANK is darkened, the arrow buttons move the fader/
rotary assignments left or right one position per press. When BANK is lit they
move by groups of eight.
SWAP
Kyma lets you alternate between what is controlled by a fader and what is controlled by a rotary. The SWAP button in the General Controls area performs this
change. Why use the Swap function? Rotaries on the Motormix, the original VCS
hardware controller, are “endless” rotaries, meaning that the information the
VCS receives when you adjust one relates to how much you have changed the
control and not the absolute position. Thus, the VCS does not convey the current value for any sound setting assigned to a rotary. By using the “swap” mode
approach, vKiP allows you to see the absolute current values for the “rotary” parameters on the sliders.
Press SWAP once and the faders will “snap” to show the current values assigned
to the virtual control surface settings normally assigned to rotaries. The normal
colors of the faders and rotaries are reversed, with the Faders now blue and the
rotaries green. Press SWAP again to return to normal operation.
17
D el or a So f t wa r e ™ b y H a rm on y S y s te m s , I nc . -
vK iP
Swap mode enabled.
FINE
If you want to precisely adjust a sound setting, press the FINE button. The button will “illuminate”, and the fader infill color lightens to indicate that you are in
“fine” mode. The thumb moves to the
center of the slider to represent the val-
Note
ue of the current setting. (If the current
Not all settings assigned to a
value of the setting is zero or at the
fader or rotary have a meaningful
maximum, the thumb remains at the
“fine” adjust. Sometimes the cor-
end and is only finely adjusted in one
responding sound setting will
direction.) Movement of the slider now
have only a couple of actual val-
equates to a much smaller change
ues. The VCS will not center in
around that value. Press FINE again to
this case when you activate fine
return to standard fader adjustment
mode.
control.
18
D el or a So f t wa r e ™ b y H a rm on y S y s te m s , I nc . -
vK iP
Snap Shots
Each Kyma sound stores one or more
Note
histories (or snapshots) of all of the
sound’s current VCS settings. You can
Sometimes when you press the
browse and/or load these snapshots
arrow keys when Browsing, the
(like a synthesizer preset) using the
preset name in the display
Snapshots buttons in the General Con-
doesn’t change. This is normal,
trols area.
due to a consequence of how
Kyma’s VCS uses a MotorMix to
If you want to just visually browse the
presets, press the purple arrow keys in
provide similar functionality.
the top “Browse” area. The names will
display in the “LCD” display. The list of snapshots “wraps around”, meaning if
you press either arrow key enough times in a row you will return to the same
snapshot. Press LOAD to load in a preset so you can audition (hear the sound)
and make adjustments.
To load a preset as you browse, press the purple
arrow keys in the Browse & Load area. (Stepping
through the presets here will be slightly slower
than when just browsing.) Since you are also loading, you will hear each sound as you press these
arrow keys. Unfortunately, the name of the preset
in this case is not available to vKiP so the display
does not show the preset names. (You can see the
name of the loaded preset on the Kyma computer
screen).
The DICE button randomly chooses new values for all of the current VCS settings except those you exclude with the VCS “lock feature” (those setting names
shown in gray on the computer screen). You can also shake your iPad to
achieve a “dice roll” action.
19
D el or a So f t wa r e ™ b y H a rm on y S y s te m s , I nc . -
vK iP
Master Volume Controls
Adjust the master volume of the Kyma sound environment by moving the blue
volume slider thumb horizontally. vKiP will remember your last adjustment of
this volume setting and re-establish it each time vKiP is started up.
Press the MUTE button if you want to “turn off” all sound. The button will glow
lighter and stay lit to remind you that “mute” has been activated. Press MUTE
again to return to normal operation. The sound engine will return to your last
volume setting.
Optional Sound Engine Controls
If you are connected to a KymaConnect host then three additional buttons are
available in the general controls area. If you connect to any other host, or use
MIDI, then these buttons are hidden.
These buttons are used to control the “DSP” sound engine and accomplish the
same purpose as the same menu commands on Kyma’s DSP menu.
START causes the sound engine to begin processing the current Kyma sound. If
a sound is already playing this will reset the sound engine and cause the sound
to play from the beginning.
STOP halts sound engine activity, causing the sound to immediately cease.
PLAY is used to start, pause, and continue a sound. If no sound is playing, tapping this button causes the current sound to begin. Once it is playing, each
time you tap this button the sound will toggle between being paused (no
sound) and playing (sound).
Info Button
The Info button takes you to a hierarchical set of information and operation
screens. We have already introduced those related to connection so we will cover the others in this section
The “User Guide” list button will display a pdf of the vKiP user manual.
20
D el or a So f t wa r e ™ b y H a rm on y S y s te m s , I nc . -
vK iP
Tapping “Support” takes you to a special support screen where you can email us
about any difficulties you may encounter. The Support screen offers a short bit
of troubleshooting advice and provides a button you can press to send an email
message directly to Delora Software technical support. In this email you should
provide as much information as you can about the nature of your problem, your
particular set up (especially networking), how you are trying to connect (MIDI,
network MIDI, OSC), and any computers and their operating system versions.
When logging is enabled (see section vKiP Preferences) you will see a second
button “Email Log To Technical Support”. Use this if Delora Software technical
support has asked you to enable logging.The “About” screen has a link to Delora’s website, as well as legal and license information.
Note
Regarding email. The application can only send a
log file if you have enabled at least one active
email account on your device. Please set up this
account if you have not
already done so before
turning on logging.
“What’s New In This Version” describes what has changed in the current vKiP
version. It also displays a “running history” of changes since the product was
first released.
21
D el or a So f t wa r e ™ b y H a rm on y S y s te m s , I nc . -
vK iP
“Connect To Kyma” provides a way to select what Paca(rana) or Capybara you
wish to connect, and whether you will use OSC or MIDI. This is covered in the
Setup section.
“Refresh Controls” is used to send a message to Kyma to resend all the current
VCS settings. Use this if you suspect that Kyma and vKiP are no longer “in sync”.
22
D el or a So f t wa r e ™ b y H a rm on y S y s te m s , I nc . -
vK iP
vKiP Preferences
You can alter the behavior of some key aspects of vKiP through various preference settings. Each of these can be viewed, and modified by the iOS Settings
app. Start iOS Settings, then look for the vKiP icon in the list of apps. Tap it to
see the vKiP preferences. Note that you must exit vKiP to access the Settings
app, and then restart vKiP once you have made your changes.
Theme lets you select which of the available themes (or “skins”) that you would
like to use. “Classic” is a slightly modified version of the original vKiP style;
“Modern” offers a crisp, contemporary look.
Strict LCD Emulation refers to the positioning of information in the display. In
vKiP, rotary labels are shown on the top line of the display (beneath the rotaries) and fader labels are on the display’s bottom line (above the faders).
While this might seem to be obvious positioning, it is opposite to the display
order on the MotorMix (and the Delora vM2 application). So if you are more
comfortable with that original format, turn “ON” the Strict LCD Emulation setting.
Disable Auto-Lock allows you to override the iPad’s standard operation of turning off the screen and going into “sleep mode” when you do not perform a
screen action during a period of time. Select “on” to keep the vKiP screen displayed continuously. This setting only applies to vKiP and does not affect your
overall setting for Auto-Lock in the Settings application. Note: Setting Disable
Auto-Lock “on” may deplete your iPad battery faster.
Jump to Touch will cause the fader knob to move/”jump” to wherever you tap
in its “fader channel” (the middle area that fills with color as the fader is moved)
when this feature is set to “ON”. When enabled, this will apply to the Faders and
Volume slider.
Control Touch Shows Value, when set to “ON”, shows the value of the fader
and rotary in the “LCD” display as long as you are pressing on the thumb/dial.
Thus, you can see “real time” changes when moving the fader thumb up/down.
23
D el or a So f t wa r e ™ b y H a rm on y S y s te m s , I nc . -
vK iP
Once your finger releases off the screen, the “LCD” returns to its normal mode
of showing the names of all current faders/rotaries.
Linear Rotaries when “ON” causes the rotary controls to respond to vertical instead of circular drags. To use a linear rotary press within the rotary area and
then drag your finger upwards to cause the rotary to rotate in a clockwise manner; drag downward to cause the rotary to rotate in a counter-clockwise direction.
You may, from time time time, need to provide additional information to help
us diagnose your problem. The two switches at the top of the Support screen
are only for this exceptional situation and should be left in their default settings
at all other times. The default setting for “Enable Logging” is “OFF”; for “Clear
Log at Startup”, the default is “ON”.
Enable Logging turns on special instructions in vKiP to capture important
events regarding its operation into a special “log file”. Normally this is left in the
OFF position unless you are requested by Delora Software technical support to
turn it on to help troubleshoot a difficulty you are experiencing.
Clear Log at Startup controls if the log file is erased each time you start vKiP.
Log files consume some of the iPad’s flash memory so they need to be cleared
from time to time. Normally this is done each time vKiP starts up. However
sometimes it is helpful to observe behavior for a number of different times vKiP
is started. When this is desired this switch is moved to the OFF position. Leave
this switch ON unless you are requested by Delora Software technical support
to do otherwise. Regardless whenever you set “Enable Logging” to OFF you
should also set “Clear Log at Startup” to ON.
24
D el or a So f t wa r e ™ b y H a rm on y S y s te m s , I nc . -
vK iP
Getting the Most Out of vKiP With the
Kyma VCS
Kyma’s VCS integration provides a number of useful features that are not fully
documented, or the documentation requires a careful reading of Kyma X Revealed! Here are a few of our favorites.
Optimize the VCS for vKiP: Kyma provides substantial, easy-to-use, VCS editing.
It is easy to adjust a sound’s VCS to fit your particular needs. Often though a
sound’s VCS is laid out best for the computer’s display and not vKiP. If you use
a sound frequently, or rely on adjusting it in a performance setting, then it
makes sense to adjust the various “widgets” to better fit vKiP. Here are a few
hints:
1. Use faders for any control where immediate visual feedback is important. vKiP and the VCS work in tandem to display many more that just
eight faders through the bank facility. So there is no reason to hamper
your interaction with a sound simply to fit it all on one screen. Likewise use rotaries for values that require only coarse adjustment, such
as multi-position switches or selectors.
2. If you require more than eight faders or rotaries make sure that they
are ordered in such a way to show in groups of eight on vKiP. Kyma
assigns the order automatically but often the choice is not what is best
for use on vKiP. Study Kyma X Revealed for how you can move VCS
“widgets” around on the screen to get the grouping you desire on vKiP.
This takes a little experimenting but the results are well worth it.
3. You can manipulate the VCS to only display desired settings on vKiP.
The VCS offers horizontal faders but these are not displayed on vKiP
(or a MotorMix for that matter). Use vertical faders for settings you
want on vKiP’s screen and horizontal faders for the others.
25
D el or a So f t wa r e ™ b y H a rm on y S y s te m s , I nc . -
vK iP
Create alternative VCS pages: Each sound can have as many “pages” as you
wish. Normally this is used to provide VCS access for each sound contained
within a sound but an alternative use is to provide a different style VCS for specific needs. For example, you might have one VCS page that is optimized for
computer display, but another one that is more appropriate for use with vKiP.
Another example is a VCS page that only shows those controls used during performance, optimized for ready access from vKiP. You will have to select the active page from the computer but once selected everything is controlled from
vKiP. Note that you can determine which page is shown when a sound is first
run by selecting that page before saving the sound.
Roll the dice!: The “dice roll” is one of the coolest features in Kyma and can be
an extremely effective way to explore a sound’s possibilities, provided the
sound’s VCS is set up appropriately. This is discussed thoroughly in Kyma X Revealed. What you might have missed though is how easy it is to use this feature
with vKiP! vKiP not only has a dedicated push button (“DICE”) that you can
press whenever you wish to create a brand new variation, but also recognizes
the iPad “shake gesture”. Use the “roll dice” feature liberally when you first encounter a sound (after “surfing the presets” of course), or you just want some
inspiration from a well-traveled one.
26
D el or a So f t wa r e ™ b y H a rm on y S y s te m s , I nc . -
vK iP
Troubleshooting
General Connection Issues
Because vKiP works in conjunction with computer hardware and software products, problems that may arise are primarily due to connection issues between
the various components. In these cases, vKiP typically attempts to automatically re-establish the connection. If, after some time, it cannot do so, the iButton
will pulse red and vKiP will no longer respond to Kyma’s VCS, nor be able to
send to it.
By far the most common problems relate to an improper network setup. Networking can be notoriously difficult to troubleshoot, especially when a setup
was working just a few minutes ago suddenly stops working. Fortunately many
Wi-Fi routers, and computers do an admirable job of “just working”.
IP addresses (those four numbers separated by periods, like “192.168.1.27”)
determine whether two devices can communicate or not. Each local network,
like the one in your home, school, or studio, uses a certain range of IP numbers. If two IP numbers do not share the same “subnet” then communications is
unlikely without special “bridging” hardware or software. Even if this works for
Internet browsing it’s not assured it will work with something like network MIDI
and OSC.
Most networks automatically assign IP numbers in a way where everything happily works. However if you move your iPad (or laptop computer) about you may
have special “location” setups for work, home, and so on. If you inadvertently
leave the iPad or computer set up for the last location in may no longer work in
your studio.
Another common cause of IP issues is relying on manually assigned IP addresses. This can work well but you need to understand the implications, which may
be difficult if someone else set them up for you.
27
D el or a So f t wa r e ™ b y H a rm on y S y s te m s , I nc . -
vK iP
If you are having trouble connecting check the IP address of your iPad from the
iOS Settings app. Compare it against your computer (if using network MIDI, KymaConnect, PacaConnect, or CapyLink), or your Paca(rana). Verify that they are
on the same subnet. if not then you have an IP setup issue.
If you are new to networking, or need a refresher, you may find our networking
guide at http://www.delora.com/tips_and_trends/networking_guide/networking_guide.html helpful.
Much of iOS’s networking features like AirPlay and iTunes Wi-Fi sync rely on a
properly working Bonjour set up. Most networking hardware now supports Bonjour without issue but a few non-Apple router have issues. Usually an Internet
search on your router’s model and Bonjour will show you forum messages and
other indications of an issue. Sometimes you will be able to resolve the problem
with a firmware update but in the extreme you may need to replace your router.
Bonjour is a very important feature that many apps, including vKiP rely upon so
this problem is something you should address.
If Another common problem is a network that suddenly stops working. Many
times this can be remedied by exiting vKiP and then using the iOS Settings app
to turn Wi-Fi off. Wait a few seconds and then turn it back on and select your
network. If this does not work then doing a complete restart of your iPad may
help.
Sometimes though the problem rests with one of your network components,
usually the “router” or “access point”. They may appear to be working, for example you can still access the Internet from a web browser, but your Paca(rana)
or computer no longer shows up on vKiP’s connection screens. Try powering off
the router/access point, wait a few seconds, then power it back on. This “hard
reset” may clear whatever condition was leading to the problem. However be
sure to give the network a bit to “come back up”, and also reconnect to it from
the iOS Settings app.
Faulty cables are a surprising common problem with network set ups. For example the cable between the Paca(rana) and your Mac or other network equipment will cause network problems if it is damaged. Sometimes this is intermit28
D el or a So f t wa r e ™ b y H a rm on y S y s te m s , I nc . -
vK iP
tent and slight movements of the cable can cause it to stop working or start
working. If your Paca(rana) seems to no longer be available on the network, first
cycle power to it, then after it has been running for about 10 seconds check its
Help screen to find its IP address. If the address reads 0.0.0.0 then it is not
connected to the network. Alternatively you can check the IP address from
Kyma’s DSP Status window, under the Configure popup.
If you encounter this situation try replacing the Ethernet cable with a known
good cable. In fact it does not hurt to try a third cable if the second also does
not work. As unlikely as it seems we have encountered multiple faulty cables in
our own troubleshooting endeavors. Also cable problems can affect any element in your “wired” network so don’t overlook one somewhere else.
Another place to investigate when a previously working setup stops working is
your Paca(rana). Paca(rana)s under some unusual circumstances can loose the
ability to properly handle OSC even while otherwise working normally. The only
remedy for this situation is to power the Paca(rana) off, wait a few moments,
and the power it back on.
Wi-Fi signal quality also plays a big factor in how well your wireless set up
works. Applications like vKiP that rely on OSC or network MIDI do suffer data
loss when the Wi-Fi conditions are poor. This is different than say browsing a
website. In that case poor Wi-Fi signals only make the website load very slowly;
you may not even know there is a problem. OSC and network MIDI are not so
forgiving.
In our experience the iOS Wi-Fi signal level on the status bar is not an accurate
predictor of Wi-Fi signal issues because it tends to be a fairly long term average;
short term issues, such as you might experience moving about the studio and
happening for a bit in a “dead zone”, will not necessarily show a low level. Also
the signal level does not indicate when there is interference from other Wi-Fi
networks, often a source of signal quality issues.
If you suspect you are losing button presses, or fader moves seem very “laggy”,
then you may be in a low signal area. Try moving around to see if operation improves. Sometimes just reorienting the iPad does the trick. For example even a
29
D el or a So f t wa r e ™ b y H a rm on y S y s te m s , I nc . -
vK iP
relatively close Wi-Fi access point that your body is between it and the iPad may
have low signal quality yet miraculously improve when you turn 90 degrees in
your chair.
One way to avoid many of these issues is to use a dedicated “computer-to-computer” Wi-Fi network between your computer and iPad. These so called “ad-hoc”
networks may provide a higher quality connection. The reasons are due to proximity (you are probably closer to the computer than an access point) and dedicated data traffic since only the iPad and computer are using it.
Unfortunately you cannot use an ad-hoc network for every need unless you also
have additional software running on your computer. Ad-hoc works fine for network MIDI without additional consideration. If, on the other hand, you wish to
use it with your Paca(rana), then you will need to use either KymaConnect or
PacaConnect to “bridge” the ad-hoc network to the network where Paca(rana) is
connected, even if the Paca(rana)’s Ethernet port is directly connected into your
Mac.
The appendix contains instructions for setting up such a network on a Mac;
Windows computers offer a similar feature.
Important Notes About the VCS
Kyma’s VCS has some operational attributes that impact vKiP. Some of these
may appear to be a problem with vKiP until you understand the idiosyncrasies.
VCS was made to work well with a MotorMix so some of its flavor remains in the
stew. Some examples of note:
1. When you move an on-screen fader using the mouse the VCS does not send
any indication of change to vKiP (or any other control surface) until you release the mouse button. However if your mouse or trackball has a “scroll
wheel” that is set up properly you can adjust the on-screen fader using that
and vKiP will display the change as expected.
2. If you start vKiP while Kyma is already displaying the VCS for a playing
sound, or vKiP reconnects, vKiP issues a “resync” request to the VCS. This
command causes the VCS to send information to vKiP about the current set30
D el or a So f t wa r e ™ b y H a rm on y S y s te m s , I nc . -
vK iP
tings. Normally vKiP automatically does this whenever it needs to and stays
in lock-step with the VCS. However occasionally the VCS and vKiP can get
out of step. This is normal and is a direct result of how the VCS works with
the MotorMix and other controllers. The remedy is to press
Note
the “Refresh Controls” button
on the Info screen.
3. The 32 switches can be used as
status indicators, including the
ability to show in real time the
currently playing sound/step.
However, due to limitations of
vKiP and the iPad, the updating
of the switch “LEDs” can lag
behind the computer screen,
sometimes making the “movement” across the switches ap-
If you have a Windows PC computer then
you have a bit more work. rtpMIDI is a
“work alike” for the Apple network MIDI
scheme. This was developed by Tobias
Erichsen who has generously made it
available to users through his website.
You can learn more about rtpMIDI here:
http://www.tobias-erichsen.de/rtpMIDI.html where you will find a link to
download the installer and a tutorial
that covers setup and use.
pear uneven when viewing on
Whether you use rtpMIDI or instead elect
the iPad. This is normal.
to use the iPad’s USB MIDI is entirely up
4. Finally, Kyma’s master volume
command is “write only”, meaning that Kyma never informs
vKiP what the current master
volume value is set to. vKiP remembers how you have
changed the master volume
to you. Harmony Systems, Inc. does not
endorse or otherwise encourage you to
use rtpMIDI. Furthermore your use of
rtpMIDI is governed by the rules and requirements of Tobias Erichsen so you
should understand what requirements,
including any licensing, he requires.
and mute controls and will use
their latest value each time vKiP
initializes. If you never adjust the master volume using vKiP, then vKiP
leaves Kyma’s master volume unchanged. In other words if you prefer to set
volume by another means then do not use the vKiP volume controls.
31
D el or a So f t wa r e ™ b y H a rm on y S y s te m s , I nc . -
vK iP
Contact Delora Support
Please read the “Info Button” section of the “Using vKiP” chapter for information
on contacting Delora Support.
32
D el or a So f t wa r e ™ b y H a rm on y S y s te m s , I nc . -
vK iP
Appendix
Using Network MIDI
If you wish to send and receive MIDI over the Wi-Fi network between your iPad
and a computer (or a computer acting as an intermediary of another MIDI device) then you need to set up that computer to offer a network MIDI connection.
OS X has offered network MIDI as a part of its CoreMIDI facilities for quite a few
years now; any Mac running OS X Leopard or later already has network MIDI
built in. All you need to do is use the OS X Audio Midi Setup application to create a network MIDI port.
Setting up the network MIDI port is only half of the equation; you also need a
way of forwarding network MIDI to the physical MIDI port you use to connect to
your Capybara (or even Paca(rana). Fortunately OS X’s network MIDI driver has a
nifty feature to directly connect a network MIDI port with another physical MIDI
port (virtual MIDI ports do not work in this situation).
Lets look at setting up an OS X network MIDI port that you can use to connect
to your Capybara or Paca(rana).
Start by running Audio Midi
Setup. Note which MIDI
port your Capybara is connected to. Double-click the
“Network” icon. This will
bring up the network MIDI
setup screen.
33
D el or a So f t wa r e ™ b y H a rm on y S y s te m s , I nc . -
vK iP
If you have never set up a
network MIDI connection before you will be greeted with
a screen like the one here.
Apple refers to network MIDI
connections as “sessions”,
and you provide a name for
each one. You can define as
many sessions as you wish,
each with its own settings.
Furthermore you can have as many sessions active at once as needed. Keep in
mind though that vKiP only needs a single session to connect.
Click the “+” button under “My Sessions” to create a new network MIDI connection. Provide it a local name of your choosing (something easy to figure out and
that does not conflict with other MIDI ports), and a “Bonjour name”. This is what
you will see in vKiP’s connection screen. Here’s an example:
34
D el or a So f t wa r e ™ b y H a rm on y S y s te m s , I nc . -
vK iP
Now you need to connect the session to the physical MIDI device used to connect to the Capybara or Paca(rana). The “Live routings” popup menus give you a
list of MIDI inputs and outputs that can be set to send and receive with the network MIDI session. Select the desired MIDI ports and your screen should look
something like this:
The final step is to enable the session and make it ready to accept connections.
First select the session by name, then verify that the popup under “Who may
connect to me:” is set to “Anyone”. This popup can be used to restrict connections to only certain devices. Now tick the check box next to the session you
wish to use. This will enable the session to accept connections. Shown on the
next page is the final set up with vKiP connected.
35
D el or a So f t wa r e ™ b y H a rm on y S y s te m s , I nc . -
vK iP
36
D el or a So f t wa r e ™ b y H a rm on y S y s te m s , I nc . -
vK iP
Setting Up An Ad-Hoc Wi-Fi Network
OS X provides a simple, straight-forward way of setting up an ad-hoc Wi-Fi network using a Mac’s built-in Airport. The following steps show screen shots from a Mac running
Snow Leopard but they are similar for OS X Lion.
Press this button to turn
Airport on
Step 1:
Open System Preferences and select “Network”. Choose the Airport item from the list at
the left. Turn Wi-Fi on if it is not already.
37
D el or a So f t wa r e ™ b y H a rm on y S y s te m s , I nc . -
vK iP
Step 2:
Open the “Network Name” popup, then select “Create Network...”.
38
D el or a So f t wa r e ™ b y H a rm on y S y s te m s , I nc . -
vK iP
Step 3:
Enter a name for your ad-hoc network. Leave “Channel” set to “Automatic” unless you
have problems with interference from other nearby Wi-Fi networks. If you are concerned
about another laptop or device connecting to your Mac check “Require Password” and
follow the on screen directions (recommended!). Note that if you elect to employ a
password you will be required to enter that password also in your iPad when you attempt to connect to this ad-hoc network.
Step 4:
From your iPad’s Settings application select “Wi-Fi”. Turn “Wi-Fi” ON if it is OFF. After a
few moments you will see the available Wi-Fi network candidates in a list. Select your
39
D el or a So f t wa r e ™ b y H a rm on y S y s te m s , I nc . -
vK iP
ad-hoc network, and if you have protected it by password, enter the password. Wait until
the network strength indicator at the top left of the screen shows an active connection.
This last step is important as it takes a few moments for the device to establish a valid
connection with the ad-hoc network. If you leave the Settings application before this occurs and try to start another application, that application may be unable to connect. If
that happens simply exit the application and wait until you see the signal strength graphic in the upper left.
40
D el or a So f t wa r e ™ b y H a rm on y S y s te m s , I nc . -
vK iP
Acknowledgements
In addition to Harmony Systems, Inc.‘s proprietary code, vKiP contains some
code provided by generous and dedicated independent developers. The follow
code was used:
oscpack -- Open Sound Control packet manipulation library
Copyright © 2004-2013 Ross Bencina
Permission is hereby granted, free of charge, to any person obtaining a copy of this software
and associated documentation files (the “Software”), to deal in the Software without restriction,
including without limitation the rights to use, copy, modify, merge, publish, distribute, sublicense,
and/or sell copies of the Software, and to permit persons to whom the Software is furnished to
do so, subject to the following conditions:
The above copyright notice and this permission notice shall be included in all copies or substantial portions of the Software.
THE SOFTWARE IS PROVIDED “AS IS”, WITHOUT WARRANTY OF ANY KIND, EXPRESS
OR IMPLIED, INCLUDING BUT NOT LIMITED TO THE WARRANTIES OF MERCHANTABILITY, FITNESS FOR A PARTICULAR PURPOSE AND NONINFRINGEMENT. IN NO EVENT
SHALL THE AUTHORS OR COPYRIGHT HOLDERS BE LIABLE FOR ANY CLAIM, DAMAGES
OR OTHER LIABILITY, WHETHER IN AN ACTION OF CONTRACT, TORT OR OTHERWISE,
ARISING FROM, OUT OF OR IN CONNECTION WITH THE SOFTWARE OR THE USE OR
OTHER DEALINGS IN THE SOFTWARE.
Reachability Extensions -- Enhancements to Apple’s Reachability class, version 2
Reachability Extensions This is a derived work of Apple's Reachability v2.0 class.
Extensions Copyright (C) 2009 Donoho Design Group, LLC. All Rights Reserved.
Redistribution and use in source and binary forms, with or without modification, are permitted
provided that the following conditions are met:
* Redistributions of source code must retain the above copyright notice, this list of conditions
and the following disclaimer.
* Redistributions in binary form must reproduce the above copyright notice, this list of conditions
and the following disclaimer in the documentation and/or other materials provided with the distribution.
41
D el or a So f t wa r e ™ b y H a rm on y S y s te m s , I nc . -
vK iP
* Neither the name of Andrew W. Donoho nor Donoho Design Group, L.L.C. may be used to endorse or promote products derived from this software without specific prior written permission.
THIS SOFTWARE IS PROVIDED BY DONOHO DESIGN GROUP, L.L.C. "AS IS" AND ANY
EXPRESS OR IMPLIED WARRANTIES, INCLUDING, BUT NOT LIMITED TO, THE IMPLIED
WARRANTIES OF MERCHANTABILITY AND FITNESS FOR A PARTICULAR PURPOSE ARE
DISCLAIMED. IN NO EVENT SHALL THE COPYRIGHT HOLDER OR CONTRIBUTORS BE
LIABLE FOR ANY DIRECT, INDIRECT, INCIDENTAL, SPECIAL, EXEMPLARY, OR CONSEQUENTIAL DAMAGES (INCLUDING, BUT NOT LIMITED TO, PROCUREMENT OF SUBSTITUTE GOODS OR SERVICES; LOSS OF USE, DATA, OR PROFITS; OR BUSINESS INTERRUPTION) HOWEVER CAUSED AND ON ANY THEORY OF LIABILITY, WHETHER IN CONTRACT, STRICT LIABILITY, OR TORT (INCLUDING NEGLIGENCE OR OTHERWISE) ARISING IN ANY WAY OUT OF THE USE OF THIS SOFTWARE, EVEN IF ADVISED OF THE POSSIBILITY OF SUCH DAMAGE.
AsyncUdpSocket
This class is in the public domain.
Originally created by Robbie Hanson on Wed Oct 01 2008, updated and maintained by Deusty
Designs and the Mac development community
http://code.google.com/p/cocoaasyncsocket/
NSObject + Properties, NSString + PropertyKVC
Copyright (c) 2008-2009, Jim Dovey All rights reserved.
Redistribution and use in source and binary forms, with or without modification, are permitted
provided that the following conditions are met:
Redistributions of source code must retain the above copyright notice, this list of conditions and
the following disclaimer.
Redistributions in binary form must reproduce the above copyright notice, this list of conditions
and the following disclaimer in the documentation and/or other materials provided with the distribution.
Neither the name of this project's author nor the names of its contributors may be used to endorse or promote products derived from this software without specific prior written permission.
THIS SOFTWARE IS PROVIDED BY THE COPYRIGHT HOLDERS AND CONTRIBUTORS
"AS IS" AND ANY EXPRESS OR IMPLIED WARRANTIES, INCLUDING, BUT NOT LIMITED
TO, THE IMPLIED WARRANTIES OF MERCHANTABILITY AND FITNESS FOR A PARTICULAR PURPOSE ARE DISCLAIMED. IN NO EVENT SHALL THE COPYRIGHT HOLDER OR
CONTRIBUTORS BE LIABLE FOR ANY DIRECT, INDIRECT, INCIDENTAL, SPECIAL, EXEMPLARY, OR CONSEQUENTIAL DAMAGES (INCLUDING, BUT NOT LIMITED TO, PROCURE42
D el or a So f t wa r e ™ b y H a rm on y S y s te m s , I nc . -
vK iP
MENT OF SUBSTITUTE GOODS OR SERVICES; LOSS OF USE, DATA, OR PROFITS; OR
BUSINESS INTERRUPTION) HOWEVER CAUSED AND ON ANY THEORY OF LIABILITY,
WHETHER IN CONTRACT, STRICT LIABILITY, OR TORT (INCLUDING NEGLIGENCE OR
OTHERWISE) ARISING IN ANY WAY OUT OF THE USE OF THIS SOFTWARE, EVEN IF ADVISED OF THE POSSIBILITY OF SUCH DAMAGE.
Cocoa Lumberjack
Software License Agreement (BSD License)
Copyright (c) 2010-2015, Deusty, LLC All rights reserved.
Redistribution and use of this software in source and binary forms, with or without modification,
are permitted provided that the following conditions are met:
* Redistributions of source code must retain the above copyright notice, this list of conditions
and the following disclaimer.
* Neither the name of Deusty nor the names of its contributors may be used to endorse or promote products derived from this software without specific prior written permission of Deusty,
LLC.
THIS SOFTWARE IS PROVIDED BY THE COPYRIGHT HOLDERS AND CONTRIBUTORS
"AS IS" AND ANY EXPRESS OR IMPLIED WARRANTIES, INCLUDING, BUT NOT LIMITED
TO, THE IMPLIED WARRANTIES OF MERCHANTABILITY AND FITNESS FOR A PARTICULAR PURPOSE ARE DISCLAIMED. IN NO EVENT SHALL THE COPYRIGHT OWNER OR
CONTRIBUTORS BE LIABLE FOR ANY DIRECT, INDIRECT, INCIDENTAL, SPECIAL, EXEMPLARY, OR CONSEQUENTIAL DAMAGES (INCLUDING, BUT NOT LIMITED TO, PROCUREMENT OF SUBSTITUTE GOODS OR SERVICES; LOSS OF USE, DATA, OR PROFITS; OR
BUSINESS INTERRUPTION) HOWEVER CAUSED AND ON ANY THEORY OF LIABILITY,
WHETHER IN CONTRACT, STRICT LIABILITY, OR TORT (INCLUDING NEGLIGENCE OR
OTHERWISE) ARISING IN ANY WAY OUT OF THE USE OF THIS SOFTWARE, EVEN IF ADVISED OF THE POSSIBILITY OF SUCH DAMAGE.
43
D el or a So f t wa r e ™ b y H a rm on y S y s te m s , I nc . -
vK iP