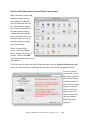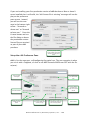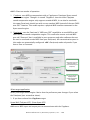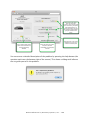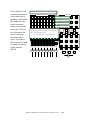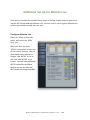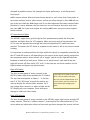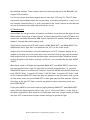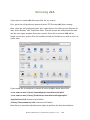
1
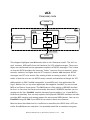
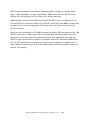
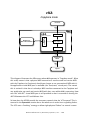
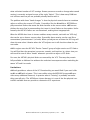
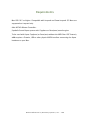
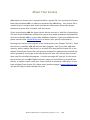
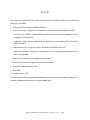
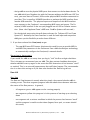
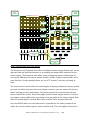
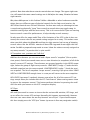
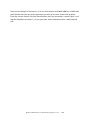
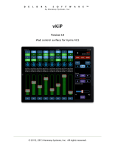
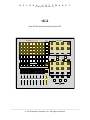
D
E
L
O
R
A
S
O
F
T
W
A
R
E
™
b y Ha rmo ny S yste ms, I nc .
vKA
Akai APC40 control surface for Kyma VCS
TRACK CONTROL
SCENE
LAUNCH
CLIP LAUNCH/SESSION OVERVIEW
Switches 1-8
Rotary 1-4
Switches 9-16
Switches 17-24
Rotary 5-8
Switches 25-32
PAN
SEND A
SEND B
BANK SELECT
SEND C
TAP TEMPO
v
STOP ALL CLIPS
SHIFT
>
<
NUDGE +
NUDGE -
V
DEVICE CONTROL
TRACK SELECTION
Fader 1-4
1
2
3
4
5
6
7
8
MASTER
Fader 5-8
CUE LEVEL
1
2
3
4
5
6
7
8
CLIP/TRACK
DEVICE ON/OFF
DETAIL VIEW
REC QUANTIZATION
MASTER
PLAY
MIDI OVERDUB
STOP
METRONOME
REC
© 2010 Harmony Systems, Inc. All rights reserved.
Under the copyright laws, this manual may not be copied, in whole or part, without the
written consent of Harmony Systems, Inc. Your rights to the software are governed by
the accompanying software license agreement.
Delora Software and vKA are trademarks of Harmony Systems, Inc.
Other company and product names mentioned in this manual are trademarks of their
respective companies. Mention of third-party products is for informational purposes
only. Harmony Systems assumes no responsibility with regard to the performance or
use of these products.
Every effort has been made to ensure the accuracy of this manual. Please contact Delora Product Support ([email protected]) should you have questions regarding information in this manual.
1
D e l ora S oftwa re ™ by Har mony Sy s t e ms , I nc. - v KA
D
E
L
O
R
A
S
O
F
T
W
A
R
E
™
b y Ha rmo ny S yste ms, I nc .
Table of Contents
Introduction to vKA!
4
vKA in Summary
5
How it Works
6
Limitations
10
Requirements!
11
About Your License!
12
Installation!
13
Updating vKA!
14
Set-Up!
15
Run the vKA Preference Pane and Enter Your License
16
Setup the vKA Preference Pane
17
Run vKA
19
Enable Kyma’s VCS
20
Troubleshooting with the Preference Pane
20
Additional Set-Up for Ableton Live!
Configure Ableton Live
Using vKA!
23
23
27
How the VCS Uses the APC40’s Controls
27
Important Notes About the VCS
33
Getting the Most Out of vKA With the Kyma VCS
34
Removing vKA!
37
Troubleshooting!
38
Acknowledgements!
40
D e l ora S oftwa re ™ by Har mony Sy s t e ms , I nc. - v KA
Introduction to vKA
Symbolic Sound’s Kyma X sound design workstation and environment is a powerful yet
flexible tool for creating, or discovering, fantastic new sounds. A user can interact with
a Kyma system using typical personal computer devices: mouse or trackball, keyboard,
and the display monitor. But Kyma also offers another means of interaction that can be
far more satisfying: a physical control surface with faders, knobs, switches, and lights.
Kyma’s control surface support is through its “Virtual Control Surface”, often simply
referred to as its “VCS”. Kyma sounds are, by their very nature, unconstrained to a specific arrangement of knobs, faders, and other control elements. Yet Kyma does a remarkable job of automatically creating a usable VCS setup for each sound that you can
modify as necessary.
The VCS is often controlled with simple mouse movements. Where it really shines
though is when coupled with one of the supported hardware control surfaces. If you do
not have one of these VCS-compatible controllers then you are missing a lot of the joy
of physical interaction with your Kyma creations!
However, not many hardware devices work seamlessly with Kyma’s VCS. The grandmother of all VCS controllers is the MotorMix. But these are getting harder and harder
to find. The VCS also supports the affordable Behringer BCF2000, though its very nature limits the VCS support to only a subset of what is possible.
Harmony Systems’ Delora vM2 product in 2009 expanded Kyma VCS support to include the JazzMutant Lemur, an innovative, forward looking controller that pioneered
multitouch technology. vM2 combined with the Lemur provides arguably a superior
interaction with the Kyma VCS over even the MotorMix. Unfortunately Lemurs are expensive.
vKA is the latest addition to the Delora Software “V Family” of control surface solutions
that work together with Kyma’s VCS. vKA transforms the popular, affordable Akai
APC40 into a VCS controller. It delivers most of the features of the VCS in an intuitive,
easy to use manner. If you already own an APC40 (and if you regularly use Ableton Live
you really should!), vKA represents an inexpensive addition to your Kyma studio that
will pay for itself in time saved and the pleasure you gain from using Kyma in a handson matter. Furthermore, since Akai manufactured its APC40 to withstand the rigors of
live performance, vKA may well be the best option if you like to use Kyma on stage.
D e l ora S oftwa re ™ by Har mony Sy s t e ms , I nc. - v KA
The APC40 is by some measures a dedicated control surface for Ableton Live. Harmony
Systems designed vKA so that it works in concert with Ableton Live. You can continue
to use the APC40 with Ableton Live, even at the same time you are controlling a Kyma
sound. vKA keeps track of messages from both Ableton Live and Kyma’s VCS. A simple
button press toggles you at any time between Live and Kyma. This seamless sharing
between Live and Kyma means you can have one less controller surface taking up valuable desk space in your studio, or in your performance setup.
vKA has built-in support for Symbolic Sound’s new “MIDI-over-OSC” feature now supported in Paca(rana) based Kyma setups. vKA can communicate directly with the Paca(rana) without the use of a physical MIDI interface! This saves the expense of a MIDI
interface on your Mac and one for your Paca(rana), plus MIDI cables. In addition, vKA
provides a utility virtual MIDI port named “Paca(rana)” that sends MIDI to and from your
Mac using the previously mentioned “MIDI-over-OSC” feature. Sequencers, Max/MSP,
and other music software can send MIDI directly to and from the Paca(rana) sound
computation engine without requiring a MIDI interface.
vKA in Summary
• Native OSX user agent program that is compatible with Intel and G5 Macs running
Leopard or Intel Macs using Snow Leopard.
• Transforms the Akai APC40’s MIDI commands to and from appropriate Kyma’s
VCS control messages.
• Supports Symbolic Sounds’ Capybara sound engine and Paca(rana) family of
sound engines.
• Works with a direct MIDI connection to the sound engine, or optionally with the
Paca(rana) using its “MIDI-over-OSC” network MIDI protocol.
• Provides a “virtual MIDI port” when used with the Paca(rana) and “MIDI-over-OSC”.
This affords MIDI applications direct communication with the Paca(rana) without
requiring additional MIDI or USB interfaces.
• Retains Ableton Live APC40 compatibility.
• Easy one button switching between controlling Ableton Live or Kyma VCS.
• Can be used with Harmony Systems PacaMidi utility to further expand the Paca(rana)’s MIDI connections.
• "Set up once and forget about it" ease-of-use.
D e l ora S oftwa re ™ by Har mony Sy s t e ms , I nc. - v KA
How it Works
vKA is a small, light-weight OSX application that run unobtrusively in the background.
It is easy to set up, and once you have done this you can pretty much forget it’s even
there. You do not really even need to understand what is happening “behind the
scenes”.
So what is happening “behind the scenes”? vKA is a “native” OSX application that is
technically a “user agent” program. This is a special type of OSX application that does
not require (nor offer) any direct user interface. Its operation is fully under OSX’s direction. vKA can automatically start when you log into your OSX account. If OSX detects
any type of problem it can automatically restart vKA. If you need to manually control
vKA’s operation, or adjust its few settings, it has a control panel available through
OSX’s System Preferences, just like you control your mouse, keyboard, and other OSX
components. There are, however, very few settings. In fact when used with a Paca(rana)
set up is pretty much automatic!
A brief comment about vKA being “native” - vKA was created using OSX’s standard developer tools and languages. It does not require a special “run time” or other unique
components for it to operate. It is literally “built for OSX”. This ensures smoother operation, less processing and memory demands, and better overall compatibility. Since
vKA was created with the same tools Apple uses for its applications you can expect a
smoother transition when OSX, or your Mac, changes in the future.
D e l ora S oftwa re ™ by Har mony Sy s t e ms , I nc. - v KA
vKA
Paca(rana) mode
Akai APC40
USB
vKA
Mac
CoreMidi
App-to-App
vKA "engine"
Paca(rana)
virtual MIDI port
Ableton Live
APC Control Surface
vKA APC
virtual MIDI port
(OSX "user agent")
App-to-App
MIDI Application
(Logic, Live, etc)
MIDI-over-OSC
port
Network connection
Paca(rana)
This diagram highlights how vKA works when in the “Paca(rana) mode”. The vKA “engine” monitors MIDI traffic from the Paca(rana) for VCS related messages. These messages are transformed into an appropriate sequence of APC40 messages. This is done
so that the APC40 provides the necessary “faders” (more on this in a moment), rotary
controls, switches, and lights that the VCS requires. Likewise vKA interprets APC40
messages into VCS user actions, like moving a fader or setting a switch. All of this
works so that the user can use APC40 rotary controls and switches to change the VCS.
vKA provides an OSX CoreMidi compatible “virtual MIDI port” that applications like
Logic, Ableton Live, or any other application that supports CoreMidi, can use to send
MIDI to and from a Kyma sound. This VKA feature is like gaining a USB MIDI interface
for free! In fact since the Paca(rana) normally also needs a USB MIDI interface you are
getting two for free. PacaMidi, another Harmony System product, is a “virtual MIDI interface and patchbay” that not only replaces these physical USB MIDI interfaces but also
provides MIDI merging and routing support for two external MIDI devices. You can use
PacaMidi along-side vKA if your MIDI set up requires these extra features.
What has been described thus far is sufficient to transform the APC40 into a VCS controller. But vKA does not stop there. You probably would like to continue using your
D e l ora S oftwa re ™ by Har mony Sy s t e ms , I nc. - v KA
APC40 to control Ableton Live without switching cables, settings, or running “MIDI
pipes”, “MIDI patchbays”, or other applications. vKA “virtualizes” the APC40 so that
Ableton Live and the Kyma VCS can both use it at the same time.
vKA provides a second virtual MIDI port named “vKA APC”. If you set Ableton Live to
find the APC40 on this port instead of the APC40’s actual port then vKA can keep track
of Ableton Live. You switch between “VCS mode” and “Live” mode using one of the
APC40’s buttons.
When you are controlling the VCS vKA continues to monitor MIDI arriving over the “vKA
APC40” virtual port. It takes note of the commands and remembers what these commands did. If you then switch to controlling Ableton Live, vKA makes sure that the
APC40’s lights and rotaries are where Live expects them to be. Meanwhile vKA still listens to VCS commands arriving from the Paca(rana) (or Capybara) and takes note of
those. When you switch back to VCS mode vKA makes sure that the APC40 reflects the
current VCS settings.
D e l ora S oftwa re ™ by Har mony Sy s t e ms , I nc. - v KA
vKA
Capybara mode
Akai APC40
USB
vKA
Mac
CoreMidi
Ableton Live
APC Control Surface
App-to-App
vKA APC
virtual MIDI port
(OSX "user agent")
vKA "engine"
CoreMidi
USB
External USB
MIDI I/O
MIDI
Capybara
This diagram illustrates the differences when vKA operates in “Capybara mode”. What
this really means is that a physical MIDI connection is used to send and receive MIDI
with the Capybara (or Paca(rana) should you choose to use conventional MIDI with it).
No application virtual MIDI port is available (the “Paca(rana)” virtual port). The reason
this is omitted is that there is already a MIDI interface connected to the Capybara and
any application can send and receive MIDI with that, even while vKA is operating. However the “vKA APC” virtual MIDI port is still provided as that is essential to sharing the
APC40 between the VCS and Ableton Live.
So how does the APC40 provide the necessary controls that the VCS expects? This is
covered in the Operation section but a few words are in order here regarding faders.
The VCS uses a “banking” strategy to allow eight physical “faders” to control a some-
D e l ora S oftwa re ™ by Har mony Sy s t e ms , I nc. - v KA
what unlimited number of VCS settings. Button presses are used to change what sound
setting is currently assigned to one of the eight “faders”. This is how many DAW control surfaces work so you are probably already familiar with it.
The problem with these “bank changes” is that the physical controls have to somehow
adjust to reflect the current VCS value. Controllers like the MotorMix or BCF2000 employ motorized faders that move the fader handles to the correct value. vM2 accomplishes the same feat by commanding the Lemur’s virtual faders to also update. Unfortunately the APC40’s faders are not motorized, making them inappropriate.
What the APC40 does have is sixteen endless rotary controls, each with an “LED ring”
that can be set to show a current value. Essentially these rotaries can be used like a
conventional “potentiometer” (or knob). When you adjust one of them the LED ring will
show the new value. Likewise when the VCS adjusts one it will also then show the current value.
vKA’s engine uses the APC40’s “Device Control” group of eight rotaries as VCS faders.
You will find that the operation is accurate, smooth, and intuitive. In a short time you
will reach for one of these “knobs” whenever you wish to adjust a VCS fader.
For now, the APC40’s physical faders are unused by the VCS. That way they remain
fully available to Ableton Live without the undesired consequences when switching between VCS and Live mode.
Limitations
vKA only provides a subset of the VCS functionality you would find if you used a MotorMix or vM2 with a Lemur. This is not unlike using the BCR2000 (except vKA provides many additional features). In practice what is “missing” is probably not something you will miss. The APC40 was chosen because it is one of the few physical controllers available that can provide a substantive VCS experience.
D e l ora S oftwa re ™ by Har mony Sy s t e ms , I nc. - v KA
Requirements
• Mac OSX 10.5 or higher. Compatible with Leopard and Snow Leopard. G5 Macs are
supported on Leopard only.
• Akai APC40 Ableton Controller.
• Symbolic Sound Kyma system with Capybara or Paca(rana) sound engine.
• To be used with Kyma Capybara (or Paca(rana) without the MIDI Over OSC feature),
vKA requires a Firewire, USB or other physical MIDI interface connecting the Kyma
hardware to your Mac.
D e l ora S oftwa re ™ by Har mony Sy s t e ms , I nc. - v KA
About Your License
vKA requires a license that is contained within a special file. You received this license
when you purchased vKA, or when you requested the vKA demo. Your license file is
unique to you. It contains your name and contact information. Please take proper
measures to insure that it remains safe and secure.
If you are evaluating vKA the demo license that we sent you is valid for a limited time.
The time interval should be sufficient for you to do a proper evaluation and hopefully
see how invaluable vKA is in your daily workflow. However, if you need additional time
please contact sales ([email protected]) to discuss your specific requirements.
Entering your license is the step #5 of the Setup process (see Chapter “Set-Up”). Once
the license is installed, vKA will work on that computer, even if you later add more
memory, add or replace hard drives, or reinstall OSX, provided the license file is not
deleted. Should your license file ever become damaged or inadvertently removed you
will be greeted by a message on the vKA preference pane like the one that occurred
when you first installed the program. A similar message will “pop up” on the Lemur
the next time you use vKA. Repeat the same steps you used before to reinstall your
license, or replace it with a new one. If you continue to encounter difficulties, or you
have misplaced your license file, please email product support ([email protected])
and we will help you work through the issue.
D e l ora S oftwa re ™ by Har mony Sy s t e ms , I nc. - v KA
Installation
Note: If you are updating to a new version of vKA, please go to the next chapter “Updating vKA” for the installation procedure.
vKA uses OSX’s standard installation application to place its required files in the appropriate locations on your Mac’s hard drive.
The entire vKA application is contained in the single file, vKA , provided on the distribution media. To install vKA, simply double-click on this file. The OSX installer will
then walk you through the installation.
vKA consists of two program components, its “preference pane” and the ”user agent”.
You interact, as needed, with vKA through its preference pane. The user agent component works silently in the background and is managed by OSX directly. The preference
pane settings inform OSX and the agent how you wish it to operate.
If you have set your Mac up with only a single OSX user account then vKA works pretty
much as you would expect. Each time you “log-in” to your account (or if you have
automatic log-in turned on) OSX starts vKA up and it is ready to go. When you log out
of your account vKA is halted.
If, on the other hand, you share your Mac with other users who each have their own
account then there are a few things to consider. vKA is installed as a system wide resource, meaning that each user account can potentially use vKA. vKA is designed to
work seamlessly in this situation. For example your license, once installed, validates all
possible user accounts. Each account can also have its own settings for vKA.
vKA only runs in an account in which it has been set up to operate. This includes the
account you were in when vKA was installed! To turn vKA “on” you must visit its preference pane in System Preferences at least once to enable vKA to operate in an account. So each user account will have to do so in order for vKA to operate when that
account is active. Conversely if you do not want vKA to run when an account is active
simply do not ever “turn it on”, or if was enabled in the past use the preference pane to
disable it.
D e l ora S oftwa re ™ by Har mony Sy s t e ms , I nc. - v KA
Updating vKA
If you are updating your production version of vKA after an initial installation, please
follow these procedures:
• Run System Preferences and click on the vKA preference pane
• Press the STOP button
• Quit/close System Preferences
• Click on the vKA (updated) installer file sent to you and follow the installation instructions
• Run System Preferences and click on the vKA preference pane. If the new version
offers new or changed features through the preference pane adjust your settings accordingly then run vKA.
D e l ora S oftwa re ™ by Har mony Sy s t e ms , I nc. - v KA
Set-Up
Once you’ve finished the OSX install, you will need to complete these setup procedures
to begin using vKA:
1. Plug your APC40 into an available USB port.
2. If you are using a Capybara or a Paca(rana) with MIDI instead of MIDI-over-OSC
• verify that the USB or FireWire MIDI interface connected to your Capybara is also
plugged in and powered
• Note that if plan on using MIDI with the Paca(rana) it too needs a USB or FireWire
MIDI interface
3. (alternative to #2) If you are using a Paca(rana) with MIDI-over-OSC
• Make sure that the Paca(rana) is connected to the same computer network as the
Mac running vKA
4. Power up the APC40 and Capybara or Paca(rana).
5. Run the vKA preference pane and enter your license
6. Setup the vKA preference pane
7. Run vKA
8. Enable Kyma’s VCS
Completing the setup procedures establishes the necessary connections between the
various components working in a typical vKA usage.
D e l ora S oftwa re ™ by Har mony Sy s t e ms , I nc. - v KA
Run the vKA Preference Pane and Enter Your License
Note: You must run the vKA
preference pane at least
once, otherwise vKA will
not run! Also you must access the preference pane
the very first time and enter your license from an
account that has administrator privileges. Once this
has been done you can access the preference pane
from any account.
Select System Preferences... from the "Apple
Menu" (upper left corner of
screen). Click on the vKA
icon (highlighted in the screen
shot above).
The first time you select the vKA preference pane from the System Preferences application you will encounter a message like the one in red text in the graphic below.
Press the License
button and use the
file dialog to locate
the license file you
received as part of
your order or demo
request. (You will
also see this message if you are a
demo or beta user
and your demo/
beta license has
expired).
D e l ora S oftwa re ™ by Har mony Sy s t e ms , I nc. - v KA
If you are installing your first production version of vKA but have a Beta or demo license installed that is still valid, the “vKA license file is missing” message will not display on the preference
pane screen. Instead,
you will see the message in the bottom right
corner - “licensed to
demo user” or “licensed
to beta user”. Press the
License button and use
the file dialog to locate
the production version
license file you received
as part of your vKA
purchase.
Setup the vKA Preference Pane
If you have previously installed
a demo or BETA version press
this button to locate your full
license.
vKA is, for the most part, self-configuring for typical use. The one exception is when
you use it with a Capybara, or elect to use MIDI instead of MIDI-over-OSC with the Paca(rana).
vKA automatically finds
your APC40's MIDI
ports
Select your Kyma
sound engine
Choose the MIDI port
your Kyma sound
engine uses to send to
the vKA
Run status indicator
Manually start and stop
vKA with these two
buttons
Check this if you want
vKA to automatically startup when you login
Check this if you want vKA
to automatically restart when
there is a major problem
D e l ora S oftwa re ™ by Har mony Sy s t e ms , I nc. - v KA
Press to license
vKA 2.0 has two modes of operation:
1.
Capybara: uses MIDI to communicate with a Capybara or Paca(rana) Kyma sound
computation engine. Though it is named “Capybara” since the older Capybara
sound computation engine only supports standard MIDI, it can also be used with
the newer Paca(rana) should you wish to use standard MIDI instead of the new “MIDI
over OSC” features. This mode requires a physical MIDI interface connected to the
Kyma sound engine.
2.
Paca(rana): uses the Paca(rana)’s “MIDI over OSC” capabilities to send MIDI to and
from the Kyma sound computation engine. This mode also creates a virtual MIDI
port call “Pacarana” that is available in your sequencer and other software that can
be used to send and receive MIDI from your Paca(rana). All communication ports in
this mode are automatically configured. vKA’s Paca(rana) mode only works if you
have a Paca or Pacarana!
Paca(rana) mode uses
MIDI-over-OSC to
communicate with your
Paca(rana)
Paca(rana) selector is
displayed when
multiple Paca(rana)s
are available.
Select target application
Select your target sound engine. Notice that the preference pane changes if you select
the Paca(rana) (see screenshot above).
1. If you have selected the Capybara target:
Kyma Midi (To Kyma VCS), (From Kyma VCS)
vKA uses a MIDI input and output port to communicate with the Capybara:
D e l ora S oftwa re ™ by Har mony Sy s t e ms , I nc. - v KA
• Assign vKA to use the physical MIDI ports that connect to the hardware device. To
use vKA with Kyma Capybara (or with the Pacarana without the MIDI-over-OSC feature), you must have a Firewire, USB or other physical MIDI interface connected to
your Mac. This is usually a USB MIDI interface or perhaps the MIDI interface from
another USB controller. The physical inputs and outputs of this MIDI interface
must connect to the Capybara’s corresponding MIDI input and output. The Paca(rana)’s MIDI interface is the one you plugged into its USB or Firewire connection. (Note: the Capybara Flame’s MIDI over FireWire feature will not work.)
• Set the desired ports using the pull down selectors for To Kyma VCS and From
Kyma VCS. Normally the same interface is used for both input and output but
vKA gives you the flexibility to make these different.
2. If you have selected the Paca(rana) target:
•
The new MIDI-over-OSC feature eliminates the need for you to provide MIDI In
and MIDI Out parameters in the Preference Pane. vKA uses Bonjour technology
to automatically configure the Paca(rana)’s network details.
Run at Log-in, Auto-restart
If you would like vKA to run every time you log-in, "tick" the Run at login checkbox.
This is the way we recommend you use vKA. The Auto-restart checkbox determines
whether vKA will start up again in the event that OSX determines it has become "stuck"
or crashed. This is an unusual happenstance but stuff does happen. The recommendation is to have this setting on if you have also checked the Run at Log-in box.
Run vKA
Run, Stop
The Run and Stop buttons do exactly what they imply: they control whether vKA is
running or not. The three segment progress indicator above those buttons indicates
the status of the Run process. In general,
•
all segments green: vKA appears to be running properly
•
two segments yellow: the program is in the process of starting up or shutting
down
•
one segment red: a serious condition in which the process has become “stuck”
and the program is unable to shut down (logout, force quit, or restart should
this occur)
D e l ora S oftwa re ™ by Har mony Sy s t e ms , I nc. - v KA
At this point of your first installation and setup, the indicator segments should be
grey/darkened since vKA has never been started.
Press the Run button. The indicator should turn yellow then green. While vKA is starting, the control panel panel indicators may momentarily display red or yellow. This is
normal. If, however, the red or yellow remains, and the vKA progress indicator shows
yellow, then vKA has detected a problem with the current setup. Go to “Troubleshooting with the Preference Pane” below to determine the likely causes and remedy.
You can start or stop Kyma (or Ableton Live) while vKA is running. There is no need to
restart vKA when you run, quit, or change applications.
Enable Kyma’s VCS
Bring up Kyma’s preferences and press the “Performance” button. Then on the displayed “Performance Preferences” panel select “MotorMix” under “External Midi Controller”. Close this panel, and then preferences, and Kyma should be ready to use vKA.
Troubleshooting with the Preference Pane
vKA helps you diagnose potential set up issues. After pressing the Run button, some
indicators may show as follows (please refer to the next diagram):
•
yellow: hardware connections are likely OK, but information is not being exchanged properly between vKA and the APC40 and/or Kyma’s VCS.
•
red: an error indicating a critical connection problem. This signifies a hardware
problem, usually a MIDI port that is no longer available, the APC40 is no longer
powered or connected, or the Paca(rana) is no longer powered or is not connected to the network.
D e l ora S oftwa re ™ by Har mony Sy s t e ms , I nc. - v KA
Indicators show the status of
each input and output
connection. They will glow green
if the connection is good, yellow
if the external device is not
properly responding, and red if
the connection itself has failed.
Light green indicates recent
activity.
Press this button to see a more
detailed report of why vKA is
unable to successfully start
The run status indicator shows
yellow if vKA has started but is
currently experiencing
difficulties.
Shows the name of the current
Paca(rana). Will show
<unavailable> if no Paca(rana)
is located
You can access a detailed description of the problem by pressing the help button (the
question mark near the bottom right of the screen). This shows a dialog with information to guide you to fix the problem.
D e l ora S oftwa re ™ by Har mony Sy s t e ms , I nc. - v KA
If the APC40 is con-
These four rows show status information when vKA detects a problem.
nected and powered
it will notify you of
TRACK CONTROL
SCENE
LAUNCH
CLIP LAUNCH/SESSION OVERVIEW
APC40 input port
problems. Essentially
APC40 output port
this duplicates the
Kyma MIDI or OSC input port
status indicators
Kyma MIDI or OSC output port
shown in the prefer-
PAN
SEND A
ence pane. This fea-
GREEN - The port is working properly
ture eliminates the
YELLOW - The port is working but the device is not responding properly
v
STOP ALL CLIPS
SHIFT
<
SEND C
TAP TEMPO
>
NUDGE -
V
RED - The port is unavailable or not work
need to keep the
SEND B
BANK SELECT
NUDGE +
DEVICE CONTROL
All four rows will show
green
when vKA has been stopped
TRACK
SELECTION
preference pane
open. This feature
does not work if vKA
1
2
3
4
5
6
7
8
1
2
3
4
5
6
7
8
is unable to communicate with the
APC40.
MASTER
CUE LEVEL
CLIP/TRACK
DEVICE ON/OFF
DETAIL VIEW
REC QUANTIZATION
MASTER
PLAY
D e l ora S oftwa re ™ by Har mony Sy s t e ms , I nc. - v KA
MIDI OVERDUB
STOP
METRONOME
REC
Additional Set-Up for Ableton Live
Once you’ve finished the standard Setup steps in the last chapter and you plan on using the APC40 and vKA with Ableton Live, you will need to use a slightly different setup than you would normally have for Live.
Configure Ableton Live
Start Live, bring up its preferences, and select the “MIDI/
Sync” tab.
Make sure that you have
“APC40” selected as at least one
of the control surfaces. Use the
drop-down menu selector to
choose “vKA APC40” as its input, and “vKA APC40” as its
output. You can have additional
APC40 controllers provided
they do not use the physical
APC40 you are using with vKA.
D e l ora S oftwa re ™ by Har mony Sy s t e ms , I nc. - v KA
Look at the MIDI device list and find the
entry “Akai APC40” (if
you have more than
one APC40 locate the
one used with vKA).
Turn off the Track,
Sync, and Remote options for both input
and output.
D e l ora S oftwa re ™ by Har mony Sy s t e ms , I nc. - v KA
Now locate the two lines
“APC40 Input (vKA
APC40)” and “APC40 Output (vKA APC40)”. Turn
off Track, Sync, and Remote.
D e l ora S oftwa re ™ by Har mony Sy s t e ms , I nc. - v KA
Finally, if you have set up
vKA in Paca(rana) mode
and wish Live to control,
or be controlled by a
Kyma sound, locate the
lines “Paca(rana)”. Set
Track on, Sync off, and
Remote off.
D e l ora S oftwa re ™ by Har mony Sy s t e ms , I nc. - v KA
Using vKA
vKA is designed to work automatically in the background once you have everything
properly set. It will load each time you log into your OSX account and sit quietly in the
background waiting until you need to use the controller. When vKA sits idle it consumes very little computer resources and can generally be ignored. However if you are
the type of user that prefers to only have software running when you are actually using
it then you can manually start and stop vKA from its preference pane.
If you like to turn off the APC40 when you are not using it, vKA will be idle until you
turn the APC40 on. vKA will then come alive with a “reset sequence” to bring everything into proper operating order. You can also power down your Capybara and MIDI
interface, or Paca(rana) when not in use and vKA will perform the same initialization
sequence when your equipment again is powered or connected.
How the VCS Uses the APC40’s Controls
Kyma’s VCS requires eight sliders, eight rotaries, and thirty-two push buttons. The
push buttons are also required to have lights that the VCS can turn on and off. Eight
additional push buttons control VCS operation, three of which also offer lights.
The diagram on the next page highlights each of these controls on the APC40’s panel.
Notice also that many of the APC40’s switches and other controls are currently unused
by vKA to provide VCS functionality. In some cases they are unused because the choice
was inappropriate for proper VCS usage. Let’s tour the main controls groups and dig in
a bit.
D e l ora S oftwa re ™ by Har mony Sy s t e ms , I nc. - v KA
VCS
switches
VCS
rotaries
TRACK CONTROL
SCENE
LAUNCH
CLIP LAUNCH/SESSION OVERVIEW
Switches 1-8
Rotary 1-4
Switches 9-16
Bank
Swap
Fine
Switches 17-24
Rotary 5-8
Switches 25-32
VCS Sync
PAN
SEND A
SEND B
BANK SELECT
v
STOP ALL CLIPS
SHIFT
>
<
SEND C
TAP TEMPO
NUDGE -
V
"Roll Dice"
NUDGE +
DEVICE CONTROL
Bank left
TRACK SELECTION
Fader 1-4
1
2
3
4
5
Ableton
Live Mode
6
7
8
Bank right
MASTER
Snapshot
load
previous/
next
Fader 5-8
VCS
"faders"
CUE LEVEL
1
2
3
4
5
6
7
Kyma
master volume
mute
8
CLIP/TRACK
DEVICE ON/OFF
DETAIL VIEW
REC QUANTIZATION
MASTER
PLAY
MIDI OVERDUB
STOP
METRONOME
REC
Kyma
master volume
level
Master volume fader and mute button
The Paca(rana) and Capybara each offer a hardware volume control feature that can be
adjusted from the Kyma preferences or by sending the proper MIDI command to the
sound engine. The Paca(rana) also offers a way of adjusting master volume from its
front panel. vKA taps the master volume feature to offer a volume control fader and a
mute function. Strictly speaking these are not VCS “features” but they are handy to
have.
The mute button is not lit when the sound engine is playing at whatever master volume
you have set. When you press the mute button it sends a “turn the volume all the way
down” message to the sound engine. The button remains lit to remind you that you
have turned off the sound. Press mute again and the sound engine returns to its previous volume setting. vKA tracks any changes that you make to the master volume fader
while the sound engine is muted. When you “unmute” these changes take hold.
Since the APC40 faders are not motorized it is possible for the fader position to not
reflect the current sound engine’s master volume level. This can happen if the level is
D e l ora S oftwa re ™ by Har mony Sy s t e ms , I nc. - v KA
changed by another means, like through the Kyma preferences, or the Paca(rana)’s
front panel.
vKA’s master volume fader and mute button work in a such a way that if you prefer to
set master volume level by other means, and do not often change it, then vKA will not
get in the way. Basically vKA keeps track if you have adjusted the master volume fader
previously. It saves whatever the last value you set and restores this value each time
you start vKA. So if you never adjust this setting vKA never sets your sound engine’s
master volume.
VCS switches and lights
The APC40’s upper-most grid of eight by four pushbuttons provide the thirty-two
switches and lights that the VCS supports. When you press one of these buttons the
VCS is sent the appropriate message that the corresponding VCS switch has been
pressed. The action the VCS takes in response to this action is left to the current sound
running.
It’s important to understand that the light within the switch is completely controlled by
the VCS and will be on or off depending on the nature of the sound setting assigned to
the companion switch. Some sounds use a “toggle” switch and the light will alternate
between on and off on each press. Others use a “push button” style switch and the
light will remain off. One useful VCS “trick” is that you can use these switches for the
light function and ignore any switch action.
Eight VCS faders
The four by two group of rotary controls in the
APC40‘s lower right corner provide the VCS faders.
The top row corresponds to faders 1 - 4; the bot-
If you adjust a VCS fader on the computer screen be aware that Kyma
does not send the updated value to its
tom 5-8. The “LED rings” around the rotaries are
control surface until you release the
used to display the current fader position. So if
mouse button after dragging the
you change Kyma sounds, or adjust a fader on the
fader!
VCS display on your computer, these indicators
change to reflect the latest value.
Eight VCS Rotaries
The four by two group of rotary controls in the APC40‘s upper right corner provide VCS
rotary controls. These are “endless rotaries”, meaning that the information the VCS receives when you adjust one relates to how much you have changed the control and not
D e l ora S oftwa re ™ by Har mony Sy s t e ms , I nc. - v KA
the absolute position. These rotaries work the same way they do in the MotorMix, the
original VCS controller.
It is for this reason that these controls do not have their “LED ring” lit. The VCS does
not provide any feedback about the current value of a setting assigned to a “pot” or rotary encoder. However there is a “trick” described in the “swap” feature section that you
can use to instantly learn what each of these are set to!
VCS bank control
Kyma allows for a large number of rotaries and faders, more than just the eight of each
vKA provides. Kyma uses a “bank system” to choose which of the eight VCS faders and
rotaries are currently affected by vKA. Please note that VCS switches and lights are not
banked! You only have thirty-two of each.
Three buttons control the VCS bank system: BANK, BANK LEFT, and BANK RIGHT. The
BANK button has a light that is on whenever the VCS is in the “bank mode”.
Imagine that all of the faders currently showing on the VCS’ computer display are arranged in one long line in the order they occur on screen (left to right; top to bottom).
Now imagine a box or frame that encloses eight consecutive faders. Whatever sound
setting assigned to the faders currently “in the box” are controlled by the eight APC40
“faders”.
When bank mode is off (light extinguished) BANK LEFT, and BANK RIGHT, moves this
box one position left or right. So if the box is currently around faders 1-8, pressing
BANK RIGHT moves it to enclose VCS faders 2-9 and the APC40 now controls those settings (APC40 “fader” 1 controls VCS fader 2, APC40 “fader” 2 controls VCS fader 3 and
so on). Likewise BANK LEFT moves the box one position to the left. Notice that no matter how many times you press BANK LEFT it never goes past the first position. The box
also stops at the last VCS fader currently assigned no matter how many times you
press BANK RIGHT.
If you press BANK to turn bank mode on (light glowing) BANK LEFT, and BANK RIGHT,
moves this box eight positions left or right, or if it “runs out of faders”, to the first or
last fader respectively. Bank mode on is useful when you have a large number of faders
and your VCS is constructed to place related settings in groups of eight.
D e l ora S oftwa re ™ by Har mony Sy s t e ms , I nc. - v KA
VCS fine control
Sometimes you need to precisely adjust a sound setting. Press FINE to turn on the
fader “fine adjust” mode. When Fine is on (the
light in the FINE button will glow) the VCS adjusts the values of vKA’s “faders” so that they
Note that not all settings assigned to a
VCS fader have a meaningful “fine” ad-
all are “half way up”, meaning the LED rings
just. Sometimes the corresponding
will light to the half (12 o’clock) position. Any
sound setting will have only a couple of
actual values. The VCS will not center
increases or decreases you now make in a
value will adjust the corresponding setting
from its current setting but with a much
the LED display in this case when you
activate fine mode.
smaller change for each degree you rotate the
controller. Press FINE again to return to normal operation.
VCS swap
Rotary controls are very different than fader controls so sometimes it is handy to temporarily reassign faders to rotaries and rotaries to faders. Kyma’s VCS has a mode
called “swap mode” that does just this. When swap mode is off the faders and rotaries
behave as normal but when swap mode is on the roles are reversed. Sound settings
previously assigned to faders are now placed on the rotaries, and the ones that were
on the rotaries before now are controlled by the faders.
vKA’s SWAP button engages this mode. When swap is on the button’s light also glows.
Each time you press SWAP it toggles between swap and normal.
Since vKA has no real faders and instead assigns the “faders” to one of the eight
groups of APC40 rotaries, swap mode works a little different then you might first expect.
When swap is active vKA does not change what is being controlled between the two
groups of rotaries. Instead it changes how each of the groups operate. Normally (swap
is off) the upper group of eight rotaries correspond to the VCS rotaries and work in an
“incremental fashion” (see “Eight VCS Rotaries” for more discussion). Their LED rings
are always off. The lower group is used for the VCS faders. They work in an “absolute
fashion” and the LED rings always reflect their current setting.
When you activate swap mode the two groups of eight rotaries change how they work.
The upper eight now work in an absolute fashion, with their LED rings displaying the
current value. The lower eight become incremental and their LED rings are extin-
D e l ora S oftwa re ™ by Har mony Sy s t e ms , I nc. - v KA
guished. Note that what these rotaries control does not change. The upper eight rotaries still control the same sound settings are it did before the swap; likewise the lower
eight rotaries.
Why does vKA operate in this fashion? Unlike a MotorMix or other hardware controller
where there are different types of physical controls for the faders and rotaries, the
APC40 has identical ones for both functions. So there was really no advantage to have
a sound setting physically “jump” from control to control when you toggle swap. Instead the setting stays with the same rotary. This is of course useful if you are learning
how to control a sound for performance; it helps develop muscle memory.
So why even offer the swap mode? One of the limitation of the VCS is that it does not
convey the current value for any sound setting assigned to a rotary. This makes sense
when you think about the MotorMix and how its eight rotaries had no way of showing
current values. But the APC40‘s rotaries all have LED rings and do not suffer this limitation. So vKA re-purposed swap mode to mean “show the values currently assigned to
my rotary controls”. In practice this is quite useful!
VCS snapshot next, previous and “roll dice”
vKA has three buttons you can use to load a Kyma sound’s “snapshot” (like a synthesizer preset). Each Kyma sound stores one or more histories (or snapshots) of all of the
sound’s current VCS settings. These buttons are grouped together in the APC40 upper
right, below the group of eight rotary controls. LOAD NEXT (“nudge +”) loads the next
available snapshot into the current sound. LOAD PREVIOUS (“nudge -”) loads the previous snapshot. The list of snapshots “wraps around”, meaning if you press either LOAD
NEXT or LOAD PREVIOUS enough times in a row you will return to the same snapshot.
ROLL DICE (“tap tempo”) randomly chooses new values for all of the current VCS settings except those you exclude with the VCS “lock feature” (those setting names show
in gray on the computer screen). This button performs identical to pressing the small
dice icon with your mouse on the VCS’s computer display.
VCS Sync
vKA and Kyma work in concert to insure that the various vKA switches, LED rings, and
so on reflect the current VCS settings. Normally this happens automatically. However
there are rare cases where the two may become “out of sync”. If you should suspect
this then simply press the “VCS Sync” button (up arrow in four-way navigation switch).
D e l ora S oftwa re ™ by Har mony Sy s t e ms , I nc. - v KA
Ableton Live mode
The APC40 is at its heart a purpose-built control surface for Ableton Live. So its entirely
likely that you purchased yours with this use in mind and would like to share the
APC40 between Kyma duties and Live duties.
vKA has special “smarts” that enable it to alternate between “Live mode” and “VCS
mode” without missing a beat. The ABLETON LIVE MODE (“Send C”) button is used to
toggle between these two modes.
Whenever vKA is in “VCS mode” this button is lit. Simply press and release it immediately to switch to “Live mode”.
When in “Live mode” things are a bit more complex. Ableton Live makes full use of
each and every switch, light, rotary, and fader on the APC40. As such there is no “safe”
button that can be used to switch back to “VCS mode”, nor is there any fool-proof way
to indicate that you are now in “Live mode”. So vKA has to resort to trickery to facilitate
switching back.
To return to “VCS mode” press and hold the ABLETON LIVE MODE (“Send C”) button for
about two seconds. When you release the button you will have returned to “VCS mode”.
As far as “how do I know when I am in Live mode?” goes it is usually fairly obvious. One
of more of the buttons that are never used in “VCS mode” will be glowing. Another
“hint” is that the “Send C” button may or may not be lit, whereas in “VCS mode” it is always lit. So if you notice that button’s light is extinguished you are in “Live mode”. If,
on the other hand, the light is on and you press it it will not extinguish if vKA is in
“Live mode”. The light will stay lit. Note that there is nothing wrong with switching
modes at any time so you can simply press ABLETON LIVE MODE (“Send C”) and see
what happens. If you end up in a different mode than you expected simply switch back.
Important Notes About the VCS
Kyma’s VCS has some operational attributes that impact the vKA. Some of these may
at first appear strange or “wrong” until you understand the idiosyncrasies. VCS was
made to work well with a MotorMix so some of its flavor remains in the stew. Two examples of note:
1. When you move an on-screen fader using the mouse the VCS does not send any indication of change to vKA (or any other control surface) until you release the mouse
button. However if your mouse or trackball has a “scroll wheel” that is set up prop-
D e l ora S oftwa re ™ by Har mony Sy s t e ms , I nc. - v KA
erly you can adjust the on-screen fader using that and vKA will display the change
as expected.
2. If you start vKA while Kyma is already displaying the VCS for a playing sound, or
vKA reinitializes for any reason (for example if your OSX MIDI configuration
changed when you turned on a USB MIDI controller), vKA issues a “resync” request
to the VCS. This command causes the VCS to send information about the fader,
switch LEDs, and other current settings. Normally vKA automaticly does this whenever it needs to and stays in lock-step with the VCS.
However occassionally the VCS and vKA can get out of step. This is normal and is a
direct result of how the VCS works with the MotorMix and other controllers. Most of
the inconsistencies will be in the “faders” LED rings showing incorrect values and/or
the “LEDs” on sw1 - sw32 being incorrect.
The remedy is to press vKA’s VCS Sync button. This button sends a “resync” request to Kyma. Kyma replies with the needed information to bring things back in
line.
Finally, the volume slider and mute button deserve special mention. Kyma’s master
volume command is “write only”, meaning that Kyma never informs vKA what the
current value master volume is set to. vKA remembers how you has changed the
master volume and mute setting in the past and will use the latest value each time
vKA initializes. If you never adjust master volume or mute using vKA then vKA
leaves Kyma’s master volume unchanged. In other words if you prefer to set volume
by another means then do not use vKA volume controls.
Getting the Most Out of vKA With the Kyma VCS
Kyma’s VCS integration provides a number of useful features that are not fully documented, or the documentation requires a careful reading of Kyma X Revealed! Here are
a few of our favorites.
Viewing a rotary’s value: If you want to see quickly all the rotary values in one go just
press SWAP. vKA’s rotaries will switch to “fader mode” and the LED rings will display
the current value. Feel free to adjust a rotary’s value while they are swapped. When you
are finished hit SWAP again. For a quick check just toggle SWAP in quick succession.
Optimize the VCS for vKA: Kyma provides substantial, easy-to-use, VCS editing. It is
easy to adjust a sound’s VCS to fit your particular needs. Often though a sound’s VCS
D e l ora S oftwa re ™ by Har mony Sy s t e ms , I nc. - v KA
is laid out best for the computer’s display and not vKA. If you use a sound frequently,
or rely on adjusting it in a performance setting, then it makes sense to adjust the various “widgets” to better fit vKA. Here are a few hints:
1. Use faders for any control where immediate visual feedback is important.
vKA and the VCS work in tandem to display many more that just eight faders
through the bank facility. So there is no reason to hamper your interaction
with a sound simply to fit it all on one screen. Assign rotaries to those settings where visual feedback is of less value.
2. If you require more than eight faders or rotaries make sure that they are ordered in such a way to show in groups of eight on vKA. Kyma assigns the
order automatically but often the choice is not what is best for use on vKA.
Study Kyma X Revealed for how you can move VCS “widgets” around on the
screen to get the grouping you desire on vKA. This takes a little experimenting but the results are well worth it.
3. The 32 switches can be used as status indicators. The VCS will display the
first 32 push buttons or toggle buttons on vKA’s thirty-two push buttons. If
a toggle button is used then its on/off status will show on each switch’s
“LED”. You can assign toggle switches to any of your sound’s “hot values”,
and it is easy to control its value from the sound itself! A great example of
this is the sound SequencerWithIndicator.kym available on the Kyma Wiki.
This is a analog-style step sequencer that uses the switch indicators as a
“case light” to show in real time the currently playing step. This is just one
example of an excellent “alternative” use of a VCS toggle widget.
Create alternative VCS pages: Each sound can have as many “pages” as you wish. Normally this is used to provide VCS access for each sound contained within a sound but
an alternative use is to provide a different style VCS for specific needs. For example,
you might have one VCS page that is optimized for computer display, but another one
that is more appropriate for use with vKA. Another example is a VCS page that only
shows those controls used during performance, optimized for ready access from vKA.
You will have to select the active page from the computer but once selected everything
is controlled from vKA. Note that you can determine which page is shown when a
sound is first run by selecting that page before saving the sound.
Roll the dice!: The “dice roll” is one of the coolest features in Kyma and can be an extremely effective way to explore a sound’s possibilities, provided the sound’s VCS is
set up appropriately. This is discussed thoroughly in Kyma X Revealed. What you might
D e l ora S oftwa re ™ by Har mony Sy s t e ms , I nc. - v KA
have missed though is how easy it is to use this feature with vKA! vKA has a dedicated
push button that you can press whenever you wish to create a brand new variation
from the current sound. Use this liberally when you first encounter a sound (after “surfing the snapshots of course”), or you just want some inspiration from a well-traveled
one.
D e l ora S oftwa re ™ by Har mony Sy s t e ms , I nc. - v KA
Removing vKA
If you need to remove vKA from your Mac for any reason:
First, go to the vKA preference pane and press STOP to stop vKA from running.
Next, close the vKA preference pane, then right click on the vKA icon (see diagram below). Select Remove “vKA” Preference Pane. This will remove the vKA preference pane
and the user agent program from your system. Once this is removed vKA will no
longer run on your system. Run the installer should you decide to you wish to use it at
a later time.
If you would like to completely remove all traces of vKA, delete these files:
<YOUR HOME FOLDER>/Library/LaunchAgents/com.delora.vKA.plist"
<YOUR HOME FOLDER>/Library/Preferences/com.delora.vKA.agent.plist"
/Applications/vKA (remove entire folder)
/Library/Documentation/vKA (remove entire folder)
Note that you must have administrative rights to perform the final two deletions.
D e l ora S oftwa re ™ by Har mony Sy s t e ms , I nc. - v KA
Troubleshooting
vKA is usually very transparent in daily use once it is properly configured. It also has a
sophisticated self-configuration system that means in many situations little or no configuration is needed. Most of the initial connection issues are straight forward to diagnose. Typical problems arise due to selecting an incorrect MIDI port when using it in
“Capybara mode”. The preference pane also a “help” button to assist in diagnosing
problems after the initial installation. See the “Set-Up” chapter for more on this.
Problems though can arise from time to time even with a set up that was working "just
a minute ago". If your APC40 no longer seems to be functioning as a VCS controller
(and you have double checked it is not in “Ableton Live mode”!) then it is possible that
vKA has encountered a problem and may even have become stuck or crashed. If you
suspect this then visit the vKA preference pane and see whether its run status is showing "green", "red", or the indicators are dark. It is very rare that status would be " all
green" while vKA is otherwise confused or has failed. If the status is all green then first
look elsewhere, perhaps restarting Kyma.
If you are using vKA in “Paca(rana) mode” then your computer network is used to
communicate directly with your Paca(rana) and Kyma. vKA uses Apple’s Bonjour technology to set up this connection. Normally this is completely automatic. However there
are some operational aspects that may at first seem confusing or incorrect.
When the network connection between the Paca(rana) and vKA is disconnected for any
reason vKA takes note of this almost immediately. If you have the preference pane
open you will see both of the “MIDI-over-OSC” ports showing yellow. This is true even
when you turn the Paca(rana) off.
When vKA decides that the Paca(rana) is unresponsive for any reason its first action is
to attempt to reconnect using Bonjour. Bonjour, however, takes a while to notice that
the Paca(rana) is no longer available and continues to provide vKA with “it’s here”,
which vKA in turn uses to attempt the reconnect. All while this is happening vKA
shows the status as “yellow”. It is only after Bonjour has finally decided that the Paca(rana) is no longer available that vKA is informed it is completely offline and the
MIDI-over-OSC “To Paca(rana)” status is shown as red. This can take a minute or so.
There is a rare situation where the vKA application can still be found loaded in memory
and is running (more or less) but is not responding. The run status indicator will show
D e l ora S oftwa re ™ by Har mony Sy s t e ms , I nc. - v KA
clear, leading you to conclude it is not running. However any attempt to start vKA will
fail.
The usual cause is that a prior run of vKA is still lingering in memory. This is what
computer experts refer to as a "zombie process". Unfortunately, like the zombies
found in video games and horror movies, a zombie process can be quite difficult to
“kill”.
The easiest way to clear this condition is to log out of OSX and log back in. However if
you are comfortable working “under the hood” then you can use OSX's Activity Monitor
application to display active processes. Search for "vKA_agent". Quit that process and
you should be able to restart vKA from the preference pane. If you are a real OSX guru
you can do something similar from the Terminal application. If neither of these approaches work then you will need to log out and restart your Mac.
D e l ora S oftwa re ™ by Har mony Sy s t e ms , I nc. - v KA
Acknowledgements
In addition to Harmony Systems, Inc.‘s proprietary code, vKA contains some code provided by generous and dedicated independent developers. The follow code was used:
AquaticPrime
Copyright (c) 2005, Lucas Newman All rights reserved.
Redistribution and use in source and binary forms, with or without modification, are
permitted provided that the following conditions are met:
• Redistributions of source code must retain the above copyright notice, this list of
conditions and the following disclaimer.
• Redistributions in binary form must reproduce the above copyright notice, this list of
conditions and the following disclaimer in the documentation and/or other materials
provided with the distribution.
• Neither the name of Aquatic nor the names of its contributors may be used to endorse or promote products derived from this software without specific prior written
permission.
THIS SOFTWARE IS PROVIDED BY THE COPYRIGHT HOLDERS AND CONTRIBUTORS "AS IS"
AND ANY EXPRESS OR IMPLIED WARRANTIES, INCLUDING, BUT NOT LIMITED TO, THE
IMPLIED WARRANTIES OF MERCHANTABILITY AND FITNESS FOR A PARTICULAR PURPOSE
ARE DISCLAIMED. IN NO EVENT SHALL THE COPYRIGHT OWNER OR CONTRIBUTORS BE
LIABLE FOR ANY DIRECT, INDIRECT, INCIDENTAL, SPECIAL, EXEMPLARY, OR CONSEQUENTIAL DAMAGES (INCLUDING, BUT NOT LIMITED TO, PROCUREMENT OF SUBSTITUTE GOODS OR SERVICES; LOSS OF USE, DATA, OR PROFITS; OR BUSINESS INTERRUPTION) HOWEVER CAUSED AND ON ANY THEORY OF LIABILITY, WHETHER IN CONTRACT,
STRICT LIABILITY, OR TORT (INCLUDING NEGLIGENCE OR OTHERWISE) ARISING IN ANY
WAY OUT OF THE USE OF THIS SOFTWARE, EVEN IF ADVISED OF THE POSSIBILITY OF
SUCH DAMAGE.
D e l ora S oftwa re ™ by Har mony Sy s t e ms , I nc. - v KA
oscpack -- Open Sound Control packet manipulation library
Copyright (c) 2004-2005 Ross Bencina <[email protected]>
Permission is hereby granted, free of charge, to any person obtaining a copy of this
software and associated documentation files (the "Software"), to deal in the Software
without restriction, including without limitation the rights to use, copy, modify, merge,
publish, distribute, sublicense, and/or sell copies of the Software, and to permit persons to whom the Software is furnished to do so, subject to the following conditions:
The above copyright notice and this permission notice shall be included in all copies or
substantial portions of the Software.
Any person wishing to distribute modifications to the Software is requested to send the
modifications to the original developer so that they can be incorporated into the canonical version.
THE SOFTWARE IS PROVIDED "AS IS", WITHOUT WARRANTY OF ANY KIND, EXPRESS OR
IMPLIED, INCLUDING BUT NOT LIMITED TO THE WARRANTIES OF MERCHANTABILITY,
FITNESS FOR A PARTICULAR PURPOSE AND NONINFRINGEMENT. IN NO EVENT SHALL
THE AUTHORS OR COPYRIGHT HOLDERS BE LIABLE FOR ANY CLAIM, DAMAGES OR
OTHER LIABILITY, WHETHER IN AN ACTION OF CONTRACT, TORT OR OTHERWISE, ARISING FROM, OUT OF OR IN CONNECTION WITH THE SOFTWARE OR THE USE OR OTHER
DEALINGS IN THE SOFTWARE.
D e l ora S oftwa re ™ by Har mony Sy s t e ms , I nc. - v KA