1
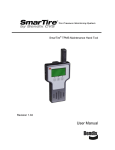
An Autonomous Firefighting Robot William Dubel Hector Gongora Kevin Bechtold Daisy Diaz Department of Electrical and Computer Engineering Florida International University, Miami, FL 33199 LEDs), and then return to the front of the house. This mission is divided into smaller tasks, and each task is implemented in the most efficient manner. The navigation of the robot throughout the house is achieved by data provided by a line tracker and ultrasound transducers. The target acquisition is achieved by data provided by a camera. The deployment of the extinguishing device is implemented with a custom arm controlled by servos. Along with these crucial tasks were other design constraints, such as the size, speed, and supply of power. Each defining characteristic of the robot is described in more detail in this document. Abstract Firefighting is an important but dangerous occupation. A firefighter must be able to get to a fire quickly and safely extinguish the fire, preventing further damage and reduce fatalities. Technology has finally bridged the gap between firefighting and machines allowing for a more efficient and effective method of firefighting. Robots designed to find a fire, before it rages out of control, could one day work with firefighters greatly reducing the risk of injury to victims. The IEEE SOUTHEASTCON 2003 Hardware Competition tests the minds of college students all over the nation with the challenge of extinguishing a fire located in a simulated house autonomously. To anyone unfamiliar with robotics, for a robot to be autonomous means the robot must operate on its own independent of any human intervention. The competition requires a robot to activate upon the sound of an audible tone (the fire alarm), locate and extinguish the simulated fire. (The fire is simulated by an array of red LEDs hidden somewhere inside the house.) This paper describes such a robot, covering the components and logic required to successfully locate and extinguish the simulated fire. 1. 2. The software for the robot was coded in C, because of compiler availability, our familiarity with the language, as well as the greater control of the system offered as compared to other higher languages. While our Microcontroller supports assembly, it was avoided because it’s a difficult to maintain, and varies greatly from processor to processor. C allowed us to easily break apart the components of software design so that different members of the team could code the system. The software design had four major components, including interfacing its peripherals, control of its motors and servos, navigation, and target acquisition. Introduction The firefighting robot is designed to search for a fire in a small floor plan of a house, extinguish the fire (by placing a cup over the Software Design 2.1 Peripheral Interfacing Peripheral interfacing included reading the four ultrasonic transducers and interpreting a distance, reading the state of the infrared line trackers, and communicating with the camera. A keypad and display were also interfaced, as well as a small speaker and status indicators, to allow the user to interact with the robot more effectively. The most programming sensitive sensor was the ultrasound. The ultrasound requires a start pulse, which then holds a line high until an echo is received. The length of time that the line is held is proportional to the distance that the sensor is reading. The ultrasound must be carefully coded with accurate delays to prevent reading incorrect distances. We handled this with timed interrupts. An interrupt is set to trigger every 50us, to give us an accuracy of about 1 cm. User interaction was not a requirement of this robot, but having a keypad and display interfaced accelerated the debugging process, as well as adding flexibility to the robots programming. Multiple routines could be loaded at once, and the user is able to choose the routine of interest from a menu system. 2.2 Motor Control System Feedback from ultrasound and line tracker Control system block diagram 2.3 Navigation The robot is programmed for a known environment that is not expected to change. This allowed us to use a simpler programming technique to navigate the robot to each of its possible destinations. Instead of providing the robot with a map of the area, and coding an algorithm that could determine the best path to take for any destination, the actual known routes were programmed in. While not as elegant, actual routes can be ‘hard-coded’ in much less time, and also requires less RAM (something rather limited on a Microcontroller). However, a new environment would mean recoding all of the path routines, instead of loading a new map file. The routines are coded to look for landmarks, such as the absence or presence of certain walls, lines, or distances, to determine its current location. This is a step above dead reckoning, where the robot would blindly track its distance traveled to determine its locations. Dead reckoning presents problems on different surfaces and when there are slight variations in the locations of the doorways, as could happen during the competition. For our coding, the only routine that was left to dead reckoning was a 90-degree turn (when not assisted by a line). The degree of error was noticeable, but not enough to cause problems for the navigation. To facilitate coding the routes based on landmarks easier, a map was drawn with particular points of interest marked as coordinates. While the coordinates had no meaning to the Microcontroller, they gave the programming team common ground to work from. One member could reuse a routine to go from one coordinate to another, even though their final destinations were different. candle, the robot moves left. If the robot is too far to the left of the candle, the robot moves right. Since the data from the camera is in pixels, the following equation was used to determine the threshold values (solved for the left threshold): 2.4 Target Acquisition The CMUcam is used for video processing. The CMUcam provides a way to recognize if the candle is in the robot’s field of view, and the position of the candle relative to the robot. On entering a room, the camera is used to detect the presence of a candle, based on whether or not an object in view meets the color criteria. The robot makes one rotation in search of the candle. If the robot detects the candle, robot proceeds to track the candle until it is at the correct distance. Otherwise, the robot exits the room and continues with the navigation routine. The robot tracks towards the candle based on the position of the candle in the camera’s field of view and the distance from the candle as measured by the ultrasound. If at any point the camera fails to recognize a candle in its field of view, the robot repeats its initial search. Only the horizontal tracking position from the camera is analyzed. If the robot is centered on the candle within an allowable range of degrees the robot moves forward or backwards until the distance from the ultrasound is correct. If the robot is too far to the right of the 3 * Re s Horizontal PLeft FView DMax − tan −1 2 Dist Candle = FView PLeft 90° 1cm − tan −1 8cm 2 = * 80 pixels = 37 px 90° The camera’s field of view is 90 degrees, horizontal resolution was 80 pixels, the maximum deviation was 1 cm, and the distance from the candle was 8 cm. When the robot is centered at the candle at the correct distance, the arm is lowered to deploy the cup. Platform The platform consists of three layers; the lowermost layer contained all locomotion control followed by the middle layer, which housed all internals including the micro controller motor controller and the user interface. The arm was also mounted to this layer giving it a strong base. 3.1 other direction causing the fingers to close and grab the extinguishing agent. With the integration of software our robot is able to lower his arm to the floor and pick up an object. When designing the arm we also noticed that the center of mass could not be on either side of the robot. Doing this would cause the robot to lean in that direction not giving us a firm stance. We moved the center of mass towards the center of the robot and this gave us a desirable outcome. Arm Design A HiTec HS-55 MicroLite servo was used as our elevation servo. The function of this servo is to extend and retract our arm. This servo not only had to be strong enough to withstand the extra weight that is added by torque, but the addition of the extinguishing agent (the cup). We also needed this servo to be compact and lightweight. Two HS-50 HiTec Feather servos were also used. These provide half the torque of the HS-55 servos, however we did not need a great deal torque since the lower extremity of the arm wouldn’t be stressed as much. The first HS- 3.2 50 was used as a wrist for our arm. It was designed so that the entire arm when folded up tucks away neatly in the robot making it compact yet functional. The gripper consists of another HS-50 servo linked to two Ushaped brass rods as fingers. The rods are shaped and mounted on a custom frame so that when the servo rotates counter clockwise it creates a torque pushing the fingers open. Likewise when the servo is rotated clockwise the torque goes in the Size Constraints The rules state the qualifying requirements for the frame are 21 cm x 21 cm x 20 cm (W x L x H). Our robot is to be measured before every trial if it doesn’t fit within specs it will be disqualified. We calculated that in order to make a good design that will fit the dimensions of the floor plan, including the 4% error deviation stated in the rules, we would need to make our robot fit within a diameter of 20 cm. We managed to make a couple of prototypes and noticed that the size constraints are very important as just a couple of centimeters could mean the difference between entering a room or hitting a wall. The arm also played a roll in that it would have to be within the box with the extinguishing agent mounted on it. This is why it was designed as a retractable arm and now our robot fits neatly within the qualifying box. consumption. This solution is about twice the initial cost of using servos, since a separate motor controller is used. However, the longevity of geared DC motor over a modified hobby servo pays for the difference after about 100 hours of use. Hobby servos that are designed for intermittent use typically fail after about 30 hours of continuous use. 4.1 3.2 4 The PWM controller handles the task of outputting a constant pulse width modulation signal to the servos and motors, freeing the Microcontroller of this task and sparing I/O lines. The Microcontroller used on this robot could handle two PWM outputs in hardware, which is enough only for the main drive motors. To provide additional PWM signals for all of the required servos and drive motors, a separate PWM controller was serially interfaced to the Microcontroller. This allows the Microcontroller to send updates only as necessary to the PWM controller. The PWM controller chosen handles up to 8 servos, and receives commands at 9600 bps. Materials The robot is constructed mainly of a Polycarbonate “Lexan” Plastic. The Polycarbonate pieces were originally cut by hand using a band saw and Dremel. These layers were then drawn in AutoCAD to be cut by laser. Various layers of this polycarbonate were needed to give us room to mount our circuit boards and sensors. The layers were attached with aluminum standoffs. These standoffs made our robot rigid and also gave it an aesthetic appeal. There were places where standoffs were not necessary or could not be used so a CA glue was used which causes the two pieces of plastic being bonded to fuse together by melting the instantaneously. Fuel tubing was used as it provided the robot with friction to grasp the cup. Motor Drive System The motor drive system consists of a PWM Controller, a motor controller, and geared drive DC motors. Using a motor controller and geared drive motors is a great improvement over modified hobby servo solutions in reliability, speed, noise (both electrical and audible), and power PWM Controller 4.2 Motor Controller The robot uses a dual H-bridge motor controller, controlled by a PWM signal, allowing it to be interfaced as a standard servo. Pulse widths greater than 1.5 ms produce forward motion on the attached motors, pulse widths less than 1.5 ms produce reverse motion. A 1.5 ms pulse width stops the motors. 4.3 the robot was measured. Under active running conditions the robot draws on average 750mA. Using the rated capacity of the NiCad battery, the run time was calculated as follows: Drive Motors The drive motors are two geared DC motors, with a max speed of 200 RPM at 7.2 volts. Using 5.5 cm diameter wheels, this translates to a max speed of about 57 cm/s. This is too fast for operation inside the maze, so the robot is operated at less than max speed. 5 Battery Life Calculation for NiCad: 900mAh = 1 .2 h 750mA This provides an estimated run time of 1.2 hours. It would be safe to subtract some percentage from that time to account for motor stalls and other unforeseen requirements. The same calculation for 2000mAh NiMH provides a run time of 2.6 hours. Both NiCad and NiMH provide a reasonable run time, and we chose 1500 mAh NiMH batteries for the robot, which provides about 2 hours of run time. Power Supply Rechargeable batteries were the power supply of choice for the robot. Combined with basic line regulation rechargeable batteries provide clean, reliable power, and allowed reuse of the batteries when depleted. The selection between different types of batteries was made based on size and power requirements. Line regulation was also required, to prevent noise and high currents from affecting the power supply to the more critical components, such as the Microcontroller or PWM controller. 5.1 Batteries Due to our size constraints, anything larger than AA size batteries would be too large for the robot. However, the batteries must offer enough charge capacity to power the robot for a reasonable amount of time. Starting with the minimum voltage requirements of our linear regulators and working our way down to the current requirements of the motors, we determined our power requirements to include a 7 Volt supply capable of providing at least 1 Amp of peak current, and 500mA of continuous current. Our choice of chemistries included NiCad, NiMH, and Li-Ion. Li-Ion batteries were too difficult to charge. In the AA size, NiCad batteries offered charge capacities of up to 900mAH, whereas NiMH offered capacities to 2000mAH. To calculate how much run time could be expected, the current draw of Battery Life Calculation 1500mAh = 2 .0 h 750mA 5.2 for NiMH: Line Regulation To protect the Microcontroller from power starvation and excessive noise, two regulators were used to provide power to the robot. One regulator provided power to the servos, and another precision low dropout regulator supplied power to the Microcontroller and associated electronics. The motor controller was powered directly from the battery, unregulated. To make this work we had to make sure that the stall current of the motor did not exceed the maximum current supply of the battery minus the current demands of the Microcontroller. Decoupling capacitors were added in appropriate places to ensure noise free operation. Before separating the regulated supplies, the Microcontroller could occasionally reset. With the split regulator design, the Microcontroller no longer resets. Had the current requirements 6. of the motors been less predictable in stall conditions, they could have been powered through their own current limiting supply, or share the regulator of the servos, at a slight loss in speed and efficiency. Microchip PIC 16F877. Microchip Corporation, Updated April 2003 http://www.microchip.com/1010/pline/picmi cro/category/embctrl/14kbytes/devices/16f8 77/ Conclusions HiTech Compiler Manual. HiTech Software, Copyright 2002 http://www.htsoft.com/products/piclite/piclit e.html This autonomous robot successfully performs the task of a firefighter in a simulated house fire. The robot accurately and efficiently finds the fire within the allotted time after the fire alarm is heard and returns to a safe place (Home), before the five minute time allocated for each trial is met. There are seldom incidents where the robot will veer off track however the use of preventative programming allows for the robots correction to return to its desired path or location. Warehouses may be the first to benefit from this technology, since the expense of activating other types of fire extinguishers may outweigh that of a robot, where product stock could be damaged by imprecise fire control methods. 7. References Hardware Competition Rules. University of Technology, Jamaica: IEEE Student Branch. IEEE Southeast Conference 2003, Student Conference. Final Version, December 1, 2002 http://www.ewh.ieee.org/r3/jamaica/southea stcon/robot.html CMUcam Vision Board User Manual. Anthony Rowe and Carnegie Mellon University. Version 1.15, 2002 http://www.seattlerobotics.com/cmucam.ht m HiTec HS-55 MicroLite servo, HS-50 HiTec Feather servos Hitec RCD USA, Inc http://www.hitecrcd.com Microchipc (bootloader code and schematic). Shane Tolmie, Copyright 2003 http://www.microchipc.com/PIC16bootload/ Gear Head Motor Datasheet. LynxMotion, Copyright 2000 http://www.lynxmotion.com/ghm02.htm