1
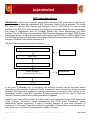
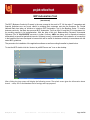
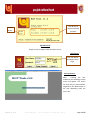
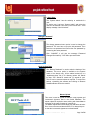
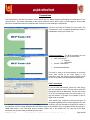
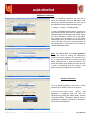
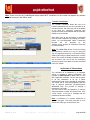
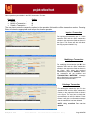
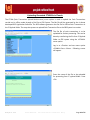
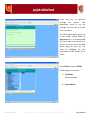
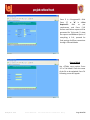
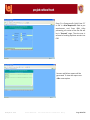
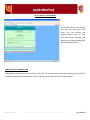
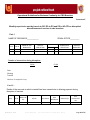
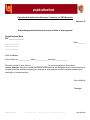
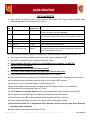
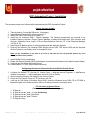
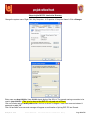
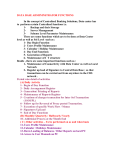
Annexure – „I‟ IAD Cir. No. 11/2012 dated 24.01.2012 CHAPTER XV INDEX -- BCP Automation Project Page No Sr. no. Particulars To 1 BCP Automation Project -- introduction 2 3 2 User Manual -- Working of BCP Automation Tool 4 23 4 Summary - Working of BCP Automation Tool 24 24 5 Installation manual 30 33 6 Do’s and Don’ts 29 29 7 Annexure:- Notice to be displayed 25 25 ii. Monthly Report Performa 26 26 iii. Stop Payment Acknowledgement 27 27 iv. Undertaking for allowing withdrawal 28 28 i. Chapter From XV Confidential: For Internal Circulations Only Page 1 of 35 BCP Automation Project Introduction:- With a view to provide uninterrupted customer service in the event of intra-day loss of connectivity, the Bank has implemented BCP Automation Project in all the branches. The crucial BCP data (viz. Balance, Stop Payment and Signature Files) of CA/CC/OD/SF Accounts is made available to the BCP PCs of the branches at predefined time intervals during the day automatically. The project is implemented using CA Unicenter Desktop and Server Management (CA DSM) Software. The CA DSM Agents are installed at EMS (Enterprise Management System), DMS (Domain Management Server) and Branch Level which transfer the crucial BCP Data. The EMS pulls BCP Data from the Staging Server and segregates it according to DMS and pushes data to them. A DMS cater to branches of multiple Circle Offices connected to it. The flow of data is depicted as under for reference: Data Center Placed At HO Staging Server Enterprise Manager Server Domain Managers Placed at CNCs (at Circle Network Centers) Branch In the event of intra-day loss of connectivity, the customer services may be continued without interruption by the branches. Cash and Transfer Transactions can be carried out through in-house developed BCP Application Software to meet the requirements of customers. After carrying out the transactions in offline mode, BCP Application Software generates one flat file each for Cash and Transfer Transactions which are by default available in C:\upload Transfer / Cash Transactions carried out in offline mode, can be uploaded into main CBS System with TTUM (Transfer Transactions Upload Maintenance) and CTUM (Cash Transactions Upload Maintenance) options respectively. It helps in avoiding duplicacy of work upon restoration of connectivity in the branch. Transactions should be uploaded in Entered Mode and to be verified by some other user to conform to the requirements of Maker / Checker. Chapter XV Confidential: For Internal Circulations Only Page 2 of 35 The Bank started implementation of BCP Automation Project in March, 2009 and in Feb, 2010 BCP Automation Project got implemented in all branches of the Bank. Salient Features of BCP Software: In offline mode, the BCP PC acts as server and other PCs can be connected as clients to it. A user can log in to the software in the offline mode to carry out the transactions during absence of connectivity at branch and upload the latest BCP Data to the database for carrying out the Cash and Transfer transactions. While doing transactions, the user can view the signatures and total debits in a day in a particular account. Stopped Cheques are not permitted to be paid. The software prompts for an undertaking if payments in an account during the day exceed the prescribed limit of Rs.15000/- as per the extant BCP guidelines. If the Total debit amount exceeds 15000/- limit in the selected A/c, the user can do the debit transaction but only after taking undertaking for the same. Annexure (iv) Balance, Stop Payment and Signature (One Time as well as Incremental) in respect of CA/CC/OD/SF Accounts are transferred to the Branch BCP PC as per following time schedule: Balance Files Stop Payment Files Incremental Signature 8.00 a.m. 1.00 p.m. 9.00 p.m. (on previous day) (0nce during the day) 6.00 p.m. As the BCP data pertaining to specific branch is transmitted to the BCP PC at branch level, No Inter- Sol transaction is allowed through BCP Tool. Circle Offices may monitor the status of Cash Txns. done by branches through BCP Tool by generating the following report: MIS PNBRPT9/119 For any query, Please contact BCP Helpdsk: [email protected] 011-23765158 Chapter XV Confidential: For Internal Circulations Only Page 3 of 35 BCP Automation Tool (User Manual) The BCP (Business Continuity Process) is the new concept in the world of IT. All the major IT companies and financial institutions are very much careful in retaining their customers and also the business. So, Punjab National Bank has taken an initiative to introduce BCP Automation Tool in the Banking Sector. To ensure business continuity, the Bank has procured BCP Automation Tool from M/s CA and M/s HCL Infosystems Ltd. for providing support in its implementation. With the help of this tool, Balances/Stop Payment/ Incremental Signature Files of CA/CC/OD/SF accounts in Indian Currency <INR> are being sent to respective branches automatically at specified periodical intervals. Software to carry out transactions in the absence of connectivity in the branches has been developed in-house which will be useful for business continuity in accordance with the extant BCP guidelines. The procedure for installation of the application software as well as working thereafter is placed below: To start the BCP double click the “shortcut to pnbBCPserver.exe” icon on the desktop. After clicking the icon system will display the following screen. The splash screen gives the information about branch name, SOL ID and database files of savings and stop payment. Chapter XV Confidential: For Internal Circulations Only Page 4 of 35 Date & time of balance and stop payment Branch details (Splash Screen) A login screen will appear after the splash screen. Login Screen Enter User Name, password & Press Login. Start up Screen:After entering the user credentials the following startup screen will appear. This screen will show only the menu options assgined by the adminstrator to the user depending upon the user’s role. Chapter XV Confidential: For Internal Circulations Only Page 5 of 35 User Maintenance: User Creation:The BCP Automation Tool starts with the creation of users under User Maintenance menu for creating the users at a branch. The User maintenance Menu has three options: 1. New User 2. Change Details 3. Sack User 1. New User: This menu option is used to create different users to start working in offline BCP Automation Tool. To create a user, PF number, initials, name and role are required. Initially a default password is to be provided which the user can change on his first log on. There are two kinds of users: I) System Admin: The system admin is a branch level administrator for creating the users, changing their passwords, activate/deactivate them, and sack a user. The system admin cannot do the financial transactions. Note: Initially the Circle Office will create the System Admin at the Branch and System Admin will be further used to create other users. II) General User: A general user is one who performs the routine tasks at the branch. The general user can be given rights according to his functions/roles. A general user can do the Cash Transactions (Deposit & Withdrawal) and Transfer Transactions. After filling the requisite inputs like PF no. , Initials, Name and Role and selecting the roles click on “Create User”. The user creation gives a message like “ New User: ######XX Created” here # sign denote the digits of PF number and XX denote the Initials of the user. The rights of Master Upload, Generating TTUM and Enable/Disable Transactions are to be given to one or two (in case a user is on leave) users who will be responsible for uploading the balance/stop payment/ signature files to the Database. Only this user will enable/disable the transactions from his system so that other users can start/stop the offline BCP Transactions. Whenever the connectivity is restored this user will generate the TTUM file and upload it to Finacle. 2. Change Details: The change details option is used to make appropriate changes to a user‟s profile accordingly. Here, select the user-id (combination of PF No. and Initials) and make necessary changes like deactivating the user, resetting the password and assigning other rights to him/her. Then click on “Modify User”. It will give a message that the user is modified. Click OK to proceed further. Chapter XV Confidential: For Internal Circulations Only Page 6 of 35 3. Sack User: The “System Admin“ has the authority to sack/unlock a user. To sack a user, Log-in as “System Admin” and select the user-id to be sacked. Then click on the “Unlock User”. It will display message “User Unlocked”. Change Password The change password menu option is used to change the password. The user has to input the old password. Then enter the new password and confirm the new password by re-entering the same password. Click “CHANGE”. It will give the message “Password Changed Successfully”. Click OK to proceed further. Back Up Data Base The “Backup Database” is used to take the backup of the database. This menu option is available to the System Admin of the branch only. All the tables backed up in a “bcpddmmyy.dmp” file (in C:\ directory) where “dd” stands for date, “mm” stands for month and “yy” stands for year. This file can be restored whenever required. To restore the backup, reinstalling the software and clicking on Restore Database Button will do the needful. Master Upload This menu is used to upload the balance, stop payment and incremental signature files in the Oracle database. The master upload is required to start working with latest balance of the day in the case of outage of connectivity. The Master Upload will find the latest files and delete all other files. It has to be ensured that the BCP PC is always kept on so that the incremental signatures are downloaded. Chapter XV Confidential: For Internal Circulations Only Page 7 of 35 The balances will be uploaded and the relative progress of data is shown by the progress bar on the screen. After uploading the balances the the system will show the number of A/cs uploaded in the local database for the offiline transactions. Uploading Stop Payments The stop payment details of the last date will be uploaded to the oracle database by clicking OK button in the screen.Stop payment details are transferred only once in a day. Uploading Signatures After updating stop payment details, incremental signatures will be automatically uploaded. Incremental Signature files are transferred only once in a day. The incremental signatures include all the newly added signatures and the tool will automatically drop the deleted signatures. Note: The BCP PC has to be kept ON so that all the necessary file are downloaded automatically for offline BCP Transactions whenever required. Chapter XV Confidential: For Internal Circulations Only Page 8 of 35 Transactions The Transactions in the BCP Automation can be started after the Master Upload and Enabling the transactions for the “General Users”. The person responsible for the master upload will ensure that no other user has logged-in. All the latest files will be uploaded and then the transactions will commence on his enabling the transactions. The user has to click the “Enable Txn” menu option. The “Transactions” menu is by default disabled and it will be enabled after clicking the “Enable Txn”. Transactions Menu:- The BCP Automation Tool can be used to do the following type of transactions: Cash Transactions : a. Deposit b. Withdrawal Transfer Transactions Verification/Modification This menu is used to do the transactions in the offline mode. After clicking on the Cash (Entry) in the transaction menu the following screen appears where we can do (a) deposit and (b) withdrawal transactions. Cash Transactions: To do the cash transactions, select the Cash (Entry) from the transactions menu. The user has to select the appropriate Deposit or Withdrawal. The user can search for an A/c by entering the name of the A/C holder or 16digit A/c Number or 10-digits of A/c Number or last 6digits of the A/c number. After selecting the 16-digit A/c number press enter, all the details regarding that A/c will be displayed. The user can verify the signature by clicking the <view signature> button. Similarly previous transactions (Debits and Credits) in that particular Account will get displayed with total debit amount on that specific day in a separate window by clicking on <View Txn> button. If the Total debit amount exceeds 15000/- limit in the selected A/c, the user can do the debit transaction but only after taking undertaking for the same. Chapter XV Confidential: For Internal Circulations Only Page 9 of 35 Withdrawal Transaction To do a withdrawal transaction the user has to select the Transaction Type as Withdrawal. After entering the requisite information the user can do the transaction through three instrument types 1. Cheque 2. Voucher 3. Withdrawal slip In case of withdrawal through cheque, user have to enter cheque number, date, amount & particulars in respective fields. After clicking on the “SAVE” button an offline transaction number will be generated. This number will be referred in all the offline transactions and for verification of the transaction of current date also. Click OK to proceed further. All the transactions of current date can be viewed by clicking <View Txn> button. Note: The <View Txn> and <View Signature> buttons are useful for viewing the transactions carried out and the signature of a customer in an A/c. It is important that an A/c is checked for all the debits during the time of offline transactions. The screen will display all the debits and warns the user to take an undertaking from the customer if the debits cross the prescribed limit of Rs.15000/- Deposit Transactions To do a deposit transaction user have to search customer by A/c holder‟s name or A/c number. In this form user have to enter amount and particulars in respective field and save the transaction by pressing the “SAVE” button. An Auto -Generated Offline Transaction Number will be provided by the software for purpose of verification. Press OK to proceed further. Chapter XV Confidential: For Internal Circulations Only Page 10 of 35 Note: There is no limit for Credit/Deposit as per extant BCP Guidelines. An A/c holder can deposit any amount in his/her account in the offline mode. Transfer Transactions The Transfer Transaction allows the user to do transfer transactions from one A/c to another A/c of the same branch. The user have to fill in the details of the debit A/c, respective instrument type (Cheque/Voucher) and its details and the credit A/c details are to be entered. After filling upon all the information in respective field, save the transaction by pressing the “SAVE” button. An Auto-Generated Offline Transaction Number will be provided by the software for the purpose of verification. Press OK to proceed further. Note: The <View Txn> button is used for viewing the transactions carried out in an A/c during the day. It is important that an A/c is checked for all the debits while doing the Debit transactions in offline mode. The screen will display all debits during the day and warns the user to take an undertaking from the customer if the debits cross the prescribed limit of Rs.15000/- Verification of Transactions The verification of a transaction is an important activity to complete a banking transaction. The concept of maker/checker is taken care of in the BCP Application Software. The s/w will not permit to do any transaction in an A/c if earlier transactions in that A/c are pending for verification. The verifier has to verify the transactions with the help of physical instrument (Cheque/Voucher/ Withdrawal Slip). The process of verifying a transaction is as under: The user has to enter the Operation “V” and the offline transaction number and press Enter. Click “Verify” button. It will give a message that the transaction has been verified. Note: A verification of a transfer transaction is given in the figure. The same procedure is to be followed for other type of transactions also. Chapter XV Confidential: For Internal Circulations Only Page 11 of 35 Other operations permissible in the BCP Automation Tool are: Operation Option Inquire I Modify a Transaction M Delete a Transaction D The user has to enter the respective options in the operation field and the offline transaction number. Pressing Enter will show the appropriate result as per the chosen operation Inquire a Transaction For inquiring the transaction put “ I ” in the operation field and the offline transaction number in the respective fields as shown in the figure. This screen will also tell about the stop payment details if any. Modifying a Transaction For modifying the transaction put M in the operation field and the offline transaction number in the respective fields as shown in the figure. After doing the required modifications press the “MODIFY” button the transaction will get modified and “TRANSACTION MODIFIED” message will be displayed in the message box. Press OK to proceed further. Deleting a Transaction For deleting the transaction put D in the operation field and the offline transaction number in the respective fields as shown in the figure. The user has to check that the transaction is valid for deletion. Press Delete. It will give a confirmation message that the transaction has been deleted. NOTE: Only unverified Txs can be deleted. Chapter XV Confidential: For Internal Circulations Only Page 12 of 35 REPORTS GENERATION The BCP tools provide the options for generating reports of cash transactions, transfer transactions and both for all the transactions between two dates. The user can view the following reports: 1. All, 2. Only Verified transactions, 3. Unverified Transactions, 4. TTUM Transactions, and 5. Deleted transactions. The user can give a date range “From” and “To” for a particular report. The default date values are preset for the current system date and all the reports will be displayed for current date if date range is not given. The report shows the following: Chapter XV Transaction Number A/c Number A/c Holder Name Dr. Amount Cr. Amount Particulars Maker/Modifier/Checker Confidential: For Internal Circulations Only Page 13 of 35 Generating TTUM The generation of TTUM can be done by clicking the “Generate TTUM” option in the menu. All the General Users have to be logged-out before the TTUM can be generated. The TTUM is generated according to the type of transactions done in the offline mode. The TTUM file will be generated separately for the Cash and Transfer Transactions. The TTUM files will be automatically created in the C:\Upload folder. The TTUM files can be distinguished by their name as it contains the type of transaction and the date and time of its generation. For Example (as in the figure), C:\upload\CASH0306_0843.txt Chapter XV Confidential: For Internal Circulations Only Page 14 of 35 Uploading Generated TTUM file in Finacle: Using PCUNIX menu option in Finacle, transfer the generated file to the Finacle from c:\upload directory of the local PC. After PCUNIX, Upload TTUM File using TTUM menu option. Enter “BM" in Report To field and “CI” in Tran Sub Type. This File should be uploaded in Entered mode (by entering „E‟ in action field). Enter “N” in the Rename after Upload. Press F4. Chapter XV Confidential: For Internal Circulations Only Page 15 of 35 Enter “F” in Fore/Background and “N” in Print Required. Press F4. Success & failure reports for TTUM Upload will be generated in PR of the user. Both reports are useful to identify the status of the transactions. Chapter XV Confidential: For Internal Circulations Only Page 16 of 35 Tx Number generated in CBS should be noted from the success report on the printout of TTUM report generated from “BCP Tool Then enquire the TM, Check & ensure that the records in Uploaded transaction matches with records in report generated from BCP Tool. Ideally there should be no records in failure report. If there is any record in failure report (i.e. not uploaded in TTUM), the corresponding voucher should be appended in the uploaded TM. After this, Transaction should be verified with physical voucher by verifier (other than the person uploaded the TTUM) in TM. Chapter XV Confidential: For Internal Circulations Only Page 17 of 35 Uploading Generated CTUM file in Finacle: The CTUM (Cash Transaction Upload Maintenance) menu option is used to upload the Cash Transactions carried out in offline mode through a flat file to CBS System. The flat file will be generated by the in-house developed BCP Application Software. The BCP software generates the flat file for offline Cash Transactions in the C:\Upload folder. The step-wise process to upload Cash Transaction file to the CBS System is as under: The flat file of cash transactions is to be uploaded for further processing. This can be done by transferring the file from C:\Upload folder to CBS system using the <PCUNIX> menu option. Log in to <Finacle> and use menu option <PCUNIX>.Press <Enter>. Following screen will appear. Enter the name of the file to be uploaded for processing from C:\upload folder. Press <F4> Chapter XV Confidential: For Internal Circulations Only Page 18 of 35 “Press any key to continue” message will appear. Take appropriate action as per the message and visit back to Fincale Core User Menu. The CTUM Menu option can be run in two modes namely Trial and Entered Mode. It is recommended that Trial mode to be used first so that all the errors can be rectified before going for final run. The steps for uploading the cash transactions to CBS System are as under: Type CTUM and press <ENTER> CTUM will give two options: 1. Trial Mode (Recommended). 2. Entered Mode Chapter XV Confidential: For Internal Circulations Only Page 19 of 35 TRIAL MODE (it is recommended that braches should first go for Trial Mode Option) Enter “Y” in <Trial Mode?> field. Press F4, following screen will appear Enter the name of file which has been transferred to UNIX using <PCUNIX> Menu Option. Enter the name of the file and press <F4>, following screen will appear Chapter XV Confidential: For Internal Circulations Only Page 20 of 35 Enter F in <Foreground?> field. Enter “Y” or “N” in <Print Required?> field as per requirement and Press F-10. Success and failure reports will be generated for Trial mode. To view the reports use PR Menu Option. If everything is O.K., proceed for final posting of offline transactions through <Entered Mode> Entered Mode Use <CTUM> menu option. Enter “N” in Trial Mode? Enter the name of the file to be uploaded, Press F4. Following screen will appear. Chapter XV Confidential: For Internal Circulations Only Page 21 of 35 Enter F in <Foreground?> field. Enter “Y” or “N” in <Print Required?> field as per requirement and Press F10. After processing, all entries of the flat file will be in “Entered” stage. Thus the user is relieved of making duplicate entries into CBS. Success and failure reports will be generated. To view the reports use <PR> menu option. Chapter XV Confidential: For Internal Circulations Only Page 22 of 35 Success Report – Entered Mode The Success Report will contain two lines per record for each entry. First line displays the original Record, Tran ID, Tran Date and Success Message. The Second Line of report displays the Account Holder’s Name. VERIFICATION OF TRANSACTIONS Subsequently, the relevant menu options viz. TM, BTP, TV may be used as required for posting and verification of these transactions but with different user to conform to the requirement of maker/checker. Chapter XV Confidential: For Internal Circulations Only Page 23 of 35 Summary -- working of BCP Tool 1. To start working in BCP Tool, double click on “shortcut to pnbBCPserver.exe” icon on the desktop. A Splash screen will appear informing the last BCP data updated in BCP Tool. 2. To upload the latest data in BCP tool, the official with right of “Generate TTUM, Master upload and Txn Enable” will log-in in BCP tool and click on Master Upload button. Doing this will upload the latest BCP data comprising of Balance files, Stop Payment files and Signature data into BCP Database. 3. To start the txns. through BCP Tool, the same official will click on Enable Txn. button, through which transactions through BCP tool will get enabled for all the users. (There can be any number of clients sharing data with BCP Server and transactions can be done on these clients & Server simultaneously.) 4. Now by applying the maker-checker concept the users will do and verify the txns. For every txn done through BCP Tool, System generated transaction number will get generated. 5. The software prompts for an undertaking if payments in an account during the day exceed the prescribed limit of Rs.15000/- as per the extant BCP guidelines. If the Total debit amount exceeds 15000/- limit in the selected A/c, the user can do the debit transaction but only after taking undertaking for the same. 6. No Inter-sol transactions are permitted through BCP Tool. 7. After getting done with the txns., the user with right of “Generate TTUM, Master upload and Txn Enable” will generate TTUM and CTUM files (for Transfer and Cash Txns respectively). 8. By referring the procedure for uploading TTUM & CTUM (provided in user manual), the transactions done through BCP Tool will be uploaded in Finacle. Chapter XV Confidential: For Internal Circulations Only Page 24 of 35 Operational Guidelines for Business Continuity for CBS Branches Notice to be displayed in CBS branches during period of disruption of services Annexure-i NOTICE CUSTOMERS PLEASE NOTE THAT THERE IS DISRUPTION OF SERVICES DUE TO NON-FUNCTIONING OF SERVER. INCONVINIENACE CAUSED IS REGRETTED. NO INTERSOL TXNs. WOULD BE PERMITTED DURING CONNECTIVITY OUTAGE. EFFORTS ARE ON TO RESUME THE SERVICES AS QUICKLY AS POSSIBLE. 1. During the period disruption due to non functioning of the system, following limited services are available to our esteemed customers: • Cash Receipt • Cash Payment • Deposit of cheques / instruments for outward clearing • Request for opening of new FD account / Renewal of existing FD account • Deposit of outstation cheques / instruments for collection • Request for opening of new account • Request for issuance of cheque book • Request for stop payment instructions 2. Cash deposited by the customers will be accounted far and balance in the account will be updated on restoration of services. 3. Due to non-updation in balance in the account during disruption of services, Bank may have to return any cheque drawn in the account or any debit instruction in the account. In case of payments not being honored the branch will be returning the cheques with the reason “Normal Services Disrupted, please present again on restoration of Services”. 4. Cash Payments may be made subject to availability of the latest balance in the account. 5. The branch will accept stop payment instructions, attachment orders or garnishee order from courts or other authorities , intimation of death/lunacy/insolvency of the customer, intimation of loss of demand draft / pay order etc. subject to the condition that the same will be acted upon on restoration of services. Chapter XV Confidential: For Internal Circulations Only Page 25 of 35 Operational Guidelines for Business Continuity for CBS Branches Annexure-ii Monthly report to be sent by branch to RO, RO to ZO and ZO to HO-ITD on disruption/ discontinuance of services in cbs branches Part: I NAME OF REGION/ZO____________ Sr.no. Sol-id NAME OF THE BRANCH/EC ZONAL OFFICE_________ DATE OF DISRUPTION TIME FROM TO REASON FOR DISRUPTION SERVICES RENDERED Number of transactions during disruption: Debit Credit Cash Clearing Transfer Numbers of complaints if any: Part II: Details of the accounts in which overdraft has been caused due to allowing payment during disruption of services S.No. Chapter Sol-id XV Nature of A/c A/c No A/c Name Amt Withdrawn Balance O/s Confidential: For Internal Circulations Only Amt recovered if any Page 26 of 35 Operational Guidelines for Business Continuity for CBS Branches Annexure-iii Acknowledgement at the time of receipt of letter of stop payment Punjab National Bank BO: _______________ Date: _______ ------------------------------------------------------------------ Dear Sir/Madam, Reg: Cheque no.____________ dated ____________ favouring ____________ We are in receipt of your letter of _________________ to note stop payment of the above cheque, however, we have to draw your attention that services are disrupted due to non functioning of the server and we shall be recording your request for stop payment into the computer system upon restoration of normal services. Yours faithfully Manager Chapter XV Confidential: For Internal Circulations Only Page 27 of 35 Operational Guidelines for Business Continuity for CBS Branches Annexure-iv Letter for allowing withdrawal during the breakdown / failure of server in CBS branches Date:________ The Manager Punjab National Bank BO: ______________ Sir, Please allow me withdrawal of Rs,________________ from my SF/CA/CC/OD a/c no. ________________ with you, subject to the condition that I/We will deposit back the amount so withdrawn with interest at the rate as applicable as for clean overdraft (as on date of creation of overdraft) in the event of such withdrawal turning into an overdraft in my above account. Thanking you Yours faithfully ( ) Address: Chapter XV Confidential: For Internal Circulations Only Page 28 of 35 DO’S and DON’Ts 1. There should be sufficient space for the software (DSM Agent, BCP Tools, Oracle and BCP data), recommended space is more than 4GB in C drive. Sr. No. 1. Software-Data CA DSM Agent Space Requirement 300 MB Remarks 2. BCP Data 100 MB 3. 4. 5. Oracle XE BCP Tool v1.0 WinRar 1.2 GB 9 MB 3.5 MB Fresh Install (Without data) For Carrying out transactions in offline mode. For file compression and encryption. 6. Signature File (Transmitted by HO) 500 MB (Approx.) Depends on no. of A/cs at branch. Incremental Signatures transmitted on weekly basis. One Time Signature transmitted only once. Runs automatically at predefined intervals and downloads the BCP Data. Its status should be <Running> BCP Data comprises of Balance file transmitted thrice a day, Stop Payment File transmitted once a day and incremental signatures. 2. There should not be any changes in Hardware and Software without prior permission from the ITD. 3. There should not be any changes in the format of file structure decided for BCP. 4. The BCP PC should be clearly marked with a Sticker /Label. 5. Power should be ON (24x7) of the PC in which DSM Agent is Installed. (i.e. BCP PC) 6. Antivirus should be updated. 7. The system date and time should be as per actual. 8. The branch router should also be kept <SWITCHED ON> on 24x7 basis. 9. Proper backup should be taken before formatting the BCP PC (server). 10. There 11. Files 12. If should not be any changes in files of the Software installed for BCP purpose from the User end. should not be specified as read only which is to be used by BCP software. end user is Using Command Window it should Properly Exit. 13. Any of the Software mentioned above in table for the BCP purpose should not be uninstalled. 14. There should not be unnecessary data in C: Drive. 15. The IP address and System Name should not be changed without prior permission from the ITD. 16. The system on which DSM Agent is installed should be connected with Network. 17. The process used by BCP software should not be stopped forcefully by end User. 18. Do not install unnecessary software in the system in which DSM agent installed. 19. Ensure that the BCP PC is migrated to Active Directory and the user logs into Active Directory with appropriate credentials. 20. Always Chapter XV follow the guideline provided by ITD, HO. Confidential: For Internal Circulations Only Page 29 of 35 BCP Automation Project - Installation The necessary steps to be followed while implementing the BCP Automation Project. Domain Activities (At ZNC) 1. 2. 3. 4. Take the backup. Format the DM server, if necessary. Install Windows Server 2003 with service pack -2 Install SQL Server 2000 with service pack - 4. Install the CA Unicenter DSM – Domain Manager. The following components are required to be installed: Explorer, Reporter, Engine, Domain Manager, Infrastructure Deployment, Web Console, Web Services, Scalability Server, Agent, CCS and Documentation. Enter the I.P. of the Enterprise Manager (10.192.18.19) 5. Install Arcserve Backup server for taking backups and take backups regularly. 6. Dump all the Software (CA Unicenter DSM, Window Server 2003, SQL Server 2000 and the Required Service Packs) in a secondary drive for example D:\ drive. Note: All the installations to be done in D:\ drive so that data can be safe guarded against any virus activity and boot drive problem. 7. Install WinRar for file compression. 8. Enable the Remote Desktop (RDP) and assign a User Name and Password (with Administrative Rights). 9. Configure the IIS. (Steps mentioned below.) 10. Create Default FTP Site. (Steps mentioned below.) Configuring the Internet Information Services(IIS) At Domain Server 1. Configure the Default FTP Site and IIS. Control Panel --> Add and remove Programs --> Add/Remove windows Component. --> Select application server Click on Details. 2. Select Internet Information Services(IIS) and click on Details 3. Check the File Transfer Protocol (FTP) services. click OK 4. It will ask for i386 folder of Windows Server 2003. Insert the Windows server 2003 CD in CD ROM or Browse the path of the Windows server 2003 or its dump (if saved in secondary drive). File structure at Domain Server (To be created by CO Team one by one.) 1. 2. 3. 4. 5. Chapter D:\Bcp‐dm D:\Bcp‐dm\current_data – it is the ftp directory D:\Bcp‐dm\current_data\ Sign\Script D:\Bcp‐dm\current_data \Transfer D:\Bcp‐dm\Temp XV Confidential: For Internal Circulations Only Page 30 of 35 Creating Default FTP Site 1. Create a user with Administrative Rights according to your Zonal Server name. For Example, if your DM Server‟s name is del_dm then user name will be deldm, and Password : pnb#123 2. Start-> Programs Administrative ToolsComputer management 3. Select Local Users and groups Right-Click and Select New User Add Details like user name and password as above. Check <Password never expires> option-> Click < Create> 4. Default FTP Site: StartPrograms Administrative Tools- Internet Information Services (IIS) Manager Choose Default FTP Site Right Click and set IP address of the DM/ Scalability Server,TCP Port-21 and change the time value to 12000 from 120. 5. Select Security Accounts TabSelect the user e.g.<deldm> and give the password. Select the Home Directory Tab and Select < A directory located on this computer> Give path of D:\BCP-DM\Current_Data and check all three options: Read,Write, Log Visits. The Directory Listing Style should be MS-DOS Click OK Branch Level Activities 1. *Change the system name. Right Click <My Computer> Properties Computer Name Click <Change>. Enter name as <bcp-######>. Here ###### denote digits of the SOL id. The general naming convention to be used is <bcp-######>. *(This is to be done at the BCP PC only and not at Client.) 2. Install the CA Unicenter DSM-agent. Select the <Agent> feature and enter<I.P. address> of the Scalability Server (Domain Server) during installation. (Please note that Respective <Scalability Server (Domain Server)> is to be chosen.) 3. 4. 5. 6. 7. 8. Install WinRar. Install Oracle XE 10g Express Edition on BCP Server PC. Install the BCP Tool (pnbBCPserver.msi) on BCP Server PC. Install Oracle <Client> on other Client PC. Install the BCP Client Tool (pnbBCPclient.msi) on Client PC. Enable the Remote Desktop. Right Click<My Computer> Properties Remote (Top-right Corner) Check <Remote Assisstance>and <Remote Desktop> (These two options need to be checked) Assign a User Name and Password. . 9. Migrate the BCP PC to Active Directory* after finishing the installation.(steps given below) 10. Branch user should login with appropriate credentials to Active Directory. The user name for login to Active Directory will be bo#### (4-digits of sol-id) and password will be the password of the mail id of the branch. Note: All the installations have to be done in the C:\ drive if not mentioned explicitly. Chapter XV Confidential: For Internal Circulations Only Page 31 of 35 Software Installation Software CD contains a folder named BCP-Tool. It contains the following files: OracleXE.exe OracleXEClient.exe pnbBCPClient.msi pnbBCPServer.msi Steps to install BCP Tools on the PC selected as database server (One at every branch): 1. Install OracleXE.exe by double-clicking the file. i) Follow the instructions during installation. (clicking next buttons will suffice) A) ii) During installation it will ask password for sys/system user of Oracle server. let it be hobcp2009. Please use the same password during installation at every branch server. Steps to run Setup for BCP Server: B) i) Install pnbBCPServer.msi on server PC. (clicking next buttons will suffice) ii) After installation, shortcut will be created on desktop. Double-click it. The following screen will appear: iii) Enter Distinctive number (Sol-ID) of branch along with other details and click “Save” iv) This completes installation on server PC. Steps to install Oracle XE Client on Other machines: 1. Install OracleXEClient.exe by double-clicking the file. Follow the instructions during installation. (Clicking next buttons will suffice) C) Steps to install BCP Tool Software Application on client machines: 1. Install pnbBCPClient.msi by double-clicking the file. 2. Follow the instructions during installation. (Clicking next buttons will suffice) 3. A shortcut to the BCP Software will be created on desktop from where the BCP Application can be used. 4. When you start the application for the first time, it will ask server IP-Address. 5. Enter the IP address of the BCP Server at Branch and click Save. 6. This completes installation on Client PCs. Note: Please ensure that the windows firewall at the BCP Server is disabled; otherwise the client will give timeout message. One user has already been created to login to BCP Tool with User-id: 9admin password: pnbbcpaudit Chapter XV Confidential: For Internal Circulations Only Page 32 of 35 *Steps to join BCP PC into Active Directory Change the system name. Right Click <My Computer> Properties Computer Name Click <Change>. Enter name as <bcp-######>. Here ###### denote digits of the SOL id. The general naming convention to be used is <bcp-######>. (This is to be done at the BCP PC only and not at Client.) Click on Domain and type mail.pnb.co.in in the box as shown in diagram. Insert user name as testuser & password as pnb_123 Click OK and after some seconds message will appear as confirmation of joining BCP PC into Domain. Chapter XV Confidential: For Internal Circulations Only Page 33 of 35 NOTES Chapter XV Confidential: For Internal Circulations Only Page 34 of 35 NOTES Chapter XV Confidential: For Internal Circulations Only Page 35 of 35