1
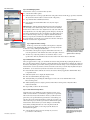
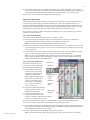
Macintosh OS 9.0.4/Windows 98/2000/NT/Windows® ME
version
Adobe Premiere
®
The essential tool for
professional digital
video editing
System Requirements
Macintosh
• Power PC processor
• Apple System software OS 9.0.4
• 32 MB of available RAM
(128 recommended)
• 50 MB of available hard disk
space required for installation
• Apple QuickTime 4.1.2
• Large capacity hard disk or
disk array
Additional Requirements for DV:
• Power PC processor (@ 300MHz)
• Apple FireWire 2.4
• QuickTime-compatible FireWire
(IEEE 1394) interface
• Large capacity hard disk or
disk array (capable of sustaining
5MB/sec)
Additional Requirements for
3rd Party Capture Cards:
• Adobe Premiere certified
Windows
• Pentium•class processor
(@ 300MHz)
• Microsoft Windows 98, Windows
98 Second Edition, Windows
2000, Windows Millennium, or
Windows NT4 Service Pack 6
• 32MB RAM (128 recommended)
• 85 MB of available hard disk
space for installation
(40 MB for application)
• 256•color video display adapter
• Large capacity hard disk or
disk array
Additional Requirements for DV:
• Microsoft DirectX-compatible
IEEE 1394 interface
• Microsoft DirectX-compatible
video display adapter
• Large capacity hard disk
or disk array (capable of
sustaining 5MB/sec)
• For built in DV: Windows 2000,
Windows 98 Second Edition, or
Windows Millennium required
Additional Requirements for
3rd Party Capture Cards:
• Adobe Premiere certified
®
6.0
Reviewer’s Guide
We hope that you will enjoy the six hands-on projects that follow. The step-by-step instructions are designed to
help you experience a broad range of features and functionality in Adobe Premiere 6.0 software, even if you have
had no prior experience editing digital video. If you are familiar with previous releases of Adobe Premiere, you
will find that these projects highlight the new features and enhancements. The Advanced Users recommendations
throughout and the Further Exploration section at the end of this guide offer additional suggestions for exploring
the rich, powerful toolset in Adobe Premiere 6.0. If you require assistance or have questions, as you proceed
through your review of Adobe Premiere 6.0, please contact your Adobe Premiere representative in the Adobe
Systems Public Relations Department.
Before you begin—Please check the System Requirements in the sidebar on this page to be sure that your hardware
is compatible with Adobe Premiere 6.0 software!
Install and Launch Adobe Premiere 6.0
1. Shut down all open applications on
your computer.
2. Insert the Adobe Premiere 6.0 Application
CD in your CD-ROM drive. You must install
Adobe Premiere from the Adobe Premiere
CD; please do not run the program from
the CD. Follow the onscreen installation
instructions. For more information, see
the Installation Read Me file on the CD.
3. Connect the IEEE 1394 cable to your DV
camcorder or DV input device and to your
computer’s IEEE 1394 port. Make sure the
DV device is connected to its power source.
Turn the device on. If it’s a DV camcorder,
put it in VTR mode. If you haven’t done
so already, insert a tape containing preshot
video. (If you do not have access to a DV
camcorder and/or your computer is not
IEEE 1394 enabled, please see the note in
the sidebar on the next page.)
The Initial Workspace screen lets you choose the way you want to
work as soon as you launch Adobe Premiere 6.0 for the first time.
You can choose one of two preferred editing modes—A/B Editing or
Single-Track Editing. Please select Single-Track Editing before
beginning the sixhands-on projects in this guide.
4. Launch Adobe Premiere.
5. After launching, the new Initial Workspace
screen appears. Read the onscreen
descriptions of the two workspaces and
select Single-Track Editing as your Initial
Work-space. Note that you can switch
your work-space to A/B, using the
new Workspace feature.
6. The enhanced Load Project Settings
dialog box appears next. The settings
include timebase, time display, frame rate,
pixel aspect ratio, frame size, compressor,
and audio format. Choose the available
preset that is appropriate for your DV
Select a project preset from the Load Project Settings dialog box. More
advanced users may wish to customize their own presets by clicking
Custom to select individual settings.
2
Got DV?
To complete Project No. 1—
Capture Digital Video,
you will need:
• a DV camcorder or other
DV input device
• a DV tape containing
preshot video
• an IEEE 1394 cable
• a Windows PC or Macintosh
computer with an
IEEE 1394 port
(For more information, see
Systems Requirements on the
preceding page.)
If you do not have access
to a DV Camcorder or other
DV input device…
If you are a member of the
press without access to a
DV camcorder, you may
request a short-term
hardware loan from your
Adobe Premiere contact in
the Adobe Systems’ public
relations department.
If you do not have access
to an IEEE 1394-enabled
computer…
You cannot hook up a DV
camcorder or other DV input
device to your computer
without an IEEE 1394 port
(either built-in or via an
installed DV capture card).
If you do not have access
to either a DV camcorder
or other DV input device or
to an IEEE 1394-enabled
computer, skip Step 3 under
Install and Launch Adobe
Premiere 6.0.
You will not be able to do
Project No. 1—Capture Digital
Video. Instead, follow the
instructions in the sidebar
on page 3, for importing
stock video clips from the
Samples Folder on the
Adobe Premiere 6.0 CD-ROM.
These supplied clips may
be used to complete
Projects 2–6.
device. (See the Hint below or consult the User Manual for your DV device if you don’t know which preset
is appropriate.)
Hint—You’ll most likely want to choose one of the standard DV settings. Note that 12-bit audio is 32kHz and
16-bit audio is 48kHz. Also note that some capture cards include their own presets, making it easy to set up
your project correctly.
Advanced Users—You may wish to click Custom to select individual settings.
The Six Guided Projects—DV in, Web out… You are about to discover how easy it is to capture digital video, put
together a story, add effects, adjust audio, and save a video project for the Web—with new Adobe Premiere 6.0.
Project No. 1—Capture Digital Video: Batch-capture clips from a DV device
Project No. 2—Arrange Clips: Layout clips in the new Storyboard window and send them in sequence to the
Timeline, via the new Automate to Timeline command
Project No. 3—Edit Video: Trim clips and set new In and Out points
Project No. 4—Add Effects: Switch to the new Effects workspace, add a new filter and change its parameters,
and perform an undo with the new History palette
Project No. 5—Adjust Audio: Fade audio tracks using the new Audio Mixer in the new Audio workspace
Project No. 6—Save for Web: Export a video production for playback on the Web
Project No. 1—Capture Digital Video
Transferring clips from a video device into a computer is usually the first step of the desktop editing process.
Adobe Premiere 6.0 includes a number of new capture tools, such as the Logging Palette, designed to make the
transfer process as fast and efficient as possible.
In this project, you’ll transfer multiple clips from a DV device into the Adobe Premiere workspace. The features
you’ll use are the new DV device control options, the enhanced Movie Capture window, and the enhanced batch
capture tool.
Step 1: Prepare for Capture
1.1 From the Menu, select File > Capture >
The Scratch Disks and Device Control preferences dialog lets
you determine where your movie clips, video and audio
previews will be stored.
Movie Capture.
1.2 In the Scratch Disks & Device Control Setup
window, choose Edit Settings.
1.3 In the Scratch Disks & Device Control Prefer-
ences dialog box, select DV Device Control from
the Device drop-down menu. Click Options.
1.4 In the new DV Device Control Options dialog,
select your device brand and device model from
the drop-down menus. Click OK.
Hint: If the DV device is unavailable, go back
to the Install and Launch the Software section
and recheck your steps.
1.5 In the Scratch Disks & Device Control
Preferences dialog box, choose the Select Folder
drop-down menu. Click New to create a new
folder in which to store your captured clips,
give it a name, select Create, and select Choose.
Hint: Create this folder in the final location
you wish to store the captured clips.
Clicking the Options
button prompts the
DV Device Control
Options dialog box
which lets you select
a particular DV
device from which
to capture.
1.6 In the Scratch Disks & Device Control Preferences dialog box, click OK.
Step 2: Capture
2.1 Verify that the Settings palette contains the settings you’ve chosen.
2.2 Select the Play button in the Movie Capture window to play the video.
2.3 Select the new Logging Palette. It can be used to quickly log video clips, set In and Out points, name clips and
www.adobe.com/premiere
reels, conveniently batch-capture multiple logged clips, and add comments about each clip.
3
Importing Stock Clips
If you do not have access
to either a DV camcorder or
other DV input device, or if
your computer is not IEEE
1394 enabled, you will not
be able to do Project No. 1—
Capture DV. Instead, follow
the instructions below for
importing stock video clips
from the Samples Folder on
the Adobe Premiere 6.0 CDROM and use these supplied
clips to complete Projects 2–6.
1. Copy the Sample Folder
from the Adobe Premiere
6.0 CD-ROM to your
computer’s hard drive
2. Launch Adobe Premiere.
3. Go to File > Import > File.
Select the folder containing the stock movie clips
on your hard drive and
select the clips to import.
Click Open.
4. Proceed to Project Two.
Hint: You can import many
types of file formats including:
.mov, .avi, Photoshop files,
MP3 audio files, etc.
The new Settings palette in the Movie Capture window
makes capture settings easily accessible.
2.4 Find the beginning of a clip you want
to capture, then click the Set In button.
2.5 At the end of the clip you want to
capture, click the Set Out button.
2.6 Click the Log In/Out button.
2.7 Name your logged clip and click OK.
2.8 Find the Batch Capture window
and click it to bring it to the front.
The Batch Capture window maintains
a list of the clips you’ve logged for
capturing. Take a moment to
familiarize yourself with the Batch
Capture window.
2.9 In the Movie Capture window, click
the Play button to restart the video.
Repeat steps 4 through 7 to log at
least two additional clips.
2.10 Once you’ve logged your clips, click
the record button (
) in the
Batch Capture window. It’s the red
circle at the bottom of the window.
Hint: Make sure you click the Capture
button in the Batch Capture window
(not the Movie Capture window)
Redesigned shuttle controls let you play, fast
forward, rewind, or control other DV device
operations in the Movie Capture window.
The new Logging palette enables you to log
video clips, set In and Out points, name clips
and reels, batch-capture multiple logged video
clips, and add comments about each clip.
Set In/Set Out buttons
Log In/Out button
2.11 At the Insert Reel dialog box, click OK to begin the capture process. [Note: Adobe Premiere 6.0 will
automatically capture only the parts of the tape for which you logged in and out points.]
2.12 Close the Movie Capture window.
2.13 Make sure there is a check mark next to each clip in the Batch Capture window—a check mark provides visual
confirmation that the clip has been captured. Close the Batch Capture window. When prompted to save the
Batch Capture list, save it to your hard drive in a location that you will remember, and name it.
Project Two—Arrange Clips
The Storyboard window helps you determine the
best way to tell a story visually. You can freely
experiment by rearranging clips and creating new
sequences in the Storyboard. When you’re finished,
simply send your clip sequence to the Timeline
using the innovative Automate to Timeline
command. Automate to Timeline sends your clips
in sequence to the Timeline and automatically adds
a default transition. (You can also send clips from
the Project window to the Timeline using Automate
to Timeline.) Once your clips are in the Timeline,
you can begin editing them and adding effects.
In this project, you’ll use the new Set Poster Frame
option, add clips to a Storyboard, rearrange the
clips, and send the clips to the Timeline with the
Automate to Timeline command.
The new Preview area (top section) in the enhanced Project
window lets you view a clip, get basic information about the
clip, and set poster frames. In the Bin area, you can create and
nest multiple bins. New command buttons (at bottom) let you
search, create, and delete selected clips and bins and add
new items such as Titles.
www.adobe.com/premiere
Choosing either the default first frame, or any other
in a clip, as the Poster Frame icon allows intuitive
identification of clips in the Project Window. The Poster
Frame is also the image shown of the clip when using
the Storyboard window.
4
Step 1: Set a New Poster Frame
1.1 Click the Project window to make it the active window. The Project window contains a bin, which holds the
clips you batch-captured in Project One or copied to your hard drive and opened in Adobe Premiere. Click
to select a clip in the list, then click the play button underneath the thumbnail-sized representation of the
clip in the Preview window to play the clip.
1.2 Click the Thumbnail View icon (the next-to-last icon to the right, located on the bottom scroll bar of the
Project Window) to view all files in the bin as thumbnails.
1.3 Move the slider bar under the Preview window to manually forward the frames in that clip.
1.4 Click the new Set Poster Frame icon (to the right of the slider bar) to change the poster frame. Notice that
the poster frame for that clip, as shown in the list of clips in the bin, changes automatically. [Note: A poster
frame is the frame Adobe Premiere 6.0 uses as an icon to represent the clip. By default, the poster frame is the
first frame of a clip. The ability to choose the poster frame you want makes working with multiple clips
significantly more intuitive.]
Project Window
Automate to Timeline Dialog Box
The new Storyboard window lets you quickly arrange
clips in sequence. Arrows are automatically drawn
between clips to show the story flow, and an end
marker is displayed. Icons within each thumbnail
indicate whether the clip contains video and audio.
A clip’s title, timecode, and user-added comments can
be displayed. The Storyboard window also shows the
combined running time for all clips.
The Automate to Timeline command lets you send an
entire sequence of clips from the Storyboard or
Project windows to the Timeline.
Timeline Window
Storyboard Window
Step 2: Create a Storyboard
2.1 Choose File > New > Storyboard.
2.2 Click to select a clip in the Project window and drag it into the Storyboard window. Repeat until all of your
clips have been dragged into the Storyboard window. If necessary, resize the Storyboard window so that you
can see all the clips. Notice that the arrows between the clips in the Storyboard indicate their sequence and
offer confirmation that the clips are in the order you designated. This is a good example of how Adobe
Premiere 6.0 constantly provides visual feedback.
2.3 Rearrange the clips by dragging them to new locations in the Storyboard.
2.4 Double-click the blank comments field under a clip to add a note about the clip and click OK.
2.5 Choose Project > Automate to Timeline (or click button next to total time in the Storyboard window).
2.6 Use the default settings in the Automate to Timeline dialog box and click OK. Adobe Premiere 6.0
automatically transfers your clips to the Timeline.
Project Three—Edit Clips
Adobe Premiere 6.0 makes video editing more intuitive and more efficient with improved visual feedback, drag
and drop capabilities and other enhancements.
In this project, you’ll use the Rolling Edit and Ripple Edit tools in the Timeline window to precisely trim clips,
then set new In and Out points in the Source view of the Monitor window.
www.adobe.com/premiere
5
Timeline Window
Toolbox with
Rolling Edit and
Ripple Edit tools,
among others
New audio
track buttons
Access to frequently
used Timeline Features
Add, delete, and modify
keyframes in the Timeline,
using the new Keyframe track.
Visual indication
of playback status
Audio Gain
Audio Pan
Step 1: Perform a Rolling Edit
A rolling edit changes the location of the edit point between two clips, keeping the duration of all other clips and
of the overall project the same. To perform a rolling edit, do the following:
1.1 Select the Rolling Edit tool (
) from the toolbox in the Timeline.
1.2 Position the cursor on the edit line between two clips on the Timeline. The cursor changes into two
double-sided arrows (an example of the enhanced visual feedback provided in Adobe Premiere 6.0).
1.3 While holding down the mouse button, drag the Rolling Edit tool from left to right to change the edit
location. Release the mouse button to finish the edit.
Step 2: Perform a Ripple Edit
A ripple edit trims only the specified clip, keeping the duration of all other clips the same. As the effects of the
trim “ripple” through the project, other clips are pulled or pushed depending on whether you shorten or lengthen
the clip you are trimming. As a result, the duration of the entire video program changes. To perform a ripple edit,
do the following:
2.1 Select the Ripple Edit tool (
) from the toolbox.
Hint: To access the tool, hold the mouse button down over the Rolling Edit tool icon until a fly-away submenu
appears. Select the second tool from the left, then let go of the mouse button.
2.2 Position the cursor between a clip you want to edit and its adjacent clip. The cursor changes into a double-
sided arrow with a red bracket. (As with the Rolling Edit tool, this is an example of how Adobe Premiere
provides visual feedback as you work.) The direction of the bracket indicates which clip the tool will modify.
2.3 While holding down the mouse button, drag the Ripple Edit tool from left to right to trim the clip.
Release the mouse button to complete the edit.
Step 3: Edit Video in the Monitor Window
The Monitor window is where you view individual clips, preview the Timeline, set In and Out points, set
markers, add and remove clips from the Timeline, and trim clips. The Monitor window includes the Source
view and the Program view. The Source view displays a single clip as it appears on your hard disk (project settings
don’t affect playback from this view). The Source view is for preparing a clip for inclusion in the Timeline or to edit
a clip you’ve opened from the Timeline. The Program view displays the current state of the Timeline; when you
preview the Timeline, it plays in the Program view.
3.1 Drag a clip from the Project window to the source side of the Monitor window.
Hint: If the Source and Program sides of the Monitor window are not displayed, click the Dual View icon
at the top of the Monitor window (of the three buttons, it’s the one on the left).
3.2 Play the clip in the Source view. As the clip plays, hit the “I” key, on your keyboard, to mark a new In point.
Then hit the “O” key to mark a new Out point.
3.3 Drag the clip from the Source view into the Timeline.
Hint: To create a new track, drop the clip to the gray area at the bottom of the Timeline window.
www.adobe.com/premiere
6
The Enhanced Monitor Window provides more efficient, flexible editing controls, with an improved layout of controllers
in the Source and Program sides, and more.
Toggle between
Dual View, Single View,
and Trim Mode
Title Safe
Action Safe
New split-cut edit
New marker
menu
New marker menu
Advanced Users: The Trim mode in Adobe Premiere 6.0 has been enhanced to make editing more precise
and efficient. To access the Trim mode, position your edit line at an edit and hit Ctrl + T (MacOS users,
hit Command + T).
Trim Mode
Visual
representation of
edit line
Out-shift
In-shift
Play edit
Project Four—Add Effects
Adding visual or audio effects can help make a video production more dynamic. Adobe Premiere 6.0 ships with
over 25 filters from Adobe After Effects. New palettes provide control over how the effects are applied.
In a typical video production workflow, effects are added after clips have been arranged and trimmed. In this
project, you’ll switch to the new Effects workspace, search for and apply a new video filter, adjust the filter
settings with the new Effect Controls palette, add keyframes using the enhanced keyframe tool, and perform
an Undo with the new History palette.
Step 1: Switch to the Effects Workspace.
A workspace is the onscreen arrangement of windows, window features, and palettes. Adobe Premiere 6.0
includes four preset workspaces—A/B Editing, Single-Track Editing, Effects, and Audio. Select Go Window >
Workspace > Effects to choose the Effects workspace. Note how the arrangement of onscreen windows
and palettes changes.
www.adobe.com/premiere
7
Video Effects Palette
Step 2: Find and Apply a Filter
Adobe Premiere 6.0 lets you search for filters by name.
2.1 Select the Video Filters palette.
2.2 Click the right arrow on the top right-hand side of the palette window. From the pop-up menu, select Find.
(Or just click on the binoculars icon at the bottom of the palette.)
2.3 Type Channel Mixer. Click Find; click Done.
Effects Controls Palette
2.4 Drag and drop the Channel Mixer filter onto any video clip in
the Timeline.
Advanced Users: With the Channel Mixer filter from Adobe After Effects,
you can modify a color channel using a mix of the current color channels.
Use this effect to make creative color adjustments not easily done with other
color adjustment tools; create high-quality grayscale images by choosing the
percentage contribution from each color channel; create high-quality sepiatone or other tinted images; and swap or duplicate channels. Red, Green,
Blue lets you specify the contribution of the individual source channel to
the output channel. Constant lets you specify the base amount of the input
channel to be added to the output channel.
Find Effects
Palette
Step 3: Adjust the Filter’s Settings
In this step, you’ll use the new Effect Controls palette to adjust the
parameters of the Channel Mixer filter. You can temporarily turn
an effect on or off by clicking the On/Off switch.
3.1 In the Effect Controls palette, drag any channel slider to the left to decrease the parameters of the channel’s effect and to the right to increase it.
The Effects Controls palette lets you
fine-tune the parameters of effects
applied to video or audio clips.
3.1 Another way to adjust the parameters of a channel’s effect is to enter
specific values. Click any underlined value and enter another value in the value box; click OK.
Step 4: Add Keyframes to a Filter
After you apply an effect to a clip, you can animate the effect for that particular clip by changing the effects settings over time using keyframes. A keyframe contains information about which effect is changing; the settings for
the effect at the keyframe’s point in time; and the point in time when the change occurs. New keyframe tracks in
Adobe Premiere 6.0 are located under each video and audio track so that you can modify a keyframe directly in
the Timeline. (See the illustration of Timeline with callouts at the bottom of page 6.)
4.1 In the Timeline window, click the arrow next to the track to which you applied the Channel Mixer effect,
to expand the track.
4.2 Click the keyframe icon to display the keyframe track.
4.3 Move the edit line halfway through your clip.
4.4 Turn keyframing on by clicking the small empty box next to the words “Channel Mixer” in the
Effect Controls palette.
4.5 With keyframing turned on, adjust a parameter in the Effect Controls palette. A keyframe will be
added automatically.
4.6 Repeat until you achieve the desired effect.
Step 5: Undo with the History Palette
Adobe Photoshop users will likely recognize the History palette, a new
addition to Adobe Premiere 6.0. The History palette lets you experiment
with creative ideas in any Adobe Premiere window, yet still return to the
point where your experimentation began. All states created during your
current work session are listed in the History palette. If you return to an
earlier state in the project, all subsequent states are dimmed in the palette;
Adobe Premiere deletes them if you resume editing. You can manually
delete them by clicking the Trash icon or choosing Delete from the
History palette menu. When you close the project file, all states are
removed from the palette.
5.1 Select the History palette. If it’s not currently on your screen,
go to Window > Show History.
www.adobe.com/premiere
The History palette gives you up
to 99 levels of undo. You can
selectively undo a previous action
without affecting any subsequent
actions taken.
8
5.2 Jump back to an earlier state of your effects work using the History palette. For example, you could click on
one of the first Filter Settings to return to that stage. Notice that the subsequent Filter Settings are then grayed
out and italicized, indicating that they’ll be deleted if you resume editing, save, or close the project file.
5.3 Save your work or continue experimenting with the History palette.
Project Five—Adjust Audio
Adobe Premiere software provides the ability to edit audio tracks in the Timeline. And, with Adobe Premiere 6.0,
you can now process audio using a professional-level mixing tool, as well—the Audio Mixer. This new tool
resembles a traditional multitrack mixer and provides both visual and numerical controls for adjusting gain, fade,
and pan for up to 99 audio tracks. The Audio Mixer works in conjunction with the Monitor window so you can
make adjustments as you play the audio and watch the synchronized video in the Monitor window.
In a typical video production workflow, audio mixing is the final step before output. In this project, you’ll fade
audio clips using the Audio Mixer.
Step 1: Prepare for Audio Mixing
1.1 Switch to Audio workspace by selecting Window > Workspace > Audio.
1.2 Import an audio file by selecting File > Import > File. Select the file you want from your hard drive or
check the Samples Folder on the Adobe Premiere 6.0 CD-ROM for stock audio files.
Hint: You can import files in many different audio file formats, such as MP3.
1.3 Import a second audio file, such as the dialogue from a video clip. [Note: We recommend that you use two clips
that would typically be mixed together, such as a voiceover track and a background soundtrack, in order to clearly
hear your audio mix.]
1.4 Drag and drop your first audio clip from the Project window to the Audio 1 track in the Timeline. Drag and
drop your second audio clip from the Project window to the Audio 2 track in the Timeline.
Hint: It’s easier to work with multiple audio tracks when you give each one a name. To do so, select Track
Options under the Timeline menu and click Name to rename your audio tracks. Click OK. Note the name
changes in the Timeline and Audio Mixer windows.
Step 2: Fade In the First Audio Track
You can fade an audio clip at precise
locations in your video program with
the volume faders in the Audio Mixer.
2.1 In the Timeline, click the rightpointing arrow next to the first
audio track to expand the track.
Click the red Display Volume
Rubberbands icon. [Note: Volume
Rubberbands are also called “fade
controls.” With Display Volume
Rubberbands on, you’ll be able to
see, as well as hear, the fades you
add to the audio track.]
2.2 Position the edit line in the Timeline
at the point where you want to start
fading the first audio track.
Master Control
Track Control
Automation
Read/Write/Off Buttons
Mute/Solo
Controls
Pan/Balance
Audio Gain
Sliders
Numeric Audio
Gain Input
2.3 In the Audio Mixer window, click
the Automation Write button (the
pencil icon) in Track 1. When Automation Write is
activated, your changes will be recorded.
2.4 In the Audio Mixer window, click the Solo button in Track 1 to hear only this track during playback.
2.5 Position your cursor over the Volume Fader in Track 1 of the Audio Mixer window.
2.6 Press your keyboard spacebar to begin playing the audio. As the clip plays, drag the Volume Fader in the Audio
Mixer window up to fade the audio in. After the clip plays, note that the volume rubberband now slants upward, indicating the audio fade-in you just added.
2.7 Press the spacebar again to hear the changes made to your audio track.
www.adobe.com/premiere
Hint: Consider using the History palette during this project to undo your audio fades as you experiment.
9
2.8 Turn on Automation Read in the Audio Mixer for Track 1. This will enable you to hear the changes you
made in Track 1 as you mix it together with Track 2.
Step 3: Fade Out the Second Audio Track
3.1 Move the edit line to the beginning of the second audio track in the Timeline. Hit the spacebar to listen to
the second audio track before you fade it.
3.2 In the Timeline, click the right-pointing arrow next to the second audio track to expand the track.
3.3 Position the edit line in the Timeline at the point where you want to start fading out the second audio track.
3.4 In the Audio Mixer window, click the Automation Write button in track 2.
3.5 Position your cursor over the Volume Fader in track 2 of the Audio Mixer window.
3.6 Press your keyboard spacebar to begin playing the audio. As the clip plays, drag the Volume Fader in the
Audio Mixer window down to fade the audio out. Notice that the volume rubberband now dips downward,
illustrating where the audio fade-out you just added is located on the audio track.
3.7 Press the spacebar again to hear the changes made to your audio track.
Advanced Users: Experiment with ganging and panning multiple audio tracks.
Project Six—Save for Web
For many Web designers, video professionals and others, this is what it all comes down to—getting streaming
media online as quickly and efficiently as possible. To that end, Adobe Premiere 6.0 provides unmatched
video-to-Web tools, enabling you to go from unedited video clips to polished online content within minutes.
Adobe Premiere 6.0 includes three options for outputting to the Web:
Save For Web—A version of Media Cleaner customized especially for Adobe by Terran Interactive, the Save For
Web command delivers multiple Web output options such as QuickTime Streaming, QuickTime Progressive
Download, RealG2 Web Download, RealG2 Streaming, Windows Media (audio and video), AVI CD-ROM,
MPEG1 and the popular MP3 audio format.
Advanced RealMedia Export—Provides even more precise output control to the RealMedia format.
Advanced Windows Media Export—Specifically for Windows users, this built-in tool offers a deeper range
of optimizing options in the Windows Media format.
In this project, you’ll check the settings of your video production in the new Settings Viewer and export the
Timeline using the new Save for Web command.
Step 1: Verify Your Settings
Ensure that your settings are correct with the Settings Viewer. The new Settings Viewer displays all settings
(including capture, project, and export) in one window and compares them to the clips in the project so that
problems can be spotted quickly. Capture, project, and export settings that don’t match are displayed in red
for easy identification. Go to Project > Settings Viewer. For optimal performance, capture, project and clip
settings should be identical.
Spot inconsistencies immediately in the new Settings Viewer.
www.adobe.com/premiere
System Requirements
10
Macintosh
• Power PC processor
• Apple System software
OS 9.0.4
• 32 MB of available RAM
(128 recommended)
• 50 MB of available hard
disk space required for
installation
• Apple QuickTime 4.1.2
• Large capacity hard disk
or disk array
Additional Requirements for DV:
• Power PC processor
(@ 300MHz)
• Apple FireWire 2.4
• QuickTime-compatible
FireWire (IEEE 1394) interface
• Large capacity hard disk
or disk array (capable of
sustaining 5MB/sec)
Step 2: Save for Web
2.1 Go to File > Export Timeline > Save For Web.
2.2 In the Save For Web dialog box, choose a desired setting
from the drop-down menu. Leave the export setting as
the default, Entire Project.
2.3 Click Start. Depending on the output choice you make,
you may be presented with further options.
2.4 After your clip has been output to your desired Web
format, find the file on your hard drive and
double-click to view it.
Advanced RealMedia Export outputs video directly to the
RealMedia format ready for Web streaming, or download, and
playback using the RealPlayer application.
The Save for Web command lets you optimize files
for specific Web formats, such as a Windows Media
video file optimized for streaming across a Broadband/LAN connection.
Advanced Windows Media Export generates
high-quality, high-bandwidth streaming video for
playback using Windows Media Player.
Additional Requirements for
3rd party Capture Cards:
• Adobe Premiere certified
capture card
Windows
• Intel Pentium II processor
(300MHz or faster)
• Microsoft Windows 98,
Windows 98 Second Edition,
Windows 2000, Windows
Millennium, or Windows NT 4.0
with Service Pack 6
• 64 MB of RAM (128 MB or
more recommended)
• 85 MB of available hard-disk
space required for installation
(40 MB for application)
• 256-color video display adapter
display adapter
• Large-capacity hard disk or disk
array
• CD-ROM drive
Additional System Requirements
for DV:
• Intel Pentium III 500MHz or
faster (Pentium III 700 MHz
recommended)
• Windows 98 Second Edition,
Windows Millennium, or
Windows 2000
• 128MB RAM (256 MB or more
recommended)
• Dedicated large capacity
7200RPM UDMA 66 IDE or SCSI
hard disk or disk array
• Microsoft certified OHCI IEEE1394 interface
• Microsoft DirectX compatible
video display adapter
Additional Requirements for 3rd
party Capture Cards:
• Adobe Premiere certified
capture card
Adobe Systems Incorporated
345 Park Avenue
San Jose, CA 95110-2704 USA
World Wide Web
www.adobe.com
www.adobe.com/premiere
Advanced Users: Experiment with the Advanced RealMedia Export or Advanced Windows Media Export tools
for more precise optimizing of files in those formats.
Further Exploration
The six projects you’ve just completed were designed to serve as an introduction to the powerful tools in
Adobe Premiere 6.0. For a deeper understanding of the program, you may want to explore any of the following:
Create a personal video production—Start with video you shot at a wedding, family reunion, or other event.
After transferring the video into Adobe Premiere 6.0, play around with the sequence of your clips in the
Storyboard. Add titles, transitions, background music. Import still images into your project and make them
move (see ‘Animating a still image’ in the user manual for help). When you’re finished, save your project to
videotape or another format, rustle up an audience, and pass the popcorn.
Experiment with effects—The 25+ filters from Adobe After Effects offer plenty of opportunity for adding interest-
ing and unique visual effects. (The Adobe After Effects filters are designated with with a blue icon in the Video
Effects palette). Experiment with such filters as Directional Blur, Color Balance, Basic 3D, Drop Shadow, Broadcast
Colors, Reduce Interface Flicker, and Transform. With the Transform filter, for instance, you can apply twodimensional geometric transformations to a clip and keyframe the anchor point, position, height, width, skew,
rotation, and opacity over time.
Use the new Edit Original command—Import an Adobe Photoshop file into an Adobe Premiere project. In Adobe
Premiere, select the image you imported, go to Edit > Edit Original, and change and save the image in Adobe
Photoshop. Once the changes are made, Adobe Premiere updates the placed content and the native application file.
For more information, see ‘Editing clips’ in the Adobe Premiere User Manual.
Make a music video—Select and import an audio track. Organize a sequence of clips in the Project or Storyboard
window. Then drop a series of unnumbered markers onto the Timeline, highlighting rhythmic features as you listen to
your audio track. Perform Automate to Timeline, and your clips will be automatically choreographed to the music,
cutting in and out at the beats you marked.
This document was created with Adobe PageMaker® software and font software from the Adobe Type Library. Adobe, the Adobe logo, Premiere, After Effects, Photoshop, Illustrator, and
GoLive are trademarks of Adobe Systems Incorporated. Microsoft,Windows,Windows 2000, and Windows NT are either registered trademarks or trademarks of Microsoft Corporation in the
United States and/or other countries. Macintosh and QuickTime are registered trademarks of Apple Computer, Inc. in the United States and other countries. Power PC is a registered trademark of
International Business Machines, Inc. Intel and Pentium are registered trademarks of Intel Corporation. All other trademarks are the properties of their respective owners.
© 2000 Adobe Systems Incorporated. All rights reserved. 07/24/01