1
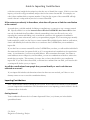
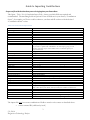
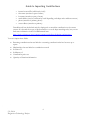
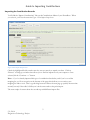
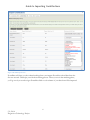
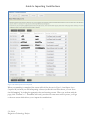
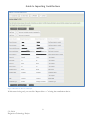
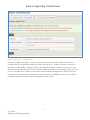
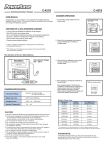
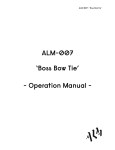
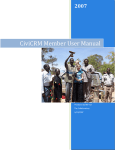
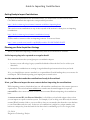
Guide to Importing Contributions Getting Ready to Import Contributions If you’ve never imported data into PowerBase before, you should look over the sections in the CiviCRM user manual that explain the concept and the procedure. http://book.civicrm.org/user/current/common-workflows/importing-data/ This section covers contribution set-up. At the very end of the section is a short piece on importing contributions. http://book.civicrm.org/user/current/contributions/setup/ PTP has made a screencast video on importing contacts. You can see it here: http://www.youtube.com/watch?v=mpH04J9jeow&list=PL128E338D9F1EC6FF Planning your Data Acquisition Strategy When you think about importing contribution data, there are several factors to consider. Is this import going to be repeated on a regular basis? Here are some reasons that you might repeat a contribution import: because you are still using a legacy system like Salsalabs or Network for Good to collect your donations. because the contributions are coming via regular direct deposit transactions from your bank. If so, you should plan to create a standard .csv or spreadsheet file with headings that you can reuse for each import. This will make repeating your import process much easier. Are the contacts that made the contribution already in PowerBase? If not, you’ll have to import the new contacts before importing the contributions. While importing contacts, think about how you will match the contributions to this contact (person or organization). The easiest and most reliable way to make sure the match happens is to put an external ID on the contact and then use that contact external ID when importing the contributions later. A contact external ID, aka External Identifier, is a field that you load with unique values so that you can import or export to another system. For example, if you’re doing voter ID work, the contact external ID will contain a link to your voter files so that you can transfer data from the voter database to your PowerBase and vice versa. In the case of contributions, it might be a unique number, also known as a unique key, from the bank for the donor that’s contributing or, if it’s for a legacy fund 1 5/1/2014 Progressive Technology Project Guide to Importing Contributions collection system, it might be the unique key that they use to identify the contact. If this is a one-time import, you can also assign an arbitrary unique value to the contact external ID. For example, use today’s date combined with a sequence number. Using the date as part of the external ID will help ensure it doesn’t overlap with anyone else’s contact external ID. If the contacts are already in PowerBase, what data will you use to link the contribution to the contact? As noted above, a reliable method for linking a contribution to a contact is to use a contact external ID. Equally reliable is to use the internal contact ID aka CiviCRM ID aka Contact ID but that can only be obtained from PowerBase, either by transcribing it into your file one by one, or by exporting the contacts and finding a way to match the contacts to the appropriate contribution records though some other means, such as your spreadsheet program. If you are setting up a monthly bank transfer file, and if you don’t have a contact external ID available from the bank or credit union, then it will definitely be worth the effort to save and reuse the CiviCRM ID in your contribution import file. If you don’t have a contact external ID or the CiviCRM ID in your data, you will need the individual’s first name and last name (in separate fields) or, if it’s an organizational contribution, the organization name. As an alternative, you can use an email address. Since sometimes first names, last names or email addresses are not unique in your PowerBase, you can use combinations of them to achieve the match that you require. This assumes, of course, that you have these fields in your contribution import file. If you don’t have these fields, or if names are combined into one field, you’ll need to edit your import file before you try to import. Are all the contributions from people that you can identify or was it cash that was collected at an event? If your import file includes cash donations where the donor was not tracked, you’ll have to use a dummy contact to use to store this contribution history. Importing Contributions First – make sure the contact is already in your system. If the contact is not already in your database, you can’t import their contributions. This document won’t cover importing contacts in detail. See the references above for details. Getting Started Your contribution file must be in a Comma Separated Values (.csv) format, not in the default spreadsheet format. 5/1/2014 Progressive Technology Project 2 Guide to Importing Contributions Prepare a file with the data that you are bringing into your PowerBase. This figure - Table 1 List of Contribution Import Fields - shows you which fields are required and recommended. The remaining fields are optional. If not all fields are in your dataset, “Contribution Status”, for example, you’ll have to add a column to your data and fill each row with the desired “Contribution Status” values. Table 1 List of Contribution Import Fields Contribution Field Accounting Code Amount Label Campaign ID Cancel Date Cancel Reason Check Number Contact ID Contribution Page Contribution Source Contribution Status Financial Type Currency Email External Identifier Fee Amount First Name Invoice ID Is Pay Later Last Name Net Amount Non-deductible Amount Note Payment Instrument Phone Pledge ID Pledge Payment Receipt Date Receive Date Soft Credit Street Address Test Thank-you Date Total Amount Transaction ID Note Not the campaign name, but the campaign id associated with the name Sufficient by itself to match to contact Good place to put this system that this contribution came from; alternatively, if you create a special batch identification for this import group, you can retrieve them later if you need to delete them or otherwise repair your imported records. Highly RECOMMENDED – set to “Completed” REQUIRED – must exactly match what’s in PowerBase May be sufficient by itself depending on dedupe rules and data content Sufficient by itself to match to contact Matches as part of name to contact Must be unique; can act as an external link for updating contribution records Set to 1 if yes Matches as part of name to contact RECOMMENDED May be sufficient by itself depending on dedupe rules and data content REQUIRED Requires identifying fields for the soft credit person: Contact ID, or External ID, or First Name, Last Name, Phone, Email, Street Address combinations. Depends on dedupe rules to match to contact N/A REQUIRED (Format the data without dollar signs. Decimal points are ok) Must be unique; can act as an external link for updating contribution records The import file must have some combination of fields to match to the contact as described above: o contact external ID (sufficient by itself) 5/1/2014 Progressive Technology Project 3 Guide to Importing Contributions o o o o o o internal contact ID (sufficient by itself) first name (matches as part of name) last name (matches as part of name) email address (may be sufficient by itself depending on dedupe rules and data content) phone (matches to primary phone) street address (matches to primary) PowerBase will use the default strict de-duping rule to match the contribution to the correct contact. It is beyond the scope of this document to cover de-dupe matching rules, but you can find some information in the CiviCRM manual here: http://book.civicrm.org/user/current/common-workflows/deduping-and-merging/ You can’t import these fields: Recurring contributions that are linked to a recurring contribution that has been set up to repeat. Memberships that are linked to contribution records In Honor of In Memory of Contribution price sets Quantity or Premium information 5/1/2014 Progressive Technology Project 4 Guide to Importing Contributions Importing the Contribution Records You’ll find the “Import Contributions” link on the Contributions Menu of your PowerBase. When you select it, you’ll see the screen in Figure 1 First Import Setup Screen. Figure 1 First Import Setup Screen Check the highlighted fields to make sure they are set correctly to match your data. Click on “Browse” to bring up a window that allows you to find the import file on your computer. Once selected, hit the “Continue >>” button. Note – if you’ve already imported this type of contribution data before, and if you’ve saved the mapping list, you’ll see an option at the bottom of the page which allows you to retrieve your mapping list and re-use it. That’s a good thing because it makes the next page go quickly the next time around, but only if the table’s field layout is in the same order as the prior import. The next couple of screens show the second step with different import files. 5/1/2014 Progressive Technology Project 5 Guide to Importing Contributions Figure 2 Second Import Screen PowerBase will show you the column headings from your import file and the related data from the first two records. This helps you with the matching process. When you are in the matching phase, you’ll go row by row and assign a PowerBase field to each column of your data that will be imported. 5/1/2014 Progressive Technology Project 6 Guide to Importing Contributions Figure 3 Second Import Screen Completed When your matching is completed, the screen will look like the one in Figure 3 Second Import Screen Completed. If you know you will be importing a dataset just like this one in the future, you can “Save the field mapping” by ticking the appropriate box and entering a name. When you are done with the page, click “Continue >>”. PowerBase will verify your data for some errors and if it passes, you’ll get to the next screen which allows you to import the contributions. 5/1/2014 Progressive Technology Project 7 Guide to Importing Contributions Figure 4 Third Screen - Review and Import If this screen looks good, you can click “Import Now>>” to bring the contribution data in. 5/1/2014 Progressive Technology Project 8 Guide to Importing Contributions Figure 5 Fourth Screen - the Import Results Once you complete the import, you get a screen with the results. If all the contribution data was entered correctly and matched a contact, all of the rows will go in. If there is an error on the row, it will show it as Invalid Row (skipped). Click on the “Download Errors” button to get a copy of your file with only the offending rows. A new column is added that holds an error message for the row. In this case, we didn’t have a match on the contact in the contribution import table. We’ll have to add the contact, then reimport the contribution. Since it’s only one contribution, we may opt to add the contribution manually after we create the Individual contact record. 5/1/2014 Progressive Technology Project 9