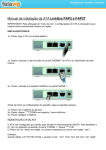
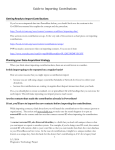
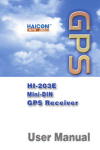
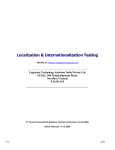
1
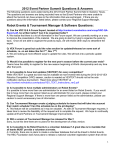
2007
CiviCRM Administrator User Manual
Produced by BIS 412
The Collaboratory
5/10/2007
Table of Contents
General Civi Background and Information.................................................................................................... 5
CiviCRM Wiki and Forum .............................................................................................................................. 5
Administrator Specific Notes ........................................................................................................................ 6
Use Cases and Step by Step Instructions ...................................................................................................... 6
Login Instructions .......................................................................................................................................... 6
CiviMember Instructions............................................................................................................................... 6
1. Newsletters/Communication ................................................................................................................ 6
1.1 Edit prayer list tags for a contact .................................................................................................... 6
2. Calendar ................................................................................................................................................ 7
2.1 Create/delete service trips.............................................................................................................. 7
3. Application Groups ............................................................................................................................... 9
3.1 Create/delete application group or site team ................................................................................ 9
3.2 Add member to application group or site team ........................................................................... 10
3.3.1 CRUD member contact .............................................................................................................. 11
3.4 Edit details to an application group .............................................................................................. 12
4. Reports ................................................................................................................................................ 13
4.1 Print Partner list ............................................................................................................................ 13
4.2 Create report of new partners ...................................................................................................... 14
4.3 Member Information Report ........................................................................................................ 15
4.4 Print linked Partner Information ................................................................................................... 15
5. Member Management ........................................................................................................................ 16
5.1 Create a New Member .................................................................................................................. 16
5.2 Update or Delete a Member or Partner ....................................................................................... 16
5.3 Add/remove a member to a site team ......................................................................................... 17
5.4 Track member participation on site teams ................................................................................... 18
5.5 Search for a member .................................................................................................................... 18
6. Website Integration ............................................................................................................................ 19
6.1 System Administrator, member, manager and team leader sign-in ............................................ 19
2
CiviContribute Instructions ......................................................................................................................... 19
8. Newsletters/Communication .............................................................................................................. 20
8.1 Export Contacts to Excel ............................................................................................................... 20
8.2 CRUD Prayer List Requests ............................................................................................................ 21
9. Money ................................................................................................................................................. 21
9.1 View a financial gift from a partner/member ............................................................................... 21
9.2 View a non-monetary gift from a partner/member ..................................................................... 22
9.3 CRUD campaign ............................................................................................................................. 22
9.4 Give premiums .............................................................................................................................. 23
9.6 Create a pledge ............................................................................................................................. 24
9.7 Categorize income ........................................................................................................................ 26
9.8 Print reports and/or tax receipts .................................................................................................. 27
9.9 Record gifts ................................................................................................................................... 28
9.10 Track Payments ........................................................................................................................... 29
10. Reports .............................................................................................................................................. 29
10.1 Print Partner list .......................................................................................................................... 29
10.2 Print Donation Total .................................................................................................................... 30
11. Member Management ...................................................................................................................... 32
11.1 Track member fundraising .......................................................................................................... 32
11.2 Track site team fundraising ......................................................................................................... 32
12. Partners ............................................................................................................................................. 33
12.1 Send a receipt to a partner ......................................................................................................... 33
12.2 Track donation information ........................................................................................................ 34
12.3 Track donation method............................................................................................................... 35
12.4 Process returned DE cards .......................................................................................................... 36
12.5 Search for a partner .................................................................................................................... 36
13. Current Website Integration ............................................................................................................. 36
13.1 Subscribe to prayer team via website......................................................................................... 36
13.2 Contribute to a site team or the entire Collaboratory via website ............................................ 36
CiviMail Instructions ................................................................................................................................... 36
14. Newsletters/Communication ............................................................................................................ 36
3
14.1 CRUD Mailing Groups.................................................................................................................. 36
14.2 Send Email ................................................................................................................................... 37
14.2.1 Mass Email ............................................................................................................................... 37
14.2.2 Prayer letter to partners .......................................................................................................... 38
14.2.3 Pledge-reminder ...................................................................................................................... 38
14.2.4 Thank-you ................................................................................................................................ 39
14.2.5 Send email/newsletter to partner/member ............................................................................ 39
14.3 Unsubscribe contact ................................................................................................................... 39
15. Member Management ...................................................................................................................... 41
15.1 Schedule a meeting ..................................................................................................................... 41
4
General Civi Background and Information
“CiviCRM is the first open source and freely downloadable constituent relationship management
solution. CiviCRM is web-based, open source, internationalized, and designed specifically to meet the
needs of advocacy, non-profit and non-governmental groups.
CiviCRM is a powerful contact, fundraising and eCRM system that allows you to record and manage
information about your various constituents including volunteers, activists, donors, employees, clients,
vendors, etc. Track and execute donations, transactions, conversations, events or any type of
correspondence with each constituent and store it all in one, easily accessible and manageable source.
CiviCRM is created by an open source community coordinated by CiviCRM LLC, and the 501c3 non-profit
Social Source Foundation. “
http://civicrm.org/aboutcivicrm
CiviCRM Wiki and Forum
While we will document CiviCRM as customized for The Collaboratory extensively in this and
other appropriate user guides, it is possible that the answer you seek will not be found in our
documentation. Should this happen, there is a CiviCRM wiki where you can search for your answer. On
the wiki, CiviCRM and its components are described in great detail and is quite organized. If the answer
cannot be found on the wiki, there is also a CiviCRM forum available to you on the website. There is a
large community of CiviCRM users and this is a great place to ask any questions that might arise and to
which you are not able to find an answer in our user’s guides or the wiki. On top of these features, the
CiviCRM website contains a FAQ as well as a blog which might be useful for things such as knowing when
to update and what new functionality might be available.
Wiki - http://wiki.civicrm.org/confluence/display/CRM/Home
Forum - http://forum.civicrm.org/
FAQ - http://wiki.civicrm.org/confluence/display/CRMDOC/FAQ
Blog - http://civicrm.org/blog/
5
Administrator Specific Notes
The administrator role as defined in the CiviCRM system will be The Collaboratory manager. The
person serving in this role will need to be able to perform all of the tasks outlined in this user manual.
The Collaboratory manager will be the owner of the CiviCRM system. There is an online administrator’s
guide which can be used as an additional resource should the administrator come across something that
is not specifically discussed in this manual.
CiviCRM Administrator’s Guide - http://wiki.civicrm.org/confluence/display/CRM/Administrator+Guide
Use Cases and Step by Step Instructions
The following sections of this manual will contain step by step instructions for performing the
functions required of an administrator. They will be broken down by the three modules contained within
CiviCRM – CiviMember, CiviContribute, and CiviMail – for organizational purposes.
Login Instructions
1. Go to http://bis412.selfip.com/dru5/ and login as an administrator.
2. Click ‘CiviCRM’ link on the left.
CiviMember Instructions
CiviMember provides “flexible membership management.” It allows you to track Collaboratory
members and put them in groups and site teams.
About CiviMember - http://civicrm.org/civimember
CiviMember Guide - http://wiki.civicrm.org/confluence/display/CRM/CiviMember+Guide
1. Newsletters/Communication
1.1 Edit prayer list tags for a contact
1. Login
2. Perform a search for desired member/partner
6
3. Select the individual to edit.
4. Select the ‘Tags’ tab followed by the ‘Edit Tags’ link at the bottom of the page.
5. Select the prayer lists with which the individual wishes to be associated with.
2. Calendar
2.1 Create/delete service trips
1. Login
2. Click ‘CiviEvent’ link on left menu.
7
3. Click on the link at the top, center of the page to manage your events
4. From this screen you have the ability to:
- Show Past Events
- Configure Upcoming Events
- Create New Events
Follow steps 1-4 listed on the web page
8
3. Application Groups
3.1 Create/delete application group or site team
1. Login
2. Click ‘Manage Groups’ link on left menu.
3. Scroll to the bottom of the page and click ‘New Group’
4. Type in “Site Team: Destination” (“Group: Group Name” for an application group) where in the
‘Name’ text box where Destination is replaced by the actually site team destination.
9
5. Select “Public User Pages and Listings” in the ‘Visibility’ dropdown.
6. Click ‘Continue’
3.2 Add member to application group or site team
1. Login
2. Click the ‘Manage Groups’ link on the left menu.
3. Scroll to the group that you wish to add the member to.
4. Click on the ‘Members’ link on that group’s row.
5. Click the ‘Add Members to Group: Group Name’ link
6. Search for the member you want to add to the group using the search screen. (If you wish to
populate your search with all members, simply do not enter any search criteria and click
‘Search’)
10
7. Once the search results are displayed, check the boxes next to the names of the people you
want to add to the group.
8. Click the ‘Add Contacts to Group: Group Name’ button.
9. Confirm your addition on the next page.
3.3.1 CRUD member contact
1. Login
2. Click the ‘Find Contacts’ link on the left menu.
11
3. Search for the member you wish to edit.
4. Once you have found the member, click on their name.
5. You will be presented with the following screen where you can use the tabs to navigate through
the different information stored for that member. Edit as needed.
3.4 Edit details to an application group
1. Login
2. Click “Manage Groups’ link on the left menu.
12
3. Go to the row containing the group you wish to edit and click the ‘Settings’ link.
4. Here you can edit the details of any group.
4. Reports
4.1 Print Partner list
1. Login
2. Click the ‘Find Contacts’ link on the left menu.
3. Search according to what you need. (Used the advances search feature for more detailed
searches based on any information stored in the system.)
13
4. Once you have searched and found which records you need, select the check boxes next to the
names you wish to print. (Or you can select the box in the blue bar directly above the names in
order to check all the names found by the search.)
5. Once you have the appropriate names checked, click the print button.
6. On the next page, click the ‘Print Contact List’ button.
4.2 Create report of new partners
1. Login
2. Click the ‘Find Contacts’ link on the left menu.
3. Click on the ‘Advanced Search’ option at the top.
4. Search according to what you need to find. In this case you will search by the ‘Memberships’
search information bar.
14
5. Once the search has populated you can either print the list using the steps outlined in “4.2
Create report of new partners” or you can export to Excel by clicking on the drop down box
above the names.
4.3 Member Information Report
1. Login
2. Follow the steps listed above in “4.2 Create Report of New Partners,” modifying the search
functionality accordingly.
4.4 Print linked Partner Information
1. Login
2. Follow the steps listed above in “4.2 Create Report of New Partners,” modifying the search
functionality accordingly. This time you will also need to use the ‘Relationships’ search bar.
15
5. Member Management
5.1 Create a New Member
1. Login
2. To add a member follow the 5 step process outlined on the left sidebar.
5.2 Update or Delete a Member or Partner
1. Login
2. Click on the ‘Find Contacts’ on the left menu.
3. Search for the member you wish to delete or update.
4. Click the name of the person you wish to edit or delete.
5. Use the edit or delete buttons as necessary. You can also edit the data contained within the
different tabs.
16
5.3 Add/remove a member to a site team
1. Login
2. Click the ‘Find Contacts’ link in the left menu.
3. Search for the member you wish to add to a site team or group.
4. Click that member’s name.
5. Click the ‘Groups’ tag.
6. Use the dropdown menu to select which site team or group you would like to add the member
to.
17
7. Click the ‘Add’ button.
5.4 Track member participation on site teams
1. Login
2. Perform a search for desired member/partner
3. Select the individual with whom you wish to view site team participation.
4. Click on the ‘Groups’ tab
5. Edit/view all of the groups or site teams that the individual is associated with.
5.5 Search for a member
1. Login
18
2. Click the ‘Find contacts’ link on the left menu.
3. At this point you can either do a blank search to populate a list of all contacts, do a simple
search by name, or click on ‘Advanced Search’ and search on any information stored in the
system.
6. Website Integration
6.1 System Administrator, member, manager and team leader sign-in
1. Follow Login instructions.
CiviContribute Instructions
CiviContribute “is an online fundraising and donor management component which enables you
to track and manage contributions.”
About CiviContribute - http://civicrm.org/civicontribute
CiviContribute Guide - http://wiki.civicrm.org/confluence/display/CRM/CiviContribute+Guide
19
8. Newsletters/Communication
8.1 Export Contacts to Excel
1. Login
2. Click the ‘Find Contacts’ link on the left menu.
3. Search for the contacts you need to find.
4. Check the box next to the names of the contacts you wish to export.
5. Select ‘Export Contacts’ from the dropdown menu.
6. Click ‘Go’
7. You can choose to either the primary contact fields or you can choose to select your own
contact fields to export.
20
8. Click the ‘Continue’ button and follow the instructions. If you export the primary fields, you will
now be ready to export. If you want to choose the fields to export you will now do so.
8.2 CRUD Prayer List Requests
1. *See ‘1.1 Edit prayer list tags for a contact’
9. Money
9.1 View a financial gift from a partner/member
1. Login
2. Perform a search for desired member/partner
3. Select the individual who donated the gift
4. Click on the ‘Contributions’ tab
5. View the information associated with the individual’s giving
21
9.2 View a non-monetary gift from a partner/member
1. *See ‘9.1 View a financial gift from a partner/member’
9.3 CRUD campaign
1. Login
2. Click on the ‘Administer CiviCRM’ link
3. Scroll to the bottom of the page to the ‘CiviContribute’ section
4. Click on the ‘Configure Online Contribution Pages’ link
22
5. Scroll to the bottom of the page and click on the ‘New Contribution Page’ link
6. In the first step for Contribution Type, select ‘Campaign Contribution’
7. Follow the rest of the steps 1-5 to complete a campaign contribution page
9.4 Give premiums
1. Save a photo of the premium to be offered in a easy-to-find folder on your C: drive
2. Login
3. Click on the ‘Administer CiviCRM’ link
23
4. Scroll to the bottom of the page to the ‘CiviContribute’ section
5. Click on the ‘Manage Premiums’ link
6. Click on the ‘New Premium’ link at the bottom of the page
7. Input the information of the premium along with the saved photo from step 1
8. Premium may now be given to individuals who meet the criteria
9.6 Create a pledge
1. Login
2. Click on the ‘Administer CiviCRM’ link
24
3. Scroll to the bottom of the page to the ‘CiviContribute’ section
4. Click on the ‘Configure Online Contribution Pages’ link
5. Scroll to the bottom of the page and click on the ‘New Contribution Page’ link
6. Follow the steps for a contribution page of your choice (i.e. select any ‘Contribution type
desired’) and then click ‘Continue’
7. In step 2 of the instructions select the ‘Enable recurring payments’ checkbox
25
8. Follow the rest of the steps to complete the contribution page.
9.7 Categorize income
1. Login
2. Click on the ‘CiviContribute’ link
3. Click on the header of the column in order to sort that column
26
4. Any column can be sorted ascending or descending
9.8 Print reports and/or tax receipts
1. Login
2. Click on the ‘CiviContribute’ link
3. Click on the desired name.
27
4. Click on the contribution tab of the individuals name and print.
9.9 Record gifts
1. Login
2. Click on Administer CiviCRM
28
3. Click on Manage Premiums in the CiviContribute section.
4. Follow the steps to create, edit, and delete gifts
9.10 Track Payments
1. see 9.8
10. Reports
10.1 Print Partner list
1. Login
29
2. Click the ‘Find Contacts’ link on the left menu.
3. Search according to what you need. (Used the advances search feature for more detailed
searches based on any information stored in the system.)
4. Once you have searched and found which records you need, select the check boxes next to the
names you wish to print. (Or you can select the box in the blue bar directly above the names in
order to check all the names found by the search.)
5. Once you have the appropriate names checked, click the print button.
6. On the next page, click the ‘Print Contact List’ button.
10.2 Print Donation Total
1. Login
2. Click ‘CiviContribute’ link on left menu.
30
3. In the ‘Contributions Summary’ area click on ‘view details’ to view the details you want to see.
4. Use the check boxes to select which record you wish to print.
5. Click the ‘Print’ button.
31
6. On the next page click the ‘Print Contributions’ button.
11. Member Management
11.1 Track member fundraising
1. Login
2. Use the advanced search feature to search for a member name as well as a contribution in the
‘Contributions’ search bar.
11.2 Track site team fundraising
1. Login
2. Click ‘Advanced Search’ on the left menu.
3. Use the ‘Contributions’ search bar to perform your search.
32
4. Select the appropriate site team or group that you wish to view contributions for in the
‘Contribution Type’ dropdown.
5. Click the ‘Search’ button.
12. Partners
12.1 Send a receipt to a partner
1. Login
2. Click on Administer CiviCRM
33
3. Click on Configure Online Contribution Pages in the CiviContribute section.
4. Select “Configure” for the appropriate page.
5. Click on the thank-you and receipting link, and ensure that the email receipt to contributor
option is checked.
12.2 Track donation information
1. Login
2. Click the ‘CiviContribute’ link on the left menu.
34
3. Use CiviContribute as appropriate.
12.3 Track donation method
1. Login
2. Click ‘Advanced Search’ on the left menu.
3. Use the ‘Contributions’ search bar to perform your search.
4. Use the ‘Paid By’ dropdown to search by donation method.
35
12.4 Process returned DE cards
1. Login
2. Search for a member or partner as described in “5.5 Search for a member”
12.5 Search for a partner
1. Login
2. Follow the same method for searching as described in “5.5 Search for a member”
13. Current Website Integration
13.1 Subscribe to prayer team via website
1. Login
2. Click on the “Subscribe to a Prayer List” link on the top right corner of the screen.
3. Follow the onscreen instructions to subscribe to the desired prayer lists.
13.2 Contribute to a site team or the entire Collaboratory via website
1. Login
2. Click on the “Make a Donation” link on the top right corner of the screen.
3. Follow the onscreen instructions to make a donation to the desired group or team.
CiviMail Instructions
CiviMail “is a robust mass-mailing component which allows you to engage your constituents
with personalized email blasts and newsletters.”
About CiviMail - http://civicrm.org/civimail
CiviMail Guide - http://wiki.civicrm.org/confluence/display/CRM/CiviMail+Guide
14. Newsletters/Communication
14.1 CRUD Mailing Groups
1. Login
2. Click the “Manage Groups’ link on the left menu.
36
3. Create a new prayer newsletter group by using the same method as described in “3.1
Create/delete application group or site team.”
14.2 Send Email
1. Login
2. Click ‘CiviMail’ link on the left menu.
3. Click on the ‘Send Mailing’ link on the left submenu under ‘CiviMail’
4. Follow the onscreen instructions to send a mailing.
14.2.1 Mass Email
1. Login
2. Click ‘CiviMail’ link on the left menu.
37
3. Click on the “New Mailing” link.
4. Follow onscreen instructions to send mailing to multiple groups.
14.2.2 Prayer letter to partners
1. Login
2. Follow instructions outlined in “14.2 Send Email,” making sure to specify that the mailing will be
going to the prayer list group you want it to.
14.2.3 Pledge-reminder
1. Login
4. Click ‘CiviMail’ link on the left menu.
38
5. Click on the “New Mailing” link.
6. Follow onscreen instructions to send mailing to the group you are reminding about the pledge..
14.2.4 Thank-you
1. Login
2. Follow instructions outlined in “14.2 Send Email,” making sure to specify that the mailing will be
going to the group or contact you want it to.
14.2.5 Send email/newsletter to partner/member
1. Login
2. Follow instructions outlined in “14.2 Send Email,” making sure to specify that the mailing will be
going to the group or contact you want it to.
14.3 Unsubscribe contact
1. Login
2. Click ‘CiviMail’ link on the left menu.
39
3. Click on the “New Mailing” link.
4. Follow onscreen instructions to send mailing. On step 3, ensure that the “Unsubscribe
Message” option has an unsubscribe message selected.
40
15. Member Management
15.1 Schedule a meeting
1. Login
2. Search for contacts you want to meet with as described in “5.5 Search for a member.”
3. Click on the name of the contact you wish to set up a meeting with.
4. Click the ‘Schedule a Meeting’ link in their profile summary.
5. Fill in the appropriate information in the following screen:
6. Click the ‘Save’ button.
41