1
HUNT ENGINEERING
Chestnut Court, Burton Row,
Brent Knoll, Somerset, TA9 4BP, UK
Tel: (+44) (0)1278 760188,
Fax: (+44) (0)1278 760199,
Email: sales@hunteng. co.uk
http://www.hunteng.co.uk
http://www.hunt-dsp.com
Using the HUNT ENGINEERING Server/Loader with Code Composer
Studio.
Rev 3.0 P.Warnes 04-3-02 (changed to include HEART based carriers)
The HUNT ENGINEERING Server/Loader tool provides a way to load a multi-processor network with
separate coff files that have been generated using the TI Code Generation Tools. It uses a simple text
file that describes the processors, how they are connected and which programs to load onto each
processor.
Code Composer Studio provides an integrated development environment that allows the development
and debugging of DSP application programs.
Users will be using the Code Composer Studio environment to develop their DSP applications, but
may wish to use the HUNT ENGINEERING Server/Loader tool when the system is deployed, or to
gain access to a higher bandwidth Host computer connection.
To enable development of a system that uses the Server/Loader using the Code Composer Studio
environment there is a Code Composer Studio “plug in” that properly integrates the Server/Loader
functionality into the development environment. The use of this “plug in” is described in the user
manual for the Server/Loader, but this document provides a quick start guide.
The full user documentation can be accessed through the “user manuals” section of the HUNT
ENGINEERING CD.
HUNT ENGINEERING is a trading style of HUNT ENGINEERING (U.K.) Ltd, Co Reg No 3333633
Directors P.Warnes & N.J.Warnes. Reg’d office 34 & 38 North St, Bridgwater, Somerset TA6 3YD. VAT Reg’d No GB 515 8449 31
Installation
During the HUNT ENGINEERING software installation, (accessed from the “Install Drivers and
Tools” option of the HUNT ENGINEERING CD) you will be asked to enter your Server/Loader
password. When your system was delivered you will have been supplied an envelope that contains this
password.
The HUNT ENGINEERING installation program will set an environmental variable HESL_DIR to
indicate which directory the Server/Loader was installed into. This is a sub-directory of your main API
installation, for example “c:\heapi\hesl”, if you installed the API into “c:\heapi”.
This installation will install CCS “plug-ins” and register them in the windows registry. This means that
when Code Composer Studio is installed it will automatically detect the plug-ins.
When you open Code Composer Studio the tools menu will contain an entry for the HUNT
ENGINEERING Server Loader. If it does not there are instructions on how to make the installation “by
hand” in the User manual for the Server/Loader.
DSP/BIOS
DSP/BIOS is the multi-threading environment provided as part of the Code Composer development
Environment. It also provided services for configuring processor features such as hardware interrupts
and timers.
As it is included in Code Composer Studio, along with the Compile tools for the C6000, all users of
HERON hardware will be able to use it.
This is used to configure the multi-tasking etc at the processor level. Simply program and use CCS to
compile the application for each DSP separately. This results in a single .out file that contains all of the
interrupt service routines etc for that processor.
The HUNT ENGINEERING Server/Loader can load any *.out file, so DSP/BIOS features can be
embedded in the programs loaded using the Server/Loader.
HERON-API
HERON-API is the communications library that HUNT ENGINEERING provide to perform the interprocessor and processor to I/O communications. Its purpose is to prevent the user from needing to
intimately understand the communications mechanism, by providing an optimised way to use the
limited DMA resources of the C6000 in a choice of ways.
It also serves the purpose of providing a common software interface to the various C6000 HERON
modules that HUNT ENGINEERING produce or plan to produce. The hardware of those modules will
be different but the HERON-API interface will not.
HERON-API is fully integrated and dependent upon DSP/BIOS.
For details of how to use the features of HERON-API refer to the user documentation for HERONAPI.
The HERON-API library is compiled into the *.out file, so can be used in any application that is loaded
using the HUNT ENGINEERING Server/Loader.
Starting
This document describes how to use CCS with a Server/Loader project. In a different document it is
explained how to create, build, and run a Server/Loader project. From the HUNT ENGINEERING
CD: Getting Started ! to start using C6000 modules and tools look here ! Getting started with
Server/Loader.
The best way to become familiar with the Server/Loader is to look at the examples provided in the
“server_loader_examples” directory of the CD. This contains simple examples that show the use of
the STDIO library and loading 1, 2 and more processors.
When making a new project for use with the Server/Loader, you should use the “Create new
HERON_API project” plug in found in Code Composer Studio under Tools!HUNT
ENGINEERING! Create new HERON-API project.
Network file.
The Network file is the text file that describes the system. For a full definition see the Server/Loader
user manual. It is here that this network file that the name of the *.out file for each processor is
defined, as well as the “bootpath” connections between the processors.
Debugging a Server/Loader program.
The Server/Loader boots standard DBP/BIOS programs onto the DSP processors. So, you might
think, why can’t I debug this in the usual way? Well, the problem is in the way the Server/Loader
boots: via the FIFO’s. Code Composer Studio loads programs via the JTAG, and will not and can
not use the FIFO’s. This raises a number of issues.
Let’s see how we could debug a Server/Loader application, without any further help. First, use Code
Composer Studio to load (File ! Load Program or Load Symbol) all processors with an *.out file
as according to the network file. Second, let all processors run free (Debug ! RunFree in all
processor windows). Third, run the Server/Loader in a separate DOS box, as usual.
Next, return to CCS and do a Debug!Halt in each processor window. This will work, but you can
see that we will halt at a random place in the application, instead of at main() or some other
convenient place. Well, we can create halting at a convenient spot by adding some code in our
program:
volatile int r=1;
while (r) { }
Place this code at the place you want to halt. But it must be placed after the call to bootloader().
Otherwise only 1 processor will get booted. And it must be done for all processors that we want to
halt at a convenient position. Let’s assume we put the extra code in the main() routine. Then:
main()
{
volatile int r=1;
bootloader();
while (r) { }
}
Once this is done, built, and reloaded onto the processors, and we have run the Server/Loader in a
separate DOS-box, when we now halt a processor it will be halted on the “while (r) { }” line.
On each processor, now edit variable “r” to become 0; then do a single step. And now we’re finally
ready to debug the Server/Loader application.
Wouldn’t it be nice if all this could be done automatically? Well, the Server/Loader plug-in does
precisely that for you. There are two ways you can use the plug-in: (1) via the Tools menu in a CCS
processor window, and (2) using the Server/Loader’s “-g” option.
What they do for you is the same. The difference is that the first method will make the Server/Loader output to a CCS child window. With the second method the Server/Loader runs as usual, in a
DOS box, but it will cause CCS to start up and they remain separate programs. Server/Loader output
will appear in the DOS-box, not in a child window in CCS.
The next section will explain how to use the Server/Loader plug-in (method 1). The other method is
very simple: use the Server/Loader in the usual way, but use option “-g” in addition. The “w32.bat”
batch file used in many Server/Loader examples accepts extra arguments, e.g. “w32 g” or “w32 vg”.
Using the Server/Loader Plug in
After starting Code Composer Studio, open any processor window, and select the “Tools!HUNT
ENGNEERING! Server loader” option. The Server/Loader plug in should open as a child window
in the CCS main window.
To use it, first select a network file in the “Network file” edit box. You can simply directly type the
path plus network file name. Or you can use the “Browse” button and browse to the network file of
your choice.
Next, select “Reset” (equivalent to the “-r” option), “Load” (equivalent to the “-l” option), “Serve”
(equivalent to the “-s” option) and “Verbose” (equivalent to the “-v” option). The default is to have
all 4 of them ticked – equivalent to using the Server/Loader with option “-rlsv”. If you don’t want
the Server/Loader to halt after setting up a debugging session, un-tick the “Halt at bootloader” box.
CCS 2.x deposits *.out files in a Debug or Release directory. To use *.out files from the Release
directory, tick “Release”. To use *.out files from the “Debug” directory, tick “Debug”. However, if
there are *.out files in the source directory, these will be used before any from a Debug or Release
directory. To not use any Release or Debug *.out file, tick the “Source” box.
In case you have a network file in which you also download bit streams, you may not want to
download the bit streams every time you restart (i.e. re-run Server/Loader). Tick the “Skip FPGA”
box to not download bit streams to FPGA and HERON-IO modules (this is equivalent to the “-a”
option).
Any output (from printf statements, for example) will appear in the grey box area in the centre of the
Server/Loader plug-in window. Any input can be typed in the “Input” edit box.
Now you can use the “Start S/L” button to load the entire network, using the Server/Loader (i.e.
using the FIFO connections to the host). Each processor will have the correct symbols loaded onto
it, and the command “Go Main” will be executed. All HEART connections as specified in the
network file will be created. The system is now loaded and ready to debug.
Any Server/Loader Standard I/O will be presented to the user in the Plug In window. If it is
necessary to re-load or re-start the system, the Server program must first be stopped using the “Stop
S/L” button, and can then be re-started using the “Start S/L” button.
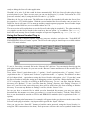
Property Page
The Server/Loader has more options than the ones shown in the plug-in window. But these most of
these options you won’t use often, if at all. If you right-click somewhere in the grey area at the
boundaries of the plug-in, a menu will pop-up. Select “Property Page” in this menu.
You should see a Properties window similar to the one shown below.
The first edit box is if you ever needed to change the path to the Server/Loader executable. The
second edit box is simply a repeat of the network file edit box of the plug-in.
Packet Size is if you use packetized mode, i.e. the “Use Packets” box is ticked. This is equivalent to
the “-k<=n>” option of the DOS-box Server/Loader. “Wait Factor” is equivalent to the wait factor
in the “-g<=n>” option. The “Automatic Matching of HERON ID’s with Code Composer objects” is
equivalent to the “-x” option of the DOS-box Server/Loader. “Use boot jumpers (HEPC9 only) is
equivalent to the “-j” option. For more information, please refer to the Server/Loader manual.
If “Load system using Code Composer Studio” is ticked, booting will proceed using CCS and not
via the FIFO’s. Don’t use this option; it’s there purely for support and problem shooting purposes.
Similarly, the “Keep LOG of actions” box is only there for support and troubleshooting purposes. If
ticked, a LOG file (named “sl”) will be created in the root of the drive that is current.
STDIO example
To follow the STDIO example provided with the HUNT ENGINEERING Server/Loader using the
plug in, open Code Composer Studio and follow the instructions of that example to build the demo.
Now open the plug in as described above; select the network file in that directory and press the
“start S/L” button.
The Plug in will load the program using the Server/Loader, and will then load the symbols into
Code Composer so that Source level debugging can be used. The DSP program is halted just after
the call to bootloader() ready for you to debug. You can step through the program and see the
output from the program in the Plug In window.
If you choose “Run”, Code Composer will give you a warning that it does not know you have
loaded a program yet. Tick the “don’t show this dialog box again” box, and choose yes. You will
then not be asked this again.
Sl_api example
The above Plug In method only works if you are using the command line version of the
Server/Loader, but there is a method to use the “Plug In” method of debugging for your DSP
application when you are using the library version of the Server/Loader.
Follow the “sl_api\exe” example provided with the HUNT ENGINEERING Server/Loader using
the Plug In, open Code Composer Studio and follow the instructions of that example to build the
demo.
There is a method to get the Server/Loader library functions to open Code Composer Studio and to
load the symbols, just like the Plug In. This is detailed in the Server/Loader user manual, but can be
easily demonstrated by opening a DOS box, and running the sl_api example with a “g” parameter,
i.e. type “mysl g <rtn>”. This will start Code Composer for debugging the sl_api example. For more
information look at the source code of the mysl.cpp.