
1
DVK522 Expansion Board
Drivers Porting Manual
2014.06.17 V1.1
Waveshare Electronics
www.wvshare.com
Copyright Statement
The ownership of this user manual is Shenzhen Waveshare Electronics Co., Ltd.
Any manner or form of modifying, distributing or copying any parts of this document
without permission is forbidden, otherwise offender will have to suffer all the
consequences.
Version update records
Version
Date
Description
V1.1
2014.06.17
Initial Release
Shenzhen Waveshare Electronics Co., Ltd.
www.waveshare.com
I
Content
Copyright Statement ..................................................................................................................I
Version update records ..............................................................................................................I
1.
Porting LED driver ............................................................................................................. 1
2.
Porting PWM driver .......................................................................................................... 2
3.
Porting Dallas’s one-wire driver ......................................................................................... 2
4.
5.
6.
7.
8.
9.
10.
3.1.
Configure the Kernel ....................................................................................... 2
3.2.
Configure the cript.fex .................................................................................... 2
3.3.
Compile the driver module ............................................................................. 3
Porting AD key driver ........................................................................................................ 3
4.1.
Configure the Kernel ....................................................................................... 3
4.2.
Configure the sript.fex .................................................................................... 3
Porting I2C driver .............................................................................................................. 4
5.1.
Configure the Kernel ....................................................................................... 4
5.2.
Configure the script.fex................................................................................... 4
Porting SPI driver .............................................................................................................. 5
6.1.
Configure the Kernel ....................................................................................... 5
6.2.
Configure the script.fex................................................................................... 6
Porting LCD driver ............................................................................................................. 7
7.1.
Configure the Kernel ....................................................................................... 7
7.2.
Configure the script.fex................................................................................... 7
Porting CTP driver ........................................................................................................... 10
8.1.
Con figure the Kernel .................................................................................... 10
8.2.
Configure the script.fex................................................................................. 11
Porting UART driver......................................................................................................... 12
Porting CSI driver ......................................................................................................... 13
10.1.
Configure the kernel ................................................................................. 13
10.2.
Configure the script.fex ............................................................................. 14
11.
Porting USB Camera .................................................................................................... 17
12.
Porting WIFI driver ...................................................................................................... 17
13.
Porting VGA driver....................................................................................................... 17
14.
Porting HDMI driver .................................................................................................... 17
15.
Porting CVBS driver ..................................................................................................... 17
16.
Updating system .......................................................................................................... 18
17.
Compiling driver module ............................................................................................. 19
Shenzhen Waveshare Electronics Co., Ltd.
www.waveshare.com
II
Document formatting convention
1. Commands on PC ubuntu terminal: preceding with '#', here root user
privileges is requested;
Commands on the board terminal: preceding with '$'.
2. This document is mainly for porting related linux driver of version 3.4.61
kernel.
1. Porting LED driver
LED driver has been includes in the kernel, just configure the script.fex directly
Add the following configuration in setting [leds_para]:
[leds_para]
leds_used = 1
leds_num = 10
leds_pin_1 = port:PH20<1><default><default><0>
leds_name_1 = "green:ph20:led1"
leds_default_1 = 1
leds_pin_2 = port:PH21<1><default><default><0>
leds_name_2 = "blue:ph21:led2"
leds_default_2 = 0
leds_trigger_2 = "heartbeat"
leds_pin_3 = port:PE04<1><default><default><0>
leds_name_3 = "led0"
leds_default_3 = 1
leds_pin_4 = port:PE05<1><default><default><0>
leds_name_4 = "led1"
leds_default_4 = 1
leds_pin_5 = port:PE06<1><default><default><0>
leds_name_5 = "led2"
leds_default_5 = 1
leds_pin_6 = port:PE07<1><default><default><0>
leds_name_6 = "led3"
leds_default_6 = 1
leds_pin_7 = port:PE8<1><default><default><0>
leds_name_7 = "led4"
leds_default_7 = 1
leds_pin_8 = port:PE09<1><default><default><0>
leds_name_8 = "led5"
leds_default_8 = 1
Shenzhen Waveshare Electronics Co., Ltd.
www.waveshare.com
1
leds_pin_9 = port:PE10<1><default><default><0>
leds_name_9 = "led6"
leds_default_9 = 1
leds_pin_10 = port:PE11<1><default><default><0>
leds_name_10 = "led7"
leds_default_10 = 1
2. Porting PWM driver
PWM driver has been includes in the kernel, just configure the script.fex directly
Add [pwm0_para]:
[pwm0_para]
pwm_used = 1
pwm_period = 20
pwm_duty_percent = 50
3. Porting Dallas’s one-wire driver
3.1.
Configure the Kernel
#make menuconfig
Note:When executing make menuconfig, it is under top-level directory of the kernel.
Device Drivers --->
<*> Dallas's 1-wire support --->
<*> 1-wire sunxi support
1- wire Bus Masters --->
<*> GPIO 1-wire busmaster
1- wire Slaves --->
<*> Thermal family implementation
3.2.
Configure the cript.fex
Add [w1_para],configuring as below:
[w1_para]
w1_used = 1
Shenzhen Waveshare Electronics Co., Ltd.
www.waveshare.com
2
w1_pin = port:PB10<1><default><default><default>
3.3.
Compile the driver module
Click
http://dl.cubieboard.org/parteners/waveshare/Source_Code/a10-cubieboard-dvk/Dr
iver%20and%20API/Driver/
to download ds18b20_dev to your own ubuntu system, compiling by enter into
source code(Detail please refer to Chapter17: Compiling driver module) Copy
w1-sun4i.ko to the board after compiling, execute the below command to
download:
$insmod w1-sun4i.ko
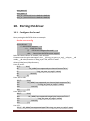
After connect the DS18B20 board correctly, navigate into
directory/sys/bus/w1/devices/w1_bus_master1, there is directory begin with
“28-“ under this directory, this is your DS18B20 device. 28 represent that your
temperature sensor is DS18B20, the following figures and letters are its ID (It is
unique and used to identify different devices), navigate into this directory, the inside
w1_slave document is its device document. Enter this command:
$cat w1_slave
on the console terminal.
4. Porting AD key driver
4.1.
Configure the Kernel
#make menuconfig
Device Drivers --->
Input device support --->
[*] Keyboards --->
<M>
sunxi tablet keys on adc0 support
[]
sunxi tablet keys on adc0 controlled throuh fex
4.2.
Configure the sript.fex
Add section [tabletkeys_para], configure as below:
[tabletkeys_para]
tabletkeys_used = 1
key0_code = 115
key1_code = 114
Shenzhen Waveshare Electronics Co., Ltd.
www.waveshare.com
3
key2_code = 139
key3_code = 217
key4_code = 102
key5_code = 1
key6_code = 28
5. Porting I2C driver
5.1.
Configure the Kernel
The kernel supports I2C, if not, configure as below:
#make menuconfig
Device Drivers --->
{*} I2C support --->
I2C Hardware Bus support --->
<*> Allwinner Technology SUNXI I2C interface
Commenting out the code on line 914 to line 918 of document i2c-sunxi.c under
directory of drivers/i2c/busses as below:
914 /* else if (ret != num){
915
printk("incomplete xfer (0x%x)\n", ret);
916
ret = -ECOMM;
917
//dev_dbg(i2c->adap.dev, "incomplete xfer (%d)\n", ret);
918
}*/
5.2.
Configure the script.fex
[twi0_para]
twi0_used = 1
twi0_scl = port:PB0<2><default><default><default>
twi0_sda = port:PB1<2><default><default><default>
[twi1_para]
twi1_used = 1
twi1_scl = port:PB18<2><default><default><default>
twi1_sda = port:PB19<2><default><default><default>
[twi2_para]
Shenzhen Waveshare Electronics Co., Ltd.
www.waveshare.com
4
twi2_used = 1
twi2_scl = port:PB20<2><default><default><default>
twi2_sda = port:PB21<2><default><default><default>
6. Porting SPI driver
6.1.
Configure the Kernel
A10:
SPI driver has been included in the kernel of 3.4.61 version, but SPI demo need to
control the pins of CS, the driver document is ctl_io.c ,
clickhttp://dl.cubieboard.org/parteners/waveshare/Source_Code/a20-cubieboarddvk/driver%20source/ to download and copy to directory of /drivers/char, modify
Makefile and Kconfig under this directory:
Add below to Makefile:
obj-$(CONFIGURE_CTL_IO)
+= ctl_io.o
Add below to Kconfig:
config CTL_IO
tristate "CTL_IO Controller"
depends on ARCH_SUN4I
help
Ctl_io controller,present on SUN4I chips.
Configure the Kernel:
#make menuconfig
Device Drivers --->
[*] SPI support --->
<*> SUN4I SPI Controller
Device Drivers --->
Character devices --->
<*> CTL_IO Controller
A20:
Kernel of 3.4.61 version on Cubieboard A20 does not get support from SPI, you
need
to
add
SPI
driver,
download
spi-sun7i.c
from
http://dl.cubieboard.org/parteners/waveshare/Source_Code/a20-cubieboard-dv
k/driver%20source/, copy to directory of drivers/spi, modify Makefile and Kconfig
under directory drivers/spi.
Shenzhen Waveshare Electronics Co., Ltd.
www.waveshare.com
5
ctl_io.c driver is also needed, please refer to operation of A10 above.
Add below to document Makefile:
obj-$(CONFIGURE_SPI_SUN7I)
+= spi-sun7i.o
Add below to document Kconfig:
config SPI_SUN7I
tristate "SUN7I SPI Controller"
depends on ARCH_SUN7I
help
Allwinner Soc SPI controller,present on SUN7I chips.
config SUN7I_SPI_NDMA
bool "SUN7I SPI Normal DMA mode select"
depends on SPI_SUN7I
help
This selects SPI DMA mode with DMA transfer
Y select NDMA mode and N select DDMA mode
Configuring as the following:
#make menuconfig
Device Drivers --->
[*] SPI support --->
<*> SUN7I SPI Controller
[*]
SUN7I SPI Normal DMA mode select
<*> DesignWare SPI controller core support
<*> User mode SPI device driver support
6.2.
Configure the script.fex
[spi0_para]
spi_used = 1
spi_cs_bitmap = 1
spi_cs0 = port:PI10<2><default><default><default>
spi_sclk = port:PI11<2><default><default><default>
spi_mosi = port:PI12<2><default><default><default>
spi_miso = port:PI13<2><default><default><default>
[spi_devices]
spi_dev_num = 1
[spi_board0]
modalias = "spidev"
max_speed_hz = 12000000
bus_num = 0
chip_select = 0
Shenzhen Waveshare Electronics Co., Ltd.
www.waveshare.com
6
mode = 3
full_duplex = 0
manual_cs = 0
7. Porting LCD driver
7.1.
Configure the Kernel
The LCD driver support has been included in linux-sunxi-sunxi-3.4.61, the driver file
can be found on drivers/video/sunxi/lcd.
Check the kernel configuration, confirm that the driver is included:
#make menuconfig
Device Drivers --->
Graphics support --->
{*} Support for frame buffer devices --->
<*> DISP Driver Support(sunxi)
-*Reserve memory block for sunxi/fb
[*]
Enable FB/UMP Integration
<*>
LCD Driver Support(sunxi)
<*>
HDMI Driver Support(sunxi)
If you want to display the boot LOGO, configuring as below:
Device Drivers --->
Graphics support --->
[*] Bootup logo --->
[*] Standard 224-color Linux logo
7.2.
Configure the script.fex
The A10 supports two channel video output, however, only LCD0 is available on
Cubieboard, therefore, we connect the 7inch capacitive LCD to the LCD0 controller.
Configure the script.fex, [dis_init] setting for display device initialization, and
[lcd0_para] setting for LCD parameters (depending on the specifications of concrete
LCD), as follows:
[disp_init]
disp_init_enable = 1
disp_mode = 0
screen0_output_type = 1
Shenzhen Waveshare Electronics Co., Ltd.
www.waveshare.com
7
screen0_output_mode = 4
screen1_output_type = 0
screen1_output_mode = 4
fb0_width = 1024
fb0_height = 768
fb0_framebuffer_num = 2
fb0_format = 10
fb0_pixel_sequence = 0
fb0_scaler_mode_enable = 0
fb1_width = 1024
fb1_height = 768
fb1_framebuffer_num = 2
fb1_format = 10
fb1_pixel_sequence = 0
fb1_scaler_mode_enable = 0
lcd0_backlight = 197
lcd1_backlight = 197
lcd0_bright = 50
lcd0_contrast = 50
lcd0_saturation = 57
lcd0_hue = 50
lcd1_bright = 50
lcd1_contrast = 50
lcd1_saturation = 57
lcd1_hue = 50
[lcd0_para]
lcd_used = 1
lcd_x = 1024
lcd_y = 600
lcd_dclk_freq = 51
lcd_pwm_not_used = 0
lcd_pwm_ch = 0
lcd_pwm_freq = 10000
lcd_pwm_pol = 0
lcd_max_bright = 240
lcd_min_bright = 64
lcd_if = 0
lcd_hbp = 158
lcd_ht = 1344
lcd_vbp = 25
lcd_vt = 1270
lcd_vspw = 3
lcd_hspw = 20
Shenzhen Waveshare Electronics Co., Ltd.
www.waveshare.com
8
lcd_hv_if = 0
lcd_hv_smode = 0
lcd_hv_s888_if = 0
lcd_hv_syuv_if = 0
lcd_lvds_ch = 0
lcd_lvds_mode = 0
lcd_lvds_bitwidth = 0
lcd_lvds_io_cross = 0
lcd_cpu_if = 0
lcd_frm = 0
lcd_io_cfg0 = 0x00000000
lcd_gamma_correction_en = 0
lcd_gamma_tbl_0 = 0x00000000
lcd_gamma_tbl_1 = 0x10101
lcd_gamma_tbl_255 = 0x00ffffff
lcd_bl_en_used = 1
lcd_bl_en = port:PH07<1><0><default><1>
lcd_power_used = 1
lcd_power = port:PH08<1><0><default><1>
lcd_pwm_used = 1
lcd_pwm = port:PB02<2><0><default><default>
lcdd0 = port:PD00<2><0><default><default>
lcdd1 = port:PD01<2><0><default><default>
lcdd2 = port:PD02<2><0><default><default>
lcdd3 = port:PD03<2><0><default><default>
lcdd4 = port:PD04<2><0><default><default>
lcdd5 = port:PD05<2><0><default><default>
lcdd6 = port:PD06<2><0><default><default>
lcdd7 = port:PD07<2><0><default><default>
lcdd8 = port:PD08<2><0><default><default>
lcdd9 = port:PD09<2><0><default><default>
lcdd10 = port:PD10<2><0><default><default>
lcdd11 = port:PD11<2><0><default><default>
lcdd12 = port:PD12<2><0><default><default>
lcdd13 = port:PD13<2><0><default><default>
lcdd14 = port:PD14<2><0><default><default>
lcdd15 = port:PD15<2><0><default><default>
lcdd16 = port:PD16<2><0><default><default>
lcdd17 = port:PD17<2><0><default><default>
lcdd18 = port:PD18<2><0><default><default>
lcdd19 = port:PD19<2><0><default><default>
lcdd20 = port:PD20<2><0><default><default>
lcdd21 = port:PD21<2><0><default><default>
lcdd22 = port:PD22<2><0><default><default>
Shenzhen Waveshare Electronics Co., Ltd.
www.waveshare.com
9
lcdd23 = port:PD23<2><0><default><default>
lcdclk = port:PD24<2><0><default><default>
lcdde = port:PD25<2><0><default><default>
lcdhsync = port:PD26<2><0><default><default>
lcdvsync = port:PD27<2><0><default><default>
Note:
When using LVDS connector, configure lcd_if = 0 to lcd_if =3.
8. Porting CTP driver
Here take capacitive touch LCD with FT5x06 MCU controller as example.
8.1.
Con figure the Kernel
A10:
Kernel of version 3.4.61 included driver document ft5x_ts.c in its source code, which
is under directory of drivers/input/touchscreen.
#make menuconfig
Device Drivers --->
Input device support --->
[*] Touchscreens --->
<M> ft5x touchscreen driver
Here compile it as mode of module.
A20:
Unfortunately the original ft5x_ts.c in linux-sunxi-sunxi-3.4.61 kernel doesn’t support
A20, therefore, copy the new ft5x_ts.c (which can be downloaded on
http://dl.cubieboard.org/parteners/waveshare/Source_Code/a20-cubieboard-dvk/dr
iver%20source/ ) to the drivers/input/touchscreen directory in kernel and replace
the original one. Besides, the touch screen interrupt pin ctp_int_port requires GPIO
interrupts, make sure the GPIO driver is included when configuring.
Configure the Kernel to include touchscreen driver:
#make menuconfig
Device Drivers --->
Input device support --->
[*] Touchscreens --->
<M> ft5x touchscreen driver
Device Drivers --->
Shenzhen Waveshare Electronics Co., Ltd.
www.waveshare.com
10
[*] GPIO Support --->
<*> GPIO Support for sunxi platform
8.2.
Configure the script.fex
Since the touch screen is connected to I2C1 controller, make sure the I2C driver has
been ported (refer to the previous section "Porting I2C Bus Driver").
Configure the [ctp_para],[ctp_list_para],and[gpio_para] setting in script.fex.
ctp_name:driver name
ctp_twi_id:I2C controller which is actually used
ctp_twi_addr:I2C device address (7bit)
ctp_screen_max_x:touch panel resolution
ctp_screen_max_y:touch panel resolution
ctp_revert_x_flag:set 1 to revert x axis
ctp_revert_y_flag:set 1 to revert y axis
ctp_exchange_x_y_flag:set 1 to exchange x axis and y axis
ctp_int_port:touch interrupt pin
ctp_wakeup:touch wakeup pin
According to the specifications and hardware connection of our 7inch capacitive LCD,
configure as follows:
A10:
[ctp_para]
ctp_used = 1
ctp_name = "ft5x_ts"
ctp_twi_id = 1
ctp_twi_addr = 0x38
ctp_screen_max_x = 1024
ctp_screen_max_y = 600
ctp_revert_x_flag = 0
ctp_revert_y_flag = 1
ctp_exchange_x_y_flag = 0
ctp_int_port = port:PH7<6><default>
ctp_wakeup = port:PB13<1><default><default><1>
ctp_io_port = port:PH7<0><default>
A20:
[ctp_para]
ctp_used = 1
Shenzhen Waveshare Electronics Co., Ltd.
www.waveshare.com
11
ctp_name = "ft5x_ts"
ctp_twi_id = 1
ctp_twi_addr = 0x38
ctp_screen_max_x = 1024
ctp_screen_max_y = 600
ctp_revert_x_flag = 0
ctp_revert_y_flag = 1
ctp_exchange_x_y_flag = 0
ctp_firm = 1
ctp_wakeup = port:PB13<1><default><default><1>
[ctp_list_para]
ctp_det_used = 1
ft5x_ts = 1
gt82x = 0
gslX680 = 0
gt9xx_ts = 0
gt811 = 0
[gpio_para]
gpio_pin_3 = port:PH07<6><default><default><default>
9. Porting UART driver
UART driver has been includes in the kernel, just configure the script.fex directly:
[uart_para3]
uart_used
=1
uart_port
=3
uart_type
=4
uart_tx
= port:PG06<4><1><default><default>
uart_rx
= port:PG07<4><1><default><default>
uart_rts
= port:PG08<4><1><default><default>
uart_cts
= port:PG09<4><1><default><default>
[uart_para4]
uart_used
uart_port
uart_type
uart_tx
uart_rx
=1
=4
=2
= port:PG10<4><1><default><default>
= port:PG11<4><1><default><default>
[uart_para6]
uart_used = 1
Shenzhen Waveshare Electronics Co., Ltd.
www.waveshare.com
12
uart_port = 6
uart_type = 2
uart_tx = port:PI12<3><1><default><default>
uart_rx = port:PI13<3><1><default><default>
10. Porting CSI driver
10.1. Configure the kernel
Here porting the OV7670 driver as example.
#make menuconfig
Device Drivers --->
<*> Multimedia support --->
<*> Video For Linux
[*] CSI Driver Configure for sun4i --->
<M>
OmniVision OV7670 sensor support
Built the camera driver as module, save and exit.
Comment out the print messages in the __s32 img_sw_para_to_reg(__u8 type, __u8
mode, __u8 value) function in disp_layer.c file, which is under
drivers/video/sunxi/disp directory.
Lines 95 to 99:
95 /*
else {
96
DE_WRN("not supported yuv channel format:%d in "
97
"img_sw_para_to_reg\n", value);
98
return 0;
99
}*/
Lines 125 to 129:
125 /*
else {
126
DE_WRN("not supported yuv channel pixel sequence:%d "
127
"in img_sw_para_to_reg\n", value);
128
return 0;
129
}*/
Lines 168 to 172:
168 /*
else {
169
DE_WRN("not supported image0 pixel sequence:%d in "
170
"img_sw_para_to_reg\n", value);
171
return 0;
172
}*/
Line 175:
175 // DE_WRN("not supported type:%d in img_sw_para_to_reg\n", type);
Shenzhen Waveshare Electronics Co., Ltd.
www.waveshare.com
13
Save, re-compile the kernel:
#make uImage
Compile the kernel modules:
#make modules
Compile the kernel modules:
#make modules_install
The installation copies the compiled kernel module from the kernel source code to
the ubuntu /lib/modules directory.
The related driver module files include: videobuf-core.ko, videobuf-dma-contig.ko,
sun4i_csi1.ko, ov7670.ko, which are located respectively in:
videobuf-core.ko,videobuf-dma-contig.ko:
/lib/modules/3.4.61+/kernel/drivers/media/video
ov7670.ko:
/lib/modules/3.4.61+/kernel/drivers/media/video/sun4i_csi/device
sun4i_csi1.ko:
/lib/modules/3.4.61+/kernel/drivers/media/video/sun4i_csi/csi1
Copy the above 4 driver files to the board, and install them in order:
$insmod videobuf-core.ko
$insmod videobuf-dma-contig.ko
$insmod ov7670.ko
$insmod sun4i_csi1.ko
Note: please pay attention to the installing order, camera driver should be installed
before sun4i_csi1.ko.
Note:
1.CSI1 pin and pin UART3 / 4 is of multiplexing, so just one of them is available in the
same time!
2.Select via opening or closing uart_used = 1 or csi_used = 1.
10.2. Configure the script.fex
Since our OV7670 camera is connected to the CSI1 controller, configure the
[csi1_para] and [camera_list_para] setting in script.fex. The suffix _b in the
parameter name indicates that this is a secondary camera parameter while two
cameras were connected to the same CSI.
csi_used = xx:enable/disable csi0 or csi1
csi_mode = xx:CSI receiver buffer mode:
0:a stand-alone buffer for each CSI receiver
1:a shared buffer for both CSI receiver
csi_dev_qty = xx: CSI device quantity, 1 or 2
Shenzhen Waveshare Electronics Co., Ltd.
www.waveshare.com
14
csi_stby_mode = xx:standby power status
0:power on when standby
1:power off when standby
csi_mname = “xxx”:
CSI module name, matches with the driver, valid option includes:
ov7670/gc0308/gt2005/hi704/sp0338/mt9m112/gc0307/mt9m113/mt9d112/hi253/
ov5640
csi_twi_id = xx:I2C
csi_twi_addr = xx:I2C address
csi_if = xx:interface timing:
0:8bit data line, with Hsync,Vsync
1:16bit data line, with Hsync,Vsync
2:24bit data line, with Hsync,Vsync
3:8bit data line, BT656 embedded sync, single-channel
4:8bit data line, BT656 embedded sync, dual-channels
5:8bit data line, BT656 embedded sync, four-channels
csi_vflip = xx:video vertical flip
0:normal
1:flip
csi_hflip = xx:video horizontal flip
0:normal
1:flip
csi_avdd = "", and csi_dvdd = "": power supply of the camera module's IO, Analog,
and Core.
"axp20_pll": powering from AXP20 LDO3
"axp20_hdmi": powering from AXP20 LDO4
"": powering from other source
csi_flash_pol = xx:flash polarity for cameras that feature flash IO control
0: flash lights when IO low level
1: flash lights when IO high level
csi_pck = xx:GPIO configuration for clock signal from module to CSI csi_ck = xx:
GPIO configuration for clock signal from CSI to module
csi_hsync = xx:GPIO configuration for clock signal from CSI to module csi_vsync =
xx:GPIO configuration for vertical sync signal from module to CSI
csi_d0 = xx to csi_d15 = xx:GPIO configuration for vertical sync signal from
module to CSI
csi_reset = xx: GPIO configuration for module reset
csi_power_en = xx:GPIO configuration for module power, high active by default
csi_stby = xx:GPIO configuration for module standby
csi_af_en = xx:GPIO configuration for module AF power
[csi1_para]
csi_used = 1
csi_dev_qty = 1
Shenzhen Waveshare Electronics Co., Ltd.
www.waveshare.com
15
csi_stby_mode = 0
csi_mname = "ov7670"
csi_if = 0
csi_iovdd = "axp20_pll"
csi_avdd = ""
csi_dvdd = ""
csi_vol_iovdd = 2800
csi_vol_dvdd =
csi_vol_avdd =
csi_vflip = 1
csi_hflip = 0
csi_flash_pol = 1
csi_facing = 1
csi_twi_id = 1
csi_twi_addr = 0x42
csi_pck = port:PG00<3><default><default><default>
csi_ck = port:PG01<3><default><default><default>
csi_hsync = port:PG02<3><default><default><default>
csi_vsync = port:PG03<3><default><default><default>
csi_d0 = port:PG04<3><default><default><default>
csi_d1 = port:PG05<3><default><default><default>
csi_d2 = port:PG06<3><default><default><default>
csi_d3 = port:PG07<3><default><default><default>
csi_d4 = port:PG08<3><default><default><default>
csi_d5 = port:PG09<3><default><default><default>
csi_d6 = port:PG10<3><default><default><default>
csi_d7 = port:PG11<3><default><default><default>
csi_reset = port:PH13<1><default><default><0>
csi_power_en = port:PH16<1><default><default><0>
csi_stby = port:PH19<1><default><default><0>
[camera_list_para]
camera_list_para_used = 1
ov7670 = 1
gc0308 = 0
gt2005 = 0
hi704 = 0
sp0838 = 0
mt9m112 = 0
mt9m113 = 0
ov2655 = 0
hi253 = 0
gc0307 = 0
mt9d112 = 0
Shenzhen Waveshare Electronics Co., Ltd.
www.waveshare.com
16
ov5640 = 0
gc2015 = 0
ov2643 = 0
gc0329 = 0
gc0309 = 0
tvp5150 = 0
s5k4ec = 0
ov5650_mv9335 = 0
siv121d = 0
gc2035 = 0
11. Porting USB Camera
USB Camera has been includes in the kernel.
12. Porting WIFI driver
WIFI driver has been includes in the kernel.
13. Porting VGA driver
VAG driver has been includes in the kernel, just configure screen0_output_type
and screen0_output_mode setting in the script.fex directly:
[disp_init]
screen0_output_type
=4
screen0_output_mode
=4
14. Porting HDMI driver
HDMI driver has been includes in the kernel, just configure screen0_output_type
and screen0_output_mode setting in the script.fex directly:
[disp_init]
screen0_output_type
=3
screen0_output_mode
=5
15. Porting CVBS driver
CVBS driver has been includes in the kernel, just configure [disp_init] and
[tvout_para] setting in the script.fex directly:
Shenzhen Waveshare Electronics Co., Ltd.
www.waveshare.com
17
[disp_init]
screen0_output_type
screen0_output_mode
[tvout_para]
tvout_used
tvout_channel_num
=2
= 14
=1
=3
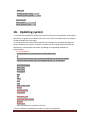
16. Updating system
1. Convert the modified script.fex into script.bin format by using fex2bin, and replace
the earlier script.bin on the board. (for more info, refer to the document <4. Prepare
for Kernel and Drivers Porting>)
2. The ported kernel need to be recompiled, and update the compiled ulmage and
driver module to the system. The driver module can be loaded automatically when
the board is connected to the power, by adding corresponding modules to
/etc/modules.
$ vi /etc/modules
# /etc/modules: kernel modules to load at boot time.
#
# This file contains the names of kernel modules that should be loaded
# at boot time, one per line. Lines beginning with "#" are ignored.
#For SATA Support
gpio_sunxi
pwm_sunxi
sunxi_gmac
disp
lcd
hdmi
ump
mali
sunxi_cedar_mod
ft5x_ts
sun4i-keyboard
rtc-pcf8563
#videobuf_core
#videobuf_dma_contig
#ov7670
#sun4i_csi1
Users can add driver module to this list.
3. Driver modules compiled by yourself can add via /etc/profile:
Shenzhen Waveshare Electronics Co., Ltd.
www.waveshare.com
18
$ vi /etc/profile
insmod /home /waveshare_demo/driver/ds18b20_dev/w1-sun4i.ko
4、Reboot the system after updating!
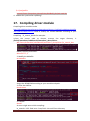
17. Compiling driver module
Compiling driver modules under
http://dl.cubieboard.org/parteners/waveshare/Source_Code/a10-cubieboard-dvk/Dr
iver%20and%20API/Driver/ need to modify the related Makefile according to your
actual kernel path.
Compiling io_control_dev.ko for example:
1.Copy the source code to ubuntu, assume the target directory is
/home/waveshare/cubieboard2/waveshare_demo/driver .
#cd /home/waveshare/cubieboard2/waveshare_demo/driver/io_control_dev
Modify the files permission:
#chmod 777 ./*
2. Modify the Makefile
#vi Makefile
Assign the KERNELDIR according to your actual kernel path.
3. Clear the old files
#make clean
4. Compile
#make
An error might occur while compiling:
io_control.c:1:23: fatal error: linux/init.h: No such file or directory
Shenzhen Waveshare Electronics Co., Ltd.
www.waveshare.com
19
compilation terminated.
make: *** [modules] Error 1
As shown in the picture below:
It is caused by the different kernel version, can be just omitted.
Copy the new generated io_control.ko file to your own system and load it.
Shenzhen Waveshare Electronics Co., Ltd.
www.waveshare.com
20


![Solaris LC40 [v04]](http://vs1.manualzilla.com/store/data/006347096_1-050cff7c0b4f91b9fb35d753454c0152-150x150.png)