1
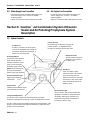
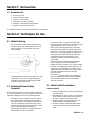
Cavitron™ JET Combination System Ultrasonic Scaler and Air Polishing Prophylaxis System Directions For Use Système combiné Cavitron™ JET Détartreur ultrasonique et système de prophylaxie par polissage à l’air Mode d’emploi Sistema combinado Cavitron™ JET Escarificador ultrasónico y unidad profiláctica de pulido neumático Instrucciones para el uso Please read carefully and completely before operating unit. Veuillez lire soigneusement et complètement avant d’utiliser le système. Por favor lea la totalidad de las instrucciones cuidadosamente antes de hacer funcionar la unidad. ENGLISH • 51 ENGLISH Cavitron™ JET Combination System Ultrasonic Scaler and Air Polishing Prophylaxis System Directions For Use Please read carefully and completely before operating unit. Introduction Cavitron™ JET Combination System Ultrasonic Scaler and Air Polishing Prophylaxis System DENTSPLY® Preventive Care is an ISO9001 and EN46000 certified company. The Cavitron™ JET Combination System is classified by Underwriters Laboratories Inc. with respect to electric shock, fire, mechanical hazards only in accordance UL 2601-1 and Can/CSA C22.2 NO. 601, assigned control # 13VA. The Cavitron™ JET dental prophylaxis system is a precision engineered and manufactured instrument. It contains controls and components for ultrasonic scaling and air polishing modes. The System operates by converting ordinary AC house current into high frequency current. The ultrasonic system consists of two parts: an insert, and the SPS (Sustained Performance System™) electronic system. The SPS™ system incorporates two closed loops. One provides automatic tuning (operating frequency is adjusted to be at resonance for each insert), the second loop automatically controls the tip stroke over different working conditions. The Cavitron™ JET Combination System produces 30,000 microscopically small strokes per second at the insert’s working tip. This combined with acoustic effects of the coolant water, produces a synergistic action that literally “powers away” the heaviest calculus deposits while providing exceptional operator and patient comfort. With the addition of the Air Polishing function, your Cavitron™ JET becomes a complete prophylaxis system. Mode selection is automatic when you place the Airpolishing insert nozzle or one of the interchangeable 30K™ ultrasonic inserts into the handpiece. Technical Support There are no serviceable parts in this device. Refer all service to a qualified service repair facility. For technical support and repair assistance in the U.S. call 1-800-347-7412 Monday through Friday, 8:00 AM to 5:00 PM (Eastern Time). For other areas, contact your local DENTSPLY representative. Supplies & Replacement Parts To order supplies or replacement parts for your Cavitron™ JET Combination System, contact your local DENTSPLY® Dealer. If your dealer is unable to assist you, call 1-800-989-8826 Monday through Friday, 8:00 AM to 5:00 PM (Eastern Time). For other areas, contact your local DENTSPLY® representative. Caution: U.S. Federal Law restricts this device to sale by or on the order of a dentist. ENGLISH • 1 Table of Contents Section Number 1 2 3 4 5 6 7 8 9 10 11 12 Section Title Description of Contents Page Number Indications ............................................................................................................................................................ 3 1.1 Ultrasonic procedures 1.2 Air Polishing procedures Contraindications and Warnings .......................................................................................................................... 3 2.1 Contraindications 2.2 Warnings Precautions ....................................................................................................................................................... 3-4 3.1 Precautions for All Systems 3.2 Precautions for Ultrasonic Prophylaxis Procedures 3.3 Precautions for Airpolishing Procedures Infection Control .................................................................................................................................................. 4 4.1 Infection Control Information Reference Card 4.2 General Infection Control Recommendations 4.3 Water Supply Recommendations Installation Instructions .................................................................................................................................... 4-6 5.1 General Information 5.2 Water Line Requirements 5.3 Air Line Requirements and Recommendations 5.4 Electrical Requirements 5.5 Unpacking the System 5.6 Power Cord/Power Connection 5.7 Foot Control Cable Assembly Connection 5.8 Incoming Water Supply Line Connection 5.9 Air Supply Line Connection Cavitron™ JET Combination System Ultrasonic Scaler and Air Polishing Prophylaxis System .......................... 6-8 6.1 System Controls 6.2 Handpiece 6.3 Cavitron® 30K™ Ultrasonic Inserts 6.4 Cavitron™ JET Air Polishing Insert Nozzle 6.5 Foot Control Information and Operation 6.6 Operation for Ultrasonic Prophylaxis Prodedures 6.7 Operation for Air Polishing Prodedures Accessories ............................................................................................................................................................ 9 7.1 Accessories List Techniques for Use ......................................................................................................................................... 9-12 8.1 General Information on Patient Positioning 8.2 Performing Ultrasonic Scaling Procedures 8.3 Patient Comfort Considerations 8.4 Air Polishing Powder Chamber 8.5 Air Polishing using the JetShield™ Accessory 8.6 Performing JET Air Polishing Procedures with JetShield™ 8.7 Performing Air Polishing Procedures without JetShield™ 8.8 Proper Angulation of the Air Polishing Insert without JetShield™ System Care .................................................................................................................................................. 13-14 9.1 Daily Maintenance —Start-Up Procedures, Between Patients, Shut-Down Procedures 9.2 Periodic Maintenance Troubleshooting ................................................................................................................................................ 14 10.1 Troubleshooting 10.2 Technical Support and Repairs Specifications ..................................................................................................................................................... 15 Classifications .................................................................................................................................................... 15 ENGLISH • 2 Section 1: Indications 1.1 Ultrasonic procedures • All general supra and subgingival scaling applications. • Periodontal debridement for all types of periodontal diseases. • For patients with a history of sensitivity to ultrasonics. • Endodontic procedures. 1.2 Air polishing procedures: • Removal of a variety of extrinsic stains, e.g., tobacco, coffee & tea, chlorhexidine. • Prophylaxis of orthodontic patients. • Preparing tooth surfaces prior to bonding and sealant procedures. Section 2: Contraindications and Warnings 2.1 Contraindications • Ultrasonic Systems should not be used for restorative dental procedures involving the condensation of amalgam. • For best performance, use only ultrasonic inserts manufactured by Dentsply® Preventive Care. • Use only Cavitron® Prophy-Jet® Cleaning Powder. 2.2 Warnings • Persons fitted with cardiac pacemakers have been cautioned that some types of electronic equipment might interfere with the operation of a pacemaker. Although no instance of pacemaker interference has ever been reported to DENTSPLY®, we recommend that the handpiece and cables be kept at least 6 to 9 inches (15 to 23 cm) away from any pacemaker and pacemaker leads during use. • Do not direct the air polishing stream at soft tissue or into the sulcus. Tissue emphysema has been reportedly caused when the air/water/powder stream was directed at the soft tissues or into the sulcus. Section 3: Precautions 3.1 Precautions for All Systems Ultrasonics • Do not place the System on or next to a radiator or other heat source. Excessive heat may damage the System’s electronics. Place the System where air is free to circulate on all sides and beneath it. • The System is portable, but must be handled with care when moving. • Equipment flushing and dental water supply system maintenance are strongly recommended. See Water Supply under Section 9: System Care. • Close the coolant water shut-off valve to the System every night before leaving the office. The use of an in-line water filter is recommended. Air Polishing • The use of an air dryer on the compressor line supplying the System will prevent condensation from forming in the air line which in turn may cause “caking” of the air polishing cleaning powder and clogging the lines at the air polishing tip. • Cavitron® Prophy-Jet® Cleaning Powder is a water-soluble sodium bicarbonate powder specially formulated for use in Cavitron® Air Polishing Systems. Do not attempt to use any other cleaning materials in the air polishing powder reservoir. • Empty the air polishing powder reservoir at the end of the day to prevent “caking” of the powder and clogging the lines and air polishing tip. 3.2 Precautions for Ultrasonic Prophylaxis Procedures • Like a toothbrush, ultrasonic inserts “wear out” with use. Inserts with just 2 mm of wear lose about 50% of their scaling efficiency. In general, it is recommended that ultrasonic inserts be discarded and replaced after 2 mm of wear to maintain optimal efficiency and avoid breakage. • If excessive wear is noted, or the insert has been bent, reshaped or otherwise damaged, discard the insert immediately. • Ultrasonic insert tips that have been bent, damaged, or reshaped are susceptible to in-use breakage and should be discarded and replaced immediately. • Retract the lips, cheeks and tongue to prevent contact with the insert tip whenever it is placed in the patient’s mouth. ENGLISH • 3 Section 3: Precautions cont'd • Avoid prolonged use on cementum or dentin. • Avoid prolonged use on polished metal surfaces as a matte finish may result. • Patients who are on a restricted sodium diet, or have severe respiratory illness, should consult their physician before undergoing air polishing prophylaxis procedures. • Patients wearing contact lenses should remove them prior to air polishing treatment. 3.3 Precautions for Air Polishing Procedures • Only set the air polishing powder flow control to the maximum position (H) when it is necessary to remove particularly difficult stains. Return the powder flow control to the medium position upon the completion of the procedure. • Avoid prolonged or excessive use on restorative dental materials. Section 4: Infection Control 4.1 Infection Control Information Reference Card • As with high speed handpieces, and other dental devices, the combination of water and ultrasonic vibration from your Cavitron™ JET Combination System will create aerosols. With proper technique, much of the Cavitron™ JET Combination System’s aerosol dispersion can be effectively controlled and minimized. Please carefully follow the procedural guidelines in this manual regarding the use of your System. • For maximal operator and patient safety, carefully follow the Infection Control Information procedures detailed on the reference card accompanying your System. For your convenience, an Infection Control Information reference card, printed on durable stock, has been included with your Cavitron™ JET Combination System. If your card is missing or misplaced, you can request a replacement in the U.S. by calling Customer Service at 1-800-989-8826 Monday through Friday, 8:00 AM to 5:00 PM (Eastern Time) For other areas, contact your local DENTSPLY representative. 4.2 General Infection Control Recommendations • As with all dental procedures, use standard personal protection equipment (i.e., wear face mask, eyewear or face shield, gloves and protective gown). 4.3 Water Supply Recommendations It is highly recommended that all dental water supply systems conform to applicable CDC (U.S. Centers for Disease Control and Prevention) and ADA (American Dental Association) standards, and that all recommendations be followed in terms of flushing, chemical flushing, and general infection control procedures. See sections 4.2 and 9. Section 5: Installation Instructions 5.1 General Information If the installation of your Cavitron™ JET Combination System is performed by someone other than trained DENTSPLY® Dealer personnel, care should be taken to observe the following requirements and recommendations. 5.2 Water Line Requirements • The System’s water supply line is factory installed. Do not disconnect from the System. • Incoming water supply line pressure to the System must be 25 psi (172 kPa) to 60 psi (414kPa). If your dental water system’s supply line pressure is above 60 psi (414 kPa), install a water pressure regulator on the supply line to your Cavitron™ JET Combination System. ENGLISH • 4 • A manual shut-off valve on the dental water system supply line should be used so that the water can be completely shut-off when the office is unoccupied. • A filter in the dental water system supply line is recommended so that any particulates in the water supply will be trapped before reaching the System. • After the above installations are completed on the dental water supply system, the dental office water line should be thoroughly flushed prior to connection to the System. Section 5: Installation Instructions cont'd 5.6 Power Cord/Power Connection 5.3 Air Line Requirements & Recommendations ™ • An air supply line is factory installed on Cavitron JET Combination System. Do not disconnect it. • Incoming air supply line pressure to the System must be 65 psig (448kPa) to 100 psig (690kPa). If your office air line pressure is above 100 psig (690kPa), install an air pressure regulator on the supply line to your Cavitron™ JET Combination System. • A manual shut-off valve on the office air supply line should be used so that the air line can be completely shut-off, and the line pressure relieved when the office is unoccupied. • Your System must be supplied with clean, dry air. To help prevent water condensation from forming in the air supply line which may cause the system to malfunction, it is strongly recommended that an air dryer be used on the compressor line supplying the System. • Verify the Power Control ON/OFF rocker switch located at the left front underside of the System is set to the OFF position before proceeding. • Plug the detachable AC cord into the back of the System. • Plug the 3 prong grounded plug into an approved outlet. ON/OFF rocker switch 5.4 Electrical Requirements Refer to Section 11: Specifications. 5.5 Unpacking the System Carefully unpack your Cavitron™ JET Combination System and verify that all components and accessories are included: 1. Cavitron™ JET Combination System with water supply line, air supply line, handpiece and cable connector assembly factory installed. 2. Air filter assembly. 3. Detachable AC Power Cord set. 4. Cavitron™ JET Insert Nozzle with cleaning tool. 5. Dual position Foot Control Assembly. 6. Cavitron® Ultrasonic Inserts (quantity optional). 7. Efficiency Indicator for Cavitron® Inserts. 8. JetShield™ Aerosol Reduction Device. 9. Literature Packet. 5.7 Foot Control Cable Assembly Connection Align the Foot Control plug with the receptacle on the back of the System and push it in until firmly seated. ENGLISH • 5 Section 5: Installation Instructions cont'd 5.8 Water Supply Line Connection 5.9 Air Supply Line Connection • Connect the free end of the system’s air supply line to office air supply line or a Cavitron™ DualSelect™ dispensing System. • Inspect all connections to make certain there are no leaks. • Connect the free end of the system’s water supply line to office water supply line or a Cavitron® DualSelect™ Dispensing System. • Inspect all connections to make certain there are no leaks. Section 6: Cavitron™ Jet Combination System Ultrasonic Scaler and Air Polishing Prophylaxis System Description 6.1 System Controls Top Grooves Provide a convenient, temporary placement for the handpiece during treatment procedures. Always place handpiece in holder when not being used. Powder Fill Cap Removable cap for filling and emptying the powder chamber. An adjustable pointer increases or decreases powder flow rates. Power Adjustment Turn knob to select ultrasonic power level for operation: clockwise increases system power, counter clockwise decreases system power. NOTE: For Air Polishing, set the power level between medium (mid) and maximum. AC Power Indicator Light Lighted when System is switched ON. Power Control ON/OFF switch located at the left front underside of the System. Lavage Flow Adjustment Turn knob to select Lavage Flow level during System operation. Clockwise increases flow at insert tip, counter clockwise decreases flow. The rate of flow through the Handpiece determines the temperature of the lavage. Low flow rates produce warmer temperatures, higher flow rates produce cooler temperatures. ENGLISH • 6 Handpiece Holder Securely holds the System's Handpiece when system is not being used. Handpiece Holds all Cavitron® 30K™ Ultrasonic Inserts and transmits power and lavage from the System to the insert. It also holds the Cavitron™ JET insert nozzle which automatically selects air polishing mode. Boost Indicator Light The two-position Foot Control provides the capability to increase the front panel Power dial setting. When lighted, indicates Foot Control is fully depressed, and System is functioning in "Boost" mode. Section 6: Cavitron™-Jet Combination System Ultrasonic Scaler and Air Polishing Prophylaxis System cont'd 6.2 Handpiece The handpiece accepts all Cavitron® 30K™ Ultrasonic Inserts and the JET air polishing insert nozzle. The open end of the handpiece accepts all Cavitron® 30K™ inserts. Handpiece Powder Flow Window Air Polishing Powder Delivery Port Cable Insert Port 6.3 Cavitron® 30K™ Ultrasonic Inserts The many styles of Cavitron® 30K™ Ultrasonic Inserts are easily interchangeable for various procedures and applications. See enclosed booklet for specific information. O-Ring Provides seal for handpiece coolant. Insert Tip Shape and size of tip determines access and adaptation. Preheated Lavage directed to tip. Connecting Body Transfers and amplifies mechanical motion of stack to insert tip. Finger Grip Magnetostrictive Stack Converts energy provided by the handpiece into mechanical oscillations used to activate the insert tip. Insert Marking Manufacturer, Date (YYMM), Frequency, Type. E.g. DENTSPLY 9608 30K FSI-SLI-10S Hold the handpiece in an upright position. Activate to bleed any air bubbles that might be trapped inside the handpiece. Lubricate the rubber O-ring on the insert with water before placing it into the handpiece. Fully seat insert with a gentle push-twist motion. DO NOT FORCE. 6.4 Cavitron™ JET Air Polishing Insert nozzle The Air Polishing Insert Nozzle automatically selects the JET mode when placed in handpiece. Air Polishing Insert Tip: Tube-in-a-tube design deliveres precise air/water/powder mixture at point of delivery. Cleaning Powder Delivery Tube: Directs air/powder flow to insert tip. Insert Heater Rod: Heats the delivered water for patient comfort. O-Ring: Seals water when Insert Nozzle is fully seated in Handpiece. Lubricate the rubber O-ring on the insert with water before placing it into the handpiece. Place the heater rod into the insert port of the handpiece. Align the powder delivery tube with the powder delivery port and gently push into handpiece until fully seated. ENGLISH • 7 Section 6: Cavitron™-Jet Combination System Ultrasonic Scaler and Air Polishing Prophylaxis System cont'd 6.5 Foot Control Information & Operation The Foot Control is a two-position momentary switch, which activates both ultrasonic energy and Lavage Flow at the insert tip. 6.6 Operation for Ultrasonic Prophylaxis Procedures Foot control released. No ultrasonic energy or lavage flow. Foot control depressed half way. Ultrasonics and lavage flow are activated Foot control depressed all the way. Boost function is activated. 6.7 Operation for Air Polishing Procedures Foot control released. Foot control depressed half way. Foot control depressed all the way. Bleed air exits insert nozzle tip. Lavage flow (rinsing function) is activated. Air Polishing Function is activated. ENGLISH • 8 Section 7: Accessories 7.1 Accessories List* 1. 2. 3. 4. 5. 6. AC Power Cord Set Cavitron® Ultrasonic Inserts Cavitron™ Jet Insert Nozzle Dual position Foot Switch Assembly DualSelect™ Medicament Dispensing System JetShield™ Aerosol Reduction Device *For detailed information, contact your local DENTSPLY® Representative. Section 8: Techniques for Use 8.1 Patient Positioning • For optimal access to both the upper and lower arches, the backrest of the chair should be adjusted as for other dental procedures. This assures patient comfort and clinician visibility. • Have the patient turn their head to the right or left. Also position their chin up or down depending upon the quadrant and surface being treated. Evacuate irrigant using either a saliva ejector or HVE. 8.2 Performing Ultrasonic Scaling Procedures NOTE: Refer to the Infection Control Information card (Form no. 80722) supplied with your Unit for general procedures to be followed at the beginning of each day and between patients. • The edges of Cavitron® Ultrasonic Inserts are intentionally rounded so there is little danger of tissue laceration with proper ultrasonic scaling technique. Whenever the insert tip is placed within the patient’s mouth, the lips, cheek and tongue should be retracted to prevent accidental prolonged contact with the activated tip. • Hold the empty Handpiece in an upright position and activate the Foot Control until fluid exits. • Lubricate the rubber O-ring on the insert with water before placing it into the handpiece. Fully seat insert with a gentle push-twist motion. DO NOT FORCE. • Set the Unit’s Power Adjustment knob to the lowest power setting for the application and the selected insert. • Activate the Foot Control and hold the Handpiece over a sink or drain. Check spray temperature to verify fluid is reaching the working end of the insert tip. Adjust the Lavage flow knob to ensure adequate flow for the selected Power setting. Greater flow settings provide cooler irrigant. • It may be necessary to adjust lavage with the System in “Boost” mode (Foot Control fully depressed) so adequate fluid will be available to cool tip, tooth interface. • In general, it is suggested that a “feather-light-touch” be used both supra- and subgingivally. The motion of the activated tip and acoustic effects in the irrigating fluid, in most cases, is adequate to remove even the most tenacious calculus. • Use Cavitron® efficiency indicator if an insert seems to require increased finger pressure to function adequately. • The use of a saliva ejector or HVE is recommended during all procedures. 8.3 Patient Comfort Considerations Reasons for sensitivity 1. Incorrect tip placement. Point should be directed away from root surfaces. 2. Not keeping tip in motion on tooth. Do not allow the insert to remain in a static position on any one area of the tooth. Change the insert’s path of motion. 3. Applying pressure. Use extremely light grasp and pressure, especially on exposed cementum. 4. If sensitivity persists, decrease power setting and/or move from the sensitive tooth to another and then return. ENGLISH • 9 Section 8: Techniques for Use cont'd 8.4 Air Polishing Powder Chamber • Use only Cavitron® Prophy-Jet® Cleaning Powder in your Cavitron™ Jet Combination System. Any other substances or additives may clog the Unit and will void the warranty. For your convenience, the cleaning powder is supplied in sealed packets. Keep packets dry and stored in a location that does not exceed 95o F. • A special container is provided with your System for powder filling and storage. The opening in the container’s fill cap permits easy filling of the powder chamber. An additional cap without a hole is provided for storage. • It is strongly recommended that the Powder Chamber be emptied at the end of each day. This will reduce moisture absorption and minimize clogging. To fill, or refill, the powder chamber: • Turn the Unit OFF. • Unscrew the Powder Fill Cap. • Transfer the powder from the packet into the fill container and screw on fill cap. • Place finger over hole and shake the powder container vigorously to break up any lumps that may have formed from settling. Carefully pour powder into the chamber until the level reaches the top of the center tube. • Replace the Chamber Powder Fill Cap and tighten. • Turn the Unit ON. To adjust the flow of powder: • Adjust the powder flow rate by positioning the control at H(12 O’clock), M(9 O’clock), or L(6 O’clock). • For heavy stain removal set the control on “H.” • For light stain removal set the control on “L.” • The control can be set at any position between “H” and “L”. • The view window at the center of the pointer lets you observe the powder flow (small white circle of powder) during operation. If no flow is seen, check for clogging or add cleaning powder. 8.5 Air Polishing using the JetShield™ Accessory Aerosol reduction device for use with air polishing systems. JetShield™ assembly and accessories – see Fig. 1. The disposable JetShield™ assembly is designed for single use; all other components are reusable and are compatible with standard clinic equipment. .ECKHA A. Ejector tube B. JetShield™ assembly NOTE: Use only Cavitron® Prophy-Jet® Cleaning Powder in the unit. Prophy-Jet® Cleaning Powder should be kept dry and stored in a location that does not exceed 95° F. F. Connector E. Ejector tube clip C. Connector D. Handpiece clip Precautions: The JetShield™ itself is designed for single use only. Use of chemical or heat sterilization will lead to poor performance and malfunction of product. ENGLISH • 10 Section 8: Techniques for Use cont'd The reusable components are wipe-disinfectable, using clean cloths and appropriate non-immersion type disinfectant. Wipe once with disinfectant to remove bioburden, then use fresh cloth and more disinfectant to clean surface. Dry with clean paper towel or air. After completion of each procedure, remove JetShield™ assembly and dispose of JetShield™ according to applicable regulations. Wipe-disinfect all other components before next use. .ECKHA ! Step-by-Step Instructions: 1) Remove entire assembly from package. 2) Insert air polishing nozzle through JetShield™ cup and seat shoulder flush on nozzle. See Figure 2. 3) Insert connector on JetShield™ assembly into the flexible ejector tube. 4) Insert connector of ejector tube into operator saliva ejector. 8.6 Performing JET Air Polishing Procedures with JetShield™ .ECKHA NOTE: Refer to the Infection Control Card supplied with your System for general procedures to be followed at the beginning of each day and between patients. 1. Insert air polishing nozzle 2. Seat shoulder flush on nozzle 3. Incorrect positioning 5) Place ejector tube clip around ejector tube and handpiece cable such that cables drape together for patient and clinician comfort. • Install JetShield™ on Cavitron Air Polishing Nozzle as indicated on instructions provided. • Select the appropriate amount of powder using the dial on the Cavitron™ JET or PROPHY-JET® 30 air polishing system. • Verify that slurry exits from the cup when held outside the mouth; adjust saliva ejector as necessary. • Divide the tooth visually into segments to polish (incisal, middle, and gingival). • Apply cup to middle third with light pressure so cup flares slightly. • Pivot nozzle inside the cup to adapt to incisal, gingival, mesial and distal surfaces. • Apply two seconds of spray for each segment of the tooth, releasing the Foot Control each time. If spray escapes, readjust cup to maintain flat contact with tooth surface. Adjust angle by pivoting nozzle inside the JetShield™ cup. • The suction from the JetShield™ can be used to remove excess saliva from the patient's mouth. • After completing each procedure, dispose of clear JetShield™ assembly according to Federal, State, and local regulations. Properly disinfect all other JetShield™ accessories prior to reusing them on future patients. 6) (Optional) Place handpiece clip along handpiece, close to handpiece/cable connection, such that clip is holding the JetShield™ evacuation tube in place along handpiece. 7) Verify that slurry exits from the JetShield™ when air polishing unit is activated. Adjust saliva ejector as necessary. 8) Proceed with routine air polishing, applying cup to tooth so cup flares slightly. Pivot nozzle inside cup, adapting to mesial and distal surfaces. Apply 2 seconds of spray for each segment of tooth, releasing foot control each time. If spray escapes, readjust cup to maintain flat contact with tooth surface, adjusting angle by pivoting nozzle inside of handpiece. ENGLISH • 11 Section 8: Techniques for Use cont'd 8.7 Performing Air Polishing procedures without JetShield™ • The recommended normal procedure is to clean 2-3 teeth with the air polishing spray (foot control depressed to the second position) and then rinse the area with water only (foot control depressed to the first position) to inspect the work site before proceeding to the next 2-3 teeth. If desired, the bleed air (foot control released) passing through the air polishing insert tip can be used to dry the work site during inspection. • Flushing the patient's tongue with water only (foot control depressed to the first position) helps reduce the saline taste) • Maintain a 3 to 4mm insert tip-to-tooth operating distance. • In the posterior regions, use the cheek to help contain aerosol spray. • The patient's lip should be held between the thumb and index finger of your free hand and pulled out and up, or down, to form a "cup". Do not retract the lips. • Tilt the patient's head toward you to help prevent puddling in the cupped lip and minimize aerosol dispersion. • Use a saliva ejector or HVE. • When air polishing the facial surfaces of the anteriors, center the spray on the middle third of the tooth and use a constant circular motion. The edge of the spray will clean the teeth to the gingiva. • Do not aim directly at the soft tissue. • Avoid prolonged use on polished metal surfaces as a matte finish may result. • In the upper anterior region, use the upper lip and your hand as a shield to help contain the aerosol spray. 8.8 Proper Angulation of the Air Polishing Insert without JetShield™ Recommended angulation on the anterior teeth is 60° with the tip aimed at the middle third of the tooth surface. ENGLISH • 12 Recommended angulation on the buccal and lingual surfaces of posterior teeth is 80° with the tip aimed slightly distally. Recommended angulation to occlusal surfaces is 90°. Section 9: System Care 9.1 Daily Maintenance Start-Up Procedures at the beginning of the day: 1. Open the manual shut-off valve on the dental water supply system. 2. With the system OFF, unscrew the powder chamber cap. Verify the powder bowl is empty. Turn the Unit ON for 15 seconds to eliminate residual powder or moisture in the lines. Turn the system OFF. 3. Shake the powder in the storage jar to create an even consistency of powder mixture. 4. Pour the powder into the chamber until it reaches the top of the center tube. 5. Secure the lid on the powder chamber. 6. Turn the system ON. Hold the Handpiece (without an insert installed) over a sink or drain, activate the Foot Control, and flush the water line at maximum water flow for at least 2 minutes. 7. Place a sterilized Cavitron® Ultrasonic Insert or Cavitron™ JET Insert Nozzle into the Handpiece and adjust the Power and Lavage Flow as required. For the JET mode, the powder flow can be adjusted. Between Patients: 1. Remove Cavitron Ultrasonic Insert or Cavitron™ JET Insert Nozzle (clean using the wire cleaning tool). Sterilize. 2. Set Water Control to highest setting. Activate the System and flush at least 30 seconds. 3. Turn the System OFF. 4. Clean and disinfect the surfaces of the cabinet, Power Cord, Handpiece Connector and cable assembly, Foot Control and cable assembly by applying an approved non-immersion type disinfectant solution* carefully following the instructions provided by the disinfectant solution manufacturer. To clean system, generously spray disinfectant solution on a clean towel and wipe all surfaces. Discard used towel. To disinfect system, generously spray disinfectant on a clean towel and wipe all surfaces. Allow disinfectant solution to air dry. 5. If using a closed water supply, check for adequate fluid volumes for next patient’s scheduled treatment. Shut-Down Procedures at the end of the day: 1. Turn the Unit OFF. 2. Remove Cavitron® Ultrasonic Insert or Cavitron™ JET Insert Nozzle (clean using the wire cleaning tool). Sterilize. 3. Unscrew the powder chamber cap. 4. Remove the powder chamber from the cabinet. Pour the powder into the powder storage jar and secure the lid. 5. Hold the open end of the powder chamber away from you. Activate the System for 15 seconds to clear the powder chamber. A high volume evacuator can be used to remove any residual powder. 6. Secure the lid on the powder chamber. 7. Clean and disinfect the surfaces of the cabinet, Power Cord, Handpiece Connector and cable assembly, Foot Control and cable assembly by applying an approved non-immersion type disinfectant solution* carefully following the instructions provided by the disinfectant solution manufacturer. To clean system, generously spray disinfectant solution on a clean towel and wipe all surfaces. Discard used towel. To disinfect system, generously spray disinfectant on a clean towel and wipe all surfaces. Allow disinfectant solution to air dry. *NOTE: Water-based disinfection solutions are preferred. Some alcohol-based disinfectant solutions may be harmful and may discolor plastic materials. If the System is connected to a DualSelect™ Medicament Dispensing System follow the recommended procedures listed in the DualSelect™ manual. If powder fluffing is observed when Foot Control is not in use, this would indicate an air leak. To correct, turn the Unit OFF, remove the Fill Cap, clean any residual powder from the O-ring seal and threads, replace the Fill Cap, tighten, and turn the Unit back ON. 9.2 Periodic Maintenance • The two repairable filters should be disassembled and inspected every 90 days. Repairable Filters: Filter Duckbill "O" Ring ENGLISH • 13 Section 9: System Care cont'd • Turn System OFF. • Remove the Powder Chamber. • Remove filter from holder and remove the tubing from one end of the filter. • Disassemble the filter as shown. • Inspect the filter element. Replace if necessary. • Reassemble the filter and reconnect the tubing and replace filter in holder. • Inspect second filter in a similar manner. • Replace the Powder Chamber. • Turn the System ON. View Window Pointer Dump/Pressure Line Fill Cap Air-Powder Flow Filter (depressurizing System) Powder Bowl Air Inlet NOTE: Never operate the System without all filters in place. Air Supply Nozzle Section 10: Troubleshooting Although service and repair of the Cavitron™ JET Combination System should be performed by DENTSPLY® personnel, the following are some basic trouble shooting procedures that will help avoid unnecessary service calls. Generally, check all lines and connections to and from the System, a loose plug or connection will often create problems. Check the settings on the System’s knobs. 10.1 Troubleshooting Guide System will not operate: (Power Indicator Light is not lighted) 1. Check that the Power switch is in the ON position, and that detachable Power Cord is fully seated in the receptacle on back of System. 2. Check that the System’s three-prong plug is fully seated in an appropriate AC receptacle, and that AC current is present. (Power Indicator Light is lighted) 1. Check that the Foot Control Connector is fully seated in the Foot Control Receptacle on the back of the System. System operates: (No lavage flow at insert tip) 1. Assure that Lavage control is properly adjusted. 2. Check that irrigant supply control valve/s (dental office water supply) are open. 3. If connected to DualSelect™ Dispensing System, check that fluid level in the selected bottle is sufficient. Make sure valves are open when using external water source. ENGLISH • 14 (JET Insert Nozzle blocks repeatedly) 1. Powder is moisture contaminated (lumpy). Discard powder. 2. Air filter is contaminated. Clean or replace filter. (No bleed air) 1. Blocked JET nozzle. Clean JET Nozzle using supplied tool. 2. Blocked filter. Clean or replace filter. (No or poor cleaning action) 1. Very low powder level or empty Powder chamber. Fill Powder Chamber. 2. Blocked JET Nozzle. Clean JET Nozzle using supplied tool. 3. Fill Cap is loose. Tighten powder fill cap, and turn System ON. (Continuous powder agitation) Fill cap not securely sealed. Shut System OFF. Remove the O-ring seal from the fill cap and clean residual powder from the cap. Be careful not to scratch or otherwise damage the plastic cap. Wipe off the O-ring and place it in the fill cap and turn System ON. 10.2 Technical Support and Repairs For technical support and assistance call 1-800-347-7412 Monday through Friday, 8:00 AM to 5:00 PM (Eastern Time). For other areas, contact your local DENTSPLY® representative. Section 11: Specifications Cavitron JET Combination System: 100/115 VAC Systems Electrical Voltage Current Frequency Water Pressure Air Pressure Flow Rate Weight Dimensions 100V Gen 120J 115V Gen 120 .9/.8 amps @ 100v/115v 50/60 Hertz 25-60 psig 65-100 psig Minimum setting (CCW) 0-15 ml/min Maximum setting (CW) >55 ml/min 12 lb. Height: 4 in. Width: 7 3/8 in. Depth: 9 ½ in. Handpiece Cable: 81 in. Foot Control Cable: 96 in. Power Cord: 84 in. Water Supply Line: 96 in. Air Supply Line: 98 in. SYSTEM ON/OFF TYPE B EQUIPMENT Cavitron JET Combination System: 200/230 VAC Systems Electrical Voltage Current Frequency Water Pressure Air Pressure Flow Rate Weight Dimensions 200V Gen 120D 230V Gen 120U .5/.4 amps @ 200v/230v 50/60 Hertz 172 - 414 kPa 448-690 kPa Minimum setting (CCW) 0-15 ml/min Maximum setting (CW) >55 ml/min 5,4 kg Height: 10,2 cm Width: 18,7 cm Depth: 24,1 cm Handpiece Cable: 2,0 m Foot Control Cable: 2,4 m Power Cord: 2,1 m Water Supply Line: 2,4 m Air Supply Line: 2,5 m Footswitch FOOTSWITCH Not for operating theatres Protection Class 1PX0 Operating Environment Temperature: Relative Humidity: 15 to 40 Deg. Celsius 30% to 75% (non-condensing) Transport and Storage Conditions Temperature: Relative Humidity: Atmospheric Pressure: 0 to 70 Deg. Celsius 10% to 95% (non-condensing) 500 to 1060 hPa Section 12: Classification Type of protection against electric shock: Class 1 Degree of protection against electric shock: Type B Degree of protection against the harmful ingress of water: Ordinary Mode of operation: Continuous Degree of safety of application in the presence of a flammable anaesthetic mixture with air or with oxygen or nitrous oxide: Equipment not suitable for use in the presence of flammable anesthetics or oxygen. ENGLISH • 15 Worldwide Service Centers Centres de service après-vente mondiaux Centros de servicio mundiales U. S. A. DENTSPLY® Preventive Care Technical Service and Repair Department 1301 Smile Way York, PA 17404 Phone: (800) 347-7412 Deutschland France Australia DENTSPLY® DeTrey GmbH De-Trey-Strasse 1 D-78467 Konstanz Germany Phone: 7531 583 0 DENTSPLY DeTrey 17 Michael FARADAY 78380 Montigny Le Bretonneux France Phone: (1) 30 14 77 77 DENTSPLY® (Australia) Pty. Ltd. 204-206 Gipps Street Abbotsford, Victoria 3067 Australia Phone: (3) 9417 1666 (3) 9417 1777 United Kingdom Italia Canada ® DENTSPLY Ltd. Hamm Moor Lane Addlestone, Weybridge Surrey KT15 2SE England Phone: (0) 1932 853422 ® ® DENTSPLY DeTrey Italia s.r.l. Via A. Cavaglieri, 26 I-00173 Roma Italia Phone: (06) 723 3626 DENTSPLY® Canada 161 Vinyl Court Woodbridge, Ontario L4L 4A3 Canada Phone: (905) 851-6060 Swiss Representative DENTSPLY® DeTrey GmbH, Konstanz Zweigniederlassung Baar Oberdorfstrasse 11 CH-6342 Baar Printed in U.S.A. Form #80684 Rev. C 11/98 Manufactured by DENTSPLY® Preventive Care DENTSPLY® International 1301 Smile Way York, PA 17404 ENGLISH • 50 Authorized EU Representative DENTSPLY® DeTrey GmbH D-78467 Konstanz, Germany Distributed by DENTSPLY® Canada Woodbridge, Ontario L4L 4A3