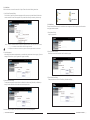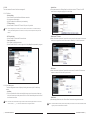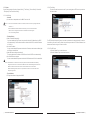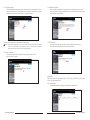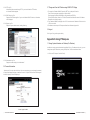
1
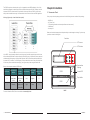
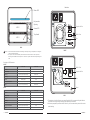
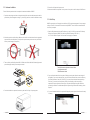
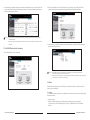
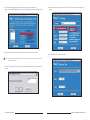
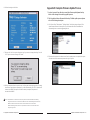
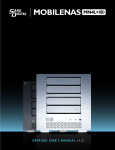
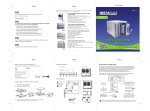
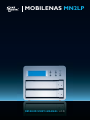
MOBILENAS MN2LP
DETAILED USER'S MANUAL v1.0
Introduction
About this User Manual
Thank you for using the product of Sans Digital Technology Inc..
This user manual will introduce the Sans Digital MN2LP products. It is recommended that you read this
manual carefully before using the MN2LP product. Although the information has been verified before
published, specifications are subject to change without prior notice. Please refer to www.sansdigital.
com or contact your sales representative for any product specification or update of related information.
If you have any questions on Sans Digital products or need the latest product information, user manual
or firmware, please contact us at [email protected] and we will get back to you as soon as
possible.
NOTE: Sans Digital only provides technical support and service to Sans Digital direct customers. For
end users or non-direct customers, please contact your distributor for prompt and better responses. If
your product is not purchased directly from Sans Digital, please do not contact us directly since you may
not get any reply.
All the product information in this manual is the property of Sans Digital, All rights reserved
Contents
Chapter 1 RAID Introduction...................................................................... 5
1.1
1.2
1.3
Chapter 2
2.1
2.2
2.3
Chapter 3
3.1
3.2
3.3
3.4
3.4.1
3.4.2
3.4.3
3.4.4
3.5
3.5.1
3.5.1.1
3.5.1.2
3.5.2
3.5.2.1
3.5.2.2
3.5.3
3.5.3.1
3.5.3.2
3.5.3.3
3.5.3.4
3.5.3.5
3.5.3.6
3.5.4
3.5.4.1
3.5.4.2
3.5.5
3.5.5.1
3.5.5.2
What is RAID?................................................................................ 5
RAID Functions............................................................................... 5
RAID 0 vs. RAID 1.......................................................................... 5
Installation................................................................................... 7
Accessories Check......................................................................... 7
Hardware Installation...................................................................... 10
Initial Setup..................................................................................... 11
User Interface Introduction..................................................... 13
User Interface Architecture............................................................. 13
Login............................................................................................... 14
Set RAID Directly without Formatting............................................. 16
Basic............................................................................................... 17
Wizard............................................................................................ 17
Add User......................................................................................... 20
Add Group...................................................................................... 21
Add Share...................................................................................... 22
Control Panel.................................................................................. 23
Users and Groups........................................................................... 23
User Management.......................................................................... 23
Group Management........................................................................ 23
File.................................................................................................. 24
File Server....................................................................................... 24
Share Management........................................................................ 24
System............................................................................................ 26
LAN Setting..................................................................................... 26
Time Setting................................................................................... 27
Turn Off Server............................................................................... 27
Information...................................................................................... 28
Disk Usage..................................................................................... 28
Error Notification Setting................................................................. 29
Network Service.............................................................................. 30
DHCP Server.................................................................................. 30
Bonjour............................................................................................ 30
Maintenance................................................................................... 30
Disk Utility....................................................................................... 30
RAID Setting................................................................................... 31
3.5.5.3
3.5.5.4
3.5.5.5
3.5.5.6
3.5.6
3.5.6.1
3.5.6.2
3.5.6.3
3.5.6.4
3.5.6.5
3.6
3.7
Firmware Upgrade.......................................................................... 32
Save Configuration......................................................................... 32
Restore Configuration..................................................................... 33
Factory Reset.................................................................................. 33
Log File........................................................................................... 33
Samba Log File............................................................................... 33
FTP Log File.................................................................................... 34
DHCP Server Log File..................................................................... 34
System Log File.............................................................................. 34
Administrator Log File..................................................................... 34
Personal Information....................................................................... 34
Operation Methods for Change and Search of the IP Address
of MN2LP........................................................................................ 35
3.8
Logout............................................................................................. 35
Appendix A Use Method of IP Setup.exe............................................................. 35
Appendix B Complete Firmware Update Process................................................ 39
Appendix C Introduction of LCD Display Items.................................................... 41
Chapter 1 RAID Introduction
1.1 What is RAID?
RAID (redundant array of independent disks or redundant array of inexpensive disks)
Whenever and wherever we are, we store our data in a hard drive. Abnormally access, slower speed
and unresponsiveness are all expected when an accident occurs or the hard disk reaches its service
life because a hard disk is widely used. By then, all data stored within may be destroyed and become
permanently irretrievable. RAID technology spares you from the threats of losing your data again!
RAID (redundant array of independent disks or redundant array of inexpensive disks) allows you to
store your data into multiple drives by dividing them up into segments. It provides data redundancy and
creates a fault-tolerant environment for data storage. With multiple drives used (at least 2) in a RAID, it
increases storage capacity as well as enhances the speed of data transfer. Be equipped with it and you
will never have to worry about the integrity of your data again because your data will be 100% protected.
1.2 RAID Functions
‧
‧
‧
‧
‧
‧
‧
‧
Expanding storage capacity
Increasing data transfer speed
Saving cost
Inherent Fault Tolerance
Hot Swap Capability
Auto-Rebuild of Data
Hot Spare Drive
On-line Capacity Expansion
1.3 RAID 0 vs. RAID 1
MN2LP provides RAID 0 and RAID 1 functions described as follows:
Striping (fast, has no fault tolerance; requires at least two hard disks)
RAID Introduction
5
The RAID 0 array does not backup data, so it is not regarded as a real RAID application. If one of the
hard disks is damaged, the entire array will fail, and all data in the array will be lost. Therefore, the fault
tolerance of RAID 0 is lower than that of any hard disk in the array. However, RAID 0 is still the term
widely used to describe these arrays. It is because that its basic idea is similar to real RAID application.
Chapter 2 Installation
Mirroring (High security; at least 2 hard disks required)
After you open the outer package, make sure that the following items are contained in the package:
2.1 Accessories Check
‧ MN2LP unit
‧ AC Power Cord
‧ CD (including information such as setup software and user manual)
‧ User Manual
‧ Accessory Kit
Make sure the related accessories and the product body are not damaged or missing. If you have any
questions, contact the Sans Digital.
Front View
LCD screen
LCD buttons
In the RAID 1 array (commonly referred to as mirroring array), hard disks are paired up; each of the two
disks contains identical data. As data is written into the mirroring array, it will be written at once and read
simultaneously. Mirroring array is highly reliable. Because it will not fail until the paired hard disks fail at
the same time. For instance, in a mirroring array of five-pair hard disks, even as many as five hard disks
fail, the array still can maintain the data integrity --as long as each pair has one good hard disk left.
Basic Operation
Method
Hard Disk
Available
Capacity
Data Reliability
0
Striping data
across each
drive
Total capacity
of all the hard
disks
Low
Mirroring
Half of total
capacity of all
the hard disks
High
1
Minimum
Data Transfer
Number of Hard
Speed
Disks
Highest
RAID Introduction
ENT
MUTE
HDD 0
Access LED
Tray Handle
2
HDD 1
For more information of RAID, refer to our website at www.sansdigital.com.
6
ALARM
Key Insertion
Opening
Below is the comparison between 2 RAID levels:
RAID Level
ESC
Lower
2
MN2LP
Installation
7
Rear View
Status LED
Key Insertion
Opening
HDD 0
Gigabit LAN Port
Access LED
Tray Handle
USB2.0 Port
HDD 1
Fan
MN2L
Notice : 1. If the hard disks are inserted and the formatting or disk array setting is completed, do not change the
position of the disks arbitrarily.
2. To replace or remove the hard disks, please shut down the machine and turn off the power first.
Removing the hard disks while the power is on will result in system malfunction and may damage the
data.
MN2LP
Description of LED Indicators
MN2LP
Alarm LED
Access LED
Power On
Lights on blue permanently
Blinks blue
System Ready
Lights on blue permanently
N/A
RAID Fail
Lights on purple permanently
Blinks red
Rebuilding
Blinks blue
Blinks between blue and purple
Blinks purple
N/A
Fan Fail
Over High Temperature
Access
Lights on purple permanently
N/A
Lights on blue permanently
Blinks blue
Status LED
Access LED
USB2.0 Port
Gigabit LAN Port
Fan
Reset
MN2L
Blinks blue
Blinks blue
System Ready
Lights on blue permanently
N/A
RAID Fail
Lights on blue permanently
Blinks red
Rebuilding
Blinks between blue and purple
Blinks between blue and purple
Fan Fail
Blinks between blue and purple
N/A
Power On
Over High Temperature
Access
8
Installation
Lights on purple permanently
N/A
Lights on blue permanently
Blinks blue
MN2L
1. The indicator on the left will light on green when Gigabit LAN Port is connected to Gigabit LAN and
the indicator on the right will light on orange when Host Access is enabled.
2. With startup completed, press and hold the “Reset” key for 5 seconds and the system will be reset to
default settings.
Installation
9
2.2. Hardware Installation
5. Connect the LAN port and the power cord.
6. Hardware installation is completed. You can power on the system to start the setup via Web Brower.
Please follow the procedure below to complete the hardware installation of MN2LP:
1. Open the outer package and take out the product body. (Make sure the related accessories and the
product body are not damaged or missing. If you have any questions, contact the distributor or sales)
2.3. Initial Setup
MN2LP supports the use of the graphic user interface (GUI) for system management. You can manage
settings via the GUI. It takes about 2 minutes to boot up MN2LP. The unit will be be accessible before
the boot up is complete.
1. Open the Web browser and enter the IP address, e.g. http://10.1.2.200 (your own host IP address).
Change the IP address of MN2LP first (the factory default IP address is 192.168.1.1)
to 10.1.2.XXX. Refer to Chapter 3 for more detail on changing the IP address.
2. Mount the product to a stable surface. Make sure that the fan is not blocked and there is appropriate
space around for heat dissipation. (Do not place the product nearby water area or any environment
that may cause damage to the product)
3. Take out the tray and install your hard disk in it. Make sure to fasten the hard disk securing screws to
prevent damages caused by unnecessary movement.
The default account and password are as follows:
Login Username: admin
Default Password: admin
2. If you use formatted hard disks, the system will display current system information and setting will
be available. If you use two new hard disks, you need to format the hard disks or create a disk array
first. Enter “Maintenance” and click “Disk Utility” if you want to format the hard disks separately or
“Disk Array” if you want to set the disk array directly. Once formatting or disk array setting is
completed, the system will restart. After re-logon, the system will display the system information
and setting is available. For detailed descriptions of system setting and hard disk formatting, refer to
Chapter 3.
4. Once the installation is completed, insert the tray back and fix it firmly in the proper place.
10
Installation
※ If you use formatted hard disks, the system will display the present system information and be ready
for setting.
Installation
11
※ When a new hard disk is detected, the system will require formatting first.
Chapter 3 User Interface Introduction
3.1 User Interface Architecture
The following is the Web Interface architecture:
Basic
Quick Setup
→ Wizard
Add User
Add Group
Add Share
Control panel
Users and Group
3. Once the hard drive is available, enter “Basic Setting” and click “Wizard” to change the system related
information, including host name, IP address and password, etc. For detailed descriptions, refer to
Chapter 3.
→ User Management
Group Management
File
→ File Server
Share Management
System
→ LAN Settings
Time Settings
Turn Off Server
Information
Disk Usage
Error Notification
Network Service
→ DHCP Server
Bonjour
BTorrent
Maintenance
→ Disk Utility
RAID Settings
Change IP setting
Firmware Upgrade
Notice : 1. Hard drive formating will erase system information. Please make sure system information is set after the
hard drive being format.
2. If you need to install additional MN2LP, please make sure to change the host name and IP address to
the deployed unit to prevent conflict.
Save Configuration
Restore Configuration
Factory Reset
Log File
4. Once the system information is changed, the system will restart automatically. After login, you can use
the system normally and installation is complete. You can start to setup the network share and user
settings.
→ Samba Log
FTP Log
DHCP Server Log
System Log
Administration Log
Notice : 1. If you change the IP address, the system may display “unable to open the web” after restart. Enter the
new IP address in the browser and you will see the login page.
12
Installation
Personal Info
Personal Information
→ Account
User Interface Introduction
13
3.2 Login
1. To format the hard disk separately, refer to the following procedures:
Enter “Maintenance” and click “Disk Utility”.
MN2LP supports graphic user interface (GUI) in Web Browser to manage the system. Make sure that
the network cable is connected and the setting program is installed first. For the example below, IP
address is: 10.1.2.200 (your own host IP address) Open the browser and input: http://10.1.2.XXX
2. Choose the hard disk to be formatted and choose file format. MN2LP provides 3 formats:
Fat32, Ext2 and Ext3 After choosing, click “Format”. The system will start to format automatically and
display the progress.
The default account and password are as follows:
Login account: admin
Default Password: admin
After login, you can choose the following screen is display for more functions.
Notice : 1. If you choose to format the hard disks separately, the system information will be recorded on the first
hard disk that is formatted, which, once damaged, may result in system malfunction.
2. MN2LP can perform 128bits loop-AES encryption for Ext2 file format only.
3. If you choose the Fat32 file format, you will be unable to set the disk array subsequently.
Notice : You can choose to format the hard disk separately or create the disk array system directly.
14
User Interface Introduction
User Interface Introduction
15
3. Once formatting is completed, the system will restart automatically. After login, enter “Disk Utility” and
you can see related information that formatting is complete. You can repeat the above procedures to
finish formatting the other hard disk.
2. Select “Disk Array Mode” and “Format File System”. After choosing, click “Create Disk” and the
system will start to perform hard disk formatting and RAID system setting automatically.
Notice : 1. If you choose to format the hard disks separately, the system information will be stored in the first
formatted hard disk.
2. The space of the second formatted hard disk will be set to fully open and all users will have the access
permission.
3.3 Set RAID Directly without Formatting
3. Once formatting is complete, the system will restart automatically. Control Panel will be display and
provide more setting for the unit.
1. Enter “Maintenance” and click “Disk Array”.
Notice : 1. Since MN2LP will store the system settings in the hard disk, you must format the hard disks
prior to setup so that the new settings can be stored.
2. Once the setting is complete, if you change format the hard disk, the system will be reset to the default
values and you will be reset the system setting.
3.4 Basic
Enter Basic function group contain “Quick Setting”, which includes 4 functions: “Wizard”, “Add User”,
“Add Group” and “Add Share”.
3.4.1 Wizard
The installation wizard may guide you to complete the basic function setting of the system within 6 steps
described as follows:
1. Select Language
MN2LP can display a language in accordance with the language used by the browser or
you can select any of the 3 default languages: “English”, “Simplified Chinese” and “Traditional
Chinese”.
16
User Interface Introduction
User Interface Introduction
17
4. Network Communication Protocol Setting
Network IP seeting, including DNS information can be setup via this screen..
2. New Password Setting (for admin)
A new password can be set for the “admin” account If you do not want to change the password, click
“Next” directly.
5. Time Setting
System date, time and time zone and designate the NTP server.
Notice : 1. The password limited to 16 characters and must be English character in lower case and numeric
numbers.
2. It is recommended that you change the default password to prevent users from changing your system
information via the default password.
3. Host Name Setting
Please set the host name of MN2LP over the network in this step. It is the network name of the unit.
The NTP (network time protocol) server provides data and time information over the network
automatically. The system is to provide two NTP server addresses: time.windows.com and time.nist.gov
for users to choose from.
6. Verifying the related equipments
All setting information will be displayed together. If everything is OK, click “Finish” to finish the setting;
if the setting is incorrect, click “Previous Page” to return to the pervious screen to change.
Notice : 1. The number of characters is limited to 15 characters, which must consist only English characters,
numeric numbers or “-”.
2. Since each MN2LP has an identical default host name, if you want to install more than two
MN2LPs, changing the host name of each of them to avoid errors.
18
User Interface Introduction
User Interface Introduction
19
3.4.2 Add User
With this function, we can add a user within 3 steps. Please refer to the following instructions:
1. User ID and Password Setting
Click “Add User” and fill in the name and password of the new user. A private folder with limited size
can be created for "Home" folder purposes. The private folder will only be access by that user only.
3.4.3 Add Group
"Group" contains different users for centralize access managements. Add Group Wazard will create the
user group and add members.
1. Group Name Setting
Input the group name.
Notice : 1. User ID is limited 20 characters in length. Only English characters in lower case and numeric numbers,
“-”, “_” or “.” is allowed. The first character must be an English character.
2. The password is limited to 16 characters in length which must be English characters in lower case.
2. User Management
After setting the Username and password, you can add newly created user into user group. (If you are
setting for the first time, only the “guest-share” group is available).
3. Share Permission Setting
To setup user premission, selecct the from the folder list to allow access (Read Only or Writable) or
deny the access. Writable will allow both read and write premission.
2. Group Members Selection
Select the user on the left and click "Add" to add to the group.
3. Share Permission Setting
Folder permission can be set as Read Only, Writeable and Deny.
Once the setting is complete, you can find the share folder in the Network Neighbors.
20
User Interface Introduction
User Interface Introduction
21
3.4.4 Add Share
Share is the Network Folder that allow sharing the date. Add Share will setup the folder in the follow
step.
1. Setting of the Share Folder’s Name
Type the folder name, and move to a blank area on the screen. Click anywhere to setup the path.
3.5 Control Panel
3.5.1 Users and Groups
In Users and Groups, you can set and manage two items: users and groups.
3.5.1.1 User Management
The user management menu will display all users in the present system. You can add or delete a
user via the “Save” or “Delete User” button. Click “Add to Group” to add it to a group.
Add User
※ Fill out the table with related contents and then click “Save”.
Notice : 1. User ID shall be 20 characters in length at maximum which must be English characters in lower case
and numeric numbers, “-”, “_” or “.” and the character must be an English character.
2. The password limit to 16 characters which must be English characters in lower case.
Notice : The share name is limited 20 characters. Only English characters in lower case,
numeric numbers, “-”, “_” or “.” is allowed. The first character must be an English character.
To add a user to a group, click the name of the user and click “Add to Group” to enter group setting .
2. Setting of Windows and FTP Access Premission
To set the premission to access the folder, check the “allow access by all” to allow all users or select
via the user and group list on the left.
3. Setting of NFS Access Premission
To set the access premission of NFS, check “allow access by all users” to allow all access or fill in the
IP address of the NFS client.
22
User Interface Introduction
3.5.1.2 Group Management
The group management menu will display all groups in the system. You can add or
delete groups via the “Save” or “Delete User” button. To add or remove a user in an existing
group, click the group first and then add or remove users.
User Interface Introduction
23
3.5.2 File
This menu includes “file server” and “share management”.
‧Update Share
※Click a share name in the “Existing Shares” and click the “windows, FTP access” or “NFS
access” button to change the property of the share folder.
3.5.2.1 File Server
‧Windows Setting
‧Check “Enable” to permit the Microsoft Windows connection.
‧Set group name and description
‧Set the IP address of the WINS server (not mandatory)
‧FTP Server Setting
※Check “Enable” to initiate the FTP function. The port is 21 by default.
Notice : You can change the port of the FTP port, which, however, make sure there is no conflict with the port
used by other related applications. For instance, do not use port 80 as the position is used by the Web
Browser.
‧NFS Server Setting
※Check “Enable” to initiate the NFS server function.
‧Guest Access Setting
※Click “Enable” to permit guest access.
※Check “Enable Disk Quota” to set the upper limit of data (Mega Bytes) uploaded by the guest.
‧Windows and FTP Access
※Check “Allow access by all users” to permit all users to access the share space in the server or
select a user or group name from the list and set the “Read Only” or “Write-in” permission.
‧NFS access
※Check “Allow access by all users” to permit all users to access. Or add the IP of the access
computer or subnet mask in the list to permit access.
3.5.2.2 Share Management
The share management screen will display all existing share names. “public” is the factory
default.
‧Add Share
※Fill in the “Share Name” with the new share folder’s name, move the mouse to a blank area,
click the left mouse key and the system will fill in the “Path” automatically and then click “Save”
to add a new share name.
Notice : The share name is 20 characters in length at maximum which must be English characters in lower case,
numeric numbers, “-”, “_” or “.” and its first character must be an English character.
24
User Interface Introduction
‧Delete Share
※After selecting a folder name, click “Delete Share” to delete the designated share name.
Notice : To delete the data in the folder, please backup the data prior to deletion. Once a folder is deleted, the data
originally stored in the folder will also be deleted.
User Interface Introduction
25
3.5.3 System
System setting includes 6 functions: “Network Setting”, “Time Setting”, “Server Startup”, “Information”,
“Disk Capacity” and “Error Notice Setting”.
3.5.3.2 Time Setting
The date, time and time zone can be set. Or you can designate an NTP server to synchronize
the time and date.
3.5.3.1 LAN Setting
‧Hostname
※You must set an independent name for MN2LP over the LAN.
Notice : 1. The number of characters is limited to 15 characters, which must consist only English characters,
numeric
numbers or “-”.
2. Since the default host names of MN2LP are identical, if you want to install more than 2
MN2LP, be sure to change the host name of each MN2LP to avoid recognition
error on the IP setting software.
‧IP Address Setting
※Obtain IP address automatically
If you have installed the DHCP server, the system will obtain the IP address from the DHCP
server automatically. If the IP address cannot be obtained from DHCP, the default IP address
is 192.168.1.1.
※Use static IP address
You can consult related MIS personnel to obtain the IP address, subnet mask and default gate
and fill them in related fields.
※Obtain DNS server address automatically
The system obtains the IP address of the DNS server from the DHCP server automatically.
※Use static DNS server address
You can consult related MIS personnel to obtain the DNS address and fill it in the related field.
The NTP (network time protocol) server is one that is provided over the network primarily for network
time checking of the user’s host. By default, the system now provides two NTP server addresses, time.
windows.com and time.nist.gov, for users to choose.
3.5.3.3 Turn Off Server
※Click the “Restart” key to restart the server.
※Click the “Shutdown” key to shut down the server.
Notice : When MN2LP is connected to the network, the system will obtain the IP address automatically
through the DHCP server. In case that the IP address cannot be obtained through the DHCP server,
MN2LP will initiate its own DHCP function to become the DHCP server. Confirm the IP
address of MN2LP (by default, 192.168.1.1) first and then set the PC to the same LAN to enter
the system login screen.
‧Physical Address
※The physical address is displayed as MN2LP.
26
User Interface Introduction
User Interface Introduction
27
3.5.3.4 Information
Display system related information:
※Product Name
※Firmware Version
※Product Vendor
※IP Address
3.5.3.5 Disk Usage
Display information about the use status of the present hard disk and restriction on user capacity.
※Overview of present hard disk status
※Use status and capacity restriction for each user.
28
User Interface Introduction
3.5.3.6 Error Notification Setting
‧Monitoring Services Setting
※Disk Usage
If checked, the system will notify the administrator in case of 90% of hard disk capacity.
※ Windows File Sharing Server
Once checked, if Samba operates abnormally, the system will notify the administrator.
※FTP Server
Once checked, if FTP server operates abnormally, the system will notify the administrator.
※DHCP Server
Once checked, if DHCP server operates abnormally, the system will notify the administrator.
‧Check Interval
System can be set to be detected on an hourly or daily basis.
‧Email Notification Setting
Check “Enable” to set whether to notify the administrator by Email.
※Error Handling Mail Server
Please fill in your mail host address (should be in the same LAN without passing through the
Router).
※Error Handing Mail Addresses
Please fill in the administrator’s mailbox.
‧Pop-Up Notification Setting
※Check “Enable” to choose whether to display related information by means of popping up a
window.
※Error Handling Pop-Up Machines
The host name of the administrator computer that displays the error window can be
designated.
User Interface Introduction
29
3.5.4 Network Service
3.5.4.1 DHCP Server
Check “Server Enable” to start the DHCP server. If the DHCP function is selected, fill in a related
IP address.
Notice : 1. If MN2LP cannot obtain the IP address from DHCP, the system will initiate its own DHCP
function.
2. If MN2LP has obtained the IP address from DHCP, you should set “use the static IP mode”
and designate a static IP for MN2LP before initiating the DHCP server function.
‧Scan
You can check whether the hard disks are normal via this key.
‧Detail
If your hard disks support the S.M.A.R.T function, click this key to display related status
information of the hard disks.
To avoid wrong commands, before formatting and scanning of the hard disks, the system will bring up a
window requesting you to confirm. Moreover, MN2LP supports USB disks and you can share the data
by inserting the USB disk into the USB port at the rear of the unit. When you insert a USB hard disk,
the system will display /mut/usb1 in “Disk Utility” and name the share folder as “usb 1” automatically in
Network Neighborhood.
3.5.4.2 Bonjour
MN2LP supports Apple’s Bonjour protocol and iTunes server
※Check “Enable” to initiate the Bonjour protocol.
Notice : 1. Once the USB disk is detected by the system, you need to set the read permission before reading the
“usb1” folder.
2. To remove the USB disk, click “Uninstall” before removal.
3.5.5 Maintenance
System maintenance includes: There are six options: disk utility, disk area, firmware update, storage
configuration, restore configuration and factory reset.
3.5.5.2 RAID Setting
MN2LP supports two disk array level applications: RAID 0 and RAID 1. If only one
hard disk is inserted, the “disk array” window will display “unable to set the disk array”; if two hard
disks are inserted, the “disk array” window will display two options: “RAID0 and RAID1”.
After selecting the RIAD mode and file format, click “Create Disk” to set the disk array.
3.5.5.1 Disk Utility
Disk information will display hard disk name, file system type, total capacity, used capacity,
cluster configuration and all configured hard disks.
‧Encrypt Box
MN2LP can perform 128bits loop-AES encryption for Ext2 file format only. To
perform this function, you need to input the 20-character password and format the hard disks
again.
‧Format
You can format the hard disks via this key. MN2LP supports 3 file formats: Fat32,
Ext2 and Ext3.
30
User Interface Introduction
User Interface Introduction
31
3.5.5.3 Firmware Upgrade
Click firmware upgrade to display the present firmware version. You can download the latest
firmware version onto your PC and designate the correct file path in “Updated File” to upgrade
the firmware. Network service will stop when you upgrade the firmware.
3.5.5.5 Restore Configuration
When the system’s configuration file is destroyed, lost or changed incorrectly, you can use
restore configuration to restore the configuration file you saved previously. Browse the System
configuration file, and click Restore.
Once the firmware is upgraded, the system will restart automatically.
3.5.5.6 Factory Reset
By clicking Factory Reset, you can reset the system configuration file to the factory
default. All system information will be lost upon the Factory Reset.
Notice : Random firmware upgrade may cause your system unable to operate normally. If your system operates
normally, it is recommended that you not upgrade the firmware. If you have any question about firmware
upgrade, contact the technical support or write to [email protected].
3.5.5.4 Save Configuration
The system configuration file can be saved in the hard disk for backup. The file
name is “config.tar” by default.
3.5.6 Log File
Login records include: Five items: “Samba Log File”, “FTP Log File”, “DHCP Server Log File”, “System
Log File” and “Administrator Log File”.
3.5.6.1 Samba Log File
Display all Microsoft Network Sharing information and its related records.
32
User Interface Introduction
User Interface Introduction
33
3.5.6.2 FTP Log File
All related log files connected through FTP. If you do not initiated the FTP function,
no information will be displayed.
3.5.6.3 DHCP Server Log File
Display all DHCP related log files. If you do not initiated the DHCP function, no information
will be displayed.
3.5.6.4 System Log File
Display all system related records, including failure log.
3.7 Change and View the IP Address using MN2LP LCD Display
1. To change the IP address of MN2LP, press the “ENT” key on the panel. Press the
“Down” arrow key and press enter button at “System Setup”
Enter the password (Default: 00000000) by using the arrows and ENT key.
To Setup DHCP network, Select Yes. For Static IP, select NO and follow the screen for IP address.
Restart the unit to finish the setting.
2. The IP address of MN2LP, will display on the LCD. You can also select "Network Info" function in the
LCD for more detail.
3. IP address can also setup via IP Setup.exe software from Windows in Appendix A.
3.8 Logout
Click “Logout” to log out the system directly.
Appendix A Using lP Setup.exe
1. Change System Information via Software (For Windows)
In addition to changing system information through Web GUI, (e.g. IP address and time, etc.), you can
change these system information by running “SetupUtil.exe”, which is described as follows:
1.1 Click to run “IP Setup.exe” and click “Setup”.
3.5.6.5 Administrator Log File
Display all records relating to the “Administrator”.
3.6 Personal Information
“User Account” is the only option in this item. In the user account page, you can change the password
of “admin” and displayed language. In addition, “Share List”, “System Disk Quota” and “Percentage of
Used Disk Capacity” will also be displayed.
Account: mysql or admin
34
User Interface Introduction
User Interface Introduction
35
1.2 The IP Setup software will detect MN2LP unit automatically and present the result to
screen. In case multiple MN2L/MN2LP are installed over the network, multiple unit will display on the
left.
1.4 Enter the IP address manually or select DHCP to obtain IP address automatically. Click Next to
complete.
To change Networl information of the MN2LP, select the hostname of the unit and click “OK”.
1.5 Enter the Date and Time setting and click Next
Notice : If you need to install more than 2 MN2LPs at the same time, make sure hostname and IP address is not
the same to aviod conflict.
1.3 Click “OK” to confirm the setting , enter the current administrator password. The default password is
"admin".
36
User Interface Introduction
Appendix A Use Method of Setup Util.exe
37
1.6 Confirm the setting and click Save.
Appendix B Complete Firmware Update Process
1. In order to prevent from data loss caused by software update please backup
data to other storage before starting update process.
2. Start to update software firmware after backup. Related update process please
refer to the following description.
2.1 Click “Control Panel”, ”Maintenance”, ”Software Update”, the following image will appear. Then
upload firmware. Browse the firmware files. The new firmware files can be downloaded from
www.sansdigital.com or contact [email protected].
1.7 After you click “Save”, the system will again ask you if you are sure to change the setting. If so, click
“OK”. If you do not want to change, click “Cancel”.
2.2 The status will be update via the below screen. Once the update process is completed, the system
will reboot and ask for username and password to login the system.
1.8 Setting is completed. Once the system is reset, it will jump back to the beginning screen. To change
other servers, repeat the above procedures. If you have finished setting, click “Exit”. It takes about 2
minutes to start MN2LP after power on. Before the startup is completed, the system will
be unable to find MN2LP.
Notice : When MN2LP is connected to the network, the system will obtain the IP address automatically
through the DHCP server. In case that the IP address cannot be obtained through the DHCP server,
MN2LP will initiate its own DHCP function to become the DHCP server. Confirm the IP
address of MN2LP (by default, 192.168.1.1) first and then set the PC to the same LAN to enter
the system login screen.
38 Appendix A Use Method of Setup Util.exe
Appendix A Use Method of Setup Util.exe
39
2.3 After completing update, please click “Remove raid system” to rebuild RAID system. For detail
information please refer to Chapter 3. Please note all the data will be remove.
Appendix C Introduction of LCD Display Items
2.4 After completing above process, please move data back to MN2LP and the update process
is finished.
40 Appendix A Use Method of Setup Util.exe
Appendix B Complete Firmware Update Process
41
WWW.SANSDIGITAL.COM