1
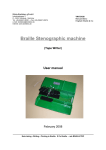
Btec100
Mini Braille printer
With automatic single sheet feed
User manual
For Windows 98 - XP
date: February 2006
Note taking • Writing • Printing in Braille. If it’s Braille...ask BRAILLETEC
Blista Brailletec gemeinnützige GmbH Technology for the Blind and Visually Impaired
Note taking • Writing • Printing in Braille. If it’s Braille...ask BRAILLETEC
2
Index
Chapter
Page: Braille Ink
Section 1 - Unpacking
1.1
1.2
1.3
1.4
1.5
6
Parts provided
Safety instructions
Maintenance and care
Transportation
Service
4
4
5
8 5
8 5
8 5
6
7
Section 2 - Description of printer
10
2.1
2.2
11
6
7
12
7
Printer
Paper tray
10
Section 3 – (First-time) operation of printer
3.1
3.2
3.3
3.4
3.5
3.6
3.7
3.8
3.9
Power supply
Computer connection
Installing the paper tray
Removing the paper / paper tray
Selecting paper size at paper tray
Paper sizes:
Inserting paper
Turning on the printer
Function key
7
13 7
14 7
15 8
16 8
17 9
19 10
19 10
20 10
13
Section 4 – Important notes
4.1
4.2
4.3
6
21
Technical data
Warranty
FAQ (Frequent asked questions)
21
23
24
Note taking • Writing • Printing in Braille. If it’s Braille...ask BRAILLETEC
3
11
11
11
12
Introduction
Btec100 is the smallest Braille printer with automatic single-sheet feed for private and
school use. It has a tray for paper storage which can be easily installed. You can
easily change paper width from A4 to A3 (vertically inserted). The paper format is
automatically detected during insertion.
Apart from the solid construction and the inside modular hardware configuration,
(which makes the printer easy to use), Btec100 fascinates with his attractive modern
design.
Available drivers are the German RTFC program under Windows 98 – Windows XP,
or the Duxbury DBT program. For more details, please refer to the manual „printing
with Btec100“ .
Have fun with Btec100!.
Section 1 - Unpacking
1.1
-
Parts provided
printer Btec100
paper tray
protective cover
power adapter
serial data cable
start-up package with Braille paper in DIN A 4
printed manual for sighted users
Manual in Braille
If shipment arrives incomplete, please contact your dealer immediately. In case of
direct purchase from Blista Brailletec, please find our address at 1.5 - service)
Note taking • Writing • Printing in Braille. If it’s Braille...ask BRAILLETEC
4
Gently remove the printer from the shipping box. Place the printer on a flat working
platform, the long horizontal slot in the smooth front panel pointing to you. Remove
the paper tray and the power adapter from the shipping box and place them besides
the printer.
1.2
Safety instructions
In order to avoid misuse, carefully read the instructions of the user’s manual. Only
operate the Btec100 in dry environment. Under any circumstances, avoid the printer
to get wet – otherwise it can be damaged. Only use the supplied power adapter.
NEVER try to repair the printer on your own. To open or remove the housing may
lead to dangerous electric shocks and other dangers.
.
Repair and maintenance may only be carried out by Blista-Brailletec gGmbH itself or
by authorised companies.
If the printer is not used for an extended period of time, unplug the power adapter.
There are no risks known resulting by the use of this product.
1.3
Maintenance and care
You can easily clean the printer housing with a slightly damped soft cloth. Do never
use an abrasive cleaner or soap.
1.4
Transportation
Keep the original shipping box for the case of repair shipment to be done. Turn the
printer off. Remove power adapter, cable, and paper tray from the printer.
1.5
Service
If you notice any malfunction, please contact your dealer immediately. In case of exworks shipment, contact Blista Brailletec directly. In this case, we appreciate a short
description of the malfunction occurred.
Blista-Brailletec gGmbH
Industriestrasse 11
D – 35041 Marburg
Tel.: x49 (0)6421-802-0
Fax: x49 (0)6421-802-14
e-mail: [email protected]
Note taking • Writing • Printing in Braille. If it’s Braille...ask BRAILLETEC
5
Section 2 - Description of printer
paper supply tray
guiding bars
multi-function key
(see below)
paper tray
mounting device
paper eject
lever for paper
feed
2.1
Printer
In case of first unpacking, the printer has an rectangular shape. Place the printer on a
flat working surface with the long horizontal paper eject slot in the smooth front panel
facing you. The convex, grooved surface points upwards
Front panel:
The paper eject slot is located on the top of the smooth front panel.
-
Top panel:
You find the function key at the extreme right-hand side of the convex top panel.
To operate the key, press its back or front part. In case of operation, you can feel
and hear a click.
In the rear part of the panel you find something like a preceding bar– it nearly
takes the complete width of the printer.
This is the upper part of the support for the paper tray. Right- and left-hand you
find parts of the housing frame of approx. 2 cm thickness. Right and left you can
touch 2 movable paper levers caring for the correct paper pressure.
-
Rear panel:
You can find the following switches and connectors in the lower right of the rear
panel from the described printer position:
From right to left:
Located at the extreme right end of the printer you find a toggle switch – the
power switch to turn the printer on an off. If the switch is toggled to the right side,
the printer is off. On the left side of the power switch you find the power socket
provided with a notch pointing upwards., followed by a 9-pin serial port connector.
Note taking • Writing • Printing in Braille. If it’s Braille...ask BRAILLETEC
6
2.2
Paper tray
The removable paper tray consists of 2 connected plexiglass plates and has a maximum width of 31,5 cm. In the middle of the paper tray you can feel the upper edge of
the front plexiglass plate. Braille paper is to be inserted behind this edge. The paper
tray has 2 guiding slots. In section 3.5 you find the information how to adapt the
guiding slots to the chosen paper size. For more information about the different paper
sizes please see section 3.6 – "paper sizes"
There is a pear-shaped long hole located at the bottom edge of the paper tray at the
extreme right- and left-hand ends. The lower part is circular and has an approx. 1,5
cm diameter. This is to fix the paper tray at the printer.
Section 3 – (First-time) operation of printer
To print from Windows, you first have to install the program RTFC (for German use)
or the Duxbury DBT program (for more details see the manual „printing with
Btec100“).
3.1
Power supply
Turn off the power supply of Btec100 (press right-hand switch). Connect the supplied
power adapter with the small plug to the Btec100. This is located in the rear panel at
the bottom between the power switch and the serial port.
Attention:
There is to feel a raised part at one of the flat sides on the top of the plug. This part
has to point upwards in order to make sure that the plug may be connected properly.
Plug the power adapter into a wall-socket.
The power adapter can operate on AC ranging from 100 Volt to 240 Volt and frequencies between 47 bis 63 Hz. For this reason it is also possible to use it in any
other foreign country as well.
3.2
Computer connection
Connect the printer to your PC with the supplied serial data cable. Both plug ends are
identical (9-pin female). Take one end of the cable and connect it to a free 9-pin serial port of your PC, the other one to the serial port of the printer. This is located at
the rear panel besides the power socket.
Take care that the cable is connected properly. The plug has to be fixed at the printer
with the screws to find at both sides
3.3
Installing the paper tray
There is a type of bar in the back area of the top panel of the printer: It nearly takes
the complete width of the printer. This is the top part of the support for the paper tray.
Press this bar with both thumbs right and left away from you. Please be careful, as
Note taking • Writing • Printing in Braille. If it’s Braille...ask BRAILLETEC
7
the support drawn by a spring jumps towards the rear. On its smooth surface there is
a round support for the paper tray either right- and left-hand. Now take the paper tray
in your hand. The narrow part with the flattened tip shall point upwards. At the bottom
edge of the paper tray you have a pear-shaped long hole right- and left-hand. The
bottom part is circular and has a diameter of 1,5 cm. The long holes have to lie on
the surface of the paper tray. Now take the paper tray and place the circular aperture
of the long hole over the round supports of the mounting device. Then press the tray
down obliquely towards the printer until you hear it locking in position.
3.4
Removing the paper / paper tray
Before removing the tray, remove the paper first. Push the two pressure levers for
paper feed from you away. The tray will be lifted up a little bit so that you can remove
the paper easily. Already retracted paper may be removed by pressing the function
key while the printer is on (-see also section 3.9: „function key“). Take the paper tray
at the right and left side and push it obliquely upwards from you away. Remove it
carefully from the mounting device.
To save as much space as possible in case of not-using the printer, it is possible to
close the paper support of the tray.
Take your 2 thumbs and press down the mounting device (in the lower middle). Then
pull it towards your body and press a little bit until you hear it locking in position.
3.5
Selecting paper size at paper tray
There are four 8 cm-long guiding bars that are caring for the paper guiding at the
printer and at the paper tray. These four guiding bars are equal and have an overhanging stop at one side. In order to choose the paper format, the guiding bars might
be fixed in 2 different positions or might be left out at all. Each of the four guiding
bars has to be connected to the corresponding position. Make sure that you do this
symmetrically so that all of them are inserted to the outside or to the inside of the
printer.
Inserting the guiding bars
Try to touch with your finger(s) from left to right over the rear, upper part of the
printer. You will feel a longitudinal slot, restricted by plexiglass, which has 2 guiding
bars one at each side. Pull them out and use your finger in order to feel inside the
slot 2 cavities at both ends. Depending from the paper format the 2 guiding bars will
be moved to the outer or inner cavities. The overhanging stops have to point upwards and in the back.
Inserting at the paper tray:
The paper tray has to be on your table in opposite direction. The pear-shaped holes
left and right are pointing to you and have to be in contact with the table.2 cm higher
above you can feel a second plexiglass in a distance of approx. 1 cm. Close by the
pear-shaped holes in the plate you can feel either left- and right-hand 2 recesses.
Insert both guiding bars and make sure that the overhanging stop is pointing upwards
Note taking • Writing • Printing in Braille. If it’s Braille...ask BRAILLETEC
8
and to you. They have to be connected in the same positions as the guiding bars of
the printer (both inside or both outside).
3.6
Paper sizes:
In order to select the desired paper size, symmetrically insert the (4) guiding bars in
the corresponding slots. (See more details in section 3.5 – „selecting paper size at
paper tray“)
Slots inside are for paper size:
Slots outside are for paper size:
Without guiding bar:
DIN A4 vertical (portrait)
special format
DIN A3 and DIN A4 horizontal
(landscape)
Attention:
After changing the paper format turn the printer off and on again. The new format will be detected automatically.
Note taking • Writing • Printing in Braille. If it’s Braille...ask BRAILLETEC
9
3.7
Inserting paper
Take the left or right pressure level and push it in the rear part. You can feel the upper edge of the front plexiglass in the middle of the suspended paper tray. Behind
this edge you can insert up to 20 pages of Braille paper. We recommend to fan it out
before inserting. After inserting the paper, pull the right or left pressure lever to your
body.
Now the printer is ready to print the document you want to send from the PC via serial port. The paper will be fed automatically and comes out of the eject slot in the
front panel. Before printing, you should leave some free space in front of the printer
for the pilling of the printed sheets..
3.8
Turning on the printer
Attention:
When turning on the printer, you should always make sure that you have paper in the
tray. Never use braille printed paper !
Once the printer is turned on for the first time, it will feed the first sheet. A sheet of
paper already fed in will be ejected and a new sheet will be taken. Make sure that the
paper store in the paper tray is inserted correctly (see also section 3.7 – „inserting
paper“). The paper format will be detected automatically and the printer is ready for
printing.
3.9
Function key
At the extreme right end of the slightly convex top panel you can feel a key to be operated in the front or in the rear part. Using it, you can hear and feel it clicking.
The key has the following functions:
Pressing the back part of the key:
-
Eject paper and feed in new sheet
Feed in first available sheet after inserting a new pile of paper
Pressing the front part of the key:
- function without running print job:
Line feed
-
Functions during printing process:
Interrupting printing process (break): press key until you hear 2 beep tones
Resume printing:
press key briefly
Stop printing process:
press key until you hear 2 tones first followed
by 3 short tones
Note taking • Writing • Printing in Braille. If it’s Braille...ask BRAILLETEC
10
Section 4 – Important notes
4.1
Technical data
Specifications:
-
-
6 and 8-dot Braille
up to 44 characters/line
one-page printing
printing speed up to 13 characters/ second
paper feed key, paper ejection
automatic paper format detection
paper width from A4 to A3 vertical (297 mm)
paper thickness 140 g/ m2 – 190 g/ m2
automatic single-sheet feed
paper supply tray for approx. 20 sheets
serial port for PC connection
compatible to German RTFC printer driver with German shorthand Braille
(Braille Grade II) or Duxbury DBT program.
internal modular hardware configuration - extremely easy to handle
Available accessories:
-
RTFC-program for German Braille
Duxbury DBT program for other languages
paper (in both formats)
noise absorbing pad
special formats with especially customised paper tray.
carrying bag
Specifications
-
4.2
comes with power adapter and serial connection cable
power consumption approx..4W idle, 20W operation
size: (L*W*H) 400*120*140 mm
weight: 4,5 kg
Warranty
Warranty is based on legal regulations for guarantee.
Repair and maintenance as well as opening of printer housing is only to be done by
Blista Brailletec gGmbH or other authorised companies. Otherwise any other actions
will void your warranty.
Note taking • Writing • Printing in Braille. If it’s Braille...ask BRAILLETEC
11
4.3
FAQ (Frequent asked questions)
- problem: The paper is not fed in.
- solution: Make sure that the paper is fanned out before inserting
- problem: the printer is correctly feeding in paper , but beeps 2 times afterwards.
- solution: the paper detector for paper feed indicates a malfunction.
Printing may be continued, but automatic function „detecting paper end“
is not performed
Please contact your customer service.
- problem: DIN A4 paper is inserted horizontally, but the printer is printing in the
middle of the sheet.
- solution: Have you specified the new paper format for the printer?
Turn the printer off and on again.
The new format will be detected when you turn the printer on again.
- problem: paper jam
- solution: Do not use printed paper! It may get stuck.
Gently remove the paper and try again.
- problem: When turning on the printer you hear the printer 3 times beeping
- solution: Please check the following:
Do you have paper in the paper tray? See section 3.7 – „inserting paper“
Did you flick the pressure lever over correctly? Pull it towards yourself.
Did you fan out the paper before inserting it?
Push the pressure lever away from you
Remove the paper from the printer, fan it out and insert it again correctly
Press the rear part of the function key one time.
(see section 3.7 – inserting paper)
Is the bottom edge of the paper pile aligned correctly in the tray?
(Push the pressure lever away from your body, help the paper to find its
way down and pull the lever towards yourself again)
Note taking • Writing • Printing in Braille. If it’s Braille...ask BRAILLETEC
12