1
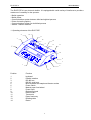
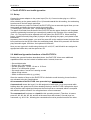
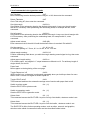
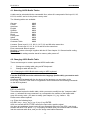
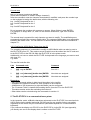
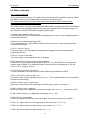
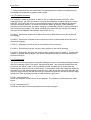
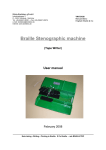
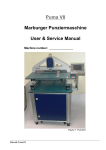
VW-79140
Manual Elotype
Braille & Inc
Read attentively before use!
ELOTYPE 4
User manual
February 2006
Blista-Brailletec gGmbH / Industriestr. 11 / D - 35041 Marburg / Germany
Phone: +49 6421 802 0 / Fax: +49 6421 802 14 / Email: [email protected]
homepage: www.brailletec.de
ELOTYPE 4
Blista-Brailletec
2
ELOTYPE 4
Blista-Brailletec
Contents
Chapter
Page Braille Ink
1.
1.1
1.2
Operating elements of the ELOTYPE
The keyboard
The interfaces
2.
2.1
2.2
The ELOTYPE 4 as a braille typewriter
Setup
Additional typewriter functions of the ELOTYPE
3.
3.1
3.1.1
3.1.2
3.2
3.3
The ELOTYPE 4 as a Braille printer
Setup
Tractor / endless paper
Additional settings
Embossing operation
Commands available in embossing mode
4.
4.1
4.2
4.2.1
4.2.2
ASCII-braille tables
Selecting ASCII-braille tables
Changing ASCII-braille tables
Changing the ASCII-braille table with MF2 keyboard
Configuring ASCII-braille tables from the PC
5.
5.1
5.2
The ELOTYPE 4 in a communications system
German braille grade 1
Text input from an MF2 keyboard in the communications mode
6.
6.1
6.2
6.2.1
6.2.2
6.2.3
6.2.4
The editor mode
key definitions in the editor mode
Editor commands
Cursor commands
The delete functions
Inserting text
Special editor commands
7.
Printing tactile graphics
8.
8.1
8.2
8.3
The ELOTYPE 4 in network mode
Teacher-students communications system
Deaf-blind communications system
Multiple-printer
9.
9.1
Troubleshooting
General Reset
10.
Technical data
General data
Accessory
Hardware adaptation
Appendix
German braille coding
Schematic of serial cable
CE-Certificate of Compliance
4
9 6
11 7
6
8
8
15 8
14
14
21
21
21
22
22
24
25
26
27
27
29
31
31
33
11
12
12
12
13
13
14
14
42
15
15
16
16
17
17
18
44
18
35
36
37
37
40
42
45
46
47
47
48
48
50
50
52
52
54
58
59
60
3
10
10
10
10
11
11
19
19
19
19
20
20
21
22
22
23
24
24
24
25
ELOTYPE 4
Blista-Brailletec
The ELOTYPE 4 is an electronic brailler. It is equipped with a wide variety of interfaces to provide a
maximum of versatility for the operator.
- Braille typewriter
- Braille printer
- Communications system between blind and sighted persons
- Printer for tactile graphics
- Communications system for deaf blind persons
- student - teacher machine
1. Operating elements of the ELOTYPE
10
4
11
3
14
12
9
13
2
14
11
10
8
7
1
6
5
Position
Function
1
2
3
4
5
6
7
8
9
10
11
12
13
14
keyboard
Parallel interface
RS 485 bus
RS 232 serial port
MF2 keyboard and earphone/vibrator sockets
Power switch
Manual paper feed wheel
Power input
Embossing head
Platen levers
Tractor slot
Paper feed entry
Reading table
Platen
4
ELOTYPE 4
Blista-Brailletec
Position of the operating elements
Front part of the upper side
In the front part of the machine the Braille Keyboard is placed.
The long key in the middle is the space key K9. Behind this you find the keys K1, K2,
K3 on the left and K4, K5, K6 on the right for the 6 dots. On the left of K3 you find K7,
on the right of K6 you find K8. On the left side of the keyboard you find K10 (upper
key) and K11 for paper feed.
On the right side you find K12 (upper key) for backspace and K13 for the margin
release. On the left and right of the long space key K9 you find K- and K+.
Upper side
Behind the keyboard, on top of the machine you find the printing head. If you write
braille, the head moves from the left to the right side.
In front of the head, you find a bar with braille dots. Here you can control the position
of the head. Behind the head you find the table for proof reading. On the left and right
of this table you find a lever for fixing the paper. If you insert the paper, please pull
one of this levers. If the paper is fixed in the right position, push the lever.
Back side
On the bottom you find the paper feed slot for inserting paper. On the right and left of
the paper feed slot there are holes for fixing the tractor for endless paper.
On the left side you find the cog wheel that drives the tractor
Left side
On this side you find the interface connectors.
The first, long one is the parallel interface, behind this there are two wholes for the
network connection of several ELOTYPEs. The last one is the serial port for
connecting the ELOTYPE to a PC.
Right side
In the front you find two round connectors for the MF 2 keyboard.
In the middle the power switch is placed. On the back there is the connector for the
external power supply.
Above this you find the handle for the paper movement.
5
ELOTYPE 4
Blista-Brailletec
1.1 The keyboard
K10
K2
K3
K4
K1
K5
K12
K6
K7
K8
K11
K13
K-
K9
K+
The keys and their basic functions
K1 – K6 Dot keys:
Keys K1 – K6 are assigned to the braille dots 1 through 6. When pressing these keys, a
braille character is embossed. The character is embossed only after the last key of a dot
combination is released.
K7 Tabulator / Dot7:
K7 alone is the tab key. Press this key to move the embossing head to the next tab position.
K7 plus at least one of K1 to K6 embosses those dots plus dot 7 in 8-dot braille. Press K7
together with K-, K+ or K9 to emboss only dot 7. Note: 8-dot braille must be selected (see
2.2. "List of commands in typewriter mode).
K8 New line / Dot8:
K8 alone is the Carriage Return / Line Feed key. Press this key to move the embossing head
back to the beginning of the next line.
K8 plus at least one of K1 to K6 or K7 embosses those dots plus dot 8 in 8-dot braille. Press
K8 together with K-, K+ or K9 to emboss only dot 8. Note: 8-dot braille must be selected (see
2.2. "List of commands in typewriter mode).
K9 Space bar:
When writing in braille, press this key to leave spaces between the words.
K10 Paper forward-feed key:
Press this key to move the paper forward to the next line position.
K11 Paper backfeed:
Press this key to move the paper back to the previous line position.
K12 Backspace key:
press this key to move the embossing head one character backward. K12 has a special
function in the Editor mode (see 6.1.)
K13 Margin release key:
If the embossing head is on the margin, the margin stop is released by pressing K13, and
you can write beyond the margin. After pressing K13 at the beginning of the line, the
embossing head can be moved beyond the margin using keys K12 or K-.
K+
Moves the embossing head one character forward. K+ has a special function in the Editor
mode (see 6.1)
6
ELOTYPE 4
Blista-Brailletec
KMoves the embossing head one character backwards. K+ has a special function in the Editor
mode (see 6.1)
1.2 The Interfaces
Serial Port: RS232
If the Elotype is used as a braille printer, the PC is connected via the serial port. You also
can connect the 'Elvis' to visualise the characters written on the Elotype in ink.
The parameters of the serial can't be modified. They are fixed to 9600 baud, no parity, 8 data
and one stop bit. See Chapter 9.
Parallel Port:
here you can connect an special ink printer to print everything that is written on the Elotype
in ink.
Don't connect any PC at this port.!
Port to connect several ElLOTYPEs together.
Position 3 in the drawing marks an interface socket used in the ELOTYPE 4 to link several
machines together in a network.
MF-2 keyboard input / Earphone or vibrator socket:
For a communications system, connect an MF-2 keyboard to the ELOTYPE 4 using either of
these two sockets (Pos. 5). Both work in parallel. Both audio signals (e.g. end of line, end of
paper) and characters are transferred to both sockets. Audio signals can be heard on an
earphone or felt using a special vibrator (e.g. for deaf-blind users). The sockets automatically
send keyboard signals if a keyboard is connected, and audio if earphones or a vibrator are
connected.
7
ELOTYPE 4
Blista-Brailletec
2. The ELOTYPE 4 as a braille typewriter
2.1 Set-up
Connect the power adapter to the power input (Pos. 8). Connect mains plug to a 100V to
240V socket.
After switching on the power switch (Pos. 6) forward towards the dot marking, the embossing
head moves to the left margin and stops.
When the power-on routine is finished, the ELOTYPE gives an acoustic signal. Now you can
insert paper and define the upper margin by pressing K9.
To insert paper, pull levers (Pos. 10) towards the keyboard.
The paper is inserted from the back of the ELOTYPE into the paper feed slot until it appears
under the embossing head and you can adjust it parallel to the far edge of the reading table
(Pos. 13). The paper must be adjusted to the left side of the ELOTYPE 4. When inserting
paper, a positive sound (rising scale) is played. After adjusting the paper, push platen levers
backwards.
Important: after inserting paper, you must first press K9 so the machine knows the paper has
been positioned at the top line under the embossing head. When K9 is pressed, the machine
plays an audio signal. Until then, the keyboard is blocked!!
Now you can type text in braille using the keys K1 to K6, K7, and K8 which are assigned to
appropriate braille dots, and the space bar, K9.
2.2 Additional typewriter functions of the ELOTYPE 4
Besides the general functions described above, the ELOTYPE 4 has some additional
capabilities which can be invoked to facilitate work. In detail, these are:
- Set and delete tabs
- Change left / right margins
- Set line spacing to 7.5 mm, 10 mm or 12.5 mm
- Select 6- or 8-dot braille system
- Set margin where "end of line" warning sounds
- Adjust sound volume
- Switch to different modes (e.g. printer).
Since the number of keys on the ELOTYPE 4 is limited to avoid cluttering, these functions
are activated using key combinations.
All commands to the ELOTYPE 4 are preceded by a command call.
Command call means the keys K1 to K6 assigned to braille dots 1 to 6 are pressed while
holding down the space bar K9. After releasing the keys, the ELOTYPE 4 accepts the input
with a positive audio signal and interprets the next input as a command, which is accepted
with another positive sound if it is recognised as a correct command.
The command call is shown as a hash # in this operating manual. (Therefore, # means:
press K1; K2; K3; K4; K5; K6; and K9 at the same time and release.) Several keys in a
command, e.g. # K13 K+, following the command call must be pressed one after the other.
8
ELOTYPE 4
Blista-Brailletec
List of commands in the typewriter mode
Set Tabulator
# K7
Move embossing head to desired position using K+ or K9; then enter the command.
Delete Tabulator
# K7
Go to Tab using K7; then enter the command.
Set right margin
# K13 K+
Set position of the embossing head to the desired right margin. Jump over the old margin
with K13 if necessary. After positioning the embossing head, for example with K9, enter
command.
Set left margin
# K13 KSet position of the embossing head to the desired left margin. Jump over the old margin with
K13 if necessary. After positioning the embossing head, for example with K-, enter
command.
Adjust sound volume
# K9 (K8)
Enter command call #, then hit K9 until the desired volume is reached. Exit with K8.
Set line spacing
# 1, # 2 or # 3
#1 sets line spacing to 7.5 mm, # 2 to 10 mm, # 3 to 12.5 mm.
Adjust margin warning
# K13 K12
Position embossing head where you wish the margin warning sound signal to ring; then enter
command.
Adjust paper length setting
# K12 xx
For endless paper, set lengths in 1" steps between xx=08 and xx=13. For arbitrary length of
single sheets, set xx=00.
Paper feed
# K8
Moves paper to the beginning of the next page.
Toggle Repeat on / off
# K10
While repeat is on, a character is embossed repeatedly when you hold keys down for more
than 0.8 sec. Press # K10 again to switch repeat off.
Toggle CR/LF on/off
# K11
This command switches the automatic carriage return function with paper feed on/off.
Switch to printer mode
Sets the ELOTYPE to printer mode.
# d (1*)
Switch to typewriter mode
Sets the ELOTYPE to typewriter mode.
# s (1*)
Select 6-dot
# 6 (1*)
This command causes the ELOTYPE 4 to print out only 6-dot braille, whatever mode is set.
Select 8-dot
# 8 (1*)
This command causes the ELOTYPE 4 to print out 8-dot braille, whatever mode is set.
The ELOTYPE 4 offers further operating modes, such as editor, network, and graphics,
which are also called via command codes and are described further below.
9
ELOTYPE 4
Blista-Brailletec
(1*) For digits and letters in German computer braille, refer to chapter 10. - Technical data.
Remember:
a) When you switch off the ELOTYPE 4, all "personal" settings, such as tab settings, left
and right margins, line spacing, beginning of margin warning sound, sound volume,
repeat function on/off, and line spacing, settings remain stored in memory.
b) After inserting a new sheet of paper, always press the space bar K9 when you have
positioned the embossing head on the top margin! The ELOTYPE waits for this
information and the keyboard remains locked until K9 is pressed.
c) Before reaching the end of page, the ELOTYPE plays a audio signal at the beginning of
the last line.
d) If you move the embossing head by hand to read what you have just written, it
automatically repositions itself on the next character when you continue typing.
3. The ELOTYPE 4 as a Braille printer
While in typewriter mode, press # d to switch the ELOTYPE to printer mode. An audio signal
is played. Writing from the braille keyboard or an attached keyboard is disabled. Only the
space bar K9 is active for marking the top of the page, or interrupt and restart printing.
You can connect the ELOTYPE 4 to a PC or laptop as a serial printer using the serial
interface to a COM port.
3.1 Set-up
3.1.1 Tractor / Endless paper
Insert tractor for endless paper into slots on the back of the machine. The side of the tractor
with a small casing and cogwheel is fixed on the left side of the machine.
Open tractor hatches, then insert paper into feed from behind and place over tractor wheels,
inserting tractor teeth. Then close tractor hatches. Transport paper manually with the manual
feed wheel (Pos. 7) until the embossing head is just on the beginning of the first page. Now
press the space bar (K9) to mark the beginning of the page and prevent embossing on the
perforation. The ELOTYPE locks the keyboard until this command is entered. The machine is
now ready to receive data.
3.1.2 Additional settings
Before switching the ELOTYPE 4 to printer mode, the following settings should be entered in
typewriter mode:
- Left and right margins
- Line spacing
- Sheet length for endless paper
- ASCII-braille-table (see chapter 4.)
- 6- or 8-dot braille
10
ELOTYPE 4
Blista-Brailletec
3.2 Embossing operation
When the ELOTYPE 4 is connected to a PC or laptop via the serial (RS 232), text stored in
the PC can be sent to the ELOTYPE. The characters must be transferred to the ELOTYPE 4
as ASCII code. The ELOTYPE 4 will convert ASCII to braille and emboss it. You should
finish these preparations before printing: While printing, the ELOTYPE controls left and right
margins and sheet length. In case no end-of-line character (CR/LF) is present in the text or
the lines are longer than the ELOTYPE's settings, a carriage return is inserted at the end of
the line and embossing continues on the next line. Therefore, for best printouts it is important
to make sure the line length settings of the text and the ELOTYPE are identical.
For printing from an MS-DOS text editor, no further preparations are necessary. In an MSDOS word processor, select the "text only" printer driver. Alternatively, you can save your
text as an ASCII file and print it on the ELOTYPE with any of the following DOS commands
PRINT, COPY or TYPE and the interface usually LPT1: or COM1: (e.g. copy mytext.txt
com1: [return])
For printing textfiles from a PC with a Windows operating system, you will first have to set up
a "Generic / Only Text" printer driver. Tips on how to set up an appropriate printer driver and
its use with the ELOTYPE will be given later in this manual in section "Appendix”.
3.3 Commands in embossing mode
Interrupt printing
Pressing the space bar K9 stops printing
K9
Start printing again
K9
press K9 again to continue the printing. To interrupt printing process press K8
Form feed
Transports paper to beginning of next page.
# K8 (1*)
select typewriter mode
#s
The ELOTYPE leaves printer mode and returns to the typewriter mode.
(1*) In a structured text, the ELOTYPE 4 allows to perform a Form Feed using the ASCII
character 0C hex.
Remember:
During printing, the functions of all keys are blocked. Only K9 is active for interrupting. While
printing is interrupted, only the above commands can be entered from the braille keyboard.
Please note that when printing is interrupted, pressing K8 to abort will clear the printing
buffer!
4. ASCII-braille Tables
Communication between the ELOTYPE and a PC or an ink-printer via the available
interfaces relies on ASCII characters. If an external keyboard is connected, keyboard codes
are converted into language-specific braille signs (such as German Umlaute ä, ö, ü etc.).
Several language-specific ASCII-Braille tables are stored in the ELOTYPE.
11
ELOTYPE 4
Blista-Brailletec
4.1 Selecting ASCII-Braille Tables
A table can be selected with the command # & xx, where & is composed of the keys K1, K2,
K3, K4, and K6, and xx is the phone country code.
The following tables are available:
German
French
American
English
Spanish
Slovenian
Dutch
Portuguese
Italian
Eurobraille
Customer Table
#&49
#&33
#&01
#&44
#&34
#&38
#&31
#&35
#&39
#&98
#&99
# means: Press keys K1, K 2, K3. K 4, K 5, K 6 and K9 at the same time.
& means: Press keys K1, K 2, K 3, K 4 and K6 at the same time.
Enter commands without spaces.
Numbers = Letters a through i together with dot 6 ! See chapter 10: German braille coding.
Remember:
The braille table setting remains stored in memory after power-off.
4.2 Changing ASCII-Braille Table
There are two ways to create a personal ASCII-braille table:
1.
2.
Change an existing table using an MF2 keyboard
Change a table with the PC.
4.2.1 Changing the ASCII-Braille table using an MF2 keyboard
First the ELOTYPE has to be switched to the language (braille table) you want to work
with (see 4.1)
Connect a MF2 keyboard with the key layout of the language you are using, to the
ELOTYPE. The ELOTYPE must be in typewriter mode. Now enter the following commands
on the MF2 keyboard:
First step:
ESC+cy xx ENTER
This command copies the braille table, which you want to modify into the "customer table"
area. cy activates the copy command. xx correspond to the number of the braille table resp. the country code - you want to modify (see chapter 4.1). (e.g. Italian = 39).
Please enter without spaces!
e.g.: Enter the following keys:
Key ESC, key +, key c, key y, key 3, key 9, key ENTER
After one second the ELOTYPE confirms the input with a positive signal.
Are there any problems, please enter all keys separately without the key ESC, and check,
weather the ELOTYPE prints + c y 3 9 properly in braille. Now your selected table is loaded
into the customer table area, and you can assign new braille characters
12
ELOTYPE 4
Blista-Brailletec
Second step
ESC+cc (character) (braille dots) ENTER
(Enter without spaces! cc means "change character")
After the command, enter the character that should be modified. and press the number keys
on the keyboard to assign the braille dots, with the following rule:
key 1 on MF2 keyboard for dot 1
key 2 on MF2 keyboard for dot 2
etc.
key 8 on MF2 keyboard for dot 8
Do not separate the numbers with commas or spaces. When finished, press ENTER.
For example, to assign dots 3, 4, and 5 to the German character ä, type: ESC+ccä345
ENTER.
The second step is repeated for each character you want to modify. The modifications are
permanently stored in the customer Braille table. The customer Braille table is not affected by
switching the mains off/on. You can switch to a different Braille table with the commands in
chapter 4.1.
4.2.2 Configuring ASCII-Braille Tables from the PC
The complete sequence of commands to modify an ASCII-Braille table can also be sent to
the ELOTYPE from a PC. This requires a text file which must be written into the PC and sent
to the ELOTYPE via the RS 232 while the ELOTYPE is in the printer mode.
Additionally you have to switch the ELOTYPE via keyboard to the language you want to work
with (see 4.1)
e.g. #&39
The text file looks like this:
Line
Command code
Comment
1.
@@ + cy xx ENTER
See 4.2.1.
2.
@@ + cc [character] [braille dots] ENTER
New dots are assigned.
3.
@@ + cc [character] [braille dots] ENTER
New dots are assigned.
Remember:
- Only the commands written in bold should be written in the text file.
- A separate line should be written for each character to be modified.
- A Maximum of 256 characters (in eight-dot Braille) can be configured.
- The "Customer Table" is loaded after sending the file from the PC to the ELOTYPE.
- This table remains active after switching the mains off.
- Other tables can be selected using the commands in section 4.1.
5. The ELOTYPE 4 in a communications system
In the typewriter mode, all Braille characters embossed on the ELOTYPE 4 are send as their
ASCII coding via the parallel and serial (RS 232) port for any possible further processing,
regardless of the device they are entered from (the Braille keyboard or a connected MF2
keyboard).
If you connect the display unit "ELVIS" to the ELOTYPE 4 via the RS 232 (see Appendix),
you directly can see on the display what is written on the ELOTYPE.
13
ELOTYPE 4
Blista-Brailletec
It is also possible to print the embossed Braille characters with an ordinary printer or a PC
monitor using a special terminal program, such as WINDOWS "Hyperterminal".
5.1 German Braille grade
Often Braille is used according to the rules of grade 1. These rules are contained in a special
ASCII-Braille table.
The commands
#&K
select the grade 1 table
#&V
quit the grade 1 table.
(& means: Press the K1, K2, K3, K4 and K6 keys together).
This table is only active when the German ASCII-Braille table (&49) is selected at the same
time.
The German Braille grade 1 includes the following rules, and while in the communications
mode, the Braille characters entered are converted into the corresponding full ASCII.
Input from the ELOTYPE
dots/key:
1,6
1,2,6
1,4,6
1,4,5,6
1,5,6
3,4,6
1,2,5,6
2,4,6
3,4,5
3,4
2,3,4,5,6
2,3,4,6
3,4,5,6 + a,b,c...i,j
Output in print
on ELVIS, PC or printer
au
eu
ei
ch
sch
ie
ü
ö
ä
äu
st
ß
1,2,3...9,0 (digits until the next space)
4,6 + 1 letter
4,5 + multiple letters
1 capital letter, rest of word in small letters
capital letters until blank
The numeric sign (3,4,5,6) and the signs for capital (4,6; 4.5) are not printed but only in their
result. (eg. number or capital letter)
5.2 Text input from the MF2 keyboard in the communications mode
Remember:
Due to limited processor capacity, it is not possible to install a program in the ELOTYPE to
process MF2 keyboard entries according to the rules of "braille grade 1" and convert for
example the input of "sch" into the braille character dots 1,5,6.
If a sighted person wants to write German grade 1 Braille via the MF2 keyboard (rather than
full Braille), then it is necessary to input the characters from the MF2 keyboard as shown in
the following table using the described keys.
14
ELOTYPE 4
Blista-Brailletec
Input from the MF2 keyboard Braille output on the ELOTYPE
1
2
3
4
5
8
9
0
` (hit SHIFT plus `´ key, not "ä")
~ (Altgr with + key, not "ß")
| (Altgr with < key)
} (Altgr with 0 key)
#
$
>
au
eu
ei
ch
sch
ü
ö
ie
ä
ß
äu
st
Number sign
capital letter
capital word
1,6
1,2,6
1,4,6
1,4,5,6
1,5,6
1,2,5,6
2,4,6
3,4,6
3,4,5
2,3,4,6
3,4
2,3,4,5,6
3,4,5,6
4,6
4,5
6. The editor mode
The ELOTYPE has a battery-backed memory into which text can be written for duplicating,
print-out or transfer to other electronic devices.
In order to offer a maximum of convenience for the user, the large memory (with a maximum
space for 32 000 Braille characters) is organised by pages and lines.
It is possible to store 25 pages of text in 6-dot Braille with 40 characters per line and 30 lines
per page.
The editor memory is accessed using the command #e (command call-e). This command is
confirmed with a positive audible signal (an ascending scale). After the editor has been
activated, the "editor cursor" will be placed at the beginning of the first page of the memory
(page 1, line 1, column 1).
Activating another mode (e.g. the printer mode with #d) closes and leaves the editor
memory.
6.1 Key definitions in the editor mode
In the editor mode, the assignment of the Braille keys K1 through K6 on the keyboard can be
redefined by pressing K7 or K12 so that (K3) is assigned to characters, (K2) words, (K1)
lines (K4) pages and (K6) markers. The keyboard can only be redefined in the editor mode.
This function enables the user for example to delete one character, one word, one line or one
page or insert text. In addition, it is possible to move the "editor cursor" by line or by page.
(for more details see "Editor commands").
The editor cursor is an imaginary cursor that marks the memory location in which a
braille character is stored.
There are six markers (M1 through M6) which can be used to mark special locations in the
entire editor memory, like the tabs or riders on index cards. M1, M2, and M3 can be moved
to any written character without changing it or any memory location; M4, M5, and M6 can
only be moved to the beginning of a line.
In the editor mode, keys K10 and K11 move only the paper, not the editor cursor in memory!
15
ELOTYPE 4
Blista-Brailletec
6.2 Editor commands
6.2.1 Cursor commands
There are two special keys (K-, K+) and a set of instructions which enable the user to control
the "Editor cursor" in the 25-page memory. Observe the following first:
The memory locations for any line in the memory are assigned to the position of the
embossing head from the left to the right.
The "editor cursor" can be moved forward and back with K+ (forward) and with K- (backward)
in any memory line, and while doing so the embossing head is also moved accordingly. If a
line is blank, the ELOTYPE plays a negative audible signal.
K+ Move cursor towards end of line (*1)
This command moves the cursor without overwriting text in memory. The embossing head is
moved simultaneously.
K- Move cursor towards beginning of line
This command moves cursor without overwriting text in memory. The embossing head is
moved simultaneously.
K7 K1 K- Cursor 1 line up
The cursor jumps 1 line upwards the beginning of the page and is then located at the
beginning of the line.
K7 K1 K+ Cursor 1 line down
The cursor jumps 1 line towards the end of the page.
K7 K1 then K3,4,5,6 Prints out cursor line and page
Prints out the current line and page numbers (line 1 to 30) (K3,K4,K5,K6 = international
numeric sign in Braille). The embossing head is then moved to the beginning of the line.
Print-out: S xx (page) Z xx (line).
K7 K1 K8 Print out text in current line
The text contained in the cursor line is printed. Embossing head does a CR/LF.
K7 K1 xx K8 Move Cursor to line xx (1*)
The cursor jumps to the beginning of line xx (xx = 1 - 30 in computer Braille). The embossing
head moves accordingly.
K7 K4 K+ Move cursor 1 page down
Moves the cursor down to the beginning of the next page (1st line, 1st column)
K7 K4 K- Move cursor 1 page up
Moves the cursor to the beginning of the previous page (from x to x -1), 1st column, 1st line.
K7 K4 xx Move cursor to the beginning of the page (xx = 1 - 25).
K7 K4 K8 Print current page
Prints out the page on which the cursor is located. The cursor remains in it's position.
K7 K6 x K+ Move marker x to the beginning of the cursor line x (x =4, 5, 6)
K7 K6 x K+ Move marker x exactly to the cursor position (x = 1, 2, 3)
K7 K6 x K8 Move cursor to marker position (x = 1 - 6)
16
ELOTYPE 4
Blista-Brailletec
1*: These commands are only executed if the appropriate line contains text; otherwise the
command is rejected with a negative audio signal.
6.2.2 The delete functions
It is possible to delete a character, a word, a line or a page by pressing key K12. After
pressing this key, the user can select K1 through K4 to delete a character using K1, a word
using K2, a line using K3 or one or several pages using K4. After the desired key function
has been selected, press K- to delete and close the delete procedure. When deleting a
character or a word in a line, the space resulting is immediately closed by moving the text in
the current line accordingly. The space resulting at the end of the line can then be closed
using the text breakdown command #o (see section 6.2.4.).
K12 K3 K- Deletes the character on which the cursor is placed and moves text of the line
accordingly.
K12 K2 K- Deletes the complete word on which the cursor is placed and moves the text of
the line accordingly.
K12 K1 K- Deletes the text from the cursor position to the end of line.
K12 K4 K- Deletes text from the current cursor position to the end of the page.
K12 K6 K- Deletes the text from the cursor position to the position of marker 1. Pressing K6
outputs an audible warning signal. The delete command can then be cancelled using K13
and executed by K6.2.3 Inserting text
The user can insert characters or complete passages of text in an already existing document
after the command "Open Text Insert" has been activated. Text is always inserted from the
position of the "editor cursor" or the "embossing head". Existing text is moved from the
insertion point towards the end of the memory. A word which cannot be completely written at
the end of a line will always appear in the next line. If the document is so large that it fills the
entire 25-page memory, the text moved by the insertion beyond the last line of the 25th page
will get lost. Each character inserted is confirmed with a beep tone.
K12 K+ inserting text on
Allows the insertion of text from the cursor position. The insertion is confirmed by an audio
signal.
K12 K- inserting text off
Closes the text insert function and allows to overwrite text again.
17
ELOTYPE 4
Blista-Brailletec
6.2.4 Special editor commands
# K7 Set the tabulator
Saves the cursor position as a tab position.
# K7 Cancel the tab
If a tab is set at the current position, it is cancelled with this command
K7 K7 Move to the tab
Moves to the next tab position in memory.
# K5 Activates/deactivates embossing while writing in the editor. The embossing head
always moves while writing, to indicate cursor position.
# c K8 Prints out the memory contents from marker M5 to M6.
# c xx K8 Prints out xx copies of the text from marker M5 to marker M6 (xx = 01 to 99).
# o Text breakdown
All text from marker M5 to marker M6 is broken down into paragraphs aligned on the left
margin, without hyphenation.
# p Send text via interface
All text from marker M5 to M6 is sent via RS 232 and parallel interface, with CR/LF at the
end of each line.
# i Receive text from interface
Text received via RS 232 or parallel interface is written into memory starting at marker M4.
Writing is not supervised! A CR/LF is expected at the end of each line.
# m Move text
All text between marker M5 and M6 is moved to the position of marker M4. Any existing text
is overwritten.
7. Printing tactile graphics with the ELOTYPE 4
The graphics mode is activated using the command # g. The ELOTYPE confirms this
command with a positive audio signal. Selecting another mode (for example the typewriter
mode # s) deactivates the graphics mode. In the graphics mode, the ELOTYPE 4 receives
appropriate data X- and Y-co-ordinates from the RS 232 serial port for positioning the
embossing head. It prints out graphics with pin 1 of the embossing head. This ensures for all
the dots to have a constant distance of 2 mm in each direction. The graphics program
“BrailleGraf” which runs under WINDOWS is described in the appendix.
18
ELOTYPE 4
Blista-Brailletec
8. The ELOTYPE 4 in network mode
Several ELOTYPEs can be connected to form a network in a loop via the high-speed serial
Bus (RS 485), for example to enable deaf - blind persons to communicate, or for a teacher student networks. The network mode is activated using the command # N and terminated
using the command # n. Note that it is important to enter a capital N for network mode,
and small n to exit. In network mode, the loop is used as the input/output channel for the
machines within the network.
Remember:
The network mode is activated using the command #N (N as a capital letter in computer
Braille: dots 1,3,4,5,7) and terminated using the command #n (n as a small letter). If entered
correctly, the two commands will be confirmed by a positive signal.
8.1 Teacher-students communications system
All ELOTYPEs are linked via the loop (RS 485) and switched to the brailler mode (#s).
Use the command #N on the teachers ELOTYPE, which means this machine is the only one
that can send information to all the other machines within the network.
- All input from the Braille keyboard of the teacher's ELOTYPE is received by the students
machines.
- It is also possible to send all text received by the teacher's ELOTYPE via the RS 232 port
from a PC to the student's machines. In this case, the teacher's ELOTYPE must first be set
to printer mode using the command #d.
- All document saved in the editor memory of the teacher's ELOTYPE can be sent to the
student's machines using the command #p. To this end, the teacher's ELOTYPE must first
be switched to the editor mode using the command #e. It is not possible to load text into the
editor memory of the student's machines via the loop.
8.2 Deaf-blind communications system
While in the brailler mode, all the ELOTYPEs linked within the loop are switched to network
mode using the command #N. Now each machine can send and receive information
concurrently.
Any input from the keyboards of all the ELOTYPE s is sent to all the other machines and
printed in chronological order.
8.3 Multiple-printer
It is also possible to form a network with several ELOTYPEs using the high-speed RS 485
BUS and operate them synchronously as printers. To this end, the machines need only be
switched to the printer mode. The ELOTYPE 4 which is connected to a PC (via the RS 232
or parallel port) is switched to network mode using the command #N. The master - machine
then sends the documents received from the PC to all the slaved ELOTYPEs.
Note: Due to the bidirectional printing, the slaved machines start printing only after the
master-machine has printed out the first line.
19
ELOTYPE 4
Blista-Brailletec
9. Trouble-shooting
There is a control program implemented in the ELOTYPE which monitors a great number of
possibly erroneous keyboard entries (for example wrong numbers and key combinations)
and rejects them with a negative audio signal (a sequence of tones from high to low). Despite
very extensive tests it is possible that after a wrong input, the ELOTYPE does no longer work
normally. In such an extreme case, the user can use the "general reset" for trouble-shooting.
9.1 General Reset
Turn off ELOTYPE 4 . Hold keys K1, K3, and K5 depressed while turning the ELOTYPE
on until an audio signal is heard informing you that the reset process has been
completed. This may take some time. Release the keys K1, K3 and K5. The embossing
head will move to the left margin.
Remember:
- After a "General Reset" has been performed, all user-settings, e.g. left / right margin, tabs,
volume, etc., are erased. The General Reset returns the ELOTYPE to the brailler mode.
- In addition, the machine is set to the following basic values: Line spacing: 10 mm (step 2),
signal volume step 6 (of 10).
- The German ASCII-braille table is loaded.
- 8-dot braille is selected.
If a General Reset does not make the ELOTYPE work properly as it used to do, please
contact your dealer or the manufacturer.
20
ELOTYPE 4
Blista-Brailletec
10. Technical data
General data
Embossing size
Medium size embossing: 2.5mm dot spacing / 6.0 mm character spacing
Line spacing
Adjustable: 7.5 mm, 10 mm or 12.5 mm (dot 1 to dot 1 of the following line)
Embossing speed
Full 8-dot braille cell: 11 char/sec
Maximum paper width
300 mm
Maximum paper length
infinite, using paper feed slot
Paper thickness
max. 160 g/m²
Serial interface RS 232
Baud rate 9600
Data bits 8
Parity no
Stop bit 1
Network interface
RS 485, 6-pin "Western" connector for linking ELOTYPES
Parallel interface
Standard, 25-pin
Operating voltage:
input 100V to 240V AC, 50-60Hz
secondary 31V DC
Power consumption
0.55 A
Total weight
5.6 kg incl. tractor feeder and mains adapter
Size
295*440*110mm (length*width*height)
21
ELOTYPE 4
Blista-Brailletec
Package contents
- ELOTYPE 4
- power adapter
- dust protection cover
- Manuals
Accessory
- Interface cable RS 232
- Interface cable for parallel port
- Interface cable for RS 485
- Tractor
- Graphics program "BrailleGraf"
- ELVIS-D" print display unit
- Ink print printer with interface cable
- MF-2 keyboard
- Aluminium frame case or hard plastic case
- Noise absorbing felt mat
- Endless paper 1000 sheets in box, 12" x 11" or 12" x 8"
- Single sheets in packs of 250
Hardware adaptation
- keyboard for single hand operation left / right
- Extra keyboard cover for spastics
- Individual keyboards for people with multiple disabilities
- Vibrator for deaf-blind persons
22
ELOTYPE 4
Blista-Brailletec
Appendix:
HELP for installing the ELOTYPE 4 as a printer under WINDOWS 95 / 98:
1.
2.
3.
4.
5.
6.
7.
Double click on "my computer" on the desktop.
Double click on "printer", then on "new printer".
Click on "continue".
Select "local printer", then click "continue".
In the "manufacturer" menu on the left, select "Generic".
Select "Generic / Text only" from the list on the right, then click "continue".
Select the interface your ELOTYPE is connected to from the list, then click "continue".
(LPT1, COM1, COM2) If you select a serial Port like COM1 or COM2, you have to
configure this Port. 9600 Baud, 8 databit, no parity, 1 stopbit. The protocol should be
‘Hardware’.
8. Now enter "Elotype" in the enter field "printer name". If you wish, you can then make the
ELOTYPE your standard printer by clicking the button below. Then click "continue".
9. Your ELOTYPE will now be installed as a printer. If you wish to print a test page, click
"no", then click "continue".
10. Depending on your Windows 95 installation, the printer driver is installed either from hard
disk, diskette, or CD. The computer will prompt you in case you have to insert a disk.
11. Now your ELOTYPE is installed, you need to configure it. Double-click the "ELOTYPE"
icon in the "printer" window.
12. From the "ELOTYPE" window that pops up, select "printer" from the menu bar, then
"properties" from the pop-up menu.
13. Select the "options" rider. There is a codepage menu on the lower right. Select the code
table you wish to use (normally this is codepage 850), then click on "OK".
Now you can print directly from all applications that use the standard Windows printer
interface. This includes, among others, WordPad, Excel.
To print, power on your ELOTYPE, insert paper, then press the spacebar (K9) after aligning
the first line of the paper under the printhead. Then switch into the printer mode by pressing
#d. If you are printing from WordPad or Excel, set the page margins (upper, lower, left, and
right) to 0 mm in the print menu. The ELOTYPE will control page margins using its own
software.
To print, simply select "file / print" from the menu bar, then press OK.
ELVIS
ELVIS is a print display unit intended for sighted persons who have no knowledge of braille
or do not want to get an expensive computer system for reading text being written on the
ELOTYPE at a time.
ELVIS allows to immediately read in print a text being written on the ELOTYPE in full braille.
To this end, all you have to do is connect ELVIS to the ELOTYPE via the serial port. The
display always shows the last written four Braille lines with a maximum of 40 characters.
There are two keys which allows to scroll in a longer text.
ELVIS weighs 420 g and is 20.5 cm wide, 6.5 cm deep and 3.5 cm high.
The graphics program "BrailleGraf" for the ELOTYPE
BrailleGraf allows
- making vector-oriented drawings. This means different drawing objects, such as straightlines, rectangles, circles, etc., are defined by their start and end points.
- Drawings can be labelled. "BrailleGraf" converts the letters into Braille characters.
- importing images in the BITMAP-format
- "BrailleGraf" runs under WINDOWS 95 and lager.
23
ELOTYPE 4
Blista-Brailletec
German braille coding
The letters and digits required in some of the commands must be entered in German
computer braille coding. The input coding for commands and digits is not changed when
loading language-specific ASCII or keyboard conversion tables.
Char
Braille dots
c
d
e
g
i
m
n
N
o
p
s
1,4
1,4,5
1,5
1,2,4,5
2,4
1,3,4
1,3,4,5
1,3,4,5,7
1,3,5
1,2,3,4
2,3,4
1
2
3
4
5
6
7
8
9
0
1,6
1,2,6
1,4,6
1,4,5,6
1,5,6
1,2,4,6
1,2,4,5,6
1,2,5,6
2,4,6
3,4,6
Schematic of the RS 232 Interface cable
RS 232 Kabel: ELOTYPE - PC
Zweimal 9-polige Sub.D Buchsen
Pin
Pin
2
3
5
3
2
5
4
8,1,6
8,1,6
4
24
ELOTYPE 4
Blista-Brailletec
CE-Certificate of Compliance
for the Braille typewriter ELOTYPE4/4E
We hereby certify that the Braille typewriter ELOTYPE4 has been tested and found to comply
with the rules and test standards stated below.
Equipment, name:
Braille typewriter, ELOTYPE4/4E
EC-rules:
- 89/336/EC, 91/263/EC, 92/031/EC,
- 73/023/EC
Technical basic standards:
- Limit values for radio noise
- Technical basic standard for
immunity from noise
- Low voltage rule
EN 55022:1994-08 and EN 55022/A1:1995-05 Kl.B
EN 50082-1:1992-01
EN 60950/A2:1994-09
Nov. 24, 1998
E. Schäfer
Manager
25