1
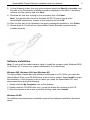
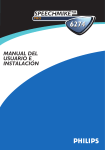
SPEECHMIKETM
CLASSIC BARCODE
6294
INSTALLATION AND
USER MANUAL
PHI
SpeechMike™ Classic
Barcode
Installation and User Manual
PHI
SpeechMike Classic Barcode Installation and User Manual
2
COPYRIGHT
© 1997 – 2003 Philips Speech Processing.
All rights reserved. Reproduction in whole or in part is prohibited without the written
consent of the copyright owner.
Information in this manual is subject to change without notice.
TRADEMARKS
SpeechMike is a trademark of Philips.
DISCLAIMER AND NOTICES
Philips Speech Processing has carried out extensive testing with most popular
configurations. However, since PC add-ons and drivers change very rapidly, we are
unable to guarantee conflict-free operation. Possible solutions for solving such conflicts
can be found in the Readme file.
The CE mark confirms that the machine corresponds to the
relevant guidelines of the European Union.
This manual has been printed on chlorine-free, recycled paper,
in line with the highest standards of environmental friendliness.
The cardboard used for packaging can be recycled. This
electronic facility contains recyclable material.
Technical changes and errors excepted.
CLASS 1 LASER PRODUCT
This product complies with US 21CFR1040.10, and IEC825-1:1993+A1:1997,
EN60825-1:1994+A11:1996.
The laser classification is marked near the scanner window on the product.
Class 1 Laser devices are not considered to be hazardous when used for their intended
purpose. The following statement is required to comply with US and international
regulations:
Caution:
Do not try to open the unit. Allow only authorized Service technicians to repair
the unit. Use of controls, adjustments or performance of procedures other than those
specified herein may result in hazardous laser light exposure.
SpeechMike Classic Barcode Installation and User Manual
Introduction
Thank you for buying a Philips SpeechMike.
The SpeechMike Classic Barcode has been designed to offer optimum user
convenience and greater efficiency for your daily work. This manual covers the
installation of the SpeechMike Classic Barcode hardware and software, the handling of
the SpeechMike Classic Barcode and the testing of the installation.
SpeechMike Classic Barcode features
• Professional dictation input device for single-handed operation.
• LEDs for visual and built-in loudspeaker for acoustic feedback.
• All buttons can be programmed to suit individual user preferences.
Package contents
• Philips SpeechMike Classic Barcode LFH 6294 with self-adhesive microphone
holder.
• Drivers for Windows 98 SE, Windows ME, Windows 2000 and Windows XP.
• SpeechMike Control Application to customize button settings for the control of
Windows applications such as Microsoft Office and Internet applications.
• SpeechMike sound recorder with enhanced recording and playback features.
• SpeechMike Classic Barcode User Manuals.
Support and feedback
For the latest information not contained in the manual, please refer to the Readme file
on the SpeechMike CD or go to the Start menu, Programs, SpeechMike and select
Readme.
For the latest version of the SpeechMike software package, please contact your
software vendor.
For additional information on professional speech processing and speech recognition
solutions from Philips Speech Processing, please visit our web site at:
http://www.dictation.philips.com
For further information, please refer to the "World-Wide Service Information" booklet
included with this package.
3
SpeechMike Classic Barcode Installation and User Manual
4
Installation
System requirements
• IBM-compatible PC
• USB port
• Minimum of 32 MB RAM recommended
• Windows 98 SE, Windows Me, Windows 2000 or Windows XP
Hardware installation
Windows ME, Windows 2000 and Windows XP:
1. Turn on your computer and plug the SpeechMike Classic Barcode into the USB port.
2. The New Hardware Found message will be displayed shortly on your screen.
Note: If this message does not appear, verify whether the USB port is enabled in the
BIOS of your system. See your hardware documentation for details or contact your
hardware vendor.
3. Installation will proceed automatically.
Windows 98 SE:
Note: The Windows 98 Second Edition CD contains the USB drivers for the microphone
and loudspeaker only. The drivers for the LED display and dictation buttons must be
installed from the SpeechMike CD before connecting the hardware.
1. Turn on your computer and insert the SpeechMike CD without plugging the
SpeechMike Classic Barcode into the USB port.
2. Autorun.exe will start. If this program is not run when you insert the SpeechMike CD,
start setup manually by doing the following:
• Double-click the My Computer icon on the desktop.
• Double-click the CD-ROM drive icon; you will be shown the contents of the CD.
• Start the program autorun.exe by double-clicking it.
3. Click Install to begin installation. When you are prompted to select the components
you wish to install, select the Control application, the SpeechMike recorder and
the SpeechMike driver. Follow the instructions on the screen to install the software
components.
4. Remove the SpeechMike CD and insert your Windows 98 SE CD.
5. Plug the SpeechMike Classic Barcode into the USB port. Windows will find a total of
four new devices.
6. When the Add New Hardware Wizard starts, click Next.
7. On the next screen, make sure that Search for the best driver for your device.
(Recommended) is selected. Then click Next.
SpeechMike Classic Barcode Installation and User Manual
5
8. On the following screen, the only option selected should be Specify a location, and
the path of the Windows\inf subfolder should be displayed in the field. If necessary,
uncheck all other options and click Next.
9. Windows will now start looking for the necessary files; click Next.
Note: The required files from the Windows 98 SE CD can be found in the
Setup/Win98 subdirectory, browse to this directory and click OK.
10. After the first part of the installation has been completed successfully, click Finish.
11. Repeat steps 6–10 until all four SpeechMike Classic Barcode components are
installed correctly .
Software installation
Note: A user must have administrator rights to install the program under Windows 2000
or Windows XP. Contact your system administrator if you need help.
Windows ME, Windows 2000 and Windows XP:
The SpeechMike Classic Barcode software is delivered on a CD. When you insert the
SpeechMike CD into your CD-ROM drive, autorun.exe is started. Select Install to begin
the installation. If this program is not run when you insert the SpeechMike CD, start
setup manually by doing the following:
1. Double-click the My Computer icon on the desktop.
2. Double-click the CD-ROM drive icon; you will be shown the contents of the CD.
3. Start the program autorun.exe by double-clicking it and select Install.
Windows 98 SE:
The software has already been installed as part of the hardware installation described
above.
6
SpeechMike Classic Barcode Installation and User Manual
Handling the SpeechMike Classic Barcode
Place the SpeechMike in the palm of your hand with the thumb on the 4-position switch
and your index finger across the trigger underneath.
SpeechMike Classic Barcode Buttons:
American Edition
International Edition
Barcode scanner
Record
Microphone
EOL
(End-ofletter)
Fast
Forward
Play/Stop
Insert/
Overwrite
Programmable
button
Scanner trigger
button
Microphone
Fast
Forward
Insert/
Overwrite
EOL
(End-ofletter)
Record
Stop
4-Position
Switch
Play
Fast
Rewind
4-Position
Switch
Fast
Rewind
6294
Loudspeaker
Loudspeaker
Microphone functions
When the SpeechMike Classic Barcode is installed correctly, the microphone and
speaker functions and the Record, Play/Stop, Fast Rewind and Fast Forward functions
are available and ready for use.
Additional button functions
The buttons on the SpeechMike can also be assigned additional functions depending on
the application and whether the buttons are used in a programmed mode. For more
information on individual button settings and on how to program buttons, consult the
Software Manual.
SpeechMike Classic Barcode Installation and User Manual
7
Barcode Scanner
The SpeechMike Classic Barcode has a built-in bar code scanner that can be
programmed to suit the application you are using. The scanner is connected to the PC
via the USB interface. The scanner supports the following standards: EAN, UPC, Code
128, Code 39, Code 93, 2 out of 5 family, Codabar, Code 11, MSI Code and Interleaved
2/5.
Configuring the scanner
Your SpeechMike Classic Barcode is preconfigured with the keyboard language US
English and the suffix "carriage return" (CR). Before using the Barcode Scanner for the
first time, it is necessary to adapt it to your local keyboard language. This must normally
be carried out once only.
To change the scanner configuration, call up the scanner configuration program
Barcodeconfig.exe on the SpeechMike Classic CD. With this application, you can
easily change the keyboard language, prefix, suffix and beep tones.
For more information on adapting the barcode scanner to your individual needs, consult
the 6294 Barcode Integration Guide on the CD.
Using the scanner
The barcode scanner is activated by pressing the scanner trigger button. The device will
scan for 3 seconds each time the trigger is depressed. When the barcode has been
scanned successfully, the device will beep and the numbers and letters of the barcode
are inserted into the currently active application.
Each time a code is scanned, the code is inserted into the active application with a
prefix and a suffix. This prefix and suffix can be adapted to your needs (text or keyboard
command) by using the scanner configuration program Barcodeconfig.exe on the
SpeechMike Classic installation CD. The default suffix is a carriage return (CR).
Installing the microphone holder
Clean the mounting location carefully, for example with alcohol, and let dry. Remove the
protective film from the adhesive strip on the back of the microphone holder and affix to
the cleaned location.
SpeechMike Classic Barcode Installation and User Manual
8
Troubleshooting
For the latest information not included in the user manual, please refer to the Readme
file. The file can be found on the SpeechMike CD and in the SpeechMike program group
in the Start menu.
If you are using your SpeechMike Classic Barcode with Windows 98 SE, check that all
components are installed properly as follows:
1. Go to the Start menu and select Settings, Control Panel.
2. Double-click the Multimedia icon; ensure that USB audio device is selected for
playback and recording. If the SpeechMike is not available in the Control Panel,
unplug it and reconnect it.
3. Ensure that the following components are installed in the Device Manager:
Under Human Interface Devices:
• USB human interface device
• HID compliant consumer control device
• HID human interface device
Under Keyboards:
• HID-compliant keyboard
Under Universal Serial Bus Controllers:
• Generic USB Hub
• USB composite device
• USB composite device
Under Sound, video and game controllers:
• USB audio device
• USB audio device
Attention:
Using the SpeechMike Classic Barcode together with certain USB hubs on certain PCs
may cause the operating system to freeze during booting.
Workaround: Unplug your SpeechMike before booting and reconnect it afterwards.
To solve this problem, we recommend replacing the USB hub or connecting your
SpeechMike Classic Barcode directly to the USB port of your computer.
Warning
The cable of your SpeechMike can be damaged if it is kinked or if it is pulled or twisted
too much. Please handle the cable carefully to ensure the best possible performance of
your SpeechMike.
If the LEDs and buttons of your SpeechMike Classic Barcode do not work correctly,
refer to the Readme file.
© 2003 by Philips Speech Processing
5103 109 9538.1
T
www.dictation.philips.com