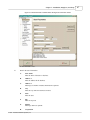
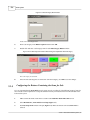
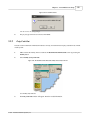
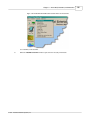
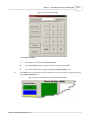
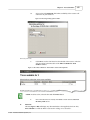
1
Point of Sale
User Manual
version 7.7
Information contained
in this publication
shows correct operating
procedure for use of this
product.
© 2006
Ideal Software Systems, Inc.
4909 Great River Drive
P.O. Box 3065
Meridian, MS 39303
601/693-1673
About This Manual
This manual contains information about installing and using the
Point of Sale software. Point of Sale is made exclusively for and
not excluded to family entertainment centers to meet business and
management software needs. This software package offers
comfortable interfaces with cutting edge abilities.
This manual also contains information about software installation,
setup, reference, usability, and troubleshooting the Ideal Point of
Sale product.
For further information about configuring and utilizing the Point of
Sale software, please call Ideal's Technical Support Desk at
601.693.1673.
Point of Sale
Copyright Notice
Copyright © 1997 - 2005 Ideal Software Systems, Inc. Ideal Software Systems, Inc., 905 22nd Avenue, P.O. Box 110,
Meridian, Mississippi 39302, USA. All Rights Reserved. Purchasers of Point of Sale licenses are given limited
permission to reproduce this manual, provided the copies are for their use only and are not sold or distributed to third
parties. All such copies must contain the title page and this notice page in their entirety.
Restricted Rights Notice
The Point of Sale Software program and the accompanying documentation described herein are sold under license
agreement. Their use, duplication, and disclosure are subject to the restrictions stated in the license agreement.
Limitation of Warranty
This publication is provided "as is" without warrenty of any kind, either express or implied, including, but not limited
to, the implied warrenties of merchantability, fitness for a particular purpose, or non-infringement. Any Ideal Software
Systems, Inc. publication may include inaccuracies or typographical errors. Changes are periodically made to these
publications, and changes may be incorporated in new editions. Ideal Software Systems, Inc. may improve or change
its products described in any publication at any time without notice. Ideal Software Systems, Inc. assumes no
responsibility for and disclaims all liability for any errors or omissions in this publication. Some jurisdictions do not
allow the exclusion of implied warrenties, so the above exclusion may not apply.
Publisher
Ideal Software Systems, Inc.
Managing Editor
Trademark Notices
Point of Sale, Front POS, Event Scheduler, MVP Credit System, Ideal
Cashless System (ICS), Access Control Manager (ACM), and Capacity
Managment are trademarks of Ideal Software Systems, Inc. Other brand
and product names are trademarks of their respective holders.
Reuben Burch
Technical Editors
Reuben Burch
Doug Hawkins
Brad Thomas
Jammy Williams
Cover Designer
Reuben Burch
Team Coordinator
Reuben Burch
Point of Sale Documentation
1) Point of Sale Complete Reference and User Guide for Owners and Managers
This manual contains everything an owner or user would ever
need to know about the Point of Sale software and all of its
modules. This manual has both reference and user sections to
cover all aspects of the program.
2) Point of Sale Reports Reference and User Guide for Owners and Managers
This manual contains all information about every report in and
relating to the Point of Sale system. This manual should be used
by the Chief Financial Officer of the company that will be using
this software.
3) Front POS Reference and User Guide for Cashiers and Managers
This manual contains all information about using the Front POS
module of the Point of Sale software. This manual should be used
by cashiers and other employees that will be using the Point of
Sale workstations.
7th Printing, May 2004
Who Should Read This Manual
This manual provides information for users who install and
run the Ideal Point of Sale software. The information in this
manual is intended to provide the user with a working
knowledge of the Point of Sale system including the features
and benefits it can contribute to a business.
Ideal Software Systems would appreciate your comments and
suggestions about this user manual.
Contents
I
Table of Contents
Chapter 1 - Welcome to Point of Sale
1.1 About Point of Sale
2
................................................................................................................................... 2
1.1.1 Who Should Use This Software.......................................................................................................................................................... 2
.......................................................................................................................................................... 3
1.1.2 Manual Organization
.......................................................................................................................................................... 6
1.1.3 Preparations
.......................................................................................................................................................... 6
1.1.4 Support
Chapter 2 - Installation, Employees, and Setup
7
2.1 Installing Point of Sale ................................................................................................................................... 7
.......................................................................................................................................................... 7
2.1.1 Preparing to Install Point of Sale
Network Wiring
......................................................................................................................................................... 7
Electrical Specifications
......................................................................................................................................................... 8
Modem Communication Lines
......................................................................................................................................................... 8
Employee Information
......................................................................................................................................................... 9
Sales Categories
......................................................................................................................................................... 9
Tax Tables
......................................................................................................................................................... 9
Retail Inventory
......................................................................................................................................................... 9
Party/Group Events
......................................................................................................................................................... 9
Tickets, Wristbands, and Customer
.........................................................................................................................................................
Cards
10
..........................................................................................................................................................
10
2.1.2 Installing Point of Sale for the First Time
..........................................................................................................................................................
15
2.1.3 Updating to Version 7.1 and Below
.......................................................................................................................................................... 17
2.1.4 Updating to Version 7.2 and Above
2.1.5 Installing the DBISAM Server.......................................................................................................................................................... 18
2.1.6 Creating/Selecting a Database.......................................................................................................................................................... 20
Editing the Locfile.ini File
......................................................................................................................................................... 20
Selecting the Database Via the Connection
.........................................................................................................................................................
Manager Window
21
..........................................................................................................................................................
24
2.1.7 Connecting Other Workstations
..........................................................................................................................................................
25
2.1.8 Repair a Database
.......................................................................................................................................................... 27
2.1.9 Optimize a Database
.......................................................................................................................................................... 29
2.1.10 Manage POS Sessions
..........................................................................................................................................................
30
2.1.11 Terminate Point of Sale Administration
Workstations
..........................................................................................................................................................
30
2.1.12 Terminate Front Workstations
..........................................................................................................................................................
31
2.1.13 Terminate ICS Kiosks
32
2.2 Entering Employees and...................................................................................................................................
Employee Groups
2.2.1 Employee Information
Employee Rights Tree
Time Clock Import
Employee Groups
Inactive Employees
Employee Cards
2.2.2 Entering the First Employee
Personal Information
Rights and Privileges
Picture
ICS Login
Employee Charges
.......................................................................................................................................................... 33
......................................................................................................................................................... 33
......................................................................................................................................................... 42
......................................................................................................................................................... 43
......................................................................................................................................................... 43
......................................................................................................................................................... 43
.......................................................................................................................................................... 43
......................................................................................................................................................... 45
......................................................................................................................................................... 47
......................................................................................................................................................... 48
......................................................................................................................................................... 50
......................................................................................................................................................... 51
© 1997 - 2005 Ideal Software Systems, Inc.
I
II
Point of Sale
.......................................................................................................................................................... 52
2.2.3 Entering Additional Employees
......................................................................................................................................................... 53
......................................................................................................................................................... 55
......................................................................................................................................................... 55
......................................................................................................................................................... 56
..........................................................................................................................................................
56
2.2.4 ICS Login
..........................................................................................................................................................
56
2.2.5 Edit an Existing Employee
2.2.6 Creating Employee Groups .......................................................................................................................................................... 59
.......................................................................................................................................................... 61
2.2.7 Editing Employee Groups
2.2.8 Assigning Employee Groups .......................................................................................................................................................... 64
2.2.9 Assigning Employee Cards .......................................................................................................................................................... 65
.......................................................................................................................................................... 66
2.2.10 Logging In with Employee Cards
FEC Administrator
......................................................................................................................................................... 66
Front POS
......................................................................................................................................................... 67
2.2.11 Making Employees Inactive .......................................................................................................................................................... 68
.......................................................................................................................................................... 69
2.2.12 Setup Camera
Advanced
......................................................................................................................................................... 70
Capture Source
......................................................................................................................................................... 71
Device Settings
......................................................................................................................................................... 72
..........................................................................................................................................................
73
2.2.13 Employee Charges
..........................................................................................................................................................
74
2.2.14 Award Employee Bonus
.......................................................................................................................................................... 76
2.2.15 Award Employee Time Worked
2.2.16 Process Payroll Deduction .......................................................................................................................................................... 77
Personal Information
Rights and Privileges
Picture
Employee Charges
................................................................................................................................... 78
2.3 Configuring System Parameters
2.3.1 System Parameters Reference .......................................................................................................................................................... 79
Store Settings
Money Settings
Terminal Settings
Printer Settings
Drawer Settings
Serial Devices Settings
PIN Pad Settings
Credit Card Settings
Party Scheduler Settings
Capacity Management Settings
Debit System Settings
Purchase Order Settings
Close Day Settings
Interface Settings
Internet Settings
Data Archive Settings
......................................................................................................................................................... 79
......................................................................................................................................................... 80
......................................................................................................................................................... 81
......................................................................................................................................... 82
......................................................................................................................................... 82
......................................................................................................................................... 83
......................................................................................................................................... 83
......................................................................................................................................................... 83
......................................................................................................................................................... 84
......................................................................................................................................................... 84
......................................................................................................................................................... 84
......................................................................................................................................................... 84
......................................................................................................................................................... 84
......................................................................................................................................................... 85
......................................................................................................................................................... 85
......................................................................................................................................................... 85
..........................................................................................................................................................
85
2.3.2 Configure Store Settings in Edit Parameters
..........................................................................................................................................................
91
2.3.3 Configure Money Settings in Edit Parameters
..........................................................................................................................................................
94
2.3.4 Configure Terminal Parameters
in Edit Parameters
..........................................................................................................................................................
99
2.3.5 Configure Printers in Edit Parameters
..........................................................................................................................................................
107
2.3.6 Configure Drawers in Edit Parameters
..........................................................................................................................................................
109
2.3.7 Configure Credit Cards in Edit
Parameters
..........................................................................................................................................................
111
2.3.8 Configure Party Scheduler in Edit Parameters
..........................................................................................................................................................
114
2.3.9 Configure Capacity Management in Edit Parameters
..........................................................................................................................................................
116
2.3.10 Configure Debit System in Edit Parameters
..........................................................................................................................................................
119
2.3.11 Configure Purchase Orders in Edit Parameters
..........................................................................................................................................................
120
2.3.12 Configure Serial Devices in Edit Parameters
..........................................................................................................................................................
122
2.3.13 Configure Close Day in Edit Parameters
..........................................................................................................................................................
124
2.3.14 Configure PIN Pad in Edit Parameters
© 1997 - 2005 Ideal Software Systems, Inc.
Contents
III
125
2.3.15 Configure Interfaces in Edit..........................................................................................................................................................
Parameters
..........................................................................................................................................................
128
2.3.16 Configure Time Clock Plus in Edit Parameters
..........................................................................................................................................................
131
2.3.17 Configure Internet in Edit Parameters
..........................................................................................................................................................
132
2.3.18 Configure Data Archive in Edit Parameters
Chapter 3 - Inventory Setup and Features
134
...................................................................................................................................
134
3.1 Inventory Categories and
Sub-Categories
3.1.1 Purpose for Using Categories.......................................................................................................................................................... 134
.......................................................................................................................................................... 135
3.1.2 Adding New Inventory Categories
3.1.3 Editing Inventory Categories.......................................................................................................................................................... 138
.......................................................................................................................................................... 139
3.1.4 Adding New Inventory Sub-Categories
.......................................................................................................................................................... 139
3.1.5 Editing Inventory Sub-Categories
................................................................................................................................... 140
3.2 Tax Tables
.......................................................................................................................................................... 140
3.2.1 About Tax Tables
.......................................................................................................................................................... 141
3.2.2 Adding a New Sales Tax
..........................................................................................................................................................
143
3.2.3 Adding a "Non Taxable" Sales
Tax
..........................................................................................................................................................
145
3.2.4 Editing a Sales Tax
..........................................................................................................................................................
145
3.2.5 Removing a Sales Tax
3.3 Inventory Unit Types ................................................................................................................................... 146
..........................................................................................................................................................
146
3.3.1 Explanation of Inventory Unit
Types
..........................................................................................................................................................
147
3.3.2 Adding Inventory Unit Types
.......................................................................................................................................................... 149
3.3.3 Modifying Inventory Unit Types
.......................................................................................................................................................... 150
3.3.4 Removing Inventory Unit Types
................................................................................................................................... 151
3.4 Units of Measure
.......................................................................................................................................................... 151
3.4.1 About Units of Measure
.......................................................................................................................................................... 151
3.4.2 Adding Units of Measure
.......................................................................................................................................................... 154
3.4.3 Editing Units of Measure
3.4.4 Removing Units of Measure .......................................................................................................................................................... 155
.......................................................................................................................................................... 155
3.4.5 Testing Units of Measure
3.5 Inventory Locations ................................................................................................................................... 157
.......................................................................................................................................................... 157
3.5.1 Inventory Location Explanation
3.5.2 Adding Inventory Locations .......................................................................................................................................................... 157
3.5.3 Editing Inventory Locations .......................................................................................................................................................... 159
................................................................................................................................... 161
3.6 Vendors
3.6.1 About Vendor Configuration.......................................................................................................................................................... 161
.......................................................................................................................................................... 161
3.6.2 Adding Vendors
.......................................................................................................................................................... 165
3.6.3 Editing Vendors
...................................................................................................................................
167
3.7 Inventory
.......................................................................................................................................................... 167
3.7.1 Inventory and Item Type Explanation
Special Inventory Codes
......................................................................................................................................................... 170
..........................................................................................................................................................
176
3.7.2 Creating a New Inventory Item
(Normal)
..........................................................................................................................................................
184
3.7.3 Creating a New Inventory Item
(Ticket Item)
..........................................................................................................................................................
188
3.7.4 Creating a New Inventory Item
(Package)
..........................................................................................................................................................
193
3.7.5 Creating a New Inventory Item
(Modifier)
..........................................................................................................................................................
197
3.7.6 Creating a New Inventory Item
(Wristband)
..........................................................................................................................................................
201
3.7.7 Creating a New Inventory Item
(Token)
..........................................................................................................................................................
204
3.7.8 Creating a New Inventory Item
(Dispense Tkt A)
..........................................................................................................................................................
208
3.7.9 Creating a New Inventory Item
(Dispense Tkt B)
..........................................................................................................................................................
211
3.7.10 Creating a New Inventory Item
(Dispense Tkt C)
..........................................................................................................................................................
215
3.7.11 Creating a New Inventory Item
(Customer Required Item)
..........................................................................................................................................................
218
3.7.12 Creating a New Inventory Item
(Mini-Golf Score Card)
© 1997 - 2005 Ideal Software Systems, Inc.
III
IV
Point of Sale
..........................................................................................................................................................
222
3.7.13 Creating a New Inventory Item
(Coupon)
..........................................................................................................................................................
225
3.7.14 Creating a New Inventory Item (Ingredient)
..........................................................................................................................................................
229
3.7.15 Creating a New Inventory Item (Open Key)
..........................................................................................................................................................
233
3.7.16 Creating a New Inventory Item (Intercard Value)
..........................................................................................................................................................
236
3.7.17 Creating a New Inventory Item (OnePOS Card Value)
..........................................................................................................................................................
240
3.7.18 Editing Inventory Items
..........................................................................................................................................................
241
3.7.19 Adding a Price Schedule
..........................................................................................................................................................
244
3.7.20 Editing a Vendor Through an Inventory Item
..........................................................................................................................................................
245
3.7.21 Using the Package Tree
..........................................................................................................................................................
247
3.7.22 Adding an Ingredient List
................................................................................................................................... 249
3.8 Modifier Lists
3.8.1 About Modifier Lists
3.8.2 Adding Modifier Lists
3.8.3 Editing Modifier Lists
3.9 Discounts
.......................................................................................................................................................... 249
.......................................................................................................................................................... 249
.......................................................................................................................................................... 255
................................................................................................................................... 257
.......................................................................................................................................................... 258
3.9.1 About Discounts
.......................................................................................................................................................... 258
3.9.2 Adding Discounts
.......................................................................................................................................................... 261
3.9.3 Editing Discounts
.......................................................................................................................................................... 262
3.9.4 Removing Items From Discounts
.......................................................................................................................................................... 263
3.9.5 View Applied Discounts
3.10 Order/Stocking Rules................................................................................................................................... 264
3.10.1 About Order/Stocking Rules.......................................................................................................................................................... 264
.......................................................................................................................................................... 264
3.10.2 Adding Order/Stocking Rules
.......................................................................................................................................................... 268
3.10.3 Editing Order/Stocking Rules
.......................................................................................................................................................... 269
3.10.4 Removing Order/Stocking Rules
................................................................................................................................... 270
3.11 Item Scripts
3.11.1 About Item Scripts
3.11.2 Adding Item Scripts
3.11.3 Editing Item Scripts
3.12 Ticket Scripts
.......................................................................................................................................................... 270
.......................................................................................................................................................... 270
.......................................................................................................................................................... 273
................................................................................................................................... 274
.......................................................................................................................................................... 274
3.12.1 About Ticket Scripts
.......................................................................................................................................................... 274
3.12.2 Adding Ticket Scripts
.......................................................................................................................................................... 276
3.12.3 Editing Ticket Scripts
.......................................................................................................................................................... 277
3.12.4 Importing a Ticket Script Directory
...................................................................................................................................
278
3.13 Consumption and Waste
.......................................................................................................................................................... 278
3.13.1 About Consumption and Waste
..........................................................................................................................................................
278
3.13.2 Adding Consumption and Waste
Counts to Inventory
281
3.13.3 Removing Consumption and..........................................................................................................................................................
Waste Counts From Inventory
Chapter 4 - Receiving, Transferring, Auditing, and
Purchase Orders for Inventory
4.1 Receiving Inventory
283
................................................................................................................................... 283
4.1.1 About Receiving Inventory .......................................................................................................................................................... 283
4.1.2 How to Receive Inventory .......................................................................................................................................................... 283
4.2 Transferring Inventory................................................................................................................................... 286
.......................................................................................................................................................... 286
4.2.1 About Transferring Inventory
4.2.2 How to Transfer Inventory .......................................................................................................................................................... 286
4.3 Auditing Inventory ................................................................................................................................... 289
.......................................................................................................................................................... 289
4.3.1 Purpose for Auditing Inventory
4.3.2 Printing Audit Count Sheets .......................................................................................................................................................... 289
© 1997 - 2005 Ideal Software Systems, Inc.
Contents
.......................................................................................................................................................... 291
4.3.3 Auditing Inventory
4.4 Purchase Orders
V
................................................................................................................................... 296
4.4.1 About Purchase Orders
4.4.2 Creating Purchase Orders
4.4.3 Editing Purchase Orders
4.4.4 Receiving Purchase Orders
.......................................................................................................................................................... 296
.......................................................................................................................................................... 296
.......................................................................................................................................................... 300
.......................................................................................................................................................... 302
Chapter 5 - Front POS Screen Setup
304
...................................................................................................................................
304
5.1 Setting Up the Front POS
Screen
5.1.1 About the Front POS Screen .......................................................................................................................................................... 304
..........................................................................................................................................................
305
5.1.2 Configuring the Main Category
Buttons
..........................................................................................................................................................
309
5.1.3 Configuring the Sub Category Buttons
..........................................................................................................................................................
310
5.1.4 Configuring the Buttons Containing the Items for Sale
..........................................................................................................................................................
315
5.1.5 Edit Item Buttons
..........................................................................................................................................................
316
5.1.6 Clear Item Buttons
..........................................................................................................................................................
316
5.1.7 Set Modifier List
..........................................................................................................................................................
318
5.1.8 Edit Modifier List
..........................................................................................................................................................
319
5.1.9 Clear Modifier List
..........................................................................................................................................................
320
5.1.10 Adding Areas
..........................................................................................................................................................
321
5.1.11 Renaming Areas
..........................................................................................................................................................
322
5.1.12 Accessory Button Color Setup
..........................................................................................................................................................
323
5.1.13 Assigning a Front POS Screen to a Workstation
................................................................................................................................... 325
5.2 Cash Payout Types
.......................................................................................................................................................... 325
5.2.1 Cash Payout Types Explanation
5.2.2 Adding Cash Payout Types .......................................................................................................................................................... 325
5.2.3 Editing Cash Payout Types .......................................................................................................................................................... 328
5.2.4 Removing Cash Payout Types.......................................................................................................................................................... 328
.......................................................................................................................................................... 329
5.2.5 Petty Cash Out
Chapter 6 - Issuing, Counting, Adjusting, and
Closing Drawers
6.1 Drawers
331
................................................................................................................................... 331
.......................................................................................................................................................... 331
6.1.1 About Drawers
.......................................................................................................................................................... 332
6.1.2 Issuing Drawers
.......................................................................................................................................................... 335
6.1.3 Removing Drawers
.......................................................................................................................................................... 336
6.1.4 Counting Drawers
.......................................................................................................................................................... 338
6.1.5 Adjusting Drawers
.......................................................................................................................................................... 340
6.1.6 Closing Drawers
.......................................................................................................................................................... 341
6.1.7 Closing All Drawers
.......................................................................................................................................................... 342
6.1.8 Adding Drawer Items
..........................................................................................................................................................
345
6.1.9 Add Additional Quantity to Drawer
Items
..........................................................................................................................................................
345
6.1.10 Remove Quantity From Drawer Items
..........................................................................................................................................................
346
6.1.11 Count and Record Quantities of Drawer Items
..........................................................................................................................................................
347
6.1.12 Audit Drawer Items
..........................................................................................................................................................
348
6.1.13 Drawer Lockout Override
Chapter 7 - Front POS, Customers, and Functions
350
350
7.1 The Sales and Payment...................................................................................................................................
Method Screens
350
7.1.1 About the Sales and Payment..........................................................................................................................................................
Method Screens
.......................................................................................................................................................... 352
7.1.2 Logging In
.......................................................................................................................................................... 355
7.1.3 Purchasing an Item With Cash
© 1997 - 2005 Ideal Software Systems, Inc.
V
VI
Point of Sale
.......................................................................................................................................................... 359
7.1.4 Purchasing an Item With Check
..........................................................................................................................................................
360
7.1.5 Purchasing an Item With Both
Cash and Check
..........................................................................................................................................................
362
7.1.6 Purchasing an Item With a Manual Credit Card
..........................................................................................................................................................
366
7.1.7 Purchasing an Item With Cash (and/or Check) and a Manual Credit Card
..........................................................................................................................................................
368
7.1.8 Purchasing an Item With a Credit Card
..........................................................................................................................................................
369
7.1.9 Purchasing an Item With Cash (and/or Check) and a Credit Card
..........................................................................................................................................................
370
7.1.10 Purchasing an Item With a OnePOS Card
..........................................................................................................................................................
372
7.1.11 Selling OnePOS Card Value
..........................................................................................................................................................
374
7.1.12 Purchasing Multiple Items
..........................................................................................................................................................
375
7.1.13 Purchasing an Item With Modifiers
..........................................................................................................................................................
376
7.1.14 Removing an Item for Purchase from the Sales Screen
..........................................................................................................................................................
377
7.1.15 Making a Sale Tax Exempt
..........................................................................................................................................................
378
7.1.16 Refunding Items
..........................................................................................................................................................
380
7.1.17 Applying Discounts to Items During a Sale
..........................................................................................................................................................
383
7.1.18 Adding Special Instructions to an Order
..........................................................................................................................................................
385
7.1.19 Opening the Cash Drawer Without Making a Sale
..........................................................................................................................................................
385
7.1.20 Freezing the Terminal
..........................................................................................................................................................
385
7.1.21 Changing the PIN Number
..........................................................................................................................................................
386
7.1.22 Closing Front POS
................................................................................................................................... 387
7.2 Customers
.......................................................................................................................................................... 387
7.2.1 Customers Reference
.......................................................................................................................................................... 388
7.2.2 Customers in FEC Administrator
7.2.3
Creating Customers
......................................................................................................................................................... 388
Editing Customers
......................................................................................................................................................... 394
Adding Customer Groups
......................................................................................................................................................... 396
Editing Customer Groups
......................................................................................................................................................... 397
Deleting Customer Groups
......................................................................................................................................................... 398
Adding Customer Rights
......................................................................................................................................................... 399
Editing Customer Rights
......................................................................................................................................................... 401
Assigning Customer Rights
......................................................................................................................................................... 401
Adding a Child Account
......................................................................................................................................................... 402
Adding State and City Information
......................................................................................................................................................... 403
Editing State and City Information
......................................................................................................................................................... 405
Deleting State and City Information
......................................................................................................................................................... 405
..........................................................................................................................................................
406
Customers in Front POS
Using Customer Look Up
......................................................................................................................................................... 406
Creating New Customers
......................................................................................................................................................... 412
Editing Customer Accounts
......................................................................................................................................................... 415
7.3 Front POS Functions ................................................................................................................................... 416
.......................................................................................................................................................... 417
7.3.1 Front POS Functions Explanation
.......................................................................................................................................................... 417
7.3.2 Pulling Cash from the Cash Drawer
.......................................................................................................................................................... 418
7.3.3 Adding Cash to the Cash Drawer
.......................................................................................................................................................... 420
7.3.4 Cashing Out of the Cash Drawer
7.3.5 Using Employee Discounts .......................................................................................................................................................... 421
..........................................................................................................................................................
422
7.3.6 Awarding Employee MVP/Bonus
Value
..........................................................................................................................................................
423
7.3.7 Reprinting Receipts
Chapter 8 - Tabs, Tips, and Accounts Receivable
8.1 Using Tabs
425
................................................................................................................................... 425
.......................................................................................................................................................... 425
8.1.1 Tabs Explanation
.......................................................................................................................................................... 425
8.1.2 Opening Customer Tabs
.......................................................................................................................................................... 429
8.1.3 Adding to Existing Tabs
..........................................................................................................................................................
430
8.1.4 Refunding Items from Existing
Customer Tabs
© 1997 - 2005 Ideal Software Systems, Inc.
Contents
.......................................................................................................................................................... 431
.......................................................................................................................................................... 431
.......................................................................................................................................................... 434
.......................................................................................................................................................... 436
.......................................................................................................................................................... 437
.......................................................................................................................................................... 438
8.1.5 Printing Tabs
8.1.6 Splitting Tabs
8.1.7 Void Items on Tabs
8.1.8 Transfer Tabs
8.1.9 Closing Tabs
8.1.10 Writing Off Tabs
8.2 Using Tips
VII
................................................................................................................................... 440
.......................................................................................................................................................... 440
8.2.1 Tips Explanation
..........................................................................................................................................................
440
8.2.2 Adding Gratuities to Credit Card
Transactions
..........................................................................................................................................................
442
8.2.3 Add Tips to Credit Card Transactions
..........................................................................................................................................................
444
8.2.4 Add Tips Through POS Administrator
..........................................................................................................................................................
445
8.2.5 Clear Out All Zero Tip Credit Card Charges
................................................................................................................................... 446
8.3 Open Invoices
.......................................................................................................................................................... 446
8.3.1 About Open Invoices
.......................................................................................................................................................... 446
8.3.2 Converting Tabs to Open Invoices
8.3.3 Paying Off Open Invoices .......................................................................................................................................................... 448
.......................................................................................................................................................... 450
8.3.4 View Customer Invoices
.......................................................................................................................................................... 452
8.3.5 View Open Invoices
Chapter 9 - Event Scheduler
453
9.1 Using Event Scheduler................................................................................................................................... 453
.......................................................................................................................................................... 453
.......................................................................................................................................................... 454
.......................................................................................................................................................... 462
.......................................................................................................................................................... 470
.......................................................................................................................................................... 474
Rescheduling Within the Same Resource
......................................................................................................................................................... 474
Rescheduling to a Different Resource
......................................................................................................................................................... 475
..........................................................................................................................................................
476
9.1.6 Print an Event Quote
..........................................................................................................................................................
476
9.1.7 Creating and Adding an Event Contract
..........................................................................................................................................................
481
9.1.8 Print an Event Contract
..........................................................................................................................................................
482
9.1.9 Issue Event Tickets
..........................................................................................................................................................
483
9.1.10 Taking a Deposit
..........................................................................................................................................................
486
9.1.11 Refunding a Deposit
..........................................................................................................................................................
486
9.1.12 Starting an Event
..........................................................................................................................................................
488
9.1.13 Adding Items to a Started Event
..........................................................................................................................................................
489
9.1.14 Paying for an Event
9.1.1 About Event Scheduler
9.1.2 Creating Resources
9.1.3 Booking an Event
9.1.4 Adding Items to an Event
9.1.5 Rescheduling an Event
Chapter 10 - MVP Credit System
490
...................................................................................................................................
490
10.1 Setting Up MVP Clubs
and MVP Credit
.......................................................................................................................................................... 490
10.1.1 About MVP Credit
.......................................................................................................................................................... 491
10.1.2 Setting Up Loyalty/MVP Clubs
10.1.3 Editing Loyalty/MVP Clubs.......................................................................................................................................................... 498
.......................................................................................................................................................... 498
10.1.4 Deleting Loyalty/MVP Clubs
499
10.1.5 Creating MVP Credit Card ..........................................................................................................................................................
Value Items
..........................................................................................................................................................
503
10.1.6 Selling MVP Credit Value in Front POS
..........................................................................................................................................................
506
10.1.7 Adding Credit to a Customer MVP Account
................................................................................................................................... 509
10.2 Using MVP Credit Cards
10.2.1 About MVP Credit Cards .......................................................................................................................................................... 509
..........................................................................................................................................................
510
10.2.2 Assigning the Card to an Existing
Customer
.......................................................................................................................................................... 510
10.2.3 Using the MVP Card for a Purchase
..........................................................................................................................................................
515
10.2.4 Using MVP Credit for Purchase
Along with Other Means of Payment
© 1997 - 2005 Ideal Software Systems, Inc.
VII
VIII
Point of Sale
516
10.2.5 Transferring Value from an..........................................................................................................................................................
MVP Card to a New Card
..........................................................................................................................................................
516
10.2.6 View Customer History
Chapter 11 - General Reports
518
................................................................................................................................... 518
11.1 Drawer Summary Report
.......................................................................................................................................................... 519
11.1.1 Drawer Summary Report Explanation
520
11.1.2 Using the Drawer Summary..........................................................................................................................................................
Report
................................................................................................................................... 521
11.2 Drawer Report
11.2.1 Drawer Report Explanation.......................................................................................................................................................... 522
11.2.2 Using the Drawer Report .......................................................................................................................................................... 523
11.3 Transaction Report ................................................................................................................................... 526
.......................................................................................................................................................... 526
11.3.1 Transaction Report Explanation
.......................................................................................................................................................... 526
11.3.2 Using the Transaction Report
................................................................................................................................... 533
11.4 Sales Report
11.4.1 Sales Report Explanation .......................................................................................................................................................... 533
.......................................................................................................................................................... 534
11.4.2 Using the Sales Report
................................................................................................................................... 536
11.5 Consolidated Sales Report
.......................................................................................................................................................... 537
11.5.1 Consolidated Sales Report Explanation
537
11.5.2 Using the Consolidated Sales..........................................................................................................................................................
Report
...................................................................................................................................
539
11.6 Sales Report YTD MTD
.......................................................................................................................................................... 539
11.6.1 Sales Report YTD MTD Explanation
539
11.6.2 Using the Sales Report YTD..........................................................................................................................................................
MTD
...................................................................................................................................
541
11.7 Receipt Reports
11.7.1 Sales Report
Sales Report Explanation
Using the Sales Report
11.7.2 Drawer Report
Drawer Report Explanation
Using the Drawer Report
.......................................................................................................................................................... 541
......................................................................................................................................................... 541
......................................................................................................................................................... 541
.......................................................................................................................................................... 543
......................................................................................................................................................... 543
......................................................................................................................................................... 543
11.8 Drawer Status Report................................................................................................................................... 544
.......................................................................................................................................................... 544
11.8.1 Drawer Status Report Explanation
.......................................................................................................................................................... 544
11.8.2 Using the Drawer Status Report
...................................................................................................................................
546
11.9 Credit Card Report
.......................................................................................................................................................... 546
11.9.1 Credit Card Report Explanation
.......................................................................................................................................................... 546
11.9.2 Using the Credit Card Report
................................................................................................................................... 548
11.10 Attraction Scan Report
.......................................................................................................................................................... 548
11.10.1 Attraction Scan Report Explanation
.......................................................................................................................................................... 548
11.10.2 Using the Attraction Scan Report
11.11 Hourly Sales Report................................................................................................................................... 550
.......................................................................................................................................................... 550
11.11.1 Hourly Sales Report Explanation
.......................................................................................................................................................... 550
11.11.2 Using the Hourly Sales Report
11.12 Hourly Scan Report ................................................................................................................................... 552
.......................................................................................................................................................... 552
11.12.1 Hourly Scan Report Explanation
.......................................................................................................................................................... 552
11.12.2 Using the Hourly Scan Report
11.13 Item Scan Report ................................................................................................................................... 554
.......................................................................................................................................................... 554
11.13.1 Item Scan Report Explanation
11.13.2 Using the Item Scan Report.......................................................................................................................................................... 554
11.14 Marketing Report ................................................................................................................................... 556
.......................................................................................................................................................... 556
11.14.1 Marketing Report Explanation
© 1997 - 2005 Ideal Software Systems, Inc.
Contents
IX
.......................................................................................................................................................... 556
11.14.2 Using the Marketing Report
11.15 Tax Income Report ................................................................................................................................... 558
.......................................................................................................................................................... 558
11.15.1 Tax Income Report Explanation
.......................................................................................................................................................... 558
11.15.2 Using the Tax Income Report
................................................................................................................................... 560
11.16 Tips Collected
11.16.1 Tips Collected Explanation.......................................................................................................................................................... 560
.......................................................................................................................................................... 560
11.16.2 Using Tips Collected
Chapter 12 - Inventory Reports
562
................................................................................................................................... 562
12.1 Inventory Listing Reports
.......................................................................................................................................................... 562
Inventory Listing by Item Explanation
......................................................................................................................................................... 562
Using the Inventory Listing by Item
......................................................................................................................................................... 563
..........................................................................................................................................................
565
By Location
Inventory Listing by Location Explanation
......................................................................................................................................................... 565
Using the Inventory Listing by Location
......................................................................................................................................................... 565
..........................................................................................................................................................
566
Summary Listing
Inventory Listing Summary Listing
.........................................................................................................................................................
Explanation
566
Using the Inventory Listing Summary
.........................................................................................................................................................
Listing
567
12.1.1 By Item
12.1.2
12.1.3
12.2 Vendor Report
................................................................................................................................... 568
12.2.1 Vendor Report Explanation.......................................................................................................................................................... 568
12.2.2 Using the Vendor Report .......................................................................................................................................................... 568
................................................................................................................................... 569
12.3 Ingredient Usage Report
.......................................................................................................................................................... 569
12.3.1 Ingredient Usage Report Explanation
.......................................................................................................................................................... 570
12.3.2 Using the Ingredient Usage Report
...................................................................................................................................
571
12.4 Cost of Goods Report
.......................................................................................................................................................... 571
12.4.1 Cost of Goods Report Explanation
.......................................................................................................................................................... 572
12.4.2 Using the Cost of Goods Report
...................................................................................................................................
573
12.5 Recipe Report
12.5.1 Recipe Report Explanation .......................................................................................................................................................... 573
12.5.2 Using the Recipe Report .......................................................................................................................................................... 574
12.6 Audit History Report ................................................................................................................................... 575
.......................................................................................................................................................... 575
12.6.1 Audit History Report Explanation
.......................................................................................................................................................... 575
12.6.2 Using the Audit History Report
...................................................................................................................................
577
12.7 Received Inventory Report
.......................................................................................................................................................... 577
12.7.1 Received Inventory Report Explanation
..........................................................................................................................................................
577
12.7.2 Using the Received Inventory
Report
................................................................................................................................... 579
12.8 Transfer Report
.......................................................................................................................................................... 579
12.8.1 Transfer Report Explanation
12.8.2 Using the Transfer Report .......................................................................................................................................................... 579
...................................................................................................................................
581
12.9 Purchase Order Summary
Report
..........................................................................................................................................................
581
12.9.1 Purchase Order Summary Report
Explanation
..........................................................................................................................................................
581
12.9.2 Using the Purchase Order Summary Report
Chapter 13 - End of Day and Other Routines
583
13.1 Closing Out the Day ................................................................................................................................... 583
.......................................................................................................................................................... 583
13.1.1 Daily Procedures
13.1.2 Closing/Night Procedures .......................................................................................................................................................... 584
13.1.3 Performing a Close Out Day.......................................................................................................................................................... 585
© 1997 - 2005 Ideal Software Systems, Inc.
IX
X
Point of Sale
.......................................................................................................................................................... 587
13.1.4 Depositing Money
................................................................................................................................... 588
13.2 Transaction File Backup
.......................................................................................................................................................... 589
13.2.1 Trimming the Transaction File
Chapter 14 - Ideal Cashless System (ICS) Debit
Card System
591
................................................................................................................................... 591
14.1 Site Preparation for ICS
14.1.1 Preparation Introduction
The Game Floor
The Back Office
14.1.2 Network Preparation
.......................................................................................................................................................... 591
......................................................................................................................................................... 591
......................................................................................................................................................... 592
.......................................................................................................................................................... 593
594
14.2 Using the Debit Card ...................................................................................................................................
System
14.2.1 Setting Up Debit Card Items.......................................................................................................................................................... 594
.......................................................................................................................................................... 601
14.2.2 Creating Debit Card Value Items
.......................................................................................................................................................... 604
14.2.3 Issuing Cash Drawers to Tellers
.......................................................................................................................................................... 606
14.2.4 Pre-Value ICS Cards
.......................................................................................................................................................... 607
14.2.5 Recycle ICS Cards
Chapter 15 - Access Control Manager (ACM) and
Turnstiles
608
15.1 Installing Turnstiles ................................................................................................................................... 608
.......................................................................................................................................................... 608
15.1.1 Understanding Turnstile Components
......................................................................................................................................................... 608
......................................................................................................................................................... 609
......................................................................................................................................................... 610
......................................................................................................................................................... 610
......................................................................................................................................................... 612
..........................................................................................................................................................
613
Free Wave Modem Configuration
..........................................................................................................................................................
617
Board and Wire Settings for "Pinging" Purposes
..........................................................................................................................................................
618
Setting Up Turnstyle Scanners
..........................................................................................................................................................
619
How PLC Handles a Scanned Access Ticket
Modems
Scanners
Y-Cable
PLC Board
Solenoid
15.1.2
15.1.3
15.1.4
15.1.5
15.2 Access Tickets
................................................................................................................................... 620
.......................................................................................................................................................... 620
15.2.1 About Access Tickets
.......................................................................................................................................................... 620
15.2.2 Setting Up Access Server Locations
.......................................................................................................................................................... 624
15.2.3 Editing Access Server Locations
.......................................................................................................................................................... 624
15.2.4 Setting Up the Ideal Access Server
..........................................................................................................................................................
626
15.2.5 Create Access Ticket Inventory
Items
..........................................................................................................................................................
633
15.2.6 Creating Season Pass Inventory
Items
.......................................................................................................................................................... 638
15.2.7 Creating Entitlements
.......................................................................................................................................................... 640
15.2.8 Editing Entitlements
.......................................................................................................................................................... 641
15.2.9 Removing Entitlements
15.2.10 View Access Ticket History.......................................................................................................................................................... 642
15.2.11 Redeeming Access Items .......................................................................................................................................................... 645
Chapter 16 - Customer, Facility, and Event
Scheduler Reports
16.1 Customer Reports
646
................................................................................................................................... 646
.......................................................................................................................................................... 646
Customer Detail Report Explanation
......................................................................................................................................................... 646
Using the Customer Detail Report
......................................................................................................................................................... 646
16.1.1 Customer Detail Report
© 1997 - 2005 Ideal Software Systems, Inc.
Contents
XI
.......................................................................................................................................................... 648
Open Invoices Report Explanation
......................................................................................................................................................... 648
Using the Open Invoices Report......................................................................................................................................................... 648
16.1.2 Open Invoices Report
16.2 Facility Reports
................................................................................................................................... 650
16.2.1 Facility Report
Facility Report Explanation
Using the Facility Report
16.2.2 Labor Report
Labor Report Explanation
Using the Labor Report
.......................................................................................................................................................... 650
......................................................................................................................................................... 650
......................................................................................................................................................... 653
.......................................................................................................................................................... 654
......................................................................................................................................................... 654
......................................................................................................................................................... 655
................................................................................................................................... 657
16.3 Event Scheduler Reports
.......................................................................................................................................................... 657
Party Planning Report Explanation
......................................................................................................................................................... 657
Using the Party Planning Report
......................................................................................................................................................... 658
..........................................................................................................................................................
660
Schedule Report
Schedule Report Explanation ......................................................................................................................................................... 660
Using the Schedule Report
......................................................................................................................................................... 660
..........................................................................................................................................................
661
Party Income Report
Party Income Report Explanation
......................................................................................................................................................... 661
Using the Party Income Report ......................................................................................................................................................... 661
663
Outstanding Issued Tickets ..........................................................................................................................................................
Report
Outstanding Issued Tickets Report
.........................................................................................................................................................
Explanation
663
Using the Outstanding Issued Ticket
.........................................................................................................................................................
Report
663
16.3.1 Party Planning Report
16.3.2
16.3.3
16.3.4
Chapter 17 - Bar Codes, Employee Listings, and
Form Letters
17.1 Printing Barcodes
664
................................................................................................................................... 664
17.1.1 About Bar Codes
17.1.2 Print Barcode Labels
.......................................................................................................................................................... 664
.......................................................................................................................................................... 664
667
17.2 Employee Labels and ...................................................................................................................................
Listings
17.2.1 About Employee Listings .......................................................................................................................................................... 667
667
17.2.2 Printing Employee Address ..........................................................................................................................................................
Labels
..........................................................................................................................................................
668
17.2.3 Printing Employee Information
Listings
17.2.4 Employee Charge Report .......................................................................................................................................................... 669
670
17.2.5 Employee Payroll Deduction..........................................................................................................................................................
Report
................................................................................................................................... 672
17.3 Form Letters and Labels
17.3.1 About Custom Form Letters.......................................................................................................................................................... 672
.......................................................................................................................................................... 672
17.3.2 Creating Form Letters
.......................................................................................................................................................... 675
17.3.3 Form Letter Selection Criteria
.......................................................................................................................................................... 678
17.3.4 Print/Preview Letter
.......................................................................................................................................................... 678
17.3.5 Edit File
.......................................................................................................................................................... 678
17.3.6 Printing Labels
Chapter 18 - Capacity Management
680
................................................................................................................................... 680
18.1 Setting Up Capacity Management
680
18.1.1 Capacity Management Setup..........................................................................................................................................................
Reference
.......................................................................................................................................................... 681
18.1.2 Defining
Adding Ratings
Editing Ratings
Deleting Ratings
Adding Formats
......................................................................................................................................................... 681
......................................................................................................................................................... 683
......................................................................................................................................................... 684
......................................................................................................................................................... 685
© 1997 - 2005 Ideal Software Systems, Inc.
XI
XII
Point of Sale
......................................................................................................................................................... 686
......................................................................................................................................................... 687
......................................................................................................................................................... 687
......................................................................................................................................................... 688
......................................................................................................................................................... 689
......................................................................................................................................................... 689
......................................................................................................................................................... 692
......................................................................................................................................................... 693
......................................................................................................................................................... 694
..........................................................................................................................................................
696
18.1.3 Adding a Film
..........................................................................................................................................................
701
18.1.4 Editing a Film
..........................................................................................................................................................
703
18.1.5 Creating Show Times
..........................................................................................................................................................
706
18.1.6 Reschedule Show Times
..........................................................................................................................................................
707
18.1.7 Repeat Show Time Schedules
..........................................................................................................................................................
709
18.1.8 Remove Show Time Schedules
..........................................................................................................................................................
710
18.1.9 Remove Show Times from Theaters
..........................................................................................................................................................
711
18.1.10 Move Show Times to Different Theaters
..........................................................................................................................................................
712
18.1.11 Repeat Day for Show Times Schedules
..........................................................................................................................................................
714
18.1.12 Delete Day for Show Times Schedules
..........................................................................................................................................................
716
18.1.13 Capacity Management POS Screen Setup
..........................................................................................................................................................
718
18.1.14 Putting Capacity Management on a Terminal
Editing Formats
Deleting Formats
Adding Sound Types
Editing Sound Types
Deleting Sound Types
Adding Theaters
Editing Theaters
Deleting Theaters
Ticket Prices
...................................................................................................................................
719
18.2 Front POS and Capacity
Management
..........................................................................................................................................................
719
18.2.1 About Capacity Management
Front POS
..........................................................................................................................................................
720
18.2.2 Selling a Movie Ticket
18.2.3 Refunding a Movie Ticket .......................................................................................................................................................... 726
.......................................................................................................................................................... 728
18.2.4 Advanced Sales for Movie Tickets
.......................................................................................................................................................... 729
18.2.5 Using Inventory Sales
Chapter 19 - Capacity Management Reports
19.1 Theater Report
731
................................................................................................................................... 731
19.1.1 Theater Report Explanation.......................................................................................................................................................... 731
19.1.2 Using the Theater Report .......................................................................................................................................................... 731
................................................................................................................................... 733
19.2 Box Office Sales Report
.......................................................................................................................................................... 733
19.2.1 Box Office Sales Report Explanation
.......................................................................................................................................................... 733
19.2.2 Using the Box Office Sales Report
735
19.3 Box Office Daily Sales...................................................................................................................................
Report
..........................................................................................................................................................
735
19.3.1 Box Office Daily Sales Report
Explanation
..........................................................................................................................................................
735
19.3.2 Using the Box Office Daily Sales
Report
19.4 Daily Sales Report ................................................................................................................................... 737
.......................................................................................................................................................... 737
19.4.1 Daily Sales Report Explanation
19.4.2 Using the Daily Sales Report.......................................................................................................................................................... 737
19.5 Weekly Sales Report ................................................................................................................................... 739
.......................................................................................................................................................... 739
19.5.1 Weekly Sales Report Explanation
.......................................................................................................................................................... 740
19.5.2 Using the Weekly Sales Report
Chapter 20 - Restaurant Reservations
742
................................................................................................................................... 742
20.1 Using Restaurant Reservations
.......................................................................................................................................................... 742
20.1.1 Restaurant Reservations Reference
.......................................................................................................................................................... 742
20.1.2 Add Table Types
.......................................................................................................................................................... 744
20.1.3 Edit Table Types
.......................................................................................................................................................... 745
20.1.4 Delete Table Types
© 1997 - 2005 Ideal Software Systems, Inc.
Contents
XIII
.......................................................................................................................................................... 746
.......................................................................................................................................................... 747
20.1.5 Add Tables
20.1.6 Edit Tables
...................................................................................................................................
748
20.2 Using Restaurant Reservations
in Front POS
..........................................................................................................................................................
748
20.2.1 About Restaurant Reservations
in Front POS
..........................................................................................................................................................
749
20.2.2 Creating Walk In Reservations
.......................................................................................................................................................... 753
20.2.3 Creating Call-In Reservations
.......................................................................................................................................................... 756
20.2.4 Occupying Tables
.......................................................................................................................................................... 757
20.2.5 Seating Customers
.......................................................................................................................................................... 758
20.2.6 ReQueing Customers
.......................................................................................................................................................... 759
20.2.7 Clear Tables
Chapter 21 - General Ledger Export and Weather
Report
21.1 General Ledger
760
................................................................................................................................... 760
.......................................................................................................................................................... 760
21.1.1 About General Ledger
.......................................................................................................................................................... 760
21.1.2 General Ledger Export Setup
21.1.3 Export General Ledger Data.......................................................................................................................................................... 760
................................................................................................................................... 760
21.2 Report Weather
.......................................................................................................................................................... 761
21.2.1 Reporting Weather Explanation
..........................................................................................................................................................
761
21.2.2 Reporting Weather to the Home
Office
Chapter 22 - Custom Reports and Report Builder
763
...................................................................................................................................
763
22.1 Custom Reports and Report
Builder
.......................................................................................................................................................... 763
22.1.1 Using Report Builder
.......................................................................................................................................................... 764
22.1.2 Add Custom Report
.......................................................................................................................................................... 766
22.1.3 Edit Custom Report
.......................................................................................................................................................... 767
22.1.4 Remove Custom Report
22.1.5 Execute External Reports .......................................................................................................................................................... 767
.......................................................................................................................................................... 768
22.1.6 Customer Card Editor
22.1.7 Edit Employee Card Layout.......................................................................................................................................................... 769
.......................................................................................................................................................... 771
22.1.8 Edit Event Contracts
Appendix A (Chapter 23) - Hardware, Variables,
and Scripts
772
...................................................................................................................................
772
23.1 Variables for Event Contracts
and Form Letters
.......................................................................................................................................................... 772
.......................................................................................................................................................... 773
23.1.1 System Variables
23.1.2 Customer Variables
23.2 Printers
................................................................................................................................... 773
.......................................................................................................................................................... 773
23.2.1 Version 7.0 and Printer Drivers
.......................................................................................................................................................... 774
23.2.2 Printer Types
Receipt Printers
Office Printers
Ticket Printers
23.2.3 Sample Ticket Scripts
Gift Ticket Script
Golf Ticket Script
Laser Tag Ticket Script
Go Kart Ride Ticket Script
Custom Scripts
23.2.4 Print Servers
......................................................................................................................................................... 774
......................................................................................................................................................... 774
......................................................................................................................................................... 774
.......................................................................................................................................................... 774
......................................................................................................................................................... 775
......................................................................................................................................................... 775
......................................................................................................................................................... 776
......................................................................................................................................................... 777
......................................................................................................................................................... 778
.......................................................................................................................................................... 780
© 1997 - 2005 Ideal Software Systems, Inc.
XIII
XIV
Point of Sale
23.3 Scanners
................................................................................................................................... 781
.......................................................................................................................................................... 781
23.3.1 Symbol 9100 (Turnstile Scanners)
23.3.2 Welch Allyn 3800 (Corded) .......................................................................................................................................................... 781
.......................................................................................................................................................... 781
23.3.3 Welch Allyn 5870 (Laser Cordless)
.......................................................................................................................................................... 781
23.3.4 Welch Allyn 3870 (Linear Cordless)
................................................................................................................................... 781
23.4 Magnetic Stripes
23.5 Touch Screens
23.6 Turnstiles
................................................................................................................................... 781
................................................................................................................................... 782
..........................................................................................................................................................
783
23.6.1 Turnstile Troubleshooting Flow
Chart
................................................................................................................................... 784
23.7 Y-Cables
Index
786
© 1997 - 2005 Ideal Software Systems, Inc.
Conventions
This manual uses a number of graphical icons to point out important information. Also, changes in text will indicate a
word or phrase that the user should take note of. These conventions are listed below:
This picture means a note is being presented. If there is additional information that can be
of assistance with a section or set of steps that instruct a user in how to use a utility, this
icon will appear along with the word NOTE.
This picture means that the joining piece of information is a tip. It will appear whenever a
suggestion or useful information on the part of the user is given. The icon will appear with
the word TIP.
This picture means a document is present. The enclosed section with this icon is a
document or a long set of instructions that the user might be asked to type in order to fulfill
a set of instructions.
This picture means warning. The user is about to follow a set of instructions that are not
reversible. Or, if instructions are not followed correctly, there could be a loss of data. This
icon appears with the word WARNING.
Bold
Bold-faced text is an indicator to the user that the word or group of words is to be
associated with an aspect of the functionality of the program. Command buttons, window
and screen names, and field names will appear in bold to assist the user in locating the next
course of action in the software.
Arial
Bold
Arial bold-faced font indicates small text commands that the user is required to type into
the Point of Sale software or other associated programs in order to complete a specific set
of instructions.
Chapters
- This manual is divided into main topics that comprise single or multiple models of the
Point of Sale system.
Sections
- Each chapter is broken down into smaller sections that cover a specific module of the
Point of Sale system.
Sub-Sections - Each chapter is broken down into smaller sections that cover a specific module of the
Point of Sale system.
Mini-Sections - Sometimes topics or sub-sections require an even lower hierarchy that defines the
system even more. Some sub-sections are broken down into mini-sections.
© 1997 - 2005 Ideal Software Systems, Inc.
2
Point of Sale
Chapter 1 - Welcome to Point of Sale
1.1
About Point of Sale
Basic user knowledge about the system and this manual
This section contains need-to-know information about Ideal's Point of Sale
system and this user/reference manual. This section contains the following
topics:
•
•
•
•
1.1.1
"Who Should Use This Software"
"Manual Organization"
"Preparations"
"Support"
Who Should Use This Software
Thank you for choosing Ideal Software Systems, Inc. for your business management needs. The following
information provides working knowledge of Ideal's Point of Sale System, the features it has, and the benefits it
can provide for you and your business.
Ideal products are currently worldwide, including customers in Canada, England, South America, South Africa,
and the Middle East. Ideal Software stands committed to continually designing and enhancing their products to
help your business run more effectively, more efficiently, and more profitably.
The Point of Sale software package boasts a number of utilities that make running a Family Entertainment Center
easier and more convenient. A few of these features are:
•
Specific terminal customization and setup
•
Employee informational database and employee rights
•
Inventory item customization and item count tracking
•
Create and track Purchase Orders for inventory
•
Inventory can be broken down into ingredients
•
Simple inventory audits
•
Each Front POS or cashier screen can be customized
•
Each Front POS screen contains 5 main item categories, 25 item sub-categories, and 450 separate item
buttons than can be assigned unique inventory items
•
Front POS handles cash, checks, credit/debit cards, and account receivable accounts (tabs)
© 1997 - 2005 Ideal Software Systems, Inc.
Chapter 1 - Welcome to Point of Sale
•
Customer information database complete with child accounts and a customer search
•
Tips can be recorded and processed
•
Events and parties can be scheduled in resources created in Point of Sale
•
Event contracts and forms can be created and printed
•
Deposits can be taken and will be recorded for events
•
An MVP Credit Card and gift card system can be implemented for customer usage
•
Detailed reports keep track of all Point of Sale transactions
•
Detailed inventory reports track of all items in transaction
•
An end of day process correctly records information for each business day
3
Also, there are separate add-on modules that can be purchased to create even more functionality for your
company. These separate modules are:
•
Access tickets and items
•
Capacity Management (Management module for cinema sales)
•
Restaurant Reservations
•
Report Builder
1.1.2
Manual Organization
This manual is arranged in the order of installation and setup sequence. There is an order to correctly configure
and implement the Ideal Point of Sale software. This manual assists the user through these procedures.
Each chapter in this manual can be broken down into two main sections: a reference guide and a user guide. The
reference guide will explain the software module and how it works. The user guide will walk the user step by
step through performing any given task. Point of Sale 4.9 Complete Reference and User Guide is divided into the
following sections:
•
Chapter 1 - Welcome to Point of Sale
This chapter introduces the Point of Sale software as a whole, while explaining the services the system
can provide a company.
•
Chapter 2 - Installation, Employees, and Setup
This chapter gives step-by-step instructions for installing and updating the Point of Sale software.
Included in this chapter is a detailed account for setting up employees in the system and configuring the
software settings to fit the needs of any entertainment business.
•
Chapter 3 - Inventory Setup and Features
© 1997 - 2005 Ideal Software Systems, Inc.
4
Point of Sale
This chapter goes into detail about every aspect of inventory, how different item types are setup, and
how they relate to the inventory properties.
•
Chapter 4 - Receiving, Transferring, Auditing, and Purchase Orders for Inventory
This chapter explains how to receive inventory into the store, transfer the inventory between storage and
sales locations, and how to create, edit, and receive purchase orders for inventory items.
•
Chapter 5 - Front POS Screen Setup
This chapter will explain how to setup the Front POS or cashier screen so that it meets the needs of the
employee, the business, and the locations of the terminal the screen will be on.
•
Chapter 6 - Issuing, Counting, Adjusting, and Closing Drawers
This chapter explains how to set up a drawer with an employee, count a drawer, adjust a drawer, etc.
•
Chapter 7 - Front POS, Customers, and Functions
This chapter discusses how to setup customers and customer groups as well as how to use the Front
POS screen and its functions. Child accounts are covered in this chapter as well.
•
Chapter 8 - Tabs, Tips, and Accounts Receivable
This chapter covers tabs and all other aspects of Accounts Receivable. This chapter also covers credit
card tips for employees.
•
Chapter 9 - Event Scheduler
This chapter explains all the functionality behind using the event and party scheduler. This includes,
booking a party, taking a deposit, setting up the room or resource, etc.
•
Chapter 10 - MVP Credit System
This chapter explains the meaning of and how to set up MVP Credit Cards.
•
Chapter 11 - General Reports
This chapter covers the explanation of each general report in the Point of Sale system. Instructions are
given for how to open and run each report.
•
Chapter 12 - Inventory Reports
This chapter covers the explanation of each inventory report. Instructions are given for how to open and
run each inventory report.
© 1997 - 2005 Ideal Software Systems, Inc.
Chapter 1 - Welcome to Point of Sale
•
5
Chapter 13 - End of Day and Other Routines
The chapter covers The Point of Sale end of day routines as well as other operations. Instructions for
the end of day process are given in this chapter.
•
Chapter 14 - Ideal Cashless System (ICS) Debit Card System
This chapter explains the debit card system, setup, and process. This chapter covers everything from
setting up ICS to how to use it.
•
Chapter 15 - Access Control Manager (ACM) and Turnstiles
This chapter gives a detailed discussion about setting up and configuring turnstiles to be used with the
Point of Sale system. Also, the Access server and Access items are covered in detail as well.
•
Chapter 16 - Customer, Facility, and Event Scheduler Reports
This chapter discusses all reports on customers, Point of Sale facilities, and the Event Scheduler are
discussed in this chapter. This chapter also explains how to open and run these reports.
•
Chapter 17 - Bar Codes, Employee Listings, and Form Letters
This chapter covers how to print out inventory bar code labels, employee listings, and customer form
letters.
•
Chapter 18 - Capacity Management
This chapter discusses everything about creating movies, show times, theaters, ticket prices, etc. in the
Capacity Management module.
•
Chapter 19 - Capacity Management Reports
This chapter explains all reports for the Capacity Management module. Instructions for how to use and
open the reports are given.
•
Chapter 20 - Restaurant Reservations
This chapter covers how to create tables and table types in the Restaurant Reservations module.
•
Chapter 21 - General Ledger Export and Weather Report
This chapter discusses the general ledger feature and how to use it with other accounting software. Also
the weather report is covered in this chapter.
•
Chapter 22 - Custom Reports and Report Builder
This chapter covers the Report Builder module as well as creating and running customer reports.
© 1997 - 2005 Ideal Software Systems, Inc.
6
Point of Sale
•
Appendix A (Chapter 23) - Hardware, Variables, and Scripts
The Appendix covers all hardware and peripherals that can be used with the Point of Sale system. Ways
to troubleshoot these peripherals are also discussed.
1.1.3
Preparations
Thank you for choosing Ideal Software Systems for your business management needs. Everyone at Ideal stands
ready to begin a long relationship with you and your company.
To insure that you get the most out of your upcoming installation and training, Ideal provides a Pre-Installation
Guide. This guide contains vital information that will assist in the preparations for the Ideal Point of Sale system
installation. The Pre-Installation Guide will also allow Ideal to learn how your business is currently operated or
how you plan to operate it. Gathering the information identified in the Pre-Installation Guide enables an Ideal
certified installer to know a good bit about your business before he/she arrives to the site. This process helps
minimize system setup time and maximize time for training.
Properly preparing for your installation will greatly reduce the chances for unnecessary overtime and/or a return
visit by an Ideal representative. The two most common and easily avoidable reasons that cause additional
installation costs to be incurred are listed below:
1.
2.
The facilities are not ready
A.
Network connections and/or electrical requirements are not met
B.
Physical areas, such as counters, are not completed
Personnel are not ready
A.
Key personnel are not available for training
B.
Management is not available for training
C.
Personnel are not hired
Communication is crucial. During the weeks leading up to your scheduled installation date, an Ideal
representative will be in constant contact with you to review these and other important items. It is much less
expensive to reschedule an installation date than to have Ideal certified installers arrive when you or your
facilities are not completely ready.
1.1.4
Support
If there are any immediate questions you have and do not find in this manual, please do not hesitate to call Ideal's
Technical Support Desk at 601.693.1673 extension 2.
Please call Ideal Software Systems, Inc. to setup an active account with Ideal's Support Technicians. All
customers may feel free to call Ideal 24 hours a day, 7 days a week. Active account customers pay monthly fees
and allow un-billable call hours from 8:00 A.M. to 5:00 P.M. Central Standard time, Monday through Friday.
Customer's without accounts or inactive accounts will pay a $75 an hour fee in thirty minute intervals for a
minimum of thirty minutes. In the case of after hours support, all customers, active and inactive, must pay a $95
an hour fee in thirty minute intervals for a minimum of thirty minutes. Other information about support plans will
be made available upon calling the support phone line.
© 1997 - 2005 Ideal Software Systems, Inc.
Chapter 2 - Installation, Employees, and Setup
7
Chapter 2 - Installation, Employees, and
Setup
2.1
Installing Point of Sale
Instructions for installing the Point of Sale software and the DBISAM
Database Engine
This section contains the proper procedures to install Ideal's Point of Sale
software and the DBISAM database. This section contains the following
topics:
• "Preparing to Install Point of Sale"
• "Network Wiring"
• "Electrical Specifications"
• "Modem Communication Lines"
• "Employee Information"
• "Sales Categories"
• "Tax Tables"
• "Retail Inventory"
• "Party/Group Events"
• "Tickets, Wristbands, and Customer Cards"
• "Installing Point of Sale for the First Time"
• "Updating to Version 7.1 and Below"
• "Updating to Version 7.2 and Above"
• "Installing the DBISAM Server"
• "Creating/Selecting a Database"
• "Editing the Locfile.ini File"
• "Selecting the Database Via the Connection Manager
Window"
• "Connecting Other Workstations"
• "Repair a Database"
• "Optimize a Database"
• "Manage POS Sessions"
• "Terminate Point of Sale Administration Workstations"
• "Terminate Front Workstations"
• "Terminate ICS Kiosks"
2.1.1
Preparing to Install Point of Sale
2.1.1.1
Network Wiring
NOTE: The preferred network cable type is 10 Base T Category 5 with RJ-45
terminating connectors.
© 1997 - 2005 Ideal Software Systems, Inc.
8
Point of Sale
Properly run network cable is the foundation on which the Ideal Point of Sale system will be installed. Network
cable that is not installed correctly can cause a multitude of problems with a new system. Ideal recommends that
the network cable be installed by a licensed contractor and that the cabling is certified.
All network cables are to be Category 5 cable with all connections made using RJ-45 connectors. The Type B
method of crimping is preferred as well:
1.
White Orange
2.
Orange
3.
White Green
4.
Blue
5.
White Blue
6.
Green
7.
White Brown
8.
Brown
The Cat 5 cable should be shielded with 4 pair standard AWG wire; the resistance should be 25 ohms/1000 feet.
All workstation runs should originate from a patch panel located by the server and hub. The Point of Sale server
will connect directly to the hub and the hub will connect to the patch panel through patch cabling (one cable for
each station). Any single cable run from the server to a workstation may not exceed 330 feet. This is the distance
restriction for the 10 Base T cabling guidelines.
Each network cable must be a straight run from the patch panel to a network RJ-45 jack located on the wall or
work area within 6 feet of each workstation. Patch cables will be used to make the connection between the
workstation and network jack. Allowances must be made for traffic flow.
WARNING: The network wiring must be in place and tested at least 7 days
prior to the arrival of the Ideal installer on site. Ideal will happily assist the
contractor with any questions regarding the wiring specifications but this must
be completed before any Point of Sale installation will be completed.
2.1.1.2
Electrical Specifications
Each workstation location should be equipped with a quad outlet. A 6-plug power strip with at least one surge
protector for each workstation (this includes manager and office workstations as well). It is recommended that
the workstations be on an isolated circuit.
2.1.1.3
Modem Communication Lines
The modem on Point of Sale system is required for Ideal to send periodic software updates, as well as
maintenance in the event that a support issue requires Ideal to access the system.
The modem will require a telephone line located near the computer to which the modem will be attached. In most
cases this computer will be the server. In some cases such as a peer-to-peer environment or single user system,
the modem can be connected to any of the workstations. A standard telephone line should be run within six feet
© 1997 - 2005 Ideal Software Systems, Inc.
Chapter 2 - Installation, Employees, and Setup
9
of the computer station and terminated in a standard RJ-11 wall jack. Ideal recommends the phone line for the
modem is a dedicated line, not a line shared with a fax machine.
NOTE: If credit card processing software has been purchased for the Point of
Sale system, an additional dedicated telephone line is required.
2.1.1.4
Employee Information
One of the first tasks to be performed with the Ideal certified installer will be to input all of the employee data.
Employees will use an ID number and/or a four digit PIN (Personal Identification Number) to log into the Ideal
Point of Sale system. Point of Sale will assign the Employee ID number. The PIN should be entered by a
manager when setting up the employees' information in the system.
TIP: It is recommend that the last four digits of the employee's social security
number be used as their PIN number.
2.1.1.5
Sales Categories
Sales categories or departments, as some family entertainment facilities refer to them, are the headings under
which the sales revenues will be reported in the Ideal Point of Sale system. Every inventory item in the system
will have a Sales Category assigned to it.
The system can have an unlimited number of sales categories. Consult an accountant or financial advisor as this
information is often used to prepare financial statements.
2.1.1.6
Tax Tables
Every item in the Point of Sale system's inventory can be specified as a taxable or non-taxable item. When an
item is sold, the correct sales tax (if any) will be applied to the transaction based upon the Tax Table assigned to
that inventory item. Any sales tax collected is clearly reported on reports in Point of Sale.
2.1.1.7
Retail Inventory
Whether the facility will be selling, stocking, or tracking inventory, every item must be entered into the Point of
Sale system. Every item will receive its own inventory record. This record is where all of the pertinent
information about the item will be entered. All intial inventory should be entered while the Ideal certified trainer
is on site.
2.1.1.8
Party/Group Events
If the business deals in family entertainment, then chances are the company will be offering a variety of birthday
and/or group packages. The Ideal Event Scheduler module makes reserving time and space easy for these types
of events. Deposits can be received on events, customized quotes can be printed, and all event information can
be maintained in one easy-to-use record. It is important that the Ideal certified installer know as much
information about how the party and group business is currently conducted or will be conducted.
© 1997 - 2005 Ideal Software Systems, Inc.
10
Point of Sale
2.1.1.9
Tickets, Wristbands, and Customer Cards
Having all needed supplies prior to installation allows for a more thorough, real-world training process. Listed
below are the most crucial yet often forgot items:
1.
Thermal Tickets
2.
Thermal Wristbands
3.
Customer Loyalty Cards
4.
Thermal Receipt Paper
A starter supply of voucher paper and/or receipt paper should have been included in Point of Sale system order.
Verify these items have been ordered by checking with the Ideal Software Systems' quote.
Thermal Tickets/Wristbands
If a thermal ticket and/or wristband printer has been purchased, paper stock for either of these items will
need to have been ordered as well. For convenience, a contact name and phone number is supplied
below. Place an order 6 weeks prior to the installation to insure that the order is received before the
Ideal Point of Sale system installation.
For Tickets and Wristbands, contact:
Globe Ticket and Label Company
800.523.5968
Contact: Gary Todd
Customer Loyalty Cards
If the family entertainment facility will be offering a customer loyalty program, an adequate supply of
customer cards will need to be ordered.
NOTE: There is special coding required for customer cards that are to be used
with the Point of Sale system. It is recommended that the cards be ordered
directly through an Ideal representative or through an approved vendor list like
the one listed below.
For Customer Loyalty Cards, contact:
Vanguard Photo Id Systems
800.323.7432
Contact: Vic Murray
WARNING: Be sure to specify the purchase of a new Ideal Point of Sale
system. This will insure that the correct ticket and/or wristband stock is ordered.
2.1.2
Installing Point of Sale for the First Time
The following instructions in this sub-section assume that the user has never installed Ideal's Point of Sale
software on the server or host computer. If a present version of Point of Sale is currently on the computer, note
the version number of the pre-installed software and skip ahead to the appropriate sub-section.
© 1997 - 2005 Ideal Software Systems, Inc.
Chapter 2 - Installation, Employees, and Setup
11
NOTE: The user will need to be at the server or a computer that will designated
as the host for the Point of Sale program and data. Either an update CD from
Ideal Software Systems or an update file is needed to perform an install or
update.
1.
Place the CD into the CD-ROM drive. The installation should begin automatically.
NOTE: If installing or updating from an update file instead of a CD sent directly
from Ideal Software Systems, then double click on the Update file to begin the
installation.
2.
Once the Setup - Ideal Point of Sale window appears, click Next to continue.
TIP: Cancel can be clicked at anytime during the update to halt the installation.
Figure 2-1. The Setup - Ideal Point of Sale begin installation window
Click Next to continue with the installation.
3.
Under Select Destination Location, select the default location for the Point of Sale install, then click
Next.
TIP: It is recommended that the default directory, C:\POS7.0, be selected as
the destination directory for support purposes. Beginning with Point of Sale
version 7.1, C:/POS7.0 is the default install directory.
© 1997 - 2005 Ideal Software Systems, Inc.
12
Point of Sale
Figure 2-2. The Setup window prompting for the destination directory
Select the destination directory and click Next.
NOTE: Take notice of the size of disk space required at the bottom of the Setup
- Ideal Point of Sale window. Make sure that the server or host machine has the
appropriate amount of space to install the program.
4.
Under Select Start Menu Folder, click Browse to select where the setup needs to place the shortcuts
for the program.
TIP: It is recommended to select the default Start Menu folder, Ideal Point of
Sale Manager, for support purposes.
Figure 2-3. The Setup window prompting for the Start Menu folder
To select the Start Menu folder, click Browse then click Next.
© 1997 - 2005 Ideal Software Systems, Inc.
Chapter 2 - Installation, Employees, and Setup
5.
13
There is only one additional task that can be checked in the Select Addition Tasks window. Make sure
that this option is checked and click Next.
NOTE: If Point of Sale is being installed for the first time, the Install Database
Engine Service has to be selected.
Figure 2-4. The Setup window showing additional tasks
Confirm that Install Database Engine Service is checked and click Next.
6.
Confirm all the setup information in the Ready to Install window is correct. Click Install.
Figure 2-5. The Setup window Ready to Install window
View the setup and click Install.
7.
After clicking Install, the installation will begin. The color bar inside the Installing window will denote
the percentage complete.
© 1997 - 2005 Ideal Software Systems, Inc.
14
Point of Sale
Figure 2-6. The Setup window showing setup completion percentage
View the percentage installed.
8.
Once the install reaches 100 percent, the DBISAM Engine will automatically install.
Figure 2-7. The DOS window showing the DBISAM Engine installation
The DBISAM Engine automatically installs.
9.
When the DBISAM Engine is finished installing, the Information window will appear. Click OK.
Figure 2-8. The Information window showing service installation completion
Click OK.
© 1997 - 2005 Ideal Software Systems, Inc.
Chapter 2 - Installation, Employees, and Setup
10.
15
This software has now been installed. The setup window will confirm the software has been installed.
Click Finish.
Figure 2-9. The setup is complete
Click Finish.
11.
2.1.3
After clicking Finish, the setup is now complete.
Updating to Version 7.1 and Below
The following instructions in this sub-section assume that the user has Ideal's Point of Sale software previously
installed on the server or host computer. When following the steps under this topic, ensure that the version
currently running is 4.7 or above. If updating a different version other than the ones mentioned previously, please
contact Ideal Software. For users with the Ideal ICS and/or RCM system you should also be updating to Version
7.0 of ICS and/or RCM. Do not upgrade POS to 7.0 unless you are also upgrading your ICS and RCM programs.
Also when upgrading to version 7.0 or 7.1, users will need to install a Generic Text Driver for the receipt printers
in windows if it does not already exist. For more information on this subject, refer to Appendix A, section
"Printers", sub-section, "Version 7.0 and Printer Drivers".
NOTE: The user will need to be at the server or a computer that will designated
as the host for the Point of Sale program and data.
WARNING: Make sure the current Point of Sale directory, including the data
files, has been backed up. Shutdown all Point of Sale programs on all
workstations. Reboot the server (or host computer if running in a peer-to-peer
environment).
© 1997 - 2005 Ideal Software Systems, Inc.
16
Point of Sale
WARNING: Please plan this upgrade carefully as the POS program will not be
accessable during the conversion. For users upgrading from any 4.7 version, the
upgrade may take between 1 to 5 hours. For users upgrading from a 4.8 version,
the upgrade may take 30 minutes to an hour. For users upgrading from 4.9, the
POS upgrade should take less than fifteen minutes, however the ICS upgrade will
take one to two hours.
NOTE: Either an update CD from Ideal Software Systems or an update file is
needed to perform an install or update. Customers upgrading from Point of Sale
version 4.6 will need to upgrade first to 4.9a.001. Please contact Ideal Software
for more information.
1.
Place the CD into the CD-ROM drive. The installation should begin automatically.
NOTE: If installing or updating from an update file sent directly from Ideal
Software Systems, then double click on the file named Update to begin the
installation.
2.
Once the Setup - Ideal Point of Sale window appears, click Next to continue (Figure 2-1).
TIP: Cancel can be clicked at anytime during the update to halt the installation.
3.
Under Select Destination Directory, choose the default location for the Point of Sale install, then click
Next (Figure 2-2).
WARNING: In order to update the data files, the default directory has to be
selected. Otherwise, a new install of Point of Sale will occur and the data files will
not be updated.
4.
Under Select Start Menu Folder, select where the setup needs to place the shortcuts for the program
(Figure 2-3).
TIP: It is recommended to select the default Start Menu folder, Ideal Point of
Sale, for support purposes.
5.
There is only one additional task that can be checked in the Select Addition Tasks window. Make sure
that this option is checked and click Next (Figure 2-4).
NOTE: If Point of Sale is being installed for the first time, the Install Database
Engine Service has to be selected.
6.
Confirm all the setup information in the Ready to Install window is correct. Click Install (Figure 2-5).
7.
After clicking Install, the installation begins. The colored bar inside the Installing window will denote
the percentage complete (Figure 2-6).
8.
Once the install reaches 100 percent, the DBISAM Engine will automatically install (Figure 2-7).
9.
When the DBISAM Engine is finished installing, the Information window will appear. Click OK
(Figure 2-8).
10.
This software has now been installed. The setup window will confirm the software has been installed.
© 1997 - 2005 Ideal Software Systems, Inc.
Chapter 2 - Installation, Employees, and Setup
17
Click Finish (Figure 2-9).
11.
Once the upgrade is complete, the Point of Sale update to 7.0 or 7.1 is complete. The Point of Sale
programs are now available to run.
NOTE: Point of Sale will perform one more upgrade when the program runs for
the first time. The time this update takes is relative to the amount of data in the
database.
2.1.4
Updating to Version 7.2 and Above
The following instructions assume the user has Ideal's Point of Sale software version 7.0 or 7.1 previously
installed on the server or host computer. If updating a different version other than the ones mentioned previously,
please contact Ideal Software.
NOTE: The user will need to be at the server or a computer that will designated
as the host for the Point of Sale program and data.
WARNING: Make sure the current Point of Sale directory, including the data
files, has been backed up. Shutdown all Point of Sale programs on all
workstations. Reboot the server (or host computer if running in a peer-to-peer
environment).
1.
Place the CD into the CD-ROM drive. The installation should begin automatically.
NOTE: If installing or updating from an update file sent directly from Ideal
Software Systems, then double click on the file named Update to begin the
installation.
2.
Once the Setup - Ideal Point of Sale window appears, click Next to continue (Figure 2-1).
TIP: Cancel can be clicked at anytime during the update to halt the installation.
3.
Under Select Destination Directory, choose the default location for the Point of Sale install, then click
Next (Figure 2-2).
WARNING: In order to update the data files, the default directory has to be
selected. Otherwise, a new install of Point of Sale will occur and the data files will
not be updated.
4.
Under Select Start Menu Folder, select where the setup needs to place the shortcuts for the program
(Figure 2-3).
TIP: It is recommended to select the default Start Menu folder, Ideal Point of
Sale, for support purposes.
5.
There is only one additional task that can be checked in the Select Addition Tasks window. Make sure
that this option is checked and click Next (Figure 2-4).
© 1997 - 2005 Ideal Software Systems, Inc.
18
Point of Sale
NOTE: If Point of Sale is being installed for the first time, the Install Database
Engine Service has to be selected.
6.
Confirm all the setup information in the Ready to Install window is correct. Click Install (Figure 2-5).
7.
After clicking Install, the installation begins. The colored bar inside the Installing window will denote
the percentage complete (Figure 2-6).
8.
Once the install reaches 100 percent, the DBISAM Engine will automatically install (Figure 2-7).
9.
When the DBISAM Engine is finished installing, the Information window will appear. Click OK
(Figure 2-8).
10.
This software has now been installed. The setup window will confirm the software has been installed.
Click Finish (Figure 2-9).
11.
Once the upgrade is complete, the Point of Sale update to 7.2 and above is complete. The Point of Sale
programs are now available to run.
NOTE: Point of Sale will perform one more upgrade when the program runs for
the first time. The time this update takes is relative to the amount of data in the
database.
2.1.5
Installing the DBISAM Server
The following instructions in this sub-section assume that the user has Ideal's Point of Sale software DBISAM
Database Engine previously installed on the server or host computer. Versions 4.6a006 and above of Point of
Sale automatically install the DBISAM Server as a service. POS version 7.3 and above now use DBISAM
version 4.15. This sub-section is to be completed if the DBISAM Server was not installed. The following
instructions assume that the user has Ideal's Point of Sale software DBISAM Database Engine previously
installed on the server or host computer.
NOTE: The user will need to have installed the DBISAM Database Engine
before the following steps can be completed. Also, the user will need to be at the
server or the host computer that has the Point of Sale program previously
installed.
1.
Go into the server's or host computer's Computer Management window and view Services.
A.
Windows 2000 and XP
Go to Start | Control Panel | Administrative Tools | Services.
© 1997 - 2005 Ideal Software Systems, Inc.
Chapter 2 - Installation, Employees, and Setup
19
Figure 2-10. The Computer Management window displaying computer services
Go into Computer Management Services.
2.
Check and ensure that the DBISAM Server is started. Right click on the DBISAM Database Server.
Confirm that the word Start is in gray. This means the service is started.
TIP: Right clicking on the service and selecting Stop will halt the service until it
is started again.
WARNING: Stopping the DBISAM Database Service while Point of Sale is
running will result in program failure. The program will not run again until the
service is restarted.
Figure 2-11 The Computer Management window displaying a selected DBISAM Database Service
The DBISAM Database Service is started.
3.
If the service is not running, right click on the DBISAM Database Service and click Start. A window
will quickly appear then disappear showing the user that the service was successfully started.
© 1997 - 2005 Ideal Software Systems, Inc.
20
Point of Sale
4.
Now the DBISAM Server needs to be installed so that it does not interact with the Desktop. Go into the
DOS Prompt.
NOTE: If the DBISAM Server is set to not interact with the Desktop, then there
will be no icon in the bottom right hand corner of the screen to show the server is
running.
5.
To get into the DOS Prompt, go to Start | Run and type COMMAND (or CMD) in the Open field.
This will bring up the DOS Prompt.
6.
At the DOS Prompt, enter the path to the Utils folder inside the POS directory.
TIP: If the DOS Prompt opens to the C:\ directory, type CD POS\UTILS. This
will put the user at the path C:\POS\Utils.
7.
Once the path inside DOS reads C:\POS\Utils, or the correct path to the Utils folder inside the POS
directory, enter the command DBSRVR.EXE/INSTALL/NOINTERACT.
8.
Now the DBISAM Server and Service are successfully installed.
2.1.6
Creating/Selecting a Database
The instructions in the following two mini-sections assume that the user has Ideal's Point of Sale software
currently installed on the server or host computer. There are two ways to select a database: 1) Editing the
Locfile.ini File and 2) Selecting the Database Via the Connection Manager Window.
TIP: The second method of selecting a database, Selecting the Database Via the
Connection Manager Window, also explains how to create a new database.
2.1.6.1
Editing the Locfile.ini File
1.
Go to the My Computer icon and browse to the POS directory.
2.
Inside the POS folder, locate the file named Locfile.ini. Open this file.
TIP: Notepad can open this program. Double-click the Locfile.ini file and either
Notepad or Word Pad should open it by default.
3.
Edit the Locfile.ini file so that it reads like the following script. (If the path to the POS\Data directory
is different then listed below, make sure the correct path is entered.)
[PointOfSale]
ServerName=POSSERVER
DBN=FEC DATABASE
DatabasePath=C:\POS\Data
Connection=S
© 1997 - 2005 Ideal Software Systems, Inc.
Chapter 2 - Installation, Employees, and Setup
21
TIP: DBN is the name of the database. DatabasePath is the path to the Point of
Sale data directory. Connection is 'S' for the Server/Client multi-user
relationship. Change this to 'L' if the user is running a Local or single user
relationship.
2.1.6.2
Selecting the Database Via the Connection Manager Window
1.
Press down and hold the CTRL key on the keyboard while double-clicking the FEC Administrator
(IdealPOSAdmin) icon (or press the Enter key).
2.
The Connection Manager window will open.
Figure 2-12. The Connection Manager window
Holding in the CTRL key while double-clicking the FEC Administrator icon will open the Connection Manager window.
3.
Confirm all the information inside the Connection Manager window is correct.
A.
Client Server
Make sure this option is selected if the Point of Sale software is on a network with this
© 1997 - 2005 Ideal Software Systems, Inc.
22
Point of Sale
relationship.
B.
Server Name
This is the name assigned to the computer that is the server or is designated as the host
computer.
C.
Database Name
This is the name assigned to the database that holds the Point of Sale data.
NOTE: The Server Name and Database Name do not affect a Point of Sale
system on network with a Single/Multi User relationship. The default Database
Name is FEC Database.
D.
Test Connection
Click this button to test the connection to the server and database. If the connection test was
successful, an Information window will appear stating so.
E.
Configure Server
Click this button to configure the DBISAM server on the Point of Sale server.
F.
Refresh List
This button refreshes the list of FEC databases available. To access this list, press the drop
down arrow.
NOTE: If the FEC Database is the only database that has been created then it
will be the only one to appear under Refresh List.
G.
Create Database
This button will allow the user to create the FEC Database if one is not present. To open the
Create Remote Database window, click Create Database.
Figure 2-13. The Create Remote Database window
Click Create Database to open the Create Remote Database window.
i.
To create the FEC Database, fill out the fields with the appropriate information.
a.
Database Name
This is the name of the database. Enter FEC Database as the name of the
database.
© 1997 - 2005 Ideal Software Systems, Inc.
Chapter 2 - Installation, Employees, and Setup
b.
ii.
H.
23
Directory
Enter the directory path of the database. (Ex. C:\POS\Data) This field will
need be to filled if the Point of Sale program will be run on a single or peerto-peer user environment.
Click OK once the correct information is entered.
Edit Database
Click this button to gain access to the database editor where the user can edit any database on
the POS server.
WARNING: No database should be edited without the assistance from Ideal
Software's support staff.
I.
Delete Database
Click this button to delete a selected database..
WARNING: Consult someone from Ideal Software's support staff before
deleting any database.
J.
Ping Server
Select this option to continually ping the server and test connectivity.
K.
Server Ping Interval
Use the up and down arrows or manually entire a time (in seconds) between pings sent to the
server.
L.
Use Remote Encryption
Select this option is the server uses a form of remote encryption.
M.
Single/Multi User
Make sure this option is selected if the Point of Sale software is on a network with this
relationship.
N.
Database Directory
This field shows the current directory that Point of Sale will look for it's data.
O.
Browse
Click this button to open the Browse for Folder window where the Point of Sale data
location can be specified.
© 1997 - 2005 Ideal Software Systems, Inc.
24
Point of Sale
Figure 2-14. The Browse for Folder window
Click Browse.
P.
4.
Strict Change Detection
Major changes between database versions will be monitored an reported with this option
checked.
Click OK if any changes were made. Ideal FEC Back Office Suite will now open.
TIP: Clicking Cancel will open Ideal FEC Back Office Suite. Any changes that
had been made prior to clicking Cancel will have been negated.
2.1.7
Connecting Other Workstations
The following instructions in this sub-section will walk the user through connecting multiple workstations to a
single server or host computer to run the Point of Sale software. For new users and customers upgrading to 7.0
from earlier versions, all terminals must have the Terminal ID set or reset from the actual workstation.
NOTE: The user will need to have installed the Point of Sale software before the
following steps can be completed.
WARNING: The user's location needs to have a network professionally run and
certified to ensure that there will be no TCP\IP connectivity issues with the Point
of Sale software. Failure to recognize this warning could result in network errors
and/or non-responsive Point of Sale workstations. Ideal Software Systems takes
no responsibility for network issues.
WARNING: To run Point of Sale from a workstation(s), ensure that the
workstation(s) can communicate with the server on the network. If the
workstation terminal(s) cannot find the server or host computer then Point of Sale
cannot be installed.
1.
The server or host computer has to be located in the My Network Places (Network Neighborhood)
window or via mapped drive.
© 1997 - 2005 Ideal Software Systems, Inc.
Chapter 2 - Installation, Employees, and Setup
25
2.
Once the computer containing the Point of Sale program is located, find and enter the POS directory.
3.
While in the POS directory, find the two executable files: IdealPOS.exe (Front POS) and
IdealPOSAdmin.exe (FEC Administrator).
4.
Right-click on the icons. There will be an option that appears called Send To.
5.
Highlight Send To and select Desktop. This will send the icons to the Desktop of the local computer.
6.
Once both icons are on the local Desktop, the Point of Sale program will be installed on the
workstation.
2.1.8
Repair a Database
The instructions in this sub-section will explain to the user how to repair Point of Sale database tables through
the Connection Manager utility.
NOTE: The user must have created a database before repairing one will be
possible.
1.
Hold down the CTRL key on the keyboard while double-clicking the FEC Administrator icon (or
press the Enter key.)
2.
The Connection Manager window will open (Figure 2-12).
3.
Click Repair Tables. An Information window will appear warning the user that all Point of Sale
stations must be closed. Click OK.
Figure 2-15. The Information window
Click OK.
WARNING: In order to repair a database, all Point of Sale programs must be
closed or their computers turned off (for example: Font POS, Ideal POS
Administration, Access Manager, etc.). If all programs are not exited before the
repair is administered, the result can be permanent damage to the database and
the stores data.
5.
The Repair Tables window will open. Individual tables may be selected for repair or all tables may be
selected at once by clicking Select All.
© 1997 - 2005 Ideal Software Systems, Inc.
26
Point of Sale
Figure 2-16. The Repair Tables window with tables selected
Select a table(s) in the database for repair.
TIP: It is recommended that all tables are selected for repair. To do this, click
Select All. If a user desires to know more about the data held by each individual
table, please contact Ideal Software Support for assistance.
6.
Once the table(s) needing repair is selected, click Repair.
7.
The Repair Progress window will appear showing the complete status of repair on each table. When
the Repair Progress window closes, the repair on the database is complete.
Figure 2-17. The Repair Progress window
When the Repair Progress window closes, the database repair is complete.
TIP: The time a database repair takes depends on how much data is present in
the table(s) selected for repair.
WARNING: If any errors are given at the end of, or during the repair process,
contact Ideal's technical support for assistance.
© 1997 - 2005 Ideal Software Systems, Inc.
Chapter 2 - Installation, Employees, and Setup
8.
2.1.9
Close the Repair Tables window by clicking Close.
Optimize a Database
The instructions in this sub-section will explain to the user how to optimize a Point of Sale
database through the Connection Manager utility. This utility can increase the Point of Sale's
speed when accessing the database's tables.
NOTE: The user must have originally created a database before optimizing one
will be possible.
1.
Hold down the CTRL key on the keyboard while double-clicking the FEC
Administrator icon (or press the Enter key.)
2.
The Connection Manager window will open (Figure 2-12).
3.
Click Optimize Tables. An Information window will appear warning the user that
all Point of Sale stations must be closed. Click OK.
Figure 2-18. The Information window
Click OK.
WARNING: In order to optimize a database, all Point of Sale programs must be
closed or their computers turned off (for example: Font POS, Ideal POS
Administration, Access Manager, etc.). If all programs are not exited before the
repair is administered, the result can be permanent damage to the database and
the stores data.
5.
The Optimize Tables window will open. Individual tables may be selected for
optimization or all tables may be selected at once by clicking Select All.
© 1997 - 2005 Ideal Software Systems, Inc.
27
28
Point of Sale
Figure 2-19. The Optimize Tables window with tables selected
Select a table(s) in the database for optimization.
TIP: It is recommended that all tables are selected for repair be pressing the
Select All button. If a user desires to know more about the data held by each
individual table, please contact Ideal Software Support for assistance.
6.
Once the table(s) needing optimization is selected, click Optimize.
7.
The Repair Progress window will appear showing the complete status of
optimization on each table. When the Repair Progress window closes, the
optimization on the database is complete.
Figure 2-20. The Repair Progress window
When the Repair Progress window closes, the database optimization is complete.
TIP: The time a database repair depends on how much data is present in the
table(s) selected for repair.
© 1997 - 2005 Ideal Software Systems, Inc.
Chapter 2 - Installation, Employees, and Setup
29
WARNING: If any errors are given at the end of or during the repair process,
contact Ideal's technical support for assistance.
8.
2.1.10
Close the Repair Form window by clicking Close.
Manage POS Sessions
The instructions in this sub-section will explain to the user how to view all the active sessions
running the Point of Sale database through the Connection Manager utility.
WARNING: The user should have all Point of Sale stations closed before this
utility is executed.
1.
Hold down the CTRL key on the keyboard while double-clicking the FEC
Administrator icon (or by pressing the Enter key.)
2.
The Connection Manager window will open (Figure 2-12).
3.
Click Manage Sessions. The Active DBISAM Sessions window will appear.
4.
All workstations currently accessing the FEC Database will be listed in this window. To get a new
count of the workstations currently on line and accessing the database, click Refresh.
Figure 2-21. The Active DBISAM Sessions window
Click Refresh.
5.
When finished viewing, click Close to return to the Connection Manager window.
© 1997 - 2005 Ideal Software Systems, Inc.
30
Point of Sale
2.1.11
Terminate Point of Sale Administration Workstations
The instructions in this sub-section will explain to the user how to simultaneously terminate
all Point of Sale programs (Front POS, POS Admin, etc.) currently being run on the Point of
Sale network.
WARNING: Before using this utility, all Point of Sale Administration users
should be warned to finish what they are doing no matter what computer they are
on.
1.
Hold down the CTRL key on the keyboard while double-clicking the FEC
Administrator icon (or by pressing the Enter key.)
2.
The Connection Manager window will open (Figure 2-12).
3.
Click Close POS Admin. The Confirm window will open asking the user if all POS
Admin programs should be closed. Click Yes to close them. Otherwise, click No.
Figure 2-22. The Confirm window
Click Yes.
4.
2.1.12
All POS Admin programs currently running will be shut down without warning to the users.
Terminate Front Workstations
The instructions in this sub-section will explain to the user how to simultaneously terminate
all Front POS programs currently being run on the Point of Sale network.
WARNING: Before using this utility, all Front POS users should be warned to
finish what they are doing. Once this utility is executed all Front POS screens
will exit even if the user was in the middle of conducting a transaction.
1.
Hold down the CTRL key on the keyboard while double-clicking the FEC
Administrator icon (or by pressing the Enter key.)
2.
The Connection Manager window will open (Figure 2-12).
3.
Click Close Front POS. The Confirm window (Figure 2-22) will open asking the
user if all Front POS programs should be closed. Click Yes to close them. Otherwise,
click No.
4.
All Front POS programs currently running will be shut down without warning to the users.
© 1997 - 2005 Ideal Software Systems, Inc.
Chapter 2 - Installation, Employees, and Setup
2.1.13
Terminate ICS Kiosks
The instructions in this sub-section will explain to the user how to simultaneously shut down
all computers running Point of Sale programs currently on the Point of Sale network.
WARNING: This utility completely shuts down all computers that are running
any modules of the Point of Sale program. The computer will be turned off no
matter what the user is doing. All users should be warned before executing this
utility.
1.
Hold down the CTRL key on the keyboard while double clicking the FEC
Administrator icon (or by pressing the Enter key.)
2.
The Connection Manager window will open (Figure 2-12).
3.
Click Close ICS Kiosk. The Confirm window (Figure 2-22) will open asking the
user if all ICS Kiosks should be closed. Click Yes to close them. Otherwise, click
No.
4.
All ICS Kiosks currently running will be shut down without warning to the users.
© 1997 - 2005 Ideal Software Systems, Inc.
31
32
2.2
Point of Sale
Entering Employees and Employee Groups
Instructions for entering employees and employee groups into the Point of
Sale software
This section contains the proper procedures to enter all employees
(including the first employee after the first install of Ideal's Point of Sale
software. This section also explains how to enter employee groups. This
section contains the following topics:
• "Employee Information"
• "Employee Rights Tree"
• "Time Clock Import"
• "Employee Groups"
• "Inactive Employees"
• "Employee Cards"
• "Entering the First Employee"
• "Personal Information"
• "Rights and Privileges"
• "Picture"
• "ICS Login"
• "Employee Charges"
• "Entering Additional Employees"
• "Personal Information"
• "Rights and Privileges"
• "Picture"
• "ICS Login"
• "Employee Charges"
• "Edit an Existing Employee"
• "Creating Employee Groups"
• "Editing Employee Groups"
• "Assigning Employee Groups"
• "Assigning Employee Cards"
• "Logging In with Employee Cards"
• "FEC Administrator"
• "Front POS"
• "Making Employees Inactive"
• "Setup Camera"
• "Advanced"
• "Capture Source"
• "Device Settings"
• "Employee Charges"
• "Award Employee Bonus"
• "Award Employee Time Worked"
• "Process Payroll Deduction"
© 1997 - 2005 Ideal Software Systems, Inc.
Chapter 2 - Installation, Employees, and Setup
2.2.1
Employee Information
2.2.1.1
Employee Rights Tree
33
The biggest benefit to using the employee portion of the Point of Sale system is that employee actions are
tracked by using ID numbers and monitored by issuing rights. Every function of Point of Sale requires an issued
right from the person logged in before it can be used. It is important to understand that before a function can be
used, the employee must have that particular right checked in the Rights Tree menu in the Add New Employee
window. Each right and the function it gives access to is discussed below. For information on assigning
employee rights, refer to sub-sections, "Entering the First Employee" and "Entering Additional Employees".
NOTE: Top managers and owners should be issued all rights to the Point of Sale
system.
1.
Front POS - The rights in this section relate specifically to all the functions in the Front POS module
that will be used on the cashier terminals. Here, an employee's abilities are controlled or monitored
while performing transactions.
A.
B.
Sales Screen - Rights in this category relate to the functions that will be used in the Front
POS Sales screen module of the Point of Sale system.
i.
Login to POS - This right allows an employee to access the Front POS program if a
drawer has been issued to that employee.
ii.
Exit from POS - This right allows the user to close the Front POS program from the
login screen.
iii.
No Sale - This right allows the user to open the cash drawer without having
completed a transaction by clicking No Sale.
iv.
Refunds Without Receipts - The employee is allowed to refund items without
needing a receipt.
v.
Refund With Receipts - The employee may only refund an item is the customer has
a receipt.
vi.
Refund Movie Tickets - Movie ticket sales are allowed to be refunded. The Capacity
Management module must be present in order for this right to be valid.
Administrative - This category contains the rights that a manager should posses to perform
Front POS functions above and beyond that of regular cashier duties.
i.
Cash Pay Out to Vendor - This right allows user to enter cash pay outs. The user is
prompted for an ID and pin number when performing this function.
ii.
Pull Cash From Drawer - This right allows the user to pull cash from a drawer and
enter the amount pulled during an employee's shift. This function is used to prevent
the cash drawer from containing too much money.
iii.
Transaction on Any Drawer - An employee may login to any workstation that has
an active drawer. This right should primarily be used as a manager right.
iv.
Pre-Issue Tickets - When scheduling large events, a user with this right can pre-print
attraction tickets that were sold for the event before the party arrives. Tickets are
considered live once they are printed. Only managers or employees responsible for
© 1997 - 2005 Ideal Software Systems, Inc.
34
Point of Sale
event tracking should have these rights.
C.
D.
v.
Add Up to <Specified Cash Amount> of Store Credit to Employee's Account This right allows the user to add up to a specified cash amount of store credit to
employee accounts.
vi.
May Override Price of Item By Up to <Specified Percentage> Percent - A user
with this right may change the price of an inventory item up to the specified
percentage.
vii.
Reprint Customer Receipt - This right allows the user to reprint any sales receipr.
Drawer Notifications - This category contains visual notifications for managers and owners
about the status of the cash drawer and specified money amounts in the drawer.
i.
Visual Notification of Drawer Pull at <Specified Cash Amount> - Managers and
owners that have this right selected will be notified of a drawer pull when the cash
quantity in the drawer reaches a specified amount.
ii.
Notify Manager to Pull Cash from Drawer at <Specified Cash Amount> Managers and owners that have this right selected will be notified to pull drawer cash
when the cash quantity in the drawer reaches a specified amount.
iii.
Disable Drawer Activity When Drawer has <Specified Cash Amount> Managers and owners that have this right selected will be notified to disable the
drawer when the cash quantity in the drawer reaches a specified amount.
Customer Accounts - Customer account functions are issued from this section. Most
employees will need rights from this section as all employees will need the ability to assist
customers. However, some rights should still be limited to managers or key personnel.
i.
Customer Activity History - The user with this right can pull up the history of a
customer's MVP credit card.
ii.
Edit Customer Account in Front POS - The user will be allowed to edit customers'
accounts inside the Front POS module while at the cashier terminals.
iii.
Issue Card to Existing Customer - This right allows the user to issue a new MVP
credit card to an existing customer if they request one or their current card is damaged
or lost.
iv.
Access Ticket History - This right allows the user to pull up the history of an access
ticket and print it to a terminal's receipt printer. The Access Server module must be
installed in order for this right to be valid.
v.
Manual Customer Lookup - With this right, the user can access the customer
database from the Front POS Sales screen using Find Customer.
vi.
Allow Access to ICS - This right allows the POS user to use the Ideal Cashless
System or ICS.
vii.
Transfer Debit - This right allows the user to transfer money credit amounts from
one card to another. The Ideal Cashless System must be installed in order for this
right to be valid.
viii.
Transfer Entitlements - This right allows entitlements to be transferred from one
debit card to another. The Ideal Cashless System must be installed in order for this
© 1997 - 2005 Ideal Software Systems, Inc.
Chapter 2 - Installation, Employees, and Setup
35
right to be valid.
ix.
E.
F.
G.
H.
Photograph Minors - Take pictures of younger customers with this right.
Sale Complete - This section of rights allows the user rights when completing transactions.
Most of these functions are strictly for managers and owners, however some of these rights will
need to be given to key cashiers.
i.
Discounts Order - This right allows the user to give a discount on a sale.
ii.
Tax Exempt Order - This right allows the user to remove the sales tax from a sale
for a church, school, or non-profit organization.
iii.
Open AR Account - This right allows the user to create a customer account and
assign a credit limit permitting the customer to charge sales to their account.
iv.
Change Prices in PS (Party Scheduler) - This right allows a user to edit the default
retail sales price of a party or event.
v.
Use Credit Card number on File - If a customer has a credit card number associated
with his/her name, the employee can use that account for purchases with this right.
vi.
Manually Authorize Credit Card - The user can authorize a credit card by just
having the customer credit card information with this right.
vii.
Employee Discount and Sale - The user can apply an employee discount to a sale
with this right.
Tabs - This section of rights allows the user to use the different functions associated with
creating and modifying tabs. Most cashiers should have most of these rights.
i.
View, Modify Any Tab - This employee right allows the user to see and change any
previously created tab.
ii.
Void Tab - This right allows the user to remove any previously created tab.
iii.
Split Tab - This right allows the user to split one previously created tab into multiple
tabs
iv.
Transfer Tab - This right allows the user to transfer open tabs from one employee
with an open drawer to another employee with an open drawer.
Restaurant Reservations - If the Restaurant Reservation module has been added to the Point
of Sale system, then these rights are valid.
i.
View Reservations - View reservations at their assigned tables with this right.
ii.
Make Reservations - This right allows the user to create reservations for customers.
iii.
Cancel Reservations - Cancel customers' reservations with this right.
iv.
Edit Reservations - Edit customers' reservations with this right.
Product Sales - This section of rights contains what employees need to sell items with right
levels higher than 0 in Front POS.
i.
Product Sells Group 1 - The user may sell items with a right level of 1 in Front POS.
© 1997 - 2005 Ideal Software Systems, Inc.
36
Point of Sale
I.
2.
ii.
Product Sells Group 2 - The user may sell items with a right level of 2 in Front POS.
iii.
Product Sells Group 3 - The user may sell items with a right level of 3 in Front POS.
iv.
Product Sells Group 4 - The user may sell items with a right level of 4 in Front POS.
v.
Product Sells Group 5 - The user may sell items with a right level of 5 in Front POS.
Party Scheduling - This section of rights contains what employees need to use the utilities of
the Event Scheduler module.
i.
Start Event - The user may start events in the Event Scheduler with this right.
ii.
Book Event - The user may schedule a new event with this right.
iii.
Take Deposit - The user may take a money deposit for a newly scheduled event with
this right.
iv.
Event Deposit Refund - The user may refund previously paid event deposits with
this right.
v.
Look Up Customer Event - The user may perform a search on events that have been
entered into the Event Scheduler module.
POS Administrator - The POS or FEC Administrator program contains the majority of the functions
for the program. The heart of the program is setup from this portion of the Point of Sale system. Mostly
managers, owners, and key employees should have access to these rights.
A.
Drawers - These rights deal specifically with the cash drawers. Most cash drawer rights
belong to a manager.
i.
Issue Drawer - This right allows the user to issue drawers to other employees. Only
managers should have this right.
ii.
Count Drawer - This right is issued to the employee that enters the cash drawer final
counts into the Point of Sale system.
iii.
Adjust Drawer - This right is issued usually to the same employee that counts the
cash drawer and allows the user to correct or edit previously counted drawer amounts.
iv.
Close Drawer - Employees with this right can close out the drawer in the Point of
Sale system.
v.
Close All Drawers - Employees with this right can close out everyone's drawer in the
Point of Sale system.
vi.
Add/Remove Drawer Items - This right allows the user to add initial or additional
drawer items. Also, this right will permit a user to remove items in the system assign
to the cash drawer.
vii.
Audit Drawer Items - Perform an inventory audit on the items assigned to the cash
drawer with this right.
viii.
Manage Open Orders - Write off tabs or convert them to open invoices with this
right. Managers or key employees should have this right.
ix.
Drawer Lockout Override - Override a drawer that has been previously locked out
© 1997 - 2005 Ideal Software Systems, Inc.
Chapter 2 - Installation, Employees, and Setup
37
with this right.
B.
C.
Inventory - All inventory rights are in this section. Employees that create, edit, and delete
inventory items should possess these rights.
i.
Edit Inventory - This right allows access to the edit inventory command.
ii.
Create Inventory - This right allows the employee to create new inventory items.
iii.
Audit Inventory - Different types of audits can be performed in the Point of Sale
system for inventory items. The following rights allow access to these different audit
commands.
a.
Audit All Inventory - This right allows the employee to edit all inventory
for the family entertainment site.
b.
Selective Audit - The employee can selectively choose the inventory items
for audit counting with this right.
c.
Selective Blind Audit - A selective audit can be performed where the
computer configured items totals will not be shown if the employee is given
this right.
d.
Purchase Order Receive - Check this option for employees to have the
right to receive inventory into stock.
iv.
Update Inventory from Audit - This right allows users to update the item counts
from the audit numbers entered while performing the audit.
v.
Print Inventory Barcodes - This option will allow the users to gain access to
printing inventory barcodes.
vi.
Transfer Inventory - This right allows the user to transfer inventory from one item
location to another.
vii.
Receive Inventory - Employees can receive inventory into a new or existing item
location with this right.
viii.
Add Vendor - This right allow the user to add a new inventory vendor into the Point
of Sale system.
ix.
Edit Vendor - This right allows users to edit vendors previously placed into the
system.
x.
Create Purchase Order - The user can create a purchase order for getting/buying
more inventory from a vendor with this right.
xi.
Edit Purchase Order Change - Check this option to obtain the rights to edit a
purchase order.
Inventory Reports - All inventory reports are in this section. A limited number of employees
should have access rights to these.
i.
Inventory Listings Report - Gain access to this report by checking this option.
ii.
Audit Report - View the Audit Report with this right.
© 1997 - 2005 Ideal Software Systems, Inc.
38
Point of Sale
D.
iii.
Vendor Report - View a list of all vendors and associated information with this right.
iv.
Ingredient Usage Report - This right allows employees to view a report about the
ingredient usage.
v.
Cost of Goods Report - View the cost of the inventory with this right.
vi.
Recipe Report - The Recipe Report can be opened with this right.
vii.
Audit Count Sheets - Print out audit sheets with this right.
viii.
Audit History - This right allows employees to view audits previously performed on
inventory.
ix.
Receive Report - This right opens the report that shows all inventory received.
x.
Purchase Order Summary Report - All purchase order outcomes can be viewed by
having rights to open this report.
xi.
Transfer Report - Inventory transferred from one item location to another will be
shown with this right.
Reports - All money related reports are under this category. Only owners and higher level
managers should have access to all reports.
i.
Drawer Summary Report - Gain access to this report by checking this option.
ii.
Drawer Report - All drawers status and money counts can be viewed with this right.
iii.
Transaction Report - Use the report filters and print out this report with this right.
iv.
Sales Report - The Sales Report can be viewed with this right.
v.
Consolidated Sales - This option will allow use and filtering of this report.
vi.
Sales Report YMD MTD - This option will allow use and filtering of sales and
quantity for a selected day, month to date, and year to date..
vii.
Receipt Report - The Receipt Report can be opened with this right.
viii.
Drawer Status Report - Drawer status can be viewed with this right.
ix.
Debit Card Transfer Report - All transfers from one debit card to another can be
viewed on with this right.
x.
Credit Card Report - This right will allow employees to open and print this report.
xi.
Attraction Scan Report - This right opens the Attraction Scan Report.
xii.
Hourly Sales Report - A sales report broken down into hours can be opened with
this right.
xiii.
Hourly Scan Report - This option opens this report.
xiv.
Item Scan Report - This right will open the report that shows the items sold by hour.
xv.
Marketing Report - Open the Marketing Report with this right.
© 1997 - 2005 Ideal Software Systems, Inc.
Chapter 2 - Installation, Employees, and Setup
E.
39
xvi.
Tax Income Report - This right will open the report that shows income based on
inventory taxes.
xvii.
Tip Report - All credit card tips are in this report that can be accessed with this right.
Maintenance - These rights are very important. All terminal settings and Point of Sale setup
parameters rights are distributed from this category. Only the people that initially setup the
system should have and use these rights.
i.
Close Day - Managers can close out the current business day with this right.
ii.
Inventory Categories - Create categories for inventory items with this option.
iii.
Front POS Screen Setup - Create the look for the Front POS module with this right.
iv.
Transfer Types - Inventory transfer types can be created with this right selected.
v.
Tax Table - The owner can use this right to create the company tax tables.
vi.
Cash Payout Types - Cash Payout Types for Front POS are created if this right is
selected.
vii.
System Parameters - The Point of Sale terminal and server parameters can only be
accessed if this right is checked.
viii.
Access Server - This right allows access to Access Server configuration which is only
valid if the Access Server module has been added onto the Point of Sale system.
ix.
Check Access Items - This right allows the users to check inventory items marked as
Access Items.
x.
Inventory Unit Types - This right permits creating inventory units of measurement.
xi.
General Ledger Export Setup - This right allows setting up the general ledger
reports.
xii.
Edit Inventory Location - Edit the locations for inventory items with this right.
xiii.
Add Inventory Location - Add the locations for inventory using this right.
xiv.
Add/Edit Table Types - Gain access to the Add/Edit Tables window with this right.
This right is only valid if the Restaurant Reservations module is installed.
xv.
Add Tables - This right allows the user to add tables in the system. This right is only
valid if the Restaurant Reservations module is installed.
xvi.
Edit Tables - This right allows the user to edit previously created tables in the
system. This right is only valid if the Restaurant Reservations module is installed.
xvii.
Add Discount Type - The user may add a new inventory discount type with this
right.
xviii.
Edit Discount Type - The user may edit previously created inventory discount types
with this right.
xix.
Add Modifier List - Add modifier lists with this right.
© 1997 - 2005 Ideal Software Systems, Inc.
40
Point of Sale
xx.
F.
G.
3.
Edit Modifier List - Edit previously created modifier lists with this right.
Movies - These are rights for the Capacity Management module. All access for the Front POS
Movie Sales screen and setup for the films and theaters is gained through these rights.
i.
Add Film - This right issues the ability to add a film into the system.
ii.
Edit Film - Edit a previously created film with this right.
iii.
Define - The different movie properties are defined and set with these rights.
a.
Ratings - This right allows the user to create film ratings.
b.
Formats - This right allows the user to create film formats.
c.
Sounds - This right allows the user to create film sound types.
d.
Theaters - This right allows the user to define theater locations.
e.
Tickets - This right allows the user to create the movie ticket buttons.
iv.
Show Times - This right allows the user to create and edit the movie show times.
v.
Theater Report - View the Theater Report with this right.
vi.
Box Office Sales Report - This right allows access to this report.
vii.
FEC Screen Setup - This right grants the user the ability to setup the Movie Sales
screen in the Front POS module.
viii.
Box Office Daily Report - View the Box Office Daily Report with this right.
ix.
Daily Sales Report - Open this report with this right.
x.
Weekly Sales report - View weekly movie sales with this right.
Custom Reports - Users of Point of Sale may create their own reports that specifically fit their
needs. This section of rights are specific for creating and using these custom reports.
i.
Edit Customer Reports Menu - This right allows users to edit the menu containing
the custom reports.
ii.
Execute External Report - Run a custom report with this right.
iii.
Report Builder - This right allows users to access and create custom reports with the
Report Builder module.
Facility - This set of rights deals with facility reports, customers, and, most importantly, employees.
Owners should be careful about which of their employees have the right to assign rights to other
employees or themselves. Most of these rights belong only to top managers and owners.
A.
Facility - This section contains the rights to the facility reports as well as other miscellaneous
rights.
i.
Facility Report - View the Facility Report with this right.
ii.
Deposits - Take deposits for event or parties with this right.
© 1997 - 2005 Ideal Software Systems, Inc.
Chapter 2 - Installation, Employees, and Setup
B.
C.
41
iii.
Petty Cash Out - This right allows the user to record taking petty cash out of the cash
drawer.
iv.
Labor Report - Use this right to view this report.
v.
General Ledger Export - Export general ledger files into other programs with this
right.
vi.
Report Weather to Home Office - Gain access the weather reporting function with
this window.
vii.
Pre-Value ICS Cards - Users may add value to ICS debit cards with this right before
they are purchased.
Employees - This group of rights is the most important in the entire system. If someone has the
ability to edit an employee's rights, then this user can gain access to every function the program
has to offer.
i.
Create Employees - This right allows the user to enter new employees into the
system.
ii.
Edit Employees - This right allows a user to edit employee information and rights.
iii.
Edit Employee Group - Edit previously created groups of defined employee rights
with this right.
iv.
Create Employee Group - Create new employee groups with this right.
v.
Employee Listing Report - This right allows the user to print off entire listings of
current employees and their information.
vi.
Employee Address Labels - Print off employee address labels with this right.
vii.
Employee Charges - Obtain the ability to charge employee sales to their accounts
with this right.
viii.
Employee Charge Report - Bring up this report with this right.
ix.
Award Bonus - Award employees a bonus with this right.
x.
Award Time Worked - With this right, the user may award time worked to an
employee.
xi.
Payroll Deduction Report - View this report with this right.
xii.
Edit Employee Cards - Edit employee cards with this right.
Customer - All customer information can be accessed through these rights. There should be no
problem with giving these rights to lower level managers and/or key employees.
i.
Create Customer - Create a new customer with this right.
ii.
Edit Customer - Edit a previously created new customer with this right.
iii.
Manage Groups - Create or control customer groups with this right.
iv.
Credit Account - This right allows employees to credit customers' accounts.
© 1997 - 2005 Ideal Software Systems, Inc.
42
Point of Sale
D.
v.
Customer Detail Report - View this customer report with this right.
vi.
Form Letters - Send letters to customer with this right.
vii.
MVP Clubs - This right allows the user to create MVP clubs in the Point of Sale
system.
viii.
Accounts Receivable Report - Access the report that shows the amount customers
owe with this right.
ix.
Define Customer Rights - Assign rights to customers with this right.
x.
Invoices - Review all invoices with this right.
xi.
Add/Edit City State Zip - Use this right to edit cities and states currently entered
into the Point of Sale system through the zip code.
xii.
Customer Card Edit - Edit customer cards with this right.
Debit Card - This section holds the right that managers must have if they are to assign
"drawers" to the kiosks. The following right only applies to systems using the Ideal Cashless
System.
i.
4.
Party Scheduler - These rights are associated with the Event Scheduler module. All Event Scheduler
reports are accessed with these rights. Mangers and Owners should have these rights.
A.
Reports - This right section allows the users the ability to access Event Scheduler reports.
i.
2.2.1.2
Issue Drawer - This right allows the user to issue a cash drawer to credit and cash
kiosks in the Ideal Cashless System.
Party Planning Report - Access this report with this right.
B.
Schedule Report - View the Schedule Report with this right.
C.
Party Income Report - This report is only accessed with this right.
D.
Outstanding Issued Tickets - This right allows the employee to view all outstanding tickets
that have been printed but not used.
E.
Edit Party Contracts - The user may edit event contracts that have already been entered into
the system with this right.
5.
Redemption Center Manager - This function is not currently used in the Point of Sale system.
6.
ICS - All Ideal Cashless System access is allowed with this right. This right is only valid if the Ideal
Cashless System has been added to the Point of Sale system.
Time Clock Import
Another important feature for users of Ideal's Point of Sale is the ability to export employee information into the
Time Clock Plus program. Selecting the option Export All Employees to Time Clock Plus creates an export
file that can be recognized and imported into the Time Clock Plus software to eliminate the need to enter staff
information twice. Follow the on-screen directions when this option is selected. For more information, refer to
section "Configuring System Parameters", sub-section "Configure Interfaces in Edit Parameters".
© 1997 - 2005 Ideal Software Systems, Inc.
Chapter 2 - Installation, Employees, and Setup
2.2.1.3
43
Employee Groups
In most family entertainment businesses, employees are setup on a hierarchy. Each level of employee has its own
set of rights. For example, all cashiers should have the same rights, as should low level managers, and general
managers.
The Employee Groups function provides a fast and convenient way to set up rights one time and then distribute
these rights to all the employees that should have them. When the group rights are edited, these changes can be
applied to all employees assigned to the group. It is not necessary to change a set of rights for each and every
employee.
2.2.1.4
Inactive Employees
If an employee account is no longer being used because the employee is no longer with the company for
whatever reason, then that account should be removed. Because Ideal's Point of Sale program uses a database to
store information, records (including employee records) cannot be removed. However, employee records no
longer in use can be tagged as inactive. An employee account with an inactive status cannot use any functions in
Front POS, FEC Administrator, nor can a user log in with an inactive account. This prevents other employees
from using inactive employees' login information to perform unwanted tasks. It also prevents the inactive
employees from accessing the system for any reason. For information on making employee accounts inactive, see
the sub-section "Making Employees Inactive".
2.2.1.5
Employee Cards
Employee cards may be purchased from Ideal to work with the Point of Sale system. These cards can be used by
all employees to log into the system, eliminating the need to type in an ID and password every time. Other than
convenience, the true advantage of using employee cards is that no one can see manager, owner, or master
passwords. For information on ordering Ideal employee cards, please call 601.693.1673. For more information
on assigned employee cards and using them, refer to sub-sections "Assigning Employee Cards" and "Logging In
with Employee Cards".
2.2.2
Entering the First Employee
This sub-section contains the information needed to create the first Point of Sale employee. The following
instructions assume that the user has just installed Point of Sale for the first time and is being prompted to enter
the first employee.
NOTE: The steps given below will only occur when the Point of Sale software is
installed into a directory with no Point of Sale software. If this is not the first
time the Point of Sale program has been run and there are currently employees in
the system, then skip to sub-section, "Entering Additional Employees".
1.
Double-click on the FEC Administrator icon to open the Ideal FEC Back Office Suite for the first
time.
2.
The Confirm window will open instructing the user to create an employee profile. Click OK.
© 1997 - 2005 Ideal Software Systems, Inc.
44
Point of Sale
NOTE: As it says in the Confirm window, make sure that the initial employee
profile has full or managerial rights.
Figure 2-23. The Confirm window
Confirm by clicking OK.
3.
The Add New Employee window will open.
© 1997 - 2005 Ideal Software Systems, Inc.
Chapter 2 - Installation, Employees, and Setup
2.2.2.1
45
Personal Information
4.
Enter the necessary information in the Personal Information tab.
Figure 2-24. The Add New Employee window's Personal Information tab
Enter the employee's personal information.
A.
Active
This will be checked by default and cannot be changed until other employees are entered.
B.
First Name
Enter the first name of the current user.
C.
Middle
Entering a middle initial is optional.
D.
Last Name
© 1997 - 2005 Ideal Software Systems, Inc.
46
Point of Sale
Enter the last name if the current user.
E.
SSN
The Social Security number is optional.
F.
Password
Entering a password is required.
i.
To enter a password, highlight **** with the mouse.
ii.
Type in a four-digit password.
NOTE: The Password field only requires and will accept a four-digit password.
The password must be four digits. Also, no letters or special characters may be
used in the password. Only numbers may be used.
G.
Verify
Confirm the password by entering the same four-digit number into the Verify field as it was
entered into the Password field.
H.
Employee ScanCode
This field will appear when a magnetic card reader stripe is connected.
TIP: To setup an employee card, see sub-section "Assigning Employee Card".
I.
Locker and Uniform
These are optional fields for the employee.
J.
Address, City, State, and Zip
These fields are for the employee's home address. They do not have to be entered.
K.
Phone Number 1 and Phone Number 2
A total of two optional phone numbers can be entered for an employee.
L.
Date of Birth
Enter the user's date of birth. This field is optional.
M.
Hire Date
As this is the first employee in the system, this field isn't necessary.
N.
Termination Date
This field does not apply to the first employee.
O.
Pay Rate
If necessary, enter an hourly pay rate. Otherwise this field is optional.
P.
Next Review Date
Put a future review date for the employee if necessary. This field is optional.
Q.
Last Review Date
As this is the first employee in the system, this field isn't valid.
R.
No Payroll Record
This option is checked by default. To uncheck it, edit the employee profile Refer to the subsection "Edit an Existing Employee".
© 1997 - 2005 Ideal Software Systems, Inc.
Chapter 2 - Installation, Employees, and Setup
S.
2.2.2.2
Work Papers Filed
This option is checked by default. To uncheck it, edit the employee profile Refer to the subsection "Edit an Existing Employee".
Rights and Privileges
5.
47
Click on and fill out the Rights and Privileges tab with the necessary information.
Figure 2-25. The Add New Employee window's Rights and Privileges tab
Select the employee's rights and privileges.
A.
Employee Group
The user has not created any Employee Groups so this field may not be used.
B.
Employee Rights Tree
Enter all the rights the user will be allowed to have in the Point of Sale system.
NOTE: If this is the first employee to be entered into the Point of Sale system,
administrator rights (all rights) will need to be assigned to this employee.
© 1997 - 2005 Ideal Software Systems, Inc.
48
Point of Sale
WARNING: If no rights are assigned to the first employee, the user will not
have rights to enter the system. If this happens, the user must uninstall the Point
of Sale software, stop the DBISAM Database Server service, then manually
delete the POS directory. Once this has been done. The user will need to see
Chapter 2 section "Installing Point of Sale" for a new install.
Figure 2-26. The Employee Rights Tree
Select the appropriate rights for the employee.
TIP: To open up more rights on the Employee Rights Tree, click .
2.2.2.3
C.
Employee Charge Limit
Employees are allowed to charge Front POS sales to their account. Enter a dollar amount that
represented to total amount an Employee can charge before paying it back.
D.
Discount Type
No discount types have been created yet so this field is invalid.
E.
Bonus Rate
Enter a dollar amount that will be added as a bonus to the employee's hourly rate or leave the
value at zero.
Picture
6.
Click the Picture tab and take the employee's picture.
NOTE: Before an employee's picture can be taken, a camera must first be
connected to the computer terminal.
© 1997 - 2005 Ideal Software Systems, Inc.
Chapter 2 - Installation, Employees, and Setup
A.
49
Take Picture
Click this button to open the Capture window.
Figure 2-27. The Add New Employee window's Picture tab
Take the employee's picture.
i.
Click Capture to take a picture, otherwise click Cancel to go back to the Picture tab.
Figure 2-28. The Capture window
Click Capture.
B.
Setup Camera
Click this button to open the Video Source utility.
© 1997 - 2005 Ideal Software Systems, Inc.
50
Point of Sale
Figure 2-29. The Picture tab with sample picture
NOTE: For more information on the Video Source utility and setting up the
camera to take better pictures, refer to the "Setup Camera" sub-section.
C.
Employee Badge
Clicking this button will print out an employee badge.
NOTE: An ID Badge printer must be setup and configured in order for this
button to function properly. For more information on setting up an ID Badge
printer, refer to the "Configure Printer in Edit Parameters" sub section in the
"Configure System Parameters" section.
2.2.2.4
ICS Login
7.
Click the ICS Login tab and fill out all necessary employee information.
NOTE: The Ideal Cashless System (ICS) must have been purchased and
installed in before this tab can be utilized.
Figure 2-30. The Add New Employee window's ICS Login tab
Enter the employee's ICS information.
© 1997 - 2005 Ideal Software Systems, Inc.
Chapter 2 - Installation, Employees, and Setup
2.2.2.5
51
A.
Username
If the employee needs to log into and use the Ideal Cashless System, then enter the same user
name in this field that the employee uses to login on the ICS server.
B.
Password
This password should be same as the password the user uses to logon to the ICS server.
Employee Charges
8.
Click OK at the bottom of the Add New Employee window as the Employee Charges tab has no use
at this point.
NOTE: The Employee Charges tab is used to display the employee's currently
outstanding charges. Since the employee being entered in this case is the first
employee, there can be no charges.
Figure 2-31. The Add New Employee window's Employee Charges tab
9.
The Information window will appear assigning the employee number. Click OK.
10.
The Confirm window will appear, asking the user if another employee should be created. Click Yes to
create another employee. Otherwise, click No.
© 1997 - 2005 Ideal Software Systems, Inc.
52
Point of Sale
Figure 2-32. The Confirm window asking if more employees are to be created
Click No to enter the program.
11.
When No is clicked, the Login window will open. Enter the User ID Number assigned to the employee
just created. Then enter the PIN Number.
NOTE: The PIN Number is the same as the Password that was entered in the
Add New Employee window.
Figure 2-33. The Login window
Enter the User ID Number and PIN Number for the employee.
12.
2.2.3
The user will now be in the Point of Sale system for the first time.
Entering Additional Employees
This sub-section contains the information needed to create an additional Point of Sale employee(s). By following
the steps below, the user can learn how to create a new employee(s) at any time during Point of Sale operation.
NOTE: At least one employee must have been previously created in order to log
into the system and have the proper rights.
1.
In the Ideal FEC Back Office Suite screen, click Facility.
2.
Select Employees | Create Employee.
© 1997 - 2005 Ideal Software Systems, Inc.
Chapter 2 - Installation, Employees, and Setup
53
Figure 2-34. The Ideal FEC Back Office Suite screen showing the Employees menu's Create Employee option
Under the Facility menu, go to Employees | Create Employee.
3.
2.2.3.1
The Add New Employee window will open.
Personal Information
4.
Enter the necessary information in the Personal Information tab (Figure 2-24).
A.
Active
This will be checked by default and cannot be changed until other employees are entered.
B.
First Name
Enter the first name of the current user.
C.
Middle
Enter the middle initial of the current user, this is optional.
D.
Last Name
Enter the last name of the current user.
E.
SSN
The Social Security number is optional.
F.
Password
Enter a password. This is required.
i.
To enter a password, highlight **** with the mouse.
ii.
Type in a four-digit password.
© 1997 - 2005 Ideal Software Systems, Inc.
54
Point of Sale
NOTE: The Password field only requires and will accept a four-digit password.
The password must be four digits. Also, no letters or special characters may be
used in the password. Only numbers may be used.
G.
Verify
Confirm the password by entering the same four-digit number into the Verify field as it was
entered into the Password field.
H.
Employee ScanCode
This field will appear when a magnetic card reader stripe is connected.
TIP: To setup an employee card, see sub-section "Assigning Employee Card".
I.
Locker and Uniform
These are optional fields for the employee.
J.
Address, City, State, and Zip
These fields are for the employee's home address. They do not have to be entered.
K.
Phone Number 1 and Phone Number 2
A total of two optional phone numbers can be entered for an employee.
L.
Date of Birth
Enter the employee's date of birth. This field is optional.
M.
Hire Date
Enter the date the employee was hired. This field is optional.
N.
Termination Date
This field shouldn't apply to new employees. However, in the event that an employee is fired,
this field should be updated.
O.
Pay Rate
If necessary fill out this field with an hourly pay rate. Otherwise this field is optional.
P.
Next Review Date
Put a future review date for the employee if necessary. This field is optional.
Q.
Last Review Date
This field will be empty with new employees. However, this field should be updated when the
employee is reviewed.
R.
No Payroll Record
This option is checked by default. To uncheck it, edit the employee profile Refer to the subsection "Edit an Existing Employee".
S.
Work Papers Filed
This option is checked by default. To uncheck it, edit the employee profile Refer to the subsection "Edit an Existing Employee".
© 1997 - 2005 Ideal Software Systems, Inc.
Chapter 2 - Installation, Employees, and Setup
2.2.3.2
55
Rights and Privileges
5.
Click on and fill out the Rights and Privileges tab with the necessary information (Figure 2-25).
A.
Employee Group
This assigns an employee group and group rights to the employee. This is optional.
NOTE: To setup an employee group, see sub-section "Creating Employee
Groups".
B.
Employee Rights Tree
Select all the rights the user will be allowed to have in the Point of Sale system (Figure 2-26).
TIP: To open up more rights on the Employee Rights Tree, click .
C.
Employee Charge Limit
Employees are allowed to charge Front POS sales to their account. Enter a dollar amount that
represents the total amount an Employee can charge before paying it back.
D.
Discount Type
If inventory discounts have been created, they can be applied to any employee.
NOTE: For more information section "Discounts" in Chapter 3.
E.
2.2.3.3
Bonus Rate
Enter a dollar amount that will be added as a bonus to the employee's hourly rate or leave the
value at zero.
Picture
6.
Click the Picture tab and take an employee picture (Figure 2-27).
NOTE: Before an employee's picture can be taken, a camera must first be
connected to computer terminal.
A.
Take Picture
Click this button to open the Capture window (Figure 2-28).
i.
B.
Click Capture to take a picture, otherwise click Cancel to go back to the Picture tab
(Figure 2-29).
Setup Camera
Click this button to open the Video Source utility.
NOTE: For more information on the Video Source utility and setting up the
camera to take better pictures, refer to the "Setup Camera" sub-section.
C.
Employee Badge
Click this button to print out an employee badge.
© 1997 - 2005 Ideal Software Systems, Inc.
56
Point of Sale
NOTE: An ID Badge printer must be setup and configured in order for this
button to function properly. For more information on setting up an ID Badge
printer, refer to the "Configure Printer in Edit Parameters" sub section in the
"Configure System Parameters" section.
2.2.3.4
Employee Charges
8.
The Employee Charges tab will show any currently outstanding employee charges (Figure 2-31).
9.
Once the employee's information is filled out correctly, click OK.
10.
The Information window will appear assigning the employee number. Click OK.
11.
The Confirm window will appear, asking the user if another employee should be created. Click Yes to
create another employee. Otherwise, click No.
12.
The user will be prompted to enter another employee. Click Yes if entering more employees or click No
to go into the Point of Sale software.
2.2.4
ICS Login
7.
Click the ICS Login tab and fill out any necessary employee information (Figure 2-30).
NOTE: The Ideal Cashless System (ICS) must have been purchased and
installed in before this tab can be utilized.
2.2.5
A.
Username
If the employee needs to log into and use the Ideal Cashless System, then enter the same user
name in this field that the employee uses to login on the ICS server.
B.
Password
This password should be same as the password the user uses to logon to the ICS server.
Edit an Existing Employee
This sub-section contains the information needed to edit an existing Point of Sale employee(s). By following the
steps below, the user can learn how to edit an existing employee(s) at any time during Point of Sale operation.
NOTE: At least one employee must have been previously created in order to
follow the steps below.
1.
In the Ideal FEC Back Office Suite screen, click Facility.
2.
Select Employees | Edit Employee.
© 1997 - 2005 Ideal Software Systems, Inc.
Chapter 2 - Installation, Employees, and Setup
57
Figure 2-35. The Ideal FEC Back Office Suite screen showing the Employees menu's Edit Employee option
Under the Facility menu, go to Employees | Edit Employee.
3.
The Choose Employee window will open. Select the employee that needs to be edited and click OK.
© 1997 - 2005 Ideal Software Systems, Inc.
58
Point of Sale
Figure 2-36. The Choose Employee window
Select an employee to be edited and click OK.
4.
The Edit Employee window will open with all of the current employee information.
TIP: The Choose Employee window offers features to search by inactive
employees, by employee last name, or with a basic search. These features are at
the top of the window.
© 1997 - 2005 Ideal Software Systems, Inc.
Chapter 2 - Installation, Employees, and Setup
59
Figure 2-37. The Edit Employee window with employee information
TIP: The employee in Figure 2-37 was assigned the number 1 because this was
the first employee to be entered into the Point of Sale. The customer number is
assigned based on the order in which the employees are created.
5.
Edit the information as needed. When finished editing, click OK.
6.
The changes will be saved and the Choose Employee window will reappear.
7.
To edit another employee, select an employee and click OK. Otherwise, click Cancel if no more
employees need to be changed.
2.2.6
Creating Employee Groups
This sub-section contains the information needed to create an employee group(s) in the Point of Sale. Creating
groups is a helpful feature in the Point of Sale that allows the user to predetermine rights to be distributed to all
levels of employment.
1.
In the Ideal FEC Back Office Suite screen, click Facility.
2.
Select Employees | Create Employee Group.
© 1997 - 2005 Ideal Software Systems, Inc.
60
Point of Sale
Figure 2-38. The Ideal FEC Back Office Suite screen showing the Employees menu's Create Employee Group
Under the Facility menu, go to Employees | Create Employee Group.
3.
The Add New Employee Group window will open. Enter the necessary information.
Figure 2-39. The Add New Employee Group window
Enter the necessary information.
© 1997 - 2005 Ideal Software Systems, Inc.
Chapter 2 - Installation, Employees, and Setup
61
A.
Description
Enter a defining name for the new employee group.
B.
Credit Limit
If the employees in this group will be permitted to charge sales to their account, enter the total
amount chargeable here.
C.
Discount
A discount can be assigned for the employee group that will be automatically account for in the
employees' transactions.
NOTE: A discount must have been created before one can be applied to the
employee group. For more information on creating discounts, refer to Chapter 3
section "Discounts".
D.
Bonus Accumulation Rate
If workers in the employee group are allowed to accumulate a bonus amount for every hour
they work, enter the hourly amount into this field.
E.
Employee Right Tree
Specify all the rights that the employees in this new group will have by checking the
corresponding boxes (Figure 2-26).
4.
Click OK once all the rights and information are entered for the group.
5.
The Warning window will appear asking the user if all the employees assigned to the rights group
should be changed. If the user needs to change all employees' rights inside the group, click Yes. If the
employees inside the group do not need to have their rights changed to match that of the group then
click No.
NOTE: This window assumes that the user has already assigned employees to an
employee group. If this employee group is being created for the first, clicking
Yes or No will not back a difference.
Figure 2-40. The Warning window confirming to apply policy changes to all employees in the group
Click Yes to apply the changes.
6.
2.2.7
The employee group policy has been created.
Editing Employee Groups
This sub-section contains the information needed to edit a previously created employee group(s) in the Point of
Sale.
© 1997 - 2005 Ideal Software Systems, Inc.
62
Point of Sale
NOTE: An employee group must have been created before the instructions
below can be followed. For more information on creating and employee group,
refer to the previous sub-section.
1.
In the Ideal FEC Back Office Suite screen, click Facility.
2.
Select Employees | Edit Employee Group.
Figure 2-41. The Ideal FEC Back Office Suite screen showing the Employees menu's Edit Employee Group
Under the Facility menu, go to Employees | Edit Employee Group.
3.
The Group Rights window will open. Select a group to edit then click OK.
© 1997 - 2005 Ideal Software Systems, Inc.
Chapter 2 - Installation, Employees, and Setup
Figure 2-42. The Group Rights window with sample groups
Select a group and click OK.
4.
The Edit Group Policy Rights window will open. Make any needed changes.
© 1997 - 2005 Ideal Software Systems, Inc.
63
64
Point of Sale
Figure 2-43. The Edit Group Policy Rights window with sample information
Make needed changes.
5.
Click OK once changes have been made for the group.
6.
The Warning window will appear asking the user if all the employees assigned to the rights group
should be changed. If the user needs to change all employees' rights inside the group, click Yes. If the
employees inside the group do not need to have their rights changed to match that of the group then
click No (Figure 2-40).
7.
The employee group policy has been changed.
2.2.8
Assigning Employee Groups
This sub-section contains the information needed to assign an employee group(s) in the Point of Sale.
NOTE: To perform the steps in this topic, make sure that an employee group has
been created. If one has not been, see sub-section "Creating Employee Groups".
1.
In the Ideal FEC Back Office Suite screen, click Facility.
2.
Select Employees | Edit Employee (Figure 2-35).
3.
In the Choose Employee window (Figure 2-36), select an employee that will be assigned to a group
policy and click OK.
© 1997 - 2005 Ideal Software Systems, Inc.
Chapter 2 - Installation, Employees, and Setup
65
4.
The Edit Employee window will appear (Figure 2-37). Click the Rights and Privileges tab, click the
down arrow in the Employee Group field, and select the desired employee group.
5.
As soon as a group is chosen, the Warning window will appear prompting the user if they would like to
apply the new group policy to the employee. Click Yes if this is the desired group. Click No if the
employee does not need to be assigned this group.
Figure 2-44. The Warning window confirming to apply the new group policy
Click Yes to apply the new group policy.
6.
The employee will now be assigned to the employee group. In the example shown in Figure 2-45, the
employee is assigned to the cashier group.
Figure 2-45. The Edit Employee window with employee information
The employee is assigned to a group.
7.
2.2.9
To edit another employee, select an employee and click OK. Otherwise, click Cancel if no more
employees need to be changed.
Assigning Employee Cards
Assigning employee cards is a quick and convenient way to log into the Point of Sale system. Employee cards
allow the user to avoid entering user numbers and passwords in front of other people. This sub-section contains
the information needed to assign employee cards in the Point of Sale.
NOTE: The user will need to have employee cards with properly encoded
magnetic stripes on the back in order to assigned the card to an employee. If
these cards are not available, call Ideal Software Solutions, Inc. at 601.693.1673.
© 1997 - 2005 Ideal Software Systems, Inc.
66
Point of Sale
NOTE: A magnetic stripe reader will need to be connected to the terminal at
which the user is assigning employee cards to an employee. If a magnetic stripe
reader is not connected to the computer, there will be no way to read the card.
1.
In the Ideal FEC Back Office Suite screen, click Facility.
2.
Select Employees | Edit Employee (Figure 2-35).
3.
In the Choose Employee window (Figure 2-36), select an employee that will be assigned a company
card and click OK.
4.
The Edit Employee window will appear (Figure 2-37). Allow the cursor to be in any field inside the
Edit Employee window.
TIP: For example, click inside the First Name field. This will make sure that the
Edit Employee window is the active window on the Desktop.
5.
Swipe the employee card through the magnetic stripe reader.
6.
When the card is programmed into the system, the card number will appear under the Employee
ScanCode field.
7.
Once the Employee ScanCode field is populated, the card has been assigned. Click OK to save the
changes.
8.
To edit another employee, select an employee and click OK. Otherwise, click Cancel if no more
employees need to be changed.
2.2.10
Logging In with Employee Cards
Logging in with employee cards is a quick and convenient way to enter the Point of Sale system. Employee cards
allow the user to avoid entering user numbers and passwords in front of other people. There are two modules to
the Point of Sale software: 1) FEC Administrator and 2) Front POS. This section contains the information
needed to logon into the Point of Sale system using an employee card.
NOTE: The user will need to be setup in Point of Sale as an employee. An
employee card will need to be assigned to the employee file. If an employee card
is not assigned, see topic "Assigning Employee Cards".
NOTE: A magnetic stripe reader will need to be connected to the terminal at
which the user is logging into the Point of Sale system. If a magnetic stripe
reader is not connected to the computer, there will be no way to read the card.
2.2.10.1 FEC Administrator
1.
Double-click the FEC Administrator icon.
2.
The Ideal FEC Back Office Suite will open. There will be a Login window asking for a User ID
Number and a PIN Number (Figure 2-33).
© 1997 - 2005 Ideal Software Systems, Inc.
Chapter 2 - Installation, Employees, and Setup
67
3.
Confirm that the cursor is inside the User ID Number field and swipe the employee card through the
magnetic stripe reader.
4.
The Login fields will be populated with user's employee number and password. The Ideal FEC Back
Office Suite will now be accessible.
NOTE: The user will only have access to the program if their employee rights
allow it. If the user does not have the rights then the program will not be
accessible.
2.2.10.2 Front POS
1.
Double-click the Front POS icon.
2.
The Ideal Software Systems POS Login Terminal screen will appear.
Figure 2-46. The Ideal Software Systems POS Login Terminal screen
The Ideal Software Systems POS Login Terminal screen will appear.
A.
After confirming the cursor is in the Employee ID field, swipe the employee card through the
magnetic stripe reader. The user will be logged in.
© 1997 - 2005 Ideal Software Systems, Inc.
68
Point of Sale
NOTE: The user will only have access to the program if their employee rights
allow them. If the user does not have the rights, then the program will not be
accessible.
B.
Click Login.
i.
The Employee ID and Pin Required window will appear.
Figure 2-47. The Employee ID and Pin Required window
The Employee ID and Pin Required window will appear.
ii.
2.2.11
After confirming the cursor is in the Employee ID field, swipe the employee card
through the magnetic stripe reader. The user will be logged in.
Making Employees Inactive
This sub-section contains the information needed to make an employee(s) inactive in the Point of Sale system.
Making an employee inactive is useful for employees or ex-employees who no longer need access to the system.
WARNING: At least two employees must have been previously created in order
to follow the steps below. If the user tries to make the only employee in the Point
of Sale system inactive or if the current user logged into the system is made
inactive, an error will result.
1.
In the Ideal FEC Back Office Suite screen, click Facility.
2.
Select Employees | Edit Employee (Figure 2-35).
3.
In the Choose Employee window (Figure 2-36), select an employee that will be terminated and click
OK.
4.
The Edit Employee window will appear (Figure 2-37). The first field will be the Active status check
box. Click inside the white box on the check mark. The check mark will disappear.
© 1997 - 2005 Ideal Software Systems, Inc.
Chapter 2 - Installation, Employees, and Setup
69
5.
Be sure to include the employee's termination date. Click inside the Termination Date field and check
the box. Select the appropriate date of termination.
6.
The employee now has an inactive status. Click OK to save the changes.
7.
To edit another employee, select an employee and click OK. Otherwise, click Cancel if no more
employees need to be changed.
2.2.12
Setup Camera
This utility lets the user setup a camera attached to a Point of Sale workstation. A camera in the Point of Sale
system is a useful tool that allows users to put faces to the names of their customers and fellow employees. The
following instructions and mini-sections explain how to use this utility.
NOTE: A digital camera must be connected to the terminal that will be using the
Setup Camera feature.
1.
In the Ideal FEC Back Office Suite screen, click Facility.
2.
Select Employees | Create Employee or Edit Employee (Figures 2-35 and 2-36) to open the Add
New Employee or Edit Employee window (Figures 2-24 and 2-37).
3.
Click on the Picture tab and click Setup Camera.
© 1997 - 2005 Ideal Software Systems, Inc.
70
Point of Sale
2.2.12.1 Advanced
4.
The Video Source window will open to the Advanced tab. Select the necessary information.
Figure 2-48. the Video Source window's Advanced tab
Select the necessary information.
A.
B.
C.
Automatic Gain Control
Use this built-in feature to automatically adjust the amount of light the camera takes in and
how bright the picture will be.
i.
Exposure
If Automatic Gain Control is unchecked, this scroll bar will be accessible.
Exposure controls the amount of light the camera takes in.
ii.
Gain
If Automatic Gain Control is unchecked, this scroll bar will determine the
brightness of the picture.
Image Mirror
i.
Mirror Horizontal
Reverse the picture's horizontal appearance by checking this option.
ii.
Mirror Vertical
Reverse the picture's vertical appearance by checking this option.
Image Enhancement
© 1997 - 2005 Ideal Software Systems, Inc.
Chapter 2 - Installation, Employees, and Setup
D.
5.
i.
Low Light Boost
Check this option if the lighting is poor where the camera is located.
ii.
Color Boost
Add more color depth through brighten and contrast features with this option.
71
Anti Flicker
i.
Off
Turn the Anti Flicker function off.
ii.
50 Hz (European)
Compensate for the "flicker" or white lines that appear in European monitors.
iii.
60 Hz (North America)
Compensate for the "flicker" or white lines that appear in North American monitors.
Click Apply if any changes have been made.
2.2.12.2 Capture Source
6.
Click on the Capture Source tab. Click the drop down arrow to select a camera for the Select a Video
Device field.
Figure 2-49. the Video Source window's Capture Source tab with sample camera
Select a camera.
NOTE: A sample Logitech camera has been selected in Figure 2-49. If no
camera is attached to the terminal, there will be no camera option under the
Select a Video Device field.
7.
Click Apply if any changes have been made.
© 1997 - 2005 Ideal Software Systems, Inc.
72
Point of Sale
2.2.12.3 Device Settings
8.
Click on the Device Settings tab. Make the necessary changes.
Figure 2-50. the Video Source window's Device Settings tab
Make the necessary changes.
A.
Brightness
Select the amount of brightness of the picture.
B.
Contrast
Select the amount of color contrast for the picture.
C.
Hue
Select the amount of hue for the colors in the picture.
D.
Saturation
Select how saturated the picture colors will appear.
E.
Sharpness
Select how sharp the lines and outlines in the picture will appear.
F.
White Balance
Select how "white" the whites in the picture will be.
G.
Gamma
The greater the amount of this value will increase the loss of color and add a transparent look.
H.
Backlight Comp.
Increase this value to compensate for an overage of back light.
I.
Default
Click this button to set all values to their programmed defaults.
© 1997 - 2005 Ideal Software Systems, Inc.
Chapter 2 - Installation, Employees, and Setup
9.
Click Apply if any changes have been made.
10.
Click OK once all camera setup changes have been made.
2.2.13
73
Employee Charges
This sub-section explains how to view all current employee charges in the Point of Sale.
NOTE: At least one employee must have been previously created in order to
follow the steps below.
1.
In the Ideal FEC Back Office Suite screen, click Facility.
2.
Select Employees | Employee Charges.
Figure 2-51. The Ideal FEC Back Office Suite screen showing the Employees menu's Employee Charges option
Under the Facility menu, go to Employees | Employee Charges.
3.
The Employee Charges window will open. Click the drop down arrow in the Before Date field and
select a date.
© 1997 - 2005 Ideal Software Systems, Inc.
74
Point of Sale
Figure 2-52. The Employee Charges window
Select a date.
4.
Highlight a currently active employee in the left side of the window that has charges in his/her name. To
select multiple employees press and hold CTRL while clicking. All employees can be selected by
clicking Select All Employees. The employee's charges will appear in the right-hand side of the
window.
5.
At this point, one or all employee charges may be deducted. To remove all charges, click Deduct All.
6.
To save any changes made to the employee charges, click Commit.
2.2.14
Award Employee Bonus
This sub-section explains how to award employees with a bonus in the Point of Sale.
NOTE: At least one employee must have been previously created in order to
follow the steps below.
1.
In the Ideal FEC Back Office Suite screen, click Facility.
2.
Select Employees | Award Bonus.
Figure 2-53. The Ideal FEC Back Office Suite screen showing the Employees menu's Award Bonus option
© 1997 - 2005 Ideal Software Systems, Inc.
Chapter 2 - Installation, Employees, and Setup
75
Under the Facility menu, go to Employees | Award Bonus.
3.
The Choose Employee window will open (Figure 2-36). Select an employee to award a bonus to and
click OK.
4.
The Award Employee Bonus window will appear. Enter the necessary information.
Figure 2-54. The Award Employee Bonus window
Enter the necessary information.
5.
A.
Amount
Enter a monetary amount for the bonus.
B.
Reason for Award
Enter a short reason for the bonus.
Click OK to apply the bonus.
© 1997 - 2005 Ideal Software Systems, Inc.
76
Point of Sale
2.2.15
Award Employee Time Worked
This sub-section explains how to award time worked to employees in the Point of Sale.
NOTE: At least one employee must have been previously created in order to
follow the steps below.
1.
In the Ideal FEC Back Office Suite screen, click Facility.
2.
Select Employees | Award Time Worked.
Figure 2-55. The Ideal FEC Back Office Suite screen showing the Employees menu's Award Time Worked option
Under the Facility menu, go to Employees | Award Time Worked.
3.
The Choose Date Range window will open. Select a start and end date by clicking the down arrows.
© 1997 - 2005 Ideal Software Systems, Inc.
Chapter 2 - Installation, Employees, and Setup
77
Figure 2-56. The Award Time Worked window
Enter a start and end date.
2.2.16
Process Payroll Deduction
For each employee that owes the facility money or has pending charges, a payroll deduction may be processed by
that employee. In the employee pull down menu, a new item option called Process Payroll Deduction will be
added.
NOTE: The Process Payroll Deduction option will only appear when at least
one employee has pending charges.
When Process Payroll Deduction is selected, a split window will appear with a grid on the top and bottom. The
top grid will display employees that owe money. The bottom grid will show the selected employee's
orders/invoices. The bottom grid will also contain the total amount owed, receipt numbers, and the time and date
of each of the orders. At the bottom of the second grid, the total amount owed of all the outstanding invoices will
be shown.
The user may double-click on a single order and enter the amount to deduct. To view the items in the order,
select the entire amount to deduct the entire amount owed.
NOTE: The receipt number and date uniquely identifies every order in POS.
Choosing to deduct value from the employee's paycheck will not immediately deduct the amount from the users
account. It only signifies that the employer plans to deduct the amount. The amount that will be paid on the
employee's invoice will be placed in the Pre-Deduction field until it is committed. The user may want to print a
report showing the amount to be deducted before committing the deduction. Once the deduction is committed it
cannot be undone programmatically.
© 1997 - 2005 Ideal Software Systems, Inc.
78
2.3
Point of Sale
Configuring System Parameters
Instructions on terminal and system settings as well as configuring all
peripherals
This section contains the setup procedures for configuring terminal and
system parameters. Also, Point of Sale has the built in ability to use a wide
variety of external hardware. Configuring all peripherals is also covered.
This chapter contains the following topics:
• "System Parameters Reference"
• "Store Settings"
• "Money Settings"
• "Terminal Settings"
• "Printer Settings"
• "Drawer Settings"
• "Credit Card Settings"
• "Serial Devices Settings"
• "PIN Pad Settings"
• "Party Scheduler Settings"
• "Capacity Management Settings"
• "Debit System Settings"
• "Purchase Order Settings"
• "Close Day Settings"
• "Interface Settings"
• "Internet Settings"
• "Data Archive"
• "Configure Store Settings in Edit Parameters"
• "Configure Money Settings in Edit Parameters"
• "Configure Terminal Parameters in Edit Parameters"
• "Configure Printers in Edit Parameters"
• "Configure Drawers in Edit Parameters"
• "Configure Credit Cards in Edit Parameters"
• "Configure Party Scheduler in Edit Parameters"
• "Configure Capacity Management in Edit Parameters"
• "Configure Debit System in Edit Parameters"
• "Configure Purchase Orders in Edit Parameters"
• "Configure Serial Devices in Edit Parameters"
• "Configure Close Day in Edit Parameters"
• "Configure Interfaces in Edit Parameters"
• "Configure Time Clock Plus in Edit Paramaters"
• "Configure Internet in Edit Parameters"
• "Configure Data Archive in Edit Paramaters"
© 1997 - 2005 Ideal Software Systems, Inc.
Chapter 2 - Installation, Employees, and Setup
2.3.1
System Parameters Reference
2.3.1.1
Store Settings
79
The Store Settings parameters window is used to enter basic store information. The name of the store as well as
the address and phone numbers are entered into this window for the Point of Sale system. Also, the marketing
question is setup in this window. The marketing question appears on the selected terminal at the end of every
sale. Refer to sub-section "Configure Store Settings in Edit Parameters" for more information.
Figure 2-57. The Store Settings window with a sample Marketing Question
A number of responses can be entered into the system that the customer can use in answering the question.
Figure 2-58. The Marketing Responses window with sample responses
Assigning the store ID is also done from this window. Changing the store ID number is an important feature for
the reasons that some family entertainment centers have more than one location. These different locations are
identified by different store ID numbers. This is also important if the Point of Sale Home Office System is being
used. The Set for Refresh function is used with the Home Office System as well. Files are pulled over an
Internet connection to the Home Office. Once this is done, the files are marked so that only new files that have
not been pulled will be unmarked. Using the Set for Refresh command will allow all files to be pulled whether
© 1997 - 2005 Ideal Software Systems, Inc.
80
Point of Sale
they have been sent before or not.
2.3.1.2
Money Settings
A number of functions are set from the Money Settings parameters window. Below is a list of these functions
and their purposes. For more information on setting up this window, refer to sub-section "Configure Money
Settings in Edit Parameters".
Display Pull Notice - The cash drawer can only hold a certain amount of cash, checks, and receipts before it
becomes difficult to close the drawer. Also, some managers feel more comfortable if a smaller amount
of cash is in the drawer. This function will prompt the employee when the drawer is full (based on the
cash amount entered) to take out the money. A manager should be the person responsible for actually
removing the money.
Default Initial Drawer Amount - Most stores start the day with a default amount of cash in all of the drawers.
This field will contain the default amount of money that should be in the drawers at the beginning of the
day and will base the drawers' total cash amount off of the entered default amount.
Inhouse Currency Description - If the MVP Credit Card system is being used with the Point of Sale system,
then the name of the store cash or credit will need to be entered here. All instances of MVP Credit
displayed in the reports will then change to the new name that the user assigns.
Default Number of Days for Customer History - Point of Sale can keep a history on a customer's credit card
and MVP credit usage. The amount of history that is kept is decided by this field.
Quick Cash Buttons - These fields decide the amounts of the Quick Cash Buttons in Front POS. Quick Cash
Buttons usually equal the number amount of the dollar bills most commonly used as payment at the
cash terminals. The amounts for these Quick Cash Buttons should be determined by the average cost of
the majority of the items sold at the terminal.
Figure 2-59. The Quick Cash Buttons in Front POS
Intercard Database Location - Only if the Intercard system has been installed and will be used with the Point
of Sale system should this field be used. The Intercard system can be integrated but it is sold separately.
For more information on using an existing Intercard system with an Ideal system or purchasing a new
Intercard system to be used with the Point of Sale software, contact Ideal Software Systems.
Time Clock Plus Installed - If the Time Clock Plus software has been installed, these settings and the other
Time Clock Settings are necessary to make the two programs communicate. This software provides
major benefits to the Point of Sale system. Employee information can be imported into Time Clock
from Point of Sale. Also, if the employees are using Ideal's employee cards, the employee can use the
card to clock into Time Clock as well as login to the Point of Sale system.
GL Export Type - This stands for General Ledger export. The Point of Sale system offers a means to convert
transaction and sales figures into a format that is readable by both Quickbooks and Peachtree products.
Gift Ticket Script - The Point of Sale system allows the sale of gift certificates. The user has the option to write
a different message to be printed out onto the gift certificate. A text or TXT file is needed for this field.
© 1997 - 2005 Ideal Software Systems, Inc.
Chapter 2 - Installation, Employees, and Setup
81
A basic TXT file can be written in the Microsoft applications Notepad or Word Pad.
2.3.1.3
Terminal Settings
The Terminal Parameters window contains both system wide settings and settings that are unique for each
terminal. A list of these settings and their functions are listed below. For more information on setting up this
window, refer to sub-section "Configure Terminal Parameters in Edit Parameters".
Terminal ID - In this field the user will indicate the terminal identification number that the parameters will
apply to by typing in the terminal number or by clicking the down arrow located to the right of the field.
Each Point of Sale terminal must have it own unique terminal number.
Terminal Description - It is important that each Point of Sale terminal has its own unique terminal ID (i.e.,
Food POS, Admissions POS, etc.)
Inventory Location - Inventory locations are the storage locations for all the items that are for sale, rent, etc.
Auto Logout - This function sets the number of seconds before the system will automatically log a user out of
the Front POS Sales screen or the FEC Administrator when not in use. This is useful in case a customer
is left alone with a Front POS terminal or an employee is left alone with the FEC Administrator and has
access to the rights.
Require Drawer to Log Into POS - This parameter should only be turned on for terminals that are not using a
cash drawer. When this parameter is turned on, it allows the user to access the sales screen and process
orders as an Open Tab. The user will be able to print a receipt for the transactions but the transactions
will remain open until they are pulled up and closed on a terminal that has a cash drawer. This feature is
typically used in restaurant settings.
Allow Tabs on Orders - This option allows orders to stay open so that more items can be added later if
necessary. This option allows basic tab and account receivable functionality.
Return to Login after sale is complete - If for some reason the employee must log back in after every
transaction, then select this option. This isn't the most efficient way to run Front POS, however it is
very secure in warding off curious customers or employees.
Ask Marketing Question - This option will allow the terminal to ask the marketing question at the end of every
transaction. This option, like all the others, applies specifically to the terminal. The user can have some
terminals asking the marketing question while others will not.
Movie Sales Terminal - Only if the Capacity Management module is installed will this option be usable. If the
Capacity Management functionality is installed, then the terminal will become a Front POS Movie
Sales terminal that can still sell regular inventory items.
Require Matching Customer Account to Redeem Access Tickets - This option ensures that the customer has
an account with the store and in the Point of Sale system before he/she can use Access Tickets. Only
Point of Sale software users with the Access Control Management (ACM) module will have a need for
this option.
OnePOS Gift Card Location - This field allows the user to identify the location of the OnePOS Card Server.
This allows an additional payment method within the Point of Sale system.
Front POS Screen - If more than one sales screen has been setup in the system, the program allows the user to
choose the screen that the terminal will be using as a Front POS Sales screen by clicking the
appropriate screen name.
© 1997 - 2005 Ideal Software Systems, Inc.
82
Point of Sale
Access Items Allowed - If the Access Server module is installed, then Point of Sale will keep track of all the
inventory items that can be used on Access Tickets. These Access Tickets are redeemable for items and
access at turnstiles and all other Point of Sale terminals.
2.3.1.3.1 Printer Settings
There are six main types of printers that can be used with the Ideal Point of Sale system. For more information
on setting up this window, refer to sub-section "Configure Printers in Edit Parameters".
Receipt Printers - A receipt printer can and should be connected to each Front POS workstation. These printers
are necessary to print a customer receipt after every transaction. Also, they are needed to send the cash
drawer an electric pulse every time the cash drawer needs to be opened. Citizen Receipt printers are
recommended due to their fast print speed and durability.
Service Printers - Service printers are receipt printers that reside in the kitchen area. As food orders are taken
and purchased at the Front POS stations, a receipt will be printed for the customer. The same order
information will be printed to the service printers that will be in an easy access location for the chefs.
These printers are also Citizen Receipt printers. They are usually connected to the Point of Sale
computer network via a print server.
Ticket Printer - The ticket printer can have two main functions. It will serve as a printer for regular Point of
Sale tickets that are used to enter events, rides, or other resources. Also, if the Access Control
Management (ACM) module is connected, the ticket printer can print out the tickets that are used at
turnstiles and other access points. The BOCA printer is the ticket printer of choice for the Ideal system.
ID Badge Printers - Many family entertainment facilities require that customers' pictures be printed onto their
customer or gift cards. This type of printer can be networked into the Point of Sale network and printed
to from any computer. However, the ID badge printer should be near the front Point of Sale workstation
as this will be where customers acquire their customer ID's.
Golf Score Card Printers - Numerous family entertainment centers offer putt-putt golf as a resource the
customers can enjoy. As a convenience to the customers, these entertainment centers print out score
cards so that the customers can have friendly competition or just go for their personal bests. Dual Bay
BOCA printers are recommended for the printing job in the Point of Sale system.
Wristband Printers - Some family entertainment centers require a proof of payment identifier while on the
premises or a customer wristband. Locations with restaurants that serve alcohol might also require a
proof of proper age before serving alcoholic drinks. Wristband printers can be networked to the Point of
Sale system but should be located near the terminal where the customers will be receiving the
wristbands.
2.3.1.3.2 Drawer Settings
Two cash drawers can be connected to each workstation however the recommended number of drawers per
station is one. The Cash Drawer Type fields refer to the type of printers that will be at the terminal and
connected to the cash drawer. As nearly all receipt printers purchased from Ideal are Citizen, this most likely will
be the option chosen. Refer to sub-section "Configure Drawers in Edit Parameters" for more information.
© 1997 - 2005 Ideal Software Systems, Inc.
Chapter 2 - Installation, Employees, and Setup
83
2.3.1.3.3 Serial Devices Settings
Other hardware devices that are compatible with the Point of Sale system are configured on this window. For
more information on setting up this window, refer to sub-section "Configure Serial Devices in Edit Parameters".
Pole Display - A pole display that shows the customer the amount of each item as it is being rung up in Front
POS, and the total cost of the transaction can be connected to a serial port and display a message while
a sale is not being processed.
Token Dispenser - Tokens for arcade games in family entertainment centers are often sold at Front POS
terminals. Instead of having to manually count out tokens from the cash drawer, a dispenser can be used
and allow employee time to be used more efficiently. Normally, as long as the token dispenser is
electronic pulse based, it should be compatible with the system.
Intercard Reader - If an Intercard system has been integrated with the Point of Sale program, Intercard Readers
must be connected to a COM port on the workstations.
Ticket Dispenser - If ticket dispensers for game tickets are used with the Point of Sale system, the peripheral
must be assigned a COM port on the workstation.
2.3.1.3.4 PIN Pad Settings
A PIN pad can be attached to a terminal for users and cashiers to enter numbers directly. For more information
on setting up a PIN pad, refer to sub-section "Configure PIN Pad in Edit Parameters".
2.3.1.4
Credit Card Settings
The Ideal Point of Sale system offers the choice of three different credit card processing packages:
1.
Authorizer
2.
IC Verify
3.
PC Charge
Currently, PC Charge is the credit card software of choice as it is integrated with the Point of Sale program to
process credit card tips. Checking the Allow gratuities for credit card option allows the system to keep track of
credit card tips. Also, credit card batches can be selected to be sent automatically through the Point of Sale
system. This option works similar to the credit card softwares' ability to send batched automatically.
A parameter called Swap expiration date on manual credit card transactions was added to swap the position
of the month and year in the expiration date on credit cards that are manually processed. This was done because
the string of card information was being sent to the processor and the processor was returning with "invalid card
or expired card" error messages. This option is a check box that, when checked, will reverse the expiration data
entered by the cashier/employee. For more information on setting up this window, refer to sub-section
"Configure Credit Card in Edit Parameters".
NOTE: The expiration date must be entered as four digits when credit card
information is entered manually.
© 1997 - 2005 Ideal Software Systems, Inc.
84
2.3.1.5
Point of Sale
Party Scheduler Settings
The Party Scheduler window has a number of important fields that need to be completed before the Event
Scheduler module is used. The Host's Comments/Checklist needs information about the tasks that are to be
attended to at every event. Comments or reminders can be entered to assist the employees as they prepare and
host the party or event. Party quotes can be printed to the local receipt printer or to a network report or Window's
printer. Lastly, an Event Contract needs to be chosen. This contract will be printed for every customer wanting to
have a party scheduled. The contract should contain all payment and cost information as well as party details and
comments. Also, this contract must have been created using report builder. For more information on setting up
this window, refer to sub-section "Configure Party Scheduler in Edit Parameters".
2.3.1.6
Capacity Management Settings
The Capacity Management window is only valid if the Capacity Management module has been installed in the
Point of Sale system. In this window, the number of minutes that tickets can still be sold after a movie is started
is entered. Also, the schedule grid start and stop time is entered here. These times indicate on the movie
scheduler when movies can begin to be scheduled and when the theaters stop showing movies.
Another notable feature is the sequence number printed onto each movie ticket sold.by Point of Sale. The
Capacity Manager Settings tab contains a feature that allows the user to resent the sequence number. For more
information on setting up this window, refer to sub-section "Configure Capacity Management in Edit
Parameters".
2.3.1.7
Debit System Settings
The Debit System window is used to setup the ICS server with the Point of Sale system. The Debit System
Currency Description is used to customize the name of the store money that customers will use. The Server
Information section is used to open up communication between the Ideal server and the Ideal Cashless System
server. This information is specific to just the server. The next section, Client Setup, is specific to the
workstation because each workstation must have its own terminal description. New and Loyalty Account
sections provide the user with the ability to specify what type of customer accounts are automatically created and
also what questions to prompt the customer for. For more information on setting up this window, refer to subsection "Configure Debit System Settings in Edit Parameters".
2.3.1.8
Purchase Order Settings
The Purchase Order window contains the information that will be filled out with every purchase order that is
created. There are two sections in this window: Bill to information and Ship to information. Even if both
addresses are the same, fill them both out with the correct address. For more information on setting up this
window, refer to sub-section "Configure Purchase Orders in Edit Parameters".
2.3.1.9
Close Day Settings
This window provides a means with which to take the responsibility of closing out the business day off of the
user. Past versions of Point of Sale required that a manual close of be performed every day in order for the
program's business day to be correct. Now the user can specify a time and a specific workstation to perform the
close of day for every day automatically. For more information on setting up this window, refer to sub-section
"Configure Close Day in Edit Parameters".
© 1997 - 2005 Ideal Software Systems, Inc.
Chapter 2 - Installation, Employees, and Setup
85
2.3.1.10 Interface Settings
This window is very useful for all Ideal customers that wish to integrate other programs or systems with their
Point of Sale system. Users of Time Clock Plus, Intercard, Aloha, and Kartvision can easily join the programs or
output information through this window. Of course users that do not possess any of these other mentioned
systems will have no use for this window. For more information on setting up this window, refer to sub-sections
"Configure Interfaces in Edit Parameters" and "Configure Time Clock Plus in Edit Parameters".
2.3.1.11 Internet Settings
This window allows users to set the following internet setting inside the Point of Sale system:
A.
Internet E-Mail address - This email address specifies where customer e-mail questions about parties
and general facility information will be sent.
B.
SMTP Server - This is the server where automated e-mails by the party scheduling system are sent.
C.
SMTP User - This is the account user name that is required to access the SMTP server
D.
SMTP Password - This is the account password required to access the SMTP server.
2.3.1.12 Data Archive Settings
POS has an option to archive POS Transaction file data. By default, Transaction File archiving will be enabled.
By default Transaction records more than 365 days will be archived. Archive records more than 7 years old will
be deleted. Archiving options may be changed by the user at any time. For more information on setting up a PIN
pad, refer to sub-section "Configure Data Archive in Edit Parameters".
2.3.2
Configure Store Settings in Edit Parameters
This sub-section contains the information needed to personalize the Point of Sale software to reflect store and/or
location information.
1.
Make sure that the Point of Sale menu is visible at the Ideal FEC Back Office Suite screen.
2.
Select Maintenance | System Parameters.
© 1997 - 2005 Ideal Software Systems, Inc.
86
Point of Sale
Figure 2-60. The Ideal FEC Back Office Suite Maintenance menu's System Parameters
Go to the Maintenance | System Parameters.
3.
The Edit Parameters Terminal window will appear. The Store Parameters window is the default
view.
TIP: The Edit Parameters Terminal window is also available by clicking
Parameters in the Front POS program. Also, the Edit Parameters Terminal
window reads Terminal 1 in Figure 2-61. The user assigns the terminal number
for each computer. The number of licenses purchased from Ideal Software
Systems decides the number of terminals.
© 1997 - 2005 Ideal Software Systems, Inc.
Chapter 2 - Installation, Employees, and Setup
Figure 2-61. The Edit Parameters Terminal window showing the Store Parameters window
The Store Parameters window.
4.
Enter in the store information.
A.
Store Name
Enter the name of the store or business.
B.
Address 1
Enter the address for the business.
C.
Address 2
Entering a second line of address information is optional.
D.
City
Enter the city where the business is located.
E.
State
Enter the state.
F.
Zip
Enter the zip code.
G.
District
Entering a district is optional.
H.
Corporation
© 1997 - 2005 Ideal Software Systems, Inc.
87
88
Point of Sale
The Corporation field is also optional.
I.
Phone Number 1
Enter the business's phone number.
J.
Phone Number 2
A second phone number is optional.
K.
Marketing Question
Asking a marketing question is optional.
TIP: If a Market Question has been entered, go to sub-section "Configure
Terminal Parameters in Edit Parameters" to setup Front POS so that the
question will be asked after every transaction.
L.
Edit Responses
Only if the Marketing Question field is populated with a question will the user need to enter
responses for that question.
i.
Click Edit Responses. The Marketing Responses window will appear (Figure 258).
ii.
Click Add New to open the Define Marketing Responses sub-window.
© 1997 - 2005 Ideal Software Systems, Inc.
Chapter 2 - Installation, Employees, and Setup
iii.
89
Enter a response in the Name field and click OK. The response will appear in the
Define Marketing Responses window.
Figure 2-62. The Market Responses sub-window
Enter a response and click OK.
iv.
v.
Clicking Add New again can enter more responses.
a.
To edit a response, highlight the response and click Modify.
b.
Change the text inside the Define Marketing Responses sub-window's
New Value field.
c.
Click OK. The edited response will appear in the Define Marketing
Responses window.
Click OK in the Define Marketing Responses window to save the responses and exit
back to the Store Settings window.
NOTE: To remove a response, highlight the response to be deleted and click
Remove.
M.
Change Store ID
TIP: The Store ID is defaulted to 001. It is recommended that this number not be
changed unless the user plans to connect multiple locations to the Point of Sale
Home Office System. Contact Ideal Software Systems for more information on
the Point of Sale Home Office System.
© 1997 - 2005 Ideal Software Systems, Inc.
90
Point of Sale
i.
Click Change Store ID. The Change or Set Store ID window will open.
ii.
Enter the new store identification number into the Store ID field. Click OK.
Figure 2-63. The Change or Set Store ID window
Enter the new store ID and click OK.
NOTE: If Point of Sale is communicating with the Point of Sale Home Office
system then the user will need to confirm the new Store ID with the corporate
office. Also, the Store ID must be three digits in length.
N.
Set for Refresh
This button is used with the Home Office System and allows a user at the corporate home
office to mark all old and new transactions and records in the data files without the
inconvenience of closing the program. This way, all files will be pulled to the Home Office
server even if they have been pulled before. Clicking this button will activate the refresh tool
and the Processing window will display the refresh progress.
Figure 2-64. The Processing window refreshing the Drawer File
Click Set for Refresh to update all files and open the Processing window.
O.
5.
Connection Information
This information contains the Local IP Address, Local Computer Name, Database Client
Version, and Database Path.
Once the Store Settings window is filled out correctly, click OK.
© 1997 - 2005 Ideal Software Systems, Inc.
Chapter 2 - Installation, Employees, and Setup
2.3.3
91
Configure Money Settings in Edit Parameters
This sub-section contains the information needed to configure the store settings and to personalize the Point of
Sale software to reflect store and/or location information.
1.
Make sure that the Point of Sale menu is visible at the Ideal FEC Back Office Suite screen.
2.
Select Maintenance | System Parameters (Figure 2-60).
3.
The Edit Parameters Terminal window will appear. The Store Settings window is the default view
(Figure 2-61).
TIP: The Edit Parameters Terminal window is also available by clicking
Parameters in the Front POS program.
4.
Click on the Money Settings window.
Figure 2-65. The Edit Parameters Terminal window showing the Money Settings window
Click on the Money Settings window.
5.
Enter in the money information.
A.
Display Pull Notice At
Enter a dollar amount at which money will need to be pulled from the drawer.
© 1997 - 2005 Ideal Software Systems, Inc.
92
Point of Sale
TIP: The default Display Pull Amount At is set to $1000. This area denotes the
maximum amount of money that can be in a money drawer before the user will be
prompted to pull some money.
B.
Default Initial Drawer Amount
Enter a dollar amount that will initially be in the drawer upon issuing.
TIP: The Default Initial drawer Amount is defaulted to 0. This means no
money will be in the drawer when issued to an employee.
C.
Inhouse Currency Description
If the location uses customer cards, assign the money card a name.
TIP: MVP Credit is the default Inhouse Currency Description.
D.
Subtract Debit Value in Sales Report
Check this option to subtract all debit values from the Sales Report.
E.
Default Number of Days For Customer History
Enter a number of days that customer transaction history will stay in the Point of Sale system.
TIP: The default amount of days is 180.
F.
Quick Cash Buttons
i.
Button 1
Enter an amount for the first quick button.
ii.
Button 2
Enter an amount for the second quick button.
iii.
Button 3
Enter an amount for the third quick button.
TIP: The button defaults are 5, 10 and 20 dollars respectively.
G.
Allowed Payments
This section lets the owner choose which forms of payment will be allowed at the Point of Sale
terminals. Check each form of payment that will be allowed.
i.
Cash
Allow cash for payment.
ii.
Checks
Allow personal checks for payment.
iii.
Debit Card
Allow a personal debit card for payment.
iv.
Credit
Allow credit cards for payment.
© 1997 - 2005 Ideal Software Systems, Inc.
Chapter 2 - Installation, Employees, and Setup
93
v.
Accounts Rec.
Allow customers to place payment due on an accounts receivable account or a tab.
vi.
MVP
Allow customers to use MVP credit for payment.
NOTE: As it mentions in the Allow Payments section, payment buttons are
terminal parameters. In other words, for every option that is checked in this
section, a button will appear in the Payment Method screen in Front POS.
H.
Allow Cash Back On Checks
Select whether or not to allow cash back on checks.
I.
Default Number of Days for Customers History
Enter the number of days customer information should stay in the database before being
deleted. the default value is 180 days.
J.
Require Employees to Change PIN Number after ____ Days
Enter a number of days the employee has before they must change their PIN Number.
TIP: The default is set to never change PIN Number. (-1 = Never)
K.
GL Export Type
Select the software that will be importing data from the Point of Sale system.
TIP: GL Export Type has two options: Quickbooks and Peachtree.
L.
Teller Drawer Reminder
Check whether or not to get a reminder for the teller drawer.
M.
Gift Ticket Script
If gift certificates are going to be used, a gift certificate script will need to be selected.
i.
Browse
Click Browse to open the Choose FGL Script for Printing Access Tickets window.
Locate the FGL script and click Open.
© 1997 - 2005 Ideal Software Systems, Inc.
94
Point of Sale
Figure 2-66. The Choose FGL Script for Printing Access Tickets window
Select the FGL script and click Open.
ii.
N.
6.
2.3.4
Edit
Clicking Edit will open a word processing program that will allow the user to edit the
FGL script.
Require Receipt to Refund
Select this option so that cashier's will be prompted to check customer sales receipts before
refunding an item(s).
Once the Money Settings window is filled out correctly, click OK.
Configure Terminal Parameters in Edit Parameters
This sub-section contains the information needed to configure and establish terminal parameters in the Point of
Sale software.
1.
Make sure that the Point of Sale menu is visible at the Ideal FEC Back Office Suite screen.
2.
Select Maintenance | System Parameters (Figure 2-60).
3.
The Edit Parameters Terminal window will appear. The Store Settings window is the default view
(Figure 2-61).
TIP: The Edit Parameters Terminal window is also available by clicking
Parameters in the Front POS program.
4.
Click on the Terminal Parameters window.
© 1997 - 2005 Ideal Software Systems, Inc.
Chapter 2 - Installation, Employees, and Setup
Figure 2-67. The Edit Parameters Terminal window showing the Terminal Parameters window
The Terminal Parameters window.
5.
Enter in the terminal information.
A.
Terminal ID
Enter the number of the workstation.
B.
Inventory Location
Select the location of the inventory being sold at the terminal.
TIP: The default location for the inventory is set to Default. For an explanation
on Inventory Locations and how to set them up, see Chapter 3, section
"Inventory Locations".
C.
Terminal Description
Enter a description for the terminal.
TIP: The Terminal Description is defaulted to the Terminal ID number.
D.
Auto Logout
i.
Front POS
Enter the number of inactive seconds before Front POS logs the user out.
© 1997 - 2005 Ideal Software Systems, Inc.
95
96
Point of Sale
ii.
POS Admin
Enter the number of inactive seconds before FEC Administrator logs the user out.
TIP: Entering 0 in the Auto Logout fields disables the log out feature.
E.
Front POS Screen
Select a Front POS screen that will appear in Front POS on the terminal.
NOTE: For an explanation on the Front POS screen and how to set it up, see
Chapter 5, section "Setting Up the Front POS Screen".
F.
Require Drawer to Log Into POS
Choose whether an employee will need to have a cash drawer connected to the Front POS
workstation to log in or not.
G.
Allow Tabs on Orders
Choose to allow or not to allow tabs on orders.
H
Return to Login After Sale is Complete
Choose to return the Front POS login after every transaction or to stay on the Front POS
screen.
I.
Ask Marketing Question
Choose to ask a marketing question after every transaction in Front POS or not.
NOTE: A Marketing Question will need to have been entered in the Edit
Parameters window in order for a question to be asked at the end of every
transaction. To enter a Marketing Question as well as responses, see sub-section
"Configure Store Settings in Edit Parameters".
J.
Movie Sales Terminal
Choose if the terminal will be used for movie sales or not.
NOTE: This option is only valid for users who have purchased the Capacity
Management module.
K.
Require Matching Customer Accounts to Redeem Access Tickets
Choose whether or not a customer will need to have a customer account to have use of Access
Tickets or not.
L.
Prompt Cashier for Table Tent Number on Complete Sale
Upon the completion of a sale, a window will appear, asking the cashier for a tent number if
this option is checked.
M.
Allow Access Time Clock Client
This option will allow the Front POS user access to Time Clock if the site is using this
program.
NOTE: Point of Sale imports Time Clock Plus data directly into a new data file
called "Time Clock". The Point of Sale program will also import daily labor
costs into the "Income File". This will allow for historical reporting on labor
costs and allow users to use report builder to report on labor activity. Labor data
will also be sent to the home office in HOS Version 4.9a.
© 1997 - 2005 Ideal Software Systems, Inc.
Chapter 2 - Installation, Employees, and Setup
97
WARNING: Time Clock Plus users should make sure all employees are clocked
out before ending the business day. Also, they may close day on the next
calendar day.
N.
Require Tip on Cash Tabs
If this option is checked, the used must enter a tip amount even when cash is used as payment.
NOTE: This option will require cashiers to enter cash tips on tabs paid with cash
or check. If this parameter is enabled, all tabs must be tipped out, even those
whose payment was made by cash or check. When a cash tab is tipped, Point of
Sale will prompt for the amount of cash tip. If the tab was paid with credit card,
POS will prompt for a credit card tip amount and the cash tip amount when the
parameter is turned on (for instances where a customer leaves a cash tip after
paying with a credit card).
Operationally, users should require the cashier or server to write the cash tip
amount on the receipt after it has been received.
When the parameter is turned on, all Tabs for that terminal when closed via cash
payment will then be moved to the Authorized Orders list on the Tabs menu in
Front POS. From here the user can select Tab and then press the Tip button
where they will be prompted to enter the tip amount on the key pad. After
entering the amount a confirmation box will appear with the amount entered so
the user can confirm the entry was correct.
A "Transaction type for cash tips" will appear on the Transaction Report. This
is an informational number as cash tips do not calculate into the sites income nor
does it factor into balancing drawer counts.
O.
Redeem Any Item From Ticket
This option allows the cashier to redeem any item from a customer's receipt.
P.
Prompt For Employee To Assign Tip
This option prompts the user to assign a tip to a specific employee.
Q.
Access Items
i.
Click this button to open the Access Terminal Items window.
© 1997 - 2005 Ideal Software Systems, Inc.
98
Point of Sale
Figure 2-68. The Access Terminal Items window
Click Access Items.
ii.
Add
Click Add to open the Select Inventory Item window. Select the inventory item(s)
that will be redeemable from an access ticket and click OK.
Figure 2-69. The Select Inventory Item window with sample inventory item
Select the inventory item(s) that will be redeemable from an access ticket and click OK.
© 1997 - 2005 Ideal Software Systems, Inc.
Chapter 2 - Installation, Employees, and Setup
99
WARNING: Items that cannot be selected are Coupons, Resources, Access
Tickets, Season Passes, and Packages. Choosing one of these item types will
result in an error.
iii.
Remove
Select an item from the Access Items Allowed window and click Remove to remove
that item from the list.
NOTE: To remove an item from the Access Items Allowed window, at least one
item has to have been added. For an explanation on Access Items and how to set
them up, see Chapter 15, the "Access Tickets" section. Also, for an explanation
on the Inventory and how to set up inventory, see Chapter 3, the "Access Tickets"
section.
R.
OnePOS Gift Card Location
This field will show the location of the OnePOS Card Server.
i.
Browse
Click this button to open the Browse For Folder window. Here the user can search
for the OnePOS Card Server location and click OK once it is located.
NOTE: The OnePOS Card Server must have been installed before a
location can be assigned for it.
6.
2.3.5
Once the Terminal Parameters window is filled out correctly, click OK.
Configure Printers in Edit Parameters
This sub-section contains the information needed to setup each type of printer in the Point of Sale software.
NOTE: Printers will have to be connected to the terminal and have had their
drivers installed before Point of Sale will be able to use them.
1.
Make sure that the Point of Sale menu is visible at the Ideal FEC Back Office Suite screen.
2.
Select Maintenance | System Parameters (Figure 2-60).
3.
The Edit Parameters Terminal window will appear. The Store Settings window is the default view
(Figure 2-61).
TIP: The Edit Parameters Terminal window is also available by clicking
Parameters in the Front POS program.
4.
Click on the Terminal Parameters | Printers window.
© 1997 - 2005 Ideal Software Systems, Inc.
100
Point of Sale
Figure 2-70. The Edit Parameters Terminal window showing the Printers window
The Printers window.
5.
The Receipt Printer tab will show by default. Setup the Receipt Printer tab.
A.
Enable
Check this option to allow any receipt printers connected to the Point of Sale network to work
with the Point of Sale system.
B.
Printer
Select a printer that will serve as the receipt printer.
C.
Test Print
Print a test receipt to ensure that the receipt printer is connected and/ or configured correctly.
NOTE: In order for the printer to print a test page, there will need to be paper in
the printer. Make sure that the printer has paper before printing.
D.
Send Cut Paper Command
This option, when checked, tells the Point of Sale terminal to send a "cut paper" command
every time a transaction is completed and a sales receipt is printed. This command will cut the
receipt so the cashier will not have to tear it.
TIP: The Send Cut Paper Command is check by default. It is highly
recommended that this option remain checked for convenience to the Front POS
users.
© 1997 - 2005 Ideal Software Systems, Inc.
Chapter 2 - Installation, Employees, and Setup
E.
Print Packages on Final Receipt
For the contents of packages to print on the customer's final receipt, check this option.
F.
Print Resources on Final Receipt
If a customer purchases time with a resource (party or event room for example) this will appear
on the sales receipt.
G.
Automatically Print Receipt on Close of Sale
Check this option for a receipt to be printed on the close of every transaction.
H.
Print Modifiers on Final Receipt
Selecting this option will print all modifiers sold in a transaction to appear on the customer's
receipt.
I.
Print Text Receipts
Select this option to print receipts with only text.
J.
Receipt Footer File
If the user wishes to have text printed at the bottom of every receipt, click
Open window. Select a text file then click Open.
to bring up the
K.
Refund Receipt Script
Click the down arrow and select a script that will appear at the end of a refund receipt. A script
must first be created before one can be selected.
L.
Add Printer to Windows
Clicking this button will allow the user to add the selected receipt printer to windows (if not
done already.) If this button is pressed, the Add Printer Wizard window will appear
prompting the user to go through the Add New Printer steps.
NOTE: The Add Printer to Windows option is available for all printers.
6.
101
Click on and setup the Service Printers tab.
© 1997 - 2005 Ideal Software Systems, Inc.
102
Point of Sale
Figure 2-71. The Printers window showing the Service Printers tab
Click the Service Printers tab.
NOTE: Two service printers can be connected at a time to the same terminal.
A.
B.
C.
Service Printer 1
i.
Enabled
Check this option to enable Service Printer 1.
ii.
Printer
Select a printer that will act as Service Printer 1.
iii.
Test Print
Print a test receipt to ensure that the receipt printer is connect and or configured
correctly.
Service Printer 2
i.
Enabled
Check this option to enable Service Printer 2.
ii.
Printer
Select a printer that will act as Service Printer 2.
iii.
Test Print
Print a test receipt to ensure that the receipt printer is connect and or configured
correctly.
Service Printer 3
i.
Enabled
Check this option to enable Service Printer 3.
© 1997 - 2005 Ideal Software Systems, Inc.
Chapter 2 - Installation, Employees, and Setup
D.
103
ii.
Printer
Select a printer that will act as Service Printer 3.
iii.
Test Print
Print a test receipt to ensure that the receipt printer is connect and or configured
correctly.
Service Printer 4
i.
Enabled
Check this option to enable Service Printer 4.
ii.
Printer
Select a printer that will act as Service Printer 4.
iii.
Test Print
Print a test receipt to ensure that the receipt printer is connect and or configured
correctly.
NOTE: In order for the printer to print a test page, there will need to be paper in
the printer. Make sure that the printer has paper before printing.
E.
7.
Print Tab Descriptions on Receipts
If a tab was used in order to complete a sale, the description of that tab will appear on the
receipt.
Click and setup the Ticket Printers tab.
Figure 2-72. The Printers tab showing the Ticket Printers tab
Select the Ticket Printers tab.
NOTE: A Ticket Printer and an Access Ticket Printer can be connected at the
same time to the same terminal.
A.
Ticket Printer
© 1997 - 2005 Ideal Software Systems, Inc.
104
Point of Sale
i.
Enable
Click this box to enable the Ticket Printer.
ii.
Printer
Select a printer that will serve as the Ticket Printer.
iii.
Test Print
Print a test ticket to ensure that the receipt printer is connect and or configured
correctly.
NOTE: In order for the printer to print a test page, there will need to be paper in
the printer. Make sure that the printer has paper before printing.
B.
8.
Access Ticket Printer
i.
Enable
Click this box to enable the Access Ticket Printer.
ii.
Printer
Select a printer that will serve as the Access Ticket Printer.
Click and setup the ID Badge Printer tab.
Figure 2-73. The Printers tab showing the ID Badge Printer tab
Select the ID Badge Printer tab.
A.
Enable ID Card Printer
Click this box to enable the ID Badge Printer.
B.
ID Card Printer
Select the type of printer.
C.
Customer Card Layout File
This field allows the user to select a template for customer id badges.
© 1997 - 2005 Ideal Software Systems, Inc.
Chapter 2 - Installation, Employees, and Setup
i.
105
Browse
Click this button to open the Choose File Customer Card Layout File. When this
window opens, select a .RTM id badge template file and click Open.
Figure 2-74. The Choose File Customer Card Layout File
Select a customer id badge .RTM file and click Open.
ii.
D.
Edit
Click this button to open the .RTM file in ReportBuilder.
Employee Card Layout File
This field allows the user to select a template for employee id badges.
i.
Browse
Click this button to open the Choose File Employee Card Layout File. When this
window opens, select a .RTM id badge template file and click Open.
Figure 2-75. The Choose File Employee Card Layout File
Select an employee id badge .RTM file and click Open.
© 1997 - 2005 Ideal Software Systems, Inc.
106
Point of Sale
ii.
9.
Edit
Click this button to open the .RTM file in ReportBuilder.
Click and setup the Golf Score Card Printer tab.
Figure 2-76. The Printers tab showing the Golf Score Card Printer tab
Select the Golf Score Card Printer tab.
10.
A.
Enable Score Card Printer
Click this box to enable the Golf Score Card Printer.
B.
Printer
Select a printer that will serve as the Golf Score Card Printer.
Click and setup the Wristband Printer tab.
© 1997 - 2005 Ideal Software Systems, Inc.
Chapter 2 - Installation, Employees, and Setup
107
Figure 2-77. The Printers tab showing the Wristband Printer tab
Select the Wristband Printer tab.
11.
2.3.6
A.
Enable Wristband Printer
Click this box to enable the Wristband Printer.
B.
Printer
Select a printer that will serve as the Wristband Printer.
Once the Printers tab is filled out correctly, click OK.
Configure Drawers in Edit Parameters
This sub-section contains the information needed to configure the system to use drawers at each terminal in the
Point of Sale software.
1.
Make sure that the Point of Sale menu is visible at the Ideal FEC Back Office Suite screen.
2.
Select Maintenance | System Parameters (Figure 2-60).
3.
The Edit Parameters Terminal window will appear. The Store Settings window is the default view
(Figure 2-61).
TIP: The Edit Parameters Terminal window is also available by clicking
Parameters in the Front POS program.
4.
Click the Terminal Parameters | Drawers window.
© 1997 - 2005 Ideal Software Systems, Inc.
108
Point of Sale
Figure 2-78. The Edit Parameters Terminal window showing the Drawers window
The Drawers window.
5.
Setup the Drawers window.
A.
Cash Drawer 1 Type
Select the receipt printer that is connected to the workstation or select a COM port that
connects the computer to the receipt printer.
NOTE: Make sure that the receipt printer is connected to a cash drawer in order
for the drawer to open upon the completion of a transaction.
B.
Cash Drawer 2 Type
If two receipt printers and two cash drawers are connected to the computer, select the second
receipt printer that is connected to the workstation or choose a COM port that connects the
computer to the receipt printer.
NOTE: Only when two cash drawers are connected to the workstation will Cash
Drawer 2 Type be necessary. If there is only one cash drawer connected to the
terminal, then Cash Drawer 2 Type should be set to Not Connected.
TIP: Both Cash Drawer Types are defaulted to Epson printers.
C.
Cash Drawer Printer
© 1997 - 2005 Ideal Software Systems, Inc.
Chapter 2 - Installation, Employees, and Setup
109
If a receipt printer is connected to a cash drawer, select it by clicking the drop down arrow.
D.
Open Drawer on Non Cash Sales
If the drawers needs to open on transactions that do not deal in cash then this option will need
to be checked.
TIP: If the user expects to take other forms of payment such as check or credit
card, it is recommended that this option be checked.
E.
Require Employees to Close or Transfer Open Tabs Before Removing Their Drawer
Select this option if the cashier or manager is required to take care of all tabs by either closing
or transferring them before the drawer can be removed.
NOTE: When this option is checked, tabs that the employee may have opened
on another user's drawer will be included. Tabs opened by an employee using
another person's drawer would still be assigned to the employee who opened the
tab and would prevent that employee from removing their drawer.
6.
2.3.7
F.
Level 2 Notification
Enter one or multiple email addresses for a level 2 drawer notification. Multiple email
addresses must be seperated by commas.
G.
Level 3 Notification
Enter one or multiple email addresses for a level 2 drawer notification. Multiple email
addresses must be seperated by commas.
Once the Drawers window is filled out correctly, click OK.
Configure Credit Cards in Edit Parameters
This sub-section contains the information needed to show the user how to configure the system to use credit
cards in the Point of Sale software.
NOTE: Starting with version 7.2a, POS will no longer remain compatible with
Authorizer and IC Verify. POS will only be compatible with PC Charge Version
5.7 or greater. It is no longer required to share the PC Charge data directory since
all communication will take place using TCP/IP sockets. Installers, Ideal or
otherwise, must remember to activate TCP/IP communications within PC
Charge. The IP address specified for credit card approval will apply to all POS
terminals. Depending on the ICS version being used, changing the PC Charge IP
address and port number will also configure the ICS Kiosk.
1.
Make sure that the Point of Sale menu is visible at the Ideal FEC Back Office Suite screen.
2.
Select Maintenance | System Parameters (Figure 2-60).
3.
The Edit Parameters Terminal window will appear. The Store Settings window is the default view
(Figure 2-61).
TIP: The Edit Parameters Terminal window is also available by clicking
Parameters in the Front POS program.
4.
Click on the Credit Cards window.
© 1997 - 2005 Ideal Software Systems, Inc.
110
Point of Sale
Figure 2-79 The Edit Parameters Terminal window showing the Credit Cards window
The Credit Cards window.
5.
Setup the Credit Cards window.
A.
Use Credit Card Processing
If the location will be accepting credit cards as payment, then this option should be checked.
B.
Credit Processing IP Address
Enter the IP address of the computer that processes the credit cards.
C.
IP Port
Enter the port number needed by the credit card processing software.
D.
Time to Wait for Approval
Set the amount of time that the Point of Sale system is to wait for a credit card to be processed.
E.
Allow Gratuities for Credit Cards
If tips will be used, then this option should be checked.
F.
Automatically Send Credit Card Batch
If the credit card transactions need to be batched automatically, check this option.
NOTE: Merchant Numbers to Batch, the Merchant ID Number, and the
Processor Code must be set if the Automatically Send Credit Card Batch
function will be in use.
© 1997 - 2005 Ideal Software Systems, Inc.
Chapter 2 - Installation, Employees, and Setup
G.
111
Send Settlement
The credit card settlement can be sent manually by clicking this button. When this button is
clicked, the Processing Credit Card Transaction window will open letting the user know
that the credit cards are being processed.
Figure 2-80. The Processing Credit Card Transaction window
The Processing Credit Card Transaction window will appear after clicking Send Settlement.
H.
Merchant ID Number
Enter the merchant ID.
I.
Processor Code
Enter the code for the processor.
NOTE: Merchant Numbers to Batch, the Merchant ID Number, and the
Processor Code all have to be provided through the bank or credit card
processing company.
6.
2.3.8
Once the Credit Cards window is filled out correctly, click OK.
Configure Party Scheduler in Edit Parameters
The following steps show the user how to setup contracts, printers and leave comments for Event Scheduler in
the Point of Sale software.
1.
Make sure that the Point of Sale menu is visible at the Ideal FEC Back Office Suite screen.
2.
Select Maintenance | System Parameters (Figure 2-60).
3.
The Edit Parameters Terminal window will appear. The Store Settings window is the default view
(Figure 2-61).
TIP: The Edit Parameters Terminal window is also available by clicking
Parameters in the Front POS program.
4.
Click on the Party Scheduler window.
© 1997 - 2005 Ideal Software Systems, Inc.
112
Point of Sale
Figure 2-81. The Edit Parameters Terminal window showing the Party Scheduler window
The Party Scheduler window.
5.
Setup the Party Scheduler window.
A.
Host's Comment/Checklist
Host comments do not have to be entered. This is optional.
B.
Print Party Quotes
Select where to print the party quotes.
i.
Receipt Printer
The quote will be printed to the receipt printer.
TIP: The Receipt Printer is selected by default.
ii.
Default Windows Printer
The option allows the user to print quotes to a regular Windows printer.
NOTE: The Default Windows Printer must be able to print on 8.5" by 11" paper.
You can set the windows default printer at the Windows printer setup screen.
C.
E-mail Address for Web Parties
Enter an email address for web parties.
© 1997 - 2005 Ideal Software Systems, Inc.
Chapter 2 - Installation, Employees, and Setup
D.
113
Event Contracts
Select a default contract that will print out for party quotes, populating the quote with the
customer information.
i.
Allow Workstation to Choose Contract to Print
Select this option if the Front POS user is to have the right to select their own event
contract file.
ii.
Directory of Contracts | Browse
Click this button to open the Contract Location Path (Browse for Folder) window.
Select the directory location containing the contract RTM file and click OK.
Figure 2-82. The Contract Location Path window
Choose the RTM file's directory and click OK.
iii.
Edit | Browse
Click this button, select the contract RTM file, and click Open.
Figure 2-83. The Choose RTM for Printing Contracts window
© 1997 - 2005 Ideal Software Systems, Inc.
114
Point of Sale
Select the RTM file and click Open.
6.
2.3.9
E.
Scheduler Start Time
Use the up and down arrows or manually enter the daily start time for the scheduler.
F.
Scheduler End Time
Use the up and down arrows or manually enter the daily end time for the scheduler.
Once the Party Scheduler window is filled out correctly, click OK.
Configure Capacity Management in Edit Parameters
This sub-section contains the information needed to configure the Capacity Management module by setting up
the Show Schedule Grid for movies by assigning start and end times in the Point of Sale software.
NOTE: The Capacity Management portion of the Point of Sale software is a
module that must be purchased separately. To purchase this module, contact
Ideal Software Systems.
1.
Make sure that the Point of Sale menu is visible at the Ideal FEC Back Office Suite screen.
2.
Select Maintenance | System Parameters (Figure 2-60).
3.
The Edit Parameters Terminal window will appear. The Store Settings window is the default view
(Figure 2-61).
TIP: The Edit Parameters Terminal window is also available by clicking
Parameters in the Front POS program.
4.
Click the Capacity Management window.
© 1997 - 2005 Ideal Software Systems, Inc.
Chapter 2 - Installation, Employees, and Setup
115
Figure 2-84. The Edit Parameters Terminal window showing the Capacity Management window
The Capacity Management window.
5.
Setup the Capacity Management window.
A.
Allow Show Sale ____ Minutes After the Movie has Started
Enter the number of minutes the customer will be allowed to purchase tickets after the movie
has started.
TIP: The number of minutes is defaulted to 20.
B.
Schedule Grid Setup
Assign the scheduled times for the movie scheduling grid.
i.
Start Time
Enter a time that movies will start playing.
ii.
End Time
Enter a time that movies will stop playing.
TIP: The Start Time and End Time are defaulted to 11:00 AM and 11:55 PM
respectively.
C.
Reset Sequence Numbers
This button will reset the sequence numbers printed on movie tickets to 0 when clicked.
© 1997 - 2005 Ideal Software Systems, Inc.
116
Point of Sale
6.
2.3.10
Once the Capacity Management window is filled out correctly, click OK.
Configure Debit System in Edit Parameters
This sub-section contains the information needed to configure the Debit System or Ideal Cashless System (ICS)
in the Point of Sale software.
NOTE: The Debit System portion of the Point of Sale software relates to the
cashless system. This section is not applicable to businesses not using the Ideal
Cashless System.
NOTE: All IP Addresses will be assigned by Ideal Software FEC Installation
Specialists if an on site installation was performed by Ideal.
1.
Make sure that the Point of Sale menu is visible at the Ideal FEC Back Office Suite screen.
2.
Select Maintenance | System Parameters (Figure 2-60).
3.
The Edit Parameters Terminal window will appear. The Store Settings window is the default view
(Figure 2-61).
TIP: The Edit Parameters Terminal window is also available by clicking
Parameters in the Front POS program.
4.
Click the Debit System window.
© 1997 - 2005 Ideal Software Systems, Inc.
Chapter 2 - Installation, Employees, and Setup
Figure 2-85. The Edit Parameters Terminal window showing the Debit System window
The Debit System window.
5.
Setup the Debit System window.
A.
Debit System Currency Description
Enter a name for the currency that will be used by the Ideal Cashless System.
TIP: Debit Card is used as the default.
B.
Server Information
NOTE: The information entered in this section will be applied to all
workstations. This information should not be different on any of the terminals
connected in the same Point of Sale network.
i.
Packet Server I/P Address
Enter the IP Address of the ICS server.
ii.
Web Server I/P Address
Enter the IP Address of the web server.
iii.
Server Port Number
Assign a port number that will access the ICS server.
© 1997 - 2005 Ideal Software Systems, Inc.
117
118
Point of Sale
C.
D.
Connect to ARI DSN
Check this option if the Point of Sale system will be communicating with an ARI server.
i.
Refresh
Click this button to re-establish the connection with the Ebank.
ii.
Ebank ODBC DBN
Select the correct ODBC driver's database name for the ICS server.
Client Setup
NOTE: The information entered in this section will be specific to the terminal.
The Client Setup information will need to be completed for each Point of Sale
terminal that will be accessing the ICS server.
E.
F.
i.
Terminal Name
Assign the workstation a unique name.
ii.
Transmitted MAC Number
The Machine Access Code is assigned by the ICS server This number will be a 16
digit hexadecimal number.
New Accounts
i.
Automatically Create as Guest Accounts
New accounts in the Ideal Cashless System (ICS) will be created as new accounts.
ii.
Automatically Create as Loyalty Accounts
New accounts in the Ideal Cashless System (ICS) will be created as loyalty accounts.
iii.
Prompt for Account Type
A prompt will ask the user what type of account should be created when a new
account is added to the Ideal Cashless System (ICS).
Loyalty Accounts
i.
Do Not Prompt User for Demographic Info
Select this option to not have a prompt appear asking for demographic information
when new accounts in the Ideal Cashless System (ICS) or made.
ii.
Automatically Prompt User for Demographic Info
Select this option to have a prompt appear that asks for demographic information
when new accounts in the Ideal Cashless System (ICS) is made.
iii.
Ask User to Enter Demographic Area
A prompt will ask the user to enter the demographic information for a customer when
a new accounts in the Ideal Cashless System (ICS) is made.
G.
Don't Allow Purchase on Bonus Value With Debit Value
Select this option to not allow bonus value to be purchased with debit value.
H.
Log Packet Data
Keep a log of the ICS packet data.
I.
Update Entitlements From Server
Click this button to update all recent entitlement changes and updates from the ICS server.
© 1997 - 2005 Ideal Software Systems, Inc.
Chapter 2 - Installation, Employees, and Setup
6.
2.3.11
119
Once the Debit System window is filled out correctly, click OK.
Configure Purchase Orders in Edit Parameters
This sub-section contains the information needed to setup purchase orders for ordering inventory in the Point of
Sale software.
1.
Make sure that the Point of Sale menu is visible at the Ideal FEC Back Office Suite screen.
2.
Select Maintenance | System Parameters (Figure 2-60).
3.
The Edit Parameters Terminal window will appear. The Store Settings window is the default view
(Figure 2-61).
TIP: The Edit Parameters Terminal window is also available by clicking
Parameters in the Front POS program.
4.
Click the Purchase Orders window.
Figure 2-86. The Edit Parameters Terminal window showing the Purchase Orders window
The Purchase Orders window.
5.
Setup the Bill To Information section.
© 1997 - 2005 Ideal Software Systems, Inc.
120
Point of Sale
6.
7.
2.3.12
A.
Name
Enter the name of the person or company that will be paying for the purchase order.
B.
Address 1
Enter the address of the person or company entered in Name.
C.
Address 2
This line is only used if all the address information will not fit in Address 1.
D.
City
Enter the city of the purchaser.
E.
State
Enter the state of the purchaser.
F.
Zip
Enter the zip code of the purchaser.
Setup the Ship To Information section.
A.
Name
Enter the name of the person or company that will be receiving the purchase order.
B.
Address 1
Enter the address of the person or company entered in Name.
C.
Address 2
This line is only used if all the address information will not fit in Address 1.
D.
City
Enter the city of the receiver.
E.
State
Enter the state of the receiver.
F.
Zip
Enter the zip code of the receiver.
Once the Purchase Orders window is filled out correctly, click OK.
Configure Serial Devices in Edit Parameters
This sub-section contains the information needed to show the user how to setup pole displays, token dispensers,
and other serial devices that can connected to the Point of Sale terminals.
1.
Make sure that the Point of Sale menu is visible at the Ideal FEC Back Office Suite screen.
2.
Select Maintenance | System Parameters (Figure 2-60).
3.
The Edit Parameters Terminal window will appear. The Store Settings window is the default view
(Figure 2-61).
© 1997 - 2005 Ideal Software Systems, Inc.
Chapter 2 - Installation, Employees, and Setup
121
TIP: The Edit Parameters Terminal window is also available by clicking
Parameters in the Front POS program.
4.
Click the Serial Devices window.
Figure 2-87. The Edit Parameters Terminal window showing the Serial Devices window
The Serial Devices window.
5.
Setup the Pole Display section.
A.
Port
Click the drop down arrow and select the COM port that the pole display will be connected to.
B.
Type
Choose between EMAX, IEEE, and Ultimate Technology for the type of pole display.
C.
Idle Message
When the Point of Sale workstation is not being used the pole display will scroll a message.
The message can be entered here.
TIP: The default message is: "This Station is Closed." This can be changed to
whatever suits the user.
NOTE: The Idle Message can only be up to 45 characters long.
© 1997 - 2005 Ideal Software Systems, Inc.
122
Point of Sale
6.
Setup the Token Dispenser section.
A.
Port
Click the drop down arrow and select the COM port that the token dispenser will be connected
to.
B.
Type
Choose between Hamilton, EDS, and Other (Pulse Based) for the type of pole display.
NOTE: If the token dispenser falls in the Other category, consult with an Ideal
Software Support Technician to ensure compatibility.
7.
If the Intercard system is being used, select a COM port for an Intercard Reader to be connected to.
8.
If using a Ticket Dispenser, select a COM port that this peripheral will be connected to.
9.
Once the Serial Devices window is filled out correctly, click OK.
2.3.13
Configure Close Day in Edit Parameters
This sub-section contains the explanations of functionality a user needs to setup an automated close of day in the
Point of Sale system. Before this feature, the user would manually have to close out the day to keep the system
on the correct business day. Now the system automates this process for the user.
1.
Make sure that the Point of Sale menu is visible at the Ideal FEC Back Office Suite screen.
2.
Select Maintenance | System Parameters (Figure 2-60).
3.
The Edit Parameters Terminal window will appear. The Store Settings window is the default view
(Figure 2-61).
TIP: The Edit Parameters Terminal window is also available by clicking
Parameters in the Front POS program.
4.
Click the Close Day window.
© 1997 - 2005 Ideal Software Systems, Inc.
Chapter 2 - Installation, Employees, and Setup
123
Figure 2-88. The Edit Parameters Terminal window showing the Close Day window
The Close Day window.
5.
Enter the necessary information.
A.
B.
Automatically End Day
Check this box if you want Point of Sale to automatically end the business day and process the
transactions.
i.
Close Day Time
Click the up and down arrows to select the time of day that the system will close out
the day.
ii.
IP Address of Close Day Workstation
Enter the IP address of the computer terminal that will remain open to the Point of
Sale program and perform the actual close of day process.
iii.
Get IP
Click this button to retrieve the workstation IP address of the computer terminal.
Prompt in POS Admin if Business Date is Incorrect
Check this option if the user would like a window to appear when POS Admin is opened
prompting that the current system date and Point of Sale business date do not match. Figure 289 below shows this warning prompt.
© 1997 - 2005 Ideal Software Systems, Inc.
124
Point of Sale
Figure 2-89. The Warning window
Click Yes to close the business date or No to continue.
C.
6.
2.3.14
Automatically Close All Authorized Tabs With $0.00 Tip
Check this option if their there are outstanding tips that need to be closed and have a total
value of zero dollars.
Once the Close Day window is filled out correctly, click OK.
Configure PIN Pad in Edit Parameters
This sub-section contains the information needed to setup PIN Pads to the Point of Sale terminals.
1.
Make sure that the Point of Sale menu is visible at the Ideal FEC Back Office Suite screen.
2.
Select Maintenance | System Parameters (Figure 2-60).
3.
The Edit Parameters Terminal window will appear. The Store Settings window is the default view
(Figure 2-61).
TIP: The Edit Parameters Terminal window is also available by clicking
Parameters in the Front POS program.
4.
Click the Terminal Parameters | PIN Pad window.
© 1997 - 2005 Ideal Software Systems, Inc.
Chapter 2 - Installation, Employees, and Setup
125
Figure 2-90. The Edit Parameters Terminal window showing the PIN Pad window
The PIN Pad window.
5.
6.
2.3.15
Enter the necessary information.
A.
PIN Pad Type
Click the down arrow and select the correct type of PIN Pad peripheral.
B.
COM Port
Using the up and down arrows or manually enter the number of the COM port the PIN Pad is
connected to.
Once the PIN Pad window is filled out correctly, click OK.
Configure Interfaces in Edit Parameters
This sub-section contains an explanation of a window that is used to integrate other programs or systems with the
Point of Sale system. Users of Intercard, Aloha, and Kartvision will want to use this window to incorporate their
other software with Point of Sale.
1.
Make sure that the Point of Sale menu is visible at the Ideal FEC Back Office Suite screen.
2.
Select Maintenance | System Parameters (Figure 2-60).
© 1997 - 2005 Ideal Software Systems, Inc.
126
Point of Sale
3.
The Edit Parameters Terminal window will appear. The Store Settings window is the default view
(Figure 2-61).
TIP: The Edit Parameters Terminal window is also available by clicking
Parameters in the Front POS program.
4.
Click the Interfaces window.
Figure 2-91. The Edit Parameters Terminal window showing the Interfaces window
The Interfaces window.
5.
Enter the necessary information.
A.
Intercard Database Location
If the system is integrated with Intercard, select the path for the database.
i.
Click
to bring up the Open window. Browse for and select the Intercard Database
if one is to be integrated with the Ideal Point of Sale. Click Open.
© 1997 - 2005 Ideal Software Systems, Inc.
Chapter 2 - Installation, Employees, and Setup
127
Figure 2-92. The Open window
Click
to bring up the Open window.
B.
Aloha Export
Check this option to export transaction and sales information to Aloha.
i.
Directory
Enter the path for where the ALOHA directory is located. Point of Sale automatically
assumes that this directory is located on the C: drive.
ii.
Update
Click this button to update all reports from Point of Sale to the Aloha program.
a.
Start Date
Once the Choose Date to Update window will appears, enter the beginning
date of the transactions that need to be updated to Aloha and click OK.
Figure 2-93. The Choose Date to Update window
Enter a Start Date and click OK.
C.
Transmit Sales to Kartvision
Check this option if Sales figures and transactions will be exported to the Kartvision program.
i.
Directory
Click Browse to open the Browse for Folder window. Search for the folder that
contains the Kartvision data and click OK.
© 1997 - 2005 Ideal Software Systems, Inc.
128
Point of Sale
6.
2.3.16
Once the Interfaces window is filled out correctly, click OK.
Configure Time Clock Plus in Edit Parameters
This sub-section contains an explanation of to incorporate Time Clock Plus with their other software and Point
of Sale.
1.
Make sure that the Point of Sale menu is visible at the Ideal FEC Back Office Suite screen.
2.
Select Maintenance | System Parameters (Figure 2-60).
3.
The Edit Parameters Terminal window will appear. The Store Settings window is the default view
(Figure 2-61).
TIP: The Edit Parameters Terminal window is also available by clicking
Parameters in the Front POS program.
4.
Click the Interfaces | Time Clock Plus window.
Figure 2-94. The Edit Parameters Terminal window showing the Time Clock Plus window with Version 4 selected
The Time Clock Plus window.
5.
Select the Time Clock Plus Version by clicking the down arrow.
© 1997 - 2005 Ideal Software Systems, Inc.
Chapter 2 - Installation, Employees, and Setup
A.
129
Version 4
If this version of Time Clock Plus is selected, enter the necessary information:
i.
Time Clock Data Location
Click Browse to open to Browse for Folder window. Search for the folder that
contains the Time Clock Plus data and click OK.
Figure 2-95. The Browse for Folder window
Search for the folder that contains the Time Clock Plus data and click OK.
TIP: If the Time Clock Plus directory is C:\Time Clock Plus, then the user
should enter C:\Time Clock Plus\Data.
ii.
Login Client Application Directory
Click Browse to open the Browse for Folder window. Search for the folder that
contains the Time Clock Plus executable and click OK.
TIP: If the Time Clock Plus directory is C:\Time Clock Plus, then the user
should enter C:\Time Clock Plus.
iii.
Export All Employees to Time Clock Plus
Click this button to send all employees created in Ideal Point of Sale to the Time
Clock Plus software. When the warning window opens, click Yes to export them or
No to exit.
Figure 2-96. The Warning window for exporting employees into Time Clock Plus
Click Yes to import employee data into the Time Clock Plus software.
B.
Version 5 (MSSQL Server)
If this version of Time Clock Plus is selected, enter the necessary information:
© 1997 - 2005 Ideal Software Systems, Inc.
130
Point of Sale
Figure 2-97. The Edit Parameters Terminal window showing the Time Clock Plus window with Version 5 selected
The Time Clock Plus window.
i.
ii.
Settings
a.
Time Clock DSN
Click the down arrow and select the DSN type.
b.
User Name
Enter the user name of the profile used to access the DSN.
c.
Password
Enter the user password of the profile used to access the DSN.
Login Client Application Directory
Click Browse to open the Browse for Folder window. Search for the folder that
contains the Time Clock Plus executable and click OK.
TIP: If the Time Clock Plus directory is C:\Time Clock Plus, then the user
should enter C:\Time Clock Plus.
iii.
Export All Employees to Time Clock Plus
Click this button to send all employees created in Ideal Point of Sale to the Time
Clock Plus software. When the warning window (Figure 2-96) opens, click Yes to
export them or No to exit.
© 1997 - 2005 Ideal Software Systems, Inc.
Chapter 2 - Installation, Employees, and Setup
6.
2.3.17
131
Once the Interfaces window is filled out correctly, click OK.
Configure Internet in Edit Parameters
Point of Sale offers an Internet options utility. The information needed to fill out this Internet window is
provided below.
1.
Make sure that the Point of Sale menu is visible at the Ideal FEC Back Office Suite screen.
2.
Select Maintenance | System Parameters (Figure 2-60).
3.
The Edit Parameters Terminal window will appear. The Store Settings window is the default view
(Figure 2-61).
TIP: The Edit Parameters Terminal window is also available by clicking
Parameters in the Front POS program.
4.
Click the Internet window.
Figure 2-98. The Edit Parameters Terminal window showing the Internet window
The Internet window.
5.
Enter the necessary information.
© 1997 - 2005 Ideal Software Systems, Inc.
132
Point of Sale
6.
2.3.18
A.
E-Mail Address
Enter the address for the automated email.
B.
SMTP Server Address
Enter the name and location of the SMTP server.
C.
SMTP User for Automated E-Mails
Enter the username for the automated email.
D.
SMTP Password for Automated E-Mails
Enter the password for the automated email.
Once the Internet window is filled out correctly, click OK.
Configure Data Archive in Edit Parameters
Point of Sale offers a data archive options utility. The information needed to fill out this Data Archive window is
provided below.
1.
Make sure that the Point of Sale menu is visible at the Ideal FEC Back Office Suite screen.
2.
Select Maintenance | System Parameters (Figure 2-60).
3.
The Edit Parameters Terminal window will appear. The Store Settings window is the default view
(Figure 2-61).
TIP: The Edit Parameters Terminal window is also available by clicking
Parameters in the Front POS program.
4.
Click the Data Archive window.
© 1997 - 2005 Ideal Software Systems, Inc.
Chapter 2 - Installation, Employees, and Setup
133
Figure 2-99. The Edit Parameters Terminal window showing the Data Archive window
The Data Archive window.
5.
6.
Enter the necessary information.
A.
Automatically Archive Transaction Data (recommended)
It is recommended that detailed transaction data be archived and deleted after a set period of
time to maintain optimal system performance. These settings will only apply to detailed
transaction data; this information is shown in the POS Transaction report. Facility, sales,
balances, transaction summary, and customer information will be kept forever. This option is
checked by default.
B.
Number of Days to Keep Active Transaction Data
Active data will be kept for the number of days specified. Then it will be archived. The default
is 365 days.
C.
Number of YEARS to Keep Archived Transaction Data
Archived data will be kept for the number of years specified. After the specified amount of
time, the data will be deleted. The default is 7 years.
Once the Data Archive window is filled out correctly, click OK.
© 1997 - 2005 Ideal Software Systems, Inc.
134
Point of Sale
Chapter 3 - Inventory Setup and Features
3.1
Inventory Categories and Sub-Categories
Instructions for setting up inventory categories and inventory SubCategories
This section contains the proper procedures for setting up all categories and
Sub-Categories for inventory items. This section contains the following
topics:
•
•
•
•
•
3.1.1
"Purpose for Using Categories"
"Adding New Inventory Categories"
"Editing Inventory Categories"
"Adding New Inventory Sub-Categories"
"Editing Inventory Sub-Categories"
Purpose for Using Categories
Inventory categories are predetermined groups for the inventory that will be entered into the system. For the sake
of convenience, they need to be created first. Categories are used in sorting inventory and regular reports.
Categories, for most family entertainment centers, are the basis for the categories in the Front POS Sales screen.
Categories are used to group inventory items of similar types together. For example, if a business has a restaurant
and a putt-putt golf course, then the hamburger and fries inventory item will go under the Food category and the
one round of golf item will go under the Golf category. Any number of categories can be entered just as any
number of items can be.
Inventory items can be broken down even further into sub-categories. Sub-categories are not necessary and only
used for customer sites that have complex inventory or a large number of items that must be entered into the
system. Sub-categories do not automatically point to their main categories. A sub-category's relationship to a
category is assigned when the inventory item is made. In Figure 3-1 below, Food is the main category and Pizza
is the sub-category. Here, a relationship between the main- and sub-categories is created. For more information
on setting up categories and sub-categories, refer to sub-sections "Adding New Inventory Categories" and
"Adding New Inventory Sub-Categories".
© 1997 - 2005 Ideal Software Systems, Inc.
Chapter 3 - Inventory Setup and Features
135
Figure 3-1. The Edit Item window with sample inventory item
3.1.2
Adding New Inventory Categories
This sub-section explains how to setup categories for all inventory items in the Point of Sale software. Setting up
categories should be done before any items are created. This will keep the user from having to edit each item that
was created before the categories were established.
1.
Make sure that the Point of Sale menu is visible at the Ideal FEC Back Office Suite screen.
2.
Select Maintenance | Inventory Categories.
© 1997 - 2005 Ideal Software Systems, Inc.
136
Point of Sale
Figure 3-2. The Ideal FEC Back Office Suite Maintenance menu's System Parameters
Select Maintenance | Inventory Categories.
3.
When the Categories and SubCategories window opens, click Add New.
© 1997 - 2005 Ideal Software Systems, Inc.
Chapter 3 - Inventory Setup and Features
137
Figure 3-3. The Categories and SubCategories window
Click Add New.
4.
When the Add Categories window opens, type in the name of the inventory category.
Figure 3-4. The Add Categories window with sample category
Enter a category name and click OK.
5.
Click OK to save the new category name.
6.
The category name will now be showing in the Categories and SubCategories window. Click OK.
© 1997 - 2005 Ideal Software Systems, Inc.
138
Point of Sale
Figure 3-5. The Categories and SubCategories window with sample category
Click OK.
7.
3.1.3
The category has been created.
Editing Inventory Categories
This sub-section explains how to edit previously made categories in the Point of Sale software.
NOTE: If a category name has been previously assigned to an inventory item and
that category name is edited, then that category name inside the item properties
will be changed automatically as well. Also, in order to edit a category name, a
category must have been previously created.
1.
Make sure that the Point of Sale menu is visible at the Ideal FEC Back Office Suite screen.
2.
Select Maintenance | Inventory Categories (Figure 3-2).
3.
When the Categories and SubCategories window opens (Figure 3-3), select the category that
needs to be changed and click Edit.
4.
When the Edit Categories window opens, change the name of the inventory category to what it
should be.
Figure 3-6. The Edit Categories window with sample category
Edit a category name.
5.
Click OK to save the changed category name.
6.
The category name will now be showing in the Categories and SubCategories window (Figure 3© 1997 - 2005 Ideal Software Systems, Inc.
Chapter 3 - Inventory Setup and Features
139
5). Click OK.
7.
3.1.4
The category has been changed.
Adding New Inventory Sub-Categories
This sub-section explains how to setup sub-categories for all inventory items in the Point of Sale software.
Setting up sub-categories, if they are needed, should be done before any items are created. This will keep the
user from having to edit each item that was created before the categories were established.
TIP: Using inventory sub-categories is solely a user's preference. sub-categories
do not have to be made in order to make inventory items.
1.
Make sure that the Point of Sale menu is visible at the Ideal FEC Back Office Suite screen.
2.
Select Maintenance | Inventory Categories (Figure 3-2)..
3.
When the Categories and SubCategories window opens (Figure 3-3), click the down arrow under the
Category Type field.
4.
Select the Sub-Categories option.
Figure 3-7. The Categories and SubCategories window showing Sub-Categories Type
Select Sub-Categories.
3.1.5
5.
Click Add New.
6.
When the Add Categories window opens (Figure 3-4), type in the name of the inventory sub category.
7.
Click OK to save the new sub-category name.
8.
The category name will now be showing in the Categories and SubCategories window under the
Category Type of Sub-Categories. Click OK.
9.
The sub-category has been created.
Editing Inventory Sub-Categories
This sub-section explains how to edit previously made sub-categories in the Point of Sale software.
© 1997 - 2005 Ideal Software Systems, Inc.
140
Point of Sale
NOTE: If a sub category name has been previously assigned to an inventory item
and that sub category name is edited, then that sub category name inside the item
properties will be changed automatically as well. Also, in order to edit a sub
category name, a sub category must have been previously created.
3.2
1.
Make sure that the Point of Sale menu is visible at the Ideal FEC Back Office Suite screen.
2.
Select Maintenance | Inventory Categories (Figure 3-2).
3.
When the Categories and SubCategories window opens (Figure 3-3), click the down arrow under the
Category Type field.
4.
Select the Sub-Categories option.
5.
Choose a sub category and click Edit.
6.
When the Edit Categories window opens (Figure 3-6), change the name of the inventory category.
7.
Click OK to save the changed sub-category name.
6.
The sub category name will now be showing in the Categories and SubCategories window under the
Category Type of Sub-Categories. Click OK.
7.
The sub-category has been changed.
Tax Tables
Instructions for setting up sales tax for inventory items
This section contains the proper procedures for setting up all sales tax
percentages for inventory items. This section contains the following topics:
•
•
•
•
•
3.2.1
"About Tax Tables"
"Adding a New Sales Tax"
"Adding a 'Non Taxable' Sales Tax"
"Editing a Sales Tax"
"Removing a Sales Tax"
About Tax Tables
Every inventory item must be assigned a tax percentage. The tax percentages are created in the Edit Tax Table
window. Tax Tables will usually only contain two types of taxes. The first tax type that gets assigned to nearly
all inventory items is the state tax. Some states have multiple taxes based on if food is being sold in a restaurant
environment or if a regular item is being purchased. Another tax type that must be created is a "non taxable"
sales tax. Some items have prices that include tax or the tax should be included at all. Other situations might call
for inventory to be sold on school, church, or non-profit organization events. In these cases tax is not applicable.
© 1997 - 2005 Ideal Software Systems, Inc.
Chapter 3 - Inventory Setup and Features
141
For more information on adding tax table, refer to sub-sections "Adding a New Sales Tax" and "Adding a 'Non
Taxable' Sales Tax".
3.2.2
Adding a New Sales Tax
This sub-section explains how to setup sales tax percentages for all inventory items in the Point of Sale software.
Setting up the sales tax should be done before any items are created. This will keep the user from having to edit
each item that was created before the sales tax percentages were established.
1.
Make sure that the Point of Sale menu is visible at the Ideal FEC Back Office Suite screen.
2.
Select Maintenance | Tax Tables.
Figure 3-8. The Ideal FEC Back Office Suite Maintenance menu's Tax Tables
Select Maintenance | Tax Tables.
3.
When the Edit Tax Table window opens, click Add New Tax.
© 1997 - 2005 Ideal Software Systems, Inc.
142
Point of Sale
Figure 3-9. The Edit Tax Table window
Click Add New Tax.
4.
Enter the required information when the Tax Type window opens.
Figure 3-10. The Tax Type window
Enter the tax type information.
A.
Description
Enter the description of the sales.
B.
Short Description
Enter a few letter abreviation that quickly describes the new tax type.
C.
Tax Amount
Enter the percentage that the sales tax will be for.
D.
Tax On Tax
If another tax needs to applied to the total tax, click the drop down arrow and select the tax to
applied.
© 1997 - 2005 Ideal Software Systems, Inc.
Chapter 3 - Inventory Setup and Features
143
NOTE: There must be at least one sales tax already created before the Tax On
Tax field can be applied. New taxes entered into the POS Sales Tax Table
window cannot be applied to the Tax On Tax field until the Edit Tax Table
window has been exited completely.
5.
Click OK to save the new tax type.
6.
The tax type will now be showing in the Edit Tax Table window. Click Close.
7.
The sales tax has been created.
3.2.3
Adding a "Non Taxable" Sales Tax
This sub-section explains how to setup a non taxable sales tax percentages for inventory items in the Point of
Sale software that should not be charged any sales tax. Setting up the sales tax should be done before any items
are created. This will keep the user from having to edit each item that was created before the sales tax
percentages were established.
1.
Make sure that the Point of Sale menu is visible at the Ideal FEC Back Office Suite screen.
2.
Select the Maintenance | Tax Tables (Figure 3-8).
3.
When the Edit Tax Table window opens (Figure 3-9), click Add New Tax.
4.
Enter the required information when the Tax Type window opens (Figure 3-10).
A.
Description
Enter Non-Taxable as the description.
B.
Short Description
Enter a few letter abreviation that quickly describes the non-taxable tax type.
C.
Tax Amount
Enter 0.00 for the tax percentage.
D.
Tax On Tax
No additional tax type should be applied here as the purpose of this tax is to equal 0%.
© 1997 - 2005 Ideal Software Systems, Inc.
144
Point of Sale
Figure 3-11. The Tax Type window with non taxable information
Enter non-taxable information.
5.
Click OK to save the new tax type.
6.
The tax type will now be showing in the Edit Tax Table window. Click Close.
Figure 3-12. The Edit Tax Table window with sample sales tax percentages
Click Close.
7.
The non taxable sales tax has been created.
© 1997 - 2005 Ideal Software Systems, Inc.
Chapter 3 - Inventory Setup and Features
3.2.4
145
Editing a Sales Tax
This sub-section explains how to edit previously created sales tax percentages in the Point of Sale software.
NOTE: If a sales tax has been previously assigned to an inventory item and that
sales tax is edited, then that sales tax inside the item properties will be changed
automatically as well. Also, in order to edit a sales tax, a sales tax must have been
previously created.
1.
Make sure that the Point of Sale menu is visible at the Ideal FEC Back Office Suite screen.
2.
Select Maintenance | Tax Tables (Figure 3-8).
3.
When the Edit Tax Table window opens (Figure 3-9), choose a tax type to edit and click Edit Tax.
4.
Make changes if necessary to the sales tax when the Tax Type window opens (Figure 3-10).
5.
Click OK to save the changes to the tax type.
6.
The changes will now show the tax type changes in the Edit Tax Table window. Click Close.
7.
The sales tax has been edited.
3.2.5
Removing a Sales Tax
This sub-section explains how to remove previously created sales tax percentages in the Point of Sale software.
NOTE: If a sales tax has been previously assigned to an inventory item and that
sales tax is removed, then that sales tax inside the item properties will be removed
automatically as well. Also, in order to remove a sales tax, a sales tax must have
been previously created.
1.
Make sure that the Point of Sale menu is visible at the Ideal FEC Back Office Suite screen.
2.
Select Maintenance | Tax Tables (Figure 3-8).
3.
When the Edit Tax Table window opens (Figure 3-9), select a tax type to edit and click Remove Tax.
4.
A warning will appear confirming the decision to remove the sales tax. Click Yes if this is the desired
action.
© 1997 - 2005 Ideal Software Systems, Inc.
146
Point of Sale
Figure 3-14. The Warning window for removing a sales tax
Click Yes.
3.3
5.
Click Close at the Edit Tax Table window.
6.
The sales tax has been removed.
Inventory Unit Types
Instructions for setting up unit types for inventory items
This section contains the proper procedures for setting up all unit types for
inventory items. This section contains the following topics:
•
•
•
•
3.3.1
"Explanation of Inventory Unit Types"
"Adding Inventory Unit Types"
"Modifying Inventory Unit Types"
"Removing Inventory Unit Types"
Explanation of Inventory Unit Types
Inventory unit types are used to explain how the inventory items are packaged and/or shipped. For example, puttputt golf clubs come in eaches or pairs. Golf balls might be packaged in units of six or a half-dozen to a package.
Eaches, dozens, and half-dozens are all examples for inventory unit types as seen in Figure 3-15. This is useful
when using Purchase Orders in the Point of Sale system. For more information on creating inventory unit types,
refer to sub-section "Adding Inventory Unit Types".
© 1997 - 2005 Ideal Software Systems, Inc.
Chapter 3 - Inventory Setup and Features
147
Figure 3-15. The Default Unit Types window with sample unit types
3.3.2
Adding Inventory Unit Types
This sub-section explains how to setup unit types for all inventory items in the Point of Sale software. Setting up
the unit types should be done before any items are created. This will keep the user from having to edit each item
that was created before the unit types were established.
1.
Make sure that the Point of Sale menu is visible at the Ideal FEC Back Office Suite screen.
2.
Select Maintenance | Inventory Unit Types.
© 1997 - 2005 Ideal Software Systems, Inc.
148
Point of Sale
Figure 3-16. The Ideal FEC Back Office Suite Maintenance menu's Inventory Unit Types
Select Maintenance | Inventory Unit Types.
3.
When the Define Unit Types window opens, click Add.
© 1997 - 2005 Ideal Software Systems, Inc.
Chapter 3 - Inventory Setup and Features
Figure 3-17. The Define Unit Types window
Click Add.
4.
In the Define Unit Types sub window, enter the unit type that will be used to define the count of
inventory.
Figure 3-18. The Define Unit Types sub window
Enter the unit type information.
A.
3.3.3
Name
Enter the unit type name.
5.
Click OK to save the new unit type.
6.
The unit type will now be showing in the Define Unit Types window. Click Close.
7.
The unit type has been created.
Modifying Inventory Unit Types
This sub-section explains how to edit unit types for the inventory items in the Point of Sale software.
© 1997 - 2005 Ideal Software Systems, Inc.
149
150
Point of Sale
NOTE: If a unit type has been previously assigned to an inventory item and that
unit type is edited, then that unit type inside the item properties will be changed
automatically as well. Also, in order to edit a unit type, a unit type must have
been previously created.
1.
Make sure that the Point of Sale menu is visible at the Ideal FEC Back Office Suite screen.
2.
Select Maintenance | Inventory Unit Types (Figure 3-16).
3.
When the Define Unit Types window opens (Figure 3-17), select a unit type and click Modify.
4.
In the Define Unit Types sub-window (Figure 3-18), edit the unit type name if necessary.
5.
Click OK to save the edited unit type.
6.
The changed unit type will now be showing in the Define Unit Types window. Click Close.
7.
The unit type has been changed.
3.3.4
Removing Inventory Unit Types
This sub-section explains how to remove unit types for the inventory items in the Point of Sale software.
NOTE: If a unit type has been previously assigned to an inventory item and that
unit type is removed, then that unit type inside the item properties will be
removed automatically as well. Also, in order to remove a unit type, a sales tax
must have been previously created.
1.
Make sure that the Point of Sale menu is visible at the Ideal FEC Back Office Suite screen.
2.
Select Maintenance | Inventory Unit Types (Figure 3-16).
3.
When the Define Unit Types window opens (Figure 3-17), click Remove.
4.
A Warning window will appear confirming the deletion of the unit type. Click Yes.
Figure 3-19. The Warning window for removing a unit type
Click Yes.
5.
The Define Unit Types window will reflect the removal of the unit type. Click Close.
6.
The unit type has been removed.
© 1997 - 2005 Ideal Software Systems, Inc.
Chapter 3 - Inventory Setup and Features
3.4
151
Units of Measure
Instructions for setting up units of measure
This section contains the proper procedures for setting up all units of
measure. This section contains the following topics:
•
•
•
•
•
3.4.1
"About Units of Measure"
"Adding Units of Measure"
"Editing Units of Measure"
"Removing Units of Measure"
"Testing Units of Measure"
About Units of Measure
Point of Sale has all of the standard measurements built into the Unit of Measure utility. Users may still add
other units of measure at any point. This utility also has a built in unit of measure converter that users may take
of advantage of to quickly calculate different measurements. Refer to the following sub-sections to learn more
about this utiility.
3.4.2
Adding Units of Measure
This sub-section explains how to place additional units of measure into the Point of Sale software. Setting up the
UOM types should be done before any items are created. This will keep the user from having to edit each item
that was created before the UOM types were established.
1.
Make sure that the Point of Sale menu is visible at the Ideal FEC Back Office Suite screen.
2.
Select Maintenance | UOM Types.
© 1997 - 2005 Ideal Software Systems, Inc.
152
Point of Sale
Figure 3-20. The Ideal FEC Back Office Suite Maintenance menu's UOM Types
Select Maintenance | UOM Types.
3.
The Unit of Measure window will open showing all of the pre-entered units of measure for the
different kinds of inventory. If the unit of measure needed by the user is not available in this list, click
Add to create a new UOM.
© 1997 - 2005 Ideal Software Systems, Inc.
Chapter 3 - Inventory Setup and Features
Figure 3-21. The Unit of Measure window with pre-entered UOMs
Click Add.
4.
When the Add/Edit UOM window opens, enter the necessary information.
Figure 3-22. The Add/Edit UOM window
Enter the UOM information.
A.
Description
This field should contain the lengthier description of this new unti of measure.
B.
Short Description
Enter a shorter version of the description entered into the Description field.
C.
A Quantity of 1 = ___/___
Enter the fractional value of what the amount of one of this new item is equal to.
© 1997 - 2005 Ideal Software Systems, Inc.
153
154
Point of Sale
TIP: For example, if the customer site sells peices of pie in their food court, each
piece of pie is considered one item. If the pie that the piece comes from gives 8
equal slices then the quantity fraction in the Add/Edit UOM window will read
1/8. For more information, refer to Figure 3-22.
D.
Base Unit
This is the pull down menu located on the right side of the fractional fields. Click the down
arrow and select the appropriate base unit associated with the fractional value of the new unit
of measure. If there is no base unit, leave No Base Unit selected.
Figure 3-23. The Add/Edit UOM window with sample information
5.
Click OK to save the new unit of measure.
6.
The unit of measure will now be showing in the Unit of Measure window. Click Close.
7.
The unit of measure has been created.
3.4.3
Editing Units of Measure
This sub-section explains how to edit user created units of measure in the Point of Sale software.
NOTE: At least one unit of measure must have been manually entered by the
user into the Unit of Measure window in order for the Edit button to be
available. Users will only be able to edit UOMs entered into the system. The
UOMs that were installed with the software will not be able to be edited. If a
UOM has been previously assigned to an inventory item and that unit type is
edited, then that UOM inside the item properties will be changed automatically as
well.
1.
Make sure that the Point of Sale menu is visible at the Ideal FEC Back Office Suite screen.
2.
Select Maintenance | UOM Types (Figure 3-20).
3.
The Unit of Measure window (Figure 3-21) will open. Only UOMs created by a user will be editable.
Select the UOM to be edited and press Edit.
© 1997 - 2005 Ideal Software Systems, Inc.
Chapter 3 - Inventory Setup and Features
4.
When the Add/Edit UOM window (Figure 3-22) opens, make the necessary changes.
5.
Click OK to save the edited unit of measure.
6.
Click Close in the Unit of Measure window.
7.
The unit of measure has been edited.
3.4.4
155
Removing Units of Measure
This sub-section explains how to remove user created units of measure in the Point of Sale software.
NOTE: At least one unit of measure must have been manually entered by the
user into the Unit of Measure window in order for the Remove button to be
available. Users will only be able to remove UOMs entered into the system. The
UOMs that were installed with the software will not be able to be removed. If a
UOM has been previously assigned to an inventory item and that unit type is
removed, then that UOM inside the item properties will be removed
automatically as well.
1.
Make sure that the Point of Sale menu is visible at the Ideal FEC Back Office Suite screen.
2.
Select Maintenance | UOM Types (Figure 3-20).
3.
The Unit of Measure window (Figure 3-21) will open. Only UOMs created by a user can be removed.
Select the UOM to be removed and click Edit.
4.
The UOM will be removed from the Unit of Measure window.
5.
The unit of measure has been removed.
3.4.5
Testing Units of Measure
This sub-section explains how to test user created units of measure in the Point of Sale software.
NOTE: At least one unit of measure must have been manually entered by the
user into the Unit of Measure window in order for the Edit button to be
available. Users will only be able to edit UOMs entered into the system. The
UOMs that were installed with the software will not be able to be edited. If a
UOM has been previously assigned to an inventory item and that unit type is
edited, then that UOM inside the item properties will be changed automatically as
well.
1.
Make sure that the Point of Sale menu is visible at the Ideal FEC Back Office Suite screen.
2.
Select Maintenance |UOM Types (Figure 3-20).
3.
The Unit of Measure window (Figure 3-21) will open. Click Test. The UOM Test window will open.
4.
Enter the information for the test conversion.
© 1997 - 2005 Ideal Software Systems, Inc.
156
Point of Sale
Figure 3-24. The UOM Test window with sample UOMs selected
Enter the conversion information.
5.
A.
Amount
This is the field to the left of the Convert From field. Use the up and down arrows to select
the amount of units to convert from.
B.
Convert From
Click the down arrow and select the unit of measure to convert from.
C.
Convert To
Click the down arrow and select the unit of measure to convert ro.
Once the units and amount are entered as shown in Figure 3-24, click Convert.
Figure 3-25. The UOM Test window with conversion value
Click Convert.
6.
The converted value will appear in the bottom of the window.
7.
Click Close to return to the Unit of Measure window (Figure 3-21).
© 1997 - 2005 Ideal Software Systems, Inc.
Chapter 3 - Inventory Setup and Features
3.5
157
Inventory Locations
Instructions for setting up inventory locations for inventory items
This section contains the proper procedures for setting up all inventory
locations for items. This section contains the following topics:
• "Inventory Location Explanation"
• "Adding Inventory Locations"
• "Editing Inventory Locations"
3.5.1
Inventory Location Explanation
Inventory locations refer to the storage location of all the inventory items. For example, the storage location for
food items might be the kitchen. Inventory locations should be setup with descriptive names so that when items
are transferred from one location to another, the reports will accurately reflect the move. Also, when items are
brought in for the first time from a purchase order, managers can accurately keep up with where the items will be
going. For more information on creating inventory locations, refer to sub-section "Adding Inventory Locations".
3.5.2
Adding Inventory Locations
This sub-section explains how to create inventory locations for all items in the Point of Sale software. Setting up
the inventory locations should be done before any items are created. This will keep the user from having to edit
each item that was created before the inventory locations were established.
1.
Make sure that the Point of Sale menu is visible at the Ideal FEC Back Office Suite screen.
2.
Select Maintenance | Add Inventory Location.
© 1997 - 2005 Ideal Software Systems, Inc.
158
Point of Sale
Figure 3-26. The Ideal FEC Back Office Suite Maintenance menu's Add Inventory Location
Choose Maintenance | Add Inventory Location.
3.
When the Create Inventory Location window opens, enter the information about the location.
Figure 3-27. The Create Inventory Location window
Enter the information.
© 1997 - 2005 Ideal Software Systems, Inc.
Chapter 3 - Inventory Setup and Features
A.
Description
Enter the description of the inventory location.
B.
Notes
All information regarding to this inventory location can be placed in the Notes field.
159
4.
Click OK to save the new inventory location.
5.
Point of Sale will prompt the user if another location needs to be made. Click Yes if this is the desired
action or click No otherwise.
6.
The user can now view the inventory locations entered in the Create Inventory Location window.
Figure 3-28. The Create Inventory Location window with sample inventory location
Click OK to save the location.
3.5.3
Editing Inventory Locations
The following steps explain how to edit the inventory locations that will be used in the Point of Sale system.
NOTE: In order to edit an inventory location, one must have been previously
created.
1.
Make sure that the Point of Sale menu is visible at the Ideal FEC Back Office Suite screen.
2.
Select Maintenance | Edit Inventory Location.
© 1997 - 2005 Ideal Software Systems, Inc.
160
Point of Sale
Figure 3-29. The Ideal FEC Back Office Suite Maintenance menu's Edit Inventory Location
Choose Maintenance | Edit Inventory Location.
3.
When the Choose Inventory Location window opens, select an inventory location and click OK.
Figure 3-30. The Choose Inventory Location window
Select a location and click OK.
4.
The Create Inventory Location window will open with the inventory location's information (Figure 327).
© 1997 - 2005 Ideal Software Systems, Inc.
Chapter 3 - Inventory Setup and Features
3.6
161
5.
Edit the information for the inventory location. When this is done, click OK.
6.
The inventory location has been edited. Click OK again in the Choose Inventory Location window.
Vendors
Instructions for setting up vendors for inventory items
This section contains the proper procedures for creating vendors and adding
their information into the system for all inventory items. This section
contains the following topics:
• "About Vendor Configuration"
• "Adding Vendors"
• "Editing Vendors"
3.6.1
About Vendor Configuration
For family entertainment centers that keep track of inventory and where it is ordered from, this is a helpful
feature. The Point of Sale system can keep track of all the vendors that provide the entertainment company with
inventory. Using the vendors feature is optional but is very useful especially if Purchase Orders will be used.
Vendors must be created before orders can be created and sent.
In the Vendor window, the only information that must be entered is basic contact and address information. This
is the information that will appear for Purchase Orders. Also, if there is a specific contact at a vendor's locations,
this information can be entered as well. For more information on adding vendors, refer to sub-section "Adding
Vendors".
3.6.2
Adding Vendors
This sub-section explains how to create vendors for inventory items in the Point of Sale software. Setting up
vendors should be done before any items are created. This will keep the user from having to edit each item that
was created before the vendors were established.
1.
Make sure that the Point of Sale menu is visible at the Ideal FEC Back Office Suite screen.
2.
Select Inventory | Add Vendor.
© 1997 - 2005 Ideal Software Systems, Inc.
162
Point of Sale
Figure 3-31. The Ideal FEC Back Office Suite Inventory menu's Add Vendor
Select Inventory | Add Vendor.
3.
When the Vendor window opens, enter the information about the vendor.
Figure 3-32. The Vendor window
Enter the information.
A.
Name
Enter the name of the vendor.
© 1997 - 2005 Ideal Software Systems, Inc.
Chapter 3 - Inventory Setup and Features
B.
Address
Enter an address for the vendor.
C.
Address 2
If necessary, use this field to enter more address information.
D.
City
Input the vendor's city.
E.
State
Enter the state.
F.
Zip
Enter the vendor's zip code.
G.
Voice Phone
Enter the vendor's phone number.
H.
Voice Extension
If the vendor has an extension, enter it in this field.
I.
Fax Phone
Enter the vendor's fax number.
J.
Contact Name
Enter the name of the contact at the vendor's location.
K.
Contact Phone
Enter the phone number for the contact.
L.
Contact Extension
If the vendor contact has an extension, enter it in this field.
M.
Customer Number
Enter the customer number of the user if applicable.
N.
Notes
Enter any notes or comments about the vendor in this section.
O.
Add Rule
163
i.
Click this button to open the Add New Rule for Vendor window.
ii.
Click the drop down arrow and select either Electronic Ordering Options or Min
Ordering Amount.
iii.
If Electronic Ordering Options is selected, the user will need to enter the necessary
information as shown in Figure 3-33 below.
Figure 3-33. The Add New Rule for Vendor window with Electronic Ordering Option selected
Enter the necessary information.
a.
© 1997 - 2005 Ideal Software Systems, Inc.
Vendor Accepts Electronic Orders
Check this option if the vendor currently being entered into the system will
accept any form of order sent electronically.
164
Point of Sale
iv.
b.
Default Export Directory
Click Browse next to this field to open the Browse for Folder window.
Select the folder that will contain all electronic orders dealing with the
current vendor and click OK.
c.
E-Mail Address to Send Order
Enter the email address the vendor uses to receive electronic style inventory
orders.
If Min Order Amount is selected, the user will need to enter the necessary
information as shown in Figure 3-34 below.
Figure 3-34. The Add New Rule for Vendor window with Min Order Amount selected
Enter the necessary information.
a.
P.
Minimum Order Amount
Enter minimum quantity of items that must be order from the vendor being
entered into the system.
Edit Rule
Select a rule to edit and click this button. This will open the Edit Rule for Vendor. Make the
necessary changes.
© 1997 - 2005 Ideal Software Systems, Inc.
Chapter 3 - Inventory Setup and Features
Figure 3-35. The Edit Rule for Vendor window with Electronic Ordering Option rule selected
Make the necessary changes.
Q.
4.
3.6.3
Delete Rule
Select a vendor rule tp delete and click this button.
Once all of the information is entered, click OK to save the new vendor.
Editing Vendors
This sub-section explains how to edit vendors for inventory items in the Point of Sale software.
NOTE: If a vendor has been previously assigned to an inventory item and that
vendor is edited, then that vendor inside the item properties will be changed
automatically as well. Also, in order to edit a vendor, a vendor must have been
previously created.
1.
Make sure that the Point of Sale menu is visible at the Ideal FEC Back Office Suite screen.
2.
Select Inventory | Edit Vendor.
© 1997 - 2005 Ideal Software Systems, Inc.
165
166
Point of Sale
Figure 3-36. The Ideal FEC Back Office Suite Inventory menu's Edit Vendor
Select Inventory | Edit Vendor.
3.
When the Vendor List window opens, select the vendor that needs to be edited and click OK.
Figure 3-37. The Vendor List window with sample vendor
Select a vendor and click OK.
TIP: A search for a vendor can be performed by entering the vendor's name in
the Vendor Name Search field.
4.
The Vendor window will open with all of the vendor information. Make any changes that need to be
made.
5.
Once the changes are made, click OK to save the edited vendor.
© 1997 - 2005 Ideal Software Systems, Inc.
Chapter 3 - Inventory Setup and Features
3.7
167
Inventory
Instructions for setting up the different inventory types
This section contains the proper procedures for creating inventory items,
editing these items, setting price schedules, and making ingredient lists.
This section contains the following topics:
• "Inventory and Item Type Explanation"
• "Special Inventory Codes"
• "Creating a New Inventory Item (Normal)"
• "Creating a New Inventory Item (Ticket)"
• "Creating a New Inventory Item (Package)"
• "Creating a New Inventory Item (Modifier)"
• "Creating a New Inventory Item (Wristband)"
• "Creating a New Inventory Item (Token)"
• "Creating a New Inventory Item (Dispense Tkt A)"
• "Creating a New Inventory Item (Dispense Tkt B)"
• "Creating a New Inventory Item (Dispense Tkt C)"
• "Creating a New Inventory Item (Customer Required Item)"
• "Creating a New Inventory Item (Mini-Golf Score Card)"
• "Creating a New Inventory Item (Coupon)"
• "Creating a New Inventory Item (Ingredient)"
• "Creating a New Inventory Item (Open Key)"
• "Creating a New Inventory Item (Intercard Value)"
• "Creating a New Inventory Item (OnePOS Card Value)"
• "Editing Inventory Items"
• "Adding a Price Schedule"
• "Editing a Vendor Through an Inventory Item"
• "Using the Package Tree"
• "Adding an Ingredient List"
3.7.1
Inventory and Item Type Explanation
Point of Sale offers a variety of item types that can be created. These item types and what they are used for is
explained below:
Normal - This item type is applied to most normal inventory items such as food and merchandise. For
information on creating this item type, see sub-section "Creating a New Inventory Item (Normal)".
Ticket Item - When this type is selected, a ticket will be printed when the item is sold. This is useful for places
that must have a proof of purchase from the customer. For example, a customer buys a round of golf
and is given a ticket for access into the facility. For information on creating this item type, see subsection "Creating a New Inventory Item (Ticket Item)".
All tickets are script based. A script must be specified for each item that will be printing a ticket, even if
the inventory item is of ticket type in the inventory. If the printer is an FGL printer, the user must
© 1997 - 2005 Ideal Software Systems, Inc.
168
Point of Sale
specify an FGL script. If the printer is Windows/PL4 language compatible, the user must use the ISS
scripting language. Event Scheduler will only print tickets for items of ticket type and that have a script
specified for the item. Point of Sale will warn the user if an inventory item of type ticket is created and a
script is not specified. The Point of Sale install will create a new directory called scripts and place
several example scripts that Point of Sale has used in previous versions.
NOTE: Information on creating FGL scripts is located in the Drivers directory of
all Point of Sale installation CD's.
Using ticket items will require the user to specify a script for each ticket item. In
previous versions, this was not necessary. Customers may report that tickets stop
printing after upgrading from previous versions. Ideal's Support staff may use an
SQL statement to assign a script to all ticket items if desired.
If the printer is FGL, each machine may use the generic printer driver to
communicate with the printer. If the printer is Windows/PC4 compatible, the user
must use the driver that is designed for the printer.
If the printer is FGL, each machine may use the generic printer driver to
communicate with the printer. If the printer is Windows/PC4 compatible, the user
must use the driver that is designed for the printer.
If users are using two types of ticket printers, Windows/PC4 and
FGL, the same script cannot be used for both types of printers (as
in previous versions of Point of Sale).
Package - If the item is sold as a packaged item, select this type. An example of a package could be an
assortment of food for a party. A customer can buy one item that is setup as a package yet includes a
hamburger, fries, and a drink. Items to be included in a packaged item must be created as inventory
prior to completing package. For information on creating this item type, see sub-section "Creating a
New Inventory Item (Package)".
Modifier - Items can be modifiers to other items. Also, modifiers can be sold with a price or at no price. When a
modifier is selected from the sales screen, it will appear indented under the main item that it is
modifying. Examples of modifiers might include: extra Cheese, no ketchup, tomatoes, small, medium,
large, etc. When a receipt is printed on a service printer such as a kitchen printer, modifiers entered for
an item will appear under the item. For information on creating this item type, see sub-section "Creating
a New Inventory Item (Modifier)".
Wristband - If this type is selected, when the item is sold, Point of Sale will print a wristband on the wristband
printer with the item description. For information on creating this item type, see sub-section "Creating a
New Inventory Item (Wristband)".
Token - If (and only if) a token dispenser is connected to a Point of Sale station, selecting this option for the
item will dispense tokens when sold. For information on creating this item type, see sub-section
"Creating a New Inventory Item (Token)".
Ticket Dispensers (Dispense Tkt A, B, and C) - These dispensers can be "daisy-chained" together so the user
can have a total of four (A,B,C,D) ticket dispensers. They dispense the one inch Admit One style
tickets. For information on creating this item type, see sub-sections "Creating a New Inventory Item
(Dispense Tkt A)", "Creating a New Inventory Item (Dispense Tkt B)", and "Creating a New Inventory
Item (Dispense Tkt C)".
Customer Required Item - These items are created specific to customers that will be buying them.
Mini-Golf Score Card - When a BOCA Micro 42 printer is used and an admittance for a mini golf or putt putt
© 1997 - 2005 Ideal Software Systems, Inc.
Chapter 3 - Inventory Setup and Features
169
game is sold, this option will print the scorecard with the number of games sold on the card. For
information on creating this item type, see sub-section "Creating a New Inventory Item (Mini-Golf
Score Card)".
Coupon - Coupons can be redeemed from any station in the Point of Sale system. Redeeming coupons carries a
negative sales price. For information on creating this item type, see sub-section "Creating a New
Inventory Item (Coupon)".
Resources - Resources are associated with the Party Scheduler module which is integrated with the Point of Sale
program. When entering resources or rooms, the user also specifies the time during which the resource
is available and the minimum reserve time. For information on setting up a Resource item, refer to
Chapter 9, sub-section "Creating Resources".
Access Ticket - Access tickets are used to gain access to a certain area of a facility. These are mainly used for
turnstile access. For information on setting up an Access Ticket item, see Chapter 15 in the "Access
Tickets" section.
Season Pass - Season passes work similarly to Access Tickets items that they can be setup to allow the customer
access to a certain area of a facility. The difference being that the item is setup during a certain date
range. For information on setting up a Season Pass item, see Chapter 15 in the "Access Tickets" section.
Ingredient - Ingredients are used for the ingredient usage reports to keep up with the cost of goods, namely food
items. For information on creating this item type, see sub-section "Creating a New Inventory Item
(Ingredient)".
Debit Card Item - These are items that can only be used with the Ideal Cashless System (ICS). These items,
when purchased, will be added to the customer's debit card. These types of items are usually cash
amounts that will get transferred to a card to be used at ICS card swipe locations such as arcade games
or extreme sports resources. For more information on creating a Debit Card Item, refer to Chapter 14,
section "Setting Up Debit Card Items".
OnePOS Card Item - These cards are used as another form of payment similar to the MVP Credit cards.
Another advantage other than being able to create multiple types of items is the item tracking function that Point
of Sale provides. Locations that keep up with food and merchandise will want to take advantage of this feature.
In order for the counts to be accurate, all Purchase Orders and inventory transfers must be kept up to date. Audits
can also be used periodically to make sure inventory counts are correct.
Also, barcodes can be assigned to inventory items. If the item currently already has a barcode, this can be
scanned in to the Barcode field and added into the system. Or, new barcodes can be assigned to inventory items.
There is certain information that must be assigned to every inventory item:
Name and Cost - For obvious reasons, the item must have a name and a price before it can be used correctly.
Category - All items should have a category. Categories are used for sorts in many of the reports. Also,
categories are for convenience for anyone who will be assisting in the setup of the Point of Sale system.
Tax Type - Items must have a tax type. Reports will be incorrect if an item is sold that doesn't have a tax type
assigned.
WARNING: If a Tax Type is not entered, tax will not be applied to the item
when it is sold.
Active - There is an ability to activate and deactivate inventory items. Inventory that is not active will
now appear in inventory listing reports unless optionally told to do so. The inventory search
check box allows for users to exclude or include inventory that is not active. Deactivating
© 1997 - 2005 Ideal Software Systems, Inc.
170
Point of Sale
inventory does not prevent any inventory from being sold or audited.
Another useful feature is Point of Sale's ability to automatically display an item's total cost once a tax has been
applied. The Post Tax field displays the updated price for all item types and can be found under the Retail Sale
Price field.
3.7.1.1
Special Inventory Codes
In order for MVP Credit values, Debit Card values, and Open Key values to work, a special code is needed in
the Inventory Description field. The codes are as follows:
Open Keys - \OK\ - The OK must be in capital letters. The code can go either before or after the name of the
item in the description field. The Retail Sales Price should be zero and the Track Inventory
Quantities option should be turned off or not checked. The Open Key item is used when an item
doesn't have an exact price. When an open key item is selected for purchase in the Front POS Sales
screen, the Enter Open Key Amount window will open. The employee can then choose the price of
the inventory item based on the merchandise sales price of what the customer would like to purchase.
For information on creating this item type, see sub-section "Creating a New Inventory Item (Open
Key)".
Figure 3-38. The Create New Inventory Item window with Open Key item
© 1997 - 2005 Ideal Software Systems, Inc.
Chapter 3 - Inventory Setup and Features
Figure 3-39. The Front POS Sales Screen with sample Open Key item
Figure 3-40. The Enter Open Key Amount window with sample price
© 1997 - 2005 Ideal Software Systems, Inc.
171
172
Point of Sale
Figure 3-41. The Front POS Sales screen with sample Open Key price
Debit Card Value - \debitcard\ - Multiple values for debit cards in the Ideal Cashless System (ICS) debit cards
can be created by placing \debitcard\ in the description field. Put the amount of the money to be added
to the card in the Retail Sale Price field. Also, the Track Inventory Quantities option should be
turned off or not checked. These items would only be for debit cards and the ICS system must be setup
with the Point of Sale system in order for the \debitcard\ command to be valid. For information on
creating this item type, refer to Chapter 14, section Using the Debit Card System, sub-section "Creating
Debit Card Value Items".
Figure 3-42. The Create New Inventory Item window with Debit Card value item
© 1997 - 2005 Ideal Software Systems, Inc.
Chapter 3 - Inventory Setup and Features
173
Figure 3-43. The Front POS Sales screen with sample Debit Card value price
Figure 3-44. The Debit Card window with sample amount to add
Intercard Value - \intercard\ - Use \intercard\ in the description field to add money value to the Intercard
based credit cards. Put the amount of the money to be added to the card in the Retail Sale Price field.
Also, the Track Inventory Quantities option should be turned off or not checked. The Intercard
system must be working with the Point of Sale system in order for this command to be valid. For
information on creating this item type, see sub-section "Creating a New Inventory Item (Intercard
Value)".
© 1997 - 2005 Ideal Software Systems, Inc.
174
Point of Sale
Figure 3-45. The Create New Inventory Item window with Intercard value item
Figure 3-46. The Front POS Sales screen with sample Intercard value price
MVP Credit Value - \mvpcredit\ - When using the Ideal Point of Sale MVP Credit feature, for adding internal
debit value to custom MVP credit or gift cards, use \mvpcredit\ in the description field. Put the
amount of the money to be added to the card in the Retail Sale Price field. Also, the Track Inventory
Quantities option should be turned off or not checked. Multiple values can be setup for this command
as well. For information on creating this item type, refer to Chapter 10, section Setting Up MVP Clubs
and MVP Credit, sub-section "Creating MVP Credit Card Value Items".
© 1997 - 2005 Ideal Software Systems, Inc.
Chapter 3 - Inventory Setup and Features
175
Figure 3-47. The Create New Inventory Item window with MVP value item
Figure 3-48. The Front POS Sales screen with sample MVP value price
Figure 3-49. The Add MVP Credit window with sample value
OnePOS Card Value - \GiftCard\ - This form of payment was recently introduced to the Point of Sale system.
Similar to MVP Credit, it is used as a form of money in a sale. For information on creating this item
type, refer to sub section "Creating a New Inventory Item (OnePOS Card Value)" in this section. To
know more about selling value to this gift card, go to Chapter 7, section The Sales and Payment Method
Screens, sub-section "Selling OnePOS Card Value".
© 1997 - 2005 Ideal Software Systems, Inc.
176
Point of Sale
Figure 3-50. The Front POS Sales screen with sample OnePOS Card value price
Figure 3-51. The Gift Card Add Value window with sample value
3.7.2
Creating a New Inventory Item (Normal)
This sub-section explains how to create a normal inventory item(s) for the Point of Sale system.
NOTE: It is important that inventory, categories, sub-categories, tax tables, unit
types, locations, and vendors be setup before any inventory items are made. This
will save a lot of time in setting up the Point of Sale system.
1.
Make sure that the Point of Sale menu is visible at the Ideal FEC Back Office Suite screen.
2.
Select Inventory | Create Inventory.
© 1997 - 2005 Ideal Software Systems, Inc.
Chapter 3 - Inventory Setup and Features
177
Figure 3-52. The Ideal FEC Back Office Suite Inventory menu's Create Inventory
Select Inventory | Create Inventory.
3.
The Create New Inventory Item window will open. Make sure that Normal is selected under Item
Type.
© 1997 - 2005 Ideal Software Systems, Inc.
178
Point of Sale
Figure 3-53. The Create New Inventory Item window with Normal Item Type selected
Make sure Normal is selected under Item Type.
4.
Enter the information for the normal inventory item.
A.
Item Number
Enter a number for this inventory item.
i.
Auto-Assign Inventory Number
Check this option if the inventory item is to be assigned a number by the Point of Sale
system.
© 1997 - 2005 Ideal Software Systems, Inc.
Chapter 3 - Inventory Setup and Features
179
TIP: The Auto-Assign Inventory Number option is checked by default. It is
recommended that each category gets its own range of inventory numbers. (Food
= 1 to 999, Golf = 1000 to 1999, etc.) This will make managing hundreds of
inventory items simpler.
B.
Retail Sale Price
Enter how much the item will be sold for.
C.
Description
Enter the name of the inventory item.
TIP: The Description field for an inventory should be unique to that item. This
will make searching for items easier than depending on searching for them by
their unique item number.
D.
Category
Click the drop down arrow and select a category for the item.
E.
Sub-Category
If the item needs a sub-category, click the drop down arrow and choose one.
F.
Tax Type
Select a tax type after the clicking the drop down arrow.
G.
Vendor
If the inventory item has a vendor, click the drop down arrow and select one.
H.
Edit Vendor
Click this button to edit the item's vendor. Refer to sub-section "Editing a Vendor Through an
Inventory Item" for more information.
I.
Barcode
If barcodes are used, enter the barcode number of the item.
TIP: If the item already has a barcode, the user may scan the barcode on the item
while the cursor is in the Barcode field of the inventory item and input the item's
original barcode into the system. The original barcode will now be recognized by
the system whenever that inventory item is scanned.
NOTE: In order for the Minimum Quantity feature to be utilized, the Track
Inventory Categories option must be checked.
J.
Ingredient List
Refer to sub-section "Adding an Ingredient List" for more information on using this utility.
K.
Active
Select this option if the inventory item is going to be actively for sale. Unselect this option to
deactivate the item. This option is selected by default.
L.
Track Inventory Quantities
Check this option for the system to keep track of the amount of this inventory item.
M.
Right Level Required
Enter a number 0 through 5 of the right level required by the employee to sell the inventory
item.
© 1997 - 2005 Ideal Software Systems, Inc.
180
Point of Sale
NOTE: If a number other than 0 through 5 is entered in the Right Level
Required field then an error will result. To change an employee rights level so
that they can sell items with a level higher than 0, refer back to Chapter 2 section
"Entering Employees and Employee Groups".
N.
Service Printer
i.
Service Printer 1
Select this option to print to a printer recognized as Service Printer 1.
ii.
Service Printer 2
Select this option to print to a printer recognized as Service Printer 2.
iii.
Service Printer 3
Select this option to print to a printer recognized as Service Printer 3.
iv.
Service Printer 4
Select this option to print to a printer recognized as Service Printer 4.
NOTE: A service printer must be networked into the Ideal system network and
setup under the printer properties in the Point of Sale program in order for
inventory item information to be printed to a kitchen or service printer.
O.
Item Script
Figure 3-54. The Item Script tab
Click on the Item Script tab.
i.
Script Filename
Select a script that will be printed upon the item's purchase (if the item requires that
something be printed other than the receipt.)
NOTE: The script chosen will be printed in addition to any other ticket,
wristband, or score card.
ii.
Print Location
a.
None
The select script will not be printed upon the item's purchase.
b.
Ticket Printer
The script will be printed to a designated ticket printer upon the sale of the
© 1997 - 2005 Ideal Software Systems, Inc.
Chapter 3 - Inventory Setup and Features
181
item.
c.
Wristband Printer
The script will print on a wristband when the item is sold.
d.
Receipt Printer
The script will print on the receipt printer local to the terminal when the item
is purchased.
e.
Golf Scorecard Printer
The script will print on a scorecard.
iii.
Script
Click the down arrow and select a item script to use.
iv.
Create
Click this button to create a item script.
v.
Edit
Edit a script in the default word processor.
NOTE: For further information on creating and editing scripts, refer to the "Item
Scripts" section.
P.
Audit Info
Figure 3-55. The Audit Info tab
Click on the Audit Info tab.
NOTE: To make the Audit Info tab accessible, the Track Inventory Quantities
must be checked.
i.
Selling UOM
Click the down arrow and select the unit of measure that the new inventory item is
sold with.
ii.
Stocking UOM
Click the down arrow and select the unit of measure that the new inventory item is
stocked with.
iii.
Counting UOM
Click the down arrow and select the unit of measure that the new inventory item is
© 1997 - 2005 Ideal Software Systems, Inc.
182
Point of Sale
counted with.
iv.
Q.
Default Receive Quantity
Enter the default number of the new inventory that will be received into inventory
every time more of this item is received.
Audit Count
This tab keeps track of all the information regarding the ingredient item.
Figure 3-56. The Audit Count tab
Click on the Audit Count tab.
NOTE: To make the Audit Count tab accessible, the Track Inventory
Quantities must be checked. All fields in this table will be populated
automatically upon receiving the ingredients into inventory.
R.
Discounts
This tab (Figure 3-100) will display any discounts that have been applied to the item. Also,
Price Schedule is on this tab. Refer to sub-section "Adding a Price Schedule".
S.
Coupon Info
In order for a cashier to scan a coupon provided by a customer, Point of Sale will require that
the customer's order contain the inventory item that the coupon is linked to in this tab.
Figure 3-57. The Coupon Info tab
Click on the Coupon Info tab.
i.
Setup Required Items
Click this button to open the Inventory Required in Order window.
© 1997 - 2005 Ideal Software Systems, Inc.
Chapter 3 - Inventory Setup and Features
183
Figure 3-58. The Inventory Required in Order window
Click Setup Required Items to open this window.
a.
Add Item
Click this button to open the Select Inventory Item window. Select an item
required for the coupon and click OK.
Figure 3-59. The Select Inventory Item window
Select an inventory item and click OK.
b.
© 1997 - 2005 Ideal Software Systems, Inc.
Remove Item
Select and item to be removed from the required item for coupon list and
click this button to remove it.
184
Point of Sale
T.
Order/Stocking Rules
This tab (Figure 3-101) allows the manager and owner to define specific rules about ording
from vendors and stocking inventory that apply to the item. Refer to section "Order/Stocking
Rules".
5.
Click OK once the item is finished. The item will now be saved in the Point of Sale system.
6.
The Confirm window will appear. Click Yes to create another item. Otherwise click No to return to the
Ideal FEC Back Office Suite screen.
Figure 3-60. The Confirm window
Click Yes to create another item, otherwise click No.
3.7.3
Creating a New Inventory Item (Ticket Item)
This sub-section explains how to create a ticket inventory item for the Point of Sale system.
NOTE: It is important that inventory, categories, sub-categories, tax tables, unit
types, locations, and vendors be setup before any inventory items are made. This
will save a lot of time in setting up the Point of Sale system.
1.
Make sure that the Point of Sale menu is visible at the Ideal FEC Back Office Suite screen.
2.
Select Inventory | Create Inventory (Figure 3-52).
3.
The Create New Inventory Item window will open. Make sure that Ticket Item is selected under
Item Type.
© 1997 - 2005 Ideal Software Systems, Inc.
Chapter 3 - Inventory Setup and Features
185
Figure 3-61. The Create New Inventory Item window with Ticket Item Type selected
Make sure Ticket Item is selected under Item Type.
4.
Enter the information for the ticket inventory item.
A.
Item Number
Enter a number for this inventory item.
i.
Auto-Assign Inventory Number
Check this option if the inventory item is to be assigned a number by the Point of Sale
system.
TIP: The Auto-Assign Inventory Number option is checked by default. It is
recommended that each category gets its own range of inventory numbers. (Food
= 1 to 999, Golf = 1000 to 1999, etc.) This will make managing hundreds of
inventory items simpler.
B.
Retail Sale Price
Enter how much the item will be sold for.
C.
Description
Enter the name of the inventory item.
TIP: The Description field for an inventory should be unique to that item. This
will make searching for items easier than depending on searching for them by
their unique item number.
D.
Category
Click the drop down arrow and select a category for the item.
E.
Sub-Category
If the item needs a sub-category, click the drop down arrow and select one.
© 1997 - 2005 Ideal Software Systems, Inc.
186
Point of Sale
F.
Tax Type
Select a tax type after the clicking the drop down arrow.
G.
Vendor
If the inventory item has a vendor, click the drop down arrow and select one.
H.
Edit Vendor
Click this button to edit the item's vendor. Refer to sub-section "Editing a Vendor Through an
Inventory Item" for more information.
I.
Barcode
If barcodes will be used, enter the barcode number of the item.
TIP: If the item already has a barcode, the user may scan the barcode on the item
while the cursor is in the Barcode field of the inventory item and input item
original barcode into the system. The original barcode will now be recognized by
the system as that inventory item whenever scanned.
J.
Active
Select this option if the inventory item is going to be actively for sale. Unselect this option to
deactivate the item. This option is selected by default.
K.
Right Level Required
Enter a number 0 through 5 of the right level required by the employee to sell the inventory
item.
NOTE: If a number other than 0 through 5 is entered in the Right Level
Required field then an error will result. To change an employee rights level so
that they can sell items with a level higher than 0, refer back to Chapter 2 section
"Entering Employees and Employee Groups".
L.
Service Printer (Figure 3-53)
i.
Service Printer 1
Select this option to print to a printer recognized as Service Printer 1.
ii.
Service Printer 2
Select this option to print to a printer recognized as Service Printer 2.
iii.
Service Printer 3
Select this option to print to a printer recognized as Service Printer 3.
iv.
Service Printer 4
Select this option to print to a printer recognized as Service Printer 4.
NOTE: A service printer must be networked into the Ideal system network and
setup under the printer properties in the Point of Sale program in order for
inventory item information to be printed to a kitchen or service printer.
M.
Item Script (Figure 3-54)
i.
Script Filename
Select a script that will be printed upon the item's purchase (if the item requires that
something be printed other than the receipt.)
© 1997 - 2005 Ideal Software Systems, Inc.
Chapter 3 - Inventory Setup and Features
187
NOTE: The script chosen will be printed in addition to any other ticket,
wristband, or score card.
ii.
Print Location
a.
None
The select script will not be printed upon the item's purchase.
b.
Ticket Printer
The script will be printed to a designated ticket printer upon the sale of the
item.
c.
Wristband Printer
The script will print on a wristband when the item is sold.
d.
Receipt Printer
The script will print on the receipt printer local to the terminal when the item
is purchased.
e.
Golf Scorecard Printer
The script will print on a scorecard.
iii.
Script
Click the down arrow and select a item script to use.
iv.
Create
Click this button to create a item script.
v.
Edit
Edit a script in the default word processor.
NOTE: For further information on creating and editing scripts, refer to the "Item
Scripts" section.
N.
Discounts
This tab (Figure 3-101) will display any discounts that have been applied to the item. Also, the
Price Schedule button is on this tab. Refer to sub-section "Adding a Price Schedule".
O.
Coupon Info (Figure 3-57)
In order for a cashier to scan a coupon provided by a customer, Point of Sale will require that
the customer's order contain the inventory item that the coupon is linked to in this tab.
i.
P.
Setup Required Items
Click this button to open the Inventory Required in Order window (Figure 3-58).
a.
Add Item
Click this button to open the Select Inventory Item window (Figure 3-59).
Select an item required for the coupon and click OK.
b.
Remove Item
Select and item to be removed from the required item for coupon list and
click this button to remove it.
Order/Stocking Rules
This tab (Figure 3-102) allows the manager and owner to define specific rules about ording
from vendors and stocking inventory that apply to the item. Refer to section "Order/Stocking
© 1997 - 2005 Ideal Software Systems, Inc.
188
Point of Sale
Rules".
5.
Click OK once the item is finished. The item will now be saved in the Point of Sale system.
6.
The Confirm window will appear (Figure 3-60). Click Yes to create another item. Otherwise click No
to return to the Ideal FEC Back Office Suite screen.
3.7.4
Creating a New Inventory Item (Package)
This sub-section explains how to create a package item for the Point of Sale system.
NOTE: It is important that inventory, categories, sub-categories, tax tables, unit
types, locations, and vendors be setup before any inventory items are made. This
will save a lot of time in setting up the Point of Sale system.
1.
Make sure that the Point of Sale menu is visible at the Ideal FEC Back Office Suite screen.
2.
Select Inventory | Create Inventory (Figure 3-52).
3.
The Create New Inventory Item window will open. Make sure that Package is selected under Item
Type.
Figure 3-62. The Create New Inventory Item window with Package Item Type selected
Make sure Package is selected under Item Type.
4.
Enter the information for the package item.
A.
Item Number
Enter a number for this inventory item.
© 1997 - 2005 Ideal Software Systems, Inc.
Chapter 3 - Inventory Setup and Features
i.
189
Auto-Assign Inventory Number
Check this option if the inventory item is to be assigned a number by the Point of Sale
system.
TIP: The Auto-Assign Inventory Number option is checked by default. It is
recommended that each category gets its own range of inventory numbers. (Food
= 1 to 999, Golf = 1000 to 1999, etc.) This will make managing hundreds of
inventory items simpler.
B.
Retail Sale Price
Enter how much the item will be sold for.
C.
Description
Enter the name of the package.
TIP: The Description field for an inventory should be unique to that item. This
will make searching for items easier than depending on searching for them by
their unique item number.
D.
Category
Click the drop down arrow and select a category for the item.
E.
Sub-Category
If the item needs a sub-category, click the drop down arrow and select one.
F.
Tax Type
Select a tax type after the clicking the drop down arrow.
G.
Vendor
If the inventory item has a vendor, click the drop down arrow and select one.
H.
Edit Vendor
Use this button to edit the item's vendor. Refer to sub-section "Editing a Vendor Through an
Inventory Item" for more information.
I.
Barcode
If barcodes are used, enter the barcode number of the item.
TIP: If the item already has a barcode, the user may scan the barcode on the item
while the cursor is in the Barcode field of the inventory item and input item
original barcode into the system. The original barcode will now be recognized by
the system as that inventory item whenever scanned.
J.
Right Level Required
Enter a number 0 through 5 of the right level required by the employee to sell the inventory
item.
NOTE: If a number other than 0 through 5 is entered in the Right Level
Required field then an error will result. To change an employee rights level so
that they can sell items with a level higher than 0, refer back to Chapter 2 section
"Entering Employees and Employee Groups".
K.
Package Tax
Click the down arrow to select from two different ways to have the package's tax amount
calculated: Assign Tax Type and Calculate Tax from Inventory.
© 1997 - 2005 Ideal Software Systems, Inc.
190
Point of Sale
NOTE: Package item price will be calculated after any discounts have been
given on the inventory item. Discounts will subtracted from the package price
before being used to calculate tax collected. Discounts will not affect the package
distribution; the item's retail sale price will always be used to calculate the
package distribution regardless of the discount applied to the package item.
It is very important that all items have a tax type assigned to them so the correct
value can be calculated.
L.
Active
Select this option if the inventory item is going to be actively for sale. Unselect this option to
deactivate the item. This option is selected by default.
M.
Edit Package
NOTE: Upon clicking Edit Package, the item will automatically be saved. A
Confirm window will open prompting the user of this fact as seen in Figure 363.
Figure 3-63. The Confirm window
The package item is saved. Click OK.
© 1997 - 2005 Ideal Software Systems, Inc.
Chapter 3 - Inventory Setup and Features
191
Figure 3-64. The Packages window
Click Edit Package to open the Packages window.
i.
Add to Package (Insert)
Click this button to add an item to the package.
a.
After pressing the Add To Package button, the Select Inventory Item
window (Figure 3-59) will open. Select an item that will go into the
package, and click OK.
NOTE: An inventory item must have been previously created in order to put an
item into a package. If no other items have been created there will be inventory to
choose from.
b.
ii.
The inventory item for the package will now appear in the Packages window
(Figure 3-64).
Remove from Package (Delete)
Selecting this option will remove a selected inventory item from the package.
a.
In the Packages window, select the item that needs to be removed and click
Remove from Package.
NOTE: In order to remove an item from a package, there first must be an item
inside the package.
b.
iii.
The item will be removed from the package.
ReAllocate
Clicking this button will change the price of the package to match the price of all the
inventory items inside the package.
© 1997 - 2005 Ideal Software Systems, Inc.
192
Point of Sale
iv.
N.
Close
Clicking this button will close the Packages window (Figure 3-64).
Service Printer (Figure 3-53)
i.
Service Printer 1
Select this option to print to a printer recognized as Service Printer 1.
ii.
Service Printer 2
Select this option to print to a printer recognized as Service Printer 2.
iii.
Service Printer 3
Select this option to print to a printer recognized as Service Printer 3.
iv.
Service Printer 4
Select this option to print to a printer recognized as Service Printer 4.
NOTE: A service printer must be networked into the Ideal system network and
setup under the printer properties in the Point of Sale program in order for
inventory item information to be printed to a kitchen or service printer.
O.
Item Script (Figure 3-54)
i.
Script Filename
Select a script that will be printed upon the item's purchase (if the item requires that
something be printed other than the receipt.)
NOTE: The script chosen will be printed in addition to any other ticket,
wristband, or score card.
ii.
Print Location
a.
None
The select script will not print upon the item's purchase.
b.
Ticket Printer
The script will print to a designated ticket printer upon the sale of the item.
c.
Wristband Printer
The script will print on a wristband when the item is sold.
d.
Receipt Printer
The script will print on the receipt printer local to the terminal when the item
is purchased.
e.
Golf Scorecard Printer
The script will print on a scorecard.
iii.
Script
Click the down arrow and select a item script to use.
iv.
Create
Click this button to create a item script.
v.
Edit
Edit a script in the default word processor.
© 1997 - 2005 Ideal Software Systems, Inc.
Chapter 3 - Inventory Setup and Features
193
NOTE: For further information on creating and editing scripts, refer to the "Item
Scripts" section.
P.
Discounts
This tab (Figure 3-101) will display any discounts that have been applied to the item. Also,
Price Schedule is on this tab. Refer to sub-section "Adding a Price Schedule".
Q.
Coupon Info (Figure 3-57)
In order for a cashier to scan a coupon provided by a customer, Point of Sale will require that
the customer's order contain the inventory item that the coupon is linked to in this tab.
i.
R.
Setup Required Items
Click this button to open the Inventory Required in Order window (Figure 3-58).
a.
Add Item
Click this button to open the Select Inventory Item window (Figure 3-59).
Select an item required for the coupon and click OK.
b.
Remove Item
Select and item to be removed from the required item for coupon list and
click this button to remove it.
Order/Stocking Rules
This tab (Figure 3-102) allows the manager and owner to define specific rules about ording
from vendors and stocking inventory that apply to the item. Refer to section "Order/Stocking
Rules".
5.
Click OK once the item is finished. The item will now be saved in the Point of Sale system.
6.
The Confirm window will appear (Figure 3-60). Click Yes to create another item. Otherwise click No
to return to the Ideal FEC Back Office Suite screen.
3.7.5
Creating a New Inventory Item (Modifier)
This sub-section explains how to create a modifier for a normal inventory item for the Point of Sale system.
NOTE: It is important that inventory, categories, sub-categories, tax tables, unit
types, locations, and vendors be setup before any inventory items are made. This
will save a lot of time in setting up the Point of Sale system.
1.
Make sure that the Point of Sale menu is visible at the Ideal FEC Back Office Suite screen.
2.
Select Inventory | Create Inventory (Figure 3-52).
3.
The Create New Inventory Item window will open. Make sure that Modifier is selected under Item
Type.
© 1997 - 2005 Ideal Software Systems, Inc.
194
Point of Sale
Figure 3-65. The Create New Inventory Item window with Modifier Item Type selected
Make sure Modifier is selected under Item Type.
4.
Enter the information for the normal inventory item.
A.
Item Number
Enter a number for this inventory item.
i.
Auto-Assign Inventory Number
Check this option if the inventory item is to be assigned a number by the Point of Sale
system.
TIP: The Auto-Assign Inventory Number option is checked by default. It is
recommended that each category gets its own range of inventory numbers. (Food
= 1 to 999, Golf = 1000 to 1999, etc.) This will make managing hundreds of
inventory items simpler.
B.
Retail Sale Price
Enter how much the item will be sold for.
C.
Description
Enter the name of the inventory item.
TIP: The Description field for an inventory should be unique to that item. This
will make searching for items easier than depending on searching for them by
their unique item number.
D.
Category
Click the drop down arrow and select a category for the item.
E.
Sub-Category
If the item needs a sub-category, click the drop down arrow and select one.
© 1997 - 2005 Ideal Software Systems, Inc.
Chapter 3 - Inventory Setup and Features
195
F.
Tax Type
Select a tax type after clicking the drop down arrow.
G.
Vendor
If the inventory item has a vendor, click the drop down arrow and select one.
H.
Edit Vendor
Click this button to edit the item's vendor. Refer to sub-section "Editing a Vendor Through an
Inventory Item" for more information.
I.
Barcode
If barcodes are used, enter the barcode number for the item.
TIP: If the item already has a barcode, the user may scan the barcode on the item
while the cursor is in the Barcode field of the inventory item and input item
original barcode into the system. The original barcode will now be recognized by
the system as that inventory item whenever scanned.
NOTE: In order for the Minimum Quantity feature to be utilized, the Track
Inventory Categories option must be checked.
J.
Ingredient List
Refer to sub-section "Adding an Ingredient List" for more information on using this utility.
K.
Active
Select this option if the inventory item is going to be actively for sale. Unselect this option to
deactivate the item. This option is selected by default.
L.
Track Inventory Quantities
Check this option for the system to keep track of the amount of this inventory item.
M.
Right Level Required
Enter a number 0 through 5 of the right level required by the employee to sell the inventory
item.
NOTE: If a number other than 0 through 5 is entered in the Right Level
Required field then an error will result. To change an employee rights level so
that they can sell items with a level higher than 0, refer back to Chapter 2 section
"Entering Employees and Employee Groups".
N.
Service Printer (Figure 3-53)
i.
Service Printer 1
Select this option to print to a printer recognized as Service Printer 1.
ii.
Service Printer 2
Select this option to print to a printer recognized as Service Printer 2.
iii.
Service Printer 3
Select this option to print to a printer recognized as Service Printer 3.
iv.
Service Printer 4
Select this option to print to a printer recognized as Service Printer 4.
© 1997 - 2005 Ideal Software Systems, Inc.
196
Point of Sale
NOTE: A service printer must be networked into the Ideal system network and
setup under the printer properties in the Point of Sale program in order for
inventory item information to be printed to a kitchen or service printer.
O.
Item Script (Figure 3-54)
i.
Script Filename
Select a script that will be printed upon the item's purchase (if the item requires that
something be printed other than the receipt.)
NOTE: The script chosen will be printed in addition to any other ticket,
wristband, or score card.
ii.
Print Location
a.
None
The select script will not be printed upon the item's purchase.
b.
Ticket Printer
The script will be printed to a designated ticket printer upon the sale of the
item.
c.
Wristband Printer
The script will print on a wristband when the item is sold.
d.
Receipt Printer
The script will print on the receipt printer local to the terminal when the item
is purchased.
e.
Golf Scorecard Printer
The script will print on a scorecard.
iii.
Script
Click the down arrow and select a item script to use.
iv.
Create
Click this button to create a item script.
v.
Edit
Edit a script in the default word processor.
NOTE: For further information on creating and editing scripts, refer to the "Item
Scripts" section.
P.
Audit Info (Figure 3-55)
NOTE: To make the Audit Info tab accessible, the Track Inventory Quantities
must be checked.
i.
Selling UOM
Click the down arrow and select the unit of measure that the new inventory item is
sold with.
ii.
Stocking UOM
Click the down arrow and select the unit of measure that the new inventory item is
stocked with.
© 1997 - 2005 Ideal Software Systems, Inc.
Chapter 3 - Inventory Setup and Features
Q.
197
iii.
Counting UOM
Click the down arrow and select the unit of measure that the new inventory item is
counted with.
iv.
Default Receive Quantity
Enter the default number of the new inventory that will be received into inventory
every time more of this item is received.
Audit Count
This tab (Figure 3-56) keeps track of all the information regarding the ingredient item.
NOTE: To make the Audit Count tab accessible, the Track Inventory
Quantities must be checked. All fields in this table will be populated
automatically upon receiving the ingredients into inventory.
R.
Discounts
This tab (Figure 3-101) will display any discounts that have been applied to the item. Also,
Price Schedule is on this tab. Refer to sub-section "Adding a Price Schedule".
S.
Coupon Info (Figure 3-57)
In order for a cashier to scan a coupon provided by a customer, Point of Sale will require that
the customer's order contain the inventory item that the coupon is linked to in this tab.
i.
T.
Setup Required Items
Click this button to open the Inventory Required in Order window (Figure 3-58).
a.
Add Item
Click this button to open the Select Inventory Item window (Figure 3-59).
Select an item required for the coupon and click OK.
b.
Remove Item
Select and item to be removed from the required item for coupon list and
click this button to remove it.
Order/Stocking Rules
This tab (Figure 3-102) allows the manager and owner to define specific rules about ording
from vendors and stocking inventory that apply to the item. Refer to section "Order/Stocking
Rules".
5.
Click OK once the item is finished. The item will now be saved in the Point of Sale system.
6.
The Confirm window will appear (Figure 3-60). Click Yes to create another item. Otherwise click No
to return to the Ideal FEC Back Office Suite screen.
3.7.6
Creating a New Inventory Item (Wristband)
This sub-section explains how to create a wristband item for the Point of Sale system.
NOTE: It is important that inventory, categories, sub-categories, tax tables, unit
types, locations, and vendors be setup before any inventory items are made. This
will save a lot of time in setting up the Point of Sale system.
1.
Make sure that the Point of Sale menu is visible at the Ideal FEC Back Office Suite screen.
© 1997 - 2005 Ideal Software Systems, Inc.
198
Point of Sale
2.
Select Inventory | Create Inventory (Figure 3-52).
3.
The Create New Inventory Item window will open. Make sure that Wristband is selected under Item
Type.
Figure 3-66. The Create New Inventory Item window with Wristband Type selected
Make sure Wristband is selected under Item Type.
4.
Enter the information for the ticket inventory item.
A.
Item Number
Enter a number for this inventory item.
i.
Auto-Assign Inventory Number
Check this option if the inventory item is to be assigned a number by the Point of Sale
system.
TIP: The Auto-Assign Inventory Number option is checked by default. It is
recommended that each category gets its own range of inventory numbers. (Food
= 1 to 999, Golf = 1000 to 1999, etc.) This will make managing hundreds of
inventory items simpler.
B.
Retail Sale Price
Enter how much the item will be sold for.
C.
Description
Enter the name of the inventory item.
TIP: The Description field for an inventory should be unique to that item. This
will make searching for items easier than depending on searching for them by
their unique item number.
D.
Category
© 1997 - 2005 Ideal Software Systems, Inc.
Chapter 3 - Inventory Setup and Features
199
Click the drop down arrow and select a category for the item.
E.
Sub-Category
If the item needs a sub-category, click the drop down arrow and select one.
F.
Tax Type
Select a tax type after the clicking the drop down arrow.
G.
Vendor
If the inventory item has a vendor, click the drop down arrow and select one.
H.
Edit Vendor
Click this button to edit the item's vendor. Refer to sub-section "Editing a Vendor Through an
Inventory Item" for more information.
I.
Barcode
If barcodes are used, enter the barcode number for the item.
TIP: If the item already has a barcode, the user may scan the barcode on the item
while the cursor is in the Barcode field of the inventory item and input item
original barcode into the system. The original barcode will now be recognized by
the system as that inventory item whenever scanned.
J.
Active
Select this option if the inventory item is going to be actively for sale. Unselect this option to
deactivate the item. This option is selected by default.
K.
Right Level Required
Enter a number 0 through 5 of the right level required by the employee to sell the inventory
item.
NOTE: If a number other than 0 through 5 is entered in the Right Level
Required field then an error will result. To change an employee rights level so
that they can sell items with a level higher than 0, refer back to Chapter 2 section
"Entering Employees and Employee Groups".
L.
Service Printer (Figure 3-53)
i.
Service Printer 1
Select this option to print to a printer recognized as Service Printer 1.
ii.
Service Printer 2
Select this option to print to a printer recognized as Service Printer 2.
iii.
Service Printer 3
Select this option to print to a printer recognized as Service Printer 3.
iv.
Service Printer 4
Select this option to print to a printer recognized as Service Printer 4.
NOTE: A service printer must be networked into the Ideal system network and
setup under the printer properties in the Point of Sale program in order for
inventory item information to be printed to a kitchen or service printer.
M.
Item Script (Figure 3-54)
© 1997 - 2005 Ideal Software Systems, Inc.
200
Point of Sale
i.
Script Filename
Select a script that will be printed upon the item's purchase (if the item requires that
something be printed other than the receipt.)
NOTE: The script chosen will be printed in addition to any other ticket,
wristband, or score card.
ii.
Print Location
a.
None
The select script will not be printed upon the item's purchase.
b.
Ticket Printer
The script will be printed to a designated ticket printer upon the sale of the
item.
c.
Wristband Printer
The script will print on a wristband when the item is sold.
d.
Receipt Printer
The script will print on the receipt printer local to the terminal when the item
is purchased.
e.
Golf Scorecard Printer
The script will print on a scorecard.
iii.
Script
Click the down arrow and select a item script to use.
iv.
Create
Click this button to create a item script.
v.
Edit
Edit a script in the default word processor.
NOTE: For further information on creating and editing scripts, refer to the "Item
Scripts" section.
N.
Discounts
This tab (Figure 3-101) will display any discounts that have been applied to the item. Also,
Price Schedule is on this tab. Refer to sub-section "Adding a Price Schedule".
O.
Coupon Info (Figure 3-57)
In order for a cashier to scan a coupon provided by a customer, Point of Sale will require that
the customer's order contain the inventory item that the coupon is linked to in this tab.
i.
Setup Required Items
Click this button to open the Inventory Required in Order window (Figure 3-58).
a.
Add Item
Click this button to open the Select Inventory Item window (Figure 3-59).
Select an item required for the coupon and click OK.
b.
Remove Item
Select and item to be removed from the required item for coupon list and
click this button to remove it.
© 1997 - 2005 Ideal Software Systems, Inc.
Chapter 3 - Inventory Setup and Features
P.
201
Order/Stocking Rules
This tab (Figure 3-102) allows the manager and owner to define specific rules about ording
from vendors and stocking inventory that apply to the item. Refer to section "Order/Stocking
Rules".
5.
Click OK once the item is finished. The item will now be saved in the Point of Sale system.
6.
The Confirm window will appear (Figure 3-60). Click Yes to create another item. Otherwise click No
to return to the Ideal FEC Back Office Suite screen.
3.7.7
Creating a New Inventory Item (Token)
This sub-section explains how to create a token item for the Point of Sale system.
NOTE: It is important that inventory, categories, sub-categories, tax tables, unit
types, locations, and vendors be setup before any inventory items are made. This
will save a lot of time in setting up the Point of Sale system.
1.
Make sure that the Point of Sale menu is visible at the Ideal FEC Back Office Suite screen.
2.
Select Inventory | Create Inventory (Figure3-52).
3.
The Create New Inventory Item window will open. Make sure that Token is selected under Item
Type.
Figure 3-67. The Create New Inventory Item window with Token Type selected
Make sure Token is selected under Item Type.
4.
Enter the information for the ticket inventory item.
© 1997 - 2005 Ideal Software Systems, Inc.
202
Point of Sale
A.
Item Number
Enter a number for this inventory item.
i.
Auto-Assign Inventory Number
Check this option if the inventory item is to be assigned a number by the Point of Sale
system.
TIP: The Auto-Assign Inventory Number option is checked by default. It is
recommended that each category gets its own range of inventory numbers. (Food
= 1 to 999, Golf = 1000 to 1999, etc.) This will make managing hundreds of
inventory items simpler.
B.
Retail Sale Price
Enter how much the item will be sold for.
C.
Description
Enter the name of the inventory item.
TIP: The Description field for an inventory should be unique to that item. This
will make searching for items easier than depending on searching for them by
their unique item number.
D.
Category
Click the drop down arrow and select a category for the item.
E.
Sub-Category
If the item needs a sub-category, click the drop down arrow and select one.
F.
Tax Type
Select a tax type after the clicking the drop down arrow.
G.
Vendor
If the inventory item has a vendor, click the drop down arrow and select one.
H.
Edit Vendor
Click this button to edit the item's vendor. Refer to sub-section "Editing a Vendor Through an
Inventory Item" for more information.
I.
Barcode
If barcodes are used, enter the barcode number of the item.
TIP: If the item already has a barcode, the user may scan the barcode on the item
while the cursor is in the Barcode field of the inventory item and input item
original barcode into the system. The original barcode will now be recognized by
the system as that inventory item whenever scanned.
J.
Active
Select this option if the inventory item is going to be actively for sale. Unselect this option to
deactivate the item. This option is selected by default.
K.
Right Level Required
Enter a number 0 through 5 of the right level required by the employee to sell the inventory
item.
© 1997 - 2005 Ideal Software Systems, Inc.
Chapter 3 - Inventory Setup and Features
203
NOTE: If a number other than 0 through 5 is entered in the Right Level
Required field then an error will result. To change an employee rights level so
that they can sell items with a level higher than 0, refer back to Chapter 2 section
"Entering Employees and Employee Groups".
L.
Service Printer (Figure 3-53)
i.
Service Printer 1
Select this option to print to a printer recognized as Service Printer 1.
ii.
Service Printer 2
Select this option to print to a printer recognized as Service Printer 2.
iii.
Service Printer 3
Select this option to print to a printer recognized as Service Printer 3.
iv.
Service Printer 4
Select this option to print to a printer recognized as Service Printer 4.
NOTE: A service printer must be networked into the Ideal system network and
setup under the printer properties in the Point of Sale program in order for
inventory item information to be printed to a kitchen or service printer.
M.
Item Script (Figure 3-54)
i.
Script Filename
Select a script that will be printed upon the item's purchase (if the item requires that
something be printed other than the receipt.)
NOTE: The script chosen will be printed in addition to any other ticket,
wristband, or score card.
ii.
Print Location
a.
None
The select script will not be printed upon the item's purchase.
b.
Ticket Printer
The script will be printed to a designated ticket printer upon the sale of the
item.
c.
Wristband Printer
The script will print on a wristband when the item is sold.
d.
Receipt Printer
The script will print on the receipt printer local to the terminal when the item
is purchased.
e.
Golf Scorecard Printer
The script will print on a scorecard.
iii.
Script
Click the down arrow and select a item script to use.
iv.
Create
Click this button to create a item script.
© 1997 - 2005 Ideal Software Systems, Inc.
204
Point of Sale
v.
Edit
Edit a script in the default word processor.
NOTE: For further information on creating and editing scripts, refer to the "Item
Scripts" section.
N.
Discounts
This tab (Figure 3-101) will display any discounts that have been applied to the item. Also,
Price Schedule is on this tab. Refer to sub-section "Adding a Price Schedule".
O.
Coupon Info (Figure 3-57)
In order for a cashier to scan a coupon provided by a customer, Point of Sale will require that
the customer's order contain the inventory item that the coupon is linked to in this tab.
i.
P.
Setup Required Items
Click this button to open the Inventory Required in Order window (Figure 3-58).
a.
Add Item
Click this button to open the Select Inventory Item window (Figure 3-59).
Select an item required for the coupon and click OK.
b.
Remove Item
Select and item to be removed from the required item for coupon list and
click this button to remove it.
Order/Stocking Rules
This tab (Figure 3-102) allows the manager and owner to define specific rules about ording
from vendors and stocking inventory that apply to the item. Refer to section "Order/Stocking
Rules".
5.
Click OK once the item is finished. The item will now be saved in the Point of Sale system.
6.
The Confirm window will appear (Figure 3-60). Click Yes to create another item. Otherwise click No
to return to the Ideal FEC Back Office Suite screen.
3.7.8
Creating a New Inventory Item (Dispense Tkt A)
This sub-section explains how to create a dispense ticket A item for the Point of Sale system.
NOTE: It is important that inventory, categories, sub-categories, tax tables, unit
types, locations, and vendors be setup before any inventory items are made. This
will save a lot of time in setting up the Point of Sale system.
1.
Make sure that the Point of Sale menu is visible at the Ideal FEC Back Office Suite screen.
2.
Select Inventory | Create Inventory (Figure 3-52).
3.
The Create New Inventory Item window will open. Make sure that Dispense Tkt A is selected under
Item Type.
© 1997 - 2005 Ideal Software Systems, Inc.
Chapter 3 - Inventory Setup and Features
205
Figure 3-68. The Create New Inventory Item window with Dispense Tkt A Type selected
Make sure Dispense Tkt A is selected under Item Type.
4.
Enter the information for the ticket inventory item.
A.
Item Number
Enter a number for this inventory item.
i.
Auto-Assign Inventory Number
Check this option if the inventory item is to be assigned a number by the Point of Sale
system.
TIP: The Auto-Assign Inventory Number option is checked by default. It is
recommended that each category gets its own range of inventory numbers. (Food
= 1 to 999, Golf = 1000 to 1999, etc.) This will make managing hundreds of
inventory items simpler.
B.
Retail Sale Price
Enter how much the item will be sold for.
C.
Description
Enter the name of the inventory item.
TIP: The Description field for an inventory should be unique to that item. This
will make searching for items easier than depending on searching for them by
their unique item number.
D.
Category
Click the drop down arrow and select a category for the item.
E.
Sub-Category
If the item needs a sub-category, click the drop down arrow and select one.
© 1997 - 2005 Ideal Software Systems, Inc.
206
Point of Sale
F.
Tax Type
Select a tax type after the clicking the drop down arrow.
G.
Vendor
If the inventory item has a vendor, click the drop down arrow and select one.
H.
Edit Vendor
Click this button to edit the item's vendor. Refer to sub-section "Editing a Vendor Through an
Inventory Item" for more information.
I.
Barcode
If barcodes are used, enter the barcode number of the item.
TIP: If the item already has a barcode, the user may scan the barcode on the item
while the cursor is in the Barcode field of the inventory item and input item
original barcode into the system. The original barcode will now be recognized by
the system as that inventory item whenever scanned.
J.
Active
Select this option if the inventory item is going to be actively for sale. Unselect this option to
deactivate the item. This option is selected by default.
K.
Right Level Required
Enter a number 0 through 5 of the right level required by the employee to sell the inventory
item.
NOTE: If a number other than 0 through 5 is entered in the Right Level
Required field then an error will result. To change an employee rights level so
that they can sell items with a level higher than 0, refer back to Chapter 2 section
"Entering Employees and Employee Groups".
L.
Service Printer (Figure 3-53)
i.
Service Printer 1
Select this option to print to a printer recognized as Service Printer 1.
ii.
Service Printer 2
Select this option to print to a printer recognized as Service Printer 2.
iii.
Service Printer 3
Select this option to print to a printer recognized as Service Printer 3.
iv.
Service Printer 4
Select this option to print to a printer recognized as Service Printer 4.
NOTE: A service printer must be networked into the Ideal system network and
setup under the printer properties in the Point of Sale program in order for
inventory item information to be printed to a kitchen or service printer.
M.
Item Script (Figure 3-54)
i.
Script Filename
Select a script that will be printed upon the item's purchase (if the item requires that
something be printed other than the receipt.)
© 1997 - 2005 Ideal Software Systems, Inc.
Chapter 3 - Inventory Setup and Features
207
NOTE: The script chosen will be printed in addition to any other ticket,
wristband, or score card.
ii.
Print Location
a.
None
The select script will not be printed upon the item's purchase.
b.
Ticket Printer
The script will be printed to a designated ticket printer upon the sale of the
item.
c.
Wristband Printer
The script will print on a wristband when the item is sold.
d.
Receipt Printer
The script will print on the receipt printer local to the terminal when the item
is purchased.
e.
Golf Scorecard Printer
The script will print on a scorecard.
iii.
Script
Click the down arrow and select a item script to use.
iv.
Create
Click this button to create a item script.
v.
Edit
Edit a script in the default word processor.
NOTE: For further information on creating and editing scripts, refer to the "Item
Scripts" section.
N.
Discounts
This tab (Figure 3-101) will display any discounts that have been applied to the item. Also,
Price Schedule is on this tab. Refer to sub-section "Adding a Price Schedule".
O.
Coupon Info (Figure 3-57)
In order for a cashier to scan a coupon provided by a customer, Point of Sale will require that
the customer's order contain the inventory item that the coupon is linked to in this tab.
i.
P.
Setup Required Items
Click this button to open the Inventory Required in Order window (Figure 3-58).
a.
Add Item
Click this button to open the Select Inventory Item window (Figure 3-59).
Select an item required for the coupon and click OK.
b.
Remove Item
Select and item to be removed from the required item for coupon list and
click this button to remove it.
Order/Stocking Rules
This tab (Figure 3-102) allows the manager and owner to define specific rules about ording
from vendors and stocking inventory that apply to the item. Refer to section "Order/Stocking
© 1997 - 2005 Ideal Software Systems, Inc.
208
Point of Sale
Rules".
5.
Click OK once the item is finished. The item will now be saved in the Point of Sale system.
6.
The Confirm window will appear (Figure 3-60). Click Yes to create another item. Otherwise click No
to return to the Ideal FEC Back Office Suite screen.
3.7.9
Creating a New Inventory Item (Dispense Tkt B)
This sub-section explains how to create a dispense ticket B item for the Point of Sale system.
NOTE: It is important that inventory, categories, sub-categories, tax tables, unit
types, locations, and vendors be setup before any inventory items are made. This
will save a lot of time in setting up the Point of Sale system.
1.
Make sure that the Point of Sale menu is visible at the Ideal FEC Back Office Suite screen.
2.
Select Inventory | Create Inventory (Figure 3-52).
3.
The Create New Inventory Item window will open. Make sure that Dispense Tkt B is selected
under Item Type.
Figure 3-69. The Create New Inventory Item window with Dispense Tkt B Type selected
Make sure Dispense Tkt B is selected under Item Type.
4.
Enter the information for the ticket inventory item.
A.
Item Number
Enter a number for this inventory item.
© 1997 - 2005 Ideal Software Systems, Inc.
Chapter 3 - Inventory Setup and Features
i.
209
Auto-Assign Inventory Number
Check this option if the inventory item is to be assigned a number by the Point of Sale
system.
TIP: The Auto-Assign Inventory Number option is checked by default. It is
recommended that each category gets its own range of inventory numbers. (Food
= 1 to 999, Golf = 1000 to 1999, etc.) This will make managing hundreds of
inventory items simpler.
B.
Retail Sale Price
Enter how much the item will be sold for.
C.
Description
Enter the name of the inventory item.
TIP: The Description field for an inventory should be unique to that item. This
will make searching for items easier than depending on searching for them by
their unique item number.
D.
Category
Click the drop down arrow and select a category for the item.
E.
Sub-Category
If the item needs a sub-category, click the drop down arrow and select one.
F.
Tax Type
Select a tax type after the clicking the drop down arrow.
G.
Vendor
If the inventory item has a vendor, click the drop down arrow and select one.
H.
Edit Vendor
Click this button to edit the item's vendor. Refer to sub-section "Editing a Vendor Through an
Inventory Item" for more information.
I.
Barcode
If barcodes are used, enter the barcode number of the item.
TIP: If the item already has a barcode, the user may scan the barcode on the item
while the cursor is in the Barcode field of the inventory item and input item
original barcode into the system. The original barcode will now be recognized by
the system as that inventory item whenever scanned.
J.
Active
Select this option if the inventory item is going to be actively for sale. Unselect this option to
deactivate the item. This option is selected by default.
K.
Right Level Required
Enter a number 0 through 5 of the right level required by the employee to sell the inventory
item.
NOTE: If a number other than 0 through 5 is entered in the Right Level
Required field then an error will result. To change an employee rights level so
that they can sell items with a level higher than 0, refer back to Chapter 2 section
"Entering Employees and Employee Groups".
© 1997 - 2005 Ideal Software Systems, Inc.
210
Point of Sale
L.
Service Printer (Figure 3-53)
i.
Service Printer 1
Select this option to print to a printer recognized as Service Printer 1.
ii.
Service Printer 2
Select this option to print to a printer recognized as Service Printer 2.
iii.
Service Printer 3
Select this option to print to a printer recognized as Service Printer 3.
iv.
Service Printer 4
Select this option to print to a printer recognized as Service Printer 4.
NOTE: A service printer must be networked into the Ideal system network and
setup under the printer properties in the Point of Sale program in order for
inventory item information to be printed to a kitchen or service printer.
M.
Item Script (Figure 3-54)
i.
Script Filename
Select a script that will be printed upon the item's purchase (if the item requires that
something be printed other than the receipt.)
NOTE: The script chosen will be printed in addition to any other ticket,
wristband, or score card.
ii.
Print Location
a.
None
The select script will not be printed upon the item's purchase.
b.
Ticket Printer
The script will be printed to a designated ticket printer upon the sale of the
item.
c.
Wristband Printer
The script will print on a wristband when the item is sold.
d.
Receipt Printer
The script will print on the receipt printer local to the terminal when the item
is purchased.
e.
Golf Scorecard Printer
The script will print on a scorecard.
iii.
Script
Click the down arrow and select a item script to use.
iv.
Create
Click this button to create a item script.
v.
Edit
Edit a script in the default word processor.
© 1997 - 2005 Ideal Software Systems, Inc.
Chapter 3 - Inventory Setup and Features
211
NOTE: For further information on creating and editing scripts, refer to the "Item
Scripts" section.
N.
Discounts
This tab (Figure 3-101) will display any discounts that have been applied to the item. Also,
Price Schedule is on this tab. Refer to sub-section "Adding a Price Schedule".
O.
Coupon Info (Figure 3-57)
In order for a cashier to scan a coupon provided by a customer, Point of Sale will require that
the customer's order contain the inventory item that the coupon is linked to in this tab.
i.
P.
Setup Required Items
Click this button to open the Inventory Required in Order window (Figure 3-58).
a.
Add Item
Click this button to open the Select Inventory Item window (Figure 3-59).
Select an item required for the coupon and click OK.
b.
Remove Item
Select and item to be removed from the required item for coupon list and
click this button to remove it.
Order/Stocking Rules
This tab (Figure 3-102) allows the manager and owner to define specific rules about ording
from vendors and stocking inventory that apply to the item. Refer to section "Order/Stocking
Rules".
5.
Click OK once the item is finished. The item will now be saved in the Point of Sale system.
6.
The Confirm window will appear (Figure 3-60). Click Yes to create another item. Otherwise click No
to return to the Ideal FEC Back Office Suite screen.
3.7.10
Creating a New Inventory Item (Dispense Tkt C)
This sub-section explains how to create a dispense ticket C item for the Point of Sale system.
NOTE: It is important that inventory, categories, sub-categories, tax tables, unit
types, locations, and vendors be setup before any inventory items are made. This
will save a lot of time in setting up the Point of Sale system.
1.
Make sure that the Point of Sale menu is visible at the Ideal FEC Back Office Suite screen.
2.
Select the Inventory | Create Inventory (Figure 3-52).
3.
The Create New Inventory Item window will open. Make sure that Dispense Tkt C is selected under
Item Type.
© 1997 - 2005 Ideal Software Systems, Inc.
212
Point of Sale
Figure 3-70. The Create New Inventory Item window with Dispense Tkt C Type selected
Make sure Dispense Tkt C is selected under Item Type.
4.
Enter the information for the ticket inventory item.
A.
Item Number
Enter a number for this inventory item.
i.
Auto-Assign Inventory Number
Check this option if the inventory item is to be assigned a number by the Point of Sale
system.
TIP: The Auto-Assign Inventory Number option is checked by default. It is
recommended that each category gets its own range of inventory numbers. (Food
= 1 to 999, Golf = 1000 to 1999, etc.) This will make managing hundreds of
inventory items simpler.
B.
Retail Sale Price
Enter how much the item will be sold for.
C.
Description
Enter the name of the inventory item.
TIP: The Description field for an inventory should be unique to that item. This
will make searching for items easier than depending on searching for them by
their unique item number.
D.
Category
Click the drop down arrow and select a category for the item.
E.
Sub-Category
If the item needs a sub-category, click the drop down arrow and select one.
© 1997 - 2005 Ideal Software Systems, Inc.
Chapter 3 - Inventory Setup and Features
213
F.
Tax Type
Select a tax type after the clicking the drop down arrow.
G.
Vendor
If the inventory item has a vendor, click the drop down arrow and select one.
H.
Edit Vendor
Click this button to edit the item's vendor. Refer to sub-section "Editing a Vendor Through an
Inventory Item" for more information.
I.
Barcode
If barcodes are used, enter barcode number of the item.
TIP: If the item already has a barcode, the user may scan the barcode on the item
while the cursor is in the Barcode field of the inventory item and input item
original barcode into the system. The original barcode will now be recognized by
the system as that inventory item whenever scanned.
J.
Active
Select this option if the inventory item is going to be actively for sale. Unselect this option to
deactivate the item. This option is selected by default.
K.
Right Level Required
Enter a number 0 through 5 of the right level required by the employee to sell the inventory
item.
NOTE: If a number other than 0 through 5 is entered in the Right Level
Required field then an error will result. To change an employee rights level so
that they can sell items with a level higher than 0, refer back to Chapter 2 section
"Entering Employees and Employee Groups".
L.
Service Printer (Figure 3-53)
i.
Service Printer 1
Select this option to print to a printer recognized as Service Printer 1.
ii.
Service Printer 2
Select this option to print to a printer recognized as Service Printer 2.
iii.
Service Printer 3
Select this option to print to a printer recognized as Service Printer 3.
iv.
Service Printer 4
Select this option to print to a printer recognized as Service Printer 4.
NOTE: A service printer must be networked into the Ideal system network and
setup under the printer properties in the Point of Sale program in order for
inventory item information to be printed to a kitchen or service printer.
M.
Item Script (Figure 3-54)
i.
Script Filename
Select a script that will be printed upon the item's purchase (if the item requires that
something be printed other than the receipt.)
© 1997 - 2005 Ideal Software Systems, Inc.
214
Point of Sale
NOTE: The script chosen will be printed in addition to any other ticket,
wristband, or score card.
ii.
Print Location
a.
None
The select script will not be printed upon the item's purchase.
b.
Ticket Printer
The script will be printed to a designated ticket printer upon the sale of the
item.
c.
Wristband Printer
The script will print on a wristband when the item is sold.
d.
Receipt Printer
The script will print on the receipt printer local to the terminal when the item
is purchased.
e.
Golf Scorecard Printer
The script will print on a scorecard.
iii.
Script
Click the down arrow and select a item script to use.
iv.
Create
Click this button to create a item script.
v.
Edit
Edit a script in the default word processor.
NOTE: For further information on creating and editing scripts, refer to the "Item
Scripts" section.
N.
Discounts
This tab (Figure 3-101) will display any discounts that have been applied to the item. Also,
Price Schedule is on this tab. Refer to sub-section "Adding a Price Schedule".
O.
Coupon Info (Figure 3-57)
In order for a cashier to scan a coupon provided by a customer, Point of Sale will require that
the customer's order contain the inventory item that the coupon is linked to in this tab.
i.
P.
Setup Required Items
Click this button to open the Inventory Required in Order window (Figure 3-58).
a.
Add Item
Click this button to open the Select Inventory Item window (Figure 3-59).
Select an item required for the coupon and click OK.
b.
Remove Item
Select and item to be removed from the required item for coupon list and
click this button to remove it.
Order/Stocking Rules
This tab (Figure 3-102) allows the manager and owner to define specific rules about ording
from vendors and stocking inventory that apply to the item. Refer to section "Order/Stocking
© 1997 - 2005 Ideal Software Systems, Inc.
Chapter 3 - Inventory Setup and Features
215
Rules".
5.
Click OK once the item is finished. The item will now be saved in the Point of Sale system.
6.
The Confirm window will appear (Figure 3-60). Click Yes to create another item. Otherwise click No
to return to the Ideal FEC Back Office Suite screen.
3.7.11
Creating a New Inventory Item (Customer Required Item)
This sub-section explains how to create a customer required item for the Point of Sale system.
NOTE: It is important that inventory, categories, sub-categories, tax tables, unit
types, locations, and vendors be setup before any inventory items are made. This
will save a lot of time in setting up the Point of Sale system.
1.
Make sure that the Point of Sale menu is visible at the Ideal FEC Back Office Suite screen.
2.
Select Inventory | Create Inventory (Figure 3-52).
3.
The Create New Inventory Item window will open. Make sure that Customer Required Item is
selected under Item Type.
Figure 3-71. The Create New Inventory Item window with Customer Required Item selected
Make sure Customer Required Item is selected under Item Type.
4.
Enter the information for the ticket inventory item.
A.
Item Number
Enter a number for this inventory item.
© 1997 - 2005 Ideal Software Systems, Inc.
216
Point of Sale
i.
Auto-Assign Inventory Number
Check this option if the inventory item is to be assigned a number by the Point of Sale
system.
TIP: The Auto-Assign Inventory Number option is checked by default. It is
recommended that each category gets its own range of inventory numbers. (Food
= 1 to 999, Golf = 1000 to 1999, etc.) This will make managing hundreds of
inventory items simpler.
B.
Retail Sale Price
Enter how much the item will be sold for.
C.
Description
Enter the name of the inventory item.
TIP: The Description field for an inventory should be unique to that item. This
will make searching for items easier than depending on searching for them by
their unique item number.
D.
Category
Click the drop down arrow and select a category for the item.
E.
Sub-Category
If the item needs a sub-category, click the drop down arrow and select one.
F.
Tax Type
Select a tax type after the clicking the drop down arrow.
G.
Vendor
If the inventory item has a vendor, click the drop down arrow and select one.
H.
Edit Vendor
Click this button to edit the item's vendor. Refer to sub-section "Editing a Vendor Through an
Inventory Item" for more information.
I.
Barcode
If barcodes are used, enter the barcode number of the item.
TIP: If the item already has a barcode, the user may scan the barcode on the item
while the cursor is in the Barcode field of the inventory item and input item
original barcode into the system. The original barcode will now be recognized by
the system as that inventory item whenever scanned.
J.
Active
Select this option if the inventory item is going to be actively for sale. Unselect this option to
deactivate the item. This option is selected by default.
K.
Right Level Required
Enter a number 0 through 5 of the right level required by the employee to sell the inventory
item.
NOTE: If a number other than 0 through 5 is entered in the Right Level
Required field then an error will result. To change an employee rights level so
that they can sell items with a level higher than 0, refer back to Chapter 2 section
"Entering Employees and Employee Groups".
© 1997 - 2005 Ideal Software Systems, Inc.
Chapter 3 - Inventory Setup and Features
L.
217
Service Printer (Figure 3-53)
i.
Service Printer 1
Select this option to print to a printer recognized as Service Printer 1.
ii.
Service Printer 2
Select this option to print to a printer recognized as Service Printer 2.
iii.
Service Printer 3
Select this option to print to a printer recognized as Service Printer 3.
iv.
Service Printer 4
Select this option to print to a printer recognized as Service Printer 4.
NOTE: A service printer must be networked into the Ideal system network and
setup under the printer properties in the Point of Sale program in order for
inventory item information to be printed to a kitchen or service printer.
M.
Item Script (Figure 3-54)
i.
Script Filename
Select a script that will be printed upon the item's purchase (if the item requires that
something be printed other than the receipt.)
NOTE: The script chosen will be printed in addition to any other ticket,
wristband, or score card.
ii.
Print Location
a.
None
The select script will not be printed upon the item's purchase.
b.
Ticket Printer
The script will be printed to a designated ticket printer upon the sale of the
item.
c.
Wristband Printer
The script will print on a wristband when the item is sold.
d.
Receipt Printer
The script will print on the receipt printer local to the terminal when the item
is purchased.
e.
Golf Scorecard Printer
The script will print on a scorecard.
iii.
Script
Click the down arrow and select a item script to use.
iv.
Create
Click this button to create a item script.
v.
Edit
Edit a script in the default word processor.
© 1997 - 2005 Ideal Software Systems, Inc.
218
Point of Sale
NOTE: For further information on creating and editing scripts, refer to the "Item
Scripts" section.
N.
Discounts
This tab (Figure 3-101) will display any discounts that have been applied to the item. Also,
Price Schedule is on this tab. Refer to sub-section "Adding a Price Schedule".
O.
Coupon Info (Figure 3-57)
In order for a cashier to scan a coupon provided by a customer, Point of Sale will require that
the customer's order contain the inventory item that the coupon is linked to in this tab.
i.
P.
Setup Required Items
Click this button to open the Inventory Required in Order window (Figure 3-58).
a.
Add Item
Click this button to open the Select Inventory Item window (Figure 3-59).
Select an item required for the coupon and click OK.
b.
Remove Item
Select and item to be removed from the required item for coupon list and
click this button to remove it.
Order/Stocking Rules
This tab (Figure 3-102) allows the manager and owner to define specific rules about ording
from vendors and stocking inventory that apply to the item. Refer to section "Order/Stocking
Rules".
5.
Click OK once the item is finished. The item will now be saved in the Point of Sale system.
6.
The Confirm window will appear (Figure 3-60). Click Yes to create another item. Otherwise click No
to return to the Ideal FEC Back Office Suite screen.
3.7.12
Creating a New Inventory Item (Mini-Golf Score Card)
This sub-section explains how to create a golf score card item for the Point of Sale system.
NOTE: It is important that inventory, categories, sub-categories, tax tables, unit
types, locations, and vendors be setup before any inventory items are made. This
will save a lot of time in setting up the Point of Sale system.
1.
Make sure that the Point of Sale menu is visible at the Ideal FEC Back Office Suite screen.
2.
Select Inventory | Create Inventory (Figure 3-52).
3.
The Create New Inventory Item window will open. Make sure that Mini-Golf Score Card is selected
under Item Type.
© 1997 - 2005 Ideal Software Systems, Inc.
Chapter 3 - Inventory Setup and Features
219
Figure 3-72. The Create New Inventory Item window with Mini-Golf Score Card selected
Make sure Mini-Golf Score Card is selected under Item Type.
4.
Enter the information for the ticket inventory item.
A.
Item Number
Enter a number for this inventory item.
i.
Auto-Assign Inventory Number
Check this option if the inventory item is to be assigned a number by the Point of Sale
system.
TIP: The Auto-Assign Inventory Number option is checked by default. It is
recommended that each category gets its own range of inventory numbers. (Food
= 1 to 999, Golf = 1000 to 1999, etc.) This will make managing hundreds of
inventory items simpler.
B.
Retail Sale Price
Enter how much the item will be sold for.
C.
Description
Enter the name of the inventory item.
TIP: The Description field for an inventory should be unique to that item. This
will make searching for items easier than depending on searching for them by
their unique item number.
D.
Category
Click the drop down arrow and select a category for the item.
E.
Sub-Category
If the item needs a sub-category, click the drop down arrow and select one.
© 1997 - 2005 Ideal Software Systems, Inc.
220
Point of Sale
F.
Tax Type
Select a tax type after the clicking the drop down arrow.
G.
Vendor
If the inventory item has a vendor, click the drop down arrow and select one.
H.
Edit Vendor
Click this button to edit the item's vendor. Refer to sub-section "Editing a Vendor Through an
Inventory Item" for more information.
I.
Barcode
If barcodes are used, enter the barcode number of the item.
TIP: If the item already has a barcode, the user may scan the barcode on the item
while the cursor is in the Barcode field of the inventory item and input item
original barcode into the system. The original barcode will now be recognized by
the system as that inventory item whenever scanned.
J.
Active
Select this option if the inventory item is going to be actively for sale. Unselect this option to
deactivate the item. This option is selected by default.
K.
Right Level Required
Enter a number 0 through 5 of the right level required by the employee to sell the inventory
item.
NOTE: If a number other than 0 through 5 is entered in the Right Level
Required field then an error will result. To change an employee rights level so
that they can sell items with a level higher than 0, refer back to Chapter 2 section
"Entering Employees and Employee Groups".
L.
Service Printer (Figure 3-52)
i.
Service Printer 1
Select this option to print to a printer recognized as Service Printer 1.
ii.
Service Printer 2
Select this option to print to a printer recognized as Service Printer 2.
iii.
Service Printer 3
Select this option to print to a printer recognized as Service Printer 3.
iv.
Service Printer 4
Select this option to print to a printer recognized as Service Printer 4.
NOTE: A service printer must be networked into the Ideal system network and
setup under the printer properties in the Point of Sale program in order for
inventory item information to be printed to a kitchen or service printer.
M.
Item Script (Figure 3-54)
i.
Script Filename
Select a script that will be printed upon the item's purchase (if the item requires that
something be printed other than the receipt.)
© 1997 - 2005 Ideal Software Systems, Inc.
Chapter 3 - Inventory Setup and Features
221
NOTE: The script chosen will be printed in addition to any other ticket,
wristband, or score card.
ii.
Print Location
a.
None
The select script will not be printed upon the item's purchase.
b.
Ticket Printer
The script will be printed to a designated ticket printer upon the sale of the
item.
c.
Wristband Printer
The script will print on a wristband when the item is sold.
d.
Receipt Printer
The script will print on the receipt printer local to the terminal when the item
is purchased.
e.
Golf Scorecard Printer
The script will print on a scorecard.
iii.
Script
Click the down arrow and select a item script to use.
iv.
Create
Click this button to create a item script.
v.
Edit
Edit a script in the default word processor.
NOTE: For further information on creating and editing scripts, refer to the "Item
Scripts" section.
N.
Discounts
This tab (Figure 3-101) will display any discounts that have been applied to the item. Also,
Price Schedule is on this tab. Refer to sub-section "Adding a Price Schedule".
O.
Coupon Info (Figure 3-57)
In order for a cashier to scan a coupon provided by a customer, Point of Sale will require that
the customer's order contain the inventory item that the coupon is linked to in this tab.
i.
P.
Setup Required Items
Click this button to open the Inventory Required in Order window (Figure 3-58).
a.
Add Item
Click this button to open the Select Inventory Item window (Figure 3-59).
Select an item required for the coupon and click OK.
b.
Remove Item
Select and item to be removed from the required item for coupon list and
click this button to remove it.
Order/Stocking Rules
This tab (Figure 3-102) allows the manager and owner to define specific rules about ording
from vendors and stocking inventory that apply to the item. Refer to section "Order/Stocking
© 1997 - 2005 Ideal Software Systems, Inc.
222
Point of Sale
Rules".
5.
Click OK once the item is finished. The item will now be saved in the Point of Sale system.
6.
The Confirm window will appear (Figure 3-60). Click Yes to create another item. Otherwise click No
to return to the Ideal FEC Back Office Suite screen.
3.7.13
Creating a New Inventory Item (Coupon)
This sub-section explains how to create a coupon item for the Point of Sale system.
NOTE: It is important that inventory, categories, sub-categories, tax tables, unit
types, locations, and vendors be setup before any inventory items are made. This
will save a lot of time in setting up the Point of Sale system.
1.
Make sure that the Point of Sale menu is visible at the Ideal FEC Back Office Suite screen.
2.
Select Inventory | Create Inventory (Figure 3-52).
3.
The Create New Inventory Item window will open. Make sure that Coupon is selected under
Item Type.
Figure 3-73. The Create New Inventory Item window with Coupon selected
Make sure Coupon is selected under Item Type.
4.
Enter the information for the ticket inventory item.
A.
Item Number
Enter a number for this inventory item.
© 1997 - 2005 Ideal Software Systems, Inc.
Chapter 3 - Inventory Setup and Features
i.
223
Auto-Assign Inventory Number
Check this option if the inventory item is to be assigned a number by the Point of Sale
system.
TIP: The Auto-Assign Inventory Number option is checked by default. It is
recommended that each category gets its own range of inventory numbers. (Food
= 1 to 999, Golf = 1000 to 1999, etc.) This will make managing hundreds of
inventory items simpler.
B.
Retail Sale Price
Enter how much the item will be sold for.
C.
Description
Enter the name of the inventory item.
TIP: The Description field for an inventory should be unique to that item. This
will make searching for items easier than depending on searching for them by
their unique item number.
D.
Category
Click the drop down arrow and select a category for the item.
E.
Sub-Category
If the item needs a sub-category, click the drop down arrow and select one.
F.
Tax Type
Select a tax type after the clicking the drop down arrow.
G.
Vendor
If the inventory item has a vendor, click the drop down arrow and select one.
H.
Edit Vendor
Click this button to edit the item's vendor. Refer to sub-section "Editing a Vendor Through an
Inventory Item" for more information.
I.
Barcode
If barcodes are used, enter the barcode number of the item.
TIP: If the item already has a barcode, the user may scan the barcode on the item
while the cursor is in the Barcode field of the inventory item and input item
original barcode into the system. The original barcode will now be recognized by
the system as that inventory item whenever scanned.
J.
Active
Select this option if the inventory item is going to be actively for sale. Unselect this option to
deactivate the item. This option is selected by default.
K.
Right Level Required
Enter a number 0 through 5 of the right level required by the employee to sell the inventory
item.
NOTE: If a number other than 0 through 5 is entered in the Right Level
Required field then an error will result. To change an employee rights level so
that they can sell items with a level higher than 0, refer back to Chapter 2 section
"Entering Employees and Employee Groups".
© 1997 - 2005 Ideal Software Systems, Inc.
224
Point of Sale
L.
Service Printer (Figure 3-53)
i.
Service Printer 1
Select this option to print to a printer recognized as Service Printer 1.
ii.
Service Printer 2
Select this option to print to a printer recognized as Service Printer 2.
iii.
Service Printer 3
Select this option to print to a printer recognized as Service Printer 3.
iv.
Service Printer 4
Select this option to print to a printer recognized as Service Printer 4.
NOTE: A service printer must be networked into the Ideal system network and
setup under the printer properties in the Point of Sale program in order for
inventory item information to be printed to a kitchen or service printer.
M.
Item Script (Figure 3-54)
i.
Script Filename
Select a script that will be printed upon the item's purchase (if the item requires that
something be printed other than the receipt.)
NOTE: The script chosen will be printed in addition to any other ticket,
wristband, or score card.
ii.
Print Location
a.
None
The select script will not be printed upon the item's purchase.
b.
Ticket Printer
The script will be printed to a designated ticket printer upon the sale of the
item.
c.
Wristband Printer
The script will print on a wristband when the item is sold.
d.
Receipt Printer
The script will print on the receipt printer local to the terminal when the item
is purchased.
e.
Golf Scorecard Printer
The script will print on a scorecard.
iii.
Script
Click the down arrow and select a item script to use.
iv.
Create
Click this button to create a item script.
v.
Edit
Edit a script in the default word processor.
© 1997 - 2005 Ideal Software Systems, Inc.
Chapter 3 - Inventory Setup and Features
225
NOTE: For further information on creating and editing scripts, refer to the "Item
Scripts" section.
N.
Discounts
This tab (Figure 3-101) will display any discounts that have been applied to the item. Also,
Price Schedule is on this tab. Refer to sub-section "Adding a Price Schedule".
O.
Coupon Info (Figure 3-57)
In order for a cashier to scan a coupon provided by a customer, Point of Sale will require that
the customer's order contain the inventory item that the coupon is linked to in this tab.
i.
P.
Setup Required Items
Click this button to open the Inventory Required in Order window (Figure 3-58).
a.
Add Item
Click this button to open the Select Inventory Item window (Figure 3-59).
Select an item required for the coupon and click OK.
b.
Remove Item
Select and item to be removed from the required item for coupon list and
click this button to remove it.
Order/Stocking Rules
This tab (Figure 3-102) allows the manager and owner to define specific rules about ording
from vendors and stocking inventory that apply to the item. Refer to section "Order/Stocking
Rules".
5.
Click OK once the item is finished. The item will now be saved in the Point of Sale system.
6.
The Confirm window will appear (Figure 3-60). Click Yes to create another item. Otherwise click No
to return to the Ideal FEC Back Office Suite screen.
3.7.14
Creating a New Inventory Item (Ingredient)
This sub-section explains how to create ingredients for normal inventory items in the Point of Sale system.
NOTE: It is important that inventory, categories, sub-categories, tax tables, unit
types, locations, and vendors be setup before any inventory items are made. This
will save a lot of time in setting up the Point of Sale system.
1.
Make sure that the Point of Sale menu is visible at the Ideal FEC Back Office Suite screen.
2.
Select Inventory | Create Inventory (Figure 3-52).
3.
The Create New Inventory Item window will open. Make sure that Ingredient is selected under Item
Type.
© 1997 - 2005 Ideal Software Systems, Inc.
226
Point of Sale
Figure 3-74. The Create New Inventory Item window with Coupon Item Type selected
Make sure Ingredient is selected under Item Type.
4.
Enter the information for the normal inventory item.
A.
Item Number
Enter a number for this inventory item.
i.
Auto-Assign Inventory Number
Check this option if the inventory item is to be assigned a number by the Point of Sale
system.
TIP: The Auto-Assign Inventory Number option is checked by default. It is
recommended that each category gets its own range of inventory numbers. (Food
= 1 to 999, Golf = 1000 to 1999, etc.) This will make managing hundreds of
inventory items simpler.
B.
Retail Sale Price
Enter how much the item will be sold for.
C.
Description
Enter the name of the inventory item.
TIP: The Description field for an inventory should be unique to that item. This
will make searching for items easier than depending on searching for them by
their unique item number.
D.
Category
Click the drop down arrow and select a category for the item.
E.
Sub-Category
If the item needs a sub-category, click the drop down arrow and select one.
© 1997 - 2005 Ideal Software Systems, Inc.
Chapter 3 - Inventory Setup and Features
227
F.
Tax Type
Select a tax type after the clicking the drop down arrow.
G.
Vendor
If the inventory item has a vendor, click the drop down arrow and select one.
H.
Edit Vendor
Click this button to edit the item's vendor. Refer to sub-section "Editing a Vendor Through an
Inventory Item" for more information.
I.
Barcode
If barcodes are used, enter the barcode number of the item.
TIP: If the item already has a barcode, the user may scan the barcode on the item
while the cursor is in the Barcode field of the inventory item and input item
original barcode into the system. The original barcode will now be recognized by
the system as that inventory item whenever scanned.
J.
Active
Select this option if the inventory item is going to be actively for sale. Unselect this option to
deactivate the item. This option is selected by default.
K.
Track Inventory Quantities
Check this option for the system to keep track of the amount of this inventory item.
L.
Right Level Required
Enter a number 0 through 5 of the right level required by the employee to sell the inventory
item.
NOTE: If a number other than 0 through 5 is entered in the Right Level
Required field then an error will result. To change an employee rights level so
that they can sell items with a level higher than 0, refer back to Chapter 2 section
"Entering Employees and Employee Groups".
M.
Service Printer (Figure 3-53)
i.
Service Printer 1
Select this option to print to a printer recognized as Service Printer 1.
ii.
Service Printer 2
Select this option to print to a printer recognized as Service Printer 2.
iii.
Service Printer 3
Select this option to print to a printer recognized as Service Printer 3.
iv.
Service Printer 4
Select this option to print to a printer recognized as Service Printer 4.
NOTE: A service printer must be networked into the Ideal system network and
setup under the printer properties in the Point of Sale program in order for
inventory item information to be printed to a kitchen or service printer.
N.
Item Script (Figure 3-54)
i.
Script Filename
Select a script that will be printed upon the item's purchase (if the item requires that
© 1997 - 2005 Ideal Software Systems, Inc.
228
Point of Sale
something be printed other than the receipt.)
NOTE: The script chosen will be printed in addition to any other ticket,
wristband, or score card.
ii.
Print Location
a.
None
The select script will not be printed upon the item's purchase.
b.
Ticket Printer
The script will be printed to a designated ticket printer upon the sale of the
item.
c.
Wristband Printer
The script will print on a wristband when the item is sold.
d.
Receipt Printer
The script will print on the receipt printer local to the terminal when the item
is purchased.
e.
Golf Scorecard Printer
The script will print on a scorecard.
iii.
Script
Click the down arrow and select a item script to use.
iv.
Create
Click this button to create a item script.
v.
Edit
Edit a script in the default word processor.
NOTE: For further information on creating and editing scripts, refer to the "Item
Scripts" section.
O.
Audit Info (Figure 3-55)
NOTE: To make the Audit Info tab accessible, the Track Inventory Quantities
must be checked.
i.
Selling UOM
Click the down arrow and select the unit of measure that the new inventory item is
sold with.
ii.
Stocking UOM
Click the down arrow and select the unit of measure that the new inventory item is
stocked with.
iii.
Counting UOM
Click the down arrow and select the unit of measure that the new inventory item is
counted with.
iv.
Default Receive Quantity
Enter the default number of the new inventory that will be received into inventory
every time more of this item is received.
© 1997 - 2005 Ideal Software Systems, Inc.
Chapter 3 - Inventory Setup and Features
P.
229
Audit Count (Figure 3-56)
This tab keeps track of all the information regarding the ingredient item.
NOTE: To make the Audit Count tab accessible, the Track Inventory
Quantities must be checked. All fields in this table will be populated
automatically upon receiving the ingredients into inventory.
Q.
Discounts
This tab (Figure 3-101) will display any discounts that have been applied to the item. Also,
Price Schedule is on this tab. Refer to sub-section "Adding a Price Schedule".
R.
Coupon Info (Figure 3-57)
In order for a cashier to scan a coupon provided by a customer, Point of Sale will require that
the customer's order contain the inventory item that the coupon is linked to in this tab.
i.
S.
Setup Required Items
Click this button to open the Inventory Required in Order window (Figure 3-58).
a.
Add Item
Click this button to open the Select Inventory Item window (Figure 3-59).
Select an item required for the coupon and click OK.
b.
Remove Item
Select and item to be removed from the required item for coupon list and
click this button to remove it.
Order/Stocking Rules
This tab (Figure 3-102) allows the manager and owner to define specific rules about ording
from vendors and stocking inventory that apply to the item. Refer to section "Order/Stocking
Rules".
5.
Click OK once the item is finished. The item will now be saved in the Point of Sale system.
6.
The Confirm window will appear (Figure 3-60). Click Yes to create another item. Otherwise click No
to return to the Ideal FEC Back Office Suite screen.
3.7.15
Creating a New Inventory Item (Open Key)
This sub-section explains how to create an Open Key item(s) for normal inventory items that don't have an
assigned Retail Sale Price in the Point of Sale system.
NOTE: It is important that inventory, categories, sub-categories, tax tables, unit
types, locations, and vendors be setup before any inventory items are made. This
will save a lot of time in setting up the Point of Sale system.
1.
Make sure that the Point of Sale menu is visible at the Ideal FEC Back Office Suite screen.
2.
Select Inventory | Create Inventory (Figure 3-52).
3.
The Create New Inventory Item window will open (Figure 3-53). Make sure that Normal is selected
under Item Type.
4.
Enter the information for the normal inventory item.
© 1997 - 2005 Ideal Software Systems, Inc.
230
Point of Sale
A.
Item Number
Enter a number for this inventory item.
i.
Auto-Assign Inventory Number
Check this option if the inventory item is to be assigned a number by the Point of Sale
system.
TIP: The Auto-Assign Inventory Number option is checked by default. It is
recommended that each category gets its own range of inventory numbers. (Food
= 1 to 999, Golf = 1000 to 1999, etc.) This will make managing hundreds of
inventory items simpler.
B.
Retail Sale Price
Do not enter a price for this field. The entire purpose of the Open Key item is to allow the
cashier to enter the price of the item.
C.
Description
Enter the name of the item, in this case be sure to enter \OK\ for the description.
TIP: The Description for an inventory should be unique to that item. This will
make searching for items easier than depending on searching for them by their
unique item number. The \OK\ description must contain capitalized OK.
Figure 3-75. The Create New Inventory Item with Open Key description
Enter a description with \OK\.
D.
Category
Click the drop down arrow and select a category for the item.
E.
Sub-Category
If the item needs a sub-category, click the drop down arrow and select one.
F.
Tax Type
Select a tax type after the clicking the drop down arrow.
G.
Vendor
If the inventory item has a vendor, click the drop down arrow and select one.
© 1997 - 2005 Ideal Software Systems, Inc.
Chapter 3 - Inventory Setup and Features
231
H.
Edit Vendor
Click this button to edit the item's vendor. Refer to sub-section "Editing a Vendor Through an
Inventory Item" for more information.
I.
Barcode
If barcodes are used, enter barcode number of the item.
TIP: If the item already has a barcode, the user may scan the barcode on the item
while the cursor is in the Barcode field of the inventory item and input item
original barcode into the system. The original barcode will now be recognized by
the system as that inventory item whenever scanned.
J.
Ingredient List
This utility should not be used with this item type.
K.
Active
Select this option if the inventory item is going to be actively for sale. Unselect this option to
deactivate the item. This option is selected by default.
L.
Track Inventory Quantities
Do not check this option. Open Key inventory cannot be tracked.
M.
Right Level Required
Enter a number 0 through 5 of the right level required by the employee to sell the inventory
item.
NOTE: If a number other than 0 through 5 is entered in the Right Level
Required field then an error will result. To change an employee rights level so
that they can sell items with a level higher than 0, refer back to Chapter 2 section
"Entering Employees and Employee Groups".
N.
Service Printer (Figure 3-53)
i.
Service Printer 1
Select this option to print to a printer recognized as Service Printer 1.
ii.
Service Printer 2
Select this option to print to a printer recognized as Service Printer 2.
iii.
Service Printer 3
Select this option to print to a printer recognized as Service Printer 3.
iv.
Service Printer 4
Select this option to print to a printer recognized as Service Printer 4.
NOTE: A service printer must be networked into the Ideal system network and
setup under the printer properties in the Point of Sale program in order for
inventory item information to be printed to a kitchen or service printer.
O.
Item Script (Figure 3-54)
i.
Script Filename
Select a script that will be printed upon the item's purchase (if the item requires that
something be printed other than the receipt.)
© 1997 - 2005 Ideal Software Systems, Inc.
232
Point of Sale
NOTE: The script chosen will be printed in addition to any other ticket,
wristband, or score card.
ii.
Print Location
a.
None
The select script will not be printed upon the item's purchase.
b.
Ticket Printer
The script will be printed to a designated ticket printer upon the sale of the
item.
c.
Wristband Printer
The script will print on a wristband when the item is sold.
d.
Receipt Printer
The script will print on the receipt printer local to the terminal when the item
is purchased.
e.
Golf Scorecard Printer
The script will print on a scorecard.
iii.
Script
Click the down arrow and select a item script to use.
iv.
Create
Click this button to create a item script.
v.
Edit
Edit a script in the default word processor.
NOTE: For further information on creating and editing scripts, refer to the "Item
Scripts" section.
P.
Audit Info (Figure 3-55)
Do not use this tab for this item type.
Q.
Audit Count
Do not use this tab for this item type.
R.
Discounts
This tab (Figure 3-101) will display any discounts that have been applied to the item. Also,
Price Schedule is on this tab. Refer to sub-section "Adding a Price Schedule".
S.
Coupon Info (Figure 3-57)
In order for a cashier to scan a coupon provided by a customer, Point of Sale will require that
the customer's order contain the inventory item that the coupon is linked to in this tab.
i.
Setup Required Items
Click this button to open the Inventory Required in Order window (Figure 3-58).
a.
Add Item
Click this button to open the Select Inventory Item window (Figure 3-59).
Select an item required for the coupon and click OK.
b.
Remove Item
© 1997 - 2005 Ideal Software Systems, Inc.
Chapter 3 - Inventory Setup and Features
233
Select and item to be removed from the required item for coupon list and
click this button to remove it.
T.
Order/Stocking Rules
This tab (Figure 3-102) allows the manager and owner to define specific rules about ording
from vendors and stocking inventory that apply to the item. Refer to section "Order/Stocking
Rules".
5.
Click OK once the item is finished. The item will now be saved in the Point of Sale system.
6.
The Confirm window will appear (Figure 3-60). Click Yes to create another item. Otherwise click No
to return to the Ideal FEC Back Office Suite screen.
3.7.16
Creating a New Inventory Item (Intercard Value)
This sub-section explains how to create Intercard item(s) for placing value onto Intercard credit cards in the
Point of Sale system.
NOTE: It is important that inventory, categories, sub-categories, tax tables, unit
types, locations, and vendors be setup before any inventory items are made. This
will save a lot of time in setting up the Point of Sale system.
1.
Make sure that the Point of Sale menu is visible at the Ideal FEC Back Office Suite screen.
2.
Select Inventory | Create Inventory (Figure 3-52).
3.
The Create New Inventory Item window will open (Figure 3-53). Make sure that Normal is selected
under Item Type.
4.
Enter the information for the normal inventory item.
A.
Item Number
Enter a number for this inventory item.
i.
Auto-Assign Inventory Number
Check this option if the inventory item is to be assigned a number by the Point of Sale
system.
TIP: The Auto-Assign Inventory Number option is checked by default. It is
recommended that each category gets its own range of inventory numbers. (Food
= 1 to 999, Golf = 1000 to 1999, etc.) This will make managing hundreds of
inventory items simpler.
B.
Retail Sale Price
Enter the value that will be added onto the Intercard credit card.
C.
Description
Enter the description for the inventory item, in this case be sure to enter \intercard\ for the
description.
© 1997 - 2005 Ideal Software Systems, Inc.
234
Point of Sale
TIP: The Description for an inventory should be unique to that item. This will
make searching for items easier than depending on searching for them by their
unique item number. The \intercard\ description must contain lower-case letters.
Figure 3-76. The Create New Inventory Item with Intercard value description
Enter a description with \intercard\.
D.
Category
Click the drop down arrow and select a category for the item.
E.
Sub-Category
If the item needs a sub-category, click the drop down arrow and select one.
F.
Tax Type
Select a tax type after the clicking the drop down arrow.
G.
Vendor
If the inventory item has a vendor, click the drop down arrow and select one.
H.
Edit Vendor
Click this button to edit the item's vendor. Refer to sub-section "Editing a Vendor Through an
Inventory Item" for more information.
I.
Barcode
If barcodes are used, enter the barcode number of the item.
TIP: If the item already has a barcode, the user may scan the barcode on the item
while the cursor is in the Barcode field of the inventory item and input item
original barcode into the system. The original barcode will now be recognized by
the system as that inventory item whenever scanned.
J.
Ingredient List
This utility should not be used with this item type.
K.
Active
Select this option if the inventory item is going to be actively for sale. Unselect this option to
deactivate the item. This option is selected by default.
L.
Track Inventory Quantities
© 1997 - 2005 Ideal Software Systems, Inc.
Chapter 3 - Inventory Setup and Features
235
Do not check this option. Intercard value cannot be tracked.
M.
Right Level Required
Enter a number 0 through 5 of the right level required by the employee to sell the inventory
item.
NOTE: If a number other than 0 through 5 is entered in the Right Level
Required field then an error will result. To change an employee rights level so
that they can sell items with a level higher than 0, refer back to Chapter 2 section
"Entering Employees and Employee Groups".
N.
Service Printer (Figure 3-53)
i.
Service Printer 1
Select this option to print to a printer recognized as Service Printer 1.
ii.
Service Printer 2
Select this option to print to a printer recognized as Service Printer 2.
iii.
Service Printer 3
Select this option to print to a printer recognized as Service Printer 3.
iv.
Service Printer 4
Select this option to print to a printer recognized as Service Printer 4.
NOTE: A service printer must be networked into the Ideal system network and
setup under the printer properties in the Point of Sale program in order for
inventory item information to be printed to a kitchen or service printer.
O.
Item Script (Figure 3-54)
i.
Script Filename
Select a script that will be printed upon the item's purchase (if the item requires that
something be printed other than the receipt.)
NOTE: The script chosen will be printed in addition to any other ticket,
wristband, or score card.
ii.
Print Location
a.
None
The select script will not be printed upon the item's purchase.
b.
Ticket Printer
The script will be printed to a designated ticket printer upon the sale of the
item.
c.
Wristband Printer
The script will print on a wristband when the item is sold.
d.
Receipt Printer
The script will print on the receipt printer local to the terminal when the item
is purchased.
e.
Golf Scorecard Printer
The script will print on a scorecard.
© 1997 - 2005 Ideal Software Systems, Inc.
236
Point of Sale
iii.
Script
Click the down arrow and select a item script to use.
iv.
Create
Click this button to create a item script.
v.
Edit
Edit a script in the default word processor.
NOTE: For further information on creating and editing scripts, refer to the "Item
Scripts" section.
P.
Audit Info (Figure 3-55)
Do not use this tab for this item type.
Q.
Audit Count (Figure 3-56)
Do not use this tab for this item type.
R.
Discounts
This tab (Figure 3-101) will display any discounts that have been applied to the item. Also,
Price Schedule is on this tab. Refer to sub-section "Adding a Price Schedule".
S.
Coupon Info (Figure 3-57)
In order for a cashier to scan a coupon provided by a customer, Point of Sale will require that
the customer's order contain the inventory item that the coupon is linked to in this tab.
i.
T.
3.7.17
Setup Required Items
Click this button to open the Inventory Required in Order window (Figure 3-58).
a.
Add Item
Click this button to open the Select Inventory Item window (Figure 3-59).
Select an item required for the coupon and click OK.
b.
Remove Item
Select and item to be removed from the required item for coupon list and
click this button to remove it.
Order/Stocking Rules
This tab (Figure 3-102) allows the manager and owner to define specific rules about ording
from vendors and stocking inventory that apply to the item. Refer to section "Order/Stocking
Rules".
5.
Click OK once the item is finished. The item will now be saved in the Point of Sale system.
6.
The Confirm window will appear (Figure 3-60). Click Yes to create another item. Otherwise click No
to return to the Ideal FEC Back Office Suite screen.
Creating a New Inventory Item (OnePOS Card Value)
This sub-section explains how to create OnePOS item(s) for placing value onto OnePOS gift cards in the Point of
Sale system.
© 1997 - 2005 Ideal Software Systems, Inc.
Chapter 3 - Inventory Setup and Features
237
NOTE: It is important that inventory, categories, sub-categories, tax tables, unit
types, locations, and vendors be setup before any inventory items are made. This
will save a lot of time in setting up the Point of Sale system.
1.
Make sure that the Point of Sale menu is visible at the Ideal FEC Back Office Suite screen.
2.
Select Inventory | Create Inventory (Figure 3-52).
3.
The Create New Inventory Item window will open (Figure 3-53). Make sure that Normal is selected
under Item Type.
4.
Enter the information for the normal inventory item.
A.
Item Number
Enter a number for this inventory item.
i.
Auto-Assign Inventory Number
Check this option if the inventory item is to be assigned a number by the Point of Sale
system.
TIP: The Auto-Assign Inventory Number option is checked by default. It is
recommended that each category gets its own range of inventory numbers. (Food
= 1 to 999, Golf = 1000 to 1999, etc.) This will make managing hundreds of
inventory items simpler.
B.
Retail Sale Price
Enter the value that will be added onto the OnePOS card.
C.
Description
Enter the name for the inventory item, in this case be sure to enter \GiftCard\ in the
description of the item.
TIP: The Description for an inventory should be unique to that item. This will
make searching for items easier than depending on searching for them by their
unique item number. The \GiftCard\ description must contain an upper-case G
and C. The rest of the letters must be lower-case.
Figure 3-77. The Create New Inventory Item with OnePOS Card value description
Enter a description with \GiftCard\.
© 1997 - 2005 Ideal Software Systems, Inc.
238
Point of Sale
D.
Category
Click the drop down arrow and select a category for the item.
E.
Sub-Category
If the item needs a sub-category, click the drop down arrow and select one.
F.
Tax Type
Select a tax type after the clicking the drop down arrow.
G.
Vendor
If the inventory item has a vendor, click the drop down arrow and select one.
H.
Edit Vendor
Click this button to edit the item's vendor. Refer to sub-section "Editing a Vendor Through an
Inventory Item" for more information.
I.
Barcode
If barcodes are used, enter the barcode number of the item.
TIP: If the item already has a barcode, the user may scan the barcode on the item
while the cursor is in the Barcode field of the inventory item and input item
original barcode into the system. The original barcode will now be recognized by
the system as that inventory item whenever scanned.
J.
Ingredient List
This utility should not be used with this item type.
K.
Active
Select this option if the inventory item is going to be actively for sale. Unselect this option to
deactivate the item. This option is selected by default.
L.
Track Inventory Quantities
Do not check this option. OnePOS card value cannot be tracked.
M.
Right Level Required
Enter a number 0 through 5 of the right level required by the employee to sell the inventory
item.
NOTE: If a number other than 0 through 5 is entered in the Right Level
Required field then an error will result. To change an employee rights level so
that they can sell items with a level higher than 0, refer back to Chapter 2 section
"Entering Employees and Employee Groups".
N.
Service Printer (Figure 3-53)
i.
Service Printer 1
Select this option to print to a printer recognized as Service Printer 1.
ii.
Service Printer 2
Select this option to print to a printer recognized as Service Printer 2.
iii.
Service Printer 3
Select this option to print to a printer recognized as Service Printer 3.
iv.
Service Printer 4
Select this option to print to a printer recognized as Service Printer 4.
© 1997 - 2005 Ideal Software Systems, Inc.
Chapter 3 - Inventory Setup and Features
239
NOTE: A service printer must be networked into the Ideal system network and
setup under the printer properties in the Point of Sale program in order for
inventory item information to be printed to a kitchen or service printer.
O.
Item Script (Figure 3-54)
i.
Script Filename
Select a script that will be printed upon the item's purchase (if the item requires that
something be printed other than the receipt.)
NOTE: The script chosen will be printed in addition to any other ticket,
wristband, or score card.
ii.
Print Location
a.
None
The select script will not be printed upon the item's purchase.
b.
Ticket Printer
The script will be printed to a designated ticket printer upon the sale of the
item.
c.
Wristband Printer
The script will print on a wristband when the item is sold.
d.
Receipt Printer
The script will print on the receipt printer local to the terminal when the item
is purchased.
e.
Golf Scorecard Printer
The script will print on a scorecard.
iii.
Script
Click the down arrow and select a item script to use.
iv.
Create
Click this button to create a item script.
v.
Edit
Edit a script in the default word processor.
NOTE: For further information on creating and editing scripts, refer to the "Item
Scripts" section.
P.
Audit Info (Figure 3-55)
NOTE: To make the Audit Info tab accessible, the Track Inventory Quantities
must be checked.
i.
Selling UOM
Click the down arrow and select the unit of measure that the new inventory item is
sold with.
ii.
Stocking UOM
Click the down arrow and select the unit of measure that the new inventory item is
stocked with.
© 1997 - 2005 Ideal Software Systems, Inc.
240
Point of Sale
Q.
iii.
Counting UOM
Click the down arrow and select the unit of measure that the new inventory item is
counted with.
iv.
Default Receive Quantity
Enter the default number of the new inventory that will be received into inventory
every time more of this item is received.
Audit Count (Figure 3-54)
This tab keeps track of all the information regarding the ingredient item.
NOTE: To make the Audit Count tab accessible, the Track Inventory
Quantities must be checked. All fields in this table will be populated
automatically upon receiving the ingredients into inventory.
R.
Discounts
This tab (Figure 3-101) will display any discounts that have been applied to the item. Also,
Price Schedule is on this tab. Refer to sub-section "Adding a Price Schedule".
S.
Coupon Info (Figure 3-57)
In order for a cashier to scan a coupon provided by a customer, Point of Sale will require that
the customer's order contain the inventory item that the coupon is linked to in this tab.
i.
T.
3.7.18
Setup Required Items
Click this button to open the Inventory Required in Order window (Figure 3-58).
a.
Add Item
Click this button to open the Select Inventory Item window (Figure 3-59).
Select an item required for the coupon and click OK.
b.
Remove Item
Select and item to be removed from the required item for coupon list and
click this button to remove it.
Order/Stocking Rules
This tab (Figure 3-102) allows the manager and owner to define specific rules about ording
from vendors and stocking inventory that apply to the item. Refer to section "Order/Stocking
Rules".
5.
Click OK once the item is finished. The item will now be saved in the Point of Sale system.
6.
The Confirm window will appear (Figure 3-60). Click Yes to create another item. Otherwise click No
to return to the Ideal FEC Back Office Suite screen.
Editing Inventory Items
This sub-section explains how to edit inventory items in the Point of Sale system.
NOTE: It is important that inventory, categories, sub-categories, tax tables, unit
types, locations, and vendors be setup before any inventory items are made. This
will save a lot of time in setting up the Point of Sale. However if the user did not
create this information, editing an item will make it possible to go back into the
item and make changes. Also, in order to edit an inventory item(s), an item(s)
must have been previously created and placed in the system.
© 1997 - 2005 Ideal Software Systems, Inc.
Chapter 3 - Inventory Setup and Features
1.
Make sure that the Point of Sale menu is visible at the Ideal FEC Back Office Suite screen.
2.
Select Inventory | Edit Inventory.
241
Figure 3-78. The Ideal FEC Back Office Suite Inventory menu's Edit Inventory
Select Inventory | Edit Inventory.
3.
The Select Inventory Item window (Figure 3-59) will open. Select the item to be edited and click OK.
4.
The Edit Inventory window will open showing all the item information currently entered.
Figure 3-79. The Edit Inventory window with sample information
The Edit Inventory window with currently entered information for an inventory item.
5.
3.7.19
Make any changes that need to be made and click OK. The inventory item will be edited.
Adding a Price Schedule
This sub-section explains how to add a price schedule to inventory items in the Point of Sale system. Price
scheduling will be crucial for items that have different costs on different days or at different times throughout the
day.
© 1997 - 2005 Ideal Software Systems, Inc.
242
Point of Sale
NOTE: Price scheduling can be done while creating and editing an inventory
item.
1.
Make sure that the Point of Sale menu is visible at the Ideal FEC Back Office Suite screen.
2.
Select Inventory | Edit Inventory (Figure 3-78).
3.
When the Select Inventory Item window opens (Figure 3-59), select an item that needs a price
schedule and click OK.
4.
The Edit Inventory window will open (Figure 3-79). Open the Discounts tab (Figure 3-101). Click
Price Schedule to open the Price Schedule window.
Figure 3-80. The Price Schedule window
Click Price Schedule to open the Price Schedule window.
NOTE: Resource Items do not have a Price Schedule button.
5.
Click Add Price Block to open the Change Pricing Options window.
© 1997 - 2005 Ideal Software Systems, Inc.
Chapter 3 - Inventory Setup and Features
Figure 3-81. The Change Pricing Options window
The Change Pricing Options window opened by clicking Add Price Block.
6.
Enter the required information.
A.
B.
Date & Time
i.
Day of Week
Enter the day of the week for the time block for the item price.
ii.
Start Time
Enter a start time for the price block.
iii.
End Time
Enter an end time where the price block will end.
Set Expire Date
Check this option to set an expiration date.
i.
C.
Expire Date
Click the down arrow to select an expiration date from the calendar.
Pricing Type
i.
Set Static Price
Select this option to enter a price for the time block allotted.
a.
© 1997 - 2005 Ideal Software Systems, Inc.
Price
243
244
Point of Sale
Enter a price for the item.
ii.
Discount Retail Price
Select this option to enter a percentage discount for the item during the allotted time
block.
a.
iii.
7.
Discount Percentage
Enter a discount percentage for the inventory item.
Item Not Available
Select this option if the item will not be available for sale during the pre-specified
time block.
Click OK to go back to the Price Schedule window. The time block will show in the Time &
Availability Schedule table.
Figure 3-82. The Price Schedule window with price block information
NOTE: More price blocks can be added by clicking Add Price Block and
Change Pricing Options window. Also, a price block can be deleted by
highlighting the price block in the Price & Availability Schedule table and
clicking Delete.
3.7.20
Editing a Vendor Through an Inventory Item
This sub-section explains how to edit a vendor for inventory items in the Point of Sale system through the item
setup screen.
NOTE: See the "Vendors" section in this chapter for other ways to edit vendors.
1.
Make sure that the Point of Sale menu is visible at the Ideal FEC Back Office Suite screen.
2.
Select Inventory | Edit Inventory (Figure 3-78).
3.
When the Select Inventory Item window opens (Figure 3-59), select an item that needs its vendor
edited and click OK.
4.
The Edit Inventory window will open (Figure 3-79). Click Edit Vendor to open the Vendor window.
© 1997 - 2005 Ideal Software Systems, Inc.
Chapter 3 - Inventory Setup and Features
245
NOTE: A vendor must have been previously created in order to edit a vendor.
See "Vendors" sub-section "Adding Vendors" in this chapter for more
information. Also, a vendor must be selected in the Vendor field in the Edit
Inventory window in order for the Vendor window to open. If no vendor is
selected an error will appear asking that a vendor be selected.
Figure 3-83. The Vendor window
Click Edit Vendor to open the Vendor window.
5.
3.7.21
Edit the vendor if necessary and click OK when finished to go back to the Edit Inventory window.
Using the Package Tree
This sub-section explains how to select items through the package tree in the Point of Sale system.
NOTE: In order to follow the steps in this section, at least one inventory item of
type package must have been previously entered into the system. For more
information on creating a package item, refer back to sub-section "Creating a
New Inventory Item (Package)".
1.
Make sure that the Point of Sale menu is visible at the Ideal FEC Back Office Suite screen.
2.
Select Inventory | Package Tree.
© 1997 - 2005 Ideal Software Systems, Inc.
246
Point of Sale
Figure 3-84. The Ideal FEC Back Office Suite Inventory menu's Package Tree
Select Inventory | Package Tree.
3.
The Item Tree window will open displaying all packaged items that have been entered into the system.
Double-click on any single item or the entire package it to edit it.
© 1997 - 2005 Ideal Software Systems, Inc.
Chapter 3 - Inventory Setup and Features
247
Figure 3-85. The Item Tree window with sample package
Double-click on any single or packaged item to edit it.
4.
3.7.22
The Edit Inventory window (Figure 3-79) will open showing all the item information currently
entered. Make any changes that need to be made and click OK. The inventory item will be edited.
Adding an Ingredient List
This sub-section explains how to add ingredients to inventory items in the Point of Sale system.
NOTE: In order to add an ingredient, ingredient items must have been previously
created. Also, adding ingredients can be done while creating an inventory item.
Editing an inventory item is not the only way to assign ingredients.
1.
Make sure that the Point of Sale menu is visible at the Ideal FEC Back Office Suite screen.
2.
Select Inventory | Edit Inventory (Figure 3-78).
3.
When the Select Inventory Item window opens (Figure 3-59), select an item that needs its ingredients
listed and click OK.
4.
The Edit Inventory window will open (Figure 3-79). Click Ingredient List to open the Ingredient
List window.
© 1997 - 2005 Ideal Software Systems, Inc.
248
Point of Sale
NOTE: Only Normal and Modifier item types can have ingredients so only these
two item types will have the Ingredient List button.
5.
Click Add Ingredient to open the Select Inventory Item window listing all previously created
ingredient types.
Figure 3-86. The Ingredient List window with sample ingredients
Click Add Ingredient List.
6.
Select the ingredient item and click OK.
7.
The ingredient will now appear in the Ingredient column.
8.
At this point, either click Add Ingredient to add another ingredient to the item or click Close to exit the
Ingredient List window.
NOTE: Select an ingredient and click Remove to delete that ingredient from the
inventory item.
© 1997 - 2005 Ideal Software Systems, Inc.
Chapter 3 - Inventory Setup and Features
3.8
249
Modifier Lists
Instructions for setting up modifier lists for inventory items
This section contains the proper procedures for adding and editing modifier
lists in the Point of Sale system so that they may be used later at the Front
POS Sales screen. This section contains the following topics:
• "About Modifier Lists"
• "Adding Modifier Lists"
• "Editing Modifier Lists"
3.8.1
About Modifier Lists
Modifier lists can now be created for item buttons. This is a very helpful feature that allows cashiers access to all
modifiers for each item while using a minimal amount of buttons. Modifiers can be anything from extra cheese on
a pizza, pickles on a hamburger, and a lemon in a drink, which is why it why button space becomes important.
Users can fill out up to four pages of modifiers for each inventory item. The following sub-sections explain how
to create modifier lists. For more information on adding a modifier list to a button that will be used on the Front
POS Sales screen, refer to Chapter 5 sub-sections "Set Modifier List" and "Edit Modifier List". For information
on using a modifier in a sale, refer to Chapter 7, sub-section "Purchasing an Item With Modifiers".
3.8.2
Adding Modifier Lists
This sub-section explains how to create modifier lists for the Point of Sale system. These modifier lists can later
be applied to Front POS Sales screen buttons.
NOTE: Before a modifier list can be created, ingredient inventory items must
have been entered into the Point of Sale system. If no ingredients have been
defined, refer back to sub-section "Creating a New Inventory Item (Ingredient)"
for more information.
1.
Make sure that the Point of Sale menu is visible at the Ideal FEC Back Office Suite screen.
2.
Select Maintenance | Add Modifier List.
© 1997 - 2005 Ideal Software Systems, Inc.
250
Point of Sale
Figure 3-87. The Ideal FEC Back Office Suite Maintenance menu's Add Modifier List
Select Maintenance | Add Modifier List.
3.
The Modifier Edit Form window will open. Enter the necessary information.
© 1997 - 2005 Ideal Software Systems, Inc.
Chapter 3 - Inventory Setup and Features
Figure 3-88. The Modifier Edit Form window
Enter the necessary information.
A.
List Description
Enter a name for the modifier list.
B.
Page 1 Label
Enter a name for the first page of modifiers.
i.
C.
Page 2 Label
Enter a name for the second page of modifiers.
i.
D.
Visible
Check this option for this page of modifiers to show.
Visible
Check this option for this page of modifiers to show.
Page 3 Label
Enter a name for the third page of modifiers.
© 1997 - 2005 Ideal Software Systems, Inc.
251
252
Point of Sale
i.
E.
Visible
Check this option for this page of modifiers to show.
Page 4 Label
Enter a name for the fourth page of modifiers.
i.
Visible
Check this option for this page of modifiers to show.
NOTE: The fourth page of modifiers is a manually entered list of modifiers in
the form of radial buttons. Ingredients that are entered on this page do not have to
be entered into the system. This page is not checked to appear by default.
F.
Edit List
Click this button to open the Modifier window
NOTE: If the user has not entered a name for the modifier list in the List
Description field, clicking Edit List will result in an error.
i.
Select one of the tabs and click on one of the buttons to open the Item Button Edit
window.
© 1997 - 2005 Ideal Software Systems, Inc.
Chapter 3 - Inventory Setup and Features
Figure 3-89. The Modifier window
Click one of the many modifier buttons.
© 1997 - 2005 Ideal Software Systems, Inc.
253
254
Point of Sale
Figure 3-90. The Item Button Edit window
Enter the necessary information.
ii.
Choose Item
Click this button to open the Select Inventory Item window (Figure 3-59). Select an
ingredient item and clickOK.
iii.
Create Item
If an item needs to be created, click this button. This will open the Create New
Inventory Item window. For more information on creating a new ingredient item,
refer back to sub-section "Creating a New Inventory Item (Ingredient)".
iv.
Edit Item
If a chosen item needs to be edited, click this button to open the Edit Inventory
window (Figure 3-79). Refer back to sub-section "Editing Inventory Items" for more
information.
v.
Button Color
Click this button to open the Color window. Select a color for the button and click
OK. Refer to Chapter 5 sub-section "Configuring the Main Category Buttons" for
more information on using the Color window.
vi.
Font
a.
Name
© 1997 - 2005 Ideal Software Systems, Inc.
Chapter 3 - Inventory Setup and Features
255
Click the down arrow and select a font for the text on the button caption.
b.
Size
Click the down arrow and select a size for the text.
c.
Button Caption
Enter a caption for the button. By default, the name of the ingredient item
will appear in this field.
d.
Load Image
Click this button to open a browse window where an image can be selected
to appear on the modifier button. Once an image is selected, click Open.
e.
Clear Image
Click this button to remove a chosen image off the modifier button.
NOTE: The font chosen for the button caption must exist on all Point of Sale
workstations. Also, button images must be less or equal to 64 by 64 pixels in size.
vii.
G.
Click OK once the button information has been entered or Cancel to close the
window.
Page 4 Radial Group
All fields in this section relate to the fourth page of the modifier list.
NOTE: All information in the Page 4 Radial Group section should only be
filled out if the fourth page of the modifier list has Visible checked.
4.
3.8.3
i.
Answer Required
Check this option if at least one modifier radial option must be selected on the fourth
modifier page.
ii.
Option Description
Enter a description for the list of the radial buttons.
iii.
Options
Enter one modifier option per line in this field. Each entry will appear as a different
modifier in the list.
Click OK once the modifier list has been created or Cancel to close this utility.
Editing Modifier Lists
This sub-section explains how to edit previously created modifier lists for the Point of Sale system.
NOTE: Before a modifier list can be edited, one must have been entered into the
Point of Sale system. If no modifier lists have been created, please refer back to
the previous sub-section for more information.
1.
Make sure that the Point of Sale menu is visible at the Ideal FEC Back Office Suite screen.
2.
Select Maintenance | Edit Modifier List.
© 1997 - 2005 Ideal Software Systems, Inc.
256
Point of Sale
Figure 3-91. The Ideal FEC Back Office Suite Maintenance menu's Edit Modifier List
Select Maintenance | Edit Modifier List.
3.
The Modifier Menu List window will open. Select a list to edit and click OK.
© 1997 - 2005 Ideal Software Systems, Inc.
Chapter 3 - Inventory Setup and Features
257
Figure 3-92. The Modifier Menu List window with sample modifier lists
Select a modifier list and click OK.
3.9
4.
The Modifier Edit Form window will open (Figure 3-88). Make any changes to the modifier list as
necessary.
5.
Once all changes have been made, click OK to save them or Cancel to close the window without
saving.
Discounts
Instructions for setting up discounts for inventory items
This section contains the proper procedures for adding and editing
discounts and removing inventory items from discount lists in the Point of
Sale system. This section contains the following topics:
•
•
•
•
•
© 1997 - 2005 Ideal Software Systems, Inc.
"About Discounts"
"Adding Discounts"
"Editing Discounts"
"Removing Items From Discounts"
"View Applied Discounts"
258
Point of Sale
3.9.1
About Discounts
The ability to apply discounts to inventory items is essential to any Point of Sale program. The discount utility
helps simplify the chore of editing inventory items to apply the discounts and then editing them again to remove
it. Individual items or entire groups of inventory categories can have discounts applied to them. Refer to the
following sub-sections for more information on discounts.
3.9.2
Adding Discounts
This sub-section explains how to create discounts for Point of Sale inventory items.
NOTE: Before a discount can be made and or applied, inventory items must have
been added into the Point of Sale system. For more information on creating an
inventory item, refer to the "Inventory" section in this chapter.
1.
Make sure that the Point of Sale menu is visible at the Ideal FEC Back Office Suite screen.
2.
Select Maintenance | Add Discount.
Figure 3-93. The Ideal FEC Back Office Suite Maintenance menu's Add Discount
Select Maintenance | Add Discount.
© 1997 - 2005 Ideal Software Systems, Inc.
Chapter 3 - Inventory Setup and Features
3.
259
The Discount Types window will open. Enter the necessary information.
Figure 3-94. The Discount Types window
Enter the necessary information.
A.
Inventory | Add Items | Add Item
Select the Discount Types menu option to open the Select Inventory Item window (Figure
3-59). Once selected, the items will appear in the table.
B.
Inventory | Add Items | Add Category
This will open the Select Category window. In the Product Categories field, click the drop
down arrow and select a category then click OK. Once selected, the items will appear in the
table.
NOTE: Before a category can be selected in the Product Categories field, one
must first be created. For more information on creating a inventory category,
refer back to the "Inventory Categories and Sub-Categories" section.
Figure 3-95. The Select Category window
Select a category and click OK.
C.
Discount Name
Enter a description name for the discount.
© 1997 - 2005 Ideal Software Systems, Inc.
260
Point of Sale
D.
Sort List
Select a way to sort the items in the table that have been chosen for the discount.
E.
Select All
Click this button to highlight all the inventory items in the table.
F.
Change Discount
Select one or multiple inventory items and click this button to open the Discount Detail
window and to edit the discount for the items that are highlighted.
Figure 3-96. The Discount Detail window
Select a discount type for the inventory item(s).
i.
Value Off Discount
Check this option and enter a monitory amount to be subtracted from the total cost of
the item upon purchase.
ii.
Percent Discount
Check this option and enter a percentage of the item's price that will be reduced from
the total cost of the item upon purchase.
iii.
Set Price
Check this option and enter a money amount that the customer will pay upon purchase
regardless of the item's initial price.
© 1997 - 2005 Ideal Software Systems, Inc.
Chapter 3 - Inventory Setup and Features
4.
3.9.3
iv.
Override Price Schedule
Check this option to force the discount to take precedence over any price schedules
that might have been made when the item was first defined.
v.
Click OK to save the discount setup or Cancel to exit.
Click OK to save the discount and settings.
Editing Discounts
This sub-section explains how to edit discounts for Point of Sale inventory items.
NOTE: Before a discount can be edited, one must first be created. For more
information on creating a discount, refer to the previous sub-section.
1.
Make sure that the Point of Sale menu is visible at the Ideal FEC Back Office Suite screen.
2.
Select Maintenance | Edit Discount.
Figure 3-97. The Ideal FEC Back Office Suite Maintenance menu's Edit Discount
Select Maintenance | Edit Discount.
3.
261
The Discount Types sub-window will open. Select a discount to edit and click OK.
© 1997 - 2005 Ideal Software Systems, Inc.
262
Point of Sale
Figure 3-98. The Discount Types sub-window
Select a discount and click OK.
4.
The Discount Types window will open (Figure 3-94). Right-click on any one or any group of
inventory items that are included in the discount. A small menu window will appear. Select Edit
Discount.
Figure 3-99. The Item Discount menu
Right-click on an inventory item and select Edit Discount.
5.
The Discount Detail window will appear (Figure 3-96). Make any necessary changes to the discount
settings.
NOTE: The user may also double-click on any one inventory item in the discount
list to open the Discount Detail window.
6.
3.9.4
Once changes have been made, click OK to close the Discount Detail window (Figure 3-96) and click
OK again to close the Discount Types window (Figure 3-94) and save the changes.
Removing Items From Discounts
This sub-section explains how to removed inventory items from discounts for Point of Sale inventory items.
© 1997 - 2005 Ideal Software Systems, Inc.
Chapter 3 - Inventory Setup and Features
263
NOTE: Before an item can be removed from a discount, one must first be
created. For more information on creating a discount, refer to the "Adding
Discounts" sub-section.
1.
Make sure that the Point of Sale menu is visible at the Ideal FEC Back Office Suite screen.
2.
Select Maintenance | Edit Discount (Figure 3-97).
3.
The Discount Types sub-window will open (Figure 3-98). Select a discount to edit and click OK.
4.
The Discount Types window will open (Figure 3-94). Right-click on any one or any group of
inventory items that are to be removed from the discount. A small menu window will appear. Select
Remove Item.
Figure 3-100. The Item Discount menu
Right-click on an inventory item and select Remove Item.
5.
The item will disappear from the list. To save the changes click OK.
TIP: A group of items can be removed by selecting Inventory | Remove Items |
Remove Category in the Discount Types window (Figure 3-94).
3.9.5
View Applied Discounts
This sub-section explains how to view applied discounts for inventory items in the Point of Sale system.
NOTE: Before an inventory item's discounts can be viewed, discounts must first
be created and applied. Refer back to the "Adding Discounts" sub-section for
more information.
1.
Make sure that the Point of Sale menu is visible at the Ideal FEC Back Office Suite screen.
2.
Select Inventory | Edit Inventory (Figure 3-78).
3.
The Select Inventory Item window will open (Figure 3-59). Select the item to be viewed and click
OK.
4.
The Edit Inventory window will open showing all the item information currently entered (Figure 379).
5.
Click the Discount tab.
© 1997 - 2005 Ideal Software Systems, Inc.
264
Point of Sale
Figure 3-101. The Discount tab with a sample discount applied
Click on the Discounts tab.
6.
View all discounts that have been applied to the inventory item.
3.10 Order/Stocking Rules
Instructions for setting up ordering and stocking information for inventory
items
This section contains the proper procedures for adding, editing, and
removing ordering and stocking information from inventory items in the
Point of Sale system. This section contains the following topics:
•
•
•
•
3.10.1
"About Order/Stocking Rules"
"Adding Order/Stocking Rules"
"Editing Order/Stocking Rules"
"Removing Order/Stocking Rules"
About Order/Stocking Rules
The Order/Stocking Rules tab is a useful utility found in the Create New Inventory Item and Edit
Item windows. Managers and owners can use this tab to define rules about ordering and stocking
specific to each inventory item. This is useful in running a more efficent business as all
ordering/stocking information is available to all employees instead of a select few.
3.10.2
Adding Order/Stocking Rules
This sub-section explains how to add rules about ordering and stocking information for inventory items in the
Point of Sale system.
© 1997 - 2005 Ideal Software Systems, Inc.
Chapter 3 - Inventory Setup and Features
265
1.
Make sure that the Point of Sale menu is visible at the Ideal FEC Back Office Suite screen.
2.
Select Inventory | Edit Inventory (Figure 3-78).
3.
When the Select Inventory Item window opens (Figure 3-59), select an item that needs an ordering or
stocking rule applied and click OK.
4.
The Edit Inventory window will open (Figure 3-79). In the bottom of the window, click the
Order/Stocking Rules tab.
Figure 3-102. The Order/Stocking Rules tab
Click the Order/Stocking Rules tab.
5.
Click Add Rule. This will open the Add New Rule for <Inventory Item> window.
6.
In the Rule field, click the drop down arrow and select one of the four rules.
© 1997 - 2005 Ideal Software Systems, Inc.
266
Point of Sale
Figure 3-103. The Add New Rule for <Inventory Item> window with the Minimum Order Quantity rule selected
Select one of the rules to apply to the inventory item.
A.
Minimum Order Quantity
Select this rule to set the minimum and maximum stock quantities of the selected item.
i.
Minimum Quantity of Inventory To Have In Stock Before Reordering
Click the up or down arrows or manually enter the minimum amount of the selected
inventory item that should be in stock before reordering.
ii.
Par Quantity of Inventory
Click the up or down arrows or manually enter the preferred maximum amount of the
selected inventory item that should be in stock after reordering.
NOTE: Each of the fields under the Minimum Order Quantity rule are
followed by the measurement value for the selected item.
B.
Inventory Shelf Life
Select this rule to set the maximum number of days the selected inventory item should remain
in stock before being discarded.
i.
Shelf Life In Days for Inventory Item
Enter the maximum number of days the selected inventory item should remain on the
shelf.
© 1997 - 2005 Ideal Software Systems, Inc.
Chapter 3 - Inventory Setup and Features
267
Figure 3-104. The Add New Rule for <Inventory Item> window with the Inventory Shelf Life rule selected
C.
End of Season Month and Day
Select this rule to set the month and day the entire stock of the selected, seasonal inventory
item should be sold by.
i.
Sell Entire Stock by End of Season
a.
End of Season Month
Click the up or down arrows or manually enter the number representative of
the month in which all stock of the selected inventory item must be sold by.
b.
Day
Click the up or down arrows or manually enter the day on which all stock of
the selected inventory item must be sold by.
Figure 3-105. The Add New Rule for <Inventory Item> window with the End of Season Month and Day rule selected
D.
Maintain at Least a Set Number of Days Inventory On Hand
Select this rule to set the minimum number of days the selected inventory item should remain
in stock.
i.
Shelf Life In Days for Inventory Item
Enter the maximum number of days the selected inventory item should remain on the
© 1997 - 2005 Ideal Software Systems, Inc.
268
Point of Sale
shelf or in stock.
Figure 3-106. The Add New Rule for <Inventory Item> window with the Maintain
On Hand rule selected
7.
3.10.3
at Least a Set Number of Days Inventory
Once the rule(s) is added, click OK to save the new rule(s).
Editing Order/Stocking Rules
This sub-section explains how to edit ordering and stocking rules for inventory items in the Point of Sale system.
NOTE: Before an inventory rule can be edited, a rule must first be assigned to
the selected inventory item. For more information on adding a rule to an
inventory item, refer back to the previous sub-section.
1.
Make sure that the Point of Sale menu is visible at the Ideal FEC Back Office Suite screen.
2.
Select Inventory | Edit Inventory (Figure 3-78).
3.
When the Select Inventory Item window opens (Figure 3-59), select an item that needs an ordering or
stocking rule applied and click OK.
4.
The Edit Inventory window will open (Figure 3-79). In the bottom of the window, click the
Order/Stocking Rules tab (Figure 3-102).
5.
Select a rule to edit and click Edit Rules. This will open the Edit Rule for <Inventory Item> window.
6.
Make the necessary changes to the rule.
© 1997 - 2005 Ideal Software Systems, Inc.
Chapter 3 - Inventory Setup and Features
269
Figure 3-107. The Edit Rule for <Inventory Item> window with the Minimum Order Quantity rule selected
Make the necessary changes.
7.
3.10.4
Once the rule(s) is edited, click OK to save the changed rule(s).
Removing Order/Stocking Rules
This sub-section explains how to remove ordering and stocking rules for inventory items in the Point of Sale
system.
NOTE: Before an inventory rule can be removed, a rule must first be assigned to
the selected inventory item. For more information on adding a rule to an
inventory item, refer back to the sub-section "Adding Order/Stocking Rules".
1.
Make sure that the Point of Sale menu is visible at the Ideal FEC Back Office Suite screen.
2.
Select Inventory | Edit Inventory (Figure 3-78).
3.
When the Select Inventory Item window opens (Figure 3-59), select an item that needs an ordering or
stocking rule applied and click OK.
4.
The Edit Inventory window will open (Figure 3-79). In the bottom of the window, click the
Order/Stocking Rules tab (Figure 3-102).
© 1997 - 2005 Ideal Software Systems, Inc.
270
Point of Sale
5.
Select a rule to remove and click Delete Rule.
6.
Once the rule(s) is edited, click OK to save the changed rule(s).
3.11 Item Scripts
Instructions for setting up item scripts
This section contains the proper procedures for adding and editing item
scripts in the Point of Sale system. This section contains the following
topics:
• "About Item Scripts"
• "Adding Item Scripts"
• "Editing Item Scripts"
3.11.1
About Item Scripts
Item scripts may be created for and assigned to individual inventory items. Scripts are used on printed receipts
that display the sale of inventory items that have a script assigned to them.
3.11.2
Adding Item Scripts
This sub-section explains how to create an item script for inventory items in the Point of Sale system through the
item setup screen.
NOTE: For more information on assigning a new script to an inventory item,
refer to sub-section "Creating a New Inventory Item (Normal)". For some sample
scripts, there is a script folder in the POS directory.
1.
Make sure that the Point of Sale menu is visible at the Ideal FEC Back Office Suite screen.
2.
Select Inventory | Edit Inventory (Figure 3-78).
3.
When the Select Inventory Item window opens (Figure 3-59), select an item that needs a script added
and click OK.
4.
The Edit Inventory window will open (Figure 3-79). In the bottom of the window, click the Item
Script tab.
5.
Click Create. This will open the Script Edit window.
6.
The user may either enter a new description and manually type in a script or click Load From File.
This will open the Choose Script to Load window.
© 1997 - 2005 Ideal Software Systems, Inc.
Chapter 3 - Inventory Setup and Features
271
Figure 3-108. The Script Edit window
Enter or load a script.
7.
Browse and select a script file load as an example in the Script Edit window. When one is selected,
click OK.
© 1997 - 2005 Ideal Software Systems, Inc.
272
Point of Sale
Figure 3-109. The Choose Script to Load window
Select a script file and click OK.
8.
Make changes to the loaded script file as necessary or enter the script without any aid from another
script.
© 1997 - 2005 Ideal Software Systems, Inc.
Chapter 3 - Inventory Setup and Features
273
Figure 3-110. The Script Edit window with sample script
9.
3.11.3
Once the script is entered, click Save to File or Save to save the new script. The user may also print the
new script by clicking Print.
Editing Item Scripts
This sub-section explains how to edit an item script for inventory items in the Point of Sale system through the
item setup screen.
NOTE: For more information on assigning a new script to an inventory item,
refer to sub-section "Creating a New Inventory Item (Normal)". For some sample
scripts, there is a script folder in the POS directory. There must have been at least
one item script previosly created before the following steps can be followed
correctly.
1.
Make sure that the Point of Sale menu is visible at the Ideal FEC Back Office Suite screen.
2.
Select Inventory | Edit Inventory (Figure 3-78).
3.
When the Select Inventory Item window opens (Figure 3-59), select an item that needs a script edited
and click OK.
4.
The Edit Inventory window will open (Figure 3-79). In the bottom of the window, select the Item
Script tab.
5.
Select an item script in the Script field by clicking the down arrow and then clicking Edit. This will
© 1997 - 2005 Ideal Software Systems, Inc.
274
Point of Sale
open the Script Edit window (Figure 3-108).
6.
Make any necessary changes to the script and click Save. The item script will be saved.
3.12 Ticket Scripts
Instructions for setting up ticket scripts
This section contains the proper procedures for adding and editing ticket
scripts in the Point of Sale system. This section contains the following
topics:
•
•
•
•
3.12.1
"About Ticket Scripts"
"Adding Ticket Scripts"
"Editing Ticket Scripts"
"Importing a Ticket Script Directory"
About Ticket Scripts
Similar to item scripts, ticket scripts are printed onto or in conjunction with receipts as a proof of purchase and or
entry into an area of the entertainment facility. For example, an indoor race track may print out ticket scripts upon
the sale of a race that the customer will then show to an employee who lets them into the race track facility. The
ticket was proof of purchase for the other employees overseeing the track and go carts.
3.12.2
Adding Ticket Scripts
This sub-section explains how to create ticket scripts for Point of Sale inventory purchases.
NOTE: For some sample scripts, there is a script folder in the POS directory.
1.
Make sure that the Point of Sale menu is visible at the Ideal FEC Back Office Suite screen.
2.
Select Maintenance | Ticket Scripts.
© 1997 - 2005 Ideal Software Systems, Inc.
Chapter 3 - Inventory Setup and Features
Figure 3-111. The Ideal FEC Back Office Suite Maintenance menu's Ticket Scripts
Select Maintenance | Add Discount.
3.
The Scripts window will open. Click Create.
© 1997 - 2005 Ideal Software Systems, Inc.
275
276
Point of Sale
Figure 3-112. The Scripts window with many sample scripts
Click Create.
4.
This will open the Script Edit window (Figure 3-108). The user may either enter a new description and
manually type in a script or click Load From File. This will open the Choose Script to Load window
(Figure 3-109).
5.
Browse and select a script file load as an example in the Script Edit window (Figure 3-110). When one
is selected, click OK.
6.
Make changes to the loaded script file as necessary or enter the script without any aid from another
script.
7.
Once the script is entered, click Save to File or Save to save the new script. The user may also print the
new script by clicking Print.
3.12.3
Editing Ticket Scripts
This sub-section explains how to edit ticket scripts for Point of Sale inventory purchases.
NOTE: In order to follow the steps below, at least one ticket scripts must have
been created. For more information on creating a ticket script, refer back to the
previous section. For some sample scripts, there is a script folder in the POS
directory.
1.
Make sure that the Point of Sale menu is visible at the Ideal FEC Back Office Suite screen.
2.
Select Maintenance | Ticket Scripts (Figure 3-111).
© 1997 - 2005 Ideal Software Systems, Inc.
Chapter 3 - Inventory Setup and Features
277
3.
The Scripts window (Figure 3-112) will open. Select a script to edit and click Edit.
4.
This will open the Script Edit window (Figure 3-108). Make changes to the loaded script file as
necessary.
5.
Once the script is entered, click Save to File or Save to save the edited script. The user may also print
the edited script by clicking Print.
3.12.4
Importing a Ticket Script Directory
This sub-section explains how to edit ticket scripts for Point of Sale inventory purchases.
NOTE: In order to follow the steps below, at least one ticket scripts must have
been created. For more information on creating a ticket script, refer back to the
previous section. For some sample scripts, there is a script folder in the POS
directory.
1.
Make sure that the Point of Sale menu is visible at the Ideal FEC Back Office Suite screen.
2.
Select Maintenance | Ticket Scripts (Figure 3-111).
3.
The Scripts window (Figure 3-112) will open. Click Import Dir.
4.
This will open the Browse for Folder window. In this window, browse for and select the folder that
contains the scripts. Click OK once the folder is selected.
NOTE: The Browse for Folder window will not allow the user to select an
individual file. Only folders can be selected in this window.
Figure 3-113. The Browse for Folder window with a sample script directory
Select a folder and click OK.
5.
All of the scripts in the selected directory will appear in the Scripts window.
© 1997 - 2005 Ideal Software Systems, Inc.
278
Point of Sale
WARNING: If the user tries to import a script with the same name as one that
currently resides in the Scripts window, an error will result.
3.13 Consumption and Waste
Instructions for identifying consumption and waste in inventory
This section contains the proper procedures for adding and removing
inventory from the consumption and waste count in the Point of Sale
system. This section contains the following topics:
• "About Consumption and Waste"
• "Adding Consumption and Waste Counts to Inventory"
• "Removing Consumption and Waste Counts From Inventory"
3.13.1
About Consumption and Waste
This useful utility allows managers and owners to keep track of inventory that has either been consumed
(ie, used or eaten) or wasted (ie, broken, thrown away, or lost). This utility will factor in consumed and
wasted figures in the total inventory counts. Also, this tool allows owners to see how much of inventory
stock is being wasted. For more information on how to use this utility, refer to the following subsections.
3.13.2
Adding Consumption and Waste Counts to Inventory
This sub-section explains how to add inventory items to the Consumption and Waste table in the Point of Sale
system.
1.
Make sure that the Point of Sale menu is visible at the Ideal FEC Back Office Suite screen.
2.
Select Inventory | Consumption & Waste.
© 1997 - 2005 Ideal Software Systems, Inc.
Chapter 3 - Inventory Setup and Features
Figure 3-114. The Ideal FEC Back Office Suite Inventory menu's Consumption and Waste
Select Inventory | Consumption & Waste.
3.
The Choose Inventory List window will open. Click New.
Figure 3-115. The Choose Inventory List window
© 1997 - 2005 Ideal Software Systems, Inc.
279
280
Point of Sale
Click New.
4.
The New List Name window will open. Enter the name of the inventory list in the List Name field and
click OK.
Figure 3-116. The New List Name window
Enter the necessary information and click OK.
5.
Select the new list description and click Select. This will open the Inventory Detail List window.
6.
Click Add to open the Select Inventory Item window (Figure 3-59).
Figure 3-117. The Inventory Detail List window
© 1997 - 2005 Ideal Software Systems, Inc.
Chapter 3 - Inventory Setup and Features
281
Click Add.
7.
Select the item to be added to the Consumption and Waste table and click OK.
8.
The inventory item will appear in the Consumption and Waste table. Edit the Consumed and Waste
fields to correctly represent the amount of the selected inventory item that has been consumed and/or
wasted.
9.
Add more items to the table and edited their consumed and wasted values if necessary.
10.
Once all of the inventory items have been added to the table and modified, click Process.
3.13.3
Removing Consumption and Waste Counts From Inventory
This sub-section explains how to remove inventory items to the Consumption and Waste table in the Point of
Sale system.
NOTE: Before items can be removed from a Consumption and Waste list, they
must first be added to a list. For more information on how to add inventory items
to the list, refer back to the previous sub-section.
1.
Make sure that the Point of Sale menu is visible at the Ideal FEC Back Office Suite screen.
© 1997 - 2005 Ideal Software Systems, Inc.
282
Point of Sale
2.
Select Inventory | Consumption & Waste (Figure 3-114).
3.
The Choose Inventory List window (Figure 3-115) will open. Select the list description containing the
inventory item to remove and click Select.
4.
This will open the Inventory Detail List window (Figure 3-117).
6.
Select the item to remove and click Delete.
7.
Once all of the necessary inventory items have been removed from the table, click Process.
© 1997 - 2005 Ideal Software Systems, Inc.
Chapter 4 - Receiving, Transferring, Auditing, and Purchase Orders for Inventory
283
Chapter 4 - Receiving, Transferring,
Auditing, and Purchase Orders for
Inventory
4.1
Receiving Inventory
Instructions for receiving inventory quantity
This section contains the proper procedures for receiving and recording
received inventory. This section contains the following topics:
• "About Receiving Inventory"
• "How to Receive Inventory"
4.1.1
About Receiving Inventory
The obvious use behind the receiving inventory function in the Point of Sale system is to record an inventory that
is brought into the family entertainment location. The important reason for recording received inventory is for
the sake of tracking inventory counts. To keep accurate counts, all items should be recorded through this simple,
easy to use function. For more information on using the inventory function, refer to sub-section "How to Receive
Inventory".
4.1.2
How to Receive Inventory
This sub-section explains how to receive inventory into the Point of Sale system. Recording received inventory
will only be necessary for inventory items whose quantities are being tracked.
NOTE: In order to receive inventory, inventory must have first been entered into
the system. See the "Inventory" section in Chapter 3 for more details.
1.
Make sure that the Point of Sale menu is visible at the Ideal FEC Back Office Suite screen.
2.
Select Inventory | Receive Inventory.
© 1997 - 2005 Ideal Software Systems, Inc.
284
Point of Sale
Figure 4-1. The Ideal FEC Back Office Suite Inventory menu's Receive Inventory
Select Inventory | Receive Inventory.
3.
The Select Inventory Item window will appear. Select the item to receive quantity for and click OK.
Figure 4-2. The Select Inventory Item window
Select an inventory item and click OK.
4.
The Receiving window will open. Enter the necessary information.
© 1997 - 2005 Ideal Software Systems, Inc.
Chapter 4 - Receiving, Transferring, Auditing, and Purchase Orders for Inventory
285
Figure 4-3. The Receiving window
Enter the necessary information.
A.
Receiving Location
Click the down arrow to select the receiving location.
B.
Quantity
Select the amount of the inventory item being received, the quantity must be greater than zero.
C.
Unit of Measure
Click the drop down arrow and select the unit of measure for the item.
D.
Cost ____ per unit
Enter the cost of one of the inventory item being received.
5.
When the information is entered, click OK to receive the inventory into the inventory location.
6.
Once the inventory is received, the Confirm window will ask if more of that inventory item needs to be
received. Click Yes to receive more or click No to stop receiving.
Figure 4-4. The Confirm window
Click Yes to receive more inventory or No to stop receiving.
© 1997 - 2005 Ideal Software Systems, Inc.
286
4.2
Point of Sale
Transferring Inventory
Instructions for transferring inventory to different locations
This section contains the proper procedures for transferring inventory. This
section contains the following topics:
• "About Transferring Inventory"
• "How to Transfer Inventory"
4.2.1
About Transferring Inventory
The inventory transfer feature is very helpful if managers track inventory over a wide range of inventory
locations. This function also contains a feature to essentially "get rid" of inventory and to no longer track it by
transferring it Out of Store. For more information on transferring inventory, see sub-section "How to Transfer
Inventory".
4.2.2
How to Transfer Inventory
This sub-section explains how to transfer inventory from one location to another in the Point of Sale system.
NOTE: In order to transfer inventory, inventory must have first been entered into
the system. See the "Inventory" section in Chapter 3 for more details. Also, at
least one inventory location has to have been created before transferring
inventory will be possible. Refer to "Inventory Locations" in Chapter 3 for more
information
1.
Make sure that the Point of Sale menu is visible at the Ideal FEC Back Office Suite screen.
2.
Select Inventory | Transfer Inventory.
© 1997 - 2005 Ideal Software Systems, Inc.
Chapter 4 - Receiving, Transferring, Auditing, and Purchase Orders for Inventory
287
Figure 4-5. The Ideal FEC Back Office Suite Inventory menu's Transfer Inventory
Select Inventory | Transfer Inventory.
3.
The Choose Location to Transfer From window will appear. Select the inventory location to receive
the inventory from and click OK.
Figure 4-6. The Choose Location to Transfer From window with sample location
Select an inventory location and click OK.
4.
The Transfer Inventory window will open. Enter the necessary information.
© 1997 - 2005 Ideal Software Systems, Inc.
288
Point of Sale
Figure 4-7. The Transfer Inventory window
Enter the necessary information.
A.
Inventory available in location
Select the inventory item that will be transferred to another location.
NOTE: In order to transfer inventory out of a location, inventory first must have
been received into that location.
B.
Quantity
Select the amount of the inventory item being transferred.
C.
Transfer to Location
Select the location the inventory will be transferred to by clicking the down arrow and
selecting the new location.
NOTE: To transfer inventory amounts out of the system, choose the Out of Store
option for the Transfer to Location.
© 1997 - 2005 Ideal Software Systems, Inc.
Chapter 4 - Receiving, Transferring, Auditing, and Purchase Orders for Inventory
4.3
289
5.
When the information is entered, click Add to transfer the inventory into the other inventory location.
6.
The inventory will now be displayed in the Inventory to be Transferred From <Location> table.
Click OK.
Auditing Inventory
Instructions for auditing inventory in the inventory locations
This section contains the procedures for auditing inventory. This section
contains the following topics:
• "Purpose for Auditing Inventory"
• "Using Audit Count Sheets"
• "Auditing Inventory"
4.3.1
Purpose for Auditing Inventory
The Point of Sale system will keep track of the inventory items for managers and users. However, sometimes
even though in theory the counts are accurate, events might occur in the store that will make the system inventory
counts untrue. Audits are manual inventory counts at the different inventory locations and should be done at least
every month if the managers wish to keep true item counts. The Point of Sale system assists the user in audit
counts by having printable item count sheets that can be used at each location to tally inventory amounts. For
more information on printing Audit Count Sheets, refer to sub-section "Printing Audit Count Sheets". For more
information on printing on performing an audit, refer to sub-section "Auditing Inventory".
There are three types of audits in the Point of Sale system.
Audit All Inventory (Assume Zero) - This option will audit all inventory items at a given location. If no item
quantity is entered for the items, the audit count will be assumed zero.
Selective Audit - Only the inventory items that are changed in an inventory location will be updated. All
inventory items not altered will keep the same inventory quantities.
Selective Blind Audit - No current inventory item counts will be shown during the audit. Only the inventory
items that are changed in an inventory location will be updated. All inventory items not altered will
keep the same inventory quantities.
4.3.2
Printing Audit Count Sheets
Before an inventory audit for an inventory location can be done correctly, the inventory in the location must be
counted. The Point of Sale software will conveniently print out Audit Count Sheets for each inventory location.
© 1997 - 2005 Ideal Software Systems, Inc.
290
Point of Sale
NOTE: In order to print out Audit Count Sheets, inventory must have first been
entered into the system. See the "Inventory" section in Chapter 3 for more details.
Also, before Audit Count Sheets can be printed, inventory locations must have
been created and inventory must have been received into these locations.
1.
Make sure that the Point of Sale menu is visible at the Ideal FEC Back Office Suite screen.
2.
Select Inventory Reports | Audit Count Sheets.
Figure 4-8. The Ideal FEC Back Office Suite Inventory Reports menu's Transfer Inventory
Select Inventory Reports | Audit Count Sheets.
3.
The Choose Location for Audit Count Sheets window will open. Select a location and click OK.
Figure 4-9. The Choose Location for Audit Count Sheets window with sample location
Click OK after selecting an inventory location.
4.
The Inventory Sort Options window will appear. Select the correct sort option.
© 1997 - 2005 Ideal Software Systems, Inc.
Chapter 4 - Receiving, Transferring, Auditing, and Purchase Orders for Inventory
291
Figure 4-10. The Inventory Sort Options window
Select the sort option.
A.
Description
Sort the inventory items by their descriptions.
B.
Item Number
Sort the inventory items by their item numbers.
C.
Stock Number
Sort the inventory items by their stock numbers.
5.
Click OK. The Print Preview window will open.
6.
Click
4.3.3
to print the Audit Count Sheets to a default printer.
Auditing Inventory
Auditing inventory in the Point of Sale system will be necessary for keeping track of inventory quantities. This
sub-section will explain how to audit an inventory location.
NOTE: Before an audit is started, be sure to have printed out and completed the
audit count sheets. For more on printing out audit count sheet see the previous
sub-section: "Printing Audit Count Sheets".
1.
Make sure that the Point of Sale menu is visible at the Ideal FEC Back Office Suite screen.
2.
Select Inventory | Audit Inventory.
© 1997 - 2005 Ideal Software Systems, Inc.
292
Point of Sale
Figure 4-11. The Ideal FEC Back Office Suite Inventory menu's Audit Inventory
Select Inventory | Audit Inventory.
3.
The Choose Inventory Location window will open. Select a location and click OK.
Figure 4-12. The Choose Inventory Location window with sample location
Select a location and click OK.
4.
Select the audit method in the Audit Options window and click OK.
© 1997 - 2005 Ideal Software Systems, Inc.
Chapter 4 - Receiving, Transferring, Auditing, and Purchase Orders for Inventory
293
Figure 4-13. The Audit Options window
Select an option and press OK.
A.
Audit all inventory
This option audits all inventory items in the location.
NOTE: Audit counts for all inventory items will assumed to be zero unless a
number amount is entered for each item.
WARNING: If a number amount is not entered for inventory quantity and the
audit is completed, then the item will record that there is a zero amount for that
item. If this item was supposed to have an amount associated with it then the
tracking quantity will be incorrect.
TIP: This is the preferred option for auditing if being performed by someone
other than a manager or owner.
5.
B.
Selective Audit
Only inventory item quantities that were adjusted will be recognized and updated.
C.
Selective Blind Audit
Only items with counts that are changed will be updated. All other inventory items will not
show an item count.
The Auditing Test window will open. Enter the needed information.
© 1997 - 2005 Ideal Software Systems, Inc.
294
Point of Sale
Figure 4-14. The Auditing window using the Audit all inventory option with sample inventory
Enter the correct information.
A.
Sort by
The inventory can be sorted by Description, Item Number, and Stock. Select the sort that best
fits the auditing process.
TIP: Description is the default Sort by.
6.
B.
Search for
Look for specific inventory items to audit using this search function.
C.
The Auditing Table
This is the table that contains all of the inventory to be audited. (In Figure 4-14, the test item
is in the Auditing table.) The item counts will need to be entered under the Audit Count
column.
i.
Click in the Audit Count column and enter the quantity of the item counted.
ii.
Click in the UOM field and change the unit of measure if necessary.
Once the audit information is completed, select Audit | Commit Changes. This will update the
inventory counts.
© 1997 - 2005 Ideal Software Systems, Inc.
Chapter 4 - Receiving, Transferring, Auditing, and Purchase Orders for Inventory
295
Figure 4-15. The Auditing window Audit menu's Commit Changes
Select Audit | Commit Changes.
NOTE: If no changes need to be made to the inventory in the location being
audited, then choose Cancel Audit under the Audit menu.
7.
Once the changes have been made, look over the Trial Audit Report by going to View | View Audit
Report.
Figure 4-16. The Auditing window View menu's View Audit Report
Select View | View Audit Report.
8.
9.
The Inventory Sort Options window will open. Select the proper sort method.
A.
Description
Sort the inventory items by their descriptions.
B.
Item Number
Sort the inventory items by their item numbers.
C.
Stock Number
Sort the inventory items by their stock numbers.
The Trial Audit Report will appear. To print this report, press
© 1997 - 2005 Ideal Software Systems, Inc.
.
296
4.4
Point of Sale
Purchase Orders
Instructions for creating, editing and receiving purchase orders for
inventory items
This section contains the proper procedures for creating purchase orders,
editing them, and then receiving them into inventory. This section contains
the following topics:
•
•
•
•
4.4.1
"About Purchase Orders"
"Creating Purchase Orders"
"Editing Purchase Orders"
"Receiving Purchase Orders"
About Purchase Orders
Purchase Orders are created for the purpose of being sent to vendors to request items for purchase. Point of Sale
keeps track of the family entertainment center's mailing and billing addresses. All vendors and their information
can be entered into the system and kept track of as well. Every inventory item can be associated with a vendor
which is then reflected in the Purchase Order. These are just a few reasons for why using the Point of Sale's
Purchase Order function is very helpful for owners and managers that wish to track inventory quantities. For
more information on creating, editing, and receiving Purchase Orders, review the other three sub-sections in this
main section.
4.4.2
Creating Purchase Orders
This sub-section explains how to create a purchase order for more inventory in the Point of Sale system.
NOTE: In order to create a purchase order, inventory must have first been
entered into the system. See the "Inventory" section in Chapter 3 for more details.
1.
Make sure that the Point of Sale menu is visible at the Ideal FEC Back Office Suite screen.
2.
Select Inventory | Create Purchase Order.
© 1997 - 2005 Ideal Software Systems, Inc.
Chapter 4 - Receiving, Transferring, Auditing, and Purchase Orders for Inventory
Figure 4-17. The Ideal FEC Back Office Suite Inventory menu's Create Purchase Order
Select Inventory | Create Purchase Order.
3.
The Purchase Order Form window will open. Enter the needed information.
© 1997 - 2005 Ideal Software Systems, Inc.
297
298
Point of Sale
Figure 4-18. The Purchase Order Form window
Enter the needed information.
A.
Vendor
Select a vendor that will be supplying the inventory.
B.
Vendor Order Number
Enter the vendor's order number.
NOTE: A vendor must have been created before one can be chosen in the
Vendor field. See the "Vendors" section in Chapter 3 for more details. Also, the
Vendor Order Number is supplied by the vendor.
C.
Purchase Order Number
Enter a purchase order number for the purchase order being created.
D.
Shipping Method
Enter the method in which the inventory will be delivered.
E.
Terms
Enter the billing terms.
F.
Sub Total
This field will be automatically populated as amounts are entered for the costs of the items.
G.
Shipping Charges
Include an amount for the shipping of the inventory.
© 1997 - 2005 Ideal Software Systems, Inc.
Chapter 4 - Receiving, Transferring, Auditing, and Purchase Orders for Inventory
299
H.
Other Charges
Any other charges for the inventory purchase should be included in this field.
I.
Total
This field is the sum of all the inventory costs, shipping charges, and other charges. This field
is automatically populated once all of the costs are entered.
J.
Add Item
Click this button to open the Select Inventory Item window.
i.
Select an inventory item that needs to be purchased and click OK.
Figure 4-19. The Select Inventory Item window with sample inventory
Select an inventory item and click OK.
ii.
The item will now appear in the Purchase Order Form.
iii.
Double-click on the item inside the Purchase Order Form. Now the fields will be
editable.
a.
Unit Cost
Enter a cost per individual item.
b.
Recommended Quantity
The quantity of the inventory item recommended for puchase. This value is
calulated using the Order/Stocking Rules assigned to the inventory item
when it was created. For more information on adding Order/Stocking Rules,
refer to the section "Order/Stocking Rules" in the previous Chapter.
c.
Quantity Ordered
Enter the amount of the item that will be ordered.
d.
UOM
The unit of measure for the inventory item.
e.
ExtCost
The total cost for that item will be automatically calculated in this field.
K.
Remove Item
If an item needs to be removed from the purchase order, select that item and click Remove
Item.
L.
Report
Click this button to view the purchase order in a report format.
© 1997 - 2005 Ideal Software Systems, Inc.
300
Point of Sale
NOTE: In order to view a purchase order report, a vendor has to be selected.
i.
M.
Click
to print the purchase out on a default printer.
Auto Order
Click this button to auto-send a purchase order to a vendor. The amounts of the items needed
from that vendor will be calculated using the Order/Stocking Rules assigned to the inventory
item when it was created. For more information on adding Order/Stocking Rules, refer to the
section "Order/Stocking Rules" in the previous Chapter.
WARNING: Before clicking Auto Order, select a vendor from the Vendor
drop down list. If a vendor is not selected, a Warning window will appear
N.
4.
Order Recom.
Click this button to see all of the recommended quantities to order for each inventory item for
the selected vendor. The recommended quantities are calculated using the Order/Stocking
Rules assigned to the inventory item when it was created. For more information on adding
Order/Stocking Rules, refer to the section "Order/Stocking Rules" in the previous Chapter.
Click OK once all of the information is entered into the purchase order to save it into the system.
NOTE: In order to save a purchase order, the purchase order must have a unique
Purchase Order Number.
4.4.3
Editing Purchase Orders
This sub-section explains how to edit a purchase order for more inventory in the Point of Sale system.
NOTE: In order to have created a purchase order, inventory must have first been
entered into the system. See the "Inventory" section in Chapter 3 for more details.
Also, in order to edit a purchase order, a purchase order must have first been
created. See the previous sub-section "Creating a Purchase Order" for more
details.
1.
Make sure that the Point of Sale menu is visible at the Ideal FEC Back Office Suite screen.
2.
Select Inventory | Edit Purchase Order.
© 1997 - 2005 Ideal Software Systems, Inc.
Chapter 4 - Receiving, Transferring, Auditing, and Purchase Orders for Inventory
301
Figure 4-20. The Ideal FEC Back Office Suite Inventory menu's Edit Purchase Order
Select Inventory | Edit Purchase Order.
3.
The Purchase Order List Form window will open. Select a purchase order previously created and
click OK.
Figure 4-21. The Purchase Order List Form window with sample purchase order
Select a purchase order and click OK.
4.
The Purchase Order Form window (Figure 4-18) will open with the purchase order information.
Make any changes that are needed and click OK to save the newly configured purchase order.
© 1997 - 2005 Ideal Software Systems, Inc.
302
Point of Sale
4.4.4
Receiving Purchase Orders
This sub-section explains how to receive a purchase order for inventory in the Point of Sale system.
NOTE: In order to receive a purchase order, a purchase order must have first
been created. See the sub-section "Creating a Purchase Order" for more details.
1.
Make sure that the Point of Sale menu is visible at the Ideal FEC Back Office Suite screen.
2.
Select Inventory | Purchase Order Receive.
Figure 4-22. The Ideal FEC Back Office Suite Inventory menu's Purchase Order Receive
Select Inventory | Purchase Order Receive.
3.
The Confirm window will appear prompting to edit an existing purchase order. Click Yes to edit
one or No to continue.
Figure 4-23. The Confirm window
Click Yes to edit a purchase order or No to continue receiving one.
4.
The Receive Inventory on Purchase Order window will open. Enter the necessary information.
© 1997 - 2005 Ideal Software Systems, Inc.
Chapter 4 - Receiving, Transferring, Auditing, and Purchase Orders for Inventory
303
Figure 4-24. The Receive Inventory on Purchase Order window
Enter the necessary information.
A.
Receive Location
Click the down arrow and select a location that the inventory will be received into.
NOTE: An inventory location must have been created in order to receive
inventory into a location.
5.
B.
Vendor
Select the vendor that the inventory came from.
C.
Purchase Order Number
Enter the purchase order for the inventory to be received.
The table in the Inventory Receive PO Receive Form window will be populated with the
inventory to be received.
A.
To view a report on the inventory to be received and other details, click Receive Report.
i.
6.
To print the report to a default printer, press
in the Print Preview window.
Click OK to receive the purchase order into the specified inventory location.
© 1997 - 2005 Ideal Software Systems, Inc.
304
Point of Sale
Chapter 5 - Front POS Screen Setup
5.1
Setting Up the Front POS Screen
Instructions for creating the Front POS screen
This section contains the procedures for creating the Front POS screen to be
used at the cashier terminals. This section contains the following topics:
•
•
•
•
•
•
•
•
•
•
•
•
•
5.1.1
"About the Front POS Screen"
"Configuring the Main Category Buttons"
"Configuring the Sub-Category Buttons"
"Configuring the Buttons Containing the Items for Sale"
"Edit Item Buttons"
"Clear Item Buttons"
"Set Modifier List"
"Edit Modifier List"
"Clear Modifier List"
"Adding Areas"
"Renaming Areas"
"Accessory Button Color Setup"
"Assigning a Front POS Screen to a Workstation"
About the Front POS Screen
Before the Point of Sales terminals can compute sales and even before the Front POS module can be used, the
Sales screen must first be setup with all the inventory and merchandise for sale. There are four main button types
on the Front POS Sales screen:
Main Category Buttons - These buttons are the top five buttons on the Sales screen. They are used to divide the
Front POS Sales screen into five main categories of inventory or merchandise items.
Sub-Category Buttons - These buttons are on the second row of the Sales screen. Each Main Category button
has its own set of five sub-category buttons. This helps to break main inventory types down further so
that navigation will be easy for employees.
Inventory Buttons - There are eighteen of these buttons for every sub-category button. It total, it adds up that
there can be 450 Inventory buttons. At most, 450 different inventory items can be assigned to one Point
of Sales screen.
Accessory Buttons - These buttons are not assigned by the user. These buttons are standard to the Front POS
Sales screen. the only user-configured property for them is the color.
Another very important feature about the Front POS Sales screen, is that a different Sales screen can be
assigned to each terminal. If the Sales screen for the restaurant needs to look different from the golf station Point
of Sale, then two Front POS screens can be created and each assigned to their different terminals.
© 1997 - 2005 Ideal Software Systems, Inc.
Chapter 5 - Front POS Screen Setup
5.1.2
305
Configuring the Main Category Buttons
It is very important that the Front POS screen be setup correctly to reflect all of the different inventory items for
sale. This sub-section explains how to setup the main categories in the Front POS module of the Point of Sale
system.
1.
Make sure that the Point of Sale menu is visible at the Ideal FEC Back Office Suite screen.
2.
Select Maintenance | Front POS Screen Setup.
Figure 5-1. The Ideal FEC Back Office Suite Maintenance menu's Front POS Screen Setup
Select Maintenance | Front POS Screen Setup.
3.
Enter a name for this new Front POS area in the Add New Area window that will appear and click OK.
© 1997 - 2005 Ideal Software Systems, Inc.
306
Point of Sale
Figure 5-2. The Add New Area window with sample area entered
Enter a new area for the Front POS and click OK.
4.
The POS Setup Form window will open. Click on the top left button as shown in Figure 5-3.
Figure 5-3. The POS Setup Form window
Click the top left button.
5.
The Edit Category Button will open. Enter a main category in the Button Caption field.
© 1997 - 2005 Ideal Software Systems, Inc.
Chapter 5 - Front POS Screen Setup
307
Figure 5-4. The Edit Category Button window with sample main category
Enter a category name in the Button Caption field.
6.
Click Click to Change to select a button color. This will open the Color window.
7.
Once the color is selected, click OK. The Click to Change button will change to the color selected.
Figure 5-5. The Color window
Select a color and click OK.
NOTE: To customize colors, click the Define Customer Colors. The Color window
will expand. Here, a new color can be defined, chosen, and then added to the color
scheme by clicking Add to Custom Colors. At this point, the color can then be added
to the button as seen in Figure 5-6.
© 1997 - 2005 Ideal Software Systems, Inc.
308
Point of Sale
Figure 5-6. The expanded Color window
Figure 5-7. The Click to Change button with a color chosen
Click on a color and then click OK.
8.
Click OK to accept the changes to the main category button. All sub-categories and item buttons will
change to the color chosen for the main category.
Figure 5-8. The POS Setup Form window with a category defined
Click OK to accept the new category and color.
9.
Continue to create main categories for the other five top buttons and assign them different colors so that
it will be easy to navigate through the item buttons.
© 1997 - 2005 Ideal Software Systems, Inc.
Chapter 5 - Front POS Screen Setup
309
Figure 5-9. The POS Setup Form window with all main categories defined
Create the other five main categories.
10.
5.1.3
Once all of the main categories are defined, click OK to save the changes.
Configuring the Sub Category Buttons
It is very important that the Front POS screen be setup correctly to reflect all of the different inventory items for
sale. This sub-section explains how to setup the sub-categories in the Front POS module of the Point of Sale
system.
1.
Make sure that the Point of Sale menu is visible at the Ideal FEC Back Office Suite screen.
2.
Select Maintenance | Front POS Screen Setup (Figure 5-1).
3.
The POS Setup Form window will open (Figure 5-3). Make sure that the correct Current Area is
selected.
4.
Select the main category that needs to have sub-categories added.
Figure 5-10. The POS Setup Form window sub category buttons
Select the correct main category.
5.
Double-click the first sub-category button. This will open the Edit Category Button window.
© 1997 - 2005 Ideal Software Systems, Inc.
310
Point of Sale
Figure 5-11. The Edit Category Button window
Double-click the sub-category button.
6.
Enter a sub-category in the Button Caption field and click OK.
7.
Double-click and enter a sub-category name in each Edit Category Button window.
Figure 5-12. The POS Setup Form window with Sub-Categories completed for first main category
Enter a sub-category for each button.
8.
5.1.4
Once all of the sub-categories are entered for each main category, click OK to save the changes.
Configuring the Buttons Containing the Items for Sale
It is very important that the Front POS screen be setup correctly to reflect all of the different inventory items for
sale. This sub-section explains how to setup the different inventory item buttons in the Front POS module of the
Point of Sale system.
1.
Make sure that the Point of Sale menu is visible at the Ideal FEC Back Office Suite screen.
2.
Select Maintenance | Front POS Screen Setup (Figure 5-1).
3.
The POS Setup Form window will open (Figure 5-3). Make sure that the correct Current Area is
selected.
© 1997 - 2005 Ideal Software Systems, Inc.
Chapter 5 - Front POS Screen Setup
4.
Select the main category that needs to have inventory items added.
Figure 5-13. The POS Setup Form window inventory buttons
Select the correct category to add the inventory buttons to.
5.
Double-click the first inventory item button. This will open the Item Button Edit window.
© 1997 - 2005 Ideal Software Systems, Inc.
311
312
Point of Sale
Figure 5-14. The Item Button Edit window
Double-click an inventory item button.
6.
Click Choose Item. This will open the Select Inventory Item window where an inventory item can be
chosen.
© 1997 - 2005 Ideal Software Systems, Inc.
Chapter 5 - Front POS Screen Setup
313
Figure 5-15. The Select Inventory Item window
Click Choose Item and select an inventory item.
NOTE: A new item can be created from this screen by clicking Create Item. For
more information on creating a new inventory item, see the "Inventory" section in
Chapter 3.
7.
Once an item is either selected, fill out the rest of the information in the Item Button Edit window.
A.
B.
Font
i.
Name
Select the font the inventory item will appear in on the button.
ii.
Size
Select the size of the text that will appear on the button.
Button Caption
Enter the name for the inventory item button.
NOTE: The Button Caption field will automatically get populated when an
inventory item is selected with the name of that inventory item.
C.
Image
An image can be created to go on the button instead of text.
i.
Load Image
Click this button to bring up the Open window. This is where an image can be
selected.
© 1997 - 2005 Ideal Software Systems, Inc.
314
Point of Sale
NOTE: Only BMP or Bitmap files can be selected to be an image on a button.
Figure 5-16. The Open window
Select an image to be on an inventory button.
D.
Clear Image
Remove any image that might currently by assigned to the button.
8.
Click OK to add the properties to the inventory button.
9.
Assign other inventory items to the other buttons.
Figure 5-17. The POS Setup Form window with inventory buttons setup
© 1997 - 2005 Ideal Software Systems, Inc.
Chapter 5 - Front POS Screen Setup
315
Assign inventory items to the other buttons.
10.
5.1.5
Once the other buttons are created, click OK to save the changes.
Edit Item Buttons
This sub-section explains how to edit the different inventory item buttons in the Front POS module of the Point
of Sale system.
1.
Make sure that the Point of Sale menu is visible at the Ideal FEC Back Office Suite screen.
2.
Select Maintenance | Front POS Screen Setup (Figure 5-1).
3.
The POS Setup Form window will open (Figure 5-3). Make sure that the correct Current Area is
selected.
4.
Select the main category that needs to have inventory items edited.
5.
Right-click the inventory item button that needs to be edited. Select Edit Button when the options
window opens.
Figure 5-18. The options window for editing item buttons
© 1997 - 2005 Ideal Software Systems, Inc.
316
Point of Sale
Right-click on a button and select Edit Button.
6.
The Item Button Edit window will open (Figure 5-14). Make the necessary changes and click OK.
7.
The button will be edited.
5.1.6
Clear Item Buttons
This sub-section explains how to clear an inventory item button in the Front POS module of the Point of Sale
system.
1.
Make sure that the Point of Sale menu is visible at the Ideal FEC Back Office Suite screen.
2.
Select Maintenance | Front POS Screen Setup (Figure 5-1).
3.
The POS Setup Form window will open (Figure 5-3). Make sure that the correct Current Area is
selected.
4.
Select the main category that needs to have inventory item removed.
5.
Right-click the inventory item button that needs to be removed. Select Clear Button when the options
window opens.
Figure 5-19. The options window for editing item buttons
Right-click on a button and click Clear Button.
6.
5.1.7
The inventory item assigned to the button will disappear. If no item was assigned to the button, no
change will be made.
Set Modifier List
This sub-section explains how to assign a modifier list to an inventory item button in the Front POS module of
the Point of Sale system.
NOTE: A modifier list must first be created before one can be assigned to a Front
POS button. If one has not been created refer back to Chapter 3 section "Discounts".
© 1997 - 2005 Ideal Software Systems, Inc.
Chapter 5 - Front POS Screen Setup
317
1.
Make sure that the Point of Sale menu is visible at the Ideal FEC Back Office Suite screen.
2.
Select Maintenance | Front POS Screen Setup (Figure 5-1).
3.
The POS Setup Form window will open (Figure 5-3). Make sure that the correct Current Area is
selected.
4.
Select the main category that needs to have the modifier list added.
5.
Right-click on the button of the correct inventory item that needs to have the list associated with it.
Select Set Modifier List when the options window opens.
NOTE: The button must have an inventory item assigned to it first before the
modifier list can be added, preferably an item that should be associated with the
modifier list.
Figure 5-20. The options window for editing item buttons
Right-click on a button and select Set Modifier List.
6.
The Modifier Menu List window will open. Select the correct list and click OK.
Figure 5-21. The Modifier Menu List window with sample lists
Select a modifier list and click OK.
7.
The list is now associated inventory item and its Front POS button.
© 1997 - 2005 Ideal Software Systems, Inc.
318
Point of Sale
5.1.8
Edit Modifier List
This sub-section explains how to edit previously assigned modifier lists to inventory item buttons in the Front
POS module of the Point of Sale system.
NOTE: A modifier list must first be created and added to a button before one can be
edited. If one has not been created refer back to Chapter 3 section "Discounts".
1.
Make sure that the Point of Sale menu is visible at the Ideal FEC Back Office Suite screen.
2.
Select Maintenance | Front POS Screen Setup (Figure 5-1).
3.
The POS Setup Form window will open (Figure 5-3). Make sure that the correct Current Area is
selected.
4.
Select the main category that needs to have the modifier list edited.
5.
Right-click on the button of the correct inventory item that needs to have the modifier list edited. Select
Edit Modifier List when the options window opens.
Figure 5-22. The options window for editing item buttons
Right-click on a button and select Edit Modifier List.
6.
The Modifier Edit Form window will open. Edit the necessary information and click OK.
© 1997 - 2005 Ideal Software Systems, Inc.
Chapter 5 - Front POS Screen Setup
319
Figure 5-23. The Modifier Edit Form window
Edit the modifier list information and click OK.
7.
5.1.9
The modifier list will now be changed.
Clear Modifier List
This sub-section explains how to clear modifier lists from buttons in the Front POS module of the Point of Sale
system.
NOTE: A modifier list must first be created and added to a button before one can be
cleared. If one has not been created refer back to Chapter 3 section "Discounts".
1.
Make sure that the Point of Sale menu is visible at the Ideal FEC Back Office Suite screen.
2.
Select Maintenance | Front POS Screen Setup (Figure 5-1).
© 1997 - 2005 Ideal Software Systems, Inc.
320
Point of Sale
3.
The POS Setup Form window will open (Figure 5-3). Make sure that the correct Current Area is
selected.
4.
Select the main category that needs to have the modifier list removed.
5.
Right-click on the button of the correct inventory item that needs to have the modifier list removed.
Select Clear Modifier List when the options window opens.
Figure 5-24. The options window for editing item buttons
Right-click on a button and select Clear Modifier List.
6.
A window will appear informing the user that the modifier list is no longer associated with the button.
Click OK.
Figure 5-25. The Ideal POS Administrator window
Click OK.
7.
5.1.10
The modifier list has been removed.
Adding Areas
Sometimes it will be necessary to setup more than one Front POS screen for the different areas at a family
entertainment location. This sub-section explains how to create a multiple areas in the Front POS module of the
Point of Sale system.
1.
Make sure that the Point of Sale menu is visible at the Ideal FEC Back Office Suite screen.
2.
Select Maintenance | Front POS Screen Setup (Figure 5-1).
3.
The POS Setup Form window will open (Figure 5-3). Click Add Area.
4.
This will bring up the Add New Area window (Figure 5-2). Enter a name for the area in the New Area
Name field.
5.
Once this new name is entered, click OK. The POS Setup Form window will now be blank and ready
for more categories and inventory items to be setup.
© 1997 - 2005 Ideal Software Systems, Inc.
Chapter 5 - Front POS Screen Setup
321
Figure 5-26. The POS Setup Form window showing a new area
Enter a new area name and click OK.
5.1.11
Renaming Areas
Renaming the area for the Front POS screen is a nice convenience that can keep the user from having to recreate
multiple terminal screens. This sub-section explains how to rename areas in the Front POS module of the Point
of Sale system.
1.
Make sure that the Point of Sale menu is visible at the Ideal FEC Back Office Suite screen.
2.
Select Maintenance | Front POS Screen Setup (Figure 5-1).
3.
The POS Setup Form window will open (Figure 5-3). Click Rename Area.
4.
This will bring up the Edit Area Name window. Enter a name for the area in the New Area Name
field.
© 1997 - 2005 Ideal Software Systems, Inc.
322
Point of Sale
Figure 5-27. The Edit Area Name window
Enter a name for the area.
5.
Once this new name is entered, click OK. The POS Setup Form window will now have a new area
name.
Figure 5-28. The POS Setup Form window showing a new area name
Click OK once the new area name is entered.
5.1.12
Accessory Button Color Setup
Changing the color of the accessory buttons for the Front POS screen helps in making the buttons easier to see
for the users. This sub-section explains how to change the accessory button color in the Front POS module of the
Point of Sale system.
1.
Make sure that the Point of Sale menu is visible at the Ideal FEC Back Office Suite screen.
2.
Select Maintenance | Front POS Screen Setup (Figure 5-1).
3.
The POS Setup Form window will open (Figure 5-3). Click the down arrow in the Accessory Button
© 1997 - 2005 Ideal Software Systems, Inc.
Chapter 5 - Front POS Screen Setup
323
Color field.
4.
Select a color to be the accessory button color by just clicking on the color.
TIP: The default color for the accessory buttons is blue. Also, it is recommended
that the color of the accessory buttons is different from all the category colors.
This will make Front POS easier to navigate.
5.1.13
Assigning a Front POS Screen to a Workstation
This sub-section contains the information needed to assign the Front POS Sales screen to a terminal(s) in the
Point of Sale software.
1.
Make sure that the Point of Sale menu is visible at the Ideal FEC Back Office Suite screen.
2.
Select the Maintenance | System Parameters.
Figure 5-29. The Ideal FEC Back Office Suite Maintenance menu's System Parameters
Select Maintenance | System Parameters.
3.
The Edit Parameters Terminal window will appear. The Store Settings tab is the default view.
© 1997 - 2005 Ideal Software Systems, Inc.
324
Point of Sale
TIP: The Edit Parameters Terminal window is also available by clicking
Parameters in the Front POS program.
4.
Click the Terminal Parameters tab.
Figure 5-30. The Edit Parameters Terminal window showing the Terminal Parameters tab
The Terminal Parameters tab.
5.
Change the Terminal ID to the number of the terminal that needs to have the Front POS screen
assigned
6.
In the Front POS Screen field, click the down arrow and select the name of the area that the assigned
terminal will open up to whenever the Front POS program is run.
© 1997 - 2005 Ideal Software Systems, Inc.
Chapter 5 - Front POS Screen Setup
5.2
325
Cash Payout Types
Instructions for cash payout procedures
This section contains the procedures for cash pay out in the Front POS
module. This section contains the following topics:
•
•
•
•
•
5.2.1
"Cash Payout Types Explanation"
"Adding Cash Payout Types"
"Editing Cash Payout Types"
"Removing Cash Payout Types"
"Petty Cash Out"
Cash Payout Types Explanation
Cash Payout Types are the different forms of payments that can be made at the Front POS station. Managers can
use this option to pay for deliveries, pay utilities, or even pay employees and based on the pay out type that they
choose, these transactions can appear in the system. Cash Payout Types will appear as options that the manager
can choose from while paying someone cash from the cash drawer.
5.2.2
Adding Cash Payout Types
This sub-section contains the information needed to configure the Front POS cash pay out types in the Point of
Sale software.
1.
Make sure that the Point of Sale menu is visible at the Ideal FEC Back Office Suite screen.
2.
Select Maintenance | Cash Payout Types.
© 1997 - 2005 Ideal Software Systems, Inc.
326
Point of Sale
Figure 5-31. The Ideal FEC Back Office Suite Maintenance menu's Cash Payout Types
Select Maintenance | Cash Payout Types.
3.
The Cash Drawer Payout Setup window will appear. Click Add.
© 1997 - 2005 Ideal Software Systems, Inc.
Chapter 5 - Front POS Screen Setup
Figure 5-32. The Cash Drawer Payout Setup window
Click Add.
4.
The Setup Payout window will appear. Enter the necessary information.
Figure 5-33. The Setup Payout window
Enter the pay out information.
5.
A.
Pay Out Description
Enter the pay out type.
B.
General Ledger Code
Enter a general ledger code that will identify the pay out type.
Once the information is entered, click OK.
© 1997 - 2005 Ideal Software Systems, Inc.
327
328
Point of Sale
NOTE: Both fields in the Setup Payout window must be filled before the pay
out type can be saved.
6.
5.2.3
The cash pay out type will now be displayed in the Cash Drawer Payout Setup window. Click Close.
Editing Cash Payout Types
This sub-section contains the information needed to edit the Front POS cash pay out types in the Point of Sale
software.
NOTE: In order to edit a cash pay out type, a pay out type must have been
previously created. Refer to the previous sub-section for more information.
1.
Make sure that the Point of Sale menu is visible at the Ideal FEC Back Office Suite screen.
2.
Select Maintenance | Cash Payout Types (Figure 5-31).
3.
The Cash Drawer Payout Setup window will appear (Figure 5-32). Select a Payout Name and click
Edit .
4.
The Setup Payout window will appear (Figure 5-33). Change any information if necessary.
5.
Once the information is entered, click OK.
NOTE: Information must be in both fields in the Setup Payout window before
the pay out type can be saved.
6.
5.2.4
The edited cash pay out type will now be displayed in the Cash Drawer Payout Setup window. Click
Close.
Removing Cash Payout Types
This sub-section contains the information needed to remove the Front POS cash pay out types in the Point of
Sale software.
NOTE: In order to remove a cash pay out type, a pay out type must have been
previously created. See sub-section "Adding Cash Payout Types" for more
information.
1.
Make sure that the Point of Sale menu is visible at the Ideal FEC Back Office Suite screen.
2.
Select Maintenance | Cash Payout Types (Figure 5-31).
3.
The Cash Drawer Payout Setup window will appear (Figure 5-32). Select a Payout Name and click
Remove.
4.
The Confirm window will appear. To delete the cash pay out type click Yes. Otherwise, click No.
© 1997 - 2005 Ideal Software Systems, Inc.
Chapter 5 - Front POS Screen Setup
329
Figure 5-34. The Confirm window
Click Yes to remove the cash pay out type.
5.
5.2.5
The pay out type will now be removed. Click Close.
Petty Cash Out
This sub-section contains the information needed to correctly record the amount of petty cash taken out of Point
of Sale system.
1.
Make sure that the Facility menu is visible at the Ideal FEC Back Office Suite screen by pressing the
Facility button.
2.
Select Facility | Petty Cash Out.
Figure 5-35. The Ideal FEC Back Office Suite Facility menu's Petty Cash Out
Select Facility | Petty Cash Out.
3.
The Petty Cash Out window will appear. Enter the needed information.
© 1997 - 2005 Ideal Software Systems, Inc.
330
Point of Sale
Figure 5-36. The Petty Cash Out window
Enter the necessary information.
4.
5.
The Setup Payout window will appear. Enter the necessary information.
A.
Amount
Enter the amount of the petty cash out.
B.
Reason
Enter a reason the petty cash is being removed.
Click OK once the Amount and Reason are correctly filled out to record the petty cash out.
© 1997 - 2005 Ideal Software Systems, Inc.
Chapter 6 - Issuing, Counting, Adjusting, and Closing Drawers
331
Chapter 6 - Issuing, Counting, Adjusting,
and Closing Drawers
6.1
Drawers
Instructions for issuing, removing, counting, adjusting, and closing
drawers
This section contains all the procedures to be used when dealing with the
cash drawers in the Point of Sale system. This section contains the
following topics:
•
•
•
•
•
•
•
•
•
•
•
•
•
6.1.1
"About Drawers"
"Issuing Drawers"
"Removing Drawers"
"Counting Drawers"
"Adjusting Drawers"
"Closing Drawers"
"Closing All Drawers"
"Adding Drawer Items"
"Add Additional Quantity to Drawer Items"
"Remove Quantity From Drawer Items"
"Count and Record Quantities of Drawer Items"
"Audit Drawer Items"
"Drawer Lockout Override"
About Drawers
The Drawer menu allows the user to perform the following functions: Issue Drawer, Count Drawer, Adjust
Drawer, Close Drawer, Drawer Items, and View Open Orders. With the exception of the View Open Orders
option, all functions are also statuses of the cash drawers. Two additional statuses for drawers are Active and
Removed. Certain drawer functions can only be performed if a drawer has been assigned a previous status. The
status structure for drawers is as follows:
Issued - At the beginning of the day or before a shift, a manager will issue a drawer to an employee. A cash
drawer must be issued in order to log into Front POS and gain access the Sales screen. Issued drawers,
just like Removed drawers, can be Counted. Also, this function is where entering the initial drawer
amount occurs. The drawer amount is defaulted from the System Parameters Money Settings tab and
can be edited when the drawer is issued to an employee. It is very important that this amount is correct
so that when the drawer is counted and reports are generated, an accurate calculation can be made. The
Drawer ID field is optional but can be a useful operational tool as the number assigned will appear on
reports. Another important feature is that drawer items can be tracked. Drawers items for example might
be tokens or coupons. Refer to sub-sections "Issuing Drawers" and "Adding Drawer Items" for more
information.
Active - This is the status of drawers that are currently issued and in use at a Point of Sale terminal. Refer to sub-
© 1997 - 2005 Ideal Software Systems, Inc.
332
Point of Sale
section "Removing Drawers" for more information.
Removed - When an employee's shift has ended and the cash drawer is removed from the workstation, this status
is given to the drawer. Removed drawers can be Counted or re-Issued back into a station. Refer to subsection "Removing Drawers" for more information.
Counted - This function prompts the user to count all the items in the Removed cash drawer. Also the user must
count cash, checks, credit Card receipts, and any other form of payment in the drawer. Only Removed
or Issued drawers can be Counted. Refer to sub-section "Counting Drawers" for more information.
Adjusted - If a drawer money count results in an overage or shortage, the manager may want to recount the
drawer for accuracy. If a new amount is counted on one of the drawer incomes, this drawer can be
Adjusted. Each new amount will need to be re-entered in the fields provided. Drawers that have been
Counted can be Adjusted. The full amount of the recounted drawer must be re-entered in full for each
field when a drawer is Adjusted. Do not enter only the difference between the counts. Refer to subsection "Adjusting Drawers" for more information.
Closed - Drawers that have been Counted or Adjusted can be Closed.
WARNING: Once a drawer has been closed, it cannot be Adjusted or reAdjusted anymore. Refer to sub-section "Closing Drawers" for more information.
6.1.2
Issuing Drawers
This sub-section contains the information needed to assign a cash drawer(s) in Front POS to an employee in the
system.
NOTE: Employees must have been created in order to assign a cash drawer. For
more information on creating employees, see the "Entering Employees and
Employee Groups" section in Chapter 2. Also, an actual, physical cash drawer
does not have to be present to assign a drawer to an employee. However, in order
for an employee to access the Front POS module, the employee must have a
drawer issued in their name.
1.
Make sure that the Point of Sale menu is visible at the Ideal FEC Back Office Suite screen.
2.
Select Drawers | Issue Drawer.
NOTE: Also, clicking
will issue a drawer to an employee.
© 1997 - 2005 Ideal Software Systems, Inc.
Chapter 6 - Issuing, Counting, Adjusting, and Closing Drawers
Figure 6-1. The Ideal FEC Back Office Suite Drawers menu's Issue Drawer
Select Drawers | Issue Drawer.
3.
The Choose Employee window will appear. Select an employee and click OK.
Figure 6-2. The Choose Employee window with sample employee
Select an employee and clickOK.
© 1997 - 2005 Ideal Software Systems, Inc.
333
334
Point of Sale
4.
The Issue Drawer window will open. Fill in the necessary information.
Figure 6-3. The Issue Drawer window
Enter the necessary information.
A.
Initial Drawer Amount
Enter the dollar amount that the cash drawer initially has when assigned to a cashier
terminal.
NOTE: The Initial Drawer Amount is defaulted to the amount defined on the
Money Settings tab in System Parameters. For more information, see
"Configuring System Parameters" sub-section "Configure Money Settings in Edit
Parameters" in Chapter 2.
B.
5.
Drawer ID Number
Enter a number for the drawer ID to make drawer identification easier.
Once the information is entered, click OK. The Confirm window will open.
Figure 6-4. The Confirm window
Click OK to open the Confirm window.
6.
Click No to add no drawers items or Yes to add more.
NOTE: To see more about adding drawer items, see the sub-section "Adding
Drawer Items" in this section.
7.
The user will be returned to the Choose Employee window. Either select another employee and click
OK to issue another drawer or click Cancel to exit the window.
© 1997 - 2005 Ideal Software Systems, Inc.
Chapter 6 - Issuing, Counting, Adjusting, and Closing Drawers
6.1.3
335
Removing Drawers
This sub-section contains the information needed to remove a cash drawer(s) in the Front POS module of the
Point of Sale system.
NOTE: To remove a drawer, a drawer must have first been issued to an
employee and opened at a Front POS terminal. Refer to the previous sub-section
for more information. Also, an employee must have a user name and password
assigned that contains the right to remove a drawer before the cash drawer can be
removed from the Front POS terminal.
1.
Make sure that the Ideal Software Systems POS Login Terminal (Front POS) screen is opened.
Figure 6-5. The Front POS screen with an open drawer
The Front POS screen.
2.
Enter an Employee ID and PIN Number.
3.
Click Remove Drawer. The drawer will now be removed from the Front POS terminal.
© 1997 - 2005 Ideal Software Systems, Inc.
336
Point of Sale
6.1.4
Counting Drawers
This sub-section shows the user how to count a cash drawer(s) that has been issued to an employee(s) in the
Point of Sale system.
NOTE: A drawer must be removed from the Front POS terminal before it can be
counted.
1.
Make sure that the Point of Sale menu is visible at the Ideal FEC Back Office Suite screen.
2.
Select Drawers | Count Drawer.
NOTE: Also, clicking
will count a drawer for an employee.
Figure 6-6. The Ideal FEC Back Office Suite Drawers menu's Count Drawer
Select Drawers | Count Drawer.
3.
The Select a Drawer window will appear. Select a drawer to count and click Select.
Figure 6-7. The Select a Drawer window with sample removed drawer
Select a removed drawer and click Select.
4.
The Count Drawer window will open. Fill in the necessary information.
© 1997 - 2005 Ideal Software Systems, Inc.
Chapter 6 - Issuing, Counting, Adjusting, and Closing Drawers
337
Figure 6-8. The Count Drawer window
Enter the necessary information.
A.
Cash Counted
Enter the amount of cash counted in the cash drawer.
NOTE: The Currency Count section can be used to count all of the paper
currency and coinage. The cash amount is added in the Cash Counted field.
B.
Credit Counted
This field is automatically populated with the total amount of credit card transactions at the
drawer being counted.
C.
Checks Counted
Enter the total sum of all the checks.
D.
Discounts Counted
This field is automatically populated with the total amount of discounts given at the drawer
being counted.
5.
Once the information is entered, click OK. The Confirm window will open.
6.
Click Yes to record the drawer counts. Otherwise click No.
© 1997 - 2005 Ideal Software Systems, Inc.
338
Point of Sale
Figure 6-9. The Confirm window
Click Yes.
7.
6.1.5
After clicking Yes, the drawer will appear in the Select a Drawer window as Counted. Click Cancel to
close the window.
Adjusting Drawers
This sub-section contains the information needed to adjust a count on a cash drawer(s) in the Point of Sale
system.
NOTE: A drawer must be counted before it can be adjusted.
1.
Make sure that the Point of Sale menu is visible at the Ideal FEC Back Office Suite screen.
2.
Select Drawers | Adjust Drawer.
NOTE: Also, clicking
will adjust a drawer for an employee.
Figure 6-10. The Ideal FEC Back Office Suite Drawers menu's Adjust Drawer
Select Drawers | Adjust Drawer.
3.
The Select a Drawer window will appear. Select a drawer to adjust and click Select.
© 1997 - 2005 Ideal Software Systems, Inc.
Chapter 6 - Issuing, Counting, Adjusting, and Closing Drawers
339
Figure 6-11. The Select a Drawer window with sample counted drawer
Select a counted drawer and click Select.
4.
The Adjust Drawer window will open. Fill in the necessary information.
Figure 6-12. The Adjust Drawer window
Enter the necessary information.
A.
Cash Counted
Change the amount of cash counted in the cash drawer.
B.
Credit Counted
Change the amount of credit card charges that took place at the cash drawer.
C.
Checks Counted
Change the total sum of all the checks.
D.
Reason for adjustment
Always enter a reason for having to adjust the drawer.
5.
Once the information is entered, click OK. The drawer will appear in the Select a Drawer window as
Adjusted.
6.
Click Cancel to close the window.
© 1997 - 2005 Ideal Software Systems, Inc.
340
Point of Sale
6.1.6
Closing Drawers
This sub-section contains the information needed to close a cash drawer(s) in the Point of Sale system.
NOTE: A drawer must be counted or adjusted before it can be closed.
1.
Make sure that the Point of Sale menu is visible at the Ideal FEC Back Office Suite screen.
2.
Select Drawers | Close Drawer.
NOTE: Also, clicking
will close a drawer for an employee.
Figure 6-13. The Ideal FEC Back Office Suite Drawers menu's Close Drawer
Select Drawers | Close Drawer.
3.
The Select a Drawer window will appear. Select a drawer to count and click Select.
Figure 6-14. The Select a Drawer window with sample adjusted drawer
Select a removed drawer and click Select.
4.
The Close Drawer window will open. Click Yes to close the drawer or No to leave it open.
© 1997 - 2005 Ideal Software Systems, Inc.
Chapter 6 - Issuing, Counting, Adjusting, and Closing Drawers
341
WARNING: The user will not be able to adjust the drawer after it has been
closed.
Figure 6-15. The Close Drawer window
Click Yes to close the drawer.
5.
6.1.7
Once the drawer is closed, the Select a Drawer window will open. The closed drawer will no longer be
showing.
Closing All Drawers
This sub-section contains the information needed to close all open cash drawers in the Point of Sale system.
NOTE: A drawer must be counted or adjusted before it can be closed.
1.
Make sure that the Point of Sale menu is visible at the Ideal FEC Back Office Suite screen.
2.
Select Drawers | Close All Drawers.
Figure 6-14. The Ideal FEC Back Office Suite Drawers menu's Close All Drawer
Select Drawers | Close All Drawers.
3.
The Select Business Day of Drawers to Close window will appear. Enter the business date of the
© 1997 - 2005 Ideal Software Systems, Inc.
342
Point of Sale
drawers to close.
Figure 6-15. The Select Business Day of Drawers to Close window
Click the down arrow and select a date in the Calendar window.
4.
The Ideal POS information window will appear informing the user that all drawers for the
selected date have been closed. Click OK.
Figure 6-16. The Ideal POS information window
Click OK
5.
6.1.8
All drawers for the selected business day will be closed.
Adding Drawer Items
This sub-section contains the information needed to add drawer items to an issued cash drawer(s) in the Point of
Sale system.
NOTE: A drawer must be issued or opened before drawer items can added.
1.
Make sure that the Point of Sale menu is visible at the Ideal FEC Back Office Suite screen.
2.
Select Drawers | Add/Remove Drawer Items.
NOTE: Another way to add drawers items is when a drawer is being issued to an
employee, the Confirm window will prompt the user to add drawer items.
© 1997 - 2005 Ideal Software Systems, Inc.
Chapter 6 - Issuing, Counting, Adjusting, and Closing Drawers
Figure 6-17. The Ideal FEC Back Office Suite Drawers menu's Add/Remove Drawer Items
Select Drawers | Add/Remove Drawer Items.
3.
The Select a Drawer window will appear. Select a drawer to add items to and click Select.
Figure 6-18. The Select a Drawer window with sample issued drawer
Select an issued drawer and click Select.
4.
The Drawer Items window will open. Click Add Item.
© 1997 - 2005 Ideal Software Systems, Inc.
343
344
Point of Sale
Figure 6-19. The Drawer Items window
Click Add Item.
5.
The Select Inventory Item window will open. Select an item to add and click OK.
6.
The Drawer Items Initial Quantity window will appear asking for the initial amount to be added into
the drawer. Enter an initial amount and click OK.
Figure 6-20. The Drawer Items Initial Quantity window
Fill in the Initial Qty field and click OK.
7.
The item and the amount will appear in the Drawer Items window. Click Close.
© 1997 - 2005 Ideal Software Systems, Inc.
Chapter 6 - Issuing, Counting, Adjusting, and Closing Drawers
6.1.9
345
Add Additional Quantity to Drawer Items
This sub-section contains the information needed to add additional quantity to items in an issued cash drawer(s)
in the Point of Sale system.
NOTE: A drawer must be issued or opened before drawer item information can
be accessed. Also, drawer items have to be added before editing the quantity
amounts of those drawer items can be done.
1.
Make sure that the Point of Sale menu is visible at the Ideal FEC Back Office Suite screen.
2.
Select Drawers | Add/Remove Drawer Items (Figure 6-17).
3.
The Select a Drawer window will appear (Figure 6-18). Select a drawer that has item quantities
needing to be added and click Select.
4.
The Drawer Items window will open (Figure 6-19). Select a drawer item and click Add Additional
Qty.
5.
The Drawer Items to Add window will open. Enter a quantity to add in the Add field and click OK.
Figure 6-21. The Drawer Items to Add window
Fill in the Add field and click OK.
6.
6.1.10
The new amount will appear in the Drawer Items window. Click Close.
Remove Quantity From Drawer Items
This sub-section contains the information needed to remove quantity from items in an issued cash drawer(s) in
the Point of Sale system.
NOTE: A drawer must be issued or opened before drawer item information can
be accessed. Also, drawer items have to be added before editing the quantity
amounts of those drawer items can be done.
1.
Make sure that the Point of Sale menu is visible at the Ideal FEC Back Office Suite screen.
2.
Select Drawers | Add/Remove Drawer Items (Figure 6-17).
3.
The Select a Drawer window will appear (Figure 6-18). Select a drawer that has item quantities
needing to be removed and click Select.
© 1997 - 2005 Ideal Software Systems, Inc.
346
Point of Sale
4.
The Drawer Items window will open (Figure 6-19). Select a drawer item and click Remove Qty.
5.
The Drawer Items to Remove window will open. Enter a quantity to remove in the Remove field and
click OK.
Figure 6-22. The Drawer Items to Remove window
Fill in the Remove field and click OK.
6.
6.1.11
The new amount will appear in the Drawer Items window. Click Close.
Count and Record Quantities of Drawer Items
This sub-section contains the information needed to count and record item quantity from an issued cash
drawer(s) in the Point of Sale system.
NOTE: A drawer must be issued or opened before drawer item information can
be accessed. Also, drawer items have to be added before counting the quantity of
those drawer items can be done.
1.
Make sure that the Point of Sale menu is visible at the Ideal FEC Back Office Suite screen.
2.
Select Drawers | Add/Remove Drawer Items (Figure 6-17).
3.
The Select a Drawer window will appear (Figure 6-18). Select a drawer that needs to have its drawer
item quantity counted and recorded and click Select.
4.
The Drawer Items window will open (Figure 6-19). Select a drawer item and click Count Item.
5.
The Total Number of Items Counted in Drawer window will open. Enter a count to record in the
Counted field and click OK.
Figure 6-23. The Total Number of Items Counted in Drawer window
Fill in the Counted field and click OK.
© 1997 - 2005 Ideal Software Systems, Inc.
Chapter 6 - Issuing, Counting, Adjusting, and Closing Drawers
6.
6.1.12
347
The counted amount will appear in the Drawer Items window. Click Close.
Audit Drawer Items
This sub-section contains the information needed to audit drawer items for an issued cash drawer(s) in the Point
of Sale system.
NOTE: Drawer items have to be added before auditing the quantity amounts of
those drawer items can be done.
1.
Make sure that the Point of Sale menu is visible at the Ideal FEC Back Office Suite screen.
2.
Select Drawers | Audit Drawer Items.
Figure 6-24. The Ideal FEC Back Office Suite Drawers menu's Audit Drawer Items
Select Drawers | Audit Drawer Items.
3.
The Select a Drawer window will appear. Select a drawer that has item quantities needing to be
audited and click Select.
© 1997 - 2005 Ideal Software Systems, Inc.
348
Point of Sale
Figure 6-25. The Select a Drawer window with active drawer
Select a drawer and click Select.
4.
The Audit Drawer window will open. For the item that needs to be audited, click inside the Count
field and enter the correct number amount for the drawer item and click Complete.
Figure 6-26. The Audit Drawer with sample item
Enter the new count for the items then click Complete.
5.
6.1.13
The Select a Drawer window will appear again (Figure 6-26). Either select another drawer or click
Cancel.
Drawer Lockout Override
This sub-section contains the information needed to adjust drawer lockout based on the amout of cash in the
drawer(s) at the Point of Sale terminals.
NOTE: A drawer must have been assigned to a user before the instructions below
can be followed. For more information on assigning a drawer to a user, refer back
to the sub-section "Issuing Drawers".
1.
Make sure that the Point of Sale menu is visible at the Ideal FEC Back Office Suite screen.
2.
Select Drawers | Drawer Lockout Override.
© 1997 - 2005 Ideal Software Systems, Inc.
Chapter 6 - Issuing, Counting, Adjusting, and Closing Drawers
349
Figure 6-27. The Ideal FEC Back Office Suite Drawers menu's Drawer Lockout Override
Select Drawers | Drawer Lockout Override.
3.
The Select a Drawer window (Figure 6-25) will appear. Select a drawer that and click Select.
4.
The Drawer Lockout Exception window will open. Information such as the current amount of cash in
the drawer and the current drawer owner lockout cash level will be available. Enter the new drawer
lockout cash level in the New Drawer Lockout Limit field and click OK.
Figure 6-28. The Drawer Lockout Exception
Enter the new drawer lockout cash level and then click OK.
5.
The new cash level lockout will be applied.
© 1997 - 2005 Ideal Software Systems, Inc.
350
Point of Sale
Chapter 7 - Front POS, Customers, and
Functions
7.1
The Sales and Payment Method Screens
Instructions for the Front POS sales and payment screens
This section contains all the procedures to use the sales and payment
screens in Front POS in the Point of Sale system. This section contains the
following topics:
•
•
•
•
•
•
•
•
•
•
•
•
•
•
•
•
•
•
•
•
•
7.1.1
"About the Sales and Payment Method Screens"
"Logging In"
"Purchasing an Item With Cash"
"Purchasing an Item With Check"
"Purchasing an Item With Both Cash and Check"
"Purchasing an Item With a Manual Credit Card"
"Purchasing an Item With Cash (and/or Check) and a Manual
Credit Card"
"Purchasing an Item With a Credit Card"
"Purchasing an Item With Cash (and/or Check) and a Credit
Card"
"Purchasing an Item With a OnePOS Card"
"Selling OnePOS Card Value"
"Purchasing Multiple Items"
"Removing an Item for Purchase from the Sales Screen"
"Making a Sale Tax Exempt"
"Refunding Items"
"Applying Discounts to Items During a Sale"
"Adding Special Instructions to an Order"
"Opening the Cash Drawer Without Making a Sale"
"Freezing the Terminal"
"Changing the PIN Number"
"Closing Front POS"
About the Sales and Payment Method Screens
The Front POS Sales screen and module is very user friendly and easy to use. All employees and Point of Sale
users should become familiar with this module and the types of payments that are accepted. There are a number
of abilities that can be utilized in using the Front POS module in the Point of Sale system.
1.
Front POS can be used effectively with a touch screen monitor. No mouse or keyboard is required.
2.
One or two cash drawers can be configured for each workstation.
3.
Front POS is directly integrated with the Event Scheduler module.
© 1997 - 2005 Ideal Software Systems, Inc.
Chapter 7 - Front POS, Customers, and Functions
351
4.
The button hierarchy on the Sales screen is very easy to navigate and even easier if used with a touch
screen monitor.
5.
A keypad replaces the need to use a keyboard to enter quantity amounts, money amounts, etc.
Figure 7-1. The Front POS key pad
6.
The Freeze Terminal button allows the user to return to the login screen if the terminal will be left
unattended for any length of time.
Figure 7-2. The Freeze Terminal button
7.
The No Sale button will open the cash drawer. Transactions are recorded when the cashier or
manager presses the No Sale button in Front POS. These transactions will appear on the
Transaction report and show the name of the authorized person who opened the drawer and the
time it was opened.
Figure 7-3. The No Sale button
8.
A sale can be altered very easily if a mistake has been made. In fact, as long as Complete Sale is not
clicked, at any point during a sale, the transaction can be completely altered or stopped.
9.
Discounts can be given quickly and easily. Front POS does all the math very quickly for the user.
NOTE: The cashier will not be able to use or swipe a credit card on a standard
sale if the cashier has already keyed in a cash, check, gift, debit card, or any
combination of payment that is more than or equal to the order amount. Also, the
cashier will not be allowed to key a cash payment that is more than $99.00 of the
original order amount. Finally, a refund cannot be keyed that is more than the
refund order amount.
10.
Discounts can also be applied to employees. The cashier will scan the employee's login card at the
order entry screen. The screen will turn light blue and the employee's name will appear above the
© 1997 - 2005 Ideal Software Systems, Inc.
352
Point of Sale
inventory item keys. The cashier may then add items to the order. As each item is added, the discount to
be applied to the item is found in the discount detail. The price shown in the order list will be the
discounted price based on the discount type for the employee. The order may then be closed just like
normal orders. Employees must use all bonus value before they may charge to their account.
11.
12.
There are two different types of refunds in the Point of Sale system. Cashiers can be required to request
a receipt in order to receive a refund or not. The rules that apply if the cashier needs a receipt from the
customer are:
A.
Cashiers must enter the date and receipt number of the order they intend to refund.
B.
Refunds may only be given on items that were actually purchased on the receipt.
C.
The price that was originally charged for the item will be the amount refunded.
D.
Items on the receipt may only be refunded once.
E.
A refund may only be made on one receipt per order.
POS allows the user to print a message at the end of refund receipt.
A.
Select Maintenance | Ticket Scripts and create a new ticket script.
B.
Enter the text to print at the bottom of the refund receipt. Do not enter any tag
information in the receipt script.
C.
Select Maintenance | System Parameters. Click on the Printers tab.
D.
Click the down arrow in the Refund Receipt Script field and select the ticket script
that was created
NOTE: The script will be printed at the bottom of the receipt without
separation. The script will be printed regardless of the number of items refunded
and will be printed even if the order total is greater than zero.
WARNING: Starting in POS version 7.3a, receipt printing was reworked. Users
will notice a delay in receipt printing due to this enhancement and the ability to
reprint receipt enhancement.
7.1.2
Logging In
The first step in using the Front POS terminal screen is logging into it with an employee login and password.
This sub-section will explain how to login into the Front POS screen for Ideal's Point of Sale system.
NOTE: An employee login and password must have been created for an
employee before a user can log into the Front POS screen. Also this employee
must have rights to log into Front POS. For more information, refer to Chapter 2,
section "Entering Employees and Employee Groups". Also, a Front POS screen
must have been configured with categories and inventory buttons as well as
assigned to a terminal before it can be usable. See Chapter 5 section "Setting Up
the Front POS Screen" for more information.
© 1997 - 2005 Ideal Software Systems, Inc.
Chapter 7 - Front POS, Customers, and Functions
1.
Double-click the Front POS icon to open the Ideal Software Systems POS Login Terminal (Front
POS) window.
Figure 7-4. The Front POS login screen
Open the Front POS screen.
2.
Enter an Employee ID.
NOTE: An employee login ID must have been previously assigned by the Point
of Sale system before one can be entered. See section "Entering Employees and
Employee Groups" in Chapter 2 for an explanation.
3.
353
Enter a PIN Number.
NOTE: A password or PIN Number must have been created when the employee
profile was created. Refer to the "Entering Employees and Employee Groups"
section in Chapter 2 for more details.
NOTE: An Employee ID and PIN Number can be entered in one of two ways.
If a keyboard is connection to the computer, these identification numbers can be
typed in. If a mouse or a touch screen monitor are connected to the terminal then
the number touchpad can be used as seen in Figure 7-5.
© 1997 - 2005 Ideal Software Systems, Inc.
354
Point of Sale
Figure 7-5. The number touchpad on the Front POS Login screen
4.
Enter the Front POS Sales screen.
A.
If a drawer has not been assigned to the terminal, click Add Drawer as shown in Figure 7-4.
B.
If a drawer has already been assigned to the terminal, click Login as shown in Figure 7-6.
Figure 7-6. The Front POS Login screen with a drawer assigned
Click Login.
5.
The user will now be in the Front POS Sales screen.
NOTE: Another way to open the Front POS Sales screen is by entering no
Employee ID or PIN Number and clicking Login or Add Drawer. This will
open the Employee ID and PIN Required window. The user name and
password may be entered to log in as seen in Figure 7-7.
© 1997 - 2005 Ideal Software Systems, Inc.
Chapter 7 - Front POS, Customers, and Functions
355
Figure 7-7. The Employee ID and PIN Required window
NOTE: If the employees are issued employee ID cards and there is a magnetic
card swipe attatched to the terminal, a user can swipe the employee card through
the card swipe and have the Employee ID and PIN Number fields automatically
entered.
7.1.3
Purchasing an Item With Cash
Selling items to customers is the entire purpose behind the Point of Sale system. The following sub-section will
explain how to sell items that are being purchased with cash.
NOTE: An employee login and password must have been created for an
employee before a user can log into the Front POS screen. Also this employee
must have rights to log into Front POS. For more information, refer to Chapter 2,
section "Entering Employees and Employee Groups". Also, a Front POS screen
must have been configured with categories and inventory buttons as well as
assigned to a terminal before it can be usable. See Chapter 5 section "Setting Up
the Front POS Screen" for more information. Finally, make sure that a cash
drawer is assigned to an employee and in turn assigned to the terminal that will be
performing the sale. Refer to Chapter 6, sub-section "Issuing Drawers".
1.
Log into Front POS and enter the Front POS Sales screen.
© 1997 - 2005 Ideal Software Systems, Inc.
356
Point of Sale
Figure 7-8. The Front POS Sales screen with sample categories and inventory items
Log into the Front POS Sales screen.
2.
Click on the inventory item's button to be sold. The item will appear in the sales window.
Figure 7-9. The Front POS Sales screen with an item chosen for purchase
Select an item for purchase.
3.
Click End Order to enter the Payment Method screen.
© 1997 - 2005 Ideal Software Systems, Inc.
Chapter 7 - Front POS, Customers, and Functions
4.
357
The Payment Method screen defaults the actual payment method to cash. At this point there a few
ways that the payment amount can be entered.
Figure 7-10. The Front POS Payment Method screen with item for purchase
Enter the Payment Method screen.
A.
The exact amount of cash the customer is giving the employee can be entered on the number
panel as shown in Figure 7-11.
Figure 7-11. The number panel in the Payment Method screen
Enter the amount of cash given on the number panel.
© 1997 - 2005 Ideal Software Systems, Inc.
358
Point of Sale
B.
If the customer pays the exact amount of the item's cost then click Exact Amount.
C.
The Quick Cash buttons can be used.
Figure 7-12. The Quick Cash buttons
Use the quick cash buttons.
NOTE: For more information about setting up the Quick Cash buttons, see the
"Configuring System Parameters" sub-section "Configure Money Settings in Edit
Parameters" in Chapter 2.
5.
Once the payment amount is entered, click Complete Sale. This will open the Sale Complete window.
TIP: Be sure to take notice of the Change Due field. This field will be
automatically populated in the lower right hand corner of the Payment Method
screen upon the completion of every sale as seen in Figure 7-13.
Figure 7-13. The Change Due field
Figure 7-14. The Sale Complete window
Click Complete Sale to open the Sale Complete window.
© 1997 - 2005 Ideal Software Systems, Inc.
Chapter 7 - Front POS, Customers, and Functions
6.
359
Click Complete Sale to end the sale. At this point, a receipt will be automatically printed to the
terminal's assigned receipt printer.
NOTE: A printer must be connected and configured on the POS terminal before
a receipt will automatically print.
TIP: Before clicking Complete Sale, an extra payment and/or service receipt can
be printed by clicking Print Payment Receipt and the Print Service Receipt
respectively.
7.1.4
Purchasing an Item With Check
Selling items to customers is the entire purpose behind the Point of Sale system. There are more forms of
payment than just cash. The following sub-section will explain how to sell items that are being purchased with
check.
NOTE: An employee login and password must have been created for an
employee before a user can log into the Front POS screen. Also this employee
must have rights to log into Front POS. For more information, refer to Chapter 2,
section "Entering Employees and Employee Groups". Also, a Front POS screen
must have been configured with categories and inventory buttons as well as
assigned to a terminal before it can be usable. See Chapter 5 section "Setting Up
the Front POS Screen" for more information. Finally, make sure that a cash
drawer is assigned to an employee and in turn assigned to the terminal that will be
performing the sale. Refer to Chapter 6, sub-section "Issuing Drawers".
1.
Log into Front POS and enter the Front POS Sales screen (Figure 7-8).
2.
Click on the inventory item's button to be sold. The item will appear in the item window.
3.
Click End Order to enter the Payment Method screen (Figure 7-10).
4.
Click Check. The number panel at this point should turn blue There two ways that the payment
amount can be entered.
Figure 7-15. The Payment Method screen with Check chosen
Click Check.
A.
The exact amount of the check the customer is paying with can be entered on the number
© 1997 - 2005 Ideal Software Systems, Inc.
360
Point of Sale
panel as shown in Figure 7-16.
Figure 7-16. The number panel in the Payment Method screen
On the number panel, enter the amount of the check given for payment.
B.
If the customer pays the exact amount of the item's cost with the check then click Exact
Amount.
NOTE: If a check is written for more than the amount due, cash cannot be given
to make the difference unless the Allow cash back on checks option is checked.
For more on this option, see the "Configuring System Parameters" sub-section
"Configure Money Settings in Edit Parameters" in Chapter 2. If this option is not
checked, then the sale will not complete until the customer writes a check for the
amount total.
5.
Once the payment amount is entered, click Complete Sale. This will open the Sale Complete window
(Figure 7-14).
TIP: Be sure to take notice of the Change Due field. This field will be
automatically populated in the lower right hand corner of the Payment Method
screen upon the completion of every sale.
6.
Click Complete Sale to end the sale. At this point, a receipt will be automatically printed to the
terminal's assigned receipt printer.
NOTE: A printer must be connected and configured on the POS terminal before
a receipt will automatically print.
TIP: Before clicking Complete Sale, an extra payment and/or service receipt can
be printed by clicking Print Payment Receipt and the Print Service Receipt
respectively.
7.1.5
Purchasing an Item With Both Cash and Check
It might become necessary to use multiple forms of payment in one sales transaction. The following sub-section
will explain how to sell items that are being purchased with both cash and check.
© 1997 - 2005 Ideal Software Systems, Inc.
Chapter 7 - Front POS, Customers, and Functions
361
NOTE: An employee login and password must have been created for an
employee before a user can log into the Front POS screen. Also this employee
must have rights to log into Front POS. For more information, refer to Chapter 2,
section "Entering Employees and Employee Groups". Also, a Front POS screen
must have been configured with categories and inventory buttons as well as
assigned to a terminal before it can be usable. See Chapter 5 section "Setting Up
the Front POS Screen" for more information. Finally, make sure that a cash
drawer is assigned to an employee and in turn assigned to the terminal that will be
performing the sale. Refer to Chapter 6, sub-section "Issuing Drawers".
1.
Log into Front POS and enter the Front POS Sales screen (Figure 7-8).
2.
Click on the inventory item's button to be sold. The item will appear in the sales window.
3.
Click End Order to enter the Payment Method screen (Figure 7-10).
4.
Click Check. The number panel at this point should turn blue.
5.
Enter the amount for the check in the blue number panel. The Check field on the right side of the
Payment Method screen should be automatically populated with the amount entered as seen in Figure
7-17.
Figure 7-17. The Check Field in the Payment Method screen
Enter the amount for the check.
6.
Click Cash. The number panel should turn back to green.
© 1997 - 2005 Ideal Software Systems, Inc.
362
Point of Sale
7.
Enter the amount being payed for with cash. The Cash field on the right side of the Payment Method
screen should be automatically populated with the amount entered as seen in Figure 7-18.
Figure 7-18. The Cash field in the Payment Method screen
Enter the cash amount.
8.
Once the payment amount is entered, click Complete Sale. This will open the Sale Complete window
(Figure 7-14).
TIP: Be sure to take notice of the Change Due field. This field will be
automatically populated in the lower right hand corner of the Payment Method
screen upon the completion of every sale.
9.
Click Complete Sale to end the sale. At this point, a receipt will be automatically printed to the
terminal's assigned receipt printer.
NOTE: A printer must be connected and configured on the POS terminal before
a receipt will automatically print.
TIP: Before clicking Complete Sale, an extra payment and/or service receipt can
be printed by clicking Print Payment Receipt and the Print Service Receipt
respectively.
7.1.6
Purchasing an Item With a Manual Credit Card
There might be times where a customer's credit card cannot be scanned yet they still wish to pay using credit and
have available all of their credit card information. The following sub-section will explain how to sell items that
are being purchased with a manual credit card in the Front POS module of the Point of Sale system.
© 1997 - 2005 Ideal Software Systems, Inc.
Chapter 7 - Front POS, Customers, and Functions
NOTE: An employee login and password must have been created for an
employee before a user can log into the Front POS screen. Also this employee
must have rights to log into Front POS. For more information, refer to Chapter 2,
section "Entering Employees and Employee Groups". Also, a Front POS screen
must have been configured with categories and inventory buttons as well as
assigned to a terminal before it can be usable. See Chapter 5 section "Setting Up
the Front POS Screen" for more information. Finally, make sure that a cash
drawer is assigned to an employee and in turn assigned to the terminal that will be
performing the sale. Refer to Chapter 6, sub-section "Issuing Drawers".
NOTE: In order to manually process a credit card, an Ideal FEC Support
Technician will need to have turned on this option. For more information on
getting this setting turned on, please contact Ideal Software Systems, Inc. Support
Department.
WARNING: A credit card cannot be processed without going through credit
card processing software nor can the information reach the processor without a
means to dial out or get on the Internet. If the Point of Sale system does not have
access to credit card processing software or does not have a means to connect to
the credit card processor, please contact Ideal Software Systems, Inc. Support
Department for more information.
NOTE: An employee must have the rights to manually authorize credit cards
before the sale can be completed. For more information, refer to Chapter 2,
section "Entering Employees and Employee Groups".
1.
Log into Front POS and enter the Front POS Sales screen (Figure 7-8).
2.
Click on the inventory item's button to be sold. The item will appear in the sales window.
3.
Click End Order to enter the Payment Method screen (Figure 7-10).
4.
Click Manual Credit Card. The Enter Credit Card Information window will open.
5.
Enter the necessary information.
© 1997 - 2005 Ideal Software Systems, Inc.
363
364
Point of Sale
Figure 7-19. The Enter Credit Card Information window
Enter the necessary information.
A.
Card Number
Enter the 16-digit card number off of the customers credit card.
B.
Expire Date
Enter the expiration date for the customer's credit card.
NOTE: The expiration date must be entered as four digits when credit card
information is entered manually.
C.
Amount to Charge
This field is automatically populated with the amount left to be paid on the purchase.
D.
From Customer Account
i.
Click this button to pull up credit card information on a current customer, then the
Select Customer window will open.
NOTE: An employee must have the rights to use credit card numbers on file
before looking up the customer credit information for a customer.
ii.
Select the correct customer and click OK.
© 1997 - 2005 Ideal Software Systems, Inc.
Chapter 7 - Front POS, Customers, and Functions
365
Figure 7-20. The Select Customer window with sample customer
Click OK after selecting a customer.
iii.
The Enter Credit Card Information window will automatically be populated as
shown in Figure 7-21.
Figure 7-21. The Enter Credit Card Information window with customer credit card information
6.
Once the credit card information is entered amount is entered, click OK. The Processing Credit Card
Transaction window will appear while the credit card information is being processed.
© 1997 - 2005 Ideal Software Systems, Inc.
366
Point of Sale
Figure 7-22. The Processing Credit Card Transaction window
Click OK to bring up the processing transaction window.
WARNING: If for some reason the credit card did not go through or could not
reach the processor, a Warning window (as seen in Figure 7-23) will appear.
Figure 7-23. The Warning window
8.
Click Complete Sale in the Sale Complete window to end the sale (Figure 7-14). At this point, two
receipts will be automatically printed to the terminal's assigned receipt printer.
NOTE: A printer must be connected and configured on the POS terminal before
a receipt will automatically print.
TIP: Before clicking Complete Sale, an extra payment and/or service receipt can
be printed by clicking Print Payment Receipt and the Print Service Receipt
respectively.
9.
7.1.7
Give the receipt that reads "Customer Copy" to the customer and have the customer sign the other
receipt (the one that will be placed in the cash drawer).
Purchasing an Item With Cash (and/or Check) and a Manual Credit Card
It might become necessary to use multiple forms of payment in one sale transaction. The following sub-section
will explain how to sell items that are being purchased with both cash, check, and a manual credit card.
© 1997 - 2005 Ideal Software Systems, Inc.
Chapter 7 - Front POS, Customers, and Functions
367
NOTE: An employee login and password must have been created for an
employee before a user can log into the Front POS screen. Also this employee
must have rights to log into Front POS. For more information, refer to Chapter 2,
section "Entering Employees and Employee Groups". Also, a Front POS screen
must have been configured with categories and inventory buttons as well as
assigned to a terminal before it can be usable. See Chapter 5 section "Setting Up
the Front POS Screen" for more information. Finally, make sure that a cash
drawer is assigned to an employee and in turn assigned to the terminal that will be
performing the sale. Refer to Chapter 6, sub-section "Issuing Drawers".
NOTE: In order to manually process a credit card, an Ideal FEC Support
Technician will need to have turned on this option. For more information on
getting this setting turned on, please contact Ideal Software Systems, Inc. Support
Department.
WARNING: A credit card cannot be processed without going through credit
card processing software nor can the information reach the processor without a
means to dial out or get on the Internet. If the Point of Sale system does not have
access to credit card processing software or does not have a means to connect to
the credit card processor, please contact Ideal Software Systems, Inc. Support
Department for more information.
NOTE: An employee must have the rights to manually authorize credit cards
before the sale can be completed. For more information, refer to Chapter 2,
section "Entering Employees and Employee Groups".
1.
Log into Front POS and enter the Front POS Sales screen (Figure 7-8).
2.
Click on the inventory item's button to be sold. The item will appear in the sales window.
3.
Click End Order to enter the Payment Method screen (Figure 7-10).
4.
Click Check. The number panel at this point should turn blue
5.
Enter the amount for the check in the blue number panel. The Check field on the right side of the
Payment Method screen should be automatically populated with the amount entered as seen in Figure
7-17.
6.
Click Cash. The number panel should turn back to green.
7.
Enter the amount being payed for with cash. The Cash field on the right side of the Payment Method
screen should be automatically populated with the amount entered as seen in Figure 7-18.
8.
Click Manual Credit Card. The Enter Credit Card Information window will open.
9.
Enter the necessary credit card information.
NOTE: The expiration date must be entered as four digits when credit card
information is entered manually.
10.
Once the credit card information is entered, click OK. The Processing Credit Card Transaction
window will appear while the credit card information is being processed.
© 1997 - 2005 Ideal Software Systems, Inc.
368
Point of Sale
WARNING: If for some reason the credit card did not go through or could not
reach the processor, a Warning window (as seen in Figure 7-25) will appear.
11.
Click Complete Sale in the Sale Complete window to end the sale (Figure 7-14). At this point, a
receipt will be automatically printed to the terminal's assigned receipt printer.
NOTE: A printer must be connected and configured on the POS terminal before
a receipt will automatically print.
TIP: Before clicking Complete Sale, an extra payment and/or service receipt can
be printed by clicking Print Payment Receipt and the Print Service Receipt
respectively.
12.
7.1.8
Give the receipt that reads "Customer Copy" to the customer and have the customer sign the other
receipt (the one that will be placed in the cash drawer).
Purchasing an Item With a Credit Card
The following sub-section will explain how to ring up items being purchased with a credit card in the Front POS
Payment screen.
NOTE: An employee login and password must have been created for an
employee before a user can log into the Front POS screen. Also this employee
must have rights to log into Front POS. For more information, refer to Chapter 2,
section "Entering Employees and Employee Groups". Also, a Front POS screen
must have been configured with categories and inventory buttons as well as
assigned to a terminal before it can be usable. See Chapter 5 section "Setting Up
the Front POS Screen" for more information. Finally, make sure that a cash
drawer is assigned to an employee and in turn assigned to the terminal that will be
performing the sale. Refer to Chapter 6, sub-section "Issuing Drawers".
NOTE: In order to manually process a credit card, an Ideal FEC Support
Technician will need to have turned on this option. For more information on
getting this setting turned on, please contact Ideal Software Systems, Inc. Support
Department.
WARNING: A credit card cannot be processed without going through credit
card processing software nor can the information reach the processor without a
means to dial out or get on the Internet. If the Point of Sale system does not have
access to credit card processing software or does not have a means to connect to
the credit card processor, please contact Ideal Software Systems, Inc. Support
Department for more information.
NOTE: In order to complete a credit card transaction, a magnetic card swipe
must be connected to the terminal performing the sale. Otherwise there will be no
means for the Point of Sale workstation to read the information off of the credit
card (other than running a manual credit card.)
1.
Log into Front POS and enter the Front POS Sales screen (Figure 7-8).
2.
Click on the inventory item's button to be sold. The item will appear in the sales window.
© 1997 - 2005 Ideal Software Systems, Inc.
Chapter 7 - Front POS, Customers, and Functions
369
3.
Click End Order to enter the Payment Method screen (Figure 7-10).
4.
Swipe the credit card through the magnetic card swipe. The Processing Credit Card Transaction
window will automatically appear to process the credit card information (Figure 7-22).
WARNING: If for some reason the credit card did not go through or could not
reach the processor, a Warning window (as seen in Figure 7-25) will appear.
5.
Click Complete Sale in the Sale Complete window to end the sale (Figure 7-14). At this point, two
receipts will be automatically printed to the terminal's assigned receipt printer.
NOTE: A printer must be connected and configured on the POS terminal before
a receipt will automatically print.
TIP: Before clicking Complete Sale, an extra payment and/or service receipt can
be printed by clicking Print Payment Receipt and the Print Service Receipt
respectively.
6.
7.1.9
Give the receipt that reads "Customer Copy" to the customer and have the customer sign the other
receipt (the one that will be placed in the cash drawer).
Purchasing an Item With Cash (and/or Check) and a Credit Card
It might become necessary to use multiple forms of payment in one sale transaction. The following sub-section
will explain how to sell items that are being purchased with both cash, check, and a manual credit card.
NOTE: An employee login and password must have been created for an
employee before a user can log into the Front POS screen. Also this employee
must have rights to log into Front POS. For more information, refer to Chapter 2,
section "Entering Employees and Employee Groups". Also, a Front POS screen
must have been configured with categories and inventory buttons as well as
assigned to a terminal before it can be usable. See Chapter 5 section "Setting Up
the Front POS Screen" for more information. Finally, make sure that a cash
drawer is assigned to an employee and in turn assigned to the terminal that will be
performing the sale. Refer to Chapter 6, sub-section "Issuing Drawers".
NOTE: In order to manually process a credit card, an Ideal FEC Support
Technician will need to have turned on this option. For more information on
getting this setting turned on, please contact Ideal Software Systems, Inc. Support
Department.
WARNING: A credit card cannot be processed without going through credit
card processing software nor can the information reach the processor without a
means to dial out or get on the Internet. If the Point of Sale system does not have
access to credit card processing software or does not have a means to connect to
the credit card processor, please contact Ideal Software Systems, Inc. Support
Department for more information.
NOTE: In order to complete a credit card transaction, a magnetic card swipe
must be connected to the terminal performing the sale. Otherwise there will be no
means for the Point of Sale workstation to read the information off of the credit
card (other than running a manual credit card.)
© 1997 - 2005 Ideal Software Systems, Inc.
370
Point of Sale
1.
Log into Front POS and enter the Front POS Sales screen (Figure 7-8).
2.
Click on the inventory item's button to be sold. The item will appear in the sales window.
3.
Click End Order to enter the Payment Method screen (Figure 7-10).
4.
Click Check. The number panel at this point should turn blue
5.
Enter the amount for the check in the blue number panel. The Check field on the right side of the
Payment Method screen should be automatically populated with the amount entered as seen in Figure
7-17.
6.
Click Cash. The number panel should turn back to green.
7.
Enter the amount being payed for with cash. The Cash field on the right side of the Payment Method
screen should be automatically populated with the amount entered as seen in Figure 7-18.
8.
Swipe the credit card through the magnetic card swipe. The Processing Credit Card Transaction
window will automatically appear to process the credit card information (Figure 7-22).
WARNING: If for some reason the credit card did not go through or could not
reach the processor, a Warning window (as seen in Figure 7-25) will appear.
9.
Click Complete Sale in the Sale Complete window to end the sale (Figure 7-14). At this point, two
receipts will be automatically printed to the terminal's assigned receipt printer.
NOTE: A printer must be connected and configured on the POS terminal before
a receipt will automatically print.
TIP: Before clicking Complete Sale, an extra payment and/or service receipt can
be printed by clicking Print Payment Receipt and the Print Service Receipt
respectively.
10.
7.1.10
Give the receipt that reads "Customer Copy" to the customer and have the customer sign the other
receipt (the one that will be placed in the cash drawer).
Purchasing an Item With a OnePOS Card
The following sub-section will explain how to ring up items being purchased with a OnePOS card in the Front
POS Payment screen.
NOTE: An employee login and password must have been created for an
employee before a user can log into the Front POS screen. Also this employee
must have rights to log into Front POS. For more information, refer to Chapter 2,
section "Entering Employees and Employee Groups". Also, a Front POS screen
must have been configured with categories and inventory buttons as well as
assigned to a terminal before it can be usable. See Chapter 5 section "Setting Up
the Front POS Screen" for more information. Finally, make sure that a cash
drawer is assigned to an employee and in turn assigned to the terminal that will be
performing the sale. Refer to Chapter 6, sub-section "Issuing Drawers".
© 1997 - 2005 Ideal Software Systems, Inc.
Chapter 7 - Front POS, Customers, and Functions
371
NOTE: In order to process a OnePOS card, the OnePOS Card Server must be
installed. Otherwise, the card will not be recognized.
WARNING: A credit card cannot be processed without going through credit
card processing software nor can the information reach the processor without a
means to dial out or get on the Internet. If the Point of Sale system does not have
access to credit card processing software or does not have a means to connect to
the credit card processor, please contact Ideal Software Systems, Inc. Support
Department for more information.
NOTE: In order to complete a OnePOS card transaction, a Magtek card reader
must be connected to the terminal performing the sale. Otherwise there will be no
means for the Point of Sale workstation to read the information off of the card.
1.
Log into Front POS and enter the Front POS Sales screen (Figure 7-8).
2.
Click on the inventory item's button to be sold. The item will appear in the sales window.
3.
Click End Order to enter the Payment Method screen (Figure 7-10).
4.
Swipe the OnePOS card through the magnetic card swipe. The Enter Payment Amount window will
appear.
Figure 7-24. The Enter Payment Amount window
Swiping the gift card will open the Enter Payment Amount window.
© 1997 - 2005 Ideal Software Systems, Inc.
372
Point of Sale
5.
Enter the amount to put on the OnePOS card up to the full amount of the purchase.
NOTE: An amount greater than the current value on the card may not be entered
in the Enter Payment Amount window.
WARNING: If a customer is paying with both a OnePOS card and a credit card,
value from the gift card must be applied first. If the credit card is used first, the
entire amount of the purchase will be placed on the credit card.
6.
Click Complete Sale in the Sale Complete window to end the sale (Figure 7-14).
NOTE: A printer must be connected and configured on the POS terminal before
a receipt will automatically print.
TIP: Before clicking Complete Sale, an extra payment and/or service receipt can
be printed by clicking Print Payment Receipt and the Print Service Receipt
respectively.
7.1.11
Selling OnePOS Card Value
If the Point of Sale system will be using OnePOS cards then OnePOS Card value must be sold. The following
sub-section will explain how to sell OnePOS value items in the Front POS module.
NOTE: An employee login and password must have been created for an
employee before a user can log into the Front POS screen. Also this employee
must have rights to log into Front POS. For more information, refer to Chapter 2,
section "Entering Employees and Employee Groups". Also, a Front POS screen
must have been configured with categories and inventory buttons as well as
assigned to a terminal before it can be usable. See Chapter 5 section "Setting Up
the Front POS Screen" for more information. Finally, make sure that a cash
drawer is assigned to an employee and in turn assigned to the terminal that will be
performing the sale. Refer to Chapter 6, sub-section "Issuing Drawers".
NOTE: An OnePOS value item must have already been created. For more
information on creating this type of item, refer to Chapter 3, section "Inventory",
sub-section "Creating a New Inventory Item (OnePOS Card Value)".
1.
Log into Front POS and enter the Front POS Sales screen (Figure 7-8).
2.
Click on the OnePOS value item's button to be sold. The item will appear in the sales window.
© 1997 - 2005 Ideal Software Systems, Inc.
Chapter 7 - Front POS, Customers, and Functions
373
Figure 7-25. The Front POS Sales screen with OnePOS value item chosen for purchase
Select a OnePOS value item for purchase.
3.
Click End Order to enter the Payment Method screen.
4.
The Payment Method screen defaults the actual payment method to cash but select the method the
customer will be paying with.
Figure 7-26. The Front POS Payment Method screen
Enter the Payment Method screen.
5.
Once the payment amount is entered, click Complete Sale. This will open the Gift Card Add Value
window.
Figure 7-27. The Gift Card Add Value window with sample amount
Click Complete Sale to open the Gift Card Add Value window.
6.
At this point, swipe the card through the magnetic swipe.
7.
This will bring the cashier to the Sale Complete window (Figure 7-14).
8.
Click Complete Sale to end the sale. At this point, a receipt will be automatically printed to the
© 1997 - 2005 Ideal Software Systems, Inc.
374
Point of Sale
terminal's assigned receipt printer.
NOTE: A printer must be connected and configured on the POS terminal before
a receipt will automatically print.
TIP: Before clicking Complete Sale, an extra payment and/or service receipt can
be printed by clicking Print Payment Receipt and the Print Service Receipt
respectively.
7.1.12
Purchasing Multiple Items
Often times customers will purchase multiple items at once. The following sub-section will explain how to
perform a multiple item purchase.
NOTE: An employee login and password must have been created for an
employee before a user can log into the Front POS screen. Also this employee
must have rights to log into Front POS. For more information, refer to Chapter 2,
section "Entering Employees and Employee Groups". Also, a Front POS screen
must have been configured with categories and inventory buttons as well as
assigned to a terminal before it can be usable. See Chapter 5 section "Setting Up
the Front POS Screen" for more information. Finally, make sure that a cash
drawer is assigned to an employee and in turn assigned to the terminal that will be
performing the sale. Refer to Chapter 6, sub-section "Issuing Drawers".
1.
Log into Front POS and enter the Front POS Sales screen (Figure 7-8).
2.
Click on the inventory item's button to be sold. The item will appear in the sales window.
3.
Go the number key pad in the Front POS Sales screen and enter the number of the item customer
wishes to purchase (if more than one.)
Figure 7-28. The Front POS Sales screen number key pad
For an item, enter the amount for purchase.
4.
Select other items for purchase and enter the number of those items for purchase. All the items will
appear in the sales window.
© 1997 - 2005 Ideal Software Systems, Inc.
Chapter 7 - Front POS, Customers, and Functions
375
Figure 7-29. The sales window with items for purchase in the Front POS Sales screen
Select other items for purchase.
5.
Once all of the inventory items for sale to the customer are selected and their quantities entered, click
End Order.
6.
In the Payment Method screen (Figure 7-10), select the form of payment that the customer desires.
7.1.13
Purchasing an Item With Modifiers
The following sub-section will explain how to sell items that use modifiers in Front POS.
NOTE: An employee login and password must have been created for an
employee before a user can log into the Front POS screen. Also this employee
must have rights to log into Front POS. For more information, refer to Chapter 2,
section "Entering Employees and Employee Groups". Also, a Front POS screen
must have been configured with categories and inventory buttons as well as
assigned to a terminal before it can be usable. See Chapter 5 section "Setting Up
the Front POS Screen" for more information. Finally, make sure that a cash
drawer is assigned to an employee and in turn assigned to the terminal that will be
performing the sale. Refer to Chapter 6, sub-section "Issuing Drawers". For this
section, modifier lists must have been set up as well. Refer to Chapter 3, section
"Modifier Lists" for more information.
1.
Log into Front POS and enter the Front POS Sales screen (Figure 7-8).
2.
Click on the inventory item's button containing modifiers. The Modifier window will appear with all of
the item's modifier choices.
© 1997 - 2005 Ideal Software Systems, Inc.
376
Point of Sale
Figure 7-30. The Modifier window with sample modifiers
Click on a button that contains a modifier list.
3.
Select the appropriate modifier for the inventory item. The modifier and the item will appear in the sales
window.
4.
Continue with the sale as the customer specifies.
7.1.14
Removing an Item for Purchase from the Sales Screen
From time to time items will get entered into the Front POS Sales screen for purchase that the customer does not
wish to buy. This can happen by mistake on part of the user or customer. Regardless of the reason for the
unwanted item in the sales window, the following sub-section will cover how to remove this item.
NOTE: An employee login and password must have been created for an
employee before a user can log into the Front POS screen. Also this employee
must have rights to log into Front POS. For more information, refer to Chapter 2,
section "Entering Employees and Employee Groups". Also, a Front POS screen
must have been configured with categories and inventory buttons as well as
assigned to a terminal before it can be usable. See Chapter 5 section "Setting Up
the Front POS Screen" for more information. Lastly, make sure that a cash
drawer is assigned to an employee and in turn assigned to the terminal that will be
performing the sale. Refer to Chapter 6, sub-section "Issuing Drawers".
1.
Log into Front POS and enter the Front POS Sales screen (Figure 7-8).
2.
Confirm that there is an unwanted item in the sales window just like in Figure 7-31 where cheese pizza
was not meant to be ordered.
© 1997 - 2005 Ideal Software Systems, Inc.
Chapter 7 - Front POS, Customers, and Functions
377
Figure 7-31. The Front POS Sales screen with an unwanted item chosen
Confirm that there is an unwanted item for purchase.
3.
Highlight the unwanted item by either clicking on it in the sales window or by clicking
4.
Once the item is select, click
5.
Continue with the sale as normal.
7.1.15
and
.
to delete the item out of the sales window. The item will be removed.
Making a Sale Tax Exempt
A item purchase will need to be tax exempt for a number of reasons (for example: school and church functions,
specials, etc.) In the next sub-section making an item tax exempt is explained.
NOTE: An employee login and password must have been created for an
employee before a user can log into the Front POS screen. Also this employee
must have rights to log into Front POS. For more information, refer to Chapter 2,
section "Entering Employees and Employee Groups". A Front POS screen must
have been configured with categories and inventory buttons as well as assigned to
a terminal before it can be usable. See Chapter 5 section "Setting Up the Front
POS Screen" for more information. Also, make sure that a cash drawer is
assigned to an employee and in turn assigned to the terminal that will be
performing the sale. Refer to Chapter 6, sub-section "Issuing Drawers". In order
to exempt an item or a purchase of items from tax inclusion, the items must have
been first setup to charge for taxes when ever purchased. Refer to Chapter 2 to
learn about tax types and inventory. Finally, an employee must have rights to tax
exemption before a tax exempt sale can be completed. For more information,
refer to Chapter 2, section "Entering Employees and Employee Groups".
1.
Log into Front POS and enter the Front POS Sales screen (Figure 7-8).
2.
Click on the inventory items' buttons to be sold. The items will appear in the sales window.
3.
Click End Order to enter the Payment Method screen (Figure 7-9).
© 1997 - 2005 Ideal Software Systems, Inc.
378
Point of Sale
4.
Click Tax Exempt. All taxes will be removed from the Tax field on the right hand side of the Payment
Method screen.
Figure 7-32. The Payment Method screen's empty Tax field
5.
7.1.16
Continue with the transaction as normal with the type of payment method the customer prefers.
Refunding Items
Items that get purposely or accidentally rung up in a sale will sometimes need to be refunded. In the next subsection refunding an item is explained for the Point of Sale system.
NOTE: An employee login and password must have been created for an
employee before a user can log into the Front POS screen. Also this employee
must have rights to log into Front POS. For more information, refer to Chapter 2,
section "Entering Employees and Employee Groups". A Front POS screen must
have been configured with categories and inventory buttons as well as assigned to
a terminal before it can be usable. See Chapter 5 section "Setting Up the Front
POS Screen" for more information. Also, make sure that a cash drawer is
assigned to an employee and in turn assigned to the terminal that will be
performing the sale. Refer to Chapter 6, sub-section "Issuing Drawers". Make
sure that a cash drawer is assigned to an employee and in turn assigned to the
terminal that will be performing the sale. Refer to Chapter 6, sub-section "Issuing
Drawers". Finally, an employee must have the rights to refund items in a sale
before the transaction can be completed. For more information, refer to Chapter
2, section "Entering Employees and Employee Groups".
1.
Log into Front POS and enter the Front POS Sales screen (Figure 7-8).
2.
Click on the inventory items' buttons to be refunded. The items will appear in the sales window.
3.
Click Refund. The Merchandise Refund window will open.
4.
Enter the necessary information.
© 1997 - 2005 Ideal Software Systems, Inc.
Chapter 7 - Front POS, Customers, and Functions
379
Figure 7-33. The Merchandise Refund window
Enter the necessary information.
NOTE: The Require Receipt to Refund option must be checked on the Money
Settings tab in the System Parameters in order for the Merchandise Refund
window to appear. If this option is not checked, the item will be immediately
refunded as shown in Figure 7-34.
A.
Receipt Number
Enter the number of the receipt manually, with the keypad, or with the up and down arrows.
B.
Receipt Date
Select the date of the transaction from the receipt.
C.
Refund Selected Item
Click this button to confirm the selected item was on the receipt and can be refunded. A
negative (-) sign will appear in front of the item name and cost.
Figure 7-34. The Front POS Sales screen with a refunded item in the sales window
© 1997 - 2005 Ideal Software Systems, Inc.
380
Point of Sale
5.
Click End Order to enter the Payment Method screen (Figure 7-9).
6.
Continue with the transaction as normal with the type of payment method the customer prefers, if strict
refunding is not in place for the current cashier.
7.1.17
Applying Discounts to Items During a Sale
This sub-section explains how to apply discounts to inventory items being sold.
NOTE: An employee login and password must have been created for an
employee before a user can log into the Front POS screen. Also this employee
must have rights to log into Front POS. For more information, refer to Chapter 2,
section "Entering Employees and Employee Groups". A Front POS screen must
have been configured with categories and inventory buttons as well as assigned to
a terminal before it can be usable. See Chapter 5 section "Setting Up the Front
POS Screen" for more information. Also, make sure that a cash drawer is
assigned to an employee and in turn assigned to the terminal that will be
performing the sale. Refer to Chapter 6, sub-section "Issuing Drawers". Make
sure that a cash drawer is assigned to an employee and in turn assigned to the
terminal that will be performing the sale. Refer to Chapter 6, sub-section "Issuing
Drawers". Finally, an employee must have the rights to refund items in a sale
before the transaction can be completed. For more information, refer to Chapter
2, section "Entering Employees and Employee Groups".
1.
Log into Front POS and enter the Front POS Sales screen (Figure 7-8).
2.
Click on the inventory item buttons for the merchandise to be sold. The items will appear in the sales
window.
3.
Click End Order to enter the Payment Method screen (Figure 7-9).
4.
Click Discount. The Discount window will open.
5.
There are a number of ways that a discount can be entered.
© 1997 - 2005 Ideal Software Systems, Inc.
Chapter 7 - Front POS, Customers, and Functions
Figure 7-35. The Discount window
A.
Click one of the quick percentage discount buttons. This will automatically apply the
percentage discount to the transaction total.
© 1997 - 2005 Ideal Software Systems, Inc.
381
382
Point of Sale
Figure 7-36. The quick percentage discount buttons
Click one of the discount buttons.
B.
Enter a dollar amount for the discount by entering a number on the key pad.
Figure 7-37. The Discount window with a dollar discount entered on the key pad
Enter a dollar amount for the discount.
C.
6.
Enter a percentage discount.
i.
Click
. The button should now turn into
.
ii.
Enter a percentage discount from the number key pad.
Click OK the to transfer the discount to the Payment Method screen.
NOTE: Only one discount can be applied to each sale. There cannot be a
percentage discount and a cash discount at the same time. If one item in a group
of items for purchase is discounted, the entire group of items will be discounted
in the sale. If items are to have individual discounts when purchased, then these
items must be rung up separately.
7.
The Discounts field on the right hand side of the Payment Method screen will display the discount to
be applied.
© 1997 - 2005 Ideal Software Systems, Inc.
Chapter 7 - Front POS, Customers, and Functions
383
Figure 7-38. The Discount field in the Payment Method screen
The Discounts field displaying the applied discount.
8.
7.1.18
Continue with the transaction as normal with the type of payment method the customer prefers.
Adding Special Instructions to an Order
This sub-section explains how to add special instructions about how food is to be prepared onto the service
receipt printed in the kitchen.
NOTE: An employee login and password must have been created for an
employee before a user can log into the Front POS screen. Also this employee
must have rights to log into Front POS. For more information, refer to Chapter 2,
section "Entering Employees and Employee Groups". A Front POS screen must
have been configured with categories and inventory buttons as well as assigned to
a terminal before it can be usable. See Chapter 5 section "Setting Up the Front
POS Screen" for more information. Also, make sure that a cash drawer is
assigned to an employee and in turn assigned to the terminal that will be
performing the sale. Refer to Chapter 6, sub-section "Issuing Drawers". Make
sure that a cash drawer is assigned to an employee and in turn assigned to the
terminal that will be performing the sale. Refer to Chapter 6, sub-section "Issuing
Drawers". Finally, an employee must have the rights to refund items in a sale
before the transaction can be completed. For more information, refer to Chapter
2, section "Entering Employees and Employee Groups".
WARNING: Before a special instruction can be added to a service receipt, a
service printer must first be installed. The special instructions will not print on a
regular receipt.
1.
Log into Front POS and enter the Front POS Sales screen (Figure 7-8).
2.
Click on the inventory item buttons for the merchandise to be sold. The items will appear in the sales
window.
3.
Click
to open the Special Instructions for <Item> window.
© 1997 - 2005 Ideal Software Systems, Inc.
384
Point of Sale
Figure 7-39. The Special Instructions for <Item> window
Click
4.
.
Enter the special instructions for the order and click OK. The text will then appear over the sales
window as shown in Figure 7-40.
Figure 7-40. The special instruction message
The message will appear above the sale.
5.
Click End Order to enter the Payment Method screen (Figure 7-9).
6.
Continue with the transaction as normal with the type of payment method the customer prefers.
© 1997 - 2005 Ideal Software Systems, Inc.
Chapter 7 - Front POS, Customers, and Functions
7.1.19
385
Opening the Cash Drawer Without Making a Sale
It is important to know how to open the cash drawer without having to perform a transaction. This sub-section
explains how to open the cash drawer upon request in Front POS.
NOTE: An employee login and password must have been created for an
employee before a user can log into the Front POS screen. Also this employee
must have rights to log into Front POS. For more information, refer to Chapter 2,
section "Entering Employees and Employee Groups". Also, make sure that a cash
drawer is assigned to an employee and in turn assigned to the terminal that will be
performing the sale. Refer to Chapter 6, sub-section "Issuing Drawers". Finally,
an employee must have rights to use No Sale. For more information, refer to
Chapter 2, section "Entering Employees and Employee Groups".
1.
Log into Front POS and enter the Front POS Sales screen (Figure 7-8).
2.
Click No Sale. The cash drawer should immediately spring open.
7.1.20
Freezing the Terminal
The following sub-section explains how to log out or freeze the terminal for Front POS.
NOTE: An employee login and password must have been created for an
employee before a user can log into the Front POS screen. Also this employee
must have rights to log into Front POS. For more information, refer to Chapter 2,
section "Entering Employees and Employee Groups". Also, make sure that a cash
drawer is assigned to an employee and in turn assigned to the terminal that will be
performing the sale. Refer to Chapter 6, sub-section "Issuing Drawers".
1.
Make sure that the user is logged into Front POS and at the Front POS Sales screen (Figure 7-8).
2.
Click Freeze Terminal. Front POS will now be back at the login screen.
7.1.21
Changing the PIN Number
The following sub-section explains how to change a pin number for Front POS.
NOTE: An employee login and password must have been created for an
employee before a user can log into the Front POS screen. Also this employee
must have rights to log into Front POS. For more information, refer to Chapter 2,
section "Entering Employees and Employee Groups". Also, make sure that a cash
drawer is assigned to an employee and in turn assigned to the terminal that will be
performing the sale. Refer to Chapter 6, sub-section "Issuing Drawers".
1.
Log into Front POS.
2.
The Employee Pin Change window will open. Enter the necessary information.
© 1997 - 2005 Ideal Software Systems, Inc.
386
Point of Sale
Figure 7-41. The Employee Pin Change window
Enter the necessary information.
3.
7.1.22
A.
Current PIN Number
Enter the current employee pin number.
B.
New PIN Number
Enter the new pin number.
C.
Verify New PIN Number
Re-enter the new pin number.
Click OK once the new pin number is entered.
Closing Front POS
This sub-section explains how to close the Front POS module of the Point of Sale system.
NOTE: An employee login and password must have been created for an
employee before a user can log into the Front POS screen. Also this employee
must have rights to log into Front POS. For more information, refer to Chapter 2,
section "Entering Employees and Employee Groups". Also, an employee must
have rights to exit out of the Front POS login screen. For more information,
refer to Chapter 2, section "Entering Employees and Employee Groups".
© 1997 - 2005 Ideal Software Systems, Inc.
Chapter 7 - Front POS, Customers, and Functions
1.
Go into the Front POS login screen.
2.
Enter an Employee ID.
387
NOTE: An employee login ID must have been previously assigned by the Point
of Sale system before one can be entered. See section "Entering Employees and
Employee Groups" in Chapter 2 for an explanation.
3.
Enter a PIN Number.
NOTE: A password or PIN Number must have been created when the employee
profile was created. Refer to the "Entering Employees and Employee Groups"
section in Chapter 2 for more details.
4.
7.2
Click Close POS. The user will have now closed the Front POS module.
Customers
Instructions for creating, editing, managing customers
This section contains information about creating, editing, and managing
customers in both the FEC Administrator and the Front POS module. This
section contains the following topics:
• "Customers Reference"
• "Customers in FEC Administrator"
• "Creating Customers"
• "Editing Customers"
• "Adding Customer Groups"
• "Editing Customer Groups"
• "Deleting Customer Groups"
• "Adding Customer Rights"
• "Editing Customer Rights"
• "Assigning Customer Rights"
• "Adding a Child Account"
• "Customers in Front POS"
• "Using Customer Look Up"
• "Creating New Customers"
• "Editing Customer Accounts"
7.2.1
Customers Reference
The Customer features are best used in correlation with one of the packages that comes with or can be added to
the Point of Sale system:
1.
MVP Credit
2.
Intercard System
© 1997 - 2005 Ideal Software Systems, Inc.
388
Point of Sale
3.
Ideal Cashless System (ICS)
Keeping track of customers information, accounts, groups, and spending is very helpful in making a family
entertainment facility customer-friendly. Customer identification cards can be assigned and used at the Front
POS terminals to identify the customer making a purchase and to track his/her visits. This can be used to reward
customers for the amount and frequency of their purchases. For example, if a customer has spent $1,000 over the
span of a year, he may be eligible for a 10% discount on all of his purchases. The MVP program can be used to
accommodate season pass holders, gift card sales, and employee and customer charge cards. As part of the MVP
program, a facility may set up different customer types (regular, corporate, church, day care, etc.) The purpose of
creating customer types is to track and generate customer mailings by customer type. For example, if a facility
has 5,000 customers in a database, it may want to mail to its 100 corporate accounts to promote a new attraction
or service. The MVP program provides a facility with increased marketing opportunities because of the ability to
generate mailings based on customers' last visit date, age, date of birth, dollar amount spent over a date range, or
number of visits over a date range.
The gift card can be used in one of several ways. A parent may put value on a card so that she will know her
children are spending money in that particular facility as well as how much she is spending at that facility. The
card can also replace gift certificates. This is the same method department stores have adopted. This eliminates
the need for printing, tracking, and issuing changes for gift certificates. Employees can use their card for
convenience while working and use it for discounts on purchases. Creating the ability to maintain a negative
balance on the card will also enable this to be more of a credit card for employees. Repeat customers, such as
day care centers, can use this same feature.
7.2.2
Customers in FEC Administrator
7.2.2.1
Creating Customers
This mini-section explains how to create customers in FEC Administrator for the Point of Sale system.
1.
Click Facility in the middle of the Ideal FEC Back Office Suite (FEC Administrator) screen to
access the Facility menus.
2.
Select Customers | Create Customer.
© 1997 - 2005 Ideal Software Systems, Inc.
Chapter 7 - Front POS, Customers, and Functions
Figure 7-42. The Ideal FEC Back Office Suite Customers menu's Create Customer
Select Customers | Create Customer.
3.
When the Add/Edit Customers window opens enter the necessary information.
© 1997 - 2005 Ideal Software Systems, Inc.
389
390
Point of Sale
Figure 7-43. The Add/Edit Customers window
Enter the customer's information.
A.
Automatically Assign Customer Number
Select this option for the system to automatically assign the numbers to the customers.
TIP: Checking Automatically Assign Customer Number is recommended.
B.
Customer Number
© 1997 - 2005 Ideal Software Systems, Inc.
Chapter 7 - Front POS, Customers, and Functions
391
Enter a customer number only if Automatically Assign Customer Number has not been
selected.
NOTE: The Customer Number field will be automatically populated if
Automatically Assign Customer Number is checked.
C.
Company Name
If the customer is affiliated with a company, enter the company's full name.
D.
Last Name
Enter the last name of the customer.
E.
First Name
Only enter a first name if the customer is an individual.
F.
Address 1
Enter an address for the customer.
G.
Address 2
Use this line if more room is needed for the address.
H.
Zip
Click the down arrow to select a zip code for the customer or if a new one needs to be entered,
type in the new zip code and press TAB.
i.
The New Zip Code window will open. Enter the information.
Figure 7-45. The New Zip Code window
Enter the zip code information.
ii.
a.
Zip Code
This field is populated with the zip code just entered by the user.
b.
City
Enter the city that the customer lives in and is in the zip code.
c.
State
Enter the state the customer is from.
Click Save when completed. The information will now be entered for the customer.
© 1997 - 2005 Ideal Software Systems, Inc.
392
Point of Sale
NOTE: See sub-section "Editing State and City Information" in this section for
more details about editing the information associated with a zip code.
I.
City
This field will be automatically populated with the information associated with the chosen zip
code.
J.
State
This field will be automatically populated with the information associated with the chosen zip
code.
K.
Home Phone
Enter the customer's home phone number.
L.
Work Phone
Enter a work phone number to be used to reach the customer.
M.
Fax Phone
Enter a fax phone number to be used.
N.
Email Address
Enter the customer's email address.
O.
Birthdate
Enter the customers birth date. The birth date is defaulted to the current date minus five years.
P.
Group
Click the down arrow and choose a group for the customer to be in.
NOTE: See mini-section "Manage Customer Groups" in this section for more
details.
Q.
Customer Type
i.
Individual
Check this option if the customer is an individual.
ii.
Company
Check this option if the customer is a company or represents a company.
iii.
Inactive
Check this option if the customer is no longer active.
R.
Child Accounts
If the customer has a child that needs to be placed on his account, click the down arrow and
select a child to go onto the account.
S.
Add Child
Click this button to add a child account to the customer account.
NOTE: For more information on Add Child, refer to the sub-section "Adding a
Child Account" in this section.
T.
Life Purchases
This field will be automatically populated when the customer makes purchases using her credit
card or MVP Credit.
© 1997 - 2005 Ideal Software Systems, Inc.
Chapter 7 - Front POS, Customers, and Functions
393
NOTE: See Chapter 10 for more information on the MVP Credit System.
U.
Take Picture
i.
Click this button to open the Capture Form window.
NOTE: If a Window's compatible camera is attached to the terminal, the picture
will appear in the Capture Form window. If no camera or no compatible camera
is attached, then the Capture Form window will be blank.
ii.
Once the desired image is in the screen, click Capture button. Otherwise click
Cancel to exit the window.
Figure 7-46. The Capture Form window
Click Take Picture button to open the Capture Form window.
V.
Camera Setup
Click this button to setup the Window's driver for the camera.
W.
Debit Card Number
This field will be automatically populated if an Ideal Cashless System debit card is assigned to
the customer.
NOTE: See Chapter 14 for more information on the "Ideal Cashless System
(ICS) Debit Card System".
X.
Print ID Badge
Click this button to print out a customer ID badge.
NOTE: An ID badge printer must first be installed on the terminal and setup in
the Point of Sale system. For information on setting up an ID badge printer the
system, see section "Configuring System Parameters", sub-section "Configure
Printers in Edit Parameters" in Chapter 2.
© 1997 - 2005 Ideal Software Systems, Inc.
394
Point of Sale
Y.
Tax ID Number
Enter the customer's Tax ID number.
Z.
Credit Limit
If the customer will be charging credit to his customer account, he will need a credit limit. The
customer will not be allowed to charge over this amount.
AA.
Net Terms
Enter the terms by which the customer will be allowed to charge to his account.
BB.
Tax Exempt
Check this option if the customer is to be exempt from all additional tax charges when
purchasing an item with his credit.
CC.
Customer MVP Balance
View the customer's current MVP Credit charges in this automatically populated field.
DD.
Credit Card Number
Enter the customer's credit card number if he wishes to have items charged to his account in
the future.
EE.
Credit Card Expire Date
Enter the date the credit card expires.
NOTE: Enter the credit card expiration date in the form (MM/DD/YYYY) in
order for the Point of Sale system to accept the date.
FF.
Discount Types
Click the down arrow to select any customer discounts that have been added into the system.
GG.
Customer Notes
Click this tab and then enter any notes necessary about the customer in the below white space.
HH.
Customer Rights
Select this tab and enter the customer rights that apply.
NOTE: Rights have to have been created before they can be assigned to the
customer. See mini-sections "Adding Customer Rights" and "Assigning Customer
Rights" in this section for more details.
4.
7.2.2.2
Once all of the information is entered for the customer, click Save. The customer will then be added to
the Point of Sale system.
Editing Customers
This mini-section explains how to edit previously created customers in the FEC Administrator portion of the
Point of Sale system.
NOTE: In order to edit a customer, one has to have been previously created.
Refer to the previous mini-section for more information.
1.
Click Facility in the middle of the Ideal FEC Back Office Suite (FEC Administrator) screen to
access the Facility menus.
© 1997 - 2005 Ideal Software Systems, Inc.
Chapter 7 - Front POS, Customers, and Functions
2.
Select Customers | Edit Customer.
Figure 7-46. The Ideal FEC Back Office Suite Customers menu's Edit Customer
Select Customers | Edit Customer.
3.
The Select Customer window will open. Select a customer and click OK.
Figure 7-47. The Select Customer Window with sample customer
Select a customer and click OK.
NOTE: The Search by function allows the users to sort by Last Name, Company
Name, and ID Number. If the customer has his picture in the system, it may be
displayed by checking the Show Picture option.
4.
When the Add/Edit Customers window opens, make the necessary changes (Figure 7-43).
© 1997 - 2005 Ideal Software Systems, Inc.
395
396
Point of Sale
5.
7.2.2.3
Once the changes are made, click Save to save the edited customer.
Adding Customer Groups
Customers at times might need to be grouped together for identification or to receive benefits. This mini-section
explains how to add customer groups in the Point of Sale system.
1.
Click Facility in the middle of the Ideal FEC Back Office Suite (FEC Administrator) screen to
access the Facility menus.
2.
Select Customers | Manage Groups.
Figure 7-48. The Ideal FEC Back Office Suite Customers menu's Manage Groups
Select Customers | Manage Groups.
3.
The Define Customer Groups window will open. Click Add.
© 1997 - 2005 Ideal Software Systems, Inc.
Chapter 7 - Front POS, Customers, and Functions
397
Figure 7-49. The Define Customer Groups window
Click Add.
4.
The Define Customer Groups sub-window will open. Enter the name for the group and click OK.
Figure 7-50. The Define Customer Groups sub-window
Enter the name of the group and click OK.
5.
7.2.2.4
The group will now appear in the main Define Customer Groups window. Click Close.
Editing Customer Groups
This sub-section explains how to edit customer groups in the Point of Sale system.
NOTE: In order to edit a customer group, one has to have been previously
created. See the previous mini-section for more information.
1.
Click Facility in the middle of the Ideal FEC Back Office Suite (FEC Administrator) screen to
access the Facility menus.
2.
Select Customers | Manage Groups (Figure 7-48).
© 1997 - 2005 Ideal Software Systems, Inc.
398
Point of Sale
3.
The Define Customer Groups window will open (Figure 7-49). Select a customer group to edit. Click
Modify.
4.
The Define Customer Groups sub-window will open. Enter a new group name in the New Value field
and click OK.
Figure 7-51. The Define Customer Groups sub-window
Enter the name of the group and click OK.
5.
7.2.2.5
The edited group will now appear in the main Define Customer Groups window. Click Close.
Deleting Customer Groups
This mini-section explains how to delete a customer group in the Point of Sale system.
NOTE: In order to delete a customer group, one has to have been previously
created. See mini-section "Adding Customer Groups" for more details.
1.
Click Facility in the middle of the Ideal FEC Back Office Suite (FEC Administrator) screen to
access the Facility menus.
2.
Select Customers | Manage Groups (Figure 7-48).
3.
The Define Customer Groups window will open (Figure 7-49). Select a customer group to delete.
Click Remove.
4.
The Warning window will open. Click Yes if the group needs to be removed..
Figure 7-52. The Warning window
Click Yes to remove the group.
5.
The removed group will no longer appear in the main Define Customer Groups window. Click Close.
© 1997 - 2005 Ideal Software Systems, Inc.
Chapter 7 - Front POS, Customers, and Functions
7.2.2.6
399
Adding Customer Rights
Certain customers will have more rights than other customers. This mini-section explains how to add customer
rights in the Point of Sale system.
1.
Click Facility in the middle of the Ideal FEC Back Office Suite (FEC Administrator) screen to
access the Facility menus.
2.
Select Customers | Define Customer Rights.
Figure 7-53. The Ideal FEC Back Office Suite Customers menu's Define Customer Rights
Select Customers | Define Customer Rights.
3.
The Customer Rights List window will open. Click Add.
© 1997 - 2005 Ideal Software Systems, Inc.
400
Point of Sale
Figure 7-54. The Customer Rights List window
Click Add.
4.
The New Customer Right sub-window will open. Type the customer right in the Customer Right
Description field and click OK.
Figure 7-55. The New Customer Right window
Enter the customer right and click OK.
5.
The rights will now appear in the main Customer Rights List window. Click Close.
© 1997 - 2005 Ideal Software Systems, Inc.
Chapter 7 - Front POS, Customers, and Functions
7.2.2.7
401
Editing Customer Rights
This mini-section explains how to edit customer rights in the Point of Sale system.
NOTE: In order to edit a customer right, one has to have been previously
created. Refer to the previous mini-section for more details.
1.
Click Facility button in the middle of the Ideal FEC Back Office Suite (FEC Administrator) screen
to access the Facility menus.
2.
Select Customers | Define Customer Rights (Figure 7-53).
3.
The Define Customer Rights window will open (Figure 7-54). Select a customer right to edit. Click
Modify.
4.
The Define Customer Rights sub-window will open. Enter a new rights name in the New Value field
and click OK.
Figure 7-56. The Define Customer Rights sub-window
Enter the name of the rights and click OK.
5.
7.2.2.8
The edited rights will now appear in the main Define Customer Rights window. Click Close.
Assigning Customer Rights
This mini-section explains how to assign previously created customer rights to customers in the Point of Sale
system.
NOTE: In order to assign rights to a customer, a customer has to have been
previously created. See Chapter 2 section "Entering Employees and Employee
Groups". Also, in order to assign rights, customer rights first must have been
created. Refer to Chapter 2 section "Entering Employees and Employee Groups".
1.
Click Facility in the middle of the Ideal FEC Back Office Suite (FEC Administrator) screen to
access the Facility menus.
2.
Select Customers | Edit Customer (Figure 7-46).
3.
The Select Customer window will open (Figure 7-47). Select a customer that rights will need to be
added to and click OK.
© 1997 - 2005 Ideal Software Systems, Inc.
402
Point of Sale
4.
When the Add/Edit Customers window opens (Figure 7-43), click Customer Rights.
5.
All the rights that have been created will appear in the white space under the tabs. Check the rights that
will apply to the customer.
Figure 7-57. The Customer Rights tab with sample rights
Check the customer rights that apply.
6.
7.2.2.9
Click Save to make the changes once the rights have been assigned.
Adding a Child Account
Children can be placed on individual adult accounts. All charges made by the child can be assessed to the adult.
This mini-section explains how to create a child account in the Point of Sale system.
NOTE: In order to add a child account, a customer account must have been
previously created. See Chapter 2 section "Entering Employees and Employee
Groups". Also, a child account can be placed on an individual and a company
account.
1.
Click Facility in the middle of the Ideal FEC Back Office Suite (FEC Administrator) screen to
access the Facility menus.
2.
Select the Customers menu and select Edit Customer (Figure 7-46).
3.
The Select Customer window will open (Figure 7-47). Select the customer that will have the child
account added and click OK.
4.
Click Add Child. A new Add/Edit Customer window will open (Figure 7-43).
5.
The only field that will be populated is Last Name. This will have been carried over from the parent
customer account. At this point, enter the child's information in the other fields.
6.
Once all of the child's information is entered, click Save to save the child to the parent account.
7.
The child account can now be viewed in the Select Customer window and will be designated a child
account with a gray bar over the customer information as seen in Figure 7-58.
© 1997 - 2005 Ideal Software Systems, Inc.
Chapter 7 - Front POS, Customers, and Functions
403
Figure 7-58. The Select Customer window with a sample child account
The child accounts appear in gray.
7.2.2.10 Adding State and City Information
This mini-section explains how to add city and state information for customers into the Point of Sale system.
NOTE: Currently, in order to have access to the Set Cities, States to Zip menu
option in the FEC Administrator, the user must have rights to use Report Builder.
To setup rights, refer to Chapter 2 section "Entering Employees and Employee
Groups".
1.
Click Facility in the middle of the Ideal FEC Back Office Suite (FEC Administrator) screen to
access the Facility menus.
2.
Select Customers | Edit Default City, State, and Zip Codes.
Figure 7-59. The Ideal FEC Back Office Suite Customers menu's Set Cities, States to Zip
Select Customers | Set States and Cities.
© 1997 - 2005 Ideal Software Systems, Inc.
404
Point of Sale
3.
The Edit Default City, State, and Zip Codes window will open. Click
.
Figure 7-60. The Edit Default City, State, and Zip Codes window with sample information
Click
4.
.
A new, empty record will appear. Enter the information for the new zip code.
Figure 7-61. The Edit City State window with a new, empty record
Enter the new zip code information.
A.
Zip
Enter the new zip code.
B.
City
Enter the city that belongs to the new zip code.
© 1997 - 2005 Ideal Software Systems, Inc.
Chapter 7 - Front POS, Customers, and Functions
C.
5.
405
State
Enter the state.
Once the new zip code and corresponding information is entered, click Close.
7.2.2.11 Editing State and City Information
This mini-section explains how to edit city and state information for customers into the Point of Sale
system.
NOTE: To edit zip code information, first a zip code must have been entered by
either creating a customer and filling out the information in the Add/Edit
Customer window or by entering the information in the Edit Default City,
State, and Zip Codes window. Currently, in order to have access to the Set
States and Cities menu option in the FEC Administrator, the user must have
rights to use Report Builder. To setup rights, refer to Chapter 2 section "Entering
Employees and Employee Groups".
1.
Click Facility in the middle of the Ideal FEC Back Office Suite (FEC Administrator) screen
to access the Facility menus.
2.
Select Customers | Edit Default City, State, and Zip Codes (Figure 7-59).
3.
The Edit Default City, State, and Zip Codes window will open (Figure 7-60). Select a
record that needs to be edited by double-clicking in either the Zip, City, or State fields.
4.
Enter the corrected zip code information.
5.
Once the fields have been edited appropriately, click Close to save the changes.
7.2.2.12 Deleting State and City Information
This mini-section explains how to remove city and state information in the Point of Sale system.
NOTE: To delete zip code information, first a zip code must have been entered
by either creating a customer and filling out the information in the Add/Edit
Customer window or by entering the information in the Edit Default City,
State, and Zip Codes window. Currently, in order to have access to the Set
States and Cities menu option in the FEC Administrator, the user must have
rights to use Report Builder. To setup rights, refer to Chapter 2 section "Entering
Employees and Employee Groups".
1.
Click Facility in the middle of the Ideal FEC Back Office Suite (FEC Administrator) screen to
access the Facility menus.
2.
3.
Select Customers | Edit Default City, State, and Zip Codes (Figure 7-61).
The Edit Default City, State, and Zip Codes window will open. Select a record to be removed and
click
.
© 1997 - 2005 Ideal Software Systems, Inc.
406
Point of Sale
NOTE: If state and city information is chosen to be removed, the data will be
removed from any customer that the zipcode information previously assigned.
4.
Once the zip code information is removed, click Close.
7.2.3
Customers in Front POS
7.2.3.1
Using Customer Look Up
It is convenient to be able to look up customer credit information while inside the Front POS module. This minisection explains how to use the Customer Look Up function in the Point of Sale system.
NOTE: In order to look up customer information, customers must have first been
created. To create employees, refer to Chapter 2 section "Entering Employees
and Employee Groups". Also, in order to login to Front POS, a user name and
password must have first been created. Also, a drawer must have been assigned to
the terminal. See Chapter 2 for assigning employee rights and refer to Chapter 6
for assigning a drawer. Finally, an employee must first have rights to access the
Customer Look Up before using it will be possible. To add employee rights,
refer to Chapter 2 section "Entering Employees and Employee Groups".
1.
Double-click the Front POS icon to open the Ideal Software Systems POS Login Terminal (Front
POS) window (Figure 7-4).
2.
Enter an Employee ID.
NOTE: An employee login ID must have been previously assigned by the Point
of Sale system before one can be entered. See section "Entering Employees and
Employee Groups" in Chapter 2 for an explanation.
3.
Enter a PIN Number.
NOTE: A password or PIN Number must have been created when the employee
profile was created. Refer to the "Entering Employees and Employee Groups"
section in Chapter 2 for more details. A Employee ID and PIN Number can be
entered in one of two ways. If a keyboard is connection to the computer, these
identification numbers can be typed in. If a mouse or a touch screen monitor are
connected to the terminal then the number touchpad can be used as seen in
Figure 7-62.
© 1997 - 2005 Ideal Software Systems, Inc.
Chapter 7 - Front POS, Customers, and Functions
Figure 7-62. The number touchpad on the Front POS Login screen
NOTE: Another way to open the Front POS Sales screen is by entering no
Employee ID or PIN Number and clicking Login or Add Drawer. This will open
the Employee ID and PIN Required window. Here the user name and password
may be entered to log in as seen in Figure 7-63.
Figure 7-63. The Employee ID and PIN Required window
4.
Enter the Front POS Sales screen.
© 1997 - 2005 Ideal Software Systems, Inc.
407
408
Point of Sale
Figure 7-64. The Front POS Sales screen
Enter the Front POS Sales screen.
5.
Click End Order. This will open the Payment Method screen.
© 1997 - 2005 Ideal Software Systems, Inc.
Chapter 7 - Front POS, Customers, and Functions
409
Figure 7-65. The Payment Method screen
Click End Order.
6.
Click Customer Lookup in the upper right-hand corner of the screen to open the Customer Info
window.
NOTE: Another way to open the Customer Info window is listed below:
1. Log into the Front POS Sales screen.
2. Click Functions and enter an Employee ID and PIN Number.
3. Once this information is entered correctly, the user will have access (assuming
that the user has rights) to the Manager Menu. Click Customer Lookup. This
will open the Customer Info window as seen in Figure 7-66.
© 1997 - 2005 Ideal Software Systems, Inc.
410
Point of Sale
Figure 7-66. The Manager Menu
7.
Enter the number of the customer that needs to be looked up.
© 1997 - 2005 Ideal Software Systems, Inc.
Chapter 7 - Front POS, Customers, and Functions
411
Figure 7-67. The Customer Info window
Click Customer Lookup.
8.
A.
If the number is unknown, click Last Name Search.
B.
The Select Customer window will open. Select the customer and click OK.
C.
The customer number will now appear in the Enter Customer Number field.
Click Select and the customer name along with the amount owed by that customer will appear at the top
of the Payment Method screen.
Figure 7-68. The Payment Method screen with customer lookup information
© 1997 - 2005 Ideal Software Systems, Inc.
412
Point of Sale
NOTE: There is even yet another way to perform a customer lookup:
1. Log into the Front POS Sales screen.
2. Click Event and open the Party Menu (Figure 9-15).
3. Click Look Up Customer. This will open the Customer Info window as seen
in Figure 7-67.
7.2.3.2
Creating New Customers
Many times customers will need to be created in Front POS instead of the FEC Administrator. The following
mini-section explains how to make customer files in the Front POS module of the Point of Sale system.
NOTE: In order to login to Front POS, a user name and password must have first
been created. Also, a drawer must have been assigned to the terminal. See
Chapter 2 for assigning employee rights and refer to Chapter 6 for assigning a
drawer. An employee must first have rights to access Customer Lookup before
using it will be possible. To add employee rights, refer to Chapter 2 section
"Entering Employees and Employee Groups".
1.
Login to the Front POS module and enter the Sales screen (Figure 7-64).
2.
Click Functions. Enter an Employee ID and PIN Number that will allow access to the Manager Menu.
3.
Once the login and password are entered the Manager Menu window will open (Figure 7-66). Click
Customer Lookup.
4.
The Customer Info window will appear (Figure 7-67). Select Last Name Search.
5.
The Select Customer window will open (Figure 7-47). Click New.
6.
This will open the Add/Edit Customer window where new customer information can be entered
(Figure 7-43).
A.
Automatically Assign Customer Number
Select this option for the system to automatically assign the numbers to the customers.
TIP: Checking Automatically Assign Customer Number is recommended.
B.
Customer Number
Enter a customer number only if Automatically Assign Customer Number has not been
selected.
NOTE: The Customer Number field will be automatically populated if
Automatically Assign Customer Number is checked.
C.
Company Name
If the customer is affiliated with a company, enter the company's full name.
D.
Last Name
© 1997 - 2005 Ideal Software Systems, Inc.
Chapter 7 - Front POS, Customers, and Functions
413
Enter the last name of the customer.
E.
First Name
Only enter a first name if the customer is an individual.
F.
Address 1
Enter an address for the customer.
G.
Address 2
Use this line if more room is needed for the address.
H.
Zip
Click the down arrow to select a zip code for the customer or if a new one needs to be entered,
type in the new zip code and press TAB.
i.
ii.
The New Zip Code window (Figure 7-45) will open. Enter the information.
a.
Zip Code
This field is populated with the zip code just entered by the user.
b.
City
Enter the city that the customer lives in and is in the zip code.
c.
State
Enter the state the customer is from.
Click Save when completed. The information will now be entered for the customer.
NOTE: See sub-section "Editing State and City Information" in this section for
more details about editing the information associated with a zip code.
I.
City
This field will be automatically populated with the information associated with the chosen zip
code.
J.
State
This field will be automatically populated with the information associated with the chosen zip
code.
K.
Home Phone
Enter the customer's home phone number.
L.
Work Phone
Enter a work phone number to be used to reach the customer.
M.
Fax Phone
Enter a fax phone number to be used.
N.
Email Address
Enter the customer's email address.
O.
Birthdate
Enter the customers birth date. The birth date is defaulted to the current date minus five years.
P.
Group
Click the down arrow and choose a group for the customer to be in.
© 1997 - 2005 Ideal Software Systems, Inc.
414
Point of Sale
NOTE: See mini-section "Manage Customer Groups" in this section for more
details.
Q.
Customer Type
i.
Individual
Check this option if the customer is an individual.
ii.
Company
Check this option if the customer is a company or represents a company.
iii.
Inactive
Check this option if the customer is no longer active.
R.
Child Accounts
If the customer has a child that needs to be placed on his account, click the down arrow and
select a child to go onto the account.
S.
Add Child
Click this button to add a child account to the customer account.
NOTE: For more information on Add Child, refer to the sub-section "Adding a
Child Account" in this section.
T.
Life Purchases
This field will be automatically populated when the customer makes purchases using her credit
card or MVP Credit.
NOTE: See Chapter 10 for more information on the MVP Credit System.
U.
Take Picture
i.
Click this button to open the Capture Form window (Figure 7-46).
NOTE: If a Window's compatible camera is attached to the terminal, the picture
will appear in the Capture Form window. If no camera or no compatible camera
is attached, then the Capture Form window will be blank.
ii.
Once the desired image is in the screen, click Capture button. Otherwise click
Cancel to exit the window.
V.
Camera Setup
Click this button to setup the Window's driver for the camera.
W.
Debit Card Number
This field will be automatically populated if an Ideal Cashless System debit card is assigned to
the customer.
NOTE: See Chapter 14 for more information on the "Ideal Cashless System
(ICS) Debit Card System".
X.
Print ID Badge
Click this button to print out a customer ID badge.
© 1997 - 2005 Ideal Software Systems, Inc.
Chapter 7 - Front POS, Customers, and Functions
415
NOTE: An ID badge printer must first be installed on the terminal and setup in
the Point of Sale system. For information on setting up an ID badge printer the
system, see section "Configuring System Parameters", sub-section "Configure
Printers in Edit Parameters" in Chapter 2.
Y.
Tax ID Number
Enter the customer's Tax ID number.
Z.
Credit Limit
If the customer will be charging credit to his customer account, he will need a credit limit. The
customer will not be allowed to charge over this amount.
AA.
Net Terms
Enter the terms by which the customer will be allowed to charge to his account.
BB.
Tax Exempt
Check this option if the customer is to be exempt from all additional tax charges when
purchasing an item with his credit.
CC.
Customer MVP Balance
View the customer's current MVP Credit charges in this automatically populated field.
DD.
Credit Card Number
Enter the customer's credit card number if he wishes to have items charged to his account in
the future.
EE.
Credit Card Expire Date
Enter the date the credit card expires.
NOTE: Enter the credit card expiration date in the form (MM/DD/YYYY) in
order for the Point of Sale system to accept the date.
FF.
Discount Types
Click the down arrow to select any customer discounts that have been added into the system.
GG.
Customer Notes
Click this tab and then enter any notes necessary about the customer in the below white space.
HH.
Customer Rights
Select this tab and enter the customer rights that apply.
NOTE: Rights have to have been created before they can be assigned to the
customer. See mini-sections "Adding Customer Rights" and "Assigning Customer
Rights" in this section for more details.
4.
7.2.3.3
Once all of the information is entered for the customer, click Save. The customer will then be added to
the Point of Sale system.
Editing Customer Accounts
Many times customers will need to be edited in Front POS instead of the FEC Administrator. The following
mini-section explains how to edit customers in the Front POS module of the Point of Sale system.
© 1997 - 2005 Ideal Software Systems, Inc.
416
Point of Sale
NOTE: In order to login to Front POS, a user name and password must have first
been created. Also, a drawer must have been assigned to the terminal. See
Chapter 2 for assigning employee rights and refer to Chapter 6 for assigning a
drawer. Also, an employee must first have rights to access the Customer Look Up
before using it will be possible. To add employee rights, refer to Chapter 2
section "Entering Employees and Employee Groups". A customer must have
been created before one can be edited. Refer to mini-section "Creating New
Customers" in this sub-section for more information on creating a new customer.
7.3
1.
Login to the Front POS module and enter the Sales screen (Figure 7-64).
2.
Click Functions. Enter an Employee ID and PIN Number that will allow access to the Manager
Menu.
3.
Once the login and password are entered the Manager Menu window will open (Figure 7-66). Click
Customer Lookup.
4.
The Customer Info window will appear (Figure 7-67). Enter the number of the customer in the Enter
Customer Number field.
A.
If the number is unknown, click Last Name Search.
B.
The Select Customer window will open (Figure 7-47). Select the customer and click OK.
C.
The customer number will now appear in the Enter Customer Number field.
5.
Click Edit Customer Account. This will open the Add/Edit Customer window (Figure 7-43).
6.
Make any changes to the customer that need to be made then click Save to keep the changes.
7.
Click Close in the Customer Info window.
8.
Click close in the Manager Menu window to return to the Front POS Sales screen.
Front POS Functions
Instructions for the Front POS function buttons
This section contains all the procedures to use function buttons in the Front
POS module of the Point of Sale system. This section contains the
following topics:
•
•
•
•
•
•
•
"Front POS Functions Explanation"
"Pulling Cash from the Cash Drawer"
"Adding Cash to the Cash Drawer"
"Cashing Out of the Cash Drawer"
"Using Employee Discounts"
"Awarding Employee MVP/Bonus Value"
"Reprinting Receipts"
© 1997 - 2005 Ideal Software Systems, Inc.
Chapter 7 - Front POS, Customers, and Functions
7.3.1
417
Front POS Functions Explanation
Two important Front POS functions are 1) pulling cash from the cash drawer and 2) cashing out of the cash
drawer.
Pulling cash from the cash drawer is an important feature that allows a manager to empty some of the money out
of the drawer once it gets too full and record this action in the Point of Sale software. Keeping minimum amounts
of cash in the drawer helps prevent theft from customers and employees that might be tempted by seeing a
drawer full of cash. This function will allow the manager to record removed money in the system. Refer to subsection "Pulling Cash from the Cash Drawer" for details on how to use this function.
Cashing out from a cash drawer is done when a manager pulls money out for petty cash, to pay an employee, to
pay a delivery man, etc. The Point of Sale system records these transactions and in the system and will post them
in the Drawer reports. For more information on using this function, refer to sub-section "Cashing Out of the
Cash Drawer" for more details.
7.3.2
Pulling Cash from the Cash Drawer
Sometimes a cash drawer will get too full and cash will need to be removed in order for the drawers to close
correctly or for prevenative measures against theft. This section explains how to pull cash from a cash drawer in
Front POS for the Point of Sale system.
NOTE: In order to pull cash from a cash drawer, an actual, physical drawer must
have been assigned to a Front POS terminal. There must be money in the cash
drawer that is less than or equal to the amount to be pulled. Also, In order to
login to Front POS, a user name and password must have first been created. Also,
a drawer must have been assigned to the terminal. See Chapter 2 for assigning
employee rights and refer to Chapter 6 for assigning a drawer. Finally, the user
will need to be in the Front POS module of the Point of Sale software in order to
perform this task. A previously assigned Employee ID and PIN Number with
specific Front POS rights will be needed. For more information, refer to Chapter
2 section "Entering Employees and Employee Groups".
1.
Double-click the Front POS icon to open the Ideal Software Systems POS Login Terminal (Front
POS) window (Figure 7-4).
2.
Enter an Employee ID.
NOTE: An employee login ID must have been previously assigned by the Point
of Sale system before one can be entered. Refer to section "Entering Employees
and Employee Groups" in Chapter 2 for an explanation.
3.
Enter a PIN Number.
NOTE: A password or PIN Number must have been created when the employee
profile was created. Refer to the "Entering Employees and Employee Groups"
section in Chapter 2 for more details.
4.
Enter the Front POS Sales screen (Figure 7-64).
5.
Click Functions and login again at the Employee ID and PIN Required window (Figure 7-763).
© 1997 - 2005 Ideal Software Systems, Inc.
418
Point of Sale
6.
Once logged in, the Manager Menu window will open. Click Pull Cash. (Figure 7-66).
7.
The Pull Cash from Drawer window will open. Enter a cash amount to pull and click OK.
Figure 7-69. The Pull Cash from Drawer window
Enter the cash amount to pull and click OK.
8.
7.3.3
The cash amount will now be successfully recorded as removed from the drawer in the Point of Sale
system.
Adding Cash to the Cash Drawer
Sometimes cash needs to be added to a drawer to make change for customers. This section explains how to add
cash to a cash drawer in Front POS for the Point of Sale system.
NOTE: In order to add cash tp a cash drawer, an actual, physical drawer must
have been assigned to a Front POS terminal. Also, In order to login to Front POS,
a user name and password must have first been created. Also, a drawer must have
been assigned to the terminal. See Chapter 2 for assigning employee rights and
refer to Chapter 6 for assigning a drawer. Finally, the user will need to be in the
Front POS module of the Point of Sale software in order to perform this task. A
previously assigned Employee ID and PIN Number with specific Front POS
rights will be needed. For more information, refer to Chapter 2 section "Entering
Employees and Employee Groups".
© 1997 - 2005 Ideal Software Systems, Inc.
Chapter 7 - Front POS, Customers, and Functions
419
1.
Double-click the Front POS icon to open the Ideal Software Systems POS Login Terminal (Front
POS) window (Figure 7-4).
2.
Enter an Employee ID.
NOTE: An employee login ID must have been previously assigned by the Point
of Sale system before one can be entered. Refer to section "Entering Employees
and Employee Groups" in Chapter 2 for an explanation.
3.
Enter a PIN Number.
NOTE: A password or PIN Number must have been created when the employee
profile was created. Refer to the "Entering Employees and Employee Groups"
section in Chapter 2 for more details.
4.
Enter the Front POS Sales screen (Figure 7-64).
5.
Click Functions and login again at the Employee ID and PIN Required window (Figure 7-63).
6.
Once logged in, the Manager Menu window will open. Click Pull Cash. (Figure 7-66).
7.
The Pull Cash from Drawer window (Figure 7-69) will open. Click Add Cash.
8.
The Add Cash to Drawer window will open. Enter the amount of cash to add to the drawer and click
OK.
© 1997 - 2005 Ideal Software Systems, Inc.
420
Point of Sale
Figure 7-70. The Add Cash to Drawer window
Enter the cash amount to add and click OK.
8.
7.3.4
The cash amount will now be successfully recorded as added to the drawer in the Point of Sale system.
Cashing Out of the Cash Drawer
The Point of Sale system is setup so that money can be pulled out if the drawer and used as payment. This
section explains how to cash out from a drawer in Front POS for the Point of Sale system.
NOTE: In order to cash out from a cash drawer, an actual, physical drawer must
have been assigned to a Front POS terminal. There must be money in the cash
drawer that is less than or equal to the amount to be cashed out. Also, in order to
login to Front POS, a user name and password must have first been created. Also,
a drawer must have been assigned to the terminal. See Chapter 2 for assigning
employee rights and refer to Chapter 6 for assigning a drawer. The user will need
to be in the Front POS module of the Point of Sale software in order to perform
this task. A previously assigned Employee ID and PIN Number with specific
Front POS rights will be needed. For more information, refer to Chapter 2 section
"Entering Employees and Employee Groups". Finally, General Ledger Export
types can be setup and used with cashing out for accounting purposes. For more
information refer to Chapter 21.
© 1997 - 2005 Ideal Software Systems, Inc.
Chapter 7 - Front POS, Customers, and Functions
421
1.
Login to the Front POS module and enter the Sales screen (Figure 7-64).
2.
Click Functions. Enter an Employee ID and PIN Number that will allow access to the Manager Menu.
3.
Once the login and password are entered the Manager Menu window will open (Figure 7-66). Click
Cash Out.
4.
When the Pull Cash from Drawer window opens, enter an amount of cash that will be cashed out from
the drawer.
Figure 7-71. The Pull Cash from Drawer window
Enter an amount to cash out.
7.3.5
5.
At this point, if a General Ledger account has been created that would be responsible for recording the
cash out transaction, it can be selected.
6.
Click OK to process the cash out amount from the cash drawer in the Point of Sale system.
Using Employee Discounts
This section explains how to apply an employee discount to a sale in the Front POS module for the Point of Sale
system.
© 1997 - 2005 Ideal Software Systems, Inc.
422
Point of Sale
NOTE: In order to apply an employee discount, discounts must first have been
created and applied to the employee. Also, a drawer must have been assigned to
the terminal. See Chapter 2 for assigning employee rights and refer to Chapter 6
for assigning a drawer. The user will need to be in the Front POS module of the
Point of Sale software in order to perform this task. A previously assigned
Employee ID and PIN Number with specific Front POS rights will be needed. For
more information, refer to Chapter 2 section "Entering Employees and Employee
Groups".
1.
Login to the Front POS module and enter the Sales screen (Figure 7-64).
2.
Click Functions. Enter an Employee ID and PIN Number that will allow access to the Manager Menu.
3.
Once the login and password are entered, the Manager Menu window will open (Figure 7-66). Click
Employee Discount.
4.
The Sales screen will be in employee discount mode (the screen will turn light blue with the employee's
name on screen). Select the items for purchase and click Complete Sale. The Payment Method screen
will contain a new button for the employee charge.
5.
Click Employee Charge and enter the amount to charge to the employee's account. The amount will be
entered through the keypad or click Exact Amount to charge the entire amount.
NOTE: The payment may also be split among cash, check, and credit cards.
Employees must use all accumulated bonus value before an order may be
charged. During an employee sale, bonus value will automatically be applied
toward the order.
6.
7.3.6
Upon completing the sale, two receipts will be printed for employee orders; one of the receipts will have
an employee signature line that the facility will keep. The other copy will have the employee's current
outstanding balance that the employee will keep.
Awarding Employee MVP/Bonus Value
This section explains how to add employee MVP and/or bonus value in the Front POS module for the Point of
Sale system.
NOTE: In order to award employee bonus credit, bonus awards must first have
been created and applied to the employee. Also, a drawer must have been
assigned to the terminal. See Chapter 2 for assigning employee rights and refer to
Chapter 6 for assigning a drawer. The user will need to be in the Front POS
module of the Point of Sale software in order to perform this task. A previously
assigned Employee ID and PIN Number with specific Front POS rights will be
needed. For more information, refer to Chapter 2 section "Entering Employees
and Employee Groups".
1.
Login to the Front POS module and enter the Sales screen (Figure 7-64).
2.
Click Functions. Enter an Employee ID and PIN Number that will allow access to the Manager Menu.
3.
Once the login and password are entered, the Manager Menu window will open (Figure 7-66). Click
© 1997 - 2005 Ideal Software Systems, Inc.
Chapter 7 - Front POS, Customers, and Functions
423
Award Employee Value.
4.
The Award Employee Value screen will appear. Enter the value to be awarded to the employee
manually or via the keypad.
Figure 7-72. The Award Employee Value window
Fill out the Enter Value to Award field.
5.
7.3.7
Click OK and the bonus value will be applied to the employee.
Reprinting Receipts
This section explains how to select and print previously issued receipts in the Front POS module for the Point of
Sale system.
NOTE: In order to print old receipts, the rights must first have been applied to
the employee. Also, a drawer must have been assigned to the terminal. See
Chapter 2 for assigning employee rights and refer to Chapter 6 for assigning a
drawer. The user will need to be in the Front POS module of the Point of Sale
software in order to perform this task. A previously assigned Employee ID and
PIN Number with specific Front POS rights will be needed. For more
information, refer to Chapter 2 section "Entering Employees and Employee
Groups".
© 1997 - 2005 Ideal Software Systems, Inc.
424
Point of Sale
1.
Login to the Front POS module and enter the Sales screen (Figure 7-64).
2.
Click Functions. Enter an Employee ID and PIN Number that will allow access to the Manager Menu.
3.
Once the login and password are entered, the Manager Menu window will open (Figure 7-66). Click
Reprint Receipt.
4.
The Reprint Receipt window will open. Enter the necessary information.
Figure 7-73. The Reprint Receipt window
Enter the necessary information.
5.
A.
Terminal
Enter the number of the terminal manually or with the up and down arrows. The terminal
number should represent the terminal where the transaction for the receipt to be printed
occured.
B.
Business Date
Click the down arrow and open the Calendar window. Select the date the transaction for the
receipt to be printed occured.
Select the receipt to print and click Print.
WARNING: Starting in POS version 7.3a, receipt printing was reworked. Users
will notice a delay in receipt printing due to this enhancement and the ability to
reprint receipt enhancement.
© 1997 - 2005 Ideal Software Systems, Inc.
Chapter 8 - Tabs, Tips, and Accounts Receivable
425
Chapter 8 - Tabs, Tips, and Accounts
Receivable
8.1
Using Tabs
Instructions for using tabs
This section contains the proper procedures to open a customer tab, close a
tab, split a tab, write off a tab, and other tab procedures in the Point of Sale
system. This section contains the following topics:
•
•
•
•
•
•
•
•
•
•
8.1.1
"Tabs Explanation"
"Opening Customer Tabs"
"Adding to Existing Tabs"
"Refunding Items from Existing Customer Tabs"
"Printing Tabs"
"Splitting Tabs"
"Void Items on Tabs"
"Transfer Tabs"
"Closing Tabs"
"Writing Off Tabs"
Tabs Explanation
Tabs are used at most restaurants with a bar and many family entertainment centers that have indoor restaurants.
Tabs are convenient for the customers that want to pay only one bill but want their purchases at different times or
at times of convenience. Tabs are helpful for employees who have multiple purchases from many different
customers but the transactions all go on the same bill. Tabs are most useful when used with the Event Scheduler
module.
Tabs in the Point of Sale system share common properties with most other sales programs that use tab
functionality. Tabs in POS can be added to, removed from, split, printed, and written off if the store wants to pay
the cost for an employee function, etc. Review the followed sub-sections for more information on using these
abilities.
8.1.2
Opening Customer Tabs
Having tab functionality is important for a business that has a restaurant or bar type environment. With the Point
of Sale software, a business will have this functionality along with other accounts receivable abilities. This subsection contains the information needed to open a tab in the Point of Sale software.
© 1997 - 2005 Ideal Software Systems, Inc.
426
Point of Sale
NOTE: The user will need to be in the Front POS module of the Point of Sale
software in order to perform this task. A previously assigned Employee ID and
PIN Number with specific Front POS rights will be needed. For more
information, refer to Chapter 2 section "Entering Employees and Employee
Groups".
1.
Start by logging into the Front POS module of the Point of Sale software.
2.
In the Front POS Sales window, select the appropriate item(s) for purchase and click End Order at the
bottom of the screen.
Figure 8-1. The Front POS Sales screen with items chosen for purchase
Select an item(s) for purchase then click End Order when finished.
3.
Inside the Payment Method screen, confirm the item(s) for purchase is correct and click Tabs.
Figure 8-2. The Payment Method screen
Confirm the item(s) for purchase then click Tabs.
4.
Once the Open Tabs window appears, click New. This will allow the user to create a new tab.
© 1997 - 2005 Ideal Software Systems, Inc.
Chapter 8 - Tabs, Tips, and Accounts Receivable
427
Figure 8-3. The Open Tabs window with a sample tab
Click New.
5.
The Tab Description Form will open. Type in the customer's name or description using a regular
keyboard attached to the terminal or the window's keyboard. Once the name is entered into the name
field, click OK.
© 1997 - 2005 Ideal Software Systems, Inc.
428
Point of Sale
Figure 8-4. The Tab Description Form window with sample tab name
Enter a description for the tab and click OK.
WARNING: If Cancel is clicked, the Sale Complete window will appear
regardless if a description is entered or not. If there is no description present and
Cancel is clicked, then the tab will have no description.
6.
The Sale Complete window will appear letting the user know the transaction was completed. A tab has
now been created for the customer. Click Complete Sale.
© 1997 - 2005 Ideal Software Systems, Inc.
Chapter 8 - Tabs, Tips, and Accounts Receivable
429
Figure 8-5. The Sale Complete window
Click Complete Sale.
TIP: New tabs can be viewed at any time by clicking Tabs in the Payment
Method screen.
8.1.3
Adding to Existing Tabs
This sub-section contains a list of instructions that the user can follow to add more value into an existing tab in
the Point of Sale software.
NOTE: The user will need to be in the Front POS module of the Point of Sale
software in order to perform this task. A previously assigned Employee ID and
PIN Number with specific Front POS rights will be needed. For more
information, refer to Chapter 2 section "Entering Employees and Employee
Groups". In order to complete the following steps, a tab has to have been
previously opened. See the previous sub-section for more information.
1.
After logging into the Front POS Sales screen (Figure 8-1), select the item(s) that is to be added to the
value of an existing tab and click End Order.
2.
Click Tabs in the Payment Method screen (Figure 8-2).
3.
Select an open tab in the Open Tabs List window (Figure 8-3). Click Add/Print.
4.
The Sale Complete window will appear letting the user know the transaction has been processed. The
item(s) will have been added to the tab.
© 1997 - 2005 Ideal Software Systems, Inc.
430
Point of Sale
TIP: Tabs with additional items can be viewed at any time by clicking Tabs in
the Payment Method screen.
NOTE: To view tabs that have been authorized, click View Authorized Tabs.
To view only open tabs again, click View Open Tabs.
8.1.4
Refunding Items from Existing Customer Tabs
This sub-section explains how to remove an item(s) from a customer's existing tab in the Point of Sale software
in the event that more value was added to the tab than desired..
NOTE: The user will need to be in the Front POS module of the Point of Sale
software in order to perform this task. A previously assigned Employee ID and
PIN Number with specific Front POS rights will be needed. For more
information, refer to Chapter 2 section "Entering Employees and Employee
Groups". Also, in order to complete the following steps, a tab has to have been
previously opened. See the sub-section "Opening Customer Tabs" for more
information.
1.
After logging into the Front POS Sales screen (Figure 8-1), select the item(s) that needs to be removed
from the existing customer tab.
2.
Click Refund. Confirm that the item(s) amount is now showing a minus sign (-).
TIP: Minus signs (-) will indicate that the item(s) value is negative. For more
information on refunding items see "The Sales and Payment Method Screens"
sub-section "Refunding Items" in Chapter 7.
Figure 8-6. The Front POS Sales screen with a refunded item
The item(s) to be refunded will show a minus sign (-).
3.
Click End Order to go to the Payment Method screen (Figure 8-2).
4.
Click Tabs to open all existing customer tabs.
5.
Select the appropriate tab that the item(s) amount will need to be deducted from and click Add/Print.
6.
The Sale Complete window will appear letting the user know the transaction has been processed. The
© 1997 - 2005 Ideal Software Systems, Inc.
Chapter 8 - Tabs, Tips, and Accounts Receivable
431
value of the selected item(s) has been removed from the tab.
TIP: Tabs can be viewed at any time by clicking Tabs in the Payment Method
screen.
NOTE: To view tabs that have been authorized, click View Authorized Tabs.
To view only open tabs again, click View Open Tabs.
8.1.5
Printing Tabs
This sub-section explains how to print customer tab(s) in the Front POS module of the Point of Sale system.
NOTE: The user will need to be in the Front POS module of the Point of Sale
software in order to perform this task. A previously assigned Employee ID and
PIN Number with specific Front POS rights will be needed. For more
information, refer to Chapter 2 section "Entering Employees and Employee
Groups". Also, in order to complete the following steps, a tab has to have been
previously opened. See the sub-section "Opening Customer Tabs" for more
information. A receipt printer must be connected to the terminal and the printer
drivers installed and setup appropriately.
1.
After logging into the Front POS Sales screen (Figure 8-1), click End Order.
2.
Click Tabs in the Payment Method screen to open all existing customer tabs.
3.
Select the customer tab (only one can be printed at a time) and click Add/Print.
4.
The Sale Complete window will appear. Click Print Payment Receipt. This will print the customer
tab onto a receipt.
NOTE: To view tabs that have been authorized, click View Authorized Tabs.
To view only open tabs again, click View Open Tabs.
8.1.6
Splitting Tabs
This sub-section contains a list of instructions that will instruct the user on splitting a customer tab into two tabs
in the event that there will be two customers paying one bill in the Point of Sale system.
NOTE: The user will need to be in the Front POS module of the Point of Sale
software in order to perform this task. A previously assigned Employee ID and
PIN Number with specific Front POS rights will be needed. For more
information, refer to Chapter 2 section "Entering Employees and Employee
Groups". Also, in order to complete the following steps, a tab has to have been
previously opened. See the sub-section "Opening Customer Tabs" for more
information. Finally, in order to split a tab, the tab will need to have two or more
items of purchase on it.
1.
Click End Order after logging into the Front POS Sales screen (Figure 8-1) to go to the Payment
Method screen (Figure 8-2).
© 1997 - 2005 Ideal Software Systems, Inc.
432
Point of Sale
2.
Click Tabs to view all existing customer tabs (Figure 8-3).
3.
Select the desired tab to split and click Split.
NOTE: Tabs in the Point of Sale system are split by items, not according to
money amounts.
4.
The Split Tab window will open. Select the item(s) that need to be placed on a separate tab and click
to place it on the tab on the right.
TIP: If an item(s) needs to be put back onto the tab on the left, select the item(s)
and click
. The user can also highlight an item on tab and click
Quantity to open the How Many <Item> window (Figure 8-8). Here, a number
may be entered for the amount of the item that will be split onto another tab. The
item selected to be split to another tab must have an amount greater than one.
Figure 8-7. The Split Tab window with sample items for purchase
Select an item(s) to be placed on another tab and click
.
© 1997 - 2005 Ideal Software Systems, Inc.
Chapter 8 - Tabs, Tips, and Accounts Receivable
433
Figure 8-8. The How Many <Item> window
5.
Once the two separate tabs or confirmed, click OK. The user will be prompted to split the tab again.
Confirming by clicking Yes will split the tab again. Click No to continue.
Figure 8-9. The Confirm window
Click No to continue.
6.
The Open Tabs List will now display all new tabs. Click Close to exit the Tabs window.
TIP: Tabs can be viewed at any time by clicking Tabs in the Payment Method
screen.
© 1997 - 2005 Ideal Software Systems, Inc.
434
Point of Sale
NOTE: To view tabs that have been authorized, click View Authorized Tabs.
To view only open tabs again, click View Open Tabs.
8.1.7
Void Items on Tabs
This sub-section will explain how to remove an item from a previously created tab in the Point of Sale system.
NOTE: The user will need to be in the Front POS module of the Point of Sale
software in order to perform this task. A previously assigned Employee ID and
PIN Number with specific Front POS rights will be needed. For more
information, refer to Chapter 2 section "Entering Employees and Employee
Groups". Also, in order to complete the following steps, a tab has to have been
previously opened. See the sub-section "Opening Customer Tabs" for more
information. Finally, in order to split a tab, the tab will need to have two or more
items of purchase on it.
1.
Click End Order after logging into the Front POS Sales screen (Figure 8-1) to go to the Payment
Method screen (Figure 8-2).
2.
Click Tabs to view all existing customer tabs (Figure 8-3).
3.
Select the desired tab to remove an item from and click Void. This will open the Void Items on Order
<number> window.
4.
Select the item to be removed from the tab and click Void Item. This will open the Enter Quantity to
Void window.
© 1997 - 2005 Ideal Software Systems, Inc.
Chapter 8 - Tabs, Tips, and Accounts Receivable
Figure 8-10. The Void Items on Order <number> window with sample item
Select the item to void and click Void Item.
5.
Enter the amount of the item to remove and click OK.
© 1997 - 2005 Ideal Software Systems, Inc.
435
436
Point of Sale
Figure 8-11. The Enter Quantity to Void window
Enter the amount of the item to void and click OK.
6.
The item will be removed from the tab.
NOTE: To view tabs that have been authorized, click View Authorized Tabs.
To view only open tabs again, click View Open Tabs.
8.1.8
Transfer Tabs
This sub-section will explain how to transfer the ownership of a previously created tab from one person to the
next in the Point of Sale system.
NOTE: The user will need to be in the Front POS module of the Point of Sale
software in order to perform this task. A previously assigned Employee ID and
PIN Number with specific Front POS rights will be needed. For more
information, refer to Chapter 2 section "Entering Employees and Employee
Groups". The employee looking to do the tab transfer muct have the apropriated
rights to do soAlso, in order to complete the following steps, a tab has to have
been previously opened. See the sub-section "Opening Customer Tabs" for more
information. Finally, in order to split a tab, the tab will need to have two or more
items of purchase on it.
© 1997 - 2005 Ideal Software Systems, Inc.
Chapter 8 - Tabs, Tips, and Accounts Receivable
437
1.
Click End Order after logging into the Front POS Sales screen (Figure 8-1) to go to the Payment
Method screen (Figure 8-2).
2.
Click Tabs to view all existing customer tabs (Figure 8-3).
3.
Select the desired tab to transfer and click Transfer. This will open the Transfer Tab window (if the
user has the proper rights to do so).
4.
After the rights are verified, a list of employees with active drawers will appear in the Transfer Tab
window. The tab may be transferred to any of the employees on the list.
Figure 8-12. the Transfer Tab window
Highlight the employee to transfer.
5.
8.1.9
Click OK once the correct employee name is highlighted.
Closing Tabs
This sub-section explains how to close an existing customer tab(s) in Point of Sale.
NOTE: The user will need to be in the Front POS module of the Point of Sale
software in order to perform this task. A previously assigned Employee ID and
PIN Number with specific Front POS rights will be needed. For more
information, refer to Chapter 2 section "Entering Employees and Employee
Groups". In order to complete the following steps, a tab has to have been
previously opened. See the sub-section "Opening Customer Tabs" for more
information.
1.
Click End Order after logging into the Front POS Sales screen (Figure 8-1) to go to the Payment
Method screen (Figure 8-2).
© 1997 - 2005 Ideal Software Systems, Inc.
438
Point of Sale
2.
Click Tabs to view all existing customer tabs (Figure 8-3).
3.
Select the desired tab to close and click Close Tab.
4.
The amount owed on the customer tab will be displayed in the Payment Method screen waiting on the
user to select a form of payment.
5.
Once the payment method is decided, and Complete Sale is clicked, the Sale Complete window will
appear confirming that the transaction was recorded and the tab was paid.
8.1.10
Writing Off Tabs
This section contains a list of instructions that will instruct the user on writing off or removing a tab(s) in the
Point of Sale system.
NOTE: The user will need to be in the Front POS module of the Point of Sale
software in order to perform this task. A previously assigned Employee ID and
PIN Number with specific Front POS rights will be needed. For more
information, refer to Chapter 2 section "Entering Employees and Employee
Groups". Also, in order to complete the following steps, a tab has to have been
previously opened. See the sub-section "Opening Customer Tabs" for more
information.
WARNING: Once a tab is written off, it can no longer be paid. There will no
longer be a record for the tab(s) that is written off.
1.
Make sure that the Point of Sale menu is visible at the Ideal FEC Back Office Suite screen.
2.
Select Drawers | Manage Open Orders.
Figure 8-13. The Ideal FEC Back Office Suite Drawers menu's Manage Open Orders
Select Drawers | Manage Open Orders.
3.
The Open Orders window will open. Select the tab that needs to be written off and click Write Off.
© 1997 - 2005 Ideal Software Systems, Inc.
Chapter 8 - Tabs, Tips, and Accounts Receivable
439
Only one tab can be written off at a time.
Figure 8-14. The Open Order window
Select a tab and click Write Off.
4.
The Confirm window will prompt the user if a write off is the desired action for the selected tab. If the
tab is to be written off then click Yes. If the tab does not need to be written off then click No.
Figure 8-15. The Confirm window
Click Yes to write off the tab.
5.
Once Yes is clicked, the tab will be written off. Click Close to exit the window.
© 1997 - 2005 Ideal Software Systems, Inc.
440
8.2
Point of Sale
Using Tips
Instructions for using tips
This section contains the proper procedures for adding tips to a sale. This
section contains the following topics:
•
•
•
•
•
8.2.1
"Tips Explanation"
"Adding Gratuities to Credit Card Transactions"
"Add Tips to Credit Card Transactions"
"Add Tips Though POS Administrator"
"Clear Out All Zero Tip Credit Card Charges"
Tips Explanation
Tips can always be given by customers to employees at any time if they are in the form of a physical payment
such as change, cash, or checks. The Point of Sale program offers a feature that will also allow customers to tip
employees using their credit and/or debit cards. Tips will be added into the system just like a regular credit card
sale but when reports are run, the tips will show as deductions from the total credit card sales. The gratuities
feature must be turned on in order for Point of Sale to accept tips. Also, only the family entertainment centers
that use PC Charge will be able to set the gratuities function.
8.2.2
Adding Gratuities to Credit Card Transactions
This sub-section contains the information needed to add the gratuities feature to the Point of Sale software so that
credit card tips may be accepted.
NOTE: Users must be using PC Charge to add gratuities to credit card
transactions. Any existing and new Ideal customers that wish to use the gratuities
feature will need to notify their processor that they need to be setup for
Restaurant/Food transactions. PC Charge requires a Merchant setting that
distinguishes between retail [R] and food [F] type transactions. The user should
contact their processor before changing any PC Charge settings. In order for the
Allow Gratuities feature to be turned on in the Terminal Parameter's option
for Allowing Tabs on Orders must be also turned on. Refer to Chapter 2 section
"Configuring System Parameters" for more information.
1.
Make sure that the Point of Sale menu is visible at the Ideal FEC Back Office Suite screen.
2.
Select Maintenance | System Parameters.
© 1997 - 2005 Ideal Software Systems, Inc.
Chapter 8 - Tabs, Tips, and Accounts Receivable
Figure 8-16. The Ideal FEC Back Office Suite Maintenance menu's System Parameters
Select Maintenance | System Parameters.
3.
The Edit Parameters Terminal window will appear. The Store Settings tab is the default view.
TIP: The Edit Parameters Terminal window is also available by clicking
Parameters in the Front POS program. The Edit Parameters Terminal
window reads Terminal 1 in Figure 8-17. The user assigns the terminal number
for each computer. The number of licenses purchased from Ideal Software
Systems decides the number of terminals.
4.
Select the Credit Cards tab.
© 1997 - 2005 Ideal Software Systems, Inc.
441
442
Point of Sale
Figure 8-17. The Edit Parameters Terminal window showing the Credit Cards tab
The Credit Cards tab.
8.2.3
5.
Check the option Allow gratuities for credit cards.
6.
Close the System Parameters window.
Add Tips to Credit Card Transactions
The Front POS module of Point of Sale allows the user to add credit card tips for employees. The following
instructions explain this process.
NOTE: Users must be using PC Charge to add gratuities to credit card
transactions. Any existing and new Ideal customers that wish to use the gratuities
feature will need to notify their processor that they need to be setup for
Restaurant/Food transactions. PC Charge requires a Merchant setting that
distinguishes between retail [R] and food [F] type transactions. The user should
contact their processor before changing any PC Charge settings. Also, the user
must have the gratuities function turned on in order to process any credit cards
tips. For more information, refer to the previous sub-section. Finally, a purchase
with a credit card must have just been completed in Front POS before the
following instructions can be followed. A tab for that sale must have been created
otherwise there will be nothing to append the tip amount to.
© 1997 - 2005 Ideal Software Systems, Inc.
Chapter 8 - Tabs, Tips, and Accounts Receivable
1.
The user must be logged into the Front POS module of the Point of Sale software.
2.
In the Front POS Sales window (Figure 8-1), click End Order at the bottom of the screen.
443
NOTE: Do not have any inventory selected.
3.
Inside the Payment Method screen, click Tabs.
Figure 8-18. The Payment Method screen
Click Tabs.
4.
Once the Open Tabs window appears (Figure 8-3), click View Authorized Tabs.
5.
The Open Tabs window will display the Authorized Tabs List. Select the tab that the tip will be going
on or associated with.
© 1997 - 2005 Ideal Software Systems, Inc.
444
Point of Sale
Figure 8-19. The Open Tabs window with the Authorized Tabs List
Select the tab to be tipped.
6.
Once the correct tab is selected, click Tip.
7.
A window will appear, prompting for a tab amount to be entered. Enter the money amount and click
OK.
8.
The employee will be prompted with a confirmation of the new amount. If the account is correct click
OK. If the amount is incorrect click No and re-enter the tip amount.
9.
The transaction will then be processed similar to a regular credit card transaction.
8.2.4
Add Tips Through POS Administrator
This section contains a list of instructions that will instruct the user on adding a tip in the Point of Sale system.
NOTE: In order to add tips through the POS Administrator, there must be an
authorized tab currently open.
1.
Make sure that the Point of Sale menu is visible at the Ideal FEC Back Office Suite screen.
2.
Select Drawers | Manage Open Orders (Figure 8-13).
© 1997 - 2005 Ideal Software Systems, Inc.
Chapter 8 - Tabs, Tips, and Accounts Receivable
445
3.
The Open Orders window (Figure8-14) will open. Select the tab that needs to be tipped click Tip.
Only one tab can be tipped at a time when using this option. To tip all tabs, refer to the following
section.
4.
The user will be prompted for the amount of the tip to add. Enter the tip amount.
8.2.5
Clear Out All Zero Tip Credit Card Charges
This section contains a list of instructions that will instruct the user on clearing out all credit card charges that
have zero tip in the Point of Sale system.
1.
Make sure that the Point of Sale menu is visible at the Ideal FEC Back Office Suite screen.
2.
Select Drawers | Manage Open Orders (Figure 8-13).
3.
The Open Orders window (Figure8-14) will open. Click Tip All. A Confrm window will appear.
Click OK.
Figure 8-20. The Confirm window
Click OK.
4.
All untipped tabs will be closed.
© 1997 - 2005 Ideal Software Systems, Inc.
446
8.3
Point of Sale
Open Invoices
Instructions for creating and paying off open invoices
This section contains the proper procedures for converting tabs to open
invoices and paying them off. This section contains the following topics:
•
•
•
•
•
8.3.1
"About Open Invoices"
"Converting Tabs to Open Invoices"
"Paying Off Open Invoices"
"View Customer Invoices"
"View Open Invoices"
About Open Invoices
Open invoices are tabs that haven't been paid and/or money owed by a customer. Making customer accounts are
useful, especially if tabs are used. If the system has the customer's information, and the customer starts a tab, and
then does not pay, the family entertainment center now has a means to keep in touch with the customer until the
bill is paid. The Point of Sale system has a function that allows a manager to quickly convert unpaid tabs into
open invoices at the end of the night.
8.3.2
Converting Tabs to Open Invoices
This sub-section explains how to convert an existing customer tab(s) into an open invoice in the Point of Sale
software.
NOTE: In order to complete the following steps, a tab has to have been
previously opened. See the sub-section "Opening Customer Tabs" for more
information.
TIP: Compared to writing off tabs, this is the preferred method to removing tabs
that cannot be paid before the day is closed out in the Point of Sale software.
1.
Make sure that the Point of Sale menu is visible at the Ideal FEC Back Office Suite screen.
2.
Select Drawers | Manage Open Orders.
© 1997 - 2005 Ideal Software Systems, Inc.
Chapter 8 - Tabs, Tips, and Accounts Receivable
447
Figure 8-21. The Ideal FEC Back Office Suite Drawers menu's Manage Open Orders option
Select Drawers | Manage Open Orders.
3.
When the Open Orders window appears, select a tab to convert to an open invoice. Click Convert to
Invoice.
Figure 8-22. The Open Order window
Select a tab and click Convert To Invoice.
NOTE: Only one tab can be converted at a time.
4.
The Select Customer window will open. Select the customer that owes the money on the tab. If the
customer is not in the customer list displayed in the window, a new one will need to be created.
© 1997 - 2005 Ideal Software Systems, Inc.
448
Point of Sale
Figure 8-23. The Select Customer window
Select a current customer or create a new one.
NOTE: Clicking New and filling out the fields in the Add/Edit Customer
window with the appropriate information can create a new customer. For more
information on creating a new customer refer to Chapter 7 in the "Customers"
sub-section.
5.
8.3.3
Click OK once the correct customer is selected. The tab will be removed from the Open Orders
window.
Paying Off Open Invoices
This sub-section explains how to pay off an existing customer's open invoice(s). In order to complete the
following steps, a tab has to have been previously converted to an open invoice in the Point of Sale system.
NOTE: If there is no open invoice, see the previous sub-section.
1.
After logging into the Front POS Sales screen, click Payment on Account. This will open the Select
Customer window.
2.
Select the name of the customer paying off an open invoice. Click OK.
3.
The Accounts Receivable window will appear listing the customer's accounts. Select the account the
customer wishes to pay.
© 1997 - 2005 Ideal Software Systems, Inc.
Chapter 8 - Tabs, Tips, and Accounts Receivable
449
Figure 8-24. The Accounts Receivable window
Select an invoice.
4.
There are two types of payments the customer can make.
A.
Full Payment
This can be done by clicking Pay in Full. The full amount of the selected invoice will then
appear in the Front POS screen.
B.
Partial Payment
If the customer wishes to pay only a portion of his tab, either click Enter Amt or OK to open
the Enter Payment Amount window.
TIP: The partial payment amount will then appear in the Front POS Sales
screen.
© 1997 - 2005 Ideal Software Systems, Inc.
450
Point of Sale
Figure 8-25. The Enter Payment Amount window
Enter the amount the customer wishes to pay on the invoice.
5.
8.3.4
Continue to the Payment Method screen, select a method of payment, and then click Complete Sale.
The Sale Complete window will appear showing that the transaction was completed.
View Customer Invoices
This sub-section explains how to view customer's invoices. In order to complete the following steps, a tab has to
have been previously converted to an open invoice in the Point of Sale system.
NOTE: If there is no open invoice, see the previous sub-section, "Converting
Tabs to Open Invoices".
1.
Click Facility in the middle of the Ideal FEC Back Office Suite (FEC Administrator) screen to
access the Facility menus.
2.
Select Customers | Invoices.
© 1997 - 2005 Ideal Software Systems, Inc.
Chapter 8 - Tabs, Tips, and Accounts Receivable
Figure 8-26. The Ideal FEC Back Office Suite Customers menu's Invoices option
Select Customers | Invoices.
3.
This will open the Choose Date Range for Invoices window. Enter the desired information.
Figure 8-27. The Choose Date Range For Invoices
Enter the dates.
A.
Start Date
Enter the starting date at which all invoices should be displayed.
B.
End Date
Enter the ending date up to display all invoices through.
C.
Print Only Open Invoices
Print only open invoices for the current time period.
© 1997 - 2005 Ideal Software Systems, Inc.
451
452
Point of Sale
TIP: A quicker way to view only open invoices along with their amounts is by
selecting Customers | Open Invoices. For more information on this, refer to the
next sub-section.
4.
The Print Preview window will appear displaying the selected invoices. Information such as customer
name and address, invoice number, and the date the invoice was made will be displayed.
5.
To print the report on invoices, click
8.3.5
.
View Open Invoices
This sub-section explains how to view only open customer's invoices. In order to complete the following steps, a
tab has to have been previously converted to an open invoice in the Point of Sale system.
NOTE: If there is no open invoice, see the previous sub-section, "Converting
Tabs to Open Invoices".
1.
Click Facility in the middle of the Ideal FEC Back Office Suite (FEC Administrator) screen to
access the Facility menus.
2.
Select Customers | Open Invoices.
Figure 8-28. The Ideal FEC Back Office Suite Customers menu's Open Invoices option
Select Customers | Open Invoices.
3.
The Print Preview window will appear displaying all currently open invoices. Information such as
customer name, address and phone numbers, invoice number, amount, and the date the invoice was
made will be displayed.
© 1997 - 2005 Ideal Software Systems, Inc.
Chapter 8 - Tabs, Tips, and Accounts Receivable
4.
To print the report on invoices, click
453
.
Chapter 9 - Event Scheduler
9.1
Using Event Scheduler
Instructions for using the appointment grid, parties, and deposits
This section contains the proper procedures for booking a party, using
deposits, starting events, adding items to a party, and other party scheduler
procedures. This section contains the following topics:
•
•
•
•
•
•
•
•
•
•
•
•
•
•
9.1.1
"About Event Scheduler"
"Creating Resources"
"Booking an Event"
"Adding Items to an Event"
"Rescheduling an Event"
• "Rescheduling Within the Same Resource"
• "Rescheduling to a Different Resource"
"Print an Event Quote"
"Creating and Adding an Event Contract"
"Print an Event Contract"
"Issue Event Tickets"
"Taking a Deposit"
"Refunding a Deposit"
"Starting an Event"
"Adding Items to a Started Event"
"Paying for an Event"Rescheduling"
About Event Scheduler
Scheduling any type of event becomes much easier with Ideal's Event Scheduler. This reservation system lets
employees use on-screen calendars to quickly reserve a location and time for birthday parties, groups, corporate
outings, or any kind of special event. This module allows the user to accept deposits, confirm reservations, and
store all of the event details in one centralized record. The Event Scheduler is fully integrated with Front POS
and the rest of the Point of Sale system. This allows for quick and fool proof processing of deposits and party
tabs. Reporting allows owners, managers, and party hosts to keep up with required party inventory and gives
the hosts and hostesses precise information so that they can quickly prepare for the next event. This module
helps the user in preventing over booking.
Other benefits include:
1.
Accepting deposits and confirming events
2.
Printing customized event contracts and reports
© 1997 - 2005 Ideal Software Systems, Inc.
454
Point of Sale
3.
Automatic scheduling of all resources: party rooms, tables, chairs, etc.
4.
Automatic scheduling of all the event's inventory
5.
Scheduling set up and clean up times
6.
Accommodates payments over the phone or at the Front POS terminal
7.
Providing fast and easy screens for scheduling
8.
Completely integrated with the Point of Sale system
9.1.2
Creating Resources
This sub-section explains how to create a resource for the Event Scheduler in the Point of Sale system.
NOTE: It is important that inventory categories, sub-categories, and tax tables be
setup before any resources are made. Refer to Chapter 3 for information on
setting up these properties.
1.
Make sure that the Point of Sale menu is visible at the Ideal FEC Back Office Suite screen.
2.
Select Inventory | Create Inventory.
Figure 9-1. The Ideal FEC Back Office Suite Inventory menu's Create Inventory
Select Inventory | Create Inventory.
3.
The Create New Inventory Item window will open. Make sure that Resource is selected under Item
Type.
© 1997 - 2005 Ideal Software Systems, Inc.
Chapter 9 - Event Scheduler
455
Figure 9-2. The Create New Inventory Item window with Resource Item Type selected
Make sure Resource is selected under Item Type.
4.
Enter the information for the resource.
A.
Item Number
Enter a number for this inventory item.
i.
Auto-Assign Inventory Number
Check this option if the inventory item is to be assigned a number by the Point of
Sale system.
TIP: The Auto-Assign Inventory Number option is checked by default. It is
recommended that each category gets its own range of inventory numbers. (Food
= 1 to 999, Golf = 1000 to 1999, etc.) This will make managing hundreds of
inventory items simpler.
B.
Retail Sale Price
Enter how much the item will be sold for.
C.
Description
Enter the name for the inventory item.
TIP: The Description field for an inventory should be unique to that item. This
will make searching for items easier than depending on searching for them by
their unique item number.
D.
Category
Click the drop down arrow and select a category for the item.
E.
Sub-Category
If the item needs a sub-category, click the drop down arrow to select one.
© 1997 - 2005 Ideal Software Systems, Inc.
456
Point of Sale
F.
Tax Type
Select a tax type after the clicking the drop down arrow.
G.
Vendor
If the inventory item has a vendor, click the drop down arrow to select one.
H.
Edit Vendor
Click this button to edit the item's vendor. Refer to sub-section "Editing a Vendor Through an
Inventory Item" in Chapter 3 for more information.
I.
Barcode
If barcodes are used, enter the barcode number of the item.
TIP: If the item already has a barcode, the user may scan the barcode on the item
while the cursor is in the Barcode field of the inventory item and input item
original barcode into the sytem. The original barcode will now be recognized by
the system as that inventory item whenever scanned.
J.
Active
Select this option if the inventory item is going to be actively for sale. Unselect this option to
deactivate the item. This option is selected by default.
K.
Right Level Required
Enter a number 0 through 5 of the right level required by the employee to sell the inventory
item.
NOTE: If a number other than 0 through 5 is entered in the Right Level
Required field then an error will result. To change an employee rights level so
that they can sell items with a level higher than 0, refer back to Chapter 2 section
"Entering Employees and Employee Groups".
L.
Service Printer
i.
Service Printer 1
Select this option to print to a printer recognized as Service Printer 1.
ii.
Service Printer 2
Select this option to print to a printer recognized as Service Printer 2.
iii.
Service Printer 3
Select this option to print to a printer recognized as Service Printer 3.
iv.
Service Printer 4
Select this option to print to a printer recognized as Service Printer 4.
NOTE: A service printer must be networked into the Ideal system network and
setup under the printer properties in the Point of Sale program in order for
inventory item information to be printed to a kitchen or service printer.
M.
Item Script
© 1997 - 2005 Ideal Software Systems, Inc.
Chapter 9 - Event Scheduler
457
Figure 9-3. The Item Script tab
Click on the Item Script tab.
i.
Script Filename
Select a script that will be printed upon the item's purchase (if the item requires that
something be printed other than the receipt.)
NOTE: The script chosen will be printed in addition to any other ticket,
wristband, or score card.
ii.
Print Location
a.
None
The select script will not be printed upon the item's purchase.
b.
Ticket Printer
The script will be printed to a designated ticket printer upon the sale of the
item.
c.
Wristband Printer
The script will print on a wristband when the item is sold.
d.
Receipt Printer
The script will print on the receipt printer local to the terminal when the item
is purchased.
e.
Golf Scorecard Printer
The script will print on a scorecard.
iii.
Script
Click the down arrow and select a item script to use.
iv.
Create
Click this button to create a item script.
v.
Edit
Edit a script in the default word processor.
NOTE: For further information on creating and editing scripts, refer to the "Item
Scripts" section in Chapter 3.
N.
Resource Info
© 1997 - 2005 Ideal Software Systems, Inc.
458
Point of Sale
Figure 9-4. The Resource Info tab
Click on the Resource Info tab.
i.
Minimum reserve time ____ minutes.
Enter a time that will serve as the time intervals for resource rental.
ii.
Capacity
Enter the total number of people that can fit in the room or resource.
iii.
Availability
NOTE: The name of the window in Figure 9-5 reads Times available for 3
because the number 3 is the item number assigned to the resource used in the
example.
Figure 9-5. The Times Available for <ITEM #> window
a.
Click Add Schedule.
b.
This will open the Change Pricing Options window. Under the Date &
Time section and Day Of Week field, click the down arrow and select a day
of the week for the time block the resource will be available for.
c.
Select a time in the Start Time field where availability of the resource will
begin for the day selected above.
© 1997 - 2005 Ideal Software Systems, Inc.
Chapter 9 - Event Scheduler
d.
459
Select a time in the End Time field where availability of the resource will
end for the day selected above.
Figure 9-6. The Change Pricing Options window
Select a day of the week.
e.
Click OK to save the time frame into the schedule of the resource. The time
will now appear in the times table of the Times Available for <item
number> window.
Figure 9-7. The Times Available for <item number> window with sample time
NOTE: To delete a time, select the time and click Delete button.
f.
O.
Once all of the times are entered, click Close to return to the Create New
Inventory Item screen.
Discounts
This tab (Figure 3-100) will display any discounts that have been applied to the item. Also,
Price Schedule is on this tab. Refer to sub-section "Adding a Price Schedule".
© 1997 - 2005 Ideal Software Systems, Inc.
460
Point of Sale
P.
Coupon Info
In order for a cashier to scan a coupon provided by a customer, Point of Sale will require that
the customer's order contain the inventory item that the coupon is linked to in this tab.
Figure 9-8. The Coupon Info tab
Click on the Coupon Info tab.
i.
Setup Required Items
Click this button to open the Inventory Required in Order window.
Figure 9-9. The Inventory Required in Order window
Click Setup Required Items to open this window.
a.
Add Item
Click this button to open the Select Inventory Item window. Select an item
required for the coupon and click OK.
© 1997 - 2005 Ideal Software Systems, Inc.
Chapter 9 - Event Scheduler
461
Figure 9-10. The Select Inventory Item window with sample item
Select an inventory item and clickOK.
b.
Q.
Remove Item
Select and item to be removed from the required item for coupon list and
click this button to remove it.
Order/Stocking Rules
This tab (Figure 3-101) allows the manager and owner to define specific rules about ording
from vendors and stocking inventory that apply to the item. Refer to section "Order/Stocking
Rules".
5.
Click OK once the item is finished. The item will now be saved in the Point of Sale system.
6.
The Confirm window will appear. Click Yes to create another item. Otherwise click No to return to the
Ideal FEC Back Office Suite screen.
Figure 9-11. The Confirm window
Click Yes to create another item, otherwise click No.
© 1997 - 2005 Ideal Software Systems, Inc.
462
Point of Sale
9.1.3
Booking an Event
Having scheduling functionality is important for a business that promotes renting out its facilities for parties,
corporate events, and other events. With the Point of Sale software, a business will have this functionality. This
sub-section contains the information needed to book an event in the Point of Sale software. The user will need to
be in the Front POS portion on the software in order to perform this task.
1.
Start by logging into the Front POS portion of the Point of Sale software.
NOTE: An employee user number and login password will need to be setup prior
to logging in. Refer to Chapter 2 section "Entering Employees and Employee
Groups" for more information.
Figure 9-12. The Front POS Login Screen
Enter an Employee ID and PIN Number.
2.
Logging in will open the Front POS Sales screen.
© 1997 - 2005 Ideal Software Systems, Inc.
Chapter 9 - Event Scheduler
463
Figure 9-13. The Front POS Sales screen with sample inventory
Open the Sales screen.
3.
Click Event. The Party Menu window will then appear.
4.
Click Book Party on the Party Menu. The Appointment Grid screen showing the current business
date will open.
© 1997 - 2005 Ideal Software Systems, Inc.
464
Point of Sale
Figure 9-14. The Party Menu window
Click Book Party.
NOTE: The resources that will hold the parties and other scheduled events will
need to be setup prior booking any parties. If there are no resources established,
the Appointment Grid will be empty. Go to the previous sub-sections for more
information.
5.
Inside the Appointment Grid screen, find the desired time for the event to start. Double-click in this
white area. A window will appear confirming that the user wants to create a new party. Click Yes to
create a new event.
© 1997 - 2005 Ideal Software Systems, Inc.
Chapter 9 - Event Scheduler
Figure 9-15. The Appointment Grid screen with sample resources
Click Book Party to open the Appointment Grid screen.
NOTE: The Point of Sale system will display a warning if the user is trying to
schedule another party in the same location as a currently existing one. Two
parties are not allowed to be scheduled in the same resource at the same time.
Figure 9-16. The Confirm window
Click Yes to create a new event.
6.
A new event will appear in blue. This event will be automatically assigned a party number.
© 1997 - 2005 Ideal Software Systems, Inc.
465
466
Point of Sale
Figure 9-17. The Appointment Grid with scheduled event
A new event will appear.
NOTE: Events scheduled in the Appointment Grid will appear in one of four
colors. These colors and their meanings are explained below.
Yellow = Scheduled
A scheduled event has been assigned a time slot in a resource on the
Appointment Grid.
Blue
= Selected
The user has highlighted a selected event. An event can be selected by
clicking on it.
Purple = Started/Invoiced
A started/invoiced event has been set to begin by the user. This status
means the event is currently in progress.
Green = Deposit Taken
A deposit taken on an event shows the payment status. A customer has
paid money toward an event that has not yet taken place but is
scheduled.
© 1997 - 2005 Ideal Software Systems, Inc.
Chapter 9 - Event Scheduler
TIP: Numbers are assigned to events automatically by the Point of Sale software.
The numbers assigned correspond with the order the events were created in. If a
user using Event Scheduler for the first time creates an event, this will be the first
one created and will be assigned the number 1 as seen in Figure 9-17.
7.
Double-click inside the new event to bring up the Invoice Number window.
Figure 9-18. The Invoice Number window for sample event 1
Double-click the new event to open the Invoice Number window.
© 1997 - 2005 Ideal Software Systems, Inc.
467
468
Point of Sale
NOTE: The actual invoice number for the event is displayed at the top of
Invoice Number window. This invoice number is the number assigned to the
event when it is first created in the Appointment Grid.
8.
Inside the Customer Information section window, select the customer requesting the event be
scheduled by clicking Choose Customer. This will open the select customer window.
A.
If the customer is not listed, click New to create another customer account in the Add/Edit
Customer window.
Figure 9-19. The Select Customer window with sample customers
Click New.
9.
Once a customer is selected, the Customer Information sections will be populated with information.
Now, the Event Information needs to be entered. The Event Information is located directly below
the Customer Information.
© 1997 - 2005 Ideal Software Systems, Inc.
Chapter 9 - Event Scheduler
469
Figure 9-20. The Add/Edit Customer window
Create a new customer account.
A.
Event Date, Begin Time, and End Time
These fields should be automatically populated with information. Check and confirm that this
is the time the customer desires.
B.
Special Instruction
This field is optional. The purpose of this field is to relay special information from the
customer to the event host.
© 1997 - 2005 Ideal Software Systems, Inc.
470
Point of Sale
C.
Age Group
This field is optional. This relays the age of the customers expected to attend the event.
D.
Tax Exempt
When this option is checked, taxes on any charge associated with the event do not apply.
NOTE: When starting a party that is tax exempt, the exempt status will persist to
the payment screen.
E.
Honoree/Occasion
This field must be fill completed.
TIP: If the event is being scheduled in honor of someone's birthday, then the
customer's name should be entered. If a business is booking the event, then the
name of the company event should be entered.
NOTE: The information entered into the Honoree/Occasion field shows as the
name of the event.
i.
Select a child customer account by clicking the down arrow on the right side of the
field.
ii.
If there are no child customer accounts, click Add Child. This will open the
Add/Edit Customer window. A new child customer can be entered here. Once an
account has been created, the child will appear by clicking the down arrow on the
right side of the Honoree/Occasion field.
NOTE: See Chapter 7 in the "Customers" section, sub-section "Adding a Child
Account" for more details.
10.
9.1.4
F.
The Max Capacity is the maximum number of customers that can be inside the event area at
one time. The Point of Sale software enters this field.
G.
The Adults field is only used when a child's party is scheduled. The amount of adults is not
included in the Max Capacity.
H.
The Participants field is the actual number of customers that will be involved in the event.
The Participants number cannot exceed the Max Capacity number.
When the Event Information is entered, click OK. The user will now be back in the Appointment
Grid. The event will be scheduled.
Adding Items to an Event
Below is a list of instructions that the user can follow to add more items onto an existing, scheduled event in the
Point of Sale software. This will allow the user to be aware of every item required for the event by the customer
as well as have every item prepared before the start time. The follow sub-section explains how to add items to an
event in the Point of Sale system.
© 1997 - 2005 Ideal Software Systems, Inc.
Chapter 9 - Event Scheduler
471
NOTE: In order to complete the following steps, an event has to have been
previously scheduled. If an event has not been scheduled, see the previous subsection. Items will need to have been created before they can be added to the
scheduled event. See Chapter 3 for more details on items and other item based
information.
1.
After logging into the Front POS Sales screen (Figure 9-13), click Event.
2.
When the Party Menu window appears, click Book Party (Figure 9-14).
3.
In the Appointment Grid screen (Figure 9-15), select the event that needs to have an item(s) added by
double-clicking that event. The Invoice Number window will open.
4.
Inside the Invoice Number window (Figure 9-18), click Add Item. The Select Inventory Item
window will emerge. Select the item(s) that the customer would like to add to the event.
TIP: The Select Inventory Item window defaults to listing the items defined as
package items. This is for convenience purposes as most items that are added to
events are package items.
Figure 9-21. The Select Inventory Item window
Select the item(s) that the customer would like to add to the event.
5.
Once OK is clicked, the Edit Detail Item window will appear. The purpose of this window is to ask the
user how many of the selected item will be required for the event.
NOTE: The Quantity in the Edit Detail Item window defaults to the maximum
number of participants.
© 1997 - 2005 Ideal Software Systems, Inc.
472
Point of Sale
TIP: The user can change this number if the default is incorrect. Also, the price
of the item can be altered. The total price for that item is listed.
Figure 9-22. The Edit Detail Item window with sample figures
Enter information into the Edit Detail Item window.
6.
Click OK. The item has now been added to the event item screen.
© 1997 - 2005 Ideal Software Systems, Inc.
Chapter 9 - Event Scheduler
Figure 9-23. The Invoice Number window with sample information
Click OK.
TIP: The added item(s) can be edited by highlighting the desired item and
clicking Edit Item. The Edit Detail Item window will open and changes can
then be made.
NOTE: The total price of the event is listed in the Invoice Number window.
This amount changes or is updated when the user adds or edits additional items.
© 1997 - 2005 Ideal Software Systems, Inc.
473
474
Point of Sale
Figure 9-24. The total and owed information in the Invoice Number window
7.
9.1.5
Click OK again to exit back into the Appointment Grid screen.
Rescheduling an Event
This sub-section explains how to change the time and/or resource of a scheduled event(s). There are two
different ways to reschedule an event: 1) Rescheduling Within the Same Resource and 2) Rescheduling
to a Different Resource.
NOTE: In order to complete the following steps, an event has to have been
previously scheduled. If an event has not been scheduled, see the sub-section
"Booking an Event".
9.1.5.1
Rescheduling Within the Same Resource
TIP: To reschedule within the same resource means that the location of the event
does not change. If an event is scheduled in Room A, it will still take place in
Room A, just at a different time.
1.
After logging into the Front POS Sales screen (Figure 9-13), click Event.
2.
When the Party Menu window appears (Figure 9-14), click Book Party.
3.
Select the event that needs to be rescheduled in the Appointment Grid and right-click on the event
(Figure 9-15). The Event Options window will appear.
Figure 9-25. The Event Options window
Right-click on the event.
4.
Select Reschedule.
5.
The Information window will appear. Click OK.
© 1997 - 2005 Ideal Software Systems, Inc.
Chapter 9 - Event Scheduler
475
Figure 9-26. The Information window
Click OK.
6.
The selected event will then turn red. At this time the Point of Sale software is prompting the user to
double-click on the new desired time within the same resource.
7.
Once the user has selected a new time slot, the Invoice Number will open. Check the new Begin Time
and End Time to ensure the event is at the desired time. The event has now been rescheduled within the
same resource.
9.1.5.2
Rescheduling to a Different Resource
TIP: To reschedule to a different resource means that the location of the event
does change. An event scheduled in Room A needs to move to Room B.
1.
In the Front POS screen (Figure 9-13), click Event.
2.
When the Party Menu window appears (Figure 9-14), select Book Party.
3.
Double-click the event that needs to change locations. The Invoice Number window will open.
Confirm that this is the correct party. Close the window.
TIP: By opening the scheduled event, the Point of Sale software will place this
event in memory. Until another scheduled event is highlighted, the chosen event
can be copied to any time slot that has the appropriate amount of time.
4.
Once the Invoice Number window is closed, double-click inside the desired time slot of the preferred
resource. Another instance of the same event should appear. The user should now have two events that
look identical in two different locations.
5.
Click inside the first instance of the event and press DELETE. A Confirm window will appear asking
if user would like to remove that room from the event. Click Yes if the room needs to be removed out of
the selected event.
© 1997 - 2005 Ideal Software Systems, Inc.
476
Point of Sale
Figure 9-27. The Confirm window
Click Yes.
9.1.6
Print an Event Quote
This sub-section explains how to print a quote for an event(s) in the Point of Sale system.
NOTE: In order to complete the following steps, an event has to have been
previously scheduled. If an event has not been scheduled, see the sub-section
"Booking an Event". Also, a printer must be connected to the computer in some
way (local or network connection) to print out the quote.
1.
Log into the Front POS Sales screen (Figure 9-13), click Event.
2.
When the Party Menu window appears (Figure 9-14), click Book Party.
3.
Double-click on the event that the customer needs the quote for in the Appointment Grid (Figure 915). The Invoice Number window will open.
4.
Click Print Quote located at the bottom of the Invoice Number window.
5.
The quote should automatically print to the default printer attached to the terminal.
9.1.7
Creating and Adding an Event Contract
This sub-section explains how to write an event contract in Point of Sale. An event contract is used as a method
of authentication with the customer that the scheduled event is understood and confirmed by both parties: the
place of business holding the event and the customer.
NOTE: In order to complete the following steps, the user will need word
processing software with the ability to convert a document into RTM format.
TIP: This is only an example for the user to follow. An event contract is not
required to read exactly as the one below. However, the System Variables and the
Customer Variables must be written correctly in order to populated by the Point
of Sale system. For more information on these variables, refer to Appendix A
section "Variables for Party Contracts and Form Letters".
1.
Make sure that the Event Scheduler menu is visible at the Ideal FEC Back Office Suite screen by
© 1997 - 2005 Ideal Software Systems, Inc.
Chapter 9 - Event Scheduler
477
clicking Event Scheduler.
2.
Select Reports | Edit Party Contract.
Figure 9-28. The Ideal FEC Back Office Suite Reports menu's Edit Party Contract
Select Reports | Party Planning Report.
3.
The Report Builder utility will open. Use this utility to build a contract containing simular information
as displayed below. For more information on using the Report Builder, refer to the Report Builder User
Guide.
© 1997 - 2005 Ideal Software Systems, Inc.
478
Point of Sale
Today's date <SystemDate>
Contact's Name: <First Name> <Last Name>
Address: <Address 1>
<Address 2>
City: <City> State: <State> Zip: <Zip>
Home Phone: <Home Phone>
Work Phone: <Work Phone>
Birthday Child: <Honoree>
Age Group: <Age_Group>
Date and Time of Party: <StartDate> for <StartTime> through <EndTime>
Park Location of Party: <Resource>
Deposit Amount: <Deposit>
Bill Information
Date Reserved: <Booked Date>
Number of Children: <Children>
Number of Adults: <Adults>
Total Cost of Party:
<Price>
Minus Deposit:
-<Deposit>
Incidental Fees:
+________
Amount Owed:
=________
Other: <Notes>
Representative___________________________________________
Parent/Guardian__________________________________________
Unique Event Number: <Number>
Customer ID Number: <Customer>
4.
Save this file in RTM format in a location that the file can be easily found.
5.
Go into the Ideal FEC Back Office Suite. Under the Point of Sale section, select Maintenance | System
© 1997 - 2005 Ideal Software Systems, Inc.
Chapter 9 - Event Scheduler
Parameters.
Figure 9-29. The Ideal FEC Back Office Suite Maintenance menu's System Parameters
Select Maintenance | System Parameters.
6.
Click on the Party Scheduler tab.
© 1997 - 2005 Ideal Software Systems, Inc.
479
480
Point of Sale
Figure 9-30. The Edit Parameters Terminal window's Party Scheduler tab
Click on the Party Scheduler tab.
7.
When setting up the event contract to be printed, there are some options on the Party Scheduler tab to
consider.
A.
Print Party Quotes
This tells Event Scheduler where to print the quote.
i.
Receipt Printer - Print the quote to the local receipt printer on receipt paper.
ii.
Default Windows Printer - Print the quote to a Windows printer that is either
connected or networked to the terminal.
NOTE: As mentioned under the Print Party Quotes section on the Party
Scheduler tab window, the Windows default printer must be able to print on 8.5"
by 11" paper. You can set the Windows default printer at the Windows printer
setup screen.
B.
Event Contracts
This points the Point of Sale software to an RTM file that will serve as the template to the
event contracts.
i.
Event Party Contract Location
This is the path where the Point of Sale software will look for the event contract.
© 1997 - 2005 Ideal Software Systems, Inc.
Chapter 9 - Event Scheduler
a.
481
Browse
Click this button to open the Browse window.
Figure 9-31 The Choose RTM File for Printing Contracts window
Choose an RTM file.
b.
8.
9.1.8
Edit
This will open Windows Explorer. The user can then select the contract file
for editing.
Once the printing parameters are setup and the event contract has been created and identified, the user
now has the option of printing event contracts.
Print an Event Contract
This sub-section explains how to print an event contract in the Point of Sale system.
NOTE: In order to complete the following steps, the user has to have created a
contract document into RTF format. If a party contract has not been created or
correctly set up in the Point of Sale software, refer to the previous sub-section.
Also, in order to complete the following steps, an event has to have been
previously scheduled. If an event has not been scheduled, see the sub-section
"Booking an Event" in this section.
1.
Log into the Front POS Sales screen (Figure 9-13) and click Event.
2.
When the Party Menu window appears (Figure 9-14), click Book Party.
3.
Double-click on the event in the Appointment Grid that the customer needs the contract for. (Figure
9-15) The Invoice Number window will open.
4.
Click Print Contract. This will open the Choose Contract to Print window. Select the appropriate
contract to print and click OK.
© 1997 - 2005 Ideal Software Systems, Inc.
482
Point of Sale
Figure 9-32. The Choose Contract to Print window
Select a contract to print and click OK.
5.
The Print Preview window will appear with the event contract.
6.
Confirm the information in the event contract. Click
7.
The contract will print to the terminal's default report printer.
9.1.9
.
Issue Event Tickets
This sub-section explains how to print off and issue tickets before an event in the Point of Sale software begins.
NOTE: In order to complete the following steps, an event has to have been
previously scheduled. If an event has not been scheduled, see the sub-section
"Booking an Event" in this section. Also, in order to complete the following
steps, a ticket item will need to have been added onto the event. To add an item
onto the event, see topic "Adding Items to an Event" in this section. Finally, in
order to print tickets, a ticket printer or receipt printer will need to be setup on or
networked to terminal that will be issuing the tickets.
1.
Log into the Front POS Sales screen (Figure 9-13) and click Event.
2.
When the Party Menu window appears (Figure 9-14), click Book Party.
3.
Double-click on the event that the customer needs the tickets issued for in the Appointment Grid
(Figure 9-15). The Invoice Number window will open.
4.
Click Issue Tickets. The tickets will immediately begin to print.
© 1997 - 2005 Ideal Software Systems, Inc.
Chapter 9 - Event Scheduler
9.1.10
483
Taking a Deposit
This sub-section explains how to take a deposit from a customer for a scheduled event in the Point of Sale
system.
NOTE: In order to complete the following steps, an event has to have been
previously scheduled. If an event has not been scheduled, see the sub-section
"Booking an Event" in this section.
1.
In the Front POS Sales screen (Figure 9-13), click Event.
2.
When the Party Menu window appears (Figure 9-14), click Take Deposit. The Current Party
Listing window will appear.
3.
If the date for the Party List is not the desired date of the event, then click Change Date.
Figure 9-33. The Current Party Listing window with sample party
Click Select Deposit to open the Current Party Listing window.
4.
The Select Date window will appear and allow the user to select the desired date. Once the date is
selected, click OK.
© 1997 - 2005 Ideal Software Systems, Inc.
484
Point of Sale
Figure 9-34. The Select Date window
Select a date and click OK.
5.
Select the desired event for the deposit to be paid to and click OK.
6.
The Enter Party Deposit window will open. Enter the amount that the customer wants to put down on
a deposit.
© 1997 - 2005 Ideal Software Systems, Inc.
Chapter 9 - Event Scheduler
485
Figure 9-35. The Enter Party Deposit window with sample amount
Enter the deposit amount.
7.
Click OK. The deposit amount has now been placed in the Front POS Sales screen.
Figure 9-36. The Front POS Sales screen with sample deposit
Click OK.
8.
Click End Order. Once the sales is completed, the deposit amount will appear for their scheduled
event.
© 1997 - 2005 Ideal Software Systems, Inc.
486
Point of Sale
NOTE: There is another way that a deposit can be taken. When in the Invoice
Number window, the user can enter a deposit amount by clicking Take Deposit.
9.1.11
Refunding a Deposit
This sub-section explains how to refund a deposit for a customer for a scheduled event in the Point of Sale
system.
NOTE: In order to complete the following steps, an event has to have been
previously scheduled. If an event has not been scheduled, see the sub-section
"Booking an Event" in this section. Also, in order to complete the following
steps, an event must have already had a deposit taken on it. For more information
on taking a deposit, see the previous sub-section in this manual.
1.
After logging into the Front POS Sales screen (Figure 9-13), click Event.
2.
When the Party Menu window appears (Figure 9-14), click Deposit Refund. The Current Party
Listing window will appear (Figure 9-33).
3.
If the date for the Party List is not the desired date of the event, then click Change Date.
4.
The Calendar window will appear (Figure 9-34) and allow the user to select the desired date. Once
the date is selected, click Select.
5.
Select the desired event for the deposit to be refunded to and click OK.
6.
The refund amount has now been placed in the Front POS screen.
7.
Click End Order. Once the sale is completed, the deposit amount will be refunded from their scheduled
event.
9.1.12
Starting an Event
This sub-section explains how to start a customer's event in the Point of Sale system.
NOTE: In order to complete the following steps, an event has to have been
previously scheduled. If an event has not been scheduled, see the sub-section
"Booking an Event" in this section.
WARNING: Once an event has started, it cannot be stopped. The only way to
take it out of the start status is to pay for and close the event. Also, once an event
has started, a deposit cannot be refunded.
1.
Once logged into the Front POS Sales screen (Figure 9-13), click Event button.
2.
When the Party Menu window appears (Figure 9-14), click Start Event. The Current Party Listing
window will appear (Figure 9-33).
© 1997 - 2005 Ideal Software Systems, Inc.
Chapter 9 - Event Scheduler
487
3.
If the date for the Party List is not the desired date of the event, then click Change Date.
4.
The Calendar window will appear (Figure 9-34) and allow the user to select the desired date. Once
the date is selected, click Select.
5.
Select the desired event to start and click OK.
6.
The event amount has now been placed in the Front POS Sales screen.
7.
Click End Order. The Payment Method screen will open.
8.
Now the event costs will need to be placed on a tab for the duration of the scheduled event. Click Tabs.
9.
Click New in the Tabs window. The Tab Description window will open. The name of the honoree will
be the default name. Click OK.
Figure 9-37. The Open Tabs window
© 1997 - 2005 Ideal Software Systems, Inc.
488
Point of Sale
Figure 9-38. The Tab Description window with default honoree name
Click OK.
10.
9.1.13
Once the event has been added to the tab, the Sale Complete window will open letting the user know
that the party has been started.
Adding Items to a Started Event
This sub-section explains how to add an item(s) to a started event in the Point of Sale system.
NOTE: In order to complete the following steps, an event has to have been
previously scheduled. If an event has not been scheduled, see the sub-section
"Booking an Event" in this section. Also, in order to complete the following
steps, an event has to have been previously started. If an event has not been
started, see the previous sub-section in this manual. Finally, an item can only be
added to a started event if the event has been placed on a tab. If the event has
already been paid for then the item must be paid for separately from the event
total cost. Refer to Chapter 8 for more information about placing an item on a tab.
See sub-section "Starting an Event" for more information on placing an event on
a tab.
1.
In the Front POS Sales screen (Figure 9-13), select the item that needs to be added to the event.
2.
Once the item is selected, click End Order to go into the Payment Method screen.
3.
Click Tabs.
4.
Select the tab that has the desired honoree's name.
© 1997 - 2005 Ideal Software Systems, Inc.
Chapter 9 - Event Scheduler
489
Figure 9-39. The Open Tabs window with a sample honoree chosen
Select an honoree's tab.
5.
9.1.14
When the tab is selected, click Add/Print. The Sale Complete window will appear letting the user
know the item has been added to the tab for the event.
Paying for an Event
This sub-section explains how to pay for a started event in the Point of Sale system.
NOTE: In order to complete the following steps, an event has to have been
previously scheduled. If an event has not been scheduled, see the sub-section
"Booking an Event" in this section. Also, in order to complete the following
steps, an event has to have been previously started. If an event has not been
started, see sub-section "Starting an Event" in this section for more information.
1.
In the Front POS Sales screen (Figure 9-13), click End Order.
2.
In the Payment Method screen, click Tabs.
3.
Locate the tab for the event that needs to be closed.
4.
Click Close Tab.
5.
Once a method of payment has been selected and the event is paid for, the Sale Complete window will
appear telling the user that the event is paid for.
© 1997 - 2005 Ideal Software Systems, Inc.
490
Point of Sale
Chapter 10 - MVP Credit System
10.1 Setting Up MVP Clubs and MVP Credit
Instructions for creating MVP clubs and establishing MVP credit
This section contains the proper procedures for setting up the MVP clubs in
the Point of Sale system and giving MVP credit to customers. This section
contains the following topics:
•
•
•
•
•
•
•
10.1.1
"About MVP Credit"
"Setting up Loyalty/MVP Clubs"
"Editing Loyalty/MVP Clubs"
"Deleting Loyalty/MVP Clubs"
"Creating MVP Credit Card Value Items"
"Selling MVP Credit Value in Front POS"
"Adding Credit to a Customer MVP Account"
About MVP Credit
MVP credit is an excellent feature that can be used to repay customers for their loyalty by providing discounts
and club memberships based on spending and/or frequency of visits. MVP credit cards can also be used as gift
cards similar to department stores'. MVP credit cards can be used like regular credit or debit cards once a
balance of credit has been placed on the card. All purchases made with this card can be monitored in the system.
This is a good way to learn what sells, what doesn't, and still provide a way of saying "thank you" to the
customers that spend by allotting them discounts. For more information about these are more functions of the
MVP credit system, refer to the many sub-sections in this main section.
Loyalty/MVP clubs are created for customers that deserve a distinguishable status based on the amount of money
they spend and/or the amount of times they visit the facility. Some of the properties and benefits that are included
in the MVP program are listed below:
Criteria For Membership - Set the club membership based upon a certain amount of purchases that must be
made to join the club.
Redemptions - Set the club membership based on the number of redemptions, if the family entertainment facility
has a redemption game center.
Visits - Set the club membership based on a pre-determined amount of visits.
Qualification Period - The time period in which the chosen criteria have to be met to join the MVP club.
Rolling Period - A rolling period functions allows the customers to have a pre-determined number of months
after the date of their last purchase in order to meet the facility's MVP criteria.
Unlimited - The customer has an unlimited amount of time to meet the club criteria with this setting.
© 1997 - 2005 Ideal Software Systems, Inc.
Chapter 10 - MVP Credit System
10.1.2
491
Setting Up Loyalty/MVP Clubs
Clubs need to be established for the customers that will be using MVP incentive programs. This sub-section
explains how to set up loyalty/MVP clubs in the Point of Sale system.
1.
Click Facility in the middle of the Ideal FEC Back Office Suite (FEC Administrator) screen to
access the Facility menus.
2.
Select Customers | Loyalty Clubs.
Figure 10-1. The Ideal FEC Back Office Suite Customers menu's Loyalty Clubs
Select Customers | Loyalty Clubs.
3.
The Manage Loyalty Clubs window will open. Click Add.
© 1997 - 2005 Ideal Software Systems, Inc.
492
Point of Sale
Figure 10-2. The Manage Loyalty Clubs window
Click Add.
4.
The Membership Management window will open to the Basic Information tab. Enter the necessary
information.
© 1997 - 2005 Ideal Software Systems, Inc.
Chapter 10 - MVP Credit System
Figure 10-3. The Membership Management window's Basic Information tab
Enter the necessary information.
5.
A.
Club Name
Enter the name of the new loyalty club.
B.
Receipt Message
Enter a messge that will appear at the bottem Loyalty Club member's receipts.
C.
Sequence Number
Enter the sequence number for the loyalty club.
Click on the Membership tab. Enter the necessary information.
© 1997 - 2005 Ideal Software Systems, Inc.
493
494
Point of Sale
Figure 10-4. The Membership Management window's Membership tab
Enter the necessary information.
A.
Criteria for Membership
Select one or more of the membership criteria options for the loyalty club.
i.
Purchases
Check this option if the customer must meet a purchase requirement to become a
member of the loyalty club.
a.
ii.
Redemption Winnings
Check this option if the customer must win a specified amount of redemption
winnings to become a member of the loyalty club.
a.
iii.
Min Winnings
Enter the minimum amount of redemption winning a customer must reach to
become a member of the loyalty club.
Visits
Check this option if the customer must visit the site a specified number of times in
order to become a member of the loyalty club.
a.
iv.
Require Amount
Enter the amount of money a customer must spend to become a member of
the loyalty club.
Times
Enter the minimum number of times a customer must visit the site to become
a member of the loyalty club.
ICS Purchases
© 1997 - 2005 Ideal Software Systems, Inc.
Chapter 10 - MVP Credit System
495
Check this option if the customer must meet an ICS purchase requirement to become
a member of the loyalty club.
a.
6.
Minimum ICS Purchases
Enter the amount of ICS Purchases a customer must make in order to
become a member of the loyalty club.
Click on the Benefits tab. Enter the necessary information.
Figure 10-5. The Membership Management window's Benefits tab
Enter the necessary information.
A.
Purchase
Customers in the loyalty club will receive purchase discounts if this option is selected.
i.
B.
ICS Bonus Value
Customers in the loyalty club will receive ICS bonus value discounts if this option is selected.
i.
7.
Customers Will Receive the Following Discount
Click the down arrow and select the type of dicount the customer in the loyalty club is
to receive.
Customers Will Receive the Following Discount
Check this option if the customer must win a specified amount of redemption
winnings to become a member of the loyalty club.
Click on the Duration tab. Enter the necessary information.
© 1997 - 2005 Ideal Software Systems, Inc.
496
Point of Sale
Figure 10-6. The Membership Management window's Duration tab
Enter the necessary information.
A.
Lifetime
Select this option if the loyalty club is for lifetime members.
B.
Set Period
Select this option if customers are to remain in the loyalty club for a predetermined period of
time.
i.
8.
Customers Will Remain a Member for ___ Months
Enter the number of months a member will stay in the loyalty club once they meet the
criteria. The customers must then meet the criteria again to remain a member.
Click on the Qualification tab. Enter the necessary information.
© 1997 - 2005 Ideal Software Systems, Inc.
Chapter 10 - MVP Credit System
497
Figure 10-7. The Membership Management window's Qualification tab
Enter the necessary information.
A.
Qualification Period
Select one of the qualification period criteria options for the loyalty club.
i.
ii.
Fixed Period
Check this option if the customer must meet the club entry requirments within a
specified time frame.
a.
Start Date
Click the down arrow and select a begin date for the customer to begin
meeting the loyalty club requirements.
b.
End Date
Click the down arrow and select a end date for the customer to meet the
loyalty club requirements.
Rolling Period
Check this option if the customer must meet the club entry requirments within a
specified amount of time.
a.
iii.
Customers Must Meet Criteria Within ___ Months of the Date of Last
Purchase
Enter the number of months the customer has to meet the loyalty club
criteria.
Unlimited
Check this option if the customer has an unlimited amount of time to meet the loyalty
club criteria.
© 1997 - 2005 Ideal Software Systems, Inc.
498
Point of Sale
9.
10.1.3
Click OK. The loyalty club parameters will be set. The new group will now appear in the Manage FEC
Clubs menu. Click Close.
Editing Loyalty/MVP Clubs
This mini-section explains how to edit customer loyalty clubs into the Point of Sale system.
NOTE: Before a loyalty club can be edited, it must first be created. For more
information on creating a loyalty club, refer to the previous mini-section.
1.
Click Facility in the middle of the Ideal FEC Back Office Suite (FEC Administrator) screen to
access the Facility menus.
2.
Select Customers | Loyalty Clubs (Figure 10-1).
3.
The Manage Loyalty Clubs window (Figure 10-2) will open. Select the loyalty club name and click
Edit.
4.
The Membership Management window (Figure 10-3) will open to the Basic Information tab. Make
the necessary changes on this tab and the others.
5.
Click OK. The loyalty club parameters will be changed.
10.1.4
Deleting Loyalty/MVP Clubs
This mini-section explains how to remove customer loyalty clubs into the Point of Sale system.
NOTE: Before a loyalty club can be removed, it must first be created. For more
information on creating a loyalty club, refer to the previous mini-section "Adding
Loyalty Clubs".
1.
Click Facility in the middle of the Ideal FEC Back Office Suite (FEC Administrator) screen to
access the Facility menus.
2.
Select Customers | Loyalty Clubs (Figure 10-1).
3.
The Manage Loyalty Clubs window (Figure 10-2) will open. Select the loyalty club name to delete
and click Remove.
4.
The Confirm window will open. If the club should be deleted, click Yes. Otherwise, click No.
© 1997 - 2005 Ideal Software Systems, Inc.
Chapter 10 - MVP Credit System
499
Figure 10-8. The Confirm window
Click Yes.
5.
10.1.5
The club will be removed.
Creating MVP Credit Card Value Items
This sub-section explains how to create an MVP Value inventory item(s) for the Point of Sale system.
NOTE: It is important that inventory, categories, sub-categories, tax tables, unit
types, locations, and vendors be setup before any inventory items are made. This
will save a lot of time in setting up the Point of Sale system.
1.
Make sure that the Point of Sale menu is visible at the Ideal FEC Back Office Suite screen.
2.
Select Inventory | Create Inventory.
Figure 10-9. The Ideal FEC Back Office Suite Inventory menu's Create Inventory
Select Inventory | Create Inventory.
3.
The Create New Inventory Item window will open. Make sure that Normal is selected under Item
Type.
© 1997 - 2005 Ideal Software Systems, Inc.
500
Point of Sale
Figure 10-10. The Create New Inventory Item window with Normal Item Type selected
Make sure Normal is selected under Item Type.
4.
Enter the information for the normal inventory item.
A.
Item Number
Enter a number for this inventory item.
i.
Auto-Assign Inventory Number
Check this option if the inventory item is to be assigned a number by the Point of
Sale system.
TIP: The Auto-Assign Inventory Number option is checked by default. It is
recommended that each category gets its own range of inventory numbers. (Food
= 1 to 999, Golf = 1000 to 1999, etc.) This will make managing hundreds of
inventory items simpler.
B.
Retail Sale Price
Enter the value that will be added onto the MVP credit card.
C.
Description
Enter \mvpcredit\ in the description of the item.
TIP: The Description for an inventory should be unique to that item. This will
make searching for items easier than depending on searching for them by their
unique item number. The \mvpcredit\ description must contain lower-case
letters.
© 1997 - 2005 Ideal Software Systems, Inc.
Chapter 10 - MVP Credit System
501
Figure 10-11. The Create New Inventory Item with MVP credit value description
Enter a description with \mvpcredit\.
D.
Category
Click the drop down arrow and select a category for the item.
E.
Sub-Category
If the item needs a sub-category, click the drop down arrow and select one.
F.
Tax Type
Select a tax type after the clicking the drop down arrow.
G.
Vendor
If the inventory item has a vendor, click the drop down arrow and select one.
H.
Barcode
If barcodes are used, enter the barcode number of the item.
TIP: If the item already has a barcode, the user may scan the barcode on the item
will the cursor is in the Barcode field of the inventory item and input item
original barcode into the system. The original barcode will now be recognized by
the system as that inventory item whenever scanned.
I.
Minimum Quantity
Do not use this field with this type of item.
J.
Active
Select this option if the inventory item is going to be actively for sale. Unselect this option to
deactivate the item. This option is selected by default.
NOTE: In order for the Minimum Quantity feature to be utilized, the Track
Inventory Categories option must be checked.
K.
Track Inventory Quantities
Do not check this option. MVP value cannot be tracked this way.
L.
Ingredient List
This utility cannot be used with this item type.
M.
Track Inventory Quantities
© 1997 - 2005 Ideal Software Systems, Inc.
502
Point of Sale
Do not check this option. Open Key inventory cannot be tracked.
N.
Right Level Required
Enter a number 0 through 5 of the right level required by the employee to sell the inventory
item.
NOTE: If a number other than 0 through 5 is entered in the Right Level
Required field then an error will result. To change an employee rights level so
that they can sell items with a level higher than 0, refer back to Chapter 2 section
"Entering Employees and Employee Groups".
O.
Service Printer (Figure 3-53)
i.
Do Not Print
If this inventory item does not need to print to a kitchen or service printer, either
check this option or do not select any option on the Service Printer tab.
ii.
Service Printer 1
Select this option to print to a printer recognized as Service Printer 1.
iii.
Service Printer 2
Select this option to print to a printer recognized as Service Printer 2.
NOTE: A service printer must be networked into the Ideal system network and
setup under the printer properties in the Point of Sale program in order for
inventory item information to be printed to a kitchen or service printer.
P.
Item Script (Figure 3-54)
i.
Script Filename
Select a script that will be printed upon the item's purchase (if the item requires that
something be printed other than the receipt.)
NOTE: The script chosen will be printed in addition to any other ticket,
wristband, or score card.
ii.
iii.
Print Location
a.
None
The select script will not be printed upon the item's purchase.
b.
Ticket Printer
The script will be printed to a designated ticket printer upon the sale of the
item.
c.
Wristband Printer
The script will print on a wristband when the item is sold.
d.
Receipt Printer
The script will print on the receipt printer local to the terminal when the item
is purchased.
e.
Golf Scorecard Printer
The script will print on a scorecard.
Script
© 1997 - 2005 Ideal Software Systems, Inc.
Chapter 10 - MVP Credit System
503
Click the down arrow and select a item script to use.
iv.
Create
Click this button to create a item script.
v.
Edit
Edit a script in the default word processor.
NOTE: For further information on creating and editing scripts, refer to the "Item
Scripts" section in Chapter 3.
Q.
Audit Info
Do not use this tab for this item type.
R.
Audit Count
Do not use this tab for this item type.
S.
Discounts
This tab (Figure 3-100) will display any discounts that have been applied to the item. Also,
Price Schedule is in this tab. Refer to sub-section "Adding a Price Schedule".
5.
Click OK once the item is finished. The item will now be saved in the Point of Sale system.
6.
The Confirm window will appear (Figure 3-56). Click Yes to create another item. Otherwise, click No
to return to the Ideal FEC Back Office Suite screen.
10.1.6
Selling MVP Credit Value in Front POS
If the Point of Sale system will be using MVP credit cards then MVP value must be sold. The following
sub-section will explain how to sell MVP value items in the Front POS module.
NOTE: An employee login and password must have been created for an
employee before a user can log into the Front POS screen. Also this employee
must have rights to log into Front POS. For more information, refer to Chapter 2,
section "Entering Employees and Employee Groups". Also, a Front POS screen
must have been configured with categories and inventory buttons as well as
assigned to a terminal before it can be usable. See Chapter 5 section "Setting Up
the Front POS Screen" for more information. Make sure that a cash drawer is
assigned to an employee and in turn assigned to the terminal that will be
performing the sale. Refer to Chapter 6, sub-section "Issuing Drawers". Finally,
an MVP value item must have already been created. For more information on
creating this type of item, refer to the previous sub-section of this manual.
1.
Log into Front POS and enter the Front POS Sales screen.
© 1997 - 2005 Ideal Software Systems, Inc.
504
Point of Sale
Figure 10-12. The Front POS Sales screen with sample categories and inventory items
Log into the Front POS Sales screen.
2.
Click on the MVP value item's button to be sold. The item will appear in the sales window.
Figure 10-13. The Front POS Sales screen with an MVP value item chosen for purchase
Select an MVP value item for purchase.
3.
Click End Order to enter the Payment Method screen.
Figure 10-14. The Front POS Payment Method screen
Click End Order to enter the Payment Method screen.
4.
The Payment Method screen defaults the actual payment method to cash but select the
customer's form of payment.
5.
Once the payment amount is entered, click Complete Sale. This will open the Add MVP
Credit window.
© 1997 - 2005 Ideal Software Systems, Inc.
Chapter 10 - MVP Credit System
6.
At this point there are three options.
Figure 10-15. The Add MVP Credit window with sample amount
Enter the Add MVP Credit window.
A.
Scan customer card
Depending on the type of card, use a hand-held barcode scanner or a magnetic stripe
reader to read the card number and assign the value to the number or customer
account in the system.
B.
Scan a ticket
If for some reason MVP cards aren't being used and receipt paper tickets are, use a
hand-held scanner to scan the barcode on the ticket.
C.
Print a ticket
If MVP the customer site is not using credit cards to store credit value and a ticket
hasn not been previously printed, click Print Ticket. The terminal's default receipt
printer will print the new gift certificate/MVP receipt paper ticket.
7.
All three of the above options will bring the cashier to the Sale Complete window.
8.
Click Complete Sale to end the sale. At this point, a receipt will automatically print to the
terminal's assigned receipt printer.
© 1997 - 2005 Ideal Software Systems, Inc.
505
506
Point of Sale
Figure 10-16. The Sale Complete window
Click Complete Sale to open the Sale Complete window.
NOTE: A printer must be connected and configured on the POS terminal before
a receipt will automatically print.
TIP: Before clicking Complete Sale, an extra payment and/or service receipt can
be printed by clicking Print Payment Receipt and Print Service Receipt
respectively.
10.1.7
Adding Credit to a Customer MVP Account
There will be certain situations where credit might need to be added or taken away from a customer account.
This sub-section explains how to add (or remove) credit in the Point of Sale system.
NOTE: The user must have the appropriate rights before crediting an account
can be performed. For more information on assigning employee rights, refer to
Chapter 2 section "Entering Employees and Employee Groups".
1.
Make sure that the Facility menu is visible by clicking Facility at the Ideal FEC Back Office Suite
screen.
2.
Select Customers | Pre Value MVP Account.
© 1997 - 2005 Ideal Software Systems, Inc.
Chapter 10 - MVP Credit System
507
Figure 10-17. The Ideal FEC Back Office Suite Customers menu's Pre Value MVP Account
Select Customers | Pre Value MVP Account.
3.
The Add Credit to MVP Cards window will open. Scan or swipe a card that needs to have credit
added.
Figure 10-18. The Add Credit to MVP Cards window
Scan or swipe an MVP card.
TIP: If a card is not available but the credit needs to be added (or removed) anyway,
click Add Card to List. This will bring up the Select Customer window. Select a
customer and click OK as seen in Figure 10-19.
© 1997 - 2005 Ideal Software Systems, Inc.
508
Point of Sale
Figure 10-19. The Select Customer window with sample customers
4.
When a card is swiped or scanned, or a customer has been selected, the name of the customer will
appear in the Add Credit to MVP Cards window as seen in Figure 10-20.
Figure 10-20. The Add Credit to MVP Cards window with sample customer name
The customer name will appear.
5.
In the Add/Subtract field, enter an amount to be added back onto the card.
NOTE: If an amount needs to be removed, enter a negative (-) sign in front of the
amount entered into the Add/Subtract field.
6.
Click OK to add the amount to the card. The Confirm window will prompt the user if the amount is to
be added. Click Yes.
© 1997 - 2005 Ideal Software Systems, Inc.
Chapter 10 - MVP Credit System
509
Figure 10-21. The Confirm window
Click Yes.
7.
The amount will now be added to the card.
TIP: More than one card can be credited at a time. To credit multiple cards
just scan or swipe multiple cards or select multiple customers. All the names
will appear in the Add Credit to MVP Cards window. Enter the amount to
credit and click OK. All the accounts will be credited.
10.2 Using MVP Credit Cards
Instructions for using MVP cards
This section contains the proper procedures for setting up the MVP cards
and other procedures in relation to the cards. This section contains the
following topics:
"About MVP Credit Cards"
"Assigning the Cad to an Existing Customer"
"Using the MVP Card for a Purchase"
"Using MVP Credit for Purchase Along with Other Means of
Payment"
• "Transferring Value from an MVP Card to a New Card"
• "View Customer History"
•
•
•
•
10.2.1
About MVP Credit Cards
MVP coupons complete with barcodes can be printed from a receipt printer. These pieces of paper are used the
same way the MVP credit cards are used but they are not as durable or easy to keep up with as the cards. It is
recommended that MVP cards be purchased with the aid of Ideal Software to ensure that the correct format of
card is used.
MVP cards can be used dually as customer cards and coupon cards. Customer cards are used to keep track of a
customer's spending which will make them eligible for the MVP clubs and special benefits. Coupon cards are
used the same way department store coupons cards are used. Value is purchased and placed on the card. This
value can be used at any Front POS terminal until the value on the card is depleted, similar to a debit card.
© 1997 - 2005 Ideal Software Systems, Inc.
510
Point of Sale
10.2.2
Assigning the Card to an Existing Customer
Please contact Ideal Software for more information on assigning a card to an existing customer.
10.2.3
Using the MVP Card for a Purchase
This sub-section explains how to complete a sale using MVP cards as the form of purchase in the Point of Sale
system.
NOTE: An Employee ID and PIN Number must have been previously assigned
to a user before logging into the Front POS Sales screen is possible. Also this
employee must have rights to log into Front POS. Refer to Chapter 2 section
"Entering Employees and Employee Groups" for more information. A Front
POS screen must have been configured with categories and inventory buttons as
well as assigned to a terminal before it can be usable. Chapter 5 section "Setting
Up the Front POS Screen" contains more information on this topic. In order to
make a sale using an MVP card, the amount of money on the card must be equal
or greater than the amount to be purchased. Finally, make sure that a cash drawer
is assigned to an employee and in turn assigned to the terminal that will be
performing the sale. For more information on assigning a cash drawer to an
employee refer to Chapter 6.
1.
Start by logging into the Front POS portion of the Point of Sale software.
© 1997 - 2005 Ideal Software Systems, Inc.
Chapter 10 - MVP Credit System
Figure 10-22. The Front POS Login Screen
Enter an Employee ID and PIN Number.
2.
Logging in will open the Front POS Sales screen.
3.
Select the items to be purchased and click End Order to enter the Payment Method screen.
© 1997 - 2005 Ideal Software Systems, Inc.
511
512
Point of Sale
Figure10-23. The Front POS Sales screen with sample inventory
Select items for purchase and click End Order.
4.
At this point, either the MVP card can be swiped or scanned or the user may click MVP Credit.
Figure 10-24. The Front POS Payment Method screen with item for purchase
A.
If MVP Credit is clicked, the MVP Payment window will open.
B.
A card can be scanned or swiped. The customer will appear in the MVP Payment window. If
no card is available, the user can click LookUp Customer and manually select the customer
with the MVP credit.
© 1997 - 2005 Ideal Software Systems, Inc.
Chapter 10 - MVP Credit System
513
Figure 10-25. The MVP Payment window
Click MVP Credit.
i.
Clicking LookUp Customer will open the Customer Info window. Here a customer
number can be manually entered.
a.
© 1997 - 2005 Ideal Software Systems, Inc.
Enter Customer Number
If the user knows the customer number, it can be entered in this field.
514
Point of Sale
Figure 10-26. The Customer Info window
Click LookUp Customer.
TIP: If a card number is not available click Last Name Search. This will bring
up the Select Customer window. Select a customer and click OK.
b.
Once the number is entered, click Select. The customer name will now
appear in the MVP Payment window.
TIP: More than one card can be charged at a time. To charge multiple cards
just scan or swipe multiple cards or select multiple customers. All the names
will appear in the MVP Payment window. The amount the customers are
paying cannot exceed the total amount of the purchase.
NOTE: If a customer is selected that doesn't need to be, this customer can be
dropped by clicking Drop from List. This will remove the customer.
5.
Once the customer(s) is selected, click Close.
6.
The user will be back in the Payment Method screen. Click Complete Sale to open the Sale Complete
window.
7.
At this point, a receipt will automatically print to the terminal's assigned receipt printer.
NOTE: A printer must be connected and configured on the POS terminal before
a receipt will automatically print.
TIP: Before clicking Complete Sale, an extra payment and/or service receipt can
be printed by clicking Print Payment Receipt and Print Service Receipt
respectively.
© 1997 - 2005 Ideal Software Systems, Inc.
Chapter 10 - MVP Credit System
10.2.4
515
Using MVP Credit for Purchase Along with Other Means of Payment
It might be necessary at times to use multiple forms of payment in one sales transaction. The following subsection will explain how to sell items that are being purchased with cash, check, and an MVP credit card.
NOTE: An Employee ID and PIN Number must have been previously assigned
to a user before logging into the Front POS Sales screen is possible. Also this
employee must have rights to log into Front POS. Refer to Chapter 2 section
"Entering Employees and Employee Groups" for more information. A Front
POS screen must have been configured with categories and inventory buttons as
well as assigned to a terminal before it can be usable. Chapter 5 section "Setting
Up the Front POS Screen" contains more information on this topic. Also, in
order to make a sale using an MVP card, the amount of money on the card must
be equal or greater than the amount to be purchased. Finally, make sure that a
cash drawer is assigned to an employee and in turn assigned to the terminal that
will be performing the sale. For more information on assigning a cash drawer to
an employee refer to Chapter 6.
1.
Log into Front POS and enter the Front POS Sales screen (Figure 10-23).
2.
Click on the inventory item's button to be sold. The item will appear in the sales window.
3.
Click End Order to enter the Payment Method screen (Figure 10-14).
4.
Click Check. The number panel at this point should turn blue
5.
Enter the amount for the check in the blue number panel. The Check field on the right side of the
Payment Method screen should be automatically populated with the amount entered.
6.
Click Cash. The number panel should turn back to green.
7.
Enter the amount being payed for with cash. The Cash field on the right side of the Payment Method
screen should be automatically populated with the amount entered.
8.
Swipe or scan the MVP credit. If necessary, enter a customer if the card is not available.
NOTE: For more information on manually selecting a customer account when a
MVP credit card is not available, see the previous sub-section in this manual.
9.
Click Complete Sale in the Sale Complete window to end the sale. At this point, a receipt will
automatically print to the terminal's assigned receipt printer.
NOTE: A printer must be connected and configured on the POS terminal before
a receipt will automatically print.
TIP: Before clicking Complete Sale, an extra payment and/or service receipt can
be printed by clicking Print Payment Receipt and Print Service Receipt
respectively.
© 1997 - 2005 Ideal Software Systems, Inc.
516
Point of Sale
10.2.5
Transferring Value from an MVP Card to a New Card
It is convenient to have the ability to transfer value from one MVP card to a new MVP card. This sub-section
explains how to make this transfer in the Front POS module of the Point of Sale program.
NOTE: An Employee ID and PIN Number must have been previously assigned
to a user before logging into the Front POS Sales screen is possible. Also this
employee must have rights to log into Front POS. Refer to Chapter 2 section
"Entering Employees and Employee Groups" for more information. A Front
POS screen must have been configured with categories and inventory buttons as
well as assigned to a terminal before it can be usable. Chapter 5 section "Setting
Up the Front POS Screen" contains more information on this topic. Also, in
order to make a sale using an MVP card, the amount of money on the card must
be equal or greater than the amount to be purchased. Finally, make sure that a
cash drawer is assigned to an employee and in turn assigned to the terminal that
will be performing the sale. For more information on assigning a cash drawer to
an employee refer to Chapter 6.
1.
Start by logging into the Front POS portion of the Point of Sale software.
2.
Logging in will open the Front POS Sales screen (Figure 10-23).
3.
Click End Order to enter the Payment Method screen (Figure 10-14).
4.
Click MVP Credit. The MVP Payment window will open (Figure 10-25).
5.
Click LookUp Customer to open the Customer Info window (Figure 10-26).
6.
Enter a customer number or manually select one then click Transfer to New Card. This will open the
Scan Customer window
7.
Scan or swipe the new card where the MVP credit value will need to be added. At this point the new
card will now hold the value of the old card. The old MVP card will be empty of any value.
Figure 10-27. The Scan Customer window
Click Transfer to New Card.
10.2.6
View Customer History
This sub-section explains how to look up the history of a customer purchasing with credit in the Front POS
module of the Point of Sale program.
© 1997 - 2005 Ideal Software Systems, Inc.
Chapter 10 - MVP Credit System
517
NOTE: An Employee ID and PIN Number must have been previously assigned
to a user before logging into the Front POS Sales screen is possible. Also this
employee must have rights to log into Front POS and to view customer history.
Refer to Chapter 2 section "Entering Employees and Employee Groups" for more
information.
1.
Start by logging into the Front POS portion of the Point of Sale software.
2.
Logging in will open the Front POS Sales screen (Figure 10-23).
3.
Click End Order button to enter the Payment Method screen (Figure 10-24).
4.
Click MVP Credit. The MVP Payment window will open (Figure 10-25).
5.
Click LookUp Customer to open the Customer Info window (Figure 10-26).
6.
Enter a customer number or manually select one then click Customer History. This will open the
Customer History window
7.
All of the customer's MVP credit history can be viewed in this window. The user can either print this
information by clicking Print or click Close to close the window.
© 1997 - 2005 Ideal Software Systems, Inc.
518
Point of Sale
Figure 10-28. The Customer History window with sample customer information
Click Customer History.
Chapter 11 - General Reports
11.1 Drawer Summary Report
Instructions for the Drawer Summary Report
This section contains an explanation about the Drawer Summary Report as
well as how to run it. This section contains the following topics:
• "Drawer Summary Report Explanation"
• "Using the Drawer Summary Report"
© 1997 - 2005 Ideal Software Systems, Inc.
Chapter 11 - General Reports
11.1.1
519
Drawer Summary Report Explanation
The Drawer Summary Report is designed to show the individual drawer totals for each drawer that was opened
and closed for a business day. These totals are grouped by terminals and also by areas representing the Front
POS screen that is assigned to each terminal.
Area - The Front POS Sales screen assigned to the groups of terminals is displayed above the terminal number
and the employee names.
Terminal - The names of the terminals as defined in the Terminal Parameters tabs that had cash drawers
assigned will appear under the area names.
Employee Name - Every employee that had a cash drawer issued to them will appear under the terminal name.
Open/Close Time - This is the time the cash drawers were opened and closed.
Cash - The cash column will show the actual cash counted from the Drawer Report. This cash amount is equal to
the Cash Sales minus Credit Card tips.
Checks - This column displays the amount of check receipts that were entered in the drawers.
Over (Short) - This column displays the total over/short amount of cash and checks.
Cash Deposit - This is the amount of cash and check receipts that were entered through POS. Pay outs are not
included. This is derived from adding the cash, checks, and over (short). For deposit balancing when
using Payouts, refer to the "Facility Report" sub-section in Chapter 16. To balance this figure with the
Cash and Checks Deposit/Receipts figure on the Facility Report, simply subtract the Payouts total from
this figure.
Credit Card - The credit card column will reflect the credit card total which includes the amount of the sales
plus any tips added and totaled by the customer.
Receipts - This amount is equal to the receipts taken in from POS in cash, checks, and credit card format plus (or
minus) the overage or shortage.
Tips - This column is the amount of tips collected from credit card receipts.
Discount - This is the amount of discounts given in Point of Sale, it also includes product and applicable taxes.
Refunds - This amount includes product and applicable tax.
Debit Card Added - This field reflects the amount of Debit Card value added to cards from Front POS using the
ICS or Intercard systems.
Debit Card Used - This column reflects the amount of Debit Card value used to purchase goods and services
from Front POS's ICS or Intercard systems.
MVP Credit Added - The MVP credit value added to customer cards through the drawer are shown in this
column.
MVP Credit Used - MVP credit used to purchase goods and services and comes from customer cards recorded
in the cash drawers is displayed here.
Coupon Amount - The amount of coupon money redeemed through the drawers is shown here.
Coupon Quantity - The number of coupons redeemed in a drawer is reflected in this field.
© 1997 - 2005 Ideal Software Systems, Inc.
520
Point of Sale
Drawer Status - The current status of the drawer is reflected in this field.
11.1.2
Using the Drawer Summary Report
This sub-section explains how to open the Drawer Summary Report in the Point of Sale system.
NOTE: The user must have rights to view reports in order to follow these
instructions. Refer to Chapter 2 section "Entering Employees and Employee
Groups" for more details.
1.
Make sure that the Point of Sale menu is visible at the Ideal FEC Back Office Suite screen.
2.
Select Reports | Drawer Summary Report.
Figure 11-1. The Ideal FEC Back Office Suite Reports menu's Drawer Summary Report
Select Reports | Drawer Summary Report.
3.
The user will be prompted to select a date for the report in the Choose Date for Report window. Select
a date and click OK.
© 1997 - 2005 Ideal Software Systems, Inc.
Chapter 11 - General Reports
521
Figure 11-2. The Choose Date for Report window
Select a date and click OK.
NOTE: In order to view this report, drawers must have been opened for the date
that is selected in the Choose Date for Report window. For more information on
issuing a drawer, see Chapter 6 section "Drawers".
TIP: In the Drawer Summary Report, users may click on a drawer detail item to
produce a drawer report for the drawer clicked.
4.
The Print Preview window will open showing the report. To print this report, click
5.
The Print window will appear. Select the printer to print to and click OK.
.
11.2 Drawer Report
Instructions for the Drawer Report
This section contains an explanation about the Drawer Report as well as
how to run it. This section contains the following topics:
• "Drawer Report Explanation"
• "Using the Drawer Report"
© 1997 - 2005 Ideal Software Systems, Inc.
522
11.2.1
Point of Sale
Drawer Report Explanation
Drawer Reports can be run at anytime for any employee on any date. After drawer counts have been entered into
the system the drawer report will accurately show the amount of cash, checks, and credit card receipts that an
employee took in during their shift.
Drawer ID Number - This number is assigned to the drawer when it was issued. The Drawer ID Number is not
required when a drawer is issued to a employee but it is recommended and is good practice.
Assigned To Employee - This shows the name of the employee the drawer was assigned to.
Status - This status reflects whether the drawer is currently Issued, Active, Removed, Counted, Adjusted, or
Closed. Only Counted, Adjusted, and Closed drawers will reflect currency totals along with over and
short figures.
Date and Time Issued - This field contains the exact date and time the drawer was issued to the employee.
Time last removed - This field shows the last time the drawer was removed from the Front POS station prior to
entering drawer counts. Drawers can be Removed and Added back to Front POS to accommodate
employee breaks.
Date and Time Closed - This field contains the exact date and time the drawer was closed in the Point of Sale
system.
Initial Drawer Amount - This field displays the initial amount that was assigned to the cash drawer.
Terminal - This is the terminal description of the POS station that the drawer was used in. The station name is
assigned in the Terminal Parameters tab. For more information, refer to Chapter 2 section
"Configuring System Parameters".
Employee Issued - This is the employee to whom the drawer was issued.
Employee Closed - This is the employee who closed the drawer after entering the drawer counts.
Initial Drawer Balance - This is the amount that was entered as the beginning balance of the drawer when it
was issued to the employee. When counting a drawer, the Initial Drawer Amount should always be
included in the Cash Counted fields.
First Counted – This is the amount of cash, checks, credit card receipts and discounts (from receipts) counted
and entered into the system. These amounts appear on the Drawer Report after using the Count
Drawer function in POS Admin or FEC Administrator's main module.
Adj. Count - If drawer amounts have to adjusted for any reason and using the Adjust Drawer function is
necessary, this column will reflect the difference in the First Count entries and the Adjusted Count
entries. For example, if the amount of cash total first entered for a drawer is $1000.00 and then an
Adjusted count of $1100.00 is entered, this column will show the Adj. Count for Cash to be $100.00. If
an Adjusted Count of $900.00 was entered, this column would show the Adj. Count for cash as
($100.00). This amount is added to or subtracted from the First Counted amount. Refer to Chapter 6 for
more information on adjusting a drawer.
Pulled - If any cash was removed from the drawer and a manager used the Pull Cash function from Front POS,
this is the total amount of cash that was pulled from the drawer during the time the drawer was active.
Refer to Chapter 7 for more information on this function. This amount is also added to the First
Counted amount.
Pay Out - If any cash was removed from the draw and a manager used the Cash Out (see Chapter 5 section
© 1997 - 2005 Ideal Software Systems, Inc.
Chapter 11 - General Reports
523
"Cash Payout Types") function from Front POS, this is the total amount of cash that was used for pay
outs during the time the drawer was active. This amount is added to the First Counted amount.
Tips - This figure represents any tips that were added to credit card sales for the employee. The Tips amount is
added to the Cash field line on the report to balance both cash and tips amounts and is deducted from
credit cards to balance credit card receipts. For example, if $100 of Cash Sales and $100 of Credit Card
Sales is entered and there had been $15.00 in Credit Card Tips, the report would appear in the following
way:
First Counted
Cash $85.00
+ Adj. Count
+ Pulled + Payouts
Credit $115.00
+ Tips
$15
($15)
- Collected
$100
Over Short
0
$100
0
Collected - This column represents the amount of money in the Cash, Checks, Credit Card, and Discounts
fields that were rung up in the drawer.
Over/(Short) - After the drawer count has been entered, this column will show any overage or shortage in Cash,
Checks, Credit Card, and Discounts fields.
Accounts Receivable - This field shows any open or unpaid customer accounts.
Refunds Given - This field totals all of the monetary amounts of any refunds performed at the Front POS
terminal .
Cash Denominations Selected - The employee has the option to enter in the money amounts of the drawer
(while using the Count Drawer function; for more information refer to Chapter 6) in amounts based on
the bill types and coinage. If the employee used this feature while counting the drawer, the bill and
coinage amounts will appear in this section of the report.
MVP Credit - This section of the report shows all MVP credit action (adding to a card or spending from a card).
Manager Signature - A manager should sign off after an employee counts the money in a cash drawer to
prevent theft or any other unlawful act.
Employee Signature - An employee should sign off on this report to ensure that no other employee performed
the count.
11.2.2
Using the Drawer Report
This sub-section explains how to open the Drawer Report in the Point of Sale system.
NOTE: The user must have rights to view reports in order to follow these
instructions. Refer to Chapter 2 section "Entering Employees and Employee
Groups" for more details.
1.
Make sure that the Point of Sale menu is visible at the Ideal FEC Back Office Suite screen.
2.
Select Reports | Drawer Report.
© 1997 - 2005 Ideal Software Systems, Inc.
524
Point of Sale
Figure 11-3. The Ideal FEC Back Office Suite Reports menu's Drawer Report
Select Reports | Drawer Report.
3.
The user will be prompted to select a date and a drawer for the report in the Choose Date and Drawer
for Report window. Select the appropriate date.
© 1997 - 2005 Ideal Software Systems, Inc.
Chapter 11 - General Reports
Figure 11-4. The Choose Date and Drawer for Report window
Select the appropriate information.
A.
Select a date on the calendar.
NOTE: In order to view this report, drawers must have been opened for the date
that is selected in the Choose Date for Report window. For more information on
issuing a drawer, see Chapter 6 section "Drawers".
B.
Click on a drawer to view and click Selected.
TIP: If all drawers for that day need to be viewed, click All Drawers to select
them all.
4.
The Print Preview window will open showing the report. To print this report, click
.
TIP: If all drawers were selected for the report, these drawers will be listed on
the left side of the screen. To view each drawer individually, click on the name of
the employee the drawer was issued to.
5.
The Print window will appear. Select the printer to print to and click OK.
© 1997 - 2005 Ideal Software Systems, Inc.
525
526
Point of Sale
11.3 Transaction Report
Instructions for the Transaction Report
This section contains an explanation about the Transaction Report as well
as how to run it. This section contains the following topics:
• "Transaction Report Explanation"
• "Using the Transaction Report"
11.3.1
Transaction Report Explanation
The Transaction Report is used to break down the day's transactions into a series of sections dealing with each
type of transaction. This is a very detailed report that allows the user to filter the report based on three things:
1.
Terminal - Filter the report by the terminal the transactions were performed on.
2.
Transaction Type - Filter the report into the specific transaction types that were performed that day.
Every type of transaction or action that can be performed in the Point of Sale system is listed in this
filtering function.
3.
Employee - All transactions by an employee can be filtered out or into the report. Every employee that
had a drawer open for the chosen day can be selected.
NOTE: There are quite a few filtering options for this report. For more
information about the filter options in this report, refer to the next sub-section
"Using the Transaction Report".
11.3.2
Using the Transaction Report
This sub-section explains how to open the Transaction Report in the Point of Sale system.
NOTE: The user must have rights to view reports in order to follow these
instructions. Refer to Chapter 2 section "Entering Employees and Employee
Groups" for more details.
1.
Make sure that the Point of Sale menu is visible at the Ideal FEC Back Office Suite screen.
2.
Select Reports | Transaction Report.
© 1997 - 2005 Ideal Software Systems, Inc.
Chapter 11 - General Reports
527
Figure 11-5. The Ideal FEC Back Office Suite Reports menu's Transaction Report
Select Reports | Transaction Report.
3.
The user will be prompted to select filters for the report in the Transaction Report window. Select the
appropriate filters.
Figure 11-6. The Transaction Report window
Select the appropriate filters.
A.
Filter By Terminal
If the report only needs to be printed for a select few terminals, check this option then check
the terminals in the window below.
© 1997 - 2005 Ideal Software Systems, Inc.
528
Point of Sale
TIP: More than one terminal can be checked.
B.
Filter By Transaction Type
Check this filter option if the report needs to reflect only certain types of transactions.
i.
Product Sold
Displays only products sold for the given business day.
ii.
Credit Card Income
Displays only income from credit cards for the given business day.
iii.
Cash Income
Displays only income from cash for the given business day.
iv.
Check Income
Displays only income from checks for the given business day.
v.
Discounts Given
Displays only discounts given to customers for the given business day.
vi.
Tax Income
Displays only tax income for the given business day.
vii.
Product Refund
Displays only refunded transactions for the given business day.
viii.
Open Cash Drawer
Displays when the cash drawer was opened for the given business day.
ix.
Pull Cash From Drawer
Displays all cash that was pulled from the cash drawer for the given business day.
x.
Purchases Made with Debit Card
Displays purchases that were made using a debit card for the given business day.
xi.
Sale of Debit Card Value @ POS
Displays all debit card purchases and value bought for and added onto the debit cards
for the given business day.
xii.
Drawer Adjustment
Displays any adjustments made when counting the cash drawers for the given
business day.
xiii.
Close Drawer
Displays when the drawers were closed for the given business day.
xiv.
Collect Credit Card Tip
Displays only tips collected from credit cards for the given business day.
xv.
Tab Write Offs
Displays tabs that have been written off for the given business day and displays their
value.
xvi.
Receive Inventory
Displays all inventory received for the given business day.
© 1997 - 2005 Ideal Software Systems, Inc.
Chapter 11 - General Reports
529
xvii.
Transfer Result TO Debit Card
Displays transfers to debit cards for the given business day.
xviii.
Transfer Result FROM Debit Card
Displays transfers from debit cards for the given business day.
xix.
Tax Exempt Sale
Displays tax exempt sales for the given business day.
xx.
Deposit Made to Bank
Displays recorded deposits to the bank for the given business day.
xxi.
Apply Deposit to Order
Displays all deposits put toward an order for the given business day.
xxii.
Deposit Made to Party
Displays all deposits put down on an event or party for the given business day.
xxiii.
Cash Payout From Drawer
Displays all cash that was paid out of the cash drawer for the given business day.
xxiv.
Visa Transaction
Displays all Visa card transactions for the given business day.
xxv.
MasterCard Transaction
Displays all MasterCard transactions for the given business day.
xxvi.
Discover Card Transaction
Displays all Discover Card transactions for the given business day.
xxvii.
AMEX Card Transaction
Displays all AMEX Card transactions for the given business day.
xxviii.
Other Credit Card
Displays any other credit card transactions that aren't previously listed for the given
business day.
xxix.
Redeem from Access Ticket
Displays any items redeemed from an access ticket for the given business day.
xxx.
Income Allocation From Package
Displays all money made from packages for the given business day.
xxxi.
Pull Cash from Debit Card Teller
Displays all cash pulled from the debit card kiosks for the given business day.
xxxii.
Adjust Manager Drawer
Displays adjustments made to manager issued drawers for the given business day.
xxxiii.
Account Receivable
Displays all money currently owed by customers for the given business day.
xxxiv.
Account Receivable Payment
Displays all money paid on accounts owed by customers for the given business day.
xxxv.
Pre-Issue ACM Tickets for a Party
Displays tickets that were pre-issued before an event or party began for the given
© 1997 - 2005 Ideal Software Systems, Inc.
530
Point of Sale
business day.
xxxvi.
Issue ACM Tickets
Displays ACM tickets issued for the given business day.
xxxvii. MVP Credit Debit
Displays debit from MVP credit cards on the given business day.
xxxviii. Capacity Management Sales
Displays any movie theatre sales for the given business day.
NOTE: The Point of Sale system must include the Capacity Management module
before the Capacity Management Sales filter will be available. Contact Ideal
Software Systems, Inc. for more details.
xxxix.
Capacity Management Refunds
Displays any movie theater refunds for the given business day.
NOTE: The Point of Sale system must include the Capacity Management module
before the Capacity Management Refunds filter will be available. Contact Ideal
Software Systems, Inc. for more details.
xl.
Zipcode Questionnaire
Displays all answers from the zipcode question asked at the end of each sale for the
given business day.
NOTE: The Marketing Questions option has to be turned on in order for the
Zipcode Questionnaire filter to be usable. For more information, refer to
Chapter 2 section "Configuring System Parameters".
xli.
Marketing Questionnaire
Displays all answers from the marketing question asked at the end of each sale for the
given business day.
NOTE: The Marketing Questions option has to be turned on in order for the
Marketing Questionnaire filter to be usable. For more information, refer to
Chapter 2 section "Configuring System Parameters".
xlii.
Tax Discount
Displays discounts in taxes for the given business day.
xliii.
Credit Card Tips Collected
Displays tips from credit cards that have already been accounted for during the given
business day.
xliv.
MVP Credit
Displays MVP credit that has been credited for the given business day.
xlv.
Change Customer Account Name
Displays any name changes made to customer accounts for the given business day.
xlvi.
Transfer Inventory into Location
Displays the transfer of inventory from one location into another for the given
business day.
© 1997 - 2005 Ideal Software Systems, Inc.
Chapter 11 - General Reports
531
xlvii.
Transfer Inventory out of Location
Displays the transfer of inventory out of one location to another for the given business
day.
xlviii.
Transfer Inventory out of the Store
Displays the transfer of inventory out of the store for the given business day.
xlix.
Pre-Credit Debit Card
Displays all debit cards that were issued credit before being purchased for the given
business day.
l.
Party Deposit Refunds
Displays any event or party refunds for the given business day.
li.
Weather Report
Displays the weather status assigned by a manager for the store during the given
business day.
lii.
Payment Made With Gift Card
Displays all payments made by gift cards.
liii.
Purchase Made For Gift Card
Displays all sales where customers bought gift cards.
liv.
Employee Charge to Account
Displays all charges made by employees to their employee charge account.
lv.
Employee Payroll Deduction
Displays all money amounts deducted from employees' paychecks.
lvi.
Award Employee Bonus Value
Displays all bonus money awarded to employees.
lvii.
Employee Work Bonus
Displays all bonus work money awarded to employees.
lviii.
Employee Bonus Used
Displays the amount of bonus used by employees.
lix.
Void Inventory On Tab
Displays all tabs that had voided inventory.
lx.
Package Item Sold
Displays the items contained in the packages sold.
lxi.
Package Item Refunded
Displays the items contained in packages that were refunded.
lxii.
Cash Tip Collected
Displays the amount of cash tips collected.
lxiii.
Add Value to Bulk ICS Cards
Displays the value added to bulk ICS Cards.
lxiv.
Typed Discounts Given
Displays the different discounts given during the transactions.
© 1997 - 2005 Ideal Software Systems, Inc.
532
Point of Sale
lxv.
Void Items In Package
Displays the voided items contained in packages.
lxvi.
Event Credit Card Payment
Displays the voided event facility use purchased with credit cards.
lxvii.
Manual Gift Certificate
Displays the gift certificates purchased with a credit card.
lxviii.
Waste Consumption
Displays the amount of the inventory disgaurded as waste.
lxvix.
Product Consumption
Displays the amount of inventory used and/or consumed by employees, managers, etc.
lxx.
Price Override
Displays all the instances of when a price was overridden by an employee.
lxxi.
Print Receipt
Displays the receipt numbers of the receipts that had been printed.
C.
Filter By Employee
If the report only needs to print for a certain employee(s), check this option then check the
employee(s) in the window below.
D.
Filter By Drawer
If the report needs to print for a certain drawer(s) that has been opened, check this option then
check the drawer(s) in the window below.
TIP: More than one employee and drawer in the filters previously mentioned can
be checked.
4.
Under Report Date, click the down arrow and select a date for the report then click OK.
TIP: In the Transaction Report, users may click on any transaction and the entire
receipt details will be displayed.
5.
The Print Preview window will open showing the report. To print this report, click
.
TIP: The transaction filters used are displayed on the left hand side of the report.
Clicking on these will quickly take the user to those headings.
6.
The Print window will appear. Select the printer to print to and click OK.
© 1997 - 2005 Ideal Software Systems, Inc.
Chapter 11 - General Reports
533
11.4 Sales Report
Instructions for the Sales Report
This section contains an explanation about the Sales Report as well as how
to run it. This section contains the following topics:
• "Sales Report Explanation"
• "Using the Sales Report"
11.4.1
Sales Report Explanation
The Sales Report can be run for a single date or date range. This report has five sorting criteria to choos from:
Item Number, Description, Retail Price, Category then Price, Category then Item Number, Category then Item
Number, and Category and Item Description.
The Sales Report is designed to show all product sold for the chosen period. All items sold appear on the report
with the quantity sold in packages, regular quantity sold, and the original retail sales price. The fields Quantity
Sold and Retail Sale Price are extended to derive the Total Income field.
When items are sold as part of a package, the percentage of the items price in that package is reported under the
Package Income column. This column is where the allocated income from the items in packages is reported.
This field is only informational to the report. The actual income from the sale of a package is reported on the line
for the Package Item in the Total Income column.
The defaulted and most common sort order for the report is by Category then Price option. When sorted by
category, items will appear under their respective category and each category will have a total.
Item Number - This is the item number as defined in Create/Edit Inventory.
Type - This is the item type (for example, Normal, Ticket, Coupon, etc.)
Description - This is the item's description that was assigned by the user when creating the inventory item. For
more information refer to Chapter 3 section "Inventory".
Sold in Packages - This is the quantity of an item that was sold as a part of a package.
Quantity Sold - This shows the quantity of the items that were sold individually.
Retail Sales Price - This denotes the standard price of the item as defined in Create/Edit Inventory when the
item was created by the user.
Total Income - When the Sales Report is run, the total amount of income for an item is derived from the
quantity sold times the item's retail sales price.
NOTE: If an item is set with a price schedule, the Total Income may not equal
the quantity times retail sales price equation.
Package Income - This field is the amount of allocated income an item has generated through selling the item in
packages. Tax is not associated with this amount because tax is applied to the price of the Package item
© 1997 - 2005 Ideal Software Systems, Inc.
534
Point of Sale
only if a tax type has been assigned to that item.
Tax Exempt - This is the income brought in from items purchased without tax.
Items Sold - This figure represents the total products sold and debit card value sold. Any refunds are included in
this amount.
Add Tax Collected - This figure shows the taxes that were collected on items sold where a tax type was defined
for that item..
Less Gift Certificates Sold - This represents the gift certificates/MVP credits that were sold. Point of Sale
accounts for them as outstanding liabilities.
Less Debit Card Value Added @ POS - (This field deals with the Ideal Cashless System (ICS) or Intercard
systems.) This value represents the value of debit added to a debit card at the Front POS stations. This
field reduces the amount of sales since this is categorized as a liability.
Gross Sales - This figure represents the total sales with the taxes collected, less the liabilities.
Less Discounts Given - This figure reduces the Gross Sales by the total amount of discounts given.
Typed Discounts (Employee, Customer, Etc.) are deducted at the bottom of the sales report.
Since these discounts cannot be subtracted, they will be listed at the bottom of the sales report.
Less Tax Collected - This figure reduces the Gross Sales by subtracting taxes to derive the Total Income.
Total Income - This is the total amount the store made.
11.4.2
Using the Sales Report
This sub-section explains how to open the Sales Report in the Point of Sale system.
NOTE: The user must have rights to view reports in order to follow these
instructions. Refer to Chapter 2 section "Entering Employees and Employee
Groups" for more details.
1.
Make sure that the Point of Sale menu is visible at the Ideal FEC Back Office Suite screen.
2.
Select Reports | Sales Report.
© 1997 - 2005 Ideal Software Systems, Inc.
Chapter 11 - General Reports
Figure 11-7. The Ideal FEC Back Office Suite Reports menu's Sales Report
Select Reports | Sales Report.
3.
The user will be prompted for filter information in the Parameters for Sales Report window.
Figure 11-8. The Parameters for Sales Report window
Enter the report filter information.
A.
Start Date
Click the down arrow and select a start date for the report.
© 1997 - 2005 Ideal Software Systems, Inc.
535
536
Point of Sale
B.
End Date
Click the down arrow and select an end date for the report.
C.
Break On Sub Category
Click this option to break the Sales Report up at the sub-category level. This option is checked
by default.
D.
Sort Order
i.
Item Number
Sort the Sales Report by inventory numbers.
ii.
Description
Sort the Sales Report by inventory descriptions.
iii.
Retail Price
Sort the Sales Report by inventory price.
iv.
Category then Price
Sort the Sales Report first by inventory categories then by the inventory price.
TIP: The Category then Price option is checked by default.
v.
Category then Item Number
Sort the Sales Report first by inventory categories then by the inventory number.
vi.
Category then Item Description
Sort the Sales Report first by inventory categories then by the inventory description.
vii.
Category then Sub Category
Sort the Sales Report first by inventory categories then by the inventory subcategories.
4.
Click OK once all of the filter information is entered.
5.
The Print Preview window will open showing the report. To print this report, click
6.
The Print window will appear. Select the printer to print to and click OK.
.
11.5 Consolidated Sales Report
Instructions for the Consolidated Sales Report
This section contains an explanation about the Consolidated Sales Report as
well as how to run it. This section contains the following topics:
• "Consolidated Sales Report Explanation"
• "Using the Consolidated Sales Report"
© 1997 - 2005 Ideal Software Systems, Inc.
Chapter 11 - General Reports
11.5.1
537
Consolidated Sales Report Explanation
The Consolidated Sales Report is a summary of the Sales Report that shows only the totals for each category
instead of listing all items sold for each category. The Grand Total section is the same as the Sales Report. If
the user DOES NOT wish to see the sub category break down on the Consolidated Sales
Report, select No when prompted.
11.5.2
Using the Consolidated Sales Report
This sub-section explains how to open the Consolidated Sales Report in the Point of Sale system.
NOTE: The user must have rights to view reports in order to follow these
instructions. Refer to Chapter 2 section "Entering Employees and Employee
Groups" for more details.
1.
Make sure that the Point of Sale menu is visible at the Ideal FEC Back Office Suite screen.
2.
Select Reports | Consolidated Sales Report.
Figure 11-9. The Ideal FEC Back Office Suite Reports menu's Consolidated Sales Report
Select Reports | Consolidated Sales Report.
3.
The user will be prompted to enter date filter information in the Date Range for Consolidated Sales
Report window.
© 1997 - 2005 Ideal Software Systems, Inc.
538
Point of Sale
Figure 11-10. The Date Range for Consolidated Sales Report window
Enter the report date filter information.
4.
A.
Start Date
Click the down arrow and select a start date for the report.
B.
End Date
Click the down arrow and select an end date for the report.
Click OK once date information is entered. The Confirm window will open asking the user if the report
should break at each sub-category. Click Yes to break the report down into sub-categories; otherwise,
click No.
Figure 11-11. The Confirm window
Decide how the report should be printed and click either Yes or No.
5.
The Print Preview window will open showing the report. To print this report, click
6.
The Print window will appear. Select the printer to print to and click OK.
.
© 1997 - 2005 Ideal Software Systems, Inc.
Chapter 11 - General Reports
539
11.6 Sales Report YTD MTD
Instructions for the Sales Report YTD MTD
This section contains an explanation about the Sales Report YTD MTD as
well as how to run it. This section contains the following topics:
• "Sales Report YTD MTD Explanation"
• "Using the Sales Report YTD MTD"
11.6.1
Sales Report YTD MTD Explanation
The Sales Report YTD MTD reports sales and quantities for a selected day, month to date, and year to date.
Category - Each category is broken down into a section.
Item - Each category is broken down into the individual items.
Quantity - Shows the total number of units of the inventory item purchased for the day, the
month to date, and the year to date.
Income - Totals the monitary amount of the units of the inventory item purchased for the day,
the month to date, and the year to date.
Category Total - This row calculates the quantities and income totals for each category.
Quantity - Shows the total number of units of the inventory item purchased for the day, the
month to date, and the year to date.
Income - Totals the monitary amount of the units of the inventory item purchased for the day,
the month to date, and the year to date.
Grand Total - This row calculates the quantities and income totals for all categories.
Quantity - Shows the total number of units of the inventory item purchased for the day, the
month to date, and the year to date.
Income - Totals the monitary amount of the units of the inventory item purchased for the day,
the month to date, and the year to date.
11.6.2
Using the Sales Report YTD MTD
This sub-section explains how to open the Sales Report YTD MTD in the Point of Sale system.
NOTE: The user must have rights to view reports in order to follow these
instructions. Refer to Chapter 2 section "Entering Employees and Employee
Groups" for more details.
© 1997 - 2005 Ideal Software Systems, Inc.
540
Point of Sale
1.
Make sure that the Point of Sale menu is visible at the Ideal FEC Back Office Suite screen.
2.
Select Reports | Sales Report YTD MTD.
Figure 11-12. The Ideal FEC Back Office Suite Reports menu's Sales Report YTD MTD
Select Reports | Sales Report YTD MTD.
3.
The user will be prompted to enter the start date in the Enter Date for Report window.
Figure 11-13. The Enter Date for Report window
Enter the start date.
4.
Click OK once date information is entered.
5.
The Print Preview window will open showing the report. To print this report, click
.
© 1997 - 2005 Ideal Software Systems, Inc.
Chapter 11 - General Reports
6.
541
The Print window will appear. Select the printer to print to and click OK.
11.7 Receipt Reports
Instructions for the Receipt Reports
This section contains an explanation about the Receipt Sales Report and the
Receipt Drawer Report as well as how to run them. This section contains
the following topics:
• "Sales Report"
• "Sales Report Explanation"
• "Using the Sales Report"
• "Drawer Report"
• "Drawer Report Explanation"
• "Using the Drawer Report"
11.7.1
Sales Report
11.7.1.1 Sales Report Explanation
This report is printed from a receipt printer. It contains all the same sales information as the regular Sales Report
but is easily accessible for any manager or owner who quickly wants to know business sales for the day without
having to return to the office.
11.7.1.2 Using the Sales Report
This mini-section explains how to open the Receipt Sales Report in the Point of Sale system.
NOTE: The user must have rights to view reports in order to follow these
instructions. Refer to Chapter 2 section "Entering Employees and Employee
Groups" for more details.
1.
Make sure that the Point of Sale menu is visible at the Ideal FEC Back Office Suite screen.
2.
Select Reports | Receipt Reports | Sales Report.
© 1997 - 2005 Ideal Software Systems, Inc.
542
Point of Sale
Figure 11-14. The Ideal FEC Back Office Suite Reports menu's Receipt Reports
Select Reports | Receipt Reports | Sales Report.
3.
The user must now enter a date for the report in the Choose Date for Report window. Click OK once a
date is selected.
Figure 11-15. The Choose Date for Report window
Select a date and click OK.
4.
The report will immediately print to the terminal's default printer.
© 1997 - 2005 Ideal Software Systems, Inc.
Chapter 11 - General Reports
11.7.2
543
Drawer Report
11.7.2.1 Drawer Report Explanation
This report is printed from a receipt printer. It contains all the same drawer information as the regular Drawer
Report but is easily accessible for any manager or owner who quickly wants to know cash drawer quantities at
that current time without having to return to the office.
11.7.2.2 Using the Drawer Report
This mini-section explains how to open the Receipt Drawer Report in the Point of Sale system.
NOTE: The user must have rights to view reports in order to follow these
instructions. Refer to Chapter 2 section "Entering Employees and Employee
Groups" for more details.
1.
Make sure that the Point of Sale menu is visible at the Ideal FEC Back Office Suite screen.
2.
Select Reports | Receipt Reports | Drawer Report (Figure 11-14).
3.
The user must now select a drawer for the report in the Select a Drawer window. Click Select once a
drawer is selected.
Figure 11-16. The Select a Drawer window
Select a drawer and click Select.
4.
The report will immediately print to the terminal's default printer.
© 1997 - 2005 Ideal Software Systems, Inc.
544
Point of Sale
11.8 Drawer Status Report
Instructions for the Drawer Status Report
This section contains an explanation about the Drawer Status Report as well
as how to run it. This section contains the following topics:
• "Drawer Status Report Explanation"
• "Using the Drawer Status Report"
11.8.1
Drawer Status Report Explanation
The Drawer Status Report is similar to the Drawer Report summary, except it only shows the open drawers and
their current statuses. This report is a good monitor for employees that have drawers issued to them.
Drawer ID - This columns shows the assigned drawer ID number when it was issued to the employee.
Assigned Name - This column contains the names of the employees the cash drawer was issued to.
Status - This column displays the status of the drawer (whether it be Active, Counted, Adjusted, etc.).
Time Opened - This column shows the time the drawer was opened in Front POS.
Time Closed - This columns shows the time the drawer was closed in Front POS.
11.8.2
Using the Drawer Status Report
This sub-section explains how to open the Drawer Status Report in the Point of Sale system.
NOTE: The user must have rights to view reports in order to follow these
instructions. Refer to Chapter 2 section "Entering Employees and Employee
Groups" for more details.
1.
Make sure that the Point of Sale menu is visible at the Ideal FEC Back Office Suite screen.
2.
Select Reports | Drawer Status Report.
© 1997 - 2005 Ideal Software Systems, Inc.
Chapter 11 - General Reports
545
Figure 11-17. The Ideal FEC Back Office Suite Reports menu's Drawer Status Report
Select Reports | Drawer Status Report.
3.
The user will be prompted to select a date for the report in the Choose Date for Report window. Select
a date a click OK.
Figure 11-18. The Choose Date for Report window
Select a date and click OK.
© 1997 - 2005 Ideal Software Systems, Inc.
546
Point of Sale
NOTE: In order to view this report, drawers must have been opened for the date
that is selected in the Choose Date for Report window. For more information on
issuing a drawer, see Chapter 6 section "Drawers".
4.
The Print Preview window will open showing the report. To print this report, click
5.
The Print window will appear. Select the printer to print to and click OK.
.
11.9 Credit Card Report
Instructions for the Credit Card Report
This section contains an explanation about the Credit Card Report as well as
how to run it. This section contains the following topics:
• "Credit Card Report Explanation"
• "Using the Credit Card Report"
11.9.1
Credit Card Report Explanation
This report allows the user to select a date range to display all credit card transactions that occurred on those
days. This report works will along side any reports that can be printed from a facilities credit card processing
software.
Receipt # - This column displays receipt numbers of credit card purchases.
Cost - This column displays the cost of the sales.
Card Type - This column displays the credit card types that were used to make the purchase.
Time - This column shows the time the purchases were made.
Report Totals - This section contains a list of all available credit card types and the amount of money spent for
each type.
Total - This field is the total of all credit card purchases.
11.9.2
Using the Credit Card Report
This sub-section explains how to open the Credit Card Report in the Point of Sale system.
NOTE: The user must have rights to view reports in order to follow these
instructions. Refer to Chapter 2 section "Entering Employees and Employee
Groups" for more details.
© 1997 - 2005 Ideal Software Systems, Inc.
Chapter 11 - General Reports
1.
Make sure that the Point of Sale menu is visible at the Ideal FEC Back Office Suite screen.
2.
Select Reports | Credit Card Report.
547
Figure 11-19. The Ideal FEC Back Office Suite Reports menu's Credit Card Report
Select Reports | Credit Card Report.
3.
The user will be prompted to select a date range for the report in the Credit Card Report window.
Enter a starting date and an ending date then click OK.
Figure 11-20. The Credit Card Report window
Enter a starting and ending date then click OK.
4.
The Print Preview window will open showing the report. To print this report, click
© 1997 - 2005 Ideal Software Systems, Inc.
.
548
Point of Sale
5.
The Print window will appear. Select the printer to print to and click OK.
11.10 Attraction Scan Report
Instructions for the Attraction Scan Report
This section contains an explanation about the Attraction Scan Report as
well as how to run it. This section contains the following topics:
• "Attraction Scan Report Explanation"
• "Using the Attraction Scan Report"
11.10.1 Attraction Scan Report Explanation
Please contact Ideal Software for more information on this report.
11.10.2 Using the Attraction Scan Report
This sub-section explains how to open the Attraction Scan Report in the Point of Sale system.
NOTE: The user must have rights to view reports in order to follow these
instructions. Refer to Chapter 2 section "Entering Employees and Employee
Groups" for more details.
1.
Make sure that the Point of Sale menu is visible at the Ideal FEC Back Office Suite screen.
2.
Select Reports | Attraction Scan Report.
© 1997 - 2005 Ideal Software Systems, Inc.
Chapter 11 - General Reports
549
Figure 11-21. The Ideal FEC Back Office Suite Reports menu's Attraction Scan Report
Select Reports | Attraction Scan Report.
3.
The user will be prompted to select a date range for the report in the Scan Report by Item window.
Enter a starting date and an ending date then click OK.
Figure 11-22. The Scan Report by Item window
Enter a starting and ending date then click OK.
4.
The Print Preview window will open showing the report. To print this report, click
5.
The Print window will appear. Select the printer to print to and click OK.
© 1997 - 2005 Ideal Software Systems, Inc.
.
550
Point of Sale
11.11 Hourly Sales Report
Instructions for the Hourly Sales Report
This section contains an explanation about the Hourly Sales Report as well
as how to run it. This section contains the following topics:
• "Hourly Sales Report Explanation"
• "Using the Hourly Sales Report"
11.11.1 Hourly Sales Report Explanation
Sales for the given business day are broken down into the hours that the facility was open. The transactions will
appear in the form of the actual items that were sold. Each hour has its own heading where in each inventory item
for that hour will be displayed.
11.11.2 Using the Hourly Sales Report
This sub-section explains how to open the Hourly Sales Report in the Point of Sale system.
NOTE: The user must have rights to view reports in order to follow these
instructions. Refer to Chapter 2 section "Entering Employees and Employee
Groups" for more details.
1.
Make sure that the Point of Sale menu is visible at the Ideal FEC Back Office Suite screen.
2.
Select Reports | Hourly Sales Report.
© 1997 - 2005 Ideal Software Systems, Inc.
Chapter 11 - General Reports
551
Figure 11-23. The Ideal FEC Back Office Suite Reports menu's Hourly Sales Report
Select Reports | Hourly Sales Report.
3.
The user will be prompted to select a date range for the report in the Sales Report by Hour window.
Enter a starting date and an ending date then click OK.
Figure 11-24. The Sales Report by Hour window
Enter a starting and ending date then click OK.
NOTE: The Hourly Sales Report contains the option to allow the user save this
report to file.
4.
The Print Preview window will open showing the report. To print this report, click
5.
The Print window will appear. Select the printer to print to and click OK.
© 1997 - 2005 Ideal Software Systems, Inc.
.
552
Point of Sale
11.12 Hourly Scan Report
Instructions for the Hourly Scan Report
This section contains an explanation about the Hourly Scan Report as well
as how to run it. This section contains the following topics:
• "Hourly Scan Report Explanation"
• "Using the Hourly Scan Report"
11.12.1 Hourly Scan Report Explanation
Please contact Ideal Software for more information on this report.
11.12.2 Using the Hourly Scan Report
This sub-section explains how to open the Hourly Scan Report in the Point of Sale system.
NOTE: The user must have rights to view reports in order to follow these
instructions. Refer to Chapter 2 section "Entering Employees and Employee
Groups" for more details.
1.
Make sure that the Point of Sale menu is visible at the Ideal FEC Back Office Suite screen.
2.
Select Reports | Hourly Scan Report.
© 1997 - 2005 Ideal Software Systems, Inc.
Chapter 11 - General Reports
553
Figure 11-25. The Ideal FEC Back Office Suite Reports menu's Hourly Scan Report
Select Reports | Hourly Scan Report.
3.
The user will be prompted to select a date range for the report in the Hourly Attraction Scan Report
window. Enter a starting date and an ending date then click OK.
Figure 11-26. The Hourly Attraction Scan Report window
Enter a starting and ending date then click OK.
4.
The Print Preview window will open showing the report. To print this report, click
5.
The Print window will appear. Select the printer to print to and click OK.
© 1997 - 2005 Ideal Software Systems, Inc.
.
554
Point of Sale
11.13 Item Scan Report
Instructions for the Item Scan Report
This section contains an explanation about the Item Scan Report as well as
how to run it. This section contains the following topics:
• "Item Scan Report Explanation"
• "Using the Item Scan Report"
11.13.1 Item Scan Report Explanation
Please contact Ideal Software for more information on this report.
11.13.2 Using the Item Scan Report
This sub-section explains how to open the Item Scan Report in the Point of Sale system.
NOTE: The user must have rights to view reports in order to follow these
instructions. Refer to Chapter 2 section "Entering Employees and Employee
Groups" for more details.
1.
Make sure that the Point of Sale menu is visible at the Ideal FEC Back Office Suite screen.
2.
Select Reports | Item Scan Report.
© 1997 - 2005 Ideal Software Systems, Inc.
Chapter 11 - General Reports
555
Figure 11-27. The Ideal FEC Back Office Suite Reports menu's Item Scan Report
Select Reports | Item Scan Report.
3.
The user will be prompted to select a date range for the report in the Scan Report by Item window.
Enter a starting date and an ending date then click OK.
Figure 11-28. The Scan Report by Item window
Enter a starting and ending date then click OK.
4.
The Print Preview window will open showing the report. To print this report, click
5.
The Print window will appear. Select the printer to print to and click OK.
© 1997 - 2005 Ideal Software Systems, Inc.
.
556
Point of Sale
11.14 Marketing Report
Instructions for the Marketing Report
This section contains an explanation about the Marketing Report as well as
how to run it. This section contains the following topics:
• "Marketing Report Explanation"
• "Using the Marketing Report"
11.14.1 Marketing Report Explanation
The Marketing Report displays all recorded responses from customers who have made a purchase and answered
the Marketing Question. For more information on setting up the Marketing Questions, go to Chapter 2 section
"Configuring System Parameters" sub-section "Configuring Store Settings in Edit Parameters".
Zip Code - If the Marketing Question is setup to ask the user for his zip code, then this will appear in the Zip
Code column.
Visitor Count - If the Zip Code option is being used, the customer visit counts will tally next to the appropriate
zip code allowing the user to keep track of what percentages of the customers come from which area.
Sales - The corresponding sales to the customers from the displayed zip codes will appear in this column. the
user can keep track of which area brings in the most money.
Question - The report displays the Marketing Question that is asked to the customers as they make a purchase.
Response - The different Responses will appear in this column. For more information on entering responses, see
Chapter 2 section "Configuring System Parameters" sub-section "Configuring Store Settings in Edit
Parameters".
Answered - This column displays the amount of times each Response was given. This is an excellent means to
find out if specific advertising strategies are working.
11.14.2 Using the Marketing Report
This sub-section explains how to open the Marketing Report in the Point of Sale system.
NOTE: The user must have rights to view reports in order to follow these
instructions. Refer to Chapter 2 section "Entering Employees and Employee
Groups" for more details.
1.
Make sure that the Point of Sale menu is visible at the Ideal FEC Back Office Suite screen.
2.
Select Reports | Marketing Report.
© 1997 - 2005 Ideal Software Systems, Inc.
Chapter 11 - General Reports
557
Figure 11-29. The Ideal FEC Back Office Suite Reports menu's Marketing Report
Select Reports and click Marketing Report.
3.
The user will be prompted to select a date range for the report in the Marketing Report window. Enter
a starting date and an ending date then click OK.
Figure 11-30. The Marketing Report window
Enter a starting and ending date then click OK.
4.
The Print Preview window will open showing the report. To print this report, click
5.
The Print window will appear. Select the printer to print to and click OK.
© 1997 - 2005 Ideal Software Systems, Inc.
.
558
Point of Sale
11.15 Tax Income Report
Instructions for the Tax Income Report
This section contains an explanation about the Tax Income Report as well
as how to run it. This section contains the following topics:
• "Tax Income Report Explanation"
• "Using the Tax Income Report"
11.15.1 Tax Income Report Explanation
This report will record the amount of taxes based on the amount of taxable inventory sold.
Tax Type - This column lists the different tax types entered into the system. For more information on
entering a tax type into the system, refer to Chapter 3 section "Tax Tables".
Tax Collected - This column displays the taxes collected for each individual tax type.
Sales Income - This column shows the total amount of sales for the items using the Tax Type in the
same row.
Total - This row totals the amounts of Tax Types to show total taxes owed and also totals the sales
income.
11.15.2 Using the Tax Income Report
This sub-section explains how to open the Tax Income Report in the Point of Sale system.
NOTE: The user must have rights to view reports in order to follow these
instructions. Refer to Chapter 2 section "Entering Employees and Employee
Groups" for more details.
1.
Make sure that the Point of Sale menu is visible at the Ideal FEC Back Office Suite screen.
2.
Select Reports | Tax Income Report.
© 1997 - 2005 Ideal Software Systems, Inc.
Chapter 11 - General Reports
559
Figure 11-31. The Ideal FEC Back Office Suite Reports menu's Tax Income Report
Select Reports | Tax Income Report.
3.
The user will be prompted to select a date range for the report in the Tax Income Report window.
Enter a starting date and an ending date then click OK.
Figure 11-32. The Tax Income Report window
Enter a starting and ending date then click OK.
4.
The Print Preview window will open showing the report. To print this report, click
5.
The Print window will appear. Select the printer to print to and click OK.
© 1997 - 2005 Ideal Software Systems, Inc.
.
560
Point of Sale
11.16 Tips Collected
Instructions for the Tips Collected
This section contains an explanation about the Tips Collected as well as
how to run it. This section contains the following topics:
• "Tips Collected Explanation"
• "Using the Tips Collected"
11.16.1 Tips Collected Explanation
Please contact Ideal Software for more information on this report.
11.16.2 Using Tips Collected
This sub-section explains how to open the Tips Collected report in the Point of Sale system.
NOTE: The user must have rights to view reports in order to follow these
instructions. Refer to Chapter 2 section "Entering Employees and Employee
Groups" for more details.
1.
Make sure that the Point of Sale menu is visible at the Ideal FEC Back Office Suite screen.
2.
Select Reports | Tips Collected.
© 1997 - 2005 Ideal Software Systems, Inc.
Chapter 11 - General Reports
561
Figure 11-33. The Ideal FEC Back Office Suite Reports menu's Tips Collected
Select Reports | Tips Collected.
3.
The user will be prompted to select a date range for the report in the Date Range for Tips Report
window. Enter a starting date and an ending date then click OK.
Figure 11-34. The Date Range for Tips Report window
Enter a starting and ending date then click OK.
4.
The Print Preview window will open showing the report. To print this report, click
5.
The Print window will appear. Select the printer to print to and click OK.
© 1997 - 2005 Ideal Software Systems, Inc.
.
562
Point of Sale
Chapter 12 - Inventory Reports
12.1 Inventory Listing Reports
Instructions for the Inventory Listing Reports
This section contains an explanation about the Inventory Listing Reports as
well as how to run them. This section contains the following topics:
• "By Item"
• "Inventory Listing by Item Explanation"
• "Using the Inventory Listing by Item"
• "By Locations"
• "Inventory Listing by Location Explanation"
• "Using the Inventory Listing by Location"
• "Summary Listing"
• "Inventory Listing Summary Listing Explanation"
• "Using the Inventory Listing Summary Listing"
12.1.1
By Item
12.1.1.1 Inventory Listing by Item Explanation
The Inventory Listing Report can be filtered using properties of the item. This report will show all
inventory items in order of their item number, description, or stock number. For more information on
entering inventory, refer to Chapter 3 section "Inventory".
Item Number - This is the number assigned to the inventory item either by the user or the Point of Sale
system. This item property is the preferred method to sorting the report.
Description - This column contains the inventory items' descriptions.
Stock No. - This column displays the stock number assigned to the inventory item by the user.
On Hand - This column shows the amount of inventory currently on hand.
Last Cost/Last Audit - This column displays the cost last entered for the inventory item in the audit last
performed.
UOM - This stands for Unit of Measure. This column shows the item's unit of measure (for example,
eaches, dozens, pairs, etc.) that the inventory item is currently being purchased or sold with.
Extended Cost - This column displays the price of an item if the price has been raised or will be equal
to that of the Retail Sale Price plus.
© 1997 - 2005 Ideal Software Systems, Inc.
Chapter 12 - Inventory Reports
563
12.1.1.2 Using the Inventory Listing by Item
This mini-section explains how to run the Inventory Listing Report by item explanation in the Point of Sale
system.
NOTE: The user must have rights to view reports in order to follow these
instructions. Refer to Chapter 2 section "Entering Employees and Employee
Groups" for more details.
1.
Make sure that the Point of Sale menu is visible at the Ideal FEC Back Office Suite screen.
2.
Select Inventory Reports | Inventory Listing Report | By Item.
Figure 12-1. The Ideal FEC Back Office Suite Inventory Reports menu's Inventory Listing Report
Select Inventory Reports | Inventory Listing Report | By Item.
3.
The user will be prompted to select filter information in the Inventory Sort & Filter Options window.
© 1997 - 2005 Ideal Software Systems, Inc.
564
Point of Sale
Figure 12-2. The Inventory Sort & Filter window
Select the filter information.
A.
Sort Order
i.
Item Number
Filter by inventory numbers.
ii.
Description
Filter by inventory description.
iii.
Stock Number
Filter by the amount of inventory in stock.
B.
Item Status
Click the down arrow and select the status of the items to appear in the report.
C.
Filter By Item Type
Check this option and click the down arrow below to filter by inventory item types.
4.
The Print Preview window will open showing the report. To print this report, click
5.
The Print window will appear. Select the printer to print to and click OK.
.
© 1997 - 2005 Ideal Software Systems, Inc.
Chapter 12 - Inventory Reports
12.1.2
565
By Location
12.1.2.1 Inventory Listing by Location Explanation
This Inventory Listing Report will group the inventory items by their current item location. For more
information on entering inventory, refer to Chapter 3 section "Inventory".
Item Number - This is the number assigned to the inventory item either by the user or the Point of Sale
system. This item property is the preferred method to sorting the report.
Description - This column contains the inventory items' descriptions.
Stock No. - This displays the stock number assigned to the inventory item by the user.
On Hand - This column shows the amount of inventory currently on hand.
Last Cost - This column shows the cost last entered while creating or receiving inventory Purchase
Orders.
Extended Cost - This column displays the price of an item if the price has been raised or will be equal
to that of the Retail Sale Price plus.
12.1.2.2 Using the Inventory Listing by Location
This mini-section explains how to run the Inventory Listing Report by item location in the Point of Sale system.
NOTE: The user must have rights to view reports in order to follow these
instructions. Refer to Chapter 2 section "Entering Employees and Employee
Groups" for more details.
1.
Make sure that the Point of Sale menu is visible at the Ideal FEC Back Office Suite screen.
2.
Select Inventory Reports | Inventory Listing Report | By Location (Figure 12-1).
3.
The user will be prompted to select filter information in the Inventory Sort Options window.
© 1997 - 2005 Ideal Software Systems, Inc.
566
Point of Sale
Figure 12-3. The Inventory Sort Options window
Select the filter information.
A.
Inventory Sort Type
i.
Description
Filter by inventory description.
ii.
Item Number
Filter by inventory numbers.
iii.
Stock Number
Filter by the amount of inventory in stock.
B.
Page Break on New Location
Check this option to enter a page break for every new location.
C.
Show only low inventory
Select this option if only items with low quantities need to be reported.
NOTE: Track Inventory Quantities must be checked in order for quantities to
show for inventory. For more information about the Track Inventory Quantities
option see Chapter 3 in the "Inventory" section.
12.1.3
4.
The Print Preview window will open showing the report. To print this report, click
5.
The Print window will appear. Select the printer to print to and click OK.
.
Summary Listing
12.1.3.1 Inventory Listing Summary Listing Explanation
This Inventory Listing Report is the shortest of the three listing reports. This report doesn't contain
information about location nor does it reflect any audit information. For more information on entering
inventory, refer to Chapter 3 section "Inventory".
© 1997 - 2005 Ideal Software Systems, Inc.
Chapter 12 - Inventory Reports
567
Item Number - This is the number assigned to the inventory item either by the user or the Point of Sale
system. This item property is the preferred method to sorting the report.
Description - This column contains the inventory items' descriptions.
Stock No. - This displays the stock number assigned to the inventory item by the user.
On Hand - This column shows the amount of inventory currently on hand.
Last Cost - This column shows the cost last entered while creating or receiving inventory Purchase
Orders.
Extended Cost - This column displays the price of an item if the price has been raised or will be equal
to that of the Retail Sale Price plus.
12.1.3.2 Using the Inventory Listing Summary Listing
This mini-section explains how to run the Inventory Listing Report by summary listing in the Point of Sale
system.
NOTE: The user must have rights to view reports in order to follow these
instructions. Refer to Chapter 2 section "Entering Employees and Employee
Groups" for more details.
1.
Make sure that the Point of Sale menu is visible at the Ideal FEC Back Office Suite screen.
2.
Select Inventory Reports | Inventory Listing Report | Summary Listing (Figure 12-1).
3.
The user will be prompted to select filter information in the Inventory Sort Options window.
Figure 12-4. The Inventory Sort Options window
Select the filter information.
A.
Inventory Sort Type
i.
Description
© 1997 - 2005 Ideal Software Systems, Inc.
568
Point of Sale
Filter by inventory description.
ii.
Item Number
Filter by inventory numbers.
iii.
Stock Number
Filter by the amount of inventory in stock.
4.
The Print Preview window will open showing the report. To print this report, click
5.
The Print window will appear. Select the printer to print to and click OK.
.
12.2 Vendor Report
Instructions for the Vendor Report
This section contains an explanation about the Vendor Report as well as
how to run it. This section contains the following topics:
• "Vendor Report Explanation"
• "Using the Vendor Report"
12.2.1
Vendor Report Explanation
The Vendor Report gives a summary listing of all the vendors and their current contact information. For more
information on entering vendors, refer to Chapter 3 section "Inventory".
Vendor Name - This is the name entered by the user for the vendor in the Point of Sale system.
Contact Name - This column displays the main contact for the vendor next to the Vendor Name in the report.
Phone Number - This is the main phone number with which employees and managers can use to contact the
vendor and or the vendor contact.
Fax Phone - This is the fax number used to send over Purchase Orders or other forms of contact.
12.2.2
Using the Vendor Report
This sub-section explains how to run the Vendor Report in the Point of Sale system.
NOTE: The user must have rights to view reports in order to follow these
instructions. Refer to Chapter 2 section "Entering Employees and Employee
Groups" for more details.
1.
Make sure that the Point of Sale menu is visible at the Ideal FEC Back Office Suite screen.
© 1997 - 2005 Ideal Software Systems, Inc.
Chapter 12 - Inventory Reports
2.
569
Select Inventory Reports | Vendor Report.
Figure 12-5. The Ideal FEC Back Office Suite Inventory Reports menu's Vendor Report
Select Inventory Reports | Vendor Report.
3.
The Print Preview window will open showing the report. To print this report, click
4.
The Print window will appear. Select the printer to print to and click OK.
.
12.3 Ingredient Usage Report
Instructions for the Ingredient Usage Report
This section contains an explanation about the Ingredient Usage Report as
well as how to run it. This section contains the following topics:
• "Ingredient Usage Report Explanation"
• "Using the Ingredient Usage Report"
12.3.1
Ingredient Usage Report Explanation
This report is used to show an ingredient breakdown for the inventory items that are sold. This report is
very useful to kitchen managers who must order the food. For more information on entering and
assigning ingredients into the Point of Sale system, refer to Chapter 3 section "Inventory".
Item number - This column shows the item number of the main inventory item the ingredient was used
in.
Description - This column displays the main inventory items' descriptions and the descriptions for the
© 1997 - 2005 Ideal Software Systems, Inc.
570
Point of Sale
ingredients.
Items Sold - This column lists the amount sold of the main inventory items that contained the
ingredients.
Ingredient Used - This column shows the number of ingredients used in the inventory item.
Cost - This column will total the overall cost for the ingredient items individually.
Total - This field totals the full amount of the ingredient items' costs.
12.3.2
Using the Ingredient Usage Report
This sub-section explains how to run the Ingredient Usage Report in the Point of Sale system.
NOTE: The user must have rights to view reports in order to follow these
instructions. Refer to Chapter 2 section "Entering Employees and Employee
Groups" for more details.
1.
Make sure that the Point of Sale menu is visible at the Ideal FEC Back Office Suite screen.
2.
Select Inventory Reports | Ingredient Usage Report.
Figure 12-6. The Ideal FEC Back Office Suite Inventory Reports menu's Ingredient Usage Report
Select Inventory Reports | Ingredient Usage Report.
3.
The user will be prompted to enter a starting date and an ending date for the report in the Ingredient
Usage Report window. Once the dates are entered click OK.
© 1997 - 2005 Ideal Software Systems, Inc.
Chapter 12 - Inventory Reports
571
Figure 12-7. The Choose Date for Report window
Enter starting and ending dates then click OK.
NOTE: If there were no ingredients used during the dates entered, then clicking
OK will return an error.
4.
The Print Preview window will open showing the report. To print this report, click
5.
The Print window will appear. Select the printer to print to and click OK.
.
12.4 Cost of Goods Report
Instructions for the Cost of Goods Report
This section contains an explanation about the Cost of Goods Report as well
as how to run it. This section contains the following topics:
• "Cost of Goods Report Explanation"
• "Using the Cost of Goods Report"
12.4.1
Cost of Goods Report Explanation
This report is used exclusively with ingredient items. The Cost of Goods Report refers to the cost of inventory
items that are made up of ingredient items. The report takes the total cost of the ingredient items and compares
them to the total amount of sales brought it for the main inventory items to reflect any turned profits. For more
information on entering and assigning ingredients into the Point of Sale system, refer to Chapter 3 section
"Inventory".
Item number - This column lists the item numbers of the ingredients. The inventory items that the ingredients
were used in are also listed in this column above the ingredient item they are associated with.
Description - This column displays the main inventory items' descriptions and the descriptions for the
© 1997 - 2005 Ideal Software Systems, Inc.
572
Point of Sale
ingredients.
Quantity Used - This column shows the amount of the ingredients used in the inventory.
Cost - This column displays the individual cost for the quantity used of each ingredient item.
Total Cost of Goods - This field sums up the costs of all the ingredients used.
Sales (Including Packages) - This field shows the total amount of sales for all inventory items and packages that
used ingredients.
Profit - This fields subtracts the Total Cost of Goods from the Sales (Including Packages) field. The result is the
total amount of profit. A percentage of profit is also given.
Grand Total - This section recalculates all totals for all inventory and ingredient items. This section will show
the store's total.
12.4.2
Using the Cost of Goods Report
This sub-section explains how to run the Cost of Goods Report in the Point of Sale system.
NOTE: The user must have rights to view reports in order to follow these
instructions. Refer to Chapter 2 section "Entering Employees and Employee
Groups" for more details.
1.
Make sure that the Point of Sale menu is visible at the Ideal FEC Back Office Suite screen.
2.
Select Inventory Reports | Using the Cost of Goods Report.
Figure 12-8. The Ideal FEC Back Office Suite Inventory Reports menu's Cost of Goods Report
Select Inventory Reports | Cost of Goods Report.
3.
The user will be prompted to enter a starting date and an ending date for the report in the Cost of Sales
Report window. Once the dates are entered click OK.
© 1997 - 2005 Ideal Software Systems, Inc.
Chapter 12 - Inventory Reports
573
Figure 12-9. The Cost of Sales Report window
Enter starting and ending dates then click OK.
NOTE: If there were no goods sold during the dates entered, then clicking OK
will return an error.
4.
The Print Preview window will open showing the report. To print this report, click
5.
The Print window will appear. Select the printer to print to and click OK.
.
12.5 Recipe Report
Instructions for the Recipe Report
This section contains an explanation about the Vendor Report as well as
how to run it. This section contains the following topics:
• "Recipe Report Explanation"
• "Using the Recipe Report"
12.5.1
Recipe Report Explanation
The Recipe Report lists all inventory items that use ingredients and then shows the ingredients that go to these
inventory items. This report will not list how to make certain food items but will instruct the employee what is
needed to make food items. For more information on adding ingredients and regular items into the Point of Sale
system, see Chapter 3 and the "Inventory" section.
Item number - These are the item numbers of the ingredients. The inventory items that the ingredients were used
in are also listed in this column above the ingredient item they are associated with.
Description - This column displays the main inventory items' descriptions and the descriptions for the
ingredients.
© 1997 - 2005 Ideal Software Systems, Inc.
574
Point of Sale
Quantity Used - This column shows the amount of the ingredients that are used in the inventory item.
Cost of Ingredients - This column lists the prices of the ingredients.
Retail Sale Price - This is the price the item is listed as in the Point of Sale. This price is compared to the
amount the item costs based on the ingredient prices.
12.5.2
Using the Recipe Report
This sub-section explains how to run the Recipe Report in the Point of Sale system.
NOTE: The user must have rights to view reports in order to follow these
instructions. Refer to Chapter 2 section "Entering Employees and Employee
Groups" for more details.
1.
Make sure that the Point of Sale menu is visible at the Ideal FEC Back Office Suite screen.
2.
Select Inventory Reports | Recipe Report.
Figure 12-10. The Ideal FEC Back Office Suite Inventory Reports menu's Recipe Report
Select Inventory Reports | Recipe Report.
3.
The Print Preview window will open showing the report. To print this report, click
4.
The Print window will appear. Select the printer to print to and click OK.
.
© 1997 - 2005 Ideal Software Systems, Inc.
Chapter 12 - Inventory Reports
575
12.6 Audit History Report
Instructions for the Audit History Report
This section contains an explanation about the Audit History Report as well
as how to run it. This section contains the following topics:
• "Audit History Report Explanation"
• "Using the Audit History Report"
12.6.1
Audit History Report Explanation
The Audit History Report reflects before and after audit counts for the audit date selected. With this report,
managers and owners have the ability to go back to previous audits already conducted.
NOTE: For more information on running an audit, refer to Chapter 4 section
"Auditing Inventory".
12.6.2
Using the Audit History Report
This sub-section explains how to run the Audit History Report in the Point of Sale system.
NOTE: The user must have rights to view reports in order to follow these
instructions. Refer to Chapter 2 section "Entering Employees and Employee
Groups" for more details. Also, in order to view any information on the Audit
History Report, inventory and inventory locations will need to have been audited.
For more information on performing an audit, refer to Chapter 4 in the "Auditing
Inventory" section of this manual.
1.
Make sure that the Point of Sale menu is visible at the Ideal FEC Back Office Suite screen.
2.
Select Inventory Reports | Audit History Report.
© 1997 - 2005 Ideal Software Systems, Inc.
576
Point of Sale
Figure 12-11. The Ideal FEC Back Office Suite Inventory Reports menu's Auditing History Report
Select Inventory Reports | Auditing History Report.
3.
The user will be prompted to select a record containing the Audit Number, the audit Date, and the
Audit Location that have previously been audited in the Inventory Audit List window. Once the dates
are entered, click OK.
Figure 12-12. The Inventory Audit List window
Select an audit record, then click OK.
NOTE: If no audits have been performed, then the Inventory Audit List
window will appear blank as in Figure 12-21.
4.
The Print Preview window will open showing the report. To print this report, click
5.
The Print window will appear. Select the printer to print to and click OK.
.
© 1997 - 2005 Ideal Software Systems, Inc.
Chapter 12 - Inventory Reports
577
12.7 Received Inventory Report
Instructions for the Received Inventory Report
This section contains an explanation about the Received Inventory Report
as well as how to run it. This section contains the following topics:
• "Received Inventory Report Explanation"
• "Using the Received Inventory Report"
12.7.1
Received Inventory Report Explanation
This report is sectioned off according to the different Inventory Locations. The inventory received into Inventory
Locations will be under that particular Inventory Location header in the report. For more information on
creating Inventory Locations and inventory items, see Chapter 3, sections "Inventory Locations" and
"Inventory". Refer to Chapter 4 section "Receiving Inventory" to learn more about receiving inventory into an
Inventory Location.
Item number - These are the item numbers of the inventory items that were received into the Inventory Location
that is listed above each section.
Description - This column displays the inventory items' descriptions.
Stock Number - This column displays the stock numbers assigned to the inventory items in the adjacent
columns.
Cost - This column lists the prices that the store/company paid for the inventory items that were received.
Quantity Received - This is the amount of the inventory items that were received into the Inventory Location.
Extended Cost - Listed in this column are the additional fees (if any) that were charged when the inventory
items were received.
12.7.2
Using the Received Inventory Report
This sub-section explains how to run the Received Inventory Report in the Point of Sale system.
NOTE: The user must have rights to view reports in order to follow these
instructions. Refer to Chapter 2 section "Entering Employees and Employee
Groups" for more details.
1.
Make sure that the Point of Sale menu is visible at the Ideal FEC Back Office Suite screen.
2.
Select Inventory Reports | Received Inventory Report.
© 1997 - 2005 Ideal Software Systems, Inc.
578
Point of Sale
Figure 12-13. The Ideal FEC Back Office Suite Inventory Reports menu's Received Inventory Report
Select Inventory Reports | Received Inventory Report.
3.
The user will be prompted to enter a starting date and an ending date for the report in the Date Range
for Inventory Received Report window. Once the dates are entered, click OK.
Figure 12-14. The Date Range for Inventory Received Report window
Enter starting and ending dates, then click OK.
4.
The Print Preview window will open showing the report. To print this report, click
5.
The Print window will appear. Select the printer to print to and click OK.
.
© 1997 - 2005 Ideal Software Systems, Inc.
Chapter 12 - Inventory Reports
579
12.8 Transfer Report
Instructions for the Transfer Report
This section contains an explanation about the Transfer Report as well as
how to run it. This section contains the following topics:
• "Transfer Report Explanation"
• "Using the Transfer Report"
12.8.1
Transfer Report Explanation
The Transfer Report is sectioned off according to the different Inventory Locations. The inventory
transferred from one location to another will be under the Inventory Location header it was transferred
from in the report. For more information on creating Inventory Locations and inventory items, see
Chapter 3, sections "Inventory Locations" and "Inventory". Refer to Chapter 4 section "Transferring
Inventory" to learn more about transferring inventory from one location to another.
Item number - These are the item numbers of the inventory items that were received into the Inventory
Location that is listed above each section.
Description - This column displays the inventory items' descriptions.
Qty - This column displays the amount of inventory that was transferred from the old location to the
new one.
Cost - This column lists the costs of the inventory items when they were received.
Transferred To - This is the Inventory Location that the inventory was recorded as moved to in the
Point of Sale system.
12.8.2
Using the Transfer Report
This sub-section explains how to run the Transfer Report in the Point of Sale system.
NOTE: The user must have rights to view reports in order to follow these
instructions. Refer to Chapter 2 section "Entering Employees and Employee
Groups" for more details.
1.
Make sure that the Point of Sale menu is visible at the Ideal FEC Back Office Suite screen.
2.
Select Inventory Reports | Transfer Report.
© 1997 - 2005 Ideal Software Systems, Inc.
580
Point of Sale
Figure 12-15. The Ideal FEC Back Office Suite Inventory Reports menu's Transfer Report
Select Inventory Reports | Transfer Report.
3.
The user will be prompted to enter a starting date and an ending date for the report in the Date Range
for Inventory Transfer Report window. Once the dates are entered, click OK.
Figure 12-16. The Date Range for Inventory Transfer Report window
Enter starting and ending dates, then click OK.
4.
The Print Preview window will open showing the report. To print this report, click
5.
The Print window will appear. Select the printer to print to and click OK.
.
© 1997 - 2005 Ideal Software Systems, Inc.
Chapter 12 - Inventory Reports
581
12.9 Purchase Order Summary Report
Instructions for the Purchase Order Summary Report
This section contains an explanation about the Purchase Order Summary
Report as well as how to run it. This section contains the following topics:
• "Purchase Order Summary Report Explanation"
• "Using the Purchase Order Summary Report"
12.9.1
Purchase Order Summary Report Explanation
This report gives a brief summary of all the Purchase Orders created for a specified date range. The
report is divided into sections. Each section displays one vendor and contains all Purchase Order
information in regards to that vendor. For more information on adding vendors into the Point of Sale
system, go to Chapter 3 section "Vendors". Refer to Chapter 4 section "Purchase Orders" for more
information on creating Purchase Orders.
PO Number - This stands for Purchase Order number. The number of the Purchase Order is assigned
by the user creating the order and is displayed in this column.
Vendor - This column displays the vendor name the Purchase Order is being sent to. The vendor name
is also displayed as the header of the section for the Purchase Orders.
Total Received - This column displays the amount of the Purchase Order that has already been
received. If the Purchase Order has not been sent or received, then this column will be empty.
For more information on receiving Purchase Orders, see Chapter 4 section "Purchase Orders".
Total Order - This column reflects the total amount of the inventory items to be purchased in the
Purchase Order.
Status - This status will show whether the Purchase Order is being ordered, received, etc.
12.9.2
Using the Purchase Order Summary Report
This sub-section explains how to run the Purchase Order Summary Report in the Point of Sale system.
NOTE: The user must have rights to view reports in order to follow these
instructions. Refer to Chapter 2 section "Entering Employees and Employee
Groups" for more details.
1.
Make sure that the Point of Sale menu is visible at the Ideal FEC Back Office Suite screen.
2.
Select Inventory Reports | Purchase Order Summary Report.
© 1997 - 2005 Ideal Software Systems, Inc.
582
Point of Sale
Figure 12-17. The Ideal FEC Back Office Suite Inventory Reports menu's Purchase Order Summary Report
Select Inventory Reports | Purchase Order Summary Report.
NOTE: If no purchase orders have been made, then en error will be returned
when OK is clicked. Refer to Chapter 4 section "Purchase Orders" for more
information on creating Purchase Orders.
3.
The Print Preview window will open showing the report. To print this report, click
4.
The Print window will appear. Select the printer to print to and click OK.
.
© 1997 - 2005 Ideal Software Systems, Inc.
Chapter 13 - End of Day and Other Routines
583
Chapter 13 - End of Day and Other
Routines
13.1 Closing Out the Day
Instructions for closing out the business day
This section contains an explanation about the closing of the day process in
the Point of Sale system. This section contains the following topics:
•
•
•
•
13.1.1
"Daily Procedures"
"Closing/Night Procedures"
"Perform a Close Out Day"
"Depositing Money"
Daily Procedures
Every day, there are procedures that managers and other employees should follow in order to allow for
smooth operation. This sub-section gives a brief list of things that should be done for all family
entertainment facilities.
1.
Issue Drawers for Employees and Debit Card Tellers - The Issue Drawer function is
found in the Drawers Menu in POS Administration or the manager can click the shortcut
button on the main FEC Administration screen. For more information, refer to Chapter 6
sub-section "Issuing Drawers". Also, if the Ideal Cashless System (ICS) or Intercard
system is integrated with the Point of Sale software, refer to Chapter 14 section "Using
the Debit Card System" sub-section "Issuing Cash Drawers to Tellers".
A.
Also, if the Ideal Cashless System (ICS) or Intercard system is integrated with
the Point of Sale software, drawers must be setup for kiosks as well. This
function is found under Facility and the menu Debit Card. Refer to Chapter 14
section "Using the Debit Card System" sub-section "Issuing Cash Drawers to
Tellers" for more information.
2.
Add Drawers to Terminals - On the Front POS Login screen, click Add Drawer on
the left for the first cash drawer and Add Drawer on the right to add the second cash
drawer, if two are going to be used. The cash drawers must be added into the system
before access into Front POS is allowed.
3.
Remove Drawers - Following the end of each shift, the employee should remove the cash
drawer by entering the ID number and password then clicking Remove Drawer.
4.
Enter Drawer Counts - After a drawer is removed, the cash drawer must be counted.
This should be done as the drawers are removed or after all drawers used for the day have
been removed. For more information, refer to Chapter 6 sub-section "Counting Drawers".
A.
The Count Drawer function is found in the Drawers menu or by clicking the
shortcut button. Check drawer accuracy by previewing the Drawer Report. If an
© 1997 - 2005 Ideal Software Systems, Inc.
584
Point of Sale
incorrect entry was made the cash drawer can be adjusted.
13.1.2
B.
Debit Card Teller Drawer Counts - If using kiosk tellers or Intercard tellers,
enter the cash amounts pulled from these tellers that were issued drawers for the
day.
C.
Drawer Reports can be printed from the Reports menu. For more information
on this report, see Chapter 11 section "Drawer Report".
Closing/Night Procedures
The procedures for closing out the business day are perhaps the most important. In order for the Point of Sale
system to keep the correct date and all reports updated correctly, the following steps should be followed at the
end of every day that the family entertainment facility does business transactions.
WARNING: All drawers should be closed before performing the Close Out Day
function. However, the Close Out Day function can be performed after all
drawers have been counted. The business day must be closed before drawer are
issued for another business day. For more information pertaining to open, closing,
and counting drawers, refer to Chapter 6. To learn more about the Close Out
Day function, go to the following sub-section: "Performing a Close Out Day".
1.
Close Drawers - After all drawers have been counted and/or adjusted, close the drawers using the
Close Drawer function found in the Drawers menu or with the shortcut button.
NOTE: For more information on counting, adjusting, or closing a cash drawer,
refer to Chapter 6.
2.
Enter Cash Deposit - In the Facility screen, select Facility | Deposits and enter the amount of cash to
deposit to the bank for the given business day.
NOTE: See sub-section "Depositing Money" in this section for more
information.
3.
Run Reports - From the Reports menu, print or save the following reports:
NOTE: For more information on printing these reports refer to Chapter 11.
4.
A.
Drawer Summary Report
B.
Sales Report
C.
Credit Card Report
D.
Transaction Report
Run Facility Report - From the Facility screen, select Facility. Print or save the Facility Report.
NOTE: For more information on printing this report, refer to Chapter 16 section
"Facility Reports".
5.
Verify Credit Card Settlement Figures - Use the Transaction Report and the Credit Card Report
© 1997 - 2005 Ideal Software Systems, Inc.
Chapter 13 - End of Day and Other Routines
585
to compare with the settlement reports used in the credit card software package that the facility uses to
process the credit transactions.
6.
Close the Business Day - From the Maintenance Menu, select Close Out Day. Once the steps to
using this function are completed, the business day should be advanced by one day.
NOTE: To learn more about the Close Out Day function, go to the following
sub-section: "Performing a Close Out Day".
13.1.3
Performing a Close Out Day
Closing out the day is an important process that is used to finalize daily reports and advance the current business
date. This sub-section explains how close out the day in the Point of Sale system.
NOTE: The user must have rights to close out the day before the following steps
can be performed. For more information on employee rights go to Chapter 2
section "Entering Employees and Employee Groups". Before the end of day can
be processed all drawers must be removed and closed. For more information on
removing and closing drawers, refer to Chapter 6. Finally, before the end of day
can be processed, all tabs must either have been converted to invoices or written
off. To learn how to convert tabs to invoices or to write them off, see Chapter 8
section "Using Tabs".
1.
Make sure that the Point of Sale menu is visible at the Ideal FEC Back Office Suite screen.
2.
Select Maintenance | Close Out Day.
© 1997 - 2005 Ideal Software Systems, Inc.
586
Point of Sale
Figure 13-1. The Ideal FEC Back Office Suite Maintenance menu's Close Out Day
Select Maintenance | Close Out Day.
3.
The Confirm window will open prompting the user if the day needs to be closed. Click Yes.
Figure 13-2. The Confirm window
Click Yes to end the day.
4.
When it is complete, the Information window will open. Click OK. The end of day will be processed.
© 1997 - 2005 Ideal Software Systems, Inc.
Chapter 13 - End of Day and Other Routines
587
Figure 13-3. The Information window
Click OK.
NOTE: Point of Sale will send a close of day notice to the to the Ideal Cashless
system processor to signal when the business day has changed.
13.1.4
Depositing Money
This sub-section explains how to record money deposit amounts in the Point of Sale system.
NOTE: The user must have rights to deposit money before the following steps
can be performed. For more information on employee rights go to Chapter 2
section "Entering Employees and Employee Groups".
1.
Make sure that the Facility menu is visible at the Ideal FEC Back Office Suite screen by clicking
Facility.
2.
Select Facility | Deposits.
Figure 13-4. The Ideal FEC Back Office Suite Facility menu's Deposits
Select Facility | Deposits.
3.
The Deposits window will open. Enter the necessary information.
© 1997 - 2005 Ideal Software Systems, Inc.
588
Point of Sale
Figure 13-5. The Deposit Cash window
Enter the necessary information.
A.
Deposit Date
Click the down arrow and select the date that the deposit was or will be taken to the bank.
NOTE: Deposits may only be made for money deposits that occurred within the
past three business days.
4.
B.
Cash Amount to Deposit
Enter the amount of cash that will or already has been deposited.
C.
Bag Number/Comment
Enter the number on the cash bag or a comment about the money being deposited.
Click OK once all the information has been entered. The window will close and the information will be
stored in the Point of Sale system.
13.2 Transaction File Backup
Instructions for closing out the transaction file backup
This section contains an explanation about the trimming the transaction file
in the Point of Sale system. This section contains the following topics:
• "Trimming the Transaction File"
© 1997 - 2005 Ideal Software Systems, Inc.
Chapter 13 - End of Day and Other Routines
13.2.1
589
Trimming the Transaction File
Backing up transactions should be an important daily event. This sub-section explains how to trim down the size
of the transaction file in the Point of Sale system.
WARNING: Trimming transaction files means that they will be deleted. Take
this into account before any transaction files are removed. Ideal recommends that
all trimmed transaction files are backed up. Read below for information on how
to perform this task.
1.
Make sure that the Point of Sale menu is visible at the Ideal FEC Back Office Suite screen.
2.
Select Maintenance | Transaction File Backup.
Figure 13-6. The Ideal FEC Back Office Suite Maintenance menu's Transaction File Backup
Select Maintenance | Transaction File Backup.
3.
The Trim Transaction File window will open Enter the necessary information.
© 1997 - 2005 Ideal Software Systems, Inc.
590
Point of Sale
Figure 13-7. The Trim Transaction File window
Enter the necessary information.
4.
A.
Delete Transactions Before
Click the down arrow to open the Calendar window and select a date. All transaction files
before the date will be deleted.
B.
Backup to File
Check this option to backup the trimmed transaction files to a predetermined file and enter the
file name for the backup.
Click OK to trim the transaction files.
© 1997 - 2005 Ideal Software Systems, Inc.
Chapter 14 - Ideal Cashless System (ICS) Debit Card System
591
Chapter 14 - Ideal Cashless System (ICS)
Debit Card System
14.1 Site Preparation for ICS
Instructions for ICS site preparations
This section contains explanations about necessary site preparations for the
Ideal Cashless System in Point of Sale. This section contains the following
topics:
• "Preparation Introduction"
• "The Game Floor"
• "The Back Office"
• "Network Preparation"
14.1.1
Preparation Introduction
This entire section of the Point of Sale manual is specifically meant to assist customers who have purchased an
Ideal Cashless System (ICS). A debit card system can become quite complicated, so it is very important that
owners and managers understand their setup and options. This section will cover much of this information.
When installing ICS, there are two main areas of concern:
1.
The game floor
2.
The back office
Generally, sites are divided into these two areas and are connected by a network of 10BaseT cabling that enables
two-way communication.
The game floor - This is where the games are located, and is often referred to as the arcade or entertainment
facility. The game floor is the area seen and accessed by the public.
The back office - This is the command center where the computers are located. This area should be a secure,
environmentally controlled area.
14.1.1.1 The Game Floor
This mini-section will discuss proper game floor arrangement.
Arrange the games together in logical units or clusters of 3, 7, or 15. Use a 4-, 8-, or 16-port switch depending on
the numbers of games in the cluster. One port of each switch must be left available for communication to the
back office.
It is strongly recommended to have one 10BaseT (CAT5) cabling connection at each electrical plug in the game
room. This will accommodate the relocation of games and other changes.
© 1997 - 2005 Ideal Software Systems, Inc.
592
Point of Sale
NOTE: It is strongly recommended that switches are used instead of hubs as they
perform more reliably.
Game Arrangement - The owner may choose to link games of a similar type together.
TIP: For example: wiring all linked racing games along a single wall into one
hub or switch, or wiring a cluster of games located around a pillar or power drop.
Game Preparation - Each game in the facility must have the standard board control and Ideal Cashless System
card swiper.
Labeling Cables - Be sure to label all cables from the game to the switch and from the game floor to the back
office. This will be helpful when network troubleshooting is necessary.
14.1.1.2 The Back Office
This mini-section will discuss proper back office arrangement.
All ICS related computers must be placed in a back office or server room where customer and employee access
can be controlled. There will be two Ideal Servers: master and slave, the master server being the primary, and the
slave being the backup.
Rack Mounting - Ideal recommends using the standard rack setup used by Compaq for mounting equipment: a
19-inch rack with four pillar posts with a depth of 29 inches and M6 square cage nut holes.
NOTE: It is the responsibility of the site to provide a place to put the computers.
TIP: For smaller sites (80 games or less), a minimum 42U rack is recommended.
A number of rack sizing tools are available on the Internet from Compaq and Hewlett Packard. Some companies
that follow the same standards as Compaq include Great Lakes Case and Cabinet and APC.
Shelf Units - The monitor requires a fixed shelf.
Compaq KVM - Ideal strongly recommends using a Compaq Keyboard Video Mouse (KVM) for each site. The
KVM offers a reliable mouse and keyboard simulator that helps to isolate issues at startup.
TIP: The Compaq KVM units can be found at any local computer store.
Monitor - A standard monitor should be mounted on a shelf for use with all ICS computers.
Keyboard and Mouse Tray - A keyboard and mouse tray should be mounted on the rack directly beneath the
monitor.
Power Strip - A multi-plug power strip should be mounted on the rack itself.
UPS - Place a rack-mounted Uninterruptible Power Supply (UPS) on the bottom of the rack. The UPS must have
a serial port output to allow monitoring of utility voltage and to permit shut down of computers in the
event of a power problem.
© 1997 - 2005 Ideal Software Systems, Inc.
Chapter 14 - Ideal Cashless System (ICS) Debit Card System
593
Temperature - The server room must be kept at approximately 73° F.
14.1.2
Network Preparation
This sub-section discusses the network information needed in connecting an Ideal Cashless System (ICS).
Cable Routing - Newly built sites typically have 10BaseT (CAT 5) cabling run after the walls are framed. Either
UTP (Unshielded Twisted Pair) or STP (Shielded Twisted Pair) cable can be used. These cables are
terminated in a patch panel in the server room and run to several network jacks in the walls located
throughout the facility.
NOTE: It is a good idea to run 10BaseT where ever power is run. This will
facilitate making later changes to the game floor layout. For more information on
game placement and locating hubs or switches, refer to the "The Game Floor"
mini-section in this section. For easier troubleshooting, it is recommended that all
network lines going into the server room are labeled and identified with the jack
that cable comes from.
Wiring Test Results - The wiring vendor should provide test results on the facility's network runs. These tests
should ensure that all lines are currently live. These tests should be provided to an Ideal installer,
because no on site installation time should be spent troubleshooting a job that should have already been
finished.
NOTE: It is strongly recommended that switches are used instead of hubs, as
they perform more reliably.
Hubs and Switches - When determining the size and quantity to purchase, remember that each switch must have
one port reserved for communication with the server.
Patch Panel - A patch panel should receive all of the 10BaseT lines coming in from the game floor and connect
them to the E-Banks.
Rack-Mounted Master Switch - The network lines leaving the patch panel are connected into a 24- or 48-port
rack-mounted switch.
Master Switch Ports - When choosing a switch, be sure that there are enough ports to accommodate all of the
incoming lines from the patch panel as well as all of the computers. Each game room network line may
have anywhere from 2 to 7 games connected to it. One switch port is needed for each network line run.
Additionally, one for each computer in the rack is required.
© 1997 - 2005 Ideal Software Systems, Inc.
594
Point of Sale
14.2 Using the Debit Card System
Instructions for using the ICS system
This section contains explanations about using the Ideal Cashless System in
Point of Sale. This section contains the following topics:
•
•
•
•
•
14.2.1
"Setting Up Debit Card Items"
"Creating Debit Card Value Items"
"Issuing Cash Drawers to Tellers"
"Pre-Value ICS Cards"
"Recycle ICS Cards"
Setting Up Debit Card Items
This sub-section explains how to create a debit card inventory item(s) for the Point of Sale system.
NOTE: It is important that inventory, categories, sub-categories, tax tables, unit
types, locations, and vendors be setup before any inventory items are made. This
will save a lot of time in setting up the Point of Sale system.
1.
Make sure that the Point of Sale menu is visible at the Ideal FEC Back Office Suite screen.
2.
Select Inventory | Create Inventory.
Figure 14-1. The Ideal FEC Back Office Suite Inventory menu's Create Inventory
Select Inventory | Create Inventory.
© 1997 - 2005 Ideal Software Systems, Inc.
Chapter 14 - Ideal Cashless System (ICS) Debit Card System
3.
595
The Create New Inventory Item window will open. Make sure that Debit Card Item is selected under
Item Type.
Figure 14-2. The Create New Inventory Item window with Debit Card Item Type selected
Make sure Debit Card Item is selected under Item Type.
4.
Enter the information for the normal inventory item.
A.
Item Number
Enter a number for this inventory item.
i.
Auto-Assign Inventory Number
Check this option if the inventory item is to be assigned a number by the Point of Sale
system.
TIP: The Auto-Assign Inventory Number option is checked by default. It is
recommended that each category gets its own range of inventory numbers. (Food
= 1 to 999, Golf = 1000 to 1999, etc.) This will make managing hundreds of
inventory items simpler.
NOTE: Upon clicking the Debit Value tab, the item will be automatically saved
and assigned a number.
B.
Retail Sale Price
Enter how much the item will be sold for.
C.
Description
Enter the name of the inventory item.
TIP: The Description for an inventory item should be unique to that item. This
will make searching for items easier than depending on searching for them by
their unique item number.
© 1997 - 2005 Ideal Software Systems, Inc.
596
Point of Sale
D.
Price Schedule
Click this button to assign price value to different times of the day or days of the week. For
more information on this feature, refer to Chapter 3 section Inventory sub-section "Adding a
Price Schedule".
E.
Category
Click the drop down arrow and select a category for the item.
F.
Sub-Category
If the item needs a sub-category, click the drop down arrow to select one.
G.
Tax Type
Click the drop down arrow and select a tax type.
H.
Vendor
If the inventory item has a vendor, click the drop down arrow to select one.
I.
Edit Vendor
To edit the vendor from this window, click this button. For more information on this feature,
refer to Chapter 3 section "Inventory" sub-section "Editing a Vendor Through an Inventory
Item".
J.
Barcode
If barcodes are used, enter the barcode number of the item.
TIP: If the item already has a barcode, the user may scan the barcode on the item
while the cursor is in the Barcode field of the inventory item and input the item's
original barcode into the system. The original barcode will now be recognized by
the system as that inventory item whenever scanned.
K.
Right Level Required
Enter a number 0 through 5 of the right level required by the employee to sell the inventory
item.
NOTE: If a number other than 0 through 5 is entered in the Right Level
Required field then an error will result. To change an employee rights level so
that they can sell items with a level higher than 0, refer back to Chapter 2 section
"Entering Employees and Employee Groups".
L.
Service Printer (Figure 3-53)
i.
Service Printer 1
Select this option to print to a printer recognized as Service Printer 1.
ii.
Service Printer 2
Select this option to print to a printer recognized as Service Printer 2.
iii.
Service Printer 3
Select this option to print to a printer recognized as Service Printer 3.
iv.
Service Printer 4
Select this option to print to a printer recognized as Service Printer 4.
NOTE: A service printer must be networked into the Ideal system network and
setup under the printer properties in the Point of Sale program in order for
inventory item information to be printed to a kitchen or service printer.
© 1997 - 2005 Ideal Software Systems, Inc.
Chapter 14 - Ideal Cashless System (ICS) Debit Card System
M.
597
Item Script (Figure 3-54)
i.
Script Filename
Select a script that will be printed upon the item's purchase (if the item requires that
something be printed other than the receipt.)
NOTE: The script chosen will be printed in addition to any other ticket,
wristband, or score card.
ii.
Print Location
a.
None
The select script will not be printed upon the item's purchase.
b.
Ticket Printer
The script will be printed to a designated ticket printer upon the sale of the
item.
c.
Wristband Printer
The script will print on a wristband when the item is sold.
d.
Receipt Printer
The script will print on the receipt printer local to the terminal when the item
is purchased.
e.
Golf Scorecard Printer
The script will print on a scorecard.
iii.
Script
Click the down arrow and select a item script to use.
iv.
Create
Click this button to create a item script.
v.
Edit
Edit a script in the default word processor.
NOTE: For further information on creating and editing scripts, refer to the "Item
Scripts" section in Chapter 3.
N.
Debit Value
© 1997 - 2005 Ideal Software Systems, Inc.
598
Point of Sale
Figure 14-5. The Debit Value tab
Click on the Debit Value tab.
i.
Purchased Value
Enter the base amount of value for the customer's purchase that will be added to the
card.
ii.
Purchased Chips
Enter the number of chips purchased in the sale.
iii.
Bonus Value
Enter an additional free value that will be placed on the card upon the customer's
purchase.
TIP: Bonus value does not have to be placed on the card, however, this is a good
customer incentive.
iv.
Bonus Chips
Enter the number of bonus chips the customer received.
v.
Comp Value
Enter the amount of value compensated back to the customer.
vi.
Comp Chips
Enter the number of compensation chips given to the customer.
vii.
Timed Value
This section is used for items that are time-based.
viii.
a.
Start Time
Enter a time that the purchased timed value will begin.
b.
Minutes
Enter the number of minutes that the time play will last once it has started.
c.
Timed Play
If the item does not start at a specific time, enter the number of minutes the
customer has purchased.
d.
Allocation
Enter the allocation percentage for the debit card item.
Additional Time
© 1997 - 2005 Ideal Software Systems, Inc.
Chapter 14 - Ideal Cashless System (ICS) Debit Card System
599
If the item is time-based, this field allows the user to add extra free time that will
added onto the original purchased time.
ix.
Bulk Add
Select this option if there are numerous entitlements to add.
x.
Entitlements
Click this button to open the Entitlements window.
Figure 14-6. The Entitlement window
a.
Add
Clicking this button will open the Entitlement window. Here the user can
enter the number of the entitlements and click OK to save the number with
the debit item.
Figure 14-7. The Entitlement window
Fill in the Enter Entitlement Number field and click OK.
NOTE: Currently, there can only be 8 entitlements assigned in the ICS for Point
of Sale.
b.
© 1997 - 2005 Ideal Software Systems, Inc.
Remove
Select an entitlement that has already been created and click remove. The
Confirm window will open asking the user if the entitlement is to be
removed. Click Yes.
600
Point of Sale
Figure 14-8. The Confirm window
Click Yes to confirm deletion of the entitlement.
c.
Close
This button closes the Entitlements window.
Q.
Discounts
This tab (Figure 3-100) will display any discounts that have been applied to the item. Also,
Price Schedule is on this tab. Refer to sub-section "Adding a Price Schedule".
R.
Coupon Info (Figure 3-57)
In order for a cashier to scan a coupon provided by a customer, Point of Sale will require that
the customer's order contain the inventory item that the coupon is linked to in this tab.
i.
S.
Setup Required Items
Click this button to open the Inventory Required in Order window (Figure 3-58).
a.
Add Item
Click this button to open the Select Inventory Item window (Figure 3-59).
Select an item required for the coupon and click OK.
b.
Remove Item
Select and item to be removed from the required item for coupon list and
click this button to remove it.
Order/Stocking Rules
This tab (Figure 3-101) allows the manager and owner to define specific rules about ording
from vendors and stocking inventory that apply to the item. Refer to section "Order/Stocking
Rules".
5.
Click OK once the item is finished. The item will now be saved in the Point of Sale system.
6.
The Confirm window will appear. Click Yes to create another item. Otherwise click No to return to the
Ideal FEC Back Office Suite screen.
Figure 14-9. The Confirm window
Click Yes to create another item, otherwise click No.
© 1997 - 2005 Ideal Software Systems, Inc.
Chapter 14 - Ideal Cashless System (ICS) Debit Card System
14.2.2
601
Creating Debit Card Value Items
This sub-section explains how to create a Debit Card Value inventory item(s) for the Point of Sale system.
NOTE: It is important that inventory, categories, sub-categories, tax tables, unit
types, locations, and vendors be setup before any inventory items are made. This
will save a lot of time in setting up the Point of Sale system. In order to take
advantage of this item type, the user must have an ICS system installed at the site.
1.
Make sure that the Point of Sale menu is visible at the Ideal FEC Back Office Suite screen.
2.
Select Inventory | Create Inventory (Figure 14-3).
3.
The Create New Inventory Item window will open. Make sure that Normal is selected under Item
Type.
Figure 14-10. The Create New Inventory Item window with Normal Item Type selected
Make sure Normal is selected under Item Type.
4.
Enter the information for the normal inventory item.
A.
Item Number
Enter a number for this inventory item.
i.
Auto-Assign Inventory Number
Check this option if the inventory item is to be assigned a number by the Point of Sale
system.
© 1997 - 2005 Ideal Software Systems, Inc.
602
Point of Sale
TIP: The Auto-Assign Inventory Number option is checked by default. It is
recommended that each category gets its own range of inventory numbers. (Food
= 1 to 999, Golf = 1000 to 1999, etc.) This will make managing hundreds of
inventory items simpler.
B.
Retail Sale Price
Enter the value that will be added onto the debit card.
C.
Description
Enter \debitcard\ in the description for the item.
TIP: The Description for an inventory should be unique to that item. This will
make searching for items easier than depending on searching for them by their
unique item number. The \debitcard\ description must contain lower-case
letters.
Figure 14-11. The Create New Inventory Item with debit card value description
Enter a description with \debitcard\.
D.
Category
Click the drop down arrow to select a category for the item.
E.
Sub-Category
If the item needs a sub-category, click the drop down arrow to select one.
F.
Tax Type
Click the drop down arrow and select a tax type.
G.
Vendor
If the inventory item has a vendor, click the drop down arrow to select one.
H.
Barcode
If barcodes are used, enter the barcode number of the item.
TIP: If the item already has a barcode, the user may scan the barcode on the item
while the cursor is in the Barcode field of the inventory item and input the item's
original barcode into the system. The original barcode will now be recognized by
the system as that inventory item whenever scanned.
I.
Track Inventory Quantities
Do not check this option. Debit card value cannot be tracked this way.
© 1997 - 2005 Ideal Software Systems, Inc.
Chapter 14 - Ideal Cashless System (ICS) Debit Card System
J.
603
Right Level Required
Enter a number 0 through 5 of the right level required by the employee to sell the inventory
item.
NOTE: If a number other than 0 through 5 is entered in the Right Level
Required field then an error will result. To change an employee rights level so
that they can sell items with a level higher than 0, refer back to Chapter 2 section
"Entering Employees and Employee Groups".
K.
Service Printer (Figure 3-53)
i.
Service Printer 1
Select this option to print to a printer recognized as Service Printer 1.
ii.
Service Printer 2
Select this option to print to a printer recognized as Service Printer 2.
iii.
Service Printer 3
Select this option to print to a printer recognized as Service Printer 3.
iv.
Service Printer 4
Select this option to print to a printer recognized as Service Printer 4.
NOTE: A service printer must be networked into the Ideal system network and
setup under the printer properties in the Point of Sale program in order for
inventory item information to be printed to a kitchen or service printer.
L.
Item Script (Figure 3-54)
i.
Script Filename
Select a script that will be printed upon the item's purchase (if the item requires that
something be printed other than the receipt.)
NOTE: The script chosen will be printed in addition to any other ticket,
wristband, or score card.
ii.
iii.
Print Location
a.
None
The select script will not be printed upon the item's purchase.
b.
Ticket Printer
The script will be printed to a designated ticket printer upon the sale of the
item.
c.
Wristband Printer
The script will print on a wristband when the item is sold.
d.
Receipt Printer
The script will print on the receipt printer local to the terminal when the item
is purchased.
e.
Golf Scorecard Printer
The script will print on a scorecard.
Script
© 1997 - 2005 Ideal Software Systems, Inc.
604
Point of Sale
Click the down arrow yo select a item script to use.
iv.
Create
Click this button to create a item script.
v.
Edit
Edit a script in the default word processor.
NOTE: For further information on creating and editing scripts, refer to the "Item
Scripts" section in Chapter 3.
M.
Audit Info (Figure 3-55)
Do not use this tab for this item type.
N.
Audit Count (Figure 3-56)
Do not use this tab for this item type.
O.
Discounts
This tab (Figure 3-100) will display any discounts that have been applied to the item. Also,
Price Schedule is on this tab. Refer to sub-section "Adding a Price Schedule".
P.
Coupon Info (Figure 3-57)
In order for a cashier to scan a coupon provided by a customer, Point of Sale will require that
the customer's order contain the inventory item that the coupon is linked to in this tab.
i.
S.
14.2.3
Setup Required Items
Click this button to open the Inventory Required in Order window (Figure 3-58).
a.
Add Item
Click this button to open the Select Inventory Item window (Figure 3-59).
Select an item required for the coupon and click OK.
b.
Remove Item
Select and item to be removed from the required item for coupon list and
click this button to remove it.
Order/Stocking Rules (Figure 3-101)
Do not use this tab.
5.
Click OK once the item is finished. The debit card value will now be saved in the Point of Sale system.
6.
The Confirm window (Figure 14-11) will appear. Click Yes to create another item. Otherwise click No
to return to the Ideal FEC Back Office Suite screen.
Issuing Cash Drawers to Tellers
This sub-section explains how to issue cash drawers in the Point of Sale system to a teller(s) and/or kiosk(s).
NOTE: The user must have rights to issues teller drawers in order to follow these
instructions. Refer to Chapter 2 section "Entering Employees and Employee
Groups" for more details. In order to take advantage of this item type, the user
must have an ICS system installed at the site.
© 1997 - 2005 Ideal Software Systems, Inc.
Chapter 14 - Ideal Cashless System (ICS) Debit Card System
605
1.
Make sure that the Facility menu is visible at the Ideal FEC Back Office Suite screen by clicking
Facility.
2.
Select Debit Card | Issue Drawer for Teller.
NOTE: The name of the Debit Card menu is subject to change based on what
the user renames the customer cards. If the user were to rename the Debit Cards
to "Fun Money", then Fun Money would appear as a menu option instead of
Debit Card.
Figure 14-12. The Ideal FEC Back Office Suite Debit Card's menu's Issue Drawer for Teller
Select Debit Card | Issue Drawer for Teller.
3.
The Issue Intercard Teller Drawer window will open. Fill in the necessary information.
Figure 14-13. The Issue Intercard Teller Drawer window
Enter the necessary information.
© 1997 - 2005 Ideal Software Systems, Inc.
606
Point of Sale
NOTE: Both Intercard and ICS kiosk teller drawers can be issued from this
window.
4.
Enter the drawer ID number into the Kiosk ID Numbers field.
A.
Show List
If using the Ideal Cashless System (ICS), click this button to bring up a list of active kiosks
around the facility. If an ICS server is not installed or integrated with the Point of Sale system,
then an error will result upon clicking this button.
NOTE: Intercard drawer ID's must be entered manually. Clicking the Show List
button for an Intercard system will result in an error.
TIP: When entering multiple teller drawer ID numbers, a comma (,) must follow
each number. For example, multiple drawer ID's would be entered like this: 123,
124, 130.
5.
14.2.4
Once the drawer ID numbers are entered, click OK. The Issue Intercard Teller Drawer window will
close and the drawer(s) for the teller will have been issued.
Pre-Value ICS Cards
This sub-section explains how to pre-value ICS cards in the Point of Sale and Ideal Cashless system.
NOTE: The customer site must have installed an ICS system in order to use this
functionality.
1.
Make sure that the Facility menu is visible at the Ideal FEC Back Office Suite screen by clicking
Facility.
2.
Select Facility | Pre-Value ICS Cards.
WARNING: Not having the Point of Sale system conected to an Ideal Cashless
system will result in an error.
© 1997 - 2005 Ideal Software Systems, Inc.
Chapter 14 - Ideal Cashless System (ICS) Debit Card System
607
Figure 14-14. The Ideal FEC Back Office Suite Facility menu's Pre-Value ICS Cards
Select Facility | Pre-Value ICS Cards.
3.
14.2.5
This utility will allow the user to pre-value ICS cards with purchased, bonus, or comp value. For more
information, please contact Ideal Software's support staff.
Recycle ICS Cards
This sub-section explains how to recycle ICS cards in the Point of Sale and Ideal Cashless system.
NOTE: The customer site must have installed an ICS system in order to use this
functionality.
1.
Make sure that the Facility menu is visible at the Ideal FEC Back Office Suite screen by clicking
Facility.
2.
Select Facility | Pre-Value ICS Cards (Figure 14-14).
WARNING: Not having the Point of Sale system conected to an Ideal Cashless
system will result in an error.
3.
This utility will allow the user to recycle ICS cards. A check box option to recycle the cards is
avalable. If the cards are to be recycled at the same time value is added; the recycle will take
place first. Recycle cannot be applied to bulk because no packet exists for bulk recycle cards.
For more information, please contact Ideal Software's support staff.
© 1997 - 2005 Ideal Software Systems, Inc.
608
Point of Sale
Chapter 15 - Access Control Manager
(ACM) and Turnstiles
15.1 Installing Turnstiles
Instructions for installing turnstiles
This section contains the information needed to install a turnstile that will
be integrated into the Point of Sale system. This section contains the
following topics:
• "Understanding Turnstile Components"
• "Modems"
• "Scanners"
• "Y-Cable"
• "PLC Board"
• "Solenoid"
• "Free Wave Modem Configuration"
• "Board and Wire Settings for 'Pinging' Purposes"
• "Setting Up Turnstile Scanners"
• "How PLC Handles a Scanned Access Ticket"
15.1.1
Understanding Turnstile Components
Turnstiles are used as access control devices. They are placed in front of attractions, and only paid customers are
allowed to pass through. Traditionally, payment was taken by dropping coins or tokens into the turnstile. The
turnstile would then allow the customer to pass through once.
The Ideal Point of Sale system has taken the functionality of a turnstile a step further. Coins and tokens have
been replaced with tickets. These tickets can be obtained at a Point of Sale terminal when purchasing a ride or
event. Barcodes are printed onto these tickets scanners connected at the turnstiles read the barcode. To determine
if the tickets being scanned are good, a controller board has to be placed in each turnstile. These boards are
called PLC boards and they allow a computer to interact with the turnstile. When a ticket is scanned, the
information is passed through the scanner to the PLC. In order for this information to travel to a computer, a
cable can be run directly from the PLC, or a wireless modem can transmit the information to the computer. The
computer receiving the information is referred to as the Access Control Manager (ACM). The ACM will
determine if the ticket is any good, and, if so, then it will send a signal back to the turnstile allowing the customer
to pass through. All of this communication takes a split second, and is instantaneous from the user's perspective.
15.1.1.1 Modems
The modems used in the wireless turnstiles are the Free Wave DGR-115R modems as seen in Figure 15-1.
Figure 15-1. The Free Wave DGR-115R modem
© 1997 - 2005 Ideal Software Systems, Inc.
Chapter 15 - Access Control Manager (ACM) and Turnstiles
609
These modems have a "10 miles point of line sight" range. Weather and radio waves can have an adverse affect
on these modems.
There are two different ways these modems can be setup: 1) Slave and 2) Master. Slave modems are mounted
inside the turnstiles, and the Master modem is attached to the ACM.
15.1.1.2 Scanners
The scanners used are Symbol LS9100 Omni Directional scanners as seen in Figure 15-2.
Figure 15-2. The Symbol LS9100 Omni Directional scanner
These scanners are mounted inside of the turnstile on one side. The scanner's "scanning face" faces down into the
turnstile opening. This makes scanning a ticket easier by being able to place a ticket under the beam and scan the
barcode. Each scanner must be programmed with a prefix. Generally, the prefix assigned to the scanner should
be the same as the PLC board. A prefix is needed because when a ticket is scanned, the information that is
relayed to the ACM will contain the prefix and then the ACM will be able to determine which turnstile made the
request.
© 1997 - 2005 Ideal Software Systems, Inc.
610
Point of Sale
15.1.1.3 Y-Cable
Another important piece of hardware is the Y-Cable.
NOTE: This cable is used only with the Tomsed PLC boards.
This cable attaches the scanner and modem directly to the PLC board itself.
In dealing with COM ports with DB9 connectors the following need to be kept in mind:
1.
Computers transmit on Pin 3, receive on Pin 2, and are grounded on Pin 5.
2.
The PLC boards created by Tomsed receive on Pin 3 and are grounded on Pin 5.
3.
Corded scanners transmit on Pin 2 and are grounded on Pin 5.
4.
Modems transmit on Pin 2, receive on Pin 3, and are grounded on Pin 5.
An important piece of information to remember is that female and male connectors are mirror images of each
other. The pins are numbered and care needs to be taken to connect to the right pin depending on the gender of
the connector being used.
Null modem cables or connectors essentially reverse the connectivity. This means that if a null modem cable is
connected to a computer, the transmission from Pin 3 and the reception from Pin 2 are reversed.
On the Y-Cable, all ends should be male connectors.
Figure 15-3 shows the Y-Cable connections.
Figure 15-3. The Y-Cable Connections picture
15.1.1.4 PLC Board
The PLC board is the communications hub for the turnstile. The board is primarily used in the turnstiles and is
produced by Ideal Software Systems, Inc.
The PLC board is mounted inside the top of the turnstile so it is easily accessible by technicians. The addresses
© 1997 - 2005 Ideal Software Systems, Inc.
Chapter 15 - Access Control Manager (ACM) and Turnstiles
611
for the PLC boards are determined by the letter that appears on the EPROM chip. All of Ideal Software System's
PLC boards are pre-programmed before being shipped out.
Below is an explanation about the PLC board connection configuration. Also, Figure 15-4 provides an
illustration if the PLC board.
Figure 15-4. The PLC board connection configuration picture
Both the scanner and the modem connections are a 4 pin connector leading into a 9 pin serial connection. The
Relay connection is a 4 pin connector but only has two wires running off of it. The first wire leading off of Pin 1
runs down to the main Tomsed board to connection to L. Pin 2 has a wire that runs down to the main Tomsed
board to connection to C.
TIP: Once all connections are setup on the board, the L and C connectors can
be jumpered together and cause the turnstile to open.
The Rotary Switch is a 4 pin connector that only has two wires. Pin 2 and Pin 4 run to the Relay switch. The last
connector is the Power connection. This is only a 3 pin connector. Pin 1 runs to the C connector on the Tomsed
board, and Pin 2 runs to the B connector also on the Tomsed board. A multi meter reading off of this should
read 24 Volts. Anything much higher or lower will cause the board not to work.
The PLC board in a turnstile is in a small green box as seen in Figure 15-5. This is the Tomsed PLC board. The
Tomsed PLC board's address is determined by the wiring.
© 1997 - 2005 Ideal Software Systems, Inc.
612
Point of Sale
Figure 15-5. The Tomsed PLC board box picture
1.
Make sure the PLC board in the turnstile location set up for scanner A is wired to receive 0 as a valid
signal. This means that X0, X1, and X2 are not wired to anything.
2.
Set it so the PLC board in the turnstile location has scanner B setup to that it is wired to receive 1 as a
valid signal. This means that X0 is wired to C.
3.
Set the PLC board in the turnstile so that the location setup for scanner C is wired to receive 2 as a
valid signal. This means that X1 is wired to C.
4.
Set it so the PLC board in the turnstile location so that the setup for scanner D is wired to receive 3 as a
valid signal. This means that X0 and X1 are wired to C.
5.
Make sure the PLC board in the turnstile location has the setup for scanner E wired to receive 4 as a
valid signal. This means that X2 is wired to C.
One of the main differences between the Ideal PLC board and the Tomsed PLC board is the Tomsed board is
unable to send a signal back to the ACM once a customer has passed through the turnstile. The Tomsed's are in
few turnstiles and are being replaced with Ideal PLC.
15.1.1.5 Solenoid
A solenoid is a specially designed electromagnet that works as explained below.
When current flows through a wire, a magnetic field is set up around the wire. Coiling a wire for many turns
makes this magnetic field becomes many times stronger as it flows around and through the center of the coils'
center in a doughnut shape. Although this magnetic field will flow in air, it flows much more easily through iron
or steel. An iron path or "C" stack around the coil is used to concentrate the magnetism where it can be its
strongest.
An iron path, known as a plunger or "T" is added in the center of the coil so that the magnetism is concentrated
even more.
Because iron is an excellent magnetic conductor and air is a poor one, the movable iron plunger is drawn by the
magnetic field into a position where the magnetism can travel fully through the metal conductor.
A solenoid operates because the magnetism tries to reduce the high resistance air gap at the bottom of the
plunger. When the plunger is completely closed, the magnetic field flows completely through a low resistance
© 1997 - 2005 Ideal Software Systems, Inc.
Chapter 15 - Access Control Manager (ACM) and Turnstiles
613
iron path. As the plunger is pulled into the coil, the air gap under the plunger is reduced, making the magnetic
field stronger and increasing solenoid force. So as the solenoid closes, it becomes more powerful.
The current alternates from positive through zero to negative sixty times a second. The magnetic field is
strongest when the alternating current is at its positive and negative peaks. As the current goes through zero, the
magnetism and solenoid force decrease and the load forces the plunger out. When magnetism and force build up
again, the plunger is pulled back in.
The solenoid is what allows the turnstile to turn and to lock. The turnstile's solenoid is set as Normally Closed.
Normally Closed refers to how the open current runs to the solenoid causing the plunger to be engaged. An
engaged plunger locks the turnstile. The plunger is an arm in the turnstile that locks down and will not allow the
turnstile to rotate. When the signal is sent to open it, the current is alternated causing the arm or plunger to
release. This in turn allows the turnstile to rotate. If the solenoid is set as Normally Open, customers would be
able to turn the turnstile arm continuously.
In sending the signal to the turnstile the arm is allowed to turn. However, the equipment needs to be able to
determining when the arm has been turned in order to turn off the pulse being sent to rotate it. This is
accomplished by a monitoring the Rotation Reset switch. The Rotation Reset switch operates by monitoring the
rotation of the turnstile. Once it rotates, this switch will reset, and release the current running to the PLC board
and discharges the relay cables causing the solenoid to be closed again.
15.1.2
Free Wave Modem Configuration
Slave and Master modems are configured and setup by using Hyper Terminal. The following steps will walk the
user through programming Free Wave DGR-115R modems using Hyper Terminal.
1.
First, connect the Free Wave DGR-115R modem to a COM port on the computer terminal.
2.
Start Hyper-Terminal by selecting Start | Programs | Accessories.
3.
Select Communications | Hyper Terminal. The Hyper Terminal window will open.
© 1997 - 2005 Ideal Software Systems, Inc.
614
Point of Sale
Figure 15-6. The Hyper Terminal window
Select Communications | Hyper Terminal.
4.
Select File | New Connection to open the Connection Description window.
5.
Enter a name for the connection and choose an icon. Click OK.
Figure 15-7. The Connection Description window
Enter a connection name and click OK.
6.
The Connect To window will open. In the Connect using field, select the COM port that the modem is
connected to and click OK..
© 1997 - 2005 Ideal Software Systems, Inc.
Chapter 15 - Access Control Manager (ACM) and Turnstiles
615
Figure 15-8. The Connect To window
Select the correct COM port and click OK.
7.
The COM <number> Properties window will open. Enter the information given below into the fields.
Figure 15-9. The COM <number> Properties window
Enter the necessary information.
© 1997 - 2005 Ideal Software Systems, Inc.
616
Point of Sale
A.
Bits per second
The Pits per second or BAUD rate field needs to be set to 19,200 data bits.
B.
Data bits
Enter 8 for this field.
C.
Parity
No parity bit is needed.
D.
Stop bits
Only one stop bit is needed.
E.
Flow control
Set this field to Hardware.
8.
Once the correct information is entered, click OK.
9.
Press the small round rubber button on the top of the Free Wave DGR-115R modem and a Main Menu
screen should appear.
10.
The first selection is (0) or Set Operation Mode. Enter 0 and you will get several Point selections.
A.
For the modem that is going to be the Master modem or the modem connected to the Access
Control Server, enter 2 and press Enter.
B.
For the Slave modems or the modems that will be connected to the turnstiles, enter 3 and press
Enter.
11.
The Master modem will be setup as Point to Multi-Point Master while the Slave modems will be Point
to Multi-Point Slaves. Press Esc one time to go back into the Main Menu screen.
12.
Now select (1) to open Set BAUD Rate. A screen will appear listing several BAUD rates.
13.
Select number 6 to get a BAUD rate of 9600 and press Enter.
14.
Now select A for Data, Parity and press Enter.
15.
A screen will appear giving a chart of selections. For this program, select the option that sets Data Bits
to 8, Parity to None, and Stop Bits to 1. Press Enter.
16.
Now press the Esc key one time and return to the Main Menu.
17.
In the Main Menu, select (2) for Edit Call Book.
18.
For the Master modem, make sure that no numbers are listed for entries 0 through 9. If there are entries
select the appropriate Entry Number and key in seven 0's. Press Enter.
19.
Enter C for Change Entry to use 0 through 9. Key in A for all. This is on the Master unit only.
20.
For the Slave modems, make sure that the number for the Master modem appears in the entry labeled 0.
To do this, key in 0 and enter the number found on the registration plate. This is found on the modem
selected to be the Master.
21.
Edit out any other numbers found in the Call Book by entering the appropriate Entry (1 through 9) and
keying in 0's.
© 1997 - 2005 Ideal Software Systems, Inc.
Chapter 15 - Access Control Manager (ACM) and Turnstiles
617
WARNING: Do not do anything with the C selection for the Slave modems.
22.
Now press Esc and go back to the Main Menu.
23.
Select (5) for Edit Multi-Point Parameters. Ensure that the entry labeled (0) for Number Repeaters is set
to 0 on all units. If it isn't, then key in the number 0 and press Enter.
24.
Now press Esc once to get back to the Main Menu. Press Esc again to exit setup.
NOTE: The screen will still show the Main Menu but the user will be out of the
set up function.
25.
To check if communication has been established between the modems, check the lights or LED's on the
bottom of each modem.
NOTE: Once configured the modems do not have to be connected to a computer
terminal to check if communications have been established. Simply plug them in
to a power source and check the LED's.
26.
27.
15.1.3
There are three lights on the bottom of each modem. These LED's are labeled CD, TX and CTS. If a
good communications connection is present, the Master modem will have the following light
configuration:
A.
CD - Solid Red
B.
TX - Dim Red
C.
CTS - Off
The Slave modems will have the following light configuration:
A.
CD - Green
B.
TX - Off
C.
CTS - Solid Red
Board and Wire Settings for "Pinging" Purposes
This sub-section will explain how to setup the boards for pinging purposes.
NOTE: The modem requires a straight through cable male to female 9 pin null
modem adapter. <LF><CR> is required to send commands. If scanner data is
not being passed through then the board may need to be reset.
1.
Hyper Terminal commands for a C board.
A.
Sending a C2 = Ping C2 is returned
i.
Point of Sale will constantly ping the board (C2) to ensure that the connection is
established.
© 1997 - 2005 Ideal Software Systems, Inc.
618
Point of Sale
2.
3.
15.1.4
B.
Sending a C1 = turnstile turned
C.
Sending a C0 = Open turnstile
Examples for Wire Colors
A.
Yellow and Blue - turnstile has turned, normally closed, connected to P206
B.
Brown and Orange - Release turnstile, connected to P202 on board
C.
Green and Red - Input from scanner, connected to DB9 for scanner pass through
Hyper Terminal commands for an A board:
A.
Sending an A2 = Ping A2 is returned
B.
Sending an A1 = This is sent by separating the wires from the rotary switch
C.
Twist the rotary switch wires back together and send an A0 = This should drop the continuity
to zero until the wires are separated again
Setting Up Turnstyle Scanners
The information in this sub-section explains how to correctly setup a Symbol LS9100 Omni Directional scanner
for a turnstile to be used with the Access Points in the Point of Sale software.
1.
Each scanner will be assigned a prefix by the user (A, B, C, etc.) and each prefix will have a setup
sheets for the scanners. The correct setup for a scanner with a prefix of A can be found in this section.
2.
Scan each of the following barcodes on the scanner setup sheet:
A.
Pg # 5- 1 Set All Defaults
B.
Pg # 5-149 Scan Prefix
C.
Pg # 5-161 1
D.
Pg # 5-160 0
E.
Pg # 5-166 6
F.
Pg # 5-165 5
G.
Pg # 5-156 ENTER
H.
Pg # 5-6 Standard RS-232C
I.
Pg# 5-20 EVEN
J.
Pg # 5-151 Scan Options
K.
Pg #5-155 <Prefix> <Data> <Suffix>
L.
Pg # 5-156 Enter
© 1997 - 2005 Ideal Software Systems, Inc.
Chapter 15 - Access Control Manager (ACM) and Turnstiles
3.
619
By scanning these barcodes, any information that the scanner outputs will begin with an A, letting the
ACM know that the information is coming from the turnstile with scanner A.
NOTE: Any scanner setup with prefix B will have output starting with B. Any
scanner setup using prefix C will have all output begin with a C. Etc. The cable
for the scanner is the model 25-11490-01, RS 232 TXD PIN2 cable.
15.1.5
How PLC Handles a Scanned Access Ticket
The following process is an explanation of how the PLC board handles a scanned Access Ticket in the Point of
Sale system.
1.
Make sure that an Access Ticket is scanned.
2.
Once scanned, the scanner will transmit the Access Ticket's information, along with the scanner's prefix,
to the PLC board.
3.
The PLC board routes the data to the attached Slave modem.
4.
The Slave modem transmits the information wirelessly to the Master modem.
5.
The ACM will acknowledge the information once it is received. The ACM then checks to ensure that
the ticket scanned is valid.
6.
If the ticket is valid, the ACM looks up the address of the turnstile based on the scanner's prefix and
sends a command of A0 (if the address is A, B0 is the address is B, etc.) to the turnstile.
7.
The Slave modem receives a signal and routes it to the PLC board.
8.
The PLC board sends a signal to the Rotary Switch, which then begins to charge.
9.
The Rotary Switch sends the charge through to the Relay causing the turnstile to open.
NOTE: The Rotary Switch controls the Relay. Whenever the Rotary Switch is
charged, the current is passed on to the Relay.
10.
The customer passes through the turnstile causing the Rotary Switch to discharge. As a result the Relay
discharges, causing the turnstile to lock.
11.
The command A1 is sent to the modem, which is then sent to the ACM.
12.
The ACM receives the A1 command, making it aware that the customer has passed through the
turnstile.
© 1997 - 2005 Ideal Software Systems, Inc.
620
Point of Sale
15.2 Access Tickets
Instructions for setting up access tickets
This section contains explanations about setting up and configuring the
access tickets and servers in the Point of Sale system. This section contains
the following topics:
•
•
•
•
•
•
•
•
•
•
•
15.2.1
"About Access Tickets"
"Setting Up Access Server Locations"
"Editing Access Server Locations"
"Setting Up the Ideal Access Server"
"Create Access Ticket Inventory Items"
"Creating Season Pass Inventory Items"
"Creating Entitlements"
"Editing Entitlements"
"Removing Entitlements"
"View Access Ticket History"
"Redeeming Access Items"
About Access Tickets
The objective of this MVP Access Ticket feature is to allow MVP and non-MVP customers to purchase
packages that contain rides and merchandise automatically redeemable at any turnstile or Front POS station
throughout the family entertainment center. For example, an access control ticket may contain a pizza, large soft
drink, and a game of golf. The food items will be redeemed at a Front POS station. The employees will be able
to scan a ticket and choose from an available list of items on the ticket. Also, the customer can perform
automated turnstile redemption. Turnstiles outfitted with barcode scanners can read the customer's ticket and
allow the customer to pass through the turnstile upon approval. A turnstile server will monitor any and all
turnstile activity approving customer's ticket requests. Point of Sale will automatically deduct the activity from
the account when it is used, keeping a history of account activity. For more information on creating Access
Ticket items in Point of Sale, refer to sub-section "Create Access Ticket Inventory Items".
A separate program built into ACM monitors the scanners located at all turnstiles. This module monitors the
input from the scanners located at the turnstiles and then sends a signal back to the electronic turnstiles to enable
access to a given venue if allowed. Scanners are programmed to send a number to the program to indicate what
venue location the data is being sent from. Output (allow or deny) is sent to the turnstiles for attractions or back
to the scanner in the form of deny or accept information. This information is interpreted in a series of beeps or
sounds. If the scan is accepted, the monitor program will update the necessary ticket's "life". Ideal Point of Sale
administration has the ability to report on ticket usage, change status, and ticket view. Viewing the status of a
ticket, what value is used and not used, is viewable at each of the Front POS stations. For more information on
turnstiles and their setup refer to the previous section "Installing Turnstiles".
15.2.2
Setting Up Access Server Locations
This sub-section explains how to setup the Access Server Locations where Access Tickets will be accepted for
the Point of Sale system.
© 1997 - 2005 Ideal Software Systems, Inc.
Chapter 15 - Access Control Manager (ACM) and Turnstiles
NOTE: The Point of Sale Access Control module must be turned on in order to
use the Access Sever. For more information on acquiring the Access Control
module, contact Ideal Software Systems, Inc.
1.
Make sure that the Point of Sale menu is visible at the Ideal FEC Back Office Suite screen.
2.
Select Maintenance | Access Server.
Figure 15-10. The Ideal FEC Back Office Suite Maintenance menu's Access Server
Select Maintenance | Access Server.
3.
The Access Server Locations window will open. Click Add New.
© 1997 - 2005 Ideal Software Systems, Inc.
621
622
Point of Sale
Figure 15-11. The Access Server Locations window
Click Add New.
4.
The Access Server Setup window will open. Enter the necessary information.
Figure 15-12. The Access Server Setup window
Enter the necessary information.
© 1997 - 2005 Ideal Software Systems, Inc.
Chapter 15 - Access Control Manager (ACM) and Turnstiles
623
A.
Access location description
Enter a descriptive name for the access location.
B.
COM Port
Click the down arrow and select a comport that the Master modem is connected to.
C.
Scanner Prefix
Enter the letter that will serve as the scanner prefix (A, B, C, etc.)
D.
Turnstile Address
Enter the assigned address of the turnstile.
E.
Server ID
Enter an ID for the Access Server (1, 2, 3, etc.)
F.
Active
The Active option is checked by default, which means the Access Server being set up is going
to be active.
G.
Add Item
Click this to open the Select Inventory Item window. Select any inventory items that need to
be accepted by the Access Server and click OK.
NOTE: An Access location description must be entered before the Add Item
button is clicked. Otherwise, an error will be returned.
Figure 5-13. The Select Inventory Item window with the Normal item filter selected
Select inventory and click OK.
NOTE: Items selected cannot by of types Coupon, Resource, Access Ticket,
Season Pass, or Package. Otherwise an error will be returned.
© 1997 - 2005 Ideal Software Systems, Inc.
624
Point of Sale
H.
Remove Item
If an item was added to list that doesn't need to be there, select the item and click Remove.
i.
When an item is selected to be taken off the list and Remove is clicked, the Point of
Sale system will prompt the user if the item needs to be removed. Click Yes.
Figure 5-14. The Confirm window
Click Yes.
5.
15.2.3
Click Save to add the new Access Server. The name of the Access Server Location will appear in the
Access Server Locations window. Click Close.
Editing Access Server Locations
This sub-section explains how to edit the Access Server Locations where Access Tickets will be accepted for the
Point of Sale system.
NOTE: The Point of Sale Access Control module must be turned on in order to
use the Access Sever. For more information on acquiring the Access Control
module, contact Ideal Software Systems, Inc.
15.2.4
1.
Make sure that the Point of Sale menu is visible at the Ideal FEC Back Office Suite screen.
2.
Select Maintenance | Access Server (Figure 15-10).
3.
The Access Server Locations window will open (Figure 15-11). Select a location and click Select.
4.
The Access Server Setup window will open (Figure 15-12). Make any necessary changes to the
information.
5.
Click Save to add the changes to the Access Server. Click Close in the Access Server Locations
window to close it.
Setting Up the Ideal Access Server
This sub-section explains how to setup the Access Server for the Point of Sale system.
© 1997 - 2005 Ideal Software Systems, Inc.
Chapter 15 - Access Control Manager (ACM) and Turnstiles
625
NOTE: The Point of Sale Access Control module must be turned on in order to
use the Access Sever. For more information on acquiring the Access Control
module, contact Ideal Software Systems, Inc. Access Server Locations must
have been previously setup before the properties of the actual Access Server can
be entered. For more information on setting up the Access Server, refer to subsection "Setting up Access Server Locations".
WARNING: The Access Control Manager must be running at all times in order
for the Access Locations and the turnstiles to communicate with the Point of
Sale. If the Access Server is not running, then the ACM module will not function
at all.
1.
Double-click the Access Control Server icon. The Access Server Log window will open.
Figure 15-15. The Access Server Log window
Open the Access Control Server.
2.
Enter the necessary information about the Access Server.
A.
Status Log
This window keeps track of all the activity for the Access Server. A sample entry is shown in
Figure 5-15.
B.
Server ID Number
Assign an ID number of one of the previously created Access Server Locations.
© 1997 - 2005 Ideal Software Systems, Inc.
626
Point of Sale
NOTE: An Access Server Location must have been created and assigned an ID
number before the Server ID Number field can be completed correctly.
C.
3.
15.2.5
Active Serial Port
i.
COM 1
Choose COM 1 if the modem is attached to this port.
ii.
COM 2
Choose COM 2 if the modem is attached to this port.
iii.
COM 3
Choose COM 3 if the modem is attached to this port.
iv.
COM 4
Choose COM 4 if the modem is attached to this port.
v.
COM 5
Choose COM 5 if the modem is attached to this port.
vi.
COM 6
Choose COM 6 if the modem is attached to this port.
vii.
COM 7
Choose COM 7 if the modem is attached to this port.
viii.
COM 8
Choose COM 8 if the modem is attached to this port.
D.
Confirm all mode
Confirm that all Access Locations will be communicating with the Access Server.
E.
Don't Update Database
Check this option so that no inventory counts will be updated on the server.
F.
Record Log to File
Select this option to keep track of all logs inside a text file.
G.
Detail Port Data
Select this option to keep track of all COM port data in the log.
H.
Clear Log
Click this to empty the Status Log window of all current logs.
Leave this module running on the server in the background in order for the ACM program to function.
Create Access Ticket Inventory Items
This sub-section explains how to create an Access Ticket inventory item that can be used with the Access Server
in the Point of Sale system.
© 1997 - 2005 Ideal Software Systems, Inc.
Chapter 15 - Access Control Manager (ACM) and Turnstiles
627
NOTE: It is important that inventory, categories, sub-categories, tax tables, unit
types, locations, and vendors be setup before any inventory items are made. This
will save a lot of time in setting up the Point of Sale system. Refer to Chapter 3
for more details. The Point of Sale Access Control module must be turned on in
order to use the Access Sever. For more information on acquiring the Access
Control module, contact Ideal Software Systems, Inc.
1.
Make sure that the Point of Sale menu is visible at the Ideal FEC Back Office Suite screen.
2.
Select Inventory | Create Inventory.
Figure 15-16. The Ideal FEC Back Office Suite Inventory menu's Create Inventory
Select Inventory | Create Inventory.
3.
The Create New Inventory Item window will open. Make sure that Access Ticket is selected under
Item Type.
© 1997 - 2005 Ideal Software Systems, Inc.
628
Point of Sale
Figure 15-17. The Create New Inventory Item window with Access Ticket Item Type selected
Make sure Access Type is selected under Item Type.
4.
Enter the information for the Access Ticket inventory item.
A.
Item Number
Enter a number for this inventory item.
i.
Auto-Assign Inventory Number
Check this option if the inventory item is to be assigned a number by the Point of Sale
system.
TIP: The Auto-Assign Inventory Number option is checked by default. It is
recommended that each category gets its own range of inventory numbers. (Food
= 1 to 999, Golf = 1000 to 1999, etc.) This will make managing hundreds of
inventory items simpler.
B.
Retail Sale Price
Enter how much the item will be sold for.
C.
Description
Enter a name for the inventory item.
TIP: The Description for an inventory should be unique to that item. This will
make searching for items easier than depending on searching for them by their
unique item number.
D.
Category
Click the drop down arrow to select a category for the item.
E.
Sub-Category
If the item needs a sub-category, click the drop down arrow to select one.
© 1997 - 2005 Ideal Software Systems, Inc.
Chapter 15 - Access Control Manager (ACM) and Turnstiles
F.
Tax Type
Click the drop down arrow and select a tax type.
G.
Vendor
If the inventory item has a vendor, click the drop down arrow and select one.
H.
Barcode
If barcodes are used, enter the barcode number of the item.
629
TIP: If the item already has a barcode, the user may scan the barcode on the item
while the cursor is in the Barcode field of the inventory item and input the item's
original barcode into the system. The original barcode will now be recognized by
the system as that inventory item whenever scanned.
I.
Right Level Required
Enter a number 0 through 5 of the right level required by the employee to sell the inventory
item.
NOTE: If a number other than 0 through 5 is entered in the Right Level
Required field then an error will result. To change an employee rights level so
that they can sell items with a level higher than 0, refer back to Chapter 2 section
"Entering Employees and Employee Groups".
J.
Setup Access Ticket
Click this to open the Edit Access Items window.
© 1997 - 2005 Ideal Software Systems, Inc.
630
Point of Sale
Figure 15-18. The Edit Access Items window
Click Setup Access Ticket to open the Edit Access Items window.
NOTE: Upon clicking Setup Access Ticket, the item will be automatically saved
and assigned a number.
i.
Add Item
Click this button to open the Select Inventory Item window.
a.
Select an inventory item to add to the Access Ticket and click OK.
NOTE: Multiple inventory items can be added to a single Access Ticket item.
ii.
Delete Item
If an item gets selected that doesn't need to be in the Access Ticket, select the item
and click Delete Item to remove it.
iii.
Modify
Select an inventory item and click Modify to open the Access Detail Item window.
© 1997 - 2005 Ideal Software Systems, Inc.
Chapter 15 - Access Control Manager (ACM) and Turnstiles
631
Figure 15-19. The Access Detail Item window
Click Modify to open the Access Detail Item window.
a.
Time Limit
Check this option if the Access Ticket item can only be used for a certain
amount of time.
b.
Hours:Minutes
If Time Limit is checked, fill out this field with the amount of time that the
item on the Access Ticket will be usable.
c.
Start Access Timer
If the Time Limit option is selected, there are two options when the Access
Ticket timer can begin: 1) after the Access Ticket is first used and 2) after
the Access Ticket is purchased.
d.
Minimum Usage Qty
Enter a minimum number of times the item can be used.
e.
Set Quantity
If there is no time limit but there is a limit on the number of times the Access
Ticket item can be used, select this option. The Set Quantity option is
selected by default.
f.
Enter Quantity
© 1997 - 2005 Ideal Software Systems, Inc.
632
Point of Sale
If the Set Quantity option is selected, then enter the maximum amount the
Access Ticket item can be used in this field.
K.
Service Printer (Figure 3-53)
i.
Service Printer 1
Select this option to print to a printer recognized as Service Printer 1.
ii.
Service Printer 2
Select this option to print to a printer recognized as Service Printer 2.
iii.
Service Printer 3
Select this option to print to a printer recognized as Service Printer 3.
iv.
Service Printer 4
Select this option to print to a printer recognized as Service Printer 4.
NOTE: A service printer must be networked into the Ideal system network and
setup under the printer properties in the Point of Sale program in order for
inventory item information to be printed to a kitchen or service printer.
L.
Item Script (Figure 3-54)
i.
Script Filename
Select a script that will be printed upon the item's purchase (if the item requires that
something be printed other than the receipt.)
NOTE: The script chosen will be printed in addition to any other ticket,
wristband, or score card.
ii.
Print Location
a.
None
The select script will not be printed upon the item's purchase.
b.
Ticket Printer
The script will be printed to a designated ticket printer upon the sale of the
item.
c.
Wristband Printer
The script will print on a wristband when the item is sold.
d.
Receipt Printer
The script will print on the receipt printer local to the terminal when the item
is purchased.
e.
Golf Scorecard Printer
The script will print on a scorecard.
iii.
Script
Click the down arrow and select a item script to use.
iv.
Create
Click this button to create a item script.
v.
Edit
© 1997 - 2005 Ideal Software Systems, Inc.
Chapter 15 - Access Control Manager (ACM) and Turnstiles
633
Edit a script in the default word processor.
NOTE: For further information on creating and editing scripts, refer to the "Item
Scripts" section.
M.
Discounts
This tab (Figure 3-100) will display any discounts that have been applied to the item. Also,
Price Schedule is on this tab. Refer to sub-section "Adding a Price Schedule".
N.
Coupon Info (Figure 3-57)
In order for a cashier to scan a coupon provided by a customer, Point of Sale will require that
the customer's order contain the inventory item that the coupon is linked to in this tab.
i.
O.
Setup Required Items
Click this button to open the Inventory Required in Order window (Figure 3-58).
a.
Add Item
Click this button to open the Select Inventory Item window (Figure 3-59).
Select an item required for the coupon and click OK.
b.
Remove Item
Select and item to be removed from the required item for coupon list and
click this button to remove it.
Order/Stocking Rules (Figure 3-101)
Do not use this tab.
5.
Click OK once the item is finished. The debit card value will now be saved in the Point of Sale system.
6.
The Confirm window will appear. Click Yes to create another item. Otherwise click No to return to the
Ideal FEC Back Office Suite screen.
Figure 15-20. The Confirm window
Click Yes to create another item, otherwise click No.
15.2.6
Creating Season Pass Inventory Items
This sub-section explains how to create a Season Pass inventory item to be used with the Access Server in the
Point of Sale system.
© 1997 - 2005 Ideal Software Systems, Inc.
634
Point of Sale
NOTE: It is important that inventory, categories, sub-categories, tax tables, unit
types, locations, and vendors be setup before any inventory items are made. This
will save a lot of time in setting up the Point of Sale system. Refer to Chapter 3
for more details. The Point of Sale Access Control module must be turned on in
order to use the Access Sever. For more information on acquiring the Access
Control module, contact Ideal Software Systems, Inc.
1.
Make sure that the Point of Sale menu is visible at the Ideal FEC Back Office Suite screen.
2.
Select Inventory | Create Inventory (Figure 15-16).
3.
The Create New Inventory Item window will open. Make sure that Season Pass is selected under
Item Type.
Figure 15-21. The Create New Inventory Item window with Season Pass Item Type selected
Make sure Season Pass is selected under Item Type.
4.
Enter the information for the Season Pass inventory item.
A.
Item Number
Enter a number for this inventory item.
i.
Auto-Assign Inventory Number
Check this option if the inventory item is to be assigned a number by the Point of Sale
system.
TIP: The Auto-Assign Inventory Number option is checked by default. It is
recommended that each category gets its own range of inventory numbers. (Food
= 1 to 999, Golf = 1000 to 1999, etc.) This will make managing hundreds of
inventory items simpler.
B.
Retail Sale Price
© 1997 - 2005 Ideal Software Systems, Inc.
Chapter 15 - Access Control Manager (ACM) and Turnstiles
635
Enter how much the item will be sold for.
C.
Description
Enter the name of the inventory item.
TIP: The Description for an inventory should be unique to that item. This will
make searching for items easier than depending on searching for them by their
unique item number.
D.
Category
Click the drop down arrow to select a category for the item.
E.
Sub-Category
If the item needs a sub-category, click the drop down arrow and select one.
F.
Tax Type
Click the drop down arrow and select a tax type.
G.
Vendor
If the inventory item has a vendor, click the drop down arrow and select one.
H.
Barcode
If barcodes are used, enter the barcode number of the item.
TIP: If the item already has a barcode, the user may scan the barcode on the item
while the cursor is in the Barcode field of the inventory item and input the item's
original barcode into the system. The original barcode will now be recognized by
the system as that inventory item whenever scanned.
I.
Right Level Required
Enter a number 0 through 5 of the right level required by the employee to sell the inventory
item.
NOTE: If a number other than 0 through 5 is entered in the Right Level
Required field then an error will result. To change an employee rights level so
that they can sell items with a level higher than 0, refer back to Chapter 2 section
"Entering Employees and Employee Groups".
J.
Setup Access Ticket
Click this button to open the Edit Access Items window (Figure 15-18).
NOTE: Upon clicking Setup Access Ticket, the item will be automatically saved
and assigned a number.
i.
Add Item
Click this button to open the Select Inventory Item window.
a.
Select an inventory item to add to the Access Ticket and click OK.
NOTE: Multiple inventory items can be added to a single Access Ticket item.
ii.
Delete Item
If an item gets selected that doesn't need to be in the Access Ticket, select the item
and click Delete Item to remove it.
© 1997 - 2005 Ideal Software Systems, Inc.
636
Point of Sale
iii.
Modify
Select an inventory item and click Modify to open the Access Detail Item window.
a.
Time Limit
Check this option if the Access Ticket item can only be used for a certain
amount of time.
b.
Hours:Minutes
If Time Limit is checked, fill out this field with the amount of time that the
item on the Access Ticket will be usable.
c.
Start Access Timer
If the Time Limit option is selected, there are two options when the Access
Ticket timer can begin: 1) after the Access Ticket is first used and 2) after
the Access Ticket is purchased.
d.
Minimum Usage Qty
Enter a minimum number of times the item can be used.
e.
Set Quantity
If there is no time limit but there is a limit on the number of times the Access
Ticket item can be used, select this option.
TIP: The Set Quantity option is selected by default.
f.
L.
Enter Quantity
If the Set Quantity option is selected, then enter the maximum amount the
Access Ticket item can be used in this field.
Service Printer (Figure 3-53)
i.
Service Printer 1
Select this option to print to a printer recognized as Service Printer 1.
ii.
Service Printer 2
Select this option to print to a printer recognized as Service Printer 2.
iii.
Service Printer 3
Select this option to print to a printer recognized as Service Printer 3.
iv.
Service Printer 4
Select this option to print to a printer recognized as Service Printer 4.
NOTE: A service printer must be networked into the Ideal system network and
setup under the printer properties in the Point of Sale program in order for
inventory item information to be printed to a kitchen or service printer.
M.
Item Script (Figure 3-54)
i.
Script Filename
Select a script that will be printed upon the item's purchase (if the item requires that
something be printed other than the receipt.)
© 1997 - 2005 Ideal Software Systems, Inc.
Chapter 15 - Access Control Manager (ACM) and Turnstiles
637
NOTE: The script chosen will be printed in addition to any other ticket,
wristband, or score card.
ii.
Print Location
a.
None
The select script will not be printed upon the item's purchase.
b.
Ticket Printer
The script will be printed to a designated ticket printer upon the sale of the
item.
c.
Wristband Printer
The script will print on a wristband when the item is sold.
d.
Receipt Printer
The script will print on the receipt printer local to the terminal when the item
is purchased.
e.
Golf Scorecard Printer
The script will print on a scorecard.
iii.
Browse
Browse for an item script to print.
iv.
Edit
Edit a script in the default word processor.
v.
Print
Print a sample of the ticket script.
NOTE: In order to print a sample of the script, a print location must be chosen.
N.
Discounts
This tab (Figure 3-100) will display any discounts that have been applied to the item. Also,
Price Schedule is on this tab. Refer to sub-section "Adding a Price Schedule".
O.
Coupon Info (Figure 3-57)
In order for a cashier to scan a coupon provided by a customer, Point of Sale will require that
the customer's order contain the inventory item that the coupon is linked to in this tab.
i.
P.
Setup Required Items
Click this button to open the Inventory Required in Order window (Figure 3-58).
a.
Add Item
Click this button to open the Select Inventory Item window (Figure 3-59).
Select an item required for the coupon and click OK.
b.
Remove Item
Select and item to be removed from the required item for coupon list and
click this button to remove it.
Season Pass
© 1997 - 2005 Ideal Software Systems, Inc.
638
Point of Sale
Figure 15-22. TheSeason Pass tab
Click on the Season Pass tab.
i.
ii.
Q.
How will the season pass expire
The user will have two options to choose from for how the season pass will expire.
a.
Season pass will expire in ____ days from the purchase date.
Select this option and enter a number of days that the season pass will expire
in (the starting date being the purchase date).
b.
Season pass will expire on a set date.
Select this option and select an exact date that the season pass will expire
regardless of when purchased.
Discount Given
If a discount has been created and can be applied to this item, click the drop down
arrow and select that discount.
Order/Stocking Rules (Figure 3-101)
Do not use this tab.
NOTE: A discount must have been created before one can be created. For more
information on creating a discount, goto the "Discounts" section in Chapter 3.
5.
Click OK once the item is finished. The item will now be saved in the Point of Sale system.
6.
The Confirm window will appear. Click Yes to create another item, otherwise click No to return to the
Ideal FEC Back Office Suite screen.
15.2.7
Creating Entitlements
This sub-section explains how to create entitlements for access ticket and season pass items in the Point of Sale
system.
1.
Make sure that the Point of Sale menu is visible at the Ideal FEC Back Office Suite screen.
2.
Select Inventory | Edit Inventory.
© 1997 - 2005 Ideal Software Systems, Inc.
Chapter 15 - Access Control Manager (ACM) and Turnstiles
639
Figure 15-23. The Ideal FEC Back Office Suite Inventory menu's Edit Inventory
Select Inventory | Edit Inventory.
3.
The Select Inventory Item window will open. Select an access ticket or season pass item and click
OK.
Figure 15-24. The Select Inventory Item window
Select an access ticket or season pass item and click OK.
4.
The Edit Inventory window will open showing all the item information currently entered. Click Setup
Access Ticket.
© 1997 - 2005 Ideal Software Systems, Inc.
640
Point of Sale
5.
The Edit Access Items window (Figure 15-18) will open. Click Entitlements.
6.
The Entitlements window will open. Click Add.
Figure 15-25. The Entitlements window
Click Add.
7.
The Entitlement sub-window will open. Enter the number of the entitlement and click OK.
Figure 15-26. The Entitlement sub-window
Enter the number for the entitlement and click OK.
8
15.2.8
The entitlement will be entered into the system.
Editing Entitlements
This sub-section explains how to edit entitlements for access ticket and season pass items in the Point of Sale
system.
1.
Make sure that the Point of Sale menu is visible at the Ideal FEC Back Office Suite screen.
2.
Select Inventory | Edit Inventory (Figure 15-23).
© 1997 - 2005 Ideal Software Systems, Inc.
Chapter 15 - Access Control Manager (ACM) and Turnstiles
641
3.
The Select Inventory Item window (Figure 15-24) will open. Select an access ticket or season pass
item and click OK.
4.
The Edit Inventory window will open showing all the item information currently entered. Click Setup
Access Ticket.
5.
The Edit Access Items window (Figure 15-18) will open. Click Entitlements.
6.
The Entitlements (Figure 15-25) window will open. Select the entitlement to edit and click Edit.
7.
The Entitlement window will open. Enter the necessary information.
Figure 15-27. The Entitlement window
Enter the necessary information.
8
15.2.9
A.
Access Type
Click the down arrow and select the type of access allowed for the entitlement.
B.
Quantity
If the Access Type is a quantity, enter a quantity for the entitlement. Otherwise, this field is
obsolete.
C.
Time
If time play is selected in the Access Type field, then enter the amount of time, in minutes, for
the entitlement. If time play is not selected, this field is obsolete.
D.
Allocation
Enter the percentage to be allocated back to the ICS card for the entitlement.
Once the changes have been entered, click OK. The entitlement will be modified.
Removing Entitlements
This sub-section explains how to remove entitlements from access ticket and season pass items in the Point of
Sale system.
1.
Make sure that the Point of Sale menu is visible at the Ideal FEC Back Office Suite screen.
© 1997 - 2005 Ideal Software Systems, Inc.
642
Point of Sale
2.
Select Inventory | Edit Inventory (Figure 15-23).
3.
The Select Inventory Item window (Figure 15-24) will open. Select an access ticket or season pass
item and click OK.
4.
The Edit Inventory window will open showing all the item information currently entered. Click Setup
Access Ticket.
5.
The Edit Access Items window (Figure 15-18) will open. Click Entitlements.
6.
The Entitlements (Figure 15-25) window will open. Select the entitlement to delete and click Remvoe.
7.
The Confirm window will open. Click Yes.
Figure 15-28. The Confirm window
Click Yes.
8
The entitlement will be removed.
15.2.10 View Access Ticket History
This sub-section explains how the user can use the Front POS module to view a customer's Access Ticket
history.
NOTE: The Point of Sale Access Control module must be turned on in order to
use the Access Sever. For more information on acquiring the Access Control
module, contact Ideal Software Systems, Inc.
1.
Login to the Front POS module and enter the Sales screen.
2.
Click Functions. Enter an Employee ID and PIN Number that will allow access to the Manager Menu.
© 1997 - 2005 Ideal Software Systems, Inc.
Chapter 15 - Access Control Manager (ACM) and Turnstiles
643
Figure 15-29. The Employee ID and PIN Required window
Enter an Employee ID and PIN Number.
3.
Once the login and password are entered the Manager Menu window will open. Click Ticket History.
© 1997 - 2005 Ideal Software Systems, Inc.
644
Point of Sale
Figure 15-30. The Manager Menu window
Click Ticket History.
4.
When the Choose Access Item window opens, either use the keypad or type in the number of the
Access Ticket that needs to have its history reviewed.
© 1997 - 2005 Ideal Software Systems, Inc.
Chapter 15 - Access Control Manager (ACM) and Turnstiles
Figure 15-31. The Choose Access Item window
Enter a number in the Ticket Number field.
5.
At this point, the user can either print the history for the ticket on the receipt printer or close the
window.
15.2.11 Redeeming Access Items
Please contact Ideal Software for more information on how to redeem Access Tickets at a terminal.
© 1997 - 2005 Ideal Software Systems, Inc.
645
646
Point of Sale
Chapter 16 - Customer, Facility, and Event
Scheduler Reports
16.1 Customer Reports
Instructions for using the Customer Reports
This section contains explanations about and printing procedures for the
Customer Reports in the Point of Sale system. This section contains the
following topics:
• "Customer Detail Report"
• "Customer Detail Report Explanation"
• "Using the Customer Detail Report"
• "Open Invoices Report"
• "Open Invoices Report Explanation"
• "Using the Open Invoices Report"
16.1.1
Customer Detail Report
16.1.1.1 Customer Detail Report Explanation
The Customer Detail Report gives a brief summary of every customer, including children, and gives information
on their current credit status.
Cust No. - This is the number of the customer in the Point of Sale system.
Name - This is the last then first name of the customer.
City - This is city the customer lives in.
State - This is the home state for the customer.
Zip - This is the customer's postal zip code.
Home Phone - This is the customer's home phone number.
Work Phone - This is the customer's work phone.
Credit Balance - Perhaps the most important field in this report, this column displays the customer's current
credit balance for the family entertainment center in the Point of Sale software.
16.1.1.2 Using the Customer Detail Report
This sub-section explains how to run the Customer Detail Report in the Point of Sale system.
© 1997 - 2005 Ideal Software Systems, Inc.
Chapter 16 - Customer, Facility, and Event Scheduler Reports
647
NOTE: The user must have rights to view reports in order to follow these
instructions. Refer to Chapter 2 section "Entering Employees and Employee
Groups" for more details.
1.
Make sure that the Facility menu is visible at the Ideal FEC Back Office Suite screen by clicking
Facility.
2.
Select Customers | Customer Detail Report.
Figure 16-1. The Ideal FEC Back Office Suite Customers menu's Customer Detail Report
Select Customers | Customer Detail Report.
3.
The user will be prompted to enter date information in the Date Range for Customer History window.
Figure 16-2. The Date Range for Customer History window
Enter the necessary information.
A.
Start Date
If the Show Activity Detail option is checked, enter a start date for the customer information
to be displayed on the Customer Detail Report.
© 1997 - 2005 Ideal Software Systems, Inc.
648
Point of Sale
B.
End Date
If the Show Activity Detail option is checked, enter an end date for the customer information
to be displayed on the Customer Detail Report.
4.
Once the date information has been selected, click OK.
5.
The Print Preview window will open showing the report. To print this report, click
6.
The Print window will appear. Select the printer to print to and click OK.
16.1.2
.
Open Invoices Report
16.1.2.1 Open Invoices Report Explanation
This report is very important as it tracks currently owed balances for all customers and employees. The Open
Invoices Report even goes as far as to show the age of all currently owed balances.
Last Name - This is the last name of the customer.
First Name - This is the first name of the customer.
Address - This column displays the full address for the customer.
Work Phone - The customer's work phone is in this column.
Home Phone - This column has the customer's home phone number.
Amount - This column contains the amount for all open invoices for each customer on the report.
Balance Owed - This column displays the amount still owed on the invoice. This amount must be equal to or
less than the Amount field. This column is the amount of money the customer must pay to clear their
balance with the store or business.
Age Days - This field shows how old each open invoice is in days. There is no limit to how long an open invoice
can remain on this report.
16.1.2.2 Using the Open Invoices Report
This sub-section explains how to run the Open Invoices Report in the Point of Sale system.
NOTE: The user must have rights to view reports in order to follow these
instructions. Refer to Chapter 2 section "Entering Employees and Employee
Groups" for more details.
1.
Make sure that the Facility menu is visible at the Ideal FEC Back Office Suite screen by clicking
Facility.
2.
Select Customers | Open Invoices.
© 1997 - 2005 Ideal Software Systems, Inc.
Chapter 16 - Customer, Facility, and Event Scheduler Reports
649
Figure 16-3. The Ideal FEC Back Office Suite Customers menu's Open Invoices
Select Customers | Open Invoices.
3.
The user will be prompted to enter start date information in the Report Cut-Off Date window. Fill in
the Start Date field by clicking the drop down arrow and then click OK.
Figure 16-4. The Report Cut-Off Date window
Enter the Start Date and click OK.
4.
The Search window will open. Either leave the Show All Values of the Customer Field option
checked to show all customer with open invoices or unselect the option and enter the customer number
of the invoice to view.
© 1997 - 2005 Ideal Software Systems, Inc.
650
Point of Sale
Figure 16-5. The Search window
Select the option to show all of the invoices or enter a customer number.
3.
The Print Preview window will open showing the report. To print this report, click
4.
The Print window will appear. Select the printer to print to and click OK.
.
16.2 Facility Reports
Instructions for using the Facility Reports
This section contains explanations about and printing procedures for the
Facility Reports in the Point of Sale system. This section contains the
following topics:
• "Facility Report"
• "Facility Report Explanation"
• "Using the Facility Report"
• "Labor Report"
• "Labor Report Explanation"
• "Using the Labor Report"
16.2.1
Facility Report
16.2.1.1 Facility Report Explanation
The Facility Report is designed to show a breakdown of sales, income, and deferred income for the business day.
In addition, the report includes month-to-date and year-to-date figures.
Income - This section of the report contains all figures that will be either added or subtracted from the report's
total ending value.
Sales - This figure represents the amount of taxable and non-taxable sales from the selected business day.
Included in this amount are Product Sold, Gross Box Office Sales, and less the Gift Certificate/MVP
Credit Sales amounts. This does not include the Ideal Cashless System (ICS) debit card value added
through Front POS stations' sales. This figure is reported further down the column on the Debit Card
Value @ POS field.
© 1997 - 2005 Ideal Software Systems, Inc.
Chapter 16 - Customer, Facility, and Event Scheduler Reports
651
Refunds - The total amount of refunds processed on the selected business day, this includes Products Sold and
Box Office Refunds. This only represents the Product Retail price refunded. This value does not include
any tax associated with items refunded. Tax amounts refunded are deducted from the Tax Collected
amount.
Discounts - This figure represents the amount of discounts given to customers. Dollar, percent, and typed
discounts are included in this field.
Tax Collected - The amount of tax collected for the selected business day appears here. The amount is derived
from Tax Income from Sales less Tax Deducted from Refunds and Discounts.
Tips - The amount of tips received (via credit card) that were not part of sales appear in this field. This amount is
subtracted separately from credit card charges.
Account Charges - This field contains the amount of all charges that were placed on accounts (or the customer
credit limits.)
Account Payments - The amount of payments received from customer invoices are recorded here in total.
Gift Certificate Sales - The amount of Gift Certificates/MVP Value sold for the selected day are summed in this
field.
Gift Certificates Uses - The amount of Gift Certificates/MVP Value that was actually used for the selected day
for purchases is here.
Party Deposits Applied - The amount of deposits that were applied to parties/events.
Party Deposits Received - This field has the amount of advance deposits that were received for the selected day
for parties or events.
Party Deposits Refunded - The amount for all event refunds will appear in this day for the selected business
day.
Credit Card Charges - The total amount of credit card charges processed during the selected business day
appear here. If gratuities are allowed on credit card sales, the Tips line can be added to this total to
derive the total credit card receipts for the day.
Debit Card Used @ POS - The amount of debit card value that was used at Front POS station for purchases of
products for the selected day are in this field.
Debit Card Value @ POS - The amount of cash received for value added to debit cards at the Front POS station
is added and listed here.
Value Added @ Teller - Debit card value that was purchased at a Kiosk by cash for the given business day
appears here.
Credit Card Charges @ Teller - Debit card value that was purchased at a Kiosk by credit card for the selected
day is shown here.
Cash & Checks Over/Short - This field contains the amount of Over/Short value from the individual cash
drawers turned in by employees.
Payouts - Cash that has been paid out of cash drawers, i.e. petty cash, is kept in this field.
Tab Write Off - Total of unpaid tabs that were written off is calculated in this field. This amount is included
because the sale was made and inventory was reduced or card value was given through a sale even
though no money was actually received.
© 1997 - 2005 Ideal Software Systems, Inc.
652
Point of Sale
Cash & Checks Receipts - This figure reflects what the deposit should be based on the sales and adjustments
listed above in the report. This figure is the sum of all figures listed in the Income section.
Actual Deposit - This field is a manual entry from the user. Totals of all deposit amounts are entered using the
Deposits function in the Facility menu. For more information, refer to Chapter 13 sub-section
"Depositing Money".
Deposits Difference - This is the difference in the Cash and Checks Receipts and the Actual Deposit entries.
Following is a list of reasons that there could be a positive or negative amount here:
1.
Deposit to bank entries could have been incorrectly entered.
2.
Additional cash or checks could have been included in the bank deposit.
3.
Cash could have been held out to make up petty cash or a safe balance.
4.
Kiosk or Teller Drawers were not issued and therefore their data was not reported.
Labor - This section is displayed when the TimeClock Manager software is incorporated with the Point of Sale
system. The Labor section will show all employee costs for hourly employees that clock in and out.
Customer Deposits - This section of the Facility Report displays all information customers' deposit credit
balances to be used with scheduled parties and events in the Event Scheduler module.
Beginning Balance - This field contains the total balance of party deposits that have been entered into Point of
Sale for scheduled parties or events that have not started for the selected business day.
Redeemed - This field contains the amount of deposit money that was received for the selected business day.
Applied - Amount of party of event deposits that were applied to completed parties for the selected business day
is shown here.
Ending Balance- This is the total balance of unused party or event deposits currently for the chosen business
day in Point of Sale.
Gift Certificates - This section contains a total of all outstanding, used, and unused customer gift certificate
values for the selected day.
Beginning Balance - The amount of outstanding gift certificate money and/or MVP Credit money at the
beginning of the business day is shown here.
Sold - The amount of gift certificates and/or MVP Credit value sold for the selected business day appears in this
field.
Redeemed - The amount of gift certificates and/or MVP Credit value used on the selected business day used for
purchases appears in this field..
Ending Balance - The amount of outstanding gift certificate money and/or MVP Credit money at the end of the
business day for the selected day is totalled here.
Accounts Receivable - This section of the Facility Report totals all open invoice figures, new and paid for the
selected business day.
Beginning Balance - The total amount of outstanding invoices at the beginning of the selected business day
appears here.
New Charges - This field contains the amount of charges that were placed on customer accounts (or the
© 1997 - 2005 Ideal Software Systems, Inc.
Chapter 16 - Customer, Facility, and Event Scheduler Reports
653
customer credit limits.)
Payments - The amount of payments received for customer invoices for the given business day is summed in this
field.
Ending Balance - This field is the total amount of outstanding invoices for all customers at the end of the
selected business day.
Debit Card Liability - This field sums the current amount of debit value currently outstanding.
Beginning Balance - This is the total outstanding debit card value that has not been used at Front POS stations
or at games.
Value Added @ POS - All debit value added to debit cards from a Front POS station for the given business day
is given in this field.
Value Added @ Teller - All debit card value that was added at teller or Kiosks for the given business day is
given in this field.
Value Used @ POS - The total amount of value redeemed off of a debit card at Front POS stations is summed
and displayed here.
Game Play - The total amount of value redeemed off of a debit card at any video game or any other redeemable
station is summed and displayed here.
Ending Balance - The amount of unredeemed, purchased value still on debit cards in distribution at the end of
the given business day is totalled and displayed in this field.
Category Sales - This section breaks down all sales into the specific categories created by the user.
Total - This amount is the total amount of all sales from all categories for the specified day and time frame.
Today - This column is specific to the category sales for the given business day.
MTD - This stands for Month-to-Date. This column shows the total sales for each category for the previous
month.
YTD - This stands for Year-to-Date. This column shows the total sales for each category for the previous year.
16.2.1.2 Using the Facility Report
This sub-section explains how to run the Facility Report in the Point of Sale system.
NOTE: The user must have rights to view reports in order to follow these
instructions. Refer to Chapter 2 section "Entering Employees and Employee
Groups" for more details.
1.
Make sure that the Facility menu is visible at the Ideal FEC Back Office Suite screen by clicking
Facility.
2.
Select Facility | Facility Report.
© 1997 - 2005 Ideal Software Systems, Inc.
654
Point of Sale
Figure 16-6. The Ideal FEC Back Office Suite Facility menu's Facility Report
Select Facility | Facility Report.
3.
The user will be prompted to enter a starting date for the report in the Facility Report window. Click
OK.
Figure 16-7. The Facility Report window
Enter the starting date and click OK.
16.2.2
4.
The Print Preview window will open showing the report. To print this report, click
5.
The Print window will appear. Select the printer to print to and click OK.
.
Labor Report
16.2.2.1 Labor Report Explanation
The Labor Report is very useful in comparing total sales versus total labor costs. This report breaks this
comparison down into numbers in the form of an easy to read chart and table. Sales are included from all
categories and labor costs include all job codes. The sales include products sold minus refunds and does not
account for taxes collected, discounts given, and outstanding tab orders. Labor cost is a product of hourly wages
time worked for each employee in each hour. The business times and dates may differ slightly from that of
TimeClock Plus where the figures were pulled.
Daily Totals - This section of the report is broken down into Date, Sales, and Labor Cost. This section compares
totals for sales and labor costs for the selected business days.
© 1997 - 2005 Ideal Software Systems, Inc.
Chapter 16 - Customer, Facility, and Event Scheduler Reports
655
Hourly Totals - This section of the Labor Reports contains a graph that displays facility Total Sales versus total
Labor Costs.
Hourly Sales Summary from 8am to 2pm - The labor costs for all days are totalled for each individual hour in
this table. This table also gives a labor cost versus sales percentage.
16.2.2.2 Using the Labor Report
This sub-section explains how to run the Labor Report in the Point of Sale system.
NOTE: The user must have rights to view reports in order to follow these
instructions. Refer to Chapter 2 section "Entering Employees and Employee
Groups" for more details.
1.
Make sure that the Facility menu is visible at the Ideal FEC Back Office Suite screen by clicking
Facility.
2.
Select Facility | Labor Report.
Figure 16-8. The Ideal FEC Back Office Suite Facility menu's Labor Report
Select Facility | Labor Report.
3.
The user will be prompted to enter date and filter information in the Labor Report Setup window.
© 1997 - 2005 Ideal Software Systems, Inc.
656
Point of Sale
Figure 16-9. The Facility Report window
Enter the necessary information.
A.
Date Range
i.
Start
Enter a starting date for the report to print.
ii.
End
Enter an ending date for the report to print.
B.
Retrieve From History
Select this option to retrieve from all previous labor reports.
C.
Filter Select
Select this option to filter the report by categories.
i.
Category
Select all the necessary categories to needed to filter the report.
NOTE: More than one category can be selected by pressing Ctrl and clicking.
ii.
Job Code
Enter a job code(s) to filter the report by.
NOTE: More than one job code can be entered as long as the job codes are
separated by commas (,).
4.
Once the date and filter information is entered, click OK.
5.
The Print Preview window will open showing the report. To print this report, click
6.
The Print window will appear. Select the printer to print to and click OK.
.
© 1997 - 2005 Ideal Software Systems, Inc.
Chapter 16 - Customer, Facility, and Event Scheduler Reports
657
16.3 Event Scheduler Reports
Instructions for using the Event Scheduler Reports
This section contains explanations about and printing procedures for the
Event Scheduler Reports in the Point of Sale system. This section contains
the following topics:
• "Party Planning Report"
• "Party Planning Report Explanation"
• "Using the Party Planning Report"
• "Schedule Report"
• "Schedule Report Explanation"
• "Using the Schedule Report"
• "Party Income Report"
• "Party Income Report Explanation"
• "Using the Party Income Report"
• "Outstanding Issued Tickets Report"
• "Outstanding Issued Tickets Report Explanation"
• "Using the Outstanding Issued Ticket Report"
16.3.1
Party Planning Report
16.3.1.1 Party Planning Report Explanation
This report prints as the Daily Event Report. Each page of this report prints for a different customer and/or
different scheduled event. Every event that has not closed or paid for will be in this report. The information in
this report is based on the information entered by the employee for the specific parties.
Sponsor Information - The customer who scheduled the party will appear in this section. All the customer
address information will appear in this section.
Guest of Honor - Under this header is the name of person/child whom the event is in honor of.
Adults Attending - The number of adults attending the event (assuming the event is a children's party) is listed
here.
Children Attending - This field is universal for the number of people attending the party or event whether they
be children for a birthday party or adults for a business event.
Booking Information - This section contains all important time, date, and status information about the event.
Date Booked - This is the date the party was booked.
Booked By - The employee that booked the party will be listed here.
Status - This field displays whether the event has been started or the deposit has been paid, etc.
Event Date - This is the date of the event or party.
© 1997 - 2005 Ideal Software Systems, Inc.
658
Point of Sale
Event Time - Both beginning and ending times are listed in this field.
Event Plan - Schedule and resource information is listed in this section of the report.
Scheduled Time - Similar to the Event Time field, this field displays both beginning and ending times.
Description - This field contains the name of the resource that will be used during the event.
Amount - This column shows the amount for scheduling a party and/or resource.
Event Plan sub-total - The cost for scheduling an event and renting a resource is summed here.
Event Detail - This section of the report lists all items that will be purchased. Also party totals are given as well
as inventory counts.
Qty - This column displays the quantity of each inventory item that will be purchased for the party/event.
Description - This column lists all the different inventory items that will be purchased for the party/event.
Price (1st) - The first price column displays the price of the individual inventory items.
Price (2nd) - The second price column is the product of the single inventory item and the number of guests.
Event Detail - This field gives the total for all of the item purchased in the Event Detail section.
Sub Total - The Event Total field and any other addition cost are summed in this field.
Tax - Any sales tax that applies is given in this field.
Total - The Sub Total and Tax fields are added and shown here.
Deposit Paid - If a deposit was paid on the event, it will be listed here and subtracted from the total cost of the
event.
Total Paid - This field is the Total field less the Deposit Paid field.
Outstanding Balance - What the customer currently owes on the party is listed here.
Host Notes - If the employee hosting the events needs to record any information, it can be written here.
Event Notes - If any special notes need to be entered for the host to see, they will appear in this section of the
report.
16.3.1.2 Using the Party Planning Report
This sub-section explains how to run the Party Planning Report in the Point of Sale system.
NOTE: The user must have rights to view reports in order to follow these
instructions. Refer to Chapter 2 section "Entering Employees and Employee
Groups" for more details.
1.
Make sure that the Event Scheduler menu is visible at the Ideal FEC Back Office Suite screen by
clicking Event Schedule.
© 1997 - 2005 Ideal Software Systems, Inc.
Chapter 16 - Customer, Facility, and Event Scheduler Reports
2.
659
Select Reports | Party Planning Report.
Figure 16-10. The Ideal FEC Back Office Suite Reports menu's Party Planning Report
Select Reports | Party Planning Report.
3.
The user will be prompted to enter a starting and ending dates for the report in the Party Planning
Report window. Click OK.
Figure 16-11. The Party Planning Report window
Enter the starting and ending dates and click OK.
NOTE: There must be events scheduled during the date ranges chosen otherwise
an error will be returned. For more information on scheduling events, go to
Chapter 9 sub-section "Booking an Event".
4.
The Print Preview window will open showing the report. To print this report, click
NOTE: All the customer's names with parties for the date range chosen will
appear on the left hand side of the Print Preview window. Parties can be
searched for with this function.
5.
The Print window will appear. Select the printer to print to and click OK.
© 1997 - 2005 Ideal Software Systems, Inc.
.
660
Point of Sale
16.3.2
Schedule Report
16.3.2.1 Schedule Report Explanation
This report gives basic information about the scheduled events and parties.
Date - This date for the parties/events are listed in this column.
Start Time - The times the events start are given in this column.
End Time - The times the events will be over are listed in this column.
Honoree - The people the parties are for are in this column.
Attending - The number of people attending each event is contained in this column.
Resource - The place each event is help is listing here.
Contact - The contacts for the events are given in this column.
Phone - The phone numbers that can be used to reach the event contacts is listed here.
16.3.2.2 Using the Schedule Report
This sub-section explains how to run the Schedule Report in the Point of Sale system.
NOTE: The user must have rights to view reports in order to follow these
instructions. Refer to Chapter 2 section "Entering Employees and Employee
Groups" for more details.
1.
Make sure that the Event Scheduler menu is visible at the Ideal FEC Back Office Suite screen by
clicking Event Schedule.
2.
Select Reports | Schedule Report.
Figure 16-12. The Ideal FEC Back Office Suite Reports menu's Schedule Report
Select Reports | Schedule Report.
3.
The user will be prompted to enter a starting and ending dates for the report in the Party Schedule
Report window. Click OK.
© 1997 - 2005 Ideal Software Systems, Inc.
Chapter 16 - Customer, Facility, and Event Scheduler Reports
661
Figure 16-13. The Party Schedule Report window
Enter the starting and ending dates and click OK.
NOTE: There must be events scheduled during the date ranges chosen otherwise
an error will be returned. For more information on scheduling events, go to
Chapter 9 sub-section "Booking an Event".
16.3.3
4.
The Print Preview window will open showing the report. To print this report, click
5.
The Print window will appear. Select the printer to print to and click OK.
.
Party Income Report
16.3.3.1 Party Income Report Explanation
The Party Income Report gives a list of the money cost of each party and the money owed on each. Deposits are
also listed. These costs are totaled at the end of the report.
Date - The dates for the parties/events are listed in this column.
NOTE: The Party Income Report is groups and orders parties by event date.
Customer Name - The name of the customer for each event is in this column.
Party Total - The total cost for each scheduled event is listed in this column.
Deposits Made - If any deposits have been paid on the parties, then they will be listed in this column.
Balance - The current balance owed for each event after any deposits have been taken out is listed here.
16.3.3.2 Using the Party Income Report
This sub-section explains how to run the Party Income Report in the Point of Sale system.
© 1997 - 2005 Ideal Software Systems, Inc.
662
Point of Sale
NOTE: The user must have rights to view reports in order to follow these
instructions. Refer to Chapter 2 section "Entering Employees and Employee
Groups" for more details.
1.
Make sure that the Event Scheduler menu is visible at the Ideal FEC Back Office Suite screen by
clicking Event Schedule.
2.
Select Reports | Party Income Report.
Figure 16-14. The Ideal FEC Back Office Suite Reports menu's Party Income Report
Select Reports | Party Income Report.
3.
The user will be prompted to enter a starting and ending dates for the report in the Scan Report by
Item window. Click OK.
Figure 16-15. The Scan Report by Item window
Enter the starting and ending dates and click OK.
4.
The Print Preview window will open showing the report. To print this report, click
5.
The Print window will appear. Select the printer to print to and click OK.
.
© 1997 - 2005 Ideal Software Systems, Inc.
Chapter 16 - Customer, Facility, and Event Scheduler Reports
16.3.4
663
Outstanding Issued Tickets Report
16.3.4.1 Outstanding Issued Tickets Report Explanation
This report only shows party ID's for any customer that has already had their party/event tickets pre-printed and
issued. This report only contains a Party ID, the Customer Name for each party, and the Event Date. This report
will not show any events or parties that have not had tickets issued or pre-printed.
16.3.4.2 Using the Outstanding Issued Ticket Report
This sub-section explains how to tun the Outstanding Issued Ticket Report in the Point of Sale system.
NOTE: The user must have rights to view reports in order to follow these
instructions. Refer to Chapter 2 section "Entering Employees and Employee
Groups" for more details.
1.
Make sure that the Event Scheduler menu is visible at the Ideal FEC Back Office Suite screen by
clicking Event Schedule.
2.
Select Reports | Outstanding Issued Ticket.
Figure 16-16. The Ideal FEC Back Office Suite Reports menu's Outstanding Issued Ticket Report
Select Reports | Outstanding Issue Ticket.
3.
The Print Preview window will open showing the report. To print this report, click
4.
The Print window will appear. Select the printer to print to and click OK.
© 1997 - 2005 Ideal Software Systems, Inc.
.
664
Point of Sale
Chapter 17 - Bar Codes, Employee Listings,
and Form Letters
17.1 Printing Barcodes
Instructions for Printing Barcodes
This section contains explanations for printing inventory barcodes in the
Point of Sale system. This section contains the following topics:
• "About Bar Codes"
• "Print Barcode Labels"
17.1.1
About Bar Codes
Many family entertainment facilities print out barcode labels and place them on inventory that can be purchased
or only rented. Barcode labels are a great feature that can be utilized to assist in keeping track of inventory.
Printing inventory labels is a very simple task that any level of employee should be able to perform.
17.1.2
Print Barcode Labels
This sub-section explains how to use the inventory barcode label printing feature of the Point of Sale system.
NOTE: The user must have rights to view reports in order to follow these
instructions. Refer to Chapter 2 section "Entering Employees and Employee
Groups" for more details. Inventory items must be created before printing any
barcode labels will be possible. For more information on creating inventory items
and setting up item properties, refer to Chapter 3 in this manual.
1.
Make sure that the Point of Sale menu is visible at the Ideal FEC Back Office Suite screen.
2.
Select Inventory | Print Barcode Labels.
© 1997 - 2005 Ideal Software Systems, Inc.
Chapter 17 - Bar Codes, Employee Listings, and Form Letters
Figure 17-1. The Ideal FEC Back Office Suite Inventory menu's Print Barcode Labels
Select Inventory | Print Barcode Labels.
3.
The Choose Labels to Print window will open.
© 1997 - 2005 Ideal Software Systems, Inc.
665
666
Point of Sale
Figure 17-2. The Choose Labels to Print window with sample inventory
Open the Choose Labels to Print window.
A.
Inventory Description Search
Enter the description of an item that needs barcode labels printed if known.
B.
Add Item
Select an item from the left side of the window and click Add Item. The item will appear on
the right side of the window.
C.
Removed Item
Select an item on the right side of the window that doesn't need labels printed and click
Remove Item.
4.
Once all of the items are selected for printing, click OK.
5.
The Print Preview window will open showing the barcode labels. To print this report, click
6.
The Print window will appear. Select the printer to print to and click OK.
.
© 1997 - 2005 Ideal Software Systems, Inc.
Chapter 17 - Bar Codes, Employee Listings, and Form Letters
667
17.2 Employee Labels and Listings
Instructions for printing labels, listings, and reports for employees
This section contains explanations for printing employees' address labels
and listings as well as various employee reports in the Point of Sale system.
This section contains the following topics:
•
•
•
•
•
17.2.1
"About Employee Listings"
"Printing Employee Address Labels"
"Printing Employee Information Listings"
"Employee Charge Report"
"Employee Payroll Deduction Report"
About Employee Listings
Point of Sale offers an excellent feature that allows owners and managers to quickly print out a list of all current
employees that have been added into the system. Address labels with current employee addresses can be printed
if letters or checks need to be mailed. Informative employee reports can be printed for Chief Financial Offers or
any other employee of management needing current information.
17.2.2
Printing Employee Address Labels
This sub-section explains how to use the print address labels for employees in the Point of Sale system.
NOTE: The user must have rights to print address labels in order to follow these
instructions. Refer to Chapter 2 section "Entering Employees and Employee
Groups" for more details.
1.
Make sure that the Facility menu is visible at the Ideal FEC Back Office Suite screen by clicking
Facility.
2.
Select Employees | Employee Address Labels.
© 1997 - 2005 Ideal Software Systems, Inc.
668
Point of Sale
Figure 17-3. The Ideal FEC Back Office Suite Employee menu's Employee Address Labels
Select Employees | Employee Address Labels.
3.
The Print Preview window will open showing the address labels. To print this report, click
4.
The Print window will appear. Select the printer to print to and click OK.
17.2.3
.
Printing Employee Information Listings
This sub-section explains how to open and print information listings for the employees in the Point of Sale
system.
NOTE: The user must have rights to print address labels in order to follow these
instructions. Refer to Chapter 2 section "Entering Employees and Employee
Groups" for more details.
1.
Make sure that the Facility menu is visible at the Ideal FEC Back Office Suite screen by clicking
Facility.
2.
Select Employees | Employee Listing Report.
© 1997 - 2005 Ideal Software Systems, Inc.
Chapter 17 - Bar Codes, Employee Listings, and Form Letters
669
Figure 17-4. The Ideal FEC Back Office Suite Employee menu's Employee Listing Report
Select Employees | Employee Listing Report.
3.
The Print Preview window will open showing the address labels. To print this report, click
4.
The Print window will appear. Select the printer to print to and click OK.
17.2.4
Employee Charge Report
This sub-section explains how to bring up the Employee Charge Report in the Point of Sale.
NOTE: The user must have rights to view reports in order to follow these
instructions. Refer to Chapter 2 section "Entering Employees and Employee
Groups" for more details.
1.
In the Ideal FEC Back Office Suite screen, click Facility.
2.
Select Employees | Employee Charge Report.
© 1997 - 2005 Ideal Software Systems, Inc.
.
670
Point of Sale
Figure 17-5. The Ideal FEC Back Office Suite screen showing the Employees menu's Employee Charge Report option
Select Employees | Employee Charge Report.
3.
The Date Range for Report window will open. Select a start and end date by clicking the down
arrows.
Figure 17-6. The Date Range for Report window
Enter a start and end date.
17.2.5
4.
The Print Preview window will open showing the report. To print this report, click
5.
The Print window will appear. Select the printer to print to and click OK.
.
Employee Payroll Deduction Report
A report may be printed for each employee detailing every item in all orders charged to his account. This subsection explains how to bring up the Payroll Deduction Report in the Point of Sale.
© 1997 - 2005 Ideal Software Systems, Inc.
Chapter 17 - Bar Codes, Employee Listings, and Form Letters
671
NOTE: The user must have rights to view reports in order to follow these
instructions. Refer to Chapter 2 section "Entering Employees and Employee
Groups" for more details.
1.
In the Ideal FEC Back Office Suite screen, click Facility.
2.
Select Employees | Payroll Deduction Report.
Figure 17-7. The Ideal FEC Back Office Suite screen showing the Employees menu's Payroll Deduction Report option
Select Employees | Payroll Deduction Report.
3.
The Payroll Deduction Report window will open. Select a start and end date by clicking the down
arrows.
Figure 17-8. The Payroll Deduction Report window
Enter a start and end date.
4.
The Print Preview window will open showing the report. To print this report, click
© 1997 - 2005 Ideal Software Systems, Inc.
.
672
Point of Sale
5.
The Print window will appear. Select the printer to print to and click OK.
17.3 Form Letters and Labels
Instructions for printing form letters and labels
This section contains explanations for printing form letters and labels for
customers in the Point of Sale system. This section contains the following
topics:
•
•
•
•
•
•
17.3.1
"About Custom Form Letters"
"Creating Form Letters"
"Form Letter Selection Criteria"
"Print/Preview Letter"
"Edit File"
"Printing Labels"
About Custom Form Letters
Form letters are a convenient feature that allows the user to compose one letter and have the Point of Sale system
fill in the information for every customer, or every filtered customer. Customer groups or individuals may be
selected and the system will populate their names and personal information into the letters. Customer address
labels can also be printed in the same way. This feature is useful for when the store has an event and the owner
wants to send personalized letters to the most loyal customers.
17.3.2
Creating Form Letters
This sub-section explains how to create form letters for the Point of Sale system. Samples for letters are provided
below as well.
NOTE: In order to complete the following steps, the user will need word
processing software with the ability to convert a document into RTF format.
TIP: These are only examples for the user to follow. Form letters are not required
to read exactly as the ones listed below. However, the System Variables and the
Customer Variables must be written correctly in order to populated by the Point
of Sale system. For more information on these variables, refer to Appendix A
section "Variables for Party Contracts and Form Letters".
1.
Open a new document inside word processing software.
2.
Enter the following text as shown in the below section into the new word document.
© 1997 - 2005 Ideal Software Systems, Inc.
Chapter 17 - Bar Codes, Employee Listings, and Form Letters
<SystemDate>
<First Name> <Last Name>
<Address 1> <Address 2>
<City>, <State> <Zip>
Dear <First Name>:
We at Really Fun Place would like to thank you for choosing to have
<Honoree>'s party at our facility. We know how important this event was to
<Honoree>. We will do our very best to make this the greatest party that
<Honoree> will ever have.
For you, as the parent, we want you to be our guest as well. Upon arrival the
day of your scheduled party, simply stop by the events coordinator desk to
check in, then just sit back and enjoy the ride.
Please feel free at any point in time to call us with your comments or questions.
We look forward to hosting <Honoree>'s birthday party.
Sincerely,
Joe Random
Events Coordinator
Birthday Child: <Honoree>
Age Group: <Age_Group>
Date and Time of Party: <Event_Date> through <End_Time>
Park Location of Party: <Resource>
Bill Information
Date Reserved: <Booked Date>
Total Cost of Party: <Price>
Number of Children: <Children>
Minus Deposit: - <Deposit>
Number of Adults: <Adults>
Total
Cost:
______
Other: <Notes>
© 1997 - 2005 Ideal Software Systems, Inc.
673
674
Point of Sale
It's almost the big day!
Just wanted to double check everything!
Date: <BizDate>
Dear <First Name>:
Thank you for choosing Really Fun Place for your child's birthday celebration.
This card is to confirm <Honoree> 's birthday party on <Event_Date> to
<End_Time>.
The total cost for the party package for approximately <Children> guests is
<Price>. (Additional guests may be added on the day of the party.)
You have ordered the following:
Drink(s)___________
___________
Pizza(s)___________
___________
Other___________
Cake___________
Your reserved party time is from _______ to _______.
Deposit paid:
party time.)
$ <Deposit> (Non-refundable within 72 hours of the reserved
Balance due:
$________ (Due on the day of the party.)
(Balance does not reflect Host/Coach/Party Pro's gratuity.)
General reminders:
1) All changes to food and beverage must be called in 72 hours prior to the party
date.
2) You may add food and beverages to your order on the day of the party prior
to start time.
3) Adult guest pizza package - Great value, save $5.00! Package includes 2 large
single topping pizzas and 2 pitchers of soda only $15.00. Must be pre-ordered
48 hours prior to the party.
4) Party rooms/tables are designed to accommodate the immediate birthday
family and party guests. There is a limited amount of adult space. If you expect
adults to stay, please plan accordingly.
5) Please arrive 15 minutes before your scheduled party starting time to assure
scheduled party table time. Proceed directly to the birthday party check-in area.
6) Socks required for soft play area.
Thank you very much! We certainly look forward to all the fun we're going to
have!
3.
Save this document in RTF format in a location that the file can be easily found.
TIP: RTF means Rich Text Format. All words inside the <> will be
automatically populated by the Point of Sale software.
© 1997 - 2005 Ideal Software Systems, Inc.
Chapter 17 - Bar Codes, Employee Listings, and Form Letters
17.3.3
675
Form Letter Selection Criteria
This sub-section explains the selection criteria for the customer form letters in the Point of Sale system.
NOTE: The user must have rights to print address labels in order to follow these
instructions. Refer to Chapter 2 section "Entering Employees and Employee
Groups" for more details.
1.
Make sure that the Facility menu is visible at the Ideal FEC Back Office Suite screen by clicking
Facility.
2.
Select Customers | Form Letters.
Figure 17-9. The Ideal FEC Back Office Suite Customers menu's Form Letters
Select Customers | Form Letters.
3.
The Form Letter Setup window will open. Enter the selection criteria.
© 1997 - 2005 Ideal Software Systems, Inc.
676
Point of Sale
Figure 17-10. The Form Letter Setup window
Enter the selection criteria.
A.
Form letter template
The path of the template for the customer form letter will populate this field once selected.
NOTE: A form letter must first be created before one can be selected. Refer to
the previous section for more information on creating a form letter.
B.
Browse
Click this button to open the Open window to select an RTF file that will serve as the template
form letter.
Figure 17-11. The Open window
Select the form letter template.
© 1997 - 2005 Ideal Software Systems, Inc.
Chapter 17 - Bar Codes, Employee Listings, and Form Letters
C.
677
Birthdate Range
Check this option to populate the form letter with customers that have specific birthday dates.
i.
Start Date
Enter a starting date for the customer's with the correct birthday dates to populate the
form letter template when printed (assuming the Birthdate Range option is selected.)
ii.
End Date
Enter an ending date for the customer's with the correct birthday dates to populate the
form letter template when printed (assuming the Birthdate Range option is selected.)
NOTE: In order for this selected to work, the customers have to be assigned
birthday dates inside the customer properties. For more information on setting up
customers, see Chapter 3 of this manual.
D.
Member of Group
If the selection needs to be broken down by customer groups, check this option and press the
down arrow to pull up the existing customer groups then select a group.
NOTE: Customer groups have to have been previously created before any groups
can be chosen in the form letter criteria. For more information on customer
groups, see Chapter 3 of this manual.
E.
F.
Total Purchases
If the template form letter needs to be populated with the names of customers that have spent a
certain amount of money within a specified time range then select this option.
i.
over _____
Enter the amount of money the customer must have spent to meet the qualifications.
ii.
between _____
Enter the starting date for the customer to have spent the money to meet the criteria.
iii.
and _____
Enter the ending date for the customer to have spent the money to meet the criteria.
Member of Club
If the selection needs to be broken down by MVP clubs, check this option and click the down
arrow to pull up the existing clubs then select an MVP club.
NOTE: MVP clubs must have been previously created before any clubs can be
chosen in the form letter criteria. For more information on MVP clubs, see
Chapter 10 of this manual.
G.
Do not send to child accounts
If the form letter does not need to be sent to any children or any child accounts, check this
option.
H.
Do not include incomplete quick accounts
If the quick account for the customer is not complete and does not need to have a form letter
sent, check this option.
© 1997 - 2005 Ideal Software Systems, Inc.
678
Point of Sale
17.3.4
Print/Preview Letter
This sub-section explains how to preview the customer form letters in the Point of Sale system.
NOTE: The user must have rights to print address labels in order to follow these
instructions. Refer to Chapter 2 section "Entering Employees and Employee
Groups" for more details. A form letter template must have been created and
selected in order to preview the letter. Refer to sub-sections "Creating Form
Letters" and "Form Letter Selection Criteria". Also, selection criteria must have
been selected before doing a print preview. For more information on selecting
filter criteria, refer to the previous sub-section.
1.
Make sure that the Facility menu is visible at the Ideal FEC Back Office Suite screen by clicking
Facility.
2.
Select Customers | Form Letters (Figure 17-9).
3.
Click Preview Letter.
4.
The Print Preview window will open showing the address labels. To print this report, click
5.
The Print window will appear. Select the printer to print to (if printing is desired) and click OK.
17.3.5
.
Edit File
This sub-section explains how to edit the template for customer form letters in the Point of Sale system.
NOTE: The user must have rights to print address labels in order to follow these
instructions. Refer to Chapter 2 section "Entering Employees and Employee
Groups" for more details. A form letter template must have been created and
selected in order to preview the letter. Refer to sub-sections "Creating Form
Letters" and "Form Letter Selection Criteria". Also, selection criteria must have
been selected before doing a print preview. For more information on selecting
filter criteria, refer to the previous sub-section.
17.3.6
1.
Make sure that the Facility menu is visible at the Ideal FEC Back Office Suite screen by clicking
Facility.
2.
Select Customers | Form Letters (Figure 17-9).
3.
Click Edit File. The default word processing program will open allowing the user to edit the template
for the form letter.
Printing Labels
This sub-section explains how to print out all of the customer labels based on the selected criteria in the Point of
Sale system.
© 1997 - 2005 Ideal Software Systems, Inc.
Chapter 17 - Bar Codes, Employee Listings, and Form Letters
679
NOTE: The user must have rights to access the Form Letters menu option in
order to follow these instructions. Refer to Chapter 2 section Entering Employees
and Employee Groups for more details. Selection criteria must have been
selected before doing a print preview. For more information on selecting filter
criteria, refer to the sub-section "Form Letter Selection Criteria".
1.
Make sure that the Facility menu is visible at the Ideal FEC Back Office Suite screen by clicking
Facility..
2.
Select Customers | Form Letters (Figure 17-9).
3.
Click Print Labels. The default office printer connected to the computer terminal will immediately
begin to the print the labels.
NOTE: In order to print the customer labels, a default printer must be connected
or mapped to the computer terminal trying to print.
© 1997 - 2005 Ideal Software Systems, Inc.
680
Point of Sale
Chapter 18 - Capacity Management
18.1 Setting Up Capacity Management
Instructions for setting up Capacity Management
This section contains instructions for setting up the Capacity Management
module in the Point of Sale system. This section contains the following
topics:
• "Capacity Management Setup Reference"
• "Defining"
• "Adding Ratings"
• "Editing Ratings"
• "Deleting Ratings"
• "Adding Format"
• "Editing Format"
• "Deleting Format"
• "Adding Sound Types"
• "Editing Sound Types"
• "Deleting Sound Types"
• "Adding Theaters"
• "Editing Theaters"
• "Deleting Theaters"
• "Ticket Prices"
• "Adding a File"
• "Editing a Film"
• "Creating Show Times"
• "Reschedule Show Times"
• "Repeat Show Time Schedules"
• "Remove Show Time Schedules"
• "Remove Show Times from Theaters"
• "Move Show Times to Different Theaters"
• "Repeat Day for Show Time Schedules"
• "Delete Day for Show Time Schedules"
• "Capacity Management POS Screen Setup"
• "Putting Capacity Management on a Terminal"
18.1.1
Capacity Management Setup Reference
This section contains instructions for setting up the Capacity Management module for the Point of Sale system.
This sub-section will help to explain the meaning of each function as general rules must be followed in order for
this module to function correctly.
© 1997 - 2005 Ideal Software Systems, Inc.
Chapter 18 - Capacity Management
681
NOTE: The Capacity Management module is separate from the basic Point of
Sale functionality and must be purchased separately. For information on
purchasing the Capacity Management module, contact Ideal Software Systems,
Inc.
1.
Define - The Define section must be completed first by selecting the Capacity Management tab and
Define. Ratings, Film Formats, Sound Types, Theaters, and Ticket Prices must be established before
anything with Capacity Management can be done. Select each format type and add types as required for
specification. Types are not required to sell movies but are necessary to ensure full disclosure of film
properties on reports.
2.
Ratings - Rating types explain what crowd of viewers the movie will be suitable for. Ratings should be
included in the information that comes with the movie. (Examples include but are not limited to: G, PG,
PG-13, R, etc.)
3.
Film Formats - Movies can be made in different formats. These format types will need to be entered
into the system.
4.
Sound Types - Dolby Digital and other surround sound types will need to be entered into the system.
5.
Theaters - Add all the movie theaters that are available to the facility. An unlimited number of theaters
may be added to the database. Theater description and maximum capacity should be entered when the
theaters are created.
6.
Ticket Prices - The user is able to setup four price buttons that will determine what prices are to be
charged for each showing type on the Front POS screen. Showing types can by used to influence the
cost of the tickets. The four defined times are Regular, Matinee, Twilight, and Special. Four ticket type
descriptions can be defined by the user. Examples of these types are usually something similar to Adult,
Child, Senior, and MVP. Each ticket type and their prices must be defined. For more information, refer
to mini-section "Ticket Prices" in this section.
7.
Films - The films that will be shown in the theater must be entered next. The following fields are
required to be filled out in the movie properties for scheduling purposes: Title, Short Title, and Runtime
(including trailer). When selecting a color, be sure to select a color that will have enough contrast to the
black letters so that they might be visible.
8.
Scheduling - Once films and theaters have been added, scheduled showings must be created. On the
Movie Schedule Grid window, users are allowed to schedule showings for each day. The x-axis shows
the time. The start and end time for the grid may be set in System Parameters under the Capacity
Management tab. Refer to Chapter 2 section "Configuring System Parameters" for more information.
The y-axis represents the different theaters. The date in the upper, left-hand corner can be changed by
either pressing the plus (+) and minus (-) keys to increase and decrease the current date, changing the
numbers date box in the upper left-hand corner, or pressing the down arrow icon in the date box and
selecting the date from the drop down calendar. The end time of the schedule grid cannot be set past
midnight. However, if a movie is scheduled, it may end past midnight. Remaining capacity is shown in
the bottom of each schedule block.
18.1.2
Defining
18.1.2.1 Adding Ratings
Before setting up films, movie ratings should be created. This mini-section explains how to create ratings for the
Capacity Management module in the Point of Sale system.
© 1997 - 2005 Ideal Software Systems, Inc.
682
Point of Sale
NOTE: The Capacity Management module is separate from the basic Point of
Sale functionality and must be purchased separately. For information on
purchasing the Capacity Management module, contact Ideal Software Systems,
Inc.
1.
Make sure that the Point of Sale menu is visible at the Ideal FEC Back Office Suite.
2.
Select Capacity Management | Define | Ratings.
Figure 18-1. The Ideal FEC Back Office Suite Capacity Management menu's Define list
Select Capacity Management | Define | Ratings.
3.
The Define Film Ratings window will open. Click Add.
© 1997 - 2005 Ideal Software Systems, Inc.
Chapter 18 - Capacity Management
683
Figure 18-2. The Define Film Ratings window
Click Add.
4.
The Define Film Ratings sub window will open. Enter the rating's name and click OK.
Figure 18-3. The Define Film Ratings sub window
Enter a rating and click OK.
5.
The rating will now appear in the Define Film Ratings main window. Click Close.
18.1.2.2 Editing Ratings
This mini-section explains how to edit previously created ratings for the Capacity Management module in the
Point of Sale system.
NOTE: The Capacity Management module is separate from the basic Point of
Sale functionality and must be purchased separately. For information on
purchasing the Capacity Management module, contact Ideal Software Systems,
Inc. Also, in order to edit a movie rating, one must have been previously created.
Refer to the previous mini-section for more information.
1.
Make sure that the Point of Sale menu is visible at the Ideal FEC Back Office Suite.
© 1997 - 2005 Ideal Software Systems, Inc.
684
Point of Sale
2.
Select Capacity Management | Define | Ratings (Figure 18-1).
3.
The Define Film Ratings window will open (Figure 18-2). Select a movie rating and click Modify.
4.
The Define Film Ratings sub-window will open (Figure 18-3). Enter the rating's new name and click
OK.
Figure 18-4. The Define Film Ratings sub window
Enter a rating and click OK.
5.
The edited rating will now appear in the Define Film Ratings main window. Click Close.
18.1.2.3 Deleting Ratings
This sub-section explains how to delete previously created ratings for the Capacity Management module in the
Point of Sale system.
NOTE: The Capacity Management module is separate from the basic Point of
Sale functionality and must be purchased separately. For information on
purchasing the Capacity Management module, contact Ideal Software Systems,
Inc. In order to delete a movie rating, one must have been previously created.
Refer to mini-section "Adding Ratings" for more information.
1.
Make sure that the Point of Sale menu is visible at the Ideal FEC Back Office Suite.
2.
Select Capacity Management | Define | Ratings (Figure 18-1).
3.
The Define Film Ratings window will open (Figure 18-2). Select a rating to be deleted and click
Remove.
4.
The Warning window will appear asking the user if the rating needs to be deleted. Click Yes.
Figure 18-5. The Warning window
Click Yes.
© 1997 - 2005 Ideal Software Systems, Inc.
Chapter 18 - Capacity Management
5.
685
The rating will now be removed from the Define Film Ratings main window. Click Close.
18.1.2.4 Adding Formats
Before setting up films, movie formats should be defined. This mini-section explains how to create film formats
for the Capacity Management module in the Point of Sale system.
NOTE: The Capacity Management module is separate from the basic Point of
Sale functionality and must be purchased separately. For information on
purchasing the Capacity Management module, contact Ideal Software Systems,
Inc.
1.
Make sure that the Point of Sale menu is visible at the Ideal FEC Back Office Suite.
2.
Select Capacity Management | Define | Formats (Figure 18-1).
3.
The Define Film Formats window will open. Click Add.
Figure 18-6. The Define Film Formats window
Click Add.
4.
The Define Film Formats sub window will open. Enter the name of the film format and click OK.
© 1997 - 2005 Ideal Software Systems, Inc.
686
Point of Sale
Figure 18-7. The Define Film Formats sub window
Enter a format and click OK.
5.
The format will now appear in the Define Film Formats main window. Click Close.
18.1.2.5 Editing Formats
This mini-section explains how to edit previously created movie formats for the Capacity Management module in
the Point of Sale system.
NOTE: The Capacity Management module is separate from the basic Point of
Sale functionality and must be purchased separately. For information on
purchasing the Capacity Management module, contact Ideal Software Systems,
Inc. In order to edit a movie format, one must have been previously created.
Refer to the previous mini-section for more information.
1.
Make sure that the Point of Sale menu is visible at the Ideal FEC Back Office Suite.
2.
Select Capacity Management | Define | Formats (Figure 18-1).
3.
The Define Film Formats window will open (Figure 18-6). Select a movie format and click Modify.
4.
The Define Film Formats sub window will open. Enter the format's new name and click OK.
Figure 18-8. The Define Film Formats sub window
Enter a format and click OK.
5.
The edited format will now appear in the Define Film Formats main window. Click Close.
© 1997 - 2005 Ideal Software Systems, Inc.
Chapter 18 - Capacity Management
687
18.1.2.6 Deleting Formats
This mini-section explains how to delete previously created film formats for the Capacity Management module
in the Point of Sale system.
NOTE: The Capacity Management module is separate from the basic Point of
Sale functionality and must be purchased separately. For information on
purchasing the Capacity Management module, contact Ideal Software Systems,
Inc. In order to delete a movie format, one must have been previously created.
mini-section "Adding Formats" contains more information on this topic.
1.
Make sure that the Point of Sale menu is visible at the Ideal FEC Back Office Suite.
2.
Select Capacity Management | Define | Formats (Figure 18-1).
3.
The Define Film Formats window will open (Figure 18-6). Select a film format to be deleted and click
Remove.
4.
The Warning window will appear asking the user if the format needs to be deleted. Click Yes.
5.
The format will now be removed from the Define Film Ratings main window. Click Close.
18.1.2.7 Adding Sound Types
Before setting up films, movie sound types should be defined. This mini-section explains how to create sounds
types for films in the Capacity Management module of the Point of Sale system.
NOTE: The Capacity Management module is separate from the basic Point of
Sale functionality and must be purchased separately. For information on
purchasing the Capacity Management module, contact Ideal Software Systems,
Inc.
1.
Make sure that the Point of Sale menu is visible at the Ideal FEC Back Office Suite.
2.
Select Capacity Management | Define | Sound (Figure 18-1).
3.
The Define Film Sound Types window will open. Click Add.
© 1997 - 2005 Ideal Software Systems, Inc.
688
Point of Sale
Figure 18-9. The Define Film Sound Types window
Click Add.
4.
The Define Film Sound Types sub window will open. Enter the name of the film sound type and click
OK.
Figure 18-10. The Define Film Sound Types sub window
Enter a sound type and click OK.
5.
The sound type will now appear in the Define Film Sound Types main window. Click Close.
18.1.2.8 Editing Sound Types
This mini-section explains how to edit previously created movie sound types for the Capacity Management
module in the Point of Sale system.
NOTE: The Capacity Management module is separate from the basic Point of
Sale functionality and must be purchased separately. For information on
purchasing the Capacity Management module, contact Ideal Software Systems,
Inc. In order to edit a movie sound type, one must have been previously created.
The previous mini-section contains more information on adding sound types.
© 1997 - 2005 Ideal Software Systems, Inc.
Chapter 18 - Capacity Management
689
1.
Make sure that the Point of Sale menu is visible at the Ideal FEC Back Office Suite.
2.
Select Capacity Management | Define | Sound (Figure 18-1).
3.
The Define Film Sound Types window will open (Figure 18-9). Select a movie sound type and click
Modify.
4.
The Define Film Sound Types sub window will open. Enter the sound type's new name and click OK.
Figure 18-11. The Define Film Sound Types sub window
Enter a sound type and click OK.
5.
The edited sound type will now appear in the Define Film Sound Types main window. Click Close.
18.1.2.9 Deleting Sound Types
This mini-section explains how to delete previously created film sound types for the Capacity Management
module in the Point of Sale system.
NOTE: The Capacity Management module is separate from the basic Point of
Sale functionality and must be purchased separately. For information on
purchasing the Capacity Management module, contact Ideal Software Systems,
Inc. In order to delete a movie sound type, one must have been previously
created. The "Adding Sound Types" mini-section has more information on this
topic.
1.
Make sure that the Point of Sale menu is visible at the Ideal FEC Back Office Suite.
2.
Select Capacity Management | Define | Sound (Figure 18-1).
3.
The Define Film Sound Types window will open (Figure 18-9). Select a film sound type to be deleted
and click Remove.
4.
The Warning window will appear asking the user if the sound type needs to be deleted. Click Yes.
5.
The sound type will now be removed from the Define Film Sound Types main window. Click Close.
18.1.2.10 Adding Theaters
Before setting up films, movie theaters should be defined. This mini-section explains how to create theaters in
the Capacity Management module of the Point of Sale system.
© 1997 - 2005 Ideal Software Systems, Inc.
690
Point of Sale
NOTE: The Capacity Management module is separate from the basic Point of
Sale functionality and must be purchased separately. For information on
purchasing the Capacity Management module, contact Ideal Software Systems,
Inc.
1.
Make sure that the Point of Sale menu is visible at the Ideal FEC Back Office Suite.
2.
Select Capacity Management | Define | Theaters (Figure 18-1).
3.
The Theater List window will open. Click New Theater.
© 1997 - 2005 Ideal Software Systems, Inc.
Chapter 18 - Capacity Management
Figure 18-12. The Theater List window
Click New Theater.
4.
The Add Edit Theaters window will open. Enter the necessary information.
Figure 18-13. The Add Edit Theater window
Enter the necessary information.
A.
Description
Enter a descriptive name for the movie theater.
B.
Max Seating
Enter the total seating capacity for the theater room.
© 1997 - 2005 Ideal Software Systems, Inc.
691
692
Point of Sale
NOTE: The number of tickets that can be sold for each theater room is based off
the total seating number entered into the Max Seating field.
C.
Low Seating
In this field enter a number that will trigger a warning letting the employee know that the
seating in the theater room is getting low.
NOTE: If the total seating for the theater room is 500 people, then enter 450 into
the Low Seating field. A warning will appear after 450 tickets have been sold
and the employee will know that there will soon be no more seating room or
tickets.
D.
Active
Check this option if the movie theater room is currently active and showing movies. Uncheck
this field otherwise.
NOTE: The Active option is checked by default.
5.
Click OK once the information is entered.
6.
The theater will now appear in the Theater List window. Click Close.
18.1.2.11 Editing Theaters
This mini-section explains how to edit previously created movie theater rooms for the Capacity Management
module in the Point of Sale system.
NOTE: The Capacity Management module is separate from the basic Point of
Sale functionality and must be purchased separately. For information on
purchasing the Capacity Management module, contact Ideal Software Systems,
Inc. In order to edit a movie theater, one must have been previously created.
Refer to the last mini-section for more information.
1.
Make sure that the Point of Sale menu is visible at the Ideal FEC Back Office Suite.
2.
Select Capacity Management | Define | Theaters (Figure 18-1).
3.
The Theater List window will open (Figure 18-12). Select a movie theater and click Modify.
4.
The Add Edit Theater window will open. Edit the theater's information and click OK.
© 1997 - 2005 Ideal Software Systems, Inc.
Chapter 18 - Capacity Management
693
Figure 18-14. The Add Edit Theater window
Edit the theater information and click OK.
5.
The edited theater will appear in the Theater List window. Click Close.
18.1.2.12 Deleting Theaters
This mini-section explains how to delete previously created movie theaters in the Capacity Management module
of the Point of Sale system.
NOTE: The Capacity Management module is separate from the basic Point of
Sale functionality and must be purchased separately. For information on
purchasing the Capacity Management module, contact Ideal Software Systems,
Inc. In order to delete a movie theater, one must have been previously created.
Refer to mini-section "Adding Theaters" for more information.
1.
Make sure that the Point of Sale menu is visible at the Ideal FEC Back Office Suite.
2.
Select Capacity Management | Define | Theaters (Figure 18-1).
3.
The Add Edit Theaters window will open (Figure 18-12). Select a theater to be deleted and click
Delete Theater.
4.
The Confirm window will appear asking the user if the theater should be removed. Click Yes.
© 1997 - 2005 Ideal Software Systems, Inc.
694
Point of Sale
Figure 18-15. The Confirm window
Click Yes.
5.
The theater will now be removed from the Add Edit Theaters window. Click Close.
18.1.2.13 Ticket Prices
Before setting up the Front POS Sales screen, movie ticket prices should be defined. This sub-section explains
how to set the movie price buttons in the Capacity Management module of the Point of Sale system.
NOTE: The Capacity Management module is separate from the basic Point of
Sale functionality and must be purchased separately. For information on
purchasing the Capacity Management module, contact Ideal Software Systems,
Inc.
1.
Make sure that the Point of Sale menu is visible at the Ideal FEC Back Office Suite.
2.
Select Capacity Management | Define | Ticket Prices (Figure 18-1).
3.
The Edit Movie Prices window will open. Click Button1.
© 1997 - 2005 Ideal Software Systems, Inc.
Chapter 18 - Capacity Management
Figure 18-16. The Edit Movie Prices window
Click Button1.
4.
The Edit Movie Ticket Button window will open. Enter the necessary information.
Figure 18-17. The Edit Movie Ticket Button window
Enter the necessary information.
A.
Description
Enter a descriptive name for the movie ticket button.
NOTE: Examples of descriptive names that can be used in the Descriptive field
are: Adult, Child, Senior, etc.
B.
Regular
Enter the regular price for the movie ticket.
C.
Matinee
Enter the matinee price for the movie ticket.
D.
Twilight
Enter the late night price for the movie ticket.
© 1997 - 2005 Ideal Software Systems, Inc.
695
696
Point of Sale
E.
Special
Enter another price for the movie ticket that will be used in special circumstances.
F.
Allow Discount
Check this option if discounts can be applied to this ticket's sale.
TIP: The Allow Discount option is checked by default.
5.
Click OK to save the ticket information. Button1 will change to the name in the description in the Edit
Movie Prices window.
Figure 18-18. The Edit Movie Prices window with sample button
The name of Button1 will change.
6.
18.1.3
The other buttons (Button2, Button3, and Button4) can be created the same way. Once all buttons are
edited, click Close.
Adding a Film
Before using the Capacity Management module, films will need to be added into the system. This sub-section
explains how to create films in the Point of Sale system.
NOTE: The Capacity Management module is separate from the basic Point of
Sale functionality and must be purchased separately. For information on
purchasing the Capacity Management module, contact Ideal Software Systems,
Inc. Before films are added, the Define categories (Ratings, Formats, and Sound
Types) need to be created. See the previous mini-sections in this chapter for more
information.
1.
Make sure that the Point of Sale menu is visible at the Ideal FEC Back Office Suite.
2.
Select Capacity Management | Add Film.
© 1997 - 2005 Ideal Software Systems, Inc.
Chapter 18 - Capacity Management
Figure 18-19. The Ideal FEC Back Office Suite Capacity Management menu's Add Film
Select Capacity Management | Add Film.
3.
The Film Editor window will open. Enter the necessary information.
© 1997 - 2005 Ideal Software Systems, Inc.
697
698
Point of Sale
Figure 18-20. The Film Editor window
Enter the necessary information.
A.
Title
Enter the full title of the movie.
B.
Short Title
Enter a shorter or abbreviated title of the movie.
TIP: The Short Title is the form of the movie name that will appear in the Front
POS screen. Be sure to make the movie name short yet still identifiable for the
other employees.
C.
Runtime (including trailer)
Enter the time in minutes of the movies. This time needs to include the time of the previews
before the movie.
D.
Start Date
Click the down arrow and select the date that the movie will begin playing in the theater.
© 1997 - 2005 Ideal Software Systems, Inc.
Chapter 18 - Capacity Management
699
Figure 18-21. The Calendar window
Select a date that the movie will begin playing.
E.
Description
Enter a short description about the movie.
F.
Serial Number
Enter the movie's serial number.
G.
Rating
Click the down arrow and select a movie rating.
H.
Return Date
Click the down arrow to open the Calendar window and select a date for the movie's return.
I.
Sound
Click the down arrow and select a movie sound type.
J.
Format
Click the down arrow and select a movie format.
K.
Distributor's Name
Click the down arrow and select a distributor.
NOTE: The names for the movie distributors are pulled from the vendor's file. If
there are no vendors in the Point of Sale system, then a distributor cannot be
selected. For more information on adding a vendor, refer to Chapter 3 section
"Vendors".
L.
Select Color
Click this button to open the Color window and select a color that will represent the movie.
© 1997 - 2005 Ideal Software Systems, Inc.
700
Point of Sale
Figure 18-22. The Color window
Select a color that will represent the movie.
M.
Active
Check this option if the movie is presently in the theaters. This option is checked by default.
N.
Select Image
Click this button to bring up the Open window. Select an image that will appear on the movie
button in the Front POS Sales screen.
Figure 18-23. The Open window
Select an image for the movie button.
O.
Image
© 1997 - 2005 Ideal Software Systems, Inc.
Chapter 18 - Capacity Management
701
If an image for the movie button in the Front POS Sales screen has been selected, this image
will appear in this field.
4.
18.1.4
Once all of the information is entered about the movie, click OK.
Editing a Film
This sub-section explains how to edit films in the Capacity Management module of the Point of Sale system.
NOTE: The Capacity Management module is separate from the basic Point of
Sale functionality and must be purchased separately. For information on
purchasing the Capacity Management module, contact Ideal Software Systems,
Inc. Before films can be edited, they first must be created. For entering a movie
and its information into the Point of Sale system, see the previous mini-section in
this chapter.
1.
Make sure that the Point of Sale menu is visible at the Ideal FEC Back Office Suite.
2.
Select Capacity Management | Edit Film.
Figure 18-24. The Ideal FEC Back Office Suite Capacity Management menu's Edit Film
Select Capacity Management | Edit Film.
3.
The Film Listing window will open. Select a movie to be edited and click OK.
© 1997 - 2005 Ideal Software Systems, Inc.
702
Point of Sale
Figure 18-25. The Film Listing window
Select a film and click OK.
4.
The Film Editor window will open. Change any information necessary.
Figure 18-26. The Film Editor window
Make any needed changes.
5.
Once all of the information is entered or changed, click OK.
© 1997 - 2005 Ideal Software Systems, Inc.
Chapter 18 - Capacity Management
18.1.5
703
Creating Show Times
This sub-section explains how to place films into time slots in the Capacity Management module of the Point of
Sale system.
NOTE: The Capacity Management module is separate from the basic Point of
Sale functionality and must be purchased separately. For information on
purchasing the Capacity Management module, contact Ideal Software Systems,
Inc. In order to place films into movie time slots, films must first have been
created. See the sub-section "Adding a Film" in the "Setting Up Capacity
Management" section of this chapter for more information. Also, in order to
place films into movie time slots, theaters must first have been created. See the
mini-section "Adding Theaters" under "Define" in the "Setting Up Capacity
Management" section of this chapter for more information.
1.
Make sure that the Point of Sale menu is visible at the Ideal FEC Back Office Suite.
2.
Select Capacity Management | Show Times.
Figure 18-27. The Ideal FEC Back Office Suite Capacity Management menu's Show Times
Select Capacity Management | Show Times.
3.
The Movie Schedule Grid window will open. Double-click on the time slot that the movie will be
playing.
© 1997 - 2005 Ideal Software Systems, Inc.
704
Point of Sale
Figure 18-28. The Movie Schedule Grid window
Double-click in a time slot.
4.
The Confirm window will open for the time slot chosen. Click Yes.
Figure 18-29. The Confirm window
Click Yes.
5.
The Show Schedule window will open. Fill in the necessary information.
© 1997 - 2005 Ideal Software Systems, Inc.
Chapter 18 - Capacity Management
705
Figure 18-30. The Show Schedule window
Fill in the necessary information.
6.
A.
Film Name
Click the down arrow and select the film that will be playing in the allotted time slot.
B.
Theater
Click the down arrow and select a theater where the selected movie will be playing.
C.
Start Time
This field will be automatically populated with the time that was clicked on the Movie
Schedule Grid window.
D.
End Time
This field will be automatically populated based on the length time entered in the properties of
the movie.
E.
Pricing
Select from the four types of pricing for the movie tickets: Regular, Matinee, Twilight, and
Special.
Click OK to enter the movie and its properties into the Movie Schedule Grid window.
© 1997 - 2005 Ideal Software Systems, Inc.
706
Point of Sale
Figure 18-31. The Movie Schedule Grid with a sample movie
Click OK to enter back into the Movie Schedule Grid window.
7.
Confirm the date in the upper left hand corner of the Movie Schedule Grid window. If the date is
incorrect, click the down arrow to open the Calendar window and change the date the movie will be
playing.
8.
Once the movies are scheduled, close the Movie Schedule Grid window.
18.1.6
Reschedule Show Times
This sub-section explains how to reschedule films in the Capacity Management module of the Point of Sale
system.
NOTE: The Capacity Management module is separate from the basic Point of
Sale functionality and must be purchased separately. For information on
purchasing the Capacity Management module, contact Ideal Software Systems,
Inc. In order to place films into movie time slots, films must first have been
created. See the sub-section "Adding a Film" in the "Setting Up Capacity
Management" section of this chapter for more information. Also, in order to
place films into movie time slots, theaters must first have been created. See the
mini-section "Adding Theaters" under "Define" in the "Setting Up Capacity
Management" section of this chapter for more information. Finally, to reschedule
a film, a film must first have been scheduled in a time slot in the Movie Schedule
Grid window. For more information, refer to the previous sub-section.
1.
Make sure that the Point of Sale menu is visible at the Ideal FEC Back Office Suite.
2.
Select Capacity Management | Show Times (Figure 18-27).
3.
The Movie Schedule Grid window will open (Figure 18-28). Right click on scheduled movie that will
need to be rescheduled and select Reschedule.
© 1997 - 2005 Ideal Software Systems, Inc.
Chapter 18 - Capacity Management
707
Figure 18-32. The Scheduling Options window's Reschedule
Select Reschedule.
4.
The Show Schedule window will open for the movie and time slot chosen. Change the start and end
times accordingly.
5.
Click OK to change the movie time and enter the Movie Schedule Grid window.
6.
Once the movies are rescheduled, close the Movie Schedule Grid window.
18.1.7
Repeat Show Time Schedules
This sub-section explains how to repeat film show times in the Capacity Management module of the Point of
Sale system.
NOTE: The Capacity Management module is separate from the basic Point of
Sale functionality and must be purchased separately. For information on
purchasing the Capacity Management module, contact Ideal Software Systems,
Inc. In order to place films into movie time slots, films must first have been
created. See the sub-section "Adding a Film" in the "Setting Up Capacity
Management" section of this chapter for more information. Also, in order to
place films into movie time slots, theaters must first have been created. See the
mini-section "Adding Theaters" under "Define" in the "Setting Up Capacity
Management" section of this chapter for more information. Finally, to repeat a
film, a film must first have been scheduled in a time slot in the Movie Schedule
Grid window. For more information, refer to the sub-section "Creating Show
Times."
1.
Make sure that the Point of Sale menu is visible at the Ideal FEC Back Office Suite.
2.
Select Capacity Management | Show Times (Figure 18-27).
3.
The Movie Schedule Grid window will open (Figure 18-28). Right-click on scheduled movie that will
need to be repeated and select Repeat Schedule.
© 1997 - 2005 Ideal Software Systems, Inc.
708
Point of Sale
Figure 18-33. The Scheduling Options window's Repeat Schedule
Select Repeat Schedule.
4.
The Show Repeat window will open for the movie and time slot chosen. Enter the necessary
information.
Figure 18-34. The Show Repeat window
Enter the necessary information.
A.
Repeat the showing of every
Click the down arrow and select how often the film schedule will be repeated.
B.
for _____ week(s)
Enter the number of weeks the repeated movie schedule needs to continue.
C.
starting on
Click the down arrow to open the calendar window and select a date that the repeated film
schedule will begin.
D.
Check Schedule
Click this to view the movie schedule.
5.
Click OK to add the repeated schedules to the Movie Schedule Grid window.
6.
Once the movies are scheduled, close the Movie Schedule Grid window.
© 1997 - 2005 Ideal Software Systems, Inc.
Chapter 18 - Capacity Management
18.1.8
709
Remove Show Time Schedules
This sub-section explains how to remove film show times in the Capacity Management module of the Point of
Sale system.
NOTE: The Capacity Management module is separate from the basic Point of
Sale functionality and must be purchased separately. For information on
purchasing the Capacity Management module, contact Ideal Software Systems,
Inc. In order to place films into movie time slots, films must first have been
created. See the sub-section "Adding a Film" in the "Setting Up Capacity
Management" section of this chapter for more information. Also, in order to
place films into movie time slots, theaters must first have been created. See the
mini-section "Adding Theaters" under "Define" in the "Setting Up Capacity
Management" section of this chapter for more information. Finally, to delete a
film's show time, a film must first have been scheduled in a time slot in the Movie
Schedule Grid window. For more information, refer to the sub-section "Creating
Show Times."
1.
Make sure that the Point of Sale menu is visible at the Ideal FEC Back Office Suite.
2.
Select Capacity Management | Show Times (Figure 18-27).
3.
The Movie Schedule Grid window will open (Figure 18-28). Right-click on the scheduled movie that
will need to be removed and select Remove.
Figure 18-34. The Scheduling Options window's Remove
Select Remove.
4.
The Confirm window will open making sure that the chosen time slot is the one needing to be deleted.
Click Yes.
Figure 18-35. The Confirm window
Click Yes.
5.
The movie time will now be removed from the Movie Schedule Grid window.
© 1997 - 2005 Ideal Software Systems, Inc.
710
Point of Sale
6.
18.1.9
Close the Movie Schedule Grid window.
Remove Show Times from Theaters
This sub-section explains how to remove film show times from theaters in the Capacity Management module of
the Point of Sale system.
NOTE: The Capacity Management module is separate from the basic Point of
Sale functionality and must be purchased separately. For information on
purchasing the Capacity Management module, contact Ideal Software Systems,
Inc. In order to place films into movie time slots, films must first have been
created. See the sub-section "Adding a Film" in the "Setting Up Capacity
Management" section of this chapter for more information. Also, in order to
place films into movie time slots, theaters must first have been created. See the
mini-section "Adding Theaters" under "Define" in the "Setting Up Capacity
Management" section of this chapter for more information. Finally, to delete a
film's show time, a film must first have been scheduled in a time slot in the Movie
Schedule Grid window. For more information, refer to the sub-section "Creating
Show Times."
1.
Make sure that the Point of Sale menu is visible at the Ideal FEC Back Office Suite.
2.
Select Capacity Management | Show Times (Figure 18-27).
3.
The Movie Schedule Grid window will open (Figure 18-28). Right-click on the scheduled movie that
will need to be removed and select Remove from House.
Figure 18-36. The Scheduling Options window's Remove from House
Select Remove from House.
4.
The Clear House window will open showing information for the movie selected. Make sure the
information is correct and click OK.
Figure 18-37. The Clear House window
© 1997 - 2005 Ideal Software Systems, Inc.
Chapter 18 - Capacity Management
711
Click OK.
5.
The movie time will now be removed from the theater.
6.
Close the Movie Schedule Grid window.
18.1.10 Move Show Times to Different Theaters
This sub-section explains how to move film show times from one theater to another in the Capacity Management
module of the Point of Sale system.
NOTE: The Capacity Management module is separate from the basic Point of
Sale functionality and must be purchased separately. For information on
purchasing the Capacity Management module, contact Ideal Software Systems,
Inc. In order to place films into movie time slots, films must first have been
created. See the sub-section "Adding a Film" in the "Setting Up Capacity
Management" section of this chapter for more information. Also, in order to
place films into movie time slots, theaters must first have been created. See the
mini-section "Adding Theaters" under "Define" in the "Setting Up Capacity
Management" section of this chapter for more information. Finally, to move a
film from one theater to another, a film must first have been scheduled in a time
slot in the Movie Schedule Grid window. For more information, refer to the subsection "Creating Show Times."
1.
Make sure that the Point of Sale menu is visible at the Ideal FEC Back Office Suite.
2.
Select Capacity Management | Show Times (Figure 18-27).
3.
The Movie Schedule Grid window will open (Figure 18-28). Right-click on the scheduled movie that
will need to be moved and select Move show to different house.
© 1997 - 2005 Ideal Software Systems, Inc.
712
Point of Sale
Figure 18-38. The Scheduling Options window's Move show to different house
Select Move show to different house.
4.
The Move Movie window will open showing information for the movie selected. Select a second
theater for the movie to move to. Make sure all other information is correct and click OK.
Figure 18-39. The Move Movie window
Click OK.
5.
The movie time will now be removed from the original theater and added to the theater of the user's
choice.
6.
Close the Movie Schedule Grid window.
18.1.11 Repeat Day for Show Times Schedules
This sub-section explains how to repeat a day's worth of film show times in the Capacity Management module of
the Point of Sale system.
© 1997 - 2005 Ideal Software Systems, Inc.
Chapter 18 - Capacity Management
NOTE: The Capacity Management module is separate from the basic Point of
Sale functionality and must be purchased separately. For information on
purchasing the Capacity Management module, contact Ideal Software Systems,
Inc. In order to place films into movie time slots, films must first have been
created. See the sub-section "Adding a Film" in the "Setting Up Capacity
Management" section of this chapter for more information. Also, in order to
place films into movie time slots, theaters must first have been created. See the
mini-section "Adding Theaters" under "Define" in the "Setting Up Capacity
Management" section of this chapter for more information.
1.
Make sure that the Point of Sale menu is visible at the Ideal FEC Back Office Suite.
2.
Select Capacity Management | Show Times (Figure 18-27).
3.
The Movie Schedule Grid window will open. Select Schedule | Repeat Day.
Figure 18-40. The Movie Schedule Grid window Schedule menu's Repeat Day
Select Schedule | Repeat Day.
4.
The Show Repeat Day window will open. Enter the necessary information.
© 1997 - 2005 Ideal Software Systems, Inc.
713
714
Point of Sale
Figure 18-41. The Show Repeat Day window
Enter the necessary information.
A.
Repeat of day <mm/dd/yyyy> on every
Select an option of how often the schedule is to repeat by clicking the down arrow.
B.
for _____ week(s)
Enter a number of weeks the schedule will need to repeat.
C.
starting on
Click the down arrow to open the Calendar window and select a date the repeating schedule
will begin.
5.
Click OK once the information is entered. The movie time will now be scheduled for the length of time
the user chose.
6.
Close the Movie Schedule Grid window.
18.1.12 Delete Day for Show Times Schedules
This sub-section explains how to delete a day's worth of film show times in the Capacity Management module of
the Point of Sale system.
NOTE: The Capacity Management module is separate from the basic Point of
Sale functionality and must be purchased separately. For information on
purchasing the Capacity Management module, contact Ideal Software Systems,
Inc. In order to place films into movie time slots, films must first have been
created. See the sub-section "Adding a Film" in the "Setting Up Capacity
Management" section of this chapter for more information. Also, in order to
place films into movie time slots, theaters must first have been created. See the
mini-section "Adding Theaters" under "Define" in the "Setting Up Capacity
Management" section of this chapter for more information.
© 1997 - 2005 Ideal Software Systems, Inc.
Chapter 18 - Capacity Management
1.
Make sure that the Point of Sale menu is visible at the Ideal FEC Back Office Suite.
2.
Select Capacity Management | Show Times (Figure 18-27).
3.
The Movie Schedule Grid window will open. Select Schedule | Delete Day.
715
Figure 18-42. The Movie Schedule Grid window Schedule menu's Delete Day
Select Schedule | Delete Day.
4.
The Select Date Range to Delete window will open. Enter a beginning date and an ending date for the
scheduled movie time slots to be deleted. Click OK.
Figure 18-43. The Select Date Range to Delete window
Enter starting and ending dates and click OK.
5.
The Warning window will open confirming the removal of the scheduled movie times. Click Yes.
© 1997 - 2005 Ideal Software Systems, Inc.
716
Point of Sale
Figure 18-44. The Warning window
Click Yes.
6.
Close the Movie Schedule Grid window.
18.1.13 Capacity Management POS Screen Setup
This sub-section explains how to setup the movie buttons for Front POS in the Capacity Management module of
the Point of Sale system.
NOTE: The Capacity Management module is separate from the basic Point of
Sale functionality and must be purchased separately. For information on
purchasing the Capacity Management module, contact Ideal Software Systems,
Inc. In order to place films on to movie buttons for the Front POS Sales screen,
films must first have been created. See the sub-section "Adding a Film" in the
"Setting Up Capacity Management" section of this chapter for more information.
1.
Make sure that the Point of Sale menu is visible at the Ideal FEC Back Office Suite.
2.
Select Capacity Management | POS Screen Setup.
Figure 18-45. The Ideal FEC Back Office Suite Capacity Management menu's POS Screen Setup
Select Capacity Management | POS Screen Setup.
© 1997 - 2005 Ideal Software Systems, Inc.
Chapter 18 - Capacity Management
3.
717
The Film Setup window will open.
Figure 18-46. The Film Setup window
Open the Film Setup window.
4.
Click an empty button where a film needs to be assigned. This will open the Film Listing window.
5.
Select a film and click OK. The movie will appear on the button in the Film Setup window.
Figure 18-47. The Film Setup window sample movie
Select a film and click OK.
6.
Add movies to the buttons until all currently showing movies are accounted for. Click Close.
© 1997 - 2005 Ideal Software Systems, Inc.
718
Point of Sale
18.1.14 Putting Capacity Management on a Terminal
This sub-section contains the information needed to configure the Terminal Parameters in the Point of Sale
software for a movie sales terminal that will use the Capacity Management module.
NOTE: The Capacity Management module is separate from the basic Point of
Sale functionality and must be purchased separately. For information on
purchasing the Capacity Management module, contact Ideal Software Systems,
Inc.
1.
Make sure that the Point of Sale menu is visible at the Ideal FEC Back Office Suite screen.
2.
Select Maintenance | System Parameters.
Figure 18-48. The Ideal FEC Back Office Suite Maintenance menu's System Parameters
Select Maintenance | System Parameters.
3.
The Edit Parameters Terminal window will appear. The Store Settings tab is the default view.
TIP: The Edit Parameters Terminal window is also available by clicking the
Parameters button in the Front POS program.
© 1997 - 2005 Ideal Software Systems, Inc.
Chapter 18 - Capacity Management
4.
719
Select the Terminal Parameters tab.
Figure 18-49. The Edit Parameters Terminal window showing the Terminal Parameters tab
The Terminal Parameters tab.
5.
Make sure the Movie Sales Terminal option is checked. This will assign the current terminal to be a
movie sales terminal.
6.
Once the Terminal Parameters tab is filled out correctly, click OK.
18.2 Front POS and Capacity Management
Instructions for Capacity Management in Front POS
This section contains instructions for using Capacity Management in the
Front POS module of the Point of Sale system. This section contains the
following topics:
•
•
•
•
•
18.2.1
"About Capacity Management Front POS"
"Selling a Movie Ticket"
"Refunding a Movie Ticket"
"Advanced Sales for Movie Tickets"
"Using Inventory Sales"
About Capacity Management Front POS
The Front POS Sales screen for the Capacity Management is separated into six main areas:
1.
Film Selection Buttons - These buttons allow the cashier to select which film ticke