1
User Manual
Wi-Fi SD
(Version 1.6)
1
Table of Contents
INTRODUCTION .............................................................................................................................4
PACKAGE CONTENTS..................................................................................................................5
FEATURES ......................................................................................................................................6
SYSTEM REQUIREMENTS ...........................................................................................................7
INSTALLING THE WI-FI SD APP..................................................................................................8
DIRECT SHARE ........................................................................................................................ 9
INTERNET MODE .................................................................................................................... 10
CONNECTING TO A SMARTPHONE PERSONAL HOTSPOT ............................................... 12
USING THE WI-FI SD APP ON IOS DEVICES .......................................................................... 13
FIRST TIME QUICK SETUP ...................................................................................................... 14
BROWSE ............................................................................................................................... 15
PLAYING VIDEOS ................................................................................................................... 16
OPENING OTHER FILE TYPES ................................................................................................. 17
DOWNLOADING FILES TO YOUR IOS DEVICE........................................................................... 18
SWITCH BETWEEN WI-FI SD/LOCAL MODE ............................................................................. 20
SHARE PHOTOS DIRECTLY TO FACEBOOK/TWITTER/FLICKR/SINA WEIBO................................. 21
EMAILING A PHOTO FROM WI-FI SD ....................................................................................... 23
SHARE PHOTOS VIA OTHER APPS .......................................................................................... 24
SHOOT & VIEW ...................................................................................................................... 25
USING THE WI-FI SD APP ON ANDROID DEVICES ............................................................... 26
FIRST TIME QUICK SETUP ...................................................................................................... 27
BROWSE ............................................................................................................................... 28
PLAYING VIDEOS ................................................................................................................... 29
OPENING OTHER FILE TYPES ................................................................................................. 30
DOWNLOADING FILES TO YOUR ANDROID DEVICE ................................................................... 31
SWITCH BETWEEN WI-FI SD/LOCAL MODE ............................................................................. 32
SHARE PHOTOS DIRECTLY TO FACEBOOK/TWITTER/FLICKR/SINA WEIBO................................. 33
EMAILING A PHOTO FROM WI-FI SD ....................................................................................... 35
SHARE PHOTOS VIA OTHER APPS .......................................................................................... 36
SHOOT & VIEW ...................................................................................................................... 37
SETTINGS ..................................................................................................................................... 39
SWITCH CONNECTION MODE .................................................................................................. 40
2
WI-FI OPTIONS ...................................................................................................................... 41
DIRECT SHARE SETTINGS ...................................................................................................... 42
INTERNET MODE SETTINGS .................................................................................................... 43
SET ADMINISTRATOR PASSWORD ........................................................................................... 44
WI-FI SD INFORMATION ......................................................................................................... 45
CONNECTING TO THE WI-FI SD CARD USING OTHER DEVICES ...................................... 46
RESTORE DEFAULTS (RETURN TO ORIGINAL SETTINGS)* .............................................. 54
UPGRADING FIRMWARE ........................................................................................................... 55
TROUBLESHOOTING .................................................................................................................. 56
SPECIFICATIONS......................................................................................................................... 58
GET MORE HELP ......................................................................................................................... 59
FCC COMPLIANCE & ADVISORY STATEMENT ..................................................................... 60
TRANSCEND LIMITED WARRANTY ......................................................................................... 62
END-USER LICENSE AGREEMENT (EULA) ............................................................................ 63
GNU GENERAL PUBLIC LICENSE (“GPL”) DISCLOSURE................................................... 66
3
Introduction
Congratulations on purchasing Transcend’s Wi-Fi SD card that instantly adds
wireless capability to your digital camera so that you can wirelessly stream digital
photos and videos to your iPad, iPhone, Android, and other Wi-Fi enabled devices.
Thanks to the use of a free downloadable App, developed for use with Apple iOS and
Android devices, the Wi-Fi SD card is able to organize all of your photos and videos
ready for easy playback. Up to 3 devices can access content from the Wi-Fi SD card
at the same time, making it easier than ever to share your favorite digital files with
friends and family. This User Manual will give you step-by-step instructions and
advice to help you get the best experience from your new device. Please read it
carefully before using the Wi-Fi SD card.
4
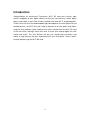
Package Contents
Wi-Fi SD Card
RDP5 card reader
Quick Start Guide and Warranty Card
5
Features
•
View photos (JPG, BMP, PNG, RAW*)
•
Playback videos** (AVI, MOV, MP4, M2T, MTS, M2TS)
•
Supports iOS, Android, Windows, Linux, and Mac OS X
•
Special App for iOS and Android devices
•
Instantly share photos and videos wirelessly
•
Shoot & View on iOS and Android devices
•
Upload photos directly to Facebook/Twitter/Flickr/Weibo
•
Fully compliant with the SD 3.0 standard
•
SDHC Class 10 speed rating
* Wi-Fi SD Card must have firmware version 1.8 or later to support RAW image files.
**For video streaming, the following resolution and video bit rate is recommended:
Resolution: HD-720p 1280x720@30fps, Video bit rate: 1472kbps.
6
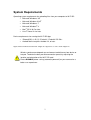
System Requirements
Operating system requirements for uploading files from your computer to Wi-Fi SD:
•
Microsoft Windows® XP
•
Microsoft Windows Vista®
•
Microsoft Windows® 7
•
Microsoft Windows® 8
•
Mac® OS X 10.5 or later
•
Linux® Kernel 2.4 or later
Device requirements for running the Wi-Fi SD App:
•
iPhone(3GS, 4, 4S, 5) / iPad mini / iPad with iOS 5.0+.
•
Android device requires Android 2.2, or later.
Apple, iPhone and iPad are trademarks of Apple Inc. App Store is a service mark of Apple Inc.
Wireless performance depends on environment and distance from device or
hotspot. To obtain the best possible connection speed, try adjusting the
location and orientation of the Wi-Fi SD card.
Please DISABLE power saving (automatic power off) on your camera for a
better user experience.
7
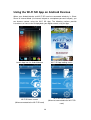
Installing the Wi-Fi SD App
Developed specifically for iOS (iPhone/iPad) and Android devices, the free to
download Wi-Fi SD App allows you to wirelessly browse and download photos and
videos stored on the Wi-Fi SD card, and customize wireless network settings.
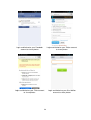
Installing the App on an iOS device:
1. Using your iOS device, open the App Store and search for the Wi-Fi SD App.
2. Select the suitable Wi-Fi SD App (iPhone or iPad version).
3. Tap FREE to start the
download process.
4. Tap INSTALL to complete
installation.
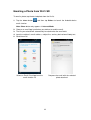
Installing the App on an Android device:
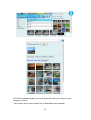
1. Using your Android device, open Google Play (for Kindle Fire users, please open
the Amazon Appstore) and search for the Wi-Fi SD App.
2. Select the suitable Wi-Fi SD App.
3. Tap Free to start the
download process.
4. Tap Install to complete
installation.
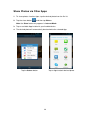
Once installation is complete, the App will be displayed on the home screen of your
device. To begin using the App, please see Using the Wi-Fi SD App.
8
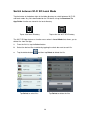
Connecting to the Wi-Fi SD Card using iOS and
Android Devices
To wirelessly access Wi-Fi SD card digital content on your iOS/Android device, you
must first connect to the Wi-Fi SD card’s dedicated wireless network.
Direct Share
(Peer-to-peer connection with iOS/Android device(s))
Direct Share mode allows you to browse photos and videos stored on the Wi-Fi SD
card on your iPhone/iPad/Android device. When connected to the Wi-Fi SD card in
Direct Share mode, your device will not have Internet access.
(On your camera)
1. Insert the Wi-Fi SD card and power-on the camera. (For directions on inserting
an SD card into your camera, please see your camera’s user manual.)
By default, the Wi-Fi SD card’s wireless network signal will automatically broadcast in
Direct Share mode once the camera is powered on. (To change the preferred default
startup mode, please see the Settings section for detailed instructions.)
(On your iOS device)
2. Tap Settings, then Wi-Fi.
3. Under Choose a Network… select WIFISD. (After turning on the camera, please
wait around 25 seconds for the network to appear. Default Wi-Fi security key:
‘12345678’. To change the default SSID and setup a Wi-Fi security key, please
see the Settings section for detailed instructions.)
(On your Android device)
2. Tap System Settings, then Wi-Fi.
3. Under Wi-Fi, select WIFISD. (After turning on the camera, please wait around 25
seconds for the network to appear. Default Wi-Fi security key: ‘12345678’. To
change the default SSID and setup Wi-Fi security key, please see the Settings
section for detailed instructions.)
9
Internet Mode
(Connect with iOS/Android device(s) and Internet hotspot)
Internet mode allows you to browse photos and videos stored on the Wi-Fi SD card
on your iPhone or iPad while connected to an Internet hotspot. In this mode, your
device has Internet access, allowing you to upload and share photos online.
Internet hotspot setup:
Before you can use the Wi-Fi SD card in Internet mode, you must be within range of
an Internet hotspot to enter the network details.
1. While connected to the Wi-Fi SD card in Direct Share mode (see previous section
for instructions), launch the Wi-Fi SD App from your iOS/Android home screen.
2. Tap Settings and enter the admin username and password, then tap Internet
Mode.
Note: The default username and password are both admin (all lower case)
3. Enter the SSID and password of the Internet hotspot and tap Done.
General use:
(On your camera)
1. Insert the Wi-Fi SD card into your camera. (For directions on inserting an SD card
into your camera, please see your camera’s user manual.)
2. Follow the steps in the Direct Share section to connect to the Wi-Fi SD card, and
then launch the Wi-Fi SD App.
3. Tap Settings and enter the admin username and password, then tap Switch
Connection Mode.
Note: The default username and password are both admin (all lower case)
4. Tap Internet Mode, then tap Apply.
Note: By default, the Wi-Fi SD card’s wireless network signal will automatically
broadcast in Direct Share mode once the camera is powered on. (To change the
preferred default startup mode to Internet Mode and skip steps 2-4 above, please
see the Settings section for detailed instructions.)
(On your iOS device)
5. Tap Settings, then Wi-Fi.
6. Under Choose a Network… select the SSID of the Internet hotspot you set up in
previously while in Direct Share mode.
10
(On your Android device)
5. Tap System Settings, then Wi-Fi.
6. Under Wi-Fi, select the SSID of the Internet hotspot you set up in previously
while in Direct Share mode.
Note: If the Wi-Fi SD card can’t connect to the Internet hotspot after about 1 min, it
will automatically switch to Direct Share mode.
Note: Some hotspots may require authentication via a web browser. In this case, the
Wi-Fi SD card will not have Internet access while connected in Internet mode, and
therefore you will not be able to upload and share photos online.
11
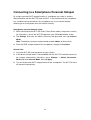
Connecting to a Smartphone Personal Hotspot
By using its personal Wi-Fi hotspot function, a smartphone can share its wireless
data connection with the Wi-Fi SD card via Wi-Fi. In any location that the smartphone
has a mobile Internet connection, the smartphone acts as an Internet hotspot,
allowing you to share photos over the Internet instantly.
Smartphone personal hotspot setup:
1. While connected to the Wi-Fi SD card in Direct Share mode (see previous section
for instructions), launch the Wi-Fi SD App from your iOS/Android home screen.
2. Tap Settings and enter the admin username and password, then tap Internet
Mode.
Note: The default username and password are both admin (all lower case)
3. Enter the SSID and password of the smartphone’s hotspot and tap Done.
General Use:
1. Insert the Wi-Fi SD card and power-on your camera.
2. If the default startup mode is Internet Mode then the Wi-Fi SD card will connect to
the hotspot automatically. Otherwise, go to Settings -> Switch Connection
Mode and select Internet Mode, then tap Apply.
3. Turn on the personal Wi-Fi hotspot feature of the smartphone. The Wi-Fi SD card
will connect automatically.
12
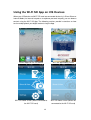
Using the Wi-Fi SD App on iOS Devices
When your iOS device and Wi-Fi SD card are connected wirelessly in Direct Share or
Internet Mode (via Internet hotspot or smartphone personal hotspot), you can browse
content using the Wi-Fi SD App. The following sections provide instructions on how
to view and playback your digital content using the App.
Launch App from the iOS device
Wi-Fi SD App loading screen
Wi-Fi SD home screen (When connected to
Wi-Fi SD home screen (When not
the Wi-Fi SD card)
connected to the Wi-Fi SD card)
13
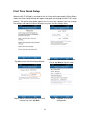
First Time Quick Setup
When the Wi-Fi SD App is launched for the first time while connected in Direct Share
mode, the Quick Setup Wizard will appear and guide you through the Wi-Fi SD setup
process. The quick setup guide appears on first use only, however you can change
the settings and add an Internet hotspot at any time via the settings menu.
Tap YES to start the Quick Setup
Step1. Modify the Wi-Fi SD SSID and
Wizard
Key or tap Next to skip this step
Step2. Add an Internet Hotspot SSID
Step3. Tap Save to save the
and security key, then tap Next
configuration
14
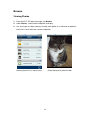
Browse
Viewing Photos
1. From the Wi-Fi SD App home page, tap Browse.
2. Under Photos, select the desired photo to display.
3. Use your finger to swipe sideways through each photo as a slideshow or go back
to the file list and select the next desired photo.
Browse photo file list, tap to select
Photo displayed in portrait mode
15
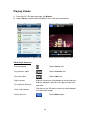
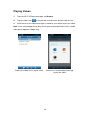
Playing Videos
1. From the Wi-Fi SD App home page, tap Browse.
2. Under Videos, select the desired video to view, it will play automatically.
Browse video file list, tap to select
Video displayed in portrait mode
Video Player Controls:
Pause playback
-
Tap the Pause icon
Play previous video
-
Tap the Previous icon
Play next video
-
Tap the Next icon
Adjust volume
-
Slide the volume bar at the bottom to the desired level
Fast-forward / Rewind
-
View / Hide controls
-
Return to file list
-
Slide the playback scroll bar at the top to the desired
track time
Tap once on the iOS device screen to switch between
the view control modes
Tap the Done button
16
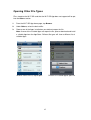
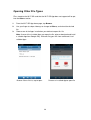
Opening Other File Types
Files stored on the Wi-Fi SD card that the Wi-Fi SD App does not support will be put
into the Others section.
1.
From the Wi-Fi SD App home page, tap Browse.
2.
Under Others, select the desired file.
3.
Choose one of the Apps installed on your device to open the file.
Note: If none of the installed Apps can open the file, please download and install
a suitable App from the App Store. Different file types will show a different list of
suitable Apps.
Browse Others file list, tap to open
Choose an installed App to open file
17
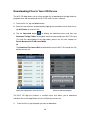
Downloading Files to Your iOS Device
The Wi-Fi SD App allows you to select multiple files to download to the App folder for
playback when not connected to the Wi-Fi SD card’s wireless network.
1. From the file list, tap the Select button.
2. Select the desired files to download by tapping the check box next to each file or
tap All Photos to select all files.
3. Tap the Download button
to display the download menu and then tap
Download To App Folder for playback when not connected to the Wi-Fi SD card.
(To view files downloaded to the App folder, please see the next chapter on
Switch Between Wi-Fi SD/Local Mode)
Or
Tap Download To Camera Roll to download it from the Wi-Fi SD card to the iOS
device camera roll.
Select desired photos from the file list
Select a download option
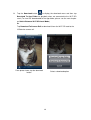
The Wi-Fi SD App also features a function menu that allows you to download
individual files to the App Folder or to the iOS device camera roll.
1.
From the file list, tap the photo you want to download.
18
2.
Tap the Download button
to display the download menu and then tap
Download To App Folder for playback when not connected to the Wi-Fi SD
card. (To view files downloaded to the App folder, please see the next chapter
on Switch Between Wi-Fi SD/Local Mode)
Or
Tap Download To Camera Roll to download it from the Wi-Fi SD card to the
iOS device camera roll.
From photo viewer, tap the download
Select a download option
button
19
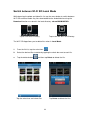
Switch between Wi-Fi SD/Local Mode
Tap the button at the bottom-right of the folder directory to switch between Wi-Fi SD
and local mode. Any files downloaded to the iOS device using the Download To
App Folder function are stored in the local directory.
Tap to view Local Directory
Tap to view the Wi-Fi SD Directory
The Wi-Fi SD App features a function menu when in Local Mode that allows you to
delete files from the App.
1.
From the file list, tap the Select button.
2.
Select the desired files to delete by tapping the check box next to each file.
3.
Tap the delete button
and then tap Delete to delete the file.
Tap Select to select files
Tap Delete to delete the files
20
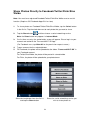
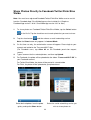
Share Photos Directly to Facebook/Twitter/Flickr/Sina
Weibo
Note: You must be a registered Facebook/Twitter/Flickr/Sina Weibo user to use this
function. (Requires iOS Facebook App v5.0.1 or later)
1.
To share photos on Facebook/Twitter/Flickr/Sina Weibo, tap the Select button
in the file list. Tap the check box next to each photo that you want to share.
2.
Tap the Share button
and then choose a social networking service.
Note: the Share button only appears in Internet Mode
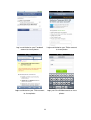
3.
On first time use only, the authorization screen will appear. Please log in to your
account and authorize the Transcend Wi-Fi SD App.
(For Facebook users, tap Allow All on the permission request screen.)
4.
Type a comment for the selected photos.
5.
For Facebook, the photo will be uploaded to the album “Transcend Wi-Fi SD” in
your Facebook account.
For Twitter/Sina Weibo, the photo will be posted in a tweet/weibo.
For Flickr, the photo will be uploaded to your photostream.
Select desired photos from the file list
Select the social networking service you
and tap the Share button
wish to share photos to
21
Log in and Authorize your Facebook
Login and Authorize your Twitter account
account to share photos
to share photos
Login and Authorize your Flickr account
Login your Sina Weibo account to share
to share photos
photos
22
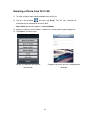
Emailing a Photo from Wi-Fi SD
1. To email a photo, tap the desired photo from the file list.
2. Tap the share button
and then tap Email. The file you selected will
automatically be attached to the email draft.
Note: Share button only appears in Internet Mode
3. Input the recipient’s email address, subject line, and any desired email body text.
4. Tap Send to send the email.
Tap the share button then tap the
Compose the email with the selected photo
email button
attached
23
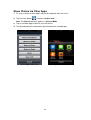
Share Photos via Other Apps
1. To share a photo via other Apps, tap the desired photo from the file list.
2. Tap the share button
and then tap Open with.
Note: The Share button only appears in Internet Mode
3. Tap an available App installed in your iOS device.
4. The desired photo will automatically be attached to the selected App.
Tap an App to attach desired photo
Tap the Open with button
24
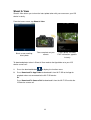
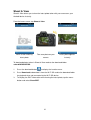
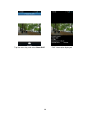
Shoot & View
Shoot & View allows you to view the latest photo taken with your camera on your iOS
device instantly.
From the home screen, tap Shoot & View.
Blank screen awaiting
latest photo
Take new photo on your
Latest photo, including
camera
EXIF information, appears
instantly
To download photos taken in Shoot & View mode to the App folder or to your iOS
device camera roll:
1.
Press the download button
2.
Press Download To App Folder to download it from Wi-Fi SD to the App for
to display the function menu.
playback when not connected to the Wi-Fi SD device.
Or
Press Download To Camera Roll to download it from the Wi-Fi SD card to the
iOS device camera roll.
25
Using the Wi-Fi SD App on Android Devices
When your Android device and Wi-Fi SD card are connected wirelessly in Direct
Share or Internet Mode (via Internet hotspot or smartphone personal hotspot), you
can browse content using the Wi-Fi SD App. The following sections provide
instructions on how to view and playback your digital content using the App.
Launch App from the Android device
Wi-Fi SD App loading screen
Wi-Fi SD home screen
Wi-Fi SD home screen
(When connected to the Wi-Fi SD card)
26
(When not connected to the Wi-Fi SD
card)
First Time Quick Setup
When the Wi-Fi SD App is launched for the first time while connected in Direct Share
mode, the Quick Setup Wizard will appear and guide you through the Wi-Fi SD setup
process. The quick setup guide appears on first use only, however you can change
the settings and add an Internet hotspot at any time via the settings menu.
Tap Yes to start the Quick Setup Wizard
Step1. Modify the Wi-Fi SD SSID and
Key or tap Next to skip this step
Step2. Add an Internet Hotspot SSID and
Step3. Tap Save to save the
security key, then tap Next
configuration
27
Browse
Viewing Photos
1.
From the Wi-Fi SD App home page, tap Browse.
2.
3.
Tap the photos icon
on the tool bar and select the desired photo to display.
Use your finger to swipe sideways through each photo as a slideshow or go
back to the photo gallery and select the next desired photo.
Browse photo gallery, tap to select
Photo displayed in portrait mode
28
Playing Videos
1.
From the Wi-Fi SD App home page, tap Browse.
2.
Tap the videos icon
3.
Choose one of the video player Apps installed on your device to play the video.
on the tool bar and select the desired video to view.
Note: If the selected App cannot play the file, please download and install a suitable
video player App from Google Play.
Browse the video file list, tap to select
Choose an installed video player App
to play the video
29
Opening Other File Types
Files stored on the Wi-Fi SD card that the Wi-Fi SD App does not support will be put
into the Others section.
1.
From the Wi-Fi SD App home page, tap Browse.
2.
Use your finger to swipe sideways to change to Others, and select the desired
file.
3.
Choose one of the Apps installed on your device to open this file.
Note: If none of the installed Apps can open the file, please download and install
a suitable App from Google Play. Different file types will show a different list of
suitable Apps.
Browse Others file list, tap to open
Choose an installed App to open file
30
Downloading Files to Your Android Device
The Wi-Fi SD App allows you to select multiple files to download to the App folder for
playback when not connected to the Wi-Fi SD card’s wireless network.
1.
From the photo gallery page, tap the select icon
2.
Select the desired files to download by tapping each photo or tap the Photo title
.
bar to select all files.
3.
Tap the download icon
on the tool bar to display the download menu and
then tap Download. (To view files downloaded to the download folder, please
see the next chapter on Switch Between Wi-Fi SD/Local Mode or check folder
path: sdcard\DCIM\WIFISD on your Android device)
Select desired files from the photo
Tap Download to download to the
gallery
sdcard\DCIM\WIFISD folder
31
Switch between Wi-Fi SD/Local Mode
While browsing the photo and video file list, tap the menu button to switch between
Wi-Fi SD and local mode. Any files downloaded to the Android device using the
Download function are stored in the local directory: sdcard\DCIM\WIFISD.
Tap to view Local Directory
Tap to view the Wi-Fi SD Directory
The Wi-Fi SD App allows you to delete files when in Local Mode.
1.
From the file list, tap the select icon
2.
Select the desired files to delete by tapping the check box next to each file.
3.
Tap the delete button
.
and then tap Delete to delete the file.
Tap the select icon and select files
Tap Delete to delete the files
32
Share Photos Directly to Facebook/Twitter/Flickr/Sina
Weibo
Note: You must be a registered Facebook/Twitter/Flickr/Sina Weibo user to use this
function. Facebook App / Sina Weibo App must be installed first. (Requires:
Facebook App version 1.9.10 / Sina Weibo App version 3.3.5 or later)
1.
To share photos on Facebook/Twitter/Flickr/Sina Weibo, tap the Select button
in the file list.Tap the check box next to each photo that you want to share.
2.
Tap the share button
and then choose a social networking service.
Note: the Share button only appears in Internet Mode
3.
On first time use only, the authorization screen will appear. Please login to your
account and authorize the Transcend Wi-Fi App.
(For Facebook users, tap Allow All on the Facebook permission request
screen.)
4.
Type a comment for the selected photos, and then tap Upload.
5.
For Facebook, the photo will be uploaded to the album “Transcend Wi-Fi SD” in
your Facebook account.
For Twitter/Sina Weibo, the photo will be posted in a tweet/weibo.
For Flickr, the photo will be uploaded to your photostream.
Select desired photos from the photo
Select the social networking service you
gallery and tap the Share button
wish to share photos to
33
Login and Authorize your Facebook
Login and Authorize your Twitter account
account to share photos
to share photos
Login and Authorize your Flickr account
Login and Authorize your Sina Weibo
to share photos
account to share photos
34
Emailing a Photo from Wi-Fi SD
To email a photo, tap the desired photo from the file list.
1. Tap the share button
and then tap Others to launch the Android device
email function.
Note: Share button only appears in Internet Mode
2. Choose an email App installed on your device to send the email.
3. The file you selected will automatically be attached to the email draft.
4. Input the recipient’s email address, subject line, and any desired email body text.
5. Send the email.
Select an Email Client App from the
Compose the email with the selected
email function list
photo attached
35
Share Photos via Other Apps
1. To share photos via other Apps, tap the desired photo from the file list.
2. Tap the share button
and then tap Others.
Note: the Share button only appears in Internet Mode
3. Tap an available App installed in your Android device.
4. The desired photo will automatically be attached to the selected App.
Tap an App to attach desired photo
Tap the Others button
36
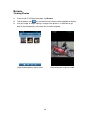
Shoot & View
Shoot & View allows you to view the latest photo taken with your camera on your
Android device instantly.
From the home screen, tap Shoot & View.
Blank screen awaiting
Take new photo on your
Latest photo appears
latest photo
camera
instantly
To download photos taken in Shoot & View mode to the download folder
sdcard/DCIM/WIFISD:
1.
Press the download button
to display the function menu.
2.
Press Download to download it from the Wi-Fi SD card to the download folder
for playback when not connected to the Wi-Fi SD device.
3.
To display the EXIF information while viewing the latest photo, tap the menu
button and select Show EXIF.
37
Tap the menu key and select Show EXIF
38
EXIF information displayed
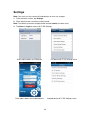
Settings
Note: You must turn the camera off and back on to save any changes.
1. From the home screen, tap Settings.
2. Enter administrator username and password.
Note: The default username and password are both admin (all lower case)
3. Tap Done or Login to access Wi-Fi SD Settings.
Enter admin details on iOS device
iOS device Wi-Fi SD Settings menu
Enter admin details on Android device
Android device Wi-Fi SD Settings menu
39
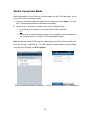
Switch Connection Mode
While connected via Direct Share or Internet Mode, the Wi-Fi SD app allows you to
easily switch Wi-Fi connection modes.
1. Tap the connection mode you would like to change to and tap Apply. The new
Wi-Fi SD connection mode will take effect immediately.
2. Go to the Wi-Fi connection settings of your iOS or Android device.
•
If switching to Direct Share: connect to the Wi-Fi SD card SSID.
Or
•
If switching to Internet Mode: connect to the available Internet hotspot that
you setup previously in the Wi-Fi SD Internet Mode settings.
Note: By default, the Wi-Fi SD card will automatically enter Direct Share mode each
time the camera is powered on. To switch default startup mode to Internet Mode
using the Wi-Fi SD App, see Wi-Fi Options.
Switch Connection Mode on iOS device
40
Switch Connection Mode on Android device
Wi-Fi Options
Note: Please upgrade the Wi-Fi SD card firmware to version 1.3 or later to enable
this function.
Default Mode lets you choose whether the Wi-Fi SD card’s wireless network signal
will automatically broadcast in Direct Share or Internet Mode each time the camera is
powered on.
Wi-Fi Options on iOS device
Wi-Fi Options on Android device
If no wireless connection to the Wi-Fi SD card exists after startup, Turn Off Wi-Fi
allows you to turn off its Wi-Fi function after the selected time and work as a normal
SDHC memory card. This can help to save camera battery life. The camera must be
powered off and back on to re-enable the Wi-Fi function.
Note: This function works on startup only. If there is a connection to the Wi-Fi SD
card after startup, the Wi-Fi function will never turn off, even if the Wi-Fi connection is
lost.
41
Direct Share Settings
To configure basic wireless settings, tap Direct Share Settings.
WPA2 wireless security is enabled by default (Default Key ‘12345678’). It is
recommended that you change the default SSID and Key to differentiate your Wi-Fi
SD card from others that may be transmitting in your area.
Note: The SSID / Key must be at least 8 characters long and no more than 32
characters. All ASCII characters are acceptable.
Direct Share settings on iOS device
Direct Share settings on Android device
42
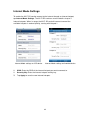
Internet Mode Settings
To enable the Wi-Fi SD card to connect to the Internet through an Internet hotspot,
tap Internet Mode Settings. The Wi-Fi SD card can save the details of up to 3
Internet hotspots. When in range, the Wi-Fi SD card will connect to one of the
available hotspots in order of priority, starting with Hotspot 1.
Internet Mode settings on iOS device
Internet Mode settings on Android device
1.
SSID: Enter the SSID of the Internet hotspot you want to connect to.
2.
Security Key: Enter the Internet hotspot security key.
3.
Tap Apply to save the new Internet hotspots.
43
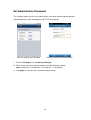
Set Administrator Password
This function allows you to set an administrator username and password to prevent
unauthorized users from changing any Wi-Fi SD card settings.
Security settings on iOS device
Security settings on Android device
1. From the Settings menu tap Security Settings.
2. Enter a new username and password for the administrator account.
Note: Username: 5-12 characters. Password: 3 - 12 characters.
3. Tap Apply to save the new username and password.
44
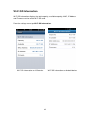
Wi-Fi SD Information
Wi-Fi SD Information displays the total capacity, available capacity, MAC, IP Address
and Firmware version of the Wi-Fi SD card.
From the settings menu tap Wi-Fi SD Information.
Wi-Fi SD information on iOS device
Wi-Fi SD information on Android device
45
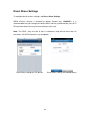
Connecting to the Wi-Fi SD Card using Other
Devices
To wirelessly access digital content on your laptop, smartphone, or tablet:
1. Direct Share: On your Wi-Fi enabled device, use the Wi-Fi connection settings to
search and connect to the Wi-Fi SD card’s dedicated wireless network.
2. Once connected, launch an Internet browser and type “192.168.11.254” into the
browser address bar.
3. Enter administrator username and password.
Note: The default username and password are both admin (all lower case)
4. You will now be able to see the home screen of the Wi-Fi SD card, where you can
view and download photos and videos from the Wi-Fi SD card, change Wi-Fi SD
card settings, and view Wi-Fi SD information.
Internet browser Wi-Fi SD card home screen
46
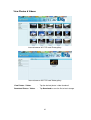
View Photos & Videos
Internet browser Wi-Fi SD card Photo gallery
Internet browser Wi-Fi SD card Video gallery
View Photos / Videos
- Tap the desired photo / video thumbnail.
Download Photos / Videos
- Tap Download to save the file to local storage.
47
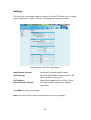
Settings
This menu lets you manage important functions of the Wi-Fi SD card such as, setting
wireless preferences, wireless security, and setting administrator password.
Internet browser Wi-Fi SD card Settings
Administrator Account
-
Set up new Username and Password.
Wi-Fi Settings
-
For Direct Share Mode: setup a new Wi-Fi SD
SSID and WPA2 security key
Wi-Fi Options
-
Select Default Mode and Turn Off Wi-Fi timer
Internet Hotspot Settings
-
For Internet Mode: setup Internet hotspot
information.
Tap Submit to submit any changes.
Note: You must turn the camera off and back on to save any changes.
48
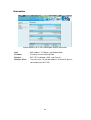
Information
Internet browser Wi-Fi SD card Network Device Information
LAN
- MAC address, IP Address and Subnet Mask.
Firmware
- Firmware version and Build Date.
Wireless
- Wi-Fi SD Card Mode, SSID, and Channel.
Wireless Client - The Host name, IP and Mac address of the Wi-Fi devices
connected to the Wi-Fi SD.
49
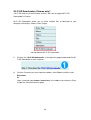
Wi-Fi SD Downloader (Chrome only)*
* Wi-Fi SD Card must have firmware version 1.8 or later to support Wi-Fi SD
Downloader in Chrome.
Wi-Fi SD Downloader allows you to select multiple files to download to your
computer, and display “Shoot & View” images.
Internet browser Wi-Fi SD Downloader
1.
Click the link “Wi-Fi SD downloader” at the top of the page to download the WiFi SD Downloader to your computer.
2.
Click the Chrome menu on the browser toolbar, select Tools, and then select
Extensions
Or
Open a new tab, type chrome://extensions/ in the address bar and press Enter
to open the Chrome extension page.
50
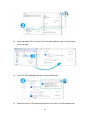
3.
Drag and drop the file “wifisd.crx” that was downloaded in step 1 to the Chrome
extension page.
4.
The Wi-Fi SD Downloader will be installed automatically.
5.
Switch to the Wi-Fi SD photo page and click on the Wi-Fi SD Downloader icon.
51
Wi-Fi SD Downloader displays the latest photo taken with your camera on your
computer instantly.
It also allows you to select multiple files to download to your computer.
52
Clear
-
Clear the “Shoot & View” image viewer
Download
-
Tap Download to save files to the computer
53
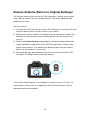
Restore Defaults (Return to Original Settings)*
This function allows you to reset the Wi-Fi SD card wireless settings to the original
factory defaults. None of the files stored on the Wi-Fi SD card are deleted when
performing this action.
(On your camera)
1. Insert the Wi-Fi SD card into your camera. (For directions on inserting an SD card
into your camera, please see your camera’s user manual.)
2. Power-on the camera and press the display button to view camera images. (For
directions on viewing images on your camera, please see your camera’s user
manual.)
3. Scroll to the Restore Defaults image and press the delete button to delete the
image. Deleting the image will reset the Wi-Fi SD card wireless settings to the
original factory defaults. (For directions on deleting images from your camera,
please see your camera’s user manual.)
4. After deleting image, please power-off your camera and reinsert the Wi-Fi SD
card again. All settings will be reset to their defaults.
*The Restore Defaults option is not supported in firmware version 1.7 or later. To
restore default settings, you must upgrade the Wi-Fi SD Card firmware. See the
following chapter for more details.
54
Upgrading Firmware
Each time the Wi-Fi SD App is launched while connected to the Wi-Fi SD Card; it will
check your card’s firmware version. If a newer version is available, a popup message
will notify you. Please go to www.transcend-info.com/downloads to download it.
For Windows/Mac user, please download Wi-Fi SD Firmware Update Tool
(Windows/Mac ver.) to upgrade firmware.
Note: To prevent data loss, it is recommended that you backup your data to
another location before upgrading the firmware of your Wi-Fi SD card.
1.
Download the firmware files and insert the Wi-Fi SD card into your computer.
(depending on your computer setup, you may need to use an SD card reader)
2.
Copy the firmware files to the root directory of Wi-Fi SD card.
3.
Eject the drive and remove the Wi-Fi SD card from your computer.
4.
Re-insert the Wi-Fi SD card into your camera.
5.
Power on the camera and wait for 5 minutes.
6.
After 5 minutes, turn camera power off and on again to complete upgrade.
IMPORTANT: Please disable power saving and do NOT power off your
camera during firmware upgrade. Any interruption during the process
may cause unexpected results.
55
Troubleshooting
1. I can’t see the Wi-Fi SD network on my device.
A: Check that Wi-Fi connectivity is enabled on your device. Also, please check
the power status of your camera. The Wi-Fi signal cannot be launched when
camera battery level is too low. Additionally, if the default startup mode is set to
Internet Mode then the Wi-Fi SD card will first search for the hotspots listed in the
Internet Mode Settings before automatically switching to Direct Share Mode.
Please wait around one minute for the network to appear.
2. I can’t connect wirelessly to the Wi-Fi SD network.
A: Turn your camera off, reinsert the Wi-Fi SD card, and then power on the
camera. Please also check the number of devices currently connected to the WiFi SD card. The Wi-Fi SD card can connect to up to 3 devices at the same time.
3. I forgot the username and password. How do I access Wi-Fi SD settings?
A: Please update firmware to reset defaults. The default username and password
are both reset to admin (all lower case)
4. How do I turn off the Wi-Fi SD card?
A: Simply turn off your camera. All Wi-Fi SD card functions will be disabled.
5. How many devices can connect to Wi-Fi SD simultaneously?
A: Up to 3 devices can connect to the Wi-Fi SD card at the same time.
6. Can the Wi-Fi SD card work in my camera?
A: Please go to http://www.transcend-info.com/Products/Compatibility/ for an
up-to-date list of compatible cameras.
7. Wi-Fi SD connection speed is slow.
A: Wireless performance depends on environment and distance from device or
hotspot. To obtain the best possible connection speed, you can experiment with
the following:
‧ Make sure your camera has adequate power.
‧ Try adjusting the location and orientation of the Wi-Fi SD card.
8. Can I change the default photo download path for my Android device?
56
A: Tap the More button
from the App home screen and select Preference to
edit the default download path of your Android device.
57
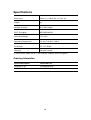
Specifications
Dimensions
32mm (L) × 24mm (W) × 2.1mm (H)
Weight
2g
Network Interface
Wi-Fi 802.11b/g/n
Wi-Fi Encryption
WEP/WPA/WPA2*
Operating Voltage
2.7V~3.6V
Operating Temperature
0°C (32°F) to 60°C (140°F)
Certificates
CE, FCC, BSMI
Warranty
Two-year Limited
*In Direct Share mode, the Wi-Fi SD card only supports WPA2 encryption.
Ordering Information
Device Description
Transcend P/N
16GB Wi-Fi SD
TS16GWSDHC10
32GB Wi-Fi SD
TS32GWSDHC10
58
Get more help
If you cannot find the answer to your problem in this manual and are having difficulty
with the Wi-Fi SD card or App, please visit our Tech Support website at
www.transcend-info.com/support.
59
FCC Compliance & Advisory Statement
This equipment has been tested and found to comply with the limits for a Class B
digital device, pursuant to Part 15 of the FCC Rules. These limits are designed to
provide reasonable protection against harmful interference in a residential installation.
This equipment generates, uses, and can radiate radio frequency energy and if not
installed and used in accordance with the instructions, may cause harmful
interference to radio communications. However, there is no guarantee that
interference will not occur in a particular installation. If this equipment does cause
harmful interference to radio or television reception, which can be determined by
turning the equipment off and on, the user is encouraged to try to correct the
interference by one or more of the following measures:
•
Reorient or relocate the receiving antenna.
•
Increase the separation between the equipment and receiver.
•
Connect the equipment into an outlet on a circuit different from that to which
the receiver is connected.
•
Consult the dealer or an experienced radio/TV technician for help.
This device complies with Part 15 of the FCC rules. Operation is subject to the
following two conditions:
1. this device may not cause harmful interference and
2. this device must accept any interference received, including interference that
may cause undesired operation of the device.
FCC RF Radiation Exposure Statement
This Transmitter must not be co-located or operating in conjunction with any other
antenna or transmitter.
Caution: Any changes or modifications not expressly approved by the
party responsible for compliance could void the user's authority to
operate this equipment.
Warning: A shielded-type power cord is required in order to meet FCC
emission limits and also to prevent interference to the nearby radio and
television reception. It is essential that only the supplied power cord be used.
Use only shielded cables to connect I/O devices to this equipment.
60
NCC 警語
第十二條:經型式認證合格之低功率射頻電機,非經許可,公司、商號或使用
者均不得得擅自變更頻率、加大功率或變更原設計之特性及功能。
第十四條:低功率射頻電機之使用不得影響飛航安全及干擾合法通信;經發現
有干擾現象時,應立即停用,並改善至無干擾時方得繼續使用。
前項合法通信,指依電信法規定作業之無線電通信。低功率射頻電機須忍受合
法通信或工業、科學及醫療用電波輻射性電機設備之干擾。
61
Transcend Limited Warranty
This product is covered by a Two-year Limited Warranty. Should your product fail under
normal use within two years from the original purchase date, Transcend will provide warranty
service pursuant to the terms of the Transcend Warranty Policy. Proof of the original
purchase date is required for warranty service. Transcend will inspect the product and in its
sole discretion repair or replace it with a refurbished product or functional equivalent. Under
special circumstances, Transcend may refund or credit the current value of the product at the
time the warranty claim is made. The decision made by Transcend shall be final and binding
upon you. Transcend may refuse to provide inspection, repair or replacement service for
products that are out of warranty, and will charge fees if these services are provided for outof-warranty products.
Limitations
Any software or digital content included with this product in disc, downloadable, or preloaded
form, is not covered under this Warranty. This Warranty does not Apply to any Transcend
product failure caused by accident, abuse, mishandling or improper usage (including use
contrary to the product description or instructions, outside the scope of the product’s intended
use, or for tooling or testing purposes), alteration, abnormal mechanical or environmental
conditions (including prolonged exposure to humidity), acts of nature, improper installation
(including connection to incompatible equipment), or problems with electrical power (including
undervoltage, overvoltage, or power supply instability). In addition, damage or alteration of
warranty, quality or authenticity stickers, and/or product serial or electronic numbers,
unauthorized repair or modification, or any physical damage to the product or evidence of
opening or tampering with the product casing will also void this Warranty. This Warranty shall
not apply to transferees of Transcend products and/or anyone who stands to profit from this
Warranty without Transcend’s prior written authorization. This Warranty only Applies to the
product itself, and excludes integrated LCD panels, rechargeable batteries, and all product
accessories (such as card adapters, cables, earphones, power adapters, and remote
controls).
Transcend Warranty Policy
Please visit www.transcend-info.com/warranty to view the Transcend Warranty Policy.
By using the product, you agree that you accept the terms of the Transcend Warranty Policy,
which may be amended from time to time.
Online registration
To expedite warranty service, please access
www.transcend-info.com/register to
register your Transcend product within 30 days of the purchase date.
62
End-User License Agreement (EULA)
Software license terms and conditions
1. Generally.
Transcend Information, Inc. ("Transcend") is willing to grant the following license to install or
use the software and/or firmware (“Licensed Software”) pursuant to this End-User License Agreement
(“Agreement”), whether provided separately or associated with a Transcend product (“Product”), to the original
purchaser of the Product upon or with which the Licensed Software was installed or associated as of the time
of purchase ("Customer") only if Customer accepts all of the terms and conditions of this Agreement.
PLEASE READ THESE TERMS CAREFULLY. USING THE SOFTWARE WILL CONSTITUTE CUSTOMER'S
ACCEPTANCE OF THE TERMS AND CONDITIONS OF THIS AGREEMENT. IF YOU DO NOT AGREE TO
THE TERMS AND CONDITIONS OF THIS AGREEMENT, DO NOT INSTALL OR USE THE LICENSED
SOFTWARE.
2. License Grant.
Transcend grants to Customer a personal, non-exclusive, non-transferable, non-
distributable, non-assignable, non-sublicensable license to install and use the Licensed Software on the
Product in accordance with the terms and conditions of this Agreement.
3. Intellectual Property Rights.
As between Transcend and Customer, the copyright and all other
intellectual property rights in the Licensed Software are the property of Transcend or its supplier(s) or
licensor(s). Any rights not expressly granted in this License are reserved to Transcend.
4. License Limitations.
Customer may not, and may not authorize or permit any third party to: (a) use the
Licensed Software for any purpose other than in connection with the Product or in a manner inconsistent with
the design or documentations of the Licensed Software; (b) license, distribute, lease, rent, lend, transfer,
assign or otherwise dispose of the Licensed Software or use the Licensed Software in any commercial hosted
or service bureau environment; (c) reverse engineer, decompile, disassemble or attempt to discover the
source code for or any trade secrets related to the Licensed Software, except and only to the extent that such
activity is expressly permitted by applicable law notwithstanding this limitation; (d) adapt, modify, alter,
translate or create any derivative works of the Licensed Software; (e) remove, alter or obscure any copyright
notice or other proprietary rights notice on the Licensed Software or Product; or (f) circumvent or attempt to
circumvent any methods employed by Transcend to control access to the components, features or functions of
the Product or Licensed Software.
5. Copying.
Customer may not copy the Licensed Software except that one copy of any separate software
component of the Licensed Software may be made to the extent that such copying is necessary for
Customer's own backup purposes.
6. Open Source.
The Licensed Software may contain open source components licensed to Transcend
63
pursuant to the license terms specified as below,
(a) GNU General Public License (GPL), the terms of which is currently available at
http://www.gnu.org/licenses/gpl.html;
(b) GNU Lesser General Public License (LGPL), the terms of which is currently available at
http://www.gnu.org/copyleft/lesser.html; and/or
(c) Code Project Open License (CPOL), the terms of which is currently available at
http://www.codeproject.com/info/cpol10.aspx.
The above license terms will control solely with respect to the open source components. In the event that this
Agreement conflicts with the requirements of the above one or more terms with respect to the use of the
corresponding open source components, Customer agrees to be bound by such one or more license terms.
7. Disclaimer.
TRANSCEND MAKES NO WARRANTY AND REPRESENTATIONS ABOUT THE
SUITABILITY, RELIABILITY, AVAILABILITY, TIMELINESS, LACK OF VIRUSES OR OTHER HARMFUL
COMPONENTS AND ACCURACY OF THE INFORMATION, LICENSED SOFTWARE, PRODUCTS,
SERVICES AND RELATED GRAPHICS CONTAINED WITHIN THE LICENSED SOFTWARE FOR ANY
PURPOSE. ALL SUCH INFORMATION, LICENSED SOFTWARE, PRODUCTS, SERVICES AND RELATED
GRAPHICS ARE PROVIDED "AS IS" WITHOUT WARRANTY OF ANY KIND. TRANSCEND HEREBY
DISCLAIMS ALL WARRANTIES AND CONDITIONS WITH REGARD TO THIS INFORMATION, LICENSED
SOFTWARE,
PRODUCTS,
SERVICES
AND
RELATED
GRAPHICS,
INCLUDING
ALL
IMPLIED
WARRANTIES AND CONDITIONS OF MERCHANTABILITY, FITNESS FOR A PARTICULAR PURPOSE,
WORKMANLIKE EFFORT, TITLE, AND NON-INFRINGEMENT.
IN NO EVENT SHALL TRANSCEND BE LIABLE FOR ANY DIRECT, INDIRECT, PUNITIVE, INCIDENTAL,
SPECIAL, CONSEQUENTIAL DAMAGES OR ANY DAMAGES WHATSOEVER INCLUDING, WITHOUT
LIMITATION, DAMAGES FOR LOSS OF USE, DATA OR PROFITS, ARISING OUT OF OR IN ANY WAY
CONNECTION WITH THE USE, PERFORMANCE OR ACCURACY OF THE LICENSED SOFTWARE OR
WITH THE DELAY OR INABILITY TO USE THE LICENSED SOFTWARE, OR THE PRODUCT WITH WHICH
THE LICENSED SOFTWARE IS ASSOCIATED, WHETHER BASED ON CONTRACT, TORT, NEGLIGENCE,
STRICT LIABILITY OR OTHERWISE, EVEN IF TRANSCEND HAS BEEN ADVISED OF THE POSSIBILITY
OF SUCH DAMAGES.
8. Limitation of Liability.
IN ANY CASE, TRANSCEND 'S LIABILITY ARISING OUT OF OR IN
CONNECTION WITH THIS AGREEMENT WILL BE LIMITED TO THE TOTAL AMOUNT ACTUALLY AND
ORIGINALLY PAID AT RETAIL BY CUSTOMER FOR THE PRODUCT. The foregoing Disclaimer and
Limitation of Liability will apply to the maximum extent permitted by applicable law. Some jurisdictions do not
allow the exclusion or limitation of incidental or consequential damages, so the exclusions and limitations set
forth above may not apply.
64
9. Termination.
Transcend may, in addition to any other remedies available to Transcend, terminate this
Agreement immediately if Customer breaches any of its obligations under this Agreement.
10. Miscellaneous.
(a) This Agreement constitutes the entire agreement between Transcend and Customer
concerning the subject matter hereof, and it may only be modified by a written amendment signed by an
authorized executive of Transcend. (b) Except to the extent applicable law, if any, provides otherwise, this
Agreement will be governed by the law of the Republic of China, excluding its conflict of law provisions. (c) If
any part of this Agreement is held invalid or unenforceable, and the remaining portions will remain in full force
and effect. (d) A waiver by either party of any term or condition of this Agreement or any breach thereof, in any
one instance, will not waive such term or condition or any subsequent breach thereof. (e) Transcend may
assign its rights under this Agreement without condition. (f) This Agreement will be binding upon and will inure
to the benefit of the parties, their successors and permitted assigns.
65
GNU General Public License (“GPL”) Disclosure
Firmware incorporated into this product and/or software used for this product may include third party
copyrighted software licensed under the GPL (hereinafter referred to as “GPL Software”). In accordance
with the GPL, if applicable: 1) the source code for the GPL Software may be downloaded at no charge
or obtained on CD for a nominal charge by calling Customer Support within three years of the date of
purchase; 2) you may copy, re-distribute and/or modify the GPL Software under the terms of the GNU
General Public License as below or any later version, which may be obtained at
http://www.gnu.org/licenses/gpl.html; 3) the GPL Software is distributed WITHOUT ANY WARRANTY,
without even implied warranty of MERCHANTABILITY or FITNESS FOR A PARTICULAR PURPOSE.
The entire risk as to the quality and performance of the GPL Software is with you. Transcend does not
provide any support for the GPL software.
66