1
SETUP
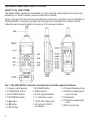
1. Choose the power source. Before using the HHSL402SD, be sure it is powered by fresh
batteries or an optional 9VDC AC adapter plugged into the bottom jack on its right side
(callout 1-13).
To remove the battery compartment cover (callout 1-17), remove the two screws holding it
in place (callout 1-15). Then install six “AA” batteries in the correct orientation, using the
polarity marks on the inside of the compartment as a guide. Replace the cover by replacing
the two screws.
2. Install an SD card. To prepare for setup, also install the supplied 2 GB SD memory card
or another card with a capacity from 1 GB to 16 GB in the socket on the bottom of the
meter (callout 1-18). When installing the card, make sure its gold contacts are facing
front and push the card into the socket until you hear a click. To remove the card, push it
in until you hear a click and the card pops out.
Now power on the instrument by pressing the POWER/ESC button (callout 1-2) to generate
a short beep. (To power off the HHSL402SD, press the POWER button and hold it until the
instrument responds with a long beep.)
When the meter powers on, a series of transient startup screens will briefly appear. Once
the display has stabilized, perform the following six setup steps in the order presented.
3. Set the date and time. Press the SET button (callout 1-5) and hold it for at least five
seconds, until the word “dAtE” appears in the center of the display y, along with the
flashing value “00.00.00” at the lower left, above “yy.mm.dd”.
Set the current year by pressing the or button repeatedly until the correct value
appears above “yy”. Quickly (within three seconds), press the REC/ENTER button to store
the setting. The next screen that appears will have the value above “mm” flashing. Use the
or button to navigate to the current month and press the REC/ENTER button to store
the setting. When the next screen flashes the value above “dd”, again use the or
button to navigate to the current day and press the REC/ENTER button to store the setting.
(If you press buttons too slowly in setup mode, the screen will revert to the normal display.
To return to the setup sequence, press and hold the SET button again. To move ahead to the
next field in the sequence or to the next parameter, press the HOLD/NEXT button.)
Once you have set the date, the display will prompt you to set the hour, minute and second
of the current time. Again use the or button to navigate to the correct values, and the
REC/ENTER button to store the settings.
4. Choose a decimal point or comma to represent the decimal division between integers
and fractions (for example, American-style 20.88 vs. European-style 20,88). Once you
have set the date and time, the display will show the word “bASIC” above the phrase
“dEC”. Press the or button to make “bASIC” (American style) or “Euro” appear in
the upper display, as desired. Press the REC/ENTER button to store the selection as the
default.
5