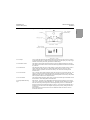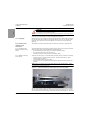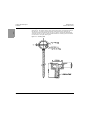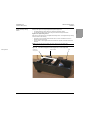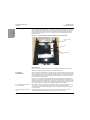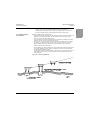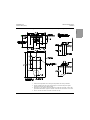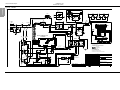
1
User Manual L-880 & L-881 PAPI, Style A 96A0209 Precision Approach Path Indicator (Voltage Powered) Retain for future use. Rev. AA, 7/9/14 L-880 & L-881 PAPI, Style A — 96A0209 Rev. AA 7/9/14 Disclaimer Disclaimer Table of Contents This manual could contain technical inaccuracies or typographical errors. ADB Airfield Solutions reserves the right to revise this manual from time to time in the contents thereof without obligation of ADB Airfield Solutions to notify any person of such revision or change. Details and values given in this manual have been compiled with care. They are not binding, however, and ADB Airfield Solutions disclaims any liability for damages or detriments suffered as a result of reliance on the information given herein or the use of products, processes or equipment to which this manual refers. No warranty is made that the use of the information or of the products, processes or equipment to which this manual refers will not infringe any third party's patents or rights. Warranties Safety Products of ADB Airfield Solutions manufacturer are guaranteed against mechanical, electrical, and physical defects (excluding lamps) which may occur during proper and normal use for a period of one year from the date of installation or 2 years from date of shipment and are guaranteed to be merchantable and fit for the ordinary purposes for which such products are made. ADB Airfield Solutions will correct by repair or replacement, at its option, equipment or parts which fail because of mechanical, electrical or physical defects, provided that the goods have been properly handled and stored prior to installation, properly installed and properly operated after installation, and provided further that Buyer gives ADB Airfield Solutions written notice of such defects after delivery of the goods to Buyer. Refer to the Safety section for more information on Material Handling Precautions and Storage precautions that must be followed. ADB Airfield Solutions reserves the right to examine goods upon which a claim is made. Said goods must be presented in the same condition as when the defect therein was discovered. ADB Airfield Solutions furthers reserves the right to require the return of such goods to establish any claim. ADB Airfield Solutions’ obligation under this guarantee is limited to making repair or replacement within a reasonable time after receipt of such written notice and does not include any other costs such as the cost of removal of defective part, installation of repaired product, labor or consequential damages of any kind, the exclusive remedy being to require such new parts to be furnished. ADB Airfield Solutions’ liability under no circumstances will exceed the contract price of goods claimed to be defective. Any returns under this guarantee are to be on a transportation charges prepaid basis. For products not manufactured by, but sold by ADB Airfield Solutions, warranty is limited to that extended by the original manufacturer. This is ADB Airfield Solutions’ sole guarantee and warranty with respect to the goods; there are no express warranties or warranties of fitness for any particular purpose or any implied warranties of fitness for any particular purpose or any implied warranties other than those made expressly herein. All such warranties being expressly disclaimed. Introduction Installation — Trademarks General notice: other product names used here are for identification purposes only and may be trademarks of their respective companies. Operation Proprietary Information Parts This information carrier contains proprietary information, which shall not be used for other purposes than those for which it has been released, nor be reproduced or disclosed to third parties without the prior written consent of ADB Airfield Solutions. No part of this publication may be reproduced, stored in a retrieval system, or transmitted in any form or by any means, mechanical, photocopy, recording, or otherwise, without the prior written permission of ADB Airfield Solutions. No patent liability is assumed with respect to the use of the information contained herein. Neither is any liability assumed for damages resulting from the use of the information contained herein. ADB Airfield Solutions shall not be liable to the purchaser of this product or third parties for damages, losses, costs, or expenses incurred by purchaser or third parties as a result of accident, misuse, or abuse of this product or unauthorized modifications, repairs, or alterations to this product. ADB Airfield Solutions shall not be liable against any damages arising from the use of any options or parts other than those designated as approved products. Copyright 2010 by ADB Airfield Solutions. All rights reserved. Schematics ii © 2014 ADB Airfield Solutions All Rights Reserved 96A0209 Rev. AA 7/9/14 L-880 & L-881 PAPI, Style A — © 2014 ADB Airfield Solutions All Rights Reserved FAA Cert A.1 Certification iii L-880 & L-881 PAPI, Style A — 96A0209 Rev. AA 7/9/14 Disclaimer Table of Contents Safety Introduction Installation — Operation Parts Schematics iv © 2014 ADB Airfield Solutions All Rights Reserved 96A0209 Rev. AA Document Date (7/2014) General Aviation Terms and Acronyms that you may encounter using our manuals. Table 1: Terms Term Definition ALCMS Acronym for Airfield Lighting Control Monitoring System. An ALCMS incorporates many components that are used to control and monitor an airport’s entire airfield lighting system. The ALCMS may include Touch Screens for lighting control, Maintenance Center(s) for data viewing and archiving, Electrical Lighting equipment for CCR control and monitoring. CCR Abbreviation for Constant Current Regulator. The CCRs are located within the Airfield Lighting Vault (ALV). They produce a constant current output to the airfield series circuit that light the airfield lighting fixtures. BRITE™ ADB Airfield Solutions’ trademarked abbreviation for Bi-directional Series Transceiver which is a term that describes the technology used to transmit and receive data across airfield lighting series circuit cabling. Remote Unit installed in the airfield (normally in pull-pits or base cans) which provides control and monitoring of individual or blocks of light fixtures. Each Remote has its own unique address for control and monitoring data communication to the Master. Master Unit installed within the lighting vault that provides the means for data communication on the airfield series circuit cables. The Master is connected in parallel (across) to the output of the CCR. Each series circuit that contains Remotes must also have a Master installed at the CCR. MWD Abbreviation of Microwave Detector. Microwave detectors are installed in predesignated locations on the airfield. The MWD also has its own unique address for control and monitoring purposes. A MWD is used to detect movement within an established detection zone and communicate the status back to the Master. Control Panel This term is used to reference the device used to control and monitor the controllable stopbars and the associated lighting equipment. The control panel could be either an L-821 style pushbutton panel or a Touchscreen style control panel. The control panel is located in the Air Traffic Control Tower cab. SMGCS Acronym which means Surface Movement Guidance and Control System. SMGCS is an organized system created to improve and enhance low visibility operations. VSP Acronym for Variable System Parameter. This term relates to a time value (in seconds) determined by the airport that is used in conjunction with the Stopbar control timing. In the event that the automatic Stopbar control or MWDs fail, the Stopbars are reset after the VSP value has expired. Table 2: General List of Aviation Acronyms Acronym Definition A2C AGLS2 Configuration Tool, US Market: BRITE III Configuration Tool AGL Aviation Ground Lighting ATC Air Traffic Controller BRITE™ Bi-directional Series Transceiver CPU Central Processing Unit CRC Cyclic Redundancy Code EEPROM Electrically Erasable Programmable Read Only Memory EMI Electromagnetic Interface FAT Factory Acceptance Test FSK Frequency Shift Keying GUI Graphical User Interface HMI Human-Machine Interface ICW Integrated Controller Workstation ILS Instrument Landing System © 2014 ADB Airfield Solutions All Rights Reserved v TERMS A.0 Terms and Acronyms L-880 & L-881 PAPI, Style A TERMS L-880 & L-881 PAPI, Style A TERMS 96A0209 Rev. AA Document Date (7/2014) Acronym TERMS vi Definition IRMS Insulation Resistance Monitoring System PAPI Precision Approach Path Indicator RF Radio Frequency RWY Runway RVR Runway Visual Range SMSS Surface Movement Surveillance System TDZ Touchdown Zone TWY Taxiway UPS Uninterrupted Power Supply © 2014 ADB Airfield Solutions All Rights Reserved 96A0209 Rev. AA 7/9/14 L-880 & L-881 PAPI, Style A Table of Contents Disclaimer TABLE OF CONTENTS A.0 Terms and Acronyms..............................................................................................................................................V 1.0 Safety........................................................................................................................................................................ 1 Table of Contents A.1 Certification ........................................................................................................iii L-880 & L-881 PAPI, Style A.................................................................................................................................... 3 Installation Introduction Table of Contents 2.0 Safety 1.1 To use this equipment safely: ............................................................................. 1 1.1.1 Additional Reference Materials: ................................................................ 1 1.1.2 Qualified Personnel .................................................................................... 1 1.1.3 Intended Use .............................................................................................. 1 1.1.4 Storage ...................................................................................................... 1 1.1.4.1 Operation .......................................................................................... 2 1.1.4.2 Material Handling Precautions .......................................................... 2 1.1.4.3 Action in the Event of a System or Component Malfunction ............. 2 1.1.4.4 Maintenance and Repair ................................................................... 2 © 2014 ADB Airfield Solutions All Rights Reserved Schematics Parts Operation 2.1 About this manual ............................................................................................... 3 2.1.1 How to work with the manual ..................................................................... 3 2.1.2 Record of changes ..................................................................................... 3 2.1.3 Icons used in the manual ........................................................................... 3 2.2 Introduction ......................................................................................................... 4 2.2.1 Type L-880 PAPI System ........................................................................... 5 2.2.2 Type L-881 PAPI System ........................................................................... 7 2.2.3 Type L-881 PAPI ........................................................................................ 7 2.2.4 PAPI Light Unit ........................................................................................... 8 2.2.4.1 Lamps ............................................................................................... 9 2.2.4.2 Reflector Panel.................................................................................. 9 2.2.4.3 Filter Panel ........................................................................................ 9 2.2.4.4 Lens Panels ...................................................................................... 9 2.2.4.5 Lens Shield ....................................................................................... 9 2.2.4.6 Adjustable Mounting Legs ................................................................. 9 2.2.4.7 Adjustable Mounting Legs ............................................................... 10 2.2.4.8 Tilt Switch ........................................................................................ 10 2.2.5 Theory of Operation ................................................................................. 11 2.2.5.1 Master ............................................................................................. 11 2.2.5.2 Daytime Operation .......................................................................... 12 2.2.5.3 Nighttime Operation ........................................................................ 12 2.2.5.4 Remote/Local Operation ................................................................. 12 2.2.5.5 Light Unit ......................................................................................... 12 2.2.5.6 Optional Heater ............................................................................... 12 2.2.5.7 Optional Interlock Relay .................................................................. 12 2.2.5.8 Tilt Switch ........................................................................................ 12 2.2.6 Style A L-880/L-881 PAPI: Required Equipment ..................................... 13 2.2.7 Specifications ........................................................................................... 14 2.2.7.1 Input Power ..................................................................................... 14 2.2.7.2 Lamps ............................................................................................. 14 2.2.7.3 Lamp Life ........................................................................................ 14 2.2.7.4 Transmission Factor of Red Sector................................................. 14 2.2.7.5 Transmission Sector ....................................................................... 14 2.2.7.6 Visual Acquisition Range ................................................................ 14 2.2.7.7 Transient Suppression .................................................................... 14 2.2.7.8 Tilt Switch ........................................................................................ 14 2.2.7.9 Mean Time Between Failures ......................................................... 14 2.2.7.10 Environmental Operating Conditions ............................................ 14 2.2.7.11 Temperature Range of Operation ................................................. 14 2.2.7.12 Humidity ........................................................................................ 14 vii L-880 & L-881 PAPI, Style A Table of Contents 96A0209 Rev. AA 7/9/14 Disclaimer 2.2.7.13 Wind .............................................................................................. 14 2.2.7.14 Mounting Provisions ...................................................................... 14 2.2.7.15 Weight ........................................................................................... 14 2.2.7.16 Dimensions.................................................................................... 15 2.2.7.17 Photometrics.................................................................................. 16 2.2.8 Digital Protractor Specifications ...............................................................17 2.2.8.1 Range .............................................................................................. 17 2.2.8.2 Resolution........................................................................................ 17 2.2.8.3 Accuracy.......................................................................................... 17 2.2.8.4 Repeatability.................................................................................... 17 2.2.8.5 Supply Voltage ................................................................................ 17 2.2.8.6 Battery Life ...................................................................................... 17 2.2.8.7 Temperature .................................................................................... 17 2.2.8.8 Weight ............................................................................................. 17 2.3 Installation .........................................................................................................18 2.3.1 Unpacking ................................................................................................18 2.3.2 Instruments for Installation and Verification .............................................18 2.3.2.1 Installation Using Bubble-Level Style Aiming Device ...................... 18 2.3.2.2 Bubble-Level Style Aiming Device................................................... 18 2.3.2.3 Installation Using Digital-Level Style Aiming Device ....................... 21 2.3.3 Siting Considerations ...............................................................................22 2.3.3.1 Distance of PAPI Units from Runway Edge..................................... 22 2.3.3.2 Lateral Spacing of PAPI Units ......................................................... 22 2.3.4 Siting PAPI with ILS Glideslope ...............................................................23 2.3.5 Siting PAPI on Runways Without ILS .......................................................23 2.3.5.1 Threshold Crossing Height (TCH) ................................................... 23 2.3.5.2 Glideslope Angle ............................................................................. 23 2.3.5.3 Distance of PAPI from Threshold .................................................... 23 2.3.5.4 Obstacle Clearance Surface............................................................ 24 2.3.5.5 Reduction of Beam Coverage for Obstacle Avoidance ................... 25 2.3.6 Siting Tolerances .....................................................................................25 2.3.6.1 Azimuthal Aiming............................................................................. 25 2.3.6.2 Mounting Height Tolerance ............................................................. 25 2.3.6.3 PAPI Tolerance Along Line Perpendicular to Runway .................... 25 2.3.6.4 Correction for Runway Longitudinal Gradient.................................. 25 2.3.7 Additional Siting Considerations ..............................................................27 2.3.8 PAPI Foundations ....................................................................................28 2.3.9 PAPI Aiming Angles .................................................................................37 2.3.10 Assembling Adjustable Legs ..................................................................37 2.3.11 Mounting Unit .........................................................................................37 2.3.12 Aligning Units .........................................................................................40 2.3.12.1 How Bubble-Level Aiming Device Works ...................................... 40 2.3.12.2 How Digital-Level Aiming Device Works ....................................... 40 2.3.13 Calibrating Digital Protractor ..................................................................43 2.3.13.1 Performing Digital Protractor Accuracy Test ................................. 43 2.3.13.2 Performing Digital Protractor Calibration Procedure .................... 44 2.3.13.3 Aligning PAPI Using Bubble-Level/Digital-Level Aiming Devices.. 47 2.3.14 Adjusting Rough Elevation Setting .........................................................48 2.3.14.1 Adjusting Rough Elevation Setting for Four-Leg PAPI System ..... 48 2.3.14.2 Adjusting Rough Elevation Setting for Three-Leg PAPI System ... 48 2.3.14.3 Adjusting Rough Elevation Setting for Three-Leg PAPI System ... 48 2.3.15 Adjusting Fine Elevation Setting ............................................................49 2.3.15.1 Adjusting Fine Elevation Setting for Four-Leg PAPI System......... 49 2.3.15.2 Adjusting Fine Elevation Setting for Three-Leg PAPI System....... 49 2.3.15.3 Adjusting Fine Elevation Setting for Three-Leg PAPI System (cont’d.) 49 2.3.16 Installing Master Box Assembly .............................................................51 2.3.16.1 Leveling Tilt Switches .................................................................... 52 2.3.17 Wiring between Masters and Light Units ................................................52 Table of Contents Safety Introduction Installation Table of Contents Operation Parts Schematics viii © 2014 ADB Airfield Solutions All Rights Reserved 3.0 Wiring Schematics and Installation Drawings...................................................................................................... 1 © 2014 ADB Airfield Solutions All Rights Reserved ix Table of Contents Safety Installation Introduction Table of Contents Operation Parts 2.3.17.1 Grounding Units ............................................................................ 52 2.3.17.2 Connecting External Wiring........................................................... 52 2.3.18 Checking Slope Angles of PAPI Units ................................................... 55 2.3.19 Using Reference Bases for Checking Stick ........................................... 56 2.3.19.1 Locating Reference Bases ............................................................ 56 2.3.19.2 Making Observations with Checking Stick .................................... 56 2.3.19.3 Making Flight Checks for Reduced Horizontal Coverage.............. 56 2.4 Operation .......................................................................................................... 57 2.4.1 Operating PAPI System ........................................................................... 57 2.4.1.1 Normal Operation ............................................................................ 57 2.4.1.2 Regions with Heavy Snowfall .......................................................... 57 2.4.1.3 Criteria for System Deactivation...................................................... 57 2.4.1.4 Initial Startup Using Local Control ................................................... 57 2.4.1.5 Remote Control Operation .............................................................. 58 2.4.1.6 Optional Interlock Relay ................................................................. 58 2.4.2 Operating Digital Protractor ..................................................................... 58 2.5 Section 5 Maintenance ..................................................................................... 60 2.5.1 Maintenance Schedule ............................................................................ 60 2.5.2 Maintenance Procedures ......................................................................... 61 2.5.2.1 Replacing Lamp .............................................................................. 61 2.5.2.2 Replacing Objective Lens ............................................................... 61 2.5.2.3 Replacing Filters ............................................................................. 62 2.5.2.4 Cleaning and Storing Digital Protractor ........................................... 62 2.6 Troubleshooting ................................................................................................ 63 2.6.1 Troubleshooting ....................................................................................... 63 2.7 Parts ................................................................................................................. 65 2.7.1 Using the Illustrated Parts List ................................................................. 65 2.7.2 L-880/L-881 Style A Part Numbering System .......................................... 65 2.7.3 L-880/L-881 PAPI Style A Optical Box Final Assembly Parts List ........... 67 2.7.4 PAPI Style A Master Box Assembly Parts List ......................................... 69 2.7.5 PAPI Style A Master Panel Assembly Parts List ...................................... 69 2.7.6 PAPI Style A Optical Assembly Parts List ................................................ 71 2.7.7 PAPI Style A Adjustable Leg Parts List .................................................... 72 2.7.8 PAPI Style A L-880 (4-Box) Field Splice Kit Parts List ............................ 73 2.7.8.1 PAPI Style A L-880 (4-Box) Field Splice Kit (With Interlock Option) Parts List 73 2.7.8.2 PAPI Style A L-880 (4-Box) Field Splice Kit (Without Interlock Option) Parts List ................................................................................................................. 73 2.7.9 PAPI Style A L-881 (2-Box) Field Splice Kit Parts List ............................ 73 2.7.9.1 PAPI Style A L-881 (2-Box) Field Splice Kit (With Interlock Option) Parts List 73 2.7.9.2 PAPI Style A L-881 (2-Box) Field Splice Kit (Without Interlock Option) Parts List ................................................................................................................. 73 2.7.10 PAPI Style A Aiming Device Kit Parts List ............................................. 74 2.7.11 Recommended Spare Parts ................................................................... 74 Disclaimer L-880 & L-881 PAPI, Style A Table of Contents Schematics 96A0209 Rev. AA 7/9/14 L-880 & L-881 PAPI, Style A Table of Contents 96A0209 Rev. AA 7/9/14 Disclaimer Table of Contents Safety Introduction Installation Table of Contents Operation Parts Schematics x © 2014 ADB Airfield Solutions All Rights Reserved 96A0209 Rev. AA Document Date (7/2014) This section contains general safety instructions for installing and using ADB Airfield Solutions equipment. Some safety instructions may not apply to the equipment in this manual. Task- and equipment-specific warnings are included in other sections of this manual where appropriate. 1.1 To use this equipment safely: Safety 1.0 Safety L-880 & L-881 PAPI, Style A Safety WARNING Read installation instructions in their entirety before starting installation. • Refer to the FAA Advisory Circular AC 150/5340-26, Maintenance of Airport Visual Aids Facilities, for instructions on safety precautions. • Observe all safety regulations. To avoid injuries, always disconnect power before making any wiring connections or touching any parts. Refer to FAA Advisory Circular AC 150/5340-26. • Become familiar with the general safety instructions in this section of the manual before installing, operating, maintaining or repairing this equipment. • Read and carefully follow the instructions throughout this manual for performing specific tasks and working with specific equipment. • Make this manual available to personnel installing, operating, maintaining or repairing this equipment. • Follow all applicable safety procedures required by your company, industry standards and government or other regulatory agencies. • Install all electrical connections to local code. • Use only electrical wire of sufficient gauge and insulation to handle the rated current demand. All wiring must meet local codes. • Route electrical wiring along a protected path. Make sure they will not be damaged by moving equipment. • Protect components from damage, wear, and harsh environment conditions. • Allow ample room for maintenance, panel accessibility, and cover removal. • Protect components from damage, wear, and harsh environment conditions. • Allow ample room for maintenance, panel accessibility, and cover removal. • Protect equipment with safety devices as specified by applicable safety regulations. • If safety devices must be removed for installation, install them immediately after the work is completed and check them for proper functioning prior to returning power to the circuit. 1.1.1 Additional Reference Materials: • • • • • 1.1.2 Qualified Personnel The term qualified personnel is defined here as individuals who thoroughly understand the equipment and its safe operation, maintenance and repair. Qualified personnel are physically capable of performing the required tasks, familiar with all relevant safety rules and regulations and have been trained to safely install, operate, maintain and repair the equipment. It is the responsibility of the company operating this equipment to ensure that its personnel meet these requirements. Always use required personal protective equipment (PPE) and follow safe electrical work practices. NFPA 70B, Electrical Equipment Maintenance. NFPA 70E, Electrical Safety Requirements for Employee Workplaces. ANSI/NFPA 79, Electrical Standards for Metalworking Machine Tools. OSHA 29 CFR, Part 1910, Occupational Health and Safety Standards. National and local electrical codes and standards. 1.1.3 Intended Use WARNING Using this equipment in ways other than described in this manual may result in personal injury, death or property and equipment damage. Use this equipment only as described in this manual. ADB Airfield Solutions cannot be responsible for injuries or damages resulting from nonstandard, unintended applications of its equipment. This equipment is designed and intended only for the purpose described in this manual. Uses not described in this manual are considered unintended uses and may result in serious personal injury, death or property and equipment damage. Unintended uses may result from taking the following actions: • Making changes to equipment that are not recommended or described in this manual or using parts that are not genuine ADB Airfield Solutions replacement parts. • Failing to make sure that auxiliary equipment complies with approval-agency requirements, local codes and all applicable safety standards. • Using materials or auxiliary equipment that are inappropriate or incompatible with ADB Airfield Solutions equipment. • Allowing unqualified personnel to perform any task. 1.1.4 Storage CAUTION If equipment is to be stored prior to installation, it must be protected from the weather and kept free of condensation and dust. Failure to follow this instruction can result in injury or equipment damage. © 2014 ADB Airfield Solutions All Rights Reserved 1 L-880 & L-881 PAPI, Style A Safety 96A0209 Rev. AA Document Date (7/2014) 1.1.4.1 Operation WARNING Safety • Only qualified personnel, physically capable of operating the equipment and with no impairments in their judgment or reaction times, should operate this equipment. • Read all system component manuals before operating this equipment. A thorough understanding of system components and their operation will help you operate the system safely and efficiently. • Before starting this equipment, check all safety interlocks, fire-detection systems, and protective devices such as panels and covers. Make sure all devices are fully functional. Do not operate the system if these devices are not working properly. Do not deactivate or bypass automatic safety interlocks or locked-out electrical disconnects or pneumatic valves. • Protect equipment with safety devices as specified by applicable safety regulations. • If safety devices must be removed for installation, install them immediately after the work is completed and check them for proper functioning. • Route electrical wiring along a protected path. Make sure they will not be damaged by moving equipment. • Never operate equipment with a known malfunction. • Do not attempt to operate or service electrical equipment if standing water is present. • Use this equipment only in the environments for which it is rated. Do not operate this equipment in humid, flammable, or explosive environments unless it has been rated for safe operation in these environments. • Never touch exposed electrical connections on equipment while the power is ON. 1.1.4.2 Material Handling Precautions CAUTION This equipment may contain electrostatic sensitive devices. • Protect from electrostatic discharge. • Electronic modules and components should be touched only when this is unavoidable e.g. soldering, replacement. • Before touching any component of the cabinet you should bring your body to the same potential as the cabinet by touching a conductive earthed part of the cabinet. • Electronic modules or components must not be brought in contact with highly insulating materials such as plastic sheets, synthetic fiber clothing. They must be laid down on conductive surfaces. • The tip of the soldering iron must be grounded. • Electronic modules and components must be stored and transported in conductive packing. 1.1.4.3 Action in the Event of a System or Component Malfunction WARNING • Do not operate a system that contains malfunctioning components. If a component malfunctions, turn the system OFF immediately. • Disconnect and lock out electrical power. • Allow only qualified personnel to make repairs. Repair or replace the malfunctioning component according to instructions provided in its manual. 1.1.4.4 Maintenance and Repair WARNING Allow only qualified personnel to perform maintenance, troubleshooting, and repair tasks. • Only persons who are properly trained and familiar with ADB Airfield Solutions equipment are permitted to service this equipment. • Disconnect and lock out electrical power. • Always use safety devices when working on this equipment. • Follow the recommended maintenance procedures in the product manuals. • Do not service or adjust any equipment unless another person trained in first aid and CPR is present. • Connect all disconnected equipment ground cables and wires after servicing equipment. Ground all conductive equipment. • Use only approved ADB Airfield Solutions replacement parts. Using unapproved parts or making unapproved modifications to equipment may void agency approvals and create safety hazards. • Check interlock systems periodically to ensure their effectiveness. • Do not attempt to service electrical equipment if standing water is present. Use caution when servicing electrical equipment in a high-humidity environment. • Use tools with insulated handles when working with electrical equipment. 2 © 2014 ADB Airfield Solutions All Rights Reserved 96A0209 Rev. AA Document Date (7/2014) L-880 & L-881 PAPI, Style A About this manual L-880 & L-881 PAPI, Style A, Voltage Powered PAPI manual. 2.1 About this manual The manual shows the information necessary to: • • • 2.1.1 How to work with the manual About this manual 2.0 L-880 & L-881 PAPI, Style A Install Carry Out Maintenance Carry Out Troubleshooting on the L-880 & L-881 PAPI, Style A. 1. Become familiar with the structure and content. 2. Carry out the actions completely and in the given sequence. 2.1.2 Record of changes Page Rev A Description EC No. Released manual. Updated Diagrams/Schematics Checked Approved Date TN WT 1996 2633 GM ER 05/05/10 2682 GM ER 06/16/10 2-11, 7-3 and schematics V 3-13 W Correction for Runway Longitudinal Gradient X Parts update Alll Y Entire Manual, parts and diagrams ER DR 08/19/11 All Z updated formats RW JC 7/25/13 All AA Updated introduction, drawings and parts RW JC 7/8/14 2.1.3 Icons used in the manual 3337 For all WARNING symbols see the Safety section. Carefully read and observe all safety instructions in this manual, which alert you to safety hazards and conditions that may result in personal injury, death or property and equipment damage and are accompanied by the symbol shown below. WARNING • Failure to observe a warning may result in personal injury, death or equipment damage. CAUTION • Failure to observe a caution may result in equipment damage. © 2014 ADB Airfield Solutions All Rights Reserved 3 L-880 & L-881 PAPI, Style A Introduction 2.2 Introduction Introduction 4 96A0209 Rev. AA Document Date (7/2014) See Figure 1 and Figure 2. This section describes the Style A, L-880 and L-881 Precision Approach Path Indicator (PAPI) systems used to provide visual approach path guidance to pilots of landing aircraft. The PAPI system is designed to operate from 220/240 Vac 50/60 Hz power. Figure 1: L-880 Four-Box System Figure 2: L-881 Two-Box System © 2014 ADB Airfield Solutions All Rights Reserved 2.2.1 Type L-880 PAPI System L-880 & L-881 PAPI, Style A Introduction See Figure 1, Figure 3, and Figure 4. The L-880 PAPI system consists of four identical light units that are normally installed on the left side of the runway (viewed from the approach end) in a line perpendicular to the runway centerline. Figure 3: © 2014 ADB Airfield Solutions All Rights Reserved PAPI Obstacle Clearance Surface 5 Introduction 96A0209 Rev. AA Document Date (7/2014) L-880 & L-881 PAPI, Style A Introduction 96A0209 Rev. AA Document Date (7/2014) Figure 4: L-880 Signal Display Introduction The units are aimed so that during a landing approach the pilot will see the following signal format: 6 • The inner two units as red and the outer two units as white when the aircraft is close to or on the approach slope. • The unit nearest the runway as red and the three units farthest from the runway as white when above the approach slope; all four units appear white if the aircraft is excessively above the approach slope; • The three units closest to the runway are seen as red and the unit farthest from the runway as white if the aircraft is slightly below the approach slope; and still further below, all the units will appear red. © 2014 ADB Airfield Solutions All Rights Reserved 2.2.2 Type L-881 PAPI System L-880 & L-881 PAPI, Style A Introduction See Figure 2, Figure 3, and Figure 5. The L-881 PAPI system consists of two identical light units that are normally installed on the left side of the runway (viewed from the approach end) in a line perpendicular to the runway centerline. Figure 5: 2.2.3 Type L-881 PAPI L-881 Signal Display The units are aimed so that during a landing approach the pilot will see the following signal format: Both units as red when the aircraft is below the approach slope The unit nearest the runway as red and the other unit as white when on or close to the approach slope Both units as white when the aircraft is above the approach slope © 2014 ADB Airfield Solutions All Rights Reserved 7 Introduction 96A0209 Rev. AA Document Date (7/2014) L-880 & L-881 PAPI, Style A Introduction 2.2.4 PAPI Light Unit 96A0209 Rev. AA Document Date (7/2014) Introduction See Figure 6 for a 3-lamp PAPI and Figure 2-7 for a 2-lamp PAPI. A single PAPI light unit contains two or three 6.6 A, 200 W lamps, two or three reflectors and red filters, four or six lenses, a lens shield, an electronic shorting device PCB, and a tilt switch assembly. The PAPI unit is mounted on three or four adjustable legs. Each of these parts is discussed below. Figure 6: 8 PAPI Light Unit (3-Lamp) © 2014 ADB Airfield Solutions All Rights Reserved 96A0209 Rev. AA Document Date (7/2014) L-880 & L-881 PAPI, Style A Introduction PAPI Light Unit (2-Lamp) Introduction Figure 7: 2.2.4.1 Lamps Two or three 200-watt prefocused halogen lamps are located in the rear of the unit, each in an indexed lampholder in a reflector and held in place with a forked spring clip. Slip-on type electrical connections permit easy replacement of failed lamps. 2.2.4.2 Reflector Panel The reflector panel is fitted with two apertures in which the elliptical reflectors are housed. The reflectors are made of aluminum that is mechanically polished for brilliance and anodized for protection. 2.2.4.3 Filter Panel The filter panel houses the two or three red filters. It also has two reference slots, C and D, used to locate the aiming device for making field adjustments of the light unit. These reference slots are precision machined in the factory. Be careful not to damage these machined slots. 2.2.4.4 Lens Panels Four or six high optical quality objective lenses are housed in two or three lens panels. The upper rim of the front lens panel is equipped with two reference blocks, A and B, for field adjustment of the light unit. These blocks are precision-adjusted in the factory to be parallel with the optical centerline of the objective lenses. 2.2.4.5 Lens Shield The flat glass shield (protective glass) serves to protect the lenses against materials such as sand and stone, and is designed to avoid reflections. 2.2.4.6 Adjustable Mounting Legs See Figure 8. The three or four adjustable mounting legs are each made up of two screw rods (3, 8) connected by a differential sleeve (4). The upper (smaller diameter) rod is fitted with nuts and locking nuts designed for coarse height setting of the unit. The differential sleeve is used for the fine adjustment setting of the unit. The lower (larger diameter) rod is inserted into a conduit column with frangible coupling held in place by a flange bolted on a concrete pad. When installing the upper and lower rods in the differential make sure there is room for movement of the rods. © 2014 ADB Airfield Solutions All Rights Reserved 9 L-880 & L-881 PAPI, Style A Introduction 2.2.4.7 Adjustable Mounting Legs 96A0209 Rev. AA Document Date (7/2014) Figure 8: Adjustable Mounting Legs Introduction 13 12 1 10 11 2 3 9 4 5 6 8 7 1. Upper 3/8 Split Lock Washer 5. Locking Hex Nut 1/2-13 9. 3/816 Hex Nut 3/8-16 2. Lower 3/8 Split Lock Washer 6. 1/213 Hex Nut 10.Lower Hex Nut 3/8-16 3. 3/816 x 6 All Thread 7. Leg Cap 11.Lower 3/8 Flat Washer 4. Differential 8. 1/213 x 5 All Thread 12.Upper 3/8 Flat Washer 13.Upper Hex Nut 3/8-16 2.2.4.8 Tilt Switch 10 The tilt switch assembly is designed to de-energize the lamps if the optical pattern is raised more than 1/2 degree or lowered more than 1/4 degree with respect to the present setting angle of the light unit. A time delay of 10-30 seconds is incorporated to prevent intermittent tilt switch activation due to vibration. The tilt switch assembly has a fail-safe operation so that any malfunction of the switch including loss of power de-energizes the lamp circuits controlled by the tilt switch. © 2014 ADB Airfield Solutions All Rights Reserved L-880 & L-881 PAPI, Style A Introduction 2.2.5 Theory of Operation This section describes the L-880/L-881 PAPI system theory of operation. It includes operations of the master, slave, optional heater, and tilt switch. 2.2.5.1 Master See Figure 9. See the Wiring Schematics section. 220/240 Vac is supplied to the Master box at TB1-1 and TB1-3. TB-2 is the neutral line. TB1-1 and TB1-3 is fed through VR1 and VR2 to provide lightning protection. 220/240 Vac is fed through circuit breaker CB1 and contactor K1. CB1 provides overcurrent protection. When CB1 is turned on, 220/240 Vac is fed to transformer T4. This steps the voltage down to 18 Vac. When the tilt switches are closed, this 18 Vac is fed to the LC-control PCB1, which provides power for the PCB. When S1 is set to LOCAL or to REM and remote wires are connected, contactor K1 is energized. When contactor K1 is energized, 220/240 Vac is fed to the inductor L1, SCRs, and step-up transformer T1 (on the L-880 system only). The LC-control PCB1 turns the SCRs on and provides 6.6 A to the lamps at TB1-13 and TB1-14. VR3 and VR4 provide lightning protection at the output. NOTE: T1-35A0494 is for 4-Box, 3-LT. Units or T1-35A0689 for 4-Box, 2-LT. Units Figure 9: © 2014 ADB Airfield Solutions All Rights Reserved Master Component Panel 11 Introduction 96A0209 Rev. AA Document Date (7/2014) Introduction L-880 & L-881 PAPI, Style A Introduction 96A0209 Rev. AA Document Date (7/2014) 2.2.5.2 Daytime Operation When the illumination on the photocell rises to 50 to 60 foot-candles, the photocell PC1 is deenergized. This de-energizes relay K2 and provides 120 Vac to J2-7 on LC-control PCB1 and turns on the PAPI system to full intensity. 2.2.5.3 Nighttime Operation When the illumination drops to 25 to 35 foot-candles, photocell PC1 energizes. This energizes relay K2 and removes 120 Vac from J2-7 on LC-control PCB1. This causes the PAPI system to operate at low intensity (if the interlock relay is used, the PAPI system will not energize until the interlock relay CS1 detects the current flow). A time delay of 45-75 seconds is incorporated in the photocell circuit to prevent switching because of stray light or temporary shadows. In case of failure of the photocell control circuitry, the system reverts to high intensity. Two night intensity settings, approximately 5% and 20% of full intensity, can be set by using toggle switch S2. This allows the user to select either of the two settings to accommodate local site conditions. NOTE: Refer to “Optional Interlock Relay” on page 12. 2.2.5.4 Remote/Local Operation Toggle switch S1 allows the unit to operate either in REM or LOCAL. When the switch is set to LOCAL, the unit can be operated locally. When the switch is set to REM and the remote wires are connected to TB1-7 and TB1-8, the unit can be operated from a remote location by a switch closure across TB1-7 and TB1-8. 2.2.5.5 Light Unit See Figure 6 and Figure 7. Power is provided to the lamps in the light boxes via TB1-13 and TB1-14 in the master and are connected in series. The normally closed tilt switch in each unit is connected to TB1-5 and TB1-6 and are connected in series. These wires connect to TB19 and TB1-10 in the master unit. If the optional heater is used in the tilt switch, two wires must be connected from TB1-11 and TB1-12 on the master unit to TB1-7 and TB1-8 on all the light units to provide power to the heater when required. 2.2.5.6 Optional Heater See Figure 9. Thermostat TH1 in the master is used to supply 240 Vac to the heater. When the outside air temperature drops below 0 °F, the thermostat turns on. This provides 240 Vac to the heater resistors R1 in the tilt switch boxes. This prevents the mercury in the tilt switches from freezing. 2.2.5.7 Optional Interlock Relay This option provides ON/OFF control through current sensing of the runway series circuit during nighttime operations. 2.2.5.8 Tilt Switch The tilt switch assembly is designed to de-energize the lamps if the optical pattern is raised more than 1/2 degree or lowered more than 1/4 degree with respect to the present setting angle of the light unit. If a tilt switch is moved from proper alignment, the time delay relay in the master will de-energize after a nominal 15-second time delay, which de-energizes the system and removes the 6.6 A power supply to all the lamps in the PAPI system. 12 © 2014 ADB Airfield Solutions All Rights Reserved 96A0209 Rev. AA Document Date (7/2014) Refer to Table 1 and Table 2 for required equipment that is supplied. Refer to Table 3 for required equipment that is not supplied. Refer to the Parts section for ordering information. Table 1: L-880 PAPI Required Equipment Supplied Description Quantity Master PAPI assembly 1 Light box assembly 4 Field splice kit 4 Instruction manual Table 2: 1 per order L-881 PAPI Required Equipment Supplied Description Quantity Master PAPI assembly 1 Light Box assembly 2 Field splice kit 2 Instruction manual Table 3: Description 1 per order Required Equipment Not Supplied Quantity Note Aiming device kit (optional) 1 One required per airport. Positioning plate 1 See Table 24 through Table 27 in the Installation section. Survey instrument 1 L-867 light base for L-880 and L-881 (optional) One L-867 light base is required per light box. As required L-867 base plate, 1 hub (optional) As required 1-1/4 inch (31.75 mm) flex conduit male connector As required 1-1/2 inch x 1-1/4 inch (38.1 x 31.75 mm) hex reducer bushing As required 1-1/4 inch (31.75 mm) flex conduit/fluid tight As required Interconnector cable (6-conductor) As required Concrete As required One L-867 base plate (1 hub) is required for the L-867 base near each optical box. Supplied by contractor. Refer to Table 4 for quantities. Supplied by contractor. Refer to Table 4 for quantities. Supplied by contractor. Refer to Table 4 for quantities. Supplied by contractor. Refer to Table 4 for quantities. L-830 30 W/45 W transformer 1 Required only with interlocking relay option. Primary connector kit 1 Required only with interlocking relay option. Table 4: Contractor-Supplied Connectors, Conduit, Cable, and Bushings L-880 PAPI Description Introduction 2.2.6 Style A L-880/L-881 PAPI: Required Equipment L-880 & L-881 PAPI, Style A Introduction Light Box #1 Light Box #2 Light Box #3 Light Box #4 L-881 PAPI L-880/881 PAPI Light Box Light #1 Box #2 Master Box 1 1/4 flex conduit male connector 2 2 2 2 2 2 1 1/2 x 1 1/4 hex reducer bushing 1 1 1 1 1 1 1 1/4 flex conduit/fluid tight 1 1 1 1 1 1 Interconnector cable (6-conductor) 2 1 1 1 2 1 © 2014 ADB Airfield Solutions All Rights Reserved 2 13 L-880 & L-881 PAPI, Style A Introduction 96A0209 Rev. AA Document Date (7/2014) Introduction 2.2.7 Specifications This subsection describes the specifications for the L-880 (4 box) and L-881 (2 box) PAPI systems. Refer to the Parts section for part numbers. 2.2.7.1 Input Power 220/240 Vac, 50/60 Hz 2.2.7.2 Lamps Two or three 200 W, 6.6 A quartz lamps per PAPI unit 2.2.7.3 Lamp Life 1000 hours 2.2.7.4 Transmission Factor of Red Sector At least 15% 2.2.7.5 Transmission Sector Three minutes of arc over full beam spread 2.2.7.6 Visual Acquisition Range 7.1 miles within an approach envelope of 5 degrees from the approach axis 2.2.7.7 Transient Suppression Solid state equipment is capable of withstanding lightning transient consisting of a 10 x 20 microsecond current surge of 15,000 amperes with the subsequent power-follow current and voltage surge of 10 kV/microsecond. System also will withstand without damage the repeated application of an overvoltage transient on the input power lines equal to 500 volts peak for a duration of 50 milliseconds. 2.2.7.8 Tilt Switch De-energizes all lamps in the PAPI system if optical pattern of any light unit is raised more than 1/2 degree or lowered more than 1/4 degree. 2.2.7.9 Mean Time Between Failures Six months (minimum) between failures for all components (excluding lamps) 2.2.7.10 Environmental Operating Conditions The environmental operating conditions includes temperature range of operation, humidity, and wind. 2.2.7.11 Temperature Range of Operation Refer to Table 5. The standard PAPI A unit meets both Class 1 and Class 2 specifications. Table 5: Temperature Range of Operation Class Operating Temperature Range (Celsius) Operating Temperature Range (Fahrenheit) Class 1 -35 to +55 °C -31 to +131 °F Class 2 -55 to +55 °C -67 to +131 °F 2.2.7.12 Humidity 0 to 100% 2.2.7.13 Wind Velocities up to 100 mph (161 km/h) 2.2.7.14 Mounting Provisions Three or four mounting legs 2.2.7.15 Weight 93 lb (42.6 kg) (approximate) per light unit; 145 lb (65.8 kg) (approximate) for master 14 © 2014 ADB Airfield Solutions All Rights Reserved 96A0209 Rev. AA Document Date (7/2014) See Figure 10 and Figure 11. Refer to Table 6. NOTE: Figure 10 shows the two-lamp/four-leg and Figure 11 shows the three-lamp/three-leg PAPI A. The four-leg PAPI A has the same dimensions as the three-leg PAPI A. Table 6: PAPI Type Width Dimensions Height Length L-880/L-881 two lamps 15.63 in. (397 mm) 40 in. (1016 mm) 35 in. (889 mm) L-880/L-881 three lamps 25.74 in. (654 mm) 40 in. (1016 mm) 39.28 in. (998 mm) Figure 10: PAPI A (Two-Lamp/Four-Leg) Dimensions 40.00 Maximum © 2014 ADB Airfield Solutions All Rights Reserved 15 Introduction 2.2.7.16 Dimensions L-880 & L-881 PAPI, Style A Introduction L-880 & L-881 PAPI, Style A Introduction 96A0209 Rev. AA Document Date (7/2014) Figure 11: PAPI A (Three-Lamp/Three-Leg) Dimensions Introduction 40.00 Maximum 2.2.7.17 Photometrics 16 Each light unit used in the L-880/L-881 PAPI systems has two/three lamps and provides a beam of light split horizontally to produce white light in the top sector and red light in the bottom sector. When viewed by an observer at a distance of 1000 feet (304.8 m), the transition from red light to white light occurs within an angle of three minutes of arc at the beam center and within an angle of five minutes of arc at the beam edges. © 2014 ADB Airfield Solutions All Rights Reserved L-880 & L-881 PAPI, Style A Introduction 2.2.8 Digital Protractor Specifications This subsection provides specifications for the optional digital protractor used to aim the PAPI. 2.2.8.1 Range Range is 360 degrees (90 degrees x 4). 2.2.8.2 Resolution Resolution is 0.01 degree (0 to 9.99 degrees). Introduction 96A0209 Rev. AA Document Date (7/2014) Resolution is 0.10 degree (10 to 90 degrees). 2.2.8.3 Accuracy Refer below for digital protractor accuracy. 0.05 degree (0 to 10 degrees). 0.10 degree (80 to 90 degrees). 0.20 degree (10 to 80 degrees). 2.2.8.4 Repeatability Repeatability is 0.05 degree. 2.2.8.5 Supply Voltage 9 volt alkaline battery. 2.2.8.6 Battery Life 500 hours typical. 2.2.8.7 Temperature Operating temperature: -5 to 50 °C (23 to 122 °F). Storage temperature: -20 to 65 °C (-4 to 149 °F). 2.2.8.8 Weight Weight is 295 g (10.4 oz). © 2014 ADB Airfield Solutions All Rights Reserved 17 L-880 & L-881 PAPI, Style A Installation 96A0209 Rev. AA Document Date (7/2014) 2.3 Installation WARNING Installation Allow only qualified personnel to perform the following tasks. Observe and follow the safety instructions in this document and all other related documentation. See FAA CERT Alert on page iii Concerning Light Signal Interruption Before Proceeding With Installation. This section provides instructions for the installation of the PAPI system. Refer to the airport project plans and specifications for the specific installation instructions. 2.3.1 Unpacking Handle equipment very carefully to prevent component damage. Note any exterior damage to the crate that might lead to detection of equipment damage. If you note any damage to any equipment, file a claim with the carrier immediately. The carrier may need to inspect the equipment. 2.3.2 Instruments for Installation and Verification This subsection provides information about the instruments necessary to install the PAPI. 2.3.2.1 Installation Using Bubble-Level Style Aiming Device The instruments below are required for installing, leveling, setting, and checking the elevation setting of the light units using the bubble-level style aiming device. 2.3.2.2 Bubble-Level Style Aiming Device • • • One bubble-level style aiming device for azimuth and elevation setting. One precision bubble level for leveling the units. One checking stick for routine checks of the elevation setting. See Figure 12 and Figure 13. The bubble-level style aiming device consists of the following: • One base to rest on reference block B and slot C, and two movable arms to rest on reference block A and slot D. • • Two graduated scales for elevation setting. One bar used for the longitudinal horizontal reference required to set both azimuth and elevation. NOTE: Figure 12 and Figure 13 show the aiming device on the three-lamp PAPI. These figures also apply to the two-lamp PAPI. Figure 12: Side View of Bubble-Level Aiming Device for Three-Lamp PAPI The two movable arms increase the stability of the aiming device and are used to establish the transverse horizontal references. Screws are provided on the bar and on the movable arms to guarantee an exact positioning of the level during setting and adjustment. This exact 18 © 2014 ADB Airfield Solutions All Rights Reserved 96A0209 Rev. AA Document Date (7/2014) L-880 & L-881 PAPI, Style A Installation Figure 13: Installation positioning is required to have a perfect match between the level and the longitudinal and transverse horizontal references. The two V-sites on the bar of the aiming device are for azimuth alignment. Top View of Bubble-Level Aiming Device for Three-Lamp PAPI Bubble Level This instrument has a 0.004 in/ft (0.3 mm/m) degree of precision which allows a very precise setting (within one minute of arc) compatible with the design precision of the PAPI light unit. © 2014 ADB Airfield Solutions All Rights Reserved 19 L-880 & L-881 PAPI, Style A Installation 96A0209 Rev. AA Document Date (7/2014) Checking Stick Installation See Figure 14. The checking stick is used to make routine checks of the elevation setting of the PAPI units. It consists of a small transparent screen attached to a lightweight rod. The screen has two horizontal lines 23 mm (0.90 in.) apart to correspond to approximately 3 minutes of arc at 25 m (82 ft). Refer to Reference Bases for Checking Stick in this section for instructions on using the checking stick. Figure 14: 20 Checking Stick © 2014 ADB Airfield Solutions All Rights Reserved 96A0209 Rev. AA Document Date (7/2014) The instruments below are required for installing, leveling, setting, and checking the elevation setting of the light units using the digital-level style aiming device. • • Installation 2.3.2.3 Installation Using Digital-Level Style Aiming Device L-880 & L-881 PAPI, Style A Installation one digital-level style aiming device for azimuth and elevation setting one precision digital protractor for leveling the units and setting the tilt switch Digital-Level Style Aiming Device See Figure 15 and Figure 16 for the digital-level aiming device. The digital-level style aiming device consists of the following: • One base to rest on reference block B and slot C, and two movable arms to rest on reference block A and slot D. • One bar used for the longitudinal horizontal reference required to set both azimuth and elevation. NOTE: Figure 15 and Figure 16 show the aiming device on the two-lamp PAPI. These figures also apply to the three-lamp PAPI. Figure 15: Digital-Level Aiming Device Digital-Level Aiming Device © 2014 ADB Airfield Solutions All Rights Reserved Side View of Digital-Level Aiming Device for Two-Lamp PAPI Digital Protractor PAPI 21 L-880 & L-881 PAPI, Style A Installation 96A0209 Rev. AA Document Date (7/2014) Installation The two movable arms increase the stability of the aiming device and are used to establish the transverse horizontal references. Screws are provided on the bar and on the movable arms to guarantee an exact positioning of the level during setting and adjustment. This exact positioning is required to have a perfect match between the level and the longitudinal and transverse horizontal references. The two V-sights on the bar of the aiming device are for azimuth alignment. Figure 16: Top View of Digital-Level Aiming Device for Two-Lamp PAPI Digital-Level Aiming Device PAPI Digital Protractor Digital Protractor For information on the digital protractor, refer to How Digital-Level Aiming Device Works in this section and Operating Digital Protractor in the Operation section. 2.3.3 Siting Considerations When viewed from the approach end, the PAPI system shall be located on the left-hand side of the runway as shown in Figure 3. The PAPI may be located on the right side of the runway if siting problems exist, such as conflicts with runways or taxiways. The PAPI must be sited and aimed so that it defines an approach path with adequate clearance over obstacles and a minimum threshold crossing height. If the runway has an established ILS glideslope, refer to Siting PAPI with ILS Glideslope in this section. The PAPI must be installed so that the visual glideslope coincides (as much as possible) with the electronic glideslope. If there is no ILS on the runway, refer to Siting PAPI on Runways Without an ILS in this section. The PAPI's glideslope must be chosen to ensure the on-course signal of the PAPI provides adequate clearance over obstacles. 2.3.3.1 Distance of PAPI Units from Runway Edge See Figure 3. The light unit nearest to the runway shall be no closer than 50 feet (15.24 m) (+10, -0 feet) (+3.048, -0 m) from the runway edge or to other runways or taxiways. This distance may be reduced to 30 feet (9.144 m) for small general aviation runways used by non-jet aircraft. 2.3.3.2 Lateral Spacing of PAPI Units The PAPI units shall have a spacing between units of 20 to 30 feet (6.096 to 9.144 m). The distance between boxes shall not vary by more than 1 foot (304.8 mm). 22 © 2014 ADB Airfield Solutions All Rights Reserved 2.3.4 Siting PAPI with ILS Glideslope L-880 & L-881 PAPI, Style A Installation When a runway has an established ILS electronic glideslope, the PAPI on-slope signal should coincide, as much as possible, with that for the ILS. To accomplish this, place the PAPI at the same distance (tolerance of ±30 feet or ±9.144 m) from the threshold as the virtual source of the ILS glideslope and aim at the same angle as the ILS glideslope. Refer to Table 7. This procedure must be modified for runways that serve aircraft in height group 4 because of the eye-to-antenna distance. For these runways, the distance of the PAPI from the threshold shall equal the distance to the virtual source of the ILS glideslope plus an additional 300 feet (91.44 m) (+50 ft, -0 ft) (+15.24 m, -0 m). Calculations should be performed to ensure that the site chosen provides adequate obstacle clearance and threshold crossing height. Table 7: Type of Aircraft Threshold Crossing Height Cockpit-to-Wheel Height Visual Threshold Crossing Height Remarks Height Group 1 (General aviation, 10 feet (3.048 m) or less small commuters, corporate turbojets) 40 feet (12.2 m) (+5 ft, -20 ft) (+1.524 m, -6.1 m) Height Group 2 (F-28, CV-340/440/580, B-737, DC-8/9) 15 feet (4.6 m) 45 feet (13.7 m) (+5 ft, -20 ft) Many runways less than 6,000 ft (1828.8 m) long with reduced widths and/or restricted weight bearing which would normally prohibit landings by larger aircraft Regional airport with limited air carrier service (+1.524 m, -6.1 m) Height Group 3 (B-707/720/727/757) 20 feet (6.1 m) 50 feet (15.24 m) (+5 ft, -15 ft) (+1.524 m, -4.6 m) Height Group 4 (B-747/767, Over 25 feet 75 feet (22.9 m) L-1011, DC-10, A-300) (7.6 m) (+5 ft, -15 ft) Primary runways not normally used by aircraft with ILS glideslope-towheel heights exceeding 20 ft (6.1 m) Most primary runways at major airports. (+1.524 m, -4.6 m) 2.3.5 Siting PAPI on Runways Without ILS When the runway doesn't have an ILS glideslope, the PAPI must be sited and aimed so that it defines an approach path which will produce the required threshold crossing height and clearance over any obstacles in the approach area. 2.3.5.1 Threshold Crossing Height (TCH) See Figure 3. The TCH is the height of the lowest on-course signal at a point directly above the threshold and the runway centerline. The minimum allowable TCH depends on the height group of the aircraft using the runway, and is shown in Table 7. The glideslope of the PAPI must provide the proper TCH for the most demanding aircraft height group using the runway. 2.3.5.2 Glideslope Angle The standard visual glideslope angle for the PAPI is 3 degrees. For non-jet runways, this may be raised to 4 degrees if required to provide obstacle clearance. 2.3.5.3 Distance of PAPI from Threshold The following method can be used to determine the PAPI installation distance from the runway threshold provided there are no obstacles in the area from which the PAPI signals can be observed, no differences in elevation between the threshold and the installation zone of the PAPI or between the units, or reduced length of runway. The distance of the PAPI units from the threshold (D1) can be calculated from the equation: D1 = TCH x cotan (angle of lowest on-course signal) where the TCH is the threshold crossing height for the most demanding aircraft using the runway. Refer to Table 7. The angle of the lowest on-course signal is determined as follows: © 2014 ADB Airfield Solutions All Rights Reserved 23 Installation 96A0209 Rev. AA Document Date (7/2014) L-880 & L-881 PAPI, Style A Installation 96A0209 Rev. AA Document Date (7/2014) For the L-880 PAPI system the angle of the lowest on-course signal will be the aiming angle of the third light unit from the runway minus 1.5 minutes or arc. Installation NOTE: The subtraction of 1.5 minutes of arc takes into account the width of the transition sector (3 minutes of arc) between the white and red part of the PAPI light beam. The lowest possible on-course signal is 3'/2 = 1.5' lower than the aiming angle. For the L-881 PAPI system this angle will be the aiming angle of the outside light unit minus 1.5 minutes of arc. 2.3.5.4 Obstacle Clearance Surface Position and aim the PAPI so that no risk exists of an obstruction being located in an area where the PAPI signals can be observed. Make a survey of the site to determine if an obstacle is present in the area where you can observe the PAPI signals. See Figure 3. This obstacle clearance surface begins 300 feet (91.44 m) in front of the PAPI units (closer to the threshold) and proceeds outward into the approach area at an angle of 1 degree less than the lowest on-course signal. This surface extends 10 degrees on either side of the runway centerline to a distance of 4 miles (6.44 km) from the point of origin. If an obstruction penetrates the obstacle clearance surface and cannot be removed, then re-aim the glideslope angle or move the PAPI system further from the threshold. By moving or re-aiming the PAPI, re-position the obstacle clearance surface so that it will not be penetrated by an obstruction. See Figure 17. Figure 17: Obstacle Clearance Surface The 1.5' is one-half the width of the transition sector of the light beam. The transition between the white to red part of the beam is 3 minutes of arc (3'). Hence the additional 1.5' must be taken into account in calculating D1. For L-881: D1 = TCH x cotan ( - 15' - 1.5') NOTE: For the L-880 PAPI system, the lowest on-course signal will be the aiming angle of the third light unit from the runway minus 1.5'. For a standard L-880 installation the lowest oncourse signal will be -10' - 1.5'. For Height Group 4 aircraft this angle will be - 15' - 1.5'. For L-880 (Standard Installation): D1 = TCH x cotan ( - 10' - 1.5') For L-880 (Ht. Group 4 aircraft): D1 = TCH x cotan ( - 15' - 1.5') 24 © 2014 ADB Airfield Solutions All Rights Reserved 2.3.5.5 Reduction of Beam Coverage for Obstacle Avoidance L-880 & L-881 PAPI, Style A Installation A PAPI system may require a reduction of the horizontal beam coverage because of an obstacle in the approach area. If this is the case, special consideration should be given to the following factors when determining the required system cutoff angle(s): Type and location of the obstacle with respect to the area where the PAPI signals can be observed • • • • • • • Wingspan of aircraft using the runway • • Cutoff angles should be FAA approved • • • Number of systems required Vertical pitch of the glideslope Installation tolerances Position of the PAPI system Additional safety considerations Manufacturing tolerances are +0.0° to -0.4° Origin of the cutoff angle should be either the outermost or innermost unit (whichever is closest in azimuth to the obstacle) When ordering a PAPI system with a reduced horizontal beam coverage from ADB Airfield Solutions, the following information is required: Type of system -- L-880 or L-881; Style A or Style B Required cutoff angle (from pilot's viewpoint and tolerance) NOTE: For example, if the nominal required cutoff is 7°, the cutoff angle which would be ordered is 7.2° (+0.0°, -0.4°). The additional 0.2° is added to the nominal value because it is the midpoint of the manufacturing tolerance (+0.0°, -0.4°). The sales order would say, for example, cutoff = 7° Right (from pilot’s viewpoint). Left/right cutoff (from pilot's viewpoint when landing) 2.3.6 Siting Tolerances Siting tolerances involve azimuthal aiming, mounting height tolerance, PAPI tolerance along a line perpendicular to the runway, and correction for the runway longitudinal gradient. 2.3.6.1 Azimuthal Aiming Each light unit shall be aimed outward into the approach zone on a line parallel to the runway centerline within a tolerance of ±1/2°. 2.3.6.2 Mounting Height Tolerance The beam centers of all light units shall be within ±1 inch (25.4 mm) of a horizontal plane. This plane shall be within ±1 foot (304.8 mm) of the elevation of the runway centerline at the intercept point of the visual approach angle with the runway except for additional siting considerations. Refer to Additonal Siting Considerations in this section. 2.3.6.3 PAPI Tolerance Along Line Perpendicular to Runway The front face of each light unit in a bar shall be located on a line perpendicular to the runway centerline within ±6 inches (152.4 mm). 2.3.6.4 Correction for Runway Longitudinal Gradient See Figure 18. Refer to AC 150/5435-28. On runways where a difference exists in elevation between the runway threshold and the elevation of the runway centerline adjacent to the PAPI, you may need to adjust the location of the light units with respect to the threshold to meet the required obstacle clearance and TCH. © 2014 ADB Airfield Solutions All Rights Reserved 25 Installation 96A0209 Rev. AA Document Date (7/2014) L-880 & L-881 PAPI, Style A Installation 96A0209 Rev. AA Document Date (7/2014) Figure 18: Correction for Runway Longitudinal Gradient Installation The RRP is at the front, center of the light emitting surface of the PAPI light unit. If the condition exists, perform the following steps to compute the change in the distance from the threshold required to preserve the proper geometry: a. Obtain the runway longitudinal gradient. This can be done by survey or obtained from airport obstruction charts or as-built drawings. b. Determine the ideal (zero gradient) distance from the threshold in accordance with the preceding instructions. c. Assume a level reference plane at the runway threshold elevation. Plot the location determined in Step 2 above. d. Plot the runway longitudinal gradient. 26 © 2014 ADB Airfield Solutions All Rights Reserved 96A0209 Rev. AA Document Date (7/2014) L-880 & L-881 PAPI, Style A Installation f. 2.3.7 Additional Siting Considerations Installation e. Project the visual glideslope angle to its intersection with the runway longitudinal gradient. Then solve for the adjusted distance from the threshold either mathematically or graphically. Refer to Mounting Height Tolerance in this section. Verify the calculated location gives the desired threshold crossing height. Below are additional siting considerations. • Where the terrain drops off rapidly near the approach threshold and severe turbulence is experienced, locate the PAPI farther from the threshold to keep the aircraft at the maximum possible threshold crossing height. • On short runways, the PAPI should be as near the threshold as possible to provide the maximum amount of runway for braking after landing. • See Figure 19. At locations where snow is likely to obscure the light beams, install the light units up to a maximum height of 6 feet (1.83 m) above ground level. This may require installing the light units farther from the runway edge to ensure adequate clearance for the most critical aircraft. Since increasing the height of the light units also increases the threshold crossing height of the visual glideslope, you may need to relocate the lights closer to the threshold to remain within the specified tolerance. • Since the effectiveness of the PAPI system is dependent on the optical red and/or white signal pattern from the light units, make sure that no other lights are close enough to confuse the pilot. Figure 19: © 2014 ADB Airfield Solutions All Rights Reserved Relocating PAPI Units 27 L-880 & L-881 PAPI, Style A Installation 2.3.8 PAPI Foundations 96A0209 Rev. AA Document Date (7/2014) Installation The PAPI units shall be installed on concrete pads at ground level with frangible couplings. The foundation should extend at least 12 inches (304.8 mm) below the frost line and at least 1 foot (304.8 mm) beyond the light unit to minimize damage from mowers. Figure 20 through Figure 23 show dimensions that are generally acceptable for the concrete pad for the twolamp and three-lamp PAPI respectively. Figure 20: 28 Installation on Concrete Pad (Two-Lamp, Three-Leg PAPI) © 2014 ADB Airfield Solutions All Rights Reserved 96A0209 Rev. AA Document Date (7/2014) L-880 & L-881 PAPI, Style A Installation Installation on Concrete Pad (Two-Lamp, Four-Leg PAPI) Installation Figure 21: © 2014 ADB Airfield Solutions All Rights Reserved 29 L-880 & L-881 PAPI, Style A Installation 96A0209 Rev. AA Document Date (7/2014) Figure 22: Installation on Concrete Pad (Three-Lamp, Three-Leg PAPI) Installation 30 © 2014 ADB Airfield Solutions All Rights Reserved 96A0209 Rev. AA Document Date (7/2014) L-880 & L-881 PAPI, Style A Installation Installation on Concrete Pad (Three-Lamp, Four-Leg PAPI) Installation Figure 23: To cast the concrete pad and anchor the support fixtures, perform the following procedure: 1. Stake out the longitudinal axis of the light units parallel to the runway centerline. 2. Dig the foundation hole per Figure 20 and Figure 21 for the two-lamp and Figures Figure 22 and Figure 23 for the three-lamp. 3. Place foam in pit to absorb frost heave below the central part of the slab. Place L-867 light base/conduit elbows or pipes for cables. Place bars for reinforcement of concrete. 4. Pour in concrete and allow it to harden for at least one day. © 2014 ADB Airfield Solutions All Rights Reserved 31 L-880 & L-881 PAPI, Style A Installation 96A0209 Rev. AA Document Date (7/2014) Installation 5. After concrete sets up, using chalk draw a longitudinal axis (in accordance with the axis staked out on the ground) on the upper surface of the pad. Draw a transverse axis perpendicular to the other axis. 6. See Figure 24 and Figure 25 for the two-lamp/three- and four-leg and Figures 3-15 and 316 for the three-lamp/three- and four-leg PAPI. Lay a positioning plate on the pad; center it by positioning the central hole at the intersection of both axes; align the plate along the longitudinal axis using the V-notches in the plate. 7. Mark the eight locations of the screws on the slab; drill the eight holes to the diameter and depth required for the expansion sleeves and insert the sleeves. 8. See Figure 24 through Figure 27 to locate flanges using mounting templates. Place and fasten the flanges with two screws. Figure 24: Positioning Plate (Two Lamps/Three Legs) Direction of Lamps Direction of Lamps 32 © 2014 ADB Airfield Solutions All Rights Reserved 96A0209 Rev. AA Document Date (7/2014) L-880 & L-881 PAPI, Style A Installation Positioning Plate (Two Lamps/Four Legs) Installation Figure 25: Direction of Lamps Direction of Lamps © 2014 ADB Airfield Solutions All Rights Reserved 33 L-880 & L-881 PAPI, Style A Installation 96A0209 Rev. AA Document Date (7/2014) Figure 26: Positioning Plate (Three Lamps/Three Legs) Installation Direction of Lamps Direction of Lamps 34 © 2014 ADB Airfield Solutions All Rights Reserved 96A0209 Rev. AA Document Date (7/2014) L-880 & L-881 PAPI, Style A Installation Positioning Plate (Three Lamps/Four Legs) Installation Figure 27: Direction of Lamps Direction of Lamps 9. Install the frangible couplings. Make sure to place the second nut, ferrule compression joint, and ferrule ring on the bottom of the EMT tube first before screwing the tube with nuts, joints, and rings onto the frangible coupling. See Figure 28. NOTE: The contractor supplies and installs the 2-inch (50.8 mm) diameter (23/16 OD) EMT tube. Determine length at installation to adjust for uneven elevation above the runway. The 2-inch EMT tube extends into the frangible coupling 3.25 inches (82.55 mm) and 1-1/2 inches (38.1 mm) into the nut and ferrule compression joint to ensure stable installation. Paint the tube according to Federal standard 595A, color #12197, international orange, to reduce corrosion. Instead of expansion sleeves, cast 3/816 x 6-inch anchor j-bolts into the concrete at the proper locations on a 4 3/4 in. (120.65 mm) diameter bolt circle, in two places. © 2014 ADB Airfield Solutions All Rights Reserved 35 L-880 & L-881 PAPI, Style A Installation 96A0209 Rev. AA Document Date (7/2014) Figure 28: Frangible Coupling Installation Nut, Ferrule Compression Joint, and Ferrule Ring EMT Tube (Contractor-Supplied) Nut, Ferrule Compression Joint, and Ferrule Ring 9 - 11/16 inches Frangible Coupling Flange 4 - 3/4 inch Dia 6 inch Dia 36 © 2014 ADB Airfield Solutions All Rights Reserved 96A0209 Rev. AA Document Date (7/2014) Refer to Table 8 and Table 9 for the aiming angles for the L-880 and L-881 PAPI light units. Table 8: Aiming Angles for L-880 PAPI Units L-880 (4 box) PAPI Aiming Angle (Minutes of Arc) Aiming Angle (Minutes of Arc) Installation 2.3.9 PAPI Aiming Angles L-880 & L-881 PAPI, Style A Installation Note (Standard Installation) (Height Group 4 Aircraft* on Runway with ILS) Unit nearest runway 30' above glide path 35' above glide path A Next adjacent unit 10' above glide path 15' above glide path A Next adjacent unit 10' below glide path 15' below glide path A Next adjacent unit 30' below glide path 35' below glide path A NOTE A: Refer to Table 7 in Siting PAPI with ILS Glideslope in this section. Table 9: Aiming Angles for L-881 PAPI Units L-881 (2 box) PAPI Aiming Angle (Minutes of Arc) (Standard Installation) Unit nearest runway 15' above glide path Unit farthest from runway 15' below glide path NOTE: 60 minutes of arc = one degree (60' = 1°). 2.3.10 Assembling Adjustable Legs Assemble the legs for each PAPI unit as follows: See Figure 8. Screw threaded rods (5, 11) into differentials (7) and assemble legs. NOTE: Do not assemble upper hex nut (1), upper split lockwasher (2), and upper flatwasher (13). These items will be installed after the PAPI unit is mounted on the legs. Screw front and rear leg assemblies into the frangible couplings installed on concrete pad. 2.3.11 Mounting Unit To mount the unit, perform the following procedure: See Figure 8. Gently mount PAPI unit on the three or four legs so that the unit rests on the top of the lower flatwasher (12), lockwasher (3), and hex nut (4). NOTE: For the three-leg PAPI, assemble the upper end of the center rear leg as shown in Item 14 of Figure 8. Make further adjustment of the leg height by using the PAPI differential (7). See also Figure 29 and Figure 30 while mounting unit. Figure 29 shows the two-lamp, fourleg PAPI. Figure 29 shows the two-lamp, three-leg PAPI. Figure 29 and Figure 30 also apply to the three-lamp PAPI. © 2014 ADB Airfield Solutions All Rights Reserved 37 L-880 & L-881 PAPI, Style A Installation 96A0209 Rev. AA Document Date (7/2014) Figure 29: Elevation Setting Sequence (Two-Lamp, Four-Leg PAPI Shown) Installation 38 © 2014 ADB Airfield Solutions All Rights Reserved 96A0209 Rev. AA Document Date (7/2014) L-880 & L-881 PAPI, Style A Installation Elevation Setting Sequence (Two-Lamp, Three-Leg PAPI Shown) Installation Figure 30: See Figure 8, install the upper flat washer (8), lock washer (1), and hex nut (10) on the threaded rod (3). Do not tighten nuts. Make sure the bottom of the unit is resting on the top of the lower flat washer (11) of the right front leg F. Make sure all locking nuts on the frangible couplings are tightened. © 2014 ADB Airfield Solutions All Rights Reserved 39 L-880 & L-881 PAPI, Style A Installation 2.3.12 Aligning Units 96A0209 Rev. AA Document Date (7/2014) Installation This subsection provides information for aligning the PAPI units using the two types of aiming devices: the bubble-level style and the digital-level style. Aligning the PAPI involves knowing how the two types of aiming devices work, using bubble-level or digital-level aiming device to align PAPI, and leveling the tilt switch. NOTE: Alignment procedures are shown for the 2-lamp PAPI in Figure 29 and Figure 30, but the procedures apply to the 3-lamp PAPI as well. 2.3.12.1 How Bubble-Level Aiming Device Works See Figure 12. The bubble-level aiming device has two graduated scales, a large metallic scale and a plastic scale (on the upper arm of the aiming device) which are used to set the aiming angle. The metallic scale is calibrated in 10 minutes of arc from 0° to 10°. Since there are 60 minutes of arc in one degree (60'= 1° or 30'= 1/2°), there are 6 divisions (0-10', 10-20', 20-30', 30-40', 40-50', 50-60') between each degree tic mark on the scale. Note the 30 minute or 1/2 degree tic mark between each degree tic mark (0 to 1°, 1 to 2°, 9 to 10°) on the metallic scale is slightly longer than the 10', 20' or 40' and 50' tic marks. The plastic scale is calibrated in minutes of arc from 0 to 10 minutes. If an angular setting of, for example, 3° 30' is desired, the setting on the aiming device is obtained by moving the upper bar of the aiming device with the attached plastic graduate scale so that the 0 line on the plastic scale lines up exactly with the 3° 30' tic mark on the metallic scale (the 30 minute (30') tic mark is midway between the 3 degree and 4 degree tic marks). After obtaining this setting, tighten the locking screw on the upper arm to secure the angular setting. Suppose now that an angle of 3° 35' is desired. To obtain this setting, perform the following procedure: Set the 0 line on the plastic scale at the 3° 30' tic mark as described above. Locate the 5 minute line on the plastic scale. It will not be lined up with any of the tic marks on the metallic scale. To obtain the desired setting of 3° 35', slowly move the 5 minute line upward until it lines up exactly with the next tic mark on the metallic scale. The 5 minute line on the plastic scale will be exactly lined up with the 4° 20' tic mark on the metallic scale when the aiming device is set for 3° 35'. NOTE: The 0° line on the bottom of the plastic scale will be centered between 3° 30' tic mark and 3° 40' tic mark on the metallic scale. Tighten the locking screw on the upper arm to secure the arm's angular setting. Practice using the aiming device to obtain the following angular settings: 3° 33' and 3° 38'. NOTE: The 3° 33' angular setting is obtained when the 3 minute line on the plastic scale is lined up with the 4 degree tic mark on the metallic scale; the 3° 38' angular setting is obtained when the 8 minute line on the plastic scale is lined up with the 4° 50' tic mark on the metallic scale. 2.3.12.2 How Digital-Level Aiming Device Works 40 This subsection describes how the digital-level aiming device works. It provides information about the digital aiming device, how to calibrate the digital protractor, and how to install the digital protractor battery. © 2014 ADB Airfield Solutions All Rights Reserved 96A0209 Rev. AA Document Date (7/2014) L-880 & L-881 PAPI, Style A Installation NOTE: Calibrate the digital-level before each use. See “Calibrating Digital Protractor” on page 43. See Figure 15 and Figure 16. The digital-level aiming device has one survey device with two pivoting arms and a precision digital protractor that reads in 0.01 degree increments. Each 0.01 degree increment indicates a 0.6 minute movement. The digital level reads directly in degrees with one hundreth (.XX) of a degree resolution. Table 10 is provided to convert minutes to decimal of degrees. Example: 3° 35’ would read 3.58°. 3° 15’ would read 3.25°. Suppose now that an angle of 3° 33' is desired. To obtain this setting, perform the following procedure: Set the digital leveling device on mounting points A, B, C, and D per Figure 15 and Figure 16. Aim the PAPI A box per the procedure on Figure 29 or Figure 30 as applicable. NOTE: The digital level displays the precise angle at which the PAPI is aimed. In this case, 3° 33’ converts to 3.55°. A laminated card with the conversion chart is provided with each alignment device. © 2014 ADB Airfield Solutions All Rights Reserved 41 Installation Digital Aiming Device L-880 & L-881 PAPI, Style A Installation 96A0209 Rev. AA Document Date (7/2014) Table 10: Installation 42 Conversion from Decimal Degrees to Minutes Minutes Decimal Degrees Minutes Decimal Degrees 1 0.02 31 0.52 2 0.03 32 0.53 3 0.05 33 0.55 4 0.07 34 0.57 5 0.08 35 0.58 6 0.10 36 0.60 7 0.12 37 0.62 8 0.13 38 0.63 9 0.15 39 0.65 10 0.17 40 0.67 11 0.18 41 0.68 12 0.20 42 0.70 13 0.22 43 0.72 14 0.23 44 0.73 15 0.25 45 0.75 16 0.27 46 0.77 17 0.28 47 0.78 18 0.30 48 0.80 19 0.32 49 0.82 20 0.33 50 0.83 21 0.35 51 0.85 22 0.37 52 0.87 23 0.38 53 0.88 24 0.40 54 0.90 25 0.42 55 0.92 26 0.43 56 0.93 27 0.45 57 0.95 28 0.47 58 0.97 29 0.48 59 0.98 30 0.50 60 1.00 © 2014 ADB Airfield Solutions All Rights Reserved 96A0209 Rev. AA Document Date (7/2014) Calibrating the digital-level style aiming device involves performing an accuracy test and if necessary, a calibration test for the digital protractor. Installation 2.3.13 Calibrating Digital Protractor L-880 & L-881 PAPI, Style A Installation NOTE: Refer to Operating Digital Protractor in the Operation section for digital protractor operating instructions. CAUTION To ensure accurate readings with the digital protractor, calibrate before use. It is also recommended to calibrate the digital protractor if it has been dropped or is being used in an environment that varies more than 5 °C (9 °F) from the environment in which it was last calibrated. Refer below for calibration instructions. 2.3.13.1 Performing Digital Protractor Accuracy Test To perform the accuracy test for the digital protractor, perform the following procedure: 1. See Figure 31. Position the digital protractor with the display facing you on a clean, flat horizontal surface. It doesn’t have to be exactly level. Wait ten seconds so the unit is completely settled and note the angle on the display. Figure 31: Positioning Digital Protractor Step 1 2. See Figure 32. Rotate the unit end-for-end so that the display is facing away from you. Be sure to set the digital protractor in exactly the same spot, and wait 10 seconds before reading the angle that is displayed. Figure 32: Rotating and Rolling Protractor Step 2 Step 3 Step 4 3. Now roll the unit forward so that that display is facing you, but the lettering on the face of the unit is upside down. Wait 10 seconds and note the angle on the display. 4. Rotate the unit end-for-end so that the display is facing away from you. The lettering should still be upside down. Wait 10 seconds and note the angle on the display. © 2014 ADB Airfield Solutions All Rights Reserved 43 L-880 & L-881 PAPI, Style A Installation 96A0209 Rev. AA Document Date (7/2014) CAUTION Installation If any of the four measurements in steps 1 through 4 varies from any other by more than 0.1 degrees, you must recalibrate the digital protractor. Refer below for calibration procedure. 2.3.13.2 Performing Digital Protractor Calibration Procedure The calibration procedure below calibrates the digital protractor through its entire 360 degree range by electronically recording four horizontal and four vertical settings. It should be performed whenever the accuracy test shows a discrepancy of 0.1 degrees or more. NOTE: You may cancel the calibration procedure at any time by turning off the digital protractor. To calibrate the digital protractor, perform the following procedure: 1. Turn on the digital protractor and place it on a flat surface. You can use any horizontal surface within 10 degrees of level and any vertical surface within 10 degrees of plumb. You must use the same surfaces throughout the entire process. NOTE: Each time you reposition the digital protractor, wait a minimum of 10 seconds before pressing the HOLD button to advance to the next step. 2. See Figure 33. Press and hold the HOLD and ALT ZERO buttons simultaneously. Keep them depressed for approximately three seconds. Figure 33: Digital Protractor Displays and Buttons 3. See Figure 34. Release the buttons when the symbol “SUP” appears. A 0 within flashing brackets then appears. These brackets are composed of four horizontal and four vertical segments. NOTE: As you proceed through this procedure, a new segment will hold steady after you complete each step. 44 © 2014 ADB Airfield Solutions All Rights Reserved 96A0209 Rev. AA Document Date (7/2014) L-880 & L-881 PAPI, Style A Installation O within Flashing Brackets Installation Figure 34: 4. Calibrate horizontal settings by performing the following procedure: a. See Figure 35. Face the digital protractor toward you. The white lettering on the face should be right-side up. Align with an edge or line. Wait 10 seconds. Press the HOLD button until [1] appears. Figure 35: Rotating and Rolling Digital Protractor for Horizontal Settings Step 4a Step 4b Step 4c Step 4d b. Rotate the digital protractor so that it faces away from you. The lettering should still be right-side up. Align with the same edge or line. Wait 10 seconds. Press the HOLD button until [2] appears. c. Roll the protractor so that it faces you. The lettering should now be upside down. Align with the same edge or line. Wait 10 seconds. Press the HOLD button until [3] appears. d. Rotate the protractor so that it faces away from you. The lettering should still be upside down. Align with the same edge or line. Wait 10 seconds. Press the HOLD button until [4] appears. © 2014 ADB Airfield Solutions All Rights Reserved 45 L-880 & L-881 PAPI, Style A Installation 96A0209 Rev. AA Document Date (7/2014) 5. Calibrate vertical settings by performing the following procedure: Installation a. See Figure 36. Place the digital protractor against a vertical surface so that it faces you. The lettering on the face should read from bottom to top. Align with an edge or line. Wait 10 seconds. Press the HOLD button until [5] appears. Figure 36: Rotating and Rolling Digital Protractor for Vertical Settings Step 5a Step 5b Step 5c Step 5d b. Roll the digital protractor so that it faces away from you. The lettering should still read from bottom to top. Align with the same edge or line. Wait 10 seconds. Press the HOLD button until [6] appears. c. Rotate the digital protractor end-for-end so that it faces you. The lettering should now read top to bottom. Align with the same edge or line. Wait 10 seconds. Press the HOLD button until [7] appears. d. Roll the digital protractor so that it faces away from you. The lettering should still read top to bottom. Align with the same edge or line. Wait 10 seconds. Press the HOLD button until [8] briefly appears, followed immediately by regular angle measuring. Installing Digital Protractor Batteries See Figure 37 for installing batteries. Figure 37: 46 Digital Protractor Installation © 2014 ADB Airfield Solutions All Rights Reserved 96A0209 Rev. AA Document Date (7/2014) L-880 & L-881 PAPI, Style A Installation To extend battery life, the digital protractor shuts off automatically when left undisturbed for five minutes, unless activity exists on the serial port. To reactivate the digital protractor, push the ON/OFF button. NOTE: Hooking serial port pin 5 (REQ) to pin 9 (BATT+) disables the auto-power shutoff. The digital protractor also indicates when the battery is low. Change the battery when the display alternately flashes “LobAt” with angle measurements. The digital protractor does not display inaccurate angles due to a weak battery. 2.3.13.3 Aligning PAPI Using Bubble-Level/Digital-Level Aiming Devices Using the bubble-level or digital-level aiming devices to align the PAPI units involves performing horizontal aiming, performing rough elevation setting, checking the horizontal aiming, and performing fine elevation setting. Preliminary Remarks The remarks below should be kept in mind in all the following operations: aligning horizontal cutoffs to aiming device, adjusting rough elevation setting, and checking horizontal aiming. • When handling the unit and, in particular, during installation and aiming, avoid movement of the reference adjusting screws in blocks A and B. NOTE: Any accidental movement of these screws will require resetting in the factory by specialized personnel. • When placing the aiming device on the PAPI unit, make sure the holes and slots in the movable arms of the aiming device are properly inserted over the screw heads in the reference blocks (A and B) and into reference slots (C and D). • The bubble level/digital protractor should be carefully positioned between the locator screws on the bar of the aiming device or against the locator screws on the movable arms. • When working with the fastening nuts and locknuts on the legs, make sure that the threaded rod does not rotate. Aligning Horizontal Cut-Offs to Aiming Device See Figure 29, Step 1 for the 4-leg PAPI and Figure 30, Step 1 for the 3-leg PAPI. Horizontal cut-offs are aligned to the aiming device, not the PAPI box. NOTE: The bubble-level style aiming device is set to the desired elevation setting (3 degrees, 15 minutes), then the PAPI unit is adjusted until the aiming device is level. For the digitallevel style aiming device, the digital protractor reads the angular setting of the PAPI box directly. For more detail on the differences between the bubble-style and digital-style aiming devices, refer to Installation Using Bubble-Level Style Aiming Device and Installation Using Digital-Level Style Aiming Device in this section. To align the horizontal cut-offs, perform the following procedure: 1. For the bubble-level style aiming device only, first set the aiming device at the required aiming angle for the unit. 2. Open up the two movable arms and place the instrument on the reference blocks A, B, and slots C and D as shown in Figure 29 and Figure 30. Carry out the following aiming procedure: a. Place rod at 164 feet (50 m) in front of the PAPI unit at the same distance from the runway centerline as reference block B and slot C. b. Check the alignment through the V-sites on bar of aiming device. Use the sighting pictures given in Figure 12 and Figure 13 for the bubble-level aiming device and © 2014 ADB Airfield Solutions All Rights Reserved 47 Installation The digital protractor is powered by a 9-volt battery. A new alkaline battery provides 500 hours of use. A 9-volt lithium battery can be used for even longer life. L-880 & L-881 PAPI, Style A Installation 96A0209 Rev. AA Document Date (7/2014) Figure 14 and Figure 15 for the digital-level aiming device. See Figure 8. If necessary, adjust alignment of unit by a small movement of the lower hex nut (4). Installation c. Tighten upper hex nut (13) on the right front leg F. d. Do not tighten lower hex nut (10). Leg F will be the pivot during the following operations. 2.3.14 Adjusting Rough Elevation Setting This subsection describes how to adjust the rough elevation for the 4-leg and 3-leg PAPI. 2.3.14.1 Adjusting Rough Elevation Setting for Four-Leg PAPI System NOTE: If the legs of the unit are installed at the same height and are level, the unit will be aimed at approximately 3 degrees. To adjust the coarse setting of the 4-leg PAPI unit, perform the following procedure: 1. See Step 2, Figure 29. Place the bubble level/digital protractor between locater screws on the movable arm resting on reference blocks A and B. 2. See Figure 8 and Figure 29. Level by adjusting the hex nuts (13, 10) on the left front leg E. 3. Tighten hex nuts (13, 10) simultaneously. 4. See Step 3, Figure 29. Place bubble level/digital protractor between locater screws on the bar of the aiming device resting on reference block B and slot C. 5. See Figure 8 and Figure 29. Level by adjusting hex nut (6) of the right rear leg G. During this operation, the rigid bottom of the unit must be free from hex nut (13) on the left rear leg H. 6. Position upper hex nut (13) on leg G against upper flat washer (12). Simultaneously tighten hex nuts and on leg G. 7. See Step 4, Figure 29. Place bubble level/digital protractor between locater screws on the movable arm resting on reference slots C and D. 8. See Figure 8 and Figure 29. Level by adjusting hex nut (10) on the left rear leg H. Some adjustment of the upper hex nut (13) may also be required. 9. Position hex nut on leg H against upper flat washer (12). Simultaneously tighten hex nuts (13, 10). 10. Tighten lower hex nut (10) on leg F. NOTE: No further adjustment is required on the hex nuts. 2.3.14.2 Adjusting Rough Elevation Setting for Three-Leg PAPI System NOTE: If the legs of the unit are installed at the same height and are level, the unit will be aimed at approximately 3 degrees. To adjust the coarse setting of the 3-leg PAPI unit, perform the following procedure: 1. See Step 2, Figure 30. Place the bubble level/digital protractor between locater screws on the movable arm resting on reference blocks A and B. 2. See Figure 8 and Figure 30. Level by adjusting the hex nuts (13, 10) on the left front leg E. 3. Tighten hex nuts (13, 10) simultaneously. 4. See Step 3, Figure 30. Place bubble level/digital protractor between locater screws on the bar of the aiming device resting on reference block B and slot C. 2.3.14.3 Adjusting Rough Elevation Setting for Three-Leg PAPI System 5. See Figure 8 and Figure 30. Level by adjusting hex nut (6) of the right rear leg G. 6. Position upper hex nut (13) on leg G against upper flat washer (12). Simultaneously tighten hex nuts on leg G. 7. Tighten lower hex nut (10) on leg F. 48 © 2014 ADB Airfield Solutions All Rights Reserved 96A0209 Rev. AA Document Date (7/2014) L-880 & L-881 PAPI, Style A Installation See Figure 8. Make sure rod at 164 feet (50 m) from the unit is still properly aligned with the V-sites on aiming bar. If not, loosen upper hex nut (13). Align the unit. Refer to “Aligning Horizontal Cut-Offs to Aiming Device” on page 47. Repeat the operations in the preceding section. NOTE: It is not necessary for the alignment to be absolutely perfect. An error of 20 inches (508 mm) at 164 feet (50 m) yields an error of 0.5°, which is within tolerance. Refer to Azimuthal Aiming in Siting Tolerances in this section. 2.3.15 Adjusting Fine Elevation Setting This subsection describes how to adjust the fine elevation setting for the 3-leg and 4-leg PAPI systems. 2.3.15.1 Adjusting Fine Elevation Setting for Four-Leg PAPI System To adjust the fine elevation settings using the differential for the 4-leg PAPI, perform the following procedure: 1. Place aiming device on unit so that it rests on the screws of reference blocks A and B, and slots C and D. 2. See Figure 29, Step 1 and Figure 8. Make sure the locking hex nuts (5, 9) for the differential (4) on right front leg F are tightened. The locking hex nuts (5, 9) for the differentials on the other legs have to remain loose. 3. See Figure 29, Step 2 and Figure 8. Place bubble level/digital protractor on the arm of the aiming device resting on reference blocks A and B. Level by turning the differential on left front leg E in the proper direction. Tighten locking hex nuts (5, 9) on the differential on leg E when leveled. 4. See Figure 29, Step 3 and Figure 8. Place bubble level/digital protractor on the bar of the aiming device resting on reference block B and slot C. Proceed with the leveling procedure by adjusting the differential on rear legs G and H, turning both differentials in the same direction with equal amplitude. Tighten locking hex nuts (6, 8) on differential on leg G when leveling is completed. 5. See Figure 29, Step 4 and Figure 8. Place bubble level/digital protractor on the movable arm resting on slots C and D. Level by turning differential of left rear leg H in the appropriate direction. Tighten locking hex nuts on differential on leg H when leveling is completed. 6. Repeat the above fine elevation adjustment steps 2 through 5. If the setting is still not correct, go back and repeat the rough elevation adjustment steps and then the fine adjustment steps until the correct setting is obtained. 2.3.15.2 Adjusting Fine Elevation Setting for Three-Leg PAPI System To adjust the fine elevation settings using the differential for the 3-leg PAPI, perform the following procedure: Place aiming device on unit so that it rests on the screws of reference blocks A and B, and slots C and D. See Figure 30, Step 1 and Figure 8. Make sure the locking hex nuts (5, 9) for the differential (4) on right front leg F are tightened. The locking hex nuts (5, 9) for the differentials on the other legs have to remain loose. 2.3.15.3 Adjusting Fine Elevation Setting for Three-Leg PAPI System (cont’d.) See Figure 30, Step 2 and Figure 8. Place bubble level/digital protractor on the arm of the aiming device resting on reference blocks A and B. Level by turning the differential on left front leg E in the proper direction. Tighten locking hex nuts (5, 9) on the differential on leg E when leveled. See Figure 30, Step 3 and Figure 8. Place bubble level/digital protractor on the bar of the aiming device resting on reference block B and slot C. Proceed with the leveling procedure by adjusting the differential on rear leg G, turning both differentials in the same direction with equal amplitude. Tighten locking hex nuts (5, 9) on differential on leg G when leveling is completed. © 2014 ADB Airfield Solutions All Rights Reserved 49 Installation Checking Horizontal Aiming L-880 & L-881 PAPI, Style A Installation 96A0209 Rev. AA Document Date (7/2014) Installation Repeat the above fine elevation adjustment steps 2 through 4. If the setting is still not correct, go back and repeat the rough elevation adjustment steps and then the fine adjustment steps until the correct setting is obtained. 50 © 2014 ADB Airfield Solutions All Rights Reserved 96A0209 Rev. AA Document Date (7/2014) This subsection provides information for installing the master box assembly. Locating Master Box See Figure 38. The master should be located behind the optical box #1 (the unit most distant from the runway) from 0 to 100 feet from the light unit. It should be located so that stray light from taxiing aircraft, rotating beacons, and automobiles does not energize the photocell on the unit. Figure 38: Master Box Assembly Preparing Master Foundation To prepare the master foundation, perform the following procedure: 1. Dig, frame, and pour the foundation for the master per Figure 38. 2. Install two-inch, 90 degree conduit elbows with couplings in the trench prior to pouring the concrete. 3. After the concrete has hardened, install frangible couplings in the two couplings on the concrete pad (optional baseplate with mounting studs can be used as shown). 4. Set the master unit on the frangible couplings and secure in place using the locking screws on the slipfitters on the bottom of the master unit. 5. Ground the master unit using AWG #12 ground wire. 6. See Figure 47 and Figure 48. Use external wiring diagrams to attach the appropriate field wiring to the labeled terminals of the master. See Figure 51 and Figure 52 for master internal wiring schematics. © 2014 ADB Airfield Solutions All Rights Reserved 51 Installation 2.3.16 Installing Master Box Assembly L-880 & L-881 PAPI, Style A Installation L-880 & L-881 PAPI, Style A Installation 2.3.16.1 Leveling Tilt Switches 96A0209 Rev. AA Document Date (7/2014) Installation To level the tilt switch, place a precision bubble level/digital protractor on top of the tilt switch (with metal plate attached to hold level). Loosen bolts and adjust the up/down position of the tilt switch until level reads true. Tighten the locking bolts. NOTE: The bubble-level and digital protractor are located respectively in the Bubble-Type Level Aiming Device and Digital Protractor-Type Level Aiming Device Kit. NOTE: Use a precision level such as the ±0.004 in/ft degree of precision level used for leveling the PAPI units. 2.3.17 Wiring between Masters and Light Units WARNING Before making any wire connections, make sure that you turn off the constant current regulator. Failure to observe this warning may result in personal injury, death, or equipment damage. This subsection describes series circuit wiring requirements. 2.3.17.1 Grounding Units Each PAPI unit must be grounded. To ground each unit: Attach a ground wire AWG #12 (minimum) to the ground lug located on the floor flange on the rear PAPI unit leg. 2.3.17.2 Connecting External Wiring All installation wiring should conform to the applicable sections of the National Electric Code and Local Codes. Make wire connections as shown in Figure 47 for the L-880 PAPI system or in Figure 48 for the L-881 PAPI system. Route cable through the flexible conduit assemblies. NOTE: All external wiring must be a minimum of 16 AWG/600 V. See Figure 39 and Figure 40 for suggested method of connecting the wires between the master unit and the light box and the equipment that the contractor supplies. A field splice kit is available for L-880 installation and for L-881 PAPI installation. Each field splice kit provides enough items for entire installation. Refer to the Parts section for ordering information. NOTE: It is important that the tilt switch wires be free from nicks and routed in such a manner as to minimize conducted interference between adjacent wires. NOTE: After making all wiring connections and checking the operation of the units, install duct seal or RTV in all conduit entrances. 52 © 2014 ADB Airfield Solutions All Rights Reserved 96A0209 Rev. AA Document Date (7/2014) L-880 & L-881 PAPI, Style A Installation L-880/L-881 Master External Connections Installation Figure 39: To Power Supply To Slave Units * Six-Pin Female Conductors * Part of ADB Field Splice Kit © 2014 ADB Airfield Solutions All Rights Reserved 53 L-880 & L-881 PAPI, Style A Installation 96A0209 Rev. AA Document Date (7/2014) Figure 40: L-880/L-881 Light Box External Connections Installation 54 © 2014 ADB Airfield Solutions All Rights Reserved 2.3.18 Checking Slope Angles of PAPI Units L-880 & L-881 PAPI, Style A Installation It may be requested that when the equipment is put initially into operation and at regular intervals thereafter, the cut-off angle of the units be checked. To make this measurement, it will be necessary to use a surveying instrument or a bubble level with telescope and a surveyor's stake. To check the slope angles of the PAPI units, perform the following procedure: 1. See Figure 41. Place the surveying instrument 6 to 10 feet (1.83 to 3.05 m) behind the unit pointing down beam. Figure 41: Checking Slope Angles 2. A surveyor's stake is held by an assistant approximately 16 feet (4.88 m) in front of the unit. 3. Take reading A for the intersection of the horizontal of the telescope with the stake. 4. Take reading B for the intersection of the cut-off plane of the light beam with the surveyor's stake. 5. The assistant should now move a precisely measured distance of about 50 to 66 feet (15 to 20 m) (±0.25%) down beam and take the same measurements A' and B', as in steps 3 and 4 above. 6. The angle x of the beam cut-off to the horizontal is found from the following formula: tan x ( A' B' AB) / D NOTE: The overline (—) denotes length where D is the horizontal distance between the two stake positions. If similar checks are to be scheduled in the future, a small concrete pad holding a galvanized pipe may be installed in front of each unit at the distances used above. © 2014 ADB Airfield Solutions All Rights Reserved 55 Installation 96A0209 Rev. AA Document Date (7/2014) L-880 & L-881 PAPI, Style A Installation 96A0209 Rev. AA Document Date (7/2014) Installation 2.3.19 Using Reference Bases for Checking Stick See Figure 14. As soon as the system is found to be operationally acceptable in all respects, install permanent sighting bases in front of each light unit to allow for routine checks of the elevation setting using the checking stick. 2.3.19.1 Locating Reference Bases To locate a reference bases, perform the following procedure: 1. Locate a concrete sighting base on the extended centerline of each unit. 2. When the PAPI is switched on, walk along the centerline of the unit observing it from time to time through the screen on the checking stick until the lower limit of the white sector is about to disappear under the lower scored line. 3. At this point, dig a hole approximately 16 inches (406.4 mm) square and 12 inches (304.8 mm) deep. 4. See Figure 24 and Figure 25 for the two-lamp/three- and four- leg positioning plate and Figure 26 and Figure 27 for the three-lamp/three- and four-leg positioning plate. Drive a steel pipe vertically in the center of the hole until its top is at ground level. 5. Place the bottom end of the checking stick on top of the pipe and observe the light unit through the screen. 6. Gradually drive the pipe into the hole, while frequently observing the light unit through the screen, until the light beam no longer appears completely white just below the upper line of the screen. 7. Repeat this procedure for the other units, using the same observer. 2.3.19.2 Making Observations with Checking Stick See Figure 14. Refer to Reference Bases for Checking Stick in this section. Place the checking stick on concrete sighting base in front of the light unit and switch the PAPI system on. Observe the light unit through the screen. Just below the upper line of the screen, the light beam should no longer appear completely white. If this is not the case, the unit is out of alignment and requires resetting. Refer to Aligning Units in this section. 2.3.19.3 Making Flight Checks for Reduced Horizontal Coverage A flight check is required for the PAPI system when there is reduced horizontal coverage to determine if all horizontal cutoffs of the PAPI beams are properly located relative to any obstacles. If horizontal realignment is required, the upper an lower locknuts on all PAPI legs must be loosened and the unit realigned. Refer to Aligning Horizontal Cut-Offs to Aiming Device in this section. 56 © 2014 ADB Airfield Solutions All Rights Reserved L-880 & L-881 PAPI, Style A Operation 2.4 Operation This section provides operating information for the PAPI system and the aiming device digital protractor. 2.4.1 Operating PAPI System This subsection provides information concerning PAPI normal operation, regions with heavy snowfall, criteria for system deactivation, initial startup using local control, REM control operation, and optional interlock relay. 2.4.1.1 Normal Operation The PAPI system must operate continuously as long as the runway is in service. At night the system may operate continuously at either 5% or 20%. The nightime intensity is set with a switch in the Master box. 2.4.1.2 Regions with Heavy Snowfall Units should operate continuously at normal standby brightness even when the runway is not in use. Any snow will thus melt and drain off. When snowfall is expected to bury the units, the location of the units should be marked with sticks or flags (approximately 7 feet high) (2.13 m) to prevent damage to the units by snow removal equipment. 2.4.1.3 Criteria for System Deactivation Pending repair and provided it is continually monitored, a unit in which one of the lamps has failed can still be regarded as operational. Should the system show more serious defects, it must be put out of operation. 2.4.1.4 Initial Startup Using Local Control To turn on PAPI A using local control, perform the following procedure: Verify that the PAPI Control Board jumper J9 is set to the 3-step setting. Short TB1-13 and TB-14 with 10 AWG wire, minimum. Connect a true RMS ammeter to this wire. Place S1 to REM and turn circuit breaker CB1 to on. Turn toggle switch S1 to LOCAL. The unit should turn on and the ammeter should read 6.6 A. If the ammeter does not read 6.6 A, adjust the output current with buttons INC and DEC on the PAPI Control Board until the correct current is obtained. Press and hold the SAVE button for two seconds to save the setting. Turn S1 to REM and CB1 to off. Disconnect photocell by removing relay K2. Turn CB1 to on and S1 to LOCAL. Unit should turn on. Refer to Table 11. Turn toggle switch S2 to 20%. The ammeter should read 5.08A. Table 11: Output Current Intensity Output Current 5% 4.09 A 20% 5.08 A 100% 6.6 A If the ammeter does not read 5.08A, adjust the output current with buttons INC and DEC on the PAPI Control Board until the correct current is obtained. Press and hold the SAVE button for two seconds to save the setting. Turn toggle switch S2 to 5%. The ammeter should read 4.09A. If the ammeter does not read 4.09A, adjust the output current with buttons INC and DEC on the PAPI Control Board until the correct current is obtained. Press and hold the SAVE button for two seconds to save the setting. Turn S1 to REM and CB1 to off. Install relay K2, and place S2 to 5% or 20% intensity for nighttime operation. Remove wire between TB1-13 and TB1-14 and re-apply field load. Turn CB1 to on and S1 to LOCAL. The system should energize and all lamps should come on. © 2014 ADB Airfield Solutions All Rights Reserved 57 Operation 96A0209 Rev. AA Document Date (7/2014) L-880 & L-881 PAPI, Style A Operation 96A0209 Rev. AA Document Date (7/2014) With the load applied, verify all current steps are correct. Re-adjust if necessary. Operation 2.4.1.5 Remote Control Operation To set Remote control, perform the following procedure: When the toggle switch S1 is set to REM and remote control wiring is connected to TB1-7 and TB1-8. The system should energize and the ammeter should read 6.6 A. All lamps should come on. Turn CB1 to off and disconnect photocell by removing relay K2. Turn CB1 to on. The system should energize, all lamps should come on, and the ammeter should read corresponding to setting of S2. Turn CB1 to off and install relay K2. Turn CB1 to on. 2.4.1.6 Optional Interlock Relay To test interlock relay operation, perform the following procedure: 1. Turn S1 to REM and CB1 to off. 2. Remove relay K2. 3. Turn CB1 to on. 4. Unit should remain off. 5. Turn on CCR that control the interlock relay. 6. Unit should turn on and all lamps should come on, and current to lamp should read corresponding to setting of switch S2. 7. Turn CCR off, unit should turn off. 8. Turn CB1 to off and install relay K2. Turn CB1 to on. 2.4.2 Operating Digital Protractor This subsection provides information for operating the digital protractor. The digital protractor is a part of the digital-level style aiming device. For more information on calibrating, maintaining, installing, and using the digital protractor, refer to “Calibrating Digital Protractor” on page 43 and “Installing Digital Protractor Batteries ” on page 46, and “Maintenance Procedures” on page 61. NOTE: Calibrate the digital-level before each use. See “Calibrating Digital Protractor” on page 43. To operate the digital protractor, perform the following procedure: See Figure 33. Push the ON/OFF button. The digital protractor displays angle readings immediately. NOTE: See Figure 42. When the unit is first turned on, the displayed angles are in standard reference mode. The true horizontal level is displayed as 0.00°. An arrow on the left side of the display indicates which way to move the digital protractor to achieve level or plumb. Figure 42: 58 Digital Protractor Initial Angle Displayed © 2014 ADB Airfield Solutions All Rights Reserved 96A0209 Rev. AA Document Date (7/2014) L-880 & L-881 PAPI, Style A Operation NOTE: To get the most accurate reading, allow the unit to settle for 5 seconds before noting the angle. NOTE: Expect a resolution of one hundredths of a degree for 10 degrees of level. The resolution automatically changes to tenths of a degree beyond these points. © 2014 ADB Airfield Solutions All Rights Reserved 59 Operation Set the digital protractor on the surface to be measured and read the angle. L-880 & L-881 PAPI, Style A Section 5 Maintenance 96A0209 Rev. AA Document Date (7/2014) Section 5 Maintenance 2.5 Section 5 Maintenance This section provides maintenance information for the L-880/L-881 PAPI systems. 2.5.1 Maintenance Schedule Refer to Table 12 for L-880/L-881 maintenance schedule. Interval After initial installation (during first few weeks) Table 12: PAPI Maintenance Maintenance Task (1) Check elevation angle of units. Action (1) For the bubble-level style aiming device only, use that checking stick that comes in the Bubble-Type Level Aiming Kit. Reset any units out of alignment. (2) For the digital-level style aiming device, check the digital protractor calibration and verify the unit elevation aiming with aiming device and digital protractor located in the Digital Protractor-Type Level Aiming Kit. Daily (1) Check for frost or dew on outer lens if units are Remove frost or dew and change airport lighting not operated continuously. circuitry per Cert Alert 02-08. See NTSB Cert Alert FAA Cert Alert No. 02-08 in Section 1 (2) Check to ensure all lamps are lighted and illuminated evenly. (1) Replace burned-out lamps. Clean any dirty glassware. (3) Check for any apparent evidence of damage to (2) Repair or replace any damaged components. unit. (4) Check all control equipment for proper operation. (3) Repair or replace any damaged components. (5) If using the aiming device with digital protractor, check the accuracy of the digital protractor. (4) Perform the digital protractor end-for-end accuracy test to make sure the digital protractor is in calibration. If the digital protractor is not accurate, perform the digital protractor calibration test. Refer to Calibrate the digital-level before each use. See “Calibrating Digital Protractor” on page 43 Weekly (more frequently during rainy season) (1) Clean outer surface of protective glass. (1) Use a soft cotton cloth moistened with alcohol. (1) Check elevation angle of units. (1) For the bubble-level style aiming device only, use that checking stick that comes in the Bubble-Type Level Aiming Kit. Reset any units out of alignment. Calibrate the digital-level before each use. For the digital-level style aiming device, check the digital protractor calibration and verify the unit elevation aiming with aiming device and digital protractor located in the Digital Protractor-Type Level Aiming Kit. See “Calibrating Digital Protractor” on page 43 Monthly 60 Performing Accuracy Test and Performing Calibration Procedure in the Installation section. (1) Repair or replace any damaged parts. (1) Inspect housing and closure system, lamps, electrical connections, filters, and protective glass for damage, breakage, or warpage. (2) Clean interior. (2) Remove any foreign matter. Clean both sides of the protective glass, color filters, lenses and reflectors. Use a soft cotton cloth moistened with alcohol. (3) Make sure mounting is rigid. (3) Tighten any loose hardware, nuts, screws, etc. Realign unit if hardware has loosened. (4) Make sure no vegetation obscures the light beams. (4) Remove vegetation. Use weed killer to prevent any additional growth. (5) Make flight check of system, if possible. (5) Verify that units give proper approach path indication. © 2014 ADB Airfield Solutions All Rights Reserved L-880 & L-881 PAPI, Style A Section 5 Maintenance 2.5.2 Maintenance Procedures Refer to maintenance procedures below. 2.5.2.1 Replacing Lamp To replace a lamp, perform the following procedure: 1. Turn off circuit breaker CB1. 2. De-energize main input breaker. 3. Disconnect the electrical slip-on fitting on burned-out lamp, swing back the spring-loaded fork and remove lamp from the reflector. NOTE: Replacement lamps shipped after May 1, 2005 will include extra male disconnects. Replacement lamp(s) 48A0077-1 will have female disconnects. If the lamps being replaced have male disconnects, then the female disconnects on the power leads must be cut off and replaced with the male disconnects supplied in the Replacement Lamp Kit (94A0337). If the lamps being replaced have female disconnects, then disconnects on the power leads do not need to be replaced. 4. Reverse Step 1 to install a new lamp. 5. Orientate lamp to match index slots in lamp base with index tabs in lampholder (one tab/slot is square, the other tab/slot is circular). Hold lamp in place by placing the forked spring clip over lamp base and locking spring clip in place by latching forked spring clip behind the locking ears located on side of lampholder. CAUTION Wear cotton gloves when handling the lamps. Touching the quartz bulb with bare fingers may seriously shorten lamp life. If the quartz bulb has been touched, wipe it carefully with lens cleaning tissue or similar material moistened with isopropyl alcohol. NOTE: It is recommended that a systematic replacement of all lamps be made after a service period of approximately 800 hours at the 100% brightness level. An elapsed-time recorder connected to the constant current regulator may be used to determine the time for replacement. 2.5.2.2 Replacing Objective Lens The objective lenses are precisely positioned in the unit and are not field repairable since the optical center of the lens must be realigned after replacement. Whenever an objective lens is damaged, the PAPI light unit must be returned to the factory for repair and adjustment. Contact ADB Airfield Solutions, Inc. Sales Department for details. © 2014 ADB Airfield Solutions All Rights Reserved 61 Section 5 Maintenance 96A0209 Rev. AA Document Date (7/2014) L-880 & L-881 PAPI, Style A Section 5 Maintenance Section 5 Maintenance 2.5.2.3 Replacing Filters 96A0209 Rev. AA Document Date (7/2014) The filters must be perfectly clean. Use a soft cotton cloth moistened with alcohol to clean filters, and wear cotton gloves when handling filters. Each filter is held in place in the filter holder by two springs. To remove or replace a filter, perform the following procedure: 1. Remove the two springs using a small pliers. 2. Unclip the lower end of each spring from the hole in the panel and pull upward on the other end of the spring to remove. 3. Remove the filter by sliding it upward out of the holder. 4. To reinstall filter, reverse the removal steps. The filter must be installed in the holder so that the lower edge (dull edge or machine edge) of the filter is down. NOTE: When cleaning filters, make sure each filter is returned to the same filter holder from which it was removed. Filter Spring Filter Holder This edge down. This is the Machine Edge. 2.5.2.4 Cleaning and Storing Digital Protractor Refer to the guidelines below for cleaning and storing the digital protractor used for aiming the PAPI. • Clean the digital protractor with mild liquid soap applied to a damp cloth. Never immerse the protractor in water. • • Do not use solvents directly on any of the digital protractor plastic surfaces. Store the digital protractor away from extreme temperature. CAUTION Never store digital protractor below –20 °C (-4 °F) or above 65 °C (149 °F). 62 © 2014 ADB Airfield Solutions All Rights Reserved 96A0209 Rev. AA Document Date (7/2014) L-880 & L-881 PAPI, Style A Troubleshooting WARNING Allow only qualified personnel to perform the following tasks. Observe and follow the safety instructions in this document and all other related documentation. De-energize the circuit and lock out the circuit or regulator so that the circuit cannot be energized by remote means before attempting to service the fixture. This section provides troubleshooting procedures. NOTE: As of 12/4/01, the tilt switch assembly for the PAPI A is internal only. Before 12/4/01, the tilt switch was external. 2.6.1 Troubleshooting Refer to Table 13. This section describes preliminary troubleshooting and provides a basic troubleshooting table. To do preliminary troubleshooting for the PAPI, perform the following procedure: 1. Check all fuses and circuit breaker. 2. Visually examine all areas of the PAPI. Check for burnt or loose connections and parts. 3. Check that input voltage is present and within +10% to -5% of nominal. 4. If the PAPI works in LOCAL but not in REMOTE, check voltage on the remote control lines. Check fuse F3. If voltage on remote control lines is correct and fuse F3 is normal, replace LC-control PCB1. 5. Turn toggle switch S1 from REM to LOCAL to check if the PAPI can be re-energized. If the PAPI re-energizes, the cause of the problem is an open circuit or overcurrent. Check the output wire for open circuit. If the output wire is closed, check overcurrent by calibrating LC-control PCB. 6. If open circuit exists, short the PAPI output with an AWG 8 (2000 volts, minimum) wire between TB1-13 and TB1-14 on the master, and turn on the PAPI. If the PAPI operates normally, the problem may be load related. Repair the PAPI output wire from the master to the individual light unit. 7. If the PAPI turns on for a few seconds and then shuts off and the the ammeter indicates 0 amps, the problem is either an open circuit, or current transformer T2 is open. Replace transformer T2. 8. If the PAPI turns on and then shuts off after a few seconds and a high current reading exists on the the ammeter, the problem is an overcurrent. Adjust the output current accordingly. If this does not work, replace LC-control PCB1 and then SCRs. 9. If the PAPI does not energize at all, check for undervoltage. If undervoltage exists, correct the undervoltage problem. © 2014 ADB Airfield Solutions All Rights Reserved 63 Troubleshooting 2.6 Troubleshooting L-880 & L-881 PAPI, Style A Troubleshooting 96A0209 Rev. AA Document Date (7/2014) Table 13: Troubleshooting Problem All lamps out Lamp(s) dim Signal Interruption when PAPI unit is not operated continuously L-880/L-881 PAPI Troubleshooting Possible Cause PAPI unit tilts Solution Realign PAPI unit. Tilt switch not level Realign tilt switch. Power input Repair or replace loose or broken wire. All lamps failed Replace lamps. Check output current level. Calibrate, if necessary. LC-control PCB1 in master failed Replace PCB1. SCRs failed Replace SCRs. Fuses burned Check all fuses. Replace blown fuses. If F4 is blown multiple times check that there are no ground faults in the output cables connected to the PAPI boxes. Ground faults must be repaired for proper PAPI operation. Shorting device PCB in light box bad Replace shorting device PCB. Dirty lens shield Clean with soft cotton cloth moistened with alcohol. Lamp not properly seated in reflector Re-seat lamp in reflector. Replace lamp socket, if necessary. Current level too low Calibrate, if necessary. Lens is improperly aligned Replace lens if loose in ring. Unit improperly aligned Use check stick to check alignment. Frost or Dew on outer lens Change airport circuitry to ensure PAPI’s are preset to operate on a low power setting of either 5 or 20 per cent. See FAA Cert Alert on page iii. Short lamp life Current level too high Check output current level. Calibrate, if necessary. Tilt switch circuitry tilted Tilt switches incorrectly wired Correct wiring. Interlock relay not operating CCR is off Turn CCR on. Interlock relay not calibrated properly Calibrate interlock relay by adjusting CS1 in master unit. T1 Failure Varying load on T1 Replace Power Core transformer (T1) and add 250V, 1A SLOBLO fuse to protect (T1) if PCB does not have F4. See Parts List F4 and T1. 64 © 2014 ADB Airfield Solutions All Rights Reserved 96A0209 Rev. AA Document Date (7/2014) L-880 & L-881 PAPI, Style A Parts To order parts, call ADB Airfield Solutions Customer Service or your local representative. Use this five-column parts list, and the accompanying illustration, to describe and locate parts correctly. 2.7.1 Using the Illustrated Parts List This subsection describes how to use the illustrated parts list covered later in this section. It does not provide the actual parts list. Parts 2.7 Parts The Item column numbers correspond to the numbers that identify parts in illustrations following each parts list. NS (not shown) indicates that a listed part is not illustrated. The Description column gives the part name, as well as its dimensions and other characteristics when appropriate. Indentions show the relationships between assemblies, subassemblies, and parts. The Part Number column gives the ADB Airfield Solutions part number. Item Part Number Quantity Note S1 Assembly xxxxxxxx 1 A NS Part xxxxxxxx 1 H1 Part or Assembly Part/Assembly for option 1 xxxxxxxx 2 Part/Assembly for option 2 xxxxxxxx 2 Assembly xxxxxxxx 1 Part xxxxxxxx 1 Part xxxxxxxx 2 T1 Description NOTE A The Quantity column contains the quantity required per unit, assembly, or subassembly. The code AR (As Required) is used if the part number is a bulk item ordered in quantities or if the quantity per assembly depends on the product version or model. The Note column contains letters that refer to notes at the end of each parts list. Notes contain special ordering or product/part version information. 2.7.2 L-880/L-881 Style A Part Numbering System Refer to Table 14 and Table 15 for all replaceable parts for each replaceable component or assembly for the L-880 and L-881 Style A PAPI systems. Figure 43 shows how to determine the part number for a particular L-880/L-881 PAPI system. NOTE: Substitution of electrical components may be done only if substitution is the exact physical equivalent (body or case size) and equal, or better electrical characteristics with respect to tolerance, failure rate, and/or reliability. Table 14: L-880 PAPI System Component Part Number Master box assembly 44A4734-1XXX Light box #1 44A4735-XXX Light box #2 44A4735-XXX Light box #3 44A4735-XXX Light box #4 44A4735-XXX Table 15: L-881 PAPI System Component Part Number Master box assembly 44A4734-2XXX Light box #1 44A4735-XXX Light box #2 44A4735-XXX © 2014 ADB Airfield Solutions All Rights Reserved 65 L-880 & L-881 PAPI, Style A Parts 96A0209 Rev. AA Document Date (7/2014) Order Codes 44A4733 - X X X X Ordering Code Style A 44A4733-XXXX Parts Style 1 = L-880 (4 Box) 2 = L-881 (2 Box) Interlock Options 1 = With Interlock Relay 2 = Without Interlock Relay Lamp 1 = 3 Lamp Optical Box 2 = 2 Lamp Optical Box (ETL Certified) Legs 1 = Three Legs 2 = Four Legs Figure 43: PAPI A L-880/L-881 Part Numbers Spare Components Description Part No. Filter, Red2 Filter, Red2 Frangible Coupling 2” EMT Frangible Coupling 2” Threaded One End Gasket, Optical Assembly (2-lamp unit) Gasket, Optical Assembly (3-lamp unit) Glass, Protective Shield (2-lamp unit) Glass, Protective Shield (3-lamp unit) Lamp, 200 W, 6.6 A, with female leads* Lamp driver/tilt sensing PCB (2-lamp and 3-lamp) LC Control Board, PAPI A Only Leg Assembly Master Box, 240 V, 4 Box, PAPI A Only Master Box, 240 V, 2 Box, PAPI A Only Optical Box, 2-Lamp (ETL Certified) Optical Box, 3-Lamp SCR Block, 95 A, PAPI A Only Shorting Device PCB, 6.6 A Spare Lamp Kit1 Tilt Switch Assembly, PAPI A Only (w/o heater) Tilt Switch Assembly, PAPI A Only (with heater) Tilt Switch Assembly, PAPI B Only 63A1019 1438.12.220 44B0180 62A0711 63A0672 4071.41.550 63A0984 63A0671-1 48A0077-1 44A5857 44A6546-33 44C2362S 44A4734-1210 44A4734-2210 44A5861-1 44A5861-2 28A0011 44D4538 94A0337 44A5863-2 44A5863-1 44A5863 1 2 3 For installations before May 2002. Spare Lamp Kit includes lamp and disconnects to convert power leads so lamp 48A0077-1 can be installed. Filter 63A1019 is 6.07” in length and is installed in PAPIs shipped from ADB after January 2005. Filter 1438.12.220 is 6.61” in length and is installed in earlier models. All other dimensions are equal. For PAPI As ordered before Fall 2007, the LC Control Board may have part no. 44D1475/3. This part is now obsolete. To order a retrofit kit, use part no. 94A0549 for both L-880 and L-881. An L-880 unit also requires part no. 94A0548 to replace the T1 transformer. Precision Approach Path Indicators installed prior to June 1998 have some different spare parts and optional features. Please contact the ADB Sales Department for this information. 66 © 2014 ADB Airfield Solutions All Rights Reserved 96A0209 Rev. AA Document Date (7/2014) See Figure 44. Item Description Part Number Tilt switch assembly Tilt switch assembly, Class I, -35 °C, without 1 Quantity Note Parts 2.7.3 L-880/L-881 PAPI Style A Optical Box Final Assembly Parts List L-880 & L-881 PAPI, Style A Parts 1 44A5863-2 Heater Tilt switch assembly, Class II, -55 °C, with 44A5863-1 heater 2 Lamp, 200 W, 6.6 A 48A0077-1 See note. A 3 Shorting device PCB 44D4538 1 B Light box assembly, two lights 60A2356 1 Light box assembly, three lights 60A2357 1 5 Adjustable leg assembly 44C2362 See note. C 6 Frangible coupling assembly 44B0180 See note. C 7 Coupling (Neer TC616) 8 Base flange Light box assembly 4 77A0009 See note. C 62B0107-2 See note. C Plug, two light 63B0371-21 2 Plug, three light 63B0371-23 2 Plug NS NOTE A: Two required for two-lamp assembly; three required for three-lamp assembly. Refer to Replacing Lamp in Maintenance Procedures in Section 5, Maintenance. NOTE B: PCB is mounted vertically on inside back of light box for two-lamp box. NOTE C: Three required for three-leg assembly; four required for four-leg assembly. NS: Not Shown © 2014 ADB Airfield Solutions All Rights Reserved 67 L-880 & L-881 PAPI, Style A Parts 96A0209 Rev. AA Document Date (7/2014) Figure 44: L-880/L-881 PAPI Optical Box Final Assembly Parts 68 © 2014 ADB Airfield Solutions All Rights Reserved 2.7.4 PAPI Style A Master Box Assembly Parts List L-880 & L-881 PAPI, Style A Parts Item Description NS Panel assembly NS Male plug Part Number Quantity 44D2656-XXX 1 73A0130 2 Note Parts 96A0209 Rev. AA Document Date (7/2014) NS: Not Shown 2.7.5 PAPI Style A Master Panel Assembly Parts List See Figure 45. Item TH1 Description Part Number Thermostat (Therm-O-Disc #37121) PCB1 PAPI control PCB SCR1 Quantity 54A0007 1 44A6546-3 1 SCR 28A0011 1 K3 Relay, 4PDT, 3 A, 24 Vdc coil 53A0310 1 K2 Relay, 4PDT, 1A, 120 Vac coil 53A0284 1 Relay socket panel mounting 49A0155 2 T2 Current XF, 6.6 A to .066 A 35A0548 1 T3 Step down XF, 240 Vac to 120 Vac 35A0474 1 T4 Step down XF, 240 to 18 Vac 35A0496 1 K1 Contactor, 4P, 15 A, 120 Vac coil 53A0222 1 Circuit breaker, 15 A, 2P 57A0039 1 Part Number Quantity Fuse, 2 A, 250 V, Slo-Blo 47A0049 2 Fuse, 1/4 A, 250 V, Slo-Blo 47A0117 1 Fuse block 47A0061 3 VR1, VR2 Lightning varistors, 571 Vac 32A0028 2 VR3, VR4 Lightning varistors, 751 Vac 32A0025 2 S1, S2 Toggle switch, SPST, 15 A, ON-OFF 45A0207 2 PCB2 Snubber network PCB 44A4752 1 K2-3 CB1 Note Continued on next page Item F1, F2 F3 F1-3 Description Current sense switch 53A0283 1 L1 Inductor 33A0013 1 T1 Step-up transformer (used on L-880 only) Two-lamp transformer 35A0457 1 CS1 Three-lamp transformer 35A0494 1 F4 Fuse 1A 47A0017 1 F4 Fuse Block 47A0061 1 © 2014 ADB Airfield Solutions All Rights Reserved Note 69 L-880 & L-881 PAPI, Style A Parts 96A0209 Rev. AA Document Date (7/2014) T1-35A0494 is for 4-Box, 3-LT. Units or 35A0689 for 4-Box, 2-LT. Units Figure 45: Master Panel Assembly Parts 70 © 2014 ADB Airfield Solutions All Rights Reserved 96A0209 Rev. AA Document Date (7/2014) Item Description Part Number Quantity Note A NS Protective glass 63A0671 1 NS Gasket for outer protective glass 63A0672 1 A NS Lens in ring (factory installation only) 44B1039 See note. B NS Filter, red 63A1019 See note. B NS Reflector 61B0128 See note. B NS Shorting device PCB 44D4538 1 Parts 2.7.6 PAPI Style A Optical Assembly Parts List L-880 & L-881 PAPI, Style A Parts NOTE A: One required for 2-lamp only. For 3-lamp PAPI replacement for front glass or gasket, contact your ADB Airfield Solutions Sales representative. NOTE B: Three required for three-lamp assembly; two required for two-lamp assembly. NS: Not Shown © 2014 ADB Airfield Solutions All Rights Reserved 71 L-880 & L-881 PAPI, Style A Parts 2.7.7 PAPI Style A Adjustable Leg Parts List 96A0209 Rev. AA Document Date (7/2014) See Figure 46. Item Description Part Number Quantity Parts 1 Split lockwasher, 3/8 66A0026-29 2 2 Threaded rod, 3/816 x 6 in. 64A0210 1 3 Differential 85B0057 1 4 Hex nut, 1/213 65A0015-33 2 5 Leg cap 62A0111 1 6 Threaded rod, 1/213 x 5 in. 64A0211 1 7 Hex nut, 3/816 65A0015-29 3 8 Flatwasher, 3/8 66A0015-31 2 Figure 46: Note Adjustable Mounting Legs 1 8 2 3 7 6 4 5 72 © 2014 ADB Airfield Solutions All Rights Reserved 96A0209 Rev. AA Document Date (7/2014) 2.7.8.1 PAPI Style A L-880 (4Box) Field Splice Kit (With Interlock Option) Parts List This subsection provides parts for the L-880 PAPI A field splice kit with and without interlock option. Parts 2.7.8 PAPI Style A L-880 (4-Box) Field Splice Kit Parts List L-880 & L-881 PAPI, Style A Parts Item Description NS L-880 field splice kit (with interlock option) Part Number Quantity 94A0235-1 1 NS Frangible coupling 62A0711 4 NS 6-pin female plug 73A0129 6 NS One-inch (25.4 mm) cable clamp 63A0563 4 NS Connector secondary kit plug 70A0050 1 NS Field splice heatshrink tube, 6 in. (152 mm) long 71A0053 15 NS Field butt splice for wire 71A0054 30 Part Number Quantity 94A0235-3 1 Note NS: Not Shown 2.7.8.2 PAPI Style A L-880 (4Box) Field Splice Kit (Without Interlock Option) Parts List Item Description NS L-880 field splice kit (without interlock option) NS Frangible coupling 62A0711 4 NS 6-pin female plug 73A0129 6 NS One-inch (25.4 mm) cable clamp 63A0563 4 NS Field splice heatshrink tube, 6 in. (152 mm) long 71A0053 15 NS Field butt splice for wire 71A0054 30 Note NS: Not Shown 2.7.9 PAPI Style A L-881 (2-Box) Field Splice Kit Parts List 2.7.9.1 PAPI Style A L-881 (2Box) Field Splice Kit (With Interlock Option) Parts List This subsection provides parts for the L-881 PAPI A field splice kit with and without interlock option. Item Description NS L-881 field splice kit (with interlock option) Part Number Quantity 94A0235-2 1 NS Frangible coupling 62A0711 4 NS 6-pin female plug 73A0129 6 NS One-inch (25.4 mm) cable clamp 63A0563 4 NS Connector secondary kit plug 70A0050 1 NS Field splice heatshrink tube, 6 in. (152 mm) long 71A0053 15 NS Field butt splice for wire 71A0054 30 Part Number Quantity Note NS: Not Shown 2.7.9.2 PAPI Style A L-881 (2Box) Field Splice Kit (Without Interlock Option) Parts List Item Description NS L-881 field splice kit (without interlock option) NS Frangible coupling 62A0711 4 NS 6-pin female plug 73A0129 6 © 2014 ADB Airfield Solutions All Rights Reserved Note 94A0235-4 73 L-880 & L-881 PAPI, Style A Parts 96A0209 Rev. AA Document Date (7/2014) Item Description Part Number Quantity Note Parts NS One-inch (25.4 mm) cable clamp 63A0563 4 NS Field splice heatshrink tube, 6 in. (152 mm) long 71A0053 15 NS Field butt splice for wire 71A0054 30 Part Number Quantity Note 44A6031 See note. A Part Number Quantity Note 48A0077-1 See note. A NS: Not Shown 2.7.10 PAPI Style A Aiming Device Kit Parts List Item NS Description Aiming Device Kit NOTE A: One per airport. NS: Not Shown 2.7.11 Recommended Spare Parts Item NS NS Description Lamp, 200 W, 6.6 A Tilt switch assembly 1 per optical box Tilt switch assembly, Class I, -35 °C, without Heater 44A5863-2 Tilt switch assembly, Class II, -55 °C, with heater 44A5863-1 NS PAPI-control PCB 44A6546-3 NS Optical box NS 1 1 Optical box, 2-lamp 44A5861-1 Optical box, 3-lamp 44A5861-2 Master box 1 Master box, 240 V, 4 box 44D4734-1210 Master box, 240 V, 2 box 44D4734-2210 NS Frangible coupling 44B0180 See note. B NS Leg assembly 44C2362 See note. B Glass, protective (2 lamp PAPI) 63A0984 1 Glass, protective (3 lamp PAPI) 63A0671-1 1 Gasket, optical assembly (2 lamp PAPI) 63A0672 1 Gasket, optical assembly (3 lamp PAPI) 4071.41.550 1 28A0011 1 NS NS NS SCR block Red filter 6.61 inch length NS Red filter 6.07 inch length (units sold after 2005) 1438.12.220 63A1019 See note. A NOTE A: Three required for three-lamp assembly; two required for two-lamp assembly. Refer to “Replacing Lamp” on page 61. NOTE B: Three required for three-leg assembly; four required for four-leg assembly. NS: Not Shown 74 © 2014 ADB Airfield Solutions All Rights Reserved 96A0209 Rev. AA Document Date (7/2014) L-880 & L-881 PAPI, Style A 43A2204 L-880 3-LAMP SEE NOTE 1 L1 INDUCTOR L-881 2 AND 3-LAMP TB1 217 T1 (35A0494) POWER CORE 3 2 4 208 215 WHITE RED 210 BLACK BROWN 4 210 142 YEL 143 GRAY 208 CB1 TB1 201 200 L1 136 T1 SCR 1 2 3 X4 1 203 202 215 222 H3 X3 X4 VR6 100/1 214 2 13 202 1 2 3 4 5 6 7 8 9 10 11 12 13 14 15 16 T2 225 226 GND VR3 2 5 8 11 128 6 222 221 5 216 EARTH GROUND 144 4 PCB2 P1 P2 J4 R1 R2 + + C2 C3 D1 D2 C1 + C4 J2 J3 NOTES: 1. T1 IS NOT USED ON L-881 12 6 7 167 CS1 K3 K2 5% 2 124 13 K3 14 : TWISTED PAIR. 4. RELAY CONTACTS AND BREAKER SHOWN DE-ENERGIZED. 5. LAST "100" NUMBER IS "168" LAST "200" NUMBER IS "226" TILT SWITCH RELAY 6. GROUND WIRES ARE GREEN/YELLOW 7. THERMOSTAT ONLY USED ON "W/HEATER" VERSIONS 109 CS1 121 CC TB1 TB1 EARTH GROUND AIRPORT ON/OFF REMOTE CONTROL (CLOSE TO TURN SYSTEM ON) 4 14 5 PC1 6 NOTE #7 164 RED K2 123 124 F3 8 TB1 RED 125 6 164 108 EARTH GROUND K2 162 125 7 9 122 117 120V 160 3. 112 TILT SWITCH RELAY 13 16 © 2014 ADB Airfield Solutions All Rights Reserved 8 122 162 154 167 165 16 6 1/4A FB 163 1 S2 129 12 155 10 BLACK 1 8 11 K1 A2 159 114 BLACK 114 160 TH1 THERMOSTAT 15 16 9 TILT SWITCH IN 10 TILT SWITCH OUT 11 240VAC FOR HEATER 12 240VAC RETURN FOR HEATER 159 20% 15 WHITE 152 102 115 161 111 A1 103 105 7 CONTACTOR COIL 111 168 1 T5 230/28V 6 10 101 15 EARTH GROUND 144 TILT SWITCH RELAY 12 K3 2. "100" SERIES IS AWG 18, 600VAC, 200C, 89A0073/1. "200" SERIES IS AWG 14, 600VAC, 200C, 89A0060/1. 8 150 12 115 5 105 6 6 4 150 8 11 5 100 2 5 9 119 LOCAL S1 2 5 3 106 104 REMOTE 100 7 154 1 2 157 1 8 109 7 161 6 110 5 104 4 106 107 108 3 110 T4 230/28V 1 2 102 103 1 101 T3 230/115V TO PHOTOCELL GREEN 219 152 6 146 3 REMOTE CONTROL 165 107 127 128 2 VR4 157 126 129 7 135 136 153 146 1 J5 133 134 126 1 PAPI-A CONTROL PCB 44A6546/3 1 2 3 4 5 6 153 142 (YELLOW) F2 2A SB 127 F1 2A SB 218 143 (GRAY) 131 132 EARTH GROUND BLACK WHITE RED 205 OUTPUT LIGHTNING ARRESTORS 226 214 225 213 217 3 200 201 22 TB1 214 VR2 204 VR1 220 14 TB1 EXTERNAL CONNECTIONS 4 2 13 216 X2 H2 210 T3 217 213 22 NEUTRAL 15A TB1 OUTPUT X1 H4 VR5 EARTH GROUND 163 3 L3 207 VR4 H1 209 13 TO LIGHT BOX NO. 4 219 (35A0689) POWER CORE 221 TO LIGHT BOX NO. 3 SEE NOTE 1 218 T1 210 1 CONTACTOR 206 4 5 7 6 TO LIGHT BOX NO. 2 216 VR6 OUTPUT LIGHTNING ARRESTORS VR3 L-880 2-LAMP SEE NOTE 1 133 134 135 TO LIGHT BOX NO. 1 226 100/1 209 220/240VAC ±10% 50/60 HZ 225 215 T2 OPTIONAL TRANSFORMER INPUT 13 14 210 213 214 215 216 215 ORANGE BLUE 1 208 2 217 INDUCTOR 3 RED GREEN ORANGE BLUE BLACK WHITE L1 1 156 Figure 47: SCHEMATICS 3.0 Wiring Schematics and Installation Drawings EARTH GROUND TB1 R Q P O N 3845 2186 2169 2014 2014 ADDED VR6 SEE ECO SEE ECO SEE ECO SEE ECO M L K J I H G F E D C B A 1830 1412 1380 1339 1047 1014 0500 0490 0352 3184 3119 3081 EC NUMBER NEW CONTROL PCB SEE ECO SEE ECO SEE ECO SEE ECO SEE ECO SEE ECO SEE ECO SEE ECO SEE EC SEE EC SEE EC PRODUCTION RELEASE BE 04SEP13 REV LEVEL BE 26FEB09 ASSOCIATED DRAWINGS: DRAWN BY: . KRF BE 29JAN09 BE 05JAN09 BE 21AUG08 REVISION DESCRIPTION Information contained on this drawing is to be used expressly in accord with purpose for which it was submitted. Any disclosure of this information is strictly prohibited except as ADB-ALNACO may otherwise agree in writing. c 1997 Copyright ADB A Siemens Company JJR 09OCT07 BE 08APR05 BE 04FEB05 BE 18NOV04 BE 14MAR03 BE 03FEB03 BE 13JUN00 BE 23MAY00 BE 16DEC99 FLB 23JAN98 KRF 05OCT97 KRF 15OCT97 KRF 19AUG97 DRAWN BY REV DATE CONTROLLED COPY Unauthorized duplication of this document in whole or part is prohibited. Initialed in RED ink below indicates authorized copy. DATE: APPRVD BY: 977 Gahanna Parkway Columbus, Ohio 43230 Tel: 614-861-1304 Fax: 614-864-2069 A Siemens Company PROJECT TITLE: DRAWING TITLE: WIRING DIAGRAM, PAPI MASTER STYLE A 240V W/ CURRENT SENSING SWITCH -35° & -55° OPERATION PROJECT NUMBER: SHEET NUMBER: 1 OF 1 DRAWN DATE: 19 AUG 97 SCALE: FULL DRAWING NUMBER: 43A2204-1 REV. R 1 L-880 & L-881 PAPI, Style A 43A2204 L1 INDUCTOR L-881 2 AND 3-LAMP TB1 217 T1 215 WHITE 210 2 4 208 216 BLACK BROWN 210 210 213 143 GRAY CB1 TB1 201 200 L1 133 134 135 4 5 7 6 136 T1 3 2 1 X4 222 1 H3 X2 H2 X3 H4 X4 2 13 TB1 1 2 3 4 5 6 7 8 9 10 11 12 13 14 15 16 T2 VR6 100/1 225 226 GND 129 7 135 136 2 5 8 11 128 143 (GRAY) 6 222 221 5 216 EARTH GROUND 144 4 PCB2 P1 P2 J4 R1 R2 + + C2 C3 D1 D2 C1 + C4 J2 J3 NOTES: 1. T1 IS NOT USED ON L-881 12 8 11 4 5 6 7 144 TILT SWITCH RELAY K3 6 10 CONTACTOR COIL 111 111 A1 K1 A2 3. 112 108 EARTH GROUND 13 12 K3 5 8 2. "100" SERIES IS AWG 18, 600VAC, 200C, 89A0073/1. "200" SERIES IS AWG 14, 600VAC, 200C, 89A0060/1. 8 157 3 106 104 9 101 LOCAL S1 K3 14 6. GROUND WIRES ARE GREEN/YELLOW 12 105 100 1 : TWISTED PAIR. 4. RELAY CONTACTS AND BREAKER SHOWN DE-ENERGIZED. 5. LAST "100" NUMBER IS "166" LAST "200" NUMBER IS "226" TILT SWITCH RELAY TILT SWITCH RELAY 119 15 6 2 109 1 8 161 7 110 6 104 5 106 107 108 4 REMOTE 100 7 154 2 5 3 110 T4 230/28V 1 2 102 103 1 101 T3 230/115V TO PHOTOCELL GREEN 219 152 6 128 3 REMOTE CONTROL 165 107 127 153 146 2 VR4 157 126 126 1 1 J5 133 134 1 2 3 4 5 6 153 PAPI-A CONTROL PCB 44A6546/3 127 F2 2A SB 142 (YELLOW) 132 131 F1 2A SB 218 BLACK WHITE RED VR3 EARTH GROUND 226 214 225 213 217 OUTPUT LIGHTNING ARRESTORS 205 VR2 204 TB1 EXTERNAL CONNECTIONS 214 163 3 22 209 14 4 VR1 220 T3 13 216 22 2 15A 202 VR5 200 201 3 L3 207 210 217 213 X1 214 203 TB1 OUTPUT H1 215 13 202 219 EARTH GROUND (35A0689) POWER CORE 221 TO LIGHT BOX NO. 4 SEE NOTE 1 T1 SCR TO LIGHT BOX NO. 3 VR4 218 210 1 206 208 K1 CONTACTOR TO LIGHT BOX NO. 2 216 VR6 OUTPUT LIGHTNING ARRESTORS VR3 142 YEL TO LIGHT BOX NO. 1 226 100/1 L-880 2-LAMP SEE NOTE 1 INPUT NEUTRAL 225 215 T2 214 OPTIONAL TRANSFORMER 209 220/240VAC ±10% 50/60 HZ 13 14 215 RED 4 215 2 ORANGE BLUE 3 208 3 217 L1 INDUCTOR 1 1 (35A0494) POWER CORE RED GREEN ORANGE BLUE BLACK WHITE SCHEMATICS L-880 3-LAMP SEE NOTE 1 156 Figure 48: 96A0209 Rev. AA Document Date (7/2014) 7. THERMOSTAT ONLY USED ON "W/HEATER" VERSIONS 105 20% 1 124 8 CC 8 11 TB1 16 12 115 4 EARTH GROUND 6 6 164 120V 160 2 5 7 163 NOTE #7 164 RED AIRPORT ON/OFF REMOTE CONTROL (CLOSE TO TURN SYSTEM ON) K2 159 114 BLACK 114 160 TH1 THERMOSTAT 14 123 121 5 BLACK 124 F3 1/4A FB 162 125 6 9 TILT SWITCH IN 10 TILT SWITCH OUT 11 240VAC FOR HEATER 12 240VAC RETURN FOR HEATER TB1 REV LEVEL EC NUMBER EARTH GROUND PC1 Q P O N 2 1830 1412 1380 1339 1047 1014 0500 0352 3184 3178 3119 3081 RED 125 122 161 7 117 M L K J I H G F E D C B A TB1 109 13 WHITE 1 129 K2 122 162 154 146 T5 230/28V 1 9 119 EARTH GROUND 5% S2 165 16 6 159 15 103 152 102 115 3845 2186 2014 2014 ADDED VR6 SEE ECO SEE ECO SEE ECO BE 27AUG13 BE 24FEB09 BE 05JAN09 BE 21AUG08 NEW CONTROL BD SEE ECO SEE ECO SEE ECO SEE ECO SEE ECO SEE ECO SEE ECO SEE EC SEE EC SEE EC SEE EC PRODUCTION RELEASE REVISION DESCRIPTION ASSOCIATED DRAWINGS: DRAWN BY: . KRF Information contained on this drawing is to be used expressly in accord with purpose for which it was submitted. Any disclosure of this information is strictly prohibited except as ADB-ALNACO may otherwise agree in writing. c 1997 Copyright ADB A Siemens Company JJR 09OCT07 BE 08APR05 BE 04FEB05 BE 18NOV04 BE 14MAR03 BE 03FEB03 BE 13JUN00 BE 16DEC99 FLB 23JAN98 TVN 17DEC97 KRF 05OCT97 KRF 15OCT97 KRF 19AUG97 DRAWN BY REV DATE CONTROLLED COPY Unauthorized duplication of this document in whole or part is prohibited. Initialed in RED ink below indicates authorized copy. APPRVD BY: DATE: 977 Gahanna Parkway Columbus, Ohio 43230 Tel: 614-861-1304 Fax: 614-864-2069 A Siemens Company PROJECT TITLE: DRAWING TITLE: WIRING DIAGRAM, PAPI MASTER STYLE A 240V -35° & -55° OPERATION PROJECT NUMBER: SHEET NUMBER: 1 OF 1 DRAWN DATE: 19 AUG 97 SCALE: FULL DRAWING NUMBER: REV. 43A2204 Q © 2014 ADB Airfield Solutions All Rights Reserved 96A0209 Rev. AA Document Date (7/2014) PAPI Installation Drawing A LIGHT BOX #1 MASTER LIGHT BOX #2 LIGHT BOX #3 SCHEMATICS Figure 49: L-880 & L-881 PAPI, Style A LIGHT BOX #4 PRECISION APPROACH PATH INDICATOR TYPE 88 STYLE CLASS MASSTER OR SLAVE NO. SERIAL NO. CAT NO. PRECISION APPROACH PATH INDICATOR TYPE 88 STYLE CLASS MASSTER OR SLAVE NO. SERIAL NO. CAT NO. PRECISION APPROACH PATH INDICATOR TYPE 88 STYLE CLASS MASSTER OR SLAVE NO. SERIAL NO. CAT NO. PRECISION APPROACH PATH INDICATOR TYPE 88 STYLE CLASS MASSTER OR SLAVE NO. SERIAL NO. CAT NO. ADB-ALNACO, INC 977 GAHANNA PARKWAY COLUMBUS, OHIO 43230 ADB-ALNACO, INC 977 GAHANNA PARKWAY COLUMBUS, OHIO 43230 ADB-ALNACO, INC 977 GAHANNA PARKWAY COLUMBUS, OHIO 43230 ADB-ALNACO, INC 977 GAHANNA PARKWAY COLUMBUS, OHIO 43230 PRECISION APPROACH PATH INDICATOR TYPE 88 STYLE CLASS MASSTER OR SLAVE NO. SERIAL NO. CAT NO. ADB-ALNACO, INC 977 GAHANNA PARKWAY COLUMBUS, OHIO 43230 4 BOX EXTERNAL WIRING VIEW A-A TYP ALL RECEPTACLE CORDSETS P1 B B A VIEW B-B BLACK (OUTPUT) 220/240 VAC INPUT TO L-830 FOR INTERLOCK RELAY OPTION BLACK (LINE) RED (TILTSWITCH) RED (LINE) ORANGE (HEATER) GREEN (GROUND) BLUE (HEATER) GREEN (TILTSWITCH) ORANGE BLUE WHITE (OUTPUT) BLACK (OUTPUT) RED (TILTSWITCH) ORANGE (HEATER) BLUE (HEATER) RED (TILTSWITCH) BLACK (OUTPUT) WHITE (OUTPUT) GREEN (TILTSWITCH) ORANGE (HEATER) BLUE (HEATER) LIGHT BOX #1 MASTER P1 P1 R1 R1 R1 A R1 R2 P1 B A A R1 TYP ALL PLUG CORDSETS P1 P2 B WHITE (OUTPUT) GREEN (TILTSWITCH) ORANGE (HEATER) BLUE (HEATER) BLACK (OUTPUT) RED (TILTSWITCH) ORANGE (HEATER) BLUE (HEATER) BLACK (OUTPUT) RED (TILTSWITCH) ORANGE (HEATER) BLUE (HEATER) WHITE (OUTPUT) GREEN (TILTSWITCH) ORANGE (HEATER) BLUE (HEATER) WHITE (OUTPUT) GREEN (TILTSWITCH) ORANGE (HEATER) BLUE (HEATER) RED (TILTSWITCH) BLACK (OUTPUT) LIGHT BOX #2 PRECISION APPROACH PATH INDICATOR TYPE 88 STYLE CLASS MASSTER OR SLAVE NO. SERIAL NO. CAT NO. PRECISION APPROACH PATH INDICATOR TYPE 88 STYLE CLASS MASSTER OR SLAVE NO. SERIAL NO. CAT NO. ADB-ALNACO, INC 977 GAHANNA PARKWAY COLUMBUS, OHIO 43230 ADB-ALNACO, INC 977 GAHANNA PARKWAY COLUMBUS, OHIO 43230 2 BOX EXTERNAL WIRING PRECISION APPROACH PATH INDICATOR TYPE 88 STYLE CLASS MASSTER OR SLAVE NO. SERIAL NO. CAT NO. ADB-ALNACO, INC 977 GAHANNA PARKWAY COLUMBUS, OHIO 43230 CONTROLLED COPY VIEW A-A Unauthorized duplication of this document in whole or part is prohibited. TYP ALL RECEPTACLE CORDSETS Initialed in RED ink below indicates authorized copy. INITIAL & DATE: P1 B VIEW B-B P1 P1 R2 R1 R1 B A TYP ALL PLUG CORDSETS P2 A R1 D BLACK (LINE) 220/240 VAC INPUT RED (LINE) GREEN (GROUND) BLACK (OUTPUT) RED (TILTSWITCH) ORANGE (HEATER) BLUE (HEATER) BLACK (OUTPUT) RED (TILTSWITCH) ORANGE (HEATER) BLUE (HEATER) WHITE (OUTPUT) GREEN (TILTSWITCH) ORANGE (HEATER) BLUE (HEATER) WHITE (OUTPUT) GREEN (TILTSWITCH) ORANGE (HEATER) BLUE (HEATER) 3709 REVISE TITLE BLOCK DTR 14AUG12 C --- SEE REV C NOTES, SH.1 DLR 02FEB09 B ----- ADDED VIEW "D" DP3 30JAN09 A ---- PRODUCTION RELEASE LWH 29MAR04 REV LEVEL ECO NUMBER ASSOCIATED DRAWINGS: TO L-830 FOR INTERLOCK RELAY OPTION ORANGE BLUE © 2014 ADB Airfield Solutions All Rights Reserved WHITE (OUTPUT) BLACK (OUTPUT) GREEN (TILTSWITCH) RED (TILTSWITCH) REVISION DESCRIPTION DRAWN BY 977 Gahanna Parkway, Columbus, Ohio 43230 Telephone: 614-861-1304, Fax: 614-864-2069 DRAWING TITLE: L880 PAPI STYLE A MASTER AND SLAVE TYPICAL INSTALLATION REV DATE DRAWN BY: DRAWN DATE: LWH 29MAR04 All information contained herein, including illustrations, specifications, and dimensions, is believed to be reliable as of the date of this publication, but is subject to change without notice. ADB reserves the right to make changes and improvements to its products and assumes no responsibility for these modifications. Any disclosure of this information is strictly prohibited except as ADB Airfield Solutions, llc. may otherwise agree to in writing. Copyright © 2012 ADB Airfield Solutions, Inc. SHEET NUMBER: N/A DRAWING NUMBER: 117A0011 2 of 2 REV. D 3 L-880 & L-881 PAPI, Style A Figure 50: 96A0209 Rev. AA Document Date (7/2014) PAPI Installation Drawing B SCHEMATICS 48.00 IN. 24.00 IN. NOTE-1 24.00 IN . NOTE: GROUND LEVEL 4.88 TYP. FOUNDATION DETAILS ARE GIVEN ONLY AS A GUIDE. THE APPROPRIATE DEPTH AND REINFORCEMENT OF THE PAD WILL DEPEND ON LOCAL SITE CONDITIONS. 6.00 IN 2.44 TYP. . 12.00 VIEW A-A APPROX. 21.65 IN DETAIL B 8.00 . POLYSTYRENE 6 INCH FOAM TO ABSORB FROST HEAVE APPROX. 35.40 INCHES DEPENDING ON SOIL RESISTANCE APPROXIMATELY 23.6 INCHES BELOW FROST LINE 24.00 1932 BASE PLATE THRESHOLD 20.00 L-867B BASE CAN 17.0000 IN . 15.5000 IN . PRECISION APPROACH PATH INDICATOR TYPE 88 STYLE CLASS MASSTER OR SLAVE NO. SERIAL NO. CAT NO. 15.5000 IN . ADB-ALNACO, INC 977 GAHANNA PARKWAY COLUMBUS, OHIO 43230 BASEPLATE FOR OPTIONAL MOUNTING SEE WIRING DETAIL DETAIL C CL PAD A . FRANGIBLE COUPLING 6.00 A APPROX. 3.15 IN 48.0000 IN . 1/2 INCH THREADED STUD IN CONCRETE FOR OPTIONAL BASEPLATE ANCHOR SLEEVE GRADE 22.50 IN L-867B BASE . 13.2500 IN. 1.00 CONCRETE SLAB 18.0 MIN 23.00 BELOW FROST LINE OR 24.00 MIN. PAPI TYPICAL INSTALLATION TWO 9/16 IN DIA MOUNTING HOLES LOCATED ON A 4 3/4 IN BOLT CIRCLE, 180 APART 25.25 IN . TO PAPI 12.00 240 VOLT INPUT 75.0000 IN . 2 INCH ELBOW 33.00 45 MAX 63.5 MIN 17.3 IN PAPI MASTER INSTALLATION (STYLE A ONLY) APPROX. 3.15 IN . ANCHOR BOLT PIPE FOR CABLES L867 B BASE 48.00 IN. 24.00 IN . 24.00 IN . GROUND LEVEL 6.00 IN NOTE: FOUNDATION DETAILS ARE GIVEN ONLY AS A GUIDE. THE APPROPRIATE DEPTH AND REINFORCEMENT OF THE PAD WILL DEPEND ON LOCAL SITE CONDITIONS. APPROX. 21.65. IN PAPI 4 LEG FOUNDATION DETAIL 6 PIN MALE CONNECTOR FROM OPTICAL BOX 6 PIN MALE CONNECTOR FROM MASTER 1" FLEX CONDUIT, FLUID TIGHT CONTRACTOR SUPPLIED 62B0064 FRANGIBLE COUPLING 1" MALE CONDUIT CONNECTOR CONTRACTOR SUPPLIED - BOTH ENDS APPROX. 35.4 INCHES DEPENDING ON SOIL RESISTANCE APPROXIMATELY 23.6 INCHES BELOW FROST LINE 1-1/2 X 1 REDUCER CONTRACTOR SUPPLIED 62B0107/2 MOUNTING FLANGE THRESHOLD POLYSTYRENE 6 INCH FOAM TO ABSORB FROST HEAVE 15.50 IN . 17.00 IN . 15.50 IN 62A0711 FRANGIBLE COUPLING . 63A0563 CABLE CLAMP 48.00 IN APPROX. 3.15 IN . NOTES: 1. ADB AIRFIELD SOLUTIONS PART 44A4733/XXXX OR EQUAL. 24.00 63A0563 CABLE CLAMP ANCHOR SLEEVE 73A0129 FEMALE CONNECTOR W/ 6' CORD 22.50 IN . 21.0000 IN. DETAIL B CONCRETE SLAB 73A0129 FEMALE CONNECTOR W/ 6' CORD REV C NOTES: 1. REMOVE VIEW D 2. CHANGE MASTER INSTALLATION CONCRETE PAD TO SHOW TWO BASE CANS. 3. ADD SH 1 DETAIL B & DETAIL C. DETAIL C CAUTION: 25.25 IN 75.0000 IN. THIS DRAWING IS ONLY INTENDED FOR USE AS GENERAL AIRFIELD SYSTEM DESIGN GUIDANCE. THE DESIGNER MUST VERIFY DESIGN WITH LOCAL CODES AND VARYING CHARACTERISTICS FOR EACH UNIQUE AIRFIELD APPLICATION. TWO 9/16 . IN DIA MOUNTING HOLES LOCATED ON A 4 3/4 IN BOLT CIRCLE, 180 APART CONTROLLED COPY Unauthorized duplication of this document in whole or part is prohibited. Initialed in RED ink below indicates authorized copy. INITIAL & DATE: 13.50 IN APPROX. 3.15 IN ANCHOR BOLT PIPE FOR CABLES L867 B BASE D FOOT FLANGE DETAIL PAPI 3 LEG FOUNDATION DETAIL RUNWAY THRESHOLD FOR L880 STYLE A TWO BOX SYSTEM 4 RUNWAY THRESHOLD FOR L880 STYLE A FOUR BOX SYSTEM 3709 REVISE TITLE BLOCK DTR 14AUG12 C --- SEE REV C NOTES DLR 02FEB09 B ---- ADDED VIEW "D" DP3 30JAN09 A ---- PRODUCTION RELEASE LWH 29MAR04 REV LEVEL ECO NUMBER ASSOCIATED DRAWINGS: REVISION DESCRIPTION DRAWN BY 977 Gahanna Parkway, Columbus, Ohio 43230 Telephone: 614-861-1304, Fax: 614-864-2069 DRAWING TITLE: L880 PAPI STYLE A MASTER AND SLAVE TYPICAL INSTALLATION L-880 / L-881 REV DATE DRAWN BY: DRAWN DATE: LWH 29MAR04 All information contained herein, including illustrations, specifications, and dimensions, is believed to be reliable as of the date of this publication, but is subject to change without notice. ADB reserves the right to make changes and improvements to its products and assumes no responsibility for these modifications. Any disclosure of this information is strictly prohibited except as ADB Airfield Solutions, llc. may otherwise agree to in writing. Copyright © 2012 ADB Airfield Solutions, Inc. SHEET NUMBER: N/A DRAWING NUMBER: 117A0011 1 of 2 REV. D © 2014 ADB Airfield Solutions All Rights Reserved 96A0209 Rev. AA Document Date (7/2014) Two-Lamp PAPI Light Box Internal Wiring Schematic © 2014 ADB Airfield Solutions All Rights Reserved SCHEMATICS Figure 51: L-880 & L-881 PAPI, Style A 5 L-880 & L-881 PAPI, Style A Figure 52: 96A0209 Rev. AA Document Date (7/2014) Three-Lamp Light Box Internal Wiring Schematic SCHEMATICS 6 © 2014 ADB Airfield Solutions All Rights Reserved Registered office: ADB Airfield Solutions LLC 977 Gahanna Parkway Columbus, OH 43230 USA Tel: +1 (614) 861 1304 ADB BVBA Tel: 32/2/722.17.11 Leuvensesteenweg 585 B-1930 Zaventem Belgium Fax: 32/2/722.17.64 ADB Airfield Solutions LLC 5500 North Service Road, Suite 1108 Burlington, Ontario L7L 6W6 Canada Tel:+1 (905) 331 6887 ADB Airfield Technologies Ltd. China Room 901, 9F, Fang Heng Intl. Plaza Building C, No. 6 Futong East Road, Chaoyang District Beijing 100102 P.R. China Tel: +86 (10) 8476 0106 ADB BVBA Tel: +49 (0)911 2105 61 60 Niederlassung Deutschland Von-der-Tann-Str. 31 90439 Nürnberg Deutschland Fax: +49 (0)911 2105 61 61 ADB Airfield Solutions, Ltd. 2nd Floor, 3 Rivonia Village Cnr Mutual Road and Rivonia Boulevard South Rivonia 2128 South Africa Tel: +27 (0) 11 525 9340 ADB Succursale France Tel: +33 (0) 01 49 89 66 30 22 Avenue des Nations Parc Silic Roissy-Paris Nord 2, Immeuble Le Renoir Hall B 93420 Villepinte France Fax: +33 (0) 01 49 89 17 81 A-10-01, Level 10 Empire Tower Jalan SS16/1 45700 Subang Jaya Selangor, Malaysia Tel: +603 8941 4868 ADB Dubai Silicon Oasis Wing D - Office D-309 P.O. Box 341218 United Arab Emirates Tel: +971 4372 4970 ADB UK Suite 4 Fax: +01628784865 110 High Street Maidenhead Berkshire SL6 1PT United Kingdom Fax: +1 (614) 864 2069 Web: www.adb-airfield.com Email: [email protected] Fax: +1 (905) 331 9389 Web: www.adb-airfield.com Fax: +86 (10) 8476 0090 Email: [email protected] Fax: +27 (0) 11 525 9348 Email: [email protected] Fax: +603 8942 4869 Fax: +971 4372 4975 Customer Services: +01628672906 Sales & General: +01628785339 ADB Italia Via Quasimodo 46 Primo Maggio 40013 Castelmaggiore (BO) Italia ADB Equipamentos Para Aeroportos Ltda Avenida Moaci n° 395 Conjunto 91 Moema CEP 04083-000 Sao Paulo-SP Brasil Tel: +55 (11) 5096-2169 ADB Doha C/O Watad Group PO Box 192 Doha, Qatar Tel: 00974 44 35 38 03 ADB bvba Taiwan Branch 6th floor, No. 283, Section 2 FU Hsing South Road Taipei 106 Taiwan R.O.C Fax:+55 (11) 5049-2304 Fax: 00974 44 35 44 89 ADB Airfield Solutions USA 977 Gahanna Pkwy Columbus, Ohio 43230 USA Telephone: (+1 614-861-1304) Fax: +1 614-864-2069 www.adb-airfieldsolutions.com The information contained in this document is subject to change without notice. ADB reserves the right to make changes and improvements to its products and assumes no responsibility for making these modifications on any equipment previously sold. 96A0209 © 2014 ADB Airfield Solutions All Rights Reserved