1
D01235620A
HS-20
2 Channel Audio Recorder
OWNER'S MANUAL
IMPORTANT SAFETY PRECAUTIONS
CAUTION: TO REDUCE THE RISK OF ELECTRIC SHOCK, DO NOT REMOVE COVER (OR
BACK). NO USER-SERVICEABLE PARTS INSIDE. REFER SERVICING TO QUALIFIED SERVICE
PERSONNEL.
The lightning flash with arrowhead symbol, within equilateral triangle, is intended to alert
the user to the presence of uninsulated “dangerous voltage” within the product’s enclosure that may be of sufficient magnitude to constitute a risk of electric shock to persons.
The exclamation point within an equilateral triangle is intended to alert the user to the
presence of important operating and maintenance (servicing) instructions in the literature accompanying the appliance.
WARNING: TO PREVENT FIRE OR
SHOCK HAZARD, DO NOT EXPOSE THIS
APPLIANCE TO RAIN OR MOISTURE.
CE Marking Information
a) Applicable electromagnetic environment: E4
b) The average half-cycle r.m.s. inrush current
1. On initial switch-on : 4.6 Arms
2. After a supply interruption of 5s : 3.6 Arms
For U.S.A.
TO THE USER
This equipment has been tested and found to comply
with the limits for a Class A digital device, pursuant to Part
15 of the FCC Rules. These limits are designed to provide
reasonable protection against harmful interference when
the equipment is operated in a commercial environment.
This equipment generates, uses, and can radiate radio
frequency energy and, if not installed and used in accordance with the instruction manual, may cause harmful
interference to radio communications.
Operation of this equipment in a residential area is likely
to cause harmful interference in which case the user
will be required to correct the interference at his own
expense.
CAUTION
Changes or modifications to this equipment not expressly
approved by TEAC CORPORATION for compliance could
void the user's authority to operate this equipment.
For Canada
THIS CLASS A DIGITAL APPARATUS COMPLIES WITH CANADIAN
ICES-003.
CET APPAREIL NUMERIQUE DE LA CLASSE A EST CONFORME A
LA NORME NMB-003 DU CANADA.
In North America use only on 120V supply.
2 TASCAM HS-20
DECLARATION OF CONFORMITY
We, TEAC EUROPE GmbH. Bahnstrasse 12, 65205
Wiesbaden-Erbenheim, Germany declare in own
responsibility, the TEAC product described in this
manual is in compliance with the corresponding
technical standards.
For the customers in Europe
WARNING
This is a Class A product. In a domestic environment, this
product may cause radio interference in which case the
user may be required to take adequate measures.
Pour les utilisateurs en Europe
AVERTISSEMENT
Il s'agit d'un produit de Classe A. Dans un environnement
domestique, cet appareil peut provoquer des
interférences radio, dans ce cas l'utilisateur peut être
amené à prendre des mesures appropriées.
Für Kunden in Europa
Warnung
Dies ist eine Einrichtung, welche die Funk-Entstörung
nach Klasse A besitzt. Diese Einrichtung kann im
Wohnbereich Funkstörungen versursachen; in diesem
Fall kann vom Betrieber verlang werden, angemessene
Maßnahmen durchzuführen und dafür aufzukommen.
IMPORTANT SAFETY INSTRUCTIONS
1 Read these instructions.
2 Keep these instructions.
3 Heed all warnings.
4 Follow all instructions.
5 Do not use this apparatus near water.
6 Clean only with dry cloth.
7 Do not block any ventilation openings. Install in
accordance with the manufacturer's instructions.
8 Do not install near any heat sources such as radiators,
heat registers, stoves, or other apparatus (including
amplifiers) that produce heat.
9 Do not defeat the safety purpose of the polarized
or grounding-type plug. A polarized plug has two
blades with one wider than the other. A grounding type plug has two blades and a third grounding
prong. The wide blade or the third prong are provided for your safety. If the provided plug does not
fit into your outlet, consult an electrician for replacement of the obsolete outlet.
10 Protect the power cord from being walked on or
pinched particularly at plugs, convenience receptacles, and the point where they exit from the apparatus.
11 Only use attachments/accessories specified by the
manufacturer.
12 Use only with the cart, stand, tripod, bracket, or table
specified by the manufacturer, or sold with the apparatus. When a cart is used, use caution when moving
the cart/apparatus combination to avoid injury from
tip-over.
• The apparatus draws nominal non-operating power
from the AC outlet with its POWER or STANDBY/ON
switch not in the ON position.
• The mains plug is used as the disconnect device, the
disconnect device shall remain readily operable.
• Caution should be taken when using earphones or
headphones with the product because excessive sound
pressure (volume) from earphones or headphones can
cause hearing loss.
• If you are experiencing problems with this product,
contact TEAC for a service eferral. Do not use the
product until it has been repaired.
CAUTION
• Do not expose this apparatus to drips or splashes.
• Do not place any objects filled with liquids, such as
vases, on the apparatus.
• Do not install this apparatus in a confined space
such as a book case or similar unit.
• The apparatus should be located close enough to
the AC outlet so that you can easily grasp the power
cord plug at any time.
• If the product uses batteries (including a battery
pack or installed batteries), they should not be
exposed to sunshine, fire or excessive heat.
• CAUTION for products that use replaceable lithium
batteries: there is danger of explosion if a battery is
replaced with an incorrect type of battery. Replace
only with the same or equivalent type.
WARNING
• Products with Class ! construction are equipped
with a power supply cord that has a grounding
plug. The cord of such a product must be plugged
into an AC outlet that has a protective grounding
connection.
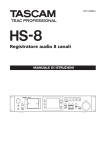
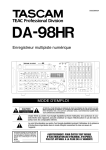
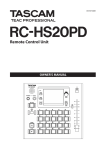
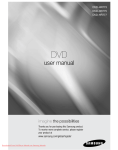
88RACK-MOUNTING THE UNIT
Use the supplied rack-mounting kit to mount the unit in a
standard 19-inch rack, as shown below.
Remove the feet of the unit before mounting.
13 Unplug this apparatus during lightning storms or
when unused for long periods of time.
14 Refer all servicing to qualified service personnel.
Servicing is required when the apparatus has been
damaged in any way, such as power-supply cord or
plug is damaged, liquid has been spilled or objects
have fallen into the apparatus, the apparatus has
been exposed to rain or moisture, does not operate
normally, or has been dropped.
CAUTION
• Leave 1U of space above the unit for ventilation.
• Allow at least 10 cm (4 in) at the rear of the unit for ventilation.
TASCAM HS-20 3
IMPORTANT SAFETY INSTRUCTIONS
88
For European Customers
Disposal of electrical and electronic equipment
(a) All electrical and electronic equipment should be
disposed of separately from the municipal waste
stream via designated collection facilities appointed
by the government or the local authorities.
(b)By disposing of the electrical and electronic
equipment correctly, you will help save valuable
resources and prevent any potential negative effects
on human health and the environment.
(c) Improper disposal of waste equipment can have
serious effects on the environment and human health
as a result of the presence of hazardous substances in
electrical and electronic equipment.
(d)The crossed out wheeled dust bin symbol indicates
that electrical and electronic equipment must be
collected and disposed of separately from household
waste.
(e) The return and collection systems are available to
the end users. For more detailed information about
disposal of old electrical and electronic equipment,
please contact your city office, waste disposal service
or the shop where you purchased the equipment.
88 For China
“仅适用于海拔2000m以下地区安全使用”
“仅适用于非熱帯气候条件下安全使用”
产品有毒有害物质或元素的名称及含量
机种:HS-20
品名
1
2
3
4
5
6
CHASSIS部份
PCB Assy部份
线材部份
附属品部份
LABEL部份
包装部份
铅
(Pb)
○
×
○
○
○
○
汞
(Hg)
○
○
○
○
○
○
有毒有害物质或元素
镉
六价铬
(Cd)
(Cr6+)
○
○
○
○
○
○
○
○
○
○
○
○
多溴联苯
(PBB)
○
○
○
○
○
○
多溴二苯醚
(PBDE)
○
○
○
○
○
○
○:表示该有毒有害物质在该部件所有均质材料中的含有量均在 SJ/T11363-2006 标准规定的限量要求以下。
×:表示该有毒有害物质至少在该部件的某一均质材料中的含量超出 SJ/T11363-2006 标准规定的限量要求。
(针对现在代替技术困难的电子部品及合金中的铅 )
4 TASCAM HS-20
Contents
1 – Introduction...............................................8
5 – FILE LIST....................................................30
Features................................................................................... 8
Included items...................................................................... 8
Conventions used in this manual................................... 8
Intellectual property rights.............................................. 9
Precautions for placement and use............................... 9
Beware of condensation.................................................... 9
Cleaning the unit................................................................10
Cleaning the display...................................................10
About USB flash drives, SD cards and CF cards.......10
Precautions for use.....................................................10
Note about confirmed media.................................10
SD card write protection..........................................10
About formats..............................................................10
Explanation of folder structure.....................................30
Folder structure .................................................................30
File names......................................................................30
File formats...........................................................................30
FILE LIST screen overview...............................................30
Root folder selection screen...................................30
Folder selection screen.............................................31
AES31 file selection screen......................................31
Take selection screen.................................................32
Playlist selection screen............................................32
Editing the name of a folder in the root
directory.........................................................................33
Loading a folder in the root directory.................33
Rebuilding folders in the root directory.............34
Deleting a folder in the root directory................34
Folder operations...............................................................35
Creating new folders..................................................35
Loading a folder..........................................................35
Rebuilding folders......................................................36
Exporting a folder.......................................................36
Deleting a folder..........................................................36
Moving between file list screens..................................37
2 – Names and functions of parts................. 11
Front panel........................................................................... 11
Rear panel.............................................................................13
PARALLEL connector..................................................14
RS-232C connector.....................................................14
RS-422 connector (attached to optional SY-2
board)..............................................................................14
Home Screen.......................................................................15
In timeline mode.........................................................15
In take and playlist modes.......................................18
Flash start screen.........................................................20
3 – Preparation...............................................21
Inserting and removing SD and CF cards..................21
Inserting SD/CF cards.................................................21
Removing SD/CF cards..............................................21
Security screws............................................................22
Protect switch for SD cards......................................22
About the display...............................................................22
Adjusting the display angle.....................................22
Adjusting display and indicator brightness.......22
Cautions related to display use..............................22
Turning the power ON and OFF....................................23
Setting the time of the built-in clock..........................24
Lock function.......................................................................24
Recording times.................................................................25
4 – Basic operation........................................26
SD/CF card preparation...................................................26
Card selection...............................................................26
Formatting SD/CF cards............................................27
Setting the master clock..................................................28
Setting inputs and outputs............................................28
Setting the inputs.......................................................28
Setting reference levels............................................28
Connecting headphones.........................................29
Recording operation limitations..................................29
6 – Overview of operation modes................38
Timeline mode functions................................................38
Take mode functions........................................................38
Playlist mode functions...................................................38
Selecting the operation mode......................................38
7 – Timeline mode.........................................39
Preparing to record...........................................................39
Basic preparations......................................................39
Creating new folders..................................................39
Recording mode settings.........................................39
Setting the file format...............................................39
Other recording settings..........................................40
Recording in timeline mode..........................................40
Locate to the recording start position.................40
Record.............................................................................40
Stopping recording....................................................40
Playback in timeline mode.............................................40
Selecting a folder........................................................40
Setting input monitoring.........................................41
Locate to the playback start position..................41
Playback control in timeline mode.......................41
Using the call function in timeline mode...........41
Reading, saving and creating AES31 editing information....................................................................................41
Loading AES31 editing information.....................41
Saving AES31 editing information........................42
TASCAM HS-20 5
Contents
Attaching a name to and saving AES31 editing
information...................................................................42
Creating new AES31 editing information...........43
Importing all takes......................................................43
Editing AES31 file names..........................................44
Deleting AES31 files...................................................44
Editing the timeline...........................................................45
Selecting the range to copy/cut/delete..............45
Setting the editing start point...............................45
Setting the editing end point.................................46
Clearing the editing start/end points..................46
Selecting a complete region for editing.............46
Copying the data in the selection (Copy)...........47
Cutting the data in the selection (Cut)................47
Erasing the data in the selection (Erase).............48
Dividing the data at the set position (Divide)...48
Inserting the data of the copy buffer
at the set position (Insert)........................................49
Inserting a selected file into the set position
(Insert File).....................................................................49
Inserting silence at the set position
(Insert Mute)..................................................................50
Pasting the copy buffer data
at the set position (Paste).........................................51
Pasting the data of a selected file into the set
position (Paste File)....................................................51
Setting fades for the designated region (Fade
IN/FadeOut)...................................................................52
Removing set fades (Remove Fade IN/Remove
FadeOut).........................................................................53
Setting the playback level
in the selected region (Level).................................53
Undoing the previous edit (UNDO)......................54
Redoing an edit (REDO)............................................54
Bouncing...............................................................................55
8 – Take mode................................................56
Preparing to record...........................................................56
Basic preparations......................................................56
Creating new folders..................................................56
Recording mode settings.........................................56
Setting the file format...............................................56
Other recording settings..........................................57
Recording in take mode..................................................57
Starting recording.......................................................57
Stopping recording....................................................57
Playback in take mode.....................................................57
Selecting a folder/take..............................................57
Setting input monitoring.........................................58
Playback control in take mode...............................58
Using the call function in playlist mode.............58
6 TASCAM HS-20
Using the flash start function in take mode......58
Take operations..................................................................59
Editing take start times.............................................59
Exporting takes............................................................59
Uploading takes to an FTP server.........................60
Deleting a take.............................................................60
Sorting takes.................................................................61
Changing the order of takes...................................61
Editing take names.....................................................61
Dividing a take.............................................................62
Combining takes.........................................................63
Undoing the previous take edit (UNDO)............64
Redoing the previously undone take edit
(REDO).............................................................................64
9 – Playlist mode............................................65
Playlist operations.............................................................65
Loading a folder..........................................................65
Creating a new playlist..............................................65
Changing a playlist name later...............................66
Loading playlists..........................................................67
Deleting a playlist.......................................................67
Editing a playlist (adding, clearing and editing
entries)...................................................................................68
ENTRY list screen.........................................................68
ASSIGN File screen......................................................69
Assigning a take to an entry....................................70
Entry number page allocation...............................70
Clearing entry assignments.....................................71
Editing entry titles.......................................................71
Editing the playback starting and ending points.
72
Editing the playback Start/End point using the
number buttons and mark list screen.................72
Editing the playback starting time.......................73
Editing fade-in/fade-out length and level.........74
Rehearsal playback.....................................................74
Saving playlists.............................................................75
Naming a playlist and saving it..............................75
Playback in playlist mode...............................................76
Selecting a playlist......................................................76
Playback control in playlist mode.........................76
Using the call function in playlist mode.............76
Using the flash start function
in playlist mode...........................................................76
10 – Internal settings.....................................77
Menu screen........................................................................77
Recording settings (REC SETUP)...................................77
REC MODE page..........................................................77
REC MODE......................................................................77
Contents
FILE FORMAT page......................................................79
OPTIONS page..............................................................80
Playback settings (PLAY SETUP)....................................80
GENERAL page.............................................................80
CONTROL page............................................................81
Sync and timecode settings (SYNC T/C).....................81
CLOCK page..................................................................81
SYNC page.....................................................................82
T/C page..........................................................................82
SETUP page...................................................................83
I/O page..........................................................................84
Remote settings (REMOTE SETUP)...............................84
GENERAL page.............................................................84
PARALLEL page............................................................85
RS–232C page...............................................................85
RS–422 page.................................................................86
NETWORK page...........................................................86
FTP page.........................................................................87
Network functions (FTP server/telnet/VNC).....88
Audio Signal Input and Output settings
(AUDIO I/O)...........................................................................90
INPUT page....................................................................90
OUTPUT page...............................................................90
Level meter settings (METER SETUP)..........................91
System settings (SYSTEM SETUP).................................91
PREFERENCES page....................................................91
ANALOG Ref LVL ADJUST page..............................92
System setting backup and preset functions...92
CLOCK ADJUST page..................................................92
DAYLIGHT SAVING TIME SETUP screen...............93
SNTP SETUP screen.....................................................93
Version information (VERSION INFO)..........................94
Viewing and working with folders and files
(BROWSE)..............................................................................95
Displaying a folder/file..............................................95
Displaying folder/file information.........................95
Copying a folder/file..................................................96
Deleting a folder/file..................................................98
Managing media (MEDIA MANAGE)...........................99
TIMER EVENT LIST screen................................................99
TIMER EVENT SETUP screen.........................................101
Playback file selection screen...............................102
Operation mode selection
(OPERATION MODE)....................................................... 104
Viewing mark information.................................... 106
Deleting marks.......................................................... 106
Editing mark positions............................................107
Editing mark names.................................................107
Manual locate function................................................. 108
12 – Other functions....................................109
Flash start function........................................................ 109
Operation using a computer keyboard.................. 109
Setting the keyboard type.................................... 109
Use the keyboard to input names...................... 109
List of keyboard operations...................................110
13 – Operation with timecode synchronization................................................................ 111
Playback synchronized with timecode.................... 111
Timeline mode........................................................... 111
Take mode................................................................... 111
Playlist Mode............................................................... 111
Basic operation................................................................. 111
Timecode offset............................................................... 111
Rechase................................................................................ 111
Recording synchronized with timecode................. 111
Timeline mode........................................................... 111
Take mode................................................................... 111
Playlist Mode............................................................... 111
14 – Loading files recorded on another
device........................................................... 112
Preparation before importing.....................................112
Using imported files on this unit................................112
15 – Troubleshooting.................................. 113
16 – Messages.............................................. 114
17 – Specifications.......................................123
Audio resolution...............................................................123
Inputs and outputs..........................................................123
Analog audio inputs and outputs.......................123
Digital audio inputs and outputs........................123
Control input/output ratings................................124
Audio performance.........................................................125
General................................................................................125
Dimensional drawings...................................................125
Block diagram...................................................................126
11 – Mark and locate functions...................105
Mark functions................................................................. 105
Adding marks............................................................ 105
Using keys to locate to marks.............................. 105
Mark list screen......................................................... 105
Locating to marks.................................................... 106
TASCAM HS-20 7
1 – Introduction
Thank you very much for purchasing the TASCAM HS-20
Two-Channel Audio Recorder.
Before connecting and using this unit, please take time to
read this manual thoroughly to ensure you understand how to
properly set it up and connect it, as well as the operation of its
many useful and convenient functions. After you have finished
reading this manual, please keep it in a safe place for future
reference.
You can also download the Owner's Manual from the TEAC
Global Site (http://teac-global.com/).
Features
• Uses SD cards and CF cards as recording media (supports
ultra DMA)
• Mirror recording possible using two cards in dual slots
• Two-track simultaneous recording at resolutions up to
192kHz/24-bit
• Three operation modes including timeline, take and playlist
• Timeline mode is similar to a tape recorder and allows
recording and playback based on a timeline
• Take mode allows playback in take units and flash starting
• Playlist mode allows takes to be added to playlists and
played in order or flash started
• File formats:
BWF (Broadcast Wave Format)
WAV (Waveform Audio Format)
• Flash starting is possible using a remote control (TASCAM
RC-HS20PD or RC-SS20 sold separately)
• Flash starting is also possible using parallel control or a
keyboard
• Auto cue, auto ready and incremental play functions
• AES31 editing information can be read and written in
timeline mode
• Playlist mode function supports reading and writing of JPPA
flash start playlist files
• JOG/SHUTTLE functions
• Color TFT touch panel with a graphical user interface
enables intuitive operation
• Balanced analog XLR inputs and outputs
• Unbalanced analog RCA inputs and outputs
• XLR AES/EBU digital inputs and outputs
• Coaxial S/PDIF digital inputs and outputs
• Headphones output
• BNC timecode input and output possible using optional
SY-2
• BNC video reference (NTSC/PAL black burst and HDTV
Tri-level signals) and word clock input, output and thru
• USB flash drives can be connected to copy files
• LAN (gigabit Ethernet) function allows file transfer and
remote control over a network
• Parallel remote control supported
• RS-232C serial remote control supported
• RS-422 serial remote control (based on 9-pin serial protocol)
supported using optional SY-2
• Mounting in a rack possible (2U)
• Can be used with TASCAM HS Editor
• SNTP function allows time to be set using an NTP server
• Recorded files can be automatically transmitted over a
network to designated servers
• Automatic playback, recording and file transfer possible in
time mode using the timer event list
• When SD cards and CF cards are inserted, folders necessary
for recording and playback are created automatically
8 TASCAM HS-20
Included items
This product includes the following items.
Take care when opening the package not to damage the items.
Keep the packing materials for transportation in the future.
Please contact TEAC if any of these items are missing or have
been damaged during transportation.
• Main unit...............................................................................................× 1
• Power cord............................................................................................× 1
• Rackmount screw kit.........................................................................× 1
• Security screws....................................................................................× 3
• Owner’s Manual
(this document including warranty at back)............................× 1
Conventions used in this manual
The following conventions are used in this manual.
• When we refer to keys, connectors and other parts of this
unit and other equipment, we use a bold font like this:
MENU key.
• “CompactFlash card” is sometimes abbreviated as “CF card”.
• Additional information is provided as necessary as tips,
notes and cautions.
TIP
These are tips about how to use the unit.
NOTE
These provide additional explanations and describe special
cases.
CAUTION
Failure to follow these instructions could result in injury,
damage to equipment or lost recording data, for example.
1 – Introduction
Intellectual property rights
• TASCAM is a trademark of TEAC Corporation, registered in
the U.S. and other countries.
• CompactFlash is a US registered trademark of SanDisk
Corporation.
• SDHC logo is a trademark of SD-3C, LLC.
• Other company names, product names and logos in this
document are trademarks or registered trademarks of their
respective owners.
Any DATA, including, but not limited to information,
described herein are intended only as illustrations of such
DATA and/or information and not as the specifications for
such DATA and/or information. TEAC Corporation disclaims
any warranty that any use of such DATA and/or information
shall be free from infringement of any third party’s
intellectual property rights or other proprietary rights, and
further, assumes no liability of whatsoever nature in the
event of any such infringement, or arising from or connected
with or related to the use of such DATA and/or information.
This product is designed to help you record and reproduce
sound works to which you own the copyright, or where
you have obtained permission from the copyright holder or
the rightful licensor. Unless you own the copyright, or have
obtained the appropriate permission from the copyright
holder or the rightful licensor, your unauthorized recording,
reproduction or distribution thereof may result in severe
criminal penalties under copyright laws and international
copyright treaties. If you are uncertain about your rights,
contact your legal advisor. Under no circumstances will TEAC
Corporation be responsible for the consequences of any
illegal copying performed using the recorder.
Precautions for placement and use
• The guaranteed operating temperature range of this
product is 5º - 35º C (41º- 95º F).
• Do not install in the following types of places. Doing
so could degrade the sound quality and/or cause
malfunctions.
oo Places with significant vibrations or that are
otherwise unstable
oo Near windows or other places exposed to direct
sunlight
oo Near heaters or other extremely hot places
oo Extremely cold places
oo Places with bad ventilation or high humidity
oo Dusty places
• Make sure that the unit is mounted in a level position for
correct operation.
• In order to promote the emission of heat, do not place
anything on top of this product.
• Do not place this product on top of a powered amplifier or
other equipment that emits heat.
Beware of condensation
If the unit is moved from a cold to a warm place, or used
immediately after a cold room has been heated or otherwise
exposed to a sudden temperature change, condensation could
occur. Should this happen, leave the unit for one or two hours
before turning the unit on.
TASCAM HS-20 9
1 – Introduction
Cleaning the unit
Use a dry soft cloth to wipe the unit clean. Do not wipe with
chemical cleaning cloths, thinner, alcohol or other chemical
agents.
Doing so could damage the surface or cause discoloration.
Cleaning the display
Gently wipe the display with a soft dry cloth that does not shed
dust (e.g. a cleaning cloth).
Avoid wiping with a stiff cloth or rubbing with force. Doing so
will damage the surface of the LCD. Do not use benzene, thinner,
manicure remover, alcohol or similar substances.
About USB flash drives, SD cards and
CF cards
This unit uses SD cards and CF cards for recording and playback.
In addition, you can connect USB flash drives and use them to
back up data from SD/CF cards and to save files to them.
A list of USB flash drives, SD cards and CF cards that have been
confirmed to work with this unit can be found on the TEAC
Global Site (http://teac-global.com/).
Precautions for use
USB flash drives, SD cards and CF cards are delicate media. In
order to avoid damaging a flash drive or card, please follow
these precautions when handling them.
• Do not leave them in extremely hot or cold places.
• Do not leave them in extremely humid places.
• Do not let them get wet.
• Do not put things on top of them or twist them.
• Do not hit them.
• Do not connect or disconnect USB flash drives, SD cards
and CF cards when they are being accessed, including
during recording, playback and data transfer.
• Always cover their connectors when transporting them. Do
not leave connectors exposed.
Note about confirmed media
This unit uses SD cards and CF cards for recording and playback
and USB flash drives to back up data from SD/CF cards and to
save files to them.
We recommend using genuine TASCAM CF cards, but you can
also use commercially-available CF cards.
Micro drives cannot be used with this unit.
Moreover, older SD/CF cards as well as some newer SD/CF cards
use slow memory components and internal buffers with low
capacity. Use of such SD/CF cards could affect the recording
performance of this unit.
Moreover, some older USB flash drives use slow memory
components or internal buffers with low capacity.
Use of such USB flash drives could increase the amount of time
necessary for reading and writing data.
Please refer to the list of USB flash drives, SD cards and CF cards
that have been confirmed to work with this unit on the TEAC
Global Site (http://teac-global.com/).
10 TASCAM HS-20
SD card write protection
In order to improve operational performance, this unit writes
track information to the media. Since track information cannot
be written to write-protected SD cards, performance will be
affected, including requiring more time to write to the media.
About formats
Always format SD and CF cards with this unit before using them
in it. Media formatted by this unit will be optimized to improve
performance with it.
If media that has been formatted by a computer or another
device is used with this unit, its operation might be affected.
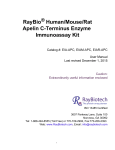
2 – Names and functions of parts
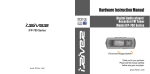
Front panel
1 POWER switch
6 MENU key
2 USB connector
7 Color display
Use to turn the power on and off.
This switch has a cover to prevent misoperation.
Open the cover from below to access and operate the
switch.
By connecting a USB flash drive, for example, you can back
up data from SD/CF cards and save files to them.
By connecting a USB keyboard, you can input folder names,
for example.
By default, the unit is set to use Japanese keyboards, which
have a different layout from US keyboards.
To use a US keyboard, change the setting on the PREFERENCES page of the SYSTEM SETUP screen. (See “PREFERENCES page” on page 91.)
NOTE
Do not disconnect a USB flash drive when using it to copy
files.
You can connect and disconnect a USB flash drive at all
other times.
You can connect and disconnect USB keyboards at any time.
This unit is not compatible with USB hubs and other devices
with USB hub functions.
3 SD/CF card indicators
The indicator for the currently selected card slot lights.
When recording, copying or transferring files by FTP, it blinks
rapidly.
When no card is inserted in the current slot, it blinks slowly.
CAUTION
Do not remove a card from the slot when its indicator (SD
card or CF card) is blinking rapidly.
4 SD/CF card slots
Insert and remove SD cards and CF cards here. (See
“Inserting and removing SD and CF cards” on page 21.)
5 HOME key
Press to open the Home Screen. Press the MENU key while
pressing and holding the HOME key to open the LOCK
SETUP screen. (See “Lock function” on page 24.)
Turn the DATA dial when pressing and holding the HOME
key to adjust the brightness of the color display, the PAUSE,
REC and PLAY keys and the JOG [SHUTTLE], and SD and CF
indicators.
Push and turn the DATA dial while pressing and holding the
HOME key to adjust the brightness of only the color display.
Press to open the MENU screen.
Press the MENU key while pressing and holding the HOME
key to open the LOCK SETUP screen. (See “Lock function” on
page 24.)
This 3.5-inch TFT color display has a 320 x 240 resolution.
It shows various types of information and is used for
numerous operations.
8 DATA dial
Turn to use as a DATA dial and press to use as an ENTER
key. When setting parameter values, press while turning to
change them in large increments (coarse mode).
When the take mode Home Screen is open and neither the
Flash Page knob nor the NEXT TAKE NAME screen number
section are selected, turn this to select the take.
When a pop-up window is open, this works as the OK or
CLOSE button.
Turn the DATA dial when pressing and holding the HOME
key to adjust the brightness of the color display, the PAUSE,
REC and PLAY keys and the JOG [SHUTTLE], and SD and CF
indicators.
Push and turn the DATA dial while pressing and holding the
HOME key to adjust the brightness of only the color display.
9 STOP key
Press to stop recording or playback.
0 PLAY key/indicator
When stopped or in playback standby, press this key to start
playback. This key lights during playback.
Press this key when in recording standby to start recording.
Both the PLAY and REC keys light during recording.
In timeline mode, press the PLAY key while pressing and
holding the REC key to start recording from that point. Both
the PLAY and REC keys light during recording.
q PAUSE key/indicator
Press this key when stopped or during playback to put the
unit in playback standby. This key lights when in standby.
Press this key while recording to put the unit in recording
standby. Both the PAUSE and REC keys light when in
recording standby.
w REC key/indicator
When a recordable card is installed and the unit is stopped,
press this key to put the unit into recording standby. Both
the PAUSE and REC keys light during recording standby.
TASCAM HS-20 11
2 – Names and functions of parts
In timeline mode, press the PLAY key while pressing and
holding the REC key to start recording from that point. Both
the PLAY and REC keys light during recording.
e PHONES knob/jack
Connect stereo headphones to this standard stereo phone
jack.
This jack outputs the signal from the internal monitoring
mixer.
Use the PHONES knob to adjust the headphones output
level.
CAUTION
Before connecting headphones, minimize the volume with
the PHONES knob. Failure to do so might cause sudden loud
noises, which could harm your hearing or result in other
trouble.
r KEYBOARD connector
Connect an IBM PC-compatible keyboard with a PS/2
interface here.
You can use it to input the names of folders, for example.
By default, the unit is set to use Japanese keyboards, which
have a different layout from US keyboards. To use a US
keyboard, change the setting on the PREFERENCES page of
the SYSTEM SETUP screen. (“PREFERENCES page” on page
91.)
t FILE LIST key
Touch to open the FILE LIST screen. (See “FILE LIST screen
overview” on page 30.)
y EXIT/CANCEL [PEAK CLEAR] key
Press to cancel input or item selection.
When a pull-up or pull-down menu is open, press to close it.
On the Home Screen, when no pull-up/pull-down menu
is open, this key functions as a reset button for peak hold
marks shown on the level meters
When the MENU screen or FILE LIST screen is open, press this
to return to the Home Screen.
On other screens, press this to return to the previous screen.
When a pop-up window is open, press this to cancel an
operation.
u CALL [CHASE] key
Press to locate to and pause playback at the call point, which
is where playback last started from playback standby.
Press this key while pressing and holding the SHIFT key to
turn synchronization with timecode ON/OFF.
i LCD TILT button
Press this button to unlock the color display.
To adjust the angle of the color display, press this button to
unlock it and pull the bottom of the display outward.
To put the display away, press this button to unlock it and
push the bottom inward.
12 TASCAM HS-20
o m [
] and , [
] (search) keys
Press one of these keys to search.
m[
] key: search backward
,[
] key: search forward
Press one of these keys while pressing and holding the
SHIFT key to search at high speed.
p . / /[MARK. / /] (skip) keys
Use these keys to skip between regions, takes and entries.
Press these keys while pressing and holding the SHIFT
key to move to the previous/next mark. After moving, the
same playback state resumes (stopped/playback standby/
playback).
a MARK key
Press this key to add a mark at the currently located time.
The maximum number of marks, including automatic marks,
possible in a single timeline/take is 99. (See “Mark functions”
on page 105.)
s SHIFT key
When stopped/in playback standby/during playback:
oo Press the . key while pressing and holding this key
to move to the previous mark, and resume the same
playback state.
oo Press the / key while pressing and holding this key to
move to the next mark, and resume the same playback
state.
oo Press the m[
] or ,[
] key while pressing
and holding this key to search at high speed.
oo Press the JOG [SHUTTLE] key while pressing and holding
this key to activate the shuttle operation mode.
oo Press the CALL [CHASE] key while pressing and holding
this key to turn timecode synchronization ON/OFF.
d JOG [SHUTTLE] key and indicator
Press to enable use of the JOG/SHUTTLE functions.
Press this key to enable the jog operation mode of the JOG/
SHUTTLE dial. When this mode is enabled, this indicator
lights.
Press this key while pressing the SHIFT key to enable the
shuttle operation mode of the JOG/SHUTTLE dial. When
this is enabled, this indicator blinks.
Press this key again to disable either mode.
f JOG/SHUTTLE dial
When in jog operation mode, turn this to change the
playback position by a corresponding amount.
When in shuttle operation mode, turn this to adjust the
playback speed according to the degree of rotation.
If you return to the original position when in shuttle
operation mode, the transport status is restored to how it
was before shuttle playback was begun.
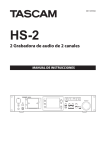
2 – Names and functions of parts
Rear panel
g ANALOG IN L/R (UNBALANCED) connectors
These RCA pin jacks are analog unbalanced inputs (L/R)
The rated input level is −10dBV.
h ANALOG IN L/R (BALANCED) connectors
These XLR connectors are balanced analog inputs (L/R)
The rated input level is +4dBu. (1: GND, 2: HOT, 3: COLD)
j DIGITAL IN (S/PDIF) connector
This connector is an unbalanced input for digital audio in
IEC60958-3(S/PDIF) and AES3-2003/IEC60958-4 (AES/EBU)
formats.
Sampling frequencies of 88.2 kHz and 96 kHz are transmitted at double speed, and 176.4 kHz and 192 kHz are at
quadruple speed.
This unit is equipped with a sampling rate converter which
supports 32 kHz to 192 kHz.
k DIGITAL IN (AES/EBU) connector
This connector is an XLR balanced input for digital audio in
AES3-2003 / IEC60958-4 (AES/EBU) and IEC60958-3 (S/PDIF)
format.
Sampling frequencies of 88.2 kHz and 96 kHz are transmitted at double speed, and 176.4 kHz and 192 kHz are at
quadruple speed.
This unit is equipped with a sampling rate converter which
supports 32 kHz to 192 kHz.
l REMOTE connector
Connect a TASCAM RC-HS20PD remote control (sold
separately) here.
NOTE
A protective cover is attached to this connector when
shipped from the factory. Remove the cover to use the
connector.
CAUTION
This is not an Ethernet connector (LAN, etc.). Never connect
this to a network using an Ethernet cable.
Doing so could damage this unit or equipment in the
network.
; RS-232C connector
This is a 9-pin D-sub connector for RS-232C serial control.
Connect an external controller, for example, here.
NOTE
It cannot be used at the same time as the RS-422 connector.
(See “RS–232C page” on page 85.)
z PARALLEL connector
This is a 25-pin D-sub connector for parallel control.
Connect a TASCAM RC-SS20 or another external controller
here.
x AC IN connector
Connect the included power cord here.
c ANALOG OUT L/R (UNBALANCED) connectors
These RCA pin jacks are analog unbalanced outputs (L/R).
Their rated output level is −10 dBV.
v ANALOG OUT L/R (BALANCED) connectors
These XLR connectors are balanced analog outputs (L/R).
Their rated output level is +6 dBu when Digital Ref. Level is
set to −9dBFs and +4dBu in other cases. (1: GND, 2: HOT, 3:
COLD)
b DIGITAL OUT (S/PDIF) connector
This connector is an unbalanced output for digital audio in
IEC60958-3(S/PDIF) format.
Sampling frequencies of 88.2 kHz and 96 kHz are transmitted at double speed, and 176.4 kHz and 192 kHz are at
quadruple speed.
n DIGITAL OUT (AES/EBU) connectors
This connector is an XLR balanced output for digital audio in
AES3-2003/IEC60958-4 (AES/EBU) format.
Sampling frequencies of 88.2 kHz and 96 kHz are transmitted at double speed, and 176.4 kHz and 192 kHz are at
quadruple speed.
m RS-422 connector (attached to optional SY-2 board)
This is a 9-pin D-sub connector for RS-422 serial control.
Connect an external controller, for example, here.
NOTE
This cannot be used at the same time as the RS-232C
connector. (See “RS–422 page” on page 86.)
,TIME CODE IN/OUT connectors (attached to optional
SY-2 board)
These BNC connectors are for SMPTE timecode input and
output.
. WORD/VIDEO IN connector
This BNC connector is for input of word clock and video
reference signals. Use this to input a word clock signal
(44.1 kHz, 48 kHz, 88.2 kHz, 96 kHz, 176.4 kHz or 192 kHz)
or a video reference signal (NTSC/PAL black burst or HDTV
Tri-Level).
Use the switch to set whether or not to terminate with 75Ω.
/ WORD/VIDEO THRU/WORD OUT connector
TASCAM HS-20 13
2 – Names and functions of parts
This BNC connector is for output of word clock thru/out and
video reference thru signals.
Use this to output a word clock signal (thru, 44.1 kHz, 48 kHz,
88.2 kHz, 96 kHz, 176.4 kHz or 192 kHz) or a video reference
signal (IN connector signal thru only).
Use the THRU/WORD OUT switch to set the signal output.
! 75Ω OFF/ON and THRU/WORD OUT switch
Use this switch to make the following settings.
oo Whether or not the WORD/VIDEO IN connector has a
terminator (75Ω)
oo The WORD/VIDEO output THRU/OUT setting (OUT is only
for WORD)
3+5V: maximum supplied current is 50 mA
When REMOTE Select (pin 14) is set to high, it can be used as an
ordinary parallel controller.
When set to low, flash start mode is enabled.
In addition, depending on the high/low setting of the Flash
Page (pin 20), the key assignments are as follows.
Pin 14
Low
Low
Pin 20
High
Low
Flash start take
1–10
11–20
The following example is of a connection that uses a fader to
start and stop playback of this unit.
@ ETHERNET connector
Use this Ethernet connector to connect to a network for file
transfer and to control this unit from an external source.
PARALLEL connector
The PARALLEL connector on the rear panel allows external
control of this unit. (A TASCAM RC-SS20 can also be connected.)
The pin assignments are as follows.
Pin
No.
1
2
3
4
5
6
7
8
9
10
11
12
13
14
15
16
17
18
19
20
21
22
23
24
25
Normal
GND
PLAY
STOP
RECORD
SKIP FWD
SKIP BWD
(Reserved)
FADER_START
(Reserved)
TALLY_PAUSE
TALLY_RECORD
TALLY_STOP
TALLY_PLAY
REMOTE_SELECT,
H or Open
PAUSE
(Reserved)
AUX1, FF
AUX2, REW
AUX3, MARK
(Reserved)
(Reserved)
TALLY_SD
(Reserved)
TALLY_CF
+5V3
RC-SS20 PonMode
I/O
GND
FLASH 1
FLASH 2
FLASH 3
FLASH 4
FLASH 5
STOP
FADER_START
(Reserved)
TALLY_PAUSE
RESERVED
TALLY_STOP
TALLY_PLAY
I
I
I
I
I
I
I
O
O
O
O
O
REMOTE_SELECT, L
I
FLASH 6
FLASH 7
FLASH 8
FLASH 9
FLASH 10
FLASH_PAGE
(Reserved)
TALLY_SD1
(Reserved)
TALLY_CF2
+5V3
I
I
I
I
I
I
O
O
O
O
I: Command input for transport control
Internal circuit, +5V pull-up
Triggers from a low input level of 50 msec or more
O: Command output, for tally output
The internal circuit is open collector
(10Ω output impedance)
Low command output when operating
20V dielectric strength, 35mA maximum current
1For RC-SS20, assigned to CF indicator
2For RC-SS20, assigned to CD indicator
14 TASCAM HS-20
For information about the assignment of AUX 1–3 (pins 17–19)
functions, see “PARALLEL page” on page 85.
NOTE
When controlling this unit with an external device that
is connected to the PARALLEL connector, if the unit is
stopped, you can start recording immediately by simultaneously inputing PLAY and RECORD signals. In addition, by
simultaneously inputting PLAY and RECORD signals
during playback in timeline mode, you can start overwrite
recording.
RS-232C connector
The RS-232C connector on the rear panel can be connected to
an RS-232C connector on a computer to allow control of this
unit from that computer.
Make settings related to communication on the RS–232C page
of the REMOTE SETUP screen. (See “RS–232C page” on page
85.)
NOTE
Please contact TASCAM customer support for information
about this unit’s RS-232C command protocol.
RS-422 connector (attached to optional SY-2
board)
The optional SY-2 board is equipped with an RS-422 connector.
You can control this unit remotely by installing an SY-2 board in
this unit and connecting the RS-422 connector to a controller or
editor compatible with the SONY P2 protocol (RS-422).
Make settings related to operation on the REMOTE SETUP screen
RS–422 page. (See “RS–422 page” on page 86.)
NOTE
Please contact TASCAM customer support for information
about this unit’s protocol compatibility.
2 – Names and functions of parts
Home Screen
6 Audio synchronization status button/indicator
Press the HOME key to open the Home Screen.
§
In timeline mode
12
3
When synchronized to a Master clock, the
SYNC indicator appears green.
The SYNC indicator blinks when not synchronized to a Master clock.
Touch this area to open the SYNC T/C screen. (See “Sync and
timecode settings (SYNC T/C)” on page 81.)
4 56
7 Transport status indicator
This icon shows the current transport status.
7
8
9
0
q
w
e
r
t
y
Playing back or jogging playback (forward)
Jogging playback (reverse)
Playback standby
Stopped
u
i
Searching backward
Searching forward
Searching backward (high-speed)
o
p a s d f
1 NTP server time synchronization status
If an error occurs during synchronization with an NTP server,
an error icon will blink like this:
§
.
2 Repeat status
When repeat playback is on, the
When repeat playback is off, the
icon lights green.
icon appears unlit.
3 Time counter (button)
The time displayed is the elapsed time or the timecode time.
Touch this area to change the time display mode.
4 Time mode (button)
This icon shows the current time display mode.
Touch this area to change the time display mode.
The time elapsed from the beginning of the
timeline is shown.
Searching forward (high-speed)
The number shown when searching backward
(shuttle operation) changes with the current
speed: x2, x4, x8, x16, x32.
The number shown when searching forward
(shuttle operation) changes with the current
speed: x2, x4, x8, x16, x32.
Recording
Recording standby
Touch this area to open the PLAY SETUP screen.
8 AES31 File name (button)
This shows the current active AES31 file name (AES31
editing information file).
A * appears when the timeline has not been saved after
editing (including the addition and removal of folder editing
marks)
Touch this area to open a pull-down menu.
The timecode for the timeline is shown.
5 Timecode status button/indicator
When accurate timecode is input and recognized correctly, the TC indicator appears green.
When timecode is not recognized correctly, the
TC indicator appears unlit.
This shows the status when operation is synchronized to
timecode.
§
The CHASE indicator appears green only
when operation is synchronized with
external timecode or the built-in timecode
generator (selectable).
The CHASE indicator blinks when not
operating with timecode synchronization
and when synchronization is lost during
synchronized operation.
Touch this area to open the SYNC T/C screen. (See “Sync and
timecode settings (SYNC T/C)” on page 81.)
START TIME EDIT button
This opens the START TIME screen where you can set the
timeline mode starting time. This can only be selected
when stopped.
REBUILD button
This rebuilds if files have been deleted or modified using
FTP.
This can only be selected when stopped.
SAVE button
Save the contents of the timeline.
This can only be selected when stopped.
TASCAM HS-20 15
2 – Names and functions of parts
SAVE AS button
This name and saves the content of the timeline.
This can only be selected when stopped.
(See “Saving AES31 editing information” on page 42.)
CREATE AES31 button
This opens the AES31 NAME screen where you can
create new AES31 files.
This can only be selected when stopped.
(See “Creating new AES31 editing information” on page
43.)
IMPORT ALL TAKES button
This imports all takes in the current folder.
This can only be selected when stopped. (See “Importing
all takes” on page 43.)
The indicators at the left end of the level meters show the
status of input monitoring. The indicator background colors
show the input monitoring status.
Timeline mode
Take mode
MON OFF
MON ON
0 Level meters
The input signal levels are shown when input monitoring is
on, during recording standby and when recording.
Each channel also has an overload indicator at its right end
that appears red when the input overloads.
During playback, track playback levels are shown when
input monitoring is off.
When the input source is set to a digital input, but there is
no input signal or if the input signal differs from the internal
setting, the channel meter display area appears gray and
one of the following messages appears.
Message
D-IN NO SIGNAL
D-IN UNLOCK
D-IN NOT AUDIO
D-IN Cbit ERROR
q Time display area
This area shows 4 equal divisions of the timeline for the set
time display mode.
This area scrolls horizontally to correspond with the time
counter.
w Mark display area
Timeline marks appear here.
This area scrolls horizontally to correspond with the time
counter.
IN mark
OUT mark
9 Input monitoring indicators
Playlist Mode
oo Release time
oo Overload indicator peak level
oo Reference level line display on/off
Meaning
No input signal
Input signal is not synchronized with
system
Cbit information of input signal is
not audio
Other Cbit information of input
signal differs from actual operation
mode
Other types of marks
e Track display area
This shows the track regions.
The left track is on the top and the right track is on the
bottom.
Region fade-ins, fade-outs and cross-fades are shown in
light blue.
The status of each region is shown by color as shown below.
Normal
White
Being recorded
Fade-in
Fade-out
Cross-fade area
Selected region
Red
Light blue
Medium blue
Selected silent part Dark blue
This area scrolls horizontally along with the time counter.
r EDIT MODE button
Touch this to turn editing mode on/off. In this mode you can
divide, erase, and trim regions, for example. (See “Editing the
timeline” on page 45.)
t Recording media info button
D–IN NO SIGNAL shown
The following settings can be made for the display of the
level meters on the METER SETUP screen from the MENU
screen.
oo Metering point
oo Peak hold time
16 TASCAM HS-20
This shows which of the card slots is being used and its
remaining recording time.
The background color is green during playback and red
while recording.
If there is no media in the card slot, No Media appears on a
light gray background.
If the card has no folders, "No Project"appears. When an
unformatted card is inserted, UNFORMAT appears.
When a card is inserted in the card slot that is not being
used for recording, UNMOUNT appears. When recording
stops, this will change to its ordinary appearance.
2 – Names and functions of parts
If the total number of entries, including files and subfolders,
inside a folder exceeds about 20,000, recording becomes
impossible and "Rec Limit" appears. For details, see
“Recording operation limitations” on page 29.
Press this area to open the MEDIA SELECT screen. (See “Card
selection” on page 26.)
Media status indicators
These indicators show whether media recording is possible,
not possible or not selected for recording.
The status will be displayed in timeline and take modes.
(Status is not displayed in playlist mode.)
o INPUT MONITOR button
Touch this button to open a pull-up menu where you can
turn input monitoring ON/OFF.
oo Indicators
Recording
possible
Recording not
possible
Not selected
for recording
When ON, sound input through the assigned input
connector is always output from this unit.
p BOUNCE I/O button
Touch this button to open a pull-up menu for bouncing.
oo Remaining media button examples
1 REC MODE set to Single
Recording
Not recording
Recording not
possible*
2 REC MODE set to Mirror
Recording
Not recording
3 REC MODE set to Mirror when mirroring not possible*
Recording
Not recording
Recording not
possible*
*See “Setting button appearance” on page 77 for more
information about when recording is not possible or
mirroring is not possible.
y Zoom rate
This shows the track area zoom ratio and the amount of time
displayed.
Turn the DATA dial to the right to zoom in (reduce the
amount of time displayed) and turn it to the left to zoom out
(increase the amount of time displayed).
u Timeline cursor
This cursor shows the position of recording or playback. It is
always shown in the middle of the screen.
i Mark name
This is the name of the mark at the current time or the
nearest preceding mark.
Touch this part while a mark name other than the auto mark
is shown to open the mark name editing screen.
Bounce button
Touch this button to bounce. In the following circumstances, this button appears gray and cannot be used.
oo When both starting (IN) and ending (OUT) points have not
been set
oo During playback or recording
SET IN button
Touch to set the current position as the bounce starting
(IN) point.
SET OUT button
Touch to set the current position as the bounce ending
(OUT) point.
CLEAR button
Touch to discard the currently set bounce starting (IN)
and ending (OUT) points.
For details about this button, see “Bouncing” on page 55.
a NEXT TAKE NAME button
Touch this button to open the NEXT TAKE NAME page where
you can set the name that will be given to takes or files
recorded in the future.
oo First half of take names
The first half of the take name can be set to either the
User Word, Folder Name or Date/Time.
(Default: DATE/TIME)
CAUTION
The first half of the take name can only be changed when
the unit is stopped.
oo User Word mode button
Use the user word for the first half of the take name.
Touch the EDIT button to open the screen where you
can change the user word. (This works the same as the
screen for editing the names of folders in the root folder.)
TASCAM HS-20 17
2 – Names and functions of parts
NOTE
If the first half of the take name or the letter in the second
half is different, a take that has the same three-digit number
in the second half can be created.
s INFO button
Touch this button to open an information display that shows
the file name of the region at the timeline cursor and the
current unit settings beneath the track display area.
oo Folder Name mode button
Use the folder name as the first half of the take name.
The upper section shows the file name of the region at the
timeline cursor.
The lower section shows the current sampling frequency,
recording bit length and frame type settings.
oo Date/Time mode button
Use the date/time for the first half of the take name. (The
format is “yyyymmdd-hhmmss”.)
Example: If it was created at 3:10:20 PM on July 1,
2014, the first half of the take name will be
“20140701-151020”.
d Mark List button
Touch this button to open the mark list. (See “Mark list
screen” on page 105.)
f Manual Locate button
Touch this button to open the MANUAL LOCATE screen. (See
“Manual locate function” on page 108.)
In take and playlist modes
gh
oo Second half of take names
The second half of the take name is comprised of one
alphabetical letter and a three-digit number. Touch the
EDIT button to open the screen where you can change
the letter.
You can change the three-digit number with the +
and – buttons. You can also touch the numerical part to
highlight it in yellow and use the DATA dial to change
the number.
In the following cases, “---” appears and the value cannot
be changed.
oo The current folder is not loaded.
oo The selected card is unavailable
oo When the numerical part of the file name of the
current take is 999
CAUTION
• The Next Take Name setting is saved to the SC/CF card. If
you change cards, the setting on that card will be used.
(Even when using a card created on another HS series unit,
the setting will change when you change the folder.)
• The numerical part of the second half of the take name can
be changed even during playback and recording.
(The first half of the take name and the letter in the second
half can only be changed when stopped.)
18 TASCAM HS-20
k
l
;
j
x
z
c
v
b
n m
In take mode
NOTE
When in playlist mode, the INPUT MONITOR, EDIT and NEXT
TAKE NAME buttons are not shown.
g Timer event function status button
This shows timer event function status. (Take mode only)
: Timer event function on
: Timer event function off
: Timer event has been edited, but not saved
2 – Names and functions of parts
Press this button to open the TIMER EVENT LIST screen. (See
“TIMER EVENT LIST screen” on page 99.)
In take mode
h Take/entry number
The number of the currently selected take or entry is shown.
In recording standby, the file name of the take to be
recorded next will be shown. Take numbers are assigned in
the order that they are recorded within a folder.
j Time mode button
This icon shows the current time display mode.
Touch this area to change the time display mode.
Mode
Details
The elapsed time from the beginning of the take
is shown.
Unless recording, the time remaining until the
end of the take is shown. When recording, the
time remaining until the maximum file size is
shown.
The elapsed time from the beginning of the
folder is shown.
Unless recording, the time remaining until the
end of the folder is shown. When recording,
the remaining recordable time on the currently
selected card using the current recording
settings is shown.
The timecode time of the file being recorded or
played is shown.
TAKE List button
This opens the take selection screen (TAKE screen). On
the take selection screen displayed by using this button,
the folder selection screen will not open even if you
press the folder name display area.
(See “FILE LIST screen overview” on page 30.)
CIRCLE @ TAKE button
Touch this to add or remove “@” at the beginning of the
current take name.
(See “Deleting a take” on page 60.)
REBUILD button
This rebuilds if files have been deleted or modified using
FTP.
In playlist mode
k Time bar
This shows the current playback position. The appearance
depends on the time display mode.
Mode
Details
The current playback
position relative to the
length of the take or
entry is shown.
The current playback
position relative to the
length of all the takes in
the folder or the entire
playlist is shown.
(White vertical lines
show the boundaries
between takes and
entries.)
Bar display
Elongates from left end
to right end
Shortens from left end
to right end
Elongates from left end
to right end
Shortens from left end
to right end
Elongates from left end
to right end
NOTE
A red progress bar that extends from the left end to the
right end with a frequency of approximately five seconds is
shown during recording.
l Take/entry name button
This shows the name and icon of the currently active take or
entry.
In recording standby, the file name of the take to be
recorded next will be shown.
When in playlist mode, a “*” appears in the icon if the playlist
has not been saved after editing (including the addition and
removal of entries).
Touch this area to open a pull-down menu.
ASSIGN FILE button
This shows the ASSIGN screen where you can assign files.
(See “ASSIGN File screen” on page 69.)
ENTRY LIST button
This shows the entry list (ENTRY) screen. (See “ENTRY list
screen” on page 68.)
ADJUST ENTRY button
This opens the ADJUST ENTRY *** screen where you can
edit an entry.
(See “Editing entry titles” on page 71, “Editing the
playback starting and ending points” on page 72,
“Editing the playback starting time” on page 73 and
“Editing fade-in/fade-out length and level” on page
74.)
REBUILD button
This rebuilds if files have been deleted or modified using
FTP.
SAVE button
This saves the current playlist. This can only be selected
when stopped.
(See “Saving playlists” on page 75.)
SAVE AS button
This adds a name to the current playlist and saves it. This
can only be selected when stopped.
(See “Saving playlists” on page 75.)
TASCAM HS-20 19
2 – Names and functions of parts
CREATE PLAYLIST button
This opens the PLAYLIST NAME screen where you can
create a new playlist.
(See “Creating a new playlist” on page 65.)
Flash start screen
1. Press the HOME key when the Home Screen is already open
to open the flash start screen.
; Level meters
These are the same as on the Home Screen in timeline
mode.
z Time display area
The appearance depends on the time display mode.
Mode
Left end
00:00:00:00
Total take or entry
length
00:00:00:00
Right end
Total take or entry
length
00:00:00:00
Total folder or playlist
length
Total folder or playlist
00:00:00:00
length
Starting time of folder Ending time of folder
or playlist
or playlist
When recording and in recording standby, however, the time
bar and division lines are not shown.
x Flash Page number and knob
This shows the Flash Page number. Touch this area to enable
selection (yellow background), and turn the DATA dial to
change the page number (turn right to increase and turn left
to decrease).
c Current time cursor
This cursor shows the playback position. This scrolls horizontally in correspondence with the time counter.
It is not shown when recording (take mode only).
v Mark name
This is the name of the mark at the current time or the
nearest preceding mark.
Touch this part while a mark name other than the auto mark
is shown to open the mark name editing screen.
b INPUT MONITOR button
These are the same as on the Home Screen in timeline
mode.
n EDIT button
Touch this button to open a pull-up menu for take editing.
m NEXT TAKE NAME button
These are the same as on the Home Screen in timeline
mode.
20 TASCAM HS-20
2. Use the DATA dial to select the page that contains the
takes or entries that you want to play after touching and
highlighting (yellow background) the operation/display
knob on the flash page.
NOTE
The flash start screen has five pages (PAGE 1–5) that can
each show 20 takes.
3. Touch a take or entry button that has a flash start indicator
lit orange on the display to use flash start playback. Flash
starting is also possible using a connected PS/2 keyboard
and devices connected to this unit’s remote connectors
(REMOTE, RS-232C and PARALLEL).
4. Touch the INFO button to open the information screen.
The contents of this screen are the same as the information
screen that opens by pressing the INFO button when the
Home Screen is open.
3 – Preparation
Inserting and removing SD and CF
cards
Inserting SD/CF cards
Insert an SD/CF card into the SD card slot or CF card slot on the
front of the unit in order to use it for recording and playback.
NOTE
SD/CF cards can be inserted whether the unit is ON or OFF.
1. Pull the card slot cover forward to open it.
Removing SD/CF cards
Turn the unit OFF or stop operations before removing an SD/CF
card.
CAUTION
Never remove an SD/CF card during recording, playback or
any other operation that accesses the card. Doing so could,
for example, cause recording errors, loss of recorded data,
and sudden loud noises to be output through monitoring
equipment, which could result in damaged equipment and
hearing loss.
1. Pull the card slot cover forward to open it.
2. If using an SD card, press the card into the slot slightly and
release it to bring the card out.
If using a CF card, press the square button to the right of the
CF card slot to bring the button out. Press the square button
in again to partially eject the CF card.
2. Insert the SD/CF card with the correct orientation.
With the labeled side up, insert the end with the connector
completely.
3. Pull the SD/CF card out by hand.
3. Close the cover.
NOTE
If you cannot close the cover of the card slot, remove the SD/
CF card and then reinsert the card.
If using a CF card, remove the CF card, press the square
button to the right of the slot and then reinsert the card.
TASCAM HS-20 21
3 – Preparation
About the display
Security screws
The included security screws can be used to lock the CF card
slot covers.
Use a Phillips head screwdriver to install or remove the
screws.
Adjusting the display angle
Push the LCD TILT button to unlock the display, and then pull
the bottom of the display forward to adjust the angle.
Pull the bottom of the display until you hear a clicking sound.
To restore it to its flat position, push the LCD TILT button again
to unlock the display, and push the bottom of the display.
Push the bottom of the display until you hear a clicking sound.
CAUTION
Do not push the display screen itself.
Protect switch for SD cards
SD cards have write-protection switches.
Writable
Not writable
If you slide the protection switch to the “LOCK” position, you
cannot record or edit files on it. Unlock the write-protection if
you want to record or delete files on it, for example.
CAUTION
Adjusting display and indicator brightness
Turn the DATA dial while pressing and holding the HOME key to
adjust the brightness of the color display, the PAUSE, REC and
PLAY keys, and the JOG [SHUTTLE], SD and CF indicators. Push
and turn the DATA dial while pressing and holding the HOME
key to adjust only the brightness of the color display.
The unit will check all audio files on a write-protected SD
card every time the device is switched. As a result, it takes
longer to switch the device. Editing the timeline is not
possible, either.
Cautions related to display use
oo The display can easily be scratched, so do not use pointed
objects, including fingernail tips, to touch it. Always touch
it with your fingers.
oo Do not press the display forcefully with a finger or poke
it with a pen, toothpick or other pointed object. Doing so
could scratch the display or cause malfunction.
oo The touch screen is made of film and glass. Do not apply
strong force to its surface. Doing so could break the glass.
oo When using the display, do not put a hand on the panel or
push around the display forcefully. Doing so could prevent
accurate position detection.
oo Do not place anything on top of the display or otherwise
put weight on the same place for a long time. Doing so
could cause the panel to warp or result in inaccurate
position detection.
22 TASCAM HS-20
3 – Preparation
oo Do not apply a commercially-available screen protection
film to the display. Doing so could prevent normal
operation.
oo Gently wipe the display with a soft dry cloth that does not
shed dust (e.g. a cleaning cloth). Avoid wiping with a stiff
cloth or rubbing with force. Doing so could damage the
surface of the LCD. Do not use benzene, thinner, manicure
remover, alcohol or similar substances.
Turning the power ON and OFF
Open the front panel POWER switch cover and press the
POWER switch.
NOTE
The display is produced with extremely high-precision
manufacturing technologies, and 99.99% or more of
the pixels are effective, but sometimes pixels might not
appear or might appear as red or black dots. This is not a
malfunction.
Start-Up Screen
Home Screen
To turn the power OFF, push the POWER switch on the front
panel again.
CAUTION
Never turn the power OFF during recording, playback,
or any other operation that accesses an SD or CF card.
Doing so could, for example, cause recording errors, loss
of recorded DATA, and sudden loud noises to be output
through monitoring equipment, which could result in
damaged equipment and hearing loss.
TASCAM HS-20 23
3 – Preparation
Setting the time of the built-in clock
1. Press the MENU key on the front panel to open the MENU
screen.
Lock function
Press the MENU key while pressing and holding the HOME key
on the front of the unit to open the LOCK SETUP screen. On
this screen you can turn on/off the lock function that disables
operation from the front panel and external devices.
2. Touch the SYSTEM SETUP button to open the SYSTEM SETUP
screen.
The front panel is divided into two sections, which can be locked
and unlocked separately.
Types of external devices are also divided into two categories,
which can be locked and unlocked separately.
If you press the button for a section, it changes from UNLOCK to
LOCK (with a yellow background) and the locked area appears
dimmed.
3. Touch the CLOCK ADJUST tab to open the CLOCK ADJUST
page where you can set the built-in clock.
Locked on LOCK SETUP screen
• When the LCD section is set to LOCK:
4. Touch the item that you want to change, and use the DATA
dial on the front panel to change the value.
5. Touch the SET button or push the DATA dial to confirm the
setting.
NOTE
After purchasing this unit, set the clock before making your
first recording. If you do not set the clock, the time stamps
on recorded files will be incorrect.
24 TASCAM HS-20
oo If the display is touched, the following pop-up message
appears when the display panel is locked.
Display panel locked
3 – Preparation
oo If one of the keys around the display is pressed, the
following pop-up message appears when the display keys
are locked.
Display keys locked
• When Transport is set to LOCK, if one of the transport keys is
pressed, the following pop-up message appears.
Transport locked
• When REMOTE/KEYBOARD is set to LOCK, if a remote
control or keyboard connected to a remote connector is
used, the following pop-up message appears.
Recording times
This table below shows the total amount of recording time (in
hours and minutes) possible on SD/CF cards of various capacities for each recording format.
File recording
format
Card capacity
8 GB
16 GB
32 GB
16-bit, 44.1kHz
12:34
25:10
50:21
16-bit, 48kHz
11:32
23:07
46:16
24-bit, 44.1kHz
8:22
16:46
33:34
24-bit, 48kHz
7:41
15:24
30:50
24-bit, 88.2kHz
4:11
8:23
16:47
24-bit, 96kHz
3:50
7:42
15:25
24-bit, 176.4kHz
2:05
4:11
8:23
24-bit, 192kHz
1:55
3:51
7:42
oo The recording times shown above are estimates. They
might differ depending on the card in use.
oo The recording times shown above are not continuous
recording times, but rather they are the total possible
recording times for the card.
Remote/Keyboard locked
• When EXTERNAL CONTROL is set to LOCK, if an operation is
attempted using RS-232C, RS-422, PARALLEL or NETWORK
control, the following pop-up message appears.
External control locked
TASCAM HS-20 25
4 – Basic operation
In this chapter, we explain the basic operation procedures that
are the same in each operation mode.
The display on this unit functions as a touchscreen.
Operate the unit using its keys, switches and touchscreen
display buttons.
On every screen except the Home Screen, a
button appears
at the top left. Touch this button to return to the previous
screen.
SD/CF card preparation
Card selection
1. Press the MENU key on the front panel to open the MENU
screen.
NOTE
You can also return to the previous screen by pressing the
EXIT/CANCEL [PEAK CLEAR] key.
2. Touch the MEDIA MANAGE button to open the MEDIA
MANAGE screen.
3 Touch the SELECT button from the MEDIA SELECT item to
open the MEDIA SELECT screen.
NOTE
You can also open the MEDIA SELECT screen by touching the
recording media info button on the Home screen.
4 Touch the button for the card that you want to use to select
it.
The background of the selected card appears yellow.
5 Touch the SET button to return to the MEDIA MANAGE
screen.
6. If you also want to format the card now, follow the
procedure starting with step 3 in “Formatting SD/CF cards”
next.
26 TASCAM HS-20
4 – Basic operation
Formatting SD/CF cards
4. Click the OK button in the pop-up window. A reconfirmation
pop-up window appears.
CAUTION
• Formatting an SD/CF card erases all the data on it.
• Always format SD and CF cards with this unit before using
them in it. If an SD/CF card that has been formatted by
another device or PC is used, operation might be affected.
1 Press the MENU key on the front panel to open the MENU
screen.
5. Click the OK button in the pop-up window.
During formatting, the following pop-up message appears.
When formatting ends, the Home Screen opens.
2 Touch the MEDIA MANAGE button to open the MEDIA
MANAGE screen.
3 Touch the QUICK button next to the SD FORMAT or CF
FORMAT item, the following message appears on the
pop-up window.
NOTE
If no card is inserted in that slot, the following pop-up
message appears.
TASCAM HS-20 27
4 – Basic operation
Setting the master clock
1 Press the HOME key on the front panel to open the Home
Screen.
Setting inputs and outputs
Setting the inputs
1. Press the MENU key on the front panel to open the MENU
screen.
2 Touch the SYNC button to open the SYNC T/C screen.
2. Touch the AUDIO I/O button to open the AUDIO I/O screen.
NOTE
You can also open the SYNC T/C screen by touching the
SYNC T/C button on the MENU screen.
3 Select the master clock that you want to use from the
MASTER item. (See “Sync and timecode settings (SYNC T/C)”
on page 81.)
On the INPUT page, make settings for input source. For
details, see “INPUT page” on page 90.
Setting reference levels
1. Press the MENU key on the front panel to open the MENU
screen.
28 TASCAM HS-20
4 – Basic operation
2 Touch the SYSTEM SETUP button to open the SYSTEM SETUP
screen.
Recording operation limitations
With this unit, recording in a folder becomes impossible when
the total number of files, subfolders and other items in that
folder becomes large. For this reason, the following things might
occur.
oo When the total number of items in one folder
exceeds about 20000
On the PREFERENCES page, set the digital reference level
(Digital Ref. Level).
(You can also select the type of keyboard.)
For details, see “PREFERENCES page” on page 91.
Connecting headphones
Recording of a new take might not be possible even when
starting recording from a stopped state. When a folder is
loaded, recording to that folder might not be possible. In
these cases, the following pop-up message appears.
oo When recording/editing is repeated in timeline
mode and the available memory runs short
Repeating recording/editing may greatly consume memory
to manage regions or editing history. In this case, recording
cannot be performed, and the following pop-up message
appears:
Connect headphones to the PHONES jack on the front panel.
Keep the headphones knob turned all the way to the left
(volume minimized) when connecting headphones.
In this case, the remaining recording time indicator for the
currently selected card on the Home Screen shows Rec Limit.
Headphones
CAUTION
Before connecting headphones, turn the PHONES knob to
the minimum volume. Failure to do so might cause sudden
loud noises, which could harm your hearing or result in
other trouble.
CAUTION
The total number of items inside one folder includes files
and folders not created by this unit.
Management files, system files and other files and folders
that are not ordinarily visible are also included in the total.
TASCAM HS-20 29
5 – FILE LIST
Explanation of folder structure
This unit manages audio files in audio folders.
Each SD/CF card has an "HS Files" folder that holds audio folders
that contain audio files (which are called "takes") in groups.
Folder structure
The folder structure is as shown below.
You can check the SD/CF card folder and file structure by
accessing it from a computer using a card reader, for example.
Be aware, however, if you change or erase files inside a folder,
or change any names, the unit might not be able to play the
contents of that folder.
FILE LIST screen overview
Press the FILE LIST key on the front of the unit to open the
AES31 file selection, take selection or playlist selection screen
according to the operation mode.
When one of these screens is open, press the FILE LIST key to
open the audio folder selection screen.
When the audio folder selection screen is open, press the FILE
LIST key to open the root folder selection screen.
NOTE
Other management files and folders are also created.
File names
The format used in naming files is as follows.
[Take name first half ]-[letter][take number].wav
Root folder selection screen
ROOT
├─ HS Files
│ │
│ ├─ Audio001
│ │ │
│ │ ├─ defaultAES.adl1
│ │ ├─ Audio001-T001.wav
│ │ ├─ Audio001-T002.wav
│ │ │
:
│ │ ├─ Audio001.adl
│ │ │
│ │ └─ _playlists
│ │
│
│ │
├─ defaultPPL.ppl2
│ │
├─ Playlist01.ppl
│ │
├─ Playlist02.ppl
│ │
│ :
│ │
├─ exportedPPLFile.ppl
│ │
│ :
│ │
│ :
│ │
├─ PPLFileforImport.ppl
│ │
│ :
│ │
│ :
This AES31 file is automatically created
This PPL file is automatically created
1
2
File formats
This unit can record and play files with the following types of
formats.
File formats:
Sampling frequencies:
Quantization bit depth:
Number of tracks:
BWF/WAV*
44.1/48/88.2/96/176.4/192 kHz
16/24 bits
2
*This unit cannot record ordinary WAV files.
(It can only play them.)
oo Directory display
The current directory level and number of subfolders
within the root folder are shown.
(In the example above, the root directory of the SD card
contains two folders.)
oo NUM OF FOLDER column
Shows the total number of folders in the root directory.
oo Fs
Shows the sampling frequency setting used when
recording for each folder. The sampling frequency values
are abbreviated as follows.
Sampling frequencies:
Fs abbreviation
44.1kHz
44k
47.952 kHz (48 kHz –0.1% pull-down)*
48k–
48.048 kHz (48 kHz +0.1% pull-up)*
48k+
88.2kHz
88k
176.4kHz
176k
*This unit is not compatible with 47.952/48.048kHz
recording/playback. When loaded, "Unsupported Fs."
appears in a pop-up and recording and playback are
disabled.
oo ENTER button
Touch the e button for the current folder (the letter
“C” appears in the
icon, which is also highlighted
yellow) to view its contents.
If you touch the e button for any folder other than the
current folder, a pop-up window will appear confirming
that you want to load that folder. Touch the OK button
to show the contents of that folder after it completes
loading.
oo Folder Name button
30 TASCAM HS-20
5 – FILE LIST
Touch to select the corresponding folder. The letter “C”
appears in the
icon, which is also highlighted yellow,
for the currently loaded folder.
oo INFO button
Touch this button when a folder is selected to open a
pop-up window with information about that file.
If no folder is selected, press this button to show information about the entire card.
oo MULTI SELECT button
Use this to enable the selection of multiple folders.
oo MENU button
Touch to open a pull-up menu where you can select
LOAD, REBUILD, EDIT NAME and DELETE.
oo Scroll buttons
Use these buttons to scroll to the beginning or end of
the folder list or scroll one page (five lines) forward or
backward. You can also scroll through the folder list one
line at a time using the DATA dial.
oo Folder name at the top right of display
Touch this to open a screen according to mode as
follows.
Timeline mode Opens the AES31 file selection screen
for the current folder.
Take mode
Opens the take selection screen for
the current folder
Playlist Mode
Opens the playlist selection screen for
the current folder
Folder selection screen
Touch to select the corresponding folder. The letter “C”
appears in the
icon, which is also highlighted yellow,
for the currently loaded folder.
oo INFO button
Touch this button when a folder is selected to open a
pop-up window with information about that file.
If no folder is selected, press this button to show information about the folders in the currently selected root
folder.
oo NEW FOLDER button
This shows the screen for creating a new folder.
oo MULTI SELECT button
Use this to enable the selection of multiple folders.
oo MENU button
Touch to open a pull-up menu where you can select
LOAD, REBUILD, EXPORT and DELETE.
oo Scroll buttons
Use these buttons to scroll to the beginning or end of
the folder list or scroll one page (five lines) forward or
backward. You can also scroll through the folder list one
line at a time using the DATA dial.
oo Folder name at the top right of screen
Touch to open the following screen according to mode.
Timeline mode Opens the AES31 file selection screen
for the current folder.
Take mode
Opens the take selection screen for the
current folder
Playlist Mode Opens the playlist selection screen for
the current folder
AES31 file selection screen
The AES31 file selection screen is only shown when the
operation mode is timeline mode.
oo Folder display
This shows the current folder.
Touch this area to show the root folder selection screen.
oo NUM OF TAKE (timeline and take modes)
This shows the number of takes in the folder.
oo TOTAL TIME (timeline and take modes)
This shows the total time of the takes in the folder.
oo NUM OF PLAYLISTS (playlist mode)
This shows the number of playlists in the folder.
oo ENTER button
Touch the e button for the current folder (the letter
“C” appears in the
icon, which is also highlighted
yellow) to view its contents.
If you touch the e button for any folder other than the
current folder, a pop-up window will appear confirming
that you want to load that folder. Touch the OK button to
show the contents of that folder.
oo Folder Name button
oo Folder name column
This shows the current folder name.
Touch this area to open the folder selection screen.
oo LOAD column
Touch the e button for the corresponding AES31 file to
import its editing information.
oo AES31 file name buttons
Touch to select the corresponding AES31 file.
oo INFO button
Touch this button when an AES31 file is selected to open
a pop-up window with information about the selected
file.
Press this button when no AES31 file is selected to show
information about the current folder.
oo CREATE AES31 button
This shows the screen for creating a new AES31 file.
TASCAM HS-20 31
5 – FILE LIST
oo MENU button
This shows a pull-up menu for selecting LOAD, EDIT
NAME and DELETE.
Playlist selection screen
The playlist selection screen is only shown when the operation
mode is playlist mode.
Take selection screen
The take selection screen is only shown when the operation
mode is take mode.
oo Folder name column
This shows the current folder name.
Touch this area to open the folder selection screen.
oo Folder name column
This shows the current folder name.
Touch this area to open the folder selection screen.
Note, however, the folder selection screen cannot be
opened from a take selection screen that was opened by
touching the TAKE LIST button in the pull-down menu
that appears when you touch a take name button on the
Home Screen.
oo LENGTH column
This shows the take length (time).
oo ENTER column
Press a take’s e button to load that take.
oo Take name buttons
Touch to select a take.
The letter “C” appears in the
icon, which is also
highlighted yellow, for the currently loaded take.
oo INFO button
When a take is selected, touch this button to open an
information pop-up for that take.
If no take is selected, press this button to show information about the current folder.
oo CIRCLE @ TAKE button
Touch this button when a take is selected to add an “@”
to the beginning of that take’s name. If that take already
has “@” at its beginning, touch this to remove it.
oo MULTI SELECT button
Touch to enable the selection of multiple takes.
oo MENU button
This shows a pull-up menu for selecting LOAD, REBUILD,
EDIT TC, EXPORT, DELETE, SORT, MOVE and EDIT NAME.
oo Scroll buttons
Use these buttons to scroll to the beginning or end of
the take list or scroll one page (five lines) forward or
backward. You can also scroll through the take list one
line at a time using the DATA dial.
32 TASCAM HS-20
oo LOAD column
Touch the e button to open a pop-up to confirm that
you want to load that playlist.
oo Playlist name buttons
Touch to select a playlist.
The letter“C” appears in the
icon, which is also
highlighted yellow, for the currently loaded playlist.
oo INFO button
Touch this button to open a pop-up window that shows
information about the playlist that is currently selected.
If no playlist is selected, press this button to show information about the current folder.
oo CREATE PLAYLIST button
This shows the screen for creating a new playlist.
oo MENU button
Touch to open a pull-up menu where you can select
LOAD, EDIT NAME and DELETE.
oo Scroll buttons
Use these buttons to scroll to the beginning or end of
the playlist or scroll one page (five lines) forward or
backward. You can also scroll through the playlist one
line at a time using the DATA dial.
5 – FILE LIST
Editing the name of a folder in the root
directory
1. Select the folder with the name that you want to edit on
the root folder selection screen. The selected folder name is
highlighted in yellow.
2. Touch the MENU button on the root folder selection screen
to open the pull-up menu.
Use this to erase the character to the right of the cursor.
oo Shift button
Touch this to switch between numerals and symbols and
uppercase and lowercase Roman letters.
oo Caps button
Use to input uppercase letters.
oo Space button
Use to input a space.
oo <- / -> buttons
Use these to move the cursor.
oo Enter button
Touch this to confirm the input name.
NOTE
3 Touch the EDIT NAME button on the pull-up menu to open
the FOLDER NAME screen.
When the Folder NAME screen is open, you can also use an
external keyboard to input names.
4. Touch the Enter button on the FOLDER NAME screen or
press the DATA dial to confirm the folder name.
Character input limitation
The maximum number of characters allowed is indicated
by the yellow background in the folder name display area.
Excess characters have a gray background and are discarded
when the Enter button is pressed.
Loading a folder in the root directory
NOTE
When multiple folders are selected, the EDIT NAME button
(to edit folder names) cannot be selected in the pull-up
menu.
1. Press the FILE LIST key on the front of the unit to open
the AES31 file selection, take selection or playlist selection
screen.
Then, press the FILE LIST key again twice to open the root
folder selection screen.
CAUTION
Name input screens such as the FOLDER NAME screen
cannot show any characters other than alphanumeric
characters and symbols.
If any characters other than alphanumeric characters and
symbols are contained in the name, such characters will
be deleted when a name input screen such as the FOLDER
NAME screen is opened.
oo Date button
Touch this button to change the folder name to the
date and time from the unit's clock in a “yyyy–mm–dd”
format.
If the same folder name already exists, an underscore (_)
followed by a number that has not been used is added.
NOTE
After pressing the Date button to change the name to the
date, you can further edit the name on this screen.
oo Folder name display area
2. Select the folder in the root directory that you want to load.
3. Touch the MENU button on the root folder selection screen
to open the pull-up menu.
4. Touch the LOAD button in the pull-up menu.
NOTE
When multiple folders are selected, the LOAD (folder
loading) item cannot be selected.
5 Touch the OK button or press the DATA dial when a confirmation pop-up message appears.
After loading completes, the Home Screen opens.
The input folder name is shown.
The maximum number of characters allowed is indicated
by a yellow background.
oo Character buttons
Use to input the file name.
oo BS button
Use this to erase the character to the left of the cursor.
oo DEL button
TASCAM HS-20 33
5 – FILE LIST
Rebuilding folders in the root directory
Rebuilding should be performed whenever an inconsistency
occurs between the unit's management files and the audio files,
for example, after a file has been deleted via FTP.
1. Press the FILE LIST key on the front of the unit to open
the AES31 file selection, take selection or playlist selection
screen. Then, press the FILE LIST key again twice to open
the root folder selection screen.
2. Select the folder that you want to rebuild.
You can touch the MULTI SELECT button on the root folder
selection screen to allow the selection of multiple folders.
3. Touch the MENU button on the root folder selection screen
to open the pull-up menu.
You can touch the MULTI SELECT button on the root folder
selection screen to allow the selection of multiple folders.
3. Touch the MENU button on the root folder selection screen
to open the pull-up menu.
One folder selected
One folder selected
Multiple folders selected
4. Touch the DELETE button in the pull-up menu.
5. Touch the OK button or press the DATA dial when a confirmation pop-up message appears.
Multiple folders selected
4. Touch the REBUILD button in the pull-up menu.
5. Touch the OK button or press the DATA dial when a confirmation pop-up message appears.
During deletion, a progress bar is displayed on the pop-up
window.
When deletion completes, the pop-up disappears.
CAUTION
When you delete a folder in the root directory, all folders,
timeline data, takes and playlists in that folder are also
deleted.
During rebuilding, a progress status pop-up appears. When
rebuilding completes, the pop-up disappears.
NOTE
If you select REBUILD when no folder has been selected on
the root folder selection screen, the entire selected card is
rebuilt.
Deleting a folder in the root directory
1. Press the FILE LIST key on the front of the unit to open
the AES31 file selection, take selection or playlist selection
screen.
Then, press the FILE LIST key again twice to open the root
folder selection screen.
2. Select the folder that you want to delete.
34 TASCAM HS-20
5 – FILE LIST
Folder operations
Creating new folders
1. Press the FILE LIST key on the front of the unit to open
the AES31 file selection, take selection or playlist selection
screen. Then, press the FILE LIST key again to open the
folder selection screen.
2 Touch the NEW FOLDER button on the pull-up menu to
open the NEW FOLDER screen where you can input the
folder name.
Input the folder name.
See “Editing the name of a folder in the root directory” on
page 33 for the input method.
Loading a folder
1. Press the FILE LIST key on the front of the unit to open
the AES31 file selection, take selection or playlist selection
screen. Then, press the FILE LIST key again to open the
folder selection screen.
2. Press the e button next to the folder that contains the
folder you want to load.
3. Select the folder that you want to load.
4. Touch the MENU button on the folder selection screen to
open the pull-up menu.
5. Touch the LOAD button in the pull-up menu.
6. Touch the OK button or press the DATA dial when a confirmation pop-up message appears.
After loading completes, the Home Screen opens.
NOTE
CAUTION
• You cannot change folder names later.
• You cannot use the “@” symbol at the beginning of a folder
name.
3. Touch the Enter button on the FOLDER NAME screen or
press the DATA dial.
4 Touch the OK button or press the DATA dial when the confirmation message appears on the pop-up window to create a
new folder with the input name.
The letter “C” appears in the
icon to the left of the name
of the current folder (loaded folder) on the folder selection
screen.
NOTE
• If the input folder name already exists, "This name already
exists" appears in a pop-up window. Touch the CLOSE
button to return to the FOLDER NAME screen, and enter a
different name.
• Immediately after a new folder is created, it becomes the
current folder (loaded folder).
The letter “C” appears in the
icon to the left of the name
of the current folder on the folder selection screen.
TASCAM HS-20 35
5 – FILE LIST
Rebuilding folders
Rebuilding should be performed whenever an inconsistency
occurs between the unit's management files and the audio files,
for example, after a file has been deleted via FTP.
1. Press the FILE LIST key on the front of the unit to open
the AES31 file selection, take selection or playlist selection
screen. Then, press the FILE LIST key again to open the
folder selection screen.
2. Select the folder that you want to rebuild.
Touch the MULTI SELECT button to enable the selection of
multiple folders.
3. Touch the MENU button on the folder selection screen to
open the pull-up menu.
2. Select the folder that you want to export.
Touch the MULTI SELECT button to enable the selection of
multiple folders.
3. Touch the MENU button on the folder selection screen to
open the pull-up menu.
One folder selected
One folder selected
Multiple folders selected
4. Touch the EXPORT button in the pull-up menu.
5. Touch the OK button or press the DATA dial when a confirmation pop-up message appears.
Multiple folders selected
4. Touch the REBUILD button in the pull-up menu.
5. Touch the OK button or press the DATA dial when a confirmation pop-up message appears.
During export, a progress status pop-up appears.
When export completes, the pop-up disappears.
CAUTION
If a folder with the same name already exists on the destination media, a confirmation message will appear in a
pop-up window.
Touch the OK button or the DATA dial to export the folder
after deleting the folder on the export destination.
During rebuilding, a progress status pop-up appears.
When rebuilding completes, the pop-up disappears.
NOTE
You can also rebuild a folder from that folder’s take
selection screen.
Exporting a folder
You can export from the selected medium to an unselected
medium (two media are necessary). When you export a folder,
the same directory structure is created at the export destination.
1. Press the FILE LIST key on the front of the unit to open
the AES31 file selection, take selection or playlist selection
screen. Then, press the FILE LIST key again to open the
folder selection screen.
36 TASCAM HS-20
Deleting a folder
1. Press the FILE LIST key on the front of the unit to open
the AES31 file selection, take selection or playlist selection
screen. Then, press the FILE LIST key again to open the
folder selection screen.
5 – FILE LIST
2. Press the e button next to the folder that contains the
folder you want to delete.
3. Select the folder that you want to delete.
Touch the MULTI SELECT button to enable the selection of
multiple folders.
4. Touch the MENU button on the folder selection screen to
open the pull-up menu.
One folder selected
Multiple folders selected
Moving between file list screens
Press the ENTER button or a folder name button on a file list
screen (root folder selection screen, folder selection screen,
AES31 file selection screen, take selection screen, playlist
selection screen) to open a different screen as shown below.
Root folder selection screen
Folder selection screen
5. Touch the DELETE button in the pull-up menu.
6. Touch the OK button or press the DATA dial when a confirmation pop-up message appears.
In timeline
mode
AES31 file selection screen
During deletion, a progress bar is displayed in a pop-up
window.
When deleting is complete, the pop-up window will
disappear.
In take
mode
CAUTION
When you delete a folder, all timeline data, takes and
playlists in that folder are also deleted.
Take selection screen
In playlist
mode
Playlist selection screen
TASCAM HS-20 37
6 – Overview of operation modes
This unit has the following three operation modes.
oo Timeline mode
This mode provides a timeline-based working environment
similar to using a tape recorder. In timeline mode, two tracks
can be recorded and played back. Marks can also be edited.
oo Take mode
This mode uses takes (files) as recording and playback units.
Two tracks can be recorded and one or two tracks can
played back. Marks can also be edited.
oo Playlist Mode
This mode provides a playlist playback function.
One or two tracks can be played using playlist playback.
oo Compatibility with JPPA flash start standards enable the
exchange of playlists with other devices.
oo Playback of up to two channels is possible for all
compatible sampling frequencies.
oo Using a TASCAM RC-HS20PD or other remote controller,
flash start playback is possible (five pages of 20 keys each).
Selecting the operation mode
1. Press the MENU key on the front panel to open the MENU
screen.
Timeline mode functions
The following functions can be used in timeline mode.
oo Simultaneous recording and playback of up to two
channels is possible at all compatible sampling
frequencies.
oo Mirror recording function utilizing dual slots.
oo Recording and playback with timecode synchronization is
possible. (The optional SY-2 board is required.)
oo A single file can be created from a designated time
interval in a timeline using the bounce function.
oo Marks can be set, managed, edited and used for playback.
oo Compatibility with the AES31 file standard allows import
and exchange of data with other devices.
NOTE
2. Touch the OPERATION MODE button to open the
OPERATION MODE screen.
Since the AES31 file standard does not support sampling
frequencies of 176.4kHz and 192kHz, editing information
for those settings is created and saved in an original format
based on AES31.
In timeline mode, playback units are called “regions,” and their
extent is shown in the track area of the Home Screen.
Take mode functions
The following functions can be used in take mode.
oo Simultaneous recording and playback of up to two
channels is possible at all compatible sampling
frequencies.
oo Auto cue, auto ready and incremental play functions are
available.
oo Using a TASCAM RC-HS20PD or other remote controller,
flash start playback is possible (five pages of 20 keys each).
oo Marks can be set, managed, edited and used for playback.
oo Automatic playback, recording and file transfer are possible
using the timer event list.
Playlist mode functions
The following functions can be used in playlist mode.
oo Playlists can be edited and managed.
oo Auto cue, auto ready and incremental play functions are
available.
38 TASCAM HS-20
3. Touch the button for the mode that you want to use to
select it.
The button for the selected mode appears yellow.
TIMELINE MODE
Timeline mode
TAKE MODE
Take mode
PLAYLIST MODE
Playlist mode
4. Touch the SET button to enable the selected mode and
return to the Home Screen.
7 – Timeline mode
In this chapter, we explain how to use the timeline mode. To
use this unit in timeline mode, set the unit’s operation mode to
TIMELINE MODE. (See “Selecting the operation mode” on page
38.)
Please refer to “4–Basic operation” when reading this chapter.
Recording mode settings
1. Press the MENU key on the front panel to open the MENU
screen.
Preparing to record
Basic preparations
Refer to “4 – Basic operation” on page 26 and make the basic
preparations for recording.
Creating new folders
Create new folders as necessary.
1. Press the FILE LIST key on the front of the unit to open the
AES31 file selection screen. Then, press the FILE LIST key
again to open the folder selection screen.
2. Touch the REC SETUP button to open the REC SETUP screen.
2. Touch the NEW FOLDER button to open the FOLDER NAME
page.
On the REC MODE page, you can select the recording mode.
The background color for the selected mode is light blue.
For more details, see “REC MODE page” on page 77.
Setting the file format
Touch the FILE FORMAT tab on the REC SETUP screen to open
the following screen.
Follow the procedures “Editing the name of a folder in the
root directory” on page 33 to input the folder name.
NOTE
You cannot use the “@” symbol at the beginning of a folder
name.
4. Touch the Enter button or press the DATA dial.
5. Touch the OK button or press the DATA dial when a confirmation pop-up message appears.
When creation of the folder completes, the Home Screen
reopens.
For details about folder operations, see “Folder operations” on
page 35.
NOTE
If you want to record with a timeline that has a sampling
frequency different from the current one, follow the procedures in “Creating new AES31 editing information” on page
43 and create an AES31 editing information file for the
desired sampling frequency.
On the FILE FORMAT page, set bit-length, maximum file size,
how files are treated when recording is paused, and the
recording sampling frequency. The selected items have a light
blue background.
For details, see “FILE FORMAT page” on page 79.
NOTE
In timeline mode, the recording sampling frequency cannot
be changed on this page.
If you want to record with a timeline that has a sampling
frequency different from the current one, follow the procedures in “Creating new AES31 editing information” on page
43 and create an AES31 editing information file for the
desired sampling frequency.
TASCAM HS-20 39
7 – Timeline mode
Other recording settings
Touch the OPTIONS tab of the REC SETUP screen to open the
following screen.
NOTE
Recording can also be controlled using parallel control.
CAUTION
When in recording standby, the parallel control signals
output are high for TALLY_RECORD and low for TALLY_
PAUSE.
When in recording standby, the REC and PAUSE keys on the
front panel will be lit.
Stopping recording
To stop recording, press the STOP key.
On the OPTIONS page, you can set the pre-recording time and
the use of auto marks. For details, see “OPTIONS page” on page
80.
Playback in timeline mode
Recording in timeline mode
Selecting a folder
Locate to the recording start position
1. Press the FILE LIST key on the front of the unit to open the
AES31 file selection screen. Then, press the FILE LIST key
again to open the folder selection screen.
Use the m[
] and ,[
] keys, jump to a mark or use
the manual locate function to locate to the time where you want
to start recording.
When timecode synchronization is ON, recording will occur
at the input timecode, so locating as described above is not
necessary.
Record
When the unit is stopped, press the REC key to put the unit into
recording standby. At this time, the
icon indicates this
transport status.
In recording standby, press the PLAY key to start recording
at the located point (current point). When synchronized to
timecode, recording starts at the time input by timecode at the
moment that the PLAY key is pressed.
The transport status display at the top left of the Home Screen
changes to recording status and part of the background
becomes red, indicating that the unit is recording. The time
counter starts at the same time.
When the elapsed time (ABS time) from the beginning of the
timeline reaches 23:59:59:MM (MM is the maximum number of
frames), “RECORD stopped. ABS time is over 24h” appears in a
pop-up message and recording stops.
NOTE
2. Touch a folder name button to select the folder you want to
play.
3. Touch the MENU button to open a pull-up menu and touch
the LOAD button.
The “Load selected folder?” pop-up appears.
When stopped, pressing the PLAY key while pressing and
holding the REC key will also start recording.
4. Touch the OK button.
When loading completes, the Home Screen opens.
Overwriting a recording
During playback, pressing the PLAY key while pressing and
holding the REC key will start recording from that point.
40 TASCAM HS-20
7 – Timeline mode
Setting input monitoring
Turn input monitoring off during playback.
If input monitoring is on, sound from the input connectors will
be output through all the output connectors of this unit.
1. Touch the INPUT MONITOR button on the Home Screen to
open a pull-up with the input monitoring ON/OFF button.
Reading, saving and creating AES31
editing information
Loading AES31 editing information
You can load AES31 editing information in the current folder to
the timeline.
The file path is as follows when you view a card on a computer.
{drive name of card}:\{HS files}\{folder name}\{AES31 editing
information}
NOTE
You cannot load an AES31 editing information file from a
folder other than the current folder.
2. If input monitoring is on (ON button blue), touch the OFF
button to turn it off (OFF button blue).
Locate to the playback start position
Use the m [
] and , [
] keys, jump to a mark or
use the manual locate function to locate to the time where
you want to start playback When timecode synchronization is
on, playback will occur at the input timecode, so locating as
described above is not necessary.
NOTE
Since the AES31 file standard does not support sampling
frequencies of 176.4kHz and 192kHz, editing information
for those settings is created and saved in an original format
based on AES31.
1. Press the FILE LIST key on the front of the unit to open the
AES31 file selection screen.
Playback control in timeline mode
Press the PLAY key to start playback.
Press the PAUSE key to start playback standby.
Press the PLAY key to end playback standby.
Press the STOP key to stop playback.
Press the . [MARK .] key or / [MARK /] key to
skip to the start of another region.
Press and hold the m [
] key or , [
] key to search
backward or forward.
Press the . [MARK .] or / [MARK /] key while
pressing and holding the SHIFT key to move between marks.
Press and hold the m [
] key or , [
] key while
pressing and holding the SHIFT key to search at high-speed.
While pressing and holding the STOP key, press the . [MARK
.] or / [MARK /] key to skip to the beginning of the
first region recorded or the end of the last region. (This only
works with the front panel keys.)
NOTE
Playback can also be controlled through the PARALLEL port.
Using the call function in timeline mode
Press the CALL [CHASE] key to locate to the point where
playback was last started from playback standby (call point) and
put the unit in playback standby mode.
2. If AES31 editing files are found in the folder, they appear in
the list.
TIP
• If you touch the INFO button after selecting a file by
touching the filename area, the date and time last changed
and the file size of that file are shown.
• The letter “C” appears in the
icon for the currently
loaded AES31 file.
4. Press the e button next to the AES31 editing information
that you want to load.
5. Touch the OK button or press the DATA dial when a confirmation pop-up message appears.
TASCAM HS-20 41
7 – Timeline mode
When loading AES31 editing information, a progress status
pop-up appears.
When loading completes, the pop-up window disappears
and the Home screen is opened.
The loaded contents replace the contents of the timeline.
Saving AES31 editing information
You can save the current timeline as an AES31 file. The saved file
is created in the current folder.
CAUTION
When you edit the timeline, save the AES31 editing information as necessary. If you do not save it, the changes will
be deleted if other AES31 editing information is loaded, the
card is removed or the unit is turned off.
If you have not saved the information after editing, a “*”
mark will be shown on the AES31 file name button.
If you load other AES31 editing information when a "*" is
shown, create new AES31 editing information, or change
the operation mode, a pop-up message asking if you want
to save the current AES31 editing information will appear.
1. Press the HOME key to open the Home Screen.
2. Touch the AES31 file name button on the Home Screen to
open the pull-down menu.
3. Touch the SAVE AS button on the pull-up menu to open the
AES31 NAME screen where you can input the AES31 editing
file name.
Input the file name. Follow the procedures “Editing the name
of a folder in the root directory” on page 33.
4. Touch the Enter button on the AES31 NAME screen or press
the DATA dial to save the input name.
While the file is being created, a progress status pop-up
appears.
When file creation completes, the pop-up disappears.
3. When you touch the SAVE button on the pull-down menu,
the information will be saved on the selected card.
While saving, the progress status will be shown in the
pop-up window.
When saving is complete, the pop-up window will disappear.
NOTE
If a file with the same name already exists, a pop-up window
opens to confirm whether you want to overwrite that file or
not. Touch the OK button to overwrite that file, or touch the
CANCEL button to return to the AES31 NAME screen.
Attaching a name to and saving AES31
editing information
You can attach a name and save the current timeline as an
AES31 file.
The file saved will be created in the current folder.
1. Press the HOME key on the front panel to open the Home
screen.
2. Touch the AES31 file name button on the Home Screen to
open the pull-down menu.
42 TASCAM HS-20
7 – Timeline mode
Creating new AES31 editing information
You can create a new AES31 file in the current folder (loaded
folder).
1. Press the HOME key on the front of the unit to open the
Home screen.
2. Touch the AES31 file name button on the Home Screen to
open the pull-down menu.
NOTE
If the entered file name already exists, "This name already
exists" appears in a pop-up window. Touch the CLOSE
button to return to the CREATE AES31 screen, and enter
another name.
3. Touch the CREATE AES31 button on the pull-down menu to
open theCREATE AES31 screen.
Importing all takes
NOTE
NOTE
You can also create a new AES31 file by touching the CREATE
AES31 button on the AES31 file selection screen.
4. Touch the AES31 NAME button on the pull-up menu to open
the AES31 NAME screen where you can enter an AES31 file
name.
To input the AES31 file name follow the procedures “Editing
the name of a folder in the root directory” on page 33.
5. Touch the Enter button or press the DATA dial to return to
the CREATE AES31 screen.
6. If necessary, set the timeline starting time and sampling
frequency.
7. When you have finished making settings, touch the CREATE
AES31 button.
8. Touch the OK button or press the DATA dial when the confirmation message appears on the pop-up window to create a
new AES31 editing information file with the input name.
Each take is imported to the timeline at its set timecode. If
the timecode time is not set, the take is imported to 00 h 00
m 00 s 00 f.
The current timeline is cleared and the AES31 editing information for all takes in the current folder that have the same
sampling frequency are imported.
1. Press the HOME key on the front of the unit to open the
Home screen.
2. Touch the AES31 file name button on the Home Screen to
open the pull-down menu.
3. Touch the IMPORT ALL TAKES button on the pull-down
menu item.
4. A confirmation message will appear on the pop-up window.
TASCAM HS-20 43
7 – Timeline mode
Touch the OK button or press the DATA dial to clear the
current timeline and import all the takes from the current
folder.
Touch the CANCEL button to return to the Home Screen.
Editing AES31 file names
Deleting AES31 files
1. Press the FILE LIST key on the front of the unit to open the
AES31 file selection screen.
2. Select the AES31 file that you want to delete.
The background color of the selected AES31 file name will
become yellow.
1. Press the FILE LIST key on the front of the unit to open the
AES31 file selection screen.
2. Select the AES31 file that you want to rename.
The background color of the selected AES31 file name will
become yellow.
3. Touch the MENU button to open the pull-up menu.
3. Touch the MENU button to open the pull-up menu.
4. Touch the EDIT NAME button on the pull-up menu to open
the AES31 NAME screen where you can enter the AES31 file
name.
Follow the procedures “Editing the name of a folder in the
root directory” on page 33.
4. Touch the DELETE button on the pull-up menu.
NOTE
If the loaded AES31 file is selected, you cannot select the
DELETE button on the pull-up menu.
5. Touch the OK button or press the DATA dial when the confirmation message appears on the pop-up window.
When deletion completes, the pop-up disappears.
NOTE
If the loaded AES31 file is selected, you cannot select the
EDIT NAME button on the pull-up menu.
5. Touch the Enter button or press the DATA dial on the AES31
NAME screen.
NOTE
If the entered file name already exists, "This name already
exists" appears in a pop-up window. Touch the CLOSE
button to return to the AES31 NAME screen, and enter
another name.
44 TASCAM HS-20
7 – Timeline mode
Editing the timeline
You can cut, erase and divide regions, for example.
The basic procedures for editing are as follows.
See the explanation of each function for detailed procedures.
1. Press the HOME key on the front of the unit to open the
Home screen.
Selecting the range to copy/cut/delete
oo When the editing start and finish points are set, the range
between the points is selected.
oo When the editing start and finish points are not set, the
entire region at the time cursor is selected.
Editing start and stop points not set
2. Touch the EDIT MODE button to enter edit mode.
oo When the timeline cursor is on the borderline between
regions, the region to the right will be edited. If the region
to the right is muted, it will not be selected.
Setting the editing start point
The EDIT MODE button becomes white with red lettering,
and the REC/MON, Bounce I/O and NEXT TAKE NAME
buttons disappear and are replaced with the EDIT, Fade/
Level and SET/SELECT buttons.
3. Touch the EDIT button to open the pull-up menu.
The pull-up menu has buttons used for editing, including
nine editing buttons (Copy, Cut, Erase, Divide, Insert, Insert
File, Insert Mute, Paste and Paste File) and UNDO and REDO
buttons.
1. Press the HOME key on the front of the unit to open the
Home screen.
2. Touch the EDIT MODE button to enter edit mode.
3 Use the m and , keys, for example, to locate the
timeline cursor at the position (time) where you want to
start editing.
4. Touch the SET/SELECT button to open the pull-up menu.
5. Touch the SET IN button on the pull-up menu to set the
editing start point (IN point)
The IN mark ( ) appears at the current position in the mark
display area.
CAUTION
If you do not save the AES31 editing information after
changing it, all changes will be cleared when you load
another folder or AES31 editing information file, remove a
card or turn off the unit’s power, for example.
NOTE
Repeated recordings or editing may greatly consume the
memory used in managing regions or editing history. In
this case, "Cannot Edit. System limit reached." appears in a
pop-up message
TASCAM HS-20 45
7 – Timeline mode
Setting the editing end point
Selecting a complete region for editing
6 Use the m and , keys, for example, to locate the
timeline cursor at the position (time) where you want to end
editing.
7. Touch the SET/SELECT button to open the pull-up menu.
8. Touch the SET OUT button on the pull-up menu to set the
editing end point (OUT point).
The OUT mark ( ) appears at the current position in the
mark display area.
1. Press the HOME key on the front of the unit to open the
Home screen.
2. Touch the EDIT MODE button to enter edit mode.
3. Move the timeline cursor to the region to be edited.
4. Touch the SET/SELECT button to open the pull-up menu.
The range between the IN mark ( ) and OUT mark ( ) will
be edited, and is shown in light blue.
Clearing the editing start/end points
1. Touch the SET/SELECT button to open the pull-up menu.
5. Touch the SELECT Region button on the pull-up menu to
select the entire region at the timeline cursor. The beginning
of the region is set to the edit start (IN) point and the end of
the region is set to the edit end (OUT) point.
2. Touch the CLEAR button on the pull-up menu. When a
confirmation pop-up window is displayed, touch the OK
button or press the DATA dial.
The current IN and OUT points are deleted, and the IN mark (
) and OUT mark ( ) disappear from the mark area.
46 TASCAM HS-20
The IN ( ) mark and OUT mark ( ) are shown at the
beginning and end of the region in the mark area. The range
between the marks will be edited and is shown in light blue.
7 – Timeline mode
Copying the data in the selection (Copy)
You can copy the selection.
NOTE
• The copied data will be saved in the copy buffer.
• When the whole fade (in/out) area is included, the fade
information will also be retained.
Selected range
Copy buffer
1. Press the HOME key on the front of the unit to open the
Home screen.
2. Touch the EDIT MODE button to enter edit mode.
3. Move the timeline cursor to the selection to copy.
4. Touch the SET/SELECT button and select the range that you
want to copy using the SET IN, SET OUT and SELECT Region
buttons on the pull-up menu.
Cutting the data in the selection (Cut)
You can erase the selection and move the following data
forward.
NOTE
• The data cut is saved in the copy buffer.
• When the whole fade (in/out) area is included, the fade
information will also be retained.
• When the IN point or OUT point is within a region, the part
outside of the selection will become a new region.
• When the IN point or OUT point is set within a fade-in or
fade-out, the fade information will be cleared.
1. Press the HOME key on the front of the unit to open the
Home screen.
2. Touch the EDIT MODE button to enter edit mode.
3. Move the timeline cursor to the area you want to cut.
4. Touch the SET/SELECT button and select the range that you
want to cut using the SET IN, SET OUT and SELECT Region
buttons on the pull-up menu.
5. Touch the EDIT button to open the pull-up menu.
5. Touch the EDIT button to open the pull-up menu.
6. Touch the Copy button on the pull-up menu. When copying
is complete, the Home Screen will open after a pop-up
window is shown.
6. Touch the Cut button on the pull-up menu. When cutting
is complete, the Home Screen will open after a pop-up
window is shown.
In this case, the EDIT pull-up menu will remain open.
In this case, the EDIT pull-up menu will remain open.
TASCAM HS-20 47
7 – Timeline mode
Erasing the data in the selection (Erase)
You can erase the selection to make an interval silent. The
positions of the following regions will remain unchanged.
NOTE
• The erased data is saved in the copy buffer.
• When the whole fade (in/out) area is included, the fade
information will also be retained.
• When the IN point or OUT point is within a region, the part
outside of the selection will become a new region.
• When the IN point or OUT point is set within a fade-in or
fade-out, the fade information will be cleared.
1. Press the HOME key on the front of the unit to open the
Home screen.
2. Touch the EDIT MODE button to enter edit mode.
3 Move the timeline cursor to the selection to erase.
4. Touch the SET/SELECT button and select the range that you
want to erase using the SET IN, SET OUT and SELECT Region
buttons on the pull-up menu.
Dividing the data at the set position (Divide)
You can divide the region at the position of the timeline cursor.
1. Press the HOME key on the front of the unit to open the
Home screen.
2. Touch the EDIT MODE button to enter edit mode.
3. Move the timeline cursor to the time where you want to
divide the region.
4. Touch the EDIT button to open the pull-up menu.
5. Touch the Divide button on the pull-up menu. When
dividing is complete, the Home Screen will open after a
pop-up window is shown.
In this case, the EDIT pull-up menu will remain open.
5. Touch the EDIT button to open the pull-up menu.
6. Touch the Erase button on the pull-up menu. When erasing
is complete, the Home Screen will open after a pop-up
window is shown.
In this case, the EDIT pull-up menu will remain open.
48 TASCAM HS-20
7 – Timeline mode
Inserting the data of the copy buffer at the
set position (Insert)
NOTE
• All regions following the insertion point will move backward
by the time of the data inserted.
• When inserting into a region, three regions will be created:
the part of the region that was before the timeline cursor,
the content of the copy buffer, and the part of the region
that was after the timeline cursor.
• If the set position is located in a fade-in or fade-out, that
fade information will be cleared.
Copy buffer
Inserting a selected file into the set position
(Insert File)
You can insert the entire contents of a 2-channel BWF/WAV file
at the set position.
NOTE
• All regions following the insertion point will move backward
by the time of the file inserted.
• When inserting into a region, three regions will be created:
the part of the region that was before the timeline cursor,
the content of the copy buffer, and the part of the region
that was after the timeline cursor.
• If the set position is located in a fade-in or fade-out, that
fade information will be cleared.
bwf file
1. Press the HOME key on the front of the unit to open the
Home screen.
2. Touch the EDIT MODE button to enter edit mode.
3. Move the timeline cursor to the position where you want to
insert data.
4. Touch the EDIT button to open the pull-up menu.
1. Press the HOME key on the front of the unit to open the
Home screen.
2. Touch the EDIT MODE button to enter edit mode.
3. Move the timeline cursor to the position where you want to
insert a file.
4. Touch the EDIT button to open the pull-up menu.
Touch the Insert button on the pull-up menu.
NOTE
The Insert button is available only when the copy buffer
contains data.
5. When insertion is complete, the Home Screen will open after
a pop-up window is shown.
In this case, the EDIT pull-up menu will remain open.
Touch the Insert File button on the pull-up menu to open
the BROWSE screen.
5. Touch the e button for the media containing the file to
insert on the BROWSE screen.
NOTE
If the top page of the BROWSE screen is not displayed, touch
on the screen. The media selection screen appears.
TASCAM HS-20 49
7 – Timeline mode
6. Select a file to insert on the BROWSE screen, and touch the
Insert File button.
Inserting silence at the set position (Insert
Mute)
You can insert silence at the set position.
NOTE
• All regions following the IN point will move backward.
• When inserting into a region, two regions will be created:
before the timeline cursor and after the timeline cursor.
• When the set position is located in a fade-in or fade-out, the
fade information will be cleared.
7. When the pop-up window to select the insertion point
opens, touch either the Current Position or File T/C button to
start insertion.
1. Press the HOME key on the front of the unit to open the
Home screen.
2. Touch the EDIT MODE button to enter edit mode.
3 Touch the SET/SELECT button and select the region where
you want to insert silence using the SET IN, SET OUT and
SELECT Region buttons on the pull-up menu.
Then, select the CANCEL button to return to the BROWSE
screen.
NOTE
If the selected file contains no timecode information when
the File T/C button is touched, the file will be inserted at 00 h
00 m 00 s 00 f.
NOTE
If you select a file from other than the current folder, the file
is copied to the current folder and then inserted.
A "Cannot Copy." pop-up window appears when a file with
the same name exists in the current folder.
To change the file with the same file name, touch the
RENAME button, or touch the CANCEL button to cancel.
5. Touch the EDIT button to open the pull-up menu.
6. Touch the Insert Mute button on the pull-up menu. When
mute insertion is complete, the Home Screen will open after
a pop-up window is shown.
8 When insertion is complete, the Home Screen will open after
a pop-up window is shown and the EDIT pull-up menu is
closed.
In this case, the EDIT pull-up menu will remain open.
50 TASCAM HS-20
7 – Timeline mode
Pasting the copy buffer data at the set
position (Paste)
You can paste copied data at the set position.
NOTE
When the set position is located in a fade-in or fade-out, the
fade information will be cleared.
Copy buffer
1. Press the HOME key on the front of the unit to open the
Home screen.
2. Touch the EDIT MODE button to enter edit mode.
3. Move the timeline cursor to the position where you want to
paste the copy buffer.
4. Touch the EDIT button to open the pull-up menu.
Touch the Paste button on the pull-up menu.
NOTE
The Paste button appears white and is available only when
the copy buffer contains data.
5. When pasting is complete, the Home Screen will open after
a pop-up window is shown.
In this case, the EDIT pull-up menu will remain open.
Pasting the data of a selected file into the set
position (Paste File)
You can paste an entire 2-channel BWF/WAV file into the set
position.
NOTE
When the set position is located in a fade-in or fade-out, the
fade information will be cleared.
bwf file
1. Press the HOME key on the front of the unit to open the
Home screen.
2. Touch the EDIT MODE button to enter edit mode.
3. Move the timeline cursor to the position where you want to
paste file data.
4. Touch the EDIT button to open the pull-up menu.
Touch the Paste File button on the pull-up menu to open the
BROWSE screen.
5. Touch the e button next to the media containing the file
you want to paste on the BROWSE screen.
NOTE
If the top page of the BROWSE screen is not displayed, touch
on the screen. The media selection screen appears.
TASCAM HS-20 51
7 – Timeline mode
6. Select the file to paste on the BROWSE screen, and touch the
Paste File button.
Setting fades for the designated region
(Fade IN/FadeOut)
You can set a fade in and a fade out for a selected region.
NOTE
7. When the pop-up window to set the pasting position opens,
touch either the Current Position or File T/C button to start
pasting.
1.
2.
3.
4.
The fade-in/fade-out ranges are indicated in light blue.
Press the HOME key on the front of the unit to open the
Home screen.
Touch the EDIT MODE button to enter edit mode.
Move the timeline cursor to where you want the fade in to
end or the fade out to begin in the region.
Touch the Fade/Level button to open the pull-up menu.
Then, select the CANCEL button to return to the BROWSE
screen.
NOTE
If the selected file contains no timecode information when
the File T/C button is touched, the file will be inserted at 00 h
00 m 00 s 00 f.
NOTE
If you select a file from other than the current folder, the file
is copied to the current folder and then pasted.
A "Cannot Copy." pop-up window appears when a file with
the same name exists in the current folder.
To change the file with the same file name, touch the
RENAME button, or touch the CANCEL button to cancel.
oo To set a fade in, touch the Fade IN button.
oo To set a fade out, touch the FadeOut button.
5. When fade-in/fade-out setting is complete, the Home
Screen will open after a pop-up window is shown.
In this case, the Fade/Level pull-up menu will remain open.
8. When pasting is complete, the Home Screen will open after
a pop-up window is shown and the EDIT pull-up menu is
closed.
52 TASCAM HS-20
7 – Timeline mode
Removing set fades (Remove Fade IN/
Remove FadeOut)
1. Press the HOME key on the front of the unit to open the
Home screen.
2. Touch the EDIT MODE button to enter edit mode.
3. Move the timeline cursor to the region where you want to
remove fade-in/out.
4. Touch the Fade/Level button to open the pull-up menu.
Setting the playback level in the selected
region (Level)
You can set the playback level for a region (after fade-in and
before fade-out).
1. Press the HOME key on the front of the unit to open the
Home screen.
2. Touch the EDIT MODE button to enter edit mode.
3. Move the timeline cursor to the region where you want to
change the playback level.
4. Touch the Fade/Level button to open the pull-up menu.
oo To remove the fade-in, touch the Remove Fade IN button.
oo To remove the fade out, touch the Remove FadeOut
button.
5. When fade removal is complete, the Home Screen will open
after a pop-up window is shown.
In this case, the Fade/Level pull-up menu will remain open.
5. Touch the Level button on the pull-up menu.
The region at the timeline cursor is indicated in yellow, and
will be affected by the Level setting.
6 When the level knob is displayed above the Level button,
use the DATA dial to set playback level.
Setting range
−∞, −120dB to +10.0dB
7. Touch the Level button again to hide the level knob. (The set
playback level will be saved.)
TASCAM HS-20 53
7 – Timeline mode
Undoing the previous edit (UNDO)
You can undo the previous timeline edit.
1. Press the HOME key on the front of the unit to open the
Home screen.
2. Touch the EDIT MODE button to enter edit mode.
3. Touch the EDIT button to open the pull-up menu.
4. Touch the UNDO button on the pull-up menu. After the
edit is undone, the Home Screen will open after a pop-up
window is shown.
In this case, the EDIT pull-up menu will remain open.
NOTE
• The UNDO button on the Fade/Level pull-up menu can also
be used to undo an edit.
• If no editing has been conducted, the UNDO button is
disabled. The UNDO button appears with white letters when
it is possible to undo an edit.
• The timeline mode can store up to 10 of the most recent
recording/editing operations. You can undo and redo
editing within this editing history range .
However, when the frequency of editing or the number of
regions increases, the number of operations that can be
stored might decrease to less than 10.
• The timeline mode editing history will be erased by the
following actions.
• Turning off the unit
• Loading a folder
• Loading AES31 editing information
• Changing the operation mode
54 TASCAM HS-20
Redoing an edit (REDO)
After undoing an edit, you can redo it.
1. Press the HOME key on the front of the unit to open the
Home screen.
2. Touch the EDIT MODE button to enter edit mode.
3. Touch the EDIT button to open the pull-up menu.
4. Touch the REDO button on the pull-up menu. When the edit
is redone, the Home Screen will open after a pop-up window
is shown.
In this case, the EDIT pull-up menu will remain open.
NOTE
• The REDO button on the Fade/Level pull-up menu can also
be used to redo an edit.
• If no edit has been undone, the REDO button is disabled. The
REDO button appears with white letters when it is possible
to redo an edit.
• The timeline mode can store up to 10 of the most recent
recording/editing operations. You can undo and redo
editing within this editing history range .
• However, when the frequency of editing or the number of
regions increases, the number of operations that can be
stored might decrease to less than 10.
• The timeline mode editing history will be erased by the
following actions.
• Turning off the unit
• Loading a folder
• Loading AES31 editing information
• Changing the operation mode
7 – Timeline mode
Bouncing
You can output part of a region or an interval that crosses
multiple regions as a single take.
Setting the bounce starting point
1. Touch the HOME key to open the Home Screen.
2. Use the m and , keys, for example, to locate the
timeline cursor to the bounce starting point (time).
3. Touch the Bounce I/O button to open a pull-up menu.
Input the file name. Follow the procedures in “Editing the
name of a folder in the root directory” on page 33.
10.Touch the Enter button. When a confirmation message
pop-up appears, touch the OK button or press the DATA
dial.
4. Touch the SET IN button on the pull-up menu to set the
bounce starting point (IN point).
The IN mark ( ) appears at the current position in the mark
display area.
While the file is being created, a progress status pop-up
appears.
When file creation completes, the pop-up disappears.
NOTE
You can cancel a bounce by pressing the CANCEL button
while the progress pop-up window is open.
Clearing the bounce starting and ending points
Setting the bounce ending point
5. Use the m and , keys, for example, to locate the
timeline cursor at the bounce ending position (time).
6. Touch the Bounce I/O button to open a pull-up menu.
7. Touch the SET OUT button on the pull-up menu to set the
bounce ending point (OUT point).
The OUT mark ( ) appears at the current position in the
mark display area.
11.Touch the Bounce I/O button to open the pull-up menu.
12.Touch the CLEAR button on the pull-up menu. When a
confirmation pop-up window appears, touch the OK button
or press the DATA dial.
The current IN and OUT points are deleted, and the IN mark (
) and OUT mark ( ) disappear from the mark area.
The range between the IN mark ( ) and OUT mark ( ) will
be edited, and is shown in light blue.
Bouncing the interval
8. Touch the Bounce I/O button to open a pull-up menu.
9. Touch the BOUNCE button on the pull-up menu to open the
BOUNCE NAME screen where you can input the bounce file
name.
TASCAM HS-20 55
8 – Take mode
In this chapter, we explain how to use the take mode. To use this
unit in take mode, set the unit’s operation mode to TAKE MODE.
(See “Selecting the operation mode” on page 38.)
Refer to “4 – Basic operation” on page 26 also when reading
this chapter.
Recording mode settings
1. Press the MENU key on the front panel to open the MENU
screen.
Preparing to record
Basic preparations
Refer to “4 – Basic operation” on page 26 and make the basic
preparations for recording.
Creating new folders
Create new folders as necessary. You do not need to create a
new folder if you plan to record into an existing one.
1. Press the FILE LIST key on the front of the unit to open the
take selection screen. Then, press the FILE LIST key again to
open the folder selection screen.
2. Touch the REC SETUP button to open the REC SETUP screen.
2 Touch the NEW FOLDER button on the pull-up menu to
open the NEW FOLDER screen where you can input the
folder name.
On the REC MODE page, you can select the recording mode.
The background color for the selected mode is light blue.
For details, see “REC MODE page” on page 77
Setting the file format
Touch the FILE FORMAT tab on the REC SETUP screen to open
the following screen.
Follow the procedures “Editing the name of a folder in the
root directory” on page 33 to input the folder name.
NOTE
You cannot use the “@” symbol at the beginning of a folder
name.
3. Touch the Enter button or press the DATA dial.
4. Touch the OK button or press the DATA dial when the confirmation pop-up message appears.
When creation of the folder completes, the Home Screen
reopens.
For details about folder operations, see “Folder operations”
on page 35.
56 TASCAM HS-20
On the FILE FORMAT page, set bit-length, maximum file size,
how files are treated when recording is paused, and the
recording sampling frequency. The selected items have a light
blue background.
For details, see “FILE FORMAT page” on page 79.
8 – Take mode
Other recording settings
Touch the OPTIONS tab of the REC SETUP screen to open the
following screen.
Stopping recording
To stop recording, press the STOP key.
Playback in take mode
Selecting a folder/take
1. Press the FILE LIST key on the front of the unit to open the
take selection screen. Then, press the FILE LIST key again to
open the folder selection screen.
On the OPTIONS page, you can set the pre-recording time and
the use of auto marks. For details, see “OPTIONS page” on page
80.
Recording in take mode
Starting recording
When the unit is stopped, press the REC key to put the unit into
recording standby. At this time, the
icon indicates this
transport status.
In recording standby, press the PLAY key to start recording.
The transport status display at the top left of the Home Screen
changes into the recording status display and part of the
background of the Home Screen becomes red, indicating that
the unit is recording. The time counter starts at the same time.
NOTE
When stopped, pressing the PLAY key while pressing and
holding the REC key will also start recording.
2. Touch the e button for the folder that contains the take you
want to load to open the take selection screen.
If it is not the current folder, a pop-up window appears
confirming that you want to load it. Touch the OK button.
NOTE
Recording can also be controlled using parallel control.
In take mode, even if you press the PLAY key while holding
the REC key during playback, you cannot overwrite a
recording.
CAUTION
When in recording standby, the parallel control signals
output are high for TALLY_RECORD and low for TALLY_
PAUSE.
When in recording standby, the REC and PAUSE keys on the
front panel will be lit.
NOTE
To load a take from the current folder, instead of steps 1–4,
touch the folder name button at the top right of the FILE
LIST screen or touch the take name button on the Home
Screen, and touch the TAKE List button in the pull-down
menu to open the take selection screen for the current
folder.
3. Select the take that you want to load.
TASCAM HS-20 57
8 – Take mode
4. Touch the MENU button in the take selection screen to open
the pull-up menu.
Setting input monitoring
Turn input monitoring off during playback.
If input monitoring is on, sound from the input connectors will
be output through all the output connectors of this unit.
1. Touch the INPUT MONITOR button on the Home Screen to
open a pull-up with the input monitoring ON/OFF buttons.
5. Touch the LOAD button in the pull-up menu.
6. When a confirmation message pop-up appears, touch the
OK button or press the DATA dial.
2. If input monitoring is on (ON button blue), touch the OFF
button to turn it off (OFF button blue).
Playback control in take mode
After loading completes, the Home Screen opens and
playback will be paused at the start of the loaded take.
NOTE
You can also press the e button for a take to load it.
In this case, no pop-up window appears, and the take
selection screen remains open after loading (the Home
screen does not reopen.)
CAUTION
If the recording sampling frequency setting and the
playback file sampling frequency are different, the
following pop-up will appear while the unit switches to the
playback file sampling frequency.
Press the PLAY key to start playback.
Press the PAUSE key to start playback standby.
Press the PLAY key to end recording standby.
Press the STOP key to stop playback.
Press the . [MARK.] key or // [MARK/] key to
switch takes.
Press and hold the m [
] key or , [
] key to search
backward or forward.
Press the . [MARK.] or / [MARK/] key while
pressing and holding the SHIFT key to move between marks.
Press and hold the m [
] key or , [
] key while
pressing and holding the SHIFT key to search at high-speed.
NOTE
• On the PLAY SETUP screen, you can set whether only the
currently selected take is played or whether all the takes
within the current folder are played. You can also enable
and disable repeat playback. (See “Playback settings (PLAY
SETUP)” on page 80.)
• Playback functions can also be controlled through through
the PARALLEL connectors.
Using the call function in playlist mode
Press the CALL [CHASE] key to locate to the point where
playback was last started from playback standby (call point) and
put the unit in playback standby mode.
Using the flash start function in take mode
Using a TASCAM RC-HS20PD (sold separately) or other remote
controller, flash start playback is possible.
For details, see “Flash start function” on page 109.
58 TASCAM HS-20
8 – Take mode
Take operations
Multiple takes can be made in audio folders.
For details about folder operations, see “5 – FILE LIST” on page
30.
The following take operations are available.
oo
oo
oo
oo
oo
oo
oo
oo
oo
oo
oo
Editing take start times
Exporting takes
Uploading takes to an FTP server
Deleting takes
Sorting takes
Changing the order of takes
Editing take names
Dividing takes (Divide)
Combining takes (Combine)
Undoing the previous edit (UNDO)
Redoing an undone edit (REDO)
Editing take start times
1. Press the FILE LIST key on the front of the unit to open the
take selection screen. Then, press the FILE LIST key again to
open the folder selection screen.
2. Touch the e button for the folder that contains the take you
want to edit to open the take selection screen.
If it is not the current folder, a pop-up window appears
confirming that you want to load it. Touch the OK button.
NOTE
To load a take from the current folder, instead of steps 2–3,
touch the folder name button at the top right of the FILE
LIST screen or touch the take name button on the Home
Screen. Then, touch the TAKE List button in the pull-down
menu to open the take selection screen for the current
folder.
3. Select the take for which you want to edit the start time.
4. Touch the MENU button in the take selection screen to open
the pull-up menu.
FRAME EDIT on
FRAME EDIT off
7. Use the number buttons to input the take start time.
oo If you begin input without selecting a unit, input will start
from the smallest one.
oo To input a specific unit, touch it to make its background
yellow, and then use the number buttons or the DATA dial
to enter two digits at a time.
oo Touch the CLEAR button to erase all entered values.
8. Touch the ENTER button to confirm the setting.
TIP
This can also be input using a connected keyboard.
Press the keyboard’s ESC key to clear all the values.
9. When the confirmation pop-up window appears, touch the
OK button or press the DATA dial.
Exporting takes
You can export takes to the current folder on a different media
device.
1. Select the take you want to export on the take selection
screen.
2. Touch the MENU button on the take selection screen to
open the pull-up menu.
5. Touch the EDIT TC button in the pull-up menu to open the
TAKE TC screen.
6. On the TAKE T/C screen, use the FRAME EDIT button to set
whether or not to input the frame value.
TASCAM HS-20 59
8 – Take mode
3. Touch the EXPORT button on the pull-up menu to open the
following pop-up window. Touch the OK button or press the
DATA dial to export the selected take.
Touch the CANCEL button on the pop-up window to return
to the take list screen.
NOTE
The file icon for a take that has been successfully uploaded
is shown like this:
.
The file icon for a take that has failed to upload is shown like
this:
.
Deleting a take
1. Select the take that you want to delete on the take selection
screen.
2. Touch the MENU button on the take selection screen to
open the pull-up menu.
NOTE
• If the target destination is empty (does not have a current
folder), the same folder structure as the source folder is
created there automatically during the export.
• If the target destination contains a file with the same name,
a pop-up window stating “Selected Take Already exist in
Export destination.” appears and exporting does not occur.
• When the total size of the EXPORT file exceeds the free space
in the export destination, a pop-up window stating “Cannot
EXPORT. Not enough space on xxx”* is shown before the
export starts, and exporting does not occur.
*xxx: SD/CF card(export destination media name)
Take selection screen with pull-up menu open
3. Touch the DELETE button on the pull-up menu.
4. Touch the OK button or press the DATA dial when the confirmation message is displayed on the pop-up window.
Uploading takes to an FTP server
This unit can upload takes to a designated folder on the FTP
server set on the FTP page of the REMOTE SETUP screen.
1. Select a take you want to upload on the take selection
screen.
2. Touch the MENU button on the take selection screen to
open the pull-up menu.
Confirmation message screen
5 Touch the OK button or press the DATA dial when the reconfirmation message is displayed on the pop-up window.
3. Touch the UPLOAD to FTP button on the pull-up menu to
open a confirmation pop-up window. Touch the OK button
or press the DATA dial to upload the selected take.
Touch the CANCEL button on the pop-up window to return
to the take list screen.
Reconfirmation message screen
During deletion, a progress bar is shown in a pop-up
window.
When deleting completes, the pop-up window will
disappear.
CAUTION
You can delete a take already in use in the timeline mode or
playlist mode.
If you delete such a folder/file, an error pop-up appears
when you attempt to play the corresponding region/entry.
60 TASCAM HS-20
8 – Take mode
Sorting takes
You can sort the order of take playback by name.
1. Touch the MENU button on the take selection screen to
open the pull-up menu.
4. Use the DATA dial and scroll buttons to move the selected
take.
Take selection screen with pull-up menu open
2. Touch the SORT button on the pull-up menu to open a
confirmation pop-up window.
5. Touch the MOVE button or press the ENTER key to move the
take to the order shown.
Touch the button at the upper left of the screen or press
the EXIT/CANCEL key to return to the take selection screen
without moving the take.
Editing take names
Confirmation message screen
3. Touch the OK button or press the ENTER key on the pop-up
window to sort the order of take playback by name.
Touch the CANCEL button to return to the take selection
screen.
1. Select the take with the name you want to edit on the take
selection screen.
2. Touch the MENU button on the take selection screen to
open the pull-up menu.
Changing the order of takes
You can move a take to change the playback order.
TAKE-1
TAKE-2
TAKE-3
TAKE-4
TAKE-5
TAKE-1
TAKE-3
TAKE-4
TAKE-2
TAKE-5
1. Select a take you want to move on the take selection screen.
2. Touch the MENU button on the take selection screen to
open the pull-up menu.
Take selection screen with pull-up menu open
3. Touch the EDIT NAME button on the pull-up menu to open
the TAKE NAME screen.
Take selection screen with pull-up menu open
3. Touch the MOVE button on the pull-up menu to open the
TAKE MOVE screen.
TAKE NAME Screen
NOTE
When you have selected multiple takes, you cannot select
the EDIT NAME button on the pull-up menu.
4. Input the take name. Follow the procedures “Editing the
name of a folder in the root directory” on page 33.
TASCAM HS-20 61
8 – Take mode
5 Touch the Enter button on the TAKE NAME screen or the
DATA dial to confirm the take name and return to the take
selection screen.
CAUTION
It is possible to edit the name of a take already in use in
timeline or playlist mode.
If you edit the name of such a take, an error pop-up appears
when you attempt to play the corresponding region/entry.
NOTE
Dividing a take
You can divide a take into two at a specified position.
TAKE-1
TAKE-1
TAKE-2
TAKE-2_a
TAKE-3
TAKE-2_b
TAKE-3
1. Press the HOME key on the front of the unit to open the
Home screen.
2. Move the timeline cursor to the position where you want to
divide.
3. Touch the EDIT button to open the pull-up menu.
Touch the Divide button on the pull-up menu.
4. When "-- Divide Mode --" appears, scrub playback mode will
become active. Use the following methods to set the exact
division position.
• The take names are given after division as follows.
First half: <Take name before division>_a
Second half: <Take name before division>_b
• The first half and second half will be played in order.
• The second half will become the current take.
• Takes that followed the current take before division will
follow the second half.
• The total number of takes increases by one after division.
• If a mark point existed at the division point, it will be set as
the beginning of the second half.
NOTE
Example:
Take list: Scene001-T001 before division
Take list: Scene001-T001 after division
oo Turn the JOG/SHUTTLE dial
oo Press the m or , key (moves one sample at a time)
oo Press the m [
] or , [
] key while pressing
and holding the SHIFT key (moves in 1ms intervals)
oo Press the . [MARK.] or / [MARK/] key
while pressing and holding the SHIFT key (moves to the
next mark point)
CAUTION
It is possible to divide a take already in use in timeline or
playlist mode.
If you divide such a take, an error pop-up will appear if you
try to play the corresponding region/entry.
When the position is determined, touch the Divide button
at the lower-left of the screen. To cancel dividing, touch the
CANCEL button at the lower left of the screen, or press the
STOP or EXIT/CANCEL key.
If the file name given after division already exists and a take
cannot be divided, the "Cannot Divide." message appears.
5. When dividing is complete, the Home Screen will open after
a pop-up window is shown.
62 TASCAM HS-20
8 – Take mode
Combining takes
You can combine a specified take with another one.
NOTE
You cannot combine takes in the following cases.
• The bit lengths, the numbers of channels or the
sampling frequencies are different.
• The file size after combining the takes exceeds the Max
File Size shown on the REC SETUP/FILE FORMAT screens.
• The open capacity of the media is less than the file size
of the second take to be combined.
TAKE-1
TAKE-2
TAKE-1
TAKE-3
TAKE-4
TAKE-5
TAKE-3
TAKE-4
TAKE-5
6. While combining, a progress bar is shown in the pop-up
window.
When combining is complete, the pop-up window will
disappear.
1. Press the HOME key on the front of the unit to open the
Home screen.
2. Set the take that will be the first half of the combined take as
the current take.
3. Touch the EDIT button to open the pull-up menu.
NOTE
• The file name of the first take is used for the combined take.
• The timecode information from the first take is used in the
combined take.
• If the combined number of mark points of the takes exceeds
100, the 101st and subsequent ones will be lost. These mark
points cannot be recovered with UNDO.
Touch the Combine button on the pull-up menu.
4. When the take selection screen opens, touch the e button
of the take to be combined with the current take.
(The yellow icon indicates the first take to be used in the
combination, which was as selected in step 3.)
CAUTION
It is possible to combine takes that are already in use in
timeline or playlist mode.
If you combine such takes, an error pop-up appears when
you attempt to play the corresponding region/entry.
5. A confirmation message appears, and an interval of
4-seconds in total before and after the take combination
point will be played repeatedly.
Touch the OK button or press the ENTER key to combine the
takes.
Touch the CANCEL button or press the EXIT/CANCEL key
to stop the repeat playback and reopen the take selection
screen.
TASCAM HS-20 63
8 – Take mode
Undoing the previous take edit (UNDO)
You can undo the previous take edit.
1. Press the HOME key on the front of the unit to open the
Home screen.
2. Touch the EDIT button to open the pull-up menu.
Touch the UNDO button on the pull-up menu.
3. When the edit is undone, the Home Screen will open after a
pop-up window is shown.
Redoing the previously undone take edit
(REDO)
After undoing an edit, you can redo it.
1. Press the HOME key on the front of the unit to open the
Home screen.
2. Touch the EDIT button to open the pull-up menu.
Touch the REDO button on the pull-up menu.
3. When the edit is redone, the Home Screen will open after a
pop-up window is shown.
In this case, the EDIT pull-up menu will remain open.
NOTE
• If no editing has been conducted, the UNDO button is
disabled. The UNDO button appears with white letters when
it is possible to undo an edit.
• The take mode edit history will be erased by the following
actions.
• Turning this unit off
• Loading a folder
• Changing the operation mode
• Recording
64 TASCAM HS-20
In this case, the EDIT pull-up menu will remain open.
NOTE
• If no edit has been undone, the REDO button is disabled. The
REDO button appears with white letters when it is possible
to redo an edit.
• The take mode edit history will be erased by the following
actions.
• Turning this unit off
• Loading a folder
• Changing the operation mode
• Recording
9 – Playlist mode
In this chapter, we explain how to use the playlist mode. To
use this unit in playlist mode, set the unit’s operation mode to
PLAYLIST MODE. (See “Selecting the operation mode” on page
38.)
Please refer to “4 – Basic operation” on page 26 when reading
this chapter.
5. Touch the OK button or press the DATA dial when a confirmation pop-up message appears.
Playlist operations
Loading a folder
Takes/files can only be added to the playlist from the currently
loaded folder. When takes/files that are in other folders are
added to a playlist they are copied to the current folder. Load a
folder first.
1 Press the HOME key on the front panel to open the Home
screen.
Then, press the FILE LIST key again to open the folder
selection screen.
When loading completes, the last loaded playlist (or a
playlist created by default for a new folder) is automatically
loaded and the Home Screen reopens.
Creating a new playlist
You can create a playlist (JPPA PPL file) in the folder of the
current folder.
The file path is as follows when you view a card on your
computer.
{Card drive name}:\{HS Files}\{folder name}\{_playlists}\
{Playlist file}
1. Press the FILE LIST key on the front of the unit to open the
playlist selection screen.
NOTE
2. Touch a folder name button to select a folder.
Its background appears yellow.
3. Touch the MENU button on the folder selection screen to
open the pull-up menu.
4. Touch the LOAD button in the pull-up menu.
When you create a folder, one JPPA PPL file is created
automatically.
2. Touch the CREATE PLAYLIST button to open the PLAYLIST
NAME screen.
Enter the playlist name.
To enter the playlist name, follow the procedures “Editing
the name of a folder in the root directory” on page 33.
3. Touch the Enter button or press the DATA dial.
NOTE
You can also press the e button for a folder to load it. If it is
not the current folder, a pop-up window appears confirming
that you want to load it. Touch the OK button.
TASCAM HS-20 65
9 – Playlist mode
4. When a confirmation message pop-up appears, touch the
OK button or press the DATA dial to confirm the playlist
name.
Changing a playlist name later
You can change playlist names later.
1. Press the FILE LIST key on the front of the unit to open the
playlist selection screen.
2. Select the playlist with the name that you want to change.
The background of the selected playlist name appears
yellow.
3. Touch the MENU button to open a pull-up menu.
While the playlist is being created, a progress status pop-up
appears.
When playlist creation completes, the pop-up disappears.
NOTE
• Immediately after a new playlist is created, it becomes the
current playlist (currently loaded playlist).
• A new playlist can also be created by touching the CREATE
PLAYLIST button on the pull-down menu that appears when
an entry name button is touched on the Home Screen.
• “C” (current) appears inside the
icon of the currently
loaded playlist.
4. Touch the EDIT NAME button in the pull-up menu to open
the PLAYLIST NAME screen.
NOTE
The EDIT NAME button in the pull-up menu cannot be
selected if the loaded playlist is selected.
5. Input the playlist name. Follow the procedures “Editing the
name of a folder in the root directory” on page 33.
6. Touch the Enter button on the PLAYLIST NAME screen or
press the DATA dial to confirm the playlist name and return
to the playlist selection screen.
66 TASCAM HS-20
9 – Playlist mode
Loading playlists
You can load a playlist (JPPA PPL file) that is in the current folder.
The file path is as follows when you view a card on a computer.
{Card drive name}:\{HS Files}\{folder name}\{_playlists}\
{Playlist file}
NOTE
You cannot load a playlist file that is not in the current
folder.
1. Press the FILE LIST key on the front of the unit to open the
playlist selection screen.
2. Select the playlist that you want to load.
3. Touch the MENU button on the Playlist selection screen to
open a pull-up menu.
Deleting a playlist
1. Press the FILE LIST key on the front of the unit to open the
playlist selection screen.
2. Select the playlist that you want to delete.
3. Touch the MENU button on the Playlist selection screen to
open a pull-up menu.
4. Touch the DELETE button in the pull-up menu.
NOTE
If you have selected the currently loaded playlist, you
cannot select the DELETE button on the pull-up menu.
5. Touch the OK button or press the DATA dial when a confirmation pop-up message appears.
4. Touch the LOAD button in the pull-up menu.
NOTE
You can also load a playlist by touching its e button.
5. Touch the OK button or press the DATA dial when a confirmation pop-up message appears.
During deletion, a progress bar is displayed in a pop-up
window.
When deletion completes, the pop-up disappears.
After loading completes, the Home Screen opens.
TASCAM HS-20 67
9 – Playlist mode
Editing a playlist (adding, clearing and
editing entries)
A playback unit in a playlist is called an “entry”.
A maximum of 100 entries can be added to a playlist.
Only takes (files) in the folder in which the playlist was created
can be added as entries.
When a take (file) that is in another folder is added to a playlist, it
is copied to the folder where the playlist was made.
Even during playback of a playlist, entries can be added to or
removed from it. Their names can also be changed.
The entry that is currently playing, however, cannot be changed.
Use the ENTRY list and ASSIGN file screens to edit playlists.
ENTRY list screen
To open this screen, touch a take or entry name button on the
Home Screen to open a pull-down menu and touch the ENTRY
LIST button, or touch the ENTRY g part of the ENTRY g t
ASSIGN button on the ASSIGN file screen.
4 Entry name button
Touch to select the corresponding entry.
Touch this button to open the take list on the right side.
When this list is open, you can touch a take name button
to assign that take to the selected entry name button.
Take list open
The entry number appears inside the
icon.
The playlist verification status also appears inside the
icon. If the format of the file is different or the file does
not exist, its name appears in gray.
Currently loaded entry
Entry is okay
Entry is a format that cannot be played
back
File added for entry has been deleted
via FTP or on the BROWSE screen
No entry
5 INFO button
1ENTRY g t ASSIGN button
Switches between the ENTRY list and ASSIGN file screens.
Touch the t ASSIGN part to open the ASSIGN file screen.
2 Playlist name display
This shows the current playlist name.
is shown if editing has been performed without saving.
3 START TC/LENGTH button
Touch this area to switch between showing the starting
time (START TC) and the length (LENGTH) in the START
TC/LENGTH column. The one shown in white is currently
displayed.
When an entry is selected, press this button to open an
information pop-up for that entry.
When an entry is not selected, press this button to show
information about the current playlist.
6 PLAY buttons
Touch to play the corresponding entry. These turn green
during playback of the corresponding entries. Touch one
during playback to stop playback of the corresponding
entry.
7 Scroll buttons
Use these buttons to scroll to the beginning or end of
the entry list, or to scroll one page (five lines) forward or
backward. You can also scroll through the entry list one line
at a time using the DATA dial.
8 START TC/LENGTH column
This shows the entry starting time or entry length (time). The
START TC/LENGTH button item shown in white is currently
shown.
9 MULTI SELECT button
Touch to enable the selection of multiple entries.
0 MENU button
Touch to open a pull-up menu where you can select
REBUILD, CLEAR, ADJUST, SAVE and SAVE AS.
68 TASCAM HS-20
9 – Playlist mode
ASSIGN File screen
To open this screen, touch a take or entry name button on the
Home Screen to open a pull-down menu and touch the ASSIGN
FILE button, or touch the t ASSIGN part of the ENTRY g t
ASSIGN button on the ASSIGN file screen.
y Take name list/buttons
This is a list of the takes in the current folder.
After touching a key assign button, touch a take name
button to assign that take to that key assign button.
If you touch the current folder name button when the name
of a folder in the root folder is shown in it, a list of the folders
in the root folder will be shown.
Touch the button of the folder that you want to load to open
the list of takes in that folder.
u Scroll buttons
Use these buttons to scroll to the beginning or end of the
take list or folder list, or to scroll one page (five lines) forward
or backward. You can also scroll through the take list one
line at a time using the DATA dial.
i Page display and selection buttons
The current key assign button page is shown.
Touch the + or – button to change the page.
o INFO button
qENTRY g t ASSIGN button
Switches between the ENTRY list and ASSIGN file screens.
Touch the ENTRY t part to open the ENTRY list screen.
w Current button
Touch this button to open the take name list of the current
folder.
When a key assign button is selected, touch this button to
open an information pop-up for that key assign button.
When a take is selected, touch this button to open an information pop-up for that take.
When nothing is selected, touch this button to show information about the current playlist.
p MENU button
Touch to open a pull-up menu where you can select
REBUILD, CLEAR, ADJUST, SAVE, and SAVE AS.
e Folder name/playlist name
This shows the names of the current folder and playlist.
is shown if editing has been performed without saving.
r Key assign list/buttons
These buttons are for entry assignments.
The flash page number and flash key number are shown
separated by a “–”.
The playlist verification status also appears inside the
icon.
The icon for the currently playing entry is and its button is
highlighted in green.
Entry currently being played back
Entry is okay
Entry is a format that cannot be played back
File added for entry has been deleted via FTP or on
the BROWSE screen
No entry
After touching one of these buttons, touch a take name
button to assign that take to that button.
t Current folder name button
This shows the name of the folder that is shown in the current
take list display area.
Touch this button to show the folder list in the take list
display area.
TASCAM HS-20 69
9 – Playlist mode
Assigning a take to an entry
1 Press the HOME key on the front panel to open the Home
Screen.
6. Touch a take name in the take list to assign that take to that
button. When a take is assigned to a button, the button’s
icon changes from (no assignment) to .
NOTE
• Only takes in the folder where the playlist is can be added to
the playlist.
• If the take that you want to add does not appear, use the
scroll buttons or DATA dial to scroll through the list until the
take appears and then touch its name.
TIP
2 Touch a file name or title name button to open a pull-down
menu and touch the ASSIGN FILE button.
Touch the t ASSIGN part to open the ASSIGN file screen.
If the take that you want to add is in a different folder, touch
the current folder name button to open the folder list. Then,
touch the name of the folder that contains the take that you
want to add to open that folder’s take name list.
7. Repeat steps 3–6 as necessary.
8. After you have completed making assignments, save the
playlist as necessary.
To save a playlist, touch the MENU button on the ASSIGN file
or ENTRY list screen to open a pull-up menu. Touch the SAVE
button. You can also touch a file name or title name button
on the Home Screen to open a pull-down menu and touch
the SAVE button.
For details about saving, see “Saving playlists” on page 75.
TIP
You can also assign a take to an entry with a similar
procedure on the Entry List screen.
CAUTION
If you do not save the playlist, all changes will be lost when
another playlist is loaded, the card is removed or the unit's
power is turned off.
On the left side are the buttons that can receive assignments, and on the right side is the list of takes that can be
assigned.
NOTE
You can also touch the t ASSIGN button on the ENTRY List
screen to open the ASSIGN File screen.
3. First, select the key assign button of the take that you want
to assign.
4. Use the + and – buttons to open the page where you want
to assign a file.
5. In the key assign button list on the left, select the one
to which you want to assign a take. The selected button
appears light blue.
NOTE
If you select a button that already has an entry assigned to
it, the corresponding take appears yellow in the take list.
70 TASCAM HS-20
Entry number page allocation
The playlist entry numbers are allocated as follows.
Page number
Entry number
1
2
3
4
5
1-20
21-40
41-60
61-80
81-100
9 – Playlist mode
Clearing entry assignments
Editing entry titles
1. Press the HOME key on the front of the unit to open the
Home screen.
2. Touch the ENTRY LIST button on the pull-down menu that is
opened by touching a file name or title name button.
This opens the ENTRY list screen.
1. Press the HOME key on the front of the unit to open the
Home screen.
2. Touch the ADJUST ENTRY button on the pull-down menu
that is opened by touching a file or title name button.
The ADJUST ### screen opens. (“###” is the entry number.)
3. Select the entry with the assignment that you want to clear.
Its background is highlighted in yellow and the take list is
shown on the right side.
When you select an entry to which a take has been assigned,
the background of that take on the take list is highlighted in
yellow.
NOTE
You can also open this screen by touching the MENU button
and then touching the ADJUST button in the pull-up menu
when a take is selected on the ENTRY list screen or one of the
key assign buttons on the left is selected on the ASSIGN file
screen.
NOTE
You can clear entry assignments by touching the take name
button highlighted in yellow.
4. Touch the MENU button on the Entry List screen to open a
pull-up menu.
ENTRY List Screen
5 Touch the CLEAR button in the pull-up menu to clear the
entry.
NOTE
On the ASSIGN file screen, when a button on the left is
selected, you can clear its entry by touching the take name
that appears yellow in the take list on the right side or by
touching the MENU button and then touching the CLEAR
button on the pull-up menu.
ASSIGN File Screen
3. The title of the selected entry shown next to the TITLE
button. Touch the TITLE button to open the EDIT TITLE
screen where you can change the title of the entry.
Input the title name. Follow the procedures “Editing the
name of a folder in the root directory” on page 33.
4. Touch the Enter button on the EDIT TITLE screen or press the
DATA dial to change the entry title.
TASCAM HS-20 71
9 – Playlist mode
Editing the playback starting and ending
points
Editing the playback Start/End point using
the number buttons and mark list screen
1 Press the HOME key on the front panel to open the HOME
screen.
2. Touch the ADJUST ENTRY button on the pull-down menu
that is displayed by touching a file or title name button.
The ADJUST ### screen opens. (“###” is the entry number.)
1. Touch the EDIT button to open the EDIT START POINT or
EDIT END POINT screen.
NOTE
You can also open this screen by touching the MENU button
and then touching the ADJUST button on the pull-up menu
when a take is selected on the ENTRY list screen or one of the
key assign buttons on the left is selected on the ASSIGN file
screen.
3 This opens the Start End Point page.
Use the FRAME EDIT button on the EDIT START/END POINT
screen to set whether or not you will edit the frame value.
2. Use the number buttons to input the playback Start/End
point.
oo If you begin input without selecting a unit, input will start
from the smallest one.
oo To input a specific unit, touch it to make its background
yellow, and then use the number buttons or the DATA dial
to enter two digits at a time.
4. When you touch a time display unit, its background will
appear yellow and its cursor will start blinking.
You can change the Start/End points using the DATA dial
when a time display unit has been selected.
Changing the selected unit past its natural limit will
increment or decrement the next higher unit.
5. You can select the unit according to the resolution you want
to change.
To change it with frame precision, select the frame unit. To
change it with sample accuracy, select the sample unit.
oo Touch the CURRENT b button to copy the current
playback position to the input value.
oo Touch the SET MAX 5 button to set the end time on the
file as the input value.
oo Touch the CLEAR button to clear all input values.
oo Touch the Mark List button to open the mark list screen
where you can copy the time from a designated mark.
NOTE
• Touch the CURRENT button to capture the current playback
position as the Start/End point.
• Touch the RESET button to display a pop-up window
confirming that you want to reset the Start/End point to
the beginning/ending time of the file. Touch the OK button
on the pop-up window to reset the Start/End point to the
beginning/ending time of the file.
On this screen, touch the e button of a mark to copy its
time to the playback Start/End point and return to the
ADJUST ### screen.
NOTE
When you change the playback Start/End time, the set
values will be adjusted automatically so that the length of
playback is longer than the total lengths of the fade-in and
fade-out.
3. Touch the ENTER button to confirm the setting.
TIP
• You can also use the PLAY key and other transport keys
while listening to the audio to find the location, and then
touch the CURRENT b button to input that value here.
• You can also use a connected keyboard to edit values on the
EDIT START POINT and EDIT END POINT screens.
Press the keyboard’s ESC key to clear all the values.
72 TASCAM HS-20
9 – Playlist mode
Editing the playback starting time
1. Press the HOME key on the front panel to open the Home
screen.
2. Touch the ADJUST ENTRY button on the pull-down menu
that is opened by touching the file name button or the title
name button.
The ADJUST ### screen opens. (“###” is the entry number.)
oo Touch the CLEAR button to erase all entered values.
7. Touch the ENTER button to confirm the setting.
TIP
• You can also use the PLAY key and other transport keys
while listening to the audio to find the location, and then
touch the CURRENT b button to input that value here.
• This can also be input using a connected keyboard.
Press the keyboard’s ESC key to clear all the values.
NOTE
You can also open this screen by touching the MENU button
and then touching the ADJUST button on the pull-up menu
when a take is selected on the ENTRY list screen or one of the
key assign buttons on the left is selected on the ASSIGN file
screen.
3. Touch the Start TC Fade/Level tab to open the screen shown
below.
4. Touch the EDIT button to open the EDIT START TC screen,
and use the number buttons to change the Start TC.
5. The value shown next to the Start TC item is the playback
starting time for the selected entry. Touch the EDIT button
for the START TC item to open the EDIT START T/C screen
where you can change the playback starting time.
Use the FRAME EDIT button on the EDIT START T/C screen to
set whether or not you will edit the frame value.
6. Use the number buttons to input the entry playback start
time.
oo If you begin input without selecting a unit, input will start
from the smallest one.
oo To input a specific unit, touch it to make its background
yellow, and then use the number buttons or the DATA dial
to enter two digits at a time.
oo Touch the CURRENT b button to copy the current
timecode time to the input value.
TASCAM HS-20 73
9 – Playlist mode
Editing fade-in/fade-out length and level
1. Press the HOME key on the front panel to open the Home
screen.
2. Touch the ADJUST ENTRY button on the pull-down menu
that is opened by touching a file or title name button.
The ADJUST ### screen opens. (“###” is the entry number.)
Rehearsal playback
You can use the transport controls for rehearsal playback while
on the ADJUST ENTRY screen.
oo The operation is the same as during normal transport
operation except that the . and / keys are used to
jump to the entry's file beginning, Start Point, End Point
and file end.
oo If you change the Start Point or Fade In Length, the
playback position will move to the Start Point. If you
change it during playback, playback will continue after
jumping to the new playback position.
oo If you change the End Point or Fade Out Length, the
playback position will move as follows. If you change it
during playback, playback will continue after jumping to
the new playback position.
3. Touch the Start TC Fade/Level tab to open the screen shown
below.
When PREVIEW
off
When changing Two seconds
End Point
before End Point
Two seconds
When changing
before Fade Out
Fade Out Length
starts
When PREVIEW on
Two seconds before
Fade Out starts
Two seconds before
Fade Out starts
oo Touch the PREVIEW button to change the contents of the
rehearsal playback.
Rehearsal playback when PREVIEW is off
4. Select the Fade In, Fade Out or Level knob and use the DATA
dial to set the value.
Ranges
oo Fade In/Out Length: 0 – 30 seconds
(0.1 second per step or 1.0 second per step when the dial
is pressed and rotated)
oo Level: −∞ to +10dB
NOTE
• After the length of a fade is changed, the value will be
automatically adjusted to a value that will fit within the
playback Start/End time interval.
• The playback level is shown by a solid red line.
• The reference level (0 dB) is shown by a dotted orange line.
74 TASCAM HS-20
oo The original audio is played back without fade in/out or
level adjustments applied.
oo You can move out of the Start/End Point range.
oo When the End Point is reached during playback, playback
jumps back to the Start Point and stops.
Press the PLAY key to start playback from the Start Point.
Use the . key, / key, SHIFT + / key and the
JOG/SHUTTLE dial to move playback to after the End
Point.
Rehearsal playback when PREVIEW is on
oo Only the interval between the Start Point and the End
Point is played back.
Locating to a point outside of that range is not possible.
oo The audio is played back with fade in/out and level adjustments applied.
9 – Playlist mode
Saving playlists
Naming a playlist and saving it
The current playlist is saved in the current folder (loaded folder)
as a JPPA PPL file.
CAUTION
After editing a playlist, save it as necessary. If you do not
save a playlist after editing, all changes will be lost when,
for example, you load another playlist, remove the selected
card, or turn off the unit.
An “*” appears in the file name or title name button when
editing has occurred that has not been saved yet. When
an “*” is shown, a pop-up message asking if you want to
save the playlist will appear when you try to do something
that would clear the edits, including when loading another
playlist, creating a new playlist and changing the operation
mode.
1. Press the HOME key on the front of the unit to open the
Home screen.
2 Touch a file name or title name button to open a pull-down
menu and touch the SAVE button to start saving the playlist.
3. Press to start saving.
While saving, a progress status pop-up appears.
When saving completes, the pop-up disappears.
NOTE
You can also save a playlist by touching the MENU button
on the ASSIGN file or ENTRY list screen to open a pull-up
menu and touching the SAVE button.
On the ENTRY List or ASSIGN File screen, after touching the
MENU button to open the pull-up, if you touch the SAVE AS
button instead of the SAVE button, you can name the playlist
before saving it.
1. Press the HOME key on the front of the unit to open the
Home screen.
2. Touch a file name or title name button to open a pull-down
menu and touch the SAVE AS button.
The PLAYLIST NAME screen where you can input new playlist
names opens.
3. Input the playlist name. Follow the procedures “Editing the
name of a folder in the root directory” on page 33.
4. Touch the Enter button on the PLAYLIST NAME screen or
press the DATA dial to save the playlist with this name.
While the file is being created, a progress status pop-up
appears.
When file creation completes, the pop-up disappears.
NOTE
When a file with the input name already exists, a pop-up
window to confirm whether you want to overwrite the file is
displayed.
Touch the OK button to overwrite that file, or touch the
CANCEL button to return to the PLAYLIST NAME screen.
Touch the OK button to overwrite that file, or touch the
CANCEL button to return to the PLAYLIST NAME screen.
ENTRY list screen
TIP
You can also name and save a playlist by touching the
MENU button on the ASSIGN file or ENTRY list screen to open
a pull-up menu, and touch the SAVE AS button.
ASSIGN File Screen
TASCAM HS-20 75
9 – Playlist mode
Playback in playlist mode
Selecting a playlist
1. Press the FILE LIST key on the front of the unit to open the
playlist selection screen.
Playback control in playlist mode
Press the PLAY key to start playback.
Press the PAUSE key to start playback standby.
Press the PLAY key again to resume playback.
Press the STOP key to stop playback.
Press the . [MARK.] key or / [MARK/] key to
switch entries.
Press and hold the m [
] key or , [
] key to search
backward or forward.
Press the . [MARK.] or / [MARK/] key while
pressing and holding the SHIFT key to move between marks.
Press and hold the m [
] key or , [
] key while
pressing and holding the SHIFT key to search at high-speed.
NOTE
2. Touch the name of the playlist that you want to play to
select it. Its background becomes yellow.
3. Touch the MENU button on the Playlist selection screen to
open a pull-up menu.
• On the PLAY SETUP screen, you can set whether only the
currently selected entry is played or whether all the entries
within the current playlist are played. You can also enable
and disable repeat playback. (See “Playback settings (PLAY
SETUP)” on page 80.)
• Playback can also be controlled through the PARALLEL port.
Using the call function in playlist mode
Press the CALL [CHASE] key to locate to the point where
playback was last started from playback standby (call point) and
put the unit in playback standby mode.
Playlist selection screen pull-up
4. Touch the LOAD button in the pull-up menu to load the
playlist. A confirmation pop-up window will appear.
Touch the OK button or press the DATA dial. When loading
completes, the Home Screen opens.
NOTE
On the playlist selection screen, instead of touching the
MENU button followed by the LOAD button in the pull-up
menu, you can also touch the e button for the playlist that
you want to play to load it.
The same pop-up message as above appears. Touch the OK
button or press the DATA dial.
76 TASCAM HS-20
Using the flash start function in playlist
mode
Using a TASCAM RC-HS20PD (sold separately) or other remote
controller, flash start playback is possible.
For details, see “Flash start function” on page 109.
10 – Internal settings
Menu screen
Press the MENU key on the front of the unit to open the MENU
screen shown below.
Recording settings (REC SETUP)
The REC SETUP screen has three tabbed pages: REC MODE, FILE
FORMAT and OPTIONS.
Touch the tabs at the bottom of the screen to open the corresponding page.
REC MODE page
Make settings related to the recording mode.
REC MODE
oo REC SETUP button
Make recording settings.
oo PLAY SETUP button
Make playback settings.
oo SYNC T/C button
Make synchronization and timecode settings.
oo Single (default): Recording on only the selected media
(current media).
oo Mirror: Recording on two media simultaneously.
88 Setting button appearance
REC mode setting
oo REMOTE SETUP button
Make external remote controller settings.
Single
oo AUDIO I/O button
Make settings related to the input and output of audio
signals.
Mirror
oo METER SETUP button
Make level meter settings.
oo SYSTEM SETUP button
Make system settings.
oo VERSION INFO button
View the system version.
oo BROWSE button
View and perform operations on folders and files on SD
cards, CF cards and USB flash drives.
oo MEDIA MANAGE button
Perform operations on media
oo TIMER EVENT LIST button
Add new events to the timer event list and edit and
delete existing events.
oo OPERATION MODE button
Set the operation mode.
Button appearance
Mirror
(when Mirror recording is not
possible*1 or unavailable*2)
*1 Conditions that make mirror recording impossible
oo Insufficient remaining space on the current media.
oo The currently selected media is not loaded.
oo The CF card set as current media is not compatible.
(PIO mode)
oo The current media is not in a compatible format.
(Not FAT16 or FAT32.)
oo A take numbered 999 already exists on one medium
with a name that matches the setting on the NEXT
TAKE NAME screen (opened from the Home Screen). (
“----“ is shown for the "NEXT TAKE NAME" number.)
oo The total number of entries (total number of files and
folders) in the current folders of both media exceeds
the system limitation.
Repeat recording and editing in timeline mode has
occurred, so not enough capacity for managing
regions and edit history is available to record.
(RecLimit is shown on the media remaining space
button.)
*2 Conditions that make mirror recording unavailable
oo Remaining space on the mirror media is insufficient.
(If the remaining space on the current media is
exhausted, mirror recording is also impossible.1)
TASCAM HS-20 77
10 – Internal settings
oo The mirror paired media is not present
(If the current media is not present, mirror recording
is also impossible.1)
oo The CF card not set as the current media is not
compatible. (PIO mode)
(If the current media is not compatible, mirror
recording is also impossible.1)
oo The non-current media is not in a compatible format.
(Not FAT16 or FAT32.) (If the format of the current
media is not compatible, mirror recording is also
impossible.1)
oo The CF card is not compatible with UDMA.
oo One or both of the media has not been formatted by
this unit.
(The media has not been formatted with the cluster
size recommended for this unit.)
oo The recording sampling frequency is set to 88.2, 96,
176.4 or 192 kHz.
If any of these conditions apply, mirror recording is
not possible and recording will occur only on the
current media.
3 One of the media has not been formatted by this unit
oo If recording starts with Mirror unavailable, the following
messages are shown.
1 If the reason that Mirror is unavailable is anything other
than 2 and 3 below
NOTE
• When set to Mirror, the same folder as the current folder of
the current media will be created on the other media.
If you start recording with Mirror set, takes with the same
name will be recorded in the matching folders on both
media.
• When set to Mirror, no recording will be possible if
the current media cannot be recorded to, even if the
non-current media has space available.
• In Mirror recording mode, if the time counter display mode
is TOTAL REMAIN, the recordable time for the media with
less remaining space is shown.
If either media runs out of space during mirror recording,
the recordable time for the media that continues recording
will be shown.
88 Various messages
oo If the REC Mode setting is changed to Mirror when Mirror
is unavailable, the following messages are shown.
1 One of the media cannot be recorded to
2 The CF card is not compatible with UDMA
78 TASCAM HS-20
2 The CF card is not compatible with UDMA
3 The CF card has not been formatted on this unit
10 – Internal settings
oo If the space on either of the media runs out or an error
occurs during recording with Mirror set, recording to the
media with no space remaining or to the media on which
an error has occurred will stop. Recording of the current
file to the other media will also stop, but recording will
continue as the next take in a new file.
Then, the message and media remaining space buttons
will be shown as follows.
1 If either of the media has run out of space
The following pop-up window appears.
Press the CANCEL button to open a pop-up confirmation
window.
Setting buttons: Disable (default), Enable
Target Free SPACE
Setting range (in hours): 1h (default) to 24h
NOTE
Even if you delete files, it is possible that the time set for
the Target Free SPACE might not be made available for
recording with this function.
In this case, delete unneeded files manually.
FILE FORMAT page
Make settings related to the file format on this page.
Media remaining space buttons
2 If a recording error has occurred with either of the media
Media remaining space buttons
88 Auto SPACE Check
You can set Target Free SPACE to a minimum time that will be
used to provide a warning when the amount of remaining
media space changes, for example, when recording stops,
the recording sampling frequency is changed or a download
completes.
If the remaining recordable time becomes less than the set time,
the following pop-up window appears.
Bit Length
Set the quantization bit rate for recording files using the
following buttons.
Setting buttons: 16bit (default), 24bit
Max File Size
Set the maximum size for recording files using the following
buttons.
Setting buttons: 640MB, 1GB, 2GB (default)
Pause Mode
Set whether or not to divide files when a recording is paused
using the following buttons.
Setting buttons: SPLIT (default), NO SPLIT
REC Fs
This shows the file recording sampling frequency.
Setting buttons: 44.1k, 48k (default), 88.2k, 96k, 176.4k, 192k
NOTE
In timeline mode, the recording sampling frequency cannot
be changed on this page.
If you want to record with a timeline that has a sampling
frequency different from the current one, follow the procedures in “Creating new AES31 editing information” on page
43 and create an AES31 editing information file for the
desired sampling frequency.
The following pop-up window appears.
Touch the OK button. Touch the OK button again when the
confirmation pop-up message appears to delete all files that
have already been uploaded to an FTP server.
If there are no uploaded files, the following pop-up window
appears:
“There are no uploaded takes to delete.”
TASCAM HS-20 79
10 – Internal settings
(In the example above, this would be when the level exceeds
the maximum level minus 0.20 dB.)
OPTIONS page
Make settings related to the pre-recording and auto marks on
this page.
NOTE
The PRE/REC/END auto marks are only added to takes in
take mode. They do not appear on the timeline in timeline
mode.
NOTE
After an Audio Over or Sync Unlock auto mark has been
placed, the same type of mark will not be repeated until at
least 10 seconds has passed.
PreREC Time
Turn this function ON or OFF and set the length of pre-recording
time.
(Default: OFF)
When PreREC Time is ON, the signal input during recording
standby is captured by the built-in memory for the set amount
of time, allowing a maximum of 5 seconds to be recorded before
recording is started manually.
To set the pre-recording time, touch the knob, and adjust the
value using the DATA dial.
Setting range: 1–5 seconds (default: 2 seconds)
Auto mark
Make settings related to auto marks.
Playback settings (PLAY SETUP)
Make playback settings on this screen.
GENERAL page
Make various settings related to the playback mode on this
page.
oo Audio Over:
Use this to add markers when the set audio level is
exceeded.
Use this to add markers when the set level is exceeded.
Turn this function ON or OFF and set the detection level.
(Default: OFF)
To set the detection level, touch the knob, and adjust the
value using the DATA dial.
Setting values: –0.20 dB (default), –0.17 dB, –0.13 dB,
–0.10 dB, –0.06 dB, –0.03 dB.
Range:
-0.10 dB to -0.06 dB (default: -0.03 dB)
Settings made here are reflected in the Over Level
setting on the METER SETUP screen.
oo Time Interval:
Use this to add marks at fixed time intervals. Turn this
function ON or OFF and set the time interval. (Default:
OFF)
To set the time, touch the knob, and adjust the value
using the DATA dial. The setting range is 1–10 minutes
(default: 5 minutes). (default value)
oo Sync Unlock:
Use this to add a mark when synchronization with
the master clock is lost. Turn this function ON or OFF.
(Default: OFF)
oo PRE/REC/END:
Marks can be added automatically at the pre-record
start, recording start and recording end points. Turn this
function ON or OFF.
(Default: OFF)
NOTE
An "audio over" occurs when the level exceeds the maximum
level (full scale) minus the value set by the user.
80 TASCAM HS-20
Play Mode
Set how the playback of takes and entries is handled using
the following buttons. This setting affects all modes except
timeline mode.
One Take button: Only the currently selected take or
(default)
entry is played back.
All Take button:
All the takes in the currently loaded
folder or all the entries in the
playlist are played back.
Repeat Mode
Turn repeat playback ON and OFF (default). (Default: OFF)
10 – Internal settings
CONTROL page
Make various settings related to the playback functions on this
page.
Sync and timecode settings (SYNC T/C)
Make various settings related to audio synchronization and
timecode on this page.
This screen has five pages: CLOCK, SYNC, T/C, SETUP and I/O.
Touch the tabs at the bottom of the screen to open the corresponding page.
CLOCK page
View various clock status information and select the clock used
for synchronization on this page.
Auto Cue
Turn the auto cue function ON or OFF (default).
If auto cue is ON, whenever a take is changed or loaded, the
unit will enter playback standby at the point where sound
first starts in the take. When Play Mode is set to One Take
and no sound is detected before the end of the take, the
unit stops at the start of the take. When Play Mode is set to
All Take and no sound is detected before the end of the take,
the unit tries to detect audio in the next take.
This setting affects all modes except timeline mode.
To set the auto cue start point detection level, touch the
knob area and use the DATA dial to change the value.
Setting values:
–72dB, –66dB, –60dB, –54dB (default),
–48dB, –42dB, –36dB, –30dB, –24dB
LEVEL: −6dB, −12dB, −24dB, −48dB
Auto Ready
Turn the auto ready function ON or OFF (default).
If auto ready is ON, when playback of a take completes the
unit automatically pauses at the beginning of the next take.
This setting affects all modes except timeline mode.
Inc. Play
Turn the incremental play function ON or OFF (default).
When incremental play is ON, press the PLAY key during
playback to move to the beginning of the next take and
continue playing.
Press the STOP key during playback to put the unit in
playback standby at the beginning of the next take.
This setting affects all modes except timeline mode.
PLAY Inhibit Time
This sets a time interval during which playback of the same
take (entry) cannot be restarted.
The following keys and commands are disabled (excluding
flash start keys/commands for other takes/entries) for the
duration of this setting: PLAY key on the front of the unit,
the PLAY key, flash start keys and fader start function of
the TASCAM RC-HS20PD remote control (sold separately),
and play and flash start commands from external control
(RS-232C, RS-422, parallel, keyboard).
Setting range: 0 (default) – 1000 msec (100 msec intervals),
Inf (during playback the affected keys are disabled)
NOTE
When the PLAY Inhibit Time item is set to Inf, the incremental play function is automatically set to OFF and cannot
be switched to ON.
STATUS
Current Fs
This shows the current sampling frequency.
CLOCK
This shows the clock synchronization status.
WORD/VIDEO
This shows WORD, VIDEO or TriLevel if a synchronization
signal is detected at the input.
D-IN
This shows the digital input signal status as follows.
Digital input signal status
Locked
When sampling rate conversion
is on
Unlocked
No signal
No audio signal present
Other Cbit information differs
from the actual operation mode
Indicator
Locked (xx.xxx kHz)
Locked (xx.xxx kHz FsCnv)
Unlocked (xx.xxx kHz)
Unlocked (no signal)
Not Audio
Unmatched Cbit
MASTER
Use the buttons to select the master clock to use.
INT button (default):
Use this unit’s internal clock.
WORD button:
Synchronize with the word clock input through the
WORD/VIDEO IN connector.
VIDEO button:
Synchronize with the video clock input through the
WORD/VIDEO IN connector.
D-IN button:
Synchronize with the clock of the digital signal selected
as the input for DIGITAL IN.
You cannot select an input as the master clock if the
sampling rate converter is ON for that input.
On the second line of the button, the digital input signal
selected is shown.
TASCAM HS-20 81
10 – Internal settings
NOTE
• A
mark appears on the button of the currently active
master clock.
• If synchronization from an external clock is interrupted,
the unit’s internal clock becomes active. In this case, the
mark appears on the INT button to show that it has become
the active clock, and the
mark appears on the button of
the selected external clock that was lost.
When ON, this function re-synchronizes when synchronization with timecode becomes inaccurate during playback.
(Default: OFF)
When set to OFF, after synchronizing once, input timecode is
ignored and the unit operates in free run mode.
When set to ON, set the amount of inaccuracy that triggers
rechasing. To set the time, touch the knob, and adjust the
value using the DATA dial.
Select a value in frames of 1/3, 1, 2 (default), 5 or 10.
Master TC
Set whether the unit synchronizes with the built-in timecode
generator or with timecode input from another device.
Internal button: Synchronize with the built-in generator.
External button (default): Synchronize with timecode input
from another device.
T/C page
SYNC page
Make settings related to timecode on this page.
Make settings related to synchronization on this page.
Set to free run
NOTE
If an optional SY-2 has not been installed, the items will be
shaded and cannot be set.
Set to jam sync (and free once)
NOTE
STATUS
Shows the current sampling frequency and clock synchronization status.
TC Chase
Use to turn playback synchronized with timecode ON or OFF
(default).
Set it to ON when you want to match the timing of this unit’s
audio with a timecode master device (audio recorder, video
or built-in timecode generator).
You can also set the timecode offset (TC Offset) to be used
with the timecode master device. Touch the EDIT button to
open the CHASE Offset screen where you can set the offset
value in a range between −23:59:59.29 and +23:59:59.29.
(Default: 00:00:00.00)
NOTE
TC Chase can also be turned ON and OFF by pressing the
SHIFT and CALL keys at the same time.
TC Rechase
82 TASCAM HS-20
If an optional SY-2 has not been installed, the items will be
shaded and cannot be set.
STATUS
This shows the timecode generator mode of the unit and the
current timecode frame type.
GENERATOR
The top line shows the current timecode generator time.
The bottom line shows the user bits (UB).
10 – Internal settings
Touch the GENERATOR item EDIT button or the user bits (UB)
display area to open the T/C USER BITS screen.
When the timecode generator is in free run mode, touch
the RESTART button to reset the timecode of the timecode
generator to the start time.
TC IN
The top line shows the time of the input timecode and the
frame type. The bottom line shows the user bits (UB) of the
input timecode.
In FREE RUN mode, touch the CAPTURE button to capture
the current timecode and set it as the timecode of the
timecode generator.
If the timecode generator mode is FREE ONCE or JAM SYNC,
the capture status (WAITING) indicator lights green when
waiting for timecode, and it turns off after timecode is
captured.
START TIME
When you touch the GENERATOR item RESTART button, the
time when the timecode restarts is shown.
Touch the START TIME item EDIT button or the START TIME
display area to open the START TIME screen.
oo Turn the power on
oo Set TC GEN MODE to this mode
oo Reset the internal clock
JAM SYNC button:
When timecode is input, the unit synchronizes to it. If
timecode input is interrupted, the unit enters free run
mode.
REGEN button:
The unit synchronizes to the input timecode.
REC RUN button:
The timecode generator only functions during recording.
At all other times, the timecode generator stops.
Frame Type
Use to set the timecode frame type.
Setting buttons: 23.976F, 24F, 25F, 29.97DF (default),
29.97ND, 30DF, 30ND
SETUP page
Make settings related to the timecode generator on this page.
STATUS
Set the current timecode frame type.
TC GEN MODE
Use theses buttons to set the timecode generator mode.
NOTE
If an optional SY-2 has not been installed, the items will be
shaded and cannot be set.
FREE RUN button:
The timecode generator runs on its own.
FREE ONCE button (default):
After the input timecode is captured once, the unit starts
free run mode.
TIME OF DAY button:
If you conduct any of the following operations, the time
will be captured from the internal clock and free run
mode will start.
TASCAM HS-20 83
10 – Internal settings
I/O page
View the synchronization signal status and set timecode output
on this page.
Remote settings (REMOTE SETUP)
Make settings for the PARALLEL, RS-232C, RS-422, NETWORK
and FTP connectors on this screen.
The REMOTE SETUP screen has 6 pages: GENERAL, PARALLEL,
RS-232C, RS-422, NETWORK and FTP.
Touch the tabs at the bottom of the screen to open the corresponding page.
GENERAL page
Make the external remote controller settings on this page.
NOTE
If an optional SY-2 has not been installed, the items will be
shaded and cannot be set.
STATUS
This shows the status of synchronization signals.
TIMECODE IN:
When timecode is input, the timecode frame rate is
shown.
WORD/VIDEO IN:
This shows WORD, VIDEO or TriLevel if a synchronization
signal is detected at the input.
TC Out Mode
Use these buttons to set the timecode output mode.
GenOut button:
Timecode is output from the internal timecode
generator.
PlayOut button (default):
In timeline mode, the timecode time for playback and
recording is output. During playback in take and playlist
modes, the timecode recorded in the file is output.
FADER MODE
Allows the fader on an external TASCAM RC-HS20PD remote
controller (sold separately) to be enabled or disabled. When
set to Disable, the internal fader is fixed at 0 dB.
Setting buttons: Disable, Enable (default)
FADER Start MODE
Set whether or not fader starting, which allows you to start
playback by raising the fader from ∞ when in playback
standby, is enabled when the fader start function of an
external TASCAM RC-HS20PD remote controller (sold
separately), for example, is on.
Setting buttons: Disable, Enable (default)
FADER Stop MODE
Set whether or not fader stopping, which allows you to put
playback into standby by lowering the fader to ∞ during
playback standby, is enabled when the fader start function
of an external TASCAM RC-HS20PD remote controller (sold
separately), for example, is on.
Setting buttons: Disable, Enable (default)
NOTE
If both the FADER Start MODE and FADER Stop MODE items
are set to Disable, the fader start function of the external
TASCAM RC-HS20PD remote controller (sold separately) will
be turned off automatically, and the FADER START indicator
will turn off. In this state, if you touch the Fader Start key
on the TASCAM RC-HS20PD remote controller, a “Cannot
Change Now. Fixed in current mode” warning appears in a
pop-up window.
RC-HS20PD ONLINE KEY RECORD
This sets whether or not the ONLINE key of a TASCAM
RC-HS20PD remote controller (sold separately) can be used
for recording operations.
Setting buttons: Disable (default), Enable
NOTE
When this is set to “Enable”
• Press the RC-HS20PD ONLINE key when stopped to put
the unit into recording standby. The RC-HS20PD ONLINE
key lights when in recording standby.
• In recording standby, press the RC-HS20PD PLAY key to
start recording.
84 TASCAM HS-20
10 – Internal settings
• When recording, press the RC-HS20PD PAUSE key to enter
recording standby.
• When recording, press the RC-HS20PD STOP key to stop
recording. The RC-HS20PD ONLINE key becomes unlit
when recording is stopped.
When this is set to “Disable”
• Use of the RC-HS20PD ONLINE key will be ignored.
• In recording standby, pressing the RC-HS20PD PLAY key
will not start recording.
• When recording, pressing the RC-HS20PD PAUSE key will
not put the unit into recording standby.
PARALLEL page
Set the AUX 1-3 functions of the PARALLEL connector on this
page.
RS–232C page
Make RS-232C serial control transmission settings on this page.
Serial Mode
Set the serial connection mode with the following buttons.
Setting buttons: RS-232C (Default), RS-422
NOTE
AUX Assign
Touch a knob to select it, making the background yellow,
and turn the DATA dial to set the function.
The functions that can be selected include F.FWD, REW,
MARK, MARK SKIP–, MARK SKIP+,and CALL.
oo AUX1 Function:
Set the function of PARALLEL connector pin 17 (AUX1)
(default: MARK SKIP+).
oo AUX2 Function:
Set the function of PARALLEL connector pin 18 (AUX2)
(default: MARK SKIP–).
oo AUX3 Function:
• Only the connector selected with this setting will function.
The RS-232C and RS-422 connectors cannot both be used
at the same time.
• This setting is synchronized with the Serial Mode item on the
RS-422 page.
• If an optional SY-2 has not been installed, this cannot be set
to RS-422.
Baud Rate (bps)
Set the transmission speed (baud rate) with these buttons.
Setting buttons (bps): 4800, 9600, 19200 and 38400 (default)
DATA Length
Set the DATA length in bits with these buttons.
Setting buttons (bits): 7 or 8 (default)
Parity Bit
Set whether or not there is a parity bit with these buttons.
Setting buttons: NONE (default), EVEN and ODD.
Stop Bit
Set the stop bit with these buttons.
Setting buttons (bits) 1 (default) and 2
Set the function of PARALLEL connector pin 19 (AUX3)
(default: MARK).
TASCAM HS-20 85
10 – Internal settings
RS–422 page
Make RS-422 serial control transmission settings on this page.
NOTE
If an optional SY-2 has not been installed, the items will be
shaded and cannot be set.
Serial Mode
Set the serial connection mode with the following buttons.
Setting buttons: RS-232C (Default), RS-422
NOTE
• Only the connector selected with this setting will function.
The RS-232C and RS-422 connectors cannot both be used
at the same time.
• This setting is synchronized with the Serial Mode item on the
RS-232C page.
• If an optional SY-2 has not been installed, this cannot be set
to RS-422.
Video Resolve
When slaving this unit to a VCR, video sync signals might be
used instead of word sync signals for the common standard
clock. In the same way as with word sync signals, you can
select whether the video clock is followed (synchronizing
the beginning of timecode frames with video signal frame
edges) or it is independent from the frame clock.
This must be turned ON to accurately control this unit from
a video editor.
ON (default): timecode frame edges synchronized with
video signal frame edges
OFF: Independent from video frame clock
NETWORK page
Make settings related to NETWORK communication on this
page.
STATUS
Shows the MAC Address of this unit and the current IP
Address.
Password
Press the Change button to open the CHANGE PASSWORD
screen.
IP MODE
Use these buttons to enable or disable network functions.
Setting buttons: Disable (default), Enable
IP SETUP
Use this section to set the IP Address, Subnet Mask and
Default Gateway.
AUTO:
The IP Address, Subnet Mask and Default
Gateway are set automatically.
Use this setting when a DHCP server exists
on the network.
STATIC:
Set the IP Address, Subnet Mask and Default
(default value) Gateway manually.
IP Address/Subnet Mask/Default Gateway
When IP SETUP is set to STATIC, the IP Address, Subnet Mask
and Default Gateway are shown here.
Touch an area to open a corresponding setting screen.
Default: 0. 0. 0. 0.
Depending on the IP SETUP setting, the appearance of this
area will change as follows:
When
setting AUTO When
setting STATIC
AUTO設定時
STATIC設定時
When
touching
タッチ中
DNS SETUP
Set the DNS server IP address so that the IP address can be
looked up by server name.
AUTO:
STATIC:
(default value)
The DNS server IP Address is set automatically.
Use this setting when a DHCP server that
can return a DNS server IP address exists on
the network.
Set the DNS server IP Address manually.
DNS Address
When DNS setup is set to STATIC, this shows the DNS server
IP address. Touch it to open a setting screen.
Default: 0. 0. 0. 0.
86 TASCAM HS-20
10 – Internal settings
Depending on the DNS SETUP setting, the appearance of
this area will change as follows.
When
setting AUTO When
setting STATIC
AUTO設定時
STATIC設定時
When
touching
タッチ中
LINK SPEED
Set the network connection speed.
oo AUTO (default):
Connects using a link speed
adapted automatically to the connection environment.
oo 100M: Operates with a fixed link speed of 100 Mbps
Changing the IP Address, Subnet Mask, Default Gateway
and DNS Address settings
Touch the applicable area on the NETWORK page of the
REMOTE SETUP screen to open the corresponding setting
screen.
Changing the password setting
Touch the Change button located near Password on the
NETWORK page of the REMOTE SETUP screen to open
the CHANGE PASSWORD screen where you can set the
password.
Up to nine characters can be entered.
oo Numbers are three digits.
(For those of two digits or less, you do not need to input
0 first.)
oo The first digits are selected when the screen opens.
oo If you touch the number button for the first number after
entering selection mode, only that number will be input.
After this, other numbers can be input like on a calculator.
oo Touch the dot (.) button to move the selection to the next
number.
Example:
Shown on screen 192. 168. 1.
1
Input 1234
234. 168. 1.
(The first “1” is pushed
1
out.)
Input “ . ”
234 168. 1.
1
FTP page
Make settings related to the FTP client function.
Target FTP Server
Set the FTP server to be connected.
Touch it to open a setting screen.
oo FTP Address:
Set the address of the FTP server to be connected.
oo Folder Name
Set the default folder for uploading to the FTP server and
downloading from FTP.
oo User ID
Set the user ID used to connect to the FTP server.
oo Password
Set the password used to connect to the FTP server.
oo Access Test
Touch this button to test the connection with the set FTP
server. A pop-up message with the result will be shown.
Auto Upload Mode
Set whether or not files that have completed recording are
automatically uploaded to the FTP server.
oo Disable (default): Files will not upload automatically.
oo Enable: Files will upload automatically.
TASCAM HS-20 87
10 – Internal settings
Delete After Upload
Set whether or not files that have been uploaded are
automatically deleted.
oo Disable (default): Uploaded files will not be deleted
automatically.
oo Enable: Uploaded files will be deleted automatically.
Timing
Set the time when uploaded files will be automatically
deleted
Soon (default), at 00:00 – at 23:30 (in 30 minute increments)
NOTE
When set to Soon, files will be deleted soon after they
complete uploading.
With all other settings, the files will be deleted at the set
time.
Network functions (FTP server/telnet/VNC)
88 FTP (File Transfer Protocol) server
Use an FTP client application to transfer files between this
unit and a computer. Connect with this unit and log in like
other FTP servers.
Connect with this unit and log in to view "A:", "B:" and "C:" in
the root directory. These correspond to the SD card, CF card
and USB flash drive, respectively.
If there is no media loaded, the contents of the corresponding directory (A, B or C) will not be shown.
NOTE
• Use an FTP application which is compatible with Unicode if
you want to display Japanese characters.
• Be sure to set the maximum simultaneous transfer number
of the FTP client application to "1" for best network performance.
• Consult with TASCAM Customer Support for details on FTP
client applications that have been tested with this unit.
oo File operations using an FTP client application
1. Reading files from this unit.
Reading files from this unit is always possible.
2. Adding new files to this unit
Adding new files to this unit is always possible.
If a BWF file or WAV file is added to the current folder
during recording, it will be displayed in the list in the
order of already existing files, recorded files and added
files.
3. Overwriting existing files on this unit
Overwriting the current take is possible only when
stopped.
Takes that are being used on the ADJUST ENTRY screen
of the playlist mode cannot be overwritten. Overwriting
other existing files is always possible.
However, if the Play Mode is set to All Take on the
GENERAL page of the PLAY SETUP screen during
playback, overwriting the take that follows the current
take might not be possible depending on the timing.
CAUTION
If you overwrite a take assigned as a playlist entry in playlist
mode, a “?” mark is shown on the applicable entry icon on
the ENTRY list or file ASSIGN screen, and the entry will no
longer be playable. To play the overwritten file assign it to
the entry again.
CAUTION
If the size, number of channels, bit length or sampling
frequency of the new audio file is different from the
overwritten file, it might not be compatible with the existing
timeline or playlist.
If you attempt to start play back with such a mismatch, the
following error message might appear.
oo Settings necessary to connect via FTP
The settings necessary to connect by FTP with this unit are
as follows.
IP Address: The IP Address of this unit is shown on the
NETWORK page of the REMOTE SETUP screen.
Port number: 21
User name: ”HS-20”
Uppercase and lowercase letters are distinguished. (You
cannot change this)
Password: The default password is “HS-20”.
Uppercase and lowercase letters are distinguished.
You can change the password with the Password
[Change…] button on the NETWORK page of the
REMOTE SETUP screen.
NOTE
• If the EXTERNAL Control on the LOCK SETUP screen is set as
LOCK, you cannot connect via FTP.
• If the External LOCK setting is enable when an FTP
connection is active, that FTP connection will be disconnected.
• If you change the setting on the NETWORK page of the
REMOTE SETUP screen when there is an FTP connection, it
will be disconnected.
88 TASCAM HS-20
Perform the following to resolve the mismatch and avoid the
error message.
Timeline mode: Delete the applicable region
Take mode:
Delete the applicable take from the card.
Playlist Mode: Assign the overwritten file on the entry
again.
CAUTION
Do not overwrite an existing audio file with a file with a
different sampling frequency. Doing so could make it impossible to resolve the mismatch.
10 – Internal settings
4. Deleting files on this unit
Deleting the current take is possible only when playback
is stopped.
Files other than the current take may always be deleted.
However, since inconsistencies will occur between the
unit's management files and audio files you need to use
the REBUILD function after deleting a file.
oo After deleting a file (while stopped if during playback/
recording) use the REBUILD function when the following
REBUILD confirmation message appears.
88 Remote control (Telnet)
This unit enables you to utilize remote control over the
Ethernet using Telnet via port 23.
oo Settings necessary for Telnet connection
The setting values necessary to connect Telnet with this unit
are as follows:
IP Address: The IP Address of this unit is shown on the
NETWORK page of the REMOTE SETUP screen.
Port number: 23
Password: The default password is “HS-20”.
Uppercase and lowercase letters are distinguished.
You can change the password with the Password
[Change…] button on the NETWORK page of the
REMOTE SETUP screen.
oo Connecting this unit with Telnet
oo If you do not rebuild, the following message might
appear because of the inconsistencies between the unit's
management files and audio files.
1. Press the computer enter key after connecting to this
unit with Telnet using the above IP address and port
number.
2. Enter the above password and press the enter key when
Enter Password appears on the Telnet console.
3. When you have successfully logged in, "Login
Successful" appears on the Telnet console. Enter “exit”
and press the Enter key to disconnect Telnet.
NOTE
oo When rebuilding is necessary, a V mark is shown on the
following buttons.
Touch the REBUILD button on a menu to rebuild.
oo File name buttons on the HOME screen
oo FILE LIST screen MENU button
oo REBUILD button on various menus
5. Adding new folders to this unit.
Adding a new folder to this unit is always possible.
6. Deleting folders on this unit
Deleting the current folder is possible only when
playback is stopped.
Deleting other folders is always possible.
7. Changing the names of files and folders on this unit
The names of files and folders on this unit can never be
changed.
NOTE
FTP transfer with USB flash drives is only supported when
the unit is stopped. Do not edit, load folders, skip or
otherwise operate the unit.
• Only one Telnet connection is possible.
• If EXTERNAL Control on the LOCK SETUP screen is set to
LOCK, you cannot make Telnet connections.
An active Telnet connection will be canceled if this is set to
LOCK.
• An active Telnet connection will be canceled if you change
the settings on the NETWORK page on the REMOTE SETUP
screen.
• Please consult with TASCAM Customer Support for the
Telnet command protocol of this unit.
88 VNC (Virtual Network Computing)
You can operate the system from a computer by using a VNC
viewer application to display the screen shown on this unit’s
LCD.
You can operate the unit as follows using a mouse in a VNC
viewer application.
Mouse left click: Functions in the same way as touching
the LCD of this unit.
Mouse wheel click: Functions in the same way as the
ENTER key of this unit.
Mouse wheel scroll: Functions in the same way as the
DATA dial of this unit.
Mouse wheel press and scroll: Functions to make coarse
adjustments in the same way as when you press and
turn the DATA dial of this unit (coarse mode).
TASCAM HS-20 89
10 – Internal settings
You can perform the following operations using the
computer keyboard when the VNC viewer application is
active.
F1 to F12 keys:
Functions in the same way as an
external keyboard connected with
this unit.
See "List of keyboard operations"
in "Operation using a computer
keyboard" of “12 – Other functions”
in this manual.
HOME key:
Functions in the same way as the
HOME key of this unit and opens
the HOME screen. Press the End
key while holding the HOME key to
open the LOCK SETUP screen.
End key:
Functions in the same way as the
MENU key of this unit and opens
the MENU screen. Press the End
key while holding the HOME key to
open the LOCK SETUP screen.
PageDown:
Functions in the same way as the
FILE LIST key of this unit and opens
the FILE LISTscreen.
Functions in the same way as
Cursor 2 key:
turning the DATA dial of this unit
clockwise.
Functions in the same way as
Cursor x key:
turning the DATA dial of this unit
counterclockwise.
Character input keys: Use to input characters when this
unit shows a keyboard screen.
oo Settings necessary for VNC connection
The settings necessary to connect a VNC viewer application
to this unit are as follows.
IP Address: The IP Address of this unit is shown on the
NETWORK page of the REMOTE SETUP screen.
Password: The default password is “HS-20”.
Uppercase and lowercase letters are distinguished.
You can change the password with the Password
[Change…] button on the NETWORK page of the
REMOTE SETUP screen.
Audio Signal Input and Output
settings (AUDIO I/O)
Change audio signal input and output settings on this screen.
The AUDIO I/O screen has two pages: INPUT and OUTPUT.
Touch the tabs at the bottom of the screen to open the corresponding page.
INPUT page
Make input settings on this page.
INPUT SOURCE
You can set the input source. Select analog XLR input,
analog RCA input or digital input.
Setting buttons: Analog XLR (default), Analog RCA, Digital X
(“X” is either AES/EBU or S/PDIF)
DIGITAL SOURCE
You can select the digital input source.
Setting buttons: AES/EBU (default), S/DIF
Fs CONVERT
Turn the sampling frequency converter ON or OFF (default)
for each pair of inputs.
OUTPUT page
This shows the output settings and signal routes.
NOTE
• Only one active VNC connection is possible.
• If EXTERNAL Control on the LOCK SETUP screen is set to
LOCK, viewing in the VNC viewer application is possible, but
mouse and keyboard operations will be ignored.
• If you change any setting on the NETWORK page of the
REMOTE SETUP screen while a VNC connection is active, it
will be disconnected.
• Please consult with TASCAM Customer Support for information about VNC viewer applications that have been
tested with this unit.
• VNC viewer application display and operation will not be
smooth when files are being transferred by FTP, or at high
system sampling frequencies (88.2kHz/96kHz/176.4kHz/1
92kHz).
90 TASCAM HS-20
METER buttons
Use these buttons to set whether the meter shows the
position before or after the fader.
Touch the button on the left to show the level before the
fader or touch the button on the right to show the level after
the fader on the meter.
Post/Pre Fader buttons
Use these buttons to set whether the headphone output is
from before or after the fader.
Pre Fader button:
Signals before the fader are output for headphones.
Post Fader button (default):
Signals after the fader are output for headphones.
Fader
10 – Internal settings
When an RC-HS20PD is connected, the RC-HS20PD fader
level is shown.
If one is not connected, this value is fixed at 0dB.
Level meter settings (METER SETUP)
Make level meter settings on this screen.
NOTE
If you press the EXIT/CANCEL [PEAK CLEAR] key when the
Home Screen is open, the peak hold display resets.
System settings (SYSTEM SETUP)
Make system settings on this screen.
The SYSTEM SETUP screen has 4 pages: PREFERENCES, ANALOG
Ref LVL ADJUST and Backup/Preset and CLOCK ADJUST.
Touch the tabs at the bottom of the screen to open the corresponding page.
PREFERENCES page
Set system preferences on this page.
Metering Point
Set whether the meters show the signal before or after the
faders.
Meters show the signal before the faders
(default).
Meters show the signal after the faders.
In this case, the button appears light blue.
Ref. Level Line
Touch to turn the reference level line that appears on the
level meter ON (default) or OFF. (Default: ON)
KBD Type
Set the connected keyboard type to either US for Englishlanguage keyboards or JPN for Japanese keyboards.
Setting buttons: US, JPN (default)
Digital Ref. Level
Set the reference level for digital inputs and outputs to a
number of decibels below the maximum level (full scale).
Setting buttons: –9dB, –14dB, –16dB, –18dB,
–20dB (default)
Reference level line display ON
Over Level
Use this to set the level at which the overload indicator
lights. The peak indication level is this amount below the
maximum level (full scale).
Touch this knob and use the DATA dial to adjust the level.
Settings: –0.20 dB (default), –0.17 dB, –0.13 dB, –0.10 dB,
–0.06 dB, –0.03 dB.
Screen Saver
The screen saver function can be set to turn the display off if
none of the following operations occur for 10 minutes.
After the display turns off, any of the following operations
will cause the display to turn on and light with the set
brightness.
oo Touch panel operation
oo Front panel key use
oo Media connection
Setting buttons: OFF (default.), ON
This setting is reflected in the Audio Over setting of the Auto
Mark item on the OPTIONS page of the REC SETUP screen.
Peak Hold Time
Use this to set the peak hold time.
Touch this knob and use the DATA dial to adjust the time.
Settings: 0 sec, 1 sec, 2 sec (default) and inf (hold forever).
Release Time
Use this to set the release time.
Touch this knob and use the DATA dial to adjust the time.
Settings: Slow, Normal (default) and Fast
TASCAM HS-20 91
10 – Internal settings
ANALOG Ref LVL ADJUST page
Use these to adjust the analog input and output reference levels
of each channel.
Setting buttons
oo Disable (default):The TC Chase setting is not backed
up. Every time the unit is turned
on, TC Chase will be set to OFF.
oo Enable: The TC Chase setting is backed up.
The TC Chase setting in use before
the unit was turned off will be
restored when it is turned on
CLOCK ADJUST page
Set the time of the built-in clock.
Use “IN x” to adjust the analog input level, and use “OUT x” to
adjust the analog output level (“x” is L or R).
Touch a knob to select it, making the background yellow, and
turn the DATA dial to set the level.
Turn the DATA dial to change it in 0.1dB increments, or press
and turn it to change it in 1dB increments. The values appear
beneath each knob.
Range: −6dB to +6dB (default value: 0dB)
If an analog input has not been set, a knob will not be shown
and “Analog IN not selected” will appear in the meter area.
Touch the item that you want to set, and use the DATA dial to
adjust the item. (See “Setting the time of the built-in clock” on
page 24.)
Touch the SET button on the CLOCK ADJUST page or press the
DATA dial to confirm the setting.
NOTE
System setting backup and preset functions
You can import/export system files and load factory settings
using the Backup/Preset page of the SYSTEM SETUP screen.
System Backup
oo You can write System Backup data to the selected card
using the Export button.
oo You can read System Backup data on the selected card
using the Import button and write it to the built-in
memory.
If there are no System Backup files, a pop-up window
indicating that the import cannot be performed is shown.
Load Factory Preset
Touch the Load button to load Factory Preset data (the
setting values when shipped from the factory).
TC Chase Backup
Use to set whether or not the TC Chase setting is backed up.
92 TASCAM HS-20
While setting the time, the clock stops and the “:” does not
blink.
When you touch the SET button, the clock starts again and
the “:” blinks.
DAYLIGHT SAVING button
Touch to open the DAYLIGHT SAVING TIME SETUP page.
SNTP SETUP button
Touch to open the SNTP SETUP screen.
10 – Internal settings
DAYLIGHT SAVING TIME SETUP screen
SNTP SETUP screen
Use this screen to set the internal clock to use daylight
saving time during the set period.
Daylight Saving Mode
Set whether or not the HS-20 follows Daylight Saving Time
changes.
oo Disable (default): The HS-20 does not follow DST changes.
oo Enable: The HS-20 follows DST changes.
Explanation
Sets the start and
end months for
Month
Daylight Saving
Time.
Sets the start
and end week for
Week
Daylight Saving
Time
Sets the start
Day of and end day for
Week Daylight Saving
Time
Sets the start
and end hour for
Time
Daylight Saving
Time
Values
START
END
default default
Jan, Feb, Mar, Apr,
May, Jun, Jul, Aug, Mar
Sep, Oct, Nov, Dec
Nov
1st, 2nd, 3rd, 4th,
5th, Last
1st
2nd
Sun, Mon, Tue,
Wed, Thu, Fri, Sat
Sun
Sun
00:00-24:00
(01:00/step)
02:00
02:00
To make the above settings, touch a knob to select it,
making the background of the parameter yellow, and turn
the DATA dial to set it.
NOTE
This screen shows the local time setting, not Coordinated
Universal Time (UTC).
Offset Time
This is the amount of time that the clock is advanced during
daylight saving time.
Setting buttons: 30min, 60min
Default: 60min
Use the screen to set the SNTP function that allows the unit
to automatically synchronize the date and time with an
Internet time server.
STATUS
This shows the current status of the system in regards to
SNTP.
oo Current Time: This shows the current date and time used
by the unit.
oo Last Sync Time: This shows the time the unit last synchronized with an NTP server.
oo SNTP Connection: This shows the status of connection
with an NTP server.
Message
Successful update
Successful update with
skew
Starting Up
Accessing Server
Disabled
Meaning
Time updated successfully
Delay occurred but time was updated
The connection is starting up
Connecting to server
SNTP function is disabled
Waiting to establish network
Waiting for Network
connection
The server name could not be found
Server Name not found
from a DNS server
The server name was found from a
Server Name found
DNS server
There was no response from the
Server connection failed
server
The server responded, but it is
refusing additional connections, so
Server refusing connections
choosing a different SNTP server
would be good.
SNTP MODE
oo Disable (default): The SNTP function is not used.
oo Enable: The SNTP function is used.
NOTE
To use the SNTP function, you must make the following NTP
Server setting and DNS server setting on the NETWORK
page of the REMOTE SETUP screen.
NTP Server
Shows the NTP server name (32 characters or less)
oo Default: ntp.nict.jp
Touch this area to open the NTP SERVER name input screen
shown below.
TASCAM HS-20 93
10 – Internal settings
NOTE
• Set this to +9:00 for Japan standard Time (JST).
• For the United States, use the following settings.
Time Zone
Pacific Standard Time (PST)
Mountain Standard Time (MST)
Central Standard Time (CST)
Eastern Standard Time (EST)
Touch the Preset button at the top right of the NTP SERVER
name input screen to open a pull-down menu that contains
options to input pre-selected NTP server names for Japan
and the USA.
Clock Update Timing
Set the timing with which the internal clock retrieves the
time information from the NTP server and updates its time.
Start Up:
The internal clock retrieves the time
information from the NTP server and
updates its time when the unit starts up.
StartUp /24h cycle: The internal clock retrieves the time
(default)
information from the NTP server and
updates its time when the unit starts up
and at the set Update Time in a 24-hour
cycle.
Update Time
This sets the time at which the unit retrieves the time information from the NTP server if ”Clock Update Timing” is set to
”StartUp/24h cycle”.
Touch a knob to select it, making the background of the
parameter yellow, and turn the DATA dial to set it.
Setting range: 00:00–00:09 to 23:00–23:09 (01:00/step)
Default: “00:00 - 00:09”
NOTE
• Since SNTP server access might be busier at the top of each
hour, this unit will access the SMTP server at a random time
during the first nine minutes of the hour.
• We recommend setting this to a time band when no events
have been set using the timer event function.
Time Zone
Use this to set the time offset from Coordinated Universal
Time (UTC).
Touch a knob to select it, making the background of the
parameter yellow, and turn the DATA dial to set it.
Setting range: −12:00 to +14:00 (00:15/step)
Default: +09:00
94 TASCAM HS-20
Setting
−08:00
−07:00
−06:00
−05:00
Version information (VERSION INFO)
This page shows the unit’s SYSTEM version.
Touch the bottom center of the screen to show internal device
data and the version of any TASCAM RC-HS20PD remote
controller (sold separately) connected to the unit.
10 – Internal settings
Viewing and working with folders and
files (BROWSE)
3. Touch the e button to move to the media/folder to see its
content.
This section describes how to work with folders and files on SD
cards, CF cards, USB flash drives and FTP servers.
oo Displaying a folder/file
oo Displaying folder/file information
oo Deleting a folder/file
oo Copying a folder/file
"Project01" folder
Displaying a folder/file
1 Press the MENU key on the front panel to open the MENU
screen.
4. To move to a subfolder, touch the e button by the folder's
name.
5. To move up one folder, touch the media name/folder name
button shown at the upper left of the screen.
2 Touch the BROWSE button to open the BROWSE screen.
The media selection screen appears the first time.
The content of the last displayed media/folder appears the
second time and later.
Displaying folder/file information
1 Move to the media/folder containing the folder/file for
which you want to view its information.
SD card
NOTE
• Touch the button to return to the media selection screen.
• Touch the
button to move to the current folder in the
current media.
• The
icon appears with a "C" and is highlighted yellow
for the current folder in the current media.
SD card
TASCAM HS-20 95
10 – Internal settings
2. Select a folder/file.
Copying a folder/file
1 Press the MENU key on the front panel to open the MENU
screen.
"Project01" folder
The selected folder/file is highlighted in yellow.
3 Touch the INFO button to show information about the
selected folder/file in a pop-up.
oo If a folder is selected, the creation date and time are
displayed.
2 Touch the BROWSE button to open the BROWSE screen.
oo If a file other than BWF/WAV is selected, the update date
and time and file size are displayed.
SD card
3. Move to the media/folder containing a folder/file that you
want to copy.
oo If a BWF/WAV file is selected, the following information is
displayed.
"Project01" folder
Select a folder/file to copy.
The selected folder/file is highlighted yellow.
4. Touch the MENU button to open the pull-up menu.
oo
oo
oo
oo
oo
File update date and time
File size
Sampling frequency
Bit length/number of channels
Length/START T/C
5. Touch the COPY button on the pull-up menu to change to
the copy destination folder selection screen.
6. Move to the copy destination folder.
96 TASCAM HS-20
10 – Internal settings
oo The media selection screen appears for the first copy.
Touch the e button for the media containing the copy
destination folder.
First time media selection screen
oo The last displayed copy destination folder selection screen
appears the second time or later.
CF card selected previously
NOTE
• While the copy destination is being selected, the BROWSE
screen title changes to "SELECT FOLDER" and blinks.
• If the CANCEL button or button is touched while selecting
a copy destination, the BROWSE screen reappears.
7. Touch the COPY button to display a confirmation message
in a pop-up window. If there are no problems, touch the OK
button or press the ENTER key to copy.
For how to enter a name, see “Editing the name of a folder in
the root directory” on page 33.
To cancel copying, touch the CANCEL button.
8. A pop-up window appears during copying. When copying is
complete, the pop-up window disappears and the BROWSE
screen reopens.
NOTE
• If you copy an FTP server folder, only the files in the first level
of that folder will be copied.
Be aware that if there are files inside subfolders in the
selected folder, they will not be copied.
• If a folder on an FTP server is selected as the copy source or
copy destination, the following screen will appear.
• If the folder/file name already exists in the copy destination,
when you press the COPY button, a RENAME confirmation
will occur.
• If the folder name already exists in the copy destination,
when you press the COPY ADD button, only the files in the
folder will be copied. If a file with the same name already
exists, it will not be copied.
• If the folder/file name already exists in the copy destination,
when you press the COPY OVER button, all the files will be
overwritten when copying.
To cancel copying or change the copy destination, touch the
CANCEL button.
NOTE
If the folder/file name already exists in the copy destination,
"Cannot Copy Folder" or "Cannot Copy File" appears in a
pop-up window.
To change the folder/file name, touch the RENAME button.
TASCAM HS-20 97
10 – Internal settings
Deleting a folder/file
4. Touch the MENU button to open the pull-up menu.
1. Press the MENU key on the front panel to open the MENU
screen.
5. Touch the DELETE button on the pull-up menu.
6. Touch the OK button or press the DATA dial when the confirmation pop-up message appears.
2. Touch the BROWSE button to open the BROWSE screen.
7. When a reconfirmation message appears in a pop-up
window, touch the OK button or press the DATA dial to
delete.
SD card
3. Move to the media/folder containing a folder/file to delete.
To cancel deleting, touch the CANCEL button.
8. A pop-up window appears during deletion.
When deletion is complete, the pop-up window disappears
and the BROWSE screen reopens.
"Project01" folder
Select a folder/file to delete.
The selected folder/file is highlighted in yellow.
CAUTION
You even can delete a folder, file or management file
already in use in timeline or playlist mode.
If you delete such a folder/file, an error pop-up appears
when you attempt to play the corresponding region/entry.
98 TASCAM HS-20
10 – Internal settings
NOTE
If an audio file of the current folder is deleted, a rebuild
confirmation message appears in the pop-up window.
Execute the rebuild. If the rebuild is not executed, a
"Play Error" pop-up message will appear because the
management and audio files will not match.
When rebuilding is necessary, a B mark appears on the
following buttons.
Touch the REBUILD button on a menu to rebuild.
• File name buttons on the HOME screen
• FILE LIST screen MENU button
• REBUILD button on each menu
TIMER EVENT LIST screen
View and set timer events, which can be used to automatically
execute the following operations at set times, on this screen.
Event type Function
Playback
Repeat playback
Managing media (MEDIA MANAGE)
Record
You can manage SD cards, CF cards and USB flash drives with
this unit.
Stop
CAUTION
If you use any of the FORMAT or COPY commands, all data
on the subject media will be erased. Use these commands
only if you are absolutely certain that you want to erase the
media.
Download (from an FTP server)
Delete and download
(After all audio files in the current folder are
deleted, the unit will download from the FTP
server.)
1
CURRENT MEDIA
This shows the currently selected media name and its status.
MEDIA SELECT
This shows the MEDIA SELECT screen.
On this screen, you can select the media to use for recording
and playback.
FORMAT
Use to format the selected media.
QUICK button:
FULL button:
This only formats the media management
information.
This formats the entire media.
USB FORMAT
Use to format a USB flash drive.
QUICK button:
FULL button:
This only formats the management
information of the USB flash drive.
Initialize the entire USB flash drive
device
MEDIA COPY
This copies the media contents.
This copies all contents from the
selected card to the unselected card.
SDwUSB/CFwUSB This copies all contents from the
selected card to the USB flash drive.
USBwSD/USBwCF This copies all contents from the USB
flash drive to the selected card.
SDwCF/CFwSD
2
3
4
5
7
6
8
9
0
q
1 Active indicator
This shows the number of active events/total events.
2 Schedule button
This shows event execution date and time information.
oo Top line: This shows the date or days of the week set for
the event.
If set for every day, this will be shown in this format:
"2014 *** 1".
If four or more days of the week are set, only the first
letter of the day will be shown (SMTWTFS).
Example: Monday to Friday would be shown as "_
MTWTF_".
oo Bottom line: This shows the time that the event is
scheduled.
TASCAM HS-20 99
10 – Internal settings
3 Event Type button
This shows the event type.
See the Event Type/Function list above for the meanings of
the icons.
4 Timer event function switch (ON/OFF)
This button turns the timer event function on/off.
Touch this button to turn it ON/OFF.
q MENU button
oo Touch this button to open a pull-up menu.
oo When the pull-up menu is open, touch this again to close
it.
If a timer event has been edited, but not saved, a V icon
will appear on this button.
MENU button pull-up menu.
5 Current date and time
This shows the current date and time of the built-in clock.
6 Event on/off switches
Use these buttons to turn individual events on/off.
An event is on when its button has a check mark.
7 Target button
This shows the file/folder that will be affected by the event.
This shows the name of the file that will be played for a
playback/repeat playback event.
This shows the name of the file/folder that will be used for
download/delete & download events.
8 ALL button
Touch this button to make it active and show all set events.
9 Display filter button
oo Touch this button to make it active and show only events
for the shown date.
oo Touch this button to open a date selection pull-up menu.
When the pull-up menu is open, touch this again to close
it.
Display filter pull up menu
RELOAD button
Discard all changes and reload the timer event information file.
SAVE button
Save the timer event information file to the media.
If a timer event has been edited, but not saved, a V icon
will appear on this button.
ADD button
Open the Timer Event Setup screen where you can edit a
new timer event.
EDIT button
Open the Timer Event Setup screen where you can edit
the selected timer event.
DELETE button
Touch this button to delete the selected timer event.
NOTE
Date setting area
Touch these to highlight them
yellow. When highlighted,
you can use the DATA dial to
adjust them.
Touch this button to switch to
the previous day.
Touch this button to switch to
the previous day.
Touch this button to switch to
the next day.
Touch this button to switch to
the next day.
Touch this button to switch to
today's date.
0 MULTI SELECT button
Press this button to activate a mode that allows the selection
of multiple events.
100 TASCAM HS-20
• Timer event functions are enabled only when in take mode.
• A maximum of 100 events can be registered and executed.
• For example, if 20 events that are each repeated 10 times
are registered, the total number of executed events would
be 200 (10 x 20). In order to keep the number of executed
events at 100 or less, only the first 10 events would be
executed. The latter 10 events would not be executed.
• Events are automatically sorted by their starting time.
• If there are two events at the same time, only the event
registered later in a list will be enabled.
• Recording/repeat playback timer events will continue until
a stop timer event.
• If the time of a recording/playback/repeat playback timer
event arrives during recording, recording will continue.
• If the time of a recording/playback/repeat playback timer
event arrives during playback, that event will be executed.
• If the time of a download timer event arrives during
recording/playback, recording/playback will continue
uninterrupted and the download event will be executed.
• If the time of a recording/playback/repeat playback timer
event arrives during downloading, downloading will
continue uninterrupted and that event will be executed.
• If a file downloaded by a download timer event has the
same name as a file in the current folder, it will overwrite
that file.
• If the time of a delete & download timer event arrives during
recording/playback, recording/playback will continue
10 – Internal settings
uninterrupted and the download will be executed, but
deletion will not be executed.
• During downloading, the SD/CF card indicator blinks.
• The timer event information file will be read automatically
when a folder is loaded.
• If the timer event information file (HS_EventList.tlist) is
overwritten an FTP or Browse function, the timer event
information file will automatically be read again.
CAUTION
If you do not save, all timer event changes will be lost when
a folder is loaded, the card is removed or the unit is turned
off.
Touch these to highlight them yellow. When highlighted,
you can use the DATA dial to adjust them.
6 Event Repeat (Event Count) field
Use this to set the the number of times the event is repeated
(1–100).
(If set to “1” the event will not repeat.)
Touch these to highlight them yellow. When highlighted,
you can use the DATA dial to adjust them.
7 Event Repeat (Last Event Time) display.
This shows the last time that the repeated event will be
executed.
8 OK button
Touch this to confirm all changes and return to the TIMER
EVENT LIST screen.
TIMER EVENT SETUP screen
Use this screen to edit the settings of a specific event.
Common settings
For recording and stop events, only the common settings
are shown and can be set.
1
2
NOTE
Repeat event setting example
To make an event repeat on the hour from 10:00 to 19:00,
make the following settings.
Time
Event Repeat: Interval Time
Event Repeat: Event Count
10:00
01:00
10
Schedule type screen
3
8
4
5
6
oo Day
On the TIMER EVENT SETUP screen, select the Day of
Week button to enable setting specific days of the week
(for weekly repetition).
The day of week buttons allow each day to be turned
ON/OFF separately.
7
1 Event Type buttons
Use these buttons to set the event type.
oo Playback:
PLAY (y)
oo Repeat playback:
PLAY (y·)
oo Record:
REC (p)
oo Stop: STOP (8)
oo Download:
Down-load (È)
(Download from the FTP server)
oo Download after deleting:
Delete&DL (È)
(After all audio files in the current folder are deleted, the
unit will download from the FTP server.)
oo Date
On the TIMER EVENT SETUP screen, select the Date
button to enable setting a specific date for event
execution.
Touch the event date areas to highlight them yellow.
When highlighted, you can use the DATA dial to adjust
them.
2 Schedule Type buttons
Use these buttons to set the schedule type of the event.
3 Time fields
Use these to set the event execution time (hour, minute and
second).
Touch these to highlight them yellow. When highlighted,
you can use the DATA dial to adjust them.
4 CANCEL button
Touch this to discard all changes and return to the TIMER
EVENT LIST screen.
5 Event Repeat (Interval Time) fields
Use these to set the the interval between repeat event
execution (hours and minutes).
NOTE
The month area can also be set to all months by selecting
"***" which appears between "Dec" and "Jan" in order.
TASCAM HS-20 101
10 – Internal settings
oo Daily
On the TIMER EVENT SETUP screen, select the Every Day
button to set the event to be executed every day.
Playback file selection screen
On the playback events/repeat playback screen, touch
the Playback File button to open one of the following
three file selection screens.
SELECT TAKE screen
Select a file for playback from media loaded in the unit on
this screen.
Playback/repeat playback event screen
oo Playback event screen
On the TIMER EVENT SETUP screen, touch the PLAY (y)
button to open the following screen.
FTP Server/Keyboard Screen selection buttons
FTP Server button:
Press this button to open the
FTP Server BROWSE screen.
Keyboard Screen button: Press this button when
paused to open the INPUT
PLAYBACK FILE screen.
Mode (time)
START TIME button: Set an event that starts playback of
the playback file at the set time.
END TIME button: Set an event that completes
playback of the playback file at the set time.
NOTE
The starting time of an event registered using END TIME will
be calculated with a time of zero if the playback file does not
exist in the current folder.
However, if a file is added through downloading, for
example, the file time will be applied.
Playback File
Touch this area to open the playback file selection
screen.
Playback files
Shows the playable files contained by the current folder.
SELECT buttons
Touch a SELECT (e) button on the SELECT TAKE screen
to set the corresponding file on the left side of this
screen as the playback file, and return to the Timer Event
Setup screen
FTP Server BROWSE screen
On this screen, you can select files on an FTP server by
name.
On this screen, you can set file names that have not yet
been downloaded to the media in the unit.
oo Repeat playback event screen
On the TIMER EVENT SETUP screen, touch the PLAY
(·y) button to open the following screen.
Take List/Keyboard Screen selection buttons
Take List button:
Touch this to switch to the
SELECT TAKE screen.
Keyboard Screen button: Press this button when
paused to open the INPUT
PLAYBACK FILE screen.
The only difference with the playback event screen is
that there is no Mode section. The Time is always the
start time.
102 TASCAM HS-20
File name list
This shows files on the FTP server.
Touch a file name to select it and highlight it yellow.
SELECT button
When a filename is selected, touch the SELECT (¸)
button to set the selected file as the playback file, and
return to the Timer Event Setup screen
10 – Internal settings
NOTE
On this screen, you can set Japanese names for files that
have not yet been downloaded to the media in the unit.
INPUT PLAYBACK FILE screen
On the screen, you can input the characters of playback
file names.
Take List/FTP Server selection buttons
Take List button:
FTP Server button:
Touch this to switch to the SELECT
TAKE screen.
Press this button to open the FTP
Server BROWSE screen.
Playback file input
oo Touch the ENTER button to set the input file name as the
playback file name and return to the Timer Event screen.
oo Even if ".wav"is not input, ".wav" will be automatically
added to the file name.
oo If the filename exceeds the screen width, use the arrow
(<-/->) keys to move the cursor and scroll the name
left and right. When the left or right end is not being
displayed, "…" appears at that end.
Download event/Delete & download event screens
oo Delete & download event screen
After all audio files in the current folder are deleted, the
unit will download set folders/files from the FTP server.
On the TIMER EVENT SETUP screen, touch the Delete&DL
(È) button to open the following screen.
Download Target
This shows the path of the file/folder that will be
downloaded.
Touch this area to open the SELECT DOWNLOAD TARGET
screen.
NOTE
The download server is the server set on the FTP page of the
REMOTE SETUP screen.
SELECT DOWNLOAD TARGET screen
On the Download event/Delete & download event
screen touch the Download Target path to open one of
the following two download selection screens
FTP Server BROWSE screen
On this screen, you can select the path of a file/folder on
the FTP server.
oo Download event screen
Use this screen to download set folders/files from the
FTP server.
On the TIMER EVENT SETUP screen, touch the Down-load
(È) button to open the following screen.
Path name input screen button
Keyboard Screen button: Touch this to switch to the path
name input screen.
File/folder to be downloaded
This shows the names of files/folders on the FTP server.
Touch a file/folder name to select it and highlight it
yellow.
SELECT button
When a file/folder name is selected, touch the SELECT
(¸) button to set the selected file/folder path as the
file/folder to be downloaded, and return to the Timer
Event Setup screen.
If you press the SELECT (¸) button without selecting
anything, the currently shown folder path will be set for
download, and the Timer Event Setup screen will reopen
Path name input screen
On this screen, you can input the characters of path
names for download.
TASCAM HS-20 103
10 – Internal settings
Operation mode selection
(OPERATION MODE)
Set the unit’s operation mode on this page.
Browse FTP Server selection button
Browse FTP Server button: Press this button to open the
FTP Server BROWSE screen.
Input of path name for file/folder to be downloaded
oo To designate a folder, input a slash (/) at the end
oo If the path name exceeds the screen width, use the arrow
(<-/->) keys to move the cursor and scroll the path left and
right. When the left or right end is not being displayed, “…”
appears at that end.
oo The “/” button only appears when inputting FTP path
names.
When shifted, it becomes the “:” input button.
104 TASCAM HS-20
After selecting an operation mode, touch the SET button to
switch to it and return to the Home Screen.
TIMELINE MODE
The timeline mode becomes active and the Home Screen
reopens.
TAKE MODE
The take mode becomes active and the Home Screen reopens.
PLAYLIST MODE
The playlist mode becomes active and the Home Screen
reopens.
11 – Mark and locate functions
• When an Audio Over or Synchronization Error auto mark is
added, another event of the same type will not cause a mark
to be added until at least 10 seconds have passed.
Mark functions
Adding marks
Using keys to locate to marks
Use the following methods to create marks.
One timeline mode or one take can have a maximum of 99
marks, including automatically-created marks.
oo Push the MARK key on the front panel.
Press the MARK key to add a mark at that playback/
recording time. In timeline mode, marks are only added to
the timeline. They are not added to files.
Mark names are in the format “MARK XX”.
Press the . [MARK .] or / [MARK /] key while
pressing and holding the SHIFT key to locate to the previous or
next mark.
NOTE
If MARK SKIP +/− is input using parallel control, the unit will
locate to the next or previous mark.
Mark list screen
Touch the Mark List button on the Home Screen to open the
MARK LIST screen.
oo Use the auto mark function
When the auto mark function is ON, marks can be added when
prerecording starts, recording starts and ends, when audio overs
occur, at regular time intervals and when synchronization errors
occur. (See “OPTIONS page” on page 80.)
In timeline mode, marks are added to the timeline and file itself.
Marks are named according to how they were made as follows.
When auto mark made
Mark name
At audio over
OVER xx
At time interval
TIME xx
At synchronization error
UNLK xx
CAUTION
The following auto marks are only added to the file (take),
and will not appear in the timeline in timeline mode.
When auto mark made
Mark name
Recording start point
REC xx
Recording end point
END xx
Pre-recording start point
PRE xx
NOTE
• Audio Overs occur when the level exceeds the maximum
level (full scale) minus the value set by the user.
(In the example above, this would be when the level exceeds
the maximum level minus 0.20 dB.)
• If a mark is triggered using parallel control, a mark is added
in the same manner as if the MARK key had been pushed.
NAME buttons
Touch to sort by mark name in descending or ascending
order.
When the mark names are sorted in ascending order, the r
icon appears inside the NAME button. When in descending
order, the s icon appears inside this button.
TIME buttons
Touch to sort marks by time in descending or ascending
order.
When they are sorted by time in ascending order, the r icon
appears inside the TIME button. When in descending order,
the s icon appears inside this button.
Mark name buttons
Touch to select a mark.
LOCATE (
) buttons
Touch one of these to locate to the corresponding mark.
LIST INFO button
Touch this to see a list of the number of marks by type in the
currently selected take.
EDIT NAME button
Touch this button to open the MARK NAME screen where
you can edit the name of the selected mark.
EDIT TIME button
Touch this button to open the MARK EDIT screen where you
can edit the position of the selected mark.
MULTI SELECT button
Use this to enable the selection of multiple marks.
DELETE button
Touch this button to erase the selected mark.
Scroll buttons
Use these buttons to scroll to the beginning or end of the
mark list or scroll one page (five lines) forward or backward.
You can also scroll through the mark list one line at a time
using the DATA dial.
TASCAM HS-20 105
11 – Mark and locate functions
Locating to marks
Touch a
button to locate to the corresponding mark.
3. Another pop-up window appears to reconfirm.
Touch the OK button or press the DATA dial to delete the
mark.
Viewing mark information
Touch the LIST INFO button on the MARK LIST screen to open
the LIST INFO page.
This screen shows a list of the number of marks by type in the
currently loaded take.
Touch the LIST INFO button again to return to the MARK LIST
screen.
Deleting a mark using the MARK LIST screen
NOTE
Mark list information screen
On the mark list information screen, you can delete marks
or types of marks by selecting them and touching the
DELETE button.
When you do this, a “Delete all marks of this type?” confirmation pop-up appears. Touch the OK button or press the
DATA dial to delete all the marks of the same type.
NOTE
After recording, the MARK LIST screen might show a TOTAL
number of marks that is 2 or 3 greater than the sum of
the MANUAL MARK, TIME, OVER and UNLK marks. This is
because the total includes REC, END and PRE (when prerecording) marks that are created during recording.
Deleting marks
1. Select the mark that you want to delete on the MARK LIST
screen.
Mark list information screen
Deleting marks using the mark list information screen
MARK LIST screen
2. Touch the DELETE button on the MARK LIST screen.
106 TASCAM HS-20
11 – Mark and locate functions
Editing mark positions
You can change the position (time) of marks added using the
MARK list (marks named “MARKXX”).
Editing mark names
1. Select the mark that you want to edit on the MARK LIST
screen.
NOTE
Automatically placed marks cannot be edited.
1. Select the mark that you want to edit on the MARK LIST
screen.
2. Touch the EDIT NAME button to open the MARK NAME
screen.
2. Touch the EDIT TIME button to open the MARK EDIT screen.
Touch the FRAME EDIT button to set whether or not the
frame value can be edited.
Follow the same procedures as “Editing the name of a folder
in the root directory” on page 33.
NOTE
FRAME EDIT on
You can also open the MARK NAME screen by touching the
mark name area on the Home Screen.
However, since the names of automatic marks cannot be
edited, the MARK NAME screen will not open for them.
FRAME EDIT off
3. Touch a number button to edit a mark. Use the DATA dial to
change the time for the selected number.
Touch the ENTER button to confirm the setting and return to
the MARK LIST screen.
oo If you begin input without selecting a digit, input will start
from the smallest one.
oo To input a specific digit, touch it to make its background
yellow, then use the number buttons or the DATA dial to
enter two digits at a time.
oo Touch the CURRENT q button to copy the current
playback position to the input value.
oo Touch the CLEAR button to clear all input values.
TIP
This can also be input using a connected keyboard.
Press the keyboard’s Enter key to confirm a setting and its
ESC key to clear all the values.
TASCAM HS-20 107
11 – Mark and locate functions
Manual locate function
You can directly input a time and locate to it.
Touch the Manual Locate button on the Home Screen to open
the MANUAL LOCATE screen.
Touch the FRAME EDIT button to set whether or not the frame
value can be edited.
FRAME EDIT on
FRAME EDIT off
There are three locate modes as follows.
ABS: Input an actual time and locate to it.
+: Input an amount of time to go forward from the current
time.
−: Input an amount of time to go backward from the current
time.
Input the time using the number buttons.
You can also select a number field in the LOCATE area and use
the DATA dial to adjust the time.
Touch the LOCATE button to locate to that new time and return
to the Home Screen.
Touch the CLEAR button to clear all input values.
TIP
This can also be input using a connected keyboard.
Press the keyboard’s Enter key to confirm a setting and its
ESC key to clear all the values.
108 TASCAM HS-20
12 – Other functions
Flash start function
Use the flash start function to instantly start playback of takes
that you have designated in advance.
A maximum of 100 takes can be started instantly using a
keyboard or devices connected to this unit’s remote connectors
(REMOTE and PARALLEL).
1. In take mode, select the folder that you want to play back.
(See “Loading a folder” on page 65.)
When in playlist mode, select a playlist. (See “Loading
playlists” on page 67.)
2. Use the DATA dial to select the page that contains the
takes or entries that you want to play after touching and
highlighting in yellow the operation/display knob on the
flash page on the Home Screen.
The first 100 numbered takes or files in the selected folder or
playlist can be played back using flash starting.
Operation using a computer keyboard
You can control this unit by connecting an IBM-PC-compatible
keyboard with a PS/2 or USB interface. Connect PS/2 keyboards
to the KEYBOARD connector on the front of the unit. Connect
USB keyboards to the USB connector on the front of the unit.
A variety of operations are possible, but using the keyboard is
especially efficient for inputting names.
Setting the keyboard type
Set the type of keyboard connected on the PREFERENCES page
of the SYSTEM SETUP screen.
Set the type of keyboard connected on the PREFERENCES page
of the SYSTEM SETUP screen. (See “PREFERENCES page” on page
91.)
Use the keyboard to input names
Page number
Take/entry number
1
1-20
2
21-40
3
41-60
oo Names of folders in root directory(see “Editing the name
of a folder in the root directory” on page 33.)
4
61-80
oo Folder names (See “Creating new folders” on page 39.)
5
81-100
oo Take names (See “Editing take names” on page 61.)
3. Touch the flash start key to immediately play the take or
entry corresponding to the key.
NOTE
If you flash start a file with a different sampling frequency,
the start of playback will be delayed while the sampling
frequency is being changed.
In order to use flash starting in take mode, you should have
only files with the same sampling frequency (REC Fs) in a
folder.
In order to use flash starting in playlist mode, you should
have only files with the same sampling frequency (REC Fs) in
the playlist.
You can edit and input characters for the following items in the
same manner as inputting characters on a computer.
oo First half of the next take name
oo Letter in the second half of the next take name
You can also use it to enter numbers for the following items.
oo Editing the T/C USER BITS
oo Editing the START TIME
oo Editing marks(See “Editing mark positions” on page 107
and “Editing mark names” on page 107.)
oo Inputting manual locate points(See “Manual locate
function” on page 108.)
oo Editing timecode offset(See “SYNC page” on page 82.)
oo Playlist name(See “Creating a new playlist” on page 65
and “Saving playlists” on page 75.)
oo Names of AES31 files(See “Creating new AES31 editing
information” on page 43.)
oo Playlist entry titles(See “Editing entry titles” on page 71.)
oo Bounce file names(See “Bouncing” on page 55.)
TASCAM HS-20 109
12 – Other functions
Selecting the type of character to input:
In the same manner as with a computer, use the Shift and
Caps Lock keys to select the type of character to input.
Inputting characters:
You can use the number, letter and symbol keys to input
them directly.
Moving the cursor:
Use the s/w keys.
Use the HOME/2 key to move the cursor to the beginning.
Use the END/x key to move the cursor to the end.
Erasing characters:
Use the Delete key to erase the character at the cursor
position.
Use the Backspace key to erase the character before the
cursor position.
Inserting characters:
Input the character at the desired position.
CAUTION
• The following symbols and punctuation marks cannot be
used in names.
\/:*?"<>|
• Japanese kana cannot be used.
• The letter in the second half of the next take name can only
be an uppercase letter from the alphabet.
110 TASCAM HS-20
List of keyboard operations
In addition to inputting names, a keyboard can be used to
control the transport and conduct various other operations. The
following is a summary of keyboard key functions.
Key
Operation
F1 key
Same as . key
F2 key
Same as / key
F3 key
Same as CALL key
F4 key
Same as STOP key
F5 key
Same as PLAY key
F6 key
Same as PAUSE key
F7 key
Turn auto cue ON/OFF
F8 key
Same as REC key
F9 key
Turn auto ready ON/OFF
F10 key
Turn repeat mode ON/OFF
F11 key
Change play mode
F12 key
—
CTRL + F1 key
FLASH 1
CTRL + F2 key
FLASH 2
CTRL + F3 key
FLASH 3
CTRL + F4 key
FLASH 4
CTRL + F5 key
FLASH 5
CTRL + F6 key
FLASH 6
CTRL + F7 key
FLASH 7
CTRL + F8 key
FLASH 8
CTRL + F9 key
FLASH 9
CTRL + F10 key
FLASH 10
CTRL + F11 key
FLASH 11
CTRL + F12 key
FLASH 12
13 – Operation with timecode synchronization
In this chapter, we explain playback synchronized with
timecode, which is possible with an optional SY-2 installed.
For recording and playback, this unit can be synchronized with
SMPTE timecode input through the TIMECODE IN connector on
the SY-2 installed in the rear panel or with its built-in timecode
generator (“master timecode” hereafter).
Timecode synchronization differs according to the operation
mode.
Playback synchronized with timecode
Timeline mode
In timeline mode, playback can be synchronized with the master
timecode.
When playing back with timecode synchronization, when
playback starts, it synchronizes with the master timecode.
Take mode
This mode does not support playback synchronization with
timecode.
Playlist Mode
This mode does not support playback synchronization with
timecode.
Basic operation
1. In timeline mode, load the folder that you want to use for
recording or playback.
2. Either of the following operations will enable synchronized
playback or recording.
oo While pressing and holding the SHIFT key, press the CALL
[CHASE] key on the front panel.
oo On the SYNC page of the SYNC T/C screen, set TC Chase to
ON.
The TC indicator on the Home Screen will change to the
CHASE indicator.
3. Press the PLAY key to start timecode synchronized playback
or the PLAY and RECORD keys to start timecode synchronized recording. The CHASE indicator on the Home Screen
appears green.
4. Press the STOP key during recording or playback with
timecode synchronization to stop recording/playback. The
CHASE indicator on the Home Screen blinks when stopped.
5 To resume recording or playback with timecode synchronization, repeat steps 3 and 4.
6. Either of the following operations will turn synchronization
off.
Timecode offset
You can set an offset for master timecode synchronization.
By doing so, you can synchronize to master timecode for
playback with a set time difference (see “SYNC page” on page
82).
Rechase
This unit continues to monitor master timecode even after
synchronized playback starts. Should the playback time of this
unit and the master timecode become unsynchronized for any
reason, the unit can “rechase” the timecode.
You can set whether or not the unit uses rechase and the degree
of the discrepancy before rechasing (see “SYNC page” on page
82).
Recording synchronized with
timecode
Timeline mode
In timeline mode, recording can be synchronized with master
timecode.
When recording with timecode synchronization, master
timecode is captured the instant that recording starts, and
recording starts from that time (timecode time) on the timeline.
Take mode
Chase and rechase are not possible.
The timecode from the built-in timecode generator is captured
at the beginning of recording as the file starting time.
Playlist Mode
In playlist mode, recording is not possible regardless of
timecode synchronization status.
CAUTION
During synchronized recording, this unit only synchronizes
to master timecode once at the start of recording. There is
no rechase function as there is with synchronized playback.
oo While pressing and holding the SHIFT key, press the CALL
[CHASE] key on the front panel.
oo On the SYNC page of the SYNC T/C screen, set TC Chase to
OFF.
oo After doing this, playback and other unit operations
continue. The CHASE indicator on the Home Screen is
replaced with the TC indicator.
TASCAM HS-20 111
14 – Loading files recorded on another device
This unit can import and play audio files that meet the following
requirements.
In addition, files created by other TASCAM HS series units can be
played back as is if they meet the following conditions:
File format:
Sampling frequency:
Quantization bit depth:
Number of tracks:
BWF/WAV
44.1/48/88.2/96/176.4/192kHz
16/24 bits
2 or less
Using imported files on this unit
1. Insert the media with the copied files into this unit’s card
slot.
2. Press the FILE LIST key on the front of the unit to open the
take selection screen. Confirm that the audio files written to
the HS Files/Audio001 folder are recognized as takes.
CAUTION
If you play a file with a different sampling frequency, the
sampling frequency of the unit will be changed automatically. This will take about 1 to 3 seconds, so we recommend
preparing files with the same sampling frequency whenever
possible.
Preparation before importing
Use this unit to format media that will be used for the first
time with it. Media formatted by this unit will be optimized to
improve performance with it.
If media that has been formatted by a computer or another
device is used with this unit, its operation might be affected.
1. Insert the media into the corresponding card slot of the unit.
2. To format media, follow the procedures in “Formatting SD/
CF cards” on page 27.
3. After confirming that the indicator for the slot with the
media is not blinking rapidly, eject the media.
NOTE
When you format media with this unit,"HS Files" and
"Audio001" folders will be created automatically in the root
directory.
4. Insert that media into the media slot of a computer, for
example.
If this media was formatted by this unit, it will be recognized
by the computer as a drive named "HS-20".
In this example, "HS-20" is used as the drive name.
5. Copy audio files that you want to import into the “Audio001”
folder inside the “HS Files” folder, which is on the HS-20.
CAUTION
Do not eject the media while data is being written to it.
Doing so could damage data on the media and even make
the data unreadable.
For details, please see the manuals for your computer, card
reader or other device being used for this purpose.
6. After writing is complete, remove the media from the media
slot of the computer or other device.
112 TASCAM HS-20
3. You can play a file by assigning it to the timeline using the
timeline mode editing function, by playing it in take mode,
or by adding it to a playlist and playing it back in playlist
mode.
See “7 – Timeline mode” on page 39 for the timeline mode
editing function, see “Recording in take mode” on page 57
for details about take mode playback and see “9 – Playlist
mode” on page 65 for details about playlist mode.
15 – Troubleshooting
If you are having trouble with the operation of this unit, please try the following before seeking repair.
If these measures do not solve the problem, please contact the store where you bought the unit or TEAC customer support.
88 The unit will not turn on.
oo Confirm that the power plug, for example, is connected
completely.
88 Media is not recognized.
oo Confirm that the card is securely inserted into the card
slot.
oo Pause recording or playback.
88 The unit controls do not function.
oo Is the panel lock function ON?
88 Playback is not possible.
oo Confirm that the audio file's sampling frequency
(44.1/48/88.2/96/176.4/192kHz) and quantization bit rate
(16/24) are compatible.
88 I hear noise.
oo Confirm that none of the cables have problems.
88 The touch panel does not work properly.
oo Do not use commercially-available protective film for LCD
screens on the touch panel.
oo Confirm that the panel lock function is not engaged and
locking the display.
88 I cannot create a new folder.
oo Confirm that a folder with the same name does not
already exist.
oo If the amount of space remaining on the media is insufficient, a new folder cannot be created. Erase unneeded
data, and then create a new folder.
88 There is no sound.
oo Reconfirm the connections of your monitoring system.
Check the amplifier volume.
oo When using a TASCAM RC-HS20PD remote controller (sold
separately), confirm that the fader is not lowered.
oo If you cannot hear the input signal, turn input monitoring
ON.
oo If you cannot hear the playback sound, turn input
monitoring OFF.
88 Recording is not possible.
oo If you are using an external device, check the connection
again.
oo Adjust the recording levels.
oo If the media does not have sufficient space, erase
unneeded data to increase the amount of available space
or change the media.
oo If the maximum number of recordable takes or the
maximum take number has been reached, change the
recording folder.
oo If the total number of items in the folder, including files
and subfolders/directories, is too large, change the
recording folder.
88 Setting changes are not remembered.
oo This unit backs up settings whenever the media selection
is changed, a folder or take is loaded, and playback or
recording occurs. After startup, if none of these actions is
conducted, settings might not be backed up even if they
are changed.
TASCAM HS-20 113
16 – Messages
The following is a list of the messages that appear in pop-up windows. Refer to this list to learn more about each message as well as how
to respond to them.
Messages with contents that vary depending on the situation are placed at the beginning of the list. The subsequent messages are listed
in alphabetical order.
Message
Meaning and response
MM "vvvvvvvv"
NUM OF FOLDERS: p
USED SIZE: u
FREE SIZE: f
TOTAL SIZE: t
This shows information about the media.
MM DEVICE ERROR
MM Format failed
MM has no folders.
Please create a folder.
MM is not available
MM is not usable
MM MEDIUM ERROR
The media cannot be recognized.
An error occurred during formatting, and formatting could not
be completed.
The media does not have any folders.
MM: SD, CF, or USB flash drive
MM: SD or CF
MM: SD, CF, or USB flash drive
MM: SD, CF, or USB flash drive
MM: SD, CF, or USB flash drive
MM not recommended format Since the media was not formatted in this unit, proper recording MM: SD or CF
for Recording/Playing.
and playback operations cannot be guaranteed, so it should be This appears when the card is
formatted with a cluster size that is
formatted.
Format this card?
smaller than the standard of this unit.
MM Read Error
An error occurred when reading the card.
MM: SD, CF, or USB flash drive
MM: SD, CF, or USB flash drive
MM to MM' Copy failed.
Copying all of one media to the other was not possible.
MM': SD, CF, or USB flash drive
MM unrecognized format
This media has been formatted in a format other than FAT.
MM: SD, CF, or USB flash drive
Please Format this card.
Format it for use with this unit.
This media does not meet the specifications required by the
MM unsupported type
MM: SD, CF, or USB flash drive
system, so it cannot be used.
MM Write Error
An error occurred when writing to the card.
MM: SD, CF, or USB flash drive
Copy N selected folder(s)
N: number selected
Export the selected folder(s).
to MM?
MM: SD or CF
Copy N selected Take(s)
N: number selected
Export the selected take(s).
to MM?.
MM: SD or CF
nnn:
entry number
eeeeeeee:
entry name
"nnn": "eeeeeee"
tttttttt
take name
"tttttttt"
fs:
sampling frequency
fs/bit/FileMode/NumOfTracks
bit:
bit rate
This shows entry information
FileMode:
MONO or POLY
Entry LENGTH: *h**m**s**f
NumOfTracks:
number of tracks
START T/C: hh:mm:ss.ff
Entry LENGTH: length of entry
entry start timecode
START T/C:
time
nnn : NNNNNNNN
nnn: take number
The take with the shown number and name cannot be found.
cannot be found
NNNNNNNN: take name
"pppppppp"
pppppppp: folders in root
folder: n
ffffffff: folder name
Shows information about folders in the root directory
Fs: f
f: recording sampling frequency
TIMECODE: t
t: timecode frame type
"ssssssss"
ssssssss: folder name
TAKES: n
n: number of takes
Fs: f
Shows information about folder
f: recording sampling frequency
TOTAL SIZE: u
u: space used
TOTAL TIME: t
t: total time of all takes
114 TASCAM HS-20
There is no media.
You cannot copy.
The unit failed to read the media.
Note
MM: SD or CF
vvvvvvvv: volume level
p: number of folders
u: capacity used
f: unused capacity t: total capacity of
media
MM: SD, CF, or USB flash drive
16 – Messages
Message
Meaning and response
"tttttttt"
date
fs/bit/FileMode/NumOfTracks Shows take information
SIZE: u
LENGTH: *h**m**s**f
"tttttttt"
START T/C: **: **: **. **
END T/C: **: **: **. **
FRAME TYPE: ** F
<AES31 ADL Info>
“ffffffff”
Size: **MB
yyyy/mm/dd hh: mm
Bounce Selected Area to file?
“ffffffff”
Canceled
Cannot add timer event.
Timer event limit reached.
Timer event limit reached."
Cannot Change Now
Fixed in current Fs.
Cannot Change Now
Fixed in current mode.
Cannot Change Now
Inc.Play cannot set to ON
while Play Inhibit Time is Inf.
Shows take information
Note
tttttttt: take name
date: year/month/day hour: minute
fs: sampling frequency
bit: bit rate
FileMode: MONO or POLY
NumOfTracks: number of tracks
u: space used
tttttttt: take name
file start timecode
START T/C:
time
file end timecode
END T/C:
time
FRAME TYPE: frame type
AES31 editing file information
ffffffff: editing information file name
The selected area will be bounced to a file.
ffffffff: file name
The operation was canceled.
The limit has been reached, so no more timer events can be
added.
The limit has been reached, so no more timer events can be
added.
With the current sampling frequency, settings cannot be
changed.
**: Playing, Chasing TC or Recording
In the current mode, settings are fixed and cannot be changed.
Since the Play Inhibit Time item is set to Inf, the Inc.Play item
cannot be turned ON.
When assigning a take from another folder to an entry, that take
Cannot Copy.
is copied to the current folder. In this case, a file with the same
name as the copied take already exists in the current folder.
"tttttttt"
already exist in current folder. RENAME button: change the name and copy the file
CANCEL button: do not copy
Cannot Copy File.
Cannot copy as the selected file already exists in the copy desti“ffffffff”
nation.
already exist in Destination.
Cannot Copy Folder.
Cannot copy as the selected folder already exists in the copy
“ffffffff”
destination.
already exist in Destination.
Cannot Copy for Insert.
Cannot copy for inserting because the selected file already exists
“ffffffff”
in the current folder.
already exist in current folder.
Cannot Copy for Paste.
Cannot copy for pasting because the selected file already exists
“ffffffff”
in the current folder.
already exist in current folder.
Cannot Copy.
Source folder and
Cannot copy as the source and destination folders are the same.
Destination folder is same.
Cannot Copy.
Cannot copy because the destination folder is a sub folder of the
Destination folder is
source folder.
sub-folder of source folder.
Cannot create more than 100 The maximum number of folders that can be created has already
folders
been reached, so a new folder cannot be created.
Cannot create new mark point.
You tried to create a mark at a time where a mark already exists.
Mark point already exists at
You cannot create a mark at the same time as another mark.
the same timestamp.
Cannot create new folder.
The media does not have enough space, so you cannot create a
new folder.
Media Full.
tttttttt: the name of the take to be
copied
ffffffff: file name
ffffffff: folder name
ffffffff: file name
ffffffff: file name
TASCAM HS-20 115
16 – Messages
Message
Cannot edit this mark point.
Mark point already exists at
the same timestamp.
Cannot execute bounce.
Media Full.
Cannot execute bounce.
Bounce file size is over 2GB.
Cannot execute combine.
"aaaaaaaa"
"bbbbbbbb"
These property are not
matched.
Cannot execute combine.
Combine file size is over MMM.
Cannot execute combine.
Media Full.
Cannot execute.
File property is not matched
to current setting.
Cannot execute.
Media Full.
Cannot Export.
Not enough space on MM
Cannot Export.
Folder already exists on MM.
Overwrite folder?
Cannot Export.
Selected Take already exist
in Export destination.
Cannot increment Take.
Interval is too short.
Or
Media almost full
Cannot increment Take.
System limit reached, Please
make new folder.
Cannot make more than
1000 folders.
Cannot make new folder.
Media Full.
Cannot RECORD.
(Internal state error)
Cannot RECORD.
ABS time is over 24h
Cannot RECORD.
Media Full.
Cannot RECORD
System limit reached.
Please make new folder.
Cannot RECORD.
Take limit reached.
Please change to another
folder
Cannot set Mark point.
Mark limit reached.
Cannot turn Fs convert On.
D–In is already
Master Clock.
116 TASCAM HS-20
Meaning and response
Note
Editing is possible even when time
Since a mark already exists at the same time, the mark cannot be data is the same at the frame level if
edited.
the value differs at the subframe level,
which is not visible on the screen.
The media does not have enough space, so you cannot bounce.
The resulting file size after the bounce would exceed 2 GB, so
bouncing is not possible.
aaaaaaa: first take to be combined
Cannot combine as the properties of the two takes are different. bbbbbbb: second take to be
combined
Cannot combine as the file size will exceed the Max File Size
indicated in the Format page on the REC SETUP screen.
MMM: 640MB, 1GB, or 2GB
The media does not have enough space, so you cannot combine.
Cannot execute as the file properties are not the same as those of
the current setting.
The media does not have enough space, so you cannot complete
the operation.
There is not enough available space on the export destination
MM: SD or CF
media.
A folder with the same name already exists in the export destination. Do you want to overwrite that folder?
Cannot export as the selected take already exists in the export
destination.
The interval was less than 4 seconds or the media does not
have enough space, so starting recording of the next take is not
possible.
The total number of items in the folder, including files and
folders/directories, is too large, so starting recording of the next
take is not possible.
The maximum number of folders that can be created has already
been reached, so a new folder cannot be created.
The media does not have enough space, so you cannot create a
new folder.
Something is preventing recording.
The timeline mode’s ABS time exceeds 24 hours so recording
cannot be started.
The media does not have enough space, so you cannot start
recording.
The total number of items in the folder, including files and
folders/directories, is too large, so starting recording is not
possible.
Since the maximum number of recordable takes or maximum
take number has been reached, recording is not possible.
Change the folder.
You cannot create more than 99 marks.
You tried to turn the sampling rate converter on for the digital
input that is already selected as the master clock.
MM: SD or CF
16 – Messages
Message
Cannot use Bridge file
because it is illegal.
CF Media Full.
SD: Still RECORDING.
CF: Stopped.
CF not recommended
for Recording/Playing.
(not UltraDMA)
CF Record error.
SD: Still RECORDING.
CF: Stopped.
Changing Fs ...
Clear Current EDL and
Import All Takes?
Clear In/Out Point?
Combine these Takes?
"aaaaaaaa"
"bbbbbbbb"
Completed
Meaning and response
Cannot use the bridge file because it is not correct.
Recording to CF has stopped because the CF does not have
enough space.
Recording to SD is continuing.
Occurs when REC Mode is set to
Mirror.
This media does not meet the specifications required by the
system, so using it for recording/playback is not recommended.
Recording to CF has stopped because an error occurred.
Recording to SD is continuing.
Occurs when REC Mode is set to
Mirror.
Changing the sampling frequency
Clear the current AES31 editing information and import all the
takes.
Clear IN and OUT points.
Combine the two takes.
The operation has completed.
Copy MM to MM'?
Confirms that you want to copy all of MM to MM'
This will erase all data on CFn'.
Copy selected Folder?
"nnnnnnnn"
Copy selected File?
"nnnnnnnn"
Note
aaaaaaa: first take to be combined
bbbbbbb: second take to be
combined
MM: SD, CF, or USB flash drive
MM': SD, CF, or USB flash drive
Copy the selected folder.
nnnnnnnn: name of folder to be
copied
Copy the selected file.
nnnnnnnn: name of file to be copied
Copy selected Take?
Copy the selected take.
Copying Folder ...
Copying File ...
The folder is being copied.
The file is being copied.
n: number of selected takes ("Take"
changes to "Takes" if "n" is 2 or more)
Copying Take ...
The take is being copied.
Create EDL failed
Create new EDL?
"eeeeeeee"
TIMELINE Start Time:
**h**m**s**f
REC Fs: **kHz
Create new Playlist?
"pppppppp"
Creating EDL ...
Delete all marks
of this type?
(Count: N)
Delete N selected Event(s)?
Delete N selected marks?
Delete N selected folder?
Delete N selected take?
Delete selected EDL?
Delete selected playlist?
Delete this Folder?
Delete this File?
Deleting EDL ...
Deleting Event(s) ...
Failed to create an AES31 editing information file.
Deleting Playlist ...
Deleting Folder ...
Deleting File ...
Deleting Take ...
The playlist is being deleted.
The folder is being deleted.
The file is being deleted.
The take is being deleted.
The uploaded file is being deleted.
Deleting Uploaded File ...
"Take" changes to "Takes" when
multiple takes are copied.
Create a new AES31 editing information file.
eeeeeeee: name of AES31 editing
information file
Confirm that you want to create a new playlist.
pppppppp: playlist name
The AES31 editing information file is being created.
Confirm the deletion of marks of the selected type.
Delete the selected event(s).
Delete the selected marks.
Delete the selected folder.
Delete the selected takes.
Delete the selected AES31 editing information file.
Delete the selected playlist.
Delete the selected folder.
Delete the selected file.
The AES31 editing information file is being deleted.
Events are being deleted.
N: number of marks of selected mark
type
N: number of selected events
N: number of marks
N: number selected
N: number selected
TASCAM HS-20 117
16 – Messages
Message
Meaning and response
Digital Input Error
(eeeeeeee)
An error occurred with the digital input selected for the input
signal.
Digital Input Error
(eeeeeeee)
An error occurred with the digital input selected for the input
signal.
D–In: Fs convert On
Cannot select as Master clock.
Directory contents changed.
REBUILD required.
REBUILD now?
Directory contents changed
via FTP.
REBUILD required.
REBUILD now?
Edit Completed
EDL Load completed
but there are some wrong
regions.
--- error --INFO WRITING
Export System Backup Data to
MM?"
Exporting folder(s)...
Exporting Take(s) ...
External Clock Lost,
Switched to Internal
The sampling rate converter is ON for the digital input that you
tried to set as the clock master.
External Clock Regained
Switch to External?
EXTERNAL Control Locked
Folder Copy Failed.
File Copy Failed.
File List Screen
is not available
in Jog Mode
File List Screen
is not available
while Recording
Folder Export failed
FTP Connection Test.
FTP Transfer Started.
--- FORMAT --Completed
118 TASCAM HS-20
Note
"eeeeeeee" is one of the following
not synchronized
Unlocked:
with system
no signal:
no signal being input
Cbit information of
not audio:
input signal is not
audio
unmatched
other input signal
Cbit information is
Cbit
different from actual
operation mode
"eeeeeeee" is one of the following
not synchronized
Unlocked:
with system
no signal:
no signal being input
Cbit information of
not audio:
input signal is not
audio
unmatched
other input signal
Cbit information is
Cbit
different from actual
operation mode
The directory needs to be rebuilt as the content has been
changed.
The directory needs to be rebuilt as the content has been
changed via FTP.
The editing operation has completed.
Loading AES31 editing information has completed, but there are
some incorrect regions.
An error occurred while writing information.
Export system backup data to the media.
A folder is being exported
The takes are being exported.
Synchronization with an external clock was disrupted, so the unit
switched to the internal clock.
Synchronization with an external clock became possible again.
External control connectors are locked to prevent misoperation.
Failed to copy the folder.
Failed to copy the file.
The File List selection screen cannot be opened when in jog
mode.
The File List screen cannot be opened when recording.
Failed to export the folder.
An FTP connection test is being conducted.
Press to start FTP transfer.
Formatting has completed.
MM: SD or CF
16 – Messages
Message
--- FULL FORMAT --FORMAT MM?
This will erase all DATA on card
--- FULL FORMAT --Formatting MM ...
Import All System Backup Data
from MM?
Initializing ...
Load Factory Preset?
Load selected folder?
"ssssssss"
Load selected take?
"tttttttt"
Loading File ...
Loading Playlist ...
Loading Folder …
Loading Take ...
Loading Timer Event List …
Make new Folder?
"ssssssss"
Make Playlist failed
Make folder failed
Making Playlist …
Making Folder …
Mark Point set
Meaning and response
Note
Full formatting will be performed.
MM: SD, CF, or USB flash drive
Full formatting is occurring.
MM: SD, CF, or USB flash drive
Import all system backup data from the media.
MM: SD or CF
Mirror REC is not available.
(MM is not available)
Mirror recording is not available because the media cannot be
used.
Mirror REC is not available.
CF not recommended type
for Recording.
(not UltraDMA)
Mirroring is not available because the card does not meet the
Occurs when REC Mode is set to
specifications required by the system so correct recording cannot
Mirror.
be guaranteed.
Mirror REC is not available.
MM formatting not optimal
for Recording.
Network Control Locked
New Folder Name must not
start with "@"
No Call Point
No Mark Point
Now Working ...
Do not remove Media.
Operation failed.
Operation failed.
Cannot find this ***.
Please Rebuild.
Operation failed.
Internal File/Folder
limit reached.
The unit is initializing.
Load the factory settings.
Load the selected folder.
nnnnnnnn: name of a folder to load
Load the selected take.
tttttttt: name of take to load
The file is being loaded.
The selected playlist is loading.
The folder is being loaded.
The selected take is loading.
The timer event list is being loaded.
Confirm that you want to create a new folder.
Failed to create a playlist.
Failed to create a folder.
A playlist is being created.
A folder is being created.
A mark has been created.
ssssssss: folder name
Occurs when REC Mode is set to
Mirror.
MM: SD or CF
Mirroring is not available because the media has not been
Occurs when REC Mode is set to
formatted on this unit so correct recording cannot be
Mirror.
guaranteed.
MM: SD or CF
Format the media on this unit before use.
Network control has been locked to prevent misoperation.
That folder name is not allowed. You cannot use the “@” symbol
at the beginning of a folder name.
There is no call point.
(Nothing has been played back since loading this folder or take.)
You tried to skip to a mark before one
There are no mark points.
was added. This disappears automatically after 2 seconds.
An operation is in process, so do not remove the media.
The operation could not be completed for some reason.
The selected folder/take could not be found, so the operation
could not be completed. Rebuild the selected item.
***: Folder or take name
The maximum number of folders that can be created has been
reached, so the operation could not be completed.
Operation failed.
Path Name is too long.
The path name has more characters than allowed, so the
operation could not be completed.
Operation Failed.
Unmatched Fs.
The sampling frequency does not match.
This message appears when making
a folder (NEW FOLDER) or recording
would result in a file path name of
more than 255 characters because
the lengths of folder names have
been increased using a computer.
TASCAM HS-20 119
16 – Messages
Message
Play Error
Buffer underrun
Play Error.
Play Error.
nnn: NNNNNNNN
Playlist Import completed
but there are some wrong
entries.
<PlayList Info>
"ppppp"
Size: **MB
yyyy/mm/dd hh: mm
Playlist Load completed
but there are some wrong
entries.
PLEASE CONFIRM
--- FULL FORMAT --FORMAT MM?
This will erase all DATA on card
PLEASE CONFIRM
--- QUICK FORMAT --FORMAT MM?
This will erase all DATA on card
PLEASE CONFIRM
Copy MM to MM'?
This will erase all DATA on MM'.
PLEASE CONFIRM
Delete this File?
"nnnnnnnn"
PLEASE CONFIRM
Delete this Folder?
"nnnnnnnn"
PLEASE CONFIRM
Delete N selected take?
PLEASE CONFIRM
Export System Backup Data
to MM?
PLEASE CONFIRM
Import All System Backup Data
from MM?
PLEASE CONFIRM
Load Factory Preset?
PLEASE CONFIRM
Remaining Rec Time is
less than N hour(s).
Delete already uploaded
takes?
--- QUICK FORMAT --FORMAT MM?
This will erase all DATA on card
--- QUICK FORMAT --Formatting MM ...
Reading DATA ...
Reading Media ...
Rebuild all folders?
Meaning and response
Rebuild changed Directory?
This will rebuild the changed directory.
120 TASCAM HS-20
Note
Data reading could not keep up during playback.
An error occurred during playback.
A playback error occurred with the take of the displayed number nnn: take number
and name.
NNNNNNNN: take name
Importing a playlist has completed, but there are some incorrect
entries.
This shows playlist information.
pppppppp: playlist name
Loading a playlist has completed, but there are some incorrect
entries.
Reconfirms that you want to full format the media
MM: SD, CF, or USB flash drive
Reconfirms that you want to quick format the media
MM: SD, CF, or USB flash drive
Reconfirms that you want to copy all of MM to MM'
MM: SD, CF, or USB flash drive
MM': SD, CF, or USB flash drive
Reconfirms that you want to delete the selected file
nnnnnnnn: name of a file to delete
Reconfirms that you want to delete the selected folder
nnnnnnnn: name of a folder to delete
Reconfirms that you want to delete the selected takes
N: number selected
Reconfirms that you want to export system backup data to the
media.
MM: SD or CF
Reconfirms that you want to import all system backup data from
MM: SD or CF
the media.
Reconfirms that you want to load the factory settings.
Reconfirm.
The available recording time is less than N hours.
Delete the already uploaded takes.
N: set Auto SPACE Check remaining
time
Quick formatting will be performed.
MM: SD, CF, or USB flash drive
Quick formatting is occurring.
MM: SD, CF, or USB flash drive
DATA is being read.
The media is being read.
This will rebuild all folders.
This message appears when you
operate a file on this unit via FTP or
on the BROWSE screen, and then
touch the REBUILD button with the
B mark.
16 – Messages
Message
Meaning and response
Rebuild current folder
and changed Directory?
This will rebuild the current folder and changed directory.
Rebuild current folder?
Rebuild failed
This will rebuild the current folder.
Rebuilding failed.
Rebuild selected folder
and changed Directory?
This will rebuild the selected folder and changed directory.
Rebuild selected folder?
Rebuilding All folder …
Rebuilding folder …
RECORD Error
RECORD Error
Buffer overflow
RECORD stopped.
ABS time is over 24h.
RECORD stopped.
Media Full.
Redo Completed
Reload Timer Event List?
Remaining Rec Time is
less than N hour(s).
Delete already uploaded
takes?
REMOTE/KEYBOARD Locked
Renaming folder
“pppppp”
to “nnnnnn”
Save changes in Current EDL
"ssssssss"
Save changes in Current
Playlist “llllllll”
Save changes in Timer Event
List?
Save Failed.
Saving File ...
Do not remove MM
Screen Locked
LCD Section Locked
Screen Locked
Touch Panel Locked Out
SD Card Locked
SD Card Locked
Cannot Record/Edit
SD Media Full.
SD: Stopped.
CF: still RECORDING.
SD Record Error.
SD: Stopped.
CF: still RECORDING.
Select Insert Position
[File T/C][Current Position]
Select Paste Position
[File T/C][Current Position]
Sort all takes?
Take Copy failed.
Take Delete failed.
This will rebuild the selected folder.
All folders are being rebuilt.
The folder is being rebuilt.
An error occurred during recording.
The recording buffer became full during recording, and writing
to the media could not keep up.
.
The timeline mode’s ABS time exceeded 24 hours so recording
stopped.
Note
This message appears when you
operate a file on this unit via FTP or
on the BROWSE screen, and then
touch the REBUILD button with the
B mark.
This message appears when you
operate a file on this unit via FTP or
on the BROWSE screen, and then
touch the REBUILD button with the
B mark.
The media ran out of space, so recording stopped.
Redoing an edit has completed.
The timer event list will be reloaded.
The available recording time is less than N hours.
Delete the already uploaded takes.
N: Auto SPACE Check set remaining
time
The remote and keyboard connectors have been locked to
prevent misoperation.
The folder is being renamed.
ffffffff: old folder name
ffffffff: new folder name
Is it okay to save changes to the current timeline?
ssssssss: name of AES31 editing information file
Save changes to the current playlist.
llllllll: playlist name
Save changes to the timer event list .
Saving the file failed.
The file is being saved. Do not remove the media.
MM: SD or CF
LCD section controls have been locked to prevent misoperation.
The touch screen has been locked to prevent misoperation.
The LOCK switch on the SD card has been engaged.
Cannot record or edit as the SD card has been locked.
This message appears when a locked
SD card is inserted.
Recording to SD has stopped because the SD does not have
enough space.
Recording to CF is continuing.
Occurs when REC Mode is set to
Mirror.
Recording to SD has stopped because an error occurred.
Recording to CF is continuing.
Occurs when REC Mode is set to
Mirror.
Select a position where you want to insert a file between the file
T/C position and current position.
Select a position where you want to paste a file between the file
T/C position and current position.
Sort all the takes.
Failed to copy the take.
Failed to delete the take.
TASCAM HS-20 121
16 – Messages
Message
Take Export failed.
Take Load failed.
There is no Entry.
There is no folders.
Please make a folder.
There is no Take.
There are no uploaded takes
to delete.
Timer Event List Screen
is available
only in Take mode.
This file was converted
to BWF format.
This name already exists.
This name already exists.
Overwrite this file?
"nnnnnnnn"
Transport Locked
Transport Section Locked
Undo Completed
Unsupported File
(too many tracks)
Unsupported Fs
Upload N selected take(s)
to FTP server?
Writing System File ...
122 TASCAM HS-20
Meaning and response
Failed to export the take.
Loading of the take failed.
The playlist does not have any entries, so playback is not
possible.
Select a playlist with entries or add entries to the current one.
There is no folder so the recording cannot be made.
Make a folder.
There is no take, so playback is not possible.
Select a folder with takes.
Note
There are no already uploaded takes to delete.
The timer event list screen can only be viewed in take mode.
The file format was converted to BWF.
This message appears when the Start
timecode in the WAV file was edited.
Another folder or take already has that name.
The same name already exists. Do you want to overwrite it?
nnnnnnnn: file name
The transport keys have been locked to prevent misoperation.
Undoing an edit has completed.
You tried to play a file with an unsupported number of tracks. Or,
you tried to add such a file to a playlist
The sampling frequency of the file that you tried to add to a
playlist is not supported.
This will upload the selected takes to the FTP server.
Recording information is being written when recording has
stopped.
n: number of takes
17 – Specifications
Audio resolution
88 Recording media
SD/SDHC cards
CompactFlash (CF) cards
88 File system
FAT32 (4 GB or more)
FAT16 (2 GB or less)
88 File formats
BWF (Broadcast Wave Format)
WAV (Waveform Audio File Format)
88 Number of channels
2 channels
88 Quantization bit depths
16-bit, 24-bit
88 Sampling frequencies
44.1/48/88.2/96/176.4/192 kHz
88 Clock reference types
INTERNAL, WORD IN, VIDEO IN, DIGITAL IN
88 Timecode frame rates
23.976, 24, 25, 29.97DF, 29.97NDF, 30DF, 30NDF
88 ANALOG IN L/R (UNBALANCED)
Connectors: RCA pin jacks
Input impedance: 3.9 kΩ
Nominal input level: −10 dBV (0.316 Vrms) ±1 dB
Maximum input level: +6 dBV (2.0 Vrms) ±1 dB
88 ANALOG OUT L/R (BALANCED)
Connectors: XLR–3–32 (1: GND, 2: HOT, 3: COLD)
Output impedance: 100 Ω or less
Nominal output level:
+4 dBu (1.23 Vrms) ±1 dB
(+6 dBu when Digital Ref. Level is set to −9 dB)
Maximum output level (selectable):
+15 dBu (4.36 Vrms) (D.Ref: −9 dBFS, A.Output: +6 dBu)
+18 dBu (6.16 Vrms) (D.Ref: −14 dBFS, A.Output: +4 dBu)
+20 dBu (7.75 Vrms) (D.Ref: −16 dBFS, A.Output: +4 dBu)
+22 dBu (9.76 Vrms) (D.Ref: −18 dBFS, A.Output: +4 dBu)
+24 dBu (12.3 Vrms) (D.Ref: −20 dBFS, A.Output: +4 dBu)
D. Ref: Digital Ref. Level setting
A.Output: Analog Out Ref. Level setting
88 ANALOG OUT L/R (UNBALANCED)
Connectors: RCA pin jacks
Output impedance: 100 Ω or less
Nominal input level: −10 dBV (0.32 Vrms) ±1 dB
Maximum input level: +6 dBV (2.0 Vrms) ±1 dB
88 PHONES jack
Inputs and outputs
Analog audio inputs and outputs
The error for nominal and maximum levels is ±1 dB or less for all
input and output jacks except the PHONES jack.
88 ANALOG IN L/R (BALANCED)
Connectors: XLR–3–31 (1: GND, 2: HOT, 3: COLD)
Input impedance: 4.3 kΩ
Nominal input level:
+4 dBu (1.23 Vrms) ±1 dB
(+6 dBu when maximum input level is set to +15 dBu)
(+6 dBu when Digital Ref. Level is set to −9 dB)
Maximum input level (selectable):
+15 dBu (4.36 Vrms) (D.Ref: −9 dBFS, A.Input: +6 dBu)
+18 dBu (6.16 Vrms) (D.Ref: −14 dBFS, A.Input: +4 dBu)
+20 dBu (7.75 Vrms) (D.Ref: −16 dBFS, A.Input: +4 dBu)
+22 dBu (9.76 Vrms) (D.Ref: −18 dBFS, A.Input: +4 dBu)
+24 dBu (12.3 Vrms) (D.Ref: −20 dBFS, A.Input: +4 dBu)
D. Ref: Digital Ref. Level setting
A. Input: Analog Input Ref. Level
Connector: standard 6.3 mm (1/4”) stereo jack
Maximum output level:
45 mW + 45 mW or more (THD+N 0.1% or less, into 32 Ω)
Digital audio inputs and outputs
88 DIGITAL IN (S/PDIF)
Connector: RCA pin jack
Input signal voltage amplitude: 200 mVp-p to 600 mVp-p/75
Ω
Input impedance: 75 Ω
Formats: AES3-2003/IEC60958-4 (AES/EBU)
IEC60958-3 (S/PDIF)
Supported sampling frequencies:
44.1/48/88.2/96/176.4/192 kHz (Single/Double/Quad)
When SRC is ON, the receivable range is 32–192 kHz.
88 DIGITAL IN (AES/EBU)
Connector: XLR–3–31
Input signal voltage range: 200 mVp–p to 10 Vp–p/110 Ω
Input impedance 110 Ω ±20%
Formats: AES3-2003/IEC60958-4 (AES/EBU)
IEC60958-3 (S/PDIF)
Supported sampling frequencies:
44.1/48/88.2/96/176.4/192kHz (Single/Double/Quad)
When SRC is ON, the receivable range is 32–192 kHz.
TASCAM HS-20 123
17 – Specifications
88 DIGITAL OUT (S/PDIF)
Connector: RCA pin jack
Output voltage: 0.5 Vpp ±20%/75 Ω
Input impedance: 75 Ω
Format: IEC60958-3 (S/PDIF)
Supported sampling frequencies:
44.1/48/88.2/96/176.4/192 kHz (Single/Double/Quad)
88 DIGITAL OUT (AES/EBU)
Connector: XLR–3–32
Output voltage: 2–5 Vp–p/110 Ω
Output impedance: 110 Ω ±20%
Format: IEC60958–4 (AES3–2003, AES/EBU)
Supported sampling frequencies:
44.1/48/88.2/96/176.4/192 kHz (Single/Double/Quad)
Control input/output ratings
88 RS–422 (attached with optional SY-2 board)
Connector: D–sub 9-pin (female, inch specification)
88 RS–232C
Connector: D–sub 9-pin (female, inch specification)
88 PARALLEL
Connector: D–sub 25-pin (female, inch specification)
88 TIMECODE IN (attached with optional SY-2 board)
Connector: BNC
Signal voltage amplitude: 0.5–5 Vp–p
Input impedance 10 kΩ
Format: SMPTE 12M–1999 compliant
88 TIMECODE OUT (attached with optional SY-2 board)
Connector: BNC
Signal voltage amplitude: 2 Vp–p
Output impedance: 600 Ω
Format: SMPTE 12M–1999 compliant
88 WORD/VIDEO IN
Connector: BNC
Input voltage: 5V TTL equivalent (WORD IN)
Signal voltage amplitude: 1 Vp–p (VIDEO IN)
Input impedance: 75 Ω ±10%
Allowable frequency deviation of external synchronization:
±100 ppm
Includes switch for enabling termination
Input frequencies (WORD):
44.1/48/88.2/96/176.4/192 kHz
Input signal (VIDEO):
24/25/29.97/30 Frame
(NTSC/PAL Black burst, HDTV Tri–Level)
88 WORD/VIDEO THRU/OUT
Connector: BNC
Signal voltage amplitude: 5V TTL equivalent
Output impedance: 75 Ω ±10%
Output frequency (WORD):
124 TASCAM HS-20
44.1/48/88.2/96/176.4/192 kHz
Frequency stability ±10 ppm or less (Ta = 20º C)
OUT/THRU switch included (OUT is only for WORD OUT)
88 ETHERNET
Connector: RJ45
Compatibility: 100BASE-TX, 1000BASE-T
88 KEYBOARD
Connector: Mini-DIN (PS/2)
88 USB
Connector: USB A-type 4-pin
Protocol: USB 2.0 HIGH SPEED (480 Mbps) compliant
88 REMOTE
Connector: RJ45
Supply voltage: 13 V
Signal: LVDS serial
17 – Specifications
Audio performance
General
88 Frequency response
88 Power
ANALOG IN to ANALOG OUT:
AC 100-240 V, 50–60 Hz
oo 20 Hz – 20 kHz: ±0.5 dB
(Fs = 44.1/48 kHz, JEITA) (recording and playback)
88 Power consumption
oo 20 Hz – 40 kHz: +0.5 dB/−2 dB
(Fs = 88.2/96 kHz, JEITA) (recording and playback)
88 Dimensions (W × H × D)
oo 20 Hz – 80 kHz: +0.5 dB/−5 dB
(Fs = 176.4/192 kHz, JEITA) (recording and playback)
88 Weight
88 Distortion
ANALOG IN to ANALOG OUT: 0.005% or less (JEITA)
(recording and playback)
22 W
482.6 x 94 x 314.1 mm (including protrusions)
4.7 kg
88 Operating temperature range
5–35ºC
88 S/N ratio
ANALOG IN to ANALOG OUT: 100 dB or more (JEITA)
(recording and playback)
11.4mm
Dimensional drawings
284.4mm
432.2mm
18.3mm
482.6mm
94mm
88mm
76mm
465mm
TASCAM HS-20 125
17 – Specifications
+6
Block diagram
126 TASCAM HS-20
✂
WARRANTY
< In the United States >
WHAT WE WILL PAY FOR
< Europe >
This warranty gives you specific legal rights and you may also have
other rights which vary from state to state. This warranty is only valid
within the country the unit was originally purchased.
We will pay all labor and material expenses for items covered by the
warranty. Payment of shipping charges is discussed in the next section
of this warranty.
This product is subject to the legal warranty regulations of the country
of purchase. In case of a defect or a problem, please contact the dealer
where you bought the product.
WHAT IS AND IS NOT COVERED
HOW YOU CAN GET WARRANTY SERVICE
Ce produit est sujet aux réglementations concernant la garantie
légale dans le pays d’achat. En cas de défaut ou de problème, veuillez
contacter le revendeur chez qui vous avez acheté le produit.
Except as specified below, this warranty covers all defects in materials
and workmanship in this product. The following are not covered by the
warranty:
1. Damage to or deterioration of the external cabinet.
2. Damages resulting from accident, misuse, abuse or neglect.
3. Damage resulting from failure to perform basic daily
maintenance and/or calibration or otherwise resulting from
failure to follow instructions contained in your owner’s
manual.
4. Damage occurring during shipment of the product. (Claims
must be presented to the carrier)
5. Damage resulting from repair or attempted repair by
anyone other than TEAC or an authorized TASCAM service
station.
6. Damage resulting from causes other than product defects,
including lack of technical skill, competence, or experience
of the user.
7. Damage to any unit which has been altered or on which the
serial number has been defaced, modified or is missing.
WHO MAY ENFORCE THE WARRANTY
This warranty may be enforced only by the original purchaser.
LENGTH OF WARRANTY
All parts except heads and disk drives are warranted for one (1) year
from the date of original purchase. Heads and disk drives are warranted
to ninety (90) days from date of original purchase. Labor is warranted for
ninety (90) days from date of original purchase.
Your unit must be serviced by an authorized TASCAM service station in
the United States. (This warranty is not enforceable outside the U.S.) If
you are unable to locate an authorized TASCAM service station in your
area, please contact us. We either will refer you to an authorized service
station or instruct you to return the unit to the factory. Whenever
warranty service is required, you must present a copy of the original
dated sales receipt from an Authorized TASCAM Dealer.
You must pay any shipping charges if it is necessary to ship the product to
service. However, if the necessary repairs are covered by the warranty, we will
pay return surface shipping charges to any destination within the United States.
LIMITATION OF IMPLIED WARRANTIES
Any implied warranties, INCLUDING WARRANTIES OF MERCHANTABILITY
AND FITNESS FOR A PARTICULAR PURPOSE, are limited in duration to the
length of this warranty.
EXCLUSION OF DAMAGES
TEAC’s liability for any defective product is limited to repair or
replacement of the product, at TEAC’s option. TEAC shall not be liable for:
1. Damages based upon inconvenience, loss of use of the product,
loss of time interrupted operation or commercial loss; or
2. Any other damages, whether incidental, consequential or
otherwise.
Some states do not allow limitations on how long an implied warranty lasts
and/or do not allow the exclusion or limitation of incidental or consequential
damages, so the above limitations and exclusions may not apply to you.
To locate an Authorized Service Center in Your Area
CALL 1-800-447-8322
Dieses Gerät unterliegt den gesetzlichen
Gewährleistungsbestimmungen des Landes, in dem es erworben
wurde. Bitte wenden Sie sich im Gewährleistungsfall an den Händler,
bei dem sie das Gerät erworben haben.
Questo apparecchio è conforme alle norme sulla garanzia vigenti nel
rispettivo Paese in cui esso è stato acquistato. Si prega di rivolgersi al
proprio commerciante, presso il quale è stato acquistato l’apparecchio,
nel caso in cui si voglia richiedere una prestazione in garanzia.
Las condiciones de garantía de este aparato están sujetas a las disposiciones
legales sobre garantía del país en el que ha sido adquirido. En caso de
garantía, debe dirigirse al establecimiento donde adquirió el aparato.
< In other countries/areas >
This warranty gives you specific legal rights, and you may also have
other rights that vary by country, state or province.
If you have a warranty claim or request, please contact the dealer where
you bought the product.
该保证书赋予了顾客特定的合法权利,并且因国家,
州或省等地域的不同,顾客可能拥有其他权利。如需
申请或要求保修,请与购买本产品的销售店进行联系。
If you require repair services for your TASCAM equipment, please
contact the dealer where the product was purchased from or the
TASCAM Distributor in your country. A list of TASCAM Distributors
can be found on our website at: http://teac-global.com/
TEAC CORPORATIONhttp://tascam.jp/
Phone: +81-42-356-9143
1-47 Ochiai, Tama-shi, Tokyo 206-8530 Japan
TEAC AMERICA, INC.http://tascam.com/
Phone: +1-323-726-0303
1834 Gage Road, Montebello, California 90640 USA
TEAC MEXICO, S.A. de C.V.http://teacmexico.net/
Phone: +52-55-5010-6000
Río Churubusco 364, Colonia Del Carmen, Delegación Coyoacán, CP 04100, México DF, México
TEAC UK LIMITEDhttp://tascam.eu/
Phone: +44-8451-302511
Meridien House, Ground Floor,69 - 71, Clarendon Road, Watford, Hertfordshire, WD17 1DS, UK
TEAC EUROPE GmbHhttp://tascam.eu/
Phone: +49-611-71580
Bahnstrasse 12, 65205 Wiesbaden-Erbenheim, Germany
TEAC SALES & TRADING(SHENZHEN) CO., LTDhttp://tascam.cn/
Phone: +86-755-88311561~2
Room 817, Block A, Hailrun Complex, 6021 Shennan Blvd., Futian District, Shenzhen 518040, China
Printed in China
✂
WARRANTY
Model/Modèle/Modell
Modello/Modelo/型号
HS-20
Owner’s name/Nom du possesseur/Name des Eigentümers
Nome del proprietario/Nombre del propietario/顾客姓名
Serial No./No de Série/Seriennummer
Numero di serie/Número de serie/序列号
Address/Adresse/Adresse
Indirizzo/Dirección/顾客地址
Date of purchase/Date de l’achat/Datum des Kaufs
Data dell’acquisto/Fecha de compra/购买日期
Dealer’s name/Nom du détaillant/Name des Händlers
Nome del commerciante/Nombre del establecimiento/销售店名
Dealer’s address/Adresse du détaillant/Adresse des Händlers
Indirizzo del commerciante/Dirección del establecimiento/销售店地址
http://teac-global.com/