1
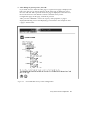
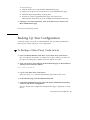
Netra Proxy Cache Server
Configuration Guide
Version 1.0
Part No: 805-3510-10
Revision A, January 1998
Netra Proxy Cache Server
Configuration Guide
A Sun Microsystems, Inc.
Business
901 San Antonio Road
Palo Alto, , CA 94303-4900
Part No: 805-3510-10
Revision A, January 1998
USA 650 960-1300 fax 650 969-9131
Netra Proxy Cache Server
Configuration Guide
Part No: 805-3510-10
Revision A, January 1998
Copyright 1998 Sun Microsystems, Inc. 901 San Antonio Road, Palo Alto, California 94303-4900 U.S.A. All rights reserved.
All rights reserved. This product or document is protected by copyright and distributed under licenses restricting its use, copying,
distribution, and decompilation. No part of this product or document may be reproduced in any form by any means without prior written
authorization of Sun and its licensors, if any.
Portions of this product may be derived from the UNIX® system, licensed from Novell, Inc., and from the Berkeley 4.3 BSD system,
licensed from the University of California. UNIX is a registered trademark in the United States and in other countries and is exclusively
licensed by X/Open Company Ltd. Third-party software, including font technology in this product, is protected by copyright and licensed
from Sun’s suppliers. RESTRICTED RIGHTS: Use, duplication, or disclosure by the U.S. Government is subject to restrictions of FAR
52.227-14(g)(2)(6/87) and FAR 52.227-19(6/87), or DFAR 252.227-7015(b)(6/95) and DFAR 227.7202-3(a).
Sun, Sun Microsystems, the Sun logo, and Solaris are trademarks or registered trademarks of Sun Microsystems, Inc. in the United States
and in other countries. All SPARC trademarks are used under license and are trademarks or registered trademarks of SPARC International,
Inc. in the United States and in other countries. Products bearing SPARC trademarks are based upon an architecture developed by Sun
Microsystems, Inc.
TM
The OPEN LOOK® and Sun Graphical User Interfaces were developed by Sun Microsystems, Inc. for its users and licensees. Sun
acknowledges the pioneering efforts of Xerox Corporation in researching and developing the concept of visual or graphical user interfaces
for the computer industry. Sun holds a nonexclusive license from Xerox to the Xerox Graphical User Interface, which license also covers
Sun’s licensees who implement OPEN LOOK GUIs and otherwise comply with Sun’s written license agreements.
THIS PUBLICATION IS PROVIDED “AS IS” WITHOUT WARRANTY OF ANY KIND, EITHER EXPRESS OR IMPLIED, INCLUDING,
BUT NOT LIMITED TO, THE IMPLIED WARRANTIES OF MERCHANTABILITY, FITNESS FOR A PARTICULAR PURPOSE, OR
NON-INFRINGEMENT.
Copyright 1997 Sun Microsystems, Inc., 901 San Antonio Road, Palo Alto, Californie 94303-4900 U.S.A. Tous droits réservés.
Ce produit ou document est protégé par un copyright et distribué avec des licences qui en restreignent l’utilisation, la copie et la
décompilation. Aucune partie de ce produit ou de sa documentation associée ne peut être reproduite sous aucune forme, par quelque
moyen que ce soit, sans l’autorisation préalable et écrite de Sun et de ses bailleurs de licence, s’il y en a.
Des parties de ce produit pourront être derivées du système UNIX® licencié par Novell, Inc. et du système Berkeley 4.3 BSD licencié par
l’Université de Californie. UNIX est une marque enregistrée aux Etats-Unis et dans d’autres pays, et licenciée exclusivement par X/Open
Company Ltd. Le logiciel détenu par des tiers, et qui comprend la technologie relative aux polices de caractères, est protégé par un
copyright et licencié par des fournisseurs de Sun.
Sun, Sun Microsystems, le logo Sun, et Solaris sont des marques déposées ou enregistrées de Sun Microsystems, Inc. aux Etats-Unis et
dans d’autres pays. Toutes les marques SPARC, utilisées sous licence, sont des marques déposées ou enregistrées de SPARC International,
Inc. aux Etats-Unis et dans d’autres pays. Les produits portant les marques SPARC sont basés sur une architecture développée par Sun
Microsystems, Inc.
TM
Les utilisateurs d’interfaces graphiques OPEN LOOK® et Sun ont été développés de Sun Microsystems, Inc. pour ses utilisateurs et
licenciés. Sun reconnaît les efforts de pionniers de Xerox Corporation pour la recherche et le développement du concept des interfaces
d’utilisation visuelle ou graphique pour l’industrie de l’informatique. Sun détient une licence non exclusive de Xerox sur l’interface
d’utilisation graphique, cette licence couvrant aussi les licenciés de Sun qui mettent en place les utilisateurs d’interfaces graphiques OPEN
LOOK et qui en outre se conforment aux licences écrites de Sun.
CETTE PUBLICATION EST FOURNIE "EN L’ETAT" SANS GARANTIE D’AUCUNE SORTE, NI EXPRESSE NI IMPLICITE, Y COMPRIS,
ET SANS QUE CETTE LISTE NE SOIT LIMITATIVE, DES GARANTIES CONCERNANT LA VALEUR MARCHANDE, L’APTITUDE DES
PRODUITS A REPONDRE A UNE UTILISATION PARTICULIERE OU LE FAIT QU’ILS NE SOIENT PAS CONTREFAISANTS DE
PRODUITS DE TIERS.
Please
Recycle
Contents
Preface
1.
vii
Preparing for Installation and Configuration
Configuration Tables
1
Initial Host Configuration
1
Proxy Cache Service Configuration
Netra Administration GUI Icons
2.
Initial Host Configuration
Overview
1
5
6
9
9
Hardware Installation 10
H
To Prepare for Initial Configuration
10
Network Interface Configuration 11
TTY Method
H
12
To Use the TTY Method to Configure the Network Interface 12
Diskette Method 14
H
To Use the Diskette Method to Configure the Network Interface
15
Using a Browser to Complete Initial Configuration 17
H
3.
To Complete Initial Configuration
Proxy Cache Service Configuration
17
35
Starting the Proxy Cache Administration Server
36
Contents v
Basic Proxy Cache Configuration
H
40
To Configure the Proxy Cache Service
40
Install Configuration 44
H
To Install Your Software Configuration
Backing Up Your Configuration
H
4.
44
45
To Backup a Netra Proxy Cache Server 45
Using a Serial Terminal to Configure a Netra Proxy Cache Server
Invoking the Command-line Program
H
To Invoke the Command-line Program
Proxy Cache Service Configuration
H
50
50
51
To Configure the Proxy Cache Service
51
Install Configuration on Host 52
H
A.
To Install Your Software Configuration
53
Establishing a tip Connection 55
Establishing a tip Connection 55
H
To Establish a tip Connection 56
Index 59
vi
Netra Proxy Cache Server Configuration Guide ♦ Revision A, January 1998
49
Preface
The Netra Proxy Cache Server Configuration Guide tells you how to install and
configure a Netra Proxy Cache Server. These instructions are designed
for an
TM
experienced system administrator with a knowledge of the Solaris operating
environment and network administration.
This manual is a companion to the Netra Proxy Cache Server User’s Manual. That
document describes advanced configuration and tells you how to monitor and
troubleshoot a Netra Proxy Cache Server.
How This Book Is Organized
Chapter 1,” presents tables that you fill out before starting Netra Proxy Cache Server
configuration.
Chapter 2,” gives you a step-by-step procedure for initial host configuration of the
Netra Proxy Cache Server.
Chapter 3,” provides instructions for performing a basic proxy cache service
configuration on a Netra Proxy Cache Server.
Chapter 4,” provides a procedure for configuring the Netra Proxy Cache Server
through use of a command-line program.
Appendix A,” provides instructions on connecting a serial terminal, PC, or another
Sun machine to your Netra Proxy Cache Server through the server’s serial port.
Preface
vii
Using UNIX Commands
This document does not contain information on basic UNIX® commands and
procedures such as shutting down the system, booting the system, and configuring
devices.
See the Solaris 2.x Handbook for SMCC Peripherals (included with the Netra Proxy
Cache product) for instructions on basic UNIX administration commands.
Typographic Conventions
TABLE P–1
Typographic Conventions
Typeface or
Symbol
AaBbCc123
Meaning
Examples
The names of commands, files, and
directories; on-screen computer
output.
Edit your .login file.
Use ls -a to list all files.
% You have mail.
AaBbCc123
What you type, when contrasted
with on-screen computer output.
% su
Password:
AaBbCc123
Book titles, new words or terms,
words to be emphasized.
Command-line variable; replace
with a real name or value.
Read Chapter 6 in the User’s Guide.
These are called class options.
You must be root to do this.
To delete a file, type rm filename.
Shell Prompts
viii
Netra Proxy Cache Server Configuration Guide ♦ Revision A, January 1998
TABLE P–2
Shell Prompts
Shell
Prompt
C shell
machine_name%
C shell superuser
machine_name#
Bourne shell and Korn shell
$
Bourne shell and Korn shell superuser
#
Related Books
This manual, the Netra Proxy Cache Server Configuration Guide, is a companion to the
Netra Proxy Cache Server User’s Manual, and to the hardware documentation that
accompanies your Netra Proxy Cache Server.
Ordering Sun Documents
The SunDocsSM program provides more than 250 manuals from Sun Microsystems,
Inc. If you live in the United States, Canada, Europe, or Japan, you can purchase
documentation sets or individual manuals using this program.
For a list of documents and how to order them, see the catalog section of the
SunExpress Internet site at http://www.sun.com/sunexpress.
Accessing Sun Documentation Online
The docs.sun.com Web site enables you to access Sun technical documentation
online. You can browse the docs.sun.com archive or search for a specific book title
or subject. The URL is http://docs.sun.com/. The current release of the Netra
Proxy Cache document set is not on this site, as of the date of hardcopy publication.
ix
Sun Welcomes Your Comments
We are interested in improving our documentation and welcome your comments and
suggestions. You can email your comments to us at the address shown below. Please
include the part number of your document in the subject line of your email or fax
message.
4 Email: [email protected]
x
Netra Proxy Cache Server Configuration Guide ♦ Revision A, January 1998
CHAPTER
1
Preparing for Installation and
Configuration
Configuration Tables
This section contains tables that you can use when performing the tasks described in
Chapter 2.” It is recommended that you make a copy of these pages and fill out the
tables before starting the procedures in Chapter 2.
Initial Host Configuration
Initial host configuration divides into the following sequence:
1. Network interface configuration
2. Completing initial host configuration (time zone, root password, and so on)
You can perform network interface configuration by either of two ways, the TTY
method or the diskette method. These methods, as well as the entire initial host
configuration process, are illustrated in Figure 1–1.
1
Figure 1–1
Initial Host Configuration
In terms of what you need to know, there is no difference between the TTY and
diskette methods. In the diskette method, you enter the Netra Proxy Cache Server’s
2
Netra Proxy Cache Server Configuration Guide ♦ Revision A, January 1998
host name during network interface configuration. In the TTY method, you specify a
host name following network interface configuration.
Table 1–2 lists the data required for network interface configuration.
TABLE 1–1
Data Required for Network Interface Configuration
Parameter
Name
Description
Enter Value Here:
network
interface (TTY
method only)
This is the network interface
(hme0) with which your host name
is associated.
hme0
Example: hme0
host name of
Netra Proxy
Cache Server
(diskette
method only)
For convenience, this should be
registered in your NIS and/or DNS
maps.
host IP address
of Netra Proxy
Cache Server
Use dotted decimal notation. Make
a note of this address. You will use
it when configuring the Netra
Proxy Cache software. Example:
129.144.118.2
netmask
Netmask used in service network,
in dotted decimal notation.
Example: 255.255.255.0
Example: host1
After you perform network interface configuration, you point a browser at your
Netra Proxy Cache Server and complete initial host configuration using the product’s
administration web pages. Table 1–2 lists the data required to complete initial host
configuration.
Preparing for Installation and Configuration 3
TABLE 1–2
Data Required to Complete Initial Host Configuration
Parameter
Name
Description
time zone
Time zone in which host resides.
Enter Value Here:
Example: US/Pacific
locale
Locale in which host resides.
Example: English
(Only choice in the current release)
host name of
Netra Proxy
Cache Server
(only if you
performed TTY
method for
network
interface
configuration)
For convenience, this should be
registered in your NIS and/or DNS
maps.
System
administrator
alias
Email addresses that will receive
mail addressed to root@<netra host
name> or Postmaster@<netra host
name>.
root password
There is no default. That is, you
start with no root password.
administration
account name
The administration account name
is setup.
administration
password
The default password is setup.
You need this password to access
the Netra Proxy Cache
administration web pages and the
setup system account.
DNS domain
name
Domain in which your Netra Proxy
Cache host resides. Examples:
acme.com or sales.acme.com
(if DNS is used)
4
Example: host1
Netra Proxy Cache Server Configuration Guide ♦ Revision A, January 1998
TABLE 1–2
Data Required to Complete Initial Host Configuration
Parameter
Name
Description
Enter Value Here:
IP address of
DNS server (if
DNS is used)
Use dotted decimal notation. This
is the DNS server that will resolve
the name of the Netra Proxy Cache
Server. Example: 129.144.91.24
NIS domain
name
NIS domain in which your Netra
Proxy Cache host resides.
Examples: acme.com or
eng.acme.com
(if NIS is used)
(continued)
Proxy Cache Service Configuration
Use the values you enter in Table 1–3 and Table 1–4 to configure the proxy cache
service.
TABLE 1–3
Data for Basic Proxy Cache Configuration
Parameter
Name
Description
Enter Value Here:
HTTP port
Port number used by the Netra
Proxy Cache Server for receiving
web requests. Most users can
accept the default of 8080.
Example: 8080
Inside firewall?
In a corporate setting, most proxy
cache servers are inside a firewall.
Domains inside
firewall
For domains not on this list, if the
server cannot find a requested
object in its local cache, it always
tries to fetch the URL from a
parent or sibling.
Parent proxies
If you are inside a firewall, you
probably have a parent proxy. You
can have multiple parents. See
following table.
Preparing for Installation and Configuration 5
The Netra Proxy Cache Server supports multiple parent and sibling proxies. For each
parent of your server, find out the following information:
4 The port it uses for HTTP
4 The port it uses for the Inter Cache Protocol (ICP)
4 Whether it supports tunneling of the Secure Sockets Layer (SSL) protocol
4 Whether it supports persistent connections (as supported by popular browsers
such as Netscape Navigator. (Netscape and Netscape Navigator are trademarks of
Netscape Communications Corporation.)
If your parent is a Netra Proxy Cache Server, keep in mind that the server uses
default port numbers of 8080 and 3130, for HTTP and ICP, respectively. Also the
Netra Proxy Cache Server supports SSL tunneling and persistent connections.
If your parent is not a Netra Proxy Cache Server, consult the documentation for that
server to determine whether it supports ICP, SSL tunneling, and persistent
connections.
TABLE 1–4
Parent Proxies (Enter Names and Values)
Parent Name
HTTP Port
ICP Port
(Enter 0 if
ICP not
supported)
Support SSL
tunneling?
(y/n)
Support
persistent
connections
(y/n)
Netra Administration GUI Icons
You perform a portion of the software configuration of a Netra Proxy Cache Array or
Server through a set of administration web pages. Table 1–5 displays the icons used
to navigate through and display the status of the Netra Proxy Cache administration
pages.
6
Netra Proxy Cache Server Configuration Guide ♦ Revision A, January 1998
TABLE 1–5
Icon
Netra GUI Icons
Description
Home icon. This navigation icon returns to the Netra Main
Administration page.
Help icon. This icon will open the help window, where the help pages are
displayed. The help window can be moved, iconified or dismissed
independent of the main browser window. The help window will update
the help pages as requested.
Back Arrow icon. This navigation icon goes back one page.
Top-of-Module icon. This navigation icon goes to the first administration
page of a particular module.
Forward Arrow icon. This navigation icon moves forward to the next
initial configuration module.
Reminder icon. This icon calls attention to important messages in
response to successfully configuring a module.
Error icon. This icon indicates errors in configuring a module.
Success icon. This icon shows that a module has been configured
successfully.
Preparing for Installation and Configuration 7
8
Netra Proxy Cache Server Configuration Guide ♦ Revision A, January 1998
CHAPTER
2
Initial Host Configuration
4 “Overview” on page 9
4 “Hardware Installation” on page 10
4 “Overview” on page 9
4 “Using a Browser to Complete Initial Configuration” on page 17
This chapter explains how to perform initial host configuration of a Netra Proxy
Cache Server.
Please fill out the tables in Chapter 1,” before starting the procedures in this chapter.
Overview
The configuration procedure for a Netra Proxy Cache Server is illustrated in Figure
2–1.
9
Figure 2–1
Netra Proxy Cache Configuration Procedure
Hardware Installation
The following tasks are covered in the hardware documentation that is shipped with
the Netra Proxy Cache product.
To Prepare for Initial Configuration
1. Open the shipping box and uncrate your Netra Proxy Cache Server.
2. Connect the server’s hme0 interface to the network.
Figure 2–2 illustrates the location of the hme0 interface on the back panel of the
Netra Proxy Cache Server.
10
Netra Proxy Cache Server Configuration Guide ♦ Revision A, January 1998
Figure 2–2
Location of Network Interface
Perform these tasks before performing the procedures in the rest of this chapter.
Network Interface Configuration
The Netra Proxy Cache product supports network interface configuration by either of
two means:
4 Establishing a serial connection from a terminal, another Sun machine, or a PC to
the Netra Proxy Cache Server and using tip to connect to the server. Appendix
A,” provides instructions for making this connection. This method of initial
configuration is referred to as the TTY method and is described in “TTY Method”
on page 12.
4 Inserting a configuration diskette in another Sun machine, a Mac, or a PC and
running a configuration program, then booting the Netra Proxy Cache Server with
that diskette in the server’s drive. The configuration diskette is shipped with the
Netra Proxy Cache product. This method of network-interface configuration is
referred to as the diskette method and is described in “Diskette Method” on page 14.
Initial Host Configuration
11
Use the method, TTY or diskette, that is more convenient for you. Following initial
host configuration, you will find a serial connection to the server to be very useful
for troubleshooting.
See Table 1–2 for the information you need to complete either of the following
procedures.
Note - If you use DNS or NIS, it is useful to register the name and IP address of a
Netra Proxy Cache Server in advance of network-interface configuration. By doing
this, a Netra Proxy Cache machine is known throughout your network at the time
you configure it.
TTY Method
Skip to “Diskette Method” on page 14 for instructions for the diskette method.
In this section it is assumed that you have connected a terminal, workstation, or PC
to your Netra Proxy Cache Server. See Appendix A,” for instructions.
To Use the TTY Method to Configure the Network
Interface
1. Power on the Netra Proxy Cache Server.
2. At the Netra Proxy Cache Server, log in as user setup with the password
setup.
NewNetra console login: setup
Password: setup password you enter is not displayed
Later, you have an opportunity to change the administration password.
3. Enter 1 to configure the local area network interface.
Welcome to the Netra server setup account
Select from the following options:
1) Configure the local area network interface.
2) Restore configuration from floppy.
3) Exit
Enter an option: 1
4. Press Return or enter 1 to accept the default choice for network interfaces:
12
Netra Proxy Cache Server Configuration Guide ♦ Revision A, January 1998
This program configures the local area network interface.
Values shown in square brackets are the default values.
Hit <return> to accept these values.
The following interfaces are available:
1) SunFastEthernet 2.0 Port 0
2) SunFastEthernet 2.0 Port 1
Enter the number corresponding to the interface
to be configured [1]:
5. Enter the host IP address for the Netra Proxy Cache Server:
Enter the local area network host address for the
Netra server:
Use dotted-decimal notation; for example, 129.144.118.2
6. Enter the netmask used on the network to which the Netra Proxy Cache Server
is connected, or press Return to accept the default of 255.255.255.0:
Enter the local area network netmask for the
Netra server [255.255.255.0]:
7. Press Return or enter 1 to accept the values just entered, or enter 2 to repeat
the steps just described:
The following configuration information has been entered:
Interface:
hme0
Host Address: <your IP address>
Netmask: <your netmask>
Select from the following options:
1) Configure hme0 with these values.
2) Discard these values and input new values.
3) Discard these values and exit.
Enter an option [1]:
After you accept the entered values, the following message is displayed:
SunFastEthernet 2.0 Port 0 has been configured for TCP/IP operation.
Host Address: <your IP address>
Netmask: <your netmask>
Welcome to the Netra server setup account
Select from the following options:
1) Configure the local area network interface.
2) Restore configuration from floppy.
3) Exit
Enter an option: 3
Initial Host Configuration
13
8. Make a note of the values displayed for host address and netmask.
9. Enter 3 (Exit).
The NewNetra console login is displayed:
NewNetra console login:
At this point, on a machine that is network-accessible to the Netra Proxy Cache
Server, you can use a browser to connect to the Netra Proxy Cache machine.
10. To ensure network connectivity, on the machine on which you will run the
browser for further configuration, enter:
non-netra% ping <netra host IP address>
If the host name and IP address of the Netra Proxy Cache machine is known to a
name service, you can ping the host by name, instead of numeric address. If you
receive a response indicating that the Netra Proxy Cache Server is reachable,
proceed. If you cannot ping the Netra Proxy Cache machine, you must have
entered the host IP address or netmask incorrectly. Check the values you noted in
Step 8 on page 14. If necessary, repeat the steps just described to configure your
network interface.
11. On the machine on which you are running the browser, point the browser at:
http://<netra host IP address>:81
The string <netra host IP address> is the address you specified in the ping
command, above.
Note - Depending on the capabilities of your router, you might need to use a
browser on a host on the same subnet as the Netra Proxy Cache Server.
12. At this point, proceed to “Using a Browser to Complete Initial Configuration”
on page 17.
Diskette Method
If you used the TTY method, as described in “TTY Method” on page 12, skip to
“Using a Browser to Complete Initial Configuration” on page 17.
In this section it is assumed that you have the configuration diskette (labeled “Netra
Proxy Cache Utilities Diskette”) that is shipped with your Netra Proxy Cache Server.
14
Netra Proxy Cache Server Configuration Guide ♦ Revision A, January 1998
To Use the Diskette Method to Configure the
Network Interface
1. Make a copy of the Netra Proxy Cache Utilities diskette.
To make a copy on a Solaris machine, do the following:
a. Insert the utilities diskette in your diskette drive and enter the following
sequence of commands:
% mkdir /tmp/hold This directory is an example
% volcheck
% cp /floppy/floppy0 /tmp/hold
b. Eject the utilities diskette.
c. Insert a blank, formatted diskette and enter the following sequence of
commands:
% volcheck
% cp /tmp/hold /floppy/floppy0
d. Eject the copy of the utilities diskette.
Note - The copying of your utilities diskette is critical. The diskette shipped
with the product is read-only.
2. Insert the copy of the configuration diskette in the drive of another Unix
machine (not the Netra Proxy Cache Server), a Mac, or a PC.
3. Invoke the config program on the diskette, as appropriate for your machine.
For example, on a PC that has a diskette drive A, invoke a:\config. For a Solaris
machine, insert your diskette and enter the following sequence of commands:
% volcheck
% cd /floppy/floppy0
% ./config.ksh
When config comes up, it displays the following:
This program generates a configuration file
for the local area network interface.
Values shown in square brackets are the default values.
Initial Host Configuration
15
4. Enter the host name of the Netra Proxy Cache Server:
Enter the Host Name for the Netra Server:
5. Enter the IP address of the Netra Proxy Cache Server:
Enter the local area network host address for the
Netra server:
Use dotted-decimal notation. For example, 129.144.88.112.
6. Enter the netmask used on the network to which the Netra Proxy Cache Server
is connected, or press Return to accept the default of 255.255.255.0:
Enter the local area network netmask for the
Netra server [255.255.255.0]:
The information you entered is saved on the diskette. This diskette now contains
network-interface-configuration information for your Netra Proxy Cache Server.
7. Make a note of the values you entered for host name, host address, and
netmask.
8. Eject the diskette from the drive.
9. Insert the same diskette in the diskette drive of your Netra Proxy Cache Server.
10. Power on the Netra Proxy Cache Server.
Wait (about a minute) till the Netra Proxy Cache Server completes the boot
process. Then, on a machine that is network-accessible to the Netra Proxy Cache
Server, you can use a browser to connect to the Netra Proxy Cache machine.
11. To ensure network connectivity, on the machine on which you will run the
browser for further configuration, enter:
non-netra% ping <netra host IP address>
If the host name and IP address of the Netra Proxy Cache machine is known to a
name service, you can ping the host by name, instead of numeric address. If you
receive a response indicating that the Netra Proxy Cache Server is reachable,
proceed. If you cannot ping the Netra Proxy Cache machine, you must have
entered the host name, host address, or netmask incorrectly. Check the values you
noted in Step 8 on page 14. If necessary, repeat the steps just described to
configure your network interface.
12. On the machine on which you are running the browser, point the browser at:
16
Netra Proxy Cache Server Configuration Guide ♦ Revision A, January 1998
http://<netra host IP address>:81
The string <netra host IP address> is the address you specified in the ping
command, above.
Note - Depending on the capabilities of your router, you might need to use a
browser on a host on the same subnet as the Netra Proxy Cache Server.
At this point, proceed to the next section.
Using a Browser to Complete Initial
Configuration
Whether you use the TTY or the diskette method for network-interface configuration,
use a browser to perform the rest of the initial configuration. Use the data gathered
in Table 1–2 to complete this procedure.
To Complete Initial Configuration
After using a browser to connect to the Netra Proxy Cache Server (as described in
the preceding section), you receive the display of the Administration Password
Dialog Box, as shown in Figure 2–3.
Figure 2–3
Administration Password Dialog Box
1. Enter setup in both the User ID and Password fields, then click OK.
Initial Host Configuration
17
The Netra Proxy Cache Welcome page is displayed, as shown in Figure 2–4.
Figure 2–4
Netra Welcome Page
2. Click the Administration link.
The Initial Configuration page is displayed, as shown below.
18
Netra Proxy Cache Server Configuration Guide ♦ Revision A, January 1998
Figure 2–5
Initial Configuration Page
Because the Netra Proxy Cache Server is being configured for the first time, the
Initial Configuration page takes the place of the Main Administration page until
the listed modules are configured. During a complete initial configuration, the
following modules are configured:
4 System Defaults
4 Host Name (only if you used the TTY, rather than the diskette, method of
network-interface configuration)
4 System Administrator Alias
4 Root Password
4 Administration Web Server
4 Name Service
Note - If the initial configuration is being done on a partially configured server,
all six modules might not be displayed. This is because the Netra Proxy Cache
software has already interrogated the system and determined that a given module
does not require configuration.
The examples in this manual show a complete initial configuration when
configuring a Netra Proxy Cache Server for the first time.
Configure modules in the order listed in the Initial Configuration page. The link
for the module to be configured next is highlighted in the web page.
3. Click System Defaults.
Initial Host Configuration
19
The System Defaults Administration page is displayed, as shown below.
Figure 2–6
System Defaults Administration Page
Use this page to configure the server’s time zone and locale.
4. To set the time zone, scroll down the list and click the country/time zone
appropriate for your location.
5. In the Default System Locale menu, click the appropriate country/language.
In the current release, there is only a single item in the menu, English. Additional
locales will be supported in future releases.
At the bottom of the page are two circular icons, one a house, the other a
question mark. These icons are links to the home page and to a help page,
respectively. While performing the initial configuration, clicking the home icon
returns to the Initial Configuration page. Following initial configuration, clicking
the home icon returns you to Netra Main Administration page. The help icon in
Figure 2–6 loads a help page for the System Defaults module. Most
administration modules have a help page.
6. Click OK to enter the system defaults information.
20
Netra Proxy Cache Server Configuration Guide ♦ Revision A, January 1998
A page indicating that the operation succeeded is displayed, as shown below.
Figure 2–7
System Defaults Administration Success
The “thumbs-up” page indicates that the System Defaults Administration module
has been successfully configured with the displayed values.
At the bottom of the page is the home icon and a circular icon with a
right-pointing arrow, called the forward-arrow icon. Clicking this link moves
forward to the next task for the initial configuration.
7. Click the forward-arrow icon.
The page that is displayed next depends on whether you used the TTY or the
diskette method of network-interface configuration:
Initial Host Configuration
21
4 If you used the TTY method, the Host Name Administration page is displayed.
Proceed to Step 8 on page 22.
4 If you used the diskette method, you have already configured your host name.
The System Administrator Alias Administration page is displayed. Skip to Step
10 on page 24.
Figure 2–8
Host Name Administration Page
8. In the Host Name Administration page (shown in Figure 2–8), replace the name
NewNetra with your machine’s host name in the Host Name field and click OK.
A host name can be of 24 or fewer characters. Valid characters are:
0-9 a-z A-Z - _
The host name cannot end in a hyphen.
A reminder page is displayed (shown below) telling you that you must reboot
your machine for the host name update to take effect. You will perform this
reboot later in the procedure.
22
Netra Proxy Cache Server Configuration Guide ♦ Revision A, January 1998
Figure 2–9
Host Name Reminder Page
9. Click the forward-arrow icon.
The System Administrator Alias Administration page is displayed, as shown
below.
Initial Host Configuration
23
Figure 2–10
System Administrator Alias Administration Page
This page enables the addition of email addresses for users who will receive
email addressed to root@<netra host name> or Postmaster@<netra host name>.
10. In the System Administrator Alias Administration page, click the Alias
Members field and enter one email address per line.
You must enter at least one address. Press Return after entering an address to
enter another address.
11. After entering one or more email addresses, click OK.
A success page is displayed, as shown below.
24
Netra Proxy Cache Server Configuration Guide ♦ Revision A, January 1998
Figure 2–11
System Administrator Alias Administration Success Page
12. Click the forward-arrow icon.
The Root Password Administration page is displayed, as shown below.
Figure 2–12
Root Password Administration Page
This page enables the changing of the root password. For initial configuration, the
Current Root Password field is blank, as there is none.
Initial Host Configuration
25
Note - The password you enter is passed as clear text over the LAN to the Netra
Proxy Cache Server.
13. Enter the new root password in the middle field and enter it a second time in
the lower field.
14. Click OK.
The success page indicates that the root password has been changed.
Should an error icon be displayed, type the correct password where indicated and
click OK.
15. In the success page, click the forward-arrow icon.
The Administration Password page is displayed, as shown below.
Figure 2–13
Administration Password Page
This page enables the changing of the administration password, which gives you
access to the Netra Proxy Cache Main Administration page and the server setup
account, described in “TTY Method” on page 12.
16. Enter setup in the top field, Current Administration Password.
26
Netra Proxy Cache Server Configuration Guide ♦ Revision A, January 1998
17. Enter a new administration password into the middle and lower fields and
click OK.
Note - The password you enter is passed as clear text over the LAN to the Netra
Proxy Cache Server.
Following successful administration password configuration, the page shown in
Figure 2–14 is displayed.
Figure 2–14
Reminder: Reauthentication May Be Required
18. In the page such as that shown in Figure 2–14, click the forward-arrow icon.
If you did not change the administration password, skip to Step 21 on page 28.
19. If you changed the administration password (from setup), at this point, a pop
up window is displayed, indicating that authorization failed and asking for a
retry. Click OK in the pop up window.
20. In a second pop up window, you are prompted to login, with setup as the
administration user. In the login pop up window, enter the administration
password you just specified in Step 17 on page 27 and click OK.
At this point, whether you changed the administration password or left it is as
setup, the Name Service Administration page is displayed, as shown below.
Initial Host Configuration
27
Figure 2–15
Name Service Administration Page
21. Click the link for the name service you use.
Use the instructions appropriate for your name service selection.
Note - It is strongly recommended you use DNS or NIS and not a Local Name
Service. You can use both DNS and NIS. If you choose DNS and/or NIS, do not
configure the Local Name Service.
For the DNS:
1. Click DNS. The page shown below is displayed.
Figure 2–16
DNS Administration Page
2. In the DNS Administration page, click Configure DNS Resolver.
The page shown below is displayed.
28
Netra Proxy Cache Server Configuration Guide ♦ Revision A, January 1998
Figure 2–17
DNS Domain Name and Name Server Addresses
3. In the second DNS Administration page, enter the following:
4 The name of the DNS domain in which the Netra Proxy Cache Server
resides.
4 The IP address of a DNS server in your enterprise. Make sure there is a
route between your Netra Proxy Cache Server or Array and the DNS server
you specify. If you are uncertain about network connectivity, from a
machine on the same subnet as the Netra Proxy Cache Server, ping the
DNS server to confirm the existence of a route between the two machines.
4 Optionally, IP addresses of two additional DNS servers in your enterprise.
Note - This host will be configured to use the Internet Domain Name System
to resolve host names. The information you supply will be used to set up the
resolv.conf configuration file. Please see the resolv.conf(4) man page
for more information. The default domain is the domain considered local to
the host. Normally, it is everything after the first period in the fully qualified
domain name of the host. For example, the host name host1.acme.com
implies a default domain of acme.com
4. Click OK.
A success page is displayed, showing your DNS entries.
5. Click the home icon.
Initial Host Configuration
29
For the first time, the Netra Main Administration page, shown in Figure 2–18,
is displayed.
In the Main Administration page note the line “There are configuration changes
that have not been saved and which require a system restart.” The word “save”
refers to backing up your configuration. You perform this step in “Backing Up
Your Configuration” on page 45. You will restart (reboot) the server starting with
Step 22 on page 32, below.
Figure 2–18
Main Administration Page
For a local name service (/etc/hosts):
Note - It is not recommended that you rely on a local name service for a Netra
Proxy Cache Array or Server.
30
Netra Proxy Cache Server Configuration Guide ♦ Revision A, January 1998
1. In the Name Service Administration page, shown in Figure 2–15, click Local
Name Service. The page shown in Figure 2–19 is displayed.
Figure 2–19
Local Name Service Administration
2. In the editable field, arrange entries as follows:
127.0.0.1 localhost
<ip address> <netra host name> loghost
3. Click OK. A success page is displayed.
4. Click the home icon in the success page. For the first time, the Netra Main
Administration page, shown in Figure 2–18, is displayed.
For the NIS:
1. In the Name Service Administration page, shown in Figure 2–15, click NIS.
The page shown in Figure 2–20 is displayed.
Initial Host Configuration
31
Figure 2–20
NIS Administration Page
2. Enter your NIS domain name.
3. Click OK. A success page is displayed.
4. Click the home icon in the success page. For the first time, the Netra Main
Administration page, shown in Figure 2–18, is displayed.
If you want to configure a name service in addition to the one you just
configured, click the Name Service link in the Main Administration page and
follow the instructions for the additional name service in Step 21 on page 28.
22. In the Main Administration page, click Restart and Shutdown under the
System Administration heading.
The Restart and Shutdown Administration page is displayed, as shown in Figure
2–21.
32
Netra Proxy Cache Server Configuration Guide ♦ Revision A, January 1998
Figure 2–21
Restart and Shutdown Administration Page
23. In the Restart and Shutdown Administration page, click Restart and click OK.
A success page is displayed. After a minute, the restart process begins. After about
two minutes, you can reload the Main Administration page from just-configured
Netra Proxy Cache Server. If you have a TTY connection to the Netra Proxy Cache
Server, you can observe the progress of the restart. At the point at which the
server displays the login prompt, you can reload the Main Administration page.
24. Confirm your initial configuration by checking your name service and host
name.
In the Main Administration page, click the Name Service and Host Name links
and examine the values displayed. If there are errors make the appropriate
changes. If you change your host name, your NIS or DNS domain name, or your
time zone, you must restart the server (see Step 22 on page 32 and Step 23 on
page 33, above).
Upon completion of the reboot, your Netra Proxy Cache Server is operational as a
proxy cache server with the following default values:
4 Listens for HTTP requests on port 8080
4 Listens for Inter Cache Protocol (ICP) requests on port 3031
Initial Host Configuration
33
4 No parent proxies configured.
If the preceding defaults do not meet your needs, proceed to Chapter 3,” to complete
the configuration of your Netra Proxy Cache Server.
34
Netra Proxy Cache Server Configuration Guide ♦ Revision A, January 1998
CHAPTER
3
Proxy Cache Service Configuration
4 “Starting the Proxy Cache Administration Server” on page 36
4 “Basic Proxy Cache Configuration” on page 40
4 “ Install Configuration” on page 44
4 “Backing Up Your Configuration” on page 45
This chapter explains how to perform basic configuration of a Netra Proxy Cache
Server.
Please fill out the tables in Chapter 1,” before starting the procedures in this chapter.
At this point, your Netra Proxy Cache server is fully functional as a proxy cache
machine with the following settings:
4 An email alias for proxy cache trouble reports of root
4 An HTTP port number of 8081, for listening to HTTP requests
4 An Inter Cache Protocol (ICP) port number of 3031, for listening to ICP requests
4 Configuration for being outside of a firewall; that is, no parent or sibling proxies
If these settings meet your needs, you can skip this chapter and consult the Netra
Proxy Cache Server User’s Manual, to read about the advanced configuration
properties available for fine-tuning your proxy cache service.
If you want, you can perform the procedures described in this chapter using a
command-line program, instead of using the web pages described here. See Chapter
4,” for instructions.
35
Starting the Proxy Cache Administration
Server
1. On a remote machine (not your Netra Proxy Cache Server), point your browser
at the Netra Proxy Cache Server, as follows:
http://<netra server>:81
where <netra server> is the host name of your Netra Proxy Cache Server. If the
host name is not known to a network name service, you must specify the numeric
IP address of the administrative host. Depending on the capabilities of your
router, you might need to use the browser on a machine on the same subnet as
the Netra Proxy Cache Server.
Upon successful connection, you receive a prompt for an administrator’s name
and password. Enter the password you specified in Step 17 on page 27. Following
successful login, the Netra Proxy Cache Main Administration page is displayed,
as shown below:
36
Netra Proxy Cache Server Configuration Guide ♦ Revision A, January 1998
Figure 3–1
Main Administration Page Following Initial Configuration
Regarding the reminder note at the top of the Main Administration page, you will
backup you configuration later in the configuration procedure.
1. In the Main Administration page, click Proxy Cache Service.
The Proxy Cache Administration page is displayed, as shown below.
Proxy Cache Service Configuration
37
Figure 3–2
Proxy Cache Administration Page: Server Stopped
2. In the Proxy Cache Administration page, click Start Administration Server.
3. A page indicating a successful operation is displayed. In this page, click the
up-arrow icon to return to the Proxy Cache Administration page.
This time, the Proxy Cache Administration page displays a full set of options for
configuration, as shown below.
38
Netra Proxy Cache Server Configuration Guide ♦ Revision A, January 1998
Figure 3–3
Proxy Cache Administration Page (Server Started)
The remainder of this chapter covers the basic proxy cache configuration and install
configuration links. Advanced proxy cache configuration and SNMP configuration
are described in the Netra Proxy Cache Server User’s Manual.
Proceed to the next section for instructions on configuring the proxy cache service.
Proxy Cache Service Configuration
39
Basic Proxy Cache Configuration
The procedure described here presumes you have started the proxy cache
administration server on your administrative host, as instructed in “Starting the
Proxy Cache Administration Server” on page 36.
To Configure the Proxy Cache Service
To complete basic proxy cache configuration, use the data you gathered in Table 1–3
and Table 1–4.
1. In the Proxy Cache Administration page, click the Basic proxy cache
configuration link.
The Basic Proxy Cache Configuration page is displayed, the top part of which is
shown in Figure 3–4.
Figure 3–4
Basic Proxy Cache Configuration: Step One
1. In the Step One segment, shown in Figure 3–4, enter an HTTP port number or
accept the default of 8080.
40
Netra Proxy Cache Server Configuration Guide ♦ Revision A, January 1998
2. Scroll down (if necessary) to the Step Two segment of the page, shown in
Figure 3–5.
Figure 3–5
Basic Proxy Cache Configuration: Step Two
3. If the Netra Proxy Cache Server is inside a firewall, you can list the domains
that are inside the firewall.
For URLs containing domains not in this list, the Netra Proxy Cache Server always
tries to fetch the object from a parent or sibling cache, if it does not have the object
in its local cache. Domains added to this list are also added to the Local Domains
property, described in Chapter 3 of the Netra Proxy Cache Server User’s Manual.
4. When you are finished entering domain names or if your server is outside of a
firewall, scroll down to display the Step Three segment, shown in Figure 3–6.
Proxy Cache Service Configuration
41
Figure 3–6
Basic Proxy Cache Configuration: Step Three
5. If your Netra Proxy Cache Server has one or more parent proxy servers, enter
the following data in the fields provided:
4 Name of parent proxy server
4 Port number at which the parent listens for HTTP requests
4 Port number at which the parent listens for Inter Cache Protocol (ICP) requests
(if the parent supports ICP—a 0 in the field indicates non-support for ICP)
4 Whether the parent supports the tunneling of the Secure Socket Layer protocol
4 Whether the parent supports persistent connections
Use the data you gathered in Table 1–4 to fill in the parent proxy information.
Note that Netra Proxy Cache Servers support ICP, SSL tunneling, and persistent
connections. If you are unsure whether a given proxy cache server supports SSL
tunneling or persistence, do not click the check boxes. If you have more than five
parent proxies, click the button to add additional rows to the table.
42
Netra Proxy Cache Server Configuration Guide ♦ Revision A, January 1998
6. After adding all parent proxies, click OK.
If you make an error, either the same page or a special error page is displayed. In
both cases, the error is cited on the page. If the same page is displayed, correct
the error and click OK to proceed. If an error page is displayed, correct the error,
the use the browser’s back button to return to the Basic Proxy Cache
Configuration page. In this page, click OK to proceed.
After you have submitted a correct set of proxy cache properties, a page is
displayed indicating success and displaying your selections. An example of such
a page is shown below.
Figure 3–7
Successful Basic Proxy Cache Configuration
Proxy Cache Service Configuration
43
7. In the success window, click the up-arrow icon to return to the Proxy Cache
Administration page.
Install Configuration
Perform this procedure after you have completed the basic proxy cache configuration.
To Install Your Software Configuration
At this point, your proxy cache configuration is recorded in a configuration database.
You need to install the configuration for your choices to take effect.
1. In the Proxy Cache Administration page, click Install Configuration. The
following page is displayed:
Figure 3–8
Confirm Installation
2. Click OK to confirm installation of your proxy cache service configuration
choices.
A page is displayed indicating successful installation. In the event of installation
failure, consult the error logs.
44
Netra Proxy Cache Server Configuration Guide ♦ Revision A, January 1998
To view error logs:
1. Click the home icon to load the Main Administration page.
2. Click Proxy Cache Service to load the Proxy Cache Administration page.
3. Under the Monitoring heading, click Log Files.
4. In the Proxy Cache Log Administration page, click View for the
Administration Client Error log or the Configuration Installation Error log.
3. Following a successful installation, click on the home icon to return to the
Main Administration page.
Proceed to the following section.
Backing Up Your Configuration
For this procedure, you need a formatted diskette. The procedure described here
backs up your Solaris and proxy cache configuration.
To Backup a Netra Proxy Cache Server
1. Insert a formatted diskette in the drive of your Netra Proxy Cache Server.
The server detects the presence of a diskette in its drive and does not offer you
the option of backing up to diskette unless the diskette is in place.
2. Point your browser at the URL for the Netra Welcome page on the machine in
which you have inserted a diskette:
http://<netra server name>:81
3. Log in to the Netra Proxy Cache Server.
Enter user name setup and the administration password for that server.
4. In the Welcome page, click the Administration link.
5. In the Main Administration page, under the System Administration heading,
click Save and Restore Configuration.
The Save and Restore Configuration Administration page is displayed, as shown
below.
Proxy Cache Service Configuration
45
Figure 3–9
Save and Restore Configuration Administration Page
Because this is the first time the configuration is saved, there is no link for
restoring a configuration.
6. Click Save configuration to diskette.
A confirmation page is displayed.
7. Click OK to confirm the save operation.
The copy operation begins. Upon completion, a success page, shown below, is
displayed.
Figure 3–10
Successful Save Operation
8. Click the up-arrow icon to return to the Save and Restore Configuration page.
46
Netra Proxy Cache Server Configuration Guide ♦ Revision A, January 1998
9. Click the Eject diskette link.
You are asked to verify the operation. Click OK. A success page is displayed.
10. In the success page, click the home icon to return to the Main Administration
page.
It is recommended that you label the diskette, switch the read-write tab to the
read-only position, and store the diskette in a safe place.
See Appendix A of the Netra Proxy Cache Server User’s Manual for instructions on
restoring a Netra Proxy Cache Server from diskette.
Proxy Cache Service Configuration
47
48
Netra Proxy Cache Server Configuration Guide ♦ Revision A, January 1998
CHAPTER
4
Using a Serial Terminal to Configure a
Netra Proxy Cache Server
4 “Invoking the Command-line Program” on page 50
4 “Proxy Cache Service Configuration” on page 51
4 “Install Configuration on Host” on page 52
This chapter describes the command-line program you can use to configure a Netra
Proxy Cache Server. This program is alternative to the configuration web pages
described in Chapter 3.
Please fill out the tables in Chapter 1,,” before starting the procedures in this chapter.
Following initial host configuration, described in Chapter 2,” a Netra Proxy Cache
Server is fully functional as a proxy cache machine with the following settings:
4 An email alias for proxy cache trouble reports of root
4 An HTTP port number of 8080, for listening to HTTP requests
4 An Inter Cache Protocol (ICP) port number of 3031, for listening to ICP requests
4 Configuration for being outside of a firewall; that is, no parent or sibling proxies
If these settings meet your needs, you can skip this chapter and consult the Netra
Proxy Cache Server User’s Manual, to read about the advanced configuration
properties available for fine-tuning your proxy cache service.
For invoking the command-line configuration program, it is assumed that you have
connected a terminal, workstation, or PC to your Netra Proxy Cache Server. See
Appendix A,” for instructions.
49
Invoking the Command-line Program
To Invoke the Command-line Program
1. As root, invoke the command-line program as follows:
# cd /opt/SUNWoam/bin
# ./quickconfig
The main menu is displayed:
Proxy Cache Quick Configuration and Installation Tool
This tool is used to define the following information for
the Proxy Cache Server:
email address for the Webmaster
HTTP port number
parent proxies
This tool allows only basic Proxy Cache configuration.
For advance configuration, please use the Netra Proxy Cache GUI tool.
----------------------------------------------------------------------Obtaining information from configuration database. Please wait...
------------------------------------------Main Menu
------------------------------------------Please select one of the following options:
1.
2.
3.
4.
5.
0.
Configure Proxy Cache Service
Configure SNMP
Install Configuration on Host
Display Proxy Cache Service Configuration
Display SNMP configuration
Quit
Select a number (from 0 to 5):
50
Netra Proxy Cache Server Configuration Guide ♦ Revision A, January 1998
Proxy Cache Service Configuration
To Configure the Proxy Cache Service
To perform basic proxy cache configuration, use the data you gathered in Table 1–3
and Table 1–4.
1. In the main menu, enter 1 (Configure Proxy Cache Service).
2. In the Configuring Proxy Cache Service Menu, enter 1 (Configure Proxy Cache
Service [via Genie]).
3. Enter an email address that will receive reports of abnormal conditions on the
Netra Proxy Cache Server or accept the default of root.
4. Enter a port number for receiving HTTP requests or accept the default of 8080.
5. Specify (y or n) whether the Proxy Cache Server is inside a firewall.
If it the server is not inside a firewall, skip to Step 10 on page 51. If the server is
inside a firewall, proceed to the next step.
6. In the Add/Delete Domains Firewall Menu, enter 0 to create a domain.
7. Enter the name of a domain inside the firewall.
For URLs containing domains not in this list, the Netra Proxy Cache Server
always tries to fetch the object from a parent or sibling cache, if it does not have
the object in its local cache. Domains added to this list are also added to the Local
Domains property, described in the Netra Proxy Cache Array User’s Manual.
8. Repeat Step 6 on page 51 and Step 7 on page 51 for each domain you want to
add. When you are finished adding domains, enter the number for the option
to return to the Proxy Cache Service Menu.
9. In the Proxy Cache Service Menu, enter 2 to create a new parent proxy.
10. In the Add/Delete/Edit Parent Proxy Menu, enter 0 to create a new parent
proxy or 1 to return to the Proxy Cache Service Menu.
Using a Serial Terminal to Configure a Netra Proxy Cache Server
51
If you do not have a parent proxy, skip to Step 15 on page 52. Otherwise, proceed
to the next step.
11. Enter 0 to create a new parent proxy.
12. For a given parent proxy, enter:
4 host name
4 HTTP port number
4 ICP port number
4 whether the proxy supports tunneling of the Secure Sockets Layer (SSL)
protocol
4 whether the proxy supports persistent connections (keep alive feature)
13. Repeat Step 11 on page 52 and Step 12 on page 52 for each parent you want to
add.
14. When you are finished adding parents, in the Add/Delete/Edit Parent Proxy
Menu, enter the number for the option to return to the Proxy Cache Service
Menu.
15. In the Configuration Proxy Cache Service Menu, enter 6 to return to the main
menu.
Your proxy cache configuration is displayed.
16. Enter y to confirm your proxy cache configuration or press Return to change
one or more entries.
After you confirm your proxy cache configuration, your entries are saved to a
configuration database and you return the quickconfig main menu.
Install Configuration on Host
Perform this procedure after you have completed proxy cache service configuration.
52
Netra Proxy Cache Server Configuration Guide ♦ Revision A, January 1998
To Install Your Software Configuration
At this point, your configuration selections are recorded in a database. You need to
install the configuration on your Netra Proxy Cache Server for your choices to take
effect.
1. In the main menu, enter 3 (Install Configuration on Host).
2. Enter y to confirm installation on your Netra Proxy Cache Server.
Upon successful installation, you are returned to the main menu.
3. In the main menu, enter 0 to exit quickconfig.
At this point, your Netra Proxy Cache Server is fully operational. See the Netra Proxy
Cache Server User’s Manual for instructions on performing advanced configuration of
your machine.
Using a Serial Terminal to Configure a Netra Proxy Cache Server
53
54
Netra Proxy Cache Server Configuration Guide ♦ Revision A, January 1998
APPENDIX
A
Establishing a tip Connection
The Netra Proxy Cache Server is shipped without a video display. To perform the
TTY method of network interface configuration, you must follow the procedure
described in this appendix to connect a serial terminal, another Sun machine, or a PC
to the server, over a serial connection. When you connect a second Sun machine to a
server, a window in your window system acts as your serial terminal.
When connecting a serial terminal or second workstation to a Netra Proxy Cache
Server, it is critical that a keyboard not be connected to the Netra Proxy Cache
machine itself.
If you are using a Solaris machine as your terminal, you should use the tip program
to connect to the Netra Proxy Cache Server, because tip enables you to use Solaris
windowing and operating system features to help you interact with the server.
Note - To use a PC to connect to a Netra Proxy Cache Server, you must have a
terminal emulation program that emulates a VT100 terminal and a null modem cable
that connects, on the server end, to the 25-pin connector and, on the PC end, to an
8-or 25-pin connector, as appropriate for the PC. On the PC, set the line settings to
9600 baud, 8 data bits, no parity, and 1 stop bit.
Establishing a tip Connection
The tip program is the Solaris program that is most commonly used to establish a
serial connection to a Solaris machine.
55
To Establish a tip ConnectionTo Establish a tip
Connection
Use the following procedure to establish a tip connection from a workstation or
serial terminal to a Netra Proxy Cache Server:
1. Obtain or build a three-wire null modem cable with DB-25 connectors.
Wires 3-2, 2-3, and 7-7 should be connected, as shown in Figure A–1.
Figure A–1
Null Modem Cable
2. Connect serial port B on the second Sun machine to serial port A on the Netra
Proxy Cache Server.
The location of the serial ports is illustrated in Figure A–2.
56
Netra Proxy Cache Server Configuration Guide ♦ Revision A, January 1998
Figure A–2
Location of Serial Port A
At this point you have the option of explicitly identifying a destination port in a
tip command line or editing the /etc/remote file and entering a tip
hardwire command.
To explicitly identify a destination port on the server, enter a command such as:
hostname% tip -9600 /dev/ttya
connected
To enable the use of tip hardwire, perform the steps below:
a. At the second Sun machine, find the line shown below in the file
/etc/remote.
hardwire:\
:dv=/dev/term/a:br#9600:el=^C^S^Q^U^D:ie=%$:oe=^D:
If the line does not exist, you must, as root, add it.
In the line above, note that the string /dev/term/a specifies serial port A. If
you want to specify serial port B on the second machine, specify the string
/dev/term/b.
b. In a shell tool window on the second Sun machine, enter:
Establishing a tip Connection
57
hostname% tip hardwire
connected
Whether you explicitly identify a port or use the hardwire argument, the tip
program responds with the message connected when a successful connection is
established.
Following the connected message, the shell window on the second machine is now
a tip window directed to the serial port specified in /etc/remote or on the tip
command line. You can now enter commands to and receive console output from the
Netra Proxy Cache Server in this window.
Tip - If you want to disconnect the tip window, enter a Return, then ~. (tilde
period) at a shell prompt, or enter a command such as the following:
hostname% kill -9 <PID of tip process>
If you cannot use the tip program to connect to a Netra Proxy Cache Server, (for
example, your connection attempt is refused) it might be because the machine from
which you are invoking tip recognizes that it is already connected to the server.
This occurs when, for example, a shell tool window is killed before a tip session
concludes. In such a circumstance, kill any tip process still running on the machine
that has a video display or delete the lock file associated with the tip process in
/var/spool/locks. See tip (1) for further details.
58
Netra Proxy Cache Server Configuration Guide ♦ Revision A, January 1998
Index
Index-59