Download ProSystem fx Knowledge Coach User Guide - Support
Transcript
Knowledge Coach User Guide October 2009 Copyright 2009, CCH INCORPORATED. A Wolters Kluwer business. All Rights Reserved. Material in this publication may not be reproduced or transmitted, in any form or by any means, without prior written permission. Requests for that permission should be directed to: CCH INCORPORATED 20101 Hamilton Avenue Suite 200 Torrance, CA 90502 The contents of this publication are believed to be accurate. However, responsibility cannot be assumed for the information contained herein, and the consequences resulting from the use thereof. Material in this publication is subject to change without notice. This User Manual and the computer software it describes are designed to provide accurate and authoritative information in regard to the subject matter covered. They are distributed with the understanding that the publisher is not engaged in rendering accounting, legal, or other professional service. If legal advice or other expert assistance is required, the services of a competent professional should be sought. “ProSystem fx Knowledge Coach” is a registered trademark of CCH INCORPORATED. Portions Copyright 1984-1990, FairCom Corporation. All rights reserved. Portions Copyright Novell, Inc. All rights reserved. “Windows” is a registered trademark of Microsoft Corporation. All other brand, product, or company names are trademarks or registered trademarks of their respective owners. Welcome to ProSystem fx Knowledge Coach Contents 1 The Next Level of Audit Efficiency 1 Getting Set Up 2 Installation 2 Licensing 2 Staff Group Rights 3 Getting Title Content 4 Getting Started with Knowledge Coach Workpapers 7 Content Used in Knowledge Coach 7 Inserting Knowledge Coach Workpapers 7 Foundation Workpapers 11 Associate Workpaper 12 Converting From Knowledge Tools (Available November 2009) 15 Reviewing Converted Workpapers 15 Knowledge Coach Workpapers in the Binder 17 The Knowledge Coach Ribbon 18 Important Elements in Knowledge Coach Workpapers 22 Embedded Hyperlinks 22 Related Workpaper Links 22 Tips 23 "Do Not Delete" Indicators 23 Knowledge Coach Tables 24 Using Other Engagement Functions in Knowledge Coach Workpapers 27 Using Microsoft Word Functions in Knowledge Coach Workpapers 27 Tips Pane 28 Tips 28 Answer Effects 28 Content Updates 31 Tailoring Your Workpapers 32 Tailoring Questions 32 Audit Areas 32 Risk Summary 34 Adding Financial-Statement-Level Risks 34 Adding Specific Risks 35 Editing Risks 36 Deleting Risks 37 Audit Programs 38 Program Step Library 38 View Available Program Steps 38 Tailor Steps in the Program Step Library 39 Contents • i Contents Add Steps from the Program Step Library 39 Modify a Program Step in the Workpaper 39 Add a Custom Program Step 40 Remove a Program Step 40 Linking Risks to Procedures 41 Linking a Program Step to a Risk Updating to the Latest Version of a Workpaper 41 42 Related Workpapers 42 Updating a Workpaper to the Latest Version 45 Diagnostics 46 Diagnostics in the Binder Frame 46 Deleting a Diagnostic 47 Copying and Pasting Knowledge Workpapers 48 Synchronizing Knowledge Coach Workpapers 49 Rolling Forward Knowledge Coach Binders 50 Keeping Answers to Questions 50 Keeping Row Customizations and Program Steps 51 How to Roll Forward a Knowledge Coach Binder 51 Guidance 52 Knowledge Coach Guidance 52 Accessing Accounting Research Manager 52 Contents • ii Welcome to ProSystem fx K nowledge C oach Chapter 1 Welcome to ProSystem fx Knowledge Coach Welcome to ProSystem fx Knowledge Coach, the latest addition to the CCH suite of audit workflow and guidance software. Developed from the ground up by auditors, for auditors, ProSystem fx Knowledge Coach combines the industry-specific content and guidance of ProSystem fx Knowledge Tools with a dynamic audit workflow engine that streamlines your audit planning process, and helps you efficiently manage an audit from beginning to end. Knowledge Coach is not just a planning tool, a workpaper generator or an audit workflow management tool. It’s all of these things and more. The Next Level of Audit Efficiency Enable your auditors to get back to auditing with ProSystem fx Knowledge Coach. Unfortunately, auditors are spending more and more of their time performing administrative tasks, such as managing workpapers, looking up information and making sure data is entered in all the necessary locations. Knowledge Coach takes care of this, letting your auditors get back to auditing. It also provides: Impressive increases in efficiency. Knowledge Coach significantly reduces time spent on your engagements through dynamic planning tools, flow of data throughout the application and workpapers, and powerful roll-forward capacity. Compliance with latest risk-based audit standards. Knowledge Coach quickly guides you through audit planning, ensuring that your engagement is tailored to the specific entity and its risks. It also facilitates your ongoing management of risks and program steps, ensuring that all identified risks are addressed throughout the engagement. Reduction in the risk and cost of over-audits. Knowledge Coach links audit procedures to identified risks, allowing your auditors to focus on needed steps and identify unnecessary ones. Dramatic improvements in accuracy. Extensive diagnostics ensure completeness. But with Knowledge Coach, information that impacts more than one workpaper or step is flowed throughout the workpapers — immediately and accurately. There is no need to find and update affected areas manually, risking incomplete or incorrect updating. Total flexibility. With Knowledge Coach, your audit plans are tailored to a specific entity using our Knowledge-Based Audit guidance, tailoring questions, and your auditor’s own professional judgment. Changes can be maintained through roll-forward and content updates. Transparency. Knowledge Coach tells your auditors what it is doing through the use of drill-downs, workflow links, diagnostics, and descriptions of the effects of answers on your workpapers. Welcome to ProSystem fx Knowledge Coach • 1 Getting Set U p Chapter 2 Getting Set Up You must complete a few administrative steps to set up your firm for Knowledge Coach. This section covers these setup tasks. Installation Knowledge Coach is a module that works within the ProSystem fx Engagement application. In Engagement version 6.0 and higher, you can choose to install the Knowledge Coach module. During the installation process, select Knowledge Coach on the Custom Setup page of the InstallShield Wizard. Knowledge Coach requires the use of the Microsoft Office 2007 platform, so you can enjoy the features of Word and Excel to which your staff is accustomed. Note: If you have already installed ProSystem fx Engagement 6.0 or higher and did not originally select the Knowledge Coach module, go to Control Panel and select to Modify the ProSystem fx Engagement application from the Programs group. Licensing There are three licenses involved in using Knowledge Coach workpapers: Engagement Workpaper Management license. This license allows users to access the Workpaper Management module of Engagement. Knowledge Coach module license. If you have a license to the Knowledge Coach module, you will be able to view and navigate within and between the Knowledge Coach workpapers in a binder. You’ll also be able to perform some common reviewer tasks, such as perusing the Program Step Library and deleting diagnostics. Specific Knowledge-Based audit title license. Having a license to each of the Knowledge-Based Audit industry titles will allow you to fully edit the Knowledge Coach workpapers for a particular industry title. Contact your system administrator for assistance with the licenses that have been assigned to you. Here is a complete list of functions and the license combinations required for you to complete each function: License Required Function Engagement Workpaper Management Knowledge Coach Specific Knowledge-Based Audit Title Insert Knowledge Coach workpapers X Open Knowledge Coach workpapers X Add, edit, and delete risks X X X View Risk Summary X X X Getting Set Up • 2 License Required Engagement Workpaper Management Knowledge Coach Specific Knowledge-Based Audit Title Answer questions within Knowledge Coach workpapers X X X Edit various fields within Knowledge Coach workpapers X X X Insert and delete rows and columns within Knowledge Coach workpapers X X X View and navigate the Program Step Library X X Add and remove program steps from the Program Step Library to an audit program X X X Add custom program steps, modify CCHprovided steps, and delete program steps X X X Sign off on program steps, mark them as "N/A," or remove sign off information X X X Use drill-down functionality between Knowledge Coach workpapers and with diagnostics X X Delete diagnostics X X Insert workpapers from missing workpaper diagnostics X X Convert a Knowledge Tools workpaper to a Knowledge Coach workpaper X X X Update a Knowledge Coach workpaper to the latest version X X X Override data retention options for Knowledge Coach workpapers for binder roll forward X X X Function For information about adding licenses in the Engagement Administrator module and assigning licenses to staff, see the Engagement Administrator Help file. Staff Group Rights Specific staff group rights are available to help your firm control which of your staff members have access to certain functions. These staff group rights are listed as follows: Getting Set Up • 3 
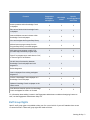
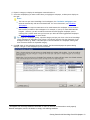
Roll Forward Knowledge Coach – Override response roll forward setting. Allows group members to override roll forward settings that have been applied to responses in a Knowledge Coach workpaper. Knowledge Coach – Accept/reject changes in updated content. Allows group members to accept/reject changes to updated Knowledge Coach content. Notes/Diagnostics Delete diagnostics. Allows group members to delete a Knowledge Coach diagnostic, in the event that it is not relevant to your engagement. For example, you may want to delete the diagnostic for “Workpaper Missing - This is a new engagement so you should add and complete KBA-201 Engagement Acceptance Form” if your firm has their own preferred form of this documentation. Typically, reviewers should be given this staff group right. See Deleting Diagnostics for more information. Sign Off Knowledge Coach – Keep program step sign off for workpapers created from existing workpapers. Allows group members to keep program step sign off information in Knowledge Coach workpapers when copying and pasting binders, creating new binders, and copying and pasting workpapers. Content Add Knowledge Coach titles. Browse to downloaded title packages (*.KCP files) and add the content for a given Knowledge Coach title to the Knowledge Coach content database on your computer. Give this right to a person in your firm who has a ProSystem fx account login, and is responsible for retrieving titles and distributing out to the rest of the staff. Release/unrelease Knowledge Coach titles. Releasing a Knowledge Coach title that has been added to the database makes it available to other staff members in your firm so that they can start adding workpapers to binders from that title. Unreleasing a title takes a title out of circulation for the entire firm. Give this right to a person in your firm who is responsible for managing the latest versions of titles. Insert Knowledge Coach workpapers from unreleased titles. This right allows you to preview Knowledge Coach workpapers from a given title by inserting them into a binder before a title is released into general circulation in your firm. Give this right to people who review titles, prepare binder templates, and generally prepare other staff members for work on audit materials. For more information on how to add or modify staff group rights, see the "Setting Up Staff Groups" book of the Engagement Administrator Help. Getting Title Content Before you can start inserting Knowledge Coach workpapers in your Engagement binders, you must download and install the Knowledge Tools industry-specific content that is compatible with the Knowledge Coach module. Once one person in your firm downloads and releases a title, the rest of your staff will receive the title via either the login process (when the Office location is selected) or via the synchronization process between Local File Rooms or with the Central File Room. Getting Set Up • 4 Viewing Available Knowledge Coach Titles To view the Knowledge Coach titles that are available to you, do the following: 1. Launch ProSystem fx Engagement Workpaper Management so that the Local File Room is displayed. 2. Select Tools > Knowledge Coach Titles. 3. The Knowledge Coach Titles window displays. Any Knowledge Coach titles that have been added to your system will be listed here, along with details about when CCH released the title, the status of the title, when your firm added the title, and when it was released to the staff at your firm. If you do not see any titles listed here, it means that titles have not yet been added and/or released. See the following sections, Downloading a Knowledge Coach Title, Adding a Knowledge Coach Title, and Releasing a Knowledge Coach Title for more information. Downloading a Knowledge Coach Title To download a Knowledge Coach title, do the following: 1. At the bottom of the Knowledge Coach Titles window, click the View other available Knowledge Coach titles available for download link to launch the ProSystem fx Knowledge Coach Support website, where the available Knowledge Coach title packages are listed. 2. Click the title to download. Detailed information about the title displays. 3. Scroll down to the How to install section. 4. Click Download. 5. Select a location to which you want to store the title package file, which will have a *.KCP extension. Note: You must have a ProSystem fx Single Sign On (SSO) user ID and password to access the Engagement Support Web site where the Knowledge Coach titles are stored. If you do not have a user ID and password, you can obtain one by contacting Customer Service at 1-800-PFX-9998, option 4. Adding a Knowledge Coach Title Once you have downloaded a Knowledge Coach title package (*.KCP file), you can add this industry-specific content to your Knowledge Coach database. To add a title, do the following: 1. Launch ProSystem fx Engagement Workpaper Management so that the Local File Room is displayed. 2. Select Tools > Knowledge Coach Titles. The Knowledge Coach Titles window displays. 3. Click Add Title. 4. Browse to the title package file (*.KCP) that you previously downloaded from the ProSystem fx Knowledge Coach Support website. 5. Click Open. A progress indicator displays while the title package is added. You will receive a message that the title has been successfully installed once the process is complete. Note: You must have appropriate staff group rights to add a Knowledge Coach title. See Staff Group Rights for more information. Once the Knowledge Coach title is added to your system, you can insert Knowledge Coach workpapers from that title, and the content for that title will synch to other users via the Office Login process or via synchronization between Local File Rooms or with the Central File Room. However, other users will not be able to add workpapers from the title until it has been released, unless a particular staff member has the staff group right to insert Knowledge Coach workpapers from unreleased titles. For more details, see the next section, Releasing a Knowledge Coach Title. Getting Set Up • 5 Releasing a Knowledge Coach Title A Knowledge Coach title must be released in order for general users in your firm to insert Knowledge Coach workpapers into their Engagement binders. To release a title, do the following: 1. Launch ProSystem fx Engagement Workpaper Management so that the Local File Room is displayed. 2. Select Tools > Knowledge Coach Titles. The Knowledge Coach Titles window displays. 3. Select one of the Knowledge Coach titles in the list that has been added but is not yet released. 4. Click Release Title. The current date and time display in the Date released column, and the status changes to Released. Note: You must have appropriate staff group rights to release a Knowledge Coach title. See Staff Group Rights for more information. Once the Knowledge Coach title is added to your system, you can start inserting Knowledge Coach workpapers from that title. However, other users will not be able to add workpapers from the title until the title has been released, unless a particular staff member has the staff group right to insert Knowledge Coach workpapers from unreleased titles. Unreleasing a Knowledge Coach Title You may decide that you want to take a particular version of a Knowledge Coach title out of circulation in your firm so that no new Knowledge Coach workpapers will be created from it. For example, when a new version of a Knowledge Coach title is released, you may want to take the previous version out of circulation. By unreleasing previous versions of a title, you can ensure that your staff will insert new workpapers from only the latest version of the title. To unrelease a title, do the following: 1. Launch ProSystem fx Engagement Workpaper Management so that the Local File Room is displayed. 2. Select Tools > Knowledge Coach Titles. The Knowledge Coach Titles window displays. 3. Select the Knowledge Coach title that you want to unrelease. 4. Click Unrelease Title, and then click Yes to confirm the decision. The status changes from Released to Installed. Note: You must have appropriate staff group rights to unrelease a Knowledge Coach title. See Staff Group Rights for more information. Getting Set Up • 6 Getting Started with K nowledge C oach Workpapers Chapter 3 Getting Started with Knowledge Coach Workpapers This section discusses how to get started with ProSystem fx Knowledge Coach workpapers. Content Used in Knowledge Coach Knowledge Coach uses Microsoft Word 2007 and Microsoft Excel 2007 to display and use the content from industry-specific Knowledge Tools titles. These titles are based on the Knowledge-Based Audit methodology, developed by CCH authors. To read more about this audit methodology and approach, do one of the following: Insert the Knowledge Coach workpaper RES-001 KBA Methodology Overview into a binder. See Inserting Knowledge Coach Workpapers for more information. From any open Knowledge Coach Workpaper, click KC Guidance in the Guidance group on the Knowledge Coach Ribbon. This displays the contents from RES-001 KBA Methodology Overview in a separate Help window. This workpaper is the roadmap or guide to the risk-based audit methodology that Knowledge Coach follows. While it is not intended to replace the CCH audit guide, it provides extensive information about the methodology and how the workpapers are intended to fit within that methodology. Inserting Knowledge Coach Workpapers To begin using the Knowledge Coach module, you must first insert Knowledge Coach workpapers. To add a new Knowledge Coach workpaper to a binder in ProSystem fx Engagement, do the following: 1. Open the binder and select the tab into which you want to insert the Knowledge Coach workpaper. 2. From the binder menu, select File > New > Knowledge Coach Workpaper. The New Knowledge Coach Workpaper dialog displays. 3. Use the Industry list to select the Knowledge Coach title containing the workpaper(s) you are adding. The name of each title includes the year for the title (“2009”), the industry name (e.g., “Commercial”), the date that CCH released the title (e.g., “10/31/09”), followed by the date that your firm added the title (e.g., “11/01/09”). Notes: Only titles that have been added to the database and then released in the Knowledge Coach Titles window by a user with appropriate staff group rights will be shown in the list of industries, unless you have the right to insert workpapers from unreleased titles. For more information, see Getting Title Content. Once you have inserted Knowledge Coach workpapers into a binder, that binder is associated as the primary title version. From that point on, you will not be able to insert workpapers from other industry titles into the binder. This serves to protect the data flow and rules that are part of the Knowledge Coach application. To find out the primary title version for your binder after Knowledge Coach workpapers have been inserted, right-click the binder and select Properties. Then select the Information tab. The Primary KC title field displays the name of the primary title. After you insert Knowledge Coach workpapers into a binder, you will still be able to insert workpapers from other versions of the same title. See Updating to the Latest Version of a Workpaper for more information. Getting Started with Knowledge Coach Workpapers • 7 4. Expand a category to display the workpapers contained within it. 5. Select the workpaper(s) you want to add. When you highlight a workpaper, its description displays to the right. Notes: The first time you insert Knowledge Coach workpapers, the foundation workpapers1 are selected automatically and cannot be deselected. For more information, see Foundation Workpapers. Some workpapers require an association to be made between the workpaper and information that has been provided in other workpapers. For example, if you try to insert AUD-800 Audit Program - (Custom), you will be asked to associate the audit program workpaper you are inserting with a custom audit area you have set up in AUD-100 Tailoring Questions Workpaper. See Associate Workpapers for more detail. Tip: To get to a workpaper quickly, expand a category and put your focus in the list of Knowledge Coach workpapers by highlighting one of them. Then quickly type the first few characters of the workpaper index (e.g. “AUD”). This takes you to the next instance of a workpaper starting with those characters within the expanded category. 6. Click OK. After all the workpapers have been created, the Selected Workpapers Properties dialog displays, listing all of the workpapers you have selected. 1Workpapers that are always needed in the binder in order for the flow of information to work properly between workpapers, and for the binder to comply with auditing standards. Getting Started with Knowledge Coach Workpapers • 8 7. Complete the following fields as applicable: Index. Enter an index number for each workpaper, if necessary. Workpaper Name. Required. You can edit the default workpaper name if necessary. Associated values such as audit areas, specialists, service organizations, etc. will be appended to the workpaper name when applicable. See Associate Workpaper for more information. Tab Location. Select the tab where you want to insert each workpaper. The default is the tab you selected in step 1. 8. Select from the following Roll Forward options: Include in Roll Forward. The workpaper appears in the new binder created for the new period. Replace in the Roll Forward with latest Knowledge Coach content. The Knowledge Coach content will be replaced by the most up-to-date version when the workpaper is opened in the new rolled-forward binder. This is the default selection. For more details on information that will be retained, see Update a Workpaper to the Latest Version. Notes If at least one related workpaper is set to be replaced with the latest version, then all related workpapers will be updated to the latest version when the binder is rolled forward. For more information and a list of related workpapers for the Commercial title, see Related Workpapers. All roll forward options can be changed later from the Workpaper Properties dialog for a particular workpaper or in the Roll Forward Binder Wizard. Some of the decisions for what data should be retained and how templates will be updated upon roll forward will be made at the administrative level. These settings can be distributed to staff members via the use of binder templates that include Knowledge Coach workpapers with these settings already established. 9. Select one of the following roll forward options for Responses: Note: The following options are not applicable to Excel Knowledge Coach workpapers. Use response roll forward setting. The Knowledge Coach workpaper will roll forward each response according to the default roll forward setting for that response as determined by CCH. Keep all responses. The Knowledge Coach workpaper will retain the current responses in all of the response areas in the new workpaper in the new binder. Reset all responses. The Knowledge Coach workpaper will reset all of the response areas in the workpaper to their default values in the new binder. Note: If information is flowing into a workpaper where “Reset all responses” is selected, the information flowing in will still appear in the workpaper if the workpaper from which the data is flowing is set to retain this data. An example of this is KBA-103 Significant Matters, which summarizes information from the Findings tables in the substantive audit programs. If the substantive audit programs are set to “Keep all responses” but KBA-103 Significant Matters is set to “Reset all responses,” you will still see the data in KBA-103 Significant Matters that flows in from the substantive audit programs. To avoid this, refresh the diagnostics and other data by choosing Yes when you are prompted to do so when you open the binder after roll forward, or by right-clicking the Refresh Diagnostics item in the Diagnostics Pane and clicking Refresh diagnostics for the entire binder. Getting Started with Knowledge Coach Workpapers • 9 10. Select the following row customization and program step options, as applicable: Note: The following options are not applicable to Excel Knowledge Coach workpapers. Merge Row Customizations. The new Knowledge Coach workpaper will merge the new content with information about the rows that were added to or deleted from the original workpaper, as well as text changes to rows in the original workpaper. These items can be reviewed when you open the rolled forward workpaper in the new binder. Keep Program Steps. The Knowledge Coach workpaper will retain the program steps in the workpaper that are added from the Program Step Library. This option is available only for audit programs for the substantive audit areas where the Program Step Library is used. Keep Custom Program Steps. Program steps you create from scratch in audit program workpapers will be kept in the new workpaper. This option is available only when the Keep Program Steps option is selected. Keep Modified Program Steps. Modifications you make to added program steps in audit workpapers will be kept in the new workpaper. This option is available only when the Keep Program Steps option is selected. 11. If workpapers require the same tab location and roll forward option, you can select several workpapers and click Edit Multiple Options. The Edit Multiple Options dialog displays, allowing you to set these options for the selected workpapers. Click OK to close the Edit Multiple Options dialog. 12. Click OK to insert the selected Knowledge Coach workpapers. Getting Started with Knowledge Coach Workpapers • 10 Foundation Workpapers The first time you insert Knowledge Coach workpapers into your binder, you will notice that some of the workpapers are automatically selected and have a gray background in the New Knowledge Coach Workpaper window. These workpapers are called foundation workpapers1, and they must be present in your binder to use other Knowledge Coach functionality and workpapers. Foundation workpapers include most of the Communication Hub workpapers, which are central to the Knowledge-Based Audit Methodology used by the Knowledge Coach titles. The following explanation is from RES-001 KBA Methodology Overview: The Communication Hub is a collection of forms that are populated throughout the audit with key information about the entity, including the overall audit strategy, fraud risks and other risks of material misstatement, misstatements identified and other findings, information to be communicated to management, and other items. The Communication Hub helps members of the audit team to understand critical information about the entity and ensures that important information is not overlooked or hidden in the details of other forms. Because of their importance to the audit process, most of the Communication Hub workpapers are also foundation workpapers. The entire group of foundation workpapers drives the direction of your audit and guides you through determining the required areas for your audit. These workpapers are a required part of every Knowledge Coach binder, because they allow information and logic to flow between workpapers. The foundation workpapers are: AUD-100 Tailoring Question Workpaper. This is your starting point. Provides a questionnaire to begin tailoring Knowledge Coach workpapers at a high level so it fits your audit engagement. AUD-101 Overall Audit Program. A Communication Hub document. Provides the road map for the entire audit process and guides you step by step through the audit. You will come back to this workpaper throughout the audit to sign off as you complete steps for each phase. In addition, this workpaper will guide you as you are ready to move on to the next audit phase. KBA-101 Overall Audit Strategy. A Communication Hub document. Outlines your strategy for the audit in terms of scope (the “why,” “what,” “when,” “where,” and “how”). You will come back to this workpaper throughout the audit as new information comes to light and your audit strategy changes. KBA-103 Significant Matters. A Communication Hub document. Provides a listing of the significant matters discovered in the audit by automatically collecting this information as it is entered in other workpapers. You can manually add significant matters directly into this workpaper as well. KBA-104 Control Deficiencies and Other. A Communication Hub document. Provides a listing of the control deficiencies and other matters discovered in the audit by automatically collecting this information as it is entered in other workpapers. You can add control deficiencies and other matters directly into this workpaper as well. KBA-400 Understanding Internal Controls - Scoping and Mapping. Helps users outline an understanding of internal controls as they are related to audit areas that are part of a significant transaction class, material, or have an associated risk. 1Workpapers that are always needed in the binder in order for the flow of information to work properly between workpapers, and for the binder to comply with auditing standards. Getting Started with Knowledge Coach Workpapers • 11 AID-501 Inherent Risk Assessment Form. The auditor selects relevant assertions for each audit area and then assesses inherent risk for each audit area/relevant assertion combination. This assessment flows into KBA-502 Summary of Risk Assessments. KBA-502 Summary of Risk Assessments. Collects financial-statement-level risks and specific risk information. This workpaper ultimately provides a snapshot of much of the audit. As planned responses are documented for each risk and then each risk is linked to program steps, it’s an easy place for both reviewers and preparers to see the most important issues in the audit. Associate Workpaper Some workpapers require you to associate them with custom values, such as audit areas, specialists, service organizations, and other items. Workpapers require an association when you need to have more than one instance of a particular Knowledge Coach workpaper in your binder for each type of item to which the workpaper is related. Making this association allows Knowledge Coach information to flow properly between workpapers. In the Commercial title, the following workpapers require associations: KBA-410 Understanding Cntls-Service Org (Custom) AUD-602 Audit Program-Using Other Auditor Work (Custom) AUD-603 Audit Program-Affiliate Involvement (Custom) AUD-604 Audit Program-Using Specialist Work (Custom) AUD-800 Audit Program – (Custom) Inserting a Workpaper that Requires an Association To insert a workpaper that requires an association, do the following: 1. Follow steps 1-4 in Inserting Knowledge Coach Workpapers. 2. Select one of the workpapers listed above that require an association. Its name and description display to the right, along with information on what data is required prior to inserting the workpaper. For example, in order in insert a custom audit program, you must first set up a new custom audit area. 3. Select the workpaper you want to add. The Associate Workpaper with Custom Value window appears, listing all of the valid items from which to choose. Note: If you have not completed sections in other workpapers that store the custom values, you receive an error message that the workpaper cannot be inserted without completing additional information in your binder. The Description field provides directions about what information to complete. See Additional Information for Associated Workpapers, below. 4. Select the item to associate with the workpaper you are inserting and click OK. The New Knowledge Coach Workpaper window now displays the custom value you selected in place of “(Custom)” at the end of the workpaper name. Note: If you have created multiple custom values (e.g. more than one custom audit area), you can create the forms you need all at once by associating the workpaper with multiple items. Once you have associated a particular custom value with a workpaper, it will no longer be available in the Associate Workpaper with Custom Value window. 5. Click OK. 6. Continue with the rest of the steps for Inserting a Knowledge Coach Workpaper. Note: You will be prompted to make associations when inserting the workpapers that require this association from related workpaper reference links or from missing workpaper diagnostics. Getting Started with Knowledge Coach Workpapers • 12 Additional Information for Associated Workpapers The following table lists the workpapers that require association in the Commercial title, along with the information that must be completed before you can insert each workpaper. Information that Must Be Completed Before You Can Create the Workpaper Workpaper That Requires Association KBA-410 Understanding Cntls-Service Org (Custom) AUD-602 Audit Program -Using Other Auditor Work (Custom) Workpaper AUD-100 Tailoring Question Workpaper KBA-101 Overall Audit Strategy AUD-100 Tailoring Question Workpaper KBA-101 Overall Audit Strategy Table/Question Association Item (Custom Value) Does the client use service organizations? Shows the "Document the service organizations used by the entity." table in KBA-101 Overall Audit Strategy. Document the service organizations used by the entity. Service Organization Are any subsidiaries, divisions, locations or segments expected to be audited by other auditors? is “Yes” Shows the "Document the subsidiaries, divisions, locations, or segments expected to be audited by other auditors." table in KBA- 101 Overall Audit Strategy. Document the subsidiaries, divisions, locations, or segments expected to be audited by other auditors. Audit Firm Name Getting Started with Knowledge Coach Workpapers • 13 Information that Must Be Completed Before You Can Create the Workpaper Workpaper That Requires Association AUD-603 Audit Program-Affiliate Involvement (Custom) Workpaper AUD-100 Tailoring Question Workpaper KBA-101 Overall Audit Strategy AUD-604 Audit Program-Using Specialist Work (Custom) AUD-800 Audit Program – (Custom) AUD-100 Tailoring Question Workpaper KBA-101 Overall Audit Strategy AUD-100 Tailoring Question Workpaper Table/Question Association Item (Custom Value) Are any subsidiaries, divisions, locations or segments expected to be audited by another office, correspondent or affiliate? is “Yes” Shows "Document the subsidiaries, divisions, locations, or segments expected to be audited by another office, correspondent, or affiliate." table in KBA-101 Overall Audit Strategy. Document the subsidiaries, divisions, locations, or segments expected to be audited by another office, correspondent, or affiliate. Other Office, Correspondent, or Affiliate Do we expect to use a specialist on our audit? is “Yes” Shows the "Document the expected use of a specialist(s) on our audit." table in KBA-101 Overall Audit Strategy. Document the expected use of a specialist(s) on our audit. What financial statement audit areas are applicable to this engagement? “Customize Audit Area” link within the answer selection box. Specialist Firm Name Custom Audit Area Getting Started with Knowledge Coach Workpapers • 14 C onverting From K nowledge T ools (A vailable N ovember 2009) Chapter 4 Converting From Knowledge Tools (Available November 2009) Knowledge Tools content is used in two applications within ProSystem fx Engagement: ProSystem fx Knowledge Tools and ProSystem fx Knowledge Coach. Though the same content is used, several differences in functionality exist between Knowledge Tools workpapers and Knowledge Coach workpapers. The process for adding titles to your computer also differs between Knowledge Coach and Knowledge Tools. For more details, see Getting Title Content. If you have started using Knowledge Tools on some of your engagements, soon you will be able to transition to the Knowledge Coach version of the workpapers to take advantage of Knowledge Coach functionality such as information flow, reducing the need for repetitive data entry. You can convert selected workpapers into the Knowledge Coach format while preserving your data. Important: The ability to convert Knowledge Tools workpapers to Knowledge Coach workpapers will be available in November. We recommend that you roll forward the binder in Knowledge Tools and then immediately convert to Knowledge Coach for a new engagement, rather than trying to convert in the middle of an active engagement. This ensures the best chance of preserving information from your Knowledge Tools workpapers, because not all workpapers are supported for conversion. Knowledge Coach titles that correspond with Knowledge Tools titles for various industries will be released according to a published schedule found on the ProSystem fx Knowledge Coach Support Site. Use this schedule to plan how you will convert engagement binders that used Knowledge Tools workpapers. Reviewing Converted Workpapers Once you have successfully converted a Knowledge Tools workpaper to its equivalent workpaper in Knowledge Coach, you should review the converted data to ensure that everything you expect to be in the workpaper is included. The following chart summarizes what data is migrated from the Knowledge Tools workpaper to the new Knowledge Coach workpaper: Knowledge Tools Information Knowledge Coach Workpaper Converted Answers to questions (see note) X Program step sign off information X Text information in Knowledge Coach tables (workpaper references, etc.) X Added rows X Deleted rows (see note) X Not Converted Converting From Knowledge Tools (Available November 2009) • 15 Knowledge Tools Information Knowledge Coach Workpaper Not Converted Converted Modification to text in rows X Modifications to text outside of Knowledge Coach tables (instructions, etc.) X Notes: Answers to questions are converted when the answer type is the same in Knowledge Coach as it was in Knowledge Tools. If the type is different (e.g. drop-down list changes to a checkbox list), the answer may not convert correctly. Rows that were deleted in Knowledge Tools are displayed in the Knowledge Coach version of the workpaper. They will be highlighted as deleted rows after you roll forward your binder in Knowledge Coach, at which point you can choose to accept or reject the deletion. Converting From Knowledge Tools (Available November 2009) • 16 K nowledge C oach Workpapers in the B inder Chapter 5 Knowledge Coach Workpapers in the Binder Once you have inserted Knowledge Coach workpapers into your binder, they will be listed along with all of your other workpapers in your Engagement binder. Knowledge Coach workpapers are indicated by a Knowledge Coach Word workpaper icon or a Knowledge Coach Excel workpaper icon . Knowledge Coach workpapers also take advantage of the Open Diagnostics column in the binder frame. If a workpaper has diagnostics that have yet to be resolved, you will see the Open Diagnostics icon next to the workpaper. For more details, see Diagnostics. Knowledge Coach Workpapers in the Binder • 17 T he K nowledge C oach R ibbon Chapter 6 The Knowledge Coach Ribbon Knowledge Coach workpapers use either a Microsoft Word 2007 or Microsoft Excel 2007 medium for viewing the title content from the Knowledge Coach content database. The Knowledge Coach ribbon in Word and Excel includes many functions you’ll need while working with Knowledge Coach workpapers. The dynamic functionality of Knowledge Coach (such as hiding and showing parts of the workpapers, flowing information between workpapers, diagnostics, and other functions) is available within Word documents. Excel Knowledge Coach workpapers also include some functionality, as shown in the Excel ribbon below: Ribbon Group/Function Icon Description Available Available in Word in Excel Available via RightClick General Refresh Knowledge Coach Data Manually refreshes the Knowledge Coach workpaper. X Knowledge Coach Help Opens the Knowledge Coach WebHelp file. X Risk Summary Allows you to view a summary of all the risks within the Risk pane. X X Add Risk Displays a drop-down menu so you can add a financial-statement-level-risk or specific risk. X X FinancialStatementLevel Risk Allows you to add a financial-statement-level risk. X X X Specific Risk Allows you to add a specific risk. X X X Risk Assessment The Knowledge Coach Ribbon • 18 Ribbon Group/Function Icon Description Available Available in Word in Excel Available via RightClick Edit Displays the Open Risk dialog so you can edit a risk. X Delete Deletes a risk. X Opens or closes the Program Step Library pane to the right of a Word audit program. Also displays a drop-down menu for Program Step Library options. X Program Step Library Opens or closes the Program Step Library. X Modify Displays a drop-down menu with customization options for inserting a new step or sub-step. X New Custom Step Allows you to insert a new custom program step. X New Custom Sub-Step Allows you to insert a new custom sub-step. X Remove Step Allows you to remove a program step. X Find Step Allows you to locate a step in the Program step Library pane. X Diagnostics Pane Opens or closes the Diagnostic pane at the bottom of the workpaper. X X Find Opens the Diagnostic pane (if it is not already open) and scrolls to the selected diagnostic within the pane. X X* Delete Deletes the diagnostics selected within the diagnostics pane. X X* Audit Programs Program Step Library X Diagnostics The Knowledge Coach Ribbon • 19 Ribbon Group/Function Icon Description Available Available in Word in Excel Available via RightClick Complete Cells Sign Off Inserts your initials and the current date (depending on the sign-off configuration). X Roll Forward Settings Opens the Roll Forward Settings menu. X View Responses Set to Keep Check this selection to view all cells that are set to be retained during roll forward. X View Responses Set to Reset Check this selection to view cells that are set to be reset during roll forward. X Mark as N/A Inserts N/A and the current date (depending on sign-off configuration). X Delete Sign Off Deletes the information in the sign-off field. X Reset Answer Resets the selected cell or cells to the default state X Tips Displays the Tips pane to the right of the workpaper. X Answer Effects Displays the Answer Effects tab in the Tips pane. X X View Updates Opens the View Content Updates tab in the Tips pane, allowing you to view significant updates to the selected workpaper. X X KC Guidance Opens the Title Help file for the associated Knowledge Coach title, displaying the KBA Methodology Overview. X X X X X* Guidance ARM Opens the Accounting Research Manager Web site. X The Knowledge Coach Ribbon • 20 Ribbon Group/Function Icon Description Available Available in Word in Excel Available via RightClick Review Customization Review Opens the Customization Review pane. X Displays a drop-down menu for inserting rows into a Knowledge Coach table. X Insert Row Above Inserts a row above the selected row. X Insert Row Below Inserts a row below the selected row. X Delete Deletes the selected row. X Table Rows * Available from the right-click menu from within a table only. The Knowledge Coach Ribbon • 21 Important Elements in K nowledge C oach Workpapers Chapter 7 Important Elements in Knowledge Coach Workpapers This section familiarizes you with the common elements of Knowledge Coach workpapers, including the various links, tips, indicators, and table elements. Embedded Hyperlinks Most Knowledge Coach workpapers begin with introductory material that describes the purpose of the workpaper and related instructions. Read this information to get familiar with the contents of the workpaper. Once you are comfortable with the introductory material, you can quickly skip the purpose and instructions by holding down the Ctrl key and clicking the Beginning of Form hyperlink at the top of the workpaper. To revisit the introductory material, use the Purpose and Instructions hyperlink to return to the top of the workpaper. Several workpapers also include “Next Steps,” which will help you decide where to go next with your work once you complete the documentation in the open workpaper. Use the Next Step hyperlink to jump back to this section in the instructions. Related Workpaper Links Throughout the body of Knowledge Coach workpapers, you’ll often see references to other Knowledge Coach workpapers that are related to the audit material in which you are working. These are shown in blue italicized text. To use related workpaper links, do the following: 1. Double-click anywhere in the blue italicized text. 2. If the related workpaper is already in your binder, the workpaper will be opened for you. Note: Related workpaper links in Knowledge Coach only look for other Knowledge Coach workpapers in the binder. The system cannot recognize or open any Knowledge Tools versions of workpapers from related workpaper links in Knowledge Coach. 3. If the related workpaper is not already in your binder, you will be asked if you would like to insert it. Do the following: a. Click Yes to insert the workpaper into your binder. The New Knowledge Coach Workpaper window displays with the related workpaper selected. b. Click OK. The Selected Workpaper Properties window displays. For more details on this screen, see Insert Knowledge Coach Workpapers. c. Click OK. The system asks if you’d like to open the workpaper. d. Click Yes to launch the workpaper. Important Elements in Knowledge Coach Workpapers • 22 Tips When you see the Tips icon in a Knowledge Coach workpaper, you can view a Tip for that section. Tips include additional guidance for completing checklists, audit programs and forms. Click the light bulb to display the Knowledge Coach Tips Pane with the Tip for the associated section. There are three categories of Tips: Practice points provide additional guidance to assist you in completing Knowledge Coach workpapers. Examples are illustrations or sample calculations related to an element in the Knowledge Coach workpaper (e.g., sample note disclosures or materiality calculations). Resources refer you to authoritative literature (e.g., references to Statement on Auditing Standards [SAS]). "Do Not Delete" Indicators When a section of a Knowledge Coach workpaper does not need to be completed due to the way you answered a tailoring question, that section is hidden in the workpaper. In its place, you will see text with a gray background that says “Do not delete this area of workpaper.” Important: These sections contain information that Knowledge Coach requires in order to build the workpaper correctly. If one of these sections is inadvertently deleted, do the following: 1. Close the workpaper that contains the deleted section. 2. Select the workpaper in the binder frame and select Tools > Repair Knowledge Coach Workpaper. This will regenerate the Knowledge Coach workpaper for you. Information provided in the workpaper (answers to questions, customizations to rows, program steps, sign offs, diagnostic states, etc.) will be kept intact and transferred to the repaired workpaper as long as that information had been saved in the workpaper. Important: Customizations you make outside of Knowledge Coach tables will not be retained in the repaired workpaper. Therefore, if you have made a significant number of customizations to instructional text or other information outside of tables, you should copy the workpaper to another binder before you repair the workpaper so that you can make the changes again in the repaired workpaper. Tip: Save your work in Knowledge Coach workpapers often by selecting File > Save. Important Elements in Knowledge Coach Workpapers • 23 Knowledge Coach Tables Most of the interactive information you’ll need to work within Knowledge Coach is provided in the form of tables in Microsoft Word. This section explains some of the important elements of Knowledge Coach tables. Answer Selection Boxes (Floaties) You will choose answers to questions in Knowledge Coach tables using an answer selection box that floats over the table to show the available choices; therefore, these boxes are informally called floaties. Knowledge Coach uses prompts that say “choose an item” or “choose all that apply” in areas where floaties are located. To use a floatie, do the following: 1. Click the text prompt that says “choose an item” or “choose all that apply.” The floatie appears, listing the choices for your answer in the form of radio buttons, a drop-down menu, or checkboxes. 2. Use your mouse to select your choice or choices. 3. Once you have clicked out of the floaties, your answer appears in read-only text. 4. Wait a few seconds for your workpaper to refresh. A progress indicator displays. Important: While the workpaper is being refreshed, you cannot perform any functions in Microsoft Word. Notes: Floaties will not appear properly if you are using dual monitors on a laptop and your laptop screen is NOT your primary monitor. To resolve this issue, flip your monitors to ensure that the laptop screen is the primary monitor. In some floaties, you can provide your own custom answer. If this is available, you will see text that says “Add custom value." Enter your custom answer in the space provided and click OK. This answer will be auto-selected when you return to the floatie. A special instance of these customizable answers is the AUD-100 tailoring question about the audit areas that are applicable to your engagement. For more details, see Audit Areas. For single-selection answers (radio buttons and drop-down menus), the floatie closes as soon as you select an answer. For multiple-selection answers (checkboxes), the floatie stays open until you have clicked or tabbed outside of the cell, so that you can select all of your choices. In some floaties, answers will be recommended for you based on how you have responded to other questions. In this case, you will see text that says “(Recommended)” after the choice that is suggested. You can select a different answer, but if you do, a Potential Error diagnostic will be generated for the question. See Diagnostics for more detail. Tip: Instead of using your mouse, you can use the following keys to answer floaties: The cell The The The The TAB key moves forward (left to right down the page) from one answer selection box or table to the next. Hold the Shift key while pressing the TAB key to move backwards UP and DOWN arrows cycle through a selection list in an answer selection box. SPACEBAR will toggle a check box control or select an option in an answer selection box. ENTER key will retain the answer and close an answer selection box. ESC key is equivalent to clicking a Cancel button. Important Elements in Knowledge Coach Workpapers • 24 Cells with Open Diagnostics A cell in a Knowledge Coach table that has an open diagnostic associated with it (unanswered question, program step not signed off, potential error, etc.) is indicated with light blue shading on the cell. To view the diagnostic for the selected cell, do one of the following: Choose Find from the Diagnostics group on the Knowledge Coach ribbon. This opens the Diagnostics Pane, if it is not already open, and will automatically scroll to and select the open diagnostic associated with the selected cell. You can also use the Find Diagnostic function on the right-click menu from a selected cell. Choose Diagnostics Pane from the Diagnostics group on the Knowledge Coach ribbon, if the Diagnostics Pane is not already displayed at the bottom of your screen. Scroll to applicable diagnostic. For more information, see Diagnostics. Note: Diagnostics are refreshed periodically as you work through the workpapers. However, if you think a particular diagnostic should be cleared and you are still seeing an open diagnostic, you can refresh the diagnostics manually. To do this, click Refresh KC Data on the General group on the Knowledge Coach ribbon. Cells that Flow To or From Other Areas To save you time and protect consistent information, Knowledge Coach automatically flows some information you provide to other workpapers. You can tell when information is coming from another workpaper by the slanted gray shading on the background of certain cells in Knowledge Coach tables. Cells that flow information in from another area of the workpaper are not editable. Instead, you modify the information in the source document in order to keep the information the same in both places. In many cases, you can drill down to the source of the information by double-clicking the blue arrow inside the cell. This launches the workpaper that contains the original question and places your focus directly in the cell from which the information is flowing. When information is updated in one workpaper and it flows to another workpaper, thereby changing the contents of the workpaper, the File Modified Flag icon is not displayed next to the workpaper that changed as a result. However, there may be additional Unanswered Question diagnostics or other diagnostics that appear, which will prompt you to complete more information in the affected workpaper. Form Tables Many Knowledge Coach tables have the structure of a “form table,” in which you must add as many rows as you need in order to accommodate the information you have. Because the number of specialists you have involved on an audit may vary by engagement, Knowledge Coach allows you to add as many rows as you need. To add rows to these kinds of tables, do the following: 1. Click in the area of the table that uses the instructions, “Type here to add an item.” This text will disappear. 2. Type relevant information in the cell. 3. Use your mouse or tab to the next cell in the table. Knowledge Coach will automatically add another empty row below the one that contains your information. It may take a few seconds for the system to completely refresh; you can watch the Word status bar at the bottom of the workpaper to monitor the refresh process. 4. Complete the other cells in the row you have added, as applicable. Important Elements in Knowledge Coach Workpapers • 25 Findings Tables A special kind of form table is the Findings Tables that are found in several documents, including each of the substantive audit programs. Because these tables ask you to decide if a finding is a financial-statementlevel risk, a specific risk, or another type of finding, they follow a special rule that requires you to be the current editor of KBA-502 Summary of Risk Assessments to add, edit, and delete findings that have been deemed as either financial-statement-level risks or specific risks. For more information, see Form Tables (above) and Risk Summary. Inserting rows Depending on the table, you will be able to insert rows in Knowledge Coach. To insert a row, do the following: 1. Click in a row in Knowledge Coach table. 2. Using the Tables group, select Rows > Insert Rows Above or Insert Rows Below. The Insert Knowledge Coach Row window displays. 3. Select the row type you would like to add and click OK. The new row is added, and renumbering is applied if necessary. Note: When you update your workpaper to the latest version, either during an active engagement or during the roll forward process, you can review any rows that were added manually through this process and either accept or reject them in the new version of the template. Deleting rows Depending on the table, you will be able to delete rows in Knowledge Coach. To delete a row, do the following: 1. Click in a row in Knowledge Coach table. 2. Using the Tables group, select Rows > Delete Row. You are asked to confirm the deletion. 3. Click Yes to continue. The row is removed, and renumbering is applied if necessary. Note: When you update your workpaper to the latest version, either during an active engagement or during the roll forward process, you can review any rows that were deleted manually through this process and either accept or reject the deletion in the new version of the template. Information outside of tables Customizations you make in text outside of Knowledge Coach tables in Microsoft Word cannot be kept and merged with a new version of the Knowledge Coach workpaper. If the option to merge changes is chosen as the roll forward setting, or if you update a workpaper on the fly from an active Engagement binder, edits made outside of Knowledge Coach tables will not appear in the new workpaper. Important Elements in Knowledge Coach Workpapers • 26 Using Other Engagement Functions in Knowledge Coach Workpapers Several Engagement functions you are used to using in non-Knowledge Coach workpapers are available in Knowledge Coach Word and Excel workpapers. Available functions include the following: Insert workpaper reference Open workpaper reference Create workpaper note Insert TB link Drill-down TB link Paste TB link Insert tickmark (available in Excel Knowledge Coach workpapers only) To use these functions, click on the Engagement ribbon at the top of Knowledge Coach workpapers. Some of the functions are also available from the right-click menu in Knowledge Coach workpapers. Using Microsoft Word Functions in Knowledge Coach Workpapers Most Microsoft Word and Excel functions are available in Knowledge Coach workpapers without restriction. However, there are some functions that are limited in Knowledge Coach Word workpapers due to the way that Knowledge Coach information is stored and used within the application. Restrictions are put in place to protect the integrity of your data and include the following: Copy/paste. You can copy and paste text information inside of Knowledge Coach Word tables without restriction. However, you cannot copy/paste responses to questions from answer selection boxes (“floaties”). You also cannot copy entire rows of information (program step rows, etc.) to other tables. If you do attempt to copy and paste restricted information and your workpaper becomes unusable, you can repair the workpaper. Undo/redo . The undo and redo functions are not available for Knowledge Coach Word workpapers, even though the ribbon icon might be illuminated in Word. Therefore, exercise caution when deleting a row or when accepting the confirmation message to change or reset an answer, as you will not be able to undo these decisions. Important Elements in Knowledge Coach Workpapers • 27 T ips Pane Chapter 8 Tips Pane Information that supplements the content in Knowledge Coach workpapers in Microsoft Word is displayed in the Tips Pane. Access the Tips Pane by selecting Tips from the Guidance group on the Knowledge Coach ribbon. Three elements display in the Tips Pane: Tips, Answer Effects, and Content Updates. Note: You can drag the Tips Pane to another monitor and then resize it as desired. Double-click on the heading to dock it back to the original location. Tips When you see the Tips icon in a Knowledge Coach workpaper, you can view a Tip for that section. Tips include additional guidance for completing checklists, audit programs and forms. Click the light bulb to display the Knowledge Coach Tips Pane with the Tip for the associated section. There are three categories of Tips: Practice points provide additional guidance to assist you in completing Knowledge Coach workpapers. Examples are illustrations or sample calculations related to an element in the Knowledge Coach workpaper (e.g., sample note disclosures or materiality calculations). Resources refer you to authoritative literature (e.g., references to Statement on Auditing Standards [SAS]). Answer Effects The Answer Effects tab on the Tips Pane provides transparency so that you know how Knowledge Coach treats the audit information in your binder in terms of logic and flow. It lists how the selected content affects other workpapers or other sections of the open workpaper. It also lists how the selected content is affected by other workpapers or other sections of the open workpaper. Accessing the Answer Effects Tab To access the Answer Effects tab on the Tips Pane, do the following: 1. Highlight or place your cursor in the section of the workpaper for which you want to view answer effect information. 2. Select Answer Effects in the Guidance group of the Knowledge Coach ribbon. You can also select the Answer Effects tab on the Tips Pane any time it is opened. 3. The answer effects for that area of the workpaper display in the Answer Effects tab on the Tips Pane. 4. When no answer effects are present for that section of the workpaper, a message displays along with a list of the top Knowledge Coach usability tips. Note: The light bulb icon that signifies that there is a tip associated with the content in the workpaper is not shown in tables when the specific area of the workpaper has only Answer Effects associated with it and there are no tips. Outside of tables, both tips and/or answer effects will display the light bulb visual indicator. Tips Pane • 28 Examples of Answer Effects The Answer Effects section lists the following conditions that are applicable to the selected area of the workpaper: Heading in Answer Pane Details That are Displayed Show Content Information that will be shown when you answer the selected question Content Shown When Questions that cause the selected content to show Flow Answer To Other areas in the workpapers to which the selected content will flow Flow Answer From Where the selected content is flowing from Workpaper to Consider Specific workpapers that are recommended for consideration based on how the question is answered Example Tips Pane • 29 Heading in Answer Pane Details That are Displayed Consider Workpaper When Questions that cause the open workpaper to be considered Recommend Answer Questions that cause the selected question to have answers that are recommended N/A Program Steps Program steps that will be marked as Not Applicable (N/A) in the Program Step Library Pane when the selected question is answered a certain way Example Viewing the Details of Each Answer Effect To view the details of each answer effect listed, click on the answer effect (i.e. “Show Content”). The information will be shown in the bottom section of the Tips Pane. In the case of Microsoft Excel workpapers, the answer effects are displayed similarly as in Microsoft Word. To view answer effects while in Microsoft Excel, do the following: 1. In a Knowledge Coach Excel workpaper, select the Answer Effects item from the Guidance group on the Knowledge Coach ribbon. 2. The Tips Pane will open with the Answer Effects tab pre-selected. 3. Answer effects in Microsoft Excel will display workpaper-level answer effects for when the workpaper should be considered. You can also access a complete list of the answer effects for a particular workpaper from the KC Guidance item accessed from the Knowledge Coach ribbon in either Microsoft Word or Excel. Follow these steps: 1. In a Knowledge Coach workpaper, select the KC Guidance item from the Guidance group on the Knowledge Coach ribbon. The HTML Help file will display. 2. From the Contents tab on the left-hand side, select the open workpaper by clicking on the purple book, using the index and workpaper name as a guide. 3. Select the Answer Effects topic within the desired workpaper to view the details of the information. Tips Pane • 30 Content Updates The Content Updates section of the Tips Pane displays information about what has changed in the open workpaper, as compared to previous versions. In Knowledge Coach workpapers in Microsoft Word or Excel, you can view the updates by doing the following from anywhere in the open workpaper: 1. Click View Updates in the Guidance group on the Knowledge Coach ribbon. You can also select the View Content Updates tab in the Tips Pane any time it is open. A summary of the updates for the workpaper is displayed in the Content Updates tab on the Tips Pane. 2. If there are no updates for the opened workpaper, a message displays along with a list of the top Knowledge Coach usability tips. You can continue to work on the workpaper as you view the updates. You can also view the content update information for a particular workpaper from the KC Guidance item accessed from the Knowledge Coach ribbon in either Microsoft Word or Excel. Follow these steps: 1. Select the KC Guidance item from the Guidance group on the Knowledge Coach ribbon. The HTML Help file displays. 2. From the Contents tab on the left-hand side, select the open workpaper by clicking on the purple book, using the index and workpaper name as a guide. 3. Select the Content Updates topic within the desired workpaper to view the summary information for any updates. Tips Pane • 31 T ailoring Y our Workpapers Chapter 9 Tailoring Your Workpapers This section explains the various methods of tailoring your workpapers in Knowledge Coach, including tailoring questions, audit areas, and changing your answers. Tailoring Questions When you answer certain questions in a Knowledge Coach workpaper in Microsoft Word, the contents of your workpapers dynamically change based on your answers to display only the information pertinent to your audit. These tailoring questions are meant to mimic the thought process that an experienced practitioner would ask themselves as they document their audit procedures. The tailoring questions are located in various workpapers. The main areas where you’ll see tailoring questions are: AUD-100 Overall Tailoring Questions AUD-801-813 series Substantive Audit Programs The location and content of tailoring questions may vary by industry title. You use answer selection boxes, or “floaties,” to answer tailoring questions. For more details see Answer Selection Boxes. To see what will happen when you answer a tailoring question a certain way, use the Answer Effects function from the Knowledge Coach ribbon. For more information, see Answer Effects. Audit Areas An important tailoring question asks you to select the audit areas that are applicable to your engagement. This question is found in AUD-100 Tailoring Question Workpaper in the Commercial title. The answer to this question will drive the contents of many other foundation workpapers by dynamically adding sections for each audit area you designate as applicable. In the floatie for this question there is a list of audit areas specific to the industry title in which you are working. Select the audit areas for your engagement here. You can add, edit, and delete custom audit areas for the entity. Access the Audit Areas window by clicking Customize audit areas. Adding a Custom Audit Area 1. Click Add. The Add Audit Area window displays. 2. Provide a name for the new audit area. Keep the name to under 30 characters. 3. Click Add on the Add Audit Area window. The new audit area displays in the Available audit areas box, with a Custom Item icon to the right. 4. Click OK to save the new audit area. The new audit area will appear at the bottom of the available audit areas in the floatie. 5. Select the checkbox next to the new audit area in the floatie to include it in your applicable audit areas and click out of the floatie to save your selection. Tailoring Your Workpapers • 32 Renaming an audit area 1. Select a custom item. If you are not sure which areas are customized, check for the Custom Item icon to the right. 2. Click Rename. The Rename Custom Audit Area window displays. 3. Enter the new name and click OK. The new audit area name displays in the Available audit areas box of the Audit Areas window. Note: You can only rename custom audit areas. Deleting an audit area 1. Select a custom audit area. If you are not sure which areas are customized, check for the Custom Item icon to the right. 2. Click Delete. A message displays asking you to confirm the procedure. 3. Click Yes to remove the custom audit area from the available audit areas list. 4. Click OK to close the dialog box. The floatie displays with the deleted value(s) excluded from the list. Changing an Answer You can change an answer that was previously provided. If you change an answer that controls the behavior of other areas in your Knowledge Coach workpapers, you will be warned about this so that you do not inadvertently remove information. To change an answer, do the following: 1. Click on the existing answer. The floatie appears with the current response pre-selected. 2. Select a different choice. The Change Answer Notification window displays. 3. To see the possible ramifications of changing your answer, click on the link that says “Click here to view the effects of changing your answer.” The Answer Effects pane displays. For more details, see Answer Effects. 4. Once you are sure you want to proceed with changing the answer, click Yes on the Change Answer Notification window. The answer is updated with your new choice. Note: Clicking on Reset Answer from the Complete Cells group on the Knowledge Coach ribbon is another way of changing an answer. Therefore, you will see the same warning when resetting an answer in a Knowledge Coach workpaper. Tailoring Your Workpapers • 33 R isk Summary Chapter 10 Risk Summary Risks can be accumulated in a central area called the Risk Summary within a Knowledge Coach binder. This summary can be accessed from any open Knowledge Coach Word or Excel workpaper. Also, risk information flows to various workpapers, as applicable, so that you always see the risk information you need to work with within the context of appropriate workpapers. The Risk Summary window allows you to view and delete risks that have been identified in the current binder and select risks to be edited. Risks are categorized into Financial-Statement-Level Risks and Specific Risks. To view the Risk Summary, click Risk Summary from the Risk Assessments group on the Knowledge Coach ribbon. To navigate through the risks, do the following: 1. Expand each risk type by clicking on the plus sign next to the risk type name to view a list of the risks that have been identified in that category. 2. Expand each risk by clicking on the plus sign next to the risk to view the workpaper index and name where the risk is addressed, the planned overall response or comment on planned audit approach (if applicable), and the name of any program step(s) that have been linked to address the risk. Important: You must be the current editor of KBA-502 Summary of Risk Assessments to add, edit, or delete risks. Adding Financial-Statement-Level Risks You can add a financial-statement-level risk, which will then appear in KBA-502 Summary of Risk Assessments and all substantive audit programs. You can document a planned overall response for each financial-statement-level risk, and you can optionally link one or more program steps in a substantive audit program to the risk using the unique risk name you have created. Note: One financial-statement-level risk, "Management Override," is provided. This description for this risk can be edited and a planned overall response can be added, but it cannot be renamed or deleted. Important: You must be the current editor of KBA-502 Summary of Risk Assessments to add a risk. To add a financial-statement-level risk, do the following: 1. Select Add Risk > Financial-Statement-Level Risk from the Knowledge Coach Ribbon, or click Risk Summary to display the Risks Pane, and then select the Financial-Statement-Level Risk section. 2. Complete the following fields: Risk name. Required. This name will be used when you link program steps to the risk. Risk description. Required. This box has a maximum of 512 characters. Type of risk. Required. See the instructions in KBA-502 Summary of Risk Assessments for more information on factors to consider in determining whether a risk is significant and/or may be related to fraud. Planned overall response. Possible responses to risks at the financial statement level are listed in the instructions to KBA-502 Summary of Risk Assessments, and incorporate guidance from SAS-99. You’ll need to enter information here in order to clear the Unaddressed Risk diagnostic for a particular risk. Risk Summary • 34 Workpaper identified in. The open workpaper is selected as the default, but you can change this. In audit programs, this selection results in the risk being added to the list of Findings in the Results section of the audit program. 3. Click Save to save the financial-statement-level risk. The newly added risk will appear in the Financial-Statement-Level Risks table in the Knowledge Coach workpaper KBA-502 Summary of Risk Assessments. Note: Use the drill-down icon to get to the substantive audit programs, from which you can link specific program steps to this financial-statement-level risk, if desired. For more details, see Linking a Program Step to a Risk. Adding Specific Risks Specific risks are summarized in KBA-502 Summary of Risk Assessments and in the substantive audit programs for the audit area(s) to which the risk is associated. You can link one or more program steps in a substantive audit program to a specific risk using the unique risk name you have created. Before any specific risks are created for a significant audit area, you’ll see information to this effect in various parts of the workpapers. For example, in KBA-502 Summary of Risk Assessments, you’ll see a row that says “No risks have been added for this area.” Important: You must be the current editor of KBA-502 Summary of Risk Assessments to add a risk. To add a specific risk, do the following: 1. Select Add > Specific Risk from the Knowledge Coach Ribbon, or click Risk Summary to display the Risks Pane, and then select the Specific Risk section. 2. Complete the following fields: Risk name. Required. Maximum 30 characters. This name will be used when you link program steps to the risk. Risk description. Required. This box has a maximum of 512 characters. Type of risk. Required. See KBA-502 Summary of Risk Assessments for more information on factors to consider in determining whether a risk is significant and/or may be related to fraud. A risk may also require tests of controls, where substantive tests alone are not sufficient. Audit areas affected by the risk. Required. Select one or more audit areas that are impacted by the risk. All audit areas are shown here, including custom audit area you have added. Relevant assertions. Required. Choose from the following: EO. Existence or Occurrence RO. Rights and Obligations CO. Completeness AV. Allocation or Valuation CU. Cutoff UC. Understandability or Classification Controls, if any, that mitigate specific risk. Evaluate the design of controls for each significant risk or fraud risk. The magnitude of a risk depends in part on whether controls are in place to mitigate those risks. Risk Summary • 35 Combined risk assessment. Inherent Risk (IR) is combined with Control Risk (CR) to determine the Risk of Material Misstatement (RMM) for each risk. The RMM level will be recommended for you, based on the table found in the instructions at KBA-502 Summary of Risk Assessments. Planned audit approach. Required. Choose from the following: Combined Approach. Audit plan consists of both tests of controls and substantive tests. Substantive: Analytical. Audit plan consists primarily of analytical procedures. Substantive: In-Depth. Audit plan consists of both analytical procedures and tests of details. Comment on planned audit approach. Use this field to document a brief description of the work you are planning, to act as a guide for linking specific program steps to this risk when you design the audit program. Workpaper identified in. The open workpaper is selected as the default, but you can change this. In audit programs, this selection results in the risk being added to the list of Findings in the Results section of the audit program. 3. Click Save to save the specific risk. The newly added risk appears in the Specific Risks table in the Knowledge Coach workpaper KBA-502 Summary of Risk Assessments in the section for the associated audit area. If the risk is related to more than one audit area, the risk will be shown separately in each of the audit areas. The risk also will be shown in the Risk Summary window, and will flow to the substantive audit program for the audit area to which it is associated. Note: Use the drill-down icon to easily get to the substantive audit programs, from which you can link specific program steps to this financial-statement-level risk, if desired. For more details, see Linking a Program Step to a Risk. Editing Risks To edit a risk, do one of the following: Important: You must be the current editor of KBA-502 Summary of Risk Assessments to edit a risk. 1. Click Risk Summary from the Risk Assessment group on the Knowledge Coach ribbon to display the Risks Summary window, select the desired risk and click Edit Risk. 2. Locate the risk in KBA-502 Summary of Risk Assessments and place your cursor on that row. 3. Click Edit from the Risk Assessment group on the Knowledge Coach ribbon, or right-click and select Edit Risk. The Financial-Statement-Level Risk section or the Specific Risk section opens, depending on the type of risk you selected. For more information, see Adding Financial-Statement-Level Risks and Adding Specific Risks. Risk Summary • 36 Deleting Risks To delete a risk, do the following: 1. Click Risk Summary the Risk Assessment group on the Knowledge Coach ribbon to display the Risks Pane. 2. Select the risk you want to delete. 3. Click Delete Risk. 4. Locate the risk in KBA-502 Summary of Risk Assessments and place your cursor on that row. 5. Click Delete from the Risk Assessment group on the Knowledge Coach ribbon. 6. Click Yes to confirm the deletion. Note: You cannot delete the "Management Override" Financial-Statement-Level risk, as this risk always applies. Risk Summary • 37 A udit Programs Chapter 11 Audit Programs The substantive audit programs in Knowledge Coach are based on a common organizational structure so that every program you open for the various audit areas is the same. This includes custom audit programs you create for the custom audit areas in your binder. For more details about custom audit programs, see Audit Areas and Associate Workpaper. Note: Custom audit programs do not contain any program steps in the library when they are created. They also do not contain tailoring questions or the ability to mark steps as “Not Applicable” based on how questions are answered. You will build the program steps from scratch in a custom audit program. Program Step Library The Program Step Library Pane displays all the program steps for a particular industry title so that you can build and customize the audit program for each audit area. When you answer the tailoring questions in each audit program, Knowledge Coach uses your answers to determine which program steps are applicable and which program steps are not applicable. The Program Step Library Pane is only available within the substantive audit programs, which are AUD-800 Audit Program – (Custom) through AUD-813 Audit Program – Other Revenue and Expenses in the Commercial title. View Available Program Steps Program steps for each audit area are displayed in the Program Step Library Pane. To see the program steps, open a substantive audit program (AUD-800 Audit Program – (Custom) through AUD-813 Audit Program – Other Revenue and Expenses in the Commercial title). The Program Step Library Pane opens on the righthand side of the screen. The audit area is displayed at the top of the screen. A short name is displayed for each of the program steps for the audit area/industry title so you can quickly see what steps are available. Expand each program step name by clicking on the plus sign next to the program step to view the full text of the program step. The right-hand column displays the assertions for each program step. The assertions are as follows: EO. Existence or Occurrence RO. Rights or Obligations CO. Completeness AV. Accuracy, Valuation, or Allocation CU. Cut Off UC. Understandability or Classification Notes: If the Program Step Library pane is closed and you want to reopen it, click Program Step Library from the Audit Programs group on the Knowledge Coach ribbon. The Program Step Library Pane can be moved and resized. The columns can also be resized, so that you can read the steps more easily. Audit Programs • 38 Tailor Steps in the Program Step Library Before you add program steps from the Program Step Library to your audit program workpaper, you should answer the tailoring questions for that audit area. This will help you narrow down the program steps that might be applicable to your engagement. For more information on answering questions, see Answer Selection Boxes. As you answer these questions, steps in the Program Step Library will be marked as not applicable. These steps are denoted by an NA notation in the column to the right of the program step name. Add Steps from the Program Step Library To add steps to your audit program, do the following: 1. Check Show only applicable steps to limit the displayed steps (optional). 2. Expand and collapse the main program steps by clicking the plus and minus signs. 3. Select the check box to add a program step to the workpaper. If you do not want to include a particular sub-step in the workpaper, clear the check box. Notes If some of the sub-steps have been excluded, the checkbox will indicate this mixed selection. To select all of the steps at once, click the checkbox in the Program Step column header. 4. Click Update Workpaper. The selected program steps are added to the workpaper. Notes: The program steps that you added will continue to have the checkmark next to them in the Program Step Library so that you can always see which steps are in your workpaper. To quickly locate a step in the Program Step Library, select a step or sub-step within the workpaper and, using the Audit Programs group on the Knowledge Coach ribbon, click Program Step Library > Find Step. The step or sub-step will be highlighted in the Program Step Library Pane. Modify a Program Step in the Workpaper Once steps have been added from the Program Step Library to the workpaper, you can customize the text of any step so that it fits your engagement. To modify a step, do the following: 1. Locate the table in a substantive audit program that contains the program steps that have been added. See Add a Step from the Program Step Library for more information. 2. Edit the step directly in the table in Microsoft Word. 3. Click out of the cell you have edited. A customization icon is displayed in the Program Step Library to the right of each program step name, main program step, or sub-step that has been modified. Note: If you float your mouse over the step in the Program Step Library, you will see a tooltip that says “Customized Step.” Audit Programs • 39 Add a Custom Program Step You may want to add your own program steps to a substantive audit program to customize the procedures to fit the needs of your engagement. To add a custom step, do the following: 1. Locate the table in a substantive audit program that contains the program steps that have been added. 2. Select the program step under which you would like to insert your new custom program step. Note: If you would like to add a custom step to an audit program where no program steps have been added, click on the row that says “No program steps have been added.” This is especially applicable to AUD-800 Audit Program – (Custom), as no program steps can be added to this workpaper from the Program Step Library; you must create custom steps in your custom audit programs. 3. Add the custom step by doing one of the following: Using the Audit Programs group on the Knowledge Coach ribbon, click Program Step Library > Modify > New Custom Step. Using the Table group on the Knowledge Coach ribbon and clicking Rows > Insert Row Above or Insert Row Below. The Insert Knowledge Coach Row window displays. Click OK to continue. 4. Two new rows are added to your table below the step you selected. The steps in the table are renumbered automatically. 5. Enter a brief name for your custom step in the first row. 6. Enter the text for the program step in the second row, next to the step number. 7. In the Primary Assertions column, click on the cell next to the program step text to display the list of assertions and select those that are applicable. 8. You can add a sub-step to your custom step by clicking Program Step Library > Modify > New Custom Sub-Step from the Audit Programs group on the Knowledge Coach ribbon. A row will be added beneath the main program step, in which you can enter the text of your sub-step. Note: Custom steps are denoted in the Program Step Library by the customization icon that is displayed to the right of each custom step’s program step name. Remove a Program Step To remove a program step from an audit program, do one of the following: Remove the Program Step from the Program Step Library 1. In the program step table within the workpaper, select the program step you want to remove. 2. Using the Audit Programs group on the Knowledge Coach ribbon, click Program Step Library > Remove Step. The program step is removed from the Program Step Library. Remove the Program Step from the Workpaper Only 1. In the Program Step Library Pane, uncheck the step you want to remove. 2. Click Update Workpaper. The step is removed from the workpaper. It remains in the Program Step Library in case you need to add it later. Audit Programs • 40 Linking R isks to Procedures Chapter 12 Linking Risks to Procedures In Knowledge Coach, you can create a direct connection between risks that have been identified throughout your audit and the procedures you design to address those risks. Financial-statement-level risks and specific risks are summarized in KBA-502 Summary of Risk Assessments, and this workpaper provides a snapshot of all of the risk information for the job at a glance. Here is an example of the Specific Risks table in KBA-502 Summary of Risk Assessments. Notice that in the Program Steps to Address Risk column, there is an indication that “No steps have been linked.” Risks are also flowed through to the substantive audit programs (AUD-800 Audit Program – (Custom) through AUD-813 Audit Program – Other Revenue and Expenses in the Commercial title). Financial-statement-level risks flow through to all of the substantive audit programs, while specific risks only flow through to the audit areas to which they relate. Until risks are linked to program steps, open diagnostics will be present in your binder. For more details, see Diagnostics. Linking a Program Step to a Risk To link a program step to a risk, do the following: 1. Open a substantive audit program (AUD-800 Audit Program – (Custom) through AUD-813 Audit Program – Other Revenue and Expenses in the Commercial title) and scroll down to the table that contains the program steps. 2. Click in the Link to Risk column for the program step you would like to link. A list of risks appears, which includes all financial-statement-level risks for the binder and all specific risks related to the particular audit area. The last selection, “Other Relevant Assertion,” is shown in the event that you want to document the fact that the program step is being performed to satisfy a relevant assertion for the audit area, instead of to satisfy an identified risk. 3. Select one or more risks, or select Other Relevant Assertion. 4. Click outside the floatie to close it. The risk name is displayed in the Link to Risk column. Also, the program step name (e.g. “Receivables Analytical”) is shown in the risk summaries at the top of the substantive audit programs and in KBA-502 Summary of Risk Assessments. Open diagnostics for Unaddressed Risk, Program Step Not Linked to Risk or Relevant Assertion will be cleared. Linking Risks to Procedures • 41 U pdating to the Latest V ersion of a Workpaper Chapter 13 Updating to the Latest Version of a Workpaper With Knowledge Coach, you can update your workpaper to the latest template at any time with a click of a button. You don’t have to manually compare your workpaper to the latest version of the workpaper template to know you’re working with the most recent information. You don’t even have to wait to roll forward your binder to get the latest version of a particular workpaper. Note: Knowledge Coach automatically replaces your workpaper with the latest template when the binder is rolled forward, unless you change the template settings in the roll forward options for the workpaper. Related Workpapers Because many of the Knowledge Coach workpapers are related to one another through information flow and the effects of answers, all related workpapers must be updated to the latest version at the same time. The related workpapers for the Commercial title are listed below. AID302 Understanding the Entity’s Revenue Streams and Revenue Recognition Policies AID501 Inherent Risk Assessment Form AID601 Considering Reliance on the Work of Internal Auditors AID901 Differences of Professional Opinion AUD100 Engagement-Level Tailoring Questions AUD101 Overall Audit Program AUD201 Audit Program: Additional Audit Procedures for an Initial Audit AUD602 Audit Program: Using the Work of Other Auditors AUD603 Audit Program: Involvement of an Affiliate AUD604 Audit Program: Using the Work of a Specialist AUD701 Audit Program: Designing Tests of Controls Updating to the Latest Version of a Workpaper • 42 AUD801 Audit Program: Cash AUD802 Audit Program: Investments in Securities, Derivative Instruments, and Hedging Activities AUD803 Audit Program: Accounts Receivable and Sales AUD804 Audit Program: Inventories and Cost of Sales AUD805 Audit Program: Prepaid Expenses, Deferred Charges, and Other Assets AUD806 Audit Program: Intangible Assets AUD807 Audit Program: Property and Equipment, and Depreciation AUD808 Audit Program: Accounts Payable and Purchases AUD809 Audit Program: Payrolls and Other Liabilities AUD810 Audit Program: Income Taxes AUD811 Audit Program: Debt Obligations AUD812 Audit Program: Equity AUD813 Audit Program: Other Revenues and Expenses AUD814 Audit Program: Journal Entries and Financial Statement Review AUD815 Audit Program: Related-Party Transactions, Commitments and Contingencies, Estimates, and Concentrations AUD816 Audit Program: Fair Value Measurements and Disclosures AUD817 Audit Program: Variable Interest Entities Updating to the Latest Version of a Workpaper • 43 AUD901 Audit Program: Subsequent Events AUD902 Audit Program: Going Concern KBA101 Overall Audit Strategy KBA102 Information for Substantive Analytical Procedures KBA103 Significant Matters KBA104 Evaluating and Communicating Control Deficiencies and Other Matters KBA105 Summary and Evaluation of Misstatements and Omitted Disclosures KBA201 Engagement Acceptance Form KBA202 Engagement Continuance Form KBA302 Understanding the Entity and Its Environment KBA303 Inquiries of Management and Others within the Entity about the Risks of Fraud KBA400 Understanding Internal Controls: Scoping and Mapping KBA401 Understanding Entity-Level Controls KBA402 Understanding General Controls for Information Technology KBA410 Understanding Controls Maintained by a Service Organization KBA502 Summary of Risk Assessments AUD800 Audit Program: Custom Updating to the Latest Version of a Workpaper • 44 Updating a Workpaper to the Latest Version To update a workpaper in an open binder, do the following: 1. Ensure that all Knowledge Coach workpapers are closed. 2. Select a Knowledge Coach Word or Excel workpaper and select Workpaper > Update to Latest Knowledge Coach Content. You can choose to either Update Selected Knowledge Coach Workpapers or to Update All Knowledge Coach Workpapers in Binder. If you have selected a workpaper that links to another Knowledge Coach workpaper via information flow or tailoring of content, you are warned that the entire set of related workpapers will be updated together. See the previous section, Related Workpapers, for more information. 3. Click OK to continue. You will see a progress indicator and then a success message. 4. Open the updated workpaper. The new content is presented in the workpaper, along with the work you did before you updated the workpaper (answers to questions, program step sign offs, workpaper customization, etc.). The Customization Review window displays. A summary of the changes to rows that were made displays. 5. Click Close once all of the changes have been reviewed and accepted or rejected. 6. To view a general description of what has changed in the workpaper as compared to prior versions, see details at Content Updates. Updating to the Latest Version of a Workpaper • 45 D iagnostics Chapter 14 Diagnostics The Diagnostics Pane displays issues in the workpaper that currently prevent it from being complete. To use the Diagnostics Pane, do the following: 1. Click Diagnostics Pane on the Knowledge Coach ribbon. The Diagnostics Pane displays at the bottom of the workpaper. The type of diagnostic is listed in the left column, and the description is listed in the right column. 2. Click Type to filter the list of diagnostics. A list of diagnostic types applicable to the open workpaper displays. Leave the diagnostics types checked if you want to see them in the list. 3. Double-click the blue arrow in any diagnostic row to move to the affected cell in the workpaper. Notes: Cells in tables that have open diagnostics are indicated by their light-blue shading. See Cells with Open Diagnostics for more details. To find a diagnostic in the Diagnostics Pane from a cell that has an open diagnostic, click Find Diagnostic from the Diagnostics group on the Knowledge Coach ribbon. The Diagnostics Pane can be moved and resized. Diagnostics in the Binder Frame You can tell if a particular Knowledge Coach has open diagnostics by looking for the Open Diagnostics icon in the Diagnostic column next to each workpaper name in the binder frame. Click the workpaper name to display the details of the diagnostics. Notes: Each time you open the binder, you should manually refresh the diagnostics. In the Diagnostics Pane, right-click on the Refresh Diagnostics item and choose either Refresh diagnostics for this workpaper or Refresh diagnostics for the entire binder. If a workpaper has more than one open diagnostic, the Diagnostic icon displays with a plus sign next to it. When you sign off on a Knowledge Coach Word workpaper, you are warned if there are open diagnostics on the selected workpaper. When you finalize a binder, you are prompted to clear any diagnostics that remain open in Knowledge Coach workpapers. Diagnostics • 46 Deleting a Diagnostic If you have the appropriate staff group rights, you can delete an open diagnostic that you do not want to reappear. For example, you may want to delete a diagnostic for “Missing Workpaper – Engagement Letter” if you already have a scanned copy of the signed Engagement Letter from your client, and you therefore do not want to use the sample engagement letter provided by the Knowledge Coach title. All diagnostics must be deleted before you can finalize the binder. To delete a diagnostic, do the following: 1. Open the Diagnostics Pane from either the binder frame or from an open Knowledge Coach Word workpaper and select the diagnostic you want to delete. 2. Click Delete Diagnostic on the Diagnostics group on the Knowledge Coach ribbon. You are asked to confirm the deletion. 3. Click Yes. Notes: You can also right-click on an open diagnostic and choose Delete Diagnostic. Multiple diagnostics can be deleted at one from the Diagnostic pane in the binder frame. Diagnostics • 47 C opying and Pasting K nowledge Workpapers Chapter 15 Copying and Pasting Knowledge Workpapers You can copy and paste Knowledge Coach workpapers from one binder to another, allowing you to benefit from work you do in one binder that can be reused and then tweaked for a similar engagement. To copy Knowledge Coach workpapers to another binder, do the following: 1. Select the workpapers you want to copy and click Edit > Copy. 2. Navigate to the binder into which you want to paste the workpapers and select a tab in that binder. 3. Click Edit > Paste. The Selected Workpaper Properties window displays. See Inserting Knowledge Coach Workpapers for more details on this window. 4. Click OK when you’re ready to continue. The workpapers are pasted into your binder. Important: In the Diagnostics Pane, right-click on the Refresh Diagnostics item and choose either Refresh diagnostics for this workpaper or Refresh diagnostics for the entire binder. You should perform this step to ensure that you are working with the most recent diagnostic information. Notes: If no Knowledge Coach workpapers exist in the binder into which you are pasting, the foundation workpapers will be inserted in addition to the workpapers you selected to copy. For more information, see Foundation Workpapers. If you copy an instance of AUD-800 Audit Program – (Custom) into a new binder, the custom audit area that is associated with the custom audit program must already exist in the new binder. For more information, see Audit Areas and Associate Workpaper. Since you are not permitted to have duplicate copies of certain Knowledge Coach workpapers (for example, KBA-101 Overall Audit Strategy), you will not be able to copy these workpapers if the workpaper already exists in the binder into which you are pasting. You may not copy a related workpaper into a binder that already contains Knowledge Coach workpapers. If you copy a related Knowledge Coach workpaper into a binder that does not yet contain Knowledge Coach workpapers, all related workpapers will be pasted into the target binder. See Related Workpapers for more information. Copying and Pasting Knowledge Workpapers • 48 Synchronizing K nowledge C oach Workpapers Chapter 16 Synchronizing Knowledge Coach Workpapers Synchronizing Knowledge Coach workpapers works the same as other Engagement workpapers, with a few important differences, as follows: Because Knowledge Coach workpapers are tied together through the logic, tailoring, information flow, and diagnostics, you must synchronize all your Knowledge Coach workpapers together as a set. Therefore, you may not check in/out or synchronize Knowledge Coach workpapers from an open binder. You will need to synchronize the entire binder when Knowledge Coach workpapers are present in the binder. You will see additional conflict scenarios after synchronizing Knowledge Coach workpapers if the system finds a duplicate workpaper when only one instance of that workpaper is permitted in the binder. For example, you can only have one instance of KBA-101 Overall Audit Strategy. If two users insert this workpaper independently, you will be asked to pick a winner to resolve the conflict. After synchronizing Knowledge Coach workpapers, you should manually refresh the diagnostics in the binder to ensure you are working with the latest diagnostic information. You will be prompted to refresh the diagnostics and other data when you open the binder after synchronization. Alternatively, in the Diagnostics Pane, right-click on the Refresh Diagnostics item and choose either Refresh diagnostics for this workpaper or Refresh diagnostics for the entire binder. Synchronizing Knowledge Coach Workpapers • 49 R olling Forward K nowledge C oach B inders Chapter 17 Rolling Forward Knowledge Coach Binders You roll forward a binder that contains Knowledge Coach workpapers in much the same way you roll forward other Engagement binders. You can manage whether workpapers are replaced with the latest version of the template and how information you provided in the workpapers is treated in the binder for the next period. To modify the roll forward settings of a workpaper, do the following: 1. Select a Knowledge Coach workpaper and click File > Properties. The Workpaper Properties window displays. 2. Modify to the settings and click OK. For more information, see Keeping Answers to Questions and Keeping Row Customizations and Program Steps . Keeping Answers to Questions The Knowledge Coach workpapers have already been analyzed to determine in which areas o f the workpapers you are likely to want to keep your information from period to period, and in which areas you will want to answer from scratch each period. You can use these default roll forward settings if you wish by leaving the Data Retention Option set to “Use response roll forward setting.” To see the cells a particular table in a Knowledge Coach Word workpaper that are set to be kept, 1. Click anywhere inside the table. 2. Click Roll Forward Settings > View Responses Set to Keep on the Complete Cells group on the Knowledge Coach ribbon. 3. Wait a few seconds for the workpaper to refresh. In each of the cells for which the default roll forward setting is “keep,” the Keep Upon Roll Forward icon is displayed. To see the cells a particular table in a Knowledge Coach Word workpaper that are set to be reset, 1. Click anywhere inside the table. 2. Click Roll Forward Settings > View Responses Set to Reset on the Complete Cells group on the Knowledge Coach ribbon. 3. Wait a few seconds for the workpaper to refresh. In each of the cells for which the default roll forward setting is “reset,” the Reset Upon Roll Forward icon is displayed. Notes: All of the cells within a column will have the same setting: either keep or reset. You can continue working in the Knowledge Coach workpaper while the roll forward setting icons are displayed. You can override the default roll forward response settings at the workpaper level by choosing either “ Keep all response” or “Reset all responses” in the Workpaper Properties window. These settings are not applicable to Knowledge Coach Excel workpapers, as they do not contain answer selection boxes or floaties. Rolling Forward Knowledge Coach Binders • 50 Keeping Row Customizations and Program Steps You can choose how changes to rows in Knowledge Coach tables are handled when you roll forward your workpapers. You can also choose how program steps in substantive audit programs are treated. Row Customizations. If you choose to “Merge Row Customization,” any rows that are added to or deleted from the current workpaper , as well as text changes to rows within tables will be merged with the content from the new Knowledge Coach workpaper when it is created. These items can be reviewed upon opening the rolled forward workpaper in the new binder. For more detail, see Customization Review. Keeping Program Steps. If you choose to “Keep Program Steps,” the program steps in the workpaper that were added from the Program Step Library will be retained in the new workpaper. This option is only available for audit programs for the substantive audit areas where the Program Step Library is used. If you choose this option, two other options are available: Keep Custom Program Steps. Custom program steps you create from scratch in audit program workpapers will be kept in the new workpaper. Keep Modified Program Steps. Modifications you make to added program steps in audit workpapers will be kept in the new workpaper. Note: Row customization and program step retention settings are not applicable to Knowledge Coach Excel workpapers. How to Roll Forward a Knowledge Coach Binder To roll forward a binder that contains Knowledge Coach workpapers, 1. Select the binder to roll forward. 2. Click Tools > Roll Forward Binder. The Roll Forward Binder Wizard displays. 3. Follow the on-screen directions on the Roll Forward Binder Wizard. The Knowledge Coach workpapers are rolled forward along with your other Engagement workpapers. 4. Wait a few minutes for the binder to refresh. This will ensure you are working with the most current information in all of your Knowledge Coach workpapers. Important: After you roll forward a binder that contains Knowledge Coach workpapers, make sure to refresh the diagnostics and other data by choosing Yes when you are prompted when you open the binder after the roll forward. Alternatively, right-click the Refresh Workpaper Diagnostic in the Diagnostics pane and select Refresh Diagnostics for the Entire Binder. This ensures that the resetting of information flow is properly refreshed. If you do not do this, you may see prior period information appear in workpapers if you open a workpaper out of the order of its information flow, since the data retention settings do not take effect until you open each workpaper. Note: You can modify the roll forward settings of Knowledge Coach workpapers during the Roll Forward process. Rolling Forward Knowledge Coach Binders • 51 Guidance Chapter 18 Guidance Knowledge Coach Guidance To obtain supplemental guidance related to a Knowledge Coach title, do the following: 1. Open any Knowledge Coach workpaper. 2. Click KC Guidance on the Guidance group on the Knowledge Coach ribbon. A help file displays. This help file contains the same content as RES-001 KBA Methodology Overview. It also contains workpaper-specific help, including tip information, content updates, and answer effects. Accessing Accounting Research Manager To access Accounting Research Manager (ARM) from within a binder, do the following: 1. Open the binder. 2. Select Guidance on the Shortcut bar. 3. Click the Accounting Research Manager icon. 4. Enter your User Name and Password and click OK. You do not have to enter your User Name and Password if it has been entered in your staff profile in Engagement Administrator. You can also access Accounting Research Manager by going directly to http://www.accountingresearchmanager.com. Guidance • 52